
:max_bytes(150000):strip_icc():format(webp)/mothersday_NataliaCampbell_Getty-5a4baef6c7822d00371e56cd.jpg)
In 2024, Adjust Background to Black for Your Product Review Video
Adjust Background to Black for Your Product Review Video
Are you planning to make a product review video but wondering how to set up your background? If so, then you’re in the right place. This post will show you how to adjust the background to black for your product review video.
It’s essential to have a smooth black background without texture for your product review videos. Having a clean background is visually appealing and enhances the video. It will make sure that your viewers can see the product clearly without any distractions.
Do the following steps to change the background to black for your product review video:

Part 1. How to change the parameters in Filmora
For this tutorial, we will do it using Wondershare Filmora . So, if you haven’t installed it yet, you can download it here:
Free Download For Win 7 or later(64-bit)
Free Download For macOS 10.14 or later
Step1 Right-click the clip in the editing timeline > Edit Properties.

Step2 Select the Color menu > Advanced.

Step3 Setting the color parameters.
Click the adjust button in the upper left, scroll down to the vignette, and then decrease the amount and size value until the oval surrounds the subject.

Scroll up to the color options and increase the contrast to 100.

Go to the light menu, then decrease the shadows to cover any remaining light spots.

Part 2. Tips: How to improve product review video
Following these tips will help you improve the quality of your product review videos and make them more enjoyable for your audience.
1) Make sure your video has the correct resolution and scale
Having the correct resolution and scale for your video will make sure that it has a high-definition (HD) or high-quality resolution. Also, it will ensure that your video is the correct size when exporting.
If the scale is different from the resolution, then the empty space will be filled with black, and you will get black bars border that makes your video smaller.
2) Use proper lighting to ensure your video looks clear and bright
To get proper lighting, you should use natural lighting whenever possible, such as sunlight. However, if you can’t shoot during the day or it’s difficult to get natural light, you will need to use artificial lighting.
Next, adjust the white balance on your camera. You can also edit the color grading to finalize the look and improve the overall color of your video.
3) Make sure the audio quality of your video is good
Poor audio can make your video harder to listen to and turn off viewers.
Summary
It is essential to know how to adjust the background to black in your product review video. This is because it can help to make your video content more professional and stand out. By the end of this tutorial, you can now try and create a professional-looking video with a black background to improve your product review video.
Free Download For macOS 10.14 or later
Step1 Right-click the clip in the editing timeline > Edit Properties.
Step2 Select the Color menu > Advanced.
Step3 Setting the color parameters.
Click the adjust button in the upper left, scroll down to the vignette, and then decrease the amount and size value until the oval surrounds the subject.
Scroll up to the color options and increase the contrast to 100.
Go to the light menu, then decrease the shadows to cover any remaining light spots.
Part 2. Tips: How to improve product review video
Following these tips will help you improve the quality of your product review videos and make them more enjoyable for your audience.
1) Make sure your video has the correct resolution and scale
Having the correct resolution and scale for your video will make sure that it has a high-definition (HD) or high-quality resolution. Also, it will ensure that your video is the correct size when exporting.
If the scale is different from the resolution, then the empty space will be filled with black, and you will get black bars border that makes your video smaller.
2) Use proper lighting to ensure your video looks clear and bright
To get proper lighting, you should use natural lighting whenever possible, such as sunlight. However, if you can’t shoot during the day or it’s difficult to get natural light, you will need to use artificial lighting.
Next, adjust the white balance on your camera. You can also edit the color grading to finalize the look and improve the overall color of your video.
3) Make sure the audio quality of your video is good
Poor audio can make your video harder to listen to and turn off viewers.
Summary
It is essential to know how to adjust the background to black in your product review video. This is because it can help to make your video content more professional and stand out. By the end of this tutorial, you can now try and create a professional-looking video with a black background to improve your product review video.
How to Add Text Behind Objects in Video
Adding text behind objects in your videos can be a great way to start your videos. For example, you can do so to create an attractive intro or startup a video. So, if you hope to make a video like a pro, let’s learn how to add text behind objects in your videos by Filmora.

Part 1. What Are The Benefits of Adding Text Behind Objects in Videos?
Your videos must maintain quality to create content worthy of a huge audience. You may have a YouTube channel or be starting down the road. Then you must give this a try because
Give a cool look
Adding text behind an object in a video looks cool! Now, your object could be a silhouette of a person or a huge skyscraper. You can add a text tile behind the object, creating the illusion. Due to this, the text will be flying in real-time.
Show creativity
Blasting your channel with innovative and creative content is the key to building a big audience. But, of course, you can always opt for many ways to create a video showing your creativity. One of those ways is to add text behind your object.
You can create an attractive intro by adding text behind objects that captivate the viewer. It ensures that your subscribers stay tuned to your channel and your content.
Build up a solid audience
Every day can be a real struggle if you are a daily content creator on YouTube. The audience demands good content. But your daily videos can get boring if you do not use new methods to edit your videos.
You can add text behind videos to spice up your intros and hook your daily audience even more. That will show the audience that you are genuinely putting in the effort.
Part 2. What Will You Need To Add Text Behind Videos?
Now there are a few things that you will need to add text behind videos. First, take a look at the basic priorities to perform this feature.
1. A Static Object Video
Adding text behind an object can be tricky if the object isn’t static. For example, the effect will be ruined if an object moves around a lot in a video.
Our goal is to create a smooth text behind the video effect. And this can only be achieved if the target object remains static in the video and does not move about its position.
2. A Video Editing Software - Wondershare Filmora
Once you select a video source, you aim to add it to a video editor. For this purpose, Wondershare Filmora would be your best choice. Wondershare Filmora allows you to create innovative and attractive videos.
Free Download For Win 7 or later(64-bit)
Free Download For macOS 10.14 or later
It has a very engaging system UI, allowing even beginner users to get their hands on it instantly. You will learn how to add text behind your videos with a few simple steps.

Now that you know the requirements for the video, let’s move on to the step-by-step guide to add text to your video.
Part 3. Step-by-Step Guide To Add Text Behind Videos
We look at two examples of how to add text behind videos in Wondershare Filmora.
- A static video with an object that can be easily masked out.
- A video with high contrast and a clean background.
Add Text behind a Static Video
First, we will go with adding text behind a static object. For this, scroll more to get the step-by-step process.
Step1 Download Wondershare Filmora
If you are a beginner just starting in the video editing business, Wondershare Filmora is the best choice. Follow the steps below to download the free version of Wondershare Filmora:
- First, download the Wondershare Filmora on your PC or Mac.
- Open the setup and install the Wondershare Filmora.
After downloading the Wondershare Filmora software, let’s edit the video. Scroll below to learn how to start the editing process!
Step2 Add the Video to the Timeline
We will first look at the static video example. For this, follow the below instructions:
- You have to start by importing your video in the import library.
- From the import library, you can click on the video and drag it down below to the timeline.

![]()
Note: Adding video to the timelines will allow you to create a workspace to edit your video.
Now let’s move on to how we will add the text tile to our video.
Step3 Add the Text Tile
It is time to add the text tile you will animate behind the object. To do that, follow the steps mentioned as such.:
- Go to the Titles icon on the bar above the import library.
- A drop-down option will be available on the left side.
- Scroll down to the Plain text.
- Here, you can see many text tiles to add to your video.
- You can choose anyone you like.
- The most commonly used tile is the Basic 6.
- When you add the text tile to the timeline, you must ensure that the text is of equal length to the video.
- To do that, drag the right corner of the text tile and drag it to the right to match the length of the video.

Step4 Edit the Text Tile
After you have added the text tile you desire, you need to type in the text. For this article, we will keep it simple. We will be typing a simple statement such as “Hello, World.“
- Double-click the Text tile to open the settings menu.
- After the settings menu is opened, type in the text box on the import window.
You will notice changes on the main window that your text has changed.

- After the text appears, you can make the font look as desired.
- Look above the text window, and you will see the type of text font selected.
- Click on the drop-down option and choose whatever you like.
Let’s move on to animate the text tile.
Step5 Animate the text tile
After adding text, it is time to animate it. This animation will decide how your text will appear behind the target object.
- First, you must open the text settings by double-clicking on the text tile in the timeline.
- In the settings opened in the import window, you will have to click on the animation tab in the upper left corner, aside from the Preset
- Now scroll down to where you will see the Right Roll
- Click on Right Roll and then click on the OK in the bottom right corner of the import window.

![]()
Note: You may notice now that the text appears in front of our object. Don’t worry now! We are getting there. With a few simple steps, we will see the results.
Now let us move on to the more significant part of the editing, masking the object. Again, look ahead to see how you can mask the object!
Step6 Mask the Object
To mask our object, we will need to be technical. We will begin by adding the same footage of the static object on our timeline. Follow the steps mentioned below:
- Drag and drop the static object footage above the timeline text. Make sure the text stays in the middle of the sandwich.

- We will hide the video in the first track to simplify things. In addition, this will make our editing easier.
- We will have to look in the effects library to insert the masking effect.
- You can see the Effects icon on the bar at the top.
- Click on the Effects.
- You will see the search bar at the top of the import window.
- In the search bar, type in Image mask.
- Drag the Image mask effect on the video above the text tile.
Now the masking effect has been added. But we would have to adjust so that it stays upon our object.
- Double-click on the video and the settings option will open up.
- Go into the Effects
![]()
Note: You must select your target object’s mask shape exactly as its shape.
- We have to mask out a building, so that we will need a vertical rectangle.

- After you have selected the shape of your object, we will need to convert it to the object’s size so that it only masks the building.
- To do that, scroll down below the import window to the settings.
- Here you can see the X, Y, and width settings.
- First, move the width bar so that it matches the width of the building.

- Now drag the X bar until the mask is confined to the building. You would have created the mask only limited to the building.

- Once you complete this step, click OK in the bottom right corner.
- Now un-hide the original video that you imported in the beginning.
Finally, play the video in the main play window from the beginning.

You have successfully created a text behind the object effect. Now that you know how to add text behind static objects let us move to learn how to add text to a video that has high contrast and a clean background.
Add text behind a high contrast and clean background
Besides the text can be added behind a static object, it can also be added to a clean background with high contrast. But how is it? Let’s dive into it.
Step1 Import the video into the timeline
- Import the video from the location in your PC media.
- When imported, drag and drop it onto the timeline.

Step2 Add the text tile
To add the text to your video, follow the steps mentioned below.
- Click on the titles icon on the bar above the import window.
- On the left drop-down option, scroll down to the titles.
- Select the Plain text option.
- You will notice that multiple options will pop up in the import window.
- Select the text title that suits you best.
- After you have selected the text style, drag and drop it down above your video in the timeline.

- Our next step would be to add the text.
- Double-click on the text tile. Doing so will open the settings menu in the import window.
- Type in the text that you want. For reference, we will keep it simple such as, “Hello world.”
- You can also adjust the font of your text.
- Above the type box, a drop-down option will show you the range of fonts available.
- Select the font you desire.

Now that you have added the text, it is time to animate it.
Step3 Take a snapshot
After typing in the text, you will notice in the main play window that your text still appears in front of your object. Therefore, we want to take it behind the object. To do so, first, you will need to take a snapshot.
Follow the steps mentioned to take a snapshot:
- Hide the main video. You can see the Eye icon aside from your main video in the edit column on the left side of the timeline.
- Click on the Eye icon to hide the main video.
- In the main play window, you will notice that the screen turns black, which leaves only the text on the screen.

- In the main play screen, you can notice a small camera icon.
- This camera icon is used to take snapshots of your screen.
- Click on the camera icon to take a snapshot of your screen.
- Your snapshot will now be saved in the main import window.

Now that we have taken a snapshot, we will need to import it into the timeline. Scroll below for more.
Step4 Add the snapshot
After taking it, your goal is to import it into the timeline. To perform this action, perform the following steps:
- Before adding the snapshot to the timeline, we must delete the main text tile.
- Then drag and drop the snapshot from the import library into the timeline above the video.
- Make sure that the snapshot is aligned well with the length of the video.
- If it is longer than the video, drag it from the right to match the length of the video.
- If its length is smaller than the video, drag it to the right to increase its length.

After adding the snapshot, we will have to change its blending mode.
Step5 Change the blending of the snapshot
To create the effect of your text behind the video, you must alter the main text’s blending mode. In this case, it will be the snapshot we took.
![]()
Note: Changing the blending mode of the snapshot will allow it to blend with the transparent background and will create the effect of the text behind the object in the video.
Follow the steps mentioned below to change the blending of the snapshot:
- Double-click the snapshot.
- If you select the compositing tab, the blending options will pop up.
- From default, it would be set to Normal. Click on the Normal
- It will show a drop-down option.
- Scroll down below until you can see an option labeled Then click on Overlay.

- And press OK in the bottom right corner to confirm your changes.
The text can be blended with the background.
- Click on the Eye icon to un-hide the video from the timeline.
- Now play the video from the start from the main play screen to see the final changes.

Congratulations! The above steps allow you to add text behind objects in your videos.
Conclusion
Modern media is full of creative content. And if you are a content creator that wants to make it through the world of YouTube and video creating, you need to be the best. You can only be the best at what you do if you keep pushing the boundaries of your creativity.
Adding text behind objects could be the first step in making your intros shine with creativity and innovation. It allows you to maintain and build your viewing audience. The more the audience, the more your content gets watched!
Free Download For macOS 10.14 or later
It has a very engaging system UI, allowing even beginner users to get their hands on it instantly. You will learn how to add text behind your videos with a few simple steps.
Now that you know the requirements for the video, let’s move on to the step-by-step guide to add text to your video.
Part 3. Step-by-Step Guide To Add Text Behind Videos
We look at two examples of how to add text behind videos in Wondershare Filmora.
- A static video with an object that can be easily masked out.
- A video with high contrast and a clean background.
Add Text behind a Static Video
First, we will go with adding text behind a static object. For this, scroll more to get the step-by-step process.
Step1 Download Wondershare Filmora
If you are a beginner just starting in the video editing business, Wondershare Filmora is the best choice. Follow the steps below to download the free version of Wondershare Filmora:
- First, download the Wondershare Filmora on your PC or Mac.
- Open the setup and install the Wondershare Filmora.
After downloading the Wondershare Filmora software, let’s edit the video. Scroll below to learn how to start the editing process!
Step2 Add the Video to the Timeline
We will first look at the static video example. For this, follow the below instructions:
- You have to start by importing your video in the import library.
- From the import library, you can click on the video and drag it down below to the timeline.
![]()
Note: Adding video to the timelines will allow you to create a workspace to edit your video.
Now let’s move on to how we will add the text tile to our video.
Step3 Add the Text Tile
It is time to add the text tile you will animate behind the object. To do that, follow the steps mentioned as such.:
- Go to the Titles icon on the bar above the import library.
- A drop-down option will be available on the left side.
- Scroll down to the Plain text.
- Here, you can see many text tiles to add to your video.
- You can choose anyone you like.
- The most commonly used tile is the Basic 6.
- When you add the text tile to the timeline, you must ensure that the text is of equal length to the video.
- To do that, drag the right corner of the text tile and drag it to the right to match the length of the video.
Step4 Edit the Text Tile
After you have added the text tile you desire, you need to type in the text. For this article, we will keep it simple. We will be typing a simple statement such as “Hello, World.“
- Double-click the Text tile to open the settings menu.
- After the settings menu is opened, type in the text box on the import window.
You will notice changes on the main window that your text has changed.
- After the text appears, you can make the font look as desired.
- Look above the text window, and you will see the type of text font selected.
- Click on the drop-down option and choose whatever you like.
Let’s move on to animate the text tile.
Step5 Animate the text tile
After adding text, it is time to animate it. This animation will decide how your text will appear behind the target object.
- First, you must open the text settings by double-clicking on the text tile in the timeline.
- In the settings opened in the import window, you will have to click on the animation tab in the upper left corner, aside from the Preset
- Now scroll down to where you will see the Right Roll
- Click on Right Roll and then click on the OK in the bottom right corner of the import window.
![]()
Note: You may notice now that the text appears in front of our object. Don’t worry now! We are getting there. With a few simple steps, we will see the results.
Now let us move on to the more significant part of the editing, masking the object. Again, look ahead to see how you can mask the object!
Step6 Mask the Object
To mask our object, we will need to be technical. We will begin by adding the same footage of the static object on our timeline. Follow the steps mentioned below:
- Drag and drop the static object footage above the timeline text. Make sure the text stays in the middle of the sandwich.
- We will hide the video in the first track to simplify things. In addition, this will make our editing easier.
- We will have to look in the effects library to insert the masking effect.
- You can see the Effects icon on the bar at the top.
- Click on the Effects.
- You will see the search bar at the top of the import window.
- In the search bar, type in Image mask.
- Drag the Image mask effect on the video above the text tile.
Now the masking effect has been added. But we would have to adjust so that it stays upon our object.
- Double-click on the video and the settings option will open up.
- Go into the Effects
![]()
Note: You must select your target object’s mask shape exactly as its shape.
- We have to mask out a building, so that we will need a vertical rectangle.
- After you have selected the shape of your object, we will need to convert it to the object’s size so that it only masks the building.
- To do that, scroll down below the import window to the settings.
- Here you can see the X, Y, and width settings.
- First, move the width bar so that it matches the width of the building.
- Now drag the X bar until the mask is confined to the building. You would have created the mask only limited to the building.
- Once you complete this step, click OK in the bottom right corner.
- Now un-hide the original video that you imported in the beginning.
Finally, play the video in the main play window from the beginning.
You have successfully created a text behind the object effect. Now that you know how to add text behind static objects let us move to learn how to add text to a video that has high contrast and a clean background.
Add text behind a high contrast and clean background
Besides the text can be added behind a static object, it can also be added to a clean background with high contrast. But how is it? Let’s dive into it.
Step1 Import the video into the timeline
- Import the video from the location in your PC media.
- When imported, drag and drop it onto the timeline.
Step2 Add the text tile
To add the text to your video, follow the steps mentioned below.
- Click on the titles icon on the bar above the import window.
- On the left drop-down option, scroll down to the titles.
- Select the Plain text option.
- You will notice that multiple options will pop up in the import window.
- Select the text title that suits you best.
- After you have selected the text style, drag and drop it down above your video in the timeline.
- Our next step would be to add the text.
- Double-click on the text tile. Doing so will open the settings menu in the import window.
- Type in the text that you want. For reference, we will keep it simple such as, “Hello world.”
- You can also adjust the font of your text.
- Above the type box, a drop-down option will show you the range of fonts available.
- Select the font you desire.
Now that you have added the text, it is time to animate it.
Step3 Take a snapshot
After typing in the text, you will notice in the main play window that your text still appears in front of your object. Therefore, we want to take it behind the object. To do so, first, you will need to take a snapshot.
Follow the steps mentioned to take a snapshot:
- Hide the main video. You can see the Eye icon aside from your main video in the edit column on the left side of the timeline.
- Click on the Eye icon to hide the main video.
- In the main play window, you will notice that the screen turns black, which leaves only the text on the screen.
- In the main play screen, you can notice a small camera icon.
- This camera icon is used to take snapshots of your screen.
- Click on the camera icon to take a snapshot of your screen.
- Your snapshot will now be saved in the main import window.
Now that we have taken a snapshot, we will need to import it into the timeline. Scroll below for more.
Step4 Add the snapshot
After taking it, your goal is to import it into the timeline. To perform this action, perform the following steps:
- Before adding the snapshot to the timeline, we must delete the main text tile.
- Then drag and drop the snapshot from the import library into the timeline above the video.
- Make sure that the snapshot is aligned well with the length of the video.
- If it is longer than the video, drag it from the right to match the length of the video.
- If its length is smaller than the video, drag it to the right to increase its length.
After adding the snapshot, we will have to change its blending mode.
Step5 Change the blending of the snapshot
To create the effect of your text behind the video, you must alter the main text’s blending mode. In this case, it will be the snapshot we took.
![]()
Note: Changing the blending mode of the snapshot will allow it to blend with the transparent background and will create the effect of the text behind the object in the video.
Follow the steps mentioned below to change the blending of the snapshot:
- Double-click the snapshot.
- If you select the compositing tab, the blending options will pop up.
- From default, it would be set to Normal. Click on the Normal
- It will show a drop-down option.
- Scroll down below until you can see an option labeled Then click on Overlay.
- And press OK in the bottom right corner to confirm your changes.
The text can be blended with the background.
- Click on the Eye icon to un-hide the video from the timeline.
- Now play the video from the start from the main play screen to see the final changes.
Congratulations! The above steps allow you to add text behind objects in your videos.
Conclusion
Modern media is full of creative content. And if you are a content creator that wants to make it through the world of YouTube and video creating, you need to be the best. You can only be the best at what you do if you keep pushing the boundaries of your creativity.
Adding text behind objects could be the first step in making your intros shine with creativity and innovation. It allows you to maintain and build your viewing audience. The more the audience, the more your content gets watched!
Add Green Screen Effects in Final Cut Pro
No matter the type of video you are shooting, the background of the video plays a major play. The background determines how eye-pleasing the frame of the entire video looks. A beautiful background enhances the video content while a distracting background can deteriorate the video outlook. You do not need to be in exotic locations or have eye-catching backgrounds in reality while shooting a video thanks to the use of the green screen effect.
Once you shoot a video with green screen background, you can replace the green screen with anything you want. You will need a video editor to replace the green screen, and Final Cut Pro is the most widely used video editor among Mac Users. We will illustrate how to add green screen in Final Cut Pro and get any background for your recorded video. We will also recommend an alternative watt to add green screen effect to your video.
Part 1. How to add green screen on Final Cut Pro
Final Cut Pro is the most popular professional video editor among Mac users. The learning curve is slightly steep, but once you get used to Final Cut Pro, you can take your recorded video to the next level with profound editing. The most important part of adding green screen effect to a video is shooting the video with a proper green screen in the background. Once you have successfully recorded your video, here are the steps on how to add background to green screen Final Cut Pro.
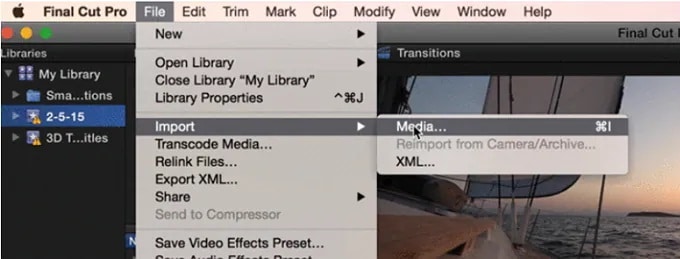
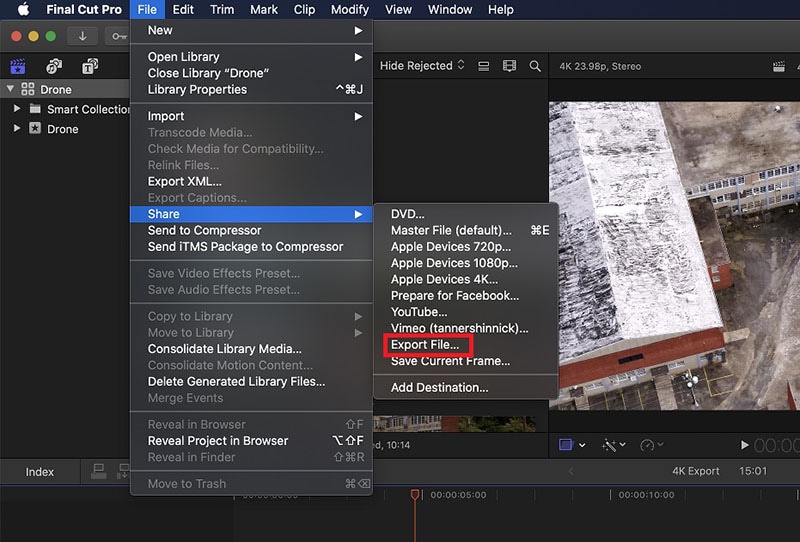
Step1 Launch Final Cut Pro and go to File> Import> Media. Select the video file with green screen background from your storage to import the file into FCP. Similarly, you should import the video or photo with which you want to replace the green screen.
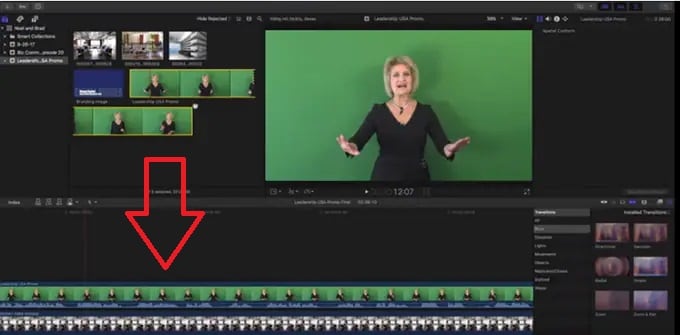
Step2 Drag the video clip with green screen background (called foreground clip) to Timeline and place it to Primary Storyline. Drag the replacement video (called background clip) below the foreground clip in Timeline.
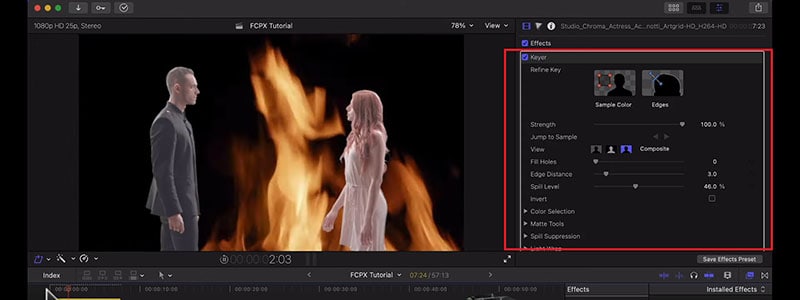
Step3 Select the foreground clip and click on Effects button present at the extreme top-right corner of the Timeline.
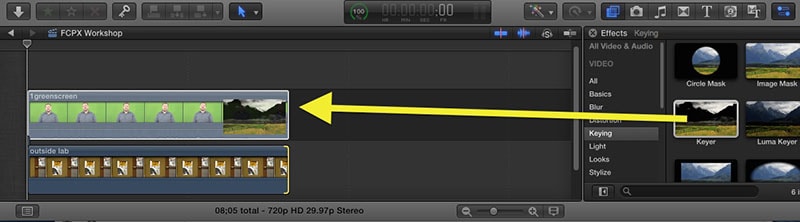
Step4 From the Effects options, select Keyer effect. If you cannot spot it immediately, you can search for it from the search field.
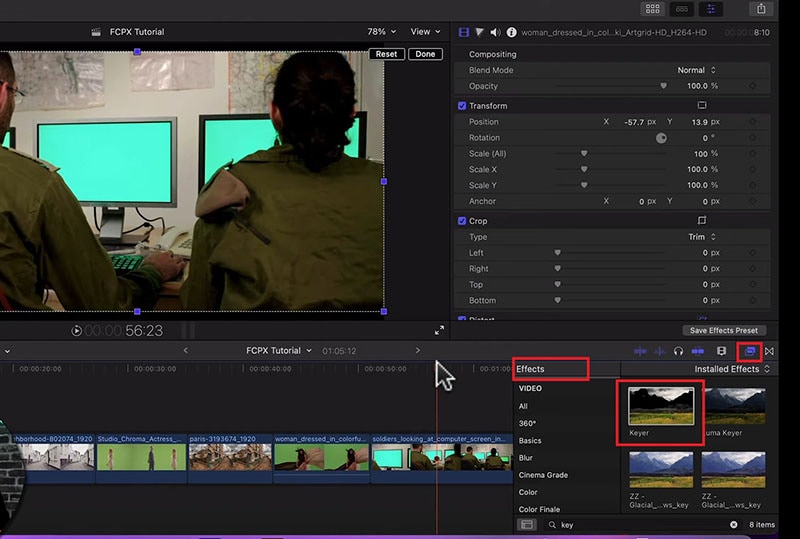
Step5 Drag and drop Keyer effect to the foreground clip. The effect detects the green screen and replaces it with the available background clip.
Step6 You might have to adjust the Keyer effect settings to get the green screen effect perfectly. Go to Inspector Window and click on Sample color and fine-tune the available settings to get it correct.
Step7 Once you are satisfied with the effect, go to File> Share> Export File and save the modified video.
Part 2. Alternative Way to Add Green Screen to Videos
Final Cut Pro is a professional but highly expensive video editor. The learning curve is not very suitable for amateur video editors. That is why if you are looking for a better alternative way to add green screen to videos, we recommend Wondershare Filmora . Filmora is a popular video editor that is available for Mac and Windows users. The user interface is extremely intuitive, and adding green screen effect is super easy. Here are the steps on how to add background to green screen effect.
Free Download For Win 7 or later(64-bit)
Free Download For macOS 10.14 or later
Step1 Download and install Filmora on your computer. Launch Filmora and click on New Projects.
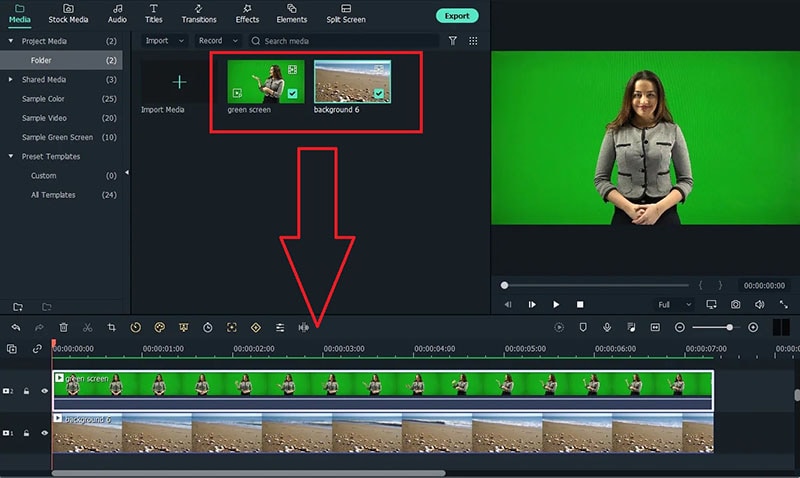
Step2 Under Project Media folder, Drag and drop the video clip with green screen background as well as the photo or video with which you want to replace the green screen.
Step3 Drag and drop the video clips on the Timeline. The video with green screen should be at the top while the replacement video or photo should be below it.
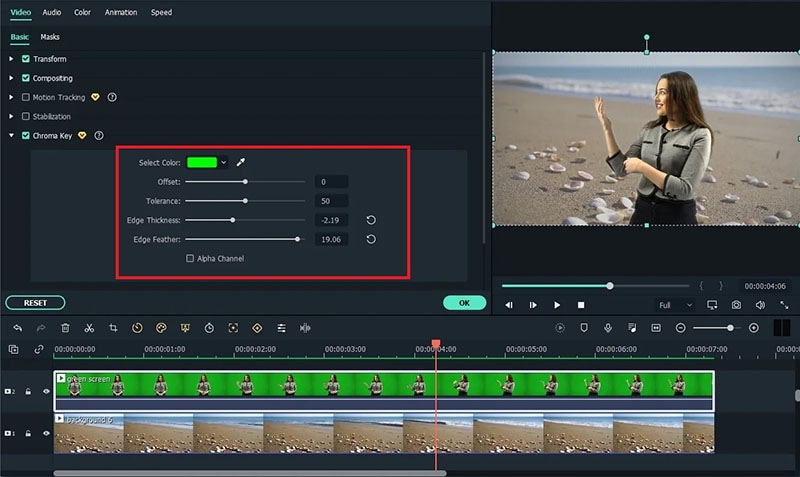
Step4 Double-click on the green screen video clip on Timeline. Go to Video>Basic and turn on Chroma key option.
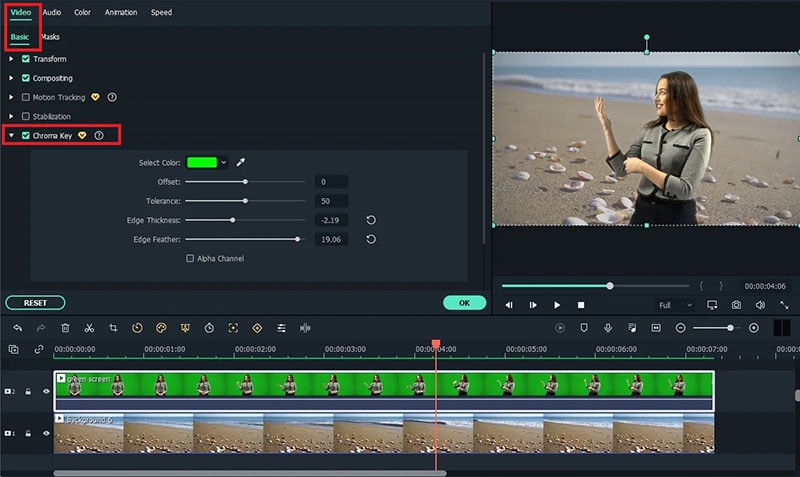
Step5 Adjust the different parameters such as offset to get the effect perfect and click on Ok button.
Step6 Play the video and if you are satisfied with the result, click on Export button to save the modified video file.
Part 3. Green Screen Video Tips to Use
We have already stated that replacing green screen in your video with an eye-catching background is the easiest part. On the contrary, shooting the green screen video is the most important part. If you shoot the video perfectly, replacing the background accurately in the video editor becomes super easy. Here are some important tips to use while shooting green screen video.
Distance – There should be enough distance between the subject and the green screen background so that the subject does not cast a shadow on the green screen. This distance is also important to place lights in between so that the green screen is perfectly lit for a great video shooting session.
Quality – You should opt for a high-quality green screen cloth for the background. This means the green screen should have a solid color instead of light and dark patches here and there. Besides, you should ensure that there are no wrinkles on the green screen.
Otherwise, when you will apply green screen effect through the video editor, the transformation will be uneven. You have to spend a lot of time adjusting the parameters to cover up uneven patches in the background.
Lighting – The way you set up your lights plays a major role in shooting green screen video perfectly. The light falling on the green screen will light up the screen evenly so that there are no light and dark patches. Transforming the green screen in the video editor will become that much easier.
You should focus on soft and even lighting for the entire green screen, and you should check through your camera to ensure the lighting is perfect. Sometimes, you can place lights behind the subject if the subject is staying stationary throughout the video. Otherwise, you can place the light above the subject for even distribution.
Aperture – The settings of your camera are equally important to smoothen out the green screen in the background and focus on the subject sharply. That is where aperture comes into the scene, and you need to use low aperture while shooting green screen videos. Low aperture opens up the camera lens, and the green screen turns softer in the background. The subject stands out while the background turns uniformly green.
Shutter Speed – While shooting a green screen video, you should keep a high shutter speed to prevent motion blur and uneven background. If the subject stays fixed throughout, the shutter speed should be double the frame rate. If the subject is moving throughout, the shutter speed should be around 4 times the frame rate such as 1/100.
ISO – The last thing you want in a green screen video is grainy footage. Your life will turn upside down editing the video and getting the green screen effect perfectly in any video editor. ISO determines the sensitivity and thereby, the grainy effect in your video. When the ISO is too high, the chance of getting grains in the video is high. It is better to use a native ISO for green screen effect, but you need to check with a sample recording and adjust if required.
Conclusion
We have answered how to add background to green screen Final Cut Pro. You can replace any green screen in your video with any video or photo for the background of the video. If you do not have Final Cut Pro or you find the steps slightly complicated, we recommend you to use Wondershare Filmora for instant green screen effect and quick adjustments for the best outcome.
Free Download For macOS 10.14 or later
Step1 Download and install Filmora on your computer. Launch Filmora and click on New Projects.
Step2 Under Project Media folder, Drag and drop the video clip with green screen background as well as the photo or video with which you want to replace the green screen.
Step3 Drag and drop the video clips on the Timeline. The video with green screen should be at the top while the replacement video or photo should be below it.
Step4 Double-click on the green screen video clip on Timeline. Go to Video>Basic and turn on Chroma key option.
Step5 Adjust the different parameters such as offset to get the effect perfect and click on Ok button.
Step6 Play the video and if you are satisfied with the result, click on Export button to save the modified video file.
Part 3. Green Screen Video Tips to Use
We have already stated that replacing green screen in your video with an eye-catching background is the easiest part. On the contrary, shooting the green screen video is the most important part. If you shoot the video perfectly, replacing the background accurately in the video editor becomes super easy. Here are some important tips to use while shooting green screen video.
Distance – There should be enough distance between the subject and the green screen background so that the subject does not cast a shadow on the green screen. This distance is also important to place lights in between so that the green screen is perfectly lit for a great video shooting session.
Quality – You should opt for a high-quality green screen cloth for the background. This means the green screen should have a solid color instead of light and dark patches here and there. Besides, you should ensure that there are no wrinkles on the green screen.
Otherwise, when you will apply green screen effect through the video editor, the transformation will be uneven. You have to spend a lot of time adjusting the parameters to cover up uneven patches in the background.
Lighting – The way you set up your lights plays a major role in shooting green screen video perfectly. The light falling on the green screen will light up the screen evenly so that there are no light and dark patches. Transforming the green screen in the video editor will become that much easier.
You should focus on soft and even lighting for the entire green screen, and you should check through your camera to ensure the lighting is perfect. Sometimes, you can place lights behind the subject if the subject is staying stationary throughout the video. Otherwise, you can place the light above the subject for even distribution.
Aperture – The settings of your camera are equally important to smoothen out the green screen in the background and focus on the subject sharply. That is where aperture comes into the scene, and you need to use low aperture while shooting green screen videos. Low aperture opens up the camera lens, and the green screen turns softer in the background. The subject stands out while the background turns uniformly green.
Shutter Speed – While shooting a green screen video, you should keep a high shutter speed to prevent motion blur and uneven background. If the subject stays fixed throughout, the shutter speed should be double the frame rate. If the subject is moving throughout, the shutter speed should be around 4 times the frame rate such as 1/100.
ISO – The last thing you want in a green screen video is grainy footage. Your life will turn upside down editing the video and getting the green screen effect perfectly in any video editor. ISO determines the sensitivity and thereby, the grainy effect in your video. When the ISO is too high, the chance of getting grains in the video is high. It is better to use a native ISO for green screen effect, but you need to check with a sample recording and adjust if required.
Conclusion
We have answered how to add background to green screen Final Cut Pro. You can replace any green screen in your video with any video or photo for the background of the video. If you do not have Final Cut Pro or you find the steps slightly complicated, we recommend you to use Wondershare Filmora for instant green screen effect and quick adjustments for the best outcome.
Using Track Matte and Tracking in Adobe After Effects: Reviewing All Possibilities
The realm of video editing has seen significant progress in recent years. With premium tools such as Adobe After Effects, you can take your videos to the next level. However, not every tool is easy to navigate. Some features in popular video editing software can be hard to get around.
The following guide provides valuable insight on how to use Track Matte in After Effects. Explore the endless possibilities of Track Mattes After Effects and Mask Tracking in After Effects. Also, discover a simple alternative to make After Effects mask tracking easy.
AI Smart Masking Spice up your video content with the endless possibilities of AI masking functions!
Free Download Free Download Learn More

Part 1: How to Utilize Track Mattes in Adobe After Effects?
After Effects by Adobe is a software application dedicated to visual effects and motion graphics for videos. The tool is commonly used in the post-production process of videos. The wide toolset of After Effects can be useful in filmmaking, video gaming, and TV. After Effects offers everything you need to take your creative inspirations to the next level.
- Motion Graphics: After Effects lets users animate characters and backgrounds in videos. You can generate 3-dimensional models from 2D animations. After Effects also supports the animation of logos to bring your elements to life.
- Rotoscoping: You can remove elements or drop new ones in your video using After Effects. The Roto Brush Tool can easily separate the background and foreground. You can then replace unwanted objects and replace them with new elements.
- Motion Tracking: Tracking the movement of an object is quite simple in After Effects. You can pin any element to a moving object. The smooth dynamics can enhance the overall result of the footage.
- VFX and Special Effects: After Effects is the perfect tool to add special effects to your videos. Its VFX tool lets users add magic to the footage. You can make objects disappear, control the weather, stabilize your video, and more.
Using Track Mattes in After Effects
In Adobe After Effects, a track matte is a layer that defines the transparency of another layer. It acts as a stencil, determining which parts of the underlying layer are visible and which are transparent. Track mattes are used for creating various effects such as text animations, transitions, and seamlessly composing multiple layers. After Effects offers four Track Matte options:
![]()
- Alpha Matte: Alpha matte in After Effects allows white areas in the matte layer to become visible while black areas become transparent. Effectively, this helps the underlying layer to show through.
- Alpha Inverted Matte: In an alpha inverted matte, black areas in the matte layer are visible, and white areas are transparent. It reverses the transparency values to create unique effects.
- Luma Matte: A luma matte uses the brightness values of the matte layer to determine visibility. Bright areas in the matte layer are visible, while dark areas are transparent.
- Luma Inverted Matte: The luma inverted matte works opposite to the luma matte. The top layer’s dark areas are visible, while bright areas are transparent.
![]()
You can use any of the track mattes in After Effects according to your requirements. Following is a step-by-step guide on how to use track mattes:
Step 1
To apply a track matte to your video, you must work with two layers. The top layer acts as the alpha or the luminance layer. The bottom layer acts as the fill. Once you have identified the layers, you can proceed to the next step.
Step 2
Go to the “Modes” column and open the dropdown menu next to “Layer List.” Here, select the layer you wish to use as the track matte.
![]()
Step 3
You will see two toggle switches once you select your layer. You can use these switches and the available options to set the transparency for the Track Matte. You can add alpha matte in After Effects or other types from here.
![]()
Part 2: Performing Mask Tracking With Adobe After Effects: Reviewing the Steps
Another remarkable feature that After Effects offers is mask tracking. Using After Effects mask tracking, you can automatically animate a mask’s position, shape, or path. This is done to match the movement of an object in a video clip. You can now easily deal with complex or fast-moving footage with this feature. To use Track Mask in After Effects, you can follow these steps:
Step 1
Import the footage you wish to edit in After Effects. Select the clip you wish to track from the timeline. Then, select the “Pen” tool from the top toolbar or press G on your keyboard. Select the area around the object you wish to mask in the footage.
![]()
Step 2
Now, open the layer and right-click on the mask name to select “Track Mask.” This will open the mask tracker in the tracker panel at the right. Open the dropdown menu next to the “Method” option. Here, you can find a range of options for tracking methods. Choose the one according to your requirements. If the object isn’t moving much, you can choose a simple option such as “Position.”
![]()
Step 3
Tap the “Analyze Forward” icon and let the tracker analyze the frames in the clip. Once the process has finished, you can restart your clip and set “Mask Mode” from the timeline to “Subtract.” This will remove the selected object from the clip.
![]()
Step 4
To fill in the details, go to the “Window” menu from the top and select “Content Aware Fill.” Once you see the panel on the screen, set the “Alpha Extension” slider to a number of your choice and click on “Generate Fill Layer.”
![]()
Part 3: How to Make Masking Easy? Try Wondershare Filmora
Although After Effects is a great tool for professional-quality video editing, it is not everyone’s cup of tea. Features such as motion track masks in After Effects are challenging to navigate. Novice users can face trouble getting around the complex masking process in After Effects. For a simpler alternative, you can try Wondershare Filmora .
Filmora is the complete solution when it comes to video editing. The multi-platform tool offers a range of useful features for video and audio manipulation. With thousands of built-in templates and presets, Filmora can help users kick-start their creative journey. You can use this easy-to-use tool as the perfect alternative to After Effects mask tracking.
Free Download For Win 7 or later(64-bit)
Free Download For macOS 10.14 or later
Main Highlights of Wondershare Filmora
Filmora offers a comprehensive toolset to help users make the most of their media files. Some useful resources provided by Wondershare Filmora include:
- AI Text-Based Editing: Filmora allows users to convert audio from videos into editable text. This can help you easily modify your video content. The feature can be used for quick transcriptions, subtitles, and translations.
![]()
- Speed Ramping: Using Filmora, users can apply professional speed effects in footage. You can adjust your video speed and create unique cinematic effects in no time. Filmora also helps maintain the audio pitch to avoid abrupt changes.
![]()
- Compound Clip: Filmora can help users merge multiple clips into a single footage. You can obtain complete control over the integrated clip for editing. This can help users manage and adjust multiple clips easily.
![]()
- AI Vocal Remover: The Vocal Remover tool of Filmora offers AI power to separate vocals and music from any audio. You can get separate acapella and vocals for various purposes. From karaoke to creative dubs, everything is now possible with Filmora.
![]()
Using AI Smart Masking in Filmora – A Step-by-Step Guide
Filmora offers an AI-powered masking feature for users. This allows automatic recognition and selection of objects in videos. You can create seamless transitions, color-correct elements, remove background, and more. The tool can easily detect and separate objects, so you don’t have to put in manual effort. Here is the step-by-step guide for AI smart masking using Filmora:
Step 1: Import Footage in Filmora
Install and launch Wondershare Filmora on your device. From the homepage, tap “New Project” and go to the “File” tab from the top. Tap “Import Media” in the dropdown menu and insert your video clips into the timeline.
![]()
Step 2: Enable AI Mask
Select your clip in the timeline and go to the “Video” tab from the right panel. Select the “Mask” option and tap the “AI Mask” icon. Under the section, you can choose from options such as “Select Character” or “Smart Brush.” Select one according to your requirements and hit “Add Mask.”
![]()
Step 3: Adjust Mask Settings and Export File
After you apply the masking option, you can adjust other mask settings. Filmora allows users to set the expansion range, blur strength, opacity, and other aspects. Once satisfied with the results, tap the “Export” button from the top-right corner and choose a pathway to save your video.
![]()
Free Download For Win 7 or later(64-bit)
Free Download For macOS 10.14 or later
Conclusion
Adobe After Effects is an industry-standard tool for video editing and manipulation. Track Mattes and Track Masks in After Effects are valuable tools that can help elevate your video’s potential. For a simple and effective alternative, you can try Wondershare Filmora. The tool uses smart masking using AI to make the process easier.
Free Download Free Download Learn More
Part 1: How to Utilize Track Mattes in Adobe After Effects?
After Effects by Adobe is a software application dedicated to visual effects and motion graphics for videos. The tool is commonly used in the post-production process of videos. The wide toolset of After Effects can be useful in filmmaking, video gaming, and TV. After Effects offers everything you need to take your creative inspirations to the next level.
- Motion Graphics: After Effects lets users animate characters and backgrounds in videos. You can generate 3-dimensional models from 2D animations. After Effects also supports the animation of logos to bring your elements to life.
- Rotoscoping: You can remove elements or drop new ones in your video using After Effects. The Roto Brush Tool can easily separate the background and foreground. You can then replace unwanted objects and replace them with new elements.
- Motion Tracking: Tracking the movement of an object is quite simple in After Effects. You can pin any element to a moving object. The smooth dynamics can enhance the overall result of the footage.
- VFX and Special Effects: After Effects is the perfect tool to add special effects to your videos. Its VFX tool lets users add magic to the footage. You can make objects disappear, control the weather, stabilize your video, and more.
Using Track Mattes in After Effects
In Adobe After Effects, a track matte is a layer that defines the transparency of another layer. It acts as a stencil, determining which parts of the underlying layer are visible and which are transparent. Track mattes are used for creating various effects such as text animations, transitions, and seamlessly composing multiple layers. After Effects offers four Track Matte options:
![]()
- Alpha Matte: Alpha matte in After Effects allows white areas in the matte layer to become visible while black areas become transparent. Effectively, this helps the underlying layer to show through.
- Alpha Inverted Matte: In an alpha inverted matte, black areas in the matte layer are visible, and white areas are transparent. It reverses the transparency values to create unique effects.
- Luma Matte: A luma matte uses the brightness values of the matte layer to determine visibility. Bright areas in the matte layer are visible, while dark areas are transparent.
- Luma Inverted Matte: The luma inverted matte works opposite to the luma matte. The top layer’s dark areas are visible, while bright areas are transparent.
![]()
You can use any of the track mattes in After Effects according to your requirements. Following is a step-by-step guide on how to use track mattes:
Step 1
To apply a track matte to your video, you must work with two layers. The top layer acts as the alpha or the luminance layer. The bottom layer acts as the fill. Once you have identified the layers, you can proceed to the next step.
Step 2
Go to the “Modes” column and open the dropdown menu next to “Layer List.” Here, select the layer you wish to use as the track matte.
![]()
Step 3
You will see two toggle switches once you select your layer. You can use these switches and the available options to set the transparency for the Track Matte. You can add alpha matte in After Effects or other types from here.
![]()
Part 2: Performing Mask Tracking With Adobe After Effects: Reviewing the Steps
Another remarkable feature that After Effects offers is mask tracking. Using After Effects mask tracking, you can automatically animate a mask’s position, shape, or path. This is done to match the movement of an object in a video clip. You can now easily deal with complex or fast-moving footage with this feature. To use Track Mask in After Effects, you can follow these steps:
Step 1
Import the footage you wish to edit in After Effects. Select the clip you wish to track from the timeline. Then, select the “Pen” tool from the top toolbar or press G on your keyboard. Select the area around the object you wish to mask in the footage.
![]()
Step 2
Now, open the layer and right-click on the mask name to select “Track Mask.” This will open the mask tracker in the tracker panel at the right. Open the dropdown menu next to the “Method” option. Here, you can find a range of options for tracking methods. Choose the one according to your requirements. If the object isn’t moving much, you can choose a simple option such as “Position.”
![]()
Step 3
Tap the “Analyze Forward” icon and let the tracker analyze the frames in the clip. Once the process has finished, you can restart your clip and set “Mask Mode” from the timeline to “Subtract.” This will remove the selected object from the clip.
![]()
Step 4
To fill in the details, go to the “Window” menu from the top and select “Content Aware Fill.” Once you see the panel on the screen, set the “Alpha Extension” slider to a number of your choice and click on “Generate Fill Layer.”
![]()
Part 3: How to Make Masking Easy? Try Wondershare Filmora
Although After Effects is a great tool for professional-quality video editing, it is not everyone’s cup of tea. Features such as motion track masks in After Effects are challenging to navigate. Novice users can face trouble getting around the complex masking process in After Effects. For a simpler alternative, you can try Wondershare Filmora .
Filmora is the complete solution when it comes to video editing. The multi-platform tool offers a range of useful features for video and audio manipulation. With thousands of built-in templates and presets, Filmora can help users kick-start their creative journey. You can use this easy-to-use tool as the perfect alternative to After Effects mask tracking.
Free Download For Win 7 or later(64-bit)
Free Download For macOS 10.14 or later
Main Highlights of Wondershare Filmora
Filmora offers a comprehensive toolset to help users make the most of their media files. Some useful resources provided by Wondershare Filmora include:
- AI Text-Based Editing: Filmora allows users to convert audio from videos into editable text. This can help you easily modify your video content. The feature can be used for quick transcriptions, subtitles, and translations.
![]()
- Speed Ramping: Using Filmora, users can apply professional speed effects in footage. You can adjust your video speed and create unique cinematic effects in no time. Filmora also helps maintain the audio pitch to avoid abrupt changes.
![]()
- Compound Clip: Filmora can help users merge multiple clips into a single footage. You can obtain complete control over the integrated clip for editing. This can help users manage and adjust multiple clips easily.
![]()
- AI Vocal Remover: The Vocal Remover tool of Filmora offers AI power to separate vocals and music from any audio. You can get separate acapella and vocals for various purposes. From karaoke to creative dubs, everything is now possible with Filmora.
![]()
Using AI Smart Masking in Filmora – A Step-by-Step Guide
Filmora offers an AI-powered masking feature for users. This allows automatic recognition and selection of objects in videos. You can create seamless transitions, color-correct elements, remove background, and more. The tool can easily detect and separate objects, so you don’t have to put in manual effort. Here is the step-by-step guide for AI smart masking using Filmora:
Step 1: Import Footage in Filmora
Install and launch Wondershare Filmora on your device. From the homepage, tap “New Project” and go to the “File” tab from the top. Tap “Import Media” in the dropdown menu and insert your video clips into the timeline.
![]()
Step 2: Enable AI Mask
Select your clip in the timeline and go to the “Video” tab from the right panel. Select the “Mask” option and tap the “AI Mask” icon. Under the section, you can choose from options such as “Select Character” or “Smart Brush.” Select one according to your requirements and hit “Add Mask.”
![]()
Step 3: Adjust Mask Settings and Export File
After you apply the masking option, you can adjust other mask settings. Filmora allows users to set the expansion range, blur strength, opacity, and other aspects. Once satisfied with the results, tap the “Export” button from the top-right corner and choose a pathway to save your video.
![]()
Free Download For Win 7 or later(64-bit)
Free Download For macOS 10.14 or later
Conclusion
Adobe After Effects is an industry-standard tool for video editing and manipulation. Track Mattes and Track Masks in After Effects are valuable tools that can help elevate your video’s potential. For a simple and effective alternative, you can try Wondershare Filmora. The tool uses smart masking using AI to make the process easier.
Also read:
- How to Make A Funny Vlog for TikTok, In 2024
- New 2024 Approved 4 Methods to Crop a Video on Android Easily
- Are You Looking for a Voice Changer to Make Your Gaming Experience More Fun? Here Is a List of the Top 6 Best Alternatives of Clownfish Voice Changers to Use
- New 2 Methods to Cut Video in VLC on Windows for 2024
- 2024 Approved How to Create a Slideshow with Icecream Slideshow Maker
- Updated Overview About Supported iPhone Video Formats and Best iPhone Video Editor & Converter
- New In 2024, Dubbing Videos With Voiceovers | Using Wondershare Filmora
- New Splitting Video in VSDC Step by Step
- 2024 Approved 12 Top Marketing Slideshow Templates
- Motion Blur Photo With GIMP Step-By-Step Guide for 2024
- New 2024 Approved How to Convert Images Into Video - Kapwing Tutorial
- A Complete Guideline To Better Use QuickTime Player for 2024
- Updated How to Blur a Still or Moving Part of Video for 2024
- Use Path Blur In Photoshop To Create Motion Effect for 2024
- How to Download and Use Windows Movie Maker 10 for 2024
- Tutorial Guides for Video Maker with Song for 2024
- New Learn How to Create a Unique Repeated Text Animation in the Filmora Video Editor. Follow the Simple Step-by-Step Instructions
- New 2024 Approved Fun & Easy Masking Tricks in Filmora
- 2024 Approved Through Speed Ramping, Create a Smooth Transition in Slow-Motion Videos. Follow This Guide and Learn About Premiere Pro Slow Motion and a Better Alternative
- New You Need to Follow Certain Steps to Complete Your Project. In the Section Below, We Will Discuss in Detail the Steps to Make a Movie From Windows Movie Maker
- 2024 Approved Techniques You Never Heard of for Learning AI Marketing YouTube
- New In 2024, Best Animated Video Makers
- In 2024, How to Fix Pokemon Go Route Not Working On Vivo T2x 5G? | Dr.fone
- How To Pause Life360 Location Sharing For Apple iPhone 11 Pro Max | Dr.fone
- In 2024, Planning to Use a Pokemon Go Joystick on Tecno Spark 10 4G? | Dr.fone
- How to Check Distance and Radius on Google Maps For your Vivo V29 | Dr.fone
- In 2024, How To Fix OEM Unlock Missing on Nokia C12 Plus?
- How to Fix Unfortunately, Contacts Has Stopped Error on Itel P40 | Dr.fone
- New What Is an AI Avatar? | Wondershare Virbo Glossary for 2024
- Unlock Your Itel P55Ts Potential The Top 20 Lock Screen Apps You Need to Try
- New In 2024, Waht Is AI Pixel Art Generator? | Wondershare Virbo Glossary
- How Do You Get Sun Stone Evolutions in Pokémon For Nokia G22? | Dr.fone
- iCloud Unlocker Download Unlock iCloud Lock for your Apple iPhone 6s
- 9 Solutions to Fix Samsung Galaxy M14 4G System Crash Issue | Dr.fone
- Title: In 2024, Adjust Background to Black for Your Product Review Video
- Author: Chloe
- Created at : 2024-05-20 03:37:50
- Updated at : 2024-05-21 03:37:50
- Link: https://ai-editing-video.techidaily.com/in-2024-adjust-background-to-black-for-your-product-review-video/
- License: This work is licensed under CC BY-NC-SA 4.0.
