
:max_bytes(150000):strip_icc():format(webp)/TheWolfAmongUsBigby-793544cded2749488ae1d20113d8d73a.jpg)
In 2024, Are You a Gaming YouTuber or Content Creator Whose Main Game Is COD Warzone? How Kickass Are Your Warzone Thumbnails? Heres a Guide on How to Make One for Free
Are You a Gaming YouTuber or Content Creator Whose Main Game Is COD Warzone? How Kickass Are Your Warzone Thumbnails? Here’s a Guide on How to Make One for Free
Gaming is a popular video category. And COD: Warzone is one of the most popular games nowadays. That said, many gamers flock to video streaming websites to watch Warzone gameplays. And there are so many of them, and the competition for views is tough. So you must use all you can to win that battle. Your Warzone thumbnails, titles, and videos themselves must be on point.
With kickass thumbnails, the eyes of users searching for Call of Duty: Warzone videos will be attracted to your content. If your content is good, that will convert to an increase in views and subscribers.

How To Make an Impressive Warzone Thumbnail for Free
We have clarified how important a Warzone thumbnail that pop is. But how to make one? That’s what this article is for. Here, you will learn how to create impressive Warzone thumbnails for free. That’s right - FOR FREE.
Without further ado, here are the steps that you should follow:
Step1 Download & Install an Excellent Warzone Thumbnail Maker
Of course, the first step is to find good software for making thumbnails. But there is no thumbnail maker specifically made for Warzone. So, the best choice is a thumbnail maker that is also a video editor - like Wondershare Filmora .
Free Download For Win 7 or later(64-bit)
Free Download For macOS 10.14 or later
Admittedly, Wondershare Filmora has premium plans. But you can download it for free. Additionally, you can use the free trial version to create video thumbnails without upgrading to the paid version. So essentially, Wondershare Filmora is a free Warzone thumbnail maker. The best part is that you can use some of Filmora’s other features to make the thumbnail as cool as possible.
Step2 Take a Snapshot of Your Call of Duty Warzone Game
Using in-game screenshots is recommended. That way, the image is personalized and can’t be found anywhere else. Unfortunately, COD: Warzone does not have an in-game functionality for screenshots. So, you have to get the image using other means. You can use the following keyboard shortcuts to grab a screenshot:
- Using Windows’ Game Bar - Windows key + ALT + PrintScreen
- NVIDIA’s Shadow Play - ALT + Z
- Windows Screenshot - Windows + PrintScreen
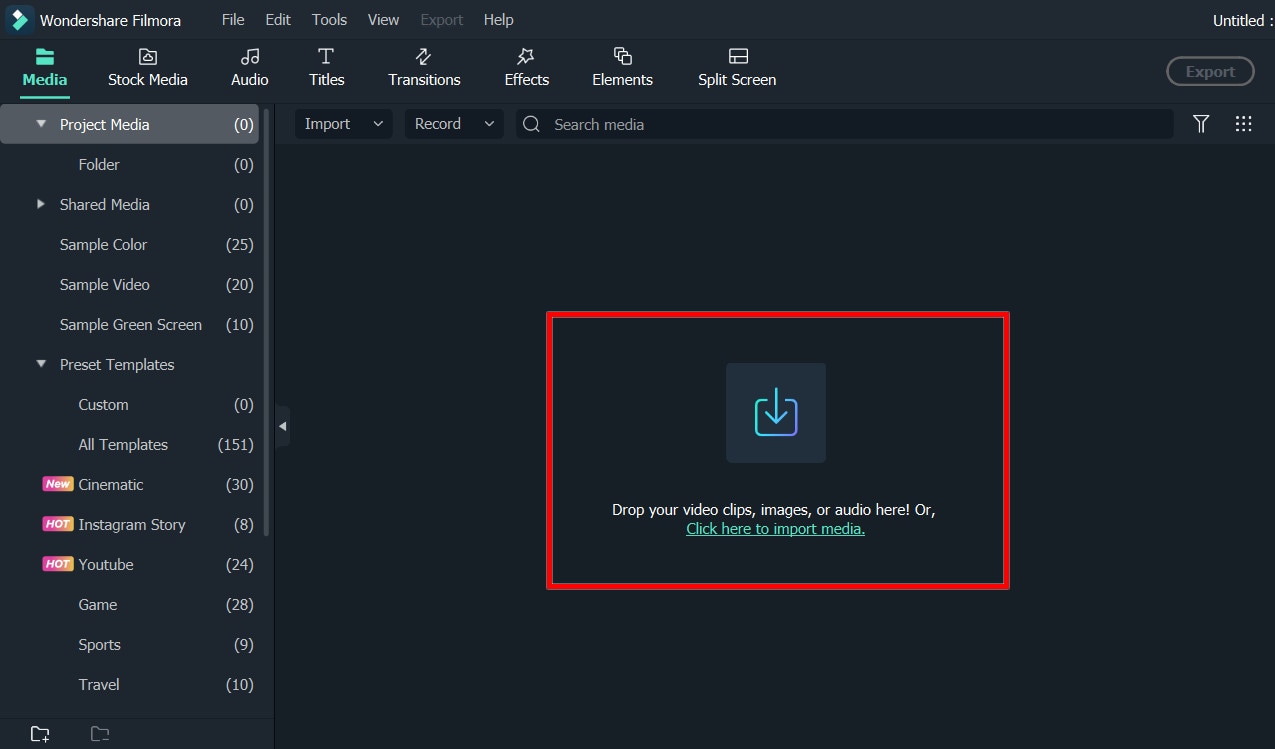
Step3 Create a Project, Set Project Ratio & Import the Snapshot
- Download and launch Wondershare Filmora.
- Click “New Project.”

- Click “File” button. In the drop-down menu, select “Project Settings.”

- In the pop-up window, set the resolution to 1280*720, which is the recommended resolution of YouTube Thumbnail.
- Drag and drop the screenshot you took into the Filmora window. Alternatively, click the “Click here to import media” link to locate and import it.

Step4 Drag the Media to the Timeline, Add Effects, Stickers & Texts
- Drag the image from the Project Media section into the timeline.

- Click “Effects.” Select an effect to use and drag it into the timeline.
- Click “Stickers.” Select stickers to use and drag them into the timeline.

- Add Text overlays to the video. To do so, click “Titles.” Select the text style and drag it into the timeline. Double-click it to edit the written text.
Step5 Find a Desired Frame and Take a Screenshot
- Play the video preview.
- Pause the video when you see the best frame to use as the thumbnail.
- Click the “Camera” icon below the video preview to take a snapshot.

- Select a file format and a target destination folder for the image.

- Click “Ok.”
Step6 Use the Screenshot as Your New COD Warzone Thumbnail
- The screenshot will appear in the Project Media section in Filmora. Right-click the image.
- Click “Reveal in Explorer.” It will open the folder where the screenshot is saved.

- Use the screenshot as your video thumbnail.

![]()
Note: The free version of Wondershare Filmora will add a watermark to saved videos. But it will not add a watermark to a snapshot. Indeed, it is a free Warzone thumbnail creator.
If you want to know more tricks about creating a nice Warzone thumbnail, please check the video below:
Tips for a Superb Call of Duty: Warzone Thumbnail
A thumbnail is useless if it does not look good on YouTube. But how can you ensure it looks good on YouTube? That’s a good question. Actually, the YouTube help center gave pointers on how your video thumbnail should be. These are the five important things you should know about:
- The Warzone thumbnail size should be at least 640 pixels wide.
- YouTube thumbnail dimensions use an aspect ratio of 16:9.
- Your Warzone thumbnail should not exceed 2MB.
- The best size for YouTube video thumbnails is 1280 pixels by 720 pixels.
- The supported image formats are JPG, PNG, and GIF.
The next question is how the actual thumbnail image should look. There’s only one rule for that. Make it as cool as possible. Call of Duty: Warzone is a first-person shooter/battle royale game. People who are into these games are drawn to this aesthetic.
5 Best Call of Duty: Warzone Thumbnails on YouTube That May Inspire You
Research is always key to accomplishing something. If you want to create kickass COD: Warzone video thumbnails, you should look at the ones that worked. Visit YouTube and find videos that have great success. That will help you get some ideas for your thumbnails.
Let us help you with that. Here are 5 Call of Duty: Warzone thumbnails you should check out.
1. Call of Duty Warzone: THE BATTLE OF VERDANSK GAMEPLAY! (No Commentary)

This video from the channel NoAnnoyingCommentary has 3.3 million views. It shows the player pointing their gun upwards. Flying in the sky are many fighter planes (obviously edited.) Then, a sepia filter is applied to make it look like a shot from past real-world wars. It is cool and sure to attract the attention of the COD: Warzone demographics.
2. TOP 300 FUNNIEST FAILS IN WARZONE

This video is made by Red Arcade . It has attracted more than 12 million views. Admittedly, the title and the video concept are already enough to attract many viewers. But we can’t say that the thumbnail did not help. It’s actually really good.
The thumbnail shows a screenshot from Warzone. A player’s character is in the middle, with his back facing the camera. The words “AFK. Don’t shoot!” are written on the wall he is facing. The character is viewed through a sniper scope. It’s more “funny” than cool. But for what the video is about, it works fantastic.
3. Clean House [PS5 UHD 4K] Next-Gen Ultra Realistic Graphics PlayStation 5 Call of Duty Gameplay

This video from HEDGEHOG ヅ has a whopping 12 million views. Again, the title likely is the main reason why it got that many views. But for sure, people did not read that long title at first. They were drawn to it by the thumbnail.
The thumbnail shows a clear-as-crystal screenshot of a team of 4 players on the battlefield. At the top left corner is the PS5 logo. Then, at the bottom left is an icon that says the video is in 4K UHD. If you’re also uploading 4K Warzone videos, you can try doing this. Users are attracted to videos that are eye-pleasing.
4. Call of Duty: Warzone Battle Royale | RTX 3080 10GB ( 4K Maximum Settings Ray Tracing OFF )

The thumbnail for this video (made by GTX 1050 Ti ), with 5.2 million views, is just an in-game screenshot. At the top-right is a large logo of GEFORCE RTX 3080 and at the bottom left is an Intel logo. Like the previous one, it attracts viewers by stating the visual appeal of the video.
5. NEW RECORD! 64 KILL GAME in CoD WARZONE! (Best Classes / Loadouts)

Like most Warzone thumbnails, this thumbnail from a Vikkstar123 video features a gun. At the top right is the victory banner, and at the bottom is the logo for kills with the number 64 next to it. The top right shows the logo of COD Warzone.
Players are attracted to amazing gameplay. Unsurprisingly, the player who got 64 kills got 3.1 million views in his video. The gist is that if you have achieved something amazing, try to incorporate it into the thumbnail.
Conclusion
Using in-game screenshots is recommended for making amazing COD Warzone thumbnails. But you should not use raw photos. You must edit them to ensure they have visual appeal. Of course, that means you need a good thumbnail maker.
Your best option is Wondershare Filmora. Why? Because it is a thumbnail maker and video editing software in one. Also, it allows you to make thumbnails for free! What could be better than that?
Free Download For macOS 10.14 or later
Admittedly, Wondershare Filmora has premium plans. But you can download it for free. Additionally, you can use the free trial version to create video thumbnails without upgrading to the paid version. So essentially, Wondershare Filmora is a free Warzone thumbnail maker. The best part is that you can use some of Filmora’s other features to make the thumbnail as cool as possible.
Step2 Take a Snapshot of Your Call of Duty Warzone Game
Using in-game screenshots is recommended. That way, the image is personalized and can’t be found anywhere else. Unfortunately, COD: Warzone does not have an in-game functionality for screenshots. So, you have to get the image using other means. You can use the following keyboard shortcuts to grab a screenshot:
- Using Windows’ Game Bar - Windows key + ALT + PrintScreen
- NVIDIA’s Shadow Play - ALT + Z
- Windows Screenshot - Windows + PrintScreen
Step3 Create a Project, Set Project Ratio & Import the Snapshot
- Download and launch Wondershare Filmora.
- Click “New Project.”
- Click “File” button. In the drop-down menu, select “Project Settings.”
- In the pop-up window, set the resolution to 1280*720, which is the recommended resolution of YouTube Thumbnail.
- Drag and drop the screenshot you took into the Filmora window. Alternatively, click the “Click here to import media” link to locate and import it.
Step4 Drag the Media to the Timeline, Add Effects, Stickers & Texts
- Drag the image from the Project Media section into the timeline.
- Click “Effects.” Select an effect to use and drag it into the timeline.
- Click “Stickers.” Select stickers to use and drag them into the timeline.
- Add Text overlays to the video. To do so, click “Titles.” Select the text style and drag it into the timeline. Double-click it to edit the written text.
Step5 Find a Desired Frame and Take a Screenshot
- Play the video preview.
- Pause the video when you see the best frame to use as the thumbnail.
- Click the “Camera” icon below the video preview to take a snapshot.
- Select a file format and a target destination folder for the image.
- Click “Ok.”
Step6 Use the Screenshot as Your New COD Warzone Thumbnail
- The screenshot will appear in the Project Media section in Filmora. Right-click the image.
- Click “Reveal in Explorer.” It will open the folder where the screenshot is saved.
- Use the screenshot as your video thumbnail.
![]()
Note: The free version of Wondershare Filmora will add a watermark to saved videos. But it will not add a watermark to a snapshot. Indeed, it is a free Warzone thumbnail creator.
If you want to know more tricks about creating a nice Warzone thumbnail, please check the video below:
Tips for a Superb Call of Duty: Warzone Thumbnail
A thumbnail is useless if it does not look good on YouTube. But how can you ensure it looks good on YouTube? That’s a good question. Actually, the YouTube help center gave pointers on how your video thumbnail should be. These are the five important things you should know about:
- The Warzone thumbnail size should be at least 640 pixels wide.
- YouTube thumbnail dimensions use an aspect ratio of 16:9.
- Your Warzone thumbnail should not exceed 2MB.
- The best size for YouTube video thumbnails is 1280 pixels by 720 pixels.
- The supported image formats are JPG, PNG, and GIF.
The next question is how the actual thumbnail image should look. There’s only one rule for that. Make it as cool as possible. Call of Duty: Warzone is a first-person shooter/battle royale game. People who are into these games are drawn to this aesthetic.
5 Best Call of Duty: Warzone Thumbnails on YouTube That May Inspire You
Research is always key to accomplishing something. If you want to create kickass COD: Warzone video thumbnails, you should look at the ones that worked. Visit YouTube and find videos that have great success. That will help you get some ideas for your thumbnails.
Let us help you with that. Here are 5 Call of Duty: Warzone thumbnails you should check out.
1. Call of Duty Warzone: THE BATTLE OF VERDANSK GAMEPLAY! (No Commentary)
This video from the channel NoAnnoyingCommentary has 3.3 million views. It shows the player pointing their gun upwards. Flying in the sky are many fighter planes (obviously edited.) Then, a sepia filter is applied to make it look like a shot from past real-world wars. It is cool and sure to attract the attention of the COD: Warzone demographics.
2. TOP 300 FUNNIEST FAILS IN WARZONE
This video is made by Red Arcade . It has attracted more than 12 million views. Admittedly, the title and the video concept are already enough to attract many viewers. But we can’t say that the thumbnail did not help. It’s actually really good.
The thumbnail shows a screenshot from Warzone. A player’s character is in the middle, with his back facing the camera. The words “AFK. Don’t shoot!” are written on the wall he is facing. The character is viewed through a sniper scope. It’s more “funny” than cool. But for what the video is about, it works fantastic.
3. Clean House [PS5 UHD 4K] Next-Gen Ultra Realistic Graphics PlayStation 5 Call of Duty Gameplay
This video from HEDGEHOG ヅ has a whopping 12 million views. Again, the title likely is the main reason why it got that many views. But for sure, people did not read that long title at first. They were drawn to it by the thumbnail.
The thumbnail shows a clear-as-crystal screenshot of a team of 4 players on the battlefield. At the top left corner is the PS5 logo. Then, at the bottom left is an icon that says the video is in 4K UHD. If you’re also uploading 4K Warzone videos, you can try doing this. Users are attracted to videos that are eye-pleasing.
4. Call of Duty: Warzone Battle Royale | RTX 3080 10GB ( 4K Maximum Settings Ray Tracing OFF )
The thumbnail for this video (made by GTX 1050 Ti ), with 5.2 million views, is just an in-game screenshot. At the top-right is a large logo of GEFORCE RTX 3080 and at the bottom left is an Intel logo. Like the previous one, it attracts viewers by stating the visual appeal of the video.
5. NEW RECORD! 64 KILL GAME in CoD WARZONE! (Best Classes / Loadouts)
Like most Warzone thumbnails, this thumbnail from a Vikkstar123 video features a gun. At the top right is the victory banner, and at the bottom is the logo for kills with the number 64 next to it. The top right shows the logo of COD Warzone.
Players are attracted to amazing gameplay. Unsurprisingly, the player who got 64 kills got 3.1 million views in his video. The gist is that if you have achieved something amazing, try to incorporate it into the thumbnail.
Conclusion
Using in-game screenshots is recommended for making amazing COD Warzone thumbnails. But you should not use raw photos. You must edit them to ensure they have visual appeal. Of course, that means you need a good thumbnail maker.
Your best option is Wondershare Filmora. Why? Because it is a thumbnail maker and video editing software in one. Also, it allows you to make thumbnails for free! What could be better than that?
Tips to Make Cinematic Color Grading
New modern color grading software allows you to do point-and-click color grading right in your browser. Color changes are as easy and intuitive as painting or sketching.
You can choose from many different look presets and movie emulations based on Hollywood movies plus real-time previews of your favorite LUTs with this software.
Part 1. What is Cinematic Color Grading?
The cinematic look is all the rage these days and aims to mimic images captured on real film rather than digitally created. To achieve this effect, film directors use various means from lighting to cinematic color gradation. The latter is a powerful tool for bringing a cool or warm tone to a video and providing smooth color transitions to fall on an image that doesn’t look too real but feels emotional.
This kind of post-production processing, which produces beautiful results when used by color magicians, requires a deep understanding of colors and their effect on our psyche and even physiology. It’s not enough to watch a color grading video and use a LUT to get where you want. You should at the very least have an understanding of:
- Color wheel
- Color quality
- Color harmony and discord
- Warm and cool colors
- Color context
Part 2. Tips to make cinematic color grading
Here are three helpful tips to create cinematic-looking images in DaVinci Resolve.
In my 10-year career as a colorist, I’ve worked on every type of content imaginable: short, long, commercial, educational, episodic—you name it. And while each of these formats requires its approach, the one constant that spans them all is the client’s desire for a cinematic look.
Virtually all of us aspire to more cinematic color, but we often come up short—in part because the term itself has become too broad to effectively target. To focus on the goal, I like to think of “cinematic” as “an image whose key visual properties are consistent with those of printed film.”
The print film was the primary medium through which we consumed cinematic images for the first century of filmmaking and is therefore at the very heart of cinematic aesthetics. In this video, I’ll show you my top three secrets to achieving this aesthetic quickly and consistently in Davinci Resolve.
Tips1: Create Color Density
The first secret to film color is to create color density. Another key aesthetic property of film images is that colors can be either highly saturated or highly luminescent but cannot be both.
We can mimic this visual characteristic by identifying strongly saturated colors in our image and using the Hue vs. Lum to reduce their brightness. This simple technique is especially effective on pure primary colors (red, green, and blue).
Tips2: Separation Beats Saturation
The second secret to film color is prioritizing separation over saturation. When you feel like an image lacks overall color or pop, it’s all too easy to reach for the saturation knob, but that’s not a very cinematic solution.
Instead, try using split toning—pushing cool colors into shadows and warm colors into highlights—to increase tonal separation and add depth to an image. This characteristic is present in virtually every film print and is deeply evocative when applied correctly.
Tips3: Strong Contrast is Your Friend
The third secret of film colors is a strong contrast. This is not always easy, as a higher contrast look inherently requires more precision with exposure placement. Too often we pump up some contrast, end up with an image that looks blown out or too crisp, and then immediately back away from editing.
However, if you stick with high contrast long enough to improve your exposure, you’ll get a very different result and be well on your way to a more cinematic image.
Part 3. How to add color cinematic grading by using Filmora?
New modern color grading software allows you to do point-and-click color grading right in your browser. Color changes are as easy and intuitive as painting or sketching.
You can choose from many different look presets and movie emulations based on Hollywood movies plus real-time previews of your favorite LUTs with this software.
Wondershare Filmora is an option if you want to easily change the colors of your projects. You may just double-click the media after dragging it onto the editing timeline to change the contrast, saturation, brightness, and hue.
Despite its speed, it also allows you to merge, edit audio, divide, rotate, and apply as many cool video effects as you like.
Step1Add the media
After installing Wondershare Filmora, click the New Project and Import button to easily find and load your videos.
Step2Correct the color [Basic and Advanced]
In the timeline, double-click the video editing window. Select the “Color” panel and make adjustments.
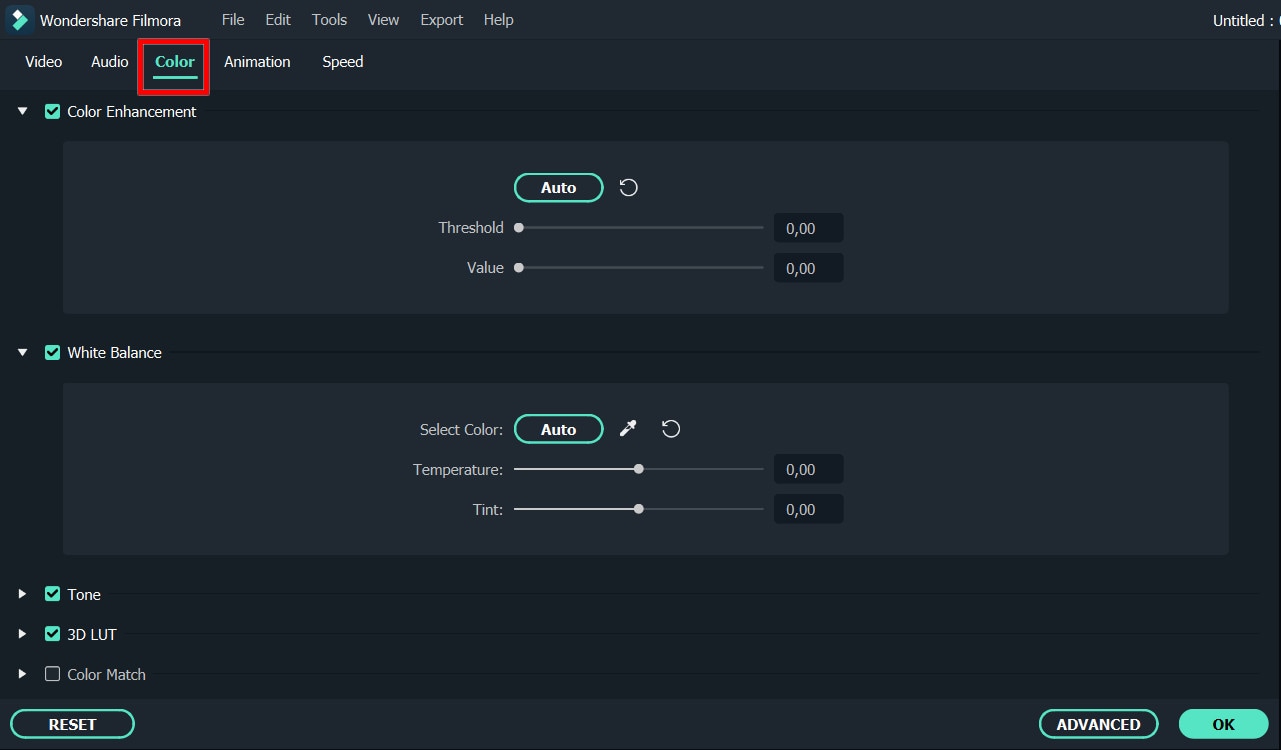
- Contrast: By adjusting this setting, you can control the brightness and color in different parts of the image.
- Saturation: This setting highlights the gray part of the video to a shade. You can adjust it to make the colors of the entire video image appear more saturated or more subdued.
- Brightness: You can change this setting to adjust the overall darkness and lightness of your project.
- Hue: Hue is generally the lightness of a color. Let’s say that when red is saturated with white, it creates a shade of pink.
- 3D LUT: 3D lookup tables provide your media with Hollywood movie color sets like the 007 series, Batman, Harry Porter, etc.
Hover over the indicator to adjust the color correction settings. Then left click on it and move the slider. The corresponding value stabilizes after releasing the mouse button.
With Filmora, you also have access to advanced color correction. Click the Advanced Color Tuning icon to enter the appropriate window where you can fine-tune the color or use preset templates.
The Preferences tab has a variety of templates, including Movie, Normal, 3D LUT, and Vignette. In the Edit tab, you can adjust color temperature, white balance, hue, 3D LUT, color, HSL, light, vignette, etc.
Step3Preview and save the new video
When you are satisfied with your creation, click “Export”. Then click the Settings button and save the new videos in different formats in the Format tab. You can also export the video directly to Vimeo or YouTube or burn it to DVD for better preservation.
Filmora’s color correction tools will make your videos look natural, more attractive, more vibrant, consistent, and professional.
Color Correction Presets
Color correction presets help your video achieve an enhanced cinematic look. Adjust gives you control over fine-tuning the colors in your shots. You can make various adjustments such as color temperature and exposure.
In the “Effects > LUT” tab, you’ll see an extensive selection of preset color settings. These include Vignettes, Movie Looks Like Old Movies, and Cinematic 3D LUT effects such as Harry Potter, Game of Thrones, House of Cards, and Mission Impossible.
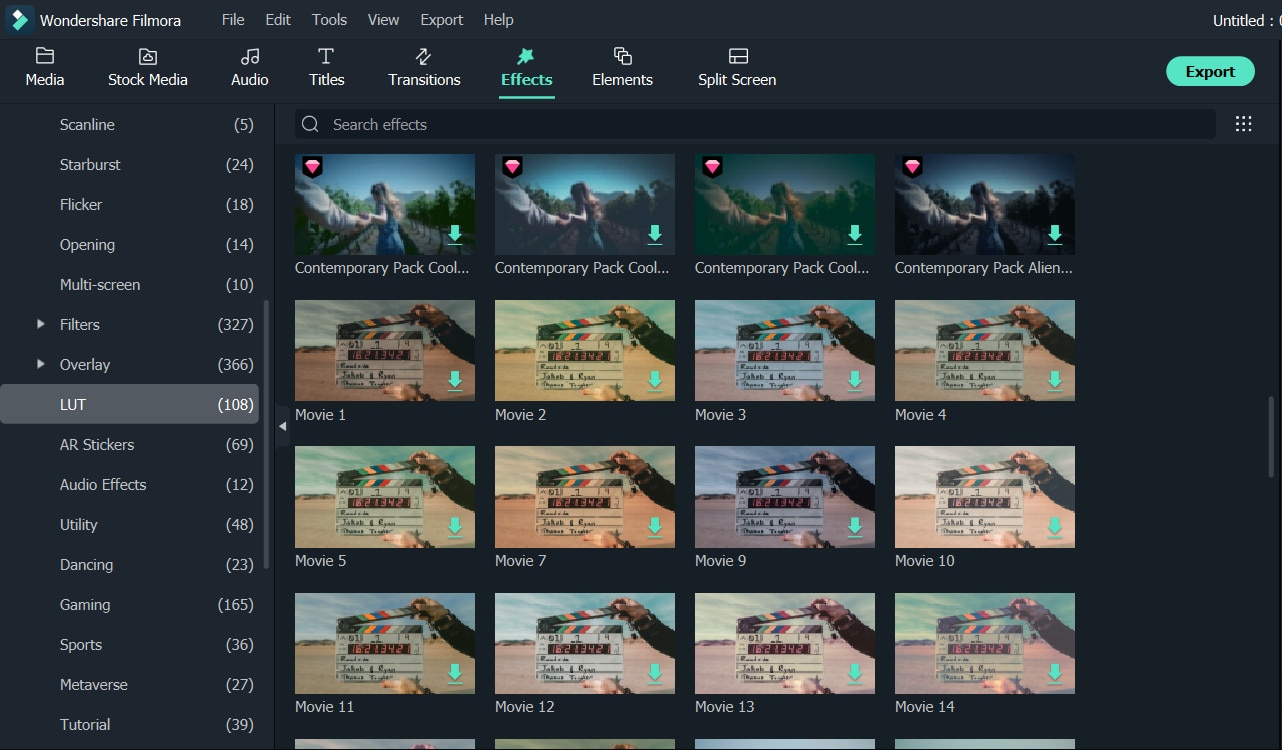
Filmora’s Color Correction Advanced Tool also categorizes your presets. Click on All Presents to see six categories: Favorites, Custom, 3D Lut, Common, Film, and Vignette.
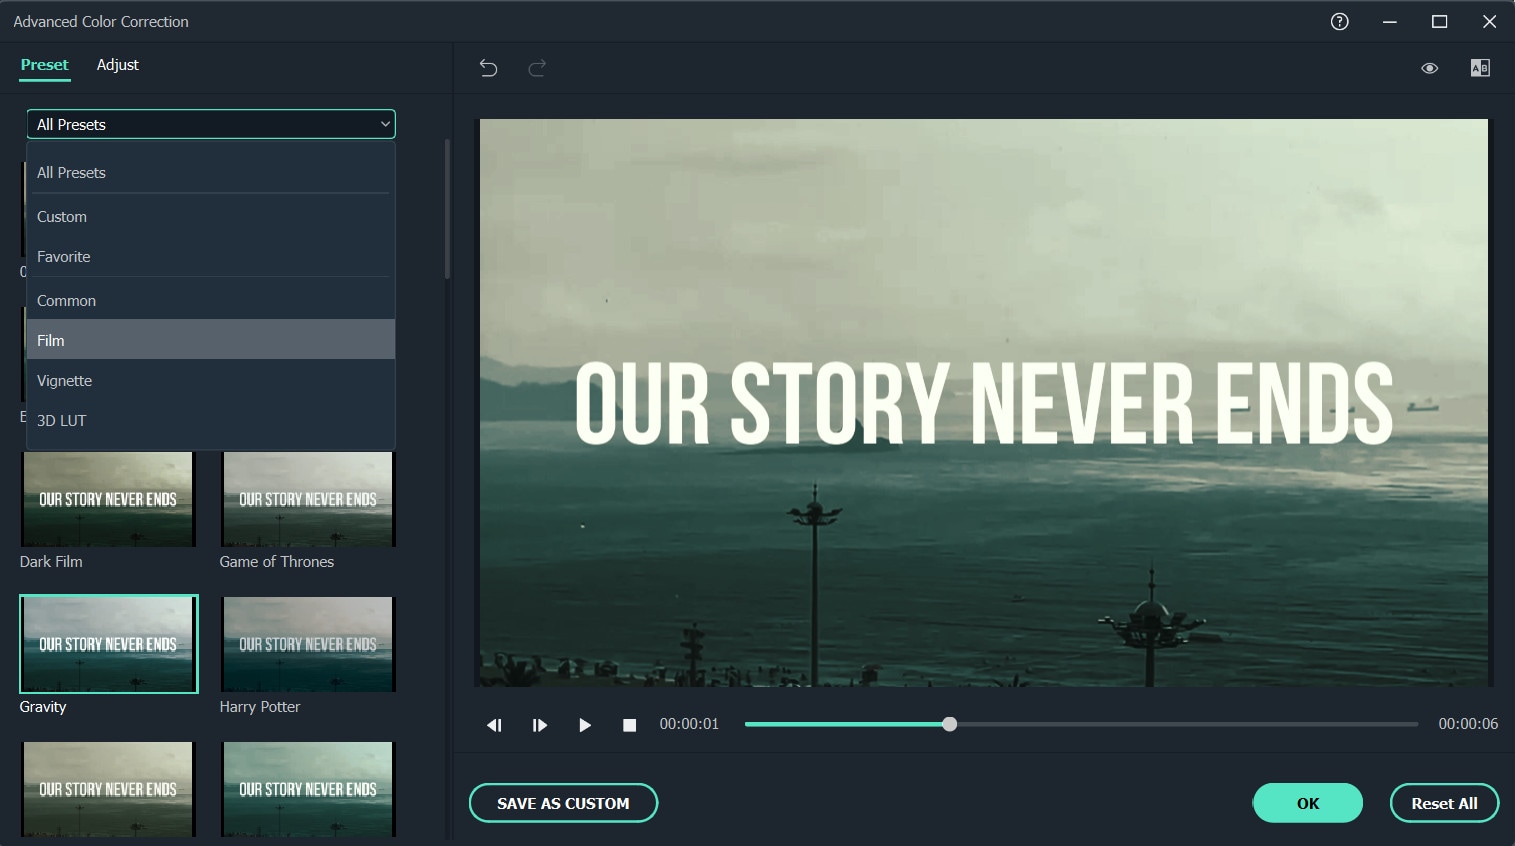
Double-click a preset to apply it to your video. You can see how it looks in the Advanced Color Correction preview window. If you are satisfied with the results, click OK.
Conclusion
Above are the steps to give your video a cinematic look using Wondershare Filmora, hope this helps if you are wondering how to do it. As we can see above, using Filmora video editor will make you more creative in making videos with a suitable emotional tone.
Free Download For Win 7 or later(64-bit)
Free Download For macOS 10.14 or later
Top 9 AMV Makers for Computer
Anime music videos, or AMVs, have become increasingly popular over the years. They allow fans to showcase their creativity and love for their favorite anime series through the use of music and video editing. However, creating a high-quality AMV requires the right software. In this article, we will introduce you to the best AMV maker software available on the market.
Best AMV Maker for Computer
If you would like to create the AMVs on your computer, the following are some of your best options;
Filmora
Best For: Vloggers, teachers and social media users
Supported OS: Windows 11/10/8/7 and macOS

Speaking of the best AMV video maker, I would recommend Filmora as the first choice. It is easy to learn and use for beginner, and come with rich video editing features: split screen, key framing, motion tracking, speed ramping, instant mode, speech to text, audio ducking and more.
Meanwhile, it also helps teachers or business people to record tutorials, files or PowerPoint from their screen wit no limit. For vloggers and other advanced users, Filmora provides green screen, AI Protrait, colorful video effect templates, color match and so forth. You can directly share the video to YouTube, Vimeo and other social media platforms.
For Win 7 or later (64-bit)
For macOS 10.12 or later
Adobe Premiere
Best For: Animators, professional cartoonists, and marketers
Supported OS: Windows and Mac

Adobe Premiere is a video editing program that can be used to create and edit all types of video projects including AMVs. It has numerous features that can make it very easy to come up with the most professional video that you want to create. Because of these very many, but very useful features, using Adobe Premiere can be difficult at first. But once you gate a hang of it, it is one of the best ways to create any video including AMVs.
Adobe Premiere can be used on both Mac and Windows operating systems and it is compatible with most video and audio formats. But like most Adobe software it is not a free solution. You do get a 7-day free trial that you can use without limitation, but you will need to pay a subscription fee to continue using it.
Apple iMovie
Best For: Marketers, freelancers, YouTubers, Bloggers
Supported OS: Mac

Apple iMovie is one of the best video editing programs for Mac and is therefore one of the best tools to choose if you will be creating your AMV on a Mac. It has all the basic video editing features that you need for a project of this magnitude including the ability to merge videos and apply filters.
This makes it the most ideal tool for creating AMVs since you typically need to break a file into various sections for your AMV. You can then add audio to the video and choose one of the effects and filters to add to it. Once the video is complete, you can then export it in 4K resolution or upload it to YouTube directly.
Sony Vegas
Best For: Animators, Marketers, Video Editors and Bloggers
Supported OS: Windows and Mac

If you are looking for a program that is designed with AMVs in mind then Sony Vegas might be a good choice. Its main purpose is to help users create stunning anime videos and it has all the necessary features to make that happen.
Sony Vegas comes with a universal editor that allows you to create your video using the multi-cam editing feature or crossfades. You can also add various effects to the video including various colors and other special effects. But as you can probably guess, Sony Vegas may be a bit complicated for the beginner user, although there are numerous tutorials to help you through this process.
Final Cut Pro
Best For: Marketers, Animators, YouTubers, Freelancers, and Professional video editors
Supported OS: Windows and Mac

Final Cut Pro is another professional and highly effective video editor that you can use to create AMVs. It has very many video editing capabilities, allowing you to edit your video in numerous ways including cropping, rotating, blending, and more. It also has over 100 different transitions and more than 149 different visual effects to create your video any way you want to.
But perhaps the best feature that Final Cut Pro has when it comes to creating and editing AMV videos is the ability to organize and crop videos easily. The “Compounding Clips” feature, in particular, will come in handy when combining footage, soundtracks, and effects into one perfect AMV.
Lightworks
Best For: YouTubers, Freelancers, Bloggers, and Marketers
Supported OS: Windows and Mac

Lightworks is an easy-to-use solution that you can use to create stunning AMV videos. The drag and drop interface makes it the most ideal solution even for beginners and it offers a lot of options for designing and customizing the videos. One other major benefit of choosing Lightworks is that it does come with a free version that is not as limited as you would expect.
The timeline is easy to use, allowing you to create AMVs from scratch or merge clips to create the video. You can also use numerous effects on the video and even add music to the video.
Windows Movie Maker
Best For: Freelancers, bloggers, marketers, and YouTubers
Supported OS: Windows

Windows Movie Maker is one of the most popular video editing tools on the Windows OS and it has all the necessary editing features that you will need when you want to create AMV videos. On this free video editing tool, you can cut, split and crop the video or even add audio files and subtitles as needed,
It can work with numerous video and image formats, offering a wide range of options when it comes to video editing. Some of the functions that you can expect to use include video trimming, which can easily be done by simply dragging the slider to the desired location. But you will find that Windows Movie Maker lacks some of the features that can make your AMVs truly stand out.
Best AMV Maker for Mobile Phones
If you want to make AMVs on your mobile device, the following are some of the best options;
Filmora
Best For: Professional Animators, Marketers, YouTubes, and Bloggers
Supported OS: Android and iOS

Filmora is one of the best video editing apps that you can download. It somehow manages to offer tools and video editing features that can otherwise be found only on desktop tools. Some of the features that can you can expect when using Filmora include reverse play, transitions, cropping, rotating, adding voiceovers, audio mixing, color tuning, and even picture-in-picture.
Filmora further simplifies the editing process by providing you with premade templates and themes that you can use to customize your AMV in many ways. It will also let you add music to the video from a huge library of licensed audio tracks.
KineMaster
Best For: Professional Animators, Bloggers, Marketers, and YouTubers
Supported OS: iOS and Android

KineMaster is a video editing app that is designed for professionals but is easy enough to use that it can be useful to you even if it is your first time using it. It has a lot of very useful video editing features including frame-by-frame editing, instant previews as well as support for up to four audio tracks that you can add to the video project.
This app also allows you to work with two video layers that you can animate in various ways including chroma key compositing, precise color adjustment, speed control, and keyframe animation.
VivaVideo
Best For: YouTubers, Freelancers, and Marketers
Supported OS: iOS and Android

VivaVideo is another very easy-to-use app that you can install on your device to create AMVs. It has hundreds of features to choose from including stickers, filters, special effects, and animated clips. It also features slow/fast motion control, a huge library of background music that you can add to the video, and premade templates to make everything easier.
It allows you to share your creation with more than 200 million users of the app or even directly share the video on social media platforms.
Related FAQs
1.Is Making AMV illegal?
If you don’t have permission from the copyright owner of the song you are using to create the AMV, then you violate the law. And considering that it can be very difficult to get permission from the copyright owner, usually the record label, most AMVs are not exactly legal.
2.How Do You Make an AMV?
It depends on the kind of AMV that you want to make. But several steps are common to all AMVs. The first thing you want to do is pick the subject of your video, which usually means choosing the character or characters that will make up your video. Then, you will want to pick the song that you will use for the AMV, and finally, choose a video editor that will allow you to put the two together.
3.What Program is Used to Make AMVs?
AMVs are made using video editing software with the necessary features to put together different video components and animate them. We have provided you with various options above.
Conclusion
Creating AMVs can be a fun experience, but only if you have the right tool for the job. The solutions we have discussed in this article can all help you create a great AMV. Choose one that suits your project
For macOS 10.12 or later
Adobe Premiere
Best For: Animators, professional cartoonists, and marketers
Supported OS: Windows and Mac
Adobe Premiere is a video editing program that can be used to create and edit all types of video projects including AMVs. It has numerous features that can make it very easy to come up with the most professional video that you want to create. Because of these very many, but very useful features, using Adobe Premiere can be difficult at first. But once you gate a hang of it, it is one of the best ways to create any video including AMVs.
Adobe Premiere can be used on both Mac and Windows operating systems and it is compatible with most video and audio formats. But like most Adobe software it is not a free solution. You do get a 7-day free trial that you can use without limitation, but you will need to pay a subscription fee to continue using it.
Apple iMovie
Best For: Marketers, freelancers, YouTubers, Bloggers
Supported OS: Mac
Apple iMovie is one of the best video editing programs for Mac and is therefore one of the best tools to choose if you will be creating your AMV on a Mac. It has all the basic video editing features that you need for a project of this magnitude including the ability to merge videos and apply filters.
This makes it the most ideal tool for creating AMVs since you typically need to break a file into various sections for your AMV. You can then add audio to the video and choose one of the effects and filters to add to it. Once the video is complete, you can then export it in 4K resolution or upload it to YouTube directly.
Sony Vegas
Best For: Animators, Marketers, Video Editors and Bloggers
Supported OS: Windows and Mac
If you are looking for a program that is designed with AMVs in mind then Sony Vegas might be a good choice. Its main purpose is to help users create stunning anime videos and it has all the necessary features to make that happen.
Sony Vegas comes with a universal editor that allows you to create your video using the multi-cam editing feature or crossfades. You can also add various effects to the video including various colors and other special effects. But as you can probably guess, Sony Vegas may be a bit complicated for the beginner user, although there are numerous tutorials to help you through this process.
Final Cut Pro
Best For: Marketers, Animators, YouTubers, Freelancers, and Professional video editors
Supported OS: Windows and Mac
Final Cut Pro is another professional and highly effective video editor that you can use to create AMVs. It has very many video editing capabilities, allowing you to edit your video in numerous ways including cropping, rotating, blending, and more. It also has over 100 different transitions and more than 149 different visual effects to create your video any way you want to.
But perhaps the best feature that Final Cut Pro has when it comes to creating and editing AMV videos is the ability to organize and crop videos easily. The “Compounding Clips” feature, in particular, will come in handy when combining footage, soundtracks, and effects into one perfect AMV.
Lightworks
Best For: YouTubers, Freelancers, Bloggers, and Marketers
Supported OS: Windows and Mac
Lightworks is an easy-to-use solution that you can use to create stunning AMV videos. The drag and drop interface makes it the most ideal solution even for beginners and it offers a lot of options for designing and customizing the videos. One other major benefit of choosing Lightworks is that it does come with a free version that is not as limited as you would expect.
The timeline is easy to use, allowing you to create AMVs from scratch or merge clips to create the video. You can also use numerous effects on the video and even add music to the video.
Windows Movie Maker
Best For: Freelancers, bloggers, marketers, and YouTubers
Supported OS: Windows
Windows Movie Maker is one of the most popular video editing tools on the Windows OS and it has all the necessary editing features that you will need when you want to create AMV videos. On this free video editing tool, you can cut, split and crop the video or even add audio files and subtitles as needed,
It can work with numerous video and image formats, offering a wide range of options when it comes to video editing. Some of the functions that you can expect to use include video trimming, which can easily be done by simply dragging the slider to the desired location. But you will find that Windows Movie Maker lacks some of the features that can make your AMVs truly stand out.
Best AMV Maker for Mobile Phones
If you want to make AMVs on your mobile device, the following are some of the best options;
Filmora
Best For: Professional Animators, Marketers, YouTubes, and Bloggers
Supported OS: Android and iOS
Filmora is one of the best video editing apps that you can download. It somehow manages to offer tools and video editing features that can otherwise be found only on desktop tools. Some of the features that can you can expect when using Filmora include reverse play, transitions, cropping, rotating, adding voiceovers, audio mixing, color tuning, and even picture-in-picture.
Filmora further simplifies the editing process by providing you with premade templates and themes that you can use to customize your AMV in many ways. It will also let you add music to the video from a huge library of licensed audio tracks.
KineMaster
Best For: Professional Animators, Bloggers, Marketers, and YouTubers
Supported OS: iOS and Android
KineMaster is a video editing app that is designed for professionals but is easy enough to use that it can be useful to you even if it is your first time using it. It has a lot of very useful video editing features including frame-by-frame editing, instant previews as well as support for up to four audio tracks that you can add to the video project.
This app also allows you to work with two video layers that you can animate in various ways including chroma key compositing, precise color adjustment, speed control, and keyframe animation.
VivaVideo
Best For: YouTubers, Freelancers, and Marketers
Supported OS: iOS and Android
VivaVideo is another very easy-to-use app that you can install on your device to create AMVs. It has hundreds of features to choose from including stickers, filters, special effects, and animated clips. It also features slow/fast motion control, a huge library of background music that you can add to the video, and premade templates to make everything easier.
It allows you to share your creation with more than 200 million users of the app or even directly share the video on social media platforms.
Related FAQs
1.Is Making AMV illegal?
If you don’t have permission from the copyright owner of the song you are using to create the AMV, then you violate the law. And considering that it can be very difficult to get permission from the copyright owner, usually the record label, most AMVs are not exactly legal.
2.How Do You Make an AMV?
It depends on the kind of AMV that you want to make. But several steps are common to all AMVs. The first thing you want to do is pick the subject of your video, which usually means choosing the character or characters that will make up your video. Then, you will want to pick the song that you will use for the AMV, and finally, choose a video editor that will allow you to put the two together.
3.What Program is Used to Make AMVs?
AMVs are made using video editing software with the necessary features to put together different video components and animate them. We have provided you with various options above.
Conclusion
Creating AMVs can be a fun experience, but only if you have the right tool for the job. The solutions we have discussed in this article can all help you create a great AMV. Choose one that suits your project
Merging Videos Like a Pro: A Step-by-Step Guide to Use FFmpeg
Video editing is a crucial aspect of creating content for many people. Whether you’re a YouTuber, a marketer, or just someone who wants to share videos with friends and family, being able to edit and manipulate your videos is key. One of the most basic video editing tasks is concatenating videos, which combines multiple files to create one cohesive video.
FFmpeg is a powerful tool that allows you to do just that, and in this guide, we’ll walk you through the process of FFmpeg concatenate videos. Whether a beginner or an experienced video editor, this guide will provide you with all the information you need to seamlessly merge your videos. From installation to execution, we’ll cover it all so you can streamline your video editing process.

Overview and Installation of FFmpeg
FFmpeg is free, open-source project that allows you to record, convert, and stream digital audio and video. It is a command-line tool widely used in video editing and transcoding. FFmpeg can be used to concatenate videos and other tasks, such as adding subtitles, changing video resolution, and more. It is available for Windows, Mac, and Linux, making it a versatile and accessible tool for anyone to use.
Here’s how to install FFmpeg:
Step1 Log in to your Ubuntu server via SSH and update the package index.
$ sudo apt update
Step2 Install FFmpeg and all the required dependencies
$ sudo apt install ffmpeg
Step3 Verify the version of FFmpeg that you’ve installed.
$ ffmpeg -version
Prerequisite
Before we merge videos using FFmpeg, we must understand the various methods available to us. FFmpeg offers three ways to concatenate videos: a demuxer, a filter, or a protocol. However, each method has its own set of considerations, and the best method for you will depend on the properties of the videos you’re working with.
It’s crucial to ensure that all encoding-related properties align with your chosen method. This includes the timebase, height and width, codecs, and pixel format. Some methods require the videos you’re merging to have the same encoding, while others allow for different encodings. It’s essential to keep this in mind to ensure that the final video is seamless without any breaks. Remember that these prerequisites will help you have a smooth process.
Concatenate Videos With Same Codecs Using FFmpeg
If the videos you want to concatenate have the same codec, you can use the FFmpeg “concat” demuxer or protocol to join them together. This simple and efficient method doesn’t require re-encoding the videos, saving time and preserving the original quality. This section will review the steps to concatenate videos using the “concat” demuxer and “concat” protocols in FFmpeg.
Merge Videos With the “Concat” Demuxer
The concat demuxer in FFmpeg allows you to join together multiple video files with the same codecs by reading a list of file paths from a text file and demuxing them in sequence. Each video starts where the previous one finishes without needing to re-encode the videos. Here’s how to do it:
Step1 Create a .txt file and list the paths of the video files you want to merge.
Join_video.txt
file /Users/Video/input1.mp4
file /Users/Video/input2.mp4
![]()
Note: You can add more than two video files.
Step2 Run the FFmpeg command:
ffmpeg -f concat -safe 0 -i join_video.txt -c copy output_demuxer.mp4
![]()
Note: -safe 0 is added to accept any file name.
-c copy will copy all the streams.
As this method allows you to “stream copy” the files instead of re-encoding them, the concatenation is very fast. This can be a good option if you have videos with the same codecs and want to join them quickly without losing quality.
Join Videos With the “Concat” Protocol
The concat protocol in FFmpeg allows you to join together multiple video files in a specific format that supports file-level concatenation, such as MPEG-2 TS. However, it cannot be used for other video formats like MP4 and WEBM.
Here’s how to use the “concat protocol:
Step1 Run the FFmpeg command:
ffmpeg -i “concat:input1.ts|input2.ts” -c copy output_protocol.ts
![]()
Note: The concat protocol allows you to “stream copy” the files by adding the option -c copy.
Step2 Input the file name of the video using this code:
ffmpeg -i “concat:input1.mp4|input2.mp4” -c copy output_protocol.mp4
![]()
Note: If you try to use this method on video formats that are not supported, only the first input video will be saved in the output video. And the video ends after the first video.
Although this method is limited in terms of supported video formats, it’s very easy to use if you merge videos in the supported formats. It’s a single command in the terminal without needing a text file. Additionally, using the -c copy option makes it efficient as it doesn’t require re-encoding, saving time.
Concatenate MP4 Video Files of Different Codecs & Resolutions Using FFmpeg
If the videos you want to concatenate have different codecs or resolutions, you can still use FFmpeg to join them together. However, this method requires re-encoding the videos, which can take longer and may result in a loss of quality. This section will cover the steps to concatenate videos with different codecs or resolutions using FFmpeg.
Here’s how to do it:
Step1 Provide the names of the input files to FFmpeg.
ffmpeg -i file1.mp4 -i file2.mp4 -i file3.mp4 \
Step2 Use the filter_complex filtergraph parameter to instruct FFmpeg from where to take the audio and video.
-filter_complex “[0:v] [0:a] [1:v] [1:a] [2:v] [2:a]
![]()
Note: [0:v][0:a] means FFmpeg needs to take the video and audio from the 0th video (file1.mp4).
Step3 Tell FFmpeg to concatenate three files (n=3).
concat=n=3:v=1:a=1 [vv] [aa]“ \
![]()
Note: The v=1:a=1 implies one stream for the audio and one stream for the video.
Step4 Map these audio and video outputs to the final video container. This is done as follows:
-map “[vv]“ -map “[aa]“ mergedVideo.mp4
It is important to note that this method requires re-encoding the videos, which can take more time and may result in a loss of quality. However, it offers the flexibility of filtering the videos before concatenating them. The filter_complex method in FFmpeg allows you to concatenate videos of different codecs and resolutions. The final step is to map the audio and video outputs to the final video container. This can be done using the -map command.
Concatenate Videos With Multiple Audio Streams Using FFmpeg
Concatenating videos with multiple audio streams can be more complex than concatenating videos with a single audio stream. This section will cover the steps to concatenate videos with multiple audio streams using FFmpeg. We’ll be using the filter_complex method in FFmpeg, which allows you to manipulate and concatenate multiple audio and video streams in a single command. This method is more advanced but allows you to join videos with different audio streams and create a final video with multiple audio tracks.
Step1 Specify the input files and opening.mkv, episode.mkv, and ending.mkv:
$ ffmpeg -i opening.mkv -i episode.mkv -i ending.mkv -filter_complex
Step2 Use the filter_complex parameter in FFmpeg to specify the input streams for the video and audio.
[0:0] [0:1] [0:2] [1:0] [1:1] [1:2] [2:0] [2:1] [2:2]
![]()
Note: Single video stream ([0:0], [1:0], [2:0])
Dual audio streams ([0:1][0:2], [1:1][1:2], [2:1][2:2])
Step3 Use the concat filter to specify that you want to concatenate 3 files (n=3) with 1 video stream (v=1) and 2 audio streams (a=2). Specify the output streams as [v], [a1], [a2]:
concat=n=3:v=1:a=2 [v] [a1] [a2]
Step4 Use the -map option to map the output streams to the final video container:
-map ‘[v]‘ -map ‘[a1]‘ -map ‘[a2]‘ output.mkv
[Bonus] Join Videos Together With Filmora
While FFmpeg offers a wide range of options for joining videos together, it can have a steep learning curve for some users. An alternative method for joining videos is using Filmora. Wondershare Filmora is a user-friendly video editing software that allows you to easily join multiple videos. It’s a great option for users new to video editing or needing experience with command-line tools like FFmpeg.
Free Download For Win 7 or later(64-bit)
Free Download For macOS 10.14 or later
Filmora has a simple drag-and-drop interface, making adding, arranging, and editing videos and audio tracks easy. Additionally, it offers various features like split, trim, crop, merge, and more. It also has various effects, transitions, and animations to enhance the overall look of your video. With Filmora, you can create professional-looking videos with minimal effort.
How-to Steps
Here’s how to merge videos using Filmora:
Step1 Open Filmora and click “New Project.”

Step2 Go to “File“ > “Import Media“ > “Import Media Files“ to add your video files to the media library.
Step3 Drag and drop the files you want to merge from the media library to the timeline, and then you’ll get the merged video seamlessly.
Step4 Edit your video.

Step5 After editing, click the “Export“ tab to save your videos.

Conclusion
FFmpeg is a powerful tool that allows you to concatenate videos in various ways. Whether you’re working with videos of the same codecs and resolutions or videos with multiple audio streams, FFmpeg can handle it. However, for users new to video editing or needing experience with command-line tools, using Filmora can be a more user-friendly option. It offers a simple drag-and-drop interface and a variety of features and effects to enhance the overall look of your video.
Step2 Run the FFmpeg command:
ffmpeg -f concat -safe 0 -i join_video.txt -c copy output_demuxer.mp4
![]()
Note: -safe 0 is added to accept any file name.
-c copy will copy all the streams.
As this method allows you to “stream copy” the files instead of re-encoding them, the concatenation is very fast. This can be a good option if you have videos with the same codecs and want to join them quickly without losing quality.
Join Videos With the “Concat” Protocol
The concat protocol in FFmpeg allows you to join together multiple video files in a specific format that supports file-level concatenation, such as MPEG-2 TS. However, it cannot be used for other video formats like MP4 and WEBM.
Here’s how to use the “concat protocol:
Step1 Run the FFmpeg command:
ffmpeg -i “concat:input1.ts|input2.ts” -c copy output_protocol.ts
![]()
Note: The concat protocol allows you to “stream copy” the files by adding the option -c copy.
Step2 Input the file name of the video using this code:
ffmpeg -i “concat:input1.mp4|input2.mp4” -c copy output_protocol.mp4
![]()
Note: If you try to use this method on video formats that are not supported, only the first input video will be saved in the output video. And the video ends after the first video.
Although this method is limited in terms of supported video formats, it’s very easy to use if you merge videos in the supported formats. It’s a single command in the terminal without needing a text file. Additionally, using the -c copy option makes it efficient as it doesn’t require re-encoding, saving time.
Concatenate MP4 Video Files of Different Codecs & Resolutions Using FFmpeg
If the videos you want to concatenate have different codecs or resolutions, you can still use FFmpeg to join them together. However, this method requires re-encoding the videos, which can take longer and may result in a loss of quality. This section will cover the steps to concatenate videos with different codecs or resolutions using FFmpeg.
Here’s how to do it:
Step1 Provide the names of the input files to FFmpeg.
ffmpeg -i file1.mp4 -i file2.mp4 -i file3.mp4 \
Step2 Use the filter_complex filtergraph parameter to instruct FFmpeg from where to take the audio and video.
-filter_complex “[0:v] [0:a] [1:v] [1:a] [2:v] [2:a]
![]()
Note: [0:v][0:a] means FFmpeg needs to take the video and audio from the 0th video (file1.mp4).
Step3 Tell FFmpeg to concatenate three files (n=3).
concat=n=3:v=1:a=1 [vv] [aa]“ \
![]()
Note: The v=1:a=1 implies one stream for the audio and one stream for the video.
Step4 Map these audio and video outputs to the final video container. This is done as follows:
-map “[vv]“ -map “[aa]“ mergedVideo.mp4
It is important to note that this method requires re-encoding the videos, which can take more time and may result in a loss of quality. However, it offers the flexibility of filtering the videos before concatenating them. The filter_complex method in FFmpeg allows you to concatenate videos of different codecs and resolutions. The final step is to map the audio and video outputs to the final video container. This can be done using the -map command.
Concatenate Videos With Multiple Audio Streams Using FFmpeg
Concatenating videos with multiple audio streams can be more complex than concatenating videos with a single audio stream. This section will cover the steps to concatenate videos with multiple audio streams using FFmpeg. We’ll be using the filter_complex method in FFmpeg, which allows you to manipulate and concatenate multiple audio and video streams in a single command. This method is more advanced but allows you to join videos with different audio streams and create a final video with multiple audio tracks.
Step1 Specify the input files and opening.mkv, episode.mkv, and ending.mkv:
$ ffmpeg -i opening.mkv -i episode.mkv -i ending.mkv -filter_complex
Step2 Use the filter_complex parameter in FFmpeg to specify the input streams for the video and audio.
[0:0] [0:1] [0:2] [1:0] [1:1] [1:2] [2:0] [2:1] [2:2]
![]()
Note: Single video stream ([0:0], [1:0], [2:0])
Dual audio streams ([0:1][0:2], [1:1][1:2], [2:1][2:2])
Step3 Use the concat filter to specify that you want to concatenate 3 files (n=3) with 1 video stream (v=1) and 2 audio streams (a=2). Specify the output streams as [v], [a1], [a2]:
concat=n=3:v=1:a=2 [v] [a1] [a2]
Step4 Use the -map option to map the output streams to the final video container:
-map ‘[v]‘ -map ‘[a1]‘ -map ‘[a2]‘ output.mkv
[Bonus] Join Videos Together With Filmora
While FFmpeg offers a wide range of options for joining videos together, it can have a steep learning curve for some users. An alternative method for joining videos is using Filmora. Wondershare Filmora is a user-friendly video editing software that allows you to easily join multiple videos. It’s a great option for users new to video editing or needing experience with command-line tools like FFmpeg.
Free Download For Win 7 or later(64-bit)
Free Download For macOS 10.14 or later
Filmora has a simple drag-and-drop interface, making adding, arranging, and editing videos and audio tracks easy. Additionally, it offers various features like split, trim, crop, merge, and more. It also has various effects, transitions, and animations to enhance the overall look of your video. With Filmora, you can create professional-looking videos with minimal effort.
How-to Steps
Here’s how to merge videos using Filmora:
Step1 Open Filmora and click “New Project.”
Step2 Go to “File“ > “Import Media“ > “Import Media Files“ to add your video files to the media library.
Step3 Drag and drop the files you want to merge from the media library to the timeline, and then you’ll get the merged video seamlessly.
Step4 Edit your video.
Step5 After editing, click the “Export“ tab to save your videos.
Conclusion
FFmpeg is a powerful tool that allows you to concatenate videos in various ways. Whether you’re working with videos of the same codecs and resolutions or videos with multiple audio streams, FFmpeg can handle it. However, for users new to video editing or needing experience with command-line tools, using Filmora can be a more user-friendly option. It offers a simple drag-and-drop interface and a variety of features and effects to enhance the overall look of your video.
Also read:
- In 2024, How to Create Discord GIF Avatar in Depth Guide
- In 2024, How to Do Perfect Match Paint 100 the Easy Way
- 4 Methods to Crop a Video on Android Easily for 2024
- Step by Step Guide on Make Gimp Transparent Background PNG for 2024
- Updated YouTube Lives Are Very Popular Nowadays and People Can Interact with the Anchor at Real Time. If You Want to Comment on a YouTube Live Chat, You Can Follow the Guide Below
- Updated Guide of 8 Photo Collage Apps for PC
- Updated Being an After Effects Editor, You Often Find Yourself the Need to Add Motion Blur After Effects. This Guide Has Got You Covered. Follow to Find Out How to Add Motion Blur in After Effects
- Updated 6 Best Methods to Make a Video Longer
- Updated In 2024, How to Create a Bokeh Effect
- New Best Way To Color Grading & Color Correction in Filmora for 2024
- New In 2024, How to Make Vintage Film Effect 1980S
- Updated How to Zoom In and Out on Mac
- New 2024 Approved How to Crop a Video in Davinci Resolve Step by Step
- Updated Splitting a Video Into Frames with the FFmpeg Step by Step
- Updated How to Create Photoshop GIF The Easy Way
- Updated 2024 Approved A Guide to Adding Audio in Wondershare Filmora
- New In 2024, How to Stabilize Videos for Free with Google Photos App
- Updated In 2024, 15 Camera Shake Preset for Premiere Pro to Add Camera Shake with Simple Keyframes. Each Preset Is Editable with Easy Steps. Make Your Video Shocking and Impressive with These Camera Shake Effects
- Updated How to Shoot Cinematic Footage From a Smartphone
- New Modern Silence Detection Tools Are Changing the Face of Video Editing. Use Them to Improve the Quality of Your Video Clips. Learn How These Tools Let You Detect Silence with Pinpoint Accuracy
- 5 Ways to Make a Fake Facetime Call Video
- In 2024, 10 Catchy Pixel Art Wallpapers and How to Custom Your Own with Ease
- New Have You Ever Tried to Remove Motion Blur From Photos? This Article Will Address How to Remove the Motion Blur Effect Using Photoshop and Its Alternatives
- New How to Create Cinematic Style Videos?
- New 2024 Approved How to Make Your CSGO Montage Impressive
- New Using Slow Motion in Adobe After Effects A Step-by-Step Procession
- 2024 Approved Looking for Efficient Ways to Create a Slow-Motion Video? Read the Article for Reliable Solutions that Provide Excellent Results
- New How to Speed Up Pictures on TikTok Slideshow
- Updated 2024 Approved How to Start a Vlog
- IMovie Review – Is It The Best Video Editor for Mac Users, In 2024
- Best Way To Color Grading & Color Correction in Filmora for 2024
- Updated How to Create a Vacation Slideshow in 5 Minutes for 2024
- Updated 2024 Approved Vintage Film Effect 1990S - How to Make
- 2024 Approved How to Split a Clip in DaVinci Resolve Step by Step
- Updated In 2024, Top 20 Best Text To Speech Software Windows, Mac, Android, iPhone & Online
- New 2024 Approved How Long Does It Take To Edit A Video
- New In 2024, 3 Best Effects to Appear on Camera Made with Filmora
- Updated 2024 Approved How to Speed Up Pictures on TikTok Slideshow
- New 2024 Approved How Can I Control Speed of a Video
- New What Is the Top Filmora Slideshow Templates? Experts Choice
- New How to Make Boring Videos Look Cool By B Rolls
- In 2024, How Do You Get Sun Stone Evolutions in Pokémon For Apple iPhone 6s? | Dr.fone
- Read This Guide to Find a Reliable Alternative to Fake GPS On Vivo Y17s | Dr.fone
- How To Transfer WhatsApp From Apple iPhone 14 Pro to Android? | Dr.fone
- In 2024, How to Use Pokémon Emerald Master Ball Cheat On Lava Blaze Curve 5G | Dr.fone
- In 2024, A Perfect Guide To Remove or Disable Google Smart Lock On Vivo V29
- What to Do if Google Play Services Keeps Stopping on Vivo Y100 5G | Dr.fone
- A Step-by-Step Guide on Using ADB and Fastboot to Remove FRP Lock on your Xiaomi Redmi Note 12 5G
- In 2024, How to Fix Pokemon Go Route Not Working On Tecno Spark 20 Pro+? | Dr.fone
- In 2024, Apple ID Locked for Security Reasons On iPhone 14 Plus? Find the Best Solution Here
- Looking For A Location Changer On Oppo Reno 11F 5G? Look No Further | Dr.fone
- Why Is My Poco C65 Offline? Troubleshooting Guide | Dr.fone
- Three Ways to Sim Unlock Vivo Y77t
- In 2024, Top 10 Best Spy Watches For your Lava Yuva 2 Pro | Dr.fone
- How To Transfer WhatsApp From iPhone 15 Pro to other iPhone 13 devices? | Dr.fone
- How to Remove and Reset Face ID on iPhone XS | Dr.fone
- Fix Unfortunately Settings Has Stopped on Honor X50 GT Quickly | Dr.fone
- How to Change Netflix Location to Get More Country Version On Vivo Y78 5G | Dr.fone
- Title: In 2024, Are You a Gaming YouTuber or Content Creator Whose Main Game Is COD Warzone? How Kickass Are Your Warzone Thumbnails? Heres a Guide on How to Make One for Free
- Author: Chloe
- Created at : 2024-04-24 07:08:17
- Updated at : 2024-04-25 07:08:17
- Link: https://ai-editing-video.techidaily.com/in-2024-are-you-a-gaming-youtuber-or-content-creator-whose-main-game-is-cod-warzone-how-kickass-are-your-warzone-thumbnails-heres-a-guide-on-how-to-make-one/
- License: This work is licensed under CC BY-NC-SA 4.0.
