
:max_bytes(150000):strip_icc():format(webp)/sb10069770n-003-56a104403df78cafdaa7dd48-ba41d70c51114343aaa38409d9cdfc3f.jpg)
In 2024, Attaining Slow Motion Video Trend Finding The Best CapCut Templates
Attaining Slow Motion Video Trend: Finding The Best CapCut Templates
In this digital realm, CapCut is a video editor, turning into another social media app. It was launched in 2020 but gained massive success by the end of 2022 with the introduction of templates. It’s an automated tool which is a sister app to TikTok. When a TikTok trend goes viral, people move to CapCut to copy that as it is. From social media influencers to users, everyone is using this video editor for good.
Recently, the CapCut template’s new trend of slow motion has been in trend. If you intend to post a video on the CapCut new trend in slow motion, this guide is for you. Without any wait, read this article to learn everything about CapCut’s new slow-motion template. Before delving into detail, you should analyze how these templates have eased our video creation.
Slow Motion Video Maker Slow your video’s speed with better control of your keyframes to create unique cinematic effects!
Make A Slow Motion Video Make A Slow Motion Video More Features

Part 1. CapCut Video Editor: How Is It Making Slow Motion Video Making Easy?
As a social media user, you must be aware of CapCut ; if not, keep reading. CapCut is a video editing platform with advanced options to help you capture key moments. With unique features , your content can go viral on TikTok, Facebook, and Instagram. After making videos, users can directly post on their social media, especially on TikTok.
This software is available to use online or download on Windows, macOS, and smartphones. Delve into its key features besides the CapCut slow motion template with neon effect:
- CapCut can trim, merge, and delete clips like every other video editor.
- You can add transitions between clips from different categories.
- From advanced features, you can add keyframe animations in video.
- Offer millions of music from the music library or extract from existing video clips.
- With its intelligent features, users can remove backgrounds and add auto-captions.
- Allows smooth editing of slow-motion and fast-speed videos with speed ramping.
Part 2. Listing Out Some Unique Templates Available on CapCut for Slow Motion Video
CapCut has a vast library of templates, as discussed earlier. They contain well-designed video layouts, transitions, effects, and texts to inspire others. For slow-motion templates, it offers extensive options that you can choose based on your preferences. If you haven’t found anything attractive, look into these CapCut new slow-motion templates.
- Camera Lenta: It’s a trending slow-motion video template on the internet. As shown, it is used by more than 23k people and requires just one clip to process. This footage shows a blurry start, which gradually turns into a clear shot with music beats.

- Slow Motion: This template is popular with over 87k usages. It requires a single clip to make a video in a 9:16 aspect ratio. In this clip, a woman lip-syncs a song that reveals properly after a blurry transition into slow motion.

- CapCut Slow Motion: With more than 546k utilizations, this template is commonly available everywhere. You need 2 clips to use this, and an 11-second video will be generated. The massive use of this template might be due to its music, effects, and transitions.

- Slow Motion Transisi: Social media influencers prefer this template to show their dance moves. It requires 4 clips to make an attractive slow-motion video. At the start of the clip, you can see a countdown timer and a music beat with dance steps.

- Slow Motion Alih: If you want to reveal your mountain travel video, this template is perfect. This 11-second template is used by over 87k people. It starts with a musical voice and progresses at normal speed. Gradually, it slows down and shifts speed abruptly with the rhythm of the music.

- Slow Motion Izacklstyle: It’s another famous template that is perfect for your travel clips. This CapCut new trend 2022 template slow motion has more than 100k uses. It asks for 4 footage to show the natural beauty of nature, mountains, waterfalls, and you.

- Slow Motion JP: With 1.3 million uses, this template is widely recognized on social media. Actually, the kid smiling in this slow-motion video makes it popular. It is an 8-second clip where the boy is standing chin-down. Suddenly, the music’s rhythm and effect change when he looks upward.

Part 3. How to Create a Simple Slow-Motion Video from a Template in CapCut?
Making a CapCut template new trend in slow motion is not very difficult. For this purpose, you have to pick one template and select the media. After choosing a template from the above section, follow the given steps for better results. Regardless of the mobile device you are using, this step-by-step guide will prove beneficial for each.
Step 1
Launch CapCut on your smartphone and sign in to your account. Access the home screen of CapCut and look for the “Template” option from the bottom. Tap on it and find the vast video template library of this platform.

Step 2
Go to the search and prompt with “Slow Motion Video” to browse results. Pick one video template of your choice and get a preview. From its preview, hit the “Use Template” button and go directly to import media. Select the video you wish and touch the “Preview” button.

Step 3
After previewing results, go to the top right side and tap the “Export” button. You will get an extended “Export Setting” menu at the bottom. It’s up to you whether to choose “Save to Device” or Save and Share to TikTok.”

Part 4. Desktop Solution: How to Make Better Slow-Motion Videos with Wondershare Filmora?
Using CapCut’s new slow-motion templates makes videos easy but restricts certain tasks. If you want to enjoy more flexibility in creating slow-motion videos, use Wondershare Filmora . It’s a video editing platform with innovative features to uplift creativity with personalization. This all-in-all platform offers AI-integrated features to generate unique content effortlessly.
Filmora can assist you in editing tasks by providing AI Copilot Editing . Besides, it can generate engaging scripts with prompts that align with your goals. Moreover, you can get copyright-free music and images to achieve appealing virtual content. Filmora can bring limitless creativity and uniqueness to your media, so move to explore it.
Free Download For Win 7 or later(64-bit)
Free Download For macOS 10.14 or later
How to Create Personalized Slow-Motion Video with Filmora
Filmora offers Speed Ramping features to slow down video as you want. It also ensures smooth playback of slow-mo videos by providing an optical flow option. Let’s move to the real process with the given steps without further delay.
Step 1: Download Filmora and Import the Video to Slow Down
If you haven’t downloaded Filmora, visit its official site and get the latest version. Launch it on your device and access its main screen. Choose “New Project” and enter its editing screen. Press “Ctrl + I” to import your video into Filmora quickly. Drag and drop your imported media to the timeline section for further processing.

Step 2: Access Speed Ramping to Customize Video Speed
Locate your cursor on the video and right-click on it to choose “Speed Ramping” from the list. This way, you will get an editing panel on the right side. You have the flexibility to select a predesigned template for speed ramping. Otherwise, hit the “Customize” button and find the graph below. Use the graph and locate the dots upward and downward to get the desired slow-motion video.

Step 3: Apply Optical Flow and Export within Personalized Settings
Later, go downward to the “AI interpolation” and extend its menu. From the menu, select “Optical Flow” for a smooth playback speed. If you are satisfied with the result, look for the “Export” button at the top right. Get the “Export” screen and adjust the parameter to save the video in your assigned settings.

Conclusion
To conclude, social media influencers set trends using CapCut in real-time. They are getting the audience’s attention through the CapCut template’s new trend of slow motion. This article has also shed light on CapCut, its slow-motion templates, and how to use it. After reading, you must realize that using Wondershare Filmora is a far better option.
Make A Slow Motion Video Make A Slow Motion Video More Features
Part 1. CapCut Video Editor: How Is It Making Slow Motion Video Making Easy?
As a social media user, you must be aware of CapCut ; if not, keep reading. CapCut is a video editing platform with advanced options to help you capture key moments. With unique features , your content can go viral on TikTok, Facebook, and Instagram. After making videos, users can directly post on their social media, especially on TikTok.
This software is available to use online or download on Windows, macOS, and smartphones. Delve into its key features besides the CapCut slow motion template with neon effect:
- CapCut can trim, merge, and delete clips like every other video editor.
- You can add transitions between clips from different categories.
- From advanced features, you can add keyframe animations in video.
- Offer millions of music from the music library or extract from existing video clips.
- With its intelligent features, users can remove backgrounds and add auto-captions.
- Allows smooth editing of slow-motion and fast-speed videos with speed ramping.
Part 2. Listing Out Some Unique Templates Available on CapCut for Slow Motion Video
CapCut has a vast library of templates, as discussed earlier. They contain well-designed video layouts, transitions, effects, and texts to inspire others. For slow-motion templates, it offers extensive options that you can choose based on your preferences. If you haven’t found anything attractive, look into these CapCut new slow-motion templates.
- Camera Lenta: It’s a trending slow-motion video template on the internet. As shown, it is used by more than 23k people and requires just one clip to process. This footage shows a blurry start, which gradually turns into a clear shot with music beats.
- Slow Motion: This template is popular with over 87k usages. It requires a single clip to make a video in a 9:16 aspect ratio. In this clip, a woman lip-syncs a song that reveals properly after a blurry transition into slow motion.
- CapCut Slow Motion: With more than 546k utilizations, this template is commonly available everywhere. You need 2 clips to use this, and an 11-second video will be generated. The massive use of this template might be due to its music, effects, and transitions.
- Slow Motion Transisi: Social media influencers prefer this template to show their dance moves. It requires 4 clips to make an attractive slow-motion video. At the start of the clip, you can see a countdown timer and a music beat with dance steps.
- Slow Motion Alih: If you want to reveal your mountain travel video, this template is perfect. This 11-second template is used by over 87k people. It starts with a musical voice and progresses at normal speed. Gradually, it slows down and shifts speed abruptly with the rhythm of the music.
- Slow Motion Izacklstyle: It’s another famous template that is perfect for your travel clips. This CapCut new trend 2022 template slow motion has more than 100k uses. It asks for 4 footage to show the natural beauty of nature, mountains, waterfalls, and you.
- Slow Motion JP: With 1.3 million uses, this template is widely recognized on social media. Actually, the kid smiling in this slow-motion video makes it popular. It is an 8-second clip where the boy is standing chin-down. Suddenly, the music’s rhythm and effect change when he looks upward.
Part 3. How to Create a Simple Slow-Motion Video from a Template in CapCut?
Making a CapCut template new trend in slow motion is not very difficult. For this purpose, you have to pick one template and select the media. After choosing a template from the above section, follow the given steps for better results. Regardless of the mobile device you are using, this step-by-step guide will prove beneficial for each.
Step 1
Launch CapCut on your smartphone and sign in to your account. Access the home screen of CapCut and look for the “Template” option from the bottom. Tap on it and find the vast video template library of this platform.
Step 2
Go to the search and prompt with “Slow Motion Video” to browse results. Pick one video template of your choice and get a preview. From its preview, hit the “Use Template” button and go directly to import media. Select the video you wish and touch the “Preview” button.
Step 3
After previewing results, go to the top right side and tap the “Export” button. You will get an extended “Export Setting” menu at the bottom. It’s up to you whether to choose “Save to Device” or Save and Share to TikTok.”
Part 4. Desktop Solution: How to Make Better Slow-Motion Videos with Wondershare Filmora?
Using CapCut’s new slow-motion templates makes videos easy but restricts certain tasks. If you want to enjoy more flexibility in creating slow-motion videos, use Wondershare Filmora . It’s a video editing platform with innovative features to uplift creativity with personalization. This all-in-all platform offers AI-integrated features to generate unique content effortlessly.
Filmora can assist you in editing tasks by providing AI Copilot Editing . Besides, it can generate engaging scripts with prompts that align with your goals. Moreover, you can get copyright-free music and images to achieve appealing virtual content. Filmora can bring limitless creativity and uniqueness to your media, so move to explore it.
Free Download For Win 7 or later(64-bit)
Free Download For macOS 10.14 or later
How to Create Personalized Slow-Motion Video with Filmora
Filmora offers Speed Ramping features to slow down video as you want. It also ensures smooth playback of slow-mo videos by providing an optical flow option. Let’s move to the real process with the given steps without further delay.
Step 1: Download Filmora and Import the Video to Slow Down
If you haven’t downloaded Filmora, visit its official site and get the latest version. Launch it on your device and access its main screen. Choose “New Project” and enter its editing screen. Press “Ctrl + I” to import your video into Filmora quickly. Drag and drop your imported media to the timeline section for further processing.
Step 2: Access Speed Ramping to Customize Video Speed
Locate your cursor on the video and right-click on it to choose “Speed Ramping” from the list. This way, you will get an editing panel on the right side. You have the flexibility to select a predesigned template for speed ramping. Otherwise, hit the “Customize” button and find the graph below. Use the graph and locate the dots upward and downward to get the desired slow-motion video.
Step 3: Apply Optical Flow and Export within Personalized Settings
Later, go downward to the “AI interpolation” and extend its menu. From the menu, select “Optical Flow” for a smooth playback speed. If you are satisfied with the result, look for the “Export” button at the top right. Get the “Export” screen and adjust the parameter to save the video in your assigned settings.
Conclusion
To conclude, social media influencers set trends using CapCut in real-time. They are getting the audience’s attention through the CapCut template’s new trend of slow motion. This article has also shed light on CapCut, its slow-motion templates, and how to use it. After reading, you must realize that using Wondershare Filmora is a far better option.
Top 10 Sound Extractors to Extract Sound From Video
It often happens that we get so engrossed in a movie or video and fall exceptionally hard for all elements. This can prompt us to extract sounds from videos, like the background music, a voiceover, or dialogue between characters.
Safe sound extraction from any type of video file will require the help of the best sound extractor software. Wondering about which you should try out? Go through this list, and then make up your mind.
- Adobe Premiere Pro
- Filmora
- iMovie
- VLC
- Online Audio Converter
- Audio Converter
- FFmpeg
- QuickTime
- Audio Extractor
- ASPOSE
- Practical Tips to Choose the Best One to Extract Sound from Videos
- Hot FAQs on Extract Sound from Videos
Top 10 Sound Extractors for Extracting Sound from video
We researched and found many software options for extracting Sound from video. After careful checking, we found 10 options with high-quality functions and performance levels. We recommend you consider them for pulling audio from video files- here’s why.
1. Adobe Premiere Pro
Adobe Premiere Pro is one of the top-level video editors available with various functions and pre-set filters/effects. So, one can customize the videos and audio as they require, like extracting Sound from video and saving them.

How to Download: Website
Compatible OS: Windows, Mac
Price: Individuals- USD 20.99/month. License for Teams- USD 35.99. All Apps-related plans.
Main Features:
- Pre-set templates are available in high-quality resolutions.
- Customize your titles and video edits.
- Automatically adjusts color matching in scenes.
- Robust text-to-speech function with multi-language support.
Pros
- Share easily across the platform with cloud support.
- Access to diverse stock media with Adobe membership.
- Supports many file formats like / (), MPEG-2, Apple ProRes, MPEG-4, native camera formats, etc.
Cons
- No perpetual license support.
- Strict eligibility rules to qualify for student-teacher plans.
Best for Users: Professionals and organization-based users, like teachers, can use this for personal and teaching-related video editing steps.
2. Filmora
If you want a software sound extractor that provides a wide range of audio editing functions, Filmora is one that we would recommend. While it is firstly a video editor, you can use audio-based editing functions like sound stabilization, extraction, visualization, audio ducking, silence detection, and more.

Free Download For Win 7 or later(64-bit)
Free Download For macOS 10.14 or later
Compatible OS: Windows, Mac
Price: Free, Annual- USD 49.99, Perpetual- USD 89.99
Main Features:
- The audio visualization feature analyzes and virtually shows beats.
- Detect silent sections in the video and remove them.
- Many audio stabilization settings like Denoise and Equalizer.
- Vital TTS/STT functions for voiceovers.
Pros
- Multiple video/audio formats are supported.
- Pre-set sound effects are present.
- Adjust the volume of videos during editing.
Cons
- Upgrade plan to remove ads.
- Audio output is mainly available in MP3.
How to use for extracting music from videos:
Step1 Download and install Filmora 11 .
Step2 Click on New Project.
Step3 Press “Click here to import Media” > choose file folder > Insert.

Step4 Drag file to editor timeline > Cut the file to a set suitable size for your audio extraction.
Step5 Click on the Edit icon from the list of icons above the timeline.
Step6 Press on Audio > Make adjustments for settings like Fade in/Face out, Equalizer, Pitch, etc.

Step7 Click Export > Local > MP3. Make changes as needed.

Step8 Hit the Export button.
Best for Users: Pro-level and beginner-level professionals and home-based users who want a comprehensive, feature-rich platform for video/audio editing can benefit from this.
3. iMovie
Mac and iOS users benefit significantly from this video editing software to create dynamic movie-quality videos. One major part of movies is the soundtrack, and you can use this software to add easily, control, and extract the sound clips.

How to Download: Mac App Store , Apple App Store
Compatible OS: Mac, iOS
Price: Free
Main Features:
- Pre-set storyboard available for optimized and thematic video edits.
- Royalty-free audio files in the library.
- You can add voiceovers.
- Add pre-set sound effects or customize them, like removing/adding audio clips.
Pros
- Sound aligns precisely with video.
- Multiple effects, filters, and editing tools are available.
- Simple sharing via social media accounts.
Cons
- Only available for iOS 15.1+ and such newest versions of Apple devices.
- You cannot access it without an Apple ID.
Best for Users: Professional video editors with diverse movie-like presentation-making needs can use this.
4. VLC
VLC is a well-known Windows-based media player that is accessible as a Chrome extension and has mobile app versions. While you can use it mainly to view videos, the software can easily cut out sound clips from the video here.

How to Download: Microsoft Store , Apple App Store , Google Play Store , Chrome Web Store
Compatible OS: Windows, iOS, Chromebook, Android
Price: Free
Main Features:
- Script the command line VLC-based invocations.
- Play different types of files with multi-format support.
- Use the in-built equalizer to optimize sound quality/effects.
- Sync with or create a new video stream.
Pros
- The software assures quick functions with all features.
- No codec installation is necessary.
- Keyboard shortcuts for specific actions.
Cons
- Difficult to search and open files.
- Not very customizable.
Best for Users: People can use VLC Media Player to stream or play videos and even make some minor adjustments/extraction.
5. Online Audio Converter
This is one of the more straightforward tools to add video files and extract Sound from video with some quick steps. The Online Audio Converter supports a wide range of video formats. You just have to add one file by dragging and dropping it from your device memory, inserting its URL, or uploading it via the cloud. Then, press the Start Extracting command.

How to Download: Website
Compatible OS: Windows, Mac, Online
Price: Monthly- USD 29.95, Annual- USD 39.95, Lifetime- USD 59.95
Main Features:
- Add files either directly through the device or the cloud.
- Insert video URL for audio extraction from online video.
- Supports multiple video file formats like MPEG, MOV, AVI, and MP4.
- Scroll to select extraction end and start points.
Pros
- Only allows videos with 500MB or smaller size.
- Straightforward three steps for the whole extraction process.
- Zero quality loss after an extraction.
Cons
- Customization options are limited.
- The main audio format supported is MP3 for extraction.
Best for Users: Beginners and pro-level users who want to extract Sound from video files quickly.
6. Audio Converter
The Audio Converter app can efficiently pull out audio clips from video and is compatible with many such media formats. You can use this to cut and trim your file, mainly to decide how much of the audio will extract. Then, play it to see the quality of the output file.

How to Download: Apple App Store
Compatible OS: iOS
Price: Free, Pro- USD 2.99.
Main Features:
- Extract sound from video in formats like M4A, MP3, OGG, M4R, FLAC, etc.
- Insert videos in formats like MP4, 3G2, 3GP, MOV, MKV, WMV, and more.
- Trim the audio to smaller sections for extraction.
- The media player version supports all audio/video types.
Pros
- Supports a wide variety of audio/video formats.
- A simple media player function is also available.
- It is compatible with many languages.
Cons
- App size of 143.1 MB can feel high to some users.
- Basic-level functions only.
Best for Users: People who want to extract Sound from video files to create ringtones can use this best.
7. FFmpeg
FFmpeg is one of the most trustworthy platforms for converting and extracting Sound from video. It is an open-source solution and comes with complete multi-media management work. This is mainly used for easily streaming, converting, and recording video/audio projects.

How to Download: Website
Compatible OS: Windows, Mac, etc.
Price: Free
Main Features:
- Audio filters are available, like virtualbass and tiltshelf.
- Video editing filters like colormap, blurdetect, and pixelize are available.
- Enhance dialog and extract sound clips.
- Constantly updating features.
Pros
- This has open-source benefits.
- No excessive installation steps are necessary.
- Supports a wide range of encoding benefits.
Cons
- One must have some sort of technical knowledge to use this.
- Finding the right features or solutions takes some time.
Best for Users: Developers with better technical knowledge can use this dynamic open-source platform for video/audio editing.
8. QuickTime
You can also use this Mac-based video player on Windows to watch different videos easily. Besides the streaming benefits, you can install plugins to optimize its available features, like adding the ability to record/edit video files.

How to Download: Website
Compatible OS: Mac, Windows
Price: Free
Main Features:
- Stream videos and even extract Sound from the files.
- Supports many video formats in the player.
- Record audio on this media player.
- Import files from other Mac products like Final Cut Pro and iMovie.
Pros
- Works on both Windows and Mac.
- Pre-set effects and filters are available that one can edit.
- Simple interface for beginners.
Cons
- Unnecessary bloatware installation is needed.
- Playback support is lacking.
Best for Users: New users can simply operate this media player to watch videos and learn the extraction process.
9. Audio Extractor
You can use this conversion and extraction software to do many editing functions, like changing, cutting, and extracting video/audio files. The supported format here is MP3 and WAV - choose which you find compatible with your final project. You can decide and extract from specific sections.

How to Download: Google Play Store
Compatible OS: Android
Price: Free with in-app purchases of USD 1.99- USD 6.99 for each item.
Main Features:
- Change audio file size and format.
- View/delete components through the app directly.
- Preview video/sound file.
- Trim/extract sounds from videos easily with the converter.
Pros <path d=”M7 22H4C3.46957 22 2.96086 21.7893 2.58579 21.4142C2.21071 21.0391 2 20.5304 2 20V13C2 12.4696 2.21071 11.9609 2.58579 11.5858C2.96086 11.2107 3.46957 11 4 11H7M14 9V5C14 4.20435
Top 10 Sound Extractors for Extracting Sound from video
We researched and found many software options for extracting Sound from video. After careful checking, we found 10 options with high-quality functions and performance levels. We recommend you consider them for pulling audio from video files- here’s why.
1. Adobe Premiere Pro
Adobe Premiere Pro is one of the top-level video editors available with various functions and pre-set filters/effects. So, one can customize the videos and audio as they require, like extracting Sound from video and saving them.
How to Download: Website
Compatible OS: Windows, Mac
Price: Individuals- USD 20.99/month. License for Teams- USD 35.99. All Apps-related plans.
Main Features:
- Pre-set templates are available in high-quality resolutions.
- Customize your titles and video edits.
- Automatically adjusts color matching in scenes.
- Robust text-to-speech function with multi-language support.
Pros
- Share easily across the platform with cloud support.
- Access to diverse stock media with Adobe membership.
- Supports many file formats like / (), MPEG-2, Apple ProRes, MPEG-4, native camera formats, etc.
Cons
- No perpetual license support.
- Strict eligibility rules to qualify for student-teacher plans.
Best for Users: Professionals and organization-based users, like teachers, can use this for personal and teaching-related video editing steps.
2. Filmora
If you want a software sound extractor that provides a wide range of audio editing functions, Filmora is one that we would recommend. While it is firstly a video editor, you can use audio-based editing functions like sound stabilization, extraction, visualization, audio ducking, silence detection, and more.
Free Download For Win 7 or later(64-bit)
Free Download For macOS 10.14 or later
Compatible OS: Windows, Mac
Price: Free, Annual- USD 49.99, Perpetual- USD 89.99
Main Features:
- The audio visualization feature analyzes and virtually shows beats.
- Detect silent sections in the video and remove them.
- Many audio stabilization settings like Denoise and Equalizer.
- Vital TTS/STT functions for voiceovers.
Pros
- Multiple video/audio formats are supported.
- Pre-set sound effects are present.
- Adjust the volume of videos during editing.
Cons
- Upgrade plan to remove ads.
- Audio output is mainly available in MP3.
How to use for extracting music from videos:
Step1 Download and install Filmora 11 .
Step2 Click on New Project.
Step3 Press “Click here to import Media” > choose file folder > Insert.
Step4 Drag file to editor timeline > Cut the file to a set suitable size for your audio extraction.
Step5 Click on the Edit icon from the list of icons above the timeline.
Step6 Press on Audio > Make adjustments for settings like Fade in/Face out, Equalizer, Pitch, etc.
Step7 Click Export > Local > MP3. Make changes as needed.
Step8 Hit the Export button.
Best for Users: Pro-level and beginner-level professionals and home-based users who want a comprehensive, feature-rich platform for video/audio editing can benefit from this.
3. iMovie
Mac and iOS users benefit significantly from this video editing software to create dynamic movie-quality videos. One major part of movies is the soundtrack, and you can use this software to add easily, control, and extract the sound clips.
How to Download: Mac App Store , Apple App Store
Compatible OS: Mac, iOS
Price: Free
Main Features:
- Pre-set storyboard available for optimized and thematic video edits.
- Royalty-free audio files in the library.
- You can add voiceovers.
- Add pre-set sound effects or customize them, like removing/adding audio clips.
Pros
- Sound aligns precisely with video.
- Multiple effects, filters, and editing tools are available.
- Simple sharing via social media accounts.
Cons
- Only available for iOS 15.1+ and such newest versions of Apple devices.
- You cannot access it without an Apple ID.
Best for Users: Professional video editors with diverse movie-like presentation-making needs can use this.
4. VLC
VLC is a well-known Windows-based media player that is accessible as a Chrome extension and has mobile app versions. While you can use it mainly to view videos, the software can easily cut out sound clips from the video here.
How to Download: Microsoft Store , Apple App Store , Google Play Store , Chrome Web Store
Compatible OS: Windows, iOS, Chromebook, Android
Price: Free
Main Features:
- Script the command line VLC-based invocations.
- Play different types of files with multi-format support.
- Use the in-built equalizer to optimize sound quality/effects.
- Sync with or create a new video stream.
Pros
- The software assures quick functions with all features.
- No codec installation is necessary.
- Keyboard shortcuts for specific actions.
Cons
- Difficult to search and open files.
- Not very customizable.
Best for Users: People can use VLC Media Player to stream or play videos and even make some minor adjustments/extraction.
5. Online Audio Converter
This is one of the more straightforward tools to add video files and extract Sound from video with some quick steps. The Online Audio Converter supports a wide range of video formats. You just have to add one file by dragging and dropping it from your device memory, inserting its URL, or uploading it via the cloud. Then, press the Start Extracting command.
How to Download: Website
Compatible OS: Windows, Mac, Online
Price: Monthly- USD 29.95, Annual- USD 39.95, Lifetime- USD 59.95
Main Features:
- Add files either directly through the device or the cloud.
- Insert video URL for audio extraction from online video.
- Supports multiple video file formats like MPEG, MOV, AVI, and MP4.
- Scroll to select extraction end and start points.
Pros
- Only allows videos with 500MB or smaller size.
- Straightforward three steps for the whole extraction process.
- Zero quality loss after an extraction.
Cons
- Customization options are limited.
- The main audio format supported is MP3 for extraction.
Best for Users: Beginners and pro-level users who want to extract Sound from video files quickly.
6. Audio Converter
The Audio Converter app can efficiently pull out audio clips from video and is compatible with many such media formats. You can use this to cut and trim your file, mainly to decide how much of the audio will extract. Then, play it to see the quality of the output file.
How to Download: Apple App Store
Compatible OS: iOS
Price: Free, Pro- USD 2.99.
Main Features:
- Extract sound from video in formats like M4A, MP3, OGG, M4R, FLAC, etc.
- Insert videos in formats like MP4, 3G2, 3GP, MOV, MKV, WMV, and more.
- Trim the audio to smaller sections for extraction.
- The media player version supports all audio/video types.
Pros
- Supports a wide variety of audio/video formats.
- A simple media player function is also available.
- It is compatible with many languages.
Cons
- App size of 143.1 MB can feel high to some users.
- Basic-level functions only.
Best for Users: People who want to extract Sound from video files to create ringtones can use this best.
7. FFmpeg
FFmpeg is one of the most trustworthy platforms for converting and extracting Sound from video. It is an open-source solution and comes with complete multi-media management work. This is mainly used for easily streaming, converting, and recording video/audio projects.
How to Download: Website
Compatible OS: Windows, Mac, etc.
Price: Free
Main Features:
- Audio filters are available, like virtualbass and tiltshelf.
- Video editing filters like colormap, blurdetect, and pixelize are available.
- Enhance dialog and extract sound clips.
- Constantly updating features.
Pros
- This has open-source benefits.
- No excessive installation steps are necessary.
- Supports a wide range of encoding benefits.
Cons
- One must have some sort of technical knowledge to use this.
- Finding the right features or solutions takes some time.
Best for Users: Developers with better technical knowledge can use this dynamic open-source platform for video/audio editing.
8. QuickTime
You can also use this Mac-based video player on Windows to watch different videos easily. Besides the streaming benefits, you can install plugins to optimize its available features, like adding the ability to record/edit video files.
How to Download: Website
Compatible OS: Mac, Windows
Price: Free
Main Features:
- Stream videos and even extract Sound from the files.
- Supports many video formats in the player.
- Record audio on this media player.
- Import files from other Mac products like Final Cut Pro and iMovie.
Pros
- Works on both Windows and Mac.
- Pre-set effects and filters are available that one can edit.
- Simple interface for beginners.
Cons
- Unnecessary bloatware installation is needed.
- Playback support is lacking.
Best for Users: New users can simply operate this media player to watch videos and learn the extraction process.
9. Audio Extractor
You can use this conversion and extraction software to do many editing functions, like changing, cutting, and extracting video/audio files. The supported format here is MP3 and WAV - choose which you find compatible with your final project. You can decide and extract from specific sections.
How to Download: Google Play Store
Compatible OS: Android
Price: Free with in-app purchases of USD 1.99- USD 6.99 for each item.
Main Features:
- Change audio file size and format.
- View/delete components through the app directly.
- Preview video/sound file.
- Trim/extract sounds from videos easily with the converter.
Pros <path d=”M7 22H4C3.46957 22 2.96086 21.7893 2.58579 21.4142C2.21071 21.0391 2 20.5304 2 20V13C2 12.4696 2.21071 11.9609 2.58579 11.5858C2.96086 11.2107 3.46957 11 4 11H7M14 9V5C14 4.20435
How to Create Cinematic Style Videos? [Easy Guide for Beginners]
Do you find cinematic-style videos appealing? Do you wish to give your content a cinematic vibe? Hold on to this article for more!
A cinematic video style resembles a film. The act is employed in film making and visual storytelling that considers aspect ratio, composition, color, lighting style, type of film, editing, filters, and set design. The cinematic background music plays an equally important role. The article is a guide to creating a cinematic intro for YouTube.
Additionally, we will discuss the procedure to work on travel intro for a vlog. So, let us not waste time anymore! Time to start the adventure!
In this article
01 How to Create a Cinematic Intro for Your Video?
02 How to Cinematic Travel Intro for Your Travel Vlog?
03 3 Trendy Sites to Download Cinematic Background Music
Part 1: How to Create a Cinematic Intro for Your Video?
Every content creator wishes to bring new ideas to the set. The part played by cinematic background music cannot be avoided no matter what innovation is ahead of us. A cinematic and classy intro to your video displays the effort performed on your work. It compels the audience to keep following you.
For this very reason, the article conveys a guide to creating a powerful cinematic intro. Let us begin this!
For Win 7 or later (64-bit)
For macOS 10.12 or later
Step 1: Launch Wondershare Filmora to begin. Import the targeted music in the program and drag it to the timeline. Now, trim the music to 30 seconds and listen to the end part. Select the last note to match the beat in the beginning part of the music.

Step 2: Moving on, add markers to the music. Use “M” from the keyboard to mark the specific part of the track. After you are done, drag the first track onto the timeline. Trim the video to match it to the first marker.

Step 3: Perform a similar process for the rest of the video clips and trim them according to the markers. The user is directed to create a 2.35:1 widescreen cinemascope bar opener. To do so, drag two black mattes onto the timeline on top of each other.

Step 4: Drag the end of both clips to match the length of the whole video. Now, it is time to animate it. Insert 240° in the y-axis for the first keyframe. Similarly, use 422.2° for the second keyframe. For the bottom y-axis, use -240° for the first keyframe and -422.2° for the second keyframe.

Step 5: After the animation is completed, head to the “Titles” tab and look for cinematic packs. Choose one and drag it onto the timeline. Secondly, alter the duration and animation of the title. The user is expected to insert a dissolve transition at the end of the title.

Step 6: Perform the same process for the rest of the tracks. Time the titles to match the clip’s ending. Now, add a dissolve transition at the end of the clip. Trim the clip into two parts and apply square blur by navigating to the “Effects” tab to blur the video clips.

Step 7: Moving on, adjust the alpha for blur intensity. Add a dissolve transition between the cuts. In the final step, go to the “Animation” and then “Customize.” Reframe the last clip and animate a zoom-out effect. Reduce the “Scale” percent to do so. A creative cinematic intro is ready!

Part 2: How to Cinematic Travel Intro for Your Travel Vlog?
Vacationing and traveling offer exposure to learn more about people and the world around us. Are you a traveler? Do you prefer a solo vacation or with your family? Whatever your answer might be, we have got you!
To make an astonishing and engaging cinematic travel for your travel vlog, Filmora is there for us. The section shall reflect on the whole procedure using royalty-free cinematic music. Let us initiate!
For Win 7 or later (64-bit)
For macOS 10.12 or later
Step 1: The first step is simple. Open Wondershare Filmora and head to the “Media” tab. Import the targeted travel video clips onto the timeline and rearrange them. Now, navigate to the “Effects” section and search “cinematic.”

Step 2: Pick one and drag it onto the second track to present cinematic bars and a widescreen look to the video. Now, move to the “Titles” section and choose the suitable one. Drag it to the third track. Double click on it to access the “Advanced settings” and make the required alterations.

Step 3: You can modify the font size, color, and timing of the video. Again, use the “Titles” panel and hit the “Subtitles” category. Select one and drag to the third track. Make relevant changes through the same procedure as above.

Step 4: After that, duplicate the subtitle track on the timeline and repeat the required changes. Sync the text to the audio once you are done with the process.

Step 5: The user is instructed to go back to the “Titles” section and search “cinematic end credits.” Pick one and drag it to the third track. Double click on it to make a few alterations. You have performed the procedure successfully.

Part 3: 3 Trendy Sites to Download Cinematic Background Music
The use of royalty-free cinematic music creates an unmatched vibe. If you do not use it, you might not run for competition. Therefore, you need to access a great music platform for this purpose. Allow us to introduce you to three workable marketplaces. The cinematic background music that they offer is mind-boggling for sure. So, let’s go? Shall we?
Pixabay
Pixabay is an online marketplace that can be accessed effortlessly. The user is free to tailor the filter options to give the system an idea of the music requirement. You can change the results from genre to movement and theme to categories as needed. Essentially, royalty-free cinematic music can be downloaded with one tap of a button.
Moreover, the duration of the track is shown to decide consciously. Cinematic dramatic, caves of dawn, honor and sword, the introvert, and chill abstract are some music offered by Pixabay.

Chosic
Chosic is a house for a wide range of cinematic background music tracks. You can preview the audio tracks before downloading them and tackle the search bar according to your movie themes and type of set design.
Furthermore, the search filters are tailored based on relevancy, popularity, and random audios. Press the download button to have the audio in MP3 format. Epic cinematic, the inspiration, discovery, and the battle are renowned cinematic background music from Chosic.

Mixkit
Mixkit has got to be an excellent choice to deal with your everyday needs of royalty-free cinematic music. With Mixkit in the frame, the user can create movie magic using the impeccable cinematic music collection. Cinematic trailer, slow trail, piano horror, motivational cinematic, and silent descent are a few examples of a strong cinematic collection.

Final Thoughts
Every content creator wishes to transform their work using different effects and filters. Adding a cinematic style video compels the audience to be on the verge of their seats, giving them a film notion. The article highlighted three apps to download good quality and cinematic background music. Filmora also brought a thrill to the vlogs and YouTube intros.
Versatile Video Editor - Wondershare Filmora
An easy yet powerful editor
Numerous effects to choose from
Detailed tutorials provided by the official channel
02 How to Cinematic Travel Intro for Your Travel Vlog?
03 3 Trendy Sites to Download Cinematic Background Music
Part 1: How to Create a Cinematic Intro for Your Video?
Every content creator wishes to bring new ideas to the set. The part played by cinematic background music cannot be avoided no matter what innovation is ahead of us. A cinematic and classy intro to your video displays the effort performed on your work. It compels the audience to keep following you.
For this very reason, the article conveys a guide to creating a powerful cinematic intro. Let us begin this!
For Win 7 or later (64-bit)
For macOS 10.12 or later
Step 1: Launch Wondershare Filmora to begin. Import the targeted music in the program and drag it to the timeline. Now, trim the music to 30 seconds and listen to the end part. Select the last note to match the beat in the beginning part of the music.
Step 2: Moving on, add markers to the music. Use “M” from the keyboard to mark the specific part of the track. After you are done, drag the first track onto the timeline. Trim the video to match it to the first marker.
Step 3: Perform a similar process for the rest of the video clips and trim them according to the markers. The user is directed to create a 2.35:1 widescreen cinemascope bar opener. To do so, drag two black mattes onto the timeline on top of each other.
Step 4: Drag the end of both clips to match the length of the whole video. Now, it is time to animate it. Insert 240° in the y-axis for the first keyframe. Similarly, use 422.2° for the second keyframe. For the bottom y-axis, use -240° for the first keyframe and -422.2° for the second keyframe.
Step 5: After the animation is completed, head to the “Titles” tab and look for cinematic packs. Choose one and drag it onto the timeline. Secondly, alter the duration and animation of the title. The user is expected to insert a dissolve transition at the end of the title.
Step 6: Perform the same process for the rest of the tracks. Time the titles to match the clip’s ending. Now, add a dissolve transition at the end of the clip. Trim the clip into two parts and apply square blur by navigating to the “Effects” tab to blur the video clips.
Step 7: Moving on, adjust the alpha for blur intensity. Add a dissolve transition between the cuts. In the final step, go to the “Animation” and then “Customize.” Reframe the last clip and animate a zoom-out effect. Reduce the “Scale” percent to do so. A creative cinematic intro is ready!
Part 2: How to Cinematic Travel Intro for Your Travel Vlog?
Vacationing and traveling offer exposure to learn more about people and the world around us. Are you a traveler? Do you prefer a solo vacation or with your family? Whatever your answer might be, we have got you!
To make an astonishing and engaging cinematic travel for your travel vlog, Filmora is there for us. The section shall reflect on the whole procedure using royalty-free cinematic music. Let us initiate!
For Win 7 or later (64-bit)
For macOS 10.12 or later
Step 1: The first step is simple. Open Wondershare Filmora and head to the “Media” tab. Import the targeted travel video clips onto the timeline and rearrange them. Now, navigate to the “Effects” section and search “cinematic.”
Step 2: Pick one and drag it onto the second track to present cinematic bars and a widescreen look to the video. Now, move to the “Titles” section and choose the suitable one. Drag it to the third track. Double click on it to access the “Advanced settings” and make the required alterations.
Step 3: You can modify the font size, color, and timing of the video. Again, use the “Titles” panel and hit the “Subtitles” category. Select one and drag to the third track. Make relevant changes through the same procedure as above.
Step 4: After that, duplicate the subtitle track on the timeline and repeat the required changes. Sync the text to the audio once you are done with the process.
Step 5: The user is instructed to go back to the “Titles” section and search “cinematic end credits.” Pick one and drag it to the third track. Double click on it to make a few alterations. You have performed the procedure successfully.
Part 3: 3 Trendy Sites to Download Cinematic Background Music
The use of royalty-free cinematic music creates an unmatched vibe. If you do not use it, you might not run for competition. Therefore, you need to access a great music platform for this purpose. Allow us to introduce you to three workable marketplaces. The cinematic background music that they offer is mind-boggling for sure. So, let’s go? Shall we?
Pixabay
Pixabay is an online marketplace that can be accessed effortlessly. The user is free to tailor the filter options to give the system an idea of the music requirement. You can change the results from genre to movement and theme to categories as needed. Essentially, royalty-free cinematic music can be downloaded with one tap of a button.
Moreover, the duration of the track is shown to decide consciously. Cinematic dramatic, caves of dawn, honor and sword, the introvert, and chill abstract are some music offered by Pixabay.
Chosic
Chosic is a house for a wide range of cinematic background music tracks. You can preview the audio tracks before downloading them and tackle the search bar according to your movie themes and type of set design.
Furthermore, the search filters are tailored based on relevancy, popularity, and random audios. Press the download button to have the audio in MP3 format. Epic cinematic, the inspiration, discovery, and the battle are renowned cinematic background music from Chosic.
Mixkit
Mixkit has got to be an excellent choice to deal with your everyday needs of royalty-free cinematic music. With Mixkit in the frame, the user can create movie magic using the impeccable cinematic music collection. Cinematic trailer, slow trail, piano horror, motivational cinematic, and silent descent are a few examples of a strong cinematic collection.
Final Thoughts
Every content creator wishes to transform their work using different effects and filters. Adding a cinematic style video compels the audience to be on the verge of their seats, giving them a film notion. The article highlighted three apps to download good quality and cinematic background music. Filmora also brought a thrill to the vlogs and YouTube intros.
Versatile Video Editor - Wondershare Filmora
An easy yet powerful editor
Numerous effects to choose from
Detailed tutorials provided by the official channel
How to Zoom Picture in Picture [Easy Solution]
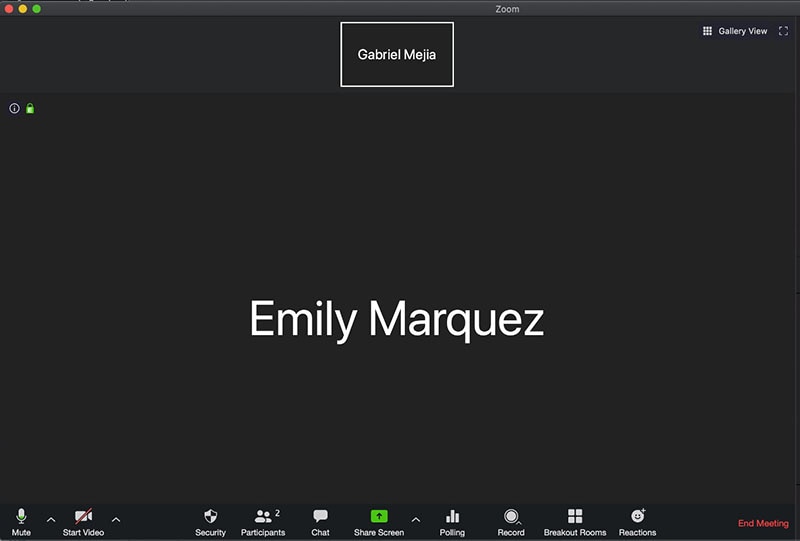
Zoom is one of the greatest options on the market for video conferencing. It doesn’t matter whether you use it at home or in an office environment; it will quickly link the team members. One of the most popular video conferencing programs is Zoom. When in-person meetings aren’t feasible, it enables you to communicate electronically with employees, and it’s been a major popularity for social occasions as well. In case you’re not acquainted, picture-in-picture mode enables you to watch videos from one app while using your PC normally. The movie will keep playing in a tiny thumbnail window so that two applications may work simultaneously on your smartphone.
You may create virtual audio and video conferences, webinars, live chats, screen sharing, and other collaboration tools with Zoom, a cloud-based video communications solution. Zoom’s most recent iPhone apps let you dismiss a Zoom Meeting while keeping the Zoom video call open in a picture-in-picture mode. To join a Zoom conference, you don’t need an account, and because the software works with Mac, Windows, Linux, iOS, and Android devices, nearly anybody can use it. Since using Zoom’s picture-in-picture mode is the same as using it with other applications, you shouldn’t have any trouble if you often use PiP mode. Here are the top 4 methods you can refer to picture in picture in Zoom.
Method 1: Swap Shared Screen with Video
You may move the Zoom Meeting PiP window across the screen, change the thumbnail’s size, and utilize other applications while it remains open, just like any other picture-in-picture window. Before leaving the meeting if you’re not giving a presentation or speaking, you should definitely mute Zoom on your iPhone to prevent noises from your typing or other activities from entering the conversation. Additionally, keep in mind to switch off the camera if you’re engaged in something distracting, at least for the duration of your activity. To reopen the Zoom Meeting and go back to the Zoom app, touch the Picture-in-Picture mode pane. Here are some actions to keep in mind:
Steps to Swap Shared Screen for Zoom Picture in Picture
Step1Launch or enter a Zoom meeting. Keep the video on your main screen at all times, closing the chat and participant list as necessary.
Step2Tap the Home button or swipe up from the bottom of the screen.
Step3Picture-in-picture mode should be activated automatically throughout the meeting.
Method 2: Use Ecamm Live
Live streaming is a fantastic way to provide original content and stand out from the crowd. To prevent any operational difficulties, a more sophisticated virtual camera is absolutely necessary. You now have magical abilities thanks to Ecamm virtual cam, including the ability to add text, animations, observe a live stream, post viewer comments, play music, share your screen, use sound effects, and many more. It offers the Ecamm live virtual camera zoom function for video conferences so you may improve your Zoom discussions by sending output to other PC programs. You could see a quality difference between what you view in Ecamm Live and what your Zoom visitors see while utilizing virtual camera with Zoom. The quality of a Zoom video stream cannot be improved using Ecamm Live. Simply broadcast the Zoom app using Ecamm Live’s Screen Share mode to utilize Ecamm Live for picture-in-picture virtual presentations on Zoom.
Steps to Use Ecamm Live for Zoom Picture in Picture
Step1Download the Ecamm Application
Install Ecamm Live on your computer, then choose the center button in the source switcher at the top of the main window to enter Screen Share mode.
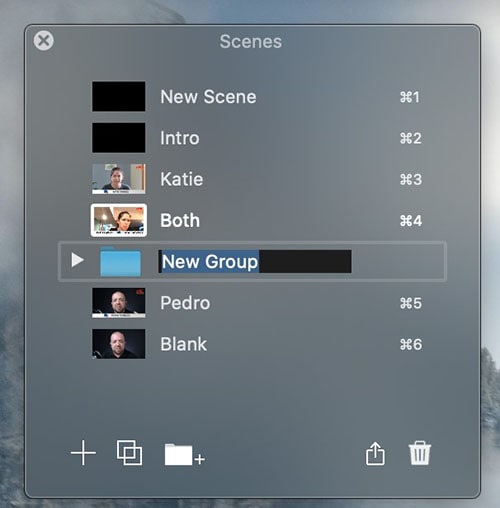
Step2Create Scenes
With the use of Ecamm Live’s Virtual Camera and Virtual Mic capabilities, you may transfer Ecamm Live’s output to almost any other Mac software, including Zoom. After setting, create the scenes in the program to quickly switch between various cameras.
Step3Select Ecamm on Zoom
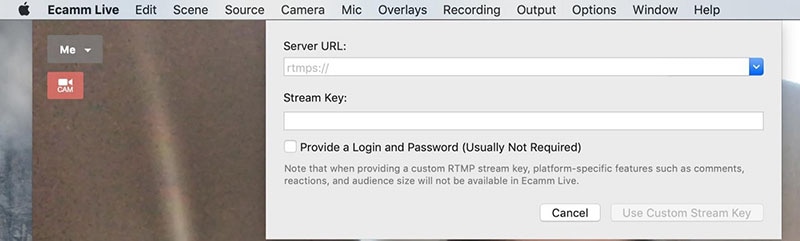
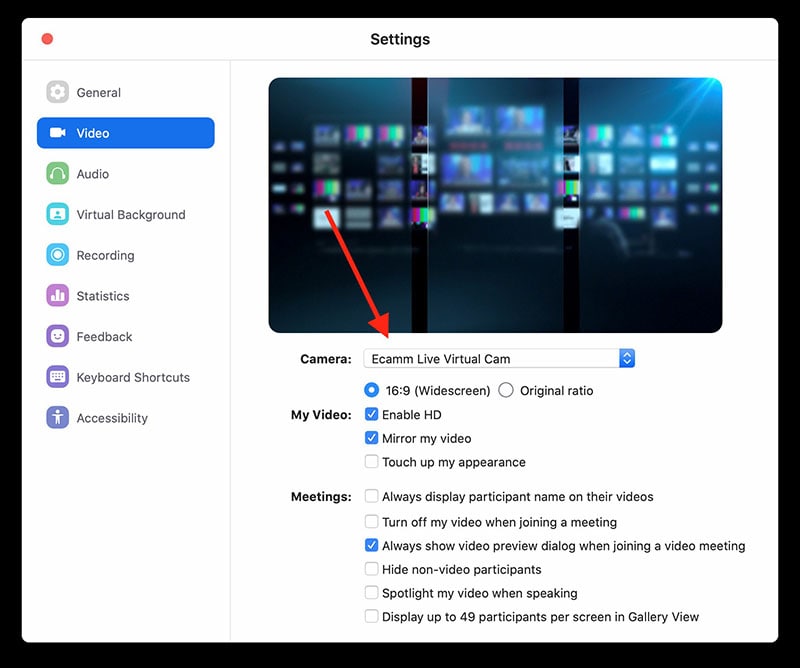
You may also utilize Ecamm Live’s Sharing Window capability to feed Ecamm Live output into Zoom. Simply activate the virtual camera, and then, as seen below, choose Ecamm Live Virtual Camera in Zoom’s video settings:
Step4Begin Your Presentation
Finally, click the PC share option to show your Zoom app to your audience. To conceal a picture-in-picture window that displays your camera image while live streaming, click the PIP button.
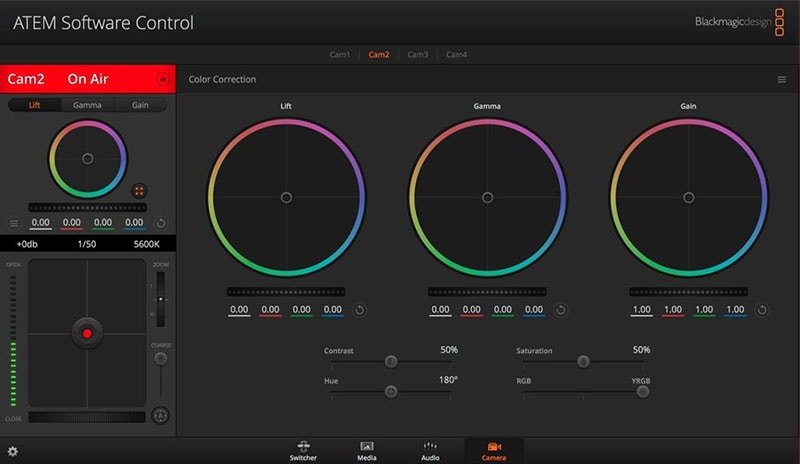
Method 3: Use Filmora as A Switcher
Zoom has solutions that will make your meetings simple and secure. It gives your remote staff a secure setting to interact and share crucial information. Ideal control over your film and configuration options to make them aesthetically pleasing is something Zoom lacks. To overcome the drawbacks and improve the quality of your online meetings, you may take use of the capabilities of Zoom in conjunction with Filmora. Filmora was developed with the intention of easing user burden and supporting applications. Though complicated, the program is simple to use. The perhaps most popular web information that may be saved on your computer can be easily captured by just angling your screen. For more information on how to record and save your Zoom for picture in picture, see the guide here.
To broadcast a variety of situations in a grid style, you may also combine inputs from your camera, microphone, computer screen, and web conferencing software. Wondershare -the finest desktop application for recording a Zoom Picture in Picture meeting- is Filmora. With the majority of cameras, this app’s screen recording capability is both user-friendly and feature-rich. Here, users may either choose a particular region to record or record their zoom meetings in Fullscreen mode. Additionally, you may choose the camera and input microphone that will be used while recording a video overlay. The addition of relevant comments like phrases, lines, drawings, symbols, etc. is also possible by users. The detailed procedure for recording a Zoom Picture-in-Picture meeting using a Filmora recorder is given below:
Free Download For Win 7 or later(64-bit)
Free Download For macOS 10.14 or later
Step1Download and Install Filmora Zoom Recorder
You may find both types, i.e., the most recent Windows and Mac versions, by first visiting the usual website and then using this Zoom. Install the program on your computer once you download it to get started.

Step2Initiate Filmora Recorder
After finishing the installation process for this Reside Zoom recorder, launch it from the main menus and choose “New Task” when prompted. It will take you to Filmora’s streamlined user interface where you can immediately start filming. Then, as seen in the picture below, you may adjust the screen recording using your preferred camera, microphone, and system settings:

Step3Begin/End the Recording
When you are through configuring this Zoom picture in picture recorder, click the Record button, and it will immediately begin recording your customized screen. Similar to that, after you’re done recording, click Stop, which will take you inside the video editor where you may edit your recorded information.

Step4Share Recordings
When you have everything ready, export your recording right away. After you’re done with the editing part, you do have a lot of options to choose from when displaying your screen capture and webcam stories. To do so, click the Export button in the item user interface’s top-right corner as shown below:
You may easily choose your preferred way to share from there if you choose to upload your work of zoom picture in picture recordings straight to the YouTube or other reputable websites right now. Simply refer to the Sharing plug-ins in the Export window to find out more.
Method 4: Use Hardware Switcher ATEM Mini Pro
Particularly on Zoom, the ATEM Mini is excellent for video conferences. The Blackmagic ATEM Mini is a USB video interface and HDMI switcher. Four HDMI inputs, or four cameras that can produce an HDMI video stream, may be switched between live. This device integrates Zoom meetings fast and makes it incredibly simple to set up your audio, a sometimes-forgotten aspect of video broadcasting. This sophisticated video switcher promises to offer broadcast-quality multi-camera footage with ease and is targeted at gamers, streamers, and online reviewers. It connects to a computer via a USB-C to USB-A connection. The video feed may then be sent to distant colleagues via a number of well-liked videos streaming services, including Zoom.
Step1The ATEM Mini Pro is a basic control switcher with pro-broadcast performance. Your ATEM Mini Pro is really simple to set up. You can connect a full setup with several cameras and microphones in around 30 minutes.
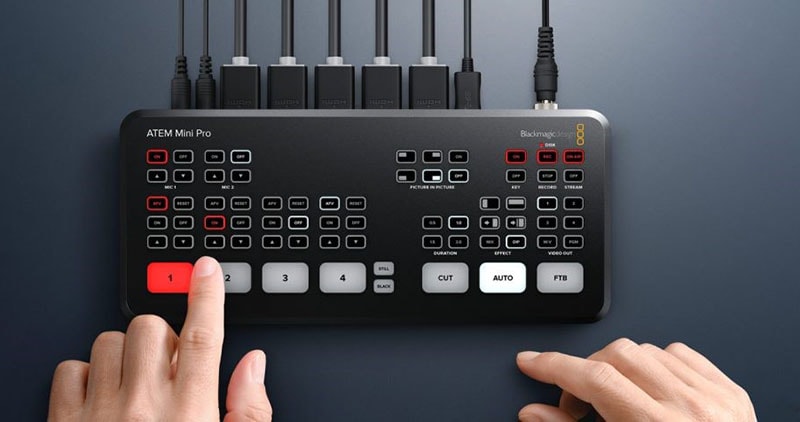
Step2You may connect several camera sources to the inputs of the ATEM Mini Pro. The 4 HDMI inputs each have a separate standards converter built in. As a result, the ATEM Mini can automatically convert inputs that are 1080p, 1080i, or 720p to the switcher’s video standard. You may make quick changes between inputs with no latency or disruption to your video output by using the ergonomic buttons.
Step3As a third option, Zoom offers ATEM Mini, which enables you to switch between several inputs, add custom visuals, and adjust audio levels all from a single interface. To improve the quality of your production, you may even use smooth transitions like wipes or fades. You can even test any input stream before making it live.
Conclusion
When you are doing a Zoom Meeting and share your screen, only to discover that what the other attendees see is a split screen with your material and the other Attendee cams, it is highly annoying. You may move the Zoom Meeting PiP window across the screen, change the thumbnail’s size, and utilize other applications while it remains open, just like any other picture-in-picture window. Someone must be sharing information in the Zoom conference for the Picture in Picture, or “Split Screen” option, to be active. We’ve listed the top techniques for doing it effectively above. To do this work without difficulty, use them as your guide.
Free Download For macOS 10.14 or later
Step1Download and Install Filmora Zoom Recorder
You may find both types, i.e., the most recent Windows and Mac versions, by first visiting the usual website and then using this Zoom. Install the program on your computer once you download it to get started.
Step2Initiate Filmora Recorder
After finishing the installation process for this Reside Zoom recorder, launch it from the main menus and choose “New Task” when prompted. It will take you to Filmora’s streamlined user interface where you can immediately start filming. Then, as seen in the picture below, you may adjust the screen recording using your preferred camera, microphone, and system settings:
Step3Begin/End the Recording
When you are through configuring this Zoom picture in picture recorder, click the Record button, and it will immediately begin recording your customized screen. Similar to that, after you’re done recording, click Stop, which will take you inside the video editor where you may edit your recorded information.
Step4Share Recordings
When you have everything ready, export your recording right away. After you’re done with the editing part, you do have a lot of options to choose from when displaying your screen capture and webcam stories. To do so, click the Export button in the item user interface’s top-right corner as shown below:
You may easily choose your preferred way to share from there if you choose to upload your work of zoom picture in picture recordings straight to the YouTube or other reputable websites right now. Simply refer to the Sharing plug-ins in the Export window to find out more.
Method 4: Use Hardware Switcher ATEM Mini Pro
Particularly on Zoom, the ATEM Mini is excellent for video conferences. The Blackmagic ATEM Mini is a USB video interface and HDMI switcher. Four HDMI inputs, or four cameras that can produce an HDMI video stream, may be switched between live. This device integrates Zoom meetings fast and makes it incredibly simple to set up your audio, a sometimes-forgotten aspect of video broadcasting. This sophisticated video switcher promises to offer broadcast-quality multi-camera footage with ease and is targeted at gamers, streamers, and online reviewers. It connects to a computer via a USB-C to USB-A connection. The video feed may then be sent to distant colleagues via a number of well-liked videos streaming services, including Zoom.
Step1The ATEM Mini Pro is a basic control switcher with pro-broadcast performance. Your ATEM Mini Pro is really simple to set up. You can connect a full setup with several cameras and microphones in around 30 minutes.
Step2You may connect several camera sources to the inputs of the ATEM Mini Pro. The 4 HDMI inputs each have a separate standards converter built in. As a result, the ATEM Mini can automatically convert inputs that are 1080p, 1080i, or 720p to the switcher’s video standard. You may make quick changes between inputs with no latency or disruption to your video output by using the ergonomic buttons.
Step3As a third option, Zoom offers ATEM Mini, which enables you to switch between several inputs, add custom visuals, and adjust audio levels all from a single interface. To improve the quality of your production, you may even use smooth transitions like wipes or fades. You can even test any input stream before making it live.
Conclusion
When you are doing a Zoom Meeting and share your screen, only to discover that what the other attendees see is a split screen with your material and the other Attendee cams, it is highly annoying. You may move the Zoom Meeting PiP window across the screen, change the thumbnail’s size, and utilize other applications while it remains open, just like any other picture-in-picture window. Someone must be sharing information in the Zoom conference for the Picture in Picture, or “Split Screen” option, to be active. We’ve listed the top techniques for doing it effectively above. To do this work without difficulty, use them as your guide.
Also read:
- New Best Cinematic LUTs For Premiere Pro Recommendation
- New Step by Step Guide of Make Gimp Transparent Background PNG
- In 2024, Discover the Top 5 Online Tools for Merging MP4 Files Easily and Quickly. Streamline Your Video Editing Process and Create Seamless Videos with These User-Friendly Tools
- New 2024 Approved Recording Video in Slow Motion Some Considerable Points
- New 2024 Approved Cropping Video in VLC Step by Step
- In 2024, Looking Into How Slow Mo Guys Have Changed the Dynamics of Slow-Motion
- In 2024, The Best 10 AI Video Analytics Companies at a Glance
- Top 11 Best Video Editing Apps for iPhone for 2024
- New AI Features of Wondershare Filmora - Silence Detection in Videos
- Updated Add Effects to Video Online for 2024
- New 2024 Approved Best Ways to Add Photos to Tik Tok Video
- New 2024 Approved Easy Ways to Add Text Overlay to Video
- How to Make a PowerPoint Looping Slideshow
- Updated How to Be a Good Podcast Host
- Updated In 2024, A Guide to Create Your Own LOL Montage Video
- Zoom In and Out on Snapchat
- Updated MP3 CUTTER DOWNLOADMP3 Cutter Download Is One of the Most Reliable Tools for Editing of Music Files in a Fast and Friendly Way
- Updated How To Fade Audio With Movavi Editor
- Updated In 2024, Discover Vintage LUTs Premiere Pro Free and Paid Options Available
- Updated In 2024, How to Add a Slideshow in PowerPoint
- 2024 Approved Learn 4 Proven Methods for Creating Engaging and Memorable Recap Videos. Elevate Your Event Coverage and Engage Your Audience with These Tips and Tricks
- Updated Top-Search The Best Game Screen Recording Tools for PC
- In 2024, Discover 30+ Amazing Templates for VN Video Editor to Elevate Your Videos. Create Professional-Looking Videos with Ease
- Updated 2024 Approved 8 Apps to Custom Your GIF Stickers
- Detailed Steps to Resize Video in Davinci Resolve for 2024
- New A Review of Efectum App Making Slow Motion Video
- Updated 2024 Approved How Can You DIY VHS Overlay in After Effects?
- Updated Best 12 Sony Vegas Slideshow Templates for Free Download for 2024
- Updated How to Edit GoPro Videos on Mac
- How to Denoise in After Effects – Audio and Video Noise Removal
- Latest Guide How To Bypass Vivo S17e FRP Without Computer
- In 2024, What You Want To Know About Two-Factor Authentication for iCloud On your iPhone 11 Pro Max
- In 2024, How to Bypass iCloud Lock from Apple iPhone 14 Pro
- In 2024, How to Unlock Disabled iPhone 15/iPad Without Computer
- In 2024, Apple iPhone 12 Pro Backup Password Never Set But Still Asking? Heres the Fix | Dr.fone
- Android Safe Mode - How to Turn off Safe Mode on Vivo Y27s? | Dr.fone
- How Can I Use a Fake GPS Without Mock Location On Samsung Galaxy M54 5G? | Dr.fone
- In 2024, Full Guide to Catch 100 IV Pokémon Using a Map On Vivo Y100t | Dr.fone
- How To Track IMEI Number Of Vivo Y100 Through Google Earth?
- Complete Review & Guide to Techeligible FRP Bypass and More For Oppo A58 4G
- How to Repair Broken video files of Pixel 8 on Windows??
- 8 Workable Fixes to the SIM not provisioned MM#2 Error on Itel P40 | Dr.fone
- In 2024, Why does the pokemon go battle league not available On Vivo Y56 5G | Dr.fone
- How To Transfer Data From Apple iPhone 12 Pro Max To Others ios devices? | Dr.fone
- Is your Vivo Y100A working too slow? Heres how you can hard reset it | Dr.fone
- Why does the pokemon go battle league not available On Tecno Phantom V Flip | Dr.fone
- How to Manually Install a Hardware Driver in Windows 11
- How to Unlock Nubia Phone with Broken Screen
- iSpoofer is not working On Tecno Spark 20 Pro+? Fixed | Dr.fone
- In 2024, Complete Guide on Unlocking iPhone 13 mini with a Broken Screen? | Dr.fone
- Title: In 2024, Attaining Slow Motion Video Trend Finding The Best CapCut Templates
- Author: Chloe
- Created at : 2024-05-20 03:38:24
- Updated at : 2024-05-21 03:38:24
- Link: https://ai-editing-video.techidaily.com/in-2024-attaining-slow-motion-video-trend-finding-the-best-capcut-templates/
- License: This work is licensed under CC BY-NC-SA 4.0.
