
In 2024, Best Ideas on Using Filmora Green Screen

Best Ideas on Using Filmora Green Screen
Green screener chroma key is commonly used in film, tv shows, and social media videos nowadays. This article will show you how to light film and edit a green screen. Additionally, you can have some fun ideas with a chroma key. Therefore, keep reading this article to know all the information.
Part 1: Cool Ideas to Use Green Screen
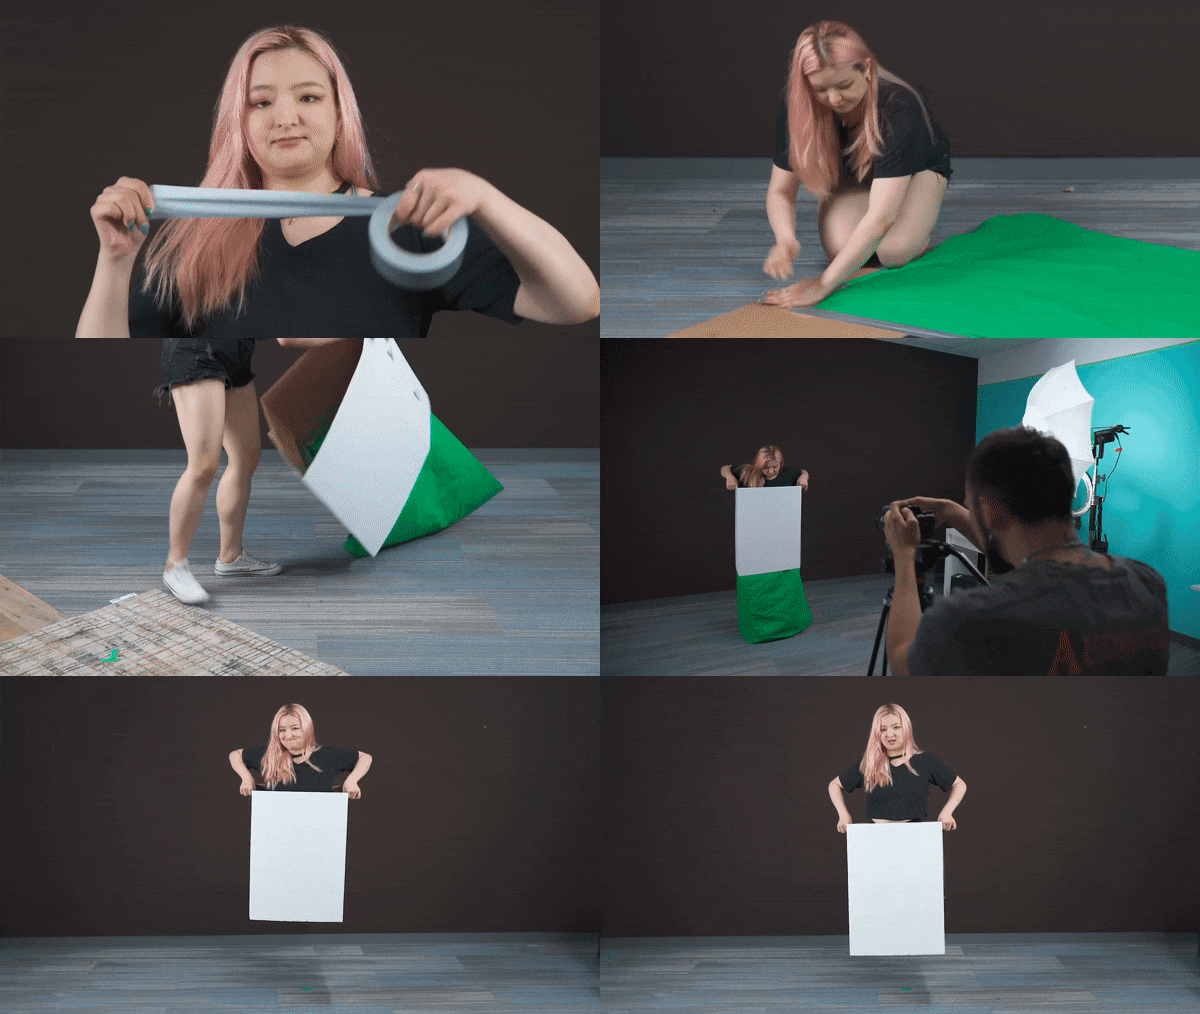
1. The Magic Box
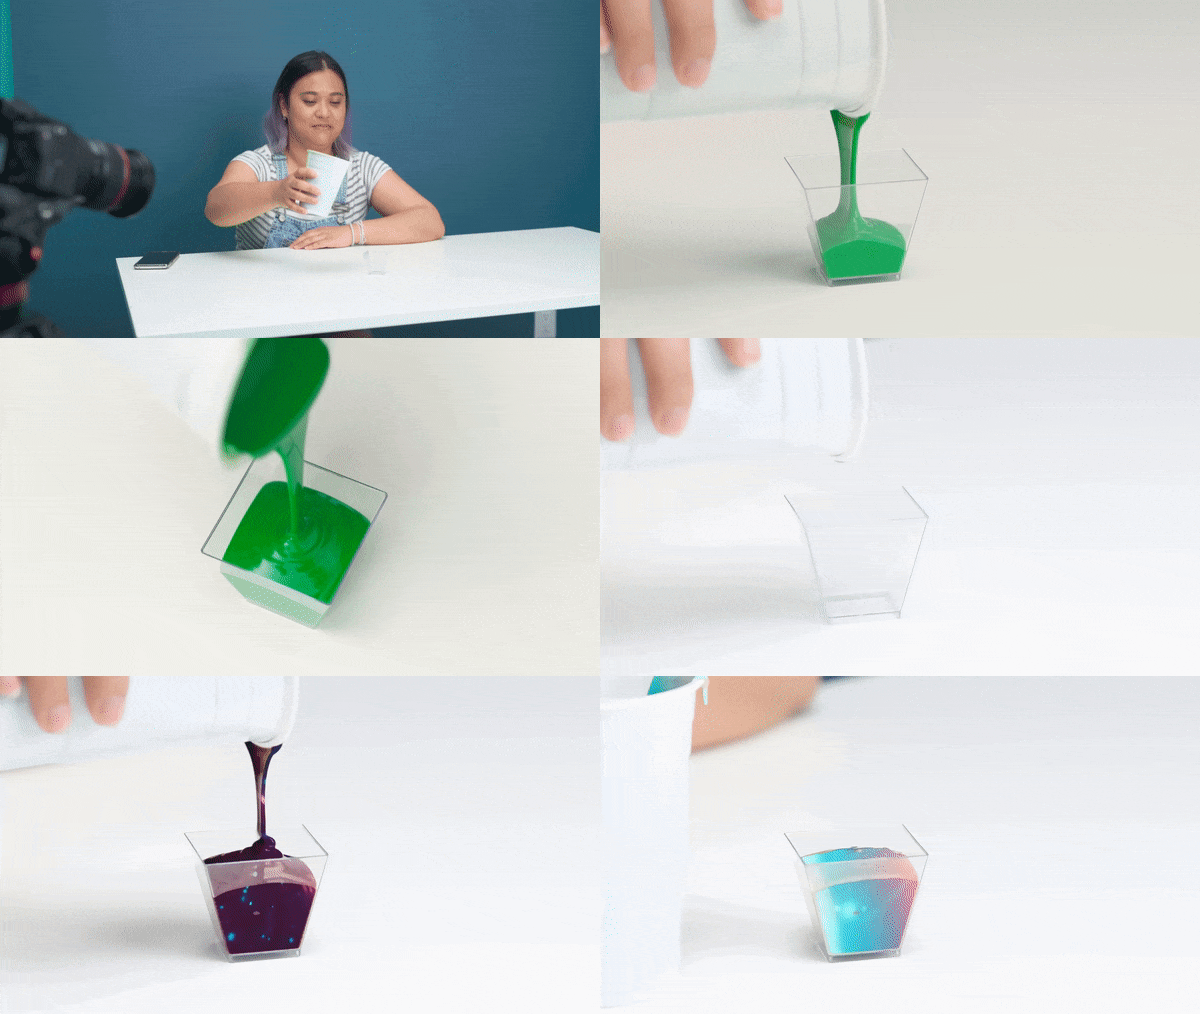
2. Liquid Transformation
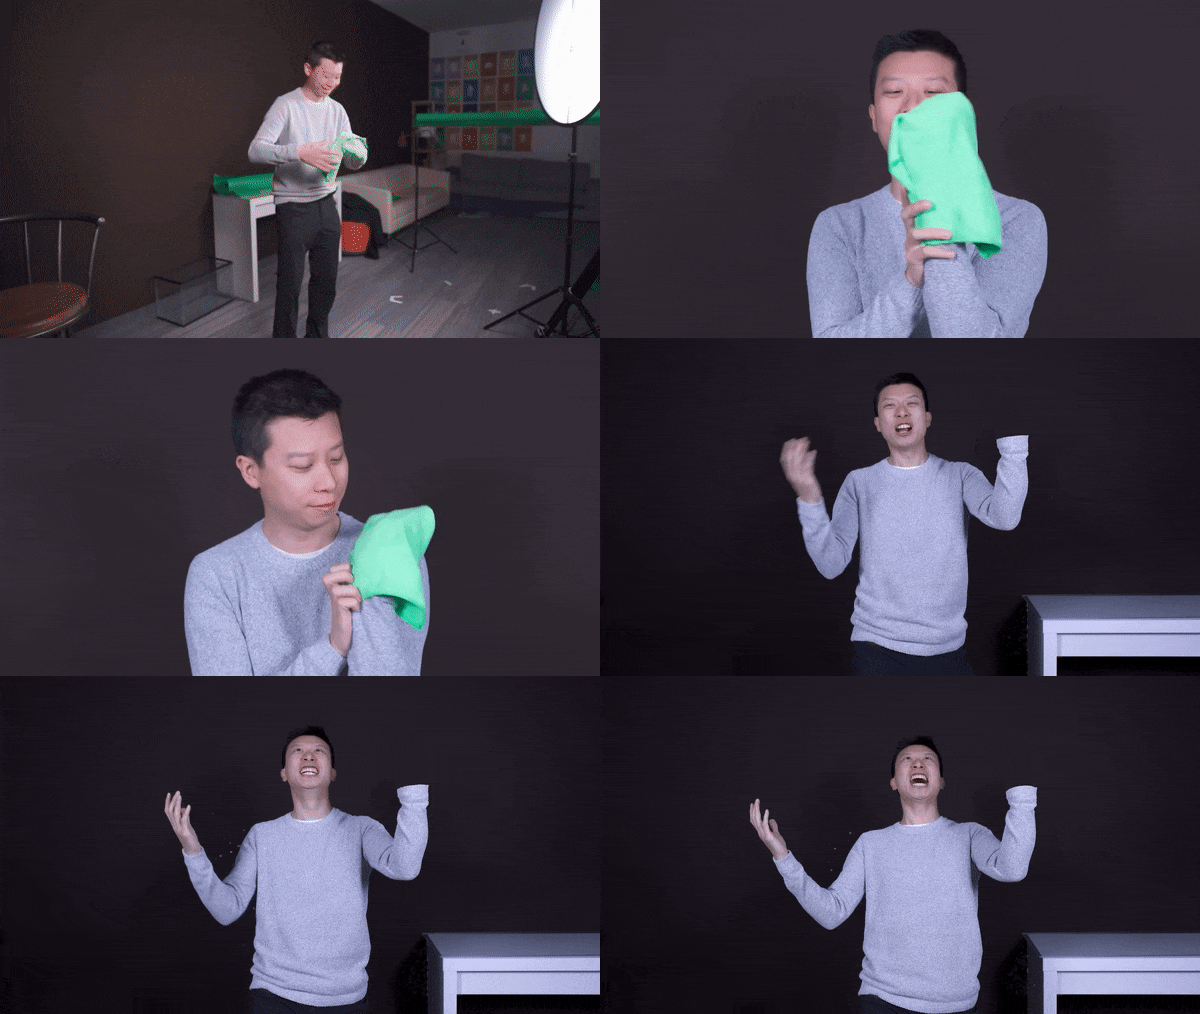
3. Key Out a Body Part
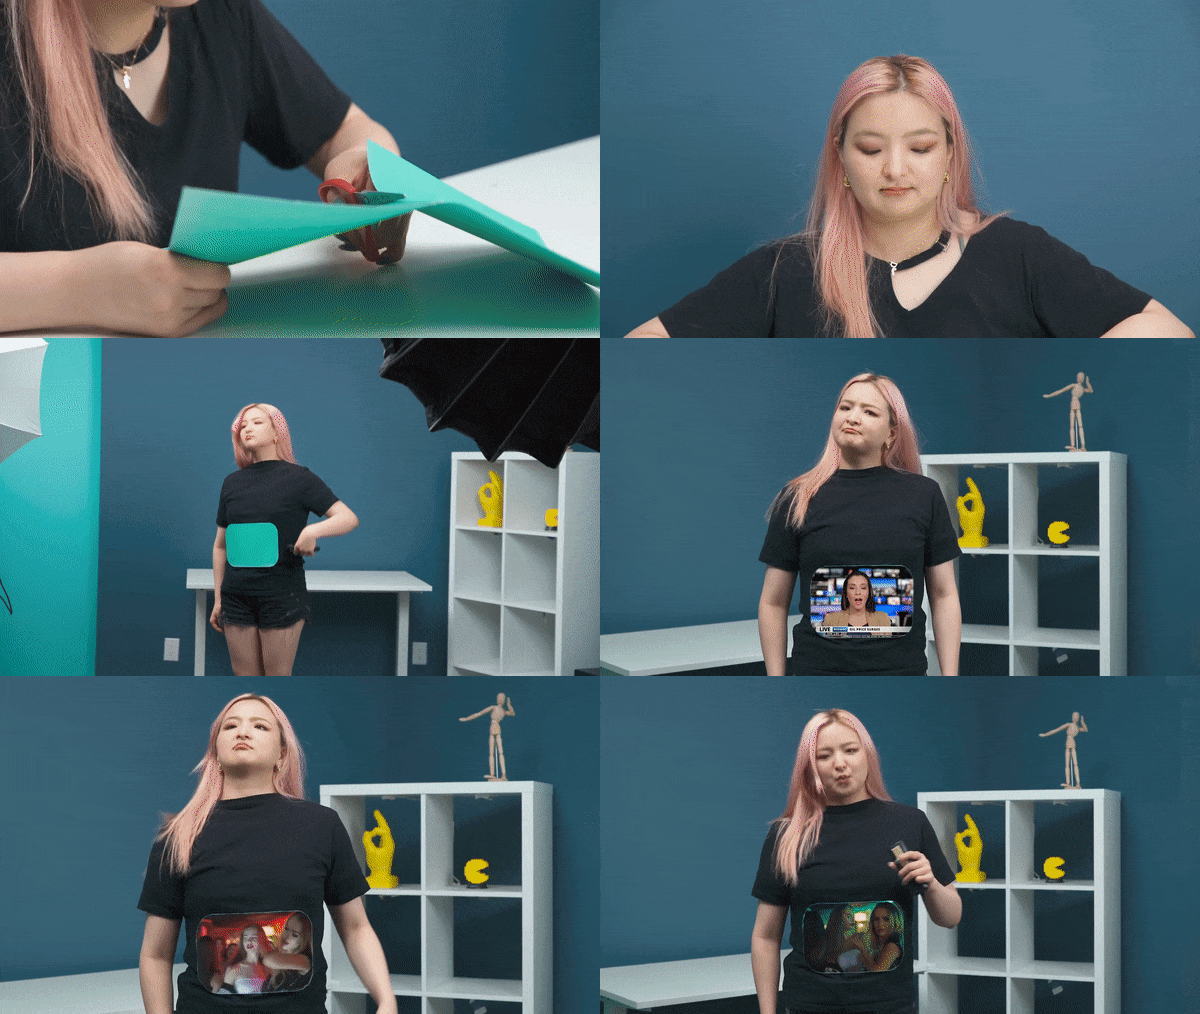
4. T-shirt TV Screen
Part 2: Setting Up The Green Screen
Filming with the green screen is getting easier and easier. Anyone can do it, but before you get started, we will share some do’s and don’ts to help you get the best results.
In fact, there are many ways to set up a green screen, but the most cost-efficient way is with a green screen fabric. If you are using a green fabric as a DIY green screen, make sure you steam or iron it out, whether taping it to a wall or hanging it off the rack. Keep in mind the green screen should not leave any wrinkles.
It is because wrinkles will make lighting the green screen a nightmare, and uneven lighting will leave you with shadows and disappointing results. It would help if you also pulled the green screen tight to get a seamless background. The better you do with the setup, the easier it will be the key it out later
Part 3: Lighting a Green Screen
It doesn’t matter how nice your green screen is. You won’t get good results if you don’t light it properly. When you light a green screen, be aware of these things.
- Make sure there are at least six feet of space between you and your green screen; therefore, you’re not casting a shadow that cannot be keyed out later.
- Remember, any shadow on the green screen is bad. The lighting on the screen should be flat, even, and one-dimensional meaning. Please don’t place the screen leaning at an angle since they’ll make it harder to light evenly.
- Do light yourself and your background separately. It will ensure your subject wouldn’t bleed into the green, which will create a halo around them.
- After you key out the green screen and lighting, your subjects should emulate the lighting from your final footage. For example, if you know sunlight is coming from the left light, your subject is from the left direction as well.
Part 4. Keying out your green screen
Once your footage is good, go into Filmora and import it into your timeline, then double-click it to find the chroma key menu. However, don’t stop there. Clicking the chroma key button is not enough to guarantee perfectly keyed footage, so play around with the offset tolerance edge thickness and edge feather. Lastly, adjust it to make sure your edit looks as good as possible.
Free Download For Win 7 or later(64-bit)
Free Download For macOS 10.14 or later
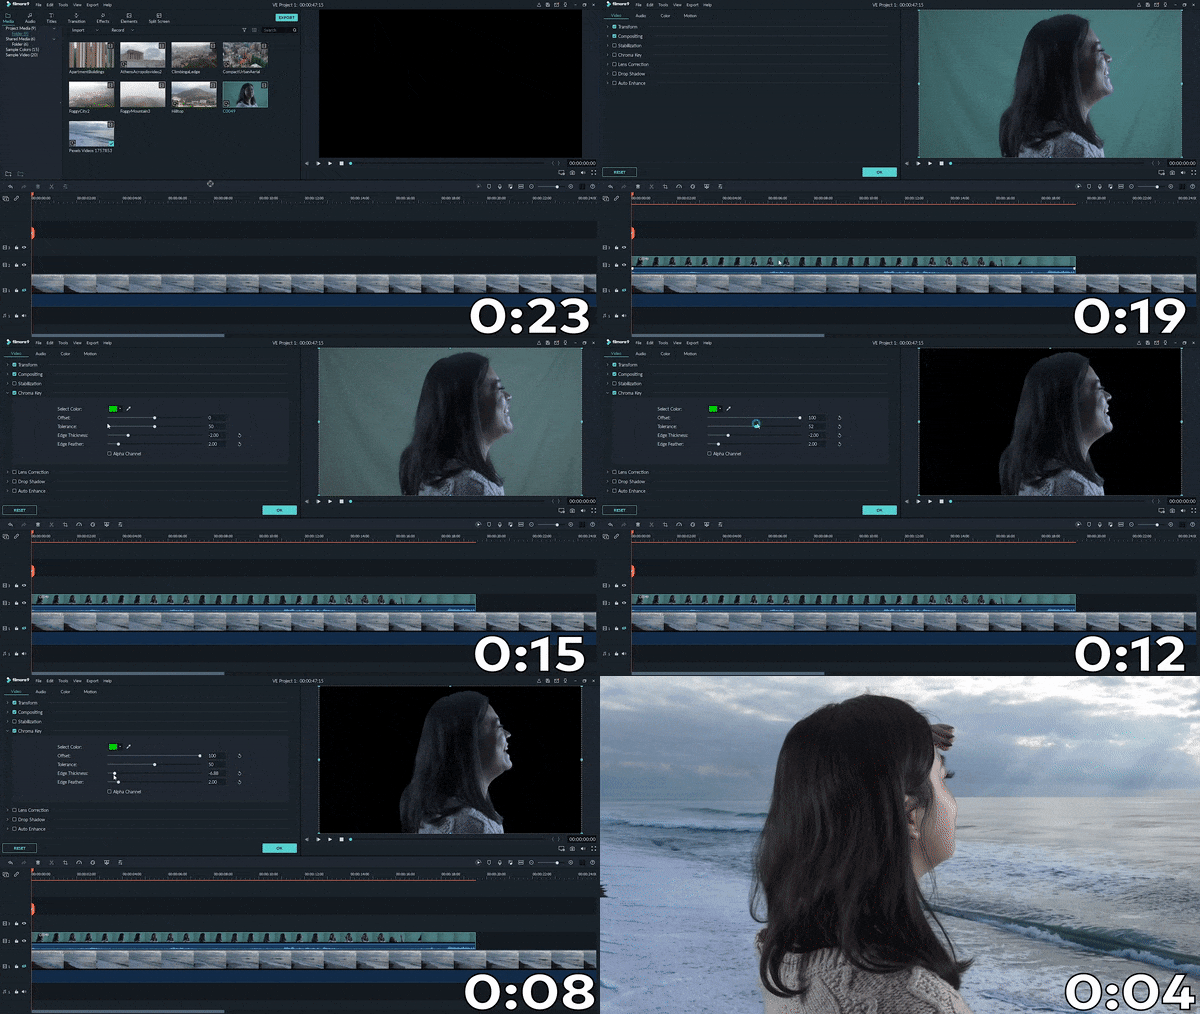
Summary
Aside from a video background, there are many things you can use chrome key effects on. For example, you can make liquid transformation, you can make a magic box, etc. In the meantime, it doesn’t matter how good your green screen, it won’t have a good results if are not light it properly. You can use Filmora to keying out your green screen. It just take a few clicks to be able keying out your green screen by following the tutorial above.
Free Download For macOS 10.14 or later

Summary
Aside from a video background, there are many things you can use chrome key effects on. For example, you can make liquid transformation, you can make a magic box, etc. In the meantime, it doesn’t matter how good your green screen, it won’t have a good results if are not light it properly. You can use Filmora to keying out your green screen. It just take a few clicks to be able keying out your green screen by following the tutorial above.
Do You Know that You Can Apply Different LUTs and Create Your Own? There Are Many LUT Online and Offline Generators that You Can Use to Create Your LUT
Lookup Tables can make your videos and pictures look more attractive. LUTs are like filters that give your media files different styles and emotions. There are many presets available on the internet that you can download to use for your media content. Moreover, LUTs help you to quickly change the look and mood of your photos and videos.
You can find LUTs for free or buy them online; some editing software already has LUTs included. Nevertheless, you can create your own LUTs using different online and offline tools. If you can’t find any online LUT generator, search for LUT generator free download. You’ll get many options allowing you to generate LUTs offline.
- Part 2: How to Create LUTs Using LUT Generator Free Download?
- Part 3: How to Create Online LUTs Using Online LUT Creator?
- Bonus Part: Wondershare Filmora – The Perfect Tool to Use Your LUTs
Part 1: An Overview of LUT Generator - The Best Platform for Creating LUTs
LUT Generator is an excellent tool for creating color-grading picture and video presets. This powerful LUT generator-free tool is available on both Windows and Mac. Moreover, you can create LUTs from any photo and video editing application, including Lightroom and Camera Raw. Not only can you create your LUTs, but you can also download presets that are already available.
Furthermore, it offers over 290 cinematic styles LUTs and 50+ LUTs that are optimized for drones and GoPro videos. If you want a surreal look, you can also use 70+ Psychedelia LUTs. This tool allows you to apply third-party effects easily on your photos and videos. Moreover, you can even match the tone of clips from different cameras to give a uniform look.
Part 2: How to Create LUTs Using LUT Generator Free Download?
If you don’t want to apply online LUTs that are available, you can create your own. To do so, you have to download the LUT Generator tool and follow these simple steps to create LUTs.
Step1
To create a LUT of your liking, search for the LUT Generator free download on your browser and download the tool.
Step2
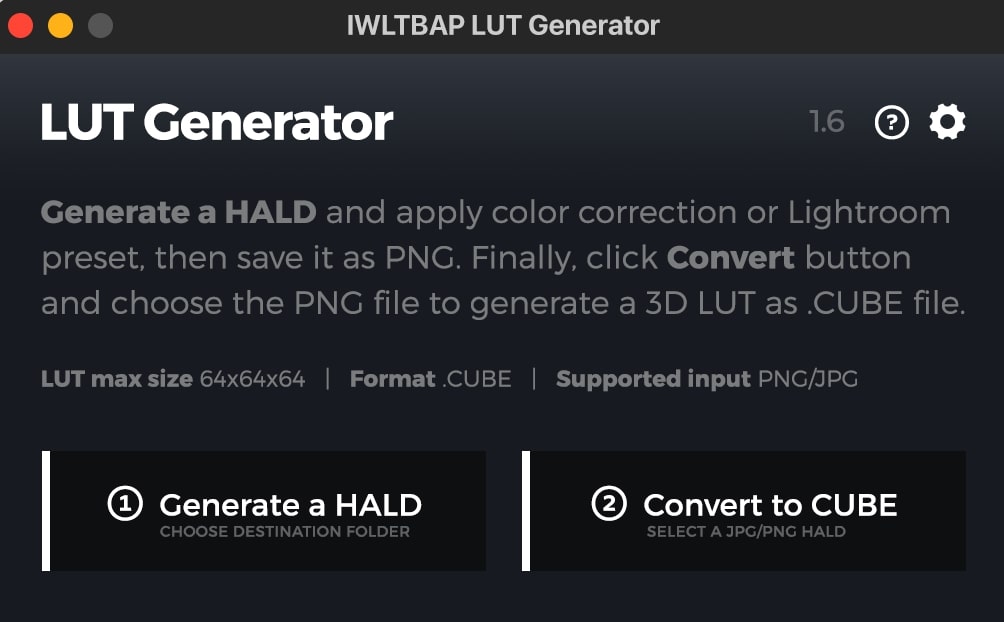
As you launch it, continue to select the “Generate a HALD” option. This option will let you generate a PNG HALD that you can use for color grading using editing software.
Step3
Open the generated PNG HALD into your preferred photo editing application. Apply the desired color correction on the PNG HALD. Save the modified PNG HALD without compression as PNG or at 100% quality in JPG format.
Step4
Click the “Convert to CUBE” button in the LUT Generator and select the modified PNG HALD you saved in the previous step.
Step5
In Preferences, choose the desired size of the 3D LUT as .CUBE format. You can choose between 25x25x25 or 64x64x64. After selecting your desired size, your customized LUT will be created in .CUBE format.
Part 3: How to Create Online LUTs Using Online LUT Creator?
There are two methods to create a LUT online and offline. Previously you’ve learned to generate LUTs using offline tools. However, you can also create LUTs online without installing any tool. This portion will teach you how to create online LUTs in this step-by-step guide.
Step1
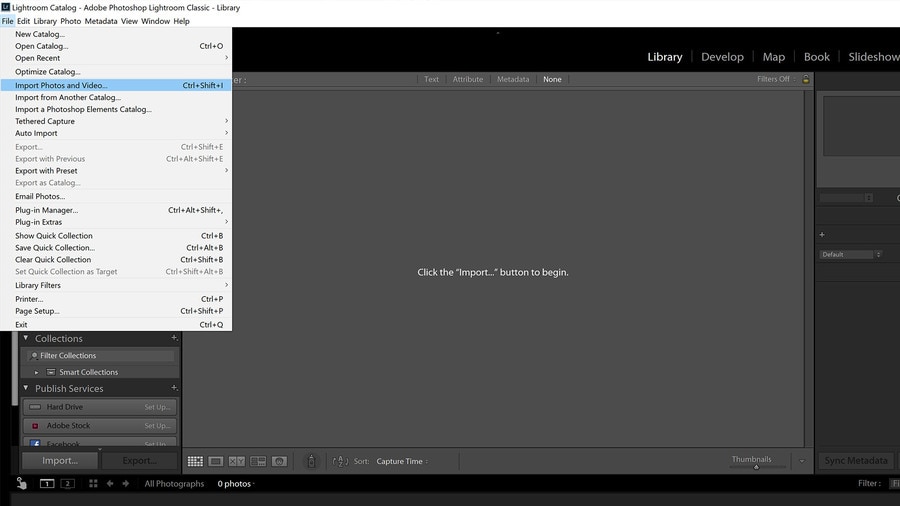
Import your photo into Lightroom by dragging and dropping it. You can also import the file by clicking the “File” button and selecting “Import Photos and Video.” For best results, ensure that the photo you will edit is still.
Step2
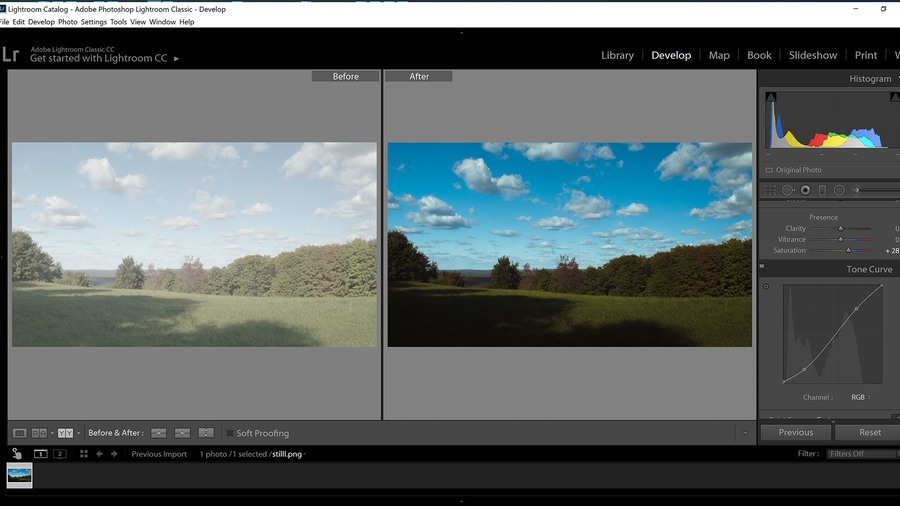
Edit your photo inside the “Develop” module in Lightroom with your desired preference and style. Only apply changes affecting the colors, not adjustments like noise reduction, vignette, or grain.
Step3
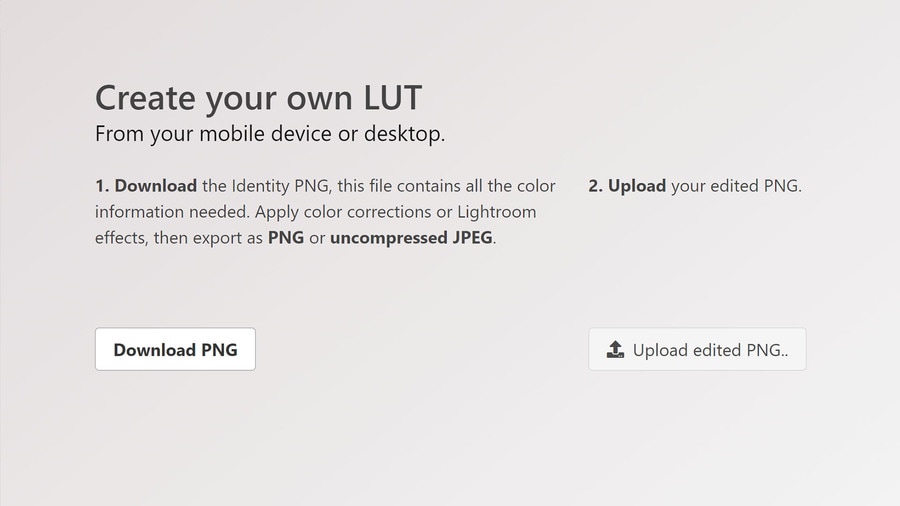
Download the original PNG from <www.onlinelutcreator.com/lutcreator> . Import it into Lightroom as you did in the first step.
Step4
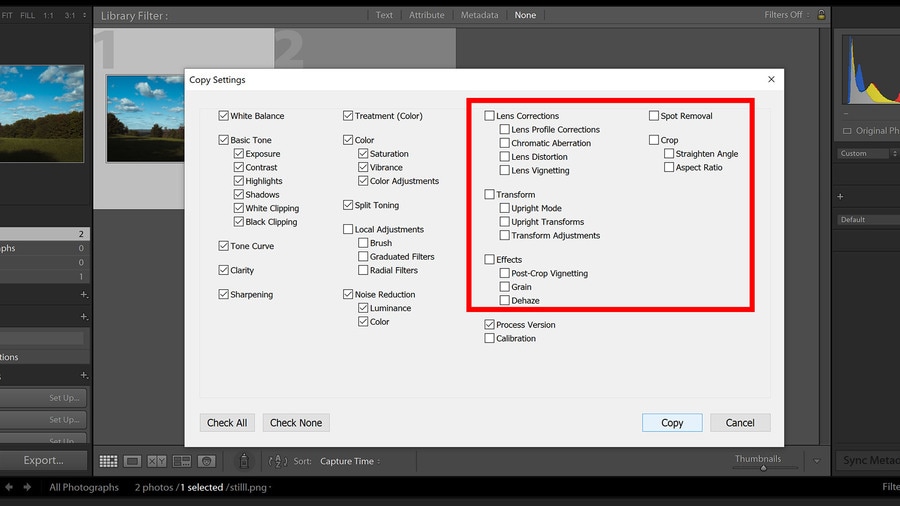
Right-click on your edited photo in the Develop module. Click “Develop Settings,” and select “Copy Settings.” After that, a new window will pop up; make sure you have the same things checked as in the screenshot.
Step5
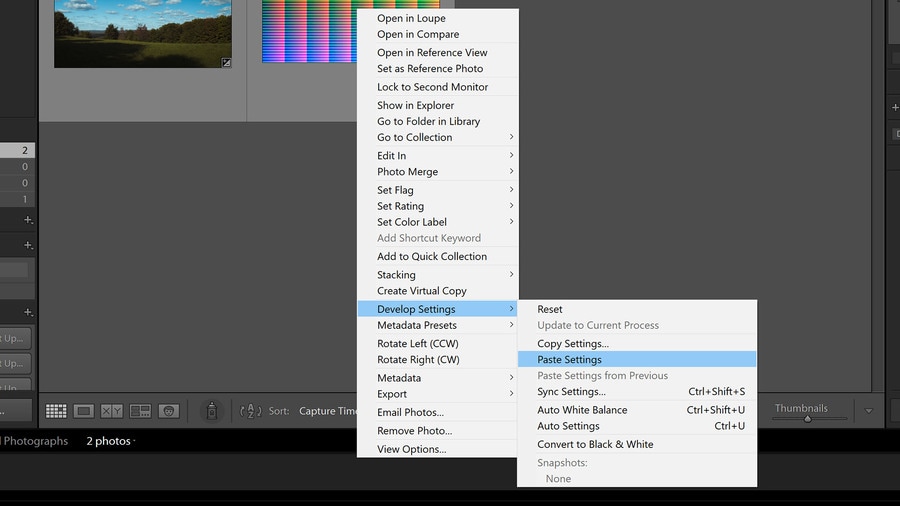
Right-click the original downloaded PNG file in the Develop module. Go to “Develop Settings,” and choose “Paste Settings.” This will paste the settings from your edited photo onto the original PNG.
Step6
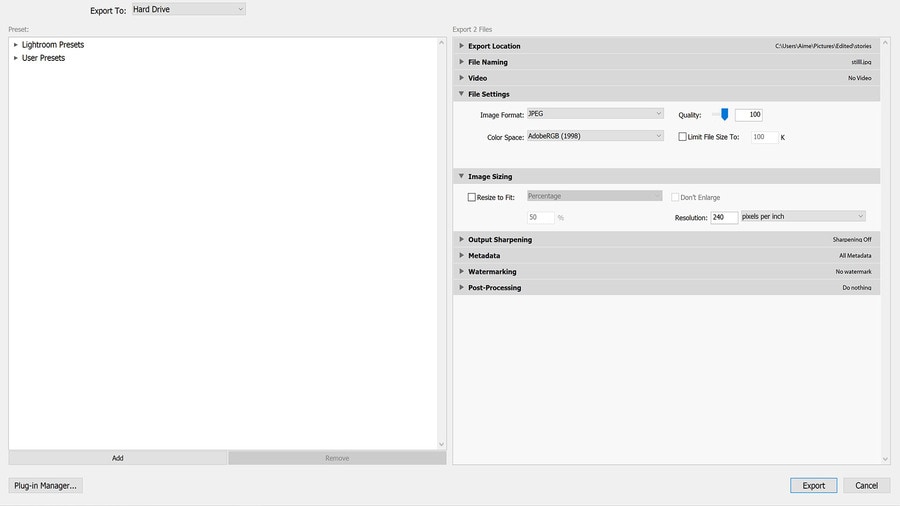
Now export the edited PNG by right-clicking on the PNG and selecting “Export.” In the Export popup menu, ensure you have the same settings as in the screenshot.
Step7
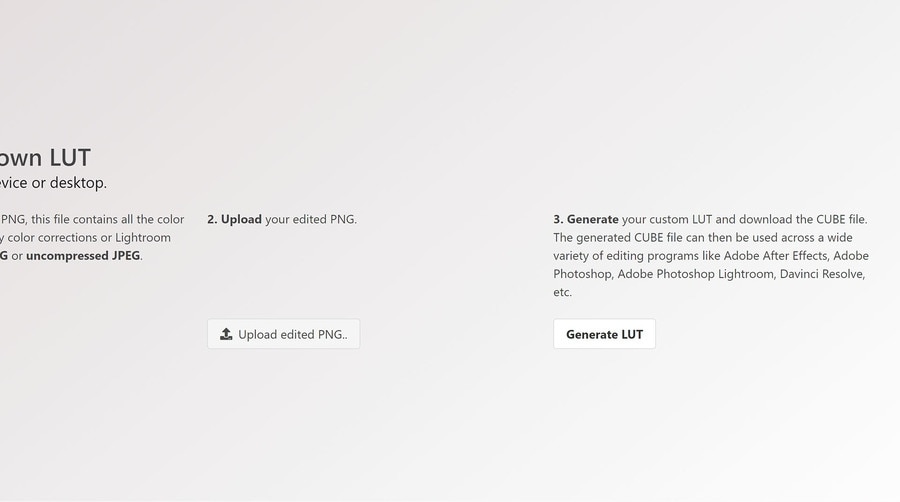
Go back to <www.onlinelutcreator.com/lutcreator> and upload the edited PNG. Generate your LUT and download it. You can now use this LUT to adjust the same color to other videos or photos.
Bonus Part: Wondershare Filmora – The Perfect Tool to Use Your LUTs
Wondershare Filmora is a powerful video editing tool that allows you to use your customized LUTs using this tool. With this tool, you can apply your custom LUTs. Moreover, you can choose from over 200+ pre-made LUTs in its library. Additionally, you can fine-tune your videos with various adjustment and correction options.
Furthermore, you can make changes frame-by-frame to your video footage. This tool also allows you to remove background noises with its AI feature. Moreover, this tool can automatically remove all your long pauses and awkward silence moments from your videos. However, to create a professional video with more options and control, it is a great tool to use.

Key Features To Keep Note of For Wondershare Filmora
- With Filmora, you can select any object or person and change its background. The AI Smart Cutout feature allows you to choose a person to change their background.
- Another fantastic feature is that it gives you access to 10 billion free media files. Moreover, you can select over 200 presets from its in-built for your videos.
- Wondershare Filmora has another unique feature, especially for vloggers and podcasters. With the Auto Ducking feature, music will fade when someone is speaking.
Empower your videos with a new mood using different LUTs. Filmora now offers 100+ top-quality 3D LUTs cover a broad range of scenarios. Transform your videos with Filmora’s powerful 3D LUTs.
Apply LUT on Videos Apply LUT on Videos Learn More

Conclusion
In conclusion, LUTs are essential in modern video and photo editing. They allow editors to apply different color adjustments to color-correct their digital media. There are many pre-made LUTs available online, covering various styles and moods. However, you can create your LUTs with LUT generator-free tools online and offline. You can apply these LUTs using tools like Wondershare Filmora.
- Part 3: How to Create Online LUTs Using Online LUT Creator?
- Bonus Part: Wondershare Filmora – The Perfect Tool to Use Your LUTs
Part 1: An Overview of LUT Generator - The Best Platform for Creating LUTs
LUT Generator is an excellent tool for creating color-grading picture and video presets. This powerful LUT generator-free tool is available on both Windows and Mac. Moreover, you can create LUTs from any photo and video editing application, including Lightroom and Camera Raw. Not only can you create your LUTs, but you can also download presets that are already available.
Furthermore, it offers over 290 cinematic styles LUTs and 50+ LUTs that are optimized for drones and GoPro videos. If you want a surreal look, you can also use 70+ Psychedelia LUTs. This tool allows you to apply third-party effects easily on your photos and videos. Moreover, you can even match the tone of clips from different cameras to give a uniform look.
Part 2: How to Create LUTs Using LUT Generator Free Download?
If you don’t want to apply online LUTs that are available, you can create your own. To do so, you have to download the LUT Generator tool and follow these simple steps to create LUTs.
Step1
To create a LUT of your liking, search for the LUT Generator free download on your browser and download the tool.
Step2
As you launch it, continue to select the “Generate a HALD” option. This option will let you generate a PNG HALD that you can use for color grading using editing software.
Step3
Open the generated PNG HALD into your preferred photo editing application. Apply the desired color correction on the PNG HALD. Save the modified PNG HALD without compression as PNG or at 100% quality in JPG format.
Step4
Click the “Convert to CUBE” button in the LUT Generator and select the modified PNG HALD you saved in the previous step.
Step5
In Preferences, choose the desired size of the 3D LUT as .CUBE format. You can choose between 25x25x25 or 64x64x64. After selecting your desired size, your customized LUT will be created in .CUBE format.

Part 3: How to Create Online LUTs Using Online LUT Creator?
There are two methods to create a LUT online and offline. Previously you’ve learned to generate LUTs using offline tools. However, you can also create LUTs online without installing any tool. This portion will teach you how to create online LUTs in this step-by-step guide.
Step1
Import your photo into Lightroom by dragging and dropping it. You can also import the file by clicking the “File” button and selecting “Import Photos and Video.” For best results, ensure that the photo you will edit is still.

Step2
Edit your photo inside the “Develop” module in Lightroom with your desired preference and style. Only apply changes affecting the colors, not adjustments like noise reduction, vignette, or grain.

Step3
Download the original PNG from <www.onlinelutcreator.com/lutcreator> . Import it into Lightroom as you did in the first step.

Step4
Right-click on your edited photo in the Develop module. Click “Develop Settings,” and select “Copy Settings.” After that, a new window will pop up; make sure you have the same things checked as in the screenshot.

Step5
Right-click the original downloaded PNG file in the Develop module. Go to “Develop Settings,” and choose “Paste Settings.” This will paste the settings from your edited photo onto the original PNG.

Step6
Now export the edited PNG by right-clicking on the PNG and selecting “Export.” In the Export popup menu, ensure you have the same settings as in the screenshot.

Step7
Go back to <www.onlinelutcreator.com/lutcreator> and upload the edited PNG. Generate your LUT and download it. You can now use this LUT to adjust the same color to other videos or photos.

Bonus Part: Wondershare Filmora – The Perfect Tool to Use Your LUTs
Wondershare Filmora is a powerful video editing tool that allows you to use your customized LUTs using this tool. With this tool, you can apply your custom LUTs. Moreover, you can choose from over 200+ pre-made LUTs in its library. Additionally, you can fine-tune your videos with various adjustment and correction options.
Furthermore, you can make changes frame-by-frame to your video footage. This tool also allows you to remove background noises with its AI feature. Moreover, this tool can automatically remove all your long pauses and awkward silence moments from your videos. However, to create a professional video with more options and control, it is a great tool to use.

Key Features To Keep Note of For Wondershare Filmora
- With Filmora, you can select any object or person and change its background. The AI Smart Cutout feature allows you to choose a person to change their background.
- Another fantastic feature is that it gives you access to 10 billion free media files. Moreover, you can select over 200 presets from its in-built for your videos.
- Wondershare Filmora has another unique feature, especially for vloggers and podcasters. With the Auto Ducking feature, music will fade when someone is speaking.
Empower your videos with a new mood using different LUTs. Filmora now offers 100+ top-quality 3D LUTs cover a broad range of scenarios. Transform your videos with Filmora’s powerful 3D LUTs.
Apply LUT on Videos Apply LUT on Videos Learn More

Conclusion
In conclusion, LUTs are essential in modern video and photo editing. They allow editors to apply different color adjustments to color-correct their digital media. There are many pre-made LUTs available online, covering various styles and moods. However, you can create your LUTs with LUT generator-free tools online and offline. You can apply these LUTs using tools like Wondershare Filmora.
How to Add Filters on iMovie
There are times when you record a video and find out that the light and color in the video have been up to the mark. The light could be too bright or too dark while there could be some color overlays in certain portion as well as the entire frame of the video. Thanks to the video editing apps, you can correct any lighting and coloration issues with different filters available to apply to your video.
If you are using iPhone or Mac, you can use Apple’s iMovie app easily. Therefore, you should know how to add filters on iMovie to get the desired output. iMovie app is available for both iPhone and iPad users as well as Mac users. You do not need prior experience in video editing to add filter to your videos to enhance and improve them. We will illustrate the steps on how to add filters in iMovie as well as suggest a better iMovie alternative.
Part 1. How to add filters on iMovie iPhone
If you have an iPhone, you are more likely to record a video with your iPhone. This is because the camera quality of iPhones is extremely good and there are various modes available for capturing different types of videos like slow-motion and time-lapse. Once you capture a video with your iPhone, you can edit the video and add filters to enhance the video quality using iMovie app available for iPhone.
You have to install iMovie app from App Store as it does not come pre-install. If you already have it installed, make sure you update it to the latest version to get all the filters. Here are the steps how to put a filter on a video in iMovie app.
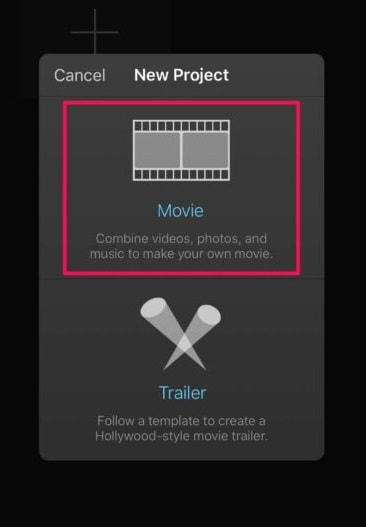
Step1 Open iMovie app on your iPhone. Tap on Create Project option and tap on Movie on the next screen.
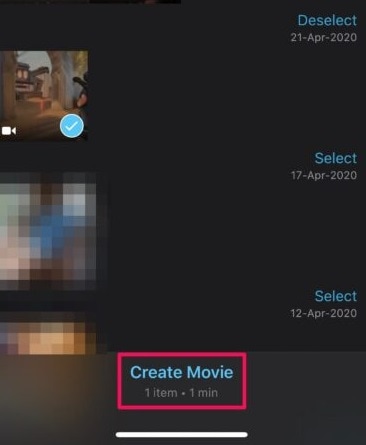
Step2 Select the video from your iPhone that you want to edit and add filters. After your selection, tap on Create Movie option located at the bottom.
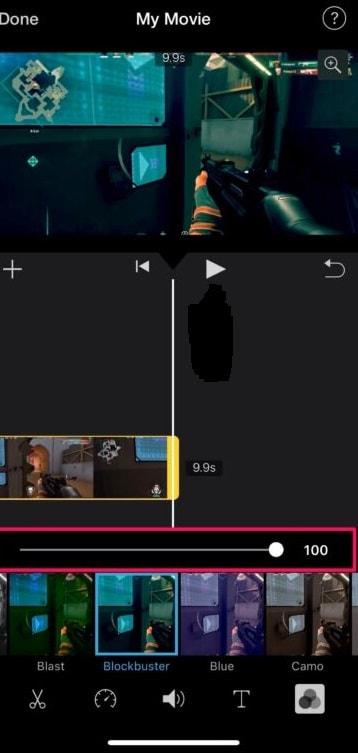
Step3 Your selected video will now be available on the Timeline where you can edit your video. Tap on Filters icon located at the bottom-right corner.
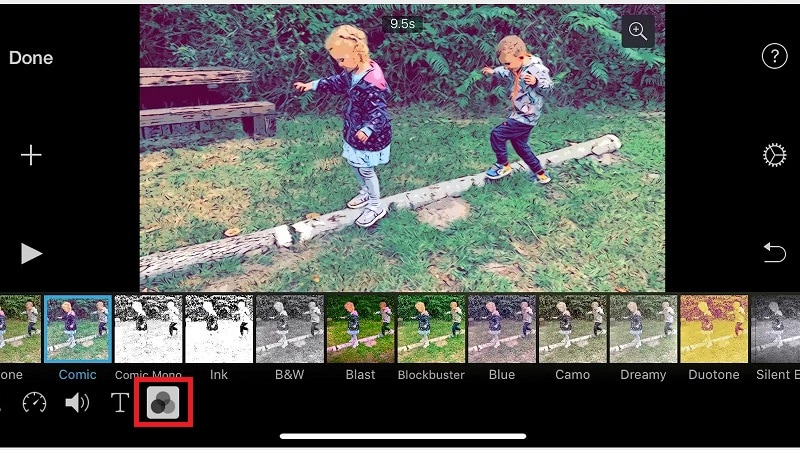
Step4 You will see all the different filters available on iMovie app. You can also find a slider above each selected filter. You can adjust the filter to increase or decrease the filter intensity.
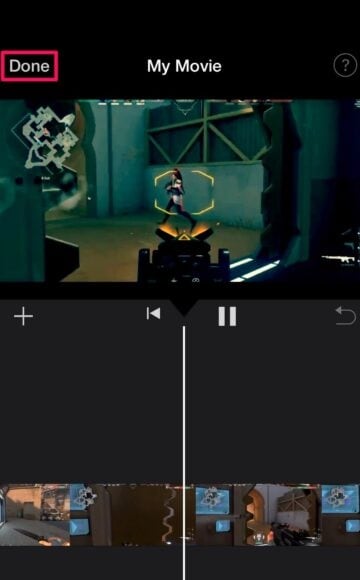
Step5 Tap on Play icon to check how the filter is looking on your video. Once you are satisfied, tap on Done option located at the top-left corner.
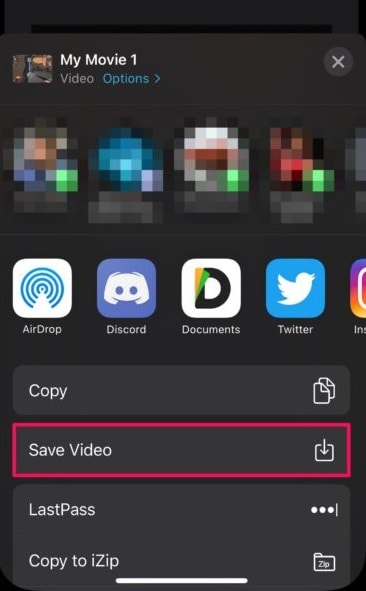
Step6 Tap on Share icon at the bottom and then tap on Save Video option to save the modified video on your iPhone.
Part 2. How to add filters on Mac iMovie
If you are someone who regularly makes videos for social media account or video streaming channel, you are more likely to record your video using a video camera and transfer the recorded video to you Mac for editing purposes. iMovie comes pre-installed on Mac, and therefore, once you have transferred the video, you can get started with editing and adding filters immediately. Here are the steps on how to add filters to iMovie on your Mac.
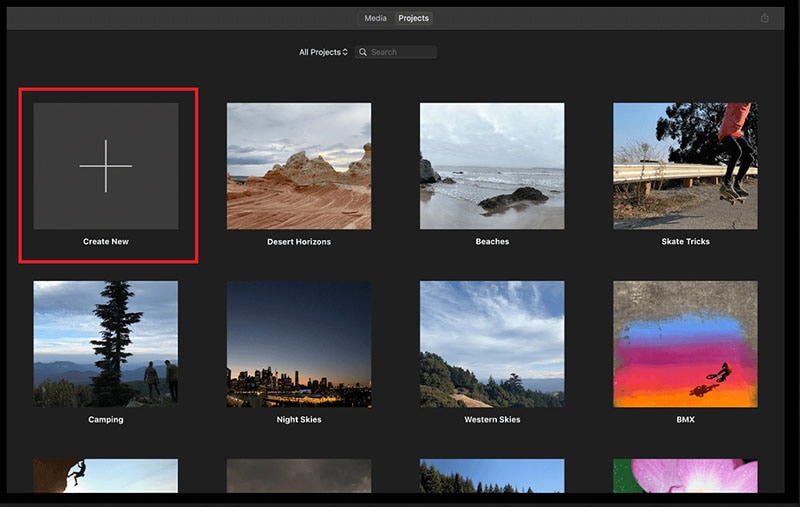
Step1 Launch iMovie from Applications folder. Click on Create New option to start a new Project.
Step2 Drag and drop the target video from Photos app to Desktop. Thereafter, drag and drop the video file from Desktop to the Timeline of iMovie project.
Step3 Click on the video clip on the Timeline and click on Crop Filter and Audio Effects icon above the Viewer.
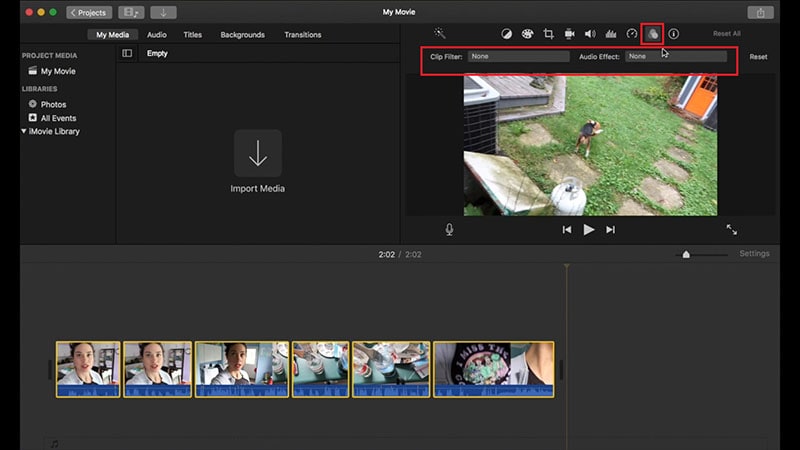
Step4 Click on Clip Filter option and you will see different filters in a window to the left. Place the mouse pointer over the filters, and you will see the filter in the Viewer.
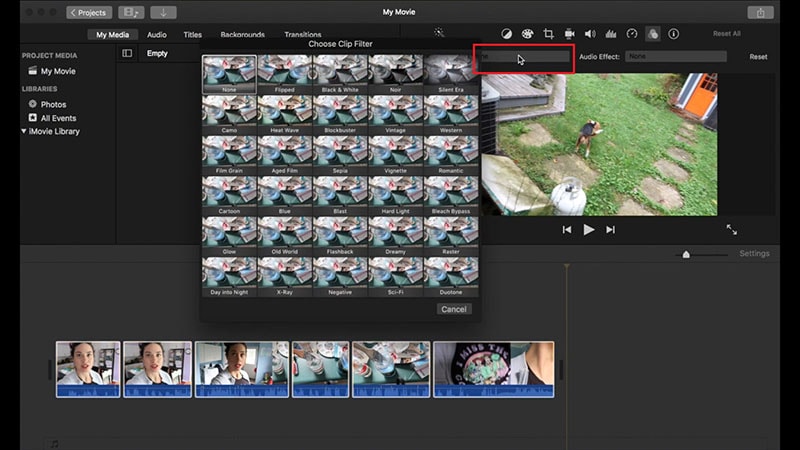
Step5 Once you are satisfied with a filter, click on that filter to apply it to the video clip.
Part 3. iMovie Alternative to add filters on Computer
There are several reasons iMovie filters may not always serve your purpose. For example, there is no way on how to add face filters on iMovie. The collection of filters is rather limited. If you are not satisfied with the filters available on iMovie, there are several iMovie alternatives available. We recommend Wondershare Filmora due to its vast collection of filters of all categories to enhance your video to the next level. Here are steps on how to add filters to your video using Filmora on your computer.
Free Download For Win 7 or later(64-bit)
Free Download For macOS 10.14 or later
Step1 Download and install Wondershare Filmora and it is available for Mac as well as Windows users. Open Filmora and click New Project.
Step2 Drag and drop video clips under Project Media folder. Thereafter, drag and drop video clips to Timeline.

Step3 Go to Effects from the top panel and click on Filters from the left panel. You will see all the different categories of filters.

Step4 Select any filter and drag and drop it on Timeline. You can stretch the duration of the filter as per your requirements.
You can also check Overlay> Utility option from the left panel to add face filters to your video in the same manner. If you want to save the modified video, click on Export button.
Conclusion
If you are an iPhone user or a Mac user, you can add filters to your video using iMovie app. You have to install iMovie app on your iPhone, but iMovie comes pre-installed on Mac. But there are limited filters available on iMovie and there is a lack of face filters which are trending in today’s viral videos. That is why we recommend Wondershare Filmora where there is a wide range of filters available to apply to your video conveniently as per your requirements.
Free Download For macOS 10.14 or later
Step1 Download and install Wondershare Filmora and it is available for Mac as well as Windows users. Open Filmora and click New Project.
Step2 Drag and drop video clips under Project Media folder. Thereafter, drag and drop video clips to Timeline.

Step3 Go to Effects from the top panel and click on Filters from the left panel. You will see all the different categories of filters.

Step4 Select any filter and drag and drop it on Timeline. You can stretch the duration of the filter as per your requirements.
You can also check Overlay> Utility option from the left panel to add face filters to your video in the same manner. If you want to save the modified video, click on Export button.
Conclusion
If you are an iPhone user or a Mac user, you can add filters to your video using iMovie app. You have to install iMovie app on your iPhone, but iMovie comes pre-installed on Mac. But there are limited filters available on iMovie and there is a lack of face filters which are trending in today’s viral videos. That is why we recommend Wondershare Filmora where there is a wide range of filters available to apply to your video conveniently as per your requirements.
Clone Yourself in Videos with Filmora
With the help of video editing programs like Filmora , you can create clones of yourself. Whether you’re looking to create a funny skit or a serious video, cloning yourself can add much production value to your project.
In this article, we’ll walk you through the process of how to clone yourself in videos using Filmora.
Part 1: How to Film Clips for Cloning Effects?
To make cloning effects, you will need to take two different shots and use a tripod to place the camera, so the frame doesn’t change.
Shooting the first clip
For the first shot, stay on one side of the frame and do the first action. For example, you can pretend to yank and take off your jacket. Then, drop the jacket to the other side of the frame.
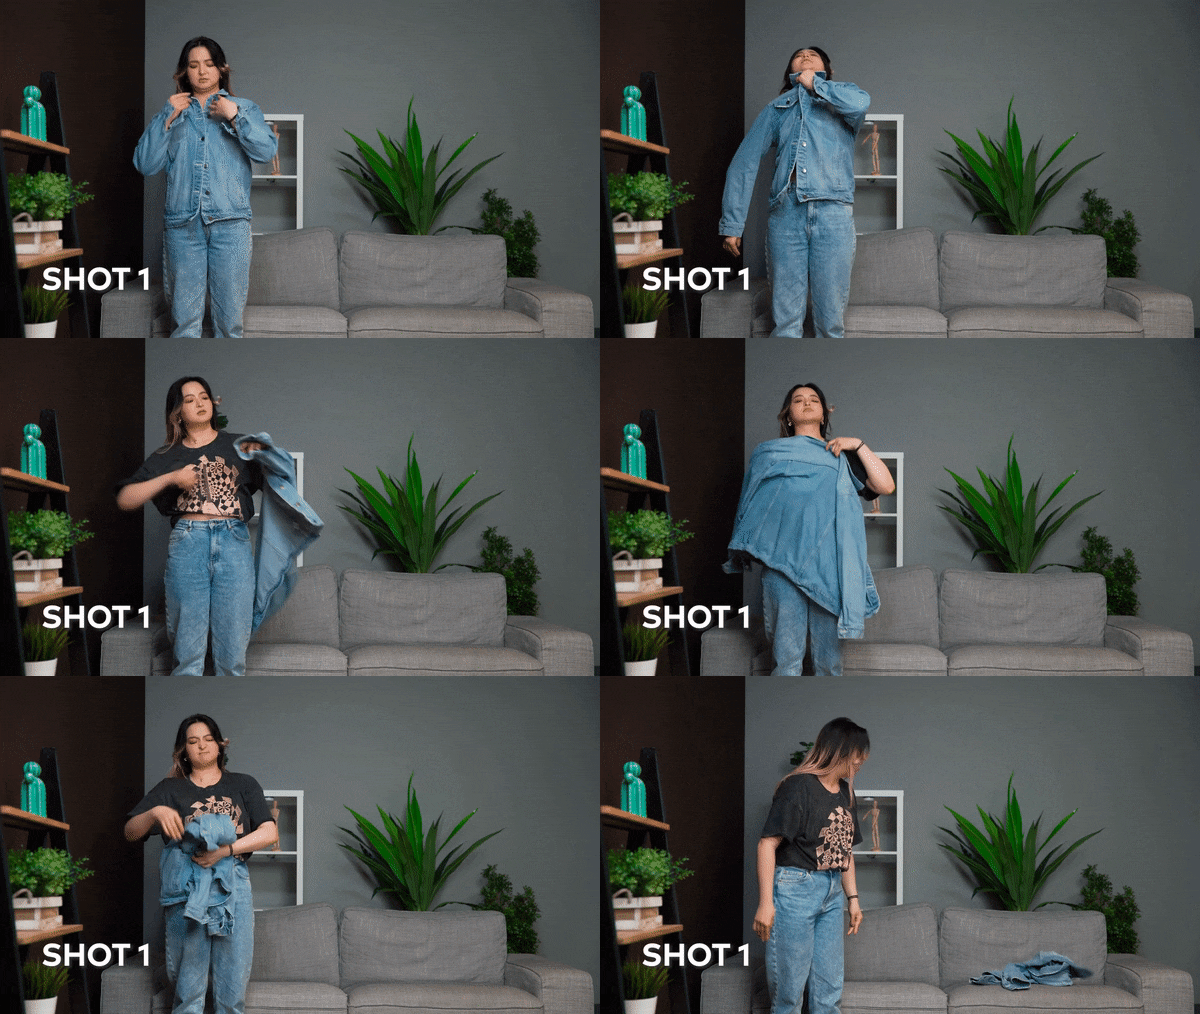
To make it more realistic, make an interaction by reacting to the “clone” while facing the other direction.
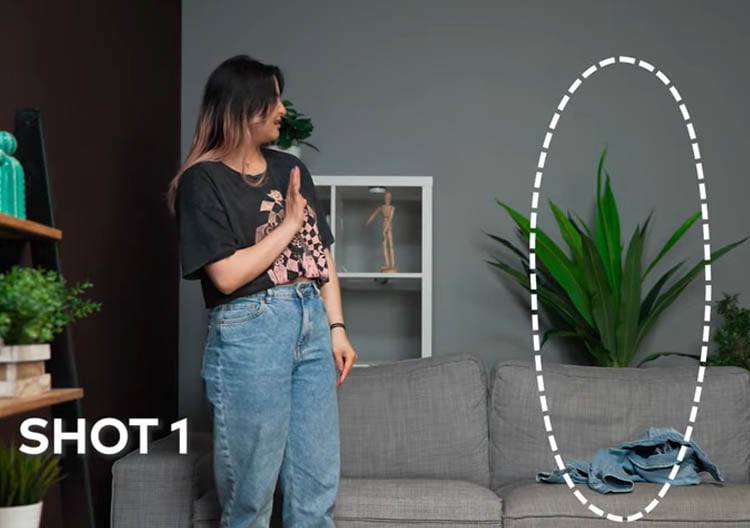
Shooting the second clip
Then, shoot for the second clip without changing the frame. You will have to go to the place where you dropped the jacket from the first shot.
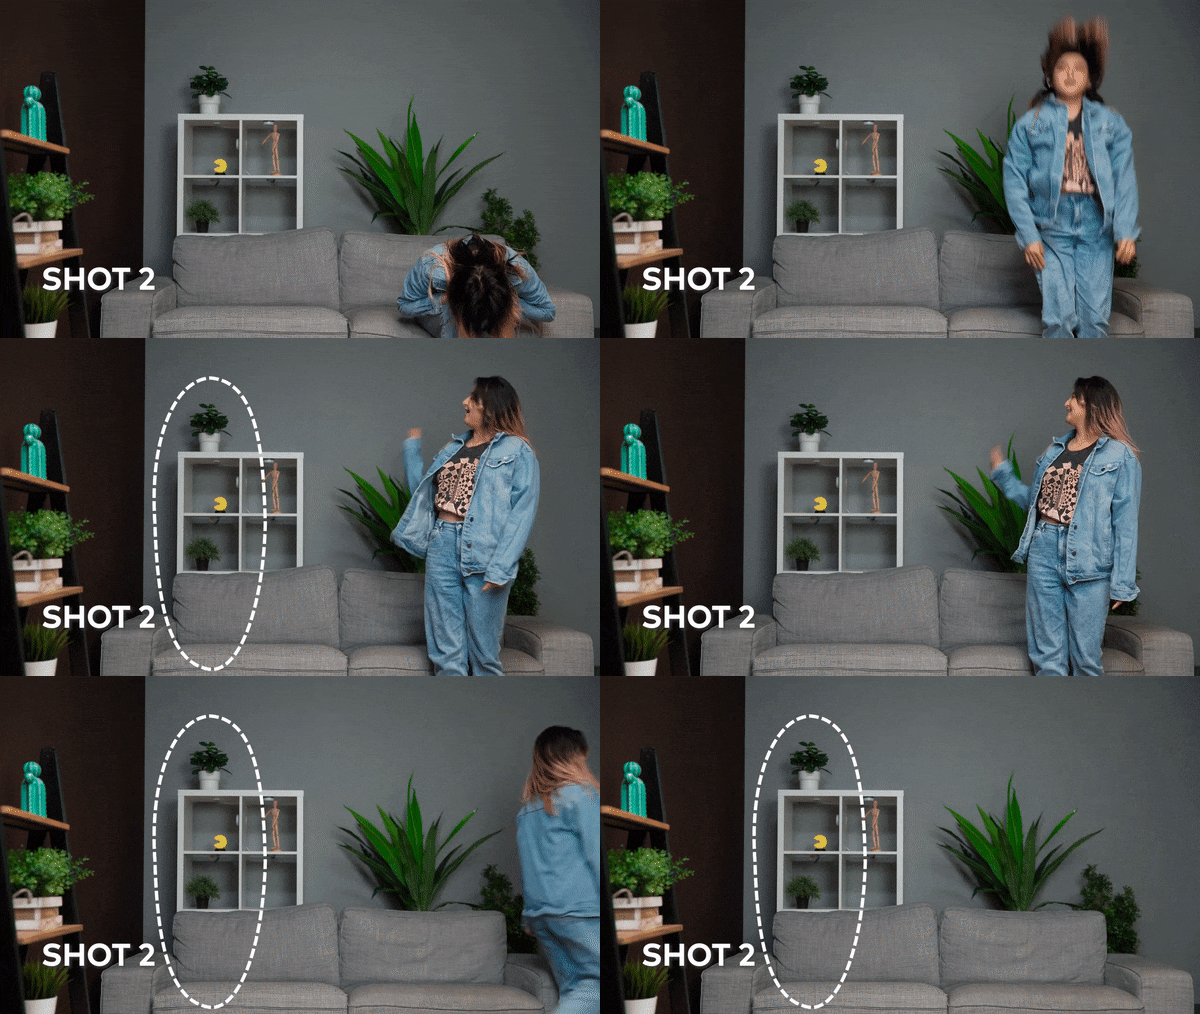
Act as if you have just appeared there and give a reaction to the other side as well.
Part 2: How to Do the Clone Effect with Filmora?
After you have shot the necessary film clips, bring the clips into Filmora 11. If you haven’t installed Filmora yet, you can go to their website and download it here:
Free Download For Win 7 or later(64-bit)
Free Download For macOS 10.14 or later
Once you have opened Filmora 11, follow the steps below:
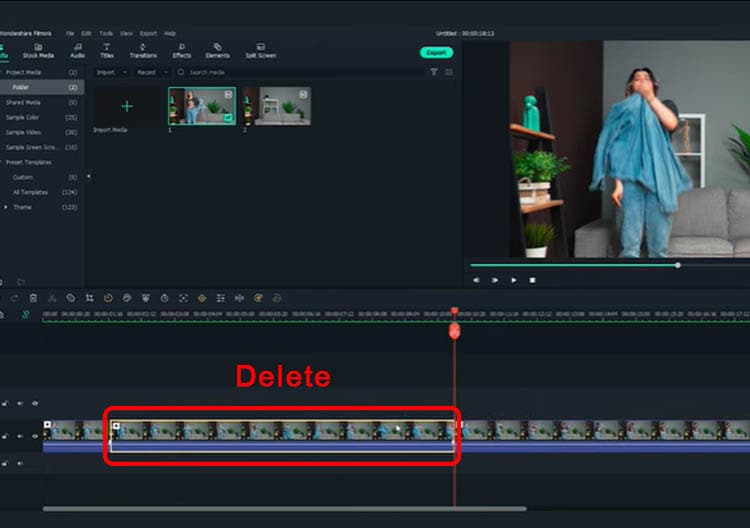
Step1 Bring the first clip to the timeline and cut the clip where you pretend to yank and take off the jacket. Select and delete the unnecessary clip.
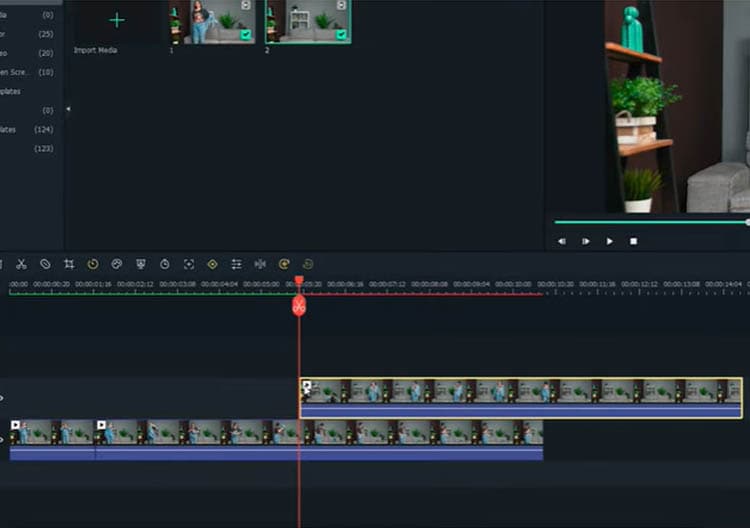
Step2 After you have the first part of the effect ready, let’s start working on the clone part using masking.
First, place the second clip on a different window track, and the starting point is where you react to the “clone.”
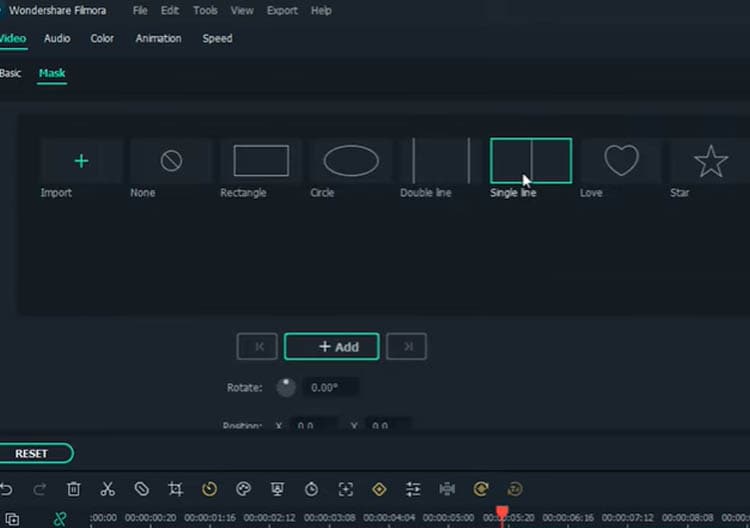
Then, double-click the second clip and go to the Filmora setting window. Tap on the Mask section > Single line.
On the preview screen, adjust the position of the mask to only show “the clone.”
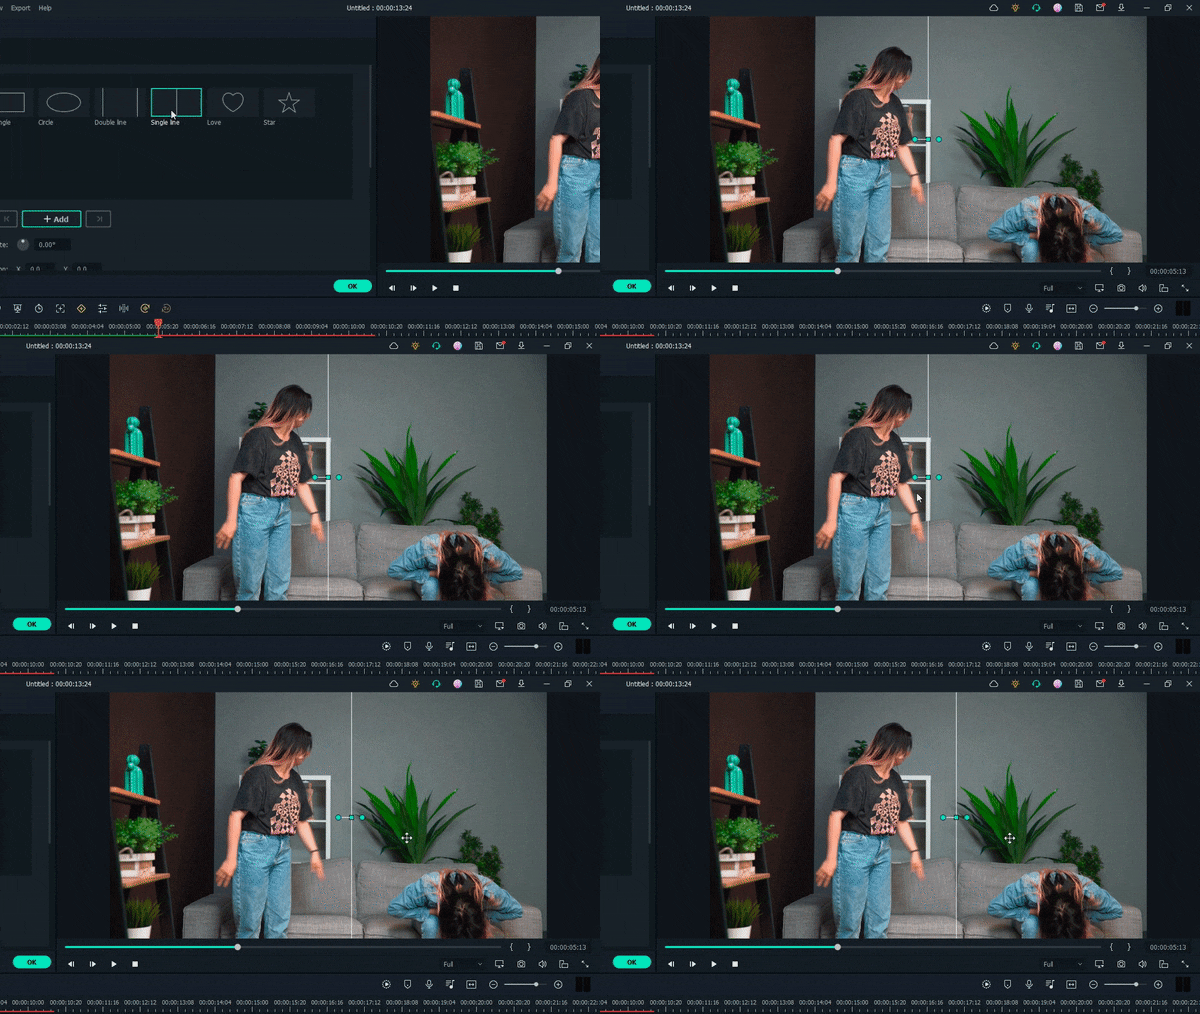
Set the blur strength on the setting to make a smoother edge transition.
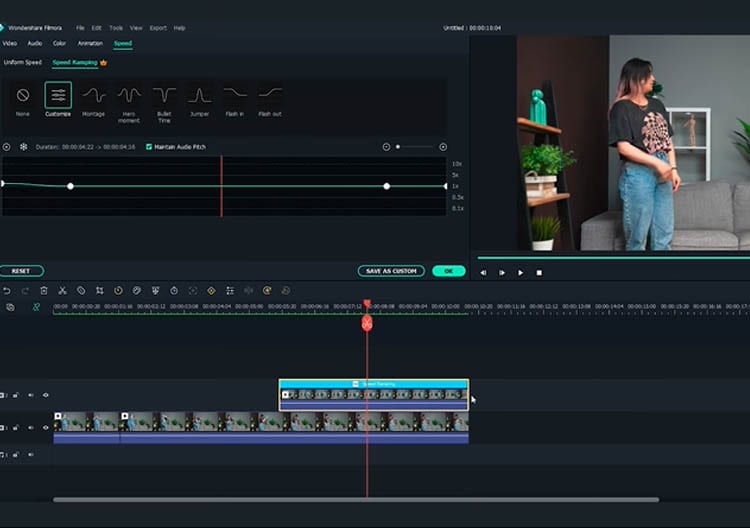
Step3 If the timing of the two clips doesn’t match, you can fix it using the speed ramping feature on Filmora 11. To use it, double-click the second clip and select Speed > Speed Ramping > Customize.

Move the keyframe up to increase the speed. You can adjust it according to your needs.
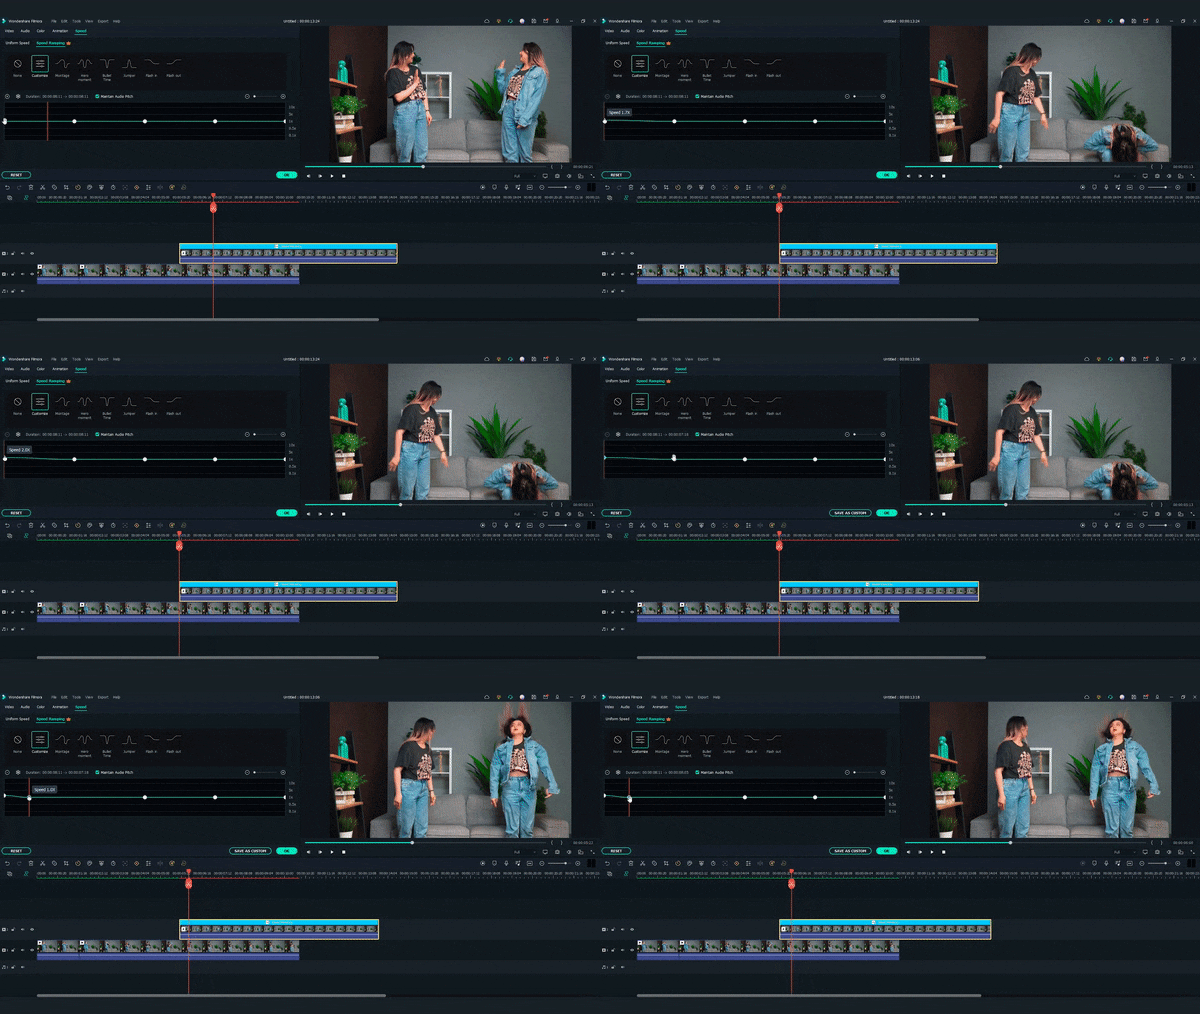
Step4 Once you are satisfied, adjust the clip length on the timeline and make sure that both clips finish at the same time.
Extra tip: Add one more effect to make it more magical.
Step1 Open the Effects window and search for “up down 1.”
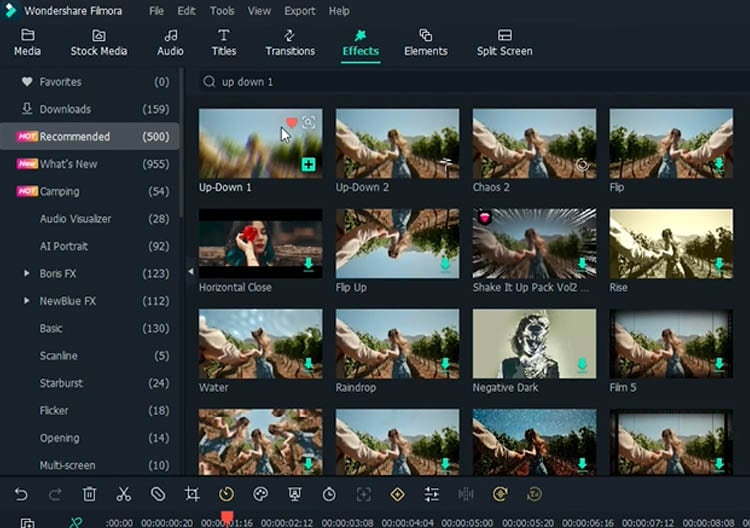
Step2 Drag and drop the effect onto the timeline where the first cut is set. Adjust the effect length to match the action.
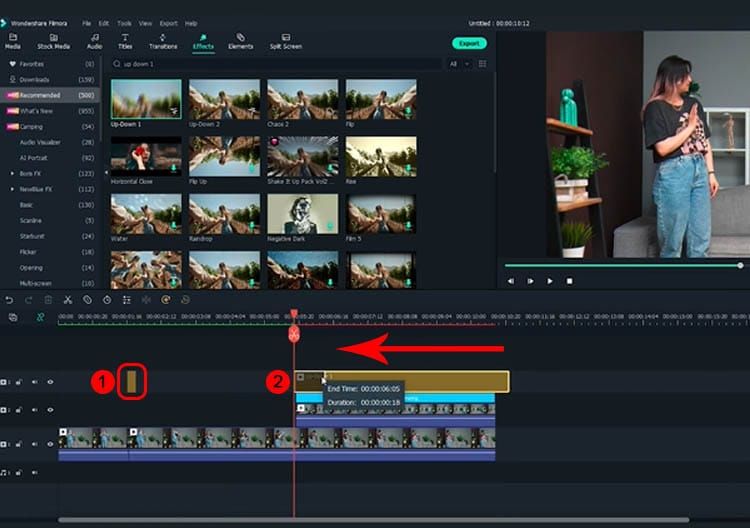
Then, drag and drop the effect again in the transition between the first and the second clip. Adjust it to the appropriate length, then it will give a more dramatic effect.
Step3 You can playback and see how it looks on the preview screen.
Summary
Making a clone effect on video is easy using Filmora. You can use the same trick to create a fashion lookbook video or other creative content to make them more engaging. Let us know if you want to see more tutorials.
Free Download For Win 7 or later(64-bit)
Free Download For macOS 10.14 or later
Free Download For macOS 10.14 or later
Once you have opened Filmora 11, follow the steps below:
Step1 Bring the first clip to the timeline and cut the clip where you pretend to yank and take off the jacket. Select and delete the unnecessary clip.

Step2 After you have the first part of the effect ready, let’s start working on the clone part using masking.
First, place the second clip on a different window track, and the starting point is where you react to the “clone.”

Then, double-click the second clip and go to the Filmora setting window. Tap on the Mask section > Single line.

On the preview screen, adjust the position of the mask to only show “the clone.”

Set the blur strength on the setting to make a smoother edge transition.
Step3 If the timing of the two clips doesn’t match, you can fix it using the speed ramping feature on Filmora 11. To use it, double-click the second clip and select Speed > Speed Ramping > Customize.

Move the keyframe up to increase the speed. You can adjust it according to your needs.

Step4 Once you are satisfied, adjust the clip length on the timeline and make sure that both clips finish at the same time.

Extra tip: Add one more effect to make it more magical.
Step1 Open the Effects window and search for “up down 1.”

Step2 Drag and drop the effect onto the timeline where the first cut is set. Adjust the effect length to match the action.

Then, drag and drop the effect again in the transition between the first and the second clip. Adjust it to the appropriate length, then it will give a more dramatic effect.
Step3 You can playback and see how it looks on the preview screen.
Summary
Making a clone effect on video is easy using Filmora. You can use the same trick to create a fashion lookbook video or other creative content to make them more engaging. Let us know if you want to see more tutorials.
Free Download For Win 7 or later(64-bit)
Free Download For macOS 10.14 or later
Also read:
- [New] 2024 Approved ScreenFlow Mastery on macOS Uncovered
- [New] 2024 Approved Top 10 Gratis Video Call Tools for Virtual Gatherings
- [New] In 2024, Adjust Twitter Video Compact Summary
- [Updated] Action Replay Compare GoPro's Hero5 Black & Session
- Effective Solutions to Resolve Cod: Black Ops Cold War Error 80070057
- Elevate Your Footage The Art of Video Stabilization in FCPX
- How to Effectively Convert iPhone Photos (JPEG, PNG) Into PDFs for 2024
- In 2024, Do You Want to Excel at Using Adobe Premiere Pro Software for Splitting Videos and Audio? Learn About Splitting a Video and Audio Using Different Tools and Add a New Skill to Your Skillset with a Step-by-Step Guide in This Article
- In 2024, Learn How to Convert MP4 Videos to 60 FPS GIFs with This Easy-to-Follow Tutorial. Get Smooth and Crisp Motion in Your GIFs in Just a Few Simple Steps
- New How Do You Create In-Camera Transitions in Your Videos? A Complete Guide for Beginners to Create These Transitions Using Their Camera at Home
- New How To Make a Video by Mouse in Filmora for 2024
- New In This Article Let Me Share with You How to Start a Vlog? Ideas and Any Tips for You to Start Your Own Vlogging Channel
- The Ultimate Guide to 10 Must-Have IG Video Editing Tools
- Title: In 2024, Best Ideas on Using Filmora Green Screen
- Author: Chloe
- Created at : 2025-01-20 19:53:14
- Updated at : 2025-01-24 12:09:47
- Link: https://ai-editing-video.techidaily.com/in-2024-best-ideas-on-using-filmora-green-screen/
- License: This work is licensed under CC BY-NC-SA 4.0.

