
:max_bytes(150000):strip_icc():format(webp)/TheOscarsStatue-33f6c30d7ffd4694a4dd1d1113de57f5.jpg)
In 2024, Best iPhone LUTs App to Use
Best iPhone LUTs App to Use
LUTs are pre-made color settings that you can apply to your pictures and videos to change how they look. These are used by professionals like photographers, filmmakers, and video editors for their work. They can change an image or video’s colors, brightness, and contrast to create different moods. Nowadays, LUTs are even available on smartphones, including iPhones.
This article will explain how to use iPhone LUTs and suggest some excellent apps. You can apply LUTs to your work to give it a more creative and professional touch. Using these, you can take your photo and video editing skills to a whole other level.
- How to Apply LUTs to Edit Video on iPhone?
- What Should a Good LUT Video Editing App Have?
- Wondershare Filmora: A Computer Alternative for Applying LUTs
Part 1: The Top Best Apps for Applying LUTs on iPhone
Lookup Tables are a great way to improve your photos and videos. However, these LUTs are not only available for PCs or Macs but also for smartphones. There are many LUTs for iPhone available that you can apply using these apps.
1. VideoLUT
If you’re looking for an iPhone app to apply LUTs, the VideoLUT app for iPhone is a good choice. This iPhone application has over 2500 LUT presets available for color grading any photo or video. Furthermore, you can change your media files’ Hue, Saturation, and Lighting to make them look better. With so many color grading options available, make your content stand out from the rest.

pros
- This LUTs iPhone app lets you make your own preset of your liking.
- Furthermore, this application supports different formats, including .cube and .3dl.
pros
- Some of the users find the user interface difficult to navigate, slowing the editing process.
Compatibility
iOS: 13.2 and higher
2.Filmic Pro
Filmic Pro is an app that lets you apply LUTs to your media files. With this app, you can import up to 7 LUTs and use them to color-correct your digital content. Apart from this, its camera lets you capture high-quality videos and pictures with manual controls. With these controls, you can adjust the focus, exposure, and other settings to capture a professional-looking image.

pros
- It has a Quick Action Modals feature, which lets all the essential options within your reach.
- Moreover, you can change the speed of your video without compromising the quality.
pros
- Many users are complaining because of the switching from a one-time payment to a subscription model.
Compatibility
iOS: 14.1 and higher
3.VideoGrade
Use the VideoGrade app on your iPhone if you want to give your videos a professional look. This fantastic app lets you import and apply different LUTs to your video footage. Moreover, you can correct the color cast or even poor lighting to improve the color composition. VideoGrade app lets you easily color grade or enhance your videos by changing brightness, saturation, and contrast.

pros
- This iPhone application has in-built filters that you can apply to get a specific color tone.
- You can save your videos in HD, and additionally, you can capture frames from your videos as well.
pros
- On some iPhone versions, this app gets stuck and crashes by deleting the current edit.
Compatibility
iOS: 13.0 and higher
4.Darkroom
Darkroom is another iPhone LUTs free photo and video editing app with many features and options. One of its prominent features is the ability to apply LUTs and filters. LUTs and filters can change the look of your photo or video to create a different mood or style. Besides this, this app allows you to create your own color adjustment and correction presets.

pros
- With its AI technology, you can modify your background, subject, and foreground.
- You can even edit multiple photos simultaneously with its batch-processing feature.
pros
- In some photos, the app automatically changes the white balance even when it’s unnecessary.
Compatibility
iOS: 14.0 and higher
5.Prequel
Prequel is an excellent iOS option to set the tone of your video and image. This powerful app allows you to apply different LUTs, overlays, and filters to your media files. It has over 800 filters and effects available to change the mood and feel of your content. Furthermore, with its editing options, you can enhance your media as much as you want by adjusting its settings.

pros
- Other than the availability of LUTs for iPhone videos, you can also use different in-built templates.
- You can add music, stickers, and even text to your videos and photos.
pros
- The filters you apply are not high quality, and the editing process is a bit complex.
Compatibility
iOS: 13.0 and higher
Empower your videos with a new mood using different LUTs. Filmora now offers 800+ top-quality 3D LUTs cover a broad range of scenarios. Transform your videos with Filmora’s powerful 3D LUTs.
Apply LUT on Videos Apply LUT on Videos Learn More


Part 2: How to Apply LUTs to Edit Video on iPhone?
If you’re having trouble applying LUTs for iPhone videos and images, then don’t worry. Follow these easy and simple steps and apply the LUTs of your choice on your media files. For the guide, we use VideoLUT to help you understand how to apply LUTs on iOS devices.
Step1
Before applying LUT using an iOS device, you must install the application first. Go to the App Store and search for the application. Download the VideoLUT app to make further edits to your image or video footage.

Step2
Open the application and select the “Open” button on the right corner of the screen. After tapping the button, navigate to “LUT Image” and import the LUT of your choice.

Step3
Once you’ve imported your preferred LUT, select the image on which you want it to be applied. To do so, go to the “Open” button and select “Image/Video.” After selecting your desired option, choose the photo or video you want to edit.

Step4
Tap the “Imported” option from the drop-down menu right next to the Open button. Then choose the “IMG” option to access the imported LUT on the mobile application. On the bottom of your screen, select your LUT by tapping it. You can also change the intensity of your LUT for iPhone.

Step5
Once done with your editing, you can download your file by selecting the Save button on the right corner of the screen.

Part 3: What Should a Good LUT Video Editing App Have?
When looking for a good LUT to apply to your videos and photos, there are many things to look for. Some of the important options that a good LUT app should have been discussed here.
- Multiple LUT Formats: A good iPhone LUT app should support different LUT formats such as .cube, .3dl, .look, and more. It allows you to use LUTs from different sources and import them easily into your application.
- Easy LUT Import and Export: The app you are choosing should have an easy-to-use interface. The interface should allow you to import and export LUTs quickly. It saves you time and helps you do the editing quicker.
- Customizable LUTs: You should be able to create custom LUTs for your content. The app should allow you to adjust colors, contrasts, and saturation settings to make editing easy.
- Preview Options: A preview function also is a good option to have in your app. This option allows you to see the LUT effect in your digital media before applying it.
- Multiple Formats Compatibility: Furthermore, the app should be compatible with popular video formats like MP4, AVI, and MOV. With this option, you can edit and export your videos in the format you need.
- Non-Destructive Editing: Moreover, the app should allow you to edit your footage by keeping the original settings alongside. This feature will not affect the original, letting you revert to the original settings if needed.
- User-Friendly Interface: An easy-to-use interface lets you focus on your creativity. A good interface makes the editing process more fluid and easier.
Part 4: Wondershare Filmora: A Computer Alternative for Applying LUTs
Wondershare Filmora is a video editing tool that has been popular for recent years. This tool offers multiple color grading and adjustment options. With its newest update, you get access to over 200 LUTs to change the tone and look of your videos. Besides LUTs, you can also add effects and transitions to your videos to make them look more engaging.
Add LUTs on Video For Win 7 or later(64-bit)
Add LUTs on Video For macOS 10.14 or later
Additionally, this tool has built-in color grading tools that you can use to give your videos a more cinematic feel. Moreover, you can save your edits in up to 4k resolution, giving it a sharper and crispier quality. Its latest update offers many AI features to make your video editing easier. Lastly, users can access its library to choose different filters, overlays, and stock media.

Key Features of Wondershare Filmora
- Wondershare Filmora is a professional video editing tool that offers masking options. You can easily mask any subject in a video with its AI technology for your video edits.
- You can use the same font and text style in all your video clips with batch editing. With this feature, all your texts will be in a similar fashion across all your videos.
- With the integration of AI now, you can generate images using text prompts. This feature allows you to be creative with words to generate a unique image.
Conclusion
To sum up, there are many color correction and adjustment options to change the mood of your content. Similarly, LUTs are a great option to color grade your photos and videos. By integrating LUTs with smartphones, you can now apply LUTs using your iOS devices. There are many LUTs for iPhone footage and images, but more importantly, choosing a good app is important.
- What Should a Good LUT Video Editing App Have?
- Wondershare Filmora: A Computer Alternative for Applying LUTs
Part 1: The Top Best Apps for Applying LUTs on iPhone
Lookup Tables are a great way to improve your photos and videos. However, these LUTs are not only available for PCs or Macs but also for smartphones. There are many LUTs for iPhone available that you can apply using these apps.
1. VideoLUT
If you’re looking for an iPhone app to apply LUTs, the VideoLUT app for iPhone is a good choice. This iPhone application has over 2500 LUT presets available for color grading any photo or video. Furthermore, you can change your media files’ Hue, Saturation, and Lighting to make them look better. With so many color grading options available, make your content stand out from the rest.
pros
- This LUTs iPhone app lets you make your own preset of your liking.
- Furthermore, this application supports different formats, including .cube and .3dl.
pros
- Some of the users find the user interface difficult to navigate, slowing the editing process.
Compatibility
iOS: 13.2 and higher
2.Filmic Pro
Filmic Pro is an app that lets you apply LUTs to your media files. With this app, you can import up to 7 LUTs and use them to color-correct your digital content. Apart from this, its camera lets you capture high-quality videos and pictures with manual controls. With these controls, you can adjust the focus, exposure, and other settings to capture a professional-looking image.
pros
- It has a Quick Action Modals feature, which lets all the essential options within your reach.
- Moreover, you can change the speed of your video without compromising the quality.
pros
- Many users are complaining because of the switching from a one-time payment to a subscription model.
Compatibility
iOS: 14.1 and higher
3.VideoGrade
Use the VideoGrade app on your iPhone if you want to give your videos a professional look. This fantastic app lets you import and apply different LUTs to your video footage. Moreover, you can correct the color cast or even poor lighting to improve the color composition. VideoGrade app lets you easily color grade or enhance your videos by changing brightness, saturation, and contrast.
pros
- This iPhone application has in-built filters that you can apply to get a specific color tone.
- You can save your videos in HD, and additionally, you can capture frames from your videos as well.
pros
- On some iPhone versions, this app gets stuck and crashes by deleting the current edit.
Compatibility
iOS: 13.0 and higher
4.Darkroom
Darkroom is another iPhone LUTs free photo and video editing app with many features and options. One of its prominent features is the ability to apply LUTs and filters. LUTs and filters can change the look of your photo or video to create a different mood or style. Besides this, this app allows you to create your own color adjustment and correction presets.
pros
- With its AI technology, you can modify your background, subject, and foreground.
- You can even edit multiple photos simultaneously with its batch-processing feature.
pros
- In some photos, the app automatically changes the white balance even when it’s unnecessary.
Compatibility
iOS: 14.0 and higher
5.Prequel
Prequel is an excellent iOS option to set the tone of your video and image. This powerful app allows you to apply different LUTs, overlays, and filters to your media files. It has over 800 filters and effects available to change the mood and feel of your content. Furthermore, with its editing options, you can enhance your media as much as you want by adjusting its settings.
pros
- Other than the availability of LUTs for iPhone videos, you can also use different in-built templates.
- You can add music, stickers, and even text to your videos and photos.
pros
- The filters you apply are not high quality, and the editing process is a bit complex.
Compatibility
iOS: 13.0 and higher
Empower your videos with a new mood using different LUTs. Filmora now offers 800+ top-quality 3D LUTs cover a broad range of scenarios. Transform your videos with Filmora’s powerful 3D LUTs.
Apply LUT on Videos Apply LUT on Videos Learn More
Part 2: How to Apply LUTs to Edit Video on iPhone?
If you’re having trouble applying LUTs for iPhone videos and images, then don’t worry. Follow these easy and simple steps and apply the LUTs of your choice on your media files. For the guide, we use VideoLUT to help you understand how to apply LUTs on iOS devices.
Step1
Before applying LUT using an iOS device, you must install the application first. Go to the App Store and search for the application. Download the VideoLUT app to make further edits to your image or video footage.
Step2
Open the application and select the “Open” button on the right corner of the screen. After tapping the button, navigate to “LUT Image” and import the LUT of your choice.
Step3
Once you’ve imported your preferred LUT, select the image on which you want it to be applied. To do so, go to the “Open” button and select “Image/Video.” After selecting your desired option, choose the photo or video you want to edit.
Step4
Tap the “Imported” option from the drop-down menu right next to the Open button. Then choose the “IMG” option to access the imported LUT on the mobile application. On the bottom of your screen, select your LUT by tapping it. You can also change the intensity of your LUT for iPhone.
Step5
Once done with your editing, you can download your file by selecting the Save button on the right corner of the screen.
Part 3: What Should a Good LUT Video Editing App Have?
When looking for a good LUT to apply to your videos and photos, there are many things to look for. Some of the important options that a good LUT app should have been discussed here.
- Multiple LUT Formats: A good iPhone LUT app should support different LUT formats such as .cube, .3dl, .look, and more. It allows you to use LUTs from different sources and import them easily into your application.
- Easy LUT Import and Export: The app you are choosing should have an easy-to-use interface. The interface should allow you to import and export LUTs quickly. It saves you time and helps you do the editing quicker.
- Customizable LUTs: You should be able to create custom LUTs for your content. The app should allow you to adjust colors, contrasts, and saturation settings to make editing easy.
- Preview Options: A preview function also is a good option to have in your app. This option allows you to see the LUT effect in your digital media before applying it.
- Multiple Formats Compatibility: Furthermore, the app should be compatible with popular video formats like MP4, AVI, and MOV. With this option, you can edit and export your videos in the format you need.
- Non-Destructive Editing: Moreover, the app should allow you to edit your footage by keeping the original settings alongside. This feature will not affect the original, letting you revert to the original settings if needed.
- User-Friendly Interface: An easy-to-use interface lets you focus on your creativity. A good interface makes the editing process more fluid and easier.
Part 4: Wondershare Filmora: A Computer Alternative for Applying LUTs
Wondershare Filmora is a video editing tool that has been popular for recent years. This tool offers multiple color grading and adjustment options. With its newest update, you get access to over 200 LUTs to change the tone and look of your videos. Besides LUTs, you can also add effects and transitions to your videos to make them look more engaging.
Add LUTs on Video For Win 7 or later(64-bit)
Add LUTs on Video For macOS 10.14 or later
Additionally, this tool has built-in color grading tools that you can use to give your videos a more cinematic feel. Moreover, you can save your edits in up to 4k resolution, giving it a sharper and crispier quality. Its latest update offers many AI features to make your video editing easier. Lastly, users can access its library to choose different filters, overlays, and stock media.
Key Features of Wondershare Filmora
- Wondershare Filmora is a professional video editing tool that offers masking options. You can easily mask any subject in a video with its AI technology for your video edits.
- You can use the same font and text style in all your video clips with batch editing. With this feature, all your texts will be in a similar fashion across all your videos.
- With the integration of AI now, you can generate images using text prompts. This feature allows you to be creative with words to generate a unique image.
Conclusion
To sum up, there are many color correction and adjustment options to change the mood of your content. Similarly, LUTs are a great option to color grade your photos and videos. By integrating LUTs with smartphones, you can now apply LUTs using your iOS devices. There are many LUTs for iPhone footage and images, but more importantly, choosing a good app is important.
4 Ways to Merge MP4 and MP3
The rising trends in audio and visual effects have introduced the media industry to new dimensions of technology. The screens around us are flickering 24/7 with videos on several topics. But, without the perfect background audios, their underlying message remains unheard. Hence, a balance of sound and picture is necessary to entice the audience and break the monotony. You can also create personalized videos by merging various video clips and adding the background sound afterwards. For this purpose, all you need is a tool that can add audio to your videos.
Let’s look at four different ways of merging audios and videos. The tools will help you craft high-end videos without involving any complex steps. You can make your videos beautiful by using the following easy to use tools.
- Filmora Wondershare
- VLC
- Photos App on Windows 10
- Using the Online Converter
Merge MP4 and MP3 Using Filmora Wondershare
Filmora Video Editor is an editing tool that brings your creativity and productivity to a whole new level. It comes with several editing options for both audio and video. All you need is to let your imagination run wild to give a personalized touch to your videos.
If you want to record podcasts, narration or voiceovers with lowered background music under speech, itsaudio ducking feature comes in handy. Filmora’sauto-synchronization feature is the cherry on top. It facilitates matching your audio with your video in a crispy way. Thus, making the whole experience of customizing video more professional.
Adding more to it, the Filmora Montage maker edits your video automatically to make it smooth with the music of your choice. Thisauto-beat sync feature is user friendly and convenient. Hence, you cannot deny that from beginners to intermediate, Filmora is empowering creators over the globe.
Filmora comes with an in-built audio library that serves the purpose of adding different sounds in the background. Its drag and drop feature make its interface more user friendly.It allows you to add audio files (.MP3, or .WMA) to videos (.Avi, .MP4, .MKV).It supports different audio and video formats that help you create awesome videos.
For Win 7 or later (64-bit)
For macOS 10.14 or later
Here is a step-by-step guide for adding sound to your videos.
Step 1: Importing the Media files (Both Audio and Video)
After you finish installing Wondershare Filmora from the official website on your computer, launch it.
You can import the MP4 and MP3 files by going to the File menu and then selecting import media files.

Tip: The software comes with a huge built-in library. You can also use it to add sound to your project.
Step 2: Adding media files to Timeline
- Now, hover the mouse over the media files that you have imported.
- Use the drag and drop feature to add the mp4 and mp3 files to the timeline.

If you want to modify the audio, the audio panel can be seen by double-tapping the audio from the timeline. This panel will appear at the top of the screen.

You can explore different options ranging from ducking to denoising.
Step 3: Exporting the File
Now that the audio has been added to the video, select the ‘Export’ tab so that you can export your video.

The exported file can be saved in different formats. (MP4, WMV, etc)
Tip: You can rename and define the resolution for better output.
Merge MP4 and MP3 Using VLC Media Player
VLC is an open-source media player that works for different platforms (Windows, Mac and Linux). The media player comes with features ranging from compression to conversion. This multimedia framework supports audio formats like AC-3, DV Audio, FLAC, MP3, Speex, Vorbis. It also supports different video formats.
If your video has no background sound, you can add it to your videos by following simple steps. Not only that, but you can also change the original audio track to make your video an exquisite piece of art.
The majority of people consider VLC as only a media player. But, it works as a video editor as well. Therefore, it allows you to add background sound to your videos. This handy tool supports various streaming protocols along with almost all multimedia files.
Here is a demonstration for adding audio to your video.
Step 1: Installation
The first step would be installing the VLC media player on your computer and launching it afterward.
Click on Media and then select Convert/Save.

A pop-up window will appear in which you have to select the Add option. This will help you load the targeted video.

Step 2: Playing both audio and video in a synchronous manner
- After loading the video, at the bottom of the dialogue box, tick the Show more options.
- Select the option named ‘Play another media synchronously.

Click Browse to import your desired audio. It will open another window.

Step 3: Adding audio
Click + Add on the second Open Media window. It will load the audio files for the video.
- Now, you’ll have your video and audio files in the formats of mp4 and mp3 respectively.

- Click on Convert/Save
- A pop-up window will appear asking about the format you wish to have for your video.

- Also, by selecting Browse, select the destination where you want to save your video.

- Click on Start so that the video and audio can be merged.

Merge MP4 and MP3 Using Windows Photo App
Windows Photo App is home to all audio and video files on your PC. You can view, edit and store your audio and video files in it. It also allows you to share those among your family and friends. The tool comes with an AI-powered assistant to manage your media efficiently. Hence, you can find your required media files faster.
With its editing features, you can bring dull moments to life. It lets you integrate photos and videos into third-party apps so that you may transform your mundane videos into extraordinary ones.
The App also comes with a backup feature that makes it a safe home for your life’s memories.
If you want to merge recordings of small video clips in no time, then Windows Photo App will assist you in doing it in a jiff. It is a built-in app for Windows 10 and comes with the easiest ways of adding sound to your videos.
Have a look at the following steps.
You can find the Windows Photo app on your desktop or press the Windows + S to open the Start menu search and type Photos in the search box.

- Click on the video editor tab.
- Select the New Video project to start a blank project.

A dialogue box will appear asking to add the desired project name. Enter the name.

You’ll see an add button on the left side. By selecting it, a drop-down menu will appear. It will show you different options for adding video to your project.

Select the desired option and add the video clips.

Adjust the order of your videos by dragging the videos in the storyboard.

- You can trim, split and rotate your videos here.
- It also allows you to use various filters, texts and 3D effects.
- After completing the editing, select the finish video button on the menu bar.
- Select your preferred video quality.
You can add audio by selecting the Custom Audio option.

You will see a window-pane on the right side with different options for adding the sound. You can add it by the drag and drop feature or by clicking on the add file option.


- Select Done to complete the process.
- You have successfully added mp3 to your video file**.**
- Tap on Finish video in the upper right corner to complete the process.

- You can also select the quality of your video.

Click on Export to save your file to your desired destination.
Merge MP4 and MP3 Using Using Online Converter
Different online resources on the internet will help combine videos. You do not have to go through the hassle of downloading and installing third-party apps. Online Converter supports different formats like MP4, AVI, FLV, MOV, 3GP, MKV, etc. With it, you can combine multiple video files into a single file in no time. The most popular output format is MP4.
The procedure is simple. You have to upload your video clips on Online Converter in the order that you want in the final output.

You’ll navigate to a page with options for adding the media files by clicking on the choose file.

After uploading the media files. You will also see options for the audio in a drop-down menu.

Select the Add option to merge mp3 to mp4.

After the mp3 is merged to the mp4, you can download the converted file or share it via social media as well.

Disadvantages
- If your internet connectivity is poor, the videos may take longer to upload.
- If the response time is slow, you need to cancel the process and re-submit the data.
- Encrypted or protected video files are not supported for the merger of the videos.
Conclusion
Each tool comes with its pros and cons. With the wide range of video editing options, you can explore these different platforms and add life to your moments. Whether you are a beginner or an intermediate, editing multimedia files has been made easy by these different tools.
For macOS 10.14 or later
Here is a step-by-step guide for adding sound to your videos.
Step 1: Importing the Media files (Both Audio and Video)
After you finish installing Wondershare Filmora from the official website on your computer, launch it.
You can import the MP4 and MP3 files by going to the File menu and then selecting import media files.
Tip: The software comes with a huge built-in library. You can also use it to add sound to your project.
Step 2: Adding media files to Timeline
- Now, hover the mouse over the media files that you have imported.
- Use the drag and drop feature to add the mp4 and mp3 files to the timeline.
If you want to modify the audio, the audio panel can be seen by double-tapping the audio from the timeline. This panel will appear at the top of the screen.
You can explore different options ranging from ducking to denoising.
Step 3: Exporting the File
Now that the audio has been added to the video, select the ‘Export’ tab so that you can export your video.
The exported file can be saved in different formats. (MP4, WMV, etc)
Tip: You can rename and define the resolution for better output.
Merge MP4 and MP3 Using VLC Media Player
VLC is an open-source media player that works for different platforms (Windows, Mac and Linux). The media player comes with features ranging from compression to conversion. This multimedia framework supports audio formats like AC-3, DV Audio, FLAC, MP3, Speex, Vorbis. It also supports different video formats.
If your video has no background sound, you can add it to your videos by following simple steps. Not only that, but you can also change the original audio track to make your video an exquisite piece of art.
The majority of people consider VLC as only a media player. But, it works as a video editor as well. Therefore, it allows you to add background sound to your videos. This handy tool supports various streaming protocols along with almost all multimedia files.
Here is a demonstration for adding audio to your video.
Step 1: Installation
The first step would be installing the VLC media player on your computer and launching it afterward.
Click on Media and then select Convert/Save.
A pop-up window will appear in which you have to select the Add option. This will help you load the targeted video.
Step 2: Playing both audio and video in a synchronous manner
- After loading the video, at the bottom of the dialogue box, tick the Show more options.
- Select the option named ‘Play another media synchronously.
Click Browse to import your desired audio. It will open another window.
Step 3: Adding audio
Click + Add on the second Open Media window. It will load the audio files for the video.
- Now, you’ll have your video and audio files in the formats of mp4 and mp3 respectively.
- Click on Convert/Save
- A pop-up window will appear asking about the format you wish to have for your video.
- Also, by selecting Browse, select the destination where you want to save your video.
- Click on Start so that the video and audio can be merged.
Merge MP4 and MP3 Using Windows Photo App
Windows Photo App is home to all audio and video files on your PC. You can view, edit and store your audio and video files in it. It also allows you to share those among your family and friends. The tool comes with an AI-powered assistant to manage your media efficiently. Hence, you can find your required media files faster.
With its editing features, you can bring dull moments to life. It lets you integrate photos and videos into third-party apps so that you may transform your mundane videos into extraordinary ones.
The App also comes with a backup feature that makes it a safe home for your life’s memories.
If you want to merge recordings of small video clips in no time, then Windows Photo App will assist you in doing it in a jiff. It is a built-in app for Windows 10 and comes with the easiest ways of adding sound to your videos.
Have a look at the following steps.
You can find the Windows Photo app on your desktop or press the Windows + S to open the Start menu search and type Photos in the search box.
- Click on the video editor tab.
- Select the New Video project to start a blank project.
A dialogue box will appear asking to add the desired project name. Enter the name.
You’ll see an add button on the left side. By selecting it, a drop-down menu will appear. It will show you different options for adding video to your project.
Select the desired option and add the video clips.
Adjust the order of your videos by dragging the videos in the storyboard.
- You can trim, split and rotate your videos here.
- It also allows you to use various filters, texts and 3D effects.
- After completing the editing, select the finish video button on the menu bar.
- Select your preferred video quality.
You can add audio by selecting the Custom Audio option.
You will see a window-pane on the right side with different options for adding the sound. You can add it by the drag and drop feature or by clicking on the add file option.
- Select Done to complete the process.
- You have successfully added mp3 to your video file**.**
- Tap on Finish video in the upper right corner to complete the process.
- You can also select the quality of your video.
Click on Export to save your file to your desired destination.
Merge MP4 and MP3 Using Using Online Converter
Different online resources on the internet will help combine videos. You do not have to go through the hassle of downloading and installing third-party apps. Online Converter supports different formats like MP4, AVI, FLV, MOV, 3GP, MKV, etc. With it, you can combine multiple video files into a single file in no time. The most popular output format is MP4.
The procedure is simple. You have to upload your video clips on Online Converter in the order that you want in the final output.
You’ll navigate to a page with options for adding the media files by clicking on the choose file.
After uploading the media files. You will also see options for the audio in a drop-down menu.
Select the Add option to merge mp3 to mp4.
After the mp3 is merged to the mp4, you can download the converted file or share it via social media as well.
Disadvantages
- If your internet connectivity is poor, the videos may take longer to upload.
- If the response time is slow, you need to cancel the process and re-submit the data.
- Encrypted or protected video files are not supported for the merger of the videos.
Conclusion
Each tool comes with its pros and cons. With the wide range of video editing options, you can explore these different platforms and add life to your moments. Whether you are a beginner or an intermediate, editing multimedia files has been made easy by these different tools.
Easy Steps to Slow Down a Video on iPhone and Android
How to edit a video to slow motion on iPhone and Android? Slow motion is an important part of video editing. You would be enhancing your feature-length films or simply preparing cool stuff for posting on social media. By slowing down some or all the scenes of your video, you make it appear cool and more interesting. The slo mo allows viewers to notice specific details of your videos or focus on what you want them to. To show you how to make slow motion video in Android and iPhone, we are going to introduce a versatile video editing app that works well on both platforms. This article will provide the step-by-step process on how to edit video to slow motion on iPhone and Android using Wondershare Filmora.
Slow Motion Maker Slow your video’s speed with better control of your keyframes to create unique cinematic effects!
Free Download Free Download Learn More
Part 1. How to Make Slow Motion Videos on iPhone With Filmora : 2 Ways
Creating slo mo videos is a staple in video editing, which helps make videos more cinematic and engaging. Understanding how to edit iPhone slow motion video will help you to create quality videos on the go. It also gives you more freedom in how you tell your visual story or keeping the attention of your viewers throughout the video.
Free Download For Win 7 or later(64-bit)
Free Download For macOS 10.14 or later
When you slow motion a video, you make it easier for your viewers to observe details in every minute. This is also an effective way to add emotional weight or a dramatic flair to your videos. Let’s explore how to edit a video slow motion on iPhone with Wondershare Filmora.
Step 1: Download Wondershare Filmora
Open the App Store on your phone. Search for Wondershare Filmora, download and launch the app on your phone. Follow the instructions on the screen to create a Filmora account or log in to an existing one to start using the app.

Step 2: Import Video to Filmora
Once you open the Filmora app, tap the + button and import the video you want to edit from your photo library.

Step 3: Slow Down the Video
Once you have imported the video, slow it down to your desired speed. You have two ways to achieve this with Filmora for iPhone:
Method 1Use the Uniform Speed Slider
Tap on the video clip, and at the bottom of the screen, select the speed slider. Adjust the slider to the right or left to adjust the speed of your video. Then tap Done, and save your video.

Method 2Use the Speed Ramping Feature
The speed ramping feature will gradually change the speed of your video. When done right, speed ramps in a video add a cinematic feel and look. Tap on the video clip. Then tap on the Speed Ramping feature at the bottom of the screen. Use the graph that appears to set the speed ramp for your video. You may choose the presets already available or customize the speed based on your own desired setting. Tap Done when you are satisfied and save the video.

Part 2. How to Make Slow Motion Videos on Android with Filmora : 2 Ways
The Android operating systems does allow you to slow down or speed up video. However, third-party apps like Wondershare Filmors provide more versatile and better outcomes. The app helps you quickly change the playback speed of a video. It is a great choice for anyone wondering how to make slow motion video in Android.
You can opt for speeding up or slowing down the video based on what you specifically want to achieve. There is also the option to use the Speed Ramp feature which allows you to customize different speed rates for the same clip. In some circumstances, combining the two features can produce exceptional results in your video editing projects. Let’s have a look at how you can use this app on your Android phone.
Free Download For Win 7 or later(64-bit)
Free Download For macOS 10.14 or later
Step 1: Download and Install Filmora
Search for Wondershare Filmora in the Google Play Store. The app is available for Android devices running Android 7.0 or higher, making it compatible with a wide range of devices. Download and install the Filmora: AI Video Editor and Maker app on your Android phone. Start the app and follow the instructions to create a new or sign into an existing account.

Step 2: Import Your Video into Filmora
Once you start the Filmora app on your Android device, tap the + button and select the video you want to import. This will add the video files in Filmora to start editing its specific components, including speed.

Step 3: Adjust the Speed with Filmora
Filmora for Android offers two methods to edit the speed of your video. You can use the speed slider for direct editing or the Speed Ramping feature for a more creative approach.
Method 1Use the Uniform Speed Slider
Tap the video that you have imported. Then, select the speed slider at the bottom of the screen. Adjust the speed of the video by dragging the speed slider to the left or right. Once satisfied, tap the Check button and save your video.

Method 2Use the Speed Ramping Feature
With the Speed Ramping feature, adjust the speed of your Android video gradually in a more creative manner. You may slow it down at the beginning or the end while accelerating the middle. This makes the video fun and more engaging to your audience.
To use this feature on Filmora for Android, tap on the video clip and select the Speed Ramping icon at the bottom of the screen. Use the graph that appears to adjust how you want the video to slow down or speed up when playing it back. Tap on the Check button once done and save your video.

Conclusion
Creating slow-motion videos is a vital skill in video editing. It improves visual storytelling and keeps your audience more engaging by focusing on the most important aspects of your videos. Wondering how to edit slo mo video on iPhone and Android devices, Wondershare Filmora offers an intuitive feature to do this. The user-friendly tool is effective in slowing down videos on both iPhone and Android phones. Download the app App Store for iPhone and Play Store for Android to enhance your slow-motion videos and unleash the creativity of mobile phone video editing.
Free Download Free Download Learn More
Part 1. How to Make Slow Motion Videos on iPhone With Filmora : 2 Ways
Creating slo mo videos is a staple in video editing, which helps make videos more cinematic and engaging. Understanding how to edit iPhone slow motion video will help you to create quality videos on the go. It also gives you more freedom in how you tell your visual story or keeping the attention of your viewers throughout the video.
Free Download For Win 7 or later(64-bit)
Free Download For macOS 10.14 or later
When you slow motion a video, you make it easier for your viewers to observe details in every minute. This is also an effective way to add emotional weight or a dramatic flair to your videos. Let’s explore how to edit a video slow motion on iPhone with Wondershare Filmora.
Step 1: Download Wondershare Filmora
Open the App Store on your phone. Search for Wondershare Filmora, download and launch the app on your phone. Follow the instructions on the screen to create a Filmora account or log in to an existing one to start using the app.
Step 2: Import Video to Filmora
Once you open the Filmora app, tap the + button and import the video you want to edit from your photo library.
Step 3: Slow Down the Video
Once you have imported the video, slow it down to your desired speed. You have two ways to achieve this with Filmora for iPhone:
Method 1Use the Uniform Speed Slider
Tap on the video clip, and at the bottom of the screen, select the speed slider. Adjust the slider to the right or left to adjust the speed of your video. Then tap Done, and save your video.
Method 2Use the Speed Ramping Feature
The speed ramping feature will gradually change the speed of your video. When done right, speed ramps in a video add a cinematic feel and look. Tap on the video clip. Then tap on the Speed Ramping feature at the bottom of the screen. Use the graph that appears to set the speed ramp for your video. You may choose the presets already available or customize the speed based on your own desired setting. Tap Done when you are satisfied and save the video.
Part 2. How to Make Slow Motion Videos on Android with Filmora : 2 Ways
The Android operating systems does allow you to slow down or speed up video. However, third-party apps like Wondershare Filmors provide more versatile and better outcomes. The app helps you quickly change the playback speed of a video. It is a great choice for anyone wondering how to make slow motion video in Android.
You can opt for speeding up or slowing down the video based on what you specifically want to achieve. There is also the option to use the Speed Ramp feature which allows you to customize different speed rates for the same clip. In some circumstances, combining the two features can produce exceptional results in your video editing projects. Let’s have a look at how you can use this app on your Android phone.
Free Download For Win 7 or later(64-bit)
Free Download For macOS 10.14 or later
Step 1: Download and Install Filmora
Search for Wondershare Filmora in the Google Play Store. The app is available for Android devices running Android 7.0 or higher, making it compatible with a wide range of devices. Download and install the Filmora: AI Video Editor and Maker app on your Android phone. Start the app and follow the instructions to create a new or sign into an existing account.
Step 2: Import Your Video into Filmora
Once you start the Filmora app on your Android device, tap the + button and select the video you want to import. This will add the video files in Filmora to start editing its specific components, including speed.
Step 3: Adjust the Speed with Filmora
Filmora for Android offers two methods to edit the speed of your video. You can use the speed slider for direct editing or the Speed Ramping feature for a more creative approach.
Method 1Use the Uniform Speed Slider
Tap the video that you have imported. Then, select the speed slider at the bottom of the screen. Adjust the speed of the video by dragging the speed slider to the left or right. Once satisfied, tap the Check button and save your video.
Method 2Use the Speed Ramping Feature
With the Speed Ramping feature, adjust the speed of your Android video gradually in a more creative manner. You may slow it down at the beginning or the end while accelerating the middle. This makes the video fun and more engaging to your audience.
To use this feature on Filmora for Android, tap on the video clip and select the Speed Ramping icon at the bottom of the screen. Use the graph that appears to adjust how you want the video to slow down or speed up when playing it back. Tap on the Check button once done and save your video.
Conclusion
Creating slow-motion videos is a vital skill in video editing. It improves visual storytelling and keeps your audience more engaging by focusing on the most important aspects of your videos. Wondering how to edit slo mo video on iPhone and Android devices, Wondershare Filmora offers an intuitive feature to do this. The user-friendly tool is effective in slowing down videos on both iPhone and Android phones. Download the app App Store for iPhone and Play Store for Android to enhance your slow-motion videos and unleash the creativity of mobile phone video editing.
Steps To Fade Audio In Premier Pro
Audio is a very big part of any video project and it can make or break the video project. This is why it is very important to not just choose a video editor that also offers audio editing, but one that is easy to use and offers a lot of editing options. This way, you can edit the audio in your project to suit your video’s production and end up with a great professional final product.
One of the video editing tools that offer features that can accomplish all that is Adobe Premier Pro. In this article, we will look at how you can use Premier Pro to fade audio in or out.
Steps to Fade Audio in Premier Pro
Premier Pro gives you two different options to fade audio in or out. Let’s look at both options and then you can choose the one that suits you best;
Fade Audio using Crossfade Audio Transition
Step1To begin, open Premier Pro on your computer and then open the audio that you want to edit.
Step2Once it is open, select the audio clip in the timeline and then click on “Sequence” at the top menu and select “Apply Audio Transition.”
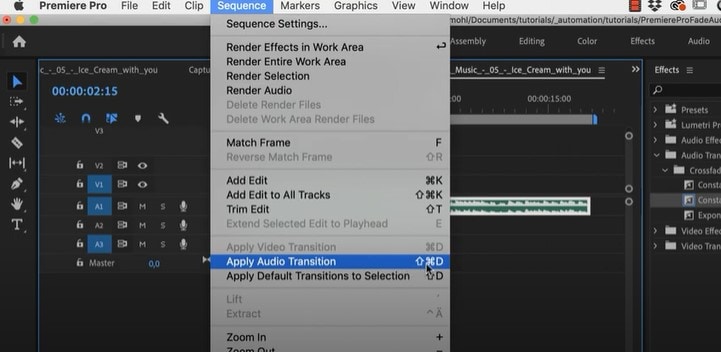
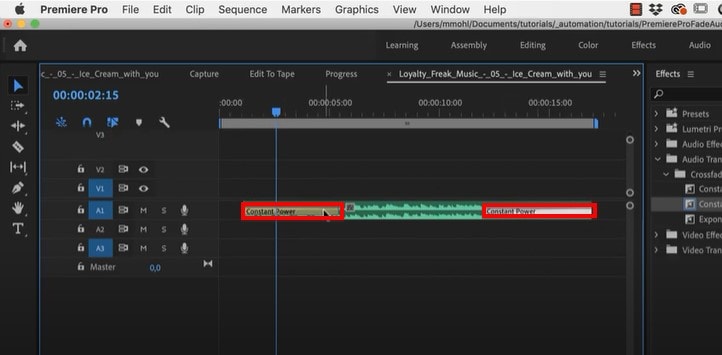
You can also use the keyboard shortcut Shift + Command + D (macOS) or Shift+ Ctrl + D (PC). This will add the “Constant Power Cross Fade” effect at the beginning and the end of the clip.
Step3You can then just change the duration of the effect by simply dragging the end of the transition.
Fade Audio using Clip Keyframes
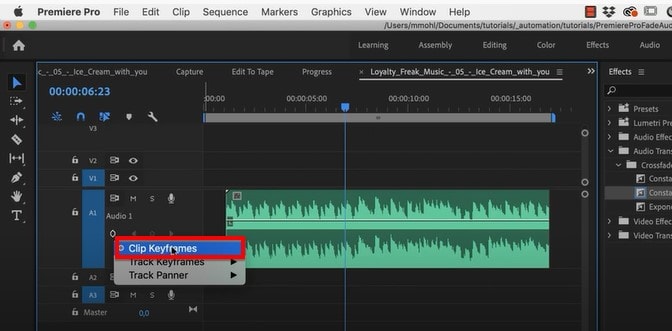
Step1Adobe Premier Pro has two volume keyframes; Track and Clip. Make the audio larger so you can see the volume line and then under the audio name, click on the volume keyframes option to make sure “Clip Keyframes” is enabled.
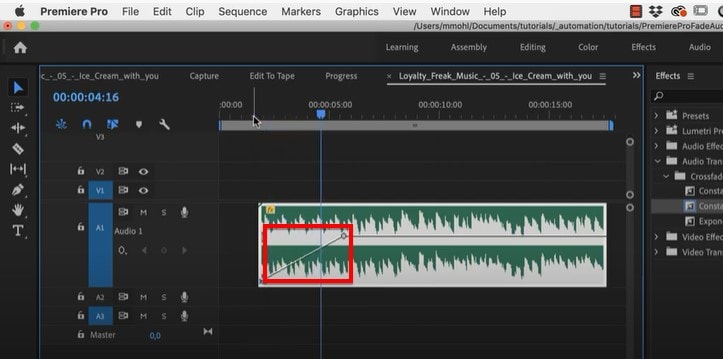
Step2You can then press down on the Command Key (macOS) or the Control Key (PC) and drag the volume line down to add a fade-in or fade-out effect.
Adobe Premiere Alternative Way to Fade Audio
If you are like most people and you find Adobe Premier Pro to be very difficult you use, we have a tool that is just as effective but also simplifies the process. This is the very simple to use Wondershare Filmora .
Just like Premier Pro, Filmora gives you two options to fade audio in and out. Let’s look at both options;
Adding Fade in and Out in Audio Pane
Step1Download and install Wondershare Filmora onto your computer, open the program and then import the audio clip that you want to edit.
Step2Once the video has been added to the timeline, double-click on it to access the “Audio” editing panel.
Step3Here, you can very simply add the fade-in and fade-out effects by simply dragging the sliders to the desired duration or by manually entering the duration in seconds.

Using the Audio Waveform
You can also use the fade icons on the left and right edges of the audio waveform to quickly add a fade in and out.
To add a fade-in effect, drag the fade-in maker to the right. Then go to the end of the clip to drag the fade-out maker to the left to add a fade-out effect.

Related FAQs about Audio Fade
1. How Do I Fade to Black in Adobe Premiere Pro?
You can easily add the Fade to Black transition in Adobe Premiere Pro using the “Effects” tab. Just open the two clips in Premiere Pro and go to “Effects.” Type in “dip to black” in the search box and when you find the effect, drag it between the two clips in the timeline. The effect will appear on the right side of the project.
You also have several customization options that you can apply to the effect to get it just right. To see these options, go to Effect Controls and you should be able to change the alignment of the effect to “Center at Cut” so that the first video fades out to black before the second video appears.
2. Premiere Pro Audio Fade Not Working?
Sometimes you can complete all the editing steps we have described above but you are unable to tell if the fade-in and fade-out effects are working because you can’t play the audio in Premiere. This is a very common problem that can easily be fixed using the following troubleshooting steps;
Check the master volume on your computer to see if this is the problem
Then check the volume in Premiere to see if the audio meter is moving as you play the clip. It is the green bar usually in the lower right corner.
If your volume is fine but you still can’t hear the audio, you may need to adjust several settings. Go to Edit > Preferences (on PC) or Preferences menu under the main Premiere Pro CC menu (macOS) and select “Audio Hardware” in the options that appear. You can then change the “Default Output” device to something else.
3. How Do You do Audio Transitions in Premiere Pro
Adding audio transitions in Premiere Pro is very easy; just open the audio that you want to edit and then Right-click (PC) or Control- Click (macOS) on either the “Constant Gain” or “Constant Power” effect from the Effects panel. Then choose “Set Selected as Default Transition” from the options in the menu.
To add a duration for the audio transitions, go to Edit > Preferences > Timeline (PC) or Premiere Pro Menu > Preferences (macOS) and enter the duration value under “Audio Transition Default Duration.”
Free Download For Win 7 or later(64-bit)
Free Download For macOS 10.14 or later
Also read:
- 2024 Approved Here, You Will Learn How to Add a Realistic Fire Effect Using Wondershare Filmora. That Will Help to Boost Your Channel and Decorate Your YouTube Channel with Creative and Unique Effects
- Best Animated Video Makers
- 2024 Approved Motion Tracking Never Goes Out of Trend, so Do You Wish to Make Your Videos Trendy with This? No Issue because Here We Will Guide You on How to Do Motion Tracking
- New 2024 Approved What Is the Best Filmora Slideshow Templates? Experts Choice
- Updated In 2024, How to Shoot Cinematic Footage From a Smartphone
- New Top-Search The Best Game Screen Recording Tools for PC
- New 3 Ways to Combine 2 or 3 Videos Into 1
- Want to Find a Good Camera for YouTube? This Article Brings You some of the Best Options of Different Varieties for Your Channel
- Updated Adding a Spooky Shadow Effect with Filmora for 2024
- 2024 Approved 11 Ways To Radial Blur To Images (iPhone/Android/Mac/Windows)
- Updated 2024 Approved Learning How to Create LUTs with LUTs Generator
- New In 2024, Finding LUTs Made by Danny Gevirtz
- How to Blur a Still or Moving Part of Video for 2024
- Best Software or Website to Convert Video Format
- Do You Want Your Videos to Look Like Danny Gevirtz? You Can Use some Inspired Presets. There Are Different Danny Gevirtz LUTs that You Can Download and Use
- Best 8 Animated Video Makers for 2024
- In 2024, Best 5 Apps To Add Song To Video
- Updated In 2024, How to Make a Smooth Speed Ramping in Premiere Pro?
- Updated In 2024, Recording Video in Slow Motion Some Considerable Points
- New YouTube Zoom to Fill Is a Great Feature for Viewing Things in Depth. This Article Answers All Questions About Fixing YouTube Zoom to Fill Not Working on Your Device
- Updated In 2024, 6 Websites to Free Download Motivational Video Footage
- Updated In 2024, Unraveling How the Slow Motion Guys Have Revolutionized The Slow Motion Game
- Updated A Complete Overview of VSCO Video Editor
- Do You Want to Use a Professional Tool to Add Subtitles? Read This Article to Discover the Best Reliable Tool to Create Subtitles in Your Desired Manner for 2024
- Updated The Right Ways to Slow Down a Video on iPhone for 2024
- New Complete Guide to Make a Super Easy Rotating Video Effect
- Updated 10 Top Suggestions for AI Video Interviews
- Updated 2024 Approved Top List Best VHS Sound Effect That You Can Use in Video Making
- Fix the Error of Unfortunately the Process.com.android.phone Has Stopped on Honor Play 40C | Dr.fone
- Edit and Send Fake Location on Telegram For your Apple iPhone XS in 3 Ways | Dr.fone
- Set Your Preferred Job Location on LinkedIn App of your Nubia Red Magic 9 Pro+ | Dr.fone
- In 2024, How to jailbreak iCloud locked Apple iPhone SE (2022)
- Full Guide on Mirroring Your Infinix Hot 40 to Your PC/Mac | Dr.fone
- How to Turn Off Google Location to Stop Tracking You on Realme C55 | Dr.fone
- Forgot iPhone 13 Pro Backup Password? Heres What to Do | Dr.fone
- In 2024, Top 9 Oppo Find X6 Pro Monitoring Apps for Parental Controls | Dr.fone
- How to Find iSpoofer Pro Activation Key On Honor X50i+? | Dr.fone
- 10 Easy-to-Use FRP Bypass Tools for Unlocking Google Accounts On Motorola Edge 40
- In 2024, Unlocking iPhone 7 Plus Passcode without a Computer
- Can Life360 Track You When Your Oppo A18 is off? | Dr.fone
- In 2024, How to Copy Contacts from Apple iPhone 6 Plus to SIM? | Dr.fone
- In 2024, The Most Useful Tips for Pokemon Go Ultra League On Samsung Galaxy A15 5G | Dr.fone
- Process of Screen Sharing Tecno Spark 20 Pro+ to PC- Detailed Steps | Dr.fone
- 7 Solutions to Fix Error Code 963 on Google Play Of Tecno Spark 20 Pro | Dr.fone
- In 2024, 5 Easy Ways to Copy Contacts from Vivo V30 to iPhone 14 and 15 | Dr.fone
- Title: In 2024, Best iPhone LUTs App to Use
- Author: Chloe
- Created at : 2024-05-20 03:38:26
- Updated at : 2024-05-21 03:38:26
- Link: https://ai-editing-video.techidaily.com/in-2024-best-iphone-luts-app-to-use/
- License: This work is licensed under CC BY-NC-SA 4.0.
