
:max_bytes(150000):strip_icc():format(webp)/asian-woman-talking-into-microphone-722208887-5b2a989730371300373a0447.jpg)
In 2024, Best Options to Replace Sky of Any Photo Online + Offline
Best Options to Replace Sky of Any Photo [Online + Offline]
An image’s background is essential because it provides context for your shot. Your main subject’s interaction with the background gives the picture more narrative and reinforces its story. If your background isn’t captivating, it can ruin everything. To make a photo appear more appealing or professional, you must know how to eliminate backgrounds effectively and edit photos with backgrounds.
This article aims to provide you with all the necessary information on how you can edit the sky and background. The article will emphasize some leading software for photo editing sky. You can gain knowledge about these tools and their key functionalities. In addition, you’ll read about an offline alternative to changing the sky in a photo.
Sky Replacement A cross-platform works like magic for background removal or sky replacement photos!
Free Download Free Download Learn More

Part 1: Top 8 Photo Sky Editor and Replacers Online [Must View]
Photo editing sky can be very beneficial as it makes your picture more focused and removes undesired objects. This part will take you through the top 8 sky-replacing apps. So, start exploring and choose the one you want:
1. SnapEdit
SnapEdit is one of the most incredible online tools with an AI sky replacement image option. With this function, users can add a more eye-catching sky background to their images instead of the default one. The tool modifies the sky background’s colors, textures, and gradients using artificial intelligence. Additionally, it offers a selection from a library of more attractive, lifelike replacement possibilities.

Key Features
- The tool can remove the grey sky with just a single click and give life to your background.
- If your outfit or tone doesn’t match the sky, you can change its hue according to your liking.
- SnapEdit lets you add and remove objects from the sky so your aesthetic picture is not ruined.
Pricing
| Pricing Plan | Billing |
|---|---|
| Pro | $5/month |
2. Fotor
With this sky replacement photo tool, you can add artistic skies to your images in place of boring ones. A single click can add breathtaking sunny, gloomy, or starry skies to your photos. You can utilize a variety of sky shots, like starry skies, blue skies, and night skies over Hawaii. This adds creativity and beauty to your images. You can also create a custom sky background for any uploaded photos.

Key Features
- You can replace the sky with any other background image. It doesn’t have to be just the sky.
- The tool offers professional Photoshop-like services without going through the complexities.
- AI sky replacement and automated editing give your sky a changed and improved look within seconds.
Pricing
| Pricing Plans | Billing |
|---|---|
| Fotor Pro | $2.66/month |
| Fotor Pro+ | $5.99/month |
3. Wondershare AI Lab
With this tool’s photo editing sky function, you can add a new sky to your images using AI technology. You can alter the sky in your pictures to a bright blue, pink, purple, and grey sky to add drama and interest. The tool can instantly replace the sky in your photo with the desired one and add a unique touch to your horizon. You can upload images up to 5MB, and the application supports most file formats.

Key Features
- The customized graphics will give you control over your photos and make them more beautiful.
- You can change the weather in your photos by replacing and editing the sky to make it better with your picture.
- You can increase sales and boost your post by adding a solid and clear background to the pictures.
Pricing
Free
4. Pixlr
Pixlr can easily swap out the sky in your images for a more visually stimulating background. In a split second, Pixlr’s AI-powered background remover can replace the backdrop image with an image of the sky and erase the original image. The creative and smart functions of the tool make it easy for everyone to change the sky in a photo.

Key Features
- Pixlr allows you to add different kinds of backgrounds to your photos. You can even add pictures directly from your system.
- The customization options help you to blend the background with your photos perfectly.
- The lasso tool will remove the original sky image clearly and precisely, even from the challenging edges.
Pricing
| Pricing Plans | Annual Billing |
|---|---|
| Plus | $0.99/month |
| Premium | $4.90/month |
| Team | $9.91/month |
5. Autoenhance.ai
Autoenhance.ai can identify the sky in your photos and replace it with one from their large collection of excellent sky photos that is more aesthetically pleasing. The tool enhances the overall effect of the picture by using AI technology to replace the sky in your picture subtly. Its sky replacement function can help replace the dreary sky with a sunny one, giving the photos a cheery and inviting appearance.

Key Features
- The photo enhancer can automatically enhance the color of the sky and upscale the quality of the image.
- You can efficiently replace or add sky to a photo with the help of AI.
- The AI can efficiently crop complex backgrounds such as trees or a flying or walking object.
Pricing
| Pricing Plans | Billing Per Month |
|---|---|
| Pay as you go | Minimum: $1.50/1 image Maximum: $309.99/1000 images |
| Subscriptions | Minimum: $49.99/75 images Maximum: $1249.99/10,000 images |
| Enterprise | Minimum: $2189.99/20,000 images Maximum: Custom/50,000+ images |
6. PhotoScissors
Using the photo editing program PhotoScissors, you can change around the sky in your images. The tool’s purpose is to assist you in correcting images that have incorrect exposure or white balance settings on your camera. It just takes three steps around the same number of minutes to change the sky in the photo online. All you need to do is make a few selections, and the tool will handle the rest.

Key Features
- You can remove the image background programmatically using the API of PhotoScissors.
- The tool accurately separates any image from the background or the sky.
- You can enhance the look of the sky quickly and easily by using its editing and customization options.
Pricing
| Number of Credits | Pricing |
|---|---|
| 1000 Credits | $29.99 |
| 200 Credits | $19.99 |
| 50 Credits | $9.99 |
| 10 Credits | $4.99 |
7. BeFunky
BeFunky’s AI-powered Sky Replacer is a specialized tool that recognizes the image’s sky and foreground to replace the sky precisely. The program is an all-in-one sky editor since it contains all the tools needed to alter the sky and foreground separately. This tool can edit the sky and front location so well that grey and dull photos become colorful and brighter.

Key Features
- The tool has a specialized feature for sky replacement images that can immediately change the sky.
- The editing feature enhances the lighting, saturation, and overall look.
- You can choose or download any sky photo and add it as your background.
Pricing
| Pricing Plan | Annual Billing |
|---|---|
| BeFunky Plus | $5.99/month |
8. remove.bg
With the sky replacement feature offered by the remove.bg software, you can add a new sky to your pictures. When you wish to enhance depth or alter the tone of your photo, this tool comes in handy. The software automatically replaces your photo’s background with a fresh sky image using artificial intelligence (AI). A range of sky photos are available for selection, including starry, dark sunny, galaxy sky, and more.

Key Features
- You can create impressive real estate photos by replacing the dull sky background with a fresh one.
- The tool can do batch processing, so you can drag many photos at once and edit them.
- You can remove any kind of background with great precision to get the perfect cutout.
Pricing
| Pricing Plan | Annual Billing/month |
|---|---|
| Subscription Plan | Minimum: $0.20/40 Credits Maximum: Custom Pricing |
| Pay as you go | Minimum: $1.99/1 Maximum: Custom Pricing |
Part 2: Wondershare Filmora: A Comprehensive Offline Solution for Background Replacement with Perfection
Background replacement can assist you in highlighting the primary topic to attract viewers while giving your products or marketing materials a polished, professional appearance. Many users look for offline background removal to edit their photos immediately. If you’re working on some projects, offline tools are a much safer option as they depend on the availability of the internet network.
When you think about an app that works offline and provides professional quality background removal, only one name comes to mind: Wondershare Filmora . The tool works like magic for background removal or sky replacement photos. You can completely rely on it for all your video editing and generating needs because of its intelligent AI features. It suits both professionals and beginners because of the ease of use and efficient AI system.
Free Download For Win 7 or later(64-bit)
Free Download For macOS 10.14 or later
Steps To Do Background Replacement Using Wondershare Filmora
There are various methods of removing and replacing the background in Wondershare Filmora. Follow the step-by-step instructions given below to use this function:
Step 1: Import Media Files To Filmora
Open the Wondershare Filmora tool and click on “New Project.” Now import your media file into the tool and then drag and drop it into the editing timeline. Import both the media files, i.e., the file from which you want to remove the background and the file you will use as a background.

Step 2: Remove Background from Imported Media
Now that both files have been brought together click on the media file that needs the background replacement. On the right side of the screen, you will see the editing tools of the app. Select the media type you edit and click the “AI Tools” option. Now, toggle on the “Chroma Key.”

Step 3: Preview and Export Final Results
Once you click on the chroma key option, the app automatically replaces the background of your media file. You can preview it, and if you are satisfied with the results, click “Export,” and save your new video.

Conclusion
Background removal and sky replacement images have become vital tools for content creators. The background of your images and videos is important as it sets a complete tone for the media. Many users use applications to replace the sky and background.
It’s important to do thorough research before you choose the right app for the job. This article gives you the best possible solutions for background replacement. You can professionally change the background of your media after reading the article.
Free Download Free Download Learn More
Part 1: Top 8 Photo Sky Editor and Replacers Online [Must View]
Photo editing sky can be very beneficial as it makes your picture more focused and removes undesired objects. This part will take you through the top 8 sky-replacing apps. So, start exploring and choose the one you want:
1. SnapEdit
SnapEdit is one of the most incredible online tools with an AI sky replacement image option. With this function, users can add a more eye-catching sky background to their images instead of the default one. The tool modifies the sky background’s colors, textures, and gradients using artificial intelligence. Additionally, it offers a selection from a library of more attractive, lifelike replacement possibilities.
Key Features
- The tool can remove the grey sky with just a single click and give life to your background.
- If your outfit or tone doesn’t match the sky, you can change its hue according to your liking.
- SnapEdit lets you add and remove objects from the sky so your aesthetic picture is not ruined.
Pricing
| Pricing Plan | Billing |
|---|---|
| Pro | $5/month |
2. Fotor
With this sky replacement photo tool, you can add artistic skies to your images in place of boring ones. A single click can add breathtaking sunny, gloomy, or starry skies to your photos. You can utilize a variety of sky shots, like starry skies, blue skies, and night skies over Hawaii. This adds creativity and beauty to your images. You can also create a custom sky background for any uploaded photos.
Key Features
- You can replace the sky with any other background image. It doesn’t have to be just the sky.
- The tool offers professional Photoshop-like services without going through the complexities.
- AI sky replacement and automated editing give your sky a changed and improved look within seconds.
Pricing
| Pricing Plans | Billing |
|---|---|
| Fotor Pro | $2.66/month |
| Fotor Pro+ | $5.99/month |
3. Wondershare AI Lab
With this tool’s photo editing sky function, you can add a new sky to your images using AI technology. You can alter the sky in your pictures to a bright blue, pink, purple, and grey sky to add drama and interest. The tool can instantly replace the sky in your photo with the desired one and add a unique touch to your horizon. You can upload images up to 5MB, and the application supports most file formats.
Key Features
- The customized graphics will give you control over your photos and make them more beautiful.
- You can change the weather in your photos by replacing and editing the sky to make it better with your picture.
- You can increase sales and boost your post by adding a solid and clear background to the pictures.
Pricing
Free
4. Pixlr
Pixlr can easily swap out the sky in your images for a more visually stimulating background. In a split second, Pixlr’s AI-powered background remover can replace the backdrop image with an image of the sky and erase the original image. The creative and smart functions of the tool make it easy for everyone to change the sky in a photo.
Key Features
- Pixlr allows you to add different kinds of backgrounds to your photos. You can even add pictures directly from your system.
- The customization options help you to blend the background with your photos perfectly.
- The lasso tool will remove the original sky image clearly and precisely, even from the challenging edges.
Pricing
| Pricing Plans | Annual Billing |
|---|---|
| Plus | $0.99/month |
| Premium | $4.90/month |
| Team | $9.91/month |
5. Autoenhance.ai
Autoenhance.ai can identify the sky in your photos and replace it with one from their large collection of excellent sky photos that is more aesthetically pleasing. The tool enhances the overall effect of the picture by using AI technology to replace the sky in your picture subtly. Its sky replacement function can help replace the dreary sky with a sunny one, giving the photos a cheery and inviting appearance.
Key Features
- The photo enhancer can automatically enhance the color of the sky and upscale the quality of the image.
- You can efficiently replace or add sky to a photo with the help of AI.
- The AI can efficiently crop complex backgrounds such as trees or a flying or walking object.
Pricing
| Pricing Plans | Billing Per Month |
|---|---|
| Pay as you go | Minimum: $1.50/1 image Maximum: $309.99/1000 images |
| Subscriptions | Minimum: $49.99/75 images Maximum: $1249.99/10,000 images |
| Enterprise | Minimum: $2189.99/20,000 images Maximum: Custom/50,000+ images |
6. PhotoScissors
Using the photo editing program PhotoScissors, you can change around the sky in your images. The tool’s purpose is to assist you in correcting images that have incorrect exposure or white balance settings on your camera. It just takes three steps around the same number of minutes to change the sky in the photo online. All you need to do is make a few selections, and the tool will handle the rest.
Key Features
- You can remove the image background programmatically using the API of PhotoScissors.
- The tool accurately separates any image from the background or the sky.
- You can enhance the look of the sky quickly and easily by using its editing and customization options.
Pricing
| Number of Credits | Pricing |
|---|---|
| 1000 Credits | $29.99 |
| 200 Credits | $19.99 |
| 50 Credits | $9.99 |
| 10 Credits | $4.99 |
7. BeFunky
BeFunky’s AI-powered Sky Replacer is a specialized tool that recognizes the image’s sky and foreground to replace the sky precisely. The program is an all-in-one sky editor since it contains all the tools needed to alter the sky and foreground separately. This tool can edit the sky and front location so well that grey and dull photos become colorful and brighter.
Key Features
- The tool has a specialized feature for sky replacement images that can immediately change the sky.
- The editing feature enhances the lighting, saturation, and overall look.
- You can choose or download any sky photo and add it as your background.
Pricing
| Pricing Plan | Annual Billing |
|---|---|
| BeFunky Plus | $5.99/month |
8. remove.bg
With the sky replacement feature offered by the remove.bg software, you can add a new sky to your pictures. When you wish to enhance depth or alter the tone of your photo, this tool comes in handy. The software automatically replaces your photo’s background with a fresh sky image using artificial intelligence (AI). A range of sky photos are available for selection, including starry, dark sunny, galaxy sky, and more.
Key Features
- You can create impressive real estate photos by replacing the dull sky background with a fresh one.
- The tool can do batch processing, so you can drag many photos at once and edit them.
- You can remove any kind of background with great precision to get the perfect cutout.
Pricing
| Pricing Plan | Annual Billing/month |
|---|---|
| Subscription Plan | Minimum: $0.20/40 Credits Maximum: Custom Pricing |
| Pay as you go | Minimum: $1.99/1 Maximum: Custom Pricing |
Part 2: Wondershare Filmora: A Comprehensive Offline Solution for Background Replacement with Perfection
Background replacement can assist you in highlighting the primary topic to attract viewers while giving your products or marketing materials a polished, professional appearance. Many users look for offline background removal to edit their photos immediately. If you’re working on some projects, offline tools are a much safer option as they depend on the availability of the internet network.
When you think about an app that works offline and provides professional quality background removal, only one name comes to mind: Wondershare Filmora . The tool works like magic for background removal or sky replacement photos. You can completely rely on it for all your video editing and generating needs because of its intelligent AI features. It suits both professionals and beginners because of the ease of use and efficient AI system.
Free Download For Win 7 or later(64-bit)
Free Download For macOS 10.14 or later
Steps To Do Background Replacement Using Wondershare Filmora
There are various methods of removing and replacing the background in Wondershare Filmora. Follow the step-by-step instructions given below to use this function:
Step 1: Import Media Files To Filmora
Open the Wondershare Filmora tool and click on “New Project.” Now import your media file into the tool and then drag and drop it into the editing timeline. Import both the media files, i.e., the file from which you want to remove the background and the file you will use as a background.
Step 2: Remove Background from Imported Media
Now that both files have been brought together click on the media file that needs the background replacement. On the right side of the screen, you will see the editing tools of the app. Select the media type you edit and click the “AI Tools” option. Now, toggle on the “Chroma Key.”
Step 3: Preview and Export Final Results
Once you click on the chroma key option, the app automatically replaces the background of your media file. You can preview it, and if you are satisfied with the results, click “Export,” and save your new video.
Conclusion
Background removal and sky replacement images have become vital tools for content creators. The background of your images and videos is important as it sets a complete tone for the media. Many users use applications to replace the sky and background.
It’s important to do thorough research before you choose the right app for the job. This article gives you the best possible solutions for background replacement. You can professionally change the background of your media after reading the article.
4 Methods to Crop a Video on Android Easily
Nowadays, we can use our mobile phones to create almost anything – they have become an indivisible part of our lives. Most of the people check their mobile phones every 2 minutes – did they receive a new message?
What about different kinds of notifications – reactions on social network, or the ones which inform us about breaking news, or, to-do lists? People are well-connected to Facebook, Instagram, TikTok, and sometimes, we just want to update our accounts with just photos or new videos we took on the go. Sometimes, we have a perfect footage we took with our Android, but we have no idea, or just no time to edit our stunning video clips on the computer.
Yes, changing or adjusting a video shouldn’t be that hard – you shouldn’t be obligated to turn to Adobe Premiere Pro or other “heavy” software in order to have a video to your whole liking. Therefore, we have mobile applications just for editing our videos, in a simple, and fast way (thank you, mobile developers!).
In this article, we will be discussing how to crop a video on Android, but since most android devices don’t have this option, you will need to do it externally, by downloading and using different apps. So, more concretely, we will touch upon how to crop our video clips using following apps: Google Photos, Clideo, and Filmora.
Using Google Photos
In case you have Android, the Google Photos app will be there – it’s free and in most cases, already installed and ready to serve you. If you can’t find Google Photos, just find it and download it from the Google Play Store.

First off, you just open the application and allow it to access photos and media on your device. Tap the video you would like to crop. Then, click on Edit: it will launch the in-app video editor.

At the bottom, you will see the Crop option and hit on it, which will result in appearing a cropping box around your video clip.

Once you see little icons at the bottom, you need to choose the first one – it’s the Ratio button, through which you can choose the aspect you would like to apply. Your choice is between these several aspect ratios: Free, Original, Square, 5:4, 16:9, 4:3, and 3:2.

Choosing Free ratio option gives you the freedom to adjust the cropping sliders manually, in order to resize the video to any aspect ratio; it is even possible to rotate the clip, pinch, and zoom in/out.
After you are done with adjusting your video, you need to click on the Save Copy button, which will save a new edited version of your footage. And, meanwhile, don’t worry! – this will not be overwritten on the original one, which will still stand intact.
Using Clideo
Clideo is an interesting one… it doesn’t require you to download anything, because there is a way to crop your video online, through the web browser on Android.
First off, you need to click on Clideo’s Android crop video tool from the browser on the smartphone. You will see a Choose File button and hit on it – this will take you to your gallery and let you find the clip you are about to crop.

You can also upload your file from Cloud Storage. You need to click on the down-arrow on the right-hand side of the button and you’ll find the option to add a clip from your Dropbox or Google Drive account.


After your file is uploaded, Clideo will take you to the editing page, where you can select the area you would like to be in the edited version, and crop the video. Here, you will be able to choose the aspect ratio, exact size of the video and the format.

Once you have finished with the cropping and settings, you need to click on Export which will process your edited video clip.

Once it is done, you proceed on the page which lets you do 3 things: Remove watermark (for it, though, you will have to sign in), Edit again, or/and Download!

Using Filmora
Filmora is an android version of software Filmora and it also gives you the opportunity to crop videos and photos with no problem. First, of course, you have to download the application from Google Play Store, and open it;

then, after opening it, you’ll click on New Project. You can choose any photo/video from your albums or stock, you might even select multiple clips.

Once you have chosen your file, you click on Next button and you proceed to the editor itself.
There, you will see different options at the bottom of your phone, such as Trim, Music, Text, Sticker, Effect, etc.

It doesn’t show you the option Crop right away, but Crop is “hidden” behind the Trim button!

So, you choose Trim, then find Crop and hit that, and then you are free to choose any aspect ratio: 1:1; 4:5; 16:9; 9:16; and 5:4. You can crop the video manually, too, and you are able to adjust where your new “screen” might be wanted most.

After you have finished with cropping and are satisfied, you can click on Export, which will take a few seconds.

After it is done, you can find your newly-cropped video in your Camera Roll.

Using Wondershare Filmora
As mentioned, Filmora is a mobile version of its desktop edition – Wondershare Filmora Video Editor . So, you can also try your hand at this very handy software which also has a nice interface.
For Win 7 or later (64-bit)
For macOS 10.14 or later
If you download Wondershare Filmora X, you will need to click on Import Media Files Here.

You will choose your clip(s) you would like to crop and then drag and drop it in the sequence.

Above your video in the sequence you will see little icons and find a Crop one.

After clicking on it, a new window will open – it’s for Crop and Zoom, where you can choose a needed ratio or do it manually (for it, you have to select Custom first).

After clicking OK, your video will be cropped as you like. Then, you can proceed with Exporting it – click on Export, choose your preferred settings, and save the video at last.

So, that’s all for this article – you have learned how to crop a video on Android, using Google Photos, Clideo, Filmora; lastly, you have learned about how to crop a video using a desktop version of Filmora, namely, Wondershare Filmora. Hopefully, this is the information which will help you make your videos more “on spot” and be satisfied with the results, as well as satisfy your viewers!
First off, you just open the application and allow it to access photos and media on your device. Tap the video you would like to crop. Then, click on Edit: it will launch the in-app video editor.
At the bottom, you will see the Crop option and hit on it, which will result in appearing a cropping box around your video clip.
Once you see little icons at the bottom, you need to choose the first one – it’s the Ratio button, through which you can choose the aspect you would like to apply. Your choice is between these several aspect ratios: Free, Original, Square, 5:4, 16:9, 4:3, and 3:2.
Choosing Free ratio option gives you the freedom to adjust the cropping sliders manually, in order to resize the video to any aspect ratio; it is even possible to rotate the clip, pinch, and zoom in/out.
After you are done with adjusting your video, you need to click on the Save Copy button, which will save a new edited version of your footage. And, meanwhile, don’t worry! – this will not be overwritten on the original one, which will still stand intact.
Using Clideo
Clideo is an interesting one… it doesn’t require you to download anything, because there is a way to crop your video online, through the web browser on Android.
First off, you need to click on Clideo’s Android crop video tool from the browser on the smartphone. You will see a Choose File button and hit on it – this will take you to your gallery and let you find the clip you are about to crop.
You can also upload your file from Cloud Storage. You need to click on the down-arrow on the right-hand side of the button and you’ll find the option to add a clip from your Dropbox or Google Drive account.
After your file is uploaded, Clideo will take you to the editing page, where you can select the area you would like to be in the edited version, and crop the video. Here, you will be able to choose the aspect ratio, exact size of the video and the format.
Once you have finished with the cropping and settings, you need to click on Export which will process your edited video clip.
Once it is done, you proceed on the page which lets you do 3 things: Remove watermark (for it, though, you will have to sign in), Edit again, or/and Download!
Using Filmora
Filmora is an android version of software Filmora and it also gives you the opportunity to crop videos and photos with no problem. First, of course, you have to download the application from Google Play Store, and open it;
then, after opening it, you’ll click on New Project. You can choose any photo/video from your albums or stock, you might even select multiple clips.
Once you have chosen your file, you click on Next button and you proceed to the editor itself.
There, you will see different options at the bottom of your phone, such as Trim, Music, Text, Sticker, Effect, etc.
It doesn’t show you the option Crop right away, but Crop is “hidden” behind the Trim button!
So, you choose Trim, then find Crop and hit that, and then you are free to choose any aspect ratio: 1:1; 4:5; 16:9; 9:16; and 5:4. You can crop the video manually, too, and you are able to adjust where your new “screen” might be wanted most.
After you have finished with cropping and are satisfied, you can click on Export, which will take a few seconds.
After it is done, you can find your newly-cropped video in your Camera Roll.
Using Wondershare Filmora
As mentioned, Filmora is a mobile version of its desktop edition – Wondershare Filmora Video Editor . So, you can also try your hand at this very handy software which also has a nice interface.
For Win 7 or later (64-bit)
For macOS 10.14 or later
If you download Wondershare Filmora X, you will need to click on Import Media Files Here.
You will choose your clip(s) you would like to crop and then drag and drop it in the sequence.
Above your video in the sequence you will see little icons and find a Crop one.
After clicking on it, a new window will open – it’s for Crop and Zoom, where you can choose a needed ratio or do it manually (for it, you have to select Custom first).
After clicking OK, your video will be cropped as you like. Then, you can proceed with Exporting it – click on Export, choose your preferred settings, and save the video at last.
So, that’s all for this article – you have learned how to crop a video on Android, using Google Photos, Clideo, Filmora; lastly, you have learned about how to crop a video using a desktop version of Filmora, namely, Wondershare Filmora. Hopefully, this is the information which will help you make your videos more “on spot” and be satisfied with the results, as well as satisfy your viewers!
Learning Unique Ways to Slow Down Time Lapse on iPhone
We have all seen time-lapse videos in vlogs or developmental videos. The time-lapse effect has been around the corner for some time and assists in several tasks. However, when it comes to understanding the content of a video, they aren’t helpful. This article will help you understand how to slow down time lapse on an i Phone.
In addition, we’ll provide some insights on slow-down time-lapse videos. You can learn about its advantages for both viewers and creators. The article will highlight some tools for transforming a time-lapse into a slo-mo. We’ll also discuss an offline tool on how to slow down a time-lapse on an iPhone. Start reading this article for a brief overview of slow-motion videos and tools.
Slow Motion Video Maker Slow your video’s speed with better control of your keyframes to create unique cinematic effects!
Make A Slow Motion Video Make A Slow Motion Video More Features
Part 1: How Does Slowing Down Videos Help Viewers and Creators?
A time-lapse video certainly makes some scenes worthy of watching. However, a slow-motion video helps in better comprehension of the topic. In this section, we’ll discuss how slowing down time-lapse video s is helpful. We’ll shed light on their applications for viewers and content creators. Without further delay, let’s dive in to solve this mystery:
For Creators
Since the era of social media , content creation has become a new trend. Creators around the globe can interact with their followers from a single platform. It gives them a chance to share their ideas and showcase their talents. Hence, here is how slow-motion videos benefit a creator in his journey:
- In Video Tutorials: Do you have a channel where you post tutorials to perform a specific task? This effect can help you slow down the video for the audience to absorb your words. It helps creators to show their viewers that they genuinely care about them. A video where basics and details are discussed is considered right.
- In Revealing Details: We encounter situations where the camera cannot capture a moment right. This is because the normal playback speed cannot highlight video details. On the other hand, a slo-mo takes proper time to showcase details. These help handle an event planning or dress designing page.
- In Creating Aesthetics: Another application of slo-mos is that they help with creativity. Adding this effect at the right time and duration enhances visuals. Moreover, adding a slo-mo effect gives the video an aesthetic appeal. It can enhance the visuals of a travel, cooking, or fashion video.
For Viewers
Slow-motion videos benefit not only creators but also viewers. They help them with enhanced learning by breaking down complex information. If you are creating slo-mos as a creator, here is how they are helping your viewers:
- In Effective Learning: You are not unaware of tutorial or explainer videos. Whether you are a student or a housewife, you must have used YouTube to your benefit. A slow-motion video can break down a complex concept or steps for a recipe. In addition, it can help you operate technology better, like Word, Excel, and more.
- In Understanding Nature: People out there prefer documentaries over dramas. They are curious about nature and the way it works. In such documentaries, slo-mos are used to present a natural phenomenon. It helps the viewers understand how a certain process occurs. Moreover, it focuses on small details in an ecosystem to explain better.
- In Reflecting Content: Next time you watch reels, notice that slo-mos catch your attention. Videos with the right speed manipulation appeal to the eyes, and viewers often watch them again. In addition, they help focus on the specifics of a gadget, fashion product, or more.
Part 2: A Guide on How to Slow Down Time Lapses on iPhone
Now that you know the benefits of slow motions, let’s proceed to our next segment. Here, we will learn how to slow down a time-lapse on an i Phone using different techniques. This will involve looking into some tools for an i Phone time lapse slowdown:
1. iMovie
This tool is perfect if you are looking for a tool to effectively slow down time-laps e. It offers speed change options to transform your time-lapse videos into slomos. The tool supports popular video formats and creates results in 4K high resolution. Creating a slo-mo is straightforward, and users can also create a high-speed motion.

Key Features
- Provides 14 templates and 20 storyboards to get started with creative videos.
- The tool operates online; hence, it isn’t necessary to download any application.
- You can synchronize your work with devices like macOS, iPad, AirDrop, and iCloud.
Steps
Do you want to know ho w to slow down a time-lapse on i Phone ? The method of performing this function is very plain and accessible, and here is the guide:
Step 1: Open iMovie and click the “Start New Project” option to start editing. Continue to select “Magic Movie” across the pop-up to proceed into the editing section.

Step 2: Choose a file from the iPhone’s video gallery and select the “Pencil” icon to start editing. Go to the “Speed” option and click it to access speed change options.

Step 3: Navigate towards the speed slider and drag it towards the left to slow down. The option “1/2x” means the speed will be half the original speed.

2. Filmmaker Pro - Video Editor
If you want to slow down the time-lapse i Phone with additional editing options, use this tool. It is a professional-level content editor for iDevices and offers to slow down the speed. You can create or slow down timelapses. The editor will export your videos in 4K high resolution. Moreover, 120 royalty-free music tracks can be inserted into your slo-mo afterward.

Key Features
- Decorate your videos with stunning animations using keyframing and track motion.
- You have over 46 transition options to complete trending TikTok and Instagram challenges.
- Over 79 classic fonts, 92 beautiful fonts, 15 Hollywood, and 26 retro fonts options.
3. Video Up! Video Editor and Maker
Adjusting the time-lapse speed of the i Phone is possible via third-party applications. This is a versatile platform for creating slo-mos without any technicalities. You will find speed setting presets when you access its video adjustment options. These presets can automatically slow down or fasten a video at a specific point. However, you can also choose its Custom option to slow down a complete video.

Key Features
- It provides 2 video export resolution options: Ultra – 4K and Full HD – 1080p.
- Offers an option to insert voiceovers and built-in music tracks in your slo-mos or videos.
- CTA to share videos straight to Instagram, Facebook, WhatsApp, and more.
4. Vidma - Video Editor Music
Are you wondering how to slow down time-lapse videos on iPhone for specific durations? Vidma is the right tool for you, offering custom speed change and duration options. The speed slider option is a simple drag and adjust method. In addition, there is an audio pitch adjustment option to maintain audio during speed alteration.

Key Features
- Users have the option to merge, crop, or resize your images or videos using this tool.
- With its AI abilities, you can generate art from text and edit it further.
- The lowest playback speed to create slow motion is 0.1x, and the highest is 10.0x.
Part 3: A Comprehensive Desktop Solution for Slowing Down Time Lapses: Wondershare Filmora
Wondershare Filmora is a platform with diverse possibilities and compatibility across iOS devices. This allows you to import media using a cable from your iPhone. It doesn’t decline the video quality upon export or import; hence, it proves to be a superior tool to adjust the time-lapse speed of the i Phone. Filmora offers multiple opportunities to transform a time lapse into slo-mo.
You can also select the time period to apply the slow-motion effect via timeline editing. In addition, users can also choose the speed ramping option for professional results. Upon creating a slow motion, you can use Filmora’s video templates, text, and more to enhance visuals. In addition, there is an Optical Flow feature to help in enhancing the slo-mo effect.
Free Download For Win 7 or later(64-bit)
Free Download For macOS 10.14 or later
Step-by-Step Guide to Slow Down a Time Lapse Video into Slow Motion in Filmora
The basic technique to change the time-lapse speed of the i Phone involves Uniform Speed. This method modulates the playback speed of a video through the slider’s position. Here is how do I slow down time lapse on i Phone using Filmora:
Step 1Commence the Speed Change Action
Initiate Filmora by giving a “New Project” command and gaining access to the editing interface. Use the “Import” > “Import from a Camera or Phone” to import files. You need to connect to the iOS device first. Bring the clip to the timeline and access the settings panel that will appear on the screen. Further, choose the “Speed” > “Uniform Speed” option and drag the Speed slider towards the left to reduce it.

Step 2Access the AI Frame Interpolation Settings
In the pursuit of achieving a seamless slow-motion effect, use the AI Frame Interpolation settings. Navigate towards the bottom to access it and opt for the “Optical Flow” option.

Step 3Activate Render Preview for Thorough Evaluation
Upon adjusting, return to the timeline panel and select the video. With the help of your cursor, navigate to the “File” > “Render Preview” option. Enable a preview prior to finalizing the video, and then hit “Export.”

Key Features of Filmora
Filmora is not just confined to creating slow motion; the interface offers much more. There are multiple AI and manual features to edit videos, adjust audio, and insert text. Here are a few video editing features of Filmora amongst many:
Green Screen: Get rid of messy or unwanted backgrounds and replace them with something captivating. For this, film the model or object in front of a green screen and enable Chroma Key. It is an AI-driven function that will auto-remove the background while preserving the object.
AI Text-to-Video: Can’t find the right visuals or time to shoot content for your channel? Use this AI to create videos from prompts without having to put in any effort. The AI will auto-generate graphics to add to the video along with the AI voice insertion.
Compound Clip: Are there multiple clips in your timeline that you want to apply the same effects to? This function will help you transform multiple clips into one. Furthermore, you can apply similar effects or transitions. In addition, this function also ensures a smooth transfer from one clip to another.
AI Thumbnail Creator: Create and edit compelling thumbnails for your videos using this AI. The AI will analyze and select the perfect video frames as thumbnail options. Further, you can edit the thumbnail and insert multiple templates to show what the video is going to be about.
Conclusion
After going through this article, readers have an extensive knowledge of how to slow down time-lapse on i Phones using multiple tools and techniques. We provided a review of these tools but also the benefits of slo-mos in content creation and viewing.
In the end, we suggest Wondershare Filmora as the best alternative to all these applications. The software is not just AI integrated but has everything you need to create slo-mos in one place. Use Filmora for creative slo-mo and other video editing features.
Make A Slow Motion Video Make A Slow Motion Video More Features
Part 1: How Does Slowing Down Videos Help Viewers and Creators?
A time-lapse video certainly makes some scenes worthy of watching. However, a slow-motion video helps in better comprehension of the topic. In this section, we’ll discuss how slowing down time-lapse video s is helpful. We’ll shed light on their applications for viewers and content creators. Without further delay, let’s dive in to solve this mystery:
For Creators
Since the era of social media , content creation has become a new trend. Creators around the globe can interact with their followers from a single platform. It gives them a chance to share their ideas and showcase their talents. Hence, here is how slow-motion videos benefit a creator in his journey:
- In Video Tutorials: Do you have a channel where you post tutorials to perform a specific task? This effect can help you slow down the video for the audience to absorb your words. It helps creators to show their viewers that they genuinely care about them. A video where basics and details are discussed is considered right.
- In Revealing Details: We encounter situations where the camera cannot capture a moment right. This is because the normal playback speed cannot highlight video details. On the other hand, a slo-mo takes proper time to showcase details. These help handle an event planning or dress designing page.
- In Creating Aesthetics: Another application of slo-mos is that they help with creativity. Adding this effect at the right time and duration enhances visuals. Moreover, adding a slo-mo effect gives the video an aesthetic appeal. It can enhance the visuals of a travel, cooking, or fashion video.
For Viewers
Slow-motion videos benefit not only creators but also viewers. They help them with enhanced learning by breaking down complex information. If you are creating slo-mos as a creator, here is how they are helping your viewers:
- In Effective Learning: You are not unaware of tutorial or explainer videos. Whether you are a student or a housewife, you must have used YouTube to your benefit. A slow-motion video can break down a complex concept or steps for a recipe. In addition, it can help you operate technology better, like Word, Excel, and more.
- In Understanding Nature: People out there prefer documentaries over dramas. They are curious about nature and the way it works. In such documentaries, slo-mos are used to present a natural phenomenon. It helps the viewers understand how a certain process occurs. Moreover, it focuses on small details in an ecosystem to explain better.
- In Reflecting Content: Next time you watch reels, notice that slo-mos catch your attention. Videos with the right speed manipulation appeal to the eyes, and viewers often watch them again. In addition, they help focus on the specifics of a gadget, fashion product, or more.
Part 2: A Guide on How to Slow Down Time Lapses on iPhone
Now that you know the benefits of slow motions, let’s proceed to our next segment. Here, we will learn how to slow down a time-lapse on an i Phone using different techniques. This will involve looking into some tools for an i Phone time lapse slowdown:
1. iMovie
This tool is perfect if you are looking for a tool to effectively slow down time-laps e. It offers speed change options to transform your time-lapse videos into slomos. The tool supports popular video formats and creates results in 4K high resolution. Creating a slo-mo is straightforward, and users can also create a high-speed motion.
Key Features
- Provides 14 templates and 20 storyboards to get started with creative videos.
- The tool operates online; hence, it isn’t necessary to download any application.
- You can synchronize your work with devices like macOS, iPad, AirDrop, and iCloud.
Steps
Do you want to know ho w to slow down a time-lapse on i Phone ? The method of performing this function is very plain and accessible, and here is the guide:
Step 1: Open iMovie and click the “Start New Project” option to start editing. Continue to select “Magic Movie” across the pop-up to proceed into the editing section.
Step 2: Choose a file from the iPhone’s video gallery and select the “Pencil” icon to start editing. Go to the “Speed” option and click it to access speed change options.
Step 3: Navigate towards the speed slider and drag it towards the left to slow down. The option “1/2x” means the speed will be half the original speed.
2. Filmmaker Pro - Video Editor
If you want to slow down the time-lapse i Phone with additional editing options, use this tool. It is a professional-level content editor for iDevices and offers to slow down the speed. You can create or slow down timelapses. The editor will export your videos in 4K high resolution. Moreover, 120 royalty-free music tracks can be inserted into your slo-mo afterward.
Key Features
- Decorate your videos with stunning animations using keyframing and track motion.
- You have over 46 transition options to complete trending TikTok and Instagram challenges.
- Over 79 classic fonts, 92 beautiful fonts, 15 Hollywood, and 26 retro fonts options.
3. Video Up! Video Editor and Maker
Adjusting the time-lapse speed of the i Phone is possible via third-party applications. This is a versatile platform for creating slo-mos without any technicalities. You will find speed setting presets when you access its video adjustment options. These presets can automatically slow down or fasten a video at a specific point. However, you can also choose its Custom option to slow down a complete video.
Key Features
- It provides 2 video export resolution options: Ultra – 4K and Full HD – 1080p.
- Offers an option to insert voiceovers and built-in music tracks in your slo-mos or videos.
- CTA to share videos straight to Instagram, Facebook, WhatsApp, and more.
4. Vidma - Video Editor Music
Are you wondering how to slow down time-lapse videos on iPhone for specific durations? Vidma is the right tool for you, offering custom speed change and duration options. The speed slider option is a simple drag and adjust method. In addition, there is an audio pitch adjustment option to maintain audio during speed alteration.
Key Features
- Users have the option to merge, crop, or resize your images or videos using this tool.
- With its AI abilities, you can generate art from text and edit it further.
- The lowest playback speed to create slow motion is 0.1x, and the highest is 10.0x.
Part 3: A Comprehensive Desktop Solution for Slowing Down Time Lapses: Wondershare Filmora
Wondershare Filmora is a platform with diverse possibilities and compatibility across iOS devices. This allows you to import media using a cable from your iPhone. It doesn’t decline the video quality upon export or import; hence, it proves to be a superior tool to adjust the time-lapse speed of the i Phone. Filmora offers multiple opportunities to transform a time lapse into slo-mo.
You can also select the time period to apply the slow-motion effect via timeline editing. In addition, users can also choose the speed ramping option for professional results. Upon creating a slow motion, you can use Filmora’s video templates, text, and more to enhance visuals. In addition, there is an Optical Flow feature to help in enhancing the slo-mo effect.
Free Download For Win 7 or later(64-bit)
Free Download For macOS 10.14 or later
Step-by-Step Guide to Slow Down a Time Lapse Video into Slow Motion in Filmora
The basic technique to change the time-lapse speed of the i Phone involves Uniform Speed. This method modulates the playback speed of a video through the slider’s position. Here is how do I slow down time lapse on i Phone using Filmora:
Step 1Commence the Speed Change Action
Initiate Filmora by giving a “New Project” command and gaining access to the editing interface. Use the “Import” > “Import from a Camera or Phone” to import files. You need to connect to the iOS device first. Bring the clip to the timeline and access the settings panel that will appear on the screen. Further, choose the “Speed” > “Uniform Speed” option and drag the Speed slider towards the left to reduce it.
Step 2Access the AI Frame Interpolation Settings
In the pursuit of achieving a seamless slow-motion effect, use the AI Frame Interpolation settings. Navigate towards the bottom to access it and opt for the “Optical Flow” option.
Step 3Activate Render Preview for Thorough Evaluation
Upon adjusting, return to the timeline panel and select the video. With the help of your cursor, navigate to the “File” > “Render Preview” option. Enable a preview prior to finalizing the video, and then hit “Export.”
Key Features of Filmora
Filmora is not just confined to creating slow motion; the interface offers much more. There are multiple AI and manual features to edit videos, adjust audio, and insert text. Here are a few video editing features of Filmora amongst many:
Green Screen: Get rid of messy or unwanted backgrounds and replace them with something captivating. For this, film the model or object in front of a green screen and enable Chroma Key. It is an AI-driven function that will auto-remove the background while preserving the object.
AI Text-to-Video: Can’t find the right visuals or time to shoot content for your channel? Use this AI to create videos from prompts without having to put in any effort. The AI will auto-generate graphics to add to the video along with the AI voice insertion.
Compound Clip: Are there multiple clips in your timeline that you want to apply the same effects to? This function will help you transform multiple clips into one. Furthermore, you can apply similar effects or transitions. In addition, this function also ensures a smooth transfer from one clip to another.
AI Thumbnail Creator: Create and edit compelling thumbnails for your videos using this AI. The AI will analyze and select the perfect video frames as thumbnail options. Further, you can edit the thumbnail and insert multiple templates to show what the video is going to be about.
Conclusion
After going through this article, readers have an extensive knowledge of how to slow down time-lapse on i Phones using multiple tools and techniques. We provided a review of these tools but also the benefits of slo-mos in content creation and viewing.
In the end, we suggest Wondershare Filmora as the best alternative to all these applications. The software is not just AI integrated but has everything you need to create slo-mos in one place. Use Filmora for creative slo-mo and other video editing features.
How To Fade Audio In Kinemaster
If you have been looking for video and audio editing tools then you have probably heard of Kinemaster. It is a great video editing app that allows users to edit all aspects of the video including any audio or music that may accompany the video. It has a lot of very useful features and the user interface is fairly easy to use.
One of the things that you can do with Kinemaster is to fade out audio, a useful feature that can help the ending of any video appear more authentic. In this article, we will be looking at how you can use Kinemaster to fade audio.
Kinemaster Fade Audio Steps
The following steps show you how you can easily fade audio in Kinemaster;
Step1If you don’t have Kinemaster already, start by downloading and installing the video editor on your computer.
Step2Open Kinemaster on your computer and then click on the “New Project” icon to start. Select the aspect ratio that you would like to use. If you are not sure, we recommend choosing the “16:9” aspect ratio.
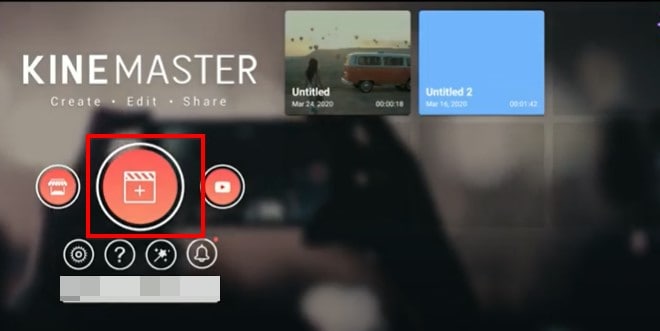
Step3In the next window, click on “Media” to select the clip you would like to add to the Kinemaster project that you have just created.
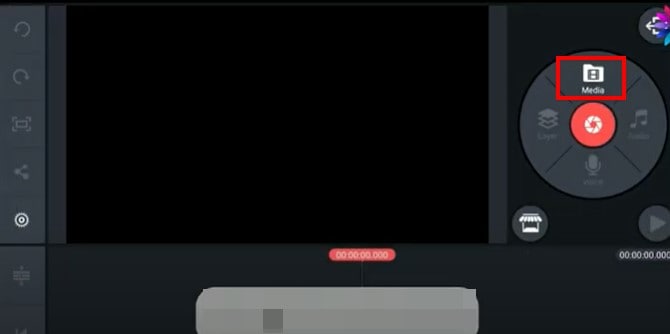
Step4To fade in and fade out the audio in the project, click on the gear icon from the options to the left of the screen.
![]()
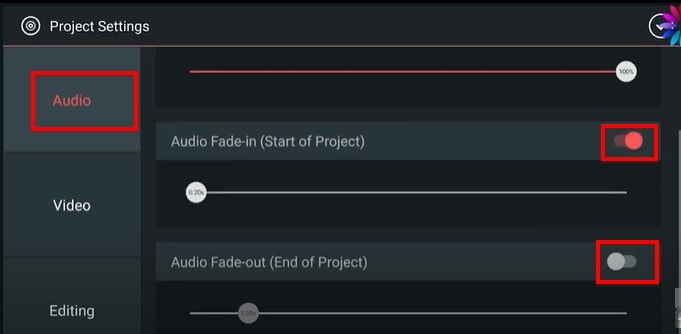
Step5Select the “Audio” tab on the next screen and then turn on the switch next to “Audio Fade-in (Start of Project)” and “Audio Fade-out (End of Project).” This will add a fade-in and fade-out effect at the beginning of the audio and at the end of it.
Step6You can then easily set the duration of the “Audio fade-in” and “Audio fade-out” by dragging the slider below each option. We recommend setting the duration to just a few seconds.
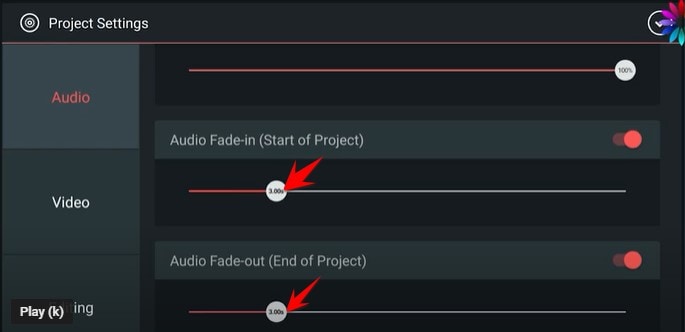
Don’t forget to save the project when you’re done.
Kinemaster Alternative to Edit Audio
Kinemaster is a good way to edit both audio and video on your computer, but the following options are just as good;
1. VideoShop
VideoShop is a simple to use and highly effective program that you can use to create and edit videos on your computer. The interface makes it easy to import any video project that you have into the program and the wealth of very useful features can help you edit the video in various ways.
For example, you can change the speed of the video, add transitions at various points in the video, add and remove text, add and remove music and so much more. Although there is a free trial version, you will only be able to access some of the more useful features when you purchase the premium version.
The Pro version of VideoShop goes for $3.99 a month, but you can get lifetime access to the program for only $39.99. One thing that VideoShop has over Kinemaster is that it is very easy to use, even beginner users find video editing a breeze with this tool.
2. Filmora
If you are looking for a simple way to edit videos on Android or iOS devices, Filmora is one of the best options in the market. This mobile version of the very popular Filmora video editor is just as easy to use as its parent program. You can use it to create video projects from scratch or upload a video and make changes to it.
It offers you a lot of choices when it comes to editing features including trimming sections of the video, adding filters, adding music, adding or removing text, and even changing the canvas or the background of the video. Advanced options such as changing the speed of the video are also available.
One of the things that we love about Filmora is that you don’t even have to create an account to use it or remove the watermark added to the completed video project, watching a video ad can be enough. But this option is only available once every 24 hours, meaning that you can only remove a watermark on the free version once a day. Filmora is available for both iOS and Android and the yearly premium plan will cost you just $19.90.
3. Quik
Quik is a video editing program created by GoPro for the purpose of editing GoPro videos, but that doesn’t mean that you will not be able to use it to edit other types of videos. You can use Quik to create a new project or edit an existing video and gives users a lot of different options when it comes to video editing.
One of the main benefits of using Quik is that you can easily add music, audio, and special effects to a video as well as change the length of the video, fade audio in and out and even change when the music starts. It is also one of the best ways to use images to create collages and slideshows very easily. There are a lot of slideshow and collage templates to choose from, and you can edit them easily by adding your music and images. Quik is completely free to use and you can upload your creation to the cloud ad share the link with others.
Conclusion
Kinemaster is one of the most popular video editing tools, especially since it simplifies the video editing process to make it very easy. All the alternative tools we have outlined here in this article are selected because they can make video editing quite simple.
Free Download For Win 7 or later(64-bit)
Free Download For macOS 10.14 or later
Also read:
- Updated 6 Free Tools To Radial Blur Photos Online
- New Using Track Matte and Tracking in Adobe After Effects Reviewing All Possibilities
- 2024 Approved How to Rotate a Video in Windows 10
- Updated How To Add Motion Blur On CapCut? (IPhone & Android) for 2024
- Updated Top 5 Free Online Video Filter Editors Improve Your Videos with Filters
- How to Edit Text in Premiere Pro for 2024
- 2024 Approved Learn How to Feather Shapes in After Effects and Add a Professional Touch to Your Designs. This Comprehensive Guide Covers Everything From the Basics to Advanced Techniques. Perfect for Beginners and Experts Alike
- New Embrace Creativity in Your Media by Replacing Backgrounds. Learn to Replace the Sky in Lightroom Through the Steps and Details Discussed in This Article
- Updated In 2024, How to Create Your Own LUTs for Your Video with Filmora
- Updated 2024 Approved A Guide to Effective Video Marketing
- Updated 2024 Approved Art of Time Manipulation A Guide to After Effects Slow Motion Mastery
- New Boost the Pace of Your Instagram Reels Videos with These Simple Tricks for 2024
- How to Create a Video Slideshow in iMovie
- New VSDC Free Video Editor Review for 2024
- 2024 Approved 10 Matching Color Combination That Works Together
- New Easy Step by Step Tutorial on Creating a Lightroom Collage
- Updated How to Make Cool COD Warzone Thumbnail
- 2024 Approved How to Make First Impression Review Video
- New 2024 Approved Top 12 Sony Vegas Slideshow Templates for Free Download
- Try These 10 Music Video Templates To Make Your Work Easy
- 2024 Approved How to Turn On/Off Motion Blur in Dying Light 2?
- In 2024, Learn How to Rotate Videos with Ease Using Shotcut with Our Comprehensive Guide. Discover Tips and Tricks to Get the Perfect Footage Every Time. Start Using Shotcut Today
- In 2024, Ways to Learn Discord Game Bots – Even if Youre Just Starting Out 20
- New Do You Waste Time Making Transparent Background in Paint
- Updated 2024 Approved How to Make a Slideshow with Icecream Slideshow Maker
- Updated Finding The Best LUTs for Wondershare Filmora for 2024
- Do You Have a Loved Ones Birthday Fast Approaching, and Youre Wondering What to Do? A Birthday Photo Slideshow Is One Good Way to Celebrate the Person and Make Them Feel that They Are Loved
- New In 2024, Best Online MPEG to GIF Converters
- Updated In 2024, Split a Clip in DaVinci Resolve Step by Step
- Updated Camtasia Review – Is It The Best Video Editor for 2024
- Bored of Extraneous Software Downloads and Program Installations to Edit Your Videos? The Best Video Editing Online Utilities Are Here at Your Rescue for 2024
- Updated In 2024, How to Edit GoPro Videos on Mac
- New Top 10 Anime Movies of All Time
- Updated Using Adobe After Effects as a Pro-Level Editing Platforms Demands You to Add Expressions in After Effects. If Youre Looking for the Solutions on After Effects How to Add Expressions Then Weve Got You Covered. Learn More Here
- Updated Fast and Easy Method to Match Color in Photoshop for 2024
- Updated In 2024, The Most Efficient Ways to Manage Your Timeline
- Updated Top 10 Video Editing Online Makers Is Worth Your Attention
- Updated In 2024, Speed Up/Down Videos in VLC
- New Finding the Best Game Recorder for PC for 2024
- Before & After Editing Trick | Wondershare Filmora Tutorial
- What Is the Best MP4 Cutter for YouTuber on Mac, In 2024
- Updated In 2024, How to Apply Video Filters Mobile and Desktop
- Do You Want to Learn About the iPhone LUT? Have You Used Them on Your iOS Device? Use This Article to Get Valuable Insights on the Same for 2024
- New 2024 Approved Detailed Steps to Rotate Video Using KMPlayer
- 2024 Approved 6 Best MP4 Mergers to Join Videos Easily
- New Top 12 Sony Vegas Slideshow Templates for Free Download for 2024
- How to Repair corrupt MP4 and MOV files of Xiaomi Redmi K70E using Video Repair Utility on Mac?
- Undelete lost music from Storm 5G
- What Pokémon Evolve with A Dawn Stone For Apple iPhone 14 Pro? | Dr.fone
- In 2024, The Best iSpoofer Alternative to Try On Oppo A1x 5G | Dr.fone
- How to Reset iPhone 12 mini Without Apple Password? | Stellar
- Possible solutions to restore deleted call logs from Spark 10 4G
- How to Bypass Activation Lock from iPhone 6 Plus or iPad?
- In 2024, How to Transfer Contacts from Infinix Smart 8 HD to iPhone XS/11 | Dr.fone
- In 2024, How to Migrate Android Data From Realme 12+ 5G to New Android Phone? | Dr.fone
- How to Screen Mirroring Nubia Red Magic 9 Pro? | Dr.fone
- What Legendaries Are In Pokemon Platinum On Tecno Spark 10 Pro? | Dr.fone
- In 2024, 3 Facts You Need to Know about Screen Mirroring Honor 80 Pro Straight Screen Edition | Dr.fone
- In 2024, Full Guide to Unlock iPhone 12 Pro Max with iTunes | Dr.fone
- Ways to trade pokemon go from far away On Realme 10T 5G? | Dr.fone
- Everything To Know About Apple ID Password Requirements For Apple iPhone XR
- Unova Stone Pokémon Go Evolution List and How Catch Them For Nubia Red Magic 9 Pro+ | Dr.fone
- Complete Tutorial to Use GPS Joystick to Fake GPS Location On Vivo V30 Lite 5G | Dr.fone
- In 2024, Overview of the Best Motorola Razr 40 Ultra Screen Mirroring App | Dr.fone
- How To Transfer WhatsApp From iPhone 14 to other iPhone 13 Pro devices? | Dr.fone
- How To Transfer Data From Apple iPhone XS Max To Other iPhone 14 Pro devices? | Dr.fone
- Title: In 2024, Best Options to Replace Sky of Any Photo Online + Offline
- Author: Chloe
- Created at : 2024-05-20 03:38:26
- Updated at : 2024-05-21 03:38:26
- Link: https://ai-editing-video.techidaily.com/in-2024-best-options-to-replace-sky-of-any-photo-online-plus-offline/
- License: This work is licensed under CC BY-NC-SA 4.0.
