
In 2024, Blender Green Screen Effects

Blender Green Screen Effects
Blender is an open-source cross-platform 3D graphics program, but this doesn’t mean it’s a low-rent option. Just like commercial packages like Lightwave 3D, it is also a very capable compositing package. Unlike Lightwave, it is a modern node-based compositor like Nuke or Fusion. It’s not what the software is designed for, but it does a bangup job of green screen compositing, as you will soon see.
Blender green screen uses technique of the chroma key a color is isolated (in our case the green of thegreen screen), or a particular luminance, it is removed and the area that was occupied by it becomes transparent, thus becoming part of the alpha channel. The transparent parts will thus show the video or the image below, which will thus define the environment in which the subject of the first movie will act.
How to Use Green Screen in Blender
So we need to pull these two elements into Blender and pull a key on the green bits to make the background show through in as naturalistic a way as possible. Blender is a node-based compositor which means the control mechanism is nodes or little LEGO blocks of love which you place on the screen and link with little strings which form your signal path.

Locate the drop-down (it goes up, actually, but you know what we mean) at the bottom of the view, and select “Movie Clip Editor.”
Click the “Open” button and choose and load your green screen footage. (You can also load sequences of images for uncompressed keys in this step if you have the space, and the footage is the right size.)
Once the clip is loaded, go back to the drop-down and select Node Editor.
The screen will be blank, but just go to the bottom of the view and click the middle button marked “Node Tree Type” to Display, and then check the Use Nodes and Backdrop buttons.
Select the “Render Layers” node, and because we won’t need it you can delete it (on the Mac this is the Forward Delete key). Then move the Compositing node out of the way because we won’t need it yet.
**Note: to zoom in and out of the nodes, use the centre scroll wheel of the mouse if you have it. To zoom in and out of the images you are working on, use the V and Alt-V keys.
**Compositing Nodes
Click the Add menu in the bar at the bottom of the view and select “Input -> Movie Clip.” Select the green screen clip you added in the Movie Clip Editor. This is the input. We have to push this through a keyer to remove the green and make those areas transparent.
**Important: in this program flow goes from left to right, so node inputs are on the left of a node, and outputs are on the right of a node.
Now select “Add -> Matte -> Keying” to add a keying node. Also “Add -> Output -> Viewer” to make the output from the key visible. Click on the little yellow dot next to Image output on the Input node, and drag it to Image input on the Keying node. Then drag the little dot next to Image output on the keying node, and drag it to the image input on the viewer node.
You now have to select the key colour, the colour which the keyer is changing to transparent. Click the Key Colour button on the Keying node, and this displays a colour selector. Click the eyedropper, and click on the image in the background somewhere on the green screen.
If you look carefully, you will see that there are some areas which still have a bit of colour and are not fully transparent. You can check this more accurately by dragging the string from the Matte output on the Keying node and linking to the input on the viewer. This is the key you have made. As you can see, the dark bits are supposed to be totally black, and there are still greys showing through. (This is because the source material wasn’t perfect.)
There are many different ways to fix this depending on the shot, but if it’s a reasonably well-shot green screen, all you will need to do is the following.
Adjust the Black Clip slider to expand the amount of greens which turn to black. Then adjust the White Clip to push the whites to prevent them from becoming transparent.
Once you have pure white and pure black, reconnect the image output of the keying node to the image input on the viewer, and you’ll see you have a decent key.
You can adjust the amount of fringing and spill (reflections from the green screen on the model), but generally the keyer does a good job of guessing that for you with a decently-shot green screen.
**Adding the background
After this, adding the background is more of the same with a slight twist. “Add -> Input -> Movie Clip,” navigate to your background clip and load it.
To blend the two layers, you have to make a mix of the two clips so that the background shows through the now transparent bits of the foreground.
“Add -> Colour -> Mix node”. Take the output from the background clip, and feed it to the top image input of the mix node. Take the output from the keying node, and feed it into the lower image input on the mix node.
Click the Alpha channel button next to the drop-down on the mix node.
And finally we have our key. The background is way too sharp and makes the green screen footage look really soft and crappy, so we need to soften the background. There is a really nice Bokeh Blur filter in blender for just this purpose to make the background look out of focus and add lots of gorgeous Bokeh blobs.
“Add -> Filter -> Bokeh Blur” and put it between the background clip and the mix. In Blender, if you add a node and place it over a string between two nodes, the string goes yellow, and dropping it will automatically insert the new node into the signal path connecting inputs and outputs.
Finally add an image to the Bokeh Blur for the shape you want the bokeh to be; we opted for a donut-shaped iris pattern.
To render out your video, connect the output of the Mix node to the input of the compositing node we left lying about earlier. It’s okay for this output to be connected to the input node of the viewer, too, as this means we see progress while rendering.
Make sure you are set up to render the right amount of frames at 30fps in the render panel on the far right. 30fps for 5 seconds (the duration of our clip) is 150 frames. Insert 150 where it says End Fr.
Select a place and a filename to output to in the Output panel further down the right-hand side. Then to render, select the info menu bar from the top-left drop-down, and finally choose “Render Menu -> Render Animation,” and the render will begin.
Wondershare Filmora
If you’re just starting out with video editing, or just want a simple program that works, Wondershare Filmora might be what you’re looking for. It has the essential tools, and anyone can learn to use it easily.
Wondershare Filmora is the one of best video editing software with cool features that compares to other competing video editing Softwares. Many video editing programs claim to offer professional results; Filmora is one of a few consumer-level tools that actually delivers.
For Win 7 or later (64-bit)
For macOS 10.12 or later
Installation Steps
- Click the icon in the center of the Media Library to add files directly.
- Go File > Import Media > Import Media Files.
- Drag and drop to the Media Library directly.
While importing a media file, Wondershar Filmora may ask you if you wish to create a proxy file to accelerate the editing process. Select “Yes” to have a fast video editing experience.

You can also import video clips using your Touch Bar controls if your computer has Touch Bar.
Related FAQs
How do I get rid of the green screen in blender?
This is achieved by Compositing Nodes: Click the Add menu in the bar at the bottom of the view and select “Input -> Movie Clip.” Select the green screen clip you added in the Movie Clip Editor. This is the input. We have to push this through a keyer to remove the green and make those areas transparent.
How do I get rid of objects in green screen?
This can be done by following these prompts: Select “Add -> Matte -> Keying” to add a keying node. Also “Add -> Output -> Viewer” to make the output from the key visible. Click on the little yellow dot next to Image output on the Input node, and drag it to Image input on the Keying node. Then drag the little dot next to Image output on the keying node, and drag it to the image input on the viewer node.
Conclusion
Obviously, to get the best green screen composites you have to shoot good “plates.” “Plates” are the main bits of the shot that you bolt together in movie visual effects. You have the foreground plate and the green screen bit with an actor filmed in front of a green screen. Then you have the background plate which is the bit you want to show through the green bits of the foreground, making the whole thing look as though the background and foreground were filmed at the same time.
For macOS 10.12 or later
Installation Steps
- Click the icon in the center of the Media Library to add files directly.
- Go File > Import Media > Import Media Files.
- Drag and drop to the Media Library directly.
While importing a media file, Wondershar Filmora may ask you if you wish to create a proxy file to accelerate the editing process. Select “Yes” to have a fast video editing experience.

You can also import video clips using your Touch Bar controls if your computer has Touch Bar.
Related FAQs
How do I get rid of the green screen in blender?
This is achieved by Compositing Nodes: Click the Add menu in the bar at the bottom of the view and select “Input -> Movie Clip.” Select the green screen clip you added in the Movie Clip Editor. This is the input. We have to push this through a keyer to remove the green and make those areas transparent.
How do I get rid of objects in green screen?
This can be done by following these prompts: Select “Add -> Matte -> Keying” to add a keying node. Also “Add -> Output -> Viewer” to make the output from the key visible. Click on the little yellow dot next to Image output on the Input node, and drag it to Image input on the Keying node. Then drag the little dot next to Image output on the keying node, and drag it to the image input on the viewer node.
Conclusion
Obviously, to get the best green screen composites you have to shoot good “plates.” “Plates” are the main bits of the shot that you bolt together in movie visual effects. You have the foreground plate and the green screen bit with an actor filmed in front of a green screen. Then you have the background plate which is the bit you want to show through the green bits of the foreground, making the whole thing look as though the background and foreground were filmed at the same time.
For macOS 10.12 or later
Installation Steps
- Click the icon in the center of the Media Library to add files directly.
- Go File > Import Media > Import Media Files.
- Drag and drop to the Media Library directly.
While importing a media file, Wondershar Filmora may ask you if you wish to create a proxy file to accelerate the editing process. Select “Yes” to have a fast video editing experience.

You can also import video clips using your Touch Bar controls if your computer has Touch Bar.
Related FAQs
How do I get rid of the green screen in blender?
This is achieved by Compositing Nodes: Click the Add menu in the bar at the bottom of the view and select “Input -> Movie Clip.” Select the green screen clip you added in the Movie Clip Editor. This is the input. We have to push this through a keyer to remove the green and make those areas transparent.
How do I get rid of objects in green screen?
This can be done by following these prompts: Select “Add -> Matte -> Keying” to add a keying node. Also “Add -> Output -> Viewer” to make the output from the key visible. Click on the little yellow dot next to Image output on the Input node, and drag it to Image input on the Keying node. Then drag the little dot next to Image output on the keying node, and drag it to the image input on the viewer node.
Conclusion
Obviously, to get the best green screen composites you have to shoot good “plates.” “Plates” are the main bits of the shot that you bolt together in movie visual effects. You have the foreground plate and the green screen bit with an actor filmed in front of a green screen. Then you have the background plate which is the bit you want to show through the green bits of the foreground, making the whole thing look as though the background and foreground were filmed at the same time.
For macOS 10.12 or later
Installation Steps
- Click the icon in the center of the Media Library to add files directly.
- Go File > Import Media > Import Media Files.
- Drag and drop to the Media Library directly.
While importing a media file, Wondershar Filmora may ask you if you wish to create a proxy file to accelerate the editing process. Select “Yes” to have a fast video editing experience.

You can also import video clips using your Touch Bar controls if your computer has Touch Bar.
Related FAQs
How do I get rid of the green screen in blender?
This is achieved by Compositing Nodes: Click the Add menu in the bar at the bottom of the view and select “Input -> Movie Clip.” Select the green screen clip you added in the Movie Clip Editor. This is the input. We have to push this through a keyer to remove the green and make those areas transparent.
How do I get rid of objects in green screen?
This can be done by following these prompts: Select “Add -> Matte -> Keying” to add a keying node. Also “Add -> Output -> Viewer” to make the output from the key visible. Click on the little yellow dot next to Image output on the Input node, and drag it to Image input on the Keying node. Then drag the little dot next to Image output on the keying node, and drag it to the image input on the viewer node.
Conclusion
Obviously, to get the best green screen composites you have to shoot good “plates.” “Plates” are the main bits of the shot that you bolt together in movie visual effects. You have the foreground plate and the green screen bit with an actor filmed in front of a green screen. Then you have the background plate which is the bit you want to show through the green bits of the foreground, making the whole thing look as though the background and foreground were filmed at the same time.
An Intro Video Describing You and Your Content Is the First and the Foremost Thing Which a Viewer Sees. Thinking of How to Make an Interesting Intro Video, This Blog Is Surely a Supportive Guide for You. Learn More Here
You scroll through different social media platforms which lead you to different bloggers and content creators who introduce themselves through the precise intro videos. It the point where a viewer either turns towards or turns away from a person presenting a brand or a business. Intro videos are a must, particularly when you are new in business and promotions. Bringing your story to life in your intro video requires a propaganda to ensure that it evokes feelings of trust, confidence, and curiosity among your target viewers.
The pillar on which a striking intro videos stands is not just a monotonous visualization with poor graphics and music. It requires expertise and moreover, it requires a ‘point’. Your boring intro video would be purposeless for the people who’re watching it. Each second, you express something new, yet filled with intricate details about your work and brand. Let’s dig in a little deeper to know how exactly your introduction video will generate leads and connects you with your target audience.
Part 1: Why Intro Video is Important
An intro video, just like it sounds, is an introduction of your brand, your content or anything that you’re promoting. It appears as soon as the viewers are all set to explore your content and brand. To make the viewer’s first glimpse of your work worthwhile, it is crucial that you explain your value preposition through a precise and appealing intro video. It is through the intro videos that your work is noticed and promoted. It is important to create a story highlight for your viewers while you’re setting the decorum of your business, brand or other content.
Additionally, your video must fulfill components of a striking intro video. Whatever you are trying to say should be clear in your video. Besides being clear enough, your intro video must be short, precise and goal-oriented. You are attracting viewers so make their view purposeful with your intro video which should tell your story. The intro video, if presented flawlessly, can captivate the visitors to interact with you and can even inspire them to add into the growth of your business/content. In a nutshell, an intro video brings your business to life, increase your boost and grabs your visitors’ attention.
Part 2: When to Use Intro Video
Apart from a variety of benefits it offers, the intro video basically forms the balusters of your brand or content. Intro videos are commonly used in the following domains:
Boost Sales : Incorporating a precise piece of work in the form of an intro video can help you boost sales magically. It is far the most effective strategy you company or brand can adopt. Your brief intro video can tell your story and convey your message in an emotional and dramatic way, which consequently attracts more viewers and ultimately, results in the boost of your sales. It is just as similar to you playing with the minds of your audience. A higher audience engagement due to your intro video can definitely prove that intro video is an asset which you can offer in addition to your marketing strategies.

More Social Shares: Social media is undoubtedly far the most highly competitive space for your brands and businesses to work like magic. It is insane how brands and businesses are promoted on the tip of your fingers by sharing the gist of your work. That gist, is of course what we are talking about here in this article. Intro videos are brief and appealing which can easily by shared over multiple platforms. The more the social shares of your intro video, the more you receive the nectar of your input.

Build Personality: If you’re socially awkward or on the contrary, a social freak; the intro video covers you all. Whoever you are and whatever you do, is most creatively presented through a precise intro video. The intricately woven description of your work in an intro video definitely does wonders. People see you through your work and they see your work and you simultaneously through an intro video, then why risk creating it conventionally?

Increase Brand Awareness: Creating a brand awareness video which narrates your story in a presentable manner is like wining the internet’s mode of lottery. A thoroughly considered and precise piece of your intro video can go viral at an unbelievable pace and before you even know, your marketing has done wonders all over the digital media. What is your brand, what it offers, how it benefits you and who is the target audience; all these queries are explained through a short intro video which would ultimately result in your brand recognition and thus the growth.

Part 3: Best Intro Video Maker
Out there, the market is jam-packed with people witnessing millions of videos on different media platforms every day. This only leads to crowded digital market but only your intro video can stand out and flaunt your work charmingly. Filmora is one best choice to professionally craft your intro video which can give your brand a head start in no time.
Wondershare Filmora is a time effective and easy to use video editing software that enable the users to create variety of videos by choosing among some great presets and powerful editing tools. Maintaining and improving the quality of videos, Filmora enables the users to choose across a variety of different video editing features. This video editing software is developed by Wondershare and it includes features for a range of users from beginner to intermediate levels.

For a composition of your intro video, Filmora is the best go-to software so why wait another minute? Currently, Filmora is compatible with Windows and macOS computers. Some of the features offered by Filmora include the following:
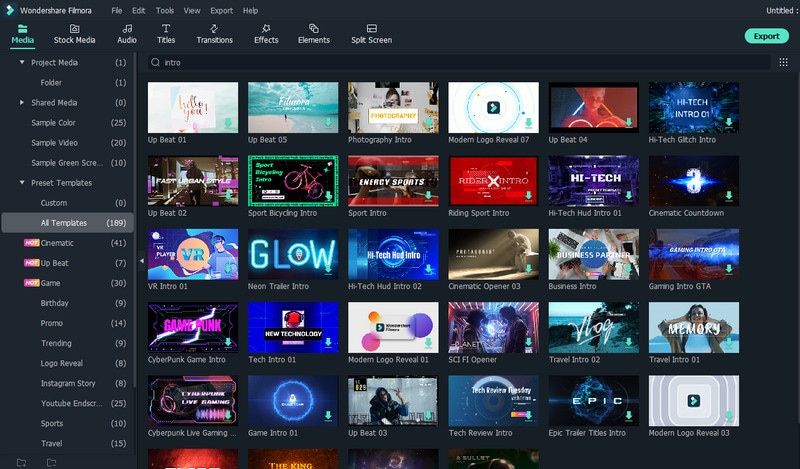
Rich Intro Templates
A wide variety of professionally crafted templates are available on your fingertips so instead of conventionally editing your videos, get your hands on the stunning templates offered by Filmora. Filmora is equipped with multiple templates which provide the users a plethora of options when it comes to customizing videos. These templates are easy to use and your intro videos can turn into a magic movie with presets offered by Filmora so grab your setup today and enjoy the affordable software now.
Numerous Video Effects
Importing media and editing it on the timeline to create a compelling tale is the first step in a video editor’s post-production process. Following those foundational steps, an editor applies various effects to the video in order to fix issues, improve mood, intensify suspense, and add magic to the video. Filmora offers a great variety of customizable filters, effects, transitions and the best part? You don’t even have to be a pro to use these effects.

Title Editing
Filmora enables the intro video makers to adorn the titles of their videos by selecting among multiple text editing options. Both short videos and full-length movies must have opening titles and closing credits. You may catch the audience’s attention from the first frame of your video by coming up with inventive methods to employ text which precisely conveys the tale of your film. You may utilize more than a hundred text settings in Filmora’s Titles tab to add text to the video.

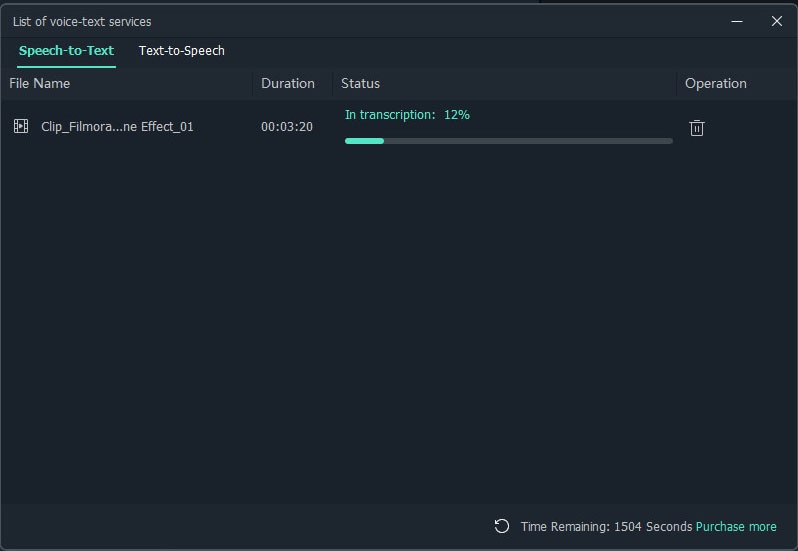
Text to Speech/STT
Speaking in your videos may increase engagement and make it simpler for viewers to grasp what you’re saying. But how can you add audio without first recording it? Are you considering hiring a voice actor? Don’t worry! Filmora got your back by offering Text to Speech (TTS) function, which enables the users to add voice to your video. Filmora automatically transcripts your text files into speech on the click of a button.
Audio Editing
Filmora additionally offers an audio panel where the software helps to manipulate audio added to your intro videos. The audio editing feature of Filmora enables users to improve the quality of the audio, to remove unwanted noises, balance pitch or change the length of a particular audio file.

Part 4: How to Create Intro Videos
To maintain consistency and to provide your brand with a unique identity, it is essential to carefully craft an intro video. Following is a step-by-step guide through which you can get your hands on this effective video editing software:
Free Download For Win 7 or later(64-bit)
Free Download For macOS 10.14 or later
Step1Download and Install the Software
The first step in creating an intro video requires the user to download and install the Filmora software in Windows or MacOS computers. To download the setup, go to https://filmora.wondershare.com/ and click ‘Download’. Afterwards, when the setup is downloaded, run the setup and install Filmora on your computer:

Step2Add Color Templates
After installing, wait until the installation is finished. Launch Wondershare Filmora and go to MEDIA tab at the top left of the interface and select the best suitable background color for your intro video from the dropdown menu in the MEDIA tab. Drag your cursor over the tile of the color you wish to use as a background and click to add the icon that appears in the center to add it to the timeline.
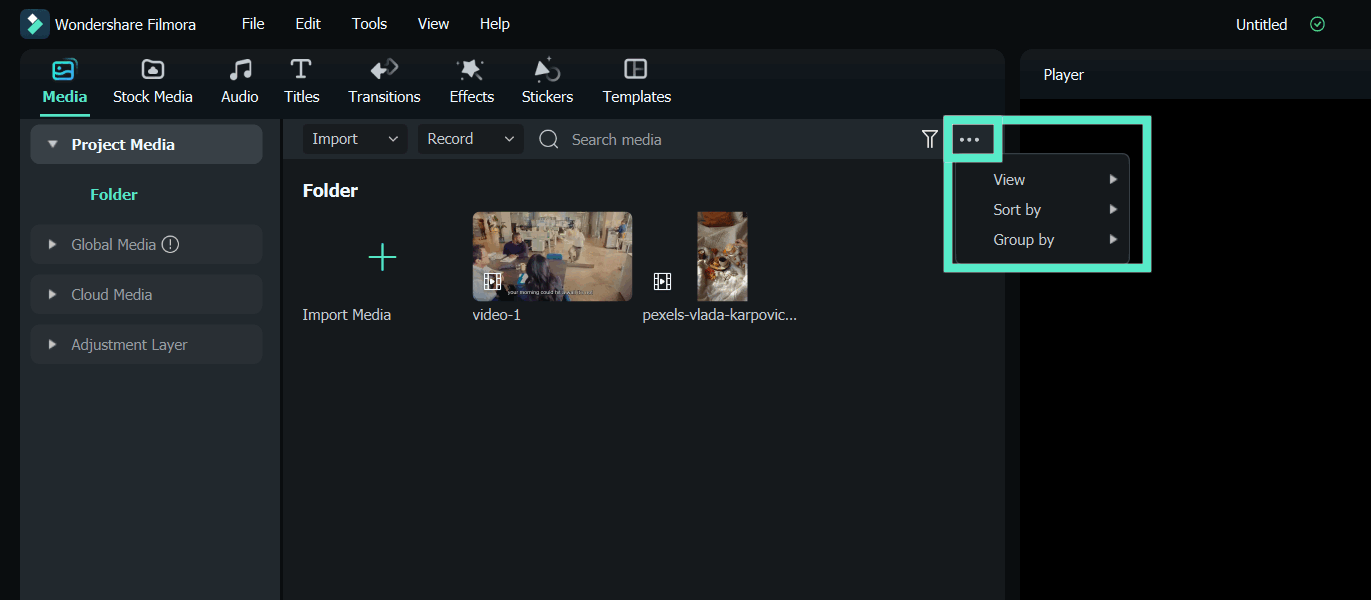
Additionally, if you don’t prefer the preset backgrounds and colors, Filmora lets you use your own background image or video clip. For this, select PROJECT MEDIA > click anywhere inside the media window > import media file of your choice. After importing the file, click on the imported file to add it to the timeline.
Step3Select and add audio effect to your Intro Video
Your video automatically grasps a lot of viewers’ attention with a spice of some music/audio in the background. To adorn your intro video further, you can add audio/music effect to your intro video using the inbuilt music and sound effects from the library. If you want to listen to a track from the inbuilt library collection of audio and music, double click on the thumbnail.

Click the AUDIO tab. Choose from Recommended audio files or import your own audio. Once, you find your desired audio/music file, drag and drop it to the audio track below the video.
Step4Add Text/Logo to your Intro Video
Click the ‘TITLE’ tab. To customize, choose title options from Recommended or add your own custom design. To change, format, and animate the text as needed, click on your desired preset or custom title and double click or drag it to the bottom area of the main library to insert a title.

Also, you need to adjust the position and duration of the title to get a better view. In the intro video, it is recommended to add your logo or slogan as well. To add your logo, drag and drop it to the track above the video, and adjust its position and size.
Step5Add Effects to your Intro Video
Go to ‘EFFECTS’ tab, choose a category from the top-left pane, and click and drag your preferred effect from the Effects library to the timeline. Adjust the playback duration by dragging the right handle of the track in the timeline as explained above. Optionally, double-click the Effects track to customize the appearance as needed.
Step6Export the Intro and Add to Shared Media
Once you’re done making your intro video, click on the ‘EXPORT’ tab in the center > go to LOCAL tab on export box > choose your preferred output format (e.g., MP4) > adjust other preferences such as destination location, resolution etc. from the right pane of the box > Click EXPORT.

Free Download For macOS 10.14 or later
Step1Download and Install the Software
The first step in creating an intro video requires the user to download and install the Filmora software in Windows or MacOS computers. To download the setup, go to https://filmora.wondershare.com/ and click ‘Download’. Afterwards, when the setup is downloaded, run the setup and install Filmora on your computer:

Step2Add Color Templates
After installing, wait until the installation is finished. Launch Wondershare Filmora and go to MEDIA tab at the top left of the interface and select the best suitable background color for your intro video from the dropdown menu in the MEDIA tab. Drag your cursor over the tile of the color you wish to use as a background and click to add the icon that appears in the center to add it to the timeline.

Additionally, if you don’t prefer the preset backgrounds and colors, Filmora lets you use your own background image or video clip. For this, select PROJECT MEDIA > click anywhere inside the media window > import media file of your choice. After importing the file, click on the imported file to add it to the timeline.
Step3Select and add audio effect to your Intro Video
Your video automatically grasps a lot of viewers’ attention with a spice of some music/audio in the background. To adorn your intro video further, you can add audio/music effect to your intro video using the inbuilt music and sound effects from the library. If you want to listen to a track from the inbuilt library collection of audio and music, double click on the thumbnail.

Click the AUDIO tab. Choose from Recommended audio files or import your own audio. Once, you find your desired audio/music file, drag and drop it to the audio track below the video.
Step4Add Text/Logo to your Intro Video
Click the ‘TITLE’ tab. To customize, choose title options from Recommended or add your own custom design. To change, format, and animate the text as needed, click on your desired preset or custom title and double click or drag it to the bottom area of the main library to insert a title.

Also, you need to adjust the position and duration of the title to get a better view. In the intro video, it is recommended to add your logo or slogan as well. To add your logo, drag and drop it to the track above the video, and adjust its position and size.
Step5Add Effects to your Intro Video
Go to ‘EFFECTS’ tab, choose a category from the top-left pane, and click and drag your preferred effect from the Effects library to the timeline. Adjust the playback duration by dragging the right handle of the track in the timeline as explained above. Optionally, double-click the Effects track to customize the appearance as needed.
Step6Export the Intro and Add to Shared Media
Once you’re done making your intro video, click on the ‘EXPORT’ tab in the center > go to LOCAL tab on export box > choose your preferred output format (e.g., MP4) > adjust other preferences such as destination location, resolution etc. from the right pane of the box > Click EXPORT.

Free Download For macOS 10.14 or later
Step1Download and Install the Software
The first step in creating an intro video requires the user to download and install the Filmora software in Windows or MacOS computers. To download the setup, go to https://filmora.wondershare.com/ and click ‘Download’. Afterwards, when the setup is downloaded, run the setup and install Filmora on your computer:

Step2Add Color Templates
After installing, wait until the installation is finished. Launch Wondershare Filmora and go to MEDIA tab at the top left of the interface and select the best suitable background color for your intro video from the dropdown menu in the MEDIA tab. Drag your cursor over the tile of the color you wish to use as a background and click to add the icon that appears in the center to add it to the timeline.

Additionally, if you don’t prefer the preset backgrounds and colors, Filmora lets you use your own background image or video clip. For this, select PROJECT MEDIA > click anywhere inside the media window > import media file of your choice. After importing the file, click on the imported file to add it to the timeline.
Step3Select and add audio effect to your Intro Video
Your video automatically grasps a lot of viewers’ attention with a spice of some music/audio in the background. To adorn your intro video further, you can add audio/music effect to your intro video using the inbuilt music and sound effects from the library. If you want to listen to a track from the inbuilt library collection of audio and music, double click on the thumbnail.

Click the AUDIO tab. Choose from Recommended audio files or import your own audio. Once, you find your desired audio/music file, drag and drop it to the audio track below the video.
Step4Add Text/Logo to your Intro Video
Click the ‘TITLE’ tab. To customize, choose title options from Recommended or add your own custom design. To change, format, and animate the text as needed, click on your desired preset or custom title and double click or drag it to the bottom area of the main library to insert a title.

Also, you need to adjust the position and duration of the title to get a better view. In the intro video, it is recommended to add your logo or slogan as well. To add your logo, drag and drop it to the track above the video, and adjust its position and size.
Step5Add Effects to your Intro Video
Go to ‘EFFECTS’ tab, choose a category from the top-left pane, and click and drag your preferred effect from the Effects library to the timeline. Adjust the playback duration by dragging the right handle of the track in the timeline as explained above. Optionally, double-click the Effects track to customize the appearance as needed.
Step6Export the Intro and Add to Shared Media
Once you’re done making your intro video, click on the ‘EXPORT’ tab in the center > go to LOCAL tab on export box > choose your preferred output format (e.g., MP4) > adjust other preferences such as destination location, resolution etc. from the right pane of the box > Click EXPORT.

Free Download For macOS 10.14 or later
Step1Download and Install the Software
The first step in creating an intro video requires the user to download and install the Filmora software in Windows or MacOS computers. To download the setup, go to https://filmora.wondershare.com/ and click ‘Download’. Afterwards, when the setup is downloaded, run the setup and install Filmora on your computer:

Step2Add Color Templates
After installing, wait until the installation is finished. Launch Wondershare Filmora and go to MEDIA tab at the top left of the interface and select the best suitable background color for your intro video from the dropdown menu in the MEDIA tab. Drag your cursor over the tile of the color you wish to use as a background and click to add the icon that appears in the center to add it to the timeline.

Additionally, if you don’t prefer the preset backgrounds and colors, Filmora lets you use your own background image or video clip. For this, select PROJECT MEDIA > click anywhere inside the media window > import media file of your choice. After importing the file, click on the imported file to add it to the timeline.
Step3Select and add audio effect to your Intro Video
Your video automatically grasps a lot of viewers’ attention with a spice of some music/audio in the background. To adorn your intro video further, you can add audio/music effect to your intro video using the inbuilt music and sound effects from the library. If you want to listen to a track from the inbuilt library collection of audio and music, double click on the thumbnail.

Click the AUDIO tab. Choose from Recommended audio files or import your own audio. Once, you find your desired audio/music file, drag and drop it to the audio track below the video.
Step4Add Text/Logo to your Intro Video
Click the ‘TITLE’ tab. To customize, choose title options from Recommended or add your own custom design. To change, format, and animate the text as needed, click on your desired preset or custom title and double click or drag it to the bottom area of the main library to insert a title.

Also, you need to adjust the position and duration of the title to get a better view. In the intro video, it is recommended to add your logo or slogan as well. To add your logo, drag and drop it to the track above the video, and adjust its position and size.
Step5Add Effects to your Intro Video
Go to ‘EFFECTS’ tab, choose a category from the top-left pane, and click and drag your preferred effect from the Effects library to the timeline. Adjust the playback duration by dragging the right handle of the track in the timeline as explained above. Optionally, double-click the Effects track to customize the appearance as needed.
Step6Export the Intro and Add to Shared Media
Once you’re done making your intro video, click on the ‘EXPORT’ tab in the center > go to LOCAL tab on export box > choose your preferred output format (e.g., MP4) > adjust other preferences such as destination location, resolution etc. from the right pane of the box > Click EXPORT.

Are You Excited to Learn About a File Format that Helps in Easy Transfer? We Are Talking About the 3GP Format. Stay with Us and Get to Know More About It
Everyone uses the internet nowadays as it is a necessary part of our lives. We exchange multimedia files and texts messages on various apps. The files that we share on the internet have a specific extension for the files. It is essential to know about the different available and widely used formats so that you can use and access the file easily.
The article below will focus on and share great details about the 3GP file format. The multimedia format is popularly used for its great benefits, such as audio and video transfer. Do you want to know more about the 3GP format? Let’s get started!
In this article
02 Advantages and Disadvantages About Video Format?
03 How Can You Open and Play 3GP Video Format?
04 How Edit 3GP Video More Creatively?
Part 1. What Is 3GP Video Format?
The multimedia files that we share on the internet have the extension as ‘.3GP’. It is an audio and video container made under the proprietorship of the 3rd Generation Partnership Project. The 3GP format stores and transmits the data that is shared between 3G-enabled devices. All 3G devices, along with some 2G and 4G devices, support 3GP file format video recording and playback.
3GP format needs less broadband demand which makes the phone run fluently. Along with taking less space as compared to other formats, it saves multimedia content efficiently. 3GP file format was designed to match the high speed of data transition between 3G networks.
Part 2. Advantages and Disadvantages About Video Format?
The 3GP format was designed to work at a high level on 3G devices. The above section of this article sheds light on what the 3GP file format is. Now that you have adequate knowledge of the format, let’s proceed and talk about the pros and cons of the file format.
Advantages of 3GP Format
- The biggest plus point of using the 3GP format is its size. The format is small in size but can store disk space. The small size of the format uses tiny amounts of data.
- The format is great because it creates an environment for business connections and improves communication. You can share text messages, videos, and multimedia files with your team members.
- 3GP file format is widely used because it has low bandwidth and also it has decreased mobile storage requirements.
- 3GP files are transferred and shared very efficiently. Hence, sharing video files has become a lot easier with this format.
- 3GP files are fast for both streaming and downloading, even if you have a weak or problematic internet connection.
Disadvantages of 3GP Format
- The quality of the audio file is damaged while compressing the file to reduce its size, as compared to the original file.
- Not every program supports 3GP file format; hence users face compatibility issues.
- Compared to the original video, the 3GP video files, after compressing, lose their quality, and the resolution is also compromised.
Part 3. How Can You Open and Play 3GP Video Format?
Do you know there are various file formats and different platforms support different formats? If we specifically talk about the 3GP format, it is supported by VLC Media Player, QuickTime Player, and 5KPlayer. Let’s discuss them:
VLC Media Player
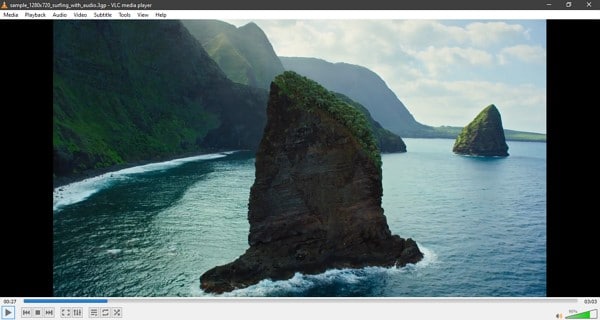
VLC Media Player is a free open-source platform that can play 3GP file format. It is developed by the VideoLAN project. VLC Media Player is a cross-platform media player software and media streamer available for Windows, Mac, Linux, and Unix.
Mobile users can use it irrespective of the device type; Android, iPhone, iPad, and iPod users can use it. VLC can be used to play 3GP format along with any format that you may encounter.
QuickTime Player
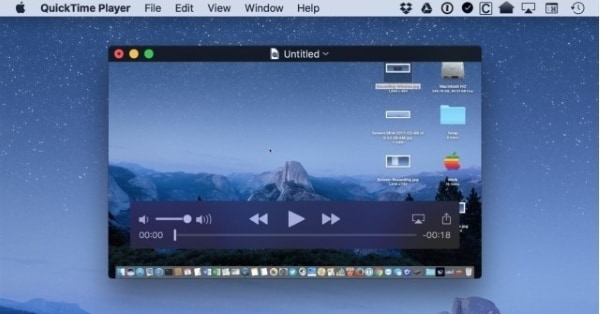
QuickTime Player was made under Apple Inc. proprietorship. It is an extendible multimedia framework and can only be used on macOS devices because the Windows-supported version was ceased after 2016. It can handle picture and digital video formats, including a 3GP file format. Although, the MOV file extension represents the QuickTime Player. QuickTime Player is pre-installed on all Mac devices.
5KPlayer
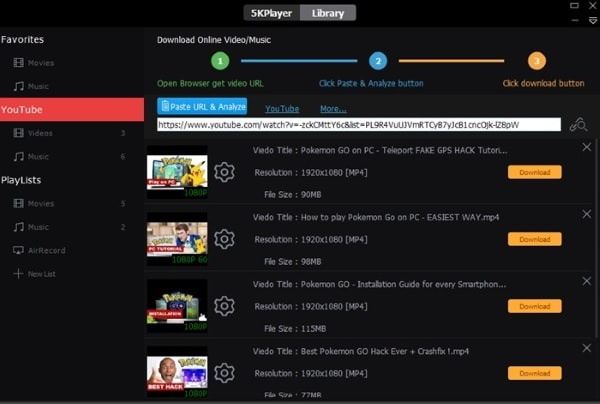
5KPlayer is developed under the proprietorship of DearMob. It is a music and video player. 5KPlayer has built-in support for AirPlay. You can stream audio and video via AirPlay without any loss in the quality of the media file. It supports different formats for multimedia, including a 3GP file format. 5KPlayer provides you the facility to download videos from 300+ sites, including YouTube, Vimeo, and Dailymotion.
3.1. Steps to Open and Play 3GP Format on VLC Media Player
Now that you know about the different platforms that support the 3GP format let us share the steps on how you can open and play 3GP video files on VLC Media Player.
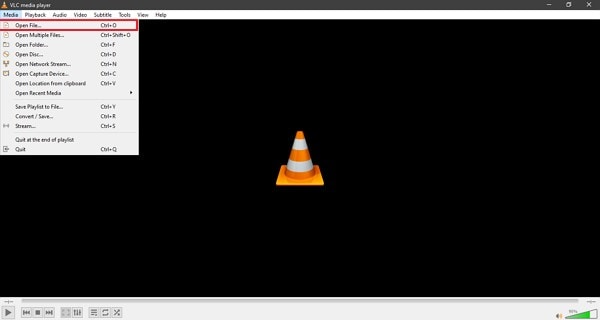
Step 1: After you have installed VLC Media Player on your device, launch it. Head to the ‘Media’ tab from the main screen by accessing the top menu. Or else, simply open VLC Media Player to drag and drop the media file there.
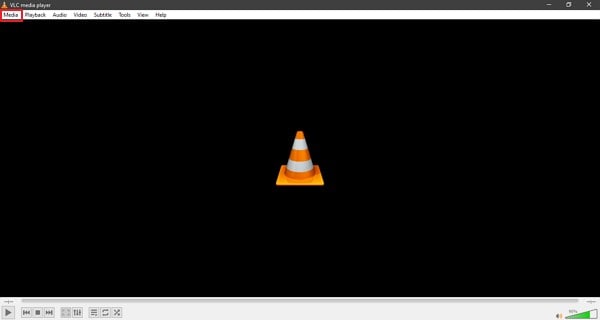
Step 2: Select the ‘Open File’ option from the Media section and locate the 3GP video file on your device. Add the file to VLC and enjoy watching it.
Part 4. How Edit 3GP Video More Creatively?
What else could be better for editing your videos than Wondershare Filmora ? Whenever you want a good video editor, you will find Filmora on top of the list. The video editor comes with an extensive range of features that you cannot even count. Moreover, it offers endless editing capabilities.
For editing unique and stunning 3GP format videos, try Filmora. It comes with both Basic and also Advanced editing features. Do you want to know more about it? Let us tell you. Filmora offers basic and standard editing tools like cut, trim, split, and join.
If we look at the advanced features, they include Green Screen, Scene Detection, Power Tool, Video Snapshot, and whatnot. Moreover, you also get various AI editing features like Auto Highlight, Auto Reframe, Auto Normalization, and much more than this.
What else does Filmora provide to its users? Let’s share a step-by-step guideline about how to edit 3GP file format videos on Filmora along with its other features.
Step 1: Import 3GP Video File
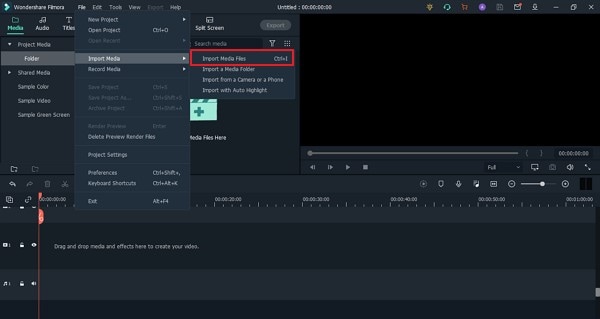
Start by launching Filmora Video Editor on your device and head to the ‘File’ tab from the top menu bar. There, hover on the ‘Import Media’ option; this will open a sub-menu with an option of ‘Import Media Files’; click on it.
For Win 7 or later (64-bit)
For macOS 10.12 or later
Step 2: Drag to Timeline
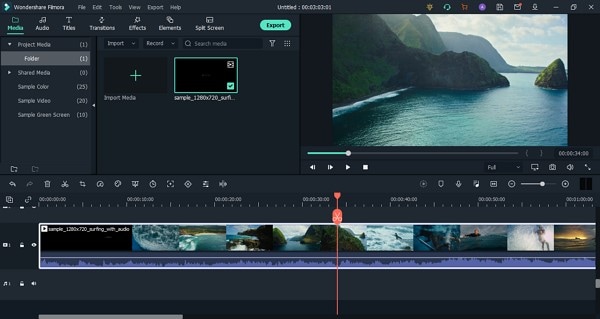
You can locate the video file from the device and import it to the software. After a successful import, the media file will appear on the screen, drag and drop it to the ‘Timeline’ to start the editing.
Step 3: Add Audio Effects
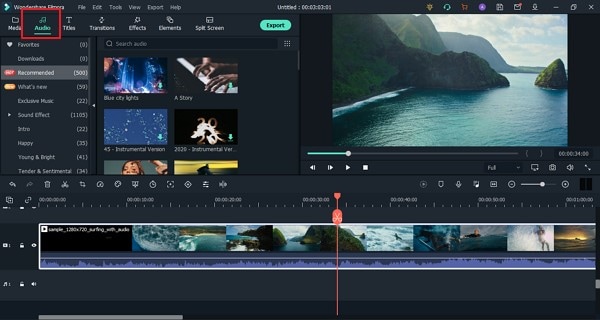
Start by adding audio effects to your video and making it more captivating. For this, head to the ‘Audio’ tab and select the most suitable sound from the provided options like Travel Vlog, Folk, Young & Bright, etc.
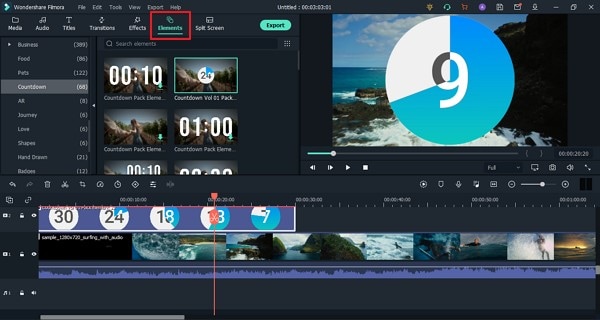
Step 4: Use Interesting Elements
What kind of elements do you like? With Filmora, you get Countdown, Laser Eye, Subscription, Share, and a lot other cooler options are available under the ‘Elements’ section.
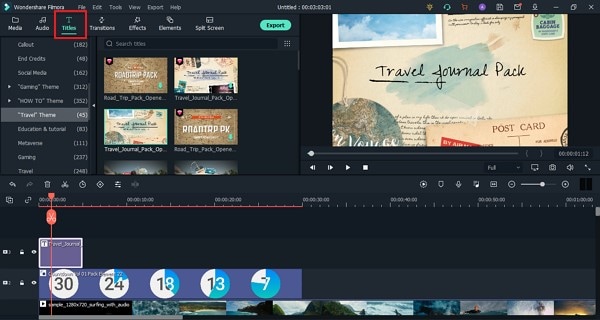
Step 5: Add Attractive Titles
Are you looking for title templates? Have you looked at the ‘Titles’ section in Filmora? You will get beautiful templates according to the latest trends and occasions.
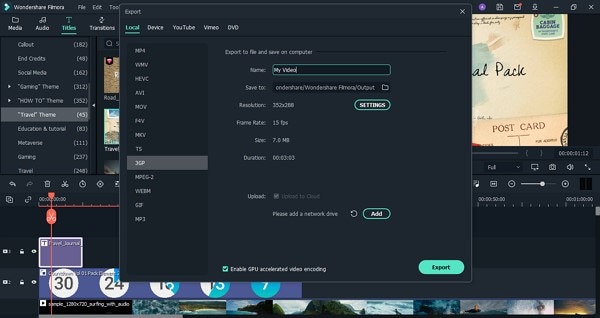
Step 6: Export 3GP File
Once you are done, export the 3GP format file. For this, click on the ‘Export’ button, select the output file format and proceed to save the file.
Bottom Line
We hope that the above article has shared sufficient information with you regarding the 3GP file format. We discussed its pros and cons, ways to open it, and also edit it. As we are concluding, let’s talk a little more about Wondershare Filmora. The video editor is an excellent choice for editing and creating mind-blowing videos.
You get various Basic and also Advanced features that can enhance your video. With Filmora, you can efficiently work with features like Silence Detection, Keyframing, Advanced Color Tuning, and much more. If you wish to create fantastic videos, use Wondershare Filmora.
For Win 7 or later (64-bit)
For macOS 10.12 or later
02 Advantages and Disadvantages About Video Format?
03 How Can You Open and Play 3GP Video Format?
04 How Edit 3GP Video More Creatively?
Part 1. What Is 3GP Video Format?
The multimedia files that we share on the internet have the extension as ‘.3GP’. It is an audio and video container made under the proprietorship of the 3rd Generation Partnership Project. The 3GP format stores and transmits the data that is shared between 3G-enabled devices. All 3G devices, along with some 2G and 4G devices, support 3GP file format video recording and playback.

3GP format needs less broadband demand which makes the phone run fluently. Along with taking less space as compared to other formats, it saves multimedia content efficiently. 3GP file format was designed to match the high speed of data transition between 3G networks.
Part 2. Advantages and Disadvantages About Video Format?
The 3GP format was designed to work at a high level on 3G devices. The above section of this article sheds light on what the 3GP file format is. Now that you have adequate knowledge of the format, let’s proceed and talk about the pros and cons of the file format.
Advantages of 3GP Format
- The biggest plus point of using the 3GP format is its size. The format is small in size but can store disk space. The small size of the format uses tiny amounts of data.
- The format is great because it creates an environment for business connections and improves communication. You can share text messages, videos, and multimedia files with your team members.
- 3GP file format is widely used because it has low bandwidth and also it has decreased mobile storage requirements.
- 3GP files are transferred and shared very efficiently. Hence, sharing video files has become a lot easier with this format.
- 3GP files are fast for both streaming and downloading, even if you have a weak or problematic internet connection.
Disadvantages of 3GP Format
- The quality of the audio file is damaged while compressing the file to reduce its size, as compared to the original file.
- Not every program supports 3GP file format; hence users face compatibility issues.
- Compared to the original video, the 3GP video files, after compressing, lose their quality, and the resolution is also compromised.
Part 3. How Can You Open and Play 3GP Video Format?
Do you know there are various file formats and different platforms support different formats? If we specifically talk about the 3GP format, it is supported by VLC Media Player, QuickTime Player, and 5KPlayer. Let’s discuss them:
VLC Media Player
VLC Media Player is a free open-source platform that can play 3GP file format. It is developed by the VideoLAN project. VLC Media Player is a cross-platform media player software and media streamer available for Windows, Mac, Linux, and Unix.
Mobile users can use it irrespective of the device type; Android, iPhone, iPad, and iPod users can use it. VLC can be used to play 3GP format along with any format that you may encounter.

QuickTime Player
QuickTime Player was made under Apple Inc. proprietorship. It is an extendible multimedia framework and can only be used on macOS devices because the Windows-supported version was ceased after 2016. It can handle picture and digital video formats, including a 3GP file format. Although, the MOV file extension represents the QuickTime Player. QuickTime Player is pre-installed on all Mac devices.

5KPlayer
5KPlayer is developed under the proprietorship of DearMob. It is a music and video player. 5KPlayer has built-in support for AirPlay. You can stream audio and video via AirPlay without any loss in the quality of the media file. It supports different formats for multimedia, including a 3GP file format. 5KPlayer provides you the facility to download videos from 300+ sites, including YouTube, Vimeo, and Dailymotion.

3.1. Steps to Open and Play 3GP Format on VLC Media Player
Now that you know about the different platforms that support the 3GP format let us share the steps on how you can open and play 3GP video files on VLC Media Player.
Step 1: After you have installed VLC Media Player on your device, launch it. Head to the ‘Media’ tab from the main screen by accessing the top menu. Or else, simply open VLC Media Player to drag and drop the media file there.

Step 2: Select the ‘Open File’ option from the Media section and locate the 3GP video file on your device. Add the file to VLC and enjoy watching it.

Part 4. How Edit 3GP Video More Creatively?
What else could be better for editing your videos than Wondershare Filmora ? Whenever you want a good video editor, you will find Filmora on top of the list. The video editor comes with an extensive range of features that you cannot even count. Moreover, it offers endless editing capabilities.
For editing unique and stunning 3GP format videos, try Filmora. It comes with both Basic and also Advanced editing features. Do you want to know more about it? Let us tell you. Filmora offers basic and standard editing tools like cut, trim, split, and join.
If we look at the advanced features, they include Green Screen, Scene Detection, Power Tool, Video Snapshot, and whatnot. Moreover, you also get various AI editing features like Auto Highlight, Auto Reframe, Auto Normalization, and much more than this.
What else does Filmora provide to its users? Let’s share a step-by-step guideline about how to edit 3GP file format videos on Filmora along with its other features.
Step 1: Import 3GP Video File
Start by launching Filmora Video Editor on your device and head to the ‘File’ tab from the top menu bar. There, hover on the ‘Import Media’ option; this will open a sub-menu with an option of ‘Import Media Files’; click on it.

For Win 7 or later (64-bit)
For macOS 10.12 or later
Step 2: Drag to Timeline
You can locate the video file from the device and import it to the software. After a successful import, the media file will appear on the screen, drag and drop it to the ‘Timeline’ to start the editing.

Step 3: Add Audio Effects
Start by adding audio effects to your video and making it more captivating. For this, head to the ‘Audio’ tab and select the most suitable sound from the provided options like Travel Vlog, Folk, Young & Bright, etc.

Step 4: Use Interesting Elements
What kind of elements do you like? With Filmora, you get Countdown, Laser Eye, Subscription, Share, and a lot other cooler options are available under the ‘Elements’ section.

Step 5: Add Attractive Titles
Are you looking for title templates? Have you looked at the ‘Titles’ section in Filmora? You will get beautiful templates according to the latest trends and occasions.

Step 6: Export 3GP File
Once you are done, export the 3GP format file. For this, click on the ‘Export’ button, select the output file format and proceed to save the file.

Bottom Line
We hope that the above article has shared sufficient information with you regarding the 3GP file format. We discussed its pros and cons, ways to open it, and also edit it. As we are concluding, let’s talk a little more about Wondershare Filmora. The video editor is an excellent choice for editing and creating mind-blowing videos.
You get various Basic and also Advanced features that can enhance your video. With Filmora, you can efficiently work with features like Silence Detection, Keyframing, Advanced Color Tuning, and much more. If you wish to create fantastic videos, use Wondershare Filmora.
For Win 7 or later (64-bit)
For macOS 10.12 or later
02 Advantages and Disadvantages About Video Format?
03 How Can You Open and Play 3GP Video Format?
04 How Edit 3GP Video More Creatively?
Part 1. What Is 3GP Video Format?
The multimedia files that we share on the internet have the extension as ‘.3GP’. It is an audio and video container made under the proprietorship of the 3rd Generation Partnership Project. The 3GP format stores and transmits the data that is shared between 3G-enabled devices. All 3G devices, along with some 2G and 4G devices, support 3GP file format video recording and playback.

3GP format needs less broadband demand which makes the phone run fluently. Along with taking less space as compared to other formats, it saves multimedia content efficiently. 3GP file format was designed to match the high speed of data transition between 3G networks.
Part 2. Advantages and Disadvantages About Video Format?
The 3GP format was designed to work at a high level on 3G devices. The above section of this article sheds light on what the 3GP file format is. Now that you have adequate knowledge of the format, let’s proceed and talk about the pros and cons of the file format.
Advantages of 3GP Format
- The biggest plus point of using the 3GP format is its size. The format is small in size but can store disk space. The small size of the format uses tiny amounts of data.
- The format is great because it creates an environment for business connections and improves communication. You can share text messages, videos, and multimedia files with your team members.
- 3GP file format is widely used because it has low bandwidth and also it has decreased mobile storage requirements.
- 3GP files are transferred and shared very efficiently. Hence, sharing video files has become a lot easier with this format.
- 3GP files are fast for both streaming and downloading, even if you have a weak or problematic internet connection.
Disadvantages of 3GP Format
- The quality of the audio file is damaged while compressing the file to reduce its size, as compared to the original file.
- Not every program supports 3GP file format; hence users face compatibility issues.
- Compared to the original video, the 3GP video files, after compressing, lose their quality, and the resolution is also compromised.
Part 3. How Can You Open and Play 3GP Video Format?
Do you know there are various file formats and different platforms support different formats? If we specifically talk about the 3GP format, it is supported by VLC Media Player, QuickTime Player, and 5KPlayer. Let’s discuss them:
VLC Media Player
VLC Media Player is a free open-source platform that can play 3GP file format. It is developed by the VideoLAN project. VLC Media Player is a cross-platform media player software and media streamer available for Windows, Mac, Linux, and Unix.
Mobile users can use it irrespective of the device type; Android, iPhone, iPad, and iPod users can use it. VLC can be used to play 3GP format along with any format that you may encounter.

QuickTime Player
QuickTime Player was made under Apple Inc. proprietorship. It is an extendible multimedia framework and can only be used on macOS devices because the Windows-supported version was ceased after 2016. It can handle picture and digital video formats, including a 3GP file format. Although, the MOV file extension represents the QuickTime Player. QuickTime Player is pre-installed on all Mac devices.

5KPlayer
5KPlayer is developed under the proprietorship of DearMob. It is a music and video player. 5KPlayer has built-in support for AirPlay. You can stream audio and video via AirPlay without any loss in the quality of the media file. It supports different formats for multimedia, including a 3GP file format. 5KPlayer provides you the facility to download videos from 300+ sites, including YouTube, Vimeo, and Dailymotion.

3.1. Steps to Open and Play 3GP Format on VLC Media Player
Now that you know about the different platforms that support the 3GP format let us share the steps on how you can open and play 3GP video files on VLC Media Player.
Step 1: After you have installed VLC Media Player on your device, launch it. Head to the ‘Media’ tab from the main screen by accessing the top menu. Or else, simply open VLC Media Player to drag and drop the media file there.

Step 2: Select the ‘Open File’ option from the Media section and locate the 3GP video file on your device. Add the file to VLC and enjoy watching it.

Part 4. How Edit 3GP Video More Creatively?
What else could be better for editing your videos than Wondershare Filmora ? Whenever you want a good video editor, you will find Filmora on top of the list. The video editor comes with an extensive range of features that you cannot even count. Moreover, it offers endless editing capabilities.
For editing unique and stunning 3GP format videos, try Filmora. It comes with both Basic and also Advanced editing features. Do you want to know more about it? Let us tell you. Filmora offers basic and standard editing tools like cut, trim, split, and join.
If we look at the advanced features, they include Green Screen, Scene Detection, Power Tool, Video Snapshot, and whatnot. Moreover, you also get various AI editing features like Auto Highlight, Auto Reframe, Auto Normalization, and much more than this.
What else does Filmora provide to its users? Let’s share a step-by-step guideline about how to edit 3GP file format videos on Filmora along with its other features.
Step 1: Import 3GP Video File
Start by launching Filmora Video Editor on your device and head to the ‘File’ tab from the top menu bar. There, hover on the ‘Import Media’ option; this will open a sub-menu with an option of ‘Import Media Files’; click on it.

For Win 7 or later (64-bit)
For macOS 10.12 or later
Step 2: Drag to Timeline
You can locate the video file from the device and import it to the software. After a successful import, the media file will appear on the screen, drag and drop it to the ‘Timeline’ to start the editing.

Step 3: Add Audio Effects
Start by adding audio effects to your video and making it more captivating. For this, head to the ‘Audio’ tab and select the most suitable sound from the provided options like Travel Vlog, Folk, Young & Bright, etc.

Step 4: Use Interesting Elements
What kind of elements do you like? With Filmora, you get Countdown, Laser Eye, Subscription, Share, and a lot other cooler options are available under the ‘Elements’ section.

Step 5: Add Attractive Titles
Are you looking for title templates? Have you looked at the ‘Titles’ section in Filmora? You will get beautiful templates according to the latest trends and occasions.

Step 6: Export 3GP File
Once you are done, export the 3GP format file. For this, click on the ‘Export’ button, select the output file format and proceed to save the file.

Bottom Line
We hope that the above article has shared sufficient information with you regarding the 3GP file format. We discussed its pros and cons, ways to open it, and also edit it. As we are concluding, let’s talk a little more about Wondershare Filmora. The video editor is an excellent choice for editing and creating mind-blowing videos.
You get various Basic and also Advanced features that can enhance your video. With Filmora, you can efficiently work with features like Silence Detection, Keyframing, Advanced Color Tuning, and much more. If you wish to create fantastic videos, use Wondershare Filmora.
For Win 7 or later (64-bit)
For macOS 10.12 or later
02 Advantages and Disadvantages About Video Format?
03 How Can You Open and Play 3GP Video Format?
04 How Edit 3GP Video More Creatively?
Part 1. What Is 3GP Video Format?
The multimedia files that we share on the internet have the extension as ‘.3GP’. It is an audio and video container made under the proprietorship of the 3rd Generation Partnership Project. The 3GP format stores and transmits the data that is shared between 3G-enabled devices. All 3G devices, along with some 2G and 4G devices, support 3GP file format video recording and playback.

3GP format needs less broadband demand which makes the phone run fluently. Along with taking less space as compared to other formats, it saves multimedia content efficiently. 3GP file format was designed to match the high speed of data transition between 3G networks.
Part 2. Advantages and Disadvantages About Video Format?
The 3GP format was designed to work at a high level on 3G devices. The above section of this article sheds light on what the 3GP file format is. Now that you have adequate knowledge of the format, let’s proceed and talk about the pros and cons of the file format.
Advantages of 3GP Format
- The biggest plus point of using the 3GP format is its size. The format is small in size but can store disk space. The small size of the format uses tiny amounts of data.
- The format is great because it creates an environment for business connections and improves communication. You can share text messages, videos, and multimedia files with your team members.
- 3GP file format is widely used because it has low bandwidth and also it has decreased mobile storage requirements.
- 3GP files are transferred and shared very efficiently. Hence, sharing video files has become a lot easier with this format.
- 3GP files are fast for both streaming and downloading, even if you have a weak or problematic internet connection.
Disadvantages of 3GP Format
- The quality of the audio file is damaged while compressing the file to reduce its size, as compared to the original file.
- Not every program supports 3GP file format; hence users face compatibility issues.
- Compared to the original video, the 3GP video files, after compressing, lose their quality, and the resolution is also compromised.
Part 3. How Can You Open and Play 3GP Video Format?
Do you know there are various file formats and different platforms support different formats? If we specifically talk about the 3GP format, it is supported by VLC Media Player, QuickTime Player, and 5KPlayer. Let’s discuss them:
VLC Media Player
VLC Media Player is a free open-source platform that can play 3GP file format. It is developed by the VideoLAN project. VLC Media Player is a cross-platform media player software and media streamer available for Windows, Mac, Linux, and Unix.
Mobile users can use it irrespective of the device type; Android, iPhone, iPad, and iPod users can use it. VLC can be used to play 3GP format along with any format that you may encounter.

QuickTime Player
QuickTime Player was made under Apple Inc. proprietorship. It is an extendible multimedia framework and can only be used on macOS devices because the Windows-supported version was ceased after 2016. It can handle picture and digital video formats, including a 3GP file format. Although, the MOV file extension represents the QuickTime Player. QuickTime Player is pre-installed on all Mac devices.

5KPlayer
5KPlayer is developed under the proprietorship of DearMob. It is a music and video player. 5KPlayer has built-in support for AirPlay. You can stream audio and video via AirPlay without any loss in the quality of the media file. It supports different formats for multimedia, including a 3GP file format. 5KPlayer provides you the facility to download videos from 300+ sites, including YouTube, Vimeo, and Dailymotion.

3.1. Steps to Open and Play 3GP Format on VLC Media Player
Now that you know about the different platforms that support the 3GP format let us share the steps on how you can open and play 3GP video files on VLC Media Player.
Step 1: After you have installed VLC Media Player on your device, launch it. Head to the ‘Media’ tab from the main screen by accessing the top menu. Or else, simply open VLC Media Player to drag and drop the media file there.

Step 2: Select the ‘Open File’ option from the Media section and locate the 3GP video file on your device. Add the file to VLC and enjoy watching it.

Part 4. How Edit 3GP Video More Creatively?
What else could be better for editing your videos than Wondershare Filmora ? Whenever you want a good video editor, you will find Filmora on top of the list. The video editor comes with an extensive range of features that you cannot even count. Moreover, it offers endless editing capabilities.
For editing unique and stunning 3GP format videos, try Filmora. It comes with both Basic and also Advanced editing features. Do you want to know more about it? Let us tell you. Filmora offers basic and standard editing tools like cut, trim, split, and join.
If we look at the advanced features, they include Green Screen, Scene Detection, Power Tool, Video Snapshot, and whatnot. Moreover, you also get various AI editing features like Auto Highlight, Auto Reframe, Auto Normalization, and much more than this.
What else does Filmora provide to its users? Let’s share a step-by-step guideline about how to edit 3GP file format videos on Filmora along with its other features.
Step 1: Import 3GP Video File
Start by launching Filmora Video Editor on your device and head to the ‘File’ tab from the top menu bar. There, hover on the ‘Import Media’ option; this will open a sub-menu with an option of ‘Import Media Files’; click on it.

For Win 7 or later (64-bit)
For macOS 10.12 or later
Step 2: Drag to Timeline
You can locate the video file from the device and import it to the software. After a successful import, the media file will appear on the screen, drag and drop it to the ‘Timeline’ to start the editing.

Step 3: Add Audio Effects
Start by adding audio effects to your video and making it more captivating. For this, head to the ‘Audio’ tab and select the most suitable sound from the provided options like Travel Vlog, Folk, Young & Bright, etc.

Step 4: Use Interesting Elements
What kind of elements do you like? With Filmora, you get Countdown, Laser Eye, Subscription, Share, and a lot other cooler options are available under the ‘Elements’ section.

Step 5: Add Attractive Titles
Are you looking for title templates? Have you looked at the ‘Titles’ section in Filmora? You will get beautiful templates according to the latest trends and occasions.

Step 6: Export 3GP File
Once you are done, export the 3GP format file. For this, click on the ‘Export’ button, select the output file format and proceed to save the file.

Bottom Line
We hope that the above article has shared sufficient information with you regarding the 3GP file format. We discussed its pros and cons, ways to open it, and also edit it. As we are concluding, let’s talk a little more about Wondershare Filmora. The video editor is an excellent choice for editing and creating mind-blowing videos.
You get various Basic and also Advanced features that can enhance your video. With Filmora, you can efficiently work with features like Silence Detection, Keyframing, Advanced Color Tuning, and much more. If you wish to create fantastic videos, use Wondershare Filmora.
For Win 7 or later (64-bit)
For macOS 10.12 or later
Replacing Sky Background Using Adobe Photoshop: A Comprehensive Guide
Editing images is an essential point for photographers to make their work stand out. Creators use certain editing tools to polish their captured media. Suppose having an image with low sunlight that dims the natural beauty of the surroundings. In this situation, replacing sky backgrounds seems the only way to set a stunning landscape.
Photographers mostly rely on Adobe Photoshop sky replacement packs for this purpose. Using this option, users put life in their dull media with skies. Without further delay, learn everything about sky replacement Photoshop in this guide.
Sky Replacement A cross-platform works like magic for background removal or sky replacement photos 

Part 1: How Good Has Photoshop Been in Helping Users Make Crisp Pictures and Media?
Adobe Photoshop is a graphics editor tool designed for professional digital art. It is widely used to grow business through designing virtual backgrounds and graphics. You can adjust the subject’s features and poses to make perfect portraits. To transform letters into artistic expressions, it offers Photoshop brushes and paints. Users can collaborate with their teammates and share work for approvals with this tool.
Key Features To Look Out In Adobe Photoshop
This tool can accelerate workflow with its latest features. It allows you to expand, add, and remove content from images with high-quality results. The following are some key features of Photoshop for your better understanding of this tool:
- It offers a sky replacement Photoshop feature that can change the sky from captured images.
- You can remove and replace your background in Photoshop and refine it as required.
- With the remove object feature, users can erase unwanted objects from images.
- Use the “Colorize” feature and make your black-and-white images colorful.
- Enhance workflow by using “Layer” masking that hides part of images without erasing them.
Part 2: A Detailed Guide on How to Replace Sky Background in Photoshop?
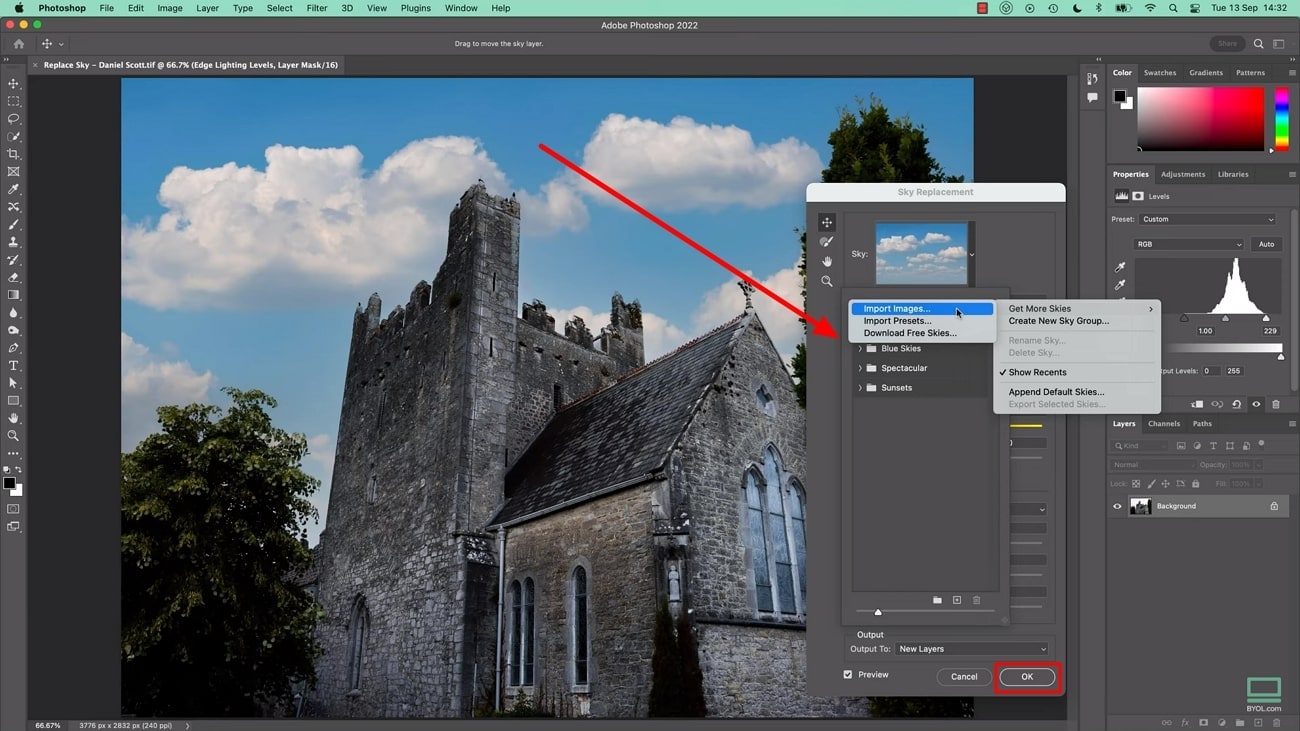
With AI integration in Adobe Photoshop, you can change skies with simple clicks. It provides a collection of skies from the Blue Skies, Spectacular, and sunset categories. Also, users can import any sky from their gallery or download one from presets. To do so, let us show you how to change the sky in Photoshop in given steps:
Step 1: Bring your desired image to the Adobe Photoshop. Head to the top toolbar and click the “Edit” option next to the “File.” Look for the “Sky Replacement” option from the list.
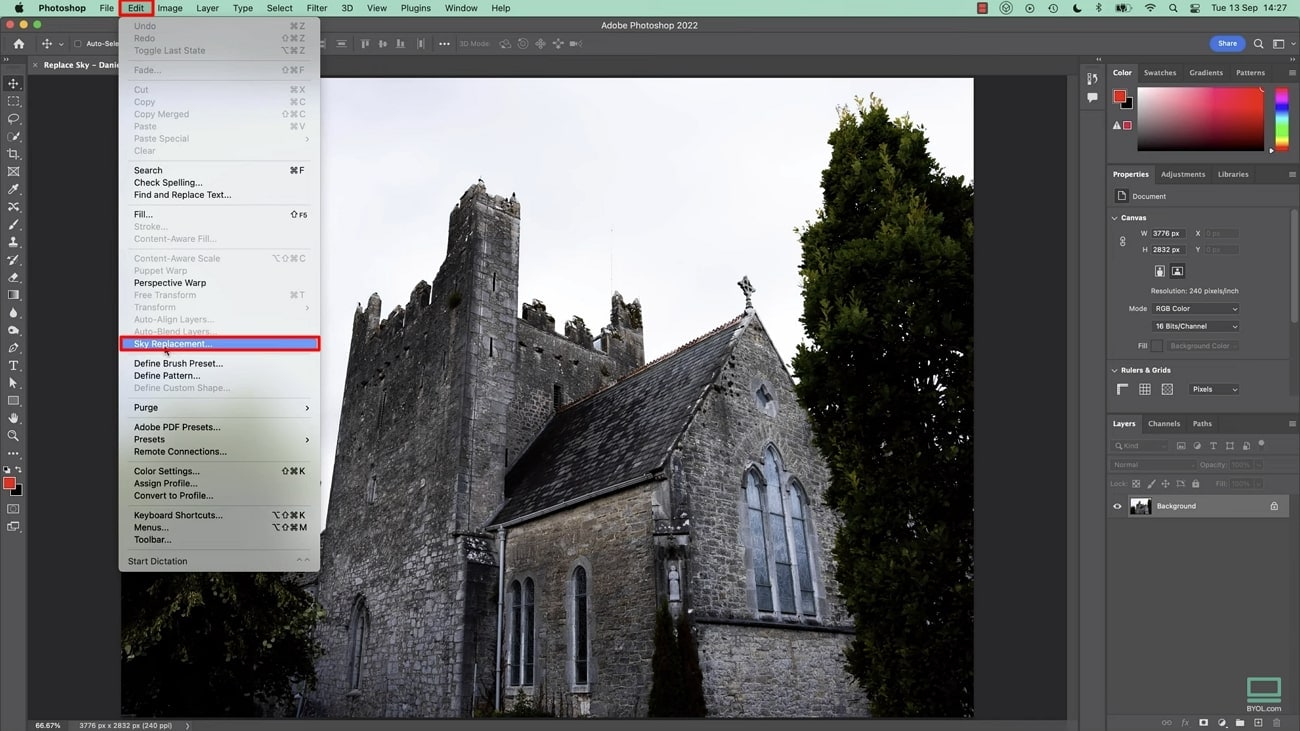
Step 2: After tapping “Sky Replacement,” you will get a respective screen on your front. Press the downward symbol next to the “Sky” and pick one sky from available options.
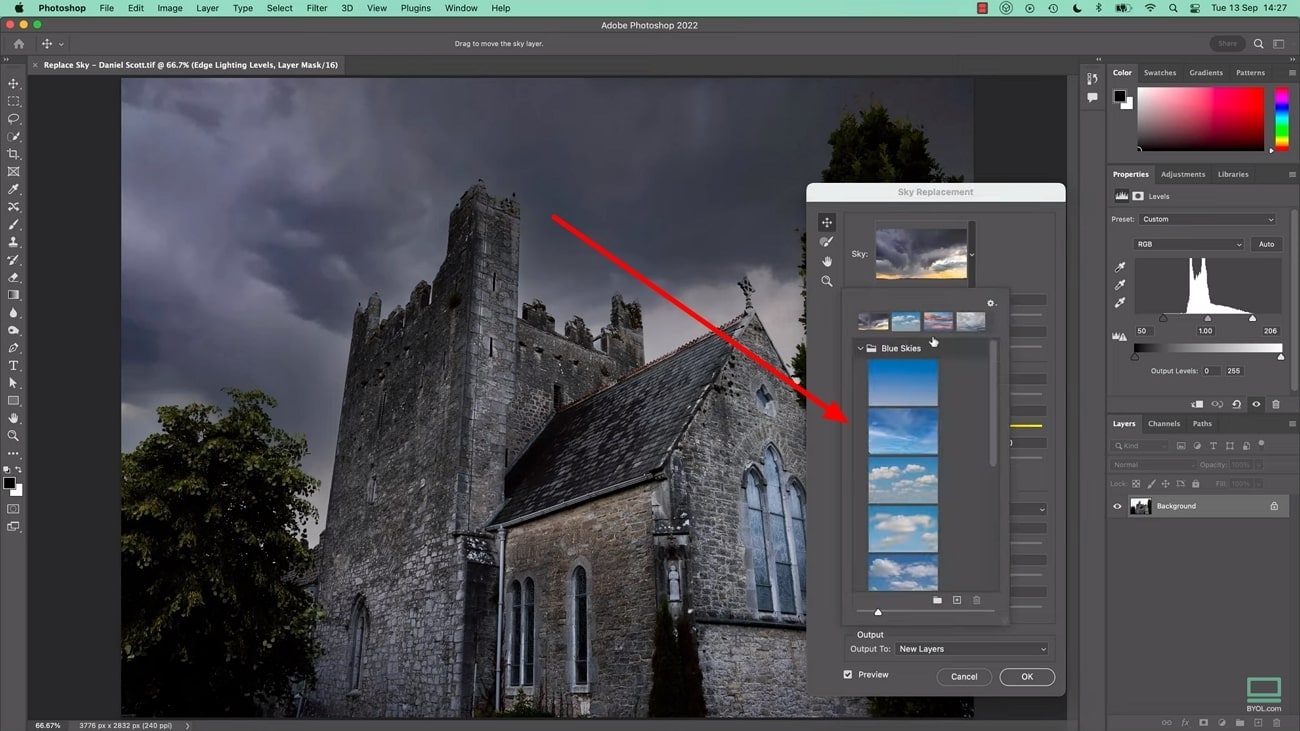
Step 3: Alternatively, you can hit the “+” icon and browse the sky image from your system. When you choose one, it gets added to the existing sky list. Select that and tap the “OK” button to apply changes in your media.
Part 3: An Alternative Solution: Wondershare Filmora Providing Workability with Easy Background Replacement
Changing sky in Photoshop is difficult for beginners and requires a basic skill set. It may take a lot of your time to understand its functionalities. That’s why choosing a tool with simple operation and high-quality output is important. In this regard, you should use Wondershare Filmora as a better option for everyone. It is a video editor that offers a variety of powerful features.
Using this tool, you can remove and change the background from your images or videos. With the integration of AI, it can automatically detect the object and foreground.
Other Prominent Video Editing Features
Apart from changing background, Filmora can perform A to Z video editing tasks. Let’s explore some of the key features to overview its fruitful functionalities:
Free Download For Win 7 or later(64-bit)
Free Download For macOS 10.14 or later
1. AI Text-to-Video
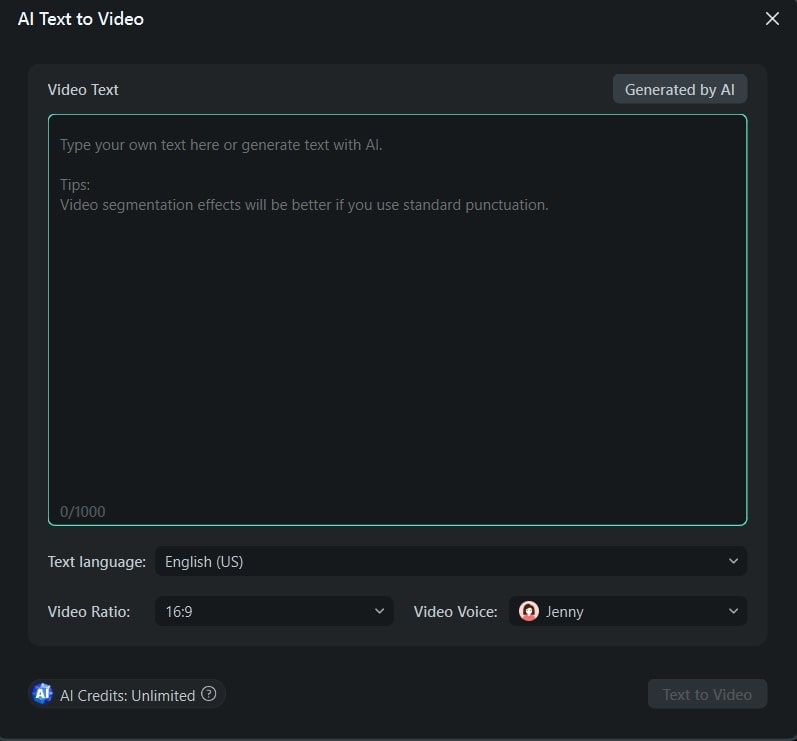
Who needs a camera and crew when you can effortlessly generate video from text? Filmora can transform your text into an engaging storytelling video with just text prompts. After getting the video, you can customize the video’s appearance with fonts, styles, and colors. Users can add smooth transitions between text elements for a cohesive flow.
2. AI Music Generator
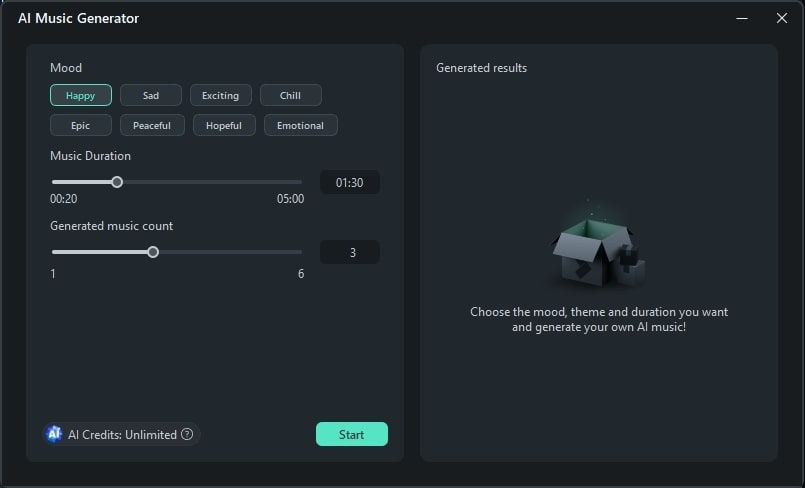
Sometimes, we get tired of searching for music that perfectly aligns with our video content. In such cases, AI music generator saves us by providing the music we want. It offers you many options to choose from different genres and styles. You can set the music duration and number of tracks you want to generate. Then, you can make manual adjustments like balancing sound and auto normalization.
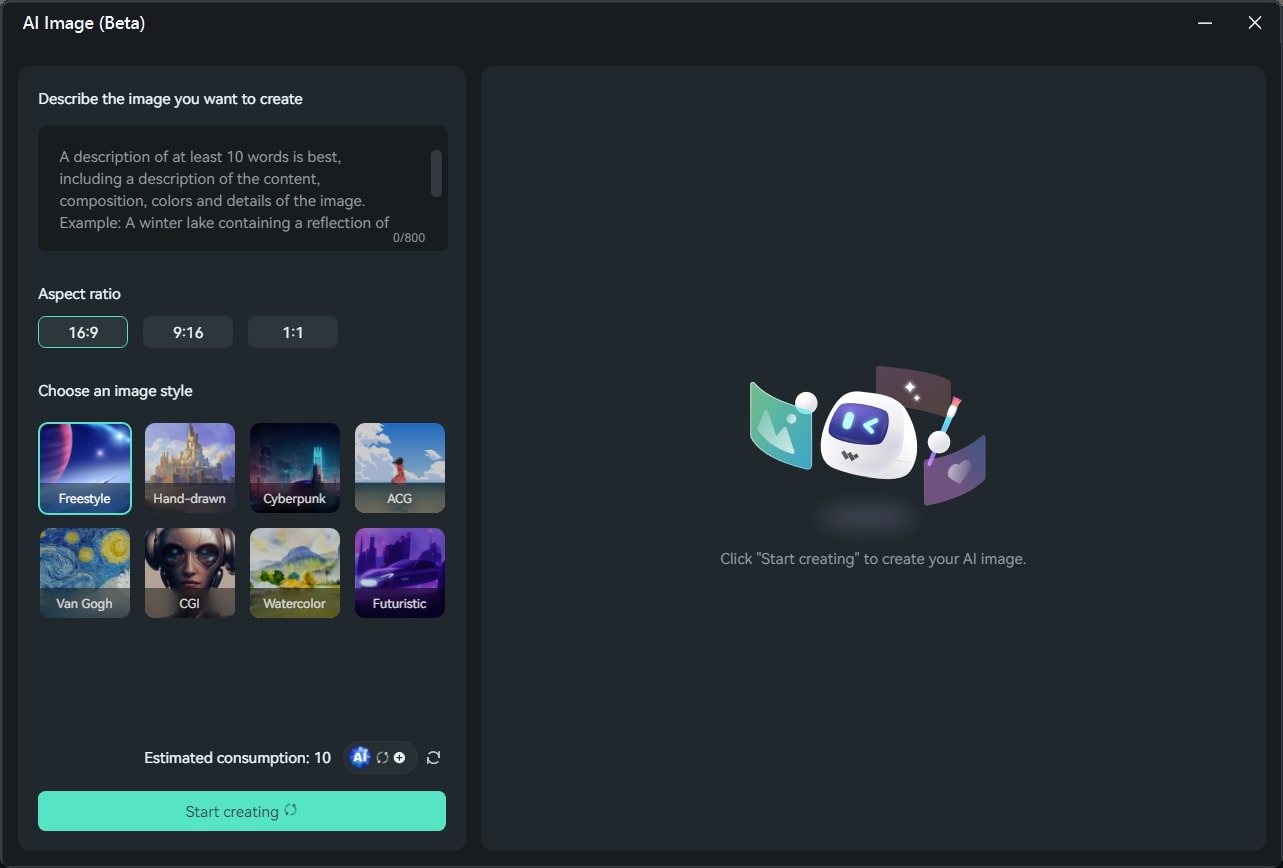
3. AI Image
Similar to text-to-video, Filmora can generate images from text. To do so, just describe your imagination in simple words. Then, you are asked to pick one resolution from given options. You can use the generated images in your projects directly. It allows you to generate an image from your chosen style. A few of the styles include Freestyle, Cyberpunk, and Futuristic.
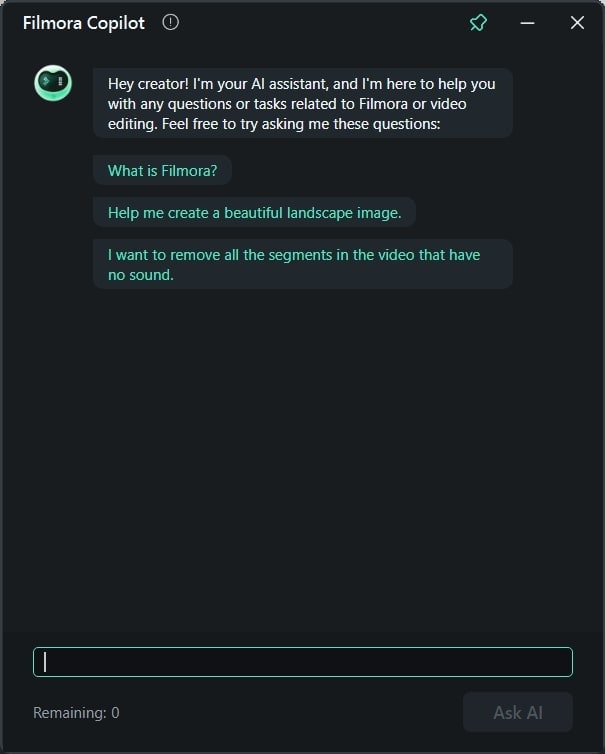
4. AI Copilot Editing
While editing projects, humans often require suggestions or assistance. For this purpose, Filmora provides you with AI Copilot as your personal AI assistant. It will prevent errors in your editing by sending error messages. You can get the best editing solution as per your needs. This way, the quality of your project gets increased.
5. AI Vocal Remover
With advanced algorithms, it is an exceptional feature of Filmora. It relieves your breath by removing unwanted vocals from your audio or video. You can now completely remove vocal sounds from the video and add your recorded ones. It’s an automated process that separates voice and background in the media panel.

Steps To Remove Background Using Two Unique Ways with Wondershare Filmora
Filmora is one of the easiest tools to operate that anyone can use to get desired results. It allows users to approach the same features in different ways. Similarly, there are two unique ways to remove or change the sky Photoshop background, which are given below.
Free Download For Win 7 or later(64-bit)
Free Download For macOS 10.14 or later
Method 1: Using Chroma Key
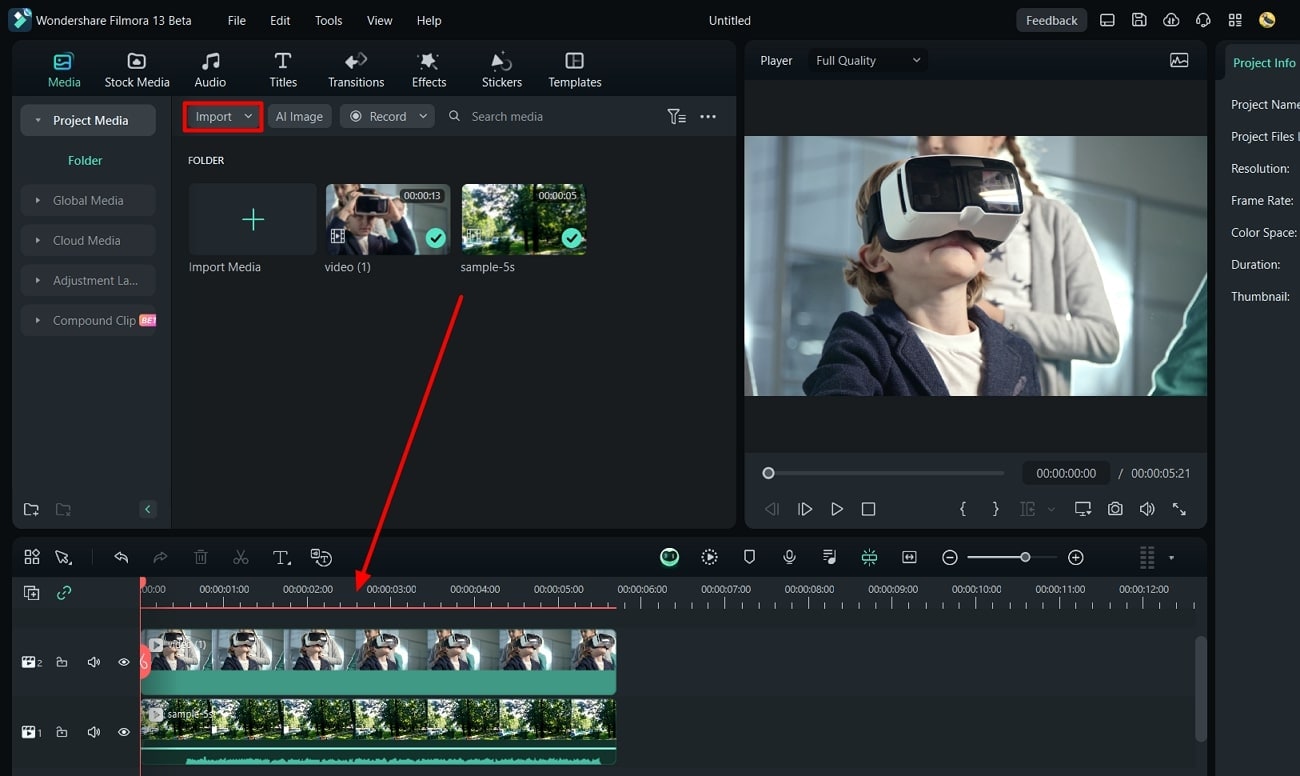
Step 1: Start your project in Filmora and import two files in the timeline. Bring the background clip first in the timeline, then the original file. Cut the unnecessary portion of background-clip.
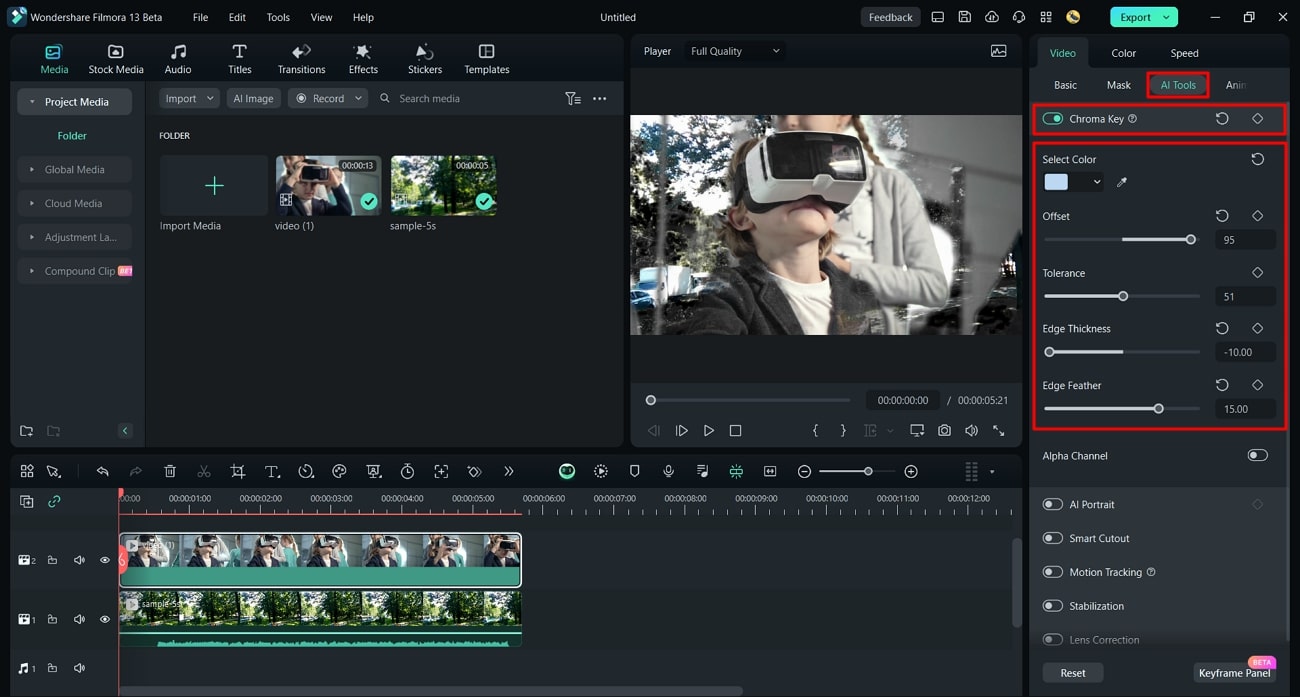
Step 2: Keep them selected and come to the “AI Tools” option in the right-side panel. Enable the “Chroma Key” toggle, and AI will automatically replace the background. You can use the “Tolerance,” “Edge Thickness,” and “Edge Feather” sliders for manual changes.
Method 2: Through AI Portrait
Step 1: Import your background clip and main video in Filmora 13. Place the background clip on track 1 and the main clip on the 2nd track in the timeline.
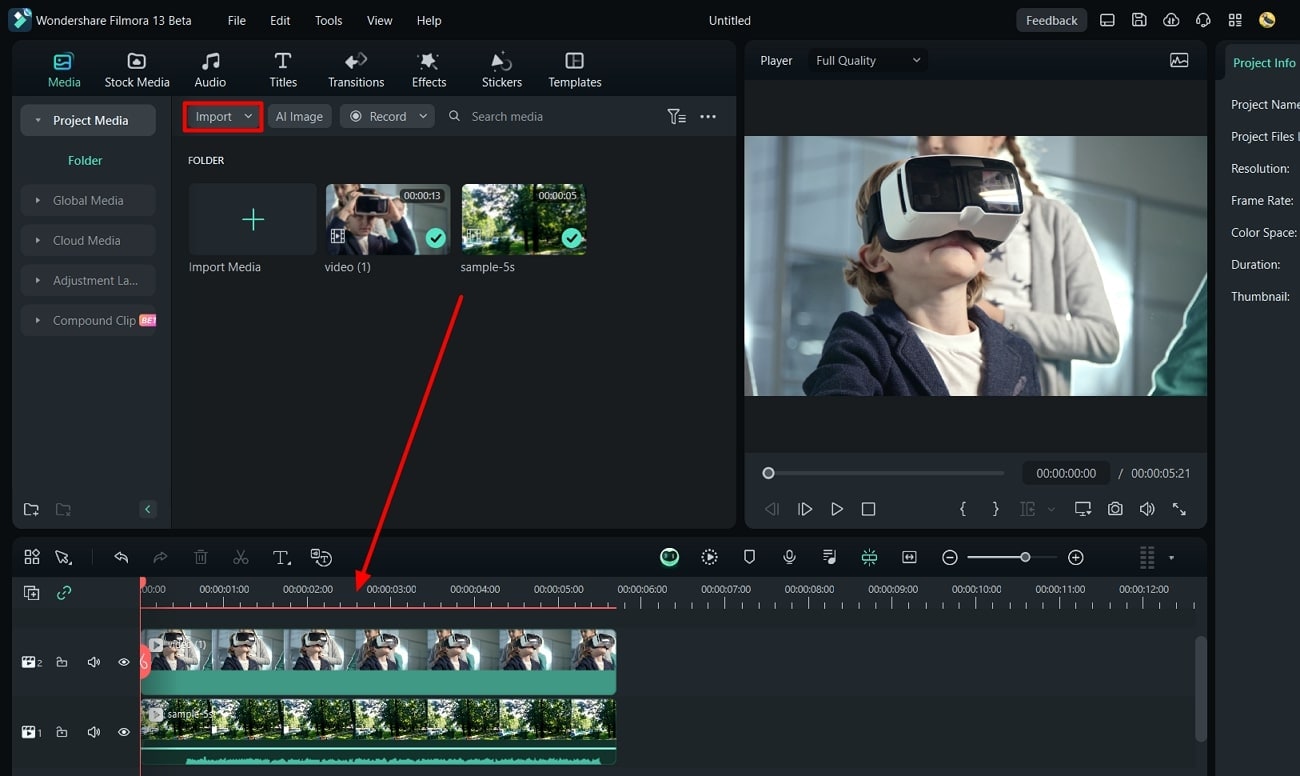
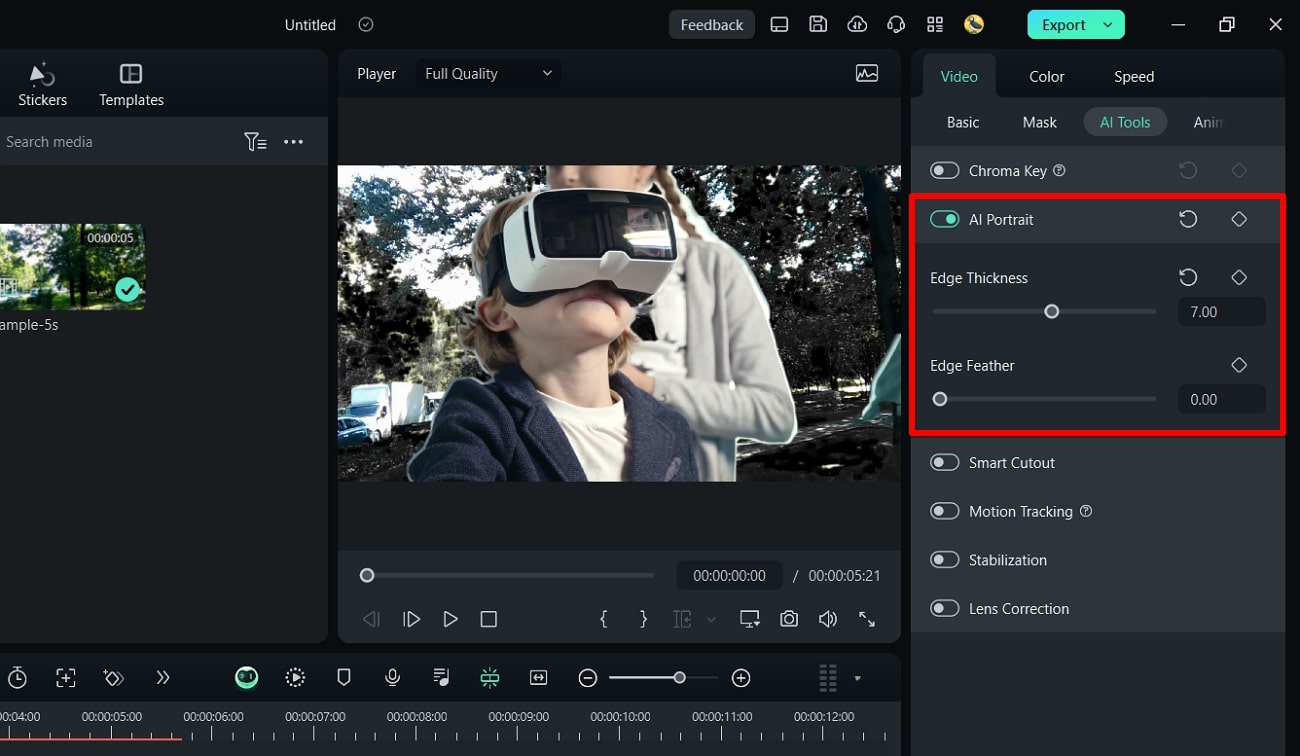
Step 2: Hold both of them and head to the right-side panel. Press the “AI Tools” option and scroll to access the “AI Portrait.” Enable that option, and your background will automatically change with AI. Now, you can make manual changes by moving the “Edge Thickness” and “Feather” sliders.
Conclusion
To wrap up, let’s say that Sky Photoshop sets the right tone for your media with landscapes. On the other hand, this feature might prove difficult for some users to handle. Thus, they can rely on Wondershare Filmora for convenience. Beginners and professionals can benefit from its extraordinary features in video editing.
Free Download Free Download Learn More

Part 1: How Good Has Photoshop Been in Helping Users Make Crisp Pictures and Media?
Adobe Photoshop is a graphics editor tool designed for professional digital art. It is widely used to grow business through designing virtual backgrounds and graphics. You can adjust the subject’s features and poses to make perfect portraits. To transform letters into artistic expressions, it offers Photoshop brushes and paints. Users can collaborate with their teammates and share work for approvals with this tool.
Key Features To Look Out In Adobe Photoshop
This tool can accelerate workflow with its latest features. It allows you to expand, add, and remove content from images with high-quality results. The following are some key features of Photoshop for your better understanding of this tool:
- It offers a sky replacement Photoshop feature that can change the sky from captured images.
- You can remove and replace your background in Photoshop and refine it as required.
- With the remove object feature, users can erase unwanted objects from images.
- Use the “Colorize” feature and make your black-and-white images colorful.
- Enhance workflow by using “Layer” masking that hides part of images without erasing them.
Part 2: A Detailed Guide on How to Replace Sky Background in Photoshop?
With AI integration in Adobe Photoshop, you can change skies with simple clicks. It provides a collection of skies from the Blue Skies, Spectacular, and sunset categories. Also, users can import any sky from their gallery or download one from presets. To do so, let us show you how to change the sky in Photoshop in given steps:
Step 1: Bring your desired image to the Adobe Photoshop. Head to the top toolbar and click the “Edit” option next to the “File.” Look for the “Sky Replacement” option from the list.

Step 2: After tapping “Sky Replacement,” you will get a respective screen on your front. Press the downward symbol next to the “Sky” and pick one sky from available options.

Step 3: Alternatively, you can hit the “+” icon and browse the sky image from your system. When you choose one, it gets added to the existing sky list. Select that and tap the “OK” button to apply changes in your media.

Part 3: An Alternative Solution: Wondershare Filmora Providing Workability with Easy Background Replacement
Changing sky in Photoshop is difficult for beginners and requires a basic skill set. It may take a lot of your time to understand its functionalities. That’s why choosing a tool with simple operation and high-quality output is important. In this regard, you should use Wondershare Filmora as a better option for everyone. It is a video editor that offers a variety of powerful features.
Using this tool, you can remove and change the background from your images or videos. With the integration of AI, it can automatically detect the object and foreground.
Other Prominent Video Editing Features
Apart from changing background, Filmora can perform A to Z video editing tasks. Let’s explore some of the key features to overview its fruitful functionalities:
Free Download For Win 7 or later(64-bit)
Free Download For macOS 10.14 or later
1. AI Text-to-Video
Who needs a camera and crew when you can effortlessly generate video from text? Filmora can transform your text into an engaging storytelling video with just text prompts. After getting the video, you can customize the video’s appearance with fonts, styles, and colors. Users can add smooth transitions between text elements for a cohesive flow.

2. AI Music Generator
Sometimes, we get tired of searching for music that perfectly aligns with our video content. In such cases, AI music generator saves us by providing the music we want. It offers you many options to choose from different genres and styles. You can set the music duration and number of tracks you want to generate. Then, you can make manual adjustments like balancing sound and auto normalization.

3. AI Image
Similar to text-to-video, Filmora can generate images from text. To do so, just describe your imagination in simple words. Then, you are asked to pick one resolution from given options. You can use the generated images in your projects directly. It allows you to generate an image from your chosen style. A few of the styles include Freestyle, Cyberpunk, and Futuristic.

4. AI Copilot Editing
While editing projects, humans often require suggestions or assistance. For this purpose, Filmora provides you with AI Copilot as your personal AI assistant. It will prevent errors in your editing by sending error messages. You can get the best editing solution as per your needs. This way, the quality of your project gets increased.

5. AI Vocal Remover
With advanced algorithms, it is an exceptional feature of Filmora. It relieves your breath by removing unwanted vocals from your audio or video. You can now completely remove vocal sounds from the video and add your recorded ones. It’s an automated process that separates voice and background in the media panel.

Steps To Remove Background Using Two Unique Ways with Wondershare Filmora
Filmora is one of the easiest tools to operate that anyone can use to get desired results. It allows users to approach the same features in different ways. Similarly, there are two unique ways to remove or change the sky Photoshop background, which are given below.
Free Download For Win 7 or later(64-bit)
Free Download For macOS 10.14 or later
Method 1: Using Chroma Key
Step 1: Start your project in Filmora and import two files in the timeline. Bring the background clip first in the timeline, then the original file. Cut the unnecessary portion of background-clip.

Step 2: Keep them selected and come to the “AI Tools” option in the right-side panel. Enable the “Chroma Key” toggle, and AI will automatically replace the background. You can use the “Tolerance,” “Edge Thickness,” and “Edge Feather” sliders for manual changes.

Method 2: Through AI Portrait
Step 1: Import your background clip and main video in Filmora 13. Place the background clip on track 1 and the main clip on the 2nd track in the timeline.

Step 2: Hold both of them and head to the right-side panel. Press the “AI Tools” option and scroll to access the “AI Portrait.” Enable that option, and your background will automatically change with AI. Now, you can make manual changes by moving the “Edge Thickness” and “Feather” sliders.

Conclusion
To wrap up, let’s say that Sky Photoshop sets the right tone for your media with landscapes. On the other hand, this feature might prove difficult for some users to handle. Thus, they can rely on Wondershare Filmora for convenience. Beginners and professionals can benefit from its extraordinary features in video editing.
Also read:
- New 2024 Approved Best 16 Motion Blur Apps for Videos & Photos
- Updated 3GP Video Format What Is 3GP Format And How To Play It for 2024
- In 2024, How to Create Vintage Film Effect 1950S
- New 10 Best Websites to Discover Free Premiere Pro Video Templates for 2024
- 2024 Approved How to Create a Special Animated Transition in Filmora in Just 2 Minutes. This Simple Step-by-Step Guide Will Show You the Easy Way
- Updated Unlock the Power of Shotcut The Ultimate Guide to Rotating Videos
- Updated How to Create One Click Video Reverse Effect in Filmora for 2024
- New Cropping Video in VLC Step by Step
- 2024 Approved Step-by-Step Guide to Storyboard
- Updated How to Crop a Video in Windows Media Player for 2024
- New 2024 Approved Tips for Choosing Location and Scheduling Music Video
- Updated 2024 Approved How to Apply Video Filters Mobile and Desktop
- New List of Whatsapp Video Format That You May Need to Know
- In 2024, Add Emoji to Linkedin Post – 5 Tips You Need to Know
- In 2024, How To Make An Interactive Quiz Video? Step-by-Step Guide
- 2024 Approved Here, You Will Learn How to Add a Realistic Fire Effect Using Wondershare Filmora. That Will Help to Boost Your Channel and Decorate Your YouTube Channel with Creative and Unique Effects
- In This Article, We Will Introduce You Our Top 5 Picks of Websites and Software Converter Online to Convert Powerpoint to Mp4 for 2024
- The Actual Discussion Is Regarding the Splitting of the Video by Using the VSDC. Also, Recommendation of Using Wondershare Filmora as the Better Substitute in Place of VSDC
- 2024 Approved Land Into the Thrill of Creating Stunning GIFs with Ezgif
- New This Guide Will Help You to Understand Everything About the Zoho Show. Also, Know What the Zoho Show Slide Is, Why It Is Used and All Related Information
- Updated 2024 Approved How to Cut Videos on Mac without Using FFmpeg?
- New Google Meet Green Screen for 2024
- New Using This Article as a Reference, the Users Would Create a Café Meal Intro and YouTube End Screen While Knowing Multiple Ways to Download Cooking Background Music
- How to Upload Videos to Twitch? Heres a Guide for Beginner
- If You Want an App to Make Videos with Pictures and Music for Social Media Posts, We Are with the Best Apps to Make Videos with Music and Pictures
- New Learning Some Perfect Ways to Convert a Slow-Motion Video to Normal for 2024
- New 2024 Approved Easy Ways to Change Aspect Ratio in iMovie?
- New 2024 Approved How to Make a Slideshow with Icecream Slideshow Maker
- Updated In 2024, Do You Know Anything About the Video Format Supported by WhatsApp? If Not, Then This Is the Right Time to Learn About WhatsApp-Supported Video Formats
- Overview of FPS for YouTube Videos
- New Cropping a Video in Final Cut Pro Step by Step for 2024
- How to Make Glitch Effect with Filmora for 2024
- In 2024, As a Designer, Color Is the Most Powerful and the Most Diverse Tool at Your Disposal. Here Are Ten Matching Color Combinations to Get You Started on Your Next Project
- Beginners Guide About WMV Format and Best WMV Video Editor
- Updated In This Article, We Will Cover the Stages of Film Production You Need to Keep in Mind.Without Further Ado, Lets Get Started
- New 2024 Approved How To Create The Best AI Thumbnail Using The Right Tools?
- New How to Change the Speed of Video in DaVinci Resolve, In 2024
- Updated 2024 Approved Different Ways To Trim Video In Premiere Pro
- New In This Article Let Me Share with You How to Start a Vlog? Ideas and Any Tips for You to Start Your Own Vlogging Channel
- 2024 Approved 4 Solutions to Resize a WebM File
- Learn How to Use 3D Camera Tracking in Adobe After Effects and Take Your Skills to the Next Level for 2024
- New 2024 Approved 10 Best Free Text to Speech Software Windows, Mac,Android, iPhone & Online
- YouTube Zoom to Fill Is a Great Feature for Viewing Things in Depth. This Article Answers All Questions About Fixing YouTube Zoom to Fill Not Working on Your Device
- New Discover 30+ Amazing Templates for VN Video Editor to Elevate Your Videos. Create Professional-Looking Videos with Ease
- Updated In 2024, Best 5 Tips to Freeze-Frame in After Effects
- Top 7 Skype Hacker to Hack Any Skype Account On your Realme C53 | Dr.fone
- In 2024, 2 Ways to Monitor Realme Narzo N53 Activity | Dr.fone
- You must know how to Share Your Winning Forex Trades With Friends and Family
- In 2024, Hacks to do pokemon go trainer battles For OnePlus Nord CE 3 5G | Dr.fone
- In 2024, How to Reset your Oppo F25 Pro 5G Lock Screen Password
- In 2024, Why does the pokemon go battle league not available On Apple iPhone 11 Pro | Dr.fone
- Fixes for Apps Keep Crashing on Infinix Zero 5G 2023 Turbo | Dr.fone
- In 2024, How to Unlock Xiaomi Redmi K70E Phone without Any Data Loss
- In 2024, How to Use Pokémon Emerald Master Ball Cheat On Lava Agni 2 5G | Dr.fone
- Preparation to Beat Giovani in Pokemon Go For Realme 11 Pro | Dr.fone
- How to Unlock Oppo Reno 11 Pro 5G Pattern Lock if Forgotten? 6 Ways
- Vivo Y56 5G Messages Recovery - Recover Deleted Messages from Vivo Y56 5G
- How to Reset a Locked Vivo Y27s Phone
- For People Wanting to Mock GPS on Poco X6 Pro Devices | Dr.fone
- Title: In 2024, Blender Green Screen Effects
- Author: Chloe
- Created at : 2024-06-26 06:24:15
- Updated at : 2024-06-27 06:24:15
- Link: https://ai-editing-video.techidaily.com/in-2024-blender-green-screen-effects/
- License: This work is licensed under CC BY-NC-SA 4.0.

