:max_bytes(150000):strip_icc():format(webp)/Google-Cloud-Next-59a9cb4a03e644389e2ffa9939c420f8.jpg)
In 2024, Create the Night-to-Day Effect Videos

Create the Night-to-Day Effect Videos
Do you wish you could control when it’s nighttime to daytime? It would make getting ready in the morning much faster! This tutorial will show you how to use the keyframe and mask feature in Filmora to make a remarkable night-to-day transition.
How-to Guide
1) Preparation
For this effect, you will need to shoot two footage shots with the same frame. The first is for the daytime clip, and the second is for nighttime.
But before that, you need to prepare some things, such as:
- Tripod to ensure your camera stays at the same point, so the frame doesn’t change.
- Mark the place where you want to shoot the scene. You can put a marker on the floor to ensure that you perform at the same spot in different shots.
Once done, let’s start shooting to get the footage.
2) Steps
Shooting footages
First, get the daytime shot. For this tutorial, we will pretend that you are walking and transitioning into nighttime at the spot you have marked.

Now, let’s film the nighttime clip. You will walk through the living room and do the same movement again at the same spot. You can dim the light and change the camera’s white balance settings to bluer to create a night feeling.

After you have both clips that you need, let’s go to Filmora and start editing.
Night-to-day transition
Step1 Launch Filmora and import the footage into the program. If you haven’t installed it, you can download Filmora on their website here: https://filmora.wondershare.com
Step2 Place the nighttime video clip on the first video track of the timeline and place the daytime clip on the top.

Step3 Find the spot where you want to create a transition between the day and nighttime. Then, you can delete the unwanted part.

Step4 Since the transition for this tutorial is where the subject started waving, make sure to place the daytime clip at the same time the subject started waving in the nighttime clip. Hence, the timing in both clips syncs.
Masking transition
For the next step, we will make a masking transition with the Filmora mask feature.
Step1 Double-click the daytime clip on the timeline. In the Filmora setting, find the Mask section > Circle. You can see the mask is applied in the preview screen.

Step2 Scroll down the setting and click add a keyframe at the beginning of the clip.

Step3 Change the scale of the mask to the smallest number and adjust the Width and Height down to 0. You can set the blur strength to 15 to make the transition edge smoother.

Step4 Move the play head to find the spot where you want the mask fully opens up, then add another keyframe. Change the scale of the mask to 2 and the Width and Height to 50. Make sure the mask occupies the whole frame.

Now, if you play back, you can see the nighttime becomes daytime through the mask.

If the movement in the two clips is a bit off, you can fix it by adding more keyframes on the mask.
3) Pro tips
You can add one more effect in Filmora to make it more magical. To do this, open the Effects window on the top left and find “Heartbeat” under the Basic section.

Drag and drop it onto the third video track and start the effect when the mask opens up. Then, trim the effect length to match the movement. Adjust the speed of this effect if needed.

The final result will look like this:

Summary
That is how to do this night-to-day transition night-to-day time shift effect in Filmora. By the end of this tutorial, you should be able to use the masking transition technique. You can apply and adjust it based on your needs.
Free Download For Win 7 or later(64-bit)
Free Download For macOS 10.14 or later
Free Download For macOS 10.14 or later
Why Your Transparent GIF Is Hard to Remove
Why Your Transparent GIF Is Hard to Remove and How to Do With It
An easy yet powerful editor
Numerous effects to choose from
Detailed tutorials provided by the official channel
GIFs are very popular type of content these days, on social media. It seems to be very engaging for the audience. The GIF image format was first developed by CompuServe in 1987. Since that time, they have been used for entertainment purposes and their application is increasing with each passing day. But when it comes to transparent GIFs, it gets annoying sometimes. It looks ugly with weird white edges.
Sometimes it becomes hard to remove such GIFs with transparent backgrounds. Do you ever think about why it happens? This blog is dedicated to explaining the possible reasons for this. Also, we are going to explain how one can achieve to remove such a transparent background from the GIF.
In this article
01 [Why Sometimes Transparent Gif is Hard to Remove](#Part 1)
02 [How to Remove the Background from an Animated Gif in Photoshop](#Part 2)
03 [8 Best Online Transparent Gif Maker Websites](#Part 3)
Part 1 Why Sometimes Transparent Gif is Hard to Remove
When the GIF looks ugly with a transparent background, it becomes necessary to remove the background. But it sometimes becomes hard as this requires proper skills as well as adequate tools to achieve this. In the absence of even one, the final output may come out to be clumsy. There are many tools that can be used to remove the background from a transparent animated GIF. But it is hard to use these tools without proper knowledge. If you learn the skills, the task becomes so easy.
Part 2 How to Remove the Background from an Animated Gif in Photoshop
Photoshop is popularly known for being a photo manipulation and editing software. But it can also be used to remove the background of an animated GIF. Here, we will discuss the step-by-step approach to removing an animated GIF background.
Step 1: Import The GIF File
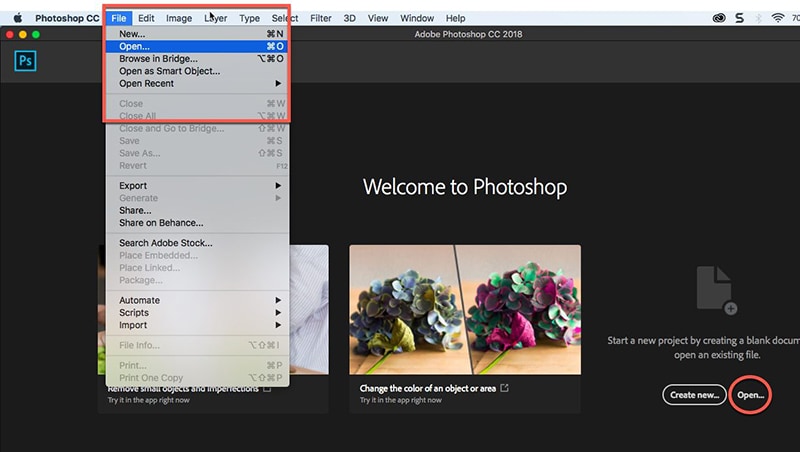
This can be done in 2 ways. One is clicking and dragging the file from the file location on the computer, into Photoshop. The second way is to click on the “File” menu of Photoshop. Then tap on “Open” and double click on the desired GIF file.
Step 2: Set Up The Project
It is required to edit each frame separately for deleting the background of an animated GIF (gif remove bg). For this:
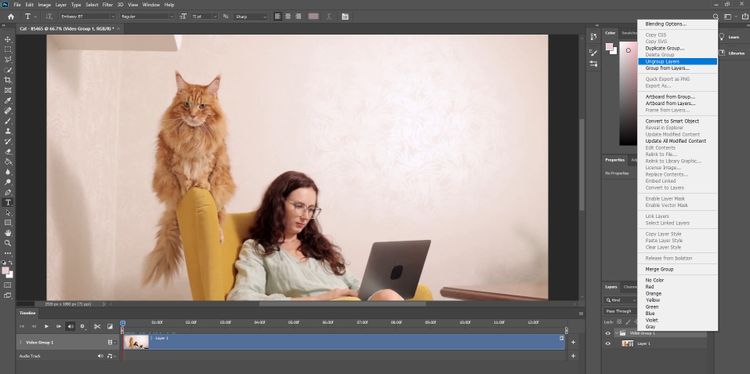
Find the “Video Group” option on the right side of Photoshop. Right-click on it and tap on the “Ungroup layers” option.
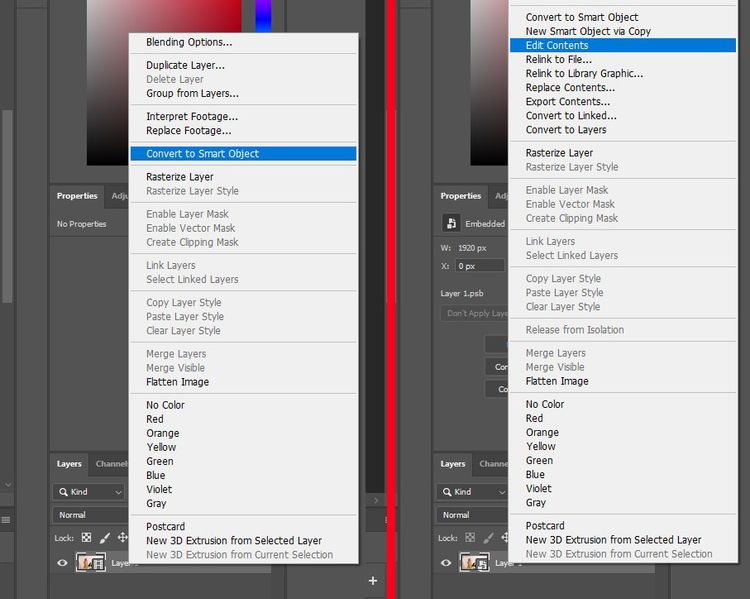
This will give you the video layer, which you want to edit. Right-click on “layer 1” and tap on the “Convert to smart object” option. Again right-click on “Layer 1” and click on “Edit Contents”.
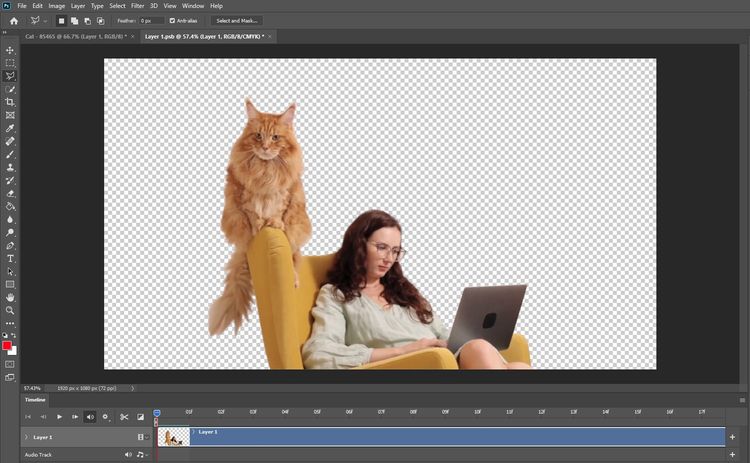
You will get a new Photoshop tap for the editing of GIF files. Just freely close the original tab.
Step 3: Begin The Editing Part
Find the blue line called the Timeline at the bottom of the screen. This Timeline will help you to edit the GIF. To make your editing easy, you can zoom on the frames with the help of a slider located at the bottom of the screen.
For a better outcome, the frame-by-frame deletion of the GIF background is advisable. It might be a little time-consuming but it is the most appropriate and accurate approach. So, delete the background from each frame independently.
To move from one frame of the GIF to another, hold and move the blue arrow having a red line.
\

Step 4: Delete The Transparent GIF Background
Now, delete the background of each frame of your GIF. To delete the background of any particular frame, click on that frame. For this, you can either use a “Quick Selection Tool” or a “Polygonal Lasso Tool”. You will get the final result that will be background free.
Step 5: Save The Project In GIF Format
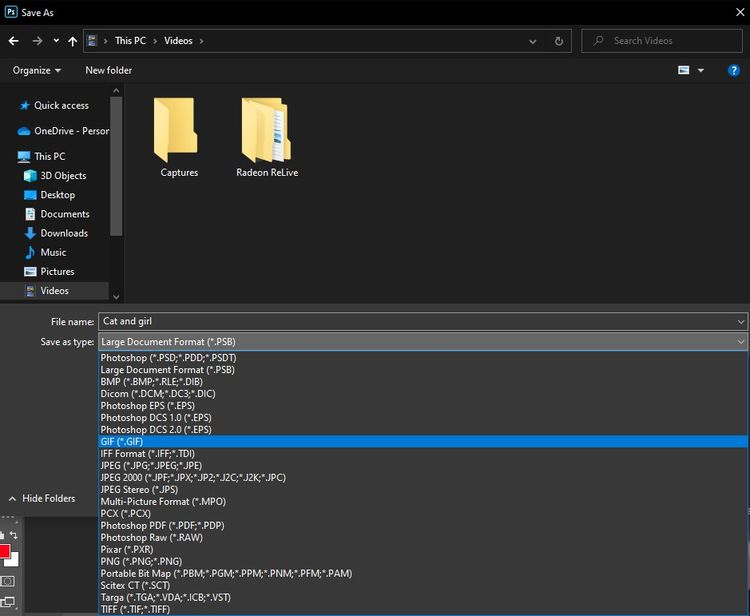
To save the GIF project, click on the “File” menu and then tap on the “Save As” option. Give a file name and select “GIF” on the “Save As Type” options menu. Then click on “OK” to save the GIF file.
Part 3 Best Online Transparent Gif Maker Websites
When it comes to how to make a gif transparent through online sources, there are many options available. Here, we are going to discuss the best options out of them.
01 Online Transparent Gif Maker for Windows
Let’s learn about the best performing online transparent Gif creator websites compatible with Windows.
● EzGif
EzGif is among the best transparent GIF-making websites available online. Using the website, one can create a high-resolution GIF with a transparent background. To achieve this, the website will ask to upload a number of images of transparent backgrounds. The images can be uploaded in PNG, JPEG, GIF, or any other format. Then, next is to combine all the images to form a GIF. The website allows users to upload a maximum of 2000 images. Each image size should not exceed 6MB and the total size of all images should not exceed 100 MB.

● Lunapic
Lunapic is also one of the best and easy-to-use websites for making a confetti GIF transparent, available for free. There is no limitation to the number of images or image size. Also, the website does not have limitations for the total file size, one can upload. It also allows the user to upload an image already having a transparent background and create a GIF out of it.

● GIF Make
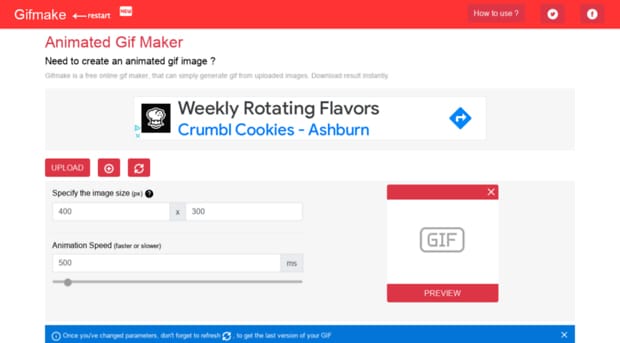
GIF make is also a useful free website for making high-quality transparent GIFs. It is easy to use this website for transparent GIF creations. You only need to upload transparent PNG images for this. It allows you to add as many as 80 images to create a GIF file. But there is one limitation to the website that it does not contain the option of uploading images without a transparent background and removing the background. So, the user only needs to upload an image with a transparent background to create a GIF.
● Animizer.net
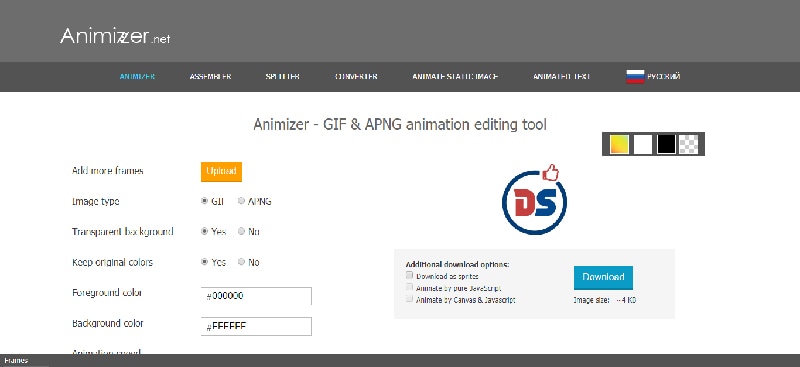
Animizer.net is also a good option when it comes to creating transparent GIFs from images, for free. For this, you can upload multiple PNG images in this online tool. Then, the tool will help you create a GIF by joining them all together. It allows you to upload an unlimited number of images. The online website also enables the creation of transparent background GIFs by uploading images with colored backgrounds. It allows you to remove the background of images and make them transparent.
02 Online Transparent Gif Maker for Mac
● EzGif
We have already discussed EzGif as the best online transparent GIF maker website for Windows. But, we want to ensure that this also works best in the MAC version. It helps to convert either a video or photos into a GIF file. Moreover, the website supports all the standard image formats such as HEIC, TIFF, PNG, JPEG, BMP, etc.
● Picasion
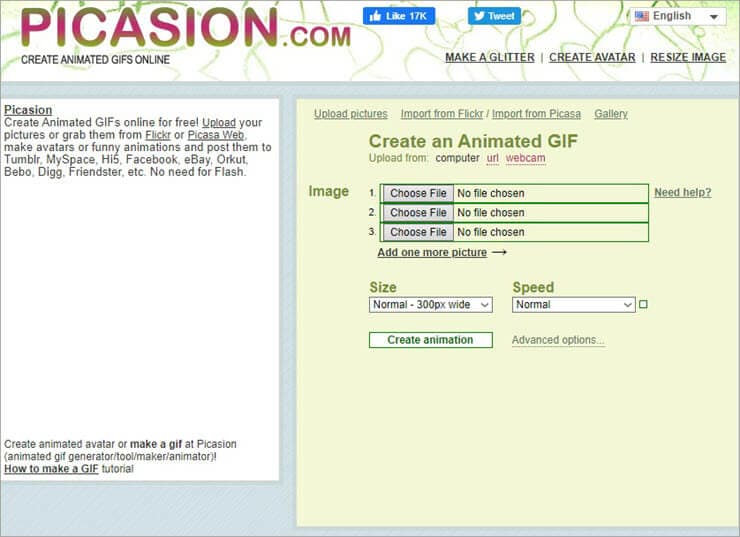
Picasion is one of the best websites for Mac users to create transparent GIFs and memes. The website is easy to use by uploading the images from the desktop location. But it has certain limitations. It only allows you to add a maximum of 3 images to convert them into GIF files. Moreover, it also lacks the capabilities of adding texts and resizing the GIFs.
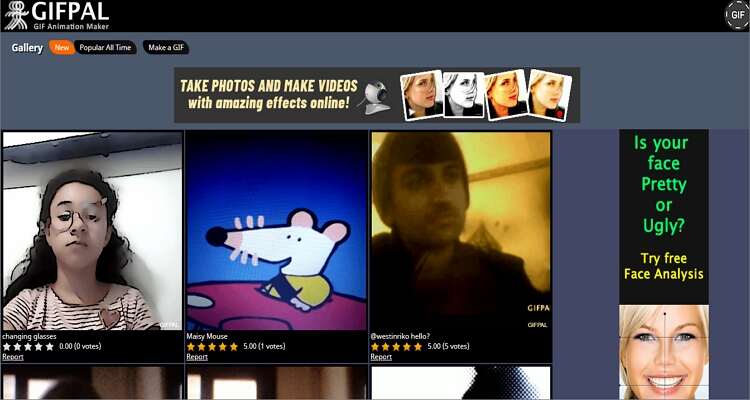
● Gifpal
Gifpal also allows the MAC user to convert images into transparent GIFs with the least effort. The loading time of the website is very fast. It also allows the user to upload the images directly from a phone camera or webcam. The user can also rearrange and remove the watermarks of the images after uploading them. It also enables the user to preview the GIF before downloading.

● Make A GIF
Last but not the least, Make a GIF is also a great website for MAC users to create transparent GIFs. People can use this website for free. It enables the user to generate GIFs out of multiple images or videos. Customization options like adding text, resizing, rearranging, etc are also available with it. But, there is a limitation with Make a GIF that it does not allow the user to preview the GIF before download.
These are some of the widely used websites for Windows and MACs applicable for making transparent GIFs. But now we are introducing the best option out of all and i.e. Wondershare Filmora.
Both Windows and MAC users can use Wondershare Filmora effectively for creating snow transparent GIFs. Though it can be used easily, it creates a GIF of high quality and resolution. This tool is highly recommended for such purposes because of its simple and most interactive interface. The user can make a GIF by combining any number of images and also from small videos. Easy customization of GIFs such as adding texts, elements, overlays, etc, is also available for the user
Moreover, one can also use Wondershare Filmora Video Editor meme maker to create a GIF online. You can directly make the GIF here, without any watermark. No sign up required for this and one can use it for free. A lot more editing options for GIFs are also accessible by the user easily.
For Win 7 or later (64-bit)
For macOS 10.12 or later
● Ending Thoughts →
● So, we can conclude that though it is hard to remove the transparent GIF, it can be done with proper knowledge and skills. There are many online free and paid tools available for this. Choose according to your suitability.
● When it comes to making a GIF on Windows and MAC platforms, we have discussed the best online websites according to their effectiveness.
● Wondershare Filmora is the most suitable option out of all, as it can be used in both Windows and MAC platforms. Moreover, people can use this wonderful tool for both creating a transparent animated GIF and removing the transparent background of the GIF. So, we can say it is an all-in-one solution.
GIFs are very popular type of content these days, on social media. It seems to be very engaging for the audience. The GIF image format was first developed by CompuServe in 1987. Since that time, they have been used for entertainment purposes and their application is increasing with each passing day. But when it comes to transparent GIFs, it gets annoying sometimes. It looks ugly with weird white edges.
Sometimes it becomes hard to remove such GIFs with transparent backgrounds. Do you ever think about why it happens? This blog is dedicated to explaining the possible reasons for this. Also, we are going to explain how one can achieve to remove such a transparent background from the GIF.
In this article
01 [Why Sometimes Transparent Gif is Hard to Remove](#Part 1)
02 [How to Remove the Background from an Animated Gif in Photoshop](#Part 2)
03 [8 Best Online Transparent Gif Maker Websites](#Part 3)
Part 1 Why Sometimes Transparent Gif is Hard to Remove
When the GIF looks ugly with a transparent background, it becomes necessary to remove the background. But it sometimes becomes hard as this requires proper skills as well as adequate tools to achieve this. In the absence of even one, the final output may come out to be clumsy. There are many tools that can be used to remove the background from a transparent animated GIF. But it is hard to use these tools without proper knowledge. If you learn the skills, the task becomes so easy.
Part 2 How to Remove the Background from an Animated Gif in Photoshop
Photoshop is popularly known for being a photo manipulation and editing software. But it can also be used to remove the background of an animated GIF. Here, we will discuss the step-by-step approach to removing an animated GIF background.
Step 1: Import The GIF File
This can be done in 2 ways. One is clicking and dragging the file from the file location on the computer, into Photoshop. The second way is to click on the “File” menu of Photoshop. Then tap on “Open” and double click on the desired GIF file.

Step 2: Set Up The Project
It is required to edit each frame separately for deleting the background of an animated GIF (gif remove bg). For this:
Find the “Video Group” option on the right side of Photoshop. Right-click on it and tap on the “Ungroup layers” option.

This will give you the video layer, which you want to edit. Right-click on “layer 1” and tap on the “Convert to smart object” option. Again right-click on “Layer 1” and click on “Edit Contents”.

You will get a new Photoshop tap for the editing of GIF files. Just freely close the original tab.
Step 3: Begin The Editing Part
Find the blue line called the Timeline at the bottom of the screen. This Timeline will help you to edit the GIF. To make your editing easy, you can zoom on the frames with the help of a slider located at the bottom of the screen.
For a better outcome, the frame-by-frame deletion of the GIF background is advisable. It might be a little time-consuming but it is the most appropriate and accurate approach. So, delete the background from each frame independently.
To move from one frame of the GIF to another, hold and move the blue arrow having a red line.
\

Step 4: Delete The Transparent GIF Background
Now, delete the background of each frame of your GIF. To delete the background of any particular frame, click on that frame. For this, you can either use a “Quick Selection Tool” or a “Polygonal Lasso Tool”. You will get the final result that will be background free.

Step 5: Save The Project In GIF Format
To save the GIF project, click on the “File” menu and then tap on the “Save As” option. Give a file name and select “GIF” on the “Save As Type” options menu. Then click on “OK” to save the GIF file.

Part 3 Best Online Transparent Gif Maker Websites
When it comes to how to make a gif transparent through online sources, there are many options available. Here, we are going to discuss the best options out of them.
01 Online Transparent Gif Maker for Windows
Let’s learn about the best performing online transparent Gif creator websites compatible with Windows.
● EzGif
EzGif is among the best transparent GIF-making websites available online. Using the website, one can create a high-resolution GIF with a transparent background. To achieve this, the website will ask to upload a number of images of transparent backgrounds. The images can be uploaded in PNG, JPEG, GIF, or any other format. Then, next is to combine all the images to form a GIF. The website allows users to upload a maximum of 2000 images. Each image size should not exceed 6MB and the total size of all images should not exceed 100 MB.

● Lunapic
Lunapic is also one of the best and easy-to-use websites for making a confetti GIF transparent, available for free. There is no limitation to the number of images or image size. Also, the website does not have limitations for the total file size, one can upload. It also allows the user to upload an image already having a transparent background and create a GIF out of it.

● GIF Make
GIF make is also a useful free website for making high-quality transparent GIFs. It is easy to use this website for transparent GIF creations. You only need to upload transparent PNG images for this. It allows you to add as many as 80 images to create a GIF file. But there is one limitation to the website that it does not contain the option of uploading images without a transparent background and removing the background. So, the user only needs to upload an image with a transparent background to create a GIF.

● Animizer.net
Animizer.net is also a good option when it comes to creating transparent GIFs from images, for free. For this, you can upload multiple PNG images in this online tool. Then, the tool will help you create a GIF by joining them all together. It allows you to upload an unlimited number of images. The online website also enables the creation of transparent background GIFs by uploading images with colored backgrounds. It allows you to remove the background of images and make them transparent.

02 Online Transparent Gif Maker for Mac
● EzGif
We have already discussed EzGif as the best online transparent GIF maker website for Windows. But, we want to ensure that this also works best in the MAC version. It helps to convert either a video or photos into a GIF file. Moreover, the website supports all the standard image formats such as HEIC, TIFF, PNG, JPEG, BMP, etc.

● Picasion
Picasion is one of the best websites for Mac users to create transparent GIFs and memes. The website is easy to use by uploading the images from the desktop location. But it has certain limitations. It only allows you to add a maximum of 3 images to convert them into GIF files. Moreover, it also lacks the capabilities of adding texts and resizing the GIFs.

● Gifpal
Gifpal also allows the MAC user to convert images into transparent GIFs with the least effort. The loading time of the website is very fast. It also allows the user to upload the images directly from a phone camera or webcam. The user can also rearrange and remove the watermarks of the images after uploading them. It also enables the user to preview the GIF before downloading.

● Make A GIF
Last but not the least, Make a GIF is also a great website for MAC users to create transparent GIFs. People can use this website for free. It enables the user to generate GIFs out of multiple images or videos. Customization options like adding text, resizing, rearranging, etc are also available with it. But, there is a limitation with Make a GIF that it does not allow the user to preview the GIF before download.

These are some of the widely used websites for Windows and MACs applicable for making transparent GIFs. But now we are introducing the best option out of all and i.e. Wondershare Filmora.
Both Windows and MAC users can use Wondershare Filmora effectively for creating snow transparent GIFs. Though it can be used easily, it creates a GIF of high quality and resolution. This tool is highly recommended for such purposes because of its simple and most interactive interface. The user can make a GIF by combining any number of images and also from small videos. Easy customization of GIFs such as adding texts, elements, overlays, etc, is also available for the user
Moreover, one can also use Wondershare Filmora Video Editor meme maker to create a GIF online. You can directly make the GIF here, without any watermark. No sign up required for this and one can use it for free. A lot more editing options for GIFs are also accessible by the user easily.
For Win 7 or later (64-bit)
For macOS 10.12 or later
● Ending Thoughts →
● So, we can conclude that though it is hard to remove the transparent GIF, it can be done with proper knowledge and skills. There are many online free and paid tools available for this. Choose according to your suitability.
● When it comes to making a GIF on Windows and MAC platforms, we have discussed the best online websites according to their effectiveness.
● Wondershare Filmora is the most suitable option out of all, as it can be used in both Windows and MAC platforms. Moreover, people can use this wonderful tool for both creating a transparent animated GIF and removing the transparent background of the GIF. So, we can say it is an all-in-one solution.
GIFs are very popular type of content these days, on social media. It seems to be very engaging for the audience. The GIF image format was first developed by CompuServe in 1987. Since that time, they have been used for entertainment purposes and their application is increasing with each passing day. But when it comes to transparent GIFs, it gets annoying sometimes. It looks ugly with weird white edges.
Sometimes it becomes hard to remove such GIFs with transparent backgrounds. Do you ever think about why it happens? This blog is dedicated to explaining the possible reasons for this. Also, we are going to explain how one can achieve to remove such a transparent background from the GIF.
In this article
01 [Why Sometimes Transparent Gif is Hard to Remove](#Part 1)
02 [How to Remove the Background from an Animated Gif in Photoshop](#Part 2)
03 [8 Best Online Transparent Gif Maker Websites](#Part 3)
Part 1 Why Sometimes Transparent Gif is Hard to Remove
When the GIF looks ugly with a transparent background, it becomes necessary to remove the background. But it sometimes becomes hard as this requires proper skills as well as adequate tools to achieve this. In the absence of even one, the final output may come out to be clumsy. There are many tools that can be used to remove the background from a transparent animated GIF. But it is hard to use these tools without proper knowledge. If you learn the skills, the task becomes so easy.
Part 2 How to Remove the Background from an Animated Gif in Photoshop
Photoshop is popularly known for being a photo manipulation and editing software. But it can also be used to remove the background of an animated GIF. Here, we will discuss the step-by-step approach to removing an animated GIF background.
Step 1: Import The GIF File
This can be done in 2 ways. One is clicking and dragging the file from the file location on the computer, into Photoshop. The second way is to click on the “File” menu of Photoshop. Then tap on “Open” and double click on the desired GIF file.

Step 2: Set Up The Project
It is required to edit each frame separately for deleting the background of an animated GIF (gif remove bg). For this:
Find the “Video Group” option on the right side of Photoshop. Right-click on it and tap on the “Ungroup layers” option.

This will give you the video layer, which you want to edit. Right-click on “layer 1” and tap on the “Convert to smart object” option. Again right-click on “Layer 1” and click on “Edit Contents”.

You will get a new Photoshop tap for the editing of GIF files. Just freely close the original tab.
Step 3: Begin The Editing Part
Find the blue line called the Timeline at the bottom of the screen. This Timeline will help you to edit the GIF. To make your editing easy, you can zoom on the frames with the help of a slider located at the bottom of the screen.
For a better outcome, the frame-by-frame deletion of the GIF background is advisable. It might be a little time-consuming but it is the most appropriate and accurate approach. So, delete the background from each frame independently.
To move from one frame of the GIF to another, hold and move the blue arrow having a red line.
\

Step 4: Delete The Transparent GIF Background
Now, delete the background of each frame of your GIF. To delete the background of any particular frame, click on that frame. For this, you can either use a “Quick Selection Tool” or a “Polygonal Lasso Tool”. You will get the final result that will be background free.

Step 5: Save The Project In GIF Format
To save the GIF project, click on the “File” menu and then tap on the “Save As” option. Give a file name and select “GIF” on the “Save As Type” options menu. Then click on “OK” to save the GIF file.

Part 3 Best Online Transparent Gif Maker Websites
When it comes to how to make a gif transparent through online sources, there are many options available. Here, we are going to discuss the best options out of them.
01 Online Transparent Gif Maker for Windows
Let’s learn about the best performing online transparent Gif creator websites compatible with Windows.
● EzGif
EzGif is among the best transparent GIF-making websites available online. Using the website, one can create a high-resolution GIF with a transparent background. To achieve this, the website will ask to upload a number of images of transparent backgrounds. The images can be uploaded in PNG, JPEG, GIF, or any other format. Then, next is to combine all the images to form a GIF. The website allows users to upload a maximum of 2000 images. Each image size should not exceed 6MB and the total size of all images should not exceed 100 MB.

● Lunapic
Lunapic is also one of the best and easy-to-use websites for making a confetti GIF transparent, available for free. There is no limitation to the number of images or image size. Also, the website does not have limitations for the total file size, one can upload. It also allows the user to upload an image already having a transparent background and create a GIF out of it.

● GIF Make
GIF make is also a useful free website for making high-quality transparent GIFs. It is easy to use this website for transparent GIF creations. You only need to upload transparent PNG images for this. It allows you to add as many as 80 images to create a GIF file. But there is one limitation to the website that it does not contain the option of uploading images without a transparent background and removing the background. So, the user only needs to upload an image with a transparent background to create a GIF.

● Animizer.net
Animizer.net is also a good option when it comes to creating transparent GIFs from images, for free. For this, you can upload multiple PNG images in this online tool. Then, the tool will help you create a GIF by joining them all together. It allows you to upload an unlimited number of images. The online website also enables the creation of transparent background GIFs by uploading images with colored backgrounds. It allows you to remove the background of images and make them transparent.

02 Online Transparent Gif Maker for Mac
● EzGif
We have already discussed EzGif as the best online transparent GIF maker website for Windows. But, we want to ensure that this also works best in the MAC version. It helps to convert either a video or photos into a GIF file. Moreover, the website supports all the standard image formats such as HEIC, TIFF, PNG, JPEG, BMP, etc.

● Picasion
Picasion is one of the best websites for Mac users to create transparent GIFs and memes. The website is easy to use by uploading the images from the desktop location. But it has certain limitations. It only allows you to add a maximum of 3 images to convert them into GIF files. Moreover, it also lacks the capabilities of adding texts and resizing the GIFs.

● Gifpal
Gifpal also allows the MAC user to convert images into transparent GIFs with the least effort. The loading time of the website is very fast. It also allows the user to upload the images directly from a phone camera or webcam. The user can also rearrange and remove the watermarks of the images after uploading them. It also enables the user to preview the GIF before downloading.

● Make A GIF
Last but not the least, Make a GIF is also a great website for MAC users to create transparent GIFs. People can use this website for free. It enables the user to generate GIFs out of multiple images or videos. Customization options like adding text, resizing, rearranging, etc are also available with it. But, there is a limitation with Make a GIF that it does not allow the user to preview the GIF before download.

These are some of the widely used websites for Windows and MACs applicable for making transparent GIFs. But now we are introducing the best option out of all and i.e. Wondershare Filmora.
Both Windows and MAC users can use Wondershare Filmora effectively for creating snow transparent GIFs. Though it can be used easily, it creates a GIF of high quality and resolution. This tool is highly recommended for such purposes because of its simple and most interactive interface. The user can make a GIF by combining any number of images and also from small videos. Easy customization of GIFs such as adding texts, elements, overlays, etc, is also available for the user
Moreover, one can also use Wondershare Filmora Video Editor meme maker to create a GIF online. You can directly make the GIF here, without any watermark. No sign up required for this and one can use it for free. A lot more editing options for GIFs are also accessible by the user easily.
For Win 7 or later (64-bit)
For macOS 10.12 or later
● Ending Thoughts →
● So, we can conclude that though it is hard to remove the transparent GIF, it can be done with proper knowledge and skills. There are many online free and paid tools available for this. Choose according to your suitability.
● When it comes to making a GIF on Windows and MAC platforms, we have discussed the best online websites according to their effectiveness.
● Wondershare Filmora is the most suitable option out of all, as it can be used in both Windows and MAC platforms. Moreover, people can use this wonderful tool for both creating a transparent animated GIF and removing the transparent background of the GIF. So, we can say it is an all-in-one solution.
GIFs are very popular type of content these days, on social media. It seems to be very engaging for the audience. The GIF image format was first developed by CompuServe in 1987. Since that time, they have been used for entertainment purposes and their application is increasing with each passing day. But when it comes to transparent GIFs, it gets annoying sometimes. It looks ugly with weird white edges.
Sometimes it becomes hard to remove such GIFs with transparent backgrounds. Do you ever think about why it happens? This blog is dedicated to explaining the possible reasons for this. Also, we are going to explain how one can achieve to remove such a transparent background from the GIF.
In this article
01 [Why Sometimes Transparent Gif is Hard to Remove](#Part 1)
02 [How to Remove the Background from an Animated Gif in Photoshop](#Part 2)
03 [8 Best Online Transparent Gif Maker Websites](#Part 3)
Part 1 Why Sometimes Transparent Gif is Hard to Remove
When the GIF looks ugly with a transparent background, it becomes necessary to remove the background. But it sometimes becomes hard as this requires proper skills as well as adequate tools to achieve this. In the absence of even one, the final output may come out to be clumsy. There are many tools that can be used to remove the background from a transparent animated GIF. But it is hard to use these tools without proper knowledge. If you learn the skills, the task becomes so easy.
Part 2 How to Remove the Background from an Animated Gif in Photoshop
Photoshop is popularly known for being a photo manipulation and editing software. But it can also be used to remove the background of an animated GIF. Here, we will discuss the step-by-step approach to removing an animated GIF background.
Step 1: Import The GIF File
This can be done in 2 ways. One is clicking and dragging the file from the file location on the computer, into Photoshop. The second way is to click on the “File” menu of Photoshop. Then tap on “Open” and double click on the desired GIF file.

Step 2: Set Up The Project
It is required to edit each frame separately for deleting the background of an animated GIF (gif remove bg). For this:
Find the “Video Group” option on the right side of Photoshop. Right-click on it and tap on the “Ungroup layers” option.

This will give you the video layer, which you want to edit. Right-click on “layer 1” and tap on the “Convert to smart object” option. Again right-click on “Layer 1” and click on “Edit Contents”.

You will get a new Photoshop tap for the editing of GIF files. Just freely close the original tab.
Step 3: Begin The Editing Part
Find the blue line called the Timeline at the bottom of the screen. This Timeline will help you to edit the GIF. To make your editing easy, you can zoom on the frames with the help of a slider located at the bottom of the screen.
For a better outcome, the frame-by-frame deletion of the GIF background is advisable. It might be a little time-consuming but it is the most appropriate and accurate approach. So, delete the background from each frame independently.
To move from one frame of the GIF to another, hold and move the blue arrow having a red line.
\

Step 4: Delete The Transparent GIF Background
Now, delete the background of each frame of your GIF. To delete the background of any particular frame, click on that frame. For this, you can either use a “Quick Selection Tool” or a “Polygonal Lasso Tool”. You will get the final result that will be background free.

Step 5: Save The Project In GIF Format
To save the GIF project, click on the “File” menu and then tap on the “Save As” option. Give a file name and select “GIF” on the “Save As Type” options menu. Then click on “OK” to save the GIF file.

Part 3 Best Online Transparent Gif Maker Websites
When it comes to how to make a gif transparent through online sources, there are many options available. Here, we are going to discuss the best options out of them.
01 Online Transparent Gif Maker for Windows
Let’s learn about the best performing online transparent Gif creator websites compatible with Windows.
● EzGif
EzGif is among the best transparent GIF-making websites available online. Using the website, one can create a high-resolution GIF with a transparent background. To achieve this, the website will ask to upload a number of images of transparent backgrounds. The images can be uploaded in PNG, JPEG, GIF, or any other format. Then, next is to combine all the images to form a GIF. The website allows users to upload a maximum of 2000 images. Each image size should not exceed 6MB and the total size of all images should not exceed 100 MB.

● Lunapic
Lunapic is also one of the best and easy-to-use websites for making a confetti GIF transparent, available for free. There is no limitation to the number of images or image size. Also, the website does not have limitations for the total file size, one can upload. It also allows the user to upload an image already having a transparent background and create a GIF out of it.

● GIF Make
GIF make is also a useful free website for making high-quality transparent GIFs. It is easy to use this website for transparent GIF creations. You only need to upload transparent PNG images for this. It allows you to add as many as 80 images to create a GIF file. But there is one limitation to the website that it does not contain the option of uploading images without a transparent background and removing the background. So, the user only needs to upload an image with a transparent background to create a GIF.

● Animizer.net
Animizer.net is also a good option when it comes to creating transparent GIFs from images, for free. For this, you can upload multiple PNG images in this online tool. Then, the tool will help you create a GIF by joining them all together. It allows you to upload an unlimited number of images. The online website also enables the creation of transparent background GIFs by uploading images with colored backgrounds. It allows you to remove the background of images and make them transparent.

02 Online Transparent Gif Maker for Mac
● EzGif
We have already discussed EzGif as the best online transparent GIF maker website for Windows. But, we want to ensure that this also works best in the MAC version. It helps to convert either a video or photos into a GIF file. Moreover, the website supports all the standard image formats such as HEIC, TIFF, PNG, JPEG, BMP, etc.

● Picasion
Picasion is one of the best websites for Mac users to create transparent GIFs and memes. The website is easy to use by uploading the images from the desktop location. But it has certain limitations. It only allows you to add a maximum of 3 images to convert them into GIF files. Moreover, it also lacks the capabilities of adding texts and resizing the GIFs.

● Gifpal
Gifpal also allows the MAC user to convert images into transparent GIFs with the least effort. The loading time of the website is very fast. It also allows the user to upload the images directly from a phone camera or webcam. The user can also rearrange and remove the watermarks of the images after uploading them. It also enables the user to preview the GIF before downloading.

● Make A GIF
Last but not the least, Make a GIF is also a great website for MAC users to create transparent GIFs. People can use this website for free. It enables the user to generate GIFs out of multiple images or videos. Customization options like adding text, resizing, rearranging, etc are also available with it. But, there is a limitation with Make a GIF that it does not allow the user to preview the GIF before download.

These are some of the widely used websites for Windows and MACs applicable for making transparent GIFs. But now we are introducing the best option out of all and i.e. Wondershare Filmora.
Both Windows and MAC users can use Wondershare Filmora effectively for creating snow transparent GIFs. Though it can be used easily, it creates a GIF of high quality and resolution. This tool is highly recommended for such purposes because of its simple and most interactive interface. The user can make a GIF by combining any number of images and also from small videos. Easy customization of GIFs such as adding texts, elements, overlays, etc, is also available for the user
Moreover, one can also use Wondershare Filmora Video Editor meme maker to create a GIF online. You can directly make the GIF here, without any watermark. No sign up required for this and one can use it for free. A lot more editing options for GIFs are also accessible by the user easily.
For Win 7 or later (64-bit)
For macOS 10.12 or later
● Ending Thoughts →
● So, we can conclude that though it is hard to remove the transparent GIF, it can be done with proper knowledge and skills. There are many online free and paid tools available for this. Choose according to your suitability.
● When it comes to making a GIF on Windows and MAC platforms, we have discussed the best online websites according to their effectiveness.
● Wondershare Filmora is the most suitable option out of all, as it can be used in both Windows and MAC platforms. Moreover, people can use this wonderful tool for both creating a transparent animated GIF and removing the transparent background of the GIF. So, we can say it is an all-in-one solution.
Find Out How to Create Your Own Custom Motion Graphics in Filmora. Add Unique Objects, Manipulate Text, and Animate Anything You Want
Preparation
What you need to prepare:
- A computer (Windows or macOS)
- Your video materials.
- Filmora video editor
Step 1
Visit the filmora.wondershare.com website and download Filmora . Install the program and wait for it to Run. Then, click on New Project.
Step 2
Go to File → Project Settings and set the FPS to 60. Also, ensure that the project is in Full Resolution (1920x1080). Click OK.

Step 3
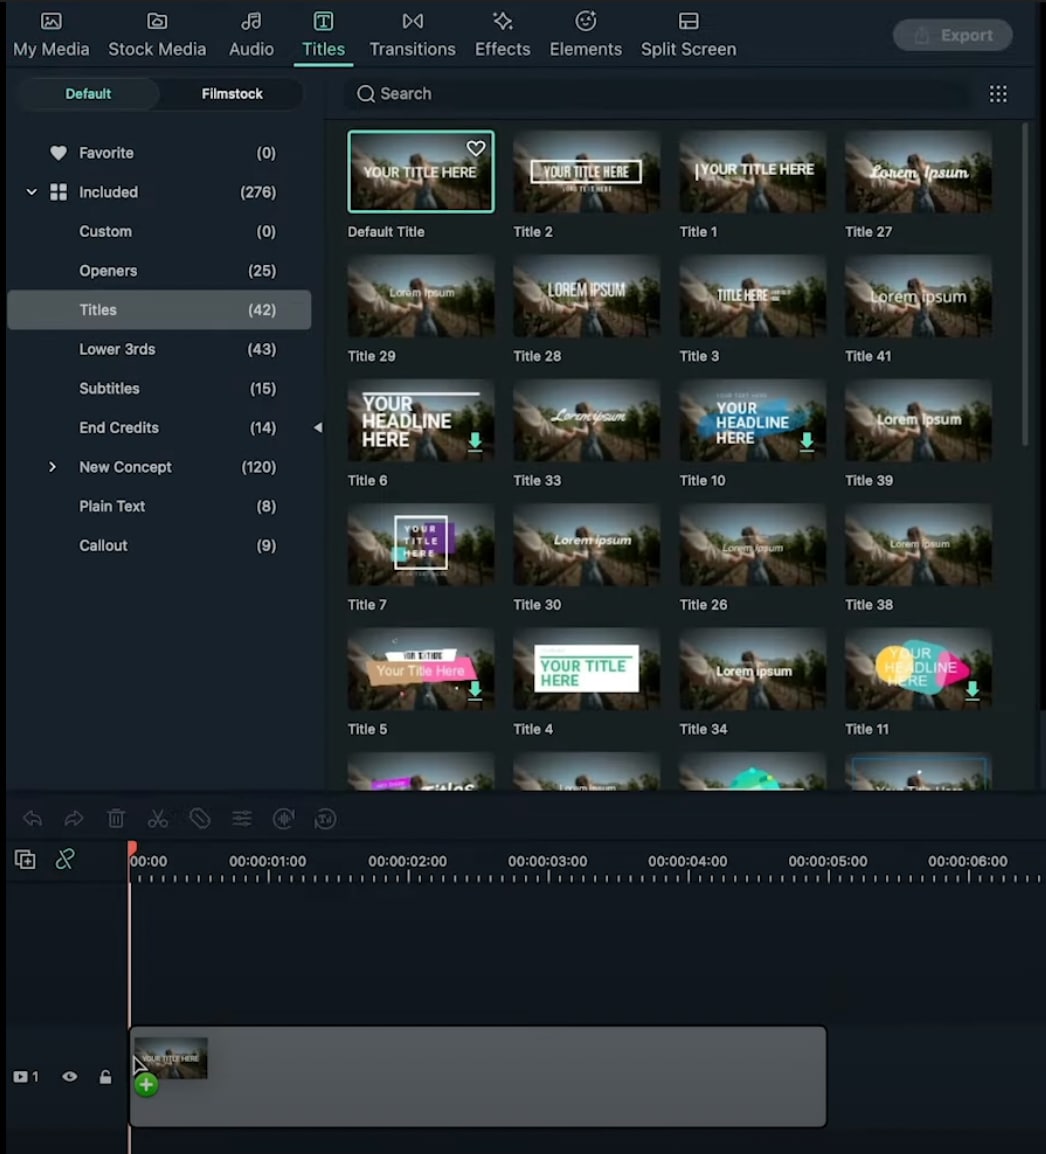
Open the Titles tab and drag the Default Title to the Timeline. Then, double-click on the Default Title and click on ADVANCED.
Step 4
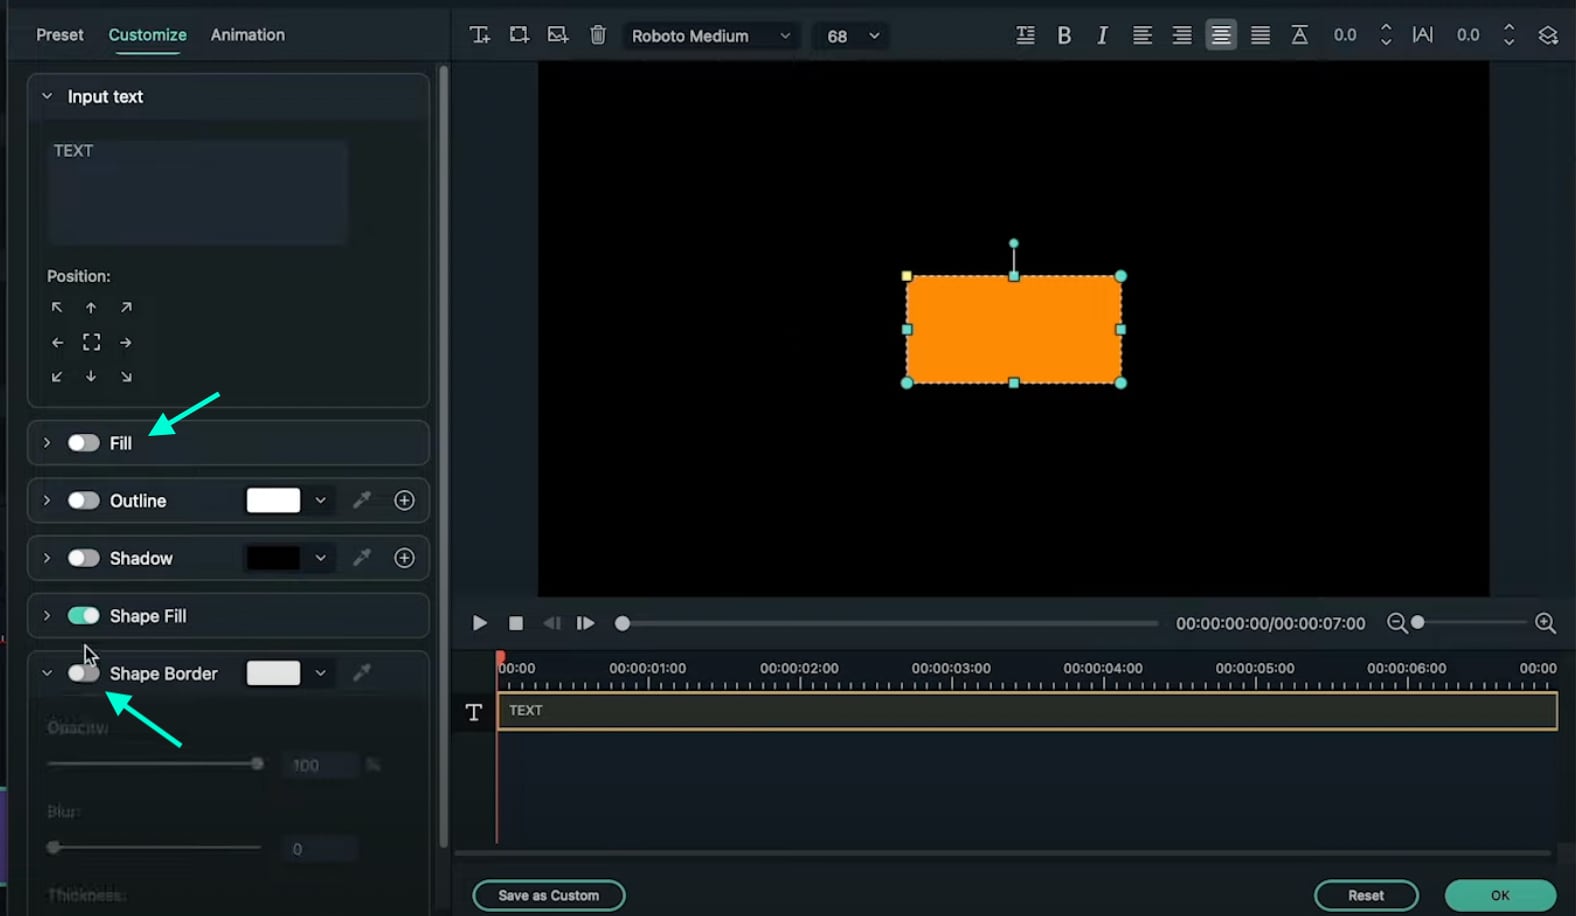
From the Advanced settings panel, delete the existing text and add a Rectangle shape.

Step 5
Disable the Text Fill and the Shape Border options from the panel on the left side.
Step 6
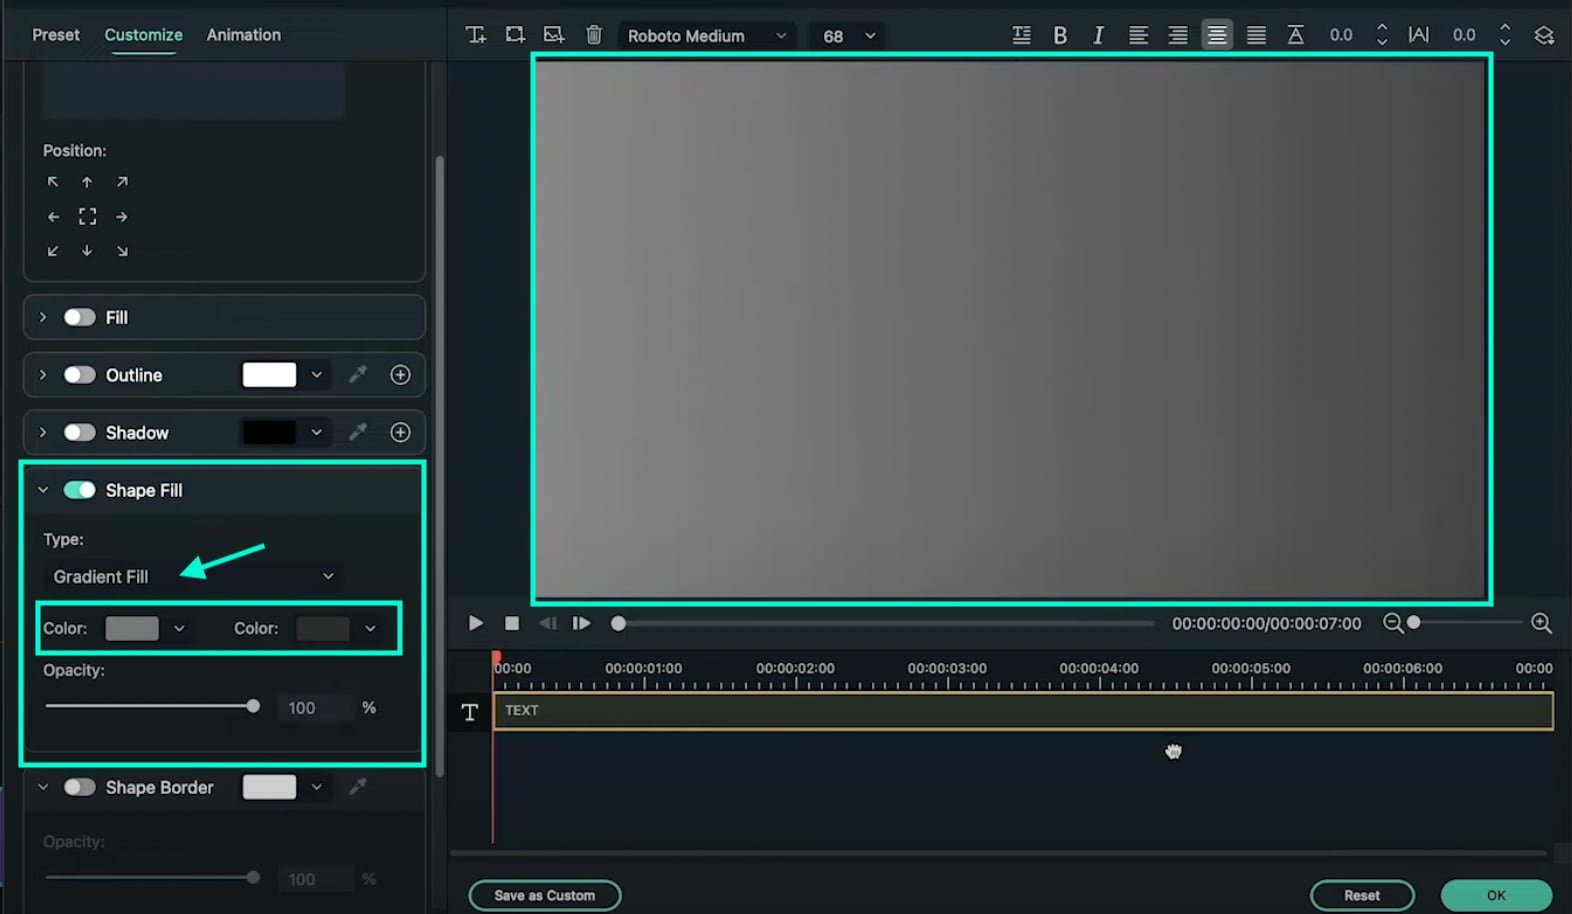
Click the drop-down arrow on the Shape Fill option and change the Type to Gradient Fill. Then, adjust the two color pallets from lighter to darker to create a gradient effect. Finally, adjust the rectangle to fit the entire screen. Click OK.
Step 7
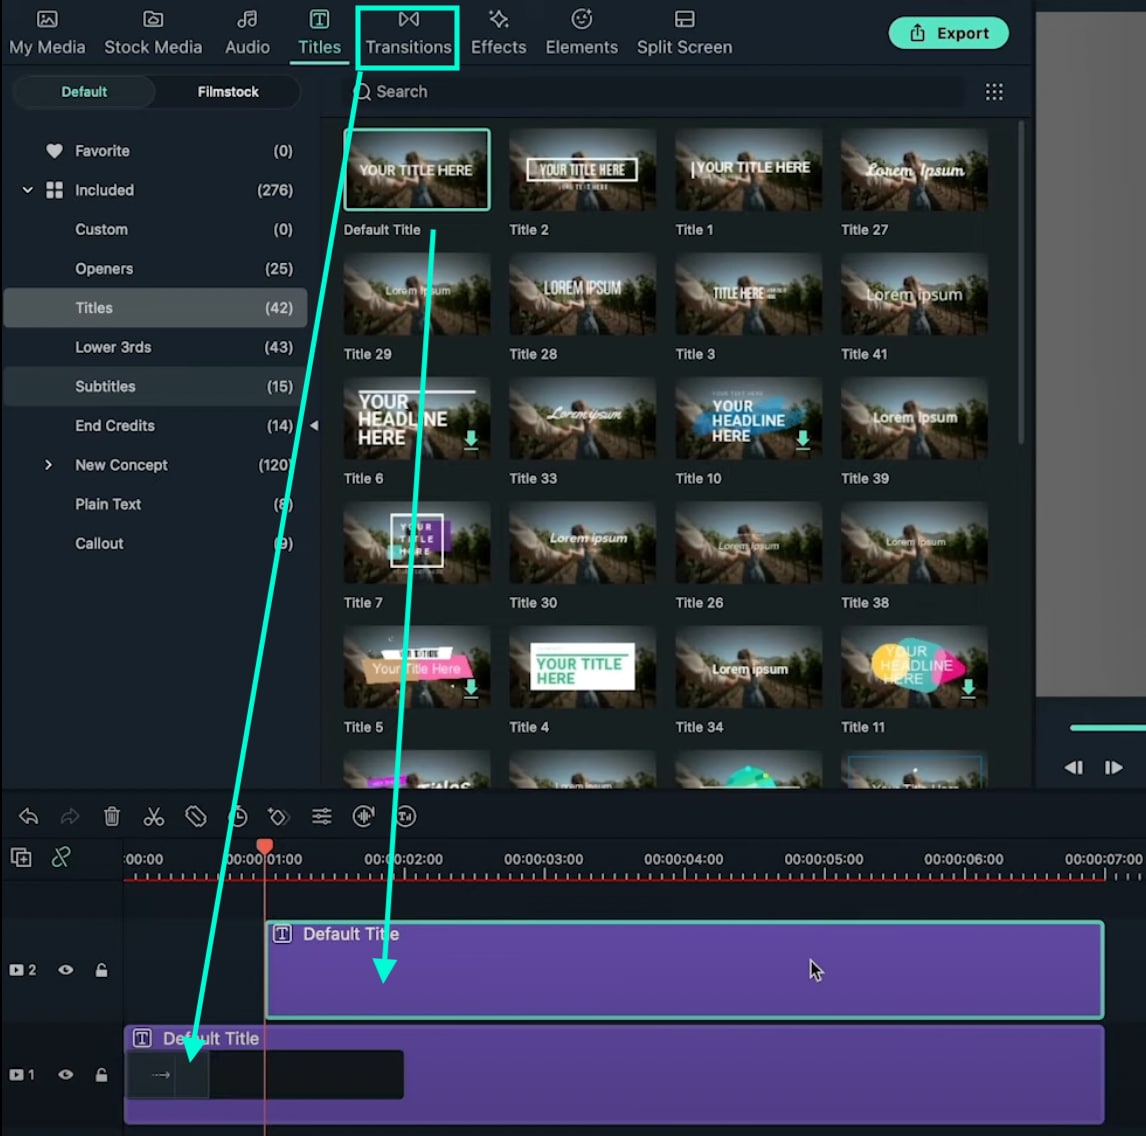
Go to the Transitions tab → search for “Push” → drag the Push transition to the Default Title in the Timeline. Then, move the Playhead to the 1-second marker and drag another Default Title to that point from the Titles tab.
Step 8
Double-click on the new Default Title → go to Advanced. Delete the default text and add a Circle shape this time instead of a Rectangle. Disable the Text Fill and Shape Fill options this time.
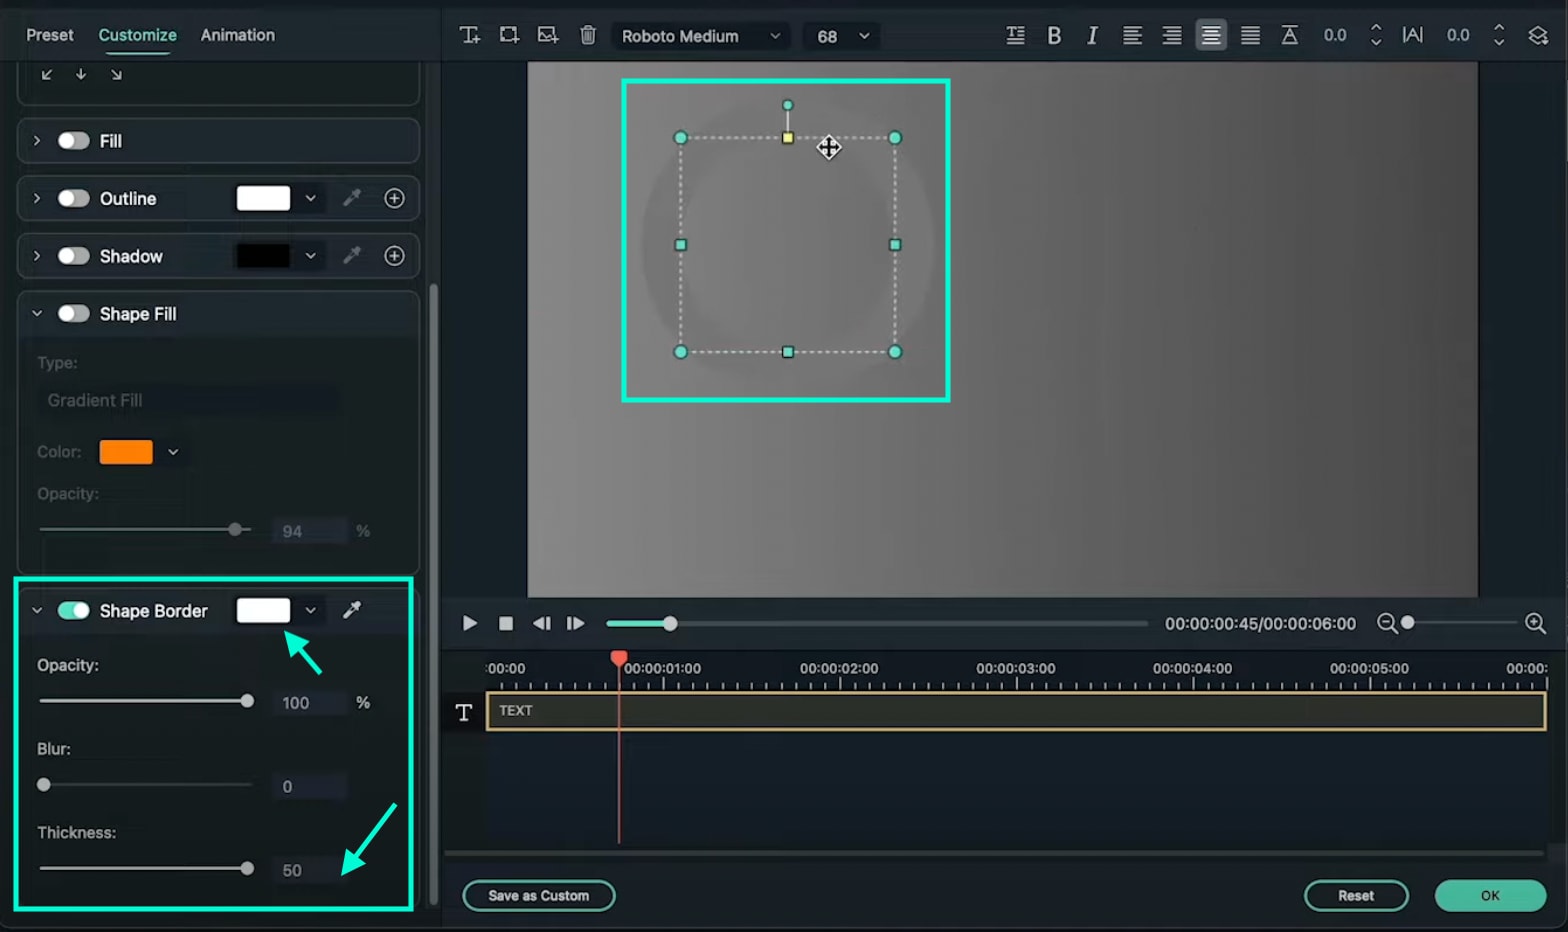
Step 9
Scroll down to Shape Border and increase the Thickness bar all the way up. Then, change the circle’s color to match your background as closely as possible. Click OK.
Step 10
Copy the Title you just edited and paste it into the above layer. Then, double-click on the copied Title and go to its Advanced settings panel.

Step 11
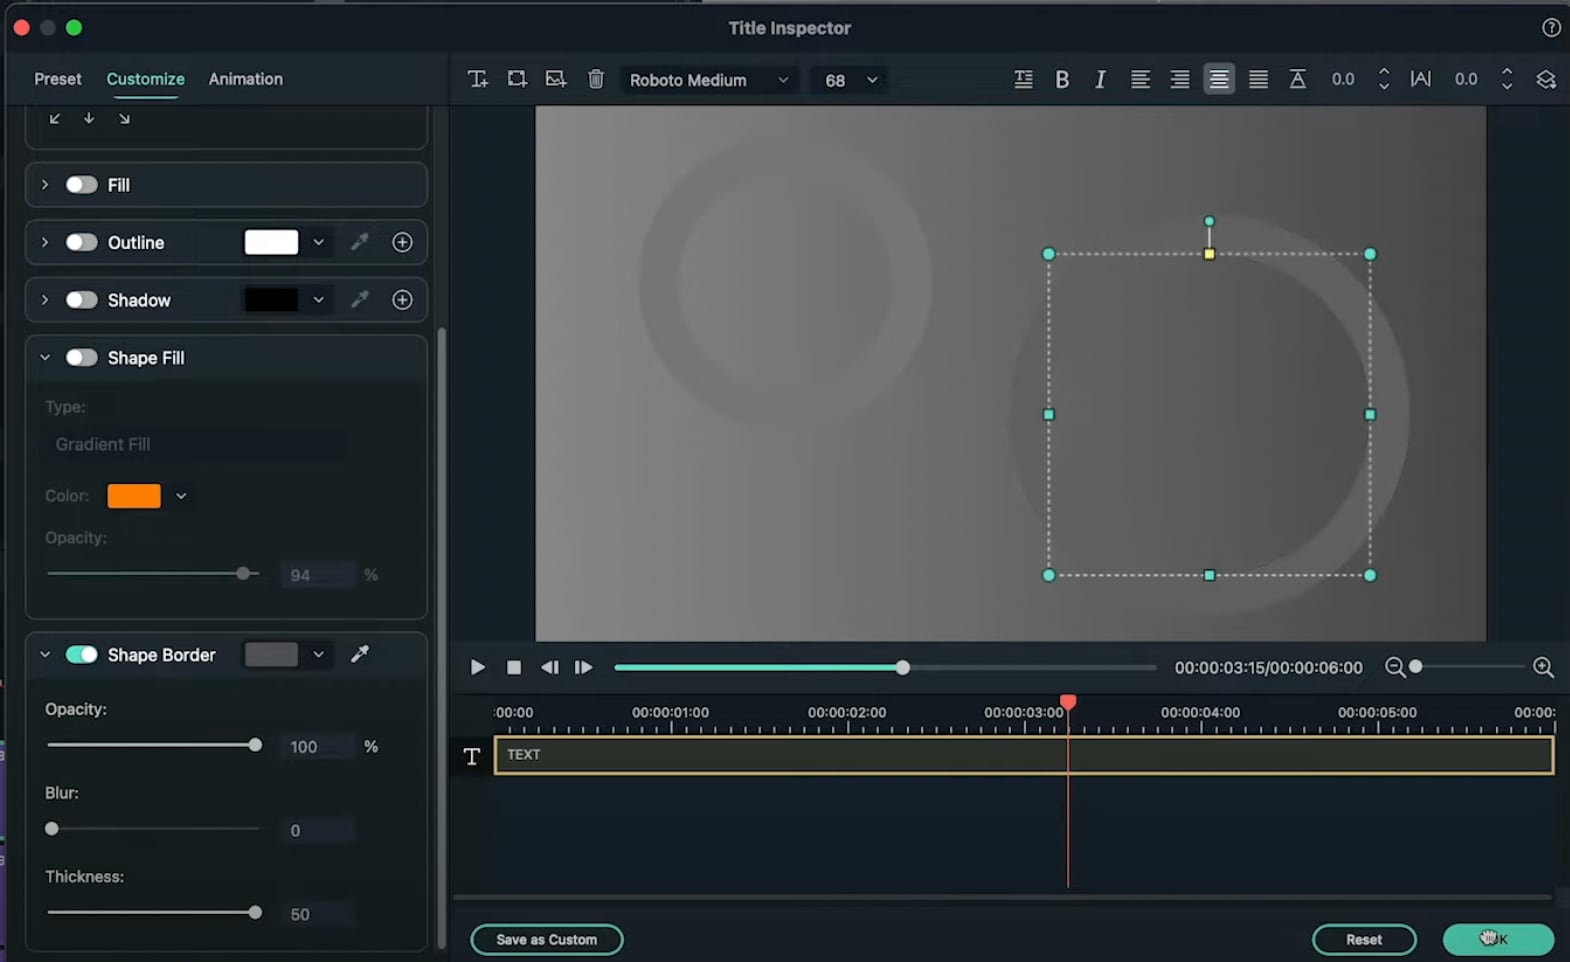
In the Advanced panel, copy the circle and paste it somewhere else on the screen. Change its size if you want, and change the shade of its color to match the background once more. You can add as many new copies of the Default Titles and copy as many circles as you want. Click OK.
Step 12
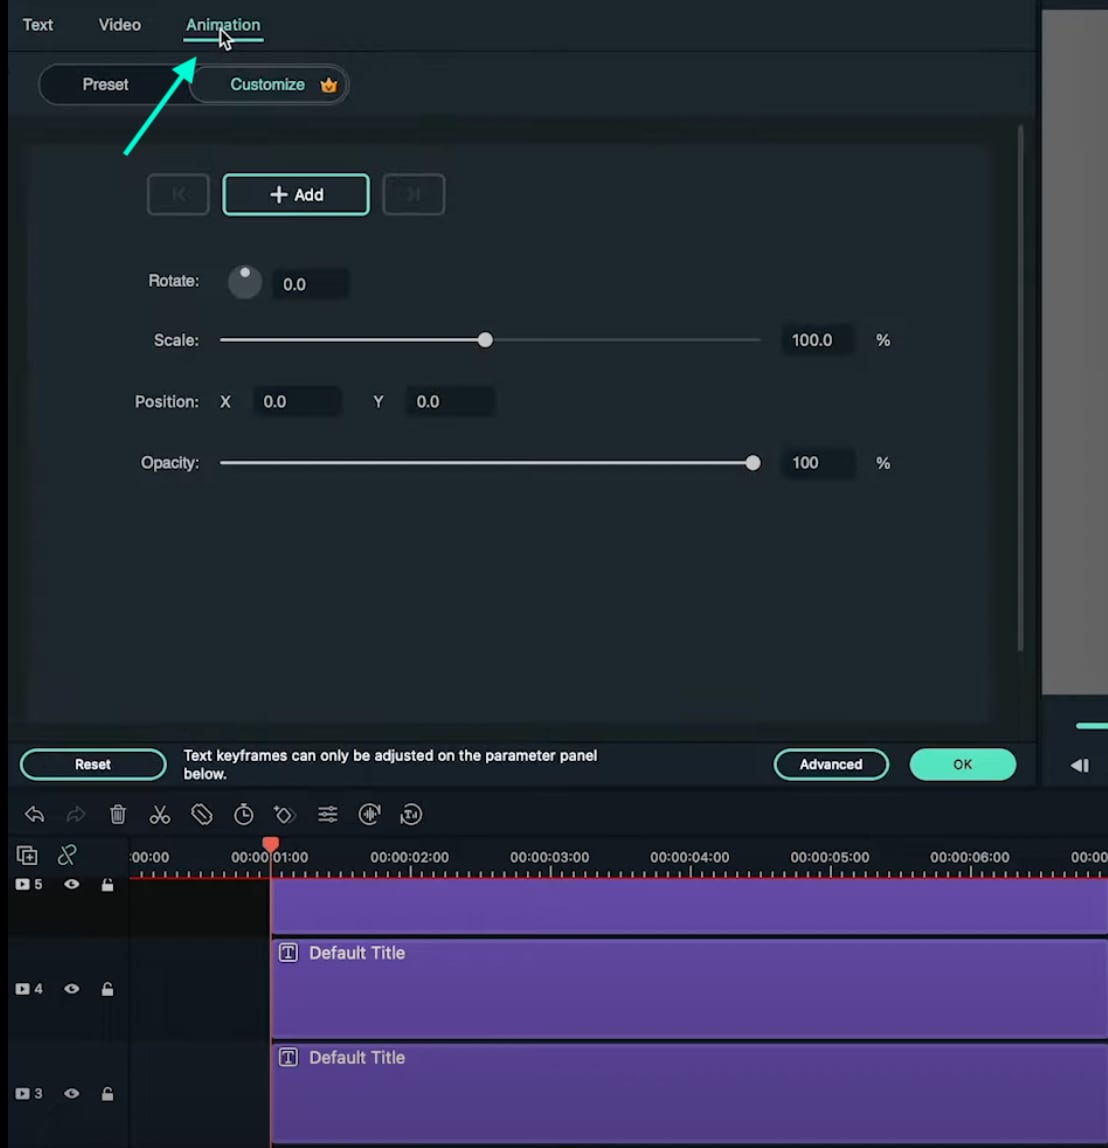
After you’re done copying and pasting more Default Titles with more Circles inside, you can start animating them. Start with the first one. Double-click on the first Default Title with the Circle inside. Make sure you place the Playhead at the beginning of that clip. Then, go to the Animation tab.
Step 13
You need to add 3 keyframes. Add the first one right now. Just click on the “**+Add” button. Then, move the Playhead somewhere in the middle and click “+Add” again. Last, move the Playhead at the end of the clip, and click “+Add**” again to add the third keyframe.

Step 14
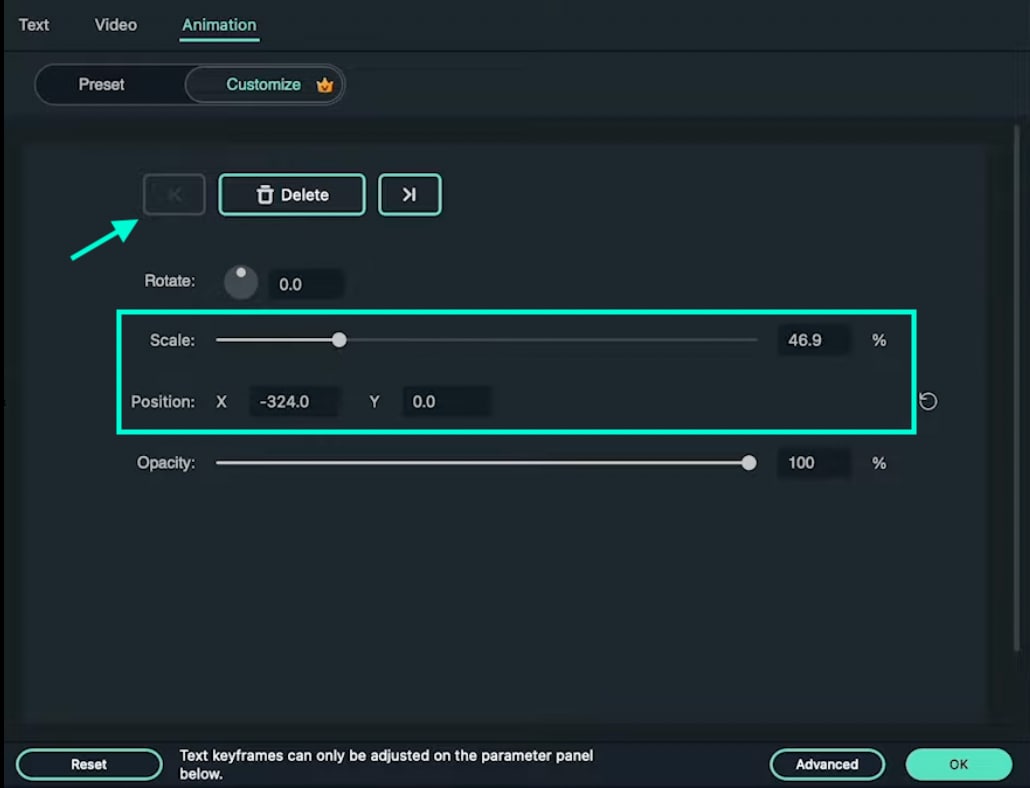
Now, go back to the first keyframe to edit its settings. Click the arrows to move between keyframes. Once you’re at the first one, start decreasing the Scale and the Position values as you move the Playhead toward the second keyframe. There are no rules here. Move each value based on how it looks best to you.
For the second keyframe, just increase the Scale and adjust the Position value based on how it looks on the screen.
Step 15
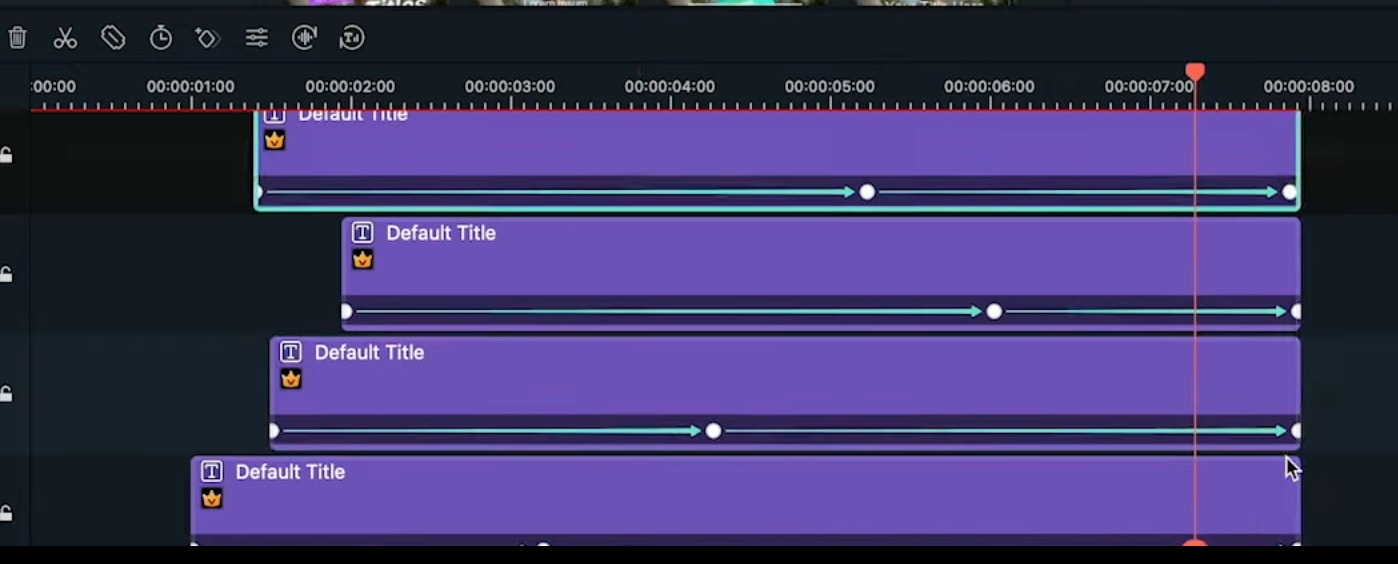
Now, apply the same method as in Step 14 to all the other circles in your video. Then, adjust the keyframe positions for all layers to create more unique movement throughout the video.
Step 16
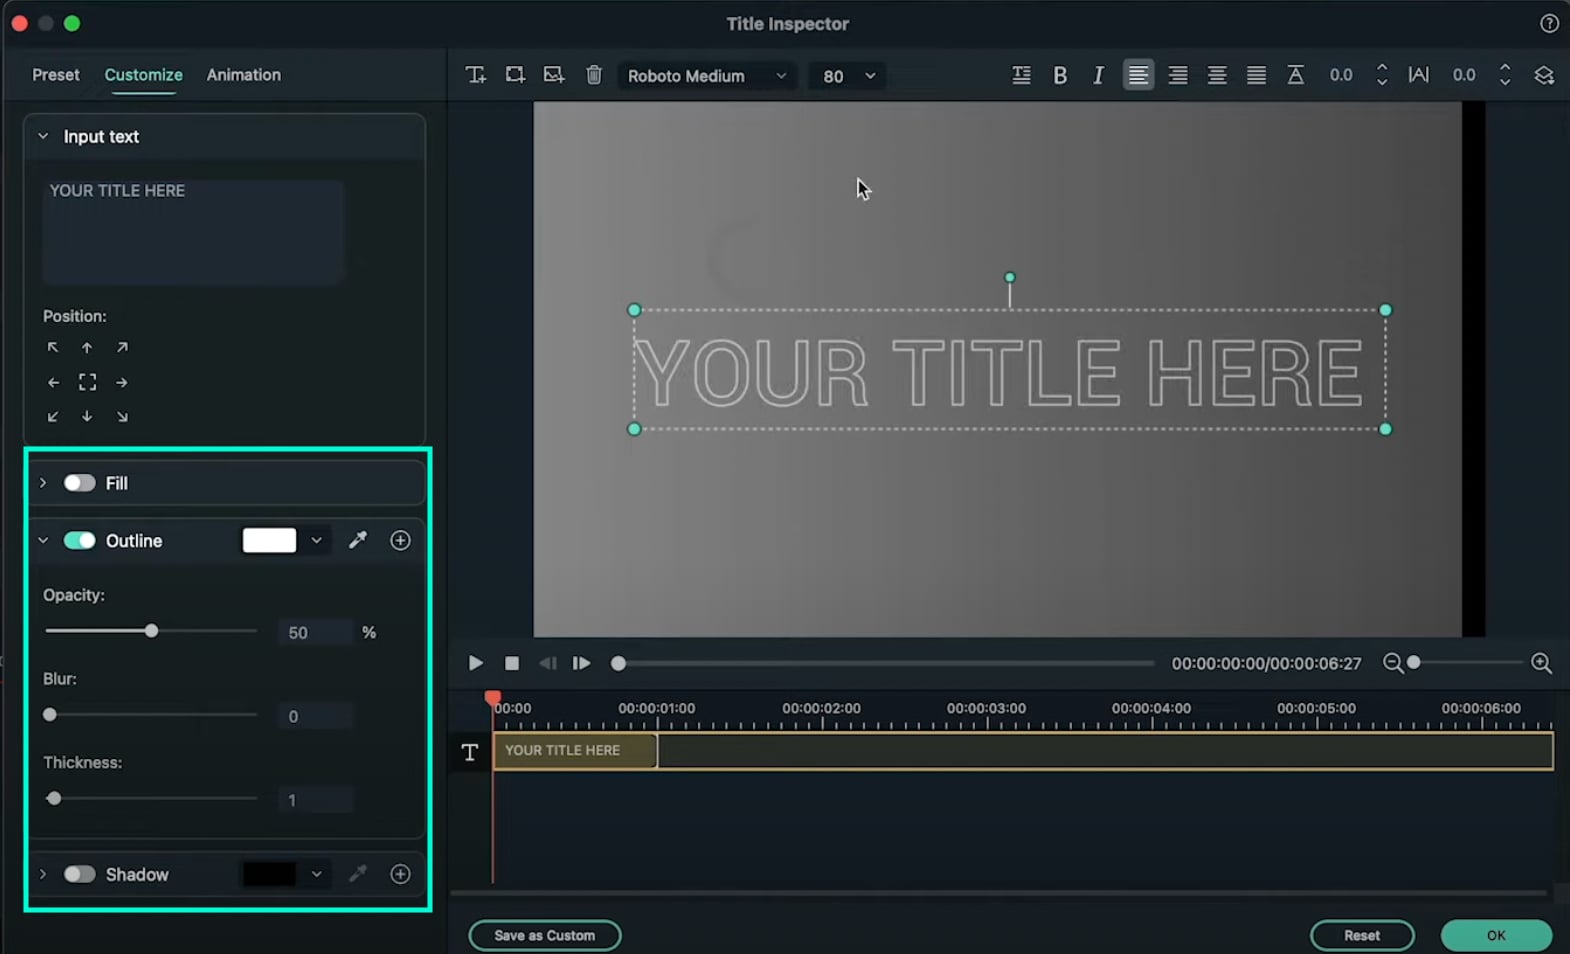
Move the Playhead to 1 second and 30 frames. Then, add a new Default Title in the Timeline and go to its Advanced settings panel. From there, Enable the Outline option and Disable the Fill option. In the Outline option, change the color to White, set Opacity to 50%, and decrease Thickness to 1.
Step 17
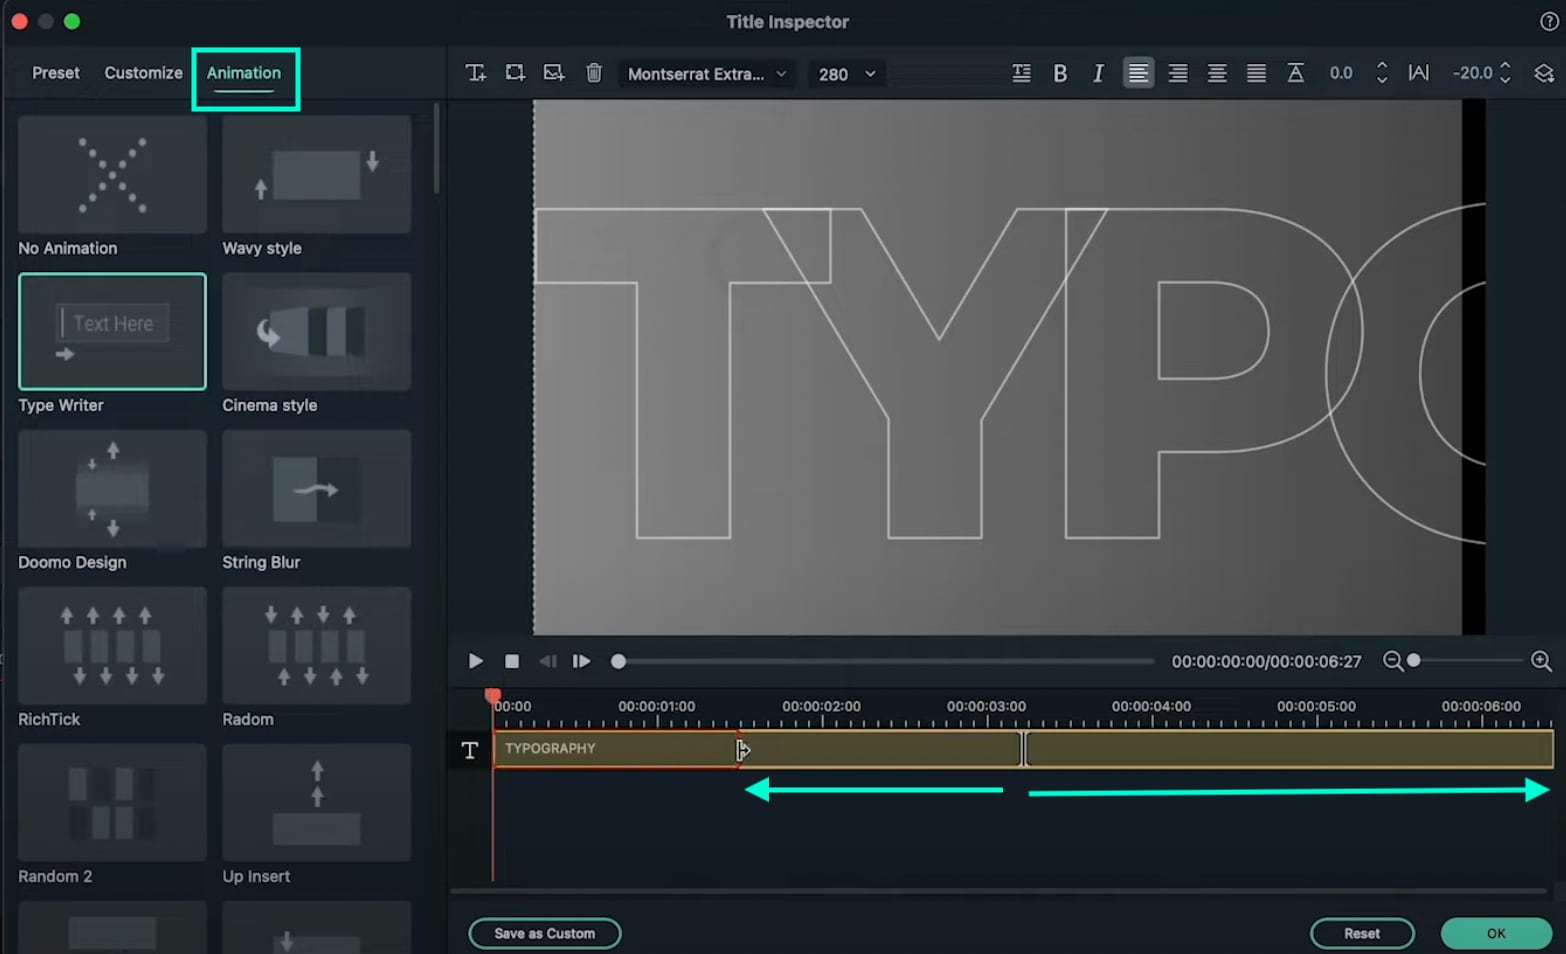
Next, choose your favorite font and type in your text inside the textbox. Then, change the value you see highlighted in this image to “-20”. Finally, increase the text size to almost fit the entire screen. Don’t worry about the fact that you can’t see all of it on the screen.

Step 18
Go to the Animation tab and apply the “Type Writer” animation. Then, drag the yellow lines below just like you see in the image here. The arrows show you the length to which you need to drag these lines. Click OK.
Step 19
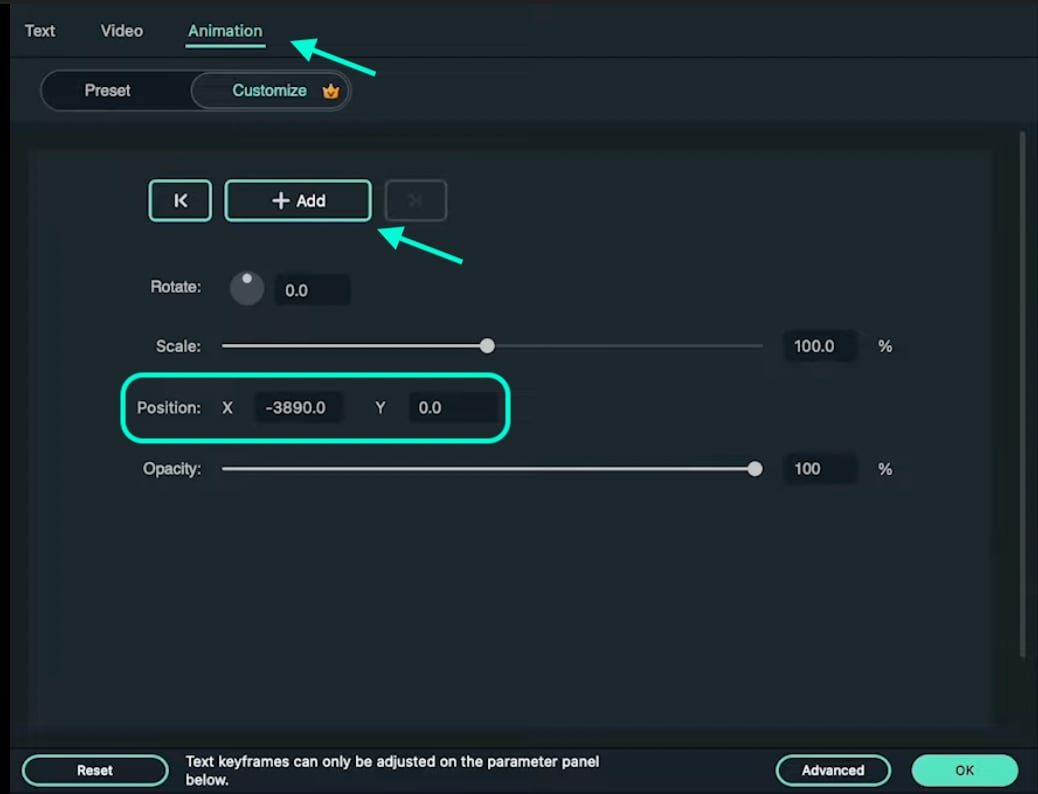
Set the Playhead to 1 second and 40 frames. Now, double-click on the last Default Title we just created and go to its Animation settings. NOTE: Don’t open its Advanced settings this time. Next, add a keyframe. Then, move the Playhead near the end of this clip in the Timeline. Now, drag the X position to the left until you see the last letter of your text appear on the screen. Click OK.
Step 20
Now, add another Default Title to the Timeline. Open its Advanced settings and type in your main text. Then, go to its Animation tab and apply the “Random 2” animation. Change its starting and end times according to your preference. Click OK.

Step 21
That’s it. You’re done! Feel free to preview the video and Render it. Congratulations on creating unique motion graphics in Filmora.
Summary
What you’ve learned:
- How to create custom motion graphics in Filmora
- How to edit and add animations to titles in Filmora
- Customize text and shapes in Filmora
What you need to prepare:
- A computer (Windows or macOS)
- Your video materials.
- Filmora video editor
Step 1
Visit the filmora.wondershare.com website and download Filmora . Install the program and wait for it to Run. Then, click on New Project.
Step 2
Go to File → Project Settings and set the FPS to 60. Also, ensure that the project is in Full Resolution (1920x1080). Click OK.

Step 3
Open the Titles tab and drag the Default Title to the Timeline. Then, double-click on the Default Title and click on ADVANCED.

Step 4
From the Advanced settings panel, delete the existing text and add a Rectangle shape.

Step 5
Disable the Text Fill and the Shape Border options from the panel on the left side.

Step 6
Click the drop-down arrow on the Shape Fill option and change the Type to Gradient Fill. Then, adjust the two color pallets from lighter to darker to create a gradient effect. Finally, adjust the rectangle to fit the entire screen. Click OK.

Step 7
Go to the Transitions tab → search for “Push” → drag the Push transition to the Default Title in the Timeline. Then, move the Playhead to the 1-second marker and drag another Default Title to that point from the Titles tab.

Step 8
Double-click on the new Default Title → go to Advanced. Delete the default text and add a Circle shape this time instead of a Rectangle. Disable the Text Fill and Shape Fill options this time.
Step 9
Scroll down to Shape Border and increase the Thickness bar all the way up. Then, change the circle’s color to match your background as closely as possible. Click OK.

Step 10
Copy the Title you just edited and paste it into the above layer. Then, double-click on the copied Title and go to its Advanced settings panel.

Step 11
In the Advanced panel, copy the circle and paste it somewhere else on the screen. Change its size if you want, and change the shade of its color to match the background once more. You can add as many new copies of the Default Titles and copy as many circles as you want. Click OK.

Step 12
After you’re done copying and pasting more Default Titles with more Circles inside, you can start animating them. Start with the first one. Double-click on the first Default Title with the Circle inside. Make sure you place the Playhead at the beginning of that clip. Then, go to the Animation tab.

Step 13
You need to add 3 keyframes. Add the first one right now. Just click on the “**+Add” button. Then, move the Playhead somewhere in the middle and click “+Add” again. Last, move the Playhead at the end of the clip, and click “+Add**” again to add the third keyframe.

Step 14
Now, go back to the first keyframe to edit its settings. Click the arrows to move between keyframes. Once you’re at the first one, start decreasing the Scale and the Position values as you move the Playhead toward the second keyframe. There are no rules here. Move each value based on how it looks best to you.
For the second keyframe, just increase the Scale and adjust the Position value based on how it looks on the screen.

Step 15
Now, apply the same method as in Step 14 to all the other circles in your video. Then, adjust the keyframe positions for all layers to create more unique movement throughout the video.

Step 16
Move the Playhead to 1 second and 30 frames. Then, add a new Default Title in the Timeline and go to its Advanced settings panel. From there, Enable the Outline option and Disable the Fill option. In the Outline option, change the color to White, set Opacity to 50%, and decrease Thickness to 1.

Step 17
Next, choose your favorite font and type in your text inside the textbox. Then, change the value you see highlighted in this image to “-20”. Finally, increase the text size to almost fit the entire screen. Don’t worry about the fact that you can’t see all of it on the screen.

Step 18
Go to the Animation tab and apply the “Type Writer” animation. Then, drag the yellow lines below just like you see in the image here. The arrows show you the length to which you need to drag these lines. Click OK.

Step 19
Set the Playhead to 1 second and 40 frames. Now, double-click on the last Default Title we just created and go to its Animation settings. NOTE: Don’t open its Advanced settings this time. Next, add a keyframe. Then, move the Playhead near the end of this clip in the Timeline. Now, drag the X position to the left until you see the last letter of your text appear on the screen. Click OK.

Step 20
Now, add another Default Title to the Timeline. Open its Advanced settings and type in your main text. Then, go to its Animation tab and apply the “Random 2” animation. Change its starting and end times according to your preference. Click OK.

Step 21
That’s it. You’re done! Feel free to preview the video and Render it. Congratulations on creating unique motion graphics in Filmora.
Summary
What you’ve learned:
- How to create custom motion graphics in Filmora
- How to edit and add animations to titles in Filmora
- Customize text and shapes in Filmora
What you need to prepare:
- A computer (Windows or macOS)
- Your video materials.
- Filmora video editor
Step 1
Visit the filmora.wondershare.com website and download Filmora . Install the program and wait for it to Run. Then, click on New Project.
Step 2
Go to File → Project Settings and set the FPS to 60. Also, ensure that the project is in Full Resolution (1920x1080). Click OK.

Step 3
Open the Titles tab and drag the Default Title to the Timeline. Then, double-click on the Default Title and click on ADVANCED.

Step 4
From the Advanced settings panel, delete the existing text and add a Rectangle shape.

Step 5
Disable the Text Fill and the Shape Border options from the panel on the left side.

Step 6
Click the drop-down arrow on the Shape Fill option and change the Type to Gradient Fill. Then, adjust the two color pallets from lighter to darker to create a gradient effect. Finally, adjust the rectangle to fit the entire screen. Click OK.

Step 7
Go to the Transitions tab → search for “Push” → drag the Push transition to the Default Title in the Timeline. Then, move the Playhead to the 1-second marker and drag another Default Title to that point from the Titles tab.

Step 8
Double-click on the new Default Title → go to Advanced. Delete the default text and add a Circle shape this time instead of a Rectangle. Disable the Text Fill and Shape Fill options this time.
Step 9
Scroll down to Shape Border and increase the Thickness bar all the way up. Then, change the circle’s color to match your background as closely as possible. Click OK.

Step 10
Copy the Title you just edited and paste it into the above layer. Then, double-click on the copied Title and go to its Advanced settings panel.

Step 11
In the Advanced panel, copy the circle and paste it somewhere else on the screen. Change its size if you want, and change the shade of its color to match the background once more. You can add as many new copies of the Default Titles and copy as many circles as you want. Click OK.

Step 12
After you’re done copying and pasting more Default Titles with more Circles inside, you can start animating them. Start with the first one. Double-click on the first Default Title with the Circle inside. Make sure you place the Playhead at the beginning of that clip. Then, go to the Animation tab.

Step 13
You need to add 3 keyframes. Add the first one right now. Just click on the “**+Add” button. Then, move the Playhead somewhere in the middle and click “+Add” again. Last, move the Playhead at the end of the clip, and click “+Add**” again to add the third keyframe.

Step 14
Now, go back to the first keyframe to edit its settings. Click the arrows to move between keyframes. Once you’re at the first one, start decreasing the Scale and the Position values as you move the Playhead toward the second keyframe. There are no rules here. Move each value based on how it looks best to you.
For the second keyframe, just increase the Scale and adjust the Position value based on how it looks on the screen.

Step 15
Now, apply the same method as in Step 14 to all the other circles in your video. Then, adjust the keyframe positions for all layers to create more unique movement throughout the video.

Step 16
Move the Playhead to 1 second and 30 frames. Then, add a new Default Title in the Timeline and go to its Advanced settings panel. From there, Enable the Outline option and Disable the Fill option. In the Outline option, change the color to White, set Opacity to 50%, and decrease Thickness to 1.

Step 17
Next, choose your favorite font and type in your text inside the textbox. Then, change the value you see highlighted in this image to “-20”. Finally, increase the text size to almost fit the entire screen. Don’t worry about the fact that you can’t see all of it on the screen.

Step 18
Go to the Animation tab and apply the “Type Writer” animation. Then, drag the yellow lines below just like you see in the image here. The arrows show you the length to which you need to drag these lines. Click OK.

Step 19
Set the Playhead to 1 second and 40 frames. Now, double-click on the last Default Title we just created and go to its Animation settings. NOTE: Don’t open its Advanced settings this time. Next, add a keyframe. Then, move the Playhead near the end of this clip in the Timeline. Now, drag the X position to the left until you see the last letter of your text appear on the screen. Click OK.

Step 20
Now, add another Default Title to the Timeline. Open its Advanced settings and type in your main text. Then, go to its Animation tab and apply the “Random 2” animation. Change its starting and end times according to your preference. Click OK.

Step 21
That’s it. You’re done! Feel free to preview the video and Render it. Congratulations on creating unique motion graphics in Filmora.
Summary
What you’ve learned:
- How to create custom motion graphics in Filmora
- How to edit and add animations to titles in Filmora
- Customize text and shapes in Filmora
What you need to prepare:
- A computer (Windows or macOS)
- Your video materials.
- Filmora video editor
Step 1
Visit the filmora.wondershare.com website and download Filmora . Install the program and wait for it to Run. Then, click on New Project.
Step 2
Go to File → Project Settings and set the FPS to 60. Also, ensure that the project is in Full Resolution (1920x1080). Click OK.

Step 3
Open the Titles tab and drag the Default Title to the Timeline. Then, double-click on the Default Title and click on ADVANCED.

Step 4
From the Advanced settings panel, delete the existing text and add a Rectangle shape.

Step 5
Disable the Text Fill and the Shape Border options from the panel on the left side.

Step 6
Click the drop-down arrow on the Shape Fill option and change the Type to Gradient Fill. Then, adjust the two color pallets from lighter to darker to create a gradient effect. Finally, adjust the rectangle to fit the entire screen. Click OK.

Step 7
Go to the Transitions tab → search for “Push” → drag the Push transition to the Default Title in the Timeline. Then, move the Playhead to the 1-second marker and drag another Default Title to that point from the Titles tab.

Step 8
Double-click on the new Default Title → go to Advanced. Delete the default text and add a Circle shape this time instead of a Rectangle. Disable the Text Fill and Shape Fill options this time.
Step 9
Scroll down to Shape Border and increase the Thickness bar all the way up. Then, change the circle’s color to match your background as closely as possible. Click OK.

Step 10
Copy the Title you just edited and paste it into the above layer. Then, double-click on the copied Title and go to its Advanced settings panel.

Step 11
In the Advanced panel, copy the circle and paste it somewhere else on the screen. Change its size if you want, and change the shade of its color to match the background once more. You can add as many new copies of the Default Titles and copy as many circles as you want. Click OK.

Step 12
After you’re done copying and pasting more Default Titles with more Circles inside, you can start animating them. Start with the first one. Double-click on the first Default Title with the Circle inside. Make sure you place the Playhead at the beginning of that clip. Then, go to the Animation tab.

Step 13
You need to add 3 keyframes. Add the first one right now. Just click on the “**+Add” button. Then, move the Playhead somewhere in the middle and click “+Add” again. Last, move the Playhead at the end of the clip, and click “+Add**” again to add the third keyframe.

Step 14
Now, go back to the first keyframe to edit its settings. Click the arrows to move between keyframes. Once you’re at the first one, start decreasing the Scale and the Position values as you move the Playhead toward the second keyframe. There are no rules here. Move each value based on how it looks best to you.
For the second keyframe, just increase the Scale and adjust the Position value based on how it looks on the screen.

Step 15
Now, apply the same method as in Step 14 to all the other circles in your video. Then, adjust the keyframe positions for all layers to create more unique movement throughout the video.

Step 16
Move the Playhead to 1 second and 30 frames. Then, add a new Default Title in the Timeline and go to its Advanced settings panel. From there, Enable the Outline option and Disable the Fill option. In the Outline option, change the color to White, set Opacity to 50%, and decrease Thickness to 1.

Step 17
Next, choose your favorite font and type in your text inside the textbox. Then, change the value you see highlighted in this image to “-20”. Finally, increase the text size to almost fit the entire screen. Don’t worry about the fact that you can’t see all of it on the screen.

Step 18
Go to the Animation tab and apply the “Type Writer” animation. Then, drag the yellow lines below just like you see in the image here. The arrows show you the length to which you need to drag these lines. Click OK.

Step 19
Set the Playhead to 1 second and 40 frames. Now, double-click on the last Default Title we just created and go to its Animation settings. NOTE: Don’t open its Advanced settings this time. Next, add a keyframe. Then, move the Playhead near the end of this clip in the Timeline. Now, drag the X position to the left until you see the last letter of your text appear on the screen. Click OK.

Step 20
Now, add another Default Title to the Timeline. Open its Advanced settings and type in your main text. Then, go to its Animation tab and apply the “Random 2” animation. Change its starting and end times according to your preference. Click OK.

Step 21
That’s it. You’re done! Feel free to preview the video and Render it. Congratulations on creating unique motion graphics in Filmora.
Summary
What you’ve learned:
- How to create custom motion graphics in Filmora
- How to edit and add animations to titles in Filmora
- Customize text and shapes in Filmora
After Reading This Article, You Can Add a B-Roll Feature From Filmora and Captivate More Audience. Explanation Video B-Roll and Story-Telling B-Roll Are Well Illustrated
Everyone is bored after watching a simple recorded video in which a character explains or tells a story. No one will watch it for more than 4 minutes!
After looking through this article, you will make your video more fascinating and get more views instantly. It’s all just due to B-roll, which will act as a ninja feature in your video. In this regard, Wondershare Filmora will handle everything.
Scroll more to discover two different types of B-roll videos and get an idea of how to make fascinating B-roll videos.
Part 1. What Is a B-roll?
B-roll is alternative or supplementary video footage that editors can use to intercut in between their main video. In that way, B-roll can add more information to a scene.
An additional footage
It is added as a supplementary video to interact with viewers more closely. This feature helps to give more details of a scene.
Visual representation
When the main explanatory video is too boring, you can add a b-roll to represent the movie’s story visually. It can also add to spice up and beat the energy of the narrative.
Without sound
The B-roll shots are mostly without audio or with little background sound. In most cases, the sound of the primary video is continued while the B-roll footage is just shown.
Act as a filler
The criteria for the B-roll is to provide the situation of the storyline. Additionally, it could be utilized as filler in between scenes in a movie or television program. B-roll may be found almost anywhere!
In this article, you will learn about two main kinds of B-rolls and the steps to edit them on Wondershare Filmora . Stick with us to the end!
Free Download For Win 7 or later(64-bit)
Free Download For macOS 10.14 or later
Part 2. Two Types of B-rolls: Explanation Video B-rolls
When recording any explanatory video, the audience may leave it in the middle of a video if a character explains without any visual representation. When explaining something new, showing the object in B-roll can be more effective than just verbally explaining what the audience is seeing.
Let’s take the video we made about microphones as an example. Instead of just verbally introduce the various mics, we inserted B-roll footage to display what they look like and how they can be used. The combination of the visual footage and the background voiceover presents the mic in a more vivid way. Also, it keeps the audience’s attention.

Goal of the explanation B-roll video
The main goal of this type of B-roll is to show your audience what you are talking about instead of just telling them in a dull way.
Part 3. How to Edit Explanation B-roll Footage on Filmora?
After getting the footage and recording shots for B-roll videos, you need to edit it on the Wondershare Filmora. For this, follow the below-mentioned steps:
Step1Download the Wondershare Filmora
There is no need to do any complex process for editing on any platform. Because we have one platform on which every tool is available.
- First of all, you have to download the Wondershare Filmora .
- Then get access to the entire features.
The premium version has new features and effects plugins that make editing more filmy and fun!
Step2Stock media in Filmora
After downloading, it’s time to edit the B-roll video. If you can’t film your own B-roll, you can use stock footage but make sure you have the license to use them.
Filmora has a unique “stock media” option that enables us to use all these elements and more to boost our videos! To add stock media, follow the below steps:
- Open the app or window of Filmora, which you have installed.
- Head towards the tab on the top right side.
- Then click on the Stock Media option and open it.
- A long list of stock videos and images will pop up.
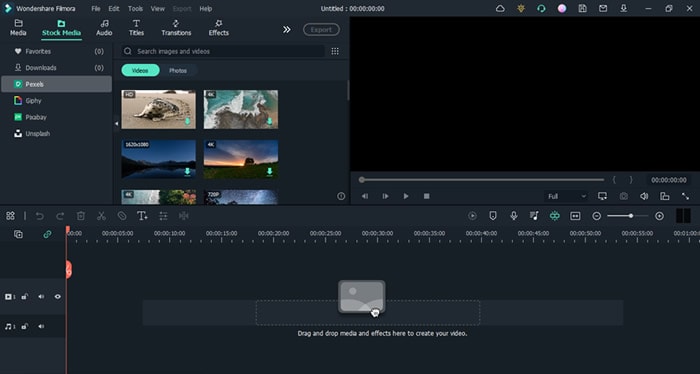
- Select whatever you want, and download it.
- Then drag and drop it in the timeline and insert it between your video.
![]()
Note: Only premium customers will get access to the stock media of the Wondershare Filmora.
Step3Add B-roll in between the main video
The most difficult and frequent asking situation is how you know when to cut to B-roll. To get to know when to insert B-roll, follow the following steps:
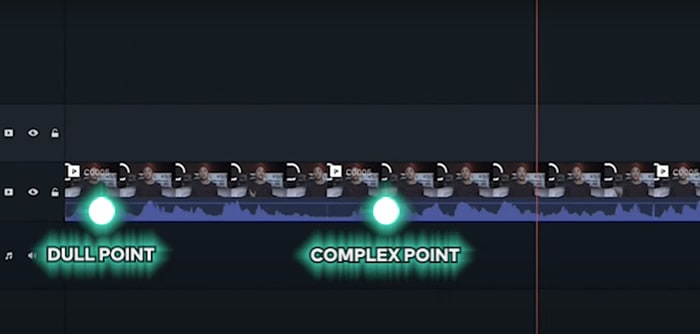
- Watch your edits back and check out where you need.
- Sense about the dull and complex points and cut the main video from there.
- The points can be easily fixed with visual aids.
Part 4. Two Types of B-rolls: Storytelling Video B-rolls
During the creation of short films or any storytelling videos, if a person sits and speaks without showing any character or anything else, it will turn boring. Due to this, you have more chances to lose your audience and viewers.
In visual storytelling, if you will insert more clips with close shots, it will make the environment cool. The crazy thing is that you can make mimic shots easily at home by utilizing household objects. Let’s check out one of the examples.
Example 1. Film B-roll footage with food
So let’s add some b-roll to give it more context even if you have a master shot of yourself looking off frame alone.
Step1Write a script
Before making any video, the first step is to write a script for the whole video. If you will have more than two characters, then make dialogues for everyone and practice it again and again to give a fascinating look.
Then speak to your audience, make sure that what you are speaking is vivid and make everything simple and crystal clear.
Step2Shot a primary video
First of all, make a primary video according to your script by implementing a camera at one side, or you can also change the angle of the camera lens during shooting to have a look from all sides.

As you can see that it’s kind of boring for the audience, but we will make it more unique by implementing closer shots. For this, follow the last step:
Step3Make B-roll shots
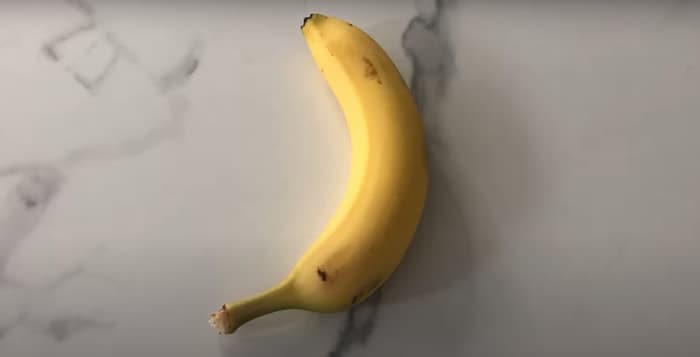
Make closer shots of things which the character have to select and pick up. Check out two B-roll shots for the main video:
- First, make a closer shot of the object (Snacks) that the character is noticing prior.
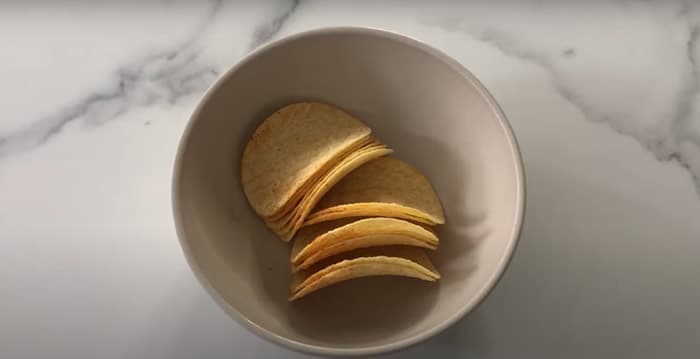
- Second, create more intimate footage of the second object (Banana) which the character will select and grab.
Step4Edit both B-roll footages in Main Video
Now, in the last, insert the B-roll footage in between the primary video from the Filmora and get your results. Enjoy it with your viewers!
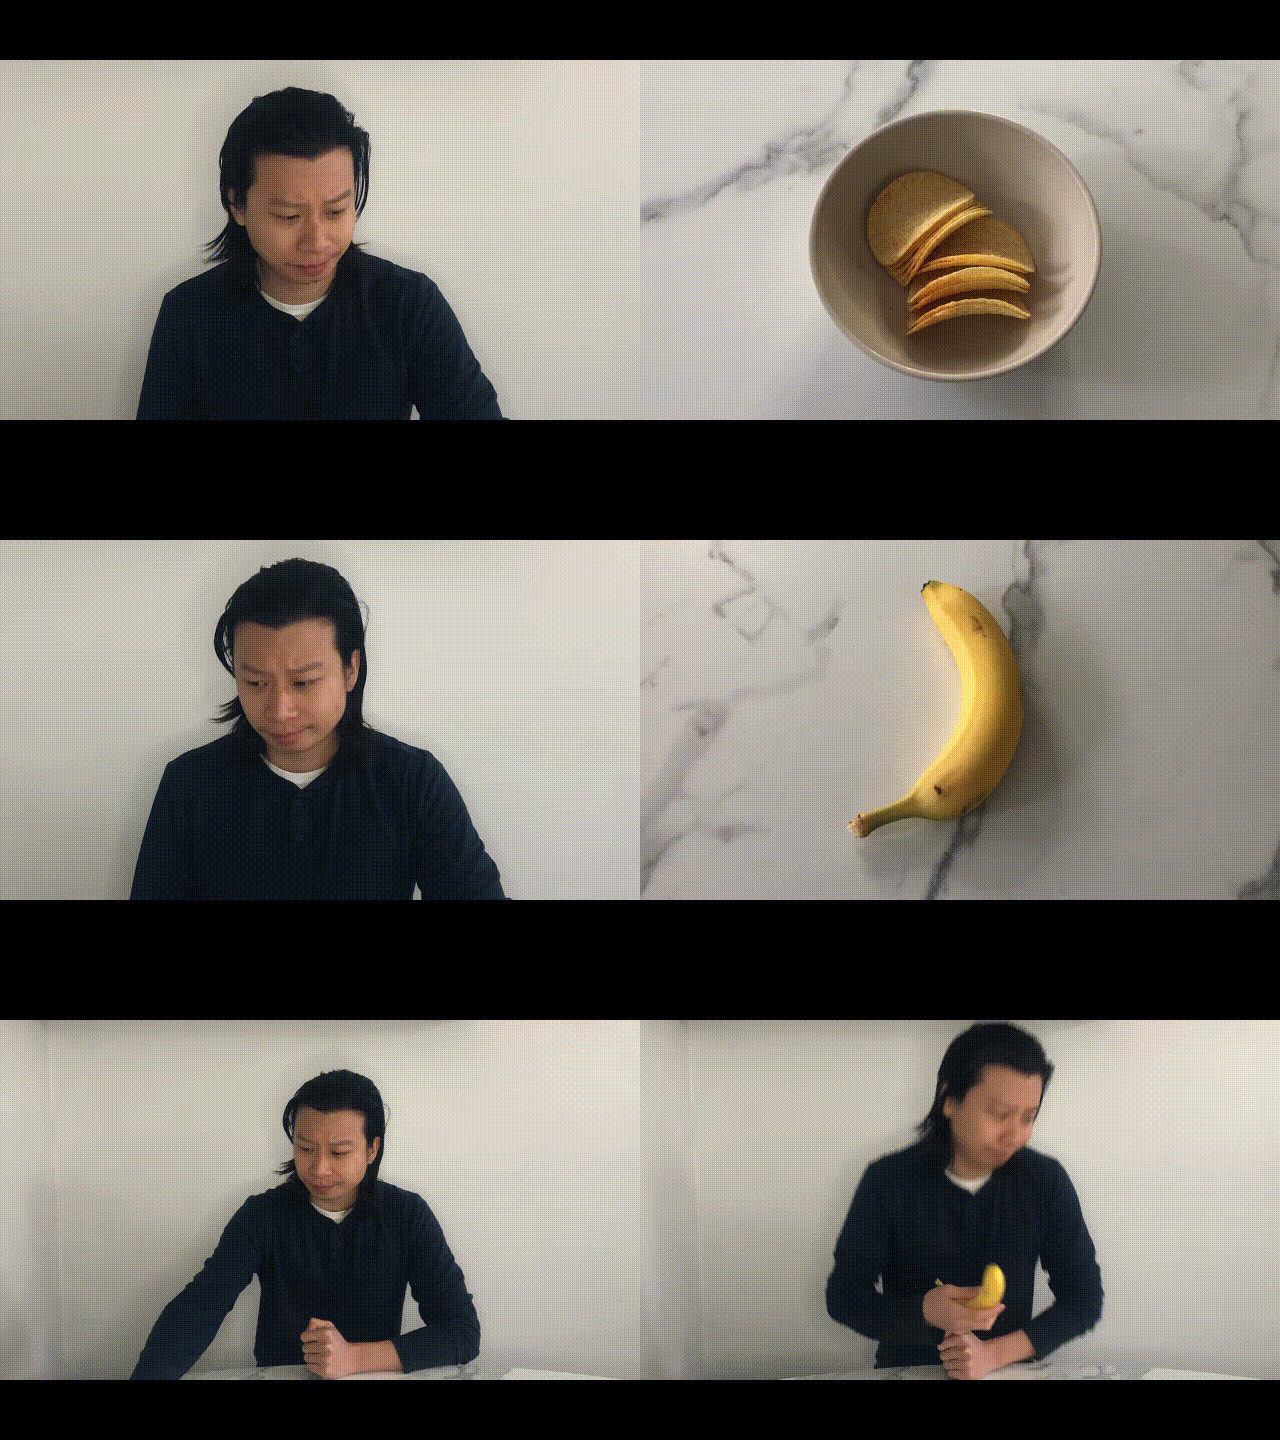
Now experiment at home with more daily life activities and create all on Filmora. Check out one more example to create B-roll footage!
Example 2. Make B-roll shots with a cardboard
Try using readily accessible cardboard to create light effects in different shapes and give the film a fantastical place. These methods frequently produce artistic videos that transmit unique moods to viewers.
Only experienced photographers and videographers understand how to use these fundamental tricks to gain viewers into the photos.
The intriguing thing is that if the light is more shaped, it will more accurately reflect the image’s background, setting, and context. Try it out!
Step1Cut the cardboard
You may shape the cardboard any way you desire. We’ll experiment with this by cutting cardboard into the shape of window shades.
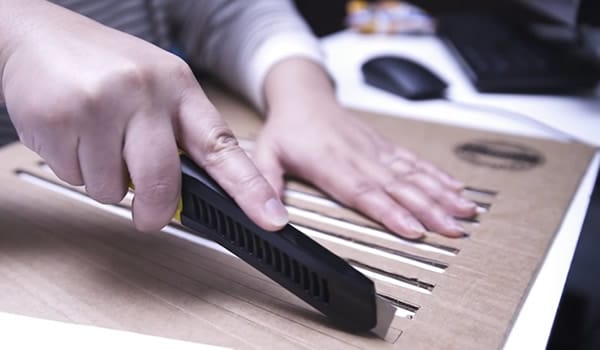
Step2Make B-roll footage
Create B-roll footage by moving the cardboard around the light source after giving it shape. The person appears to be seated close to the window and conveys aesthetic vibrancy.

Now, use this B-roll footage in your video and give it a more professional look. The more creative you are, the more audience will attract to you.
Conclusion
Making B-roll shots is creative and fun! You can make all the footage at home by following easy steps. Try out different ones to make your video viral and boost the target audience!
You can easily use Wondershare Filmora during editing and their stock media to save your time in video making. Share your hacks with your audience to get more experience!
Free Download For macOS 10.14 or later
Part 2. Two Types of B-rolls: Explanation Video B-rolls
When recording any explanatory video, the audience may leave it in the middle of a video if a character explains without any visual representation. When explaining something new, showing the object in B-roll can be more effective than just verbally explaining what the audience is seeing.
Let’s take the video we made about microphones as an example. Instead of just verbally introduce the various mics, we inserted B-roll footage to display what they look like and how they can be used. The combination of the visual footage and the background voiceover presents the mic in a more vivid way. Also, it keeps the audience’s attention.

Goal of the explanation B-roll video
The main goal of this type of B-roll is to show your audience what you are talking about instead of just telling them in a dull way.
Part 3. How to Edit Explanation B-roll Footage on Filmora?
After getting the footage and recording shots for B-roll videos, you need to edit it on the Wondershare Filmora. For this, follow the below-mentioned steps:
Step1Download the Wondershare Filmora
There is no need to do any complex process for editing on any platform. Because we have one platform on which every tool is available.
- First of all, you have to download the Wondershare Filmora .
- Then get access to the entire features.
The premium version has new features and effects plugins that make editing more filmy and fun!
Step2Stock media in Filmora
After downloading, it’s time to edit the B-roll video. If you can’t film your own B-roll, you can use stock footage but make sure you have the license to use them.
Filmora has a unique “stock media” option that enables us to use all these elements and more to boost our videos! To add stock media, follow the below steps:
- Open the app or window of Filmora, which you have installed.
- Head towards the tab on the top right side.
- Then click on the Stock Media option and open it.
- A long list of stock videos and images will pop up.

- Select whatever you want, and download it.
- Then drag and drop it in the timeline and insert it between your video.
![]()
Note: Only premium customers will get access to the stock media of the Wondershare Filmora.
Step3Add B-roll in between the main video
The most difficult and frequent asking situation is how you know when to cut to B-roll. To get to know when to insert B-roll, follow the following steps:
- Watch your edits back and check out where you need.
- Sense about the dull and complex points and cut the main video from there.
- The points can be easily fixed with visual aids.

Part 4. Two Types of B-rolls: Storytelling Video B-rolls
During the creation of short films or any storytelling videos, if a person sits and speaks without showing any character or anything else, it will turn boring. Due to this, you have more chances to lose your audience and viewers.
In visual storytelling, if you will insert more clips with close shots, it will make the environment cool. The crazy thing is that you can make mimic shots easily at home by utilizing household objects. Let’s check out one of the examples.
Example 1. Film B-roll footage with food
So let’s add some b-roll to give it more context even if you have a master shot of yourself looking off frame alone.
Step1Write a script
Before making any video, the first step is to write a script for the whole video. If you will have more than two characters, then make dialogues for everyone and practice it again and again to give a fascinating look.
Then speak to your audience, make sure that what you are speaking is vivid and make everything simple and crystal clear.
Step2Shot a primary video
First of all, make a primary video according to your script by implementing a camera at one side, or you can also change the angle of the camera lens during shooting to have a look from all sides.

As you can see that it’s kind of boring for the audience, but we will make it more unique by implementing closer shots. For this, follow the last step:
Step3Make B-roll shots
Make closer shots of things which the character have to select and pick up. Check out two B-roll shots for the main video:
- First, make a closer shot of the object (Snacks) that the character is noticing prior.

- Second, create more intimate footage of the second object (Banana) which the character will select and grab.

Step4Edit both B-roll footages in Main Video
Now, in the last, insert the B-roll footage in between the primary video from the Filmora and get your results. Enjoy it with your viewers!

Now experiment at home with more daily life activities and create all on Filmora. Check out one more example to create B-roll footage!
Example 2. Make B-roll shots with a cardboard
Try using readily accessible cardboard to create light effects in different shapes and give the film a fantastical place. These methods frequently produce artistic videos that transmit unique moods to viewers.
Only experienced photographers and videographers understand how to use these fundamental tricks to gain viewers into the photos.
The intriguing thing is that if the light is more shaped, it will more accurately reflect the image’s background, setting, and context. Try it out!
Step1Cut the cardboard
You may shape the cardboard any way you desire. We’ll experiment with this by cutting cardboard into the shape of window shades.

Step2Make B-roll footage
Create B-roll footage by moving the cardboard around the light source after giving it shape. The person appears to be seated close to the window and conveys aesthetic vibrancy.

Now, use this B-roll footage in your video and give it a more professional look. The more creative you are, the more audience will attract to you.
Conclusion
Making B-roll shots is creative and fun! You can make all the footage at home by following easy steps. Try out different ones to make your video viral and boost the target audience!
You can easily use Wondershare Filmora during editing and their stock media to save your time in video making. Share your hacks with your audience to get more experience!
Also read:
- 2024 Approved Add Amazing Filters and Effects for Fun to Watch GIFs Using Adobe After Effects. Read on to Discover an Easy-to-Learn After Effects Alternative
- Updated In 2024, Beginners Guide About WMV Format and Best WMV Video Editor
- Updated Recommended Video Background Online Changers
- Updated In 2024, How to Make an Adobe Slideshow the Easy Way
- New In 2024, Stunning Glitch Effect and Its Creation Steps for Premiere Pro
- In 2024, Having Issues Trying to View SRT Files when You Add Subtitle Files for VLC? Learn the Right Ways to Do so and the Best Alternative Solution
- 3 Best Effects to Appear on Camera Made with Filmora
- 2024 Approved How to Use Renderforest Intro Video Maker
- Updated 2024 Approved Best Ways to Add Photos to Tik Tok Video
- Ultimate Guide To Make A Political Video
- In 2024, Create Kinetice Typography Text Effect in Filmora
- New In 2024, Srt File Creator
- New Slow Motion Video Editors To Look Out For
- New 7 Best Green Screen Software for Beginners on Mac for 2024
- 2024 Approved How to Shoot Cinematic Footage From a Smartphone
- New 2024 Approved Guide to Create a Timelapse Video in After Effects
- New 3 Ways To Stream And Record At The Same Time
- Updated Discover the Top 5 Online Tools for Merging MP4 Files Easily and Quickly. Streamline Your Video Editing Process and Create Seamless Videos with These User-Friendly Tools
- 2024 Approved 4 Methods for Rotating Your GoPro Videos Professionally
- Updated Easy Steps to Add Miniature Effect to Videos for 2024
- New 2024 Approved Dubbing Videos With Voiceovers | Using Wondershare Filmora
- Updated 2024 Approved How to Use Blender Green Screen
- Updated 2 Methods to Crop a Video in VLC for 2024
- Updated Are You Excited to Learn About a File Format that Helps in Easy Transfer? We Are Talking About the 3GP Format. Stay with Us and Get to Know More About It
- New Top 10 Transparent Image Online Tools That Give You an Advantage for 2024
- New How to Share YouTube Video on Zoom for 2024
- In 2024, Fake the Location to Get Around the MLB Blackouts on Apple iPhone 15 | Dr.fone
- Bricked Your Itel P40+? Heres A Full Solution | Dr.fone
- In 2024, How to Transfer Data from Oppo K11x to BlackBerry | Dr.fone
- Best Ways to Bypass iCloud Activation Lock on Apple iPhone X/iPad/iPod
- Updated Top 10 Best Photo to Animation Converters for 2024
- Top 7 Phone Number Locators To Track Realme 11 Pro Location | Dr.fone
- How to Rescue Lost Pictures from Honor X50i?
- A Quick Guide to Xiaomi Mix Fold 3 FRP Bypass Instantly
- The Best iSpoofer Alternative to Try On Samsung Galaxy A34 5G | Dr.fone
- In 2024, How to Transfer Contacts from Poco C51 to Other Android Devices Using Bluetooth? | Dr.fone
- How to Cast Honor Play 8T Screen to PC Using WiFi | Dr.fone
- 2024 Approved Text To Speech | Wondershare Virbo Online
- In 2024, How to Share/Fake Location on WhatsApp for Nubia Red Magic 9 Pro+ | Dr.fone
- Title: In 2024, Create the Night-to-Day Effect Videos
- Author: Chloe
- Created at : 2024-05-20 03:37:59
- Updated at : 2024-05-21 03:37:59
- Link: https://ai-editing-video.techidaily.com/in-2024-create-the-night-to-day-effect-videos/
- License: This work is licensed under CC BY-NC-SA 4.0.

