:max_bytes(150000):strip_icc():format(webp)/001_2654847-5b99b903c9e77c005077d0d8.jpg)
In 2024, Creative Ways to Add Green Screen Effects In Photoshop

Creative Ways to Add Green Screen Effects In Photoshop
Removing green screen backgrounds and replacing them with stunning videos is a common practice in video and movie making. The same process is applicable to still photos as well. You can take a photo with a green screen background and replace the screen with any photo as per your preference and requirement. You will need a high-quality photo editor to add green screen effects to your photo. There is no better photo editor in the world than Adobe Photoshop.
First, you have to opt for remove green screen Photoshop and then add anything you want in place of the green screen. The difference between Chroma key Photoshop and any other photo editor is that you can pay attention to details and remove the entire green screen halo effect around the main subject or object on the photo. Therefore, there will be no jittery green edges and green patches to disturb the overall photo quality. Here are the steps to use green screen effect in Adobe Photoshop.
1. How To Use Green Screen in Photoshop?
There are various ways available to remove greenscreen Photoshop. The beginners prefer using the Magic Wand tool but there will always be green patches around the main object on the photo. These green patches will get highlighted when you insert any image in the background. Therefore, we are using the best method to Chroma key Photoshop and that is through Color Range option. Here are the detailed steps to use color keying in Photoshop to use green screen effect.
Step 1: Launch Adobe Photoshop and open your photo with green screen background.
Step 2: Go to Select menu and click on Color Range.

Step 3: Pick the Eyedropper tool. Hold Shift key to select the green background. You can also hold Alt key to remove any selection that you might have done by mistake. When you are perfectly ok with the selection of the green screen background, you should click on OK button.

Step 3: Go to Select menu and click on Inverse. Now, the selection will be on the main subject instead of the background.

Step 4: If you want to see a preview of the selection in your photo, you should select Image radio button and from Selection Preview, select any option other than None.

Step 5: Go to Select menu again and click on Refine Edge. Use the sliders to fine-tune the selection so that the selection is smooth on the edges of the main subject of the photo. Once done, click on OK button.

Step 6: Go to Select menu and click on Inverse again.
Step 7: Press Delete key to delete the green screen background selection.
Step 8: Open the replacement image which you want to put in the place of the green screen background that you have just deleted.
Step 9: Select the entire replacement image and copy the replacement. Come back to your photo and paste the replacement image. Make sure that the layer of the replacement image must be placed below the layer of your photo.

Step 10: You can adjust the size of the images as per your requirement so that everything fits perfectly in the frame. Similarly, you should adjust the color scheme so that the superimposition does not look awkward.
2. Best Way To Add Green Screen Effect To Video
In the previous section, we have stated how to remove the green screen background in any image and replace that with a stunning background photo. In this section, we will state how to add green screen effects in a video. There are many who think that adding green screen effects in a video takes a lot of expertise, but it is not the case.
If you select the suitable video editor, it is a matter of a few steps only. We recommend Wondershare Filmora to add green screen effects to your video where you have shot the scenes with green screen backgrounds. Here are the steps to follow to remove green screen backgrounds and replace with any photo or video as per your preference.
For Win 7 or later (64-bit)
For macOS 10.12 or later
Step 1: Download and install Wondershare Filmora.
Step 2: Launch Filmora and go for Create New Project option to get started.
Step 3: Import your video with green screen background and move it to the Timeline.
Step 4: Import the replacement photo or video and put it directly on the Timeline.
On the Timeline, your recorded video should be below the replacement photo or video.

Step 5: Double-click on your video, and you will come across a panel on the upper-left side. From that panel, you have to turn on Chroma Key option. This will enable the green screen effect due to which you will see the replacement photo or video superimposed on your recorded video in the green screen background.

Step 6: Finally, adjust the parameters available to fine-tune the overall green screen effect. Lastly, click on Ok button.
Conclusion
If you are looking to add green screen effects to your photo, you can opt for Chroma key Photoshop. Adobe Photoshop is the best photo editor to remove the green screen backgrounds on your photo and replace them with any image you want. Color keying in Photoshop enables you to change any solid color background to anything you want. Similarly, you can use Wondershare Filmora to add green screen effects to your video in simple steps.
For macOS 10.12 or later
Step 1: Download and install Wondershare Filmora.
Step 2: Launch Filmora and go for Create New Project option to get started.
Step 3: Import your video with green screen background and move it to the Timeline.
Step 4: Import the replacement photo or video and put it directly on the Timeline.
On the Timeline, your recorded video should be below the replacement photo or video.

Step 5: Double-click on your video, and you will come across a panel on the upper-left side. From that panel, you have to turn on Chroma Key option. This will enable the green screen effect due to which you will see the replacement photo or video superimposed on your recorded video in the green screen background.

Step 6: Finally, adjust the parameters available to fine-tune the overall green screen effect. Lastly, click on Ok button.
Conclusion
If you are looking to add green screen effects to your photo, you can opt for Chroma key Photoshop. Adobe Photoshop is the best photo editor to remove the green screen backgrounds on your photo and replace them with any image you want. Color keying in Photoshop enables you to change any solid color background to anything you want. Similarly, you can use Wondershare Filmora to add green screen effects to your video in simple steps.
For macOS 10.12 or later
Step 1: Download and install Wondershare Filmora.
Step 2: Launch Filmora and go for Create New Project option to get started.
Step 3: Import your video with green screen background and move it to the Timeline.
Step 4: Import the replacement photo or video and put it directly on the Timeline.
On the Timeline, your recorded video should be below the replacement photo or video.

Step 5: Double-click on your video, and you will come across a panel on the upper-left side. From that panel, you have to turn on Chroma Key option. This will enable the green screen effect due to which you will see the replacement photo or video superimposed on your recorded video in the green screen background.

Step 6: Finally, adjust the parameters available to fine-tune the overall green screen effect. Lastly, click on Ok button.
Conclusion
If you are looking to add green screen effects to your photo, you can opt for Chroma key Photoshop. Adobe Photoshop is the best photo editor to remove the green screen backgrounds on your photo and replace them with any image you want. Color keying in Photoshop enables you to change any solid color background to anything you want. Similarly, you can use Wondershare Filmora to add green screen effects to your video in simple steps.
For macOS 10.12 or later
Step 1: Download and install Wondershare Filmora.
Step 2: Launch Filmora and go for Create New Project option to get started.
Step 3: Import your video with green screen background and move it to the Timeline.
Step 4: Import the replacement photo or video and put it directly on the Timeline.
On the Timeline, your recorded video should be below the replacement photo or video.

Step 5: Double-click on your video, and you will come across a panel on the upper-left side. From that panel, you have to turn on Chroma Key option. This will enable the green screen effect due to which you will see the replacement photo or video superimposed on your recorded video in the green screen background.

Step 6: Finally, adjust the parameters available to fine-tune the overall green screen effect. Lastly, click on Ok button.
Conclusion
If you are looking to add green screen effects to your photo, you can opt for Chroma key Photoshop. Adobe Photoshop is the best photo editor to remove the green screen backgrounds on your photo and replace them with any image you want. Color keying in Photoshop enables you to change any solid color background to anything you want. Similarly, you can use Wondershare Filmora to add green screen effects to your video in simple steps.
Guide To Creating the Best Video Collages
By the combination of multiple videos together, you can create a studio-friendly video collage. Several types of collage videos are on the web, such as overlays, grids, split-screen, sequential, and more. If you are a startup business, you need to be aware of the effectiveness of video collages. It helps in showing more information in a limited time.
By the end of this discussion, you will know how to make a video collage with music without investing extra time and effort. Besides this, we will also guide you in making captivating video collages with Filmstock.
Part 1: What Is The Purpose of Using Video Collages?
Video collages serve various purposes according to the user’s needs. It helps create multiple creative video clips or images into a single composition. Some of the objectives of video collages are mentioned below that can be very helpful to you:
Visual Storytelling
If you want to convey your story or a message to the world, you can use video collages to present your story sequentially through video clips and images. Visual storytelling can be found in various mediums, including films, television, etc. The video collage technique helps you to create a showcase of your different moments. It includes event highlights or memories with friends or families.
Online Platforms
Video collages are one of the most popular formats of content creation on social media. It is because it allows you to share multiple moments, highlights, and scenes to engage your audience from different angles. This format is very popular with students because they can create and share their multiple moments in a single video.
Complementary Content
You can create contrasting content that conveys your message or theme using video collages. You can create a perfect comparison by using different images and videos side-by-side. Moreover, using this method, you can create amazing video content and stand out if you are a video editor.
Increasing Screen Coverage
Video collages allow you to present your content in a way that can use the maximum screen. It gets great when you have limited space and time to showcase your multiple visuals. You can optimize the available space and provide a comprehensive content view. Get this done by selecting and arranging the visual content carefully.
Video Collage Editor A powerful video editor helping you make a video collage without investing extra time and effort!
Free Download Free Download Learn More

Part 2: Filmstock: A Great Resource For Getting Video Collage Template
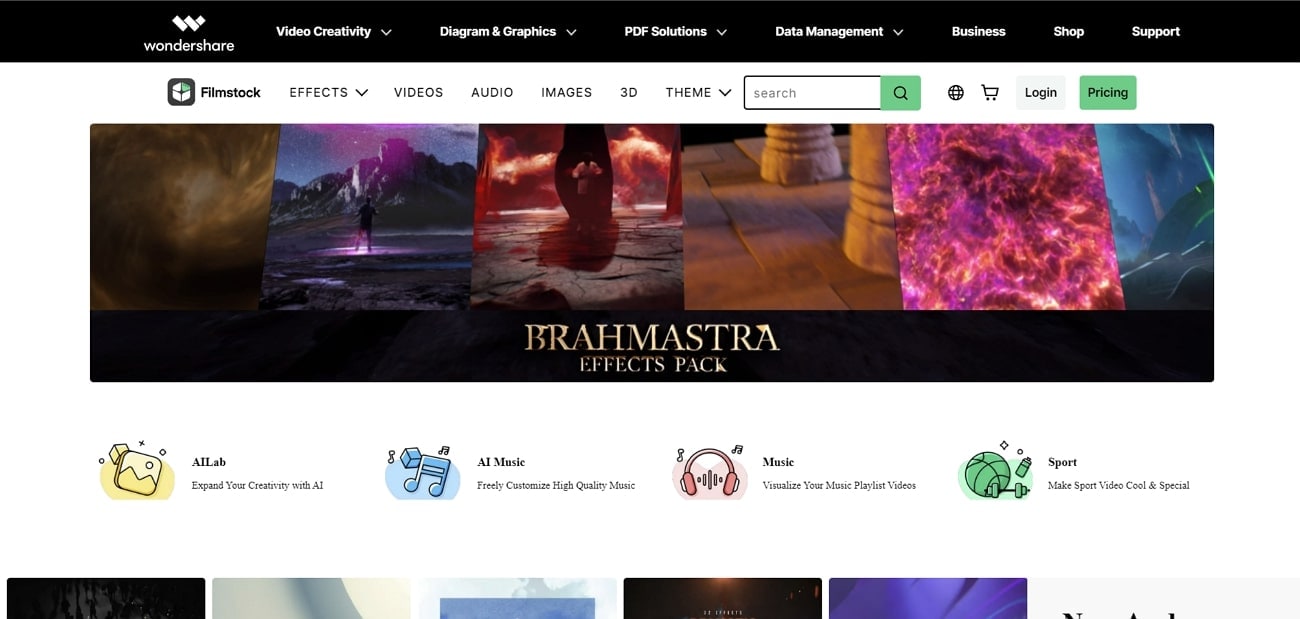
Have you understood the purpose of using video collages for managing memories? You will require a resource for creating the best video collages. Having a template makes things extremely easy to cover in video editing. Wondershare provides the option of using Filmstock , a dedicated resource for getting video collage templates. You can find everything in Filmstock to make a video collage, from effects to videos and audio.
The entire collection provided in Filmstock is highly sophisticated and coherent. It truly makes procession easy and convenient for users who are interested in video editing. While finding the best effects for Filmora, you can also observe great resource packs for Adobe After Effects. The entire resource is categorized into different sections, making it easy for you to navigate content.
Working with Filmstock is easy and effective when combined with Filmora. You can also immerse yourself in 3D content within this resource website. When it comes to creating collage videos, you can get help from the templates available at Filmstock.
Part 3: Wondershare Filmora: Create The Finest Video Collages Through Filmstock
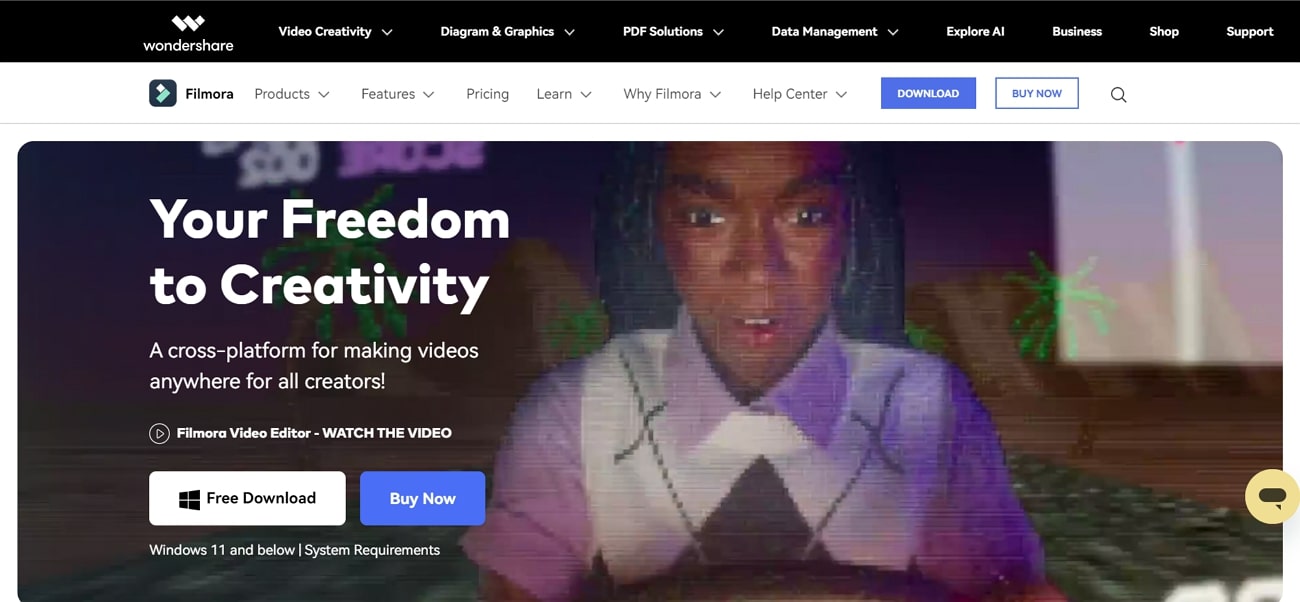
By consulting Filmstock, you are now aware of how to get the best video collage templates from the platform. After finding one for your work, you can go to Wondershare Filmora to create and edit the video collage. It features a unique video editing platform for its users, giving a diversity of options to work with.
Free Download For Win 7 or later(64-bit)
Free Download For macOS 10.14 or later
From editing the video to managing its audio, you can perform all tasks on Filmora with ease. Unlike other video editors, Wondershare Filmora does not make it difficult for you to edit videos. Its structure is designed to make operations easy for all kinds of users who are in video editing. To know more about how Filmora makes things easy in creating the finest video collages, learn more about its features below:
1. Motion Tracking
If your video collage has a specific element that needs to be tracked, you can utilize the services of motion tracking . With a single click, you can track the motion of an object and make it the center of the video.
2. Adjustment Layer
Users working on specific video content require dedicated presets for their work. They can create adjustment layers for color grading, presets, and perform other operations.
3. AI Copywriting
Those who are creating specific social media content can utilize the services of AI copywriting powered by ChatGPT. All you must do is provide a prompt, after which they can create the perfect content for their video collage.
4. Speech-To-Text
If your video collage needs to be induced with subtitles, the service of Speech-to-Text works perfectly on Filmora. Users can get the best subtitles in a single click, with an accuracy of more than 95%, making it a great tool.
Part 4: Step-by-Step Guide: Creating Video Collages Through Filmstock
Filmstock is a resource library where you can access diversified templates for several things. It also helps you access the attractive video collage template. With that template, you can make optimistically impressive video collages. You can access the collages on versatile ranges and utilize them as needed.
You must be thinking that it is not easy to make video collages with Filmstock. However, it is not true, and you can see it for yourself from the below-given instructions:
Filmora Tutorial - Create a Photo Sliding Birthday Intro | Filmora Creator Academy
Free Download For Win 7 or later(64-bit)
Free Download For macOS 10.14 or later
Step 1Open Filmstock and Select Video Collage
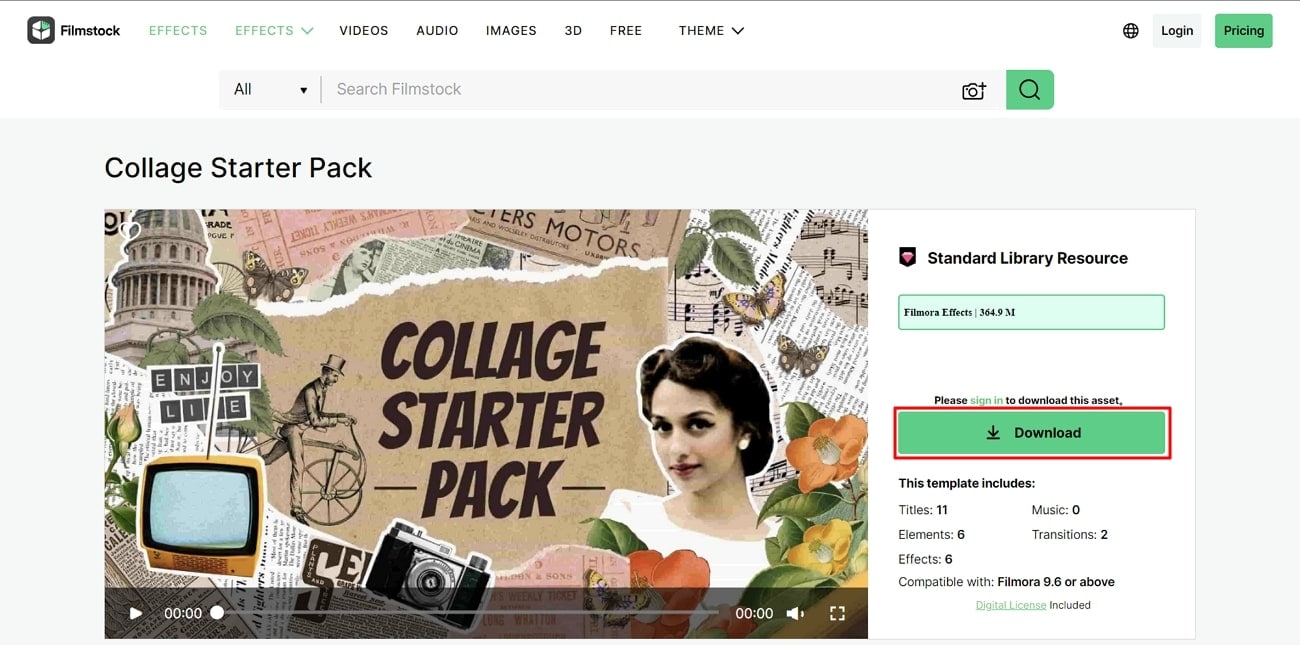
Access Filmstock on your device and go to “Search Bar.” From here, search for Video Collages, continue to select one template, and click the “Download” button. Once the template is downloaded, launch Filmora and import your video clips.
Step 2Make a Video Collage
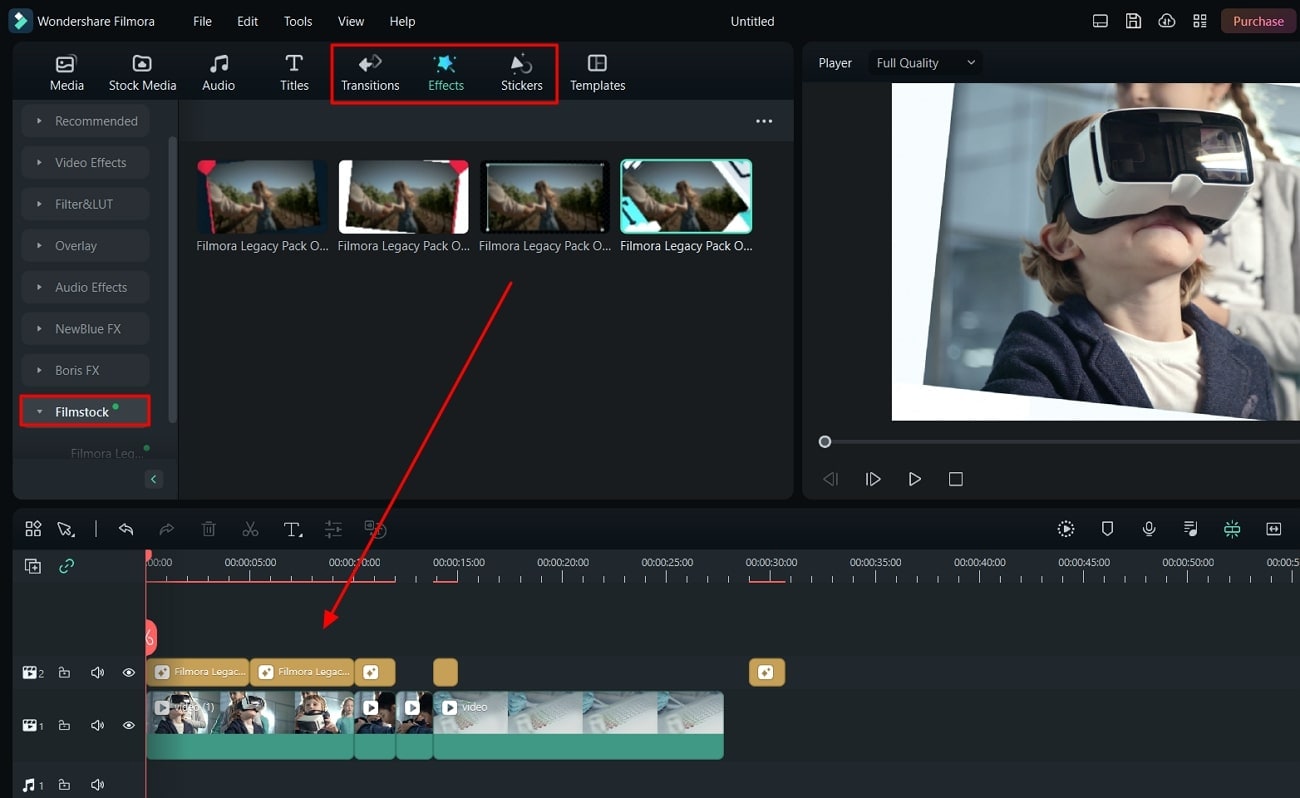
Next, drag the clips to the timeline and go to “Effects.” Locate the desired effect and drag it on the video in “Timeline.” Once done, select the “Transitions” icon and drag the transition in videos in “Timeline.” You can also customize the additional parameters from the adjustment section.
Step 3Preview and Export Video Collages
Make sure to click the “Play” icon to preview the results. When satisfied with the results, hit the “Export” button. Manage the export settings in the next window, and again select “Export.”
Bonus Part: Creating Slideshows Using Wondershare Filmora
Do you know that Wondershare Filmora can also be used to create slideshows? In this part, we will be discussing the details of how to create slideshows using Filmora. Look through the steps below to understand things that need to be investigated while creating slideshows:
Filmora Tutorial - Edit a Fast Slideshow Intro
Free Download For Win 7 or later(64-bit)
Free Download For macOS 10.14 or later
Step 1Launch Wondershare Filmora
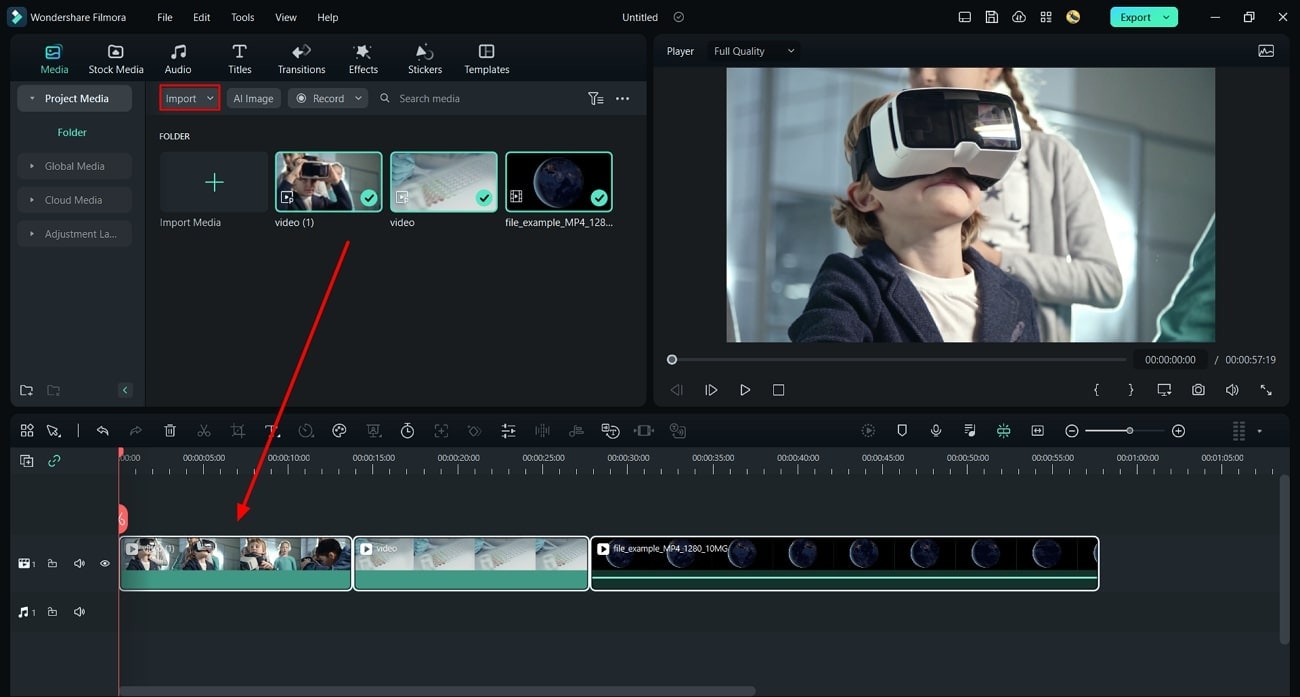
On opening Wondershare Filmora on your computer, continue to select the “New Project” button. This opens a new screen where you can import the content for the slideshow on Filmora. Select the “Import” option to add the media content for the slideshow. After importing the media content, drag and drop it on the timeline.
Step 2Add Effects to Slideshow
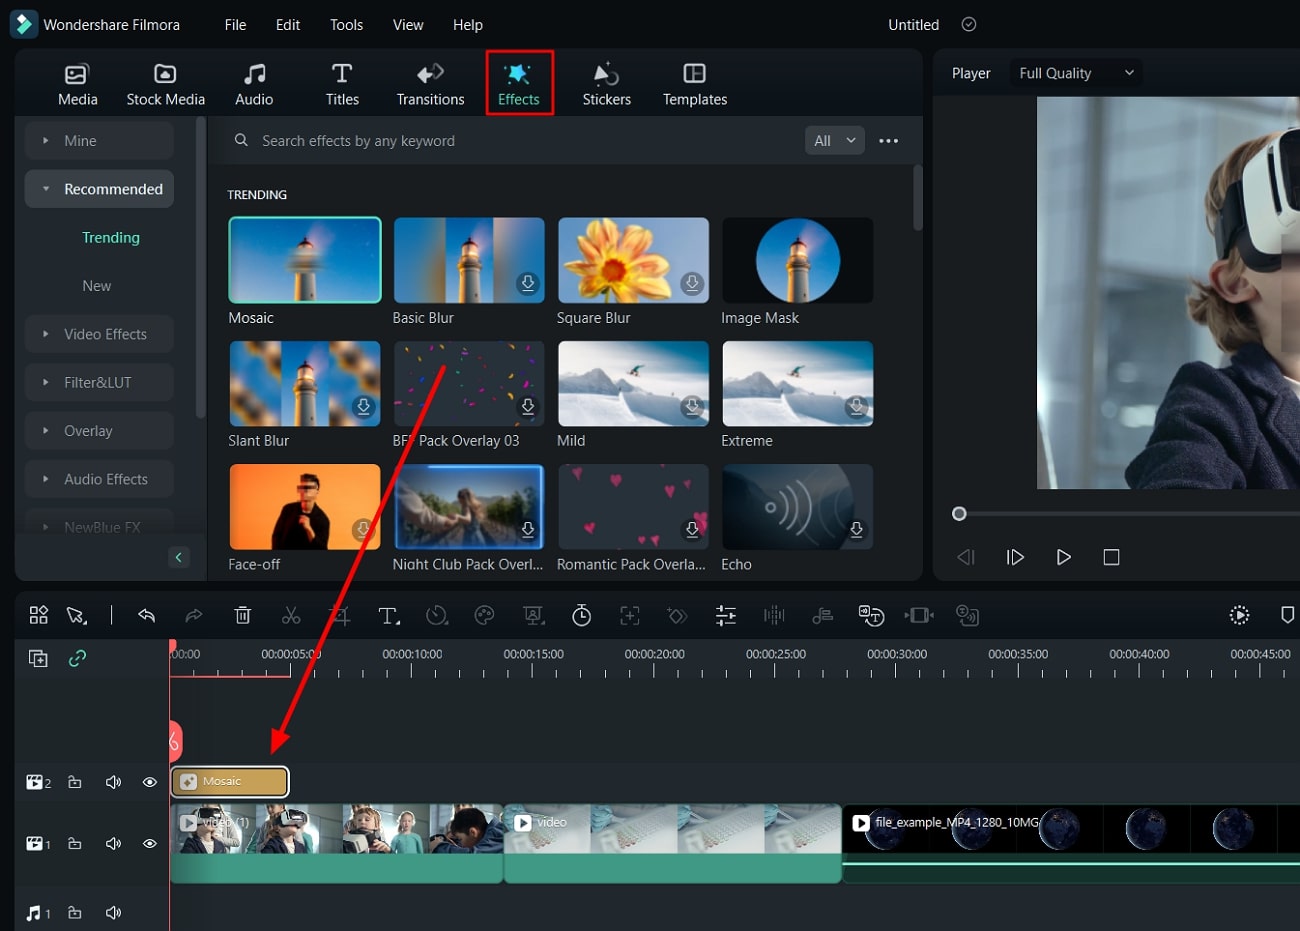
Once the media content is imported for the slideshow, continue to add effects to your video editing canvas. You can proceed to the “Effects” tab and add your appropriate choice.
Step 3Add Transitions and Titles
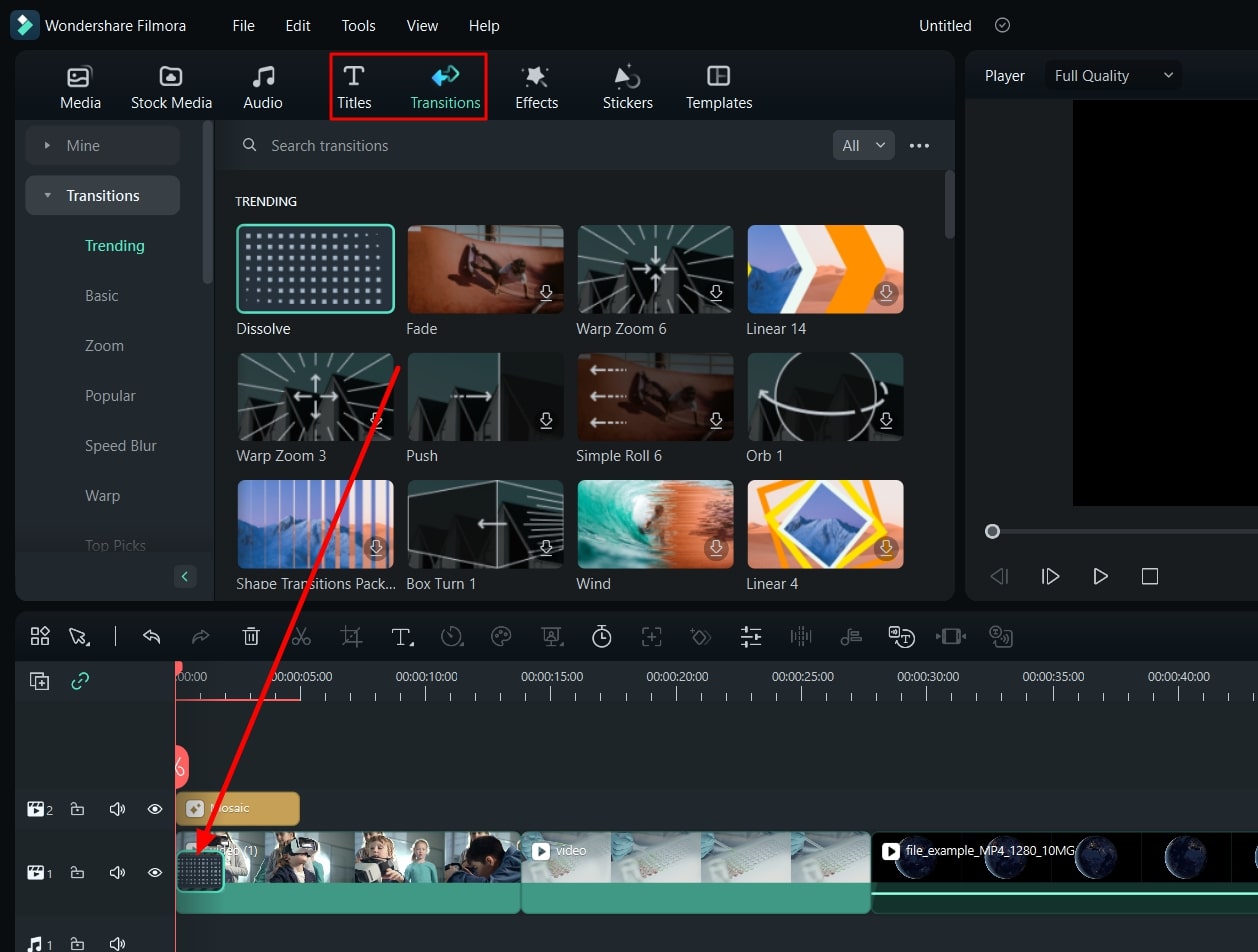
Following this, you can also look to add “Transitions” to your work. This can be done by accessing the options from the top of the screen. You can add “Titles” to your slideshow to create the best content.
Step 4Export Final Slideshow from Filmora
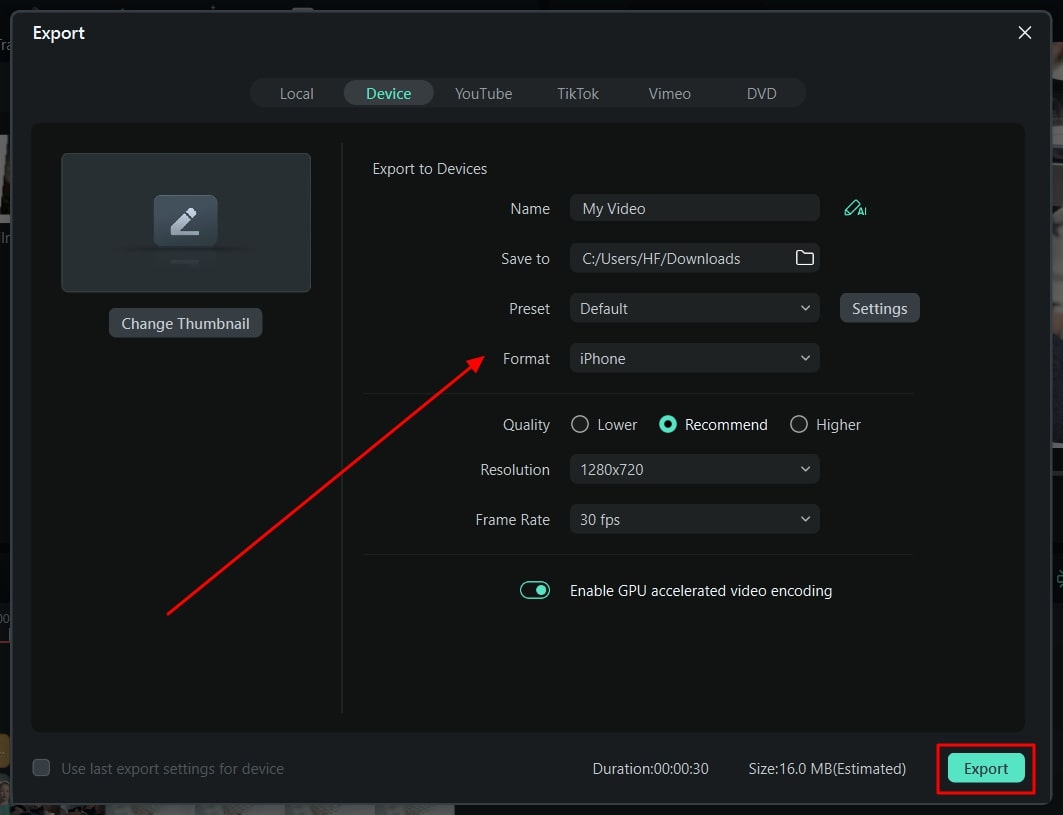
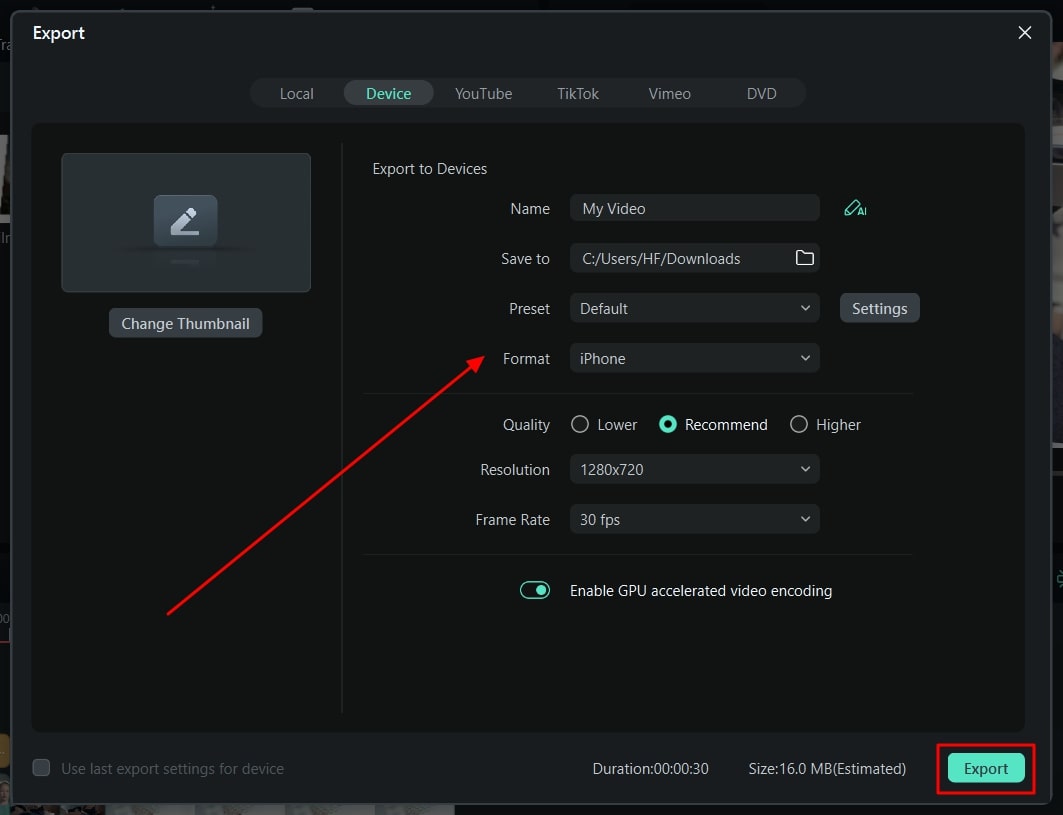
Once you are done with this, lead to the “Export” option to save the created slideshow on Filmora. Set the parameters for the video and click “Export” on the window to execute the process.
Conclusion
This article has provided viewers with an idea of how to create the best video collages with the right platforms. Filmstock, which offers resources for video collage templates, has been discussed. Along with that, Wondershare Filmora has been displayed as the best option for making video collages of the finest quality. If you wish to create perfect video collages, work on the details to get the best results.
Free Download Free Download Learn More

Part 2: Filmstock: A Great Resource For Getting Video Collage Template
Have you understood the purpose of using video collages for managing memories? You will require a resource for creating the best video collages. Having a template makes things extremely easy to cover in video editing. Wondershare provides the option of using Filmstock , a dedicated resource for getting video collage templates. You can find everything in Filmstock to make a video collage, from effects to videos and audio.
The entire collection provided in Filmstock is highly sophisticated and coherent. It truly makes procession easy and convenient for users who are interested in video editing. While finding the best effects for Filmora, you can also observe great resource packs for Adobe After Effects. The entire resource is categorized into different sections, making it easy for you to navigate content.
Working with Filmstock is easy and effective when combined with Filmora. You can also immerse yourself in 3D content within this resource website. When it comes to creating collage videos, you can get help from the templates available at Filmstock.

Part 3: Wondershare Filmora: Create The Finest Video Collages Through Filmstock
By consulting Filmstock, you are now aware of how to get the best video collage templates from the platform. After finding one for your work, you can go to Wondershare Filmora to create and edit the video collage. It features a unique video editing platform for its users, giving a diversity of options to work with.
Free Download For Win 7 or later(64-bit)
Free Download For macOS 10.14 or later
From editing the video to managing its audio, you can perform all tasks on Filmora with ease. Unlike other video editors, Wondershare Filmora does not make it difficult for you to edit videos. Its structure is designed to make operations easy for all kinds of users who are in video editing. To know more about how Filmora makes things easy in creating the finest video collages, learn more about its features below:
1. Motion Tracking
If your video collage has a specific element that needs to be tracked, you can utilize the services of motion tracking . With a single click, you can track the motion of an object and make it the center of the video.
2. Adjustment Layer
Users working on specific video content require dedicated presets for their work. They can create adjustment layers for color grading, presets, and perform other operations.
3. AI Copywriting
Those who are creating specific social media content can utilize the services of AI copywriting powered by ChatGPT. All you must do is provide a prompt, after which they can create the perfect content for their video collage.
4. Speech-To-Text
If your video collage needs to be induced with subtitles, the service of Speech-to-Text works perfectly on Filmora. Users can get the best subtitles in a single click, with an accuracy of more than 95%, making it a great tool.

Part 4: Step-by-Step Guide: Creating Video Collages Through Filmstock
Filmstock is a resource library where you can access diversified templates for several things. It also helps you access the attractive video collage template. With that template, you can make optimistically impressive video collages. You can access the collages on versatile ranges and utilize them as needed.
You must be thinking that it is not easy to make video collages with Filmstock. However, it is not true, and you can see it for yourself from the below-given instructions:
Filmora Tutorial - Create a Photo Sliding Birthday Intro | Filmora Creator Academy
Free Download For Win 7 or later(64-bit)
Free Download For macOS 10.14 or later
Step 1Open Filmstock and Select Video Collage
Access Filmstock on your device and go to “Search Bar.” From here, search for Video Collages, continue to select one template, and click the “Download” button. Once the template is downloaded, launch Filmora and import your video clips.

Step 2Make a Video Collage
Next, drag the clips to the timeline and go to “Effects.” Locate the desired effect and drag it on the video in “Timeline.” Once done, select the “Transitions” icon and drag the transition in videos in “Timeline.” You can also customize the additional parameters from the adjustment section.

Step 3Preview and Export Video Collages
Make sure to click the “Play” icon to preview the results. When satisfied with the results, hit the “Export” button. Manage the export settings in the next window, and again select “Export.”

Bonus Part: Creating Slideshows Using Wondershare Filmora
Do you know that Wondershare Filmora can also be used to create slideshows? In this part, we will be discussing the details of how to create slideshows using Filmora. Look through the steps below to understand things that need to be investigated while creating slideshows:
Filmora Tutorial - Edit a Fast Slideshow Intro
Free Download For Win 7 or later(64-bit)
Free Download For macOS 10.14 or later
Step 1Launch Wondershare Filmora
On opening Wondershare Filmora on your computer, continue to select the “New Project” button. This opens a new screen where you can import the content for the slideshow on Filmora. Select the “Import” option to add the media content for the slideshow. After importing the media content, drag and drop it on the timeline.

Step 2Add Effects to Slideshow
Once the media content is imported for the slideshow, continue to add effects to your video editing canvas. You can proceed to the “Effects” tab and add your appropriate choice.

Step 3Add Transitions and Titles
Following this, you can also look to add “Transitions” to your work. This can be done by accessing the options from the top of the screen. You can add “Titles” to your slideshow to create the best content.

Step 4Export Final Slideshow from Filmora
Once you are done with this, lead to the “Export” option to save the created slideshow on Filmora. Set the parameters for the video and click “Export” on the window to execute the process.

Conclusion
This article has provided viewers with an idea of how to create the best video collages with the right platforms. Filmstock, which offers resources for video collage templates, has been discussed. Along with that, Wondershare Filmora has been displayed as the best option for making video collages of the finest quality. If you wish to create perfect video collages, work on the details to get the best results.
Learn Everything About Leeming LUT Pro
Create High-Quality Video - Wondershare Filmora
An easy and powerful YouTube video editor
Numerous video and audio effects to choose from
Detailed tutorials are provided by the official channel
Color grading can be a tedious process, especially if you don’t have the technical skills required to achieve the desired result. That’s where a LUT can come in handy. So, what is a LUT?
LUT stands for “look up table.” Simply put, a LUT is a color preset that you can apply to your video footage to speed up the color grading process. While LUTs are commonly used to speed up the color grading process, they can also be used for other tasks, such as color transfer between software, monitor calibration, and more.
In this article, we’ll explore a particular LUT – Leeming LUT Pro™ and how you can use it in various video editors.

In this article
02 Supported Cameras of Leeming LUT Pro™
03 How to Import and Use Leeming LUT Pro™ in Different Video Editors
What is Leeming LUT Pro™?
Leeming LUT Pro™ is the world’s first unified, corrective Look Up Table (LUT) system for supported cameras. It’s designed to maximize dynamic range, fix skin tones, remove unwanted color casts and provide an accurate Rec709 starting point for further creative color grading.
The Pro LUTs are designed for perfect Rec709 colorimetry and have a linear luma curve, with an average measured dE(2000) of less than 1. As a result, they are visually indistinguishable from reality to the human eye.
Athena LUTs are a brighter version of Pro. They are designed around how the eye sees while retaining the same perfect colorimetry as Pro.
Supported Cameras of Leeming LUT Pro™
- Panasonic G Series: All G series cameras with Cine-D, V-LogL, and HLG for Rec709
- Panasonic S Series: All S series cameras with V-Log, V-Log BRAW, V-Log ProRes RAW, Cine-D, Cine-D2, and HLG for Rec709
- Fujifilm X Series: All X Series cameras with F-Log, Eterna Cinema, Pro Neg Std, and HLG for Rec709
- Canon R Series: All R series cameras with the Faithful Picture Style, C-Log, C-Log3, and CanonRAW
- Canon C Series: All C series cameras with BT.709, C-Log2, C-Log3, HDR-PQ for Rec709, and HLG for Rec709
- Blackmagic Pocket 4K/6K/6K Pro: All cameras with Gen 4 or Gen5 Film
- Blackmagic Pocket/Micro: Older cameras with Gen1 Film
- Nikon Z Series: All cameras with N-Log, Flat
- Sony A Series: All cameras with Picture profile menus, like the A7, with Cine2, S-Log2, S-Log3, HLG/3 for Rec709, and S-Cinetone
- JVC: GY-LS300 with J-Log1
- RunCam: 5 Orange Normal, Flat
- GoPro: 6,7 8, 9 & 10 ProTune, 4 & 5 ProTune, Session ProTune
- DJI: Mavic3, Phantom 4 Pro, Air 2S, Mavic 2 Pro, Mavic Air 2, Mini Series, Mavic Air, Mavic Pro, Pocket 2, Osmo Pocket, Osmo Action, X5 Series
How to Import and Use Leeming LUT Pro™ in Different Video Editors
Leeming LUT Pro™ is supported by various video editors, coloring software, and motion graphics programs, such as:
- Final Cut Pro X
- Avid Media Composer
- DaVinci Resolve
- Adobe Premiere Pro
- Adobe After Effects
- Magix Vegas
- Grass Valley Edius
- Lightworks
- Cyberlink PowerDirector
- LumaFusion
Next, we’ll explore how you can use Leeming LUT in some popular video editors.
1. How to Use Leeming LUT in FCPX
Follow these steps to use Leeming LUT in Final Cut Pro:
Step 1. Import Footage
Launch Final Cut Pro and import your footage. To import your footage, navigate to the top left corner and click on the import icon (the arrow pointing downwards).
In the window that opens, your camera or device name should appear in the left column under devices.
Click on your camera or device to display the media you want to import. Then select the media you want to import and click on the import selected button in the bottom right corner to import your footage.

Step 2. Highlight the Footage
Highlight all the footage by clicking and dragging your pointer over the footage or press Command + A to select all the footage.

Step 3. Open the Inspector
After highlighting all the footage, open the Inspector menu and click the little i icon. Then go down to the bottom of the Inspector and switch from Basic to General.
Step 4. Select the Camera LUT Option
Select Camera LUT from the options under General and click on the Add Custom Camera LUT option.
Step 5. Import Leeming LUTs into FCPX
Find the folder where your Leeming LUTs are stored and import them into Final Cut Pro by clicking on Open.
Step 6. Select the LUT
Once imported, go back to the Camera LUT option under General and click on it. Then scroll down the available options and select your Leeming LUT under the Custom Camera options.
Finally, click the profile you used to apply it to your footage.
2. How to Use Leeming LUT in PowerDirector
Follow these steps to use a LUT in PowerDirector:
Step 1. Launch PowerDirector
Open PowerDirector and select Full Mode.
Step 2. Import Media
Click the import button and then select Import Media Folder to import the video footage you want to apply the Leeming LUT to.
Step 3. Add Footage to Timeline
Drag and drop the imported video footage into your project’s timeline.
Step 4. Select the Fix/Enhance Option
Click on the video clip on the timeline and choose the Fix/Enhance option.
Step 5. Select the Color Presets & CLUTs Option
In the top left window that opens above the timeline, select the Color Presets & CLUTs option under Enhance.
Step 6. Apply the Leeming LUT to the Footage
Click on the import button in the panel to import the Leeming LUT file. Once imported, apply it to give your video a more vibrant look.
Part 5: Bonus! Use Filmora – Easy to Use Video Editor for Color LUTs
Besides Final Cut Pro and PowerDirector, Filmora is another excellent video editing software that you can use to apply LUTs to your video.
Designed for beginners and intermediate users, Filmora is an intuitive yet powerful video editing software.
For instance, you can apply 3D LUTs to your video using Filmora. Unlike 1D LUTs, which can only control one value setting, 3D LUTs can allow you to control various value settings. As a result, 3D LUTs can give you more control over specific color values in your video.
Here’s how you can apply LUTs using Filmora:
Step 1. Import the Footage
Launch Filmora and choose New Project. In the New Project window that opens, import the video you want to apply the LUT to by clicking on Import and selecting one of the drop-down options.
Step 2. Add the Video to the Timeline
Drag and drop the video into your project’s timeline.
Step 3. Open the Color Tab
Double click the video on the timeline to select it. Once it’s selected, go to the top left panel and click on the color tab.

Step 4. Apply a LUT to the Video
Under the color tab, navigate to the 3D LUT option and select one of the available options in the 3D LUT drop-down menu to apply a LUT.
Many LUTs are named after popular TV shows and series whose visual styles they mimic, such as Batman, House of Cards, Game of Thrones, Mission Impossible, Harry Potter, Star Wars, and more.
Once you apply a LUT, you can see your changes in the Preview Window. Besides using the preset LUTs, Filmora also allows you to use custom LUTs. Instead of choosing one of the presets, click on the Load New LUT option to import your custom LUT into Filmora.
Step 5. Make Fine Adjustments
Once you apply a LUT, Filmora can allow you to make further modifications to the video. Click on the Advanced button at the bottom of the color tab to view advanced color correction options.
In the new window that opens, you can adjust several things, such as color, light, HSL, and more. You can also choose from a variety of other available presets.

Step 6. Save the Changes
Once you’re satisfied with the changes you’ve applied, click on the OK button in the lower right corner to save the changes.
For Win 7 or later (64-bit)
For macOS 10.12 or later
Conclusion
LUTs are a fast way to color grade your footage after color correction. However, to ensure your LUTs work effectively, here are some important guidelines you should observe when using LUTs:
- Ensure your footage matches from shot to shot, especially if you’re applying LUTs to multiple clips.
- Ensure your exposure is correct before using LUTs. You can use a histogram to help you set the exposure.
- Ensure you apply LUTs to a video that’s been properly color corrected.
- Make small adjustments to things, such as brightness, saturation, contrast, exposure, color temperature, and tint for best results.
- Test out various LUTs before settling for one because shooting conditions can drastically affect how different LUTs look.
Ultimately, LUTs are an excellent way to make your video more cinematic. If you don’t have advanced video editing skills or prior experience working with LUTs, don’t worry. Filmora is a user-friendly video editing software that allows you to quickly apply LUTs with no video editing experience. Just download Filmora for free to get started.
Color grading can be a tedious process, especially if you don’t have the technical skills required to achieve the desired result. That’s where a LUT can come in handy. So, what is a LUT?
LUT stands for “look up table.” Simply put, a LUT is a color preset that you can apply to your video footage to speed up the color grading process. While LUTs are commonly used to speed up the color grading process, they can also be used for other tasks, such as color transfer between software, monitor calibration, and more.
In this article, we’ll explore a particular LUT – Leeming LUT Pro™ and how you can use it in various video editors.

In this article
02 Supported Cameras of Leeming LUT Pro™
03 How to Import and Use Leeming LUT Pro™ in Different Video Editors
What is Leeming LUT Pro™?
Leeming LUT Pro™ is the world’s first unified, corrective Look Up Table (LUT) system for supported cameras. It’s designed to maximize dynamic range, fix skin tones, remove unwanted color casts and provide an accurate Rec709 starting point for further creative color grading.
The Pro LUTs are designed for perfect Rec709 colorimetry and have a linear luma curve, with an average measured dE(2000) of less than 1. As a result, they are visually indistinguishable from reality to the human eye.
Athena LUTs are a brighter version of Pro. They are designed around how the eye sees while retaining the same perfect colorimetry as Pro.
Supported Cameras of Leeming LUT Pro™
- Panasonic G Series: All G series cameras with Cine-D, V-LogL, and HLG for Rec709
- Panasonic S Series: All S series cameras with V-Log, V-Log BRAW, V-Log ProRes RAW, Cine-D, Cine-D2, and HLG for Rec709
- Fujifilm X Series: All X Series cameras with F-Log, Eterna Cinema, Pro Neg Std, and HLG for Rec709
- Canon R Series: All R series cameras with the Faithful Picture Style, C-Log, C-Log3, and CanonRAW
- Canon C Series: All C series cameras with BT.709, C-Log2, C-Log3, HDR-PQ for Rec709, and HLG for Rec709
- Blackmagic Pocket 4K/6K/6K Pro: All cameras with Gen 4 or Gen5 Film
- Blackmagic Pocket/Micro: Older cameras with Gen1 Film
- Nikon Z Series: All cameras with N-Log, Flat
- Sony A Series: All cameras with Picture profile menus, like the A7, with Cine2, S-Log2, S-Log3, HLG/3 for Rec709, and S-Cinetone
- JVC: GY-LS300 with J-Log1
- RunCam: 5 Orange Normal, Flat
- GoPro: 6,7 8, 9 & 10 ProTune, 4 & 5 ProTune, Session ProTune
- DJI: Mavic3, Phantom 4 Pro, Air 2S, Mavic 2 Pro, Mavic Air 2, Mini Series, Mavic Air, Mavic Pro, Pocket 2, Osmo Pocket, Osmo Action, X5 Series
How to Import and Use Leeming LUT Pro™ in Different Video Editors
Leeming LUT Pro™ is supported by various video editors, coloring software, and motion graphics programs, such as:
- Final Cut Pro X
- Avid Media Composer
- DaVinci Resolve
- Adobe Premiere Pro
- Adobe After Effects
- Magix Vegas
- Grass Valley Edius
- Lightworks
- Cyberlink PowerDirector
- LumaFusion
Next, we’ll explore how you can use Leeming LUT in some popular video editors.
1. How to Use Leeming LUT in FCPX
Follow these steps to use Leeming LUT in Final Cut Pro:
Step 1. Import Footage
Launch Final Cut Pro and import your footage. To import your footage, navigate to the top left corner and click on the import icon (the arrow pointing downwards).
In the window that opens, your camera or device name should appear in the left column under devices.
Click on your camera or device to display the media you want to import. Then select the media you want to import and click on the import selected button in the bottom right corner to import your footage.

Step 2. Highlight the Footage
Highlight all the footage by clicking and dragging your pointer over the footage or press Command + A to select all the footage.

Step 3. Open the Inspector
After highlighting all the footage, open the Inspector menu and click the little i icon. Then go down to the bottom of the Inspector and switch from Basic to General.
Step 4. Select the Camera LUT Option
Select Camera LUT from the options under General and click on the Add Custom Camera LUT option.
Step 5. Import Leeming LUTs into FCPX
Find the folder where your Leeming LUTs are stored and import them into Final Cut Pro by clicking on Open.
Step 6. Select the LUT
Once imported, go back to the Camera LUT option under General and click on it. Then scroll down the available options and select your Leeming LUT under the Custom Camera options.
Finally, click the profile you used to apply it to your footage.
2. How to Use Leeming LUT in PowerDirector
Follow these steps to use a LUT in PowerDirector:
Step 1. Launch PowerDirector
Open PowerDirector and select Full Mode.
Step 2. Import Media
Click the import button and then select Import Media Folder to import the video footage you want to apply the Leeming LUT to.
Step 3. Add Footage to Timeline
Drag and drop the imported video footage into your project’s timeline.
Step 4. Select the Fix/Enhance Option
Click on the video clip on the timeline and choose the Fix/Enhance option.
Step 5. Select the Color Presets & CLUTs Option
In the top left window that opens above the timeline, select the Color Presets & CLUTs option under Enhance.
Step 6. Apply the Leeming LUT to the Footage
Click on the import button in the panel to import the Leeming LUT file. Once imported, apply it to give your video a more vibrant look.
Part 5: Bonus! Use Filmora – Easy to Use Video Editor for Color LUTs
Besides Final Cut Pro and PowerDirector, Filmora is another excellent video editing software that you can use to apply LUTs to your video.
Designed for beginners and intermediate users, Filmora is an intuitive yet powerful video editing software.
For instance, you can apply 3D LUTs to your video using Filmora. Unlike 1D LUTs, which can only control one value setting, 3D LUTs can allow you to control various value settings. As a result, 3D LUTs can give you more control over specific color values in your video.
Here’s how you can apply LUTs using Filmora:
Step 1. Import the Footage
Launch Filmora and choose New Project. In the New Project window that opens, import the video you want to apply the LUT to by clicking on Import and selecting one of the drop-down options.
Step 2. Add the Video to the Timeline
Drag and drop the video into your project’s timeline.
Step 3. Open the Color Tab
Double click the video on the timeline to select it. Once it’s selected, go to the top left panel and click on the color tab.

Step 4. Apply a LUT to the Video
Under the color tab, navigate to the 3D LUT option and select one of the available options in the 3D LUT drop-down menu to apply a LUT.
Many LUTs are named after popular TV shows and series whose visual styles they mimic, such as Batman, House of Cards, Game of Thrones, Mission Impossible, Harry Potter, Star Wars, and more.
Once you apply a LUT, you can see your changes in the Preview Window. Besides using the preset LUTs, Filmora also allows you to use custom LUTs. Instead of choosing one of the presets, click on the Load New LUT option to import your custom LUT into Filmora.
Step 5. Make Fine Adjustments
Once you apply a LUT, Filmora can allow you to make further modifications to the video. Click on the Advanced button at the bottom of the color tab to view advanced color correction options.
In the new window that opens, you can adjust several things, such as color, light, HSL, and more. You can also choose from a variety of other available presets.

Step 6. Save the Changes
Once you’re satisfied with the changes you’ve applied, click on the OK button in the lower right corner to save the changes.
For Win 7 or later (64-bit)
For macOS 10.12 or later
Conclusion
LUTs are a fast way to color grade your footage after color correction. However, to ensure your LUTs work effectively, here are some important guidelines you should observe when using LUTs:
- Ensure your footage matches from shot to shot, especially if you’re applying LUTs to multiple clips.
- Ensure your exposure is correct before using LUTs. You can use a histogram to help you set the exposure.
- Ensure you apply LUTs to a video that’s been properly color corrected.
- Make small adjustments to things, such as brightness, saturation, contrast, exposure, color temperature, and tint for best results.
- Test out various LUTs before settling for one because shooting conditions can drastically affect how different LUTs look.
Ultimately, LUTs are an excellent way to make your video more cinematic. If you don’t have advanced video editing skills or prior experience working with LUTs, don’t worry. Filmora is a user-friendly video editing software that allows you to quickly apply LUTs with no video editing experience. Just download Filmora for free to get started.
Color grading can be a tedious process, especially if you don’t have the technical skills required to achieve the desired result. That’s where a LUT can come in handy. So, what is a LUT?
LUT stands for “look up table.” Simply put, a LUT is a color preset that you can apply to your video footage to speed up the color grading process. While LUTs are commonly used to speed up the color grading process, they can also be used for other tasks, such as color transfer between software, monitor calibration, and more.
In this article, we’ll explore a particular LUT – Leeming LUT Pro™ and how you can use it in various video editors.

In this article
02 Supported Cameras of Leeming LUT Pro™
03 How to Import and Use Leeming LUT Pro™ in Different Video Editors
What is Leeming LUT Pro™?
Leeming LUT Pro™ is the world’s first unified, corrective Look Up Table (LUT) system for supported cameras. It’s designed to maximize dynamic range, fix skin tones, remove unwanted color casts and provide an accurate Rec709 starting point for further creative color grading.
The Pro LUTs are designed for perfect Rec709 colorimetry and have a linear luma curve, with an average measured dE(2000) of less than 1. As a result, they are visually indistinguishable from reality to the human eye.
Athena LUTs are a brighter version of Pro. They are designed around how the eye sees while retaining the same perfect colorimetry as Pro.
Supported Cameras of Leeming LUT Pro™
- Panasonic G Series: All G series cameras with Cine-D, V-LogL, and HLG for Rec709
- Panasonic S Series: All S series cameras with V-Log, V-Log BRAW, V-Log ProRes RAW, Cine-D, Cine-D2, and HLG for Rec709
- Fujifilm X Series: All X Series cameras with F-Log, Eterna Cinema, Pro Neg Std, and HLG for Rec709
- Canon R Series: All R series cameras with the Faithful Picture Style, C-Log, C-Log3, and CanonRAW
- Canon C Series: All C series cameras with BT.709, C-Log2, C-Log3, HDR-PQ for Rec709, and HLG for Rec709
- Blackmagic Pocket 4K/6K/6K Pro: All cameras with Gen 4 or Gen5 Film
- Blackmagic Pocket/Micro: Older cameras with Gen1 Film
- Nikon Z Series: All cameras with N-Log, Flat
- Sony A Series: All cameras with Picture profile menus, like the A7, with Cine2, S-Log2, S-Log3, HLG/3 for Rec709, and S-Cinetone
- JVC: GY-LS300 with J-Log1
- RunCam: 5 Orange Normal, Flat
- GoPro: 6,7 8, 9 & 10 ProTune, 4 & 5 ProTune, Session ProTune
- DJI: Mavic3, Phantom 4 Pro, Air 2S, Mavic 2 Pro, Mavic Air 2, Mini Series, Mavic Air, Mavic Pro, Pocket 2, Osmo Pocket, Osmo Action, X5 Series
How to Import and Use Leeming LUT Pro™ in Different Video Editors
Leeming LUT Pro™ is supported by various video editors, coloring software, and motion graphics programs, such as:
- Final Cut Pro X
- Avid Media Composer
- DaVinci Resolve
- Adobe Premiere Pro
- Adobe After Effects
- Magix Vegas
- Grass Valley Edius
- Lightworks
- Cyberlink PowerDirector
- LumaFusion
Next, we’ll explore how you can use Leeming LUT in some popular video editors.
1. How to Use Leeming LUT in FCPX
Follow these steps to use Leeming LUT in Final Cut Pro:
Step 1. Import Footage
Launch Final Cut Pro and import your footage. To import your footage, navigate to the top left corner and click on the import icon (the arrow pointing downwards).
In the window that opens, your camera or device name should appear in the left column under devices.
Click on your camera or device to display the media you want to import. Then select the media you want to import and click on the import selected button in the bottom right corner to import your footage.

Step 2. Highlight the Footage
Highlight all the footage by clicking and dragging your pointer over the footage or press Command + A to select all the footage.

Step 3. Open the Inspector
After highlighting all the footage, open the Inspector menu and click the little i icon. Then go down to the bottom of the Inspector and switch from Basic to General.
Step 4. Select the Camera LUT Option
Select Camera LUT from the options under General and click on the Add Custom Camera LUT option.
Step 5. Import Leeming LUTs into FCPX
Find the folder where your Leeming LUTs are stored and import them into Final Cut Pro by clicking on Open.
Step 6. Select the LUT
Once imported, go back to the Camera LUT option under General and click on it. Then scroll down the available options and select your Leeming LUT under the Custom Camera options.
Finally, click the profile you used to apply it to your footage.
2. How to Use Leeming LUT in PowerDirector
Follow these steps to use a LUT in PowerDirector:
Step 1. Launch PowerDirector
Open PowerDirector and select Full Mode.
Step 2. Import Media
Click the import button and then select Import Media Folder to import the video footage you want to apply the Leeming LUT to.
Step 3. Add Footage to Timeline
Drag and drop the imported video footage into your project’s timeline.
Step 4. Select the Fix/Enhance Option
Click on the video clip on the timeline and choose the Fix/Enhance option.
Step 5. Select the Color Presets & CLUTs Option
In the top left window that opens above the timeline, select the Color Presets & CLUTs option under Enhance.
Step 6. Apply the Leeming LUT to the Footage
Click on the import button in the panel to import the Leeming LUT file. Once imported, apply it to give your video a more vibrant look.
Part 5: Bonus! Use Filmora – Easy to Use Video Editor for Color LUTs
Besides Final Cut Pro and PowerDirector, Filmora is another excellent video editing software that you can use to apply LUTs to your video.
Designed for beginners and intermediate users, Filmora is an intuitive yet powerful video editing software.
For instance, you can apply 3D LUTs to your video using Filmora. Unlike 1D LUTs, which can only control one value setting, 3D LUTs can allow you to control various value settings. As a result, 3D LUTs can give you more control over specific color values in your video.
Here’s how you can apply LUTs using Filmora:
Step 1. Import the Footage
Launch Filmora and choose New Project. In the New Project window that opens, import the video you want to apply the LUT to by clicking on Import and selecting one of the drop-down options.
Step 2. Add the Video to the Timeline
Drag and drop the video into your project’s timeline.
Step 3. Open the Color Tab
Double click the video on the timeline to select it. Once it’s selected, go to the top left panel and click on the color tab.

Step 4. Apply a LUT to the Video
Under the color tab, navigate to the 3D LUT option and select one of the available options in the 3D LUT drop-down menu to apply a LUT.
Many LUTs are named after popular TV shows and series whose visual styles they mimic, such as Batman, House of Cards, Game of Thrones, Mission Impossible, Harry Potter, Star Wars, and more.
Once you apply a LUT, you can see your changes in the Preview Window. Besides using the preset LUTs, Filmora also allows you to use custom LUTs. Instead of choosing one of the presets, click on the Load New LUT option to import your custom LUT into Filmora.
Step 5. Make Fine Adjustments
Once you apply a LUT, Filmora can allow you to make further modifications to the video. Click on the Advanced button at the bottom of the color tab to view advanced color correction options.
In the new window that opens, you can adjust several things, such as color, light, HSL, and more. You can also choose from a variety of other available presets.

Step 6. Save the Changes
Once you’re satisfied with the changes you’ve applied, click on the OK button in the lower right corner to save the changes.
For Win 7 or later (64-bit)
For macOS 10.12 or later
Conclusion
LUTs are a fast way to color grade your footage after color correction. However, to ensure your LUTs work effectively, here are some important guidelines you should observe when using LUTs:
- Ensure your footage matches from shot to shot, especially if you’re applying LUTs to multiple clips.
- Ensure your exposure is correct before using LUTs. You can use a histogram to help you set the exposure.
- Ensure you apply LUTs to a video that’s been properly color corrected.
- Make small adjustments to things, such as brightness, saturation, contrast, exposure, color temperature, and tint for best results.
- Test out various LUTs before settling for one because shooting conditions can drastically affect how different LUTs look.
Ultimately, LUTs are an excellent way to make your video more cinematic. If you don’t have advanced video editing skills or prior experience working with LUTs, don’t worry. Filmora is a user-friendly video editing software that allows you to quickly apply LUTs with no video editing experience. Just download Filmora for free to get started.
Color grading can be a tedious process, especially if you don’t have the technical skills required to achieve the desired result. That’s where a LUT can come in handy. So, what is a LUT?
LUT stands for “look up table.” Simply put, a LUT is a color preset that you can apply to your video footage to speed up the color grading process. While LUTs are commonly used to speed up the color grading process, they can also be used for other tasks, such as color transfer between software, monitor calibration, and more.
In this article, we’ll explore a particular LUT – Leeming LUT Pro™ and how you can use it in various video editors.

In this article
02 Supported Cameras of Leeming LUT Pro™
03 How to Import and Use Leeming LUT Pro™ in Different Video Editors
What is Leeming LUT Pro™?
Leeming LUT Pro™ is the world’s first unified, corrective Look Up Table (LUT) system for supported cameras. It’s designed to maximize dynamic range, fix skin tones, remove unwanted color casts and provide an accurate Rec709 starting point for further creative color grading.
The Pro LUTs are designed for perfect Rec709 colorimetry and have a linear luma curve, with an average measured dE(2000) of less than 1. As a result, they are visually indistinguishable from reality to the human eye.
Athena LUTs are a brighter version of Pro. They are designed around how the eye sees while retaining the same perfect colorimetry as Pro.
Supported Cameras of Leeming LUT Pro™
- Panasonic G Series: All G series cameras with Cine-D, V-LogL, and HLG for Rec709
- Panasonic S Series: All S series cameras with V-Log, V-Log BRAW, V-Log ProRes RAW, Cine-D, Cine-D2, and HLG for Rec709
- Fujifilm X Series: All X Series cameras with F-Log, Eterna Cinema, Pro Neg Std, and HLG for Rec709
- Canon R Series: All R series cameras with the Faithful Picture Style, C-Log, C-Log3, and CanonRAW
- Canon C Series: All C series cameras with BT.709, C-Log2, C-Log3, HDR-PQ for Rec709, and HLG for Rec709
- Blackmagic Pocket 4K/6K/6K Pro: All cameras with Gen 4 or Gen5 Film
- Blackmagic Pocket/Micro: Older cameras with Gen1 Film
- Nikon Z Series: All cameras with N-Log, Flat
- Sony A Series: All cameras with Picture profile menus, like the A7, with Cine2, S-Log2, S-Log3, HLG/3 for Rec709, and S-Cinetone
- JVC: GY-LS300 with J-Log1
- RunCam: 5 Orange Normal, Flat
- GoPro: 6,7 8, 9 & 10 ProTune, 4 & 5 ProTune, Session ProTune
- DJI: Mavic3, Phantom 4 Pro, Air 2S, Mavic 2 Pro, Mavic Air 2, Mini Series, Mavic Air, Mavic Pro, Pocket 2, Osmo Pocket, Osmo Action, X5 Series
How to Import and Use Leeming LUT Pro™ in Different Video Editors
Leeming LUT Pro™ is supported by various video editors, coloring software, and motion graphics programs, such as:
- Final Cut Pro X
- Avid Media Composer
- DaVinci Resolve
- Adobe Premiere Pro
- Adobe After Effects
- Magix Vegas
- Grass Valley Edius
- Lightworks
- Cyberlink PowerDirector
- LumaFusion
Next, we’ll explore how you can use Leeming LUT in some popular video editors.
1. How to Use Leeming LUT in FCPX
Follow these steps to use Leeming LUT in Final Cut Pro:
Step 1. Import Footage
Launch Final Cut Pro and import your footage. To import your footage, navigate to the top left corner and click on the import icon (the arrow pointing downwards).
In the window that opens, your camera or device name should appear in the left column under devices.
Click on your camera or device to display the media you want to import. Then select the media you want to import and click on the import selected button in the bottom right corner to import your footage.

Step 2. Highlight the Footage
Highlight all the footage by clicking and dragging your pointer over the footage or press Command + A to select all the footage.

Step 3. Open the Inspector
After highlighting all the footage, open the Inspector menu and click the little i icon. Then go down to the bottom of the Inspector and switch from Basic to General.
Step 4. Select the Camera LUT Option
Select Camera LUT from the options under General and click on the Add Custom Camera LUT option.
Step 5. Import Leeming LUTs into FCPX
Find the folder where your Leeming LUTs are stored and import them into Final Cut Pro by clicking on Open.
Step 6. Select the LUT
Once imported, go back to the Camera LUT option under General and click on it. Then scroll down the available options and select your Leeming LUT under the Custom Camera options.
Finally, click the profile you used to apply it to your footage.
2. How to Use Leeming LUT in PowerDirector
Follow these steps to use a LUT in PowerDirector:
Step 1. Launch PowerDirector
Open PowerDirector and select Full Mode.
Step 2. Import Media
Click the import button and then select Import Media Folder to import the video footage you want to apply the Leeming LUT to.
Step 3. Add Footage to Timeline
Drag and drop the imported video footage into your project’s timeline.
Step 4. Select the Fix/Enhance Option
Click on the video clip on the timeline and choose the Fix/Enhance option.
Step 5. Select the Color Presets & CLUTs Option
In the top left window that opens above the timeline, select the Color Presets & CLUTs option under Enhance.
Step 6. Apply the Leeming LUT to the Footage
Click on the import button in the panel to import the Leeming LUT file. Once imported, apply it to give your video a more vibrant look.
Part 5: Bonus! Use Filmora – Easy to Use Video Editor for Color LUTs
Besides Final Cut Pro and PowerDirector, Filmora is another excellent video editing software that you can use to apply LUTs to your video.
Designed for beginners and intermediate users, Filmora is an intuitive yet powerful video editing software.
For instance, you can apply 3D LUTs to your video using Filmora. Unlike 1D LUTs, which can only control one value setting, 3D LUTs can allow you to control various value settings. As a result, 3D LUTs can give you more control over specific color values in your video.
Here’s how you can apply LUTs using Filmora:
Step 1. Import the Footage
Launch Filmora and choose New Project. In the New Project window that opens, import the video you want to apply the LUT to by clicking on Import and selecting one of the drop-down options.
Step 2. Add the Video to the Timeline
Drag and drop the video into your project’s timeline.
Step 3. Open the Color Tab
Double click the video on the timeline to select it. Once it’s selected, go to the top left panel and click on the color tab.

Step 4. Apply a LUT to the Video
Under the color tab, navigate to the 3D LUT option and select one of the available options in the 3D LUT drop-down menu to apply a LUT.
Many LUTs are named after popular TV shows and series whose visual styles they mimic, such as Batman, House of Cards, Game of Thrones, Mission Impossible, Harry Potter, Star Wars, and more.
Once you apply a LUT, you can see your changes in the Preview Window. Besides using the preset LUTs, Filmora also allows you to use custom LUTs. Instead of choosing one of the presets, click on the Load New LUT option to import your custom LUT into Filmora.
Step 5. Make Fine Adjustments
Once you apply a LUT, Filmora can allow you to make further modifications to the video. Click on the Advanced button at the bottom of the color tab to view advanced color correction options.
In the new window that opens, you can adjust several things, such as color, light, HSL, and more. You can also choose from a variety of other available presets.

Step 6. Save the Changes
Once you’re satisfied with the changes you’ve applied, click on the OK button in the lower right corner to save the changes.
For Win 7 or later (64-bit)
For macOS 10.12 or later
Conclusion
LUTs are a fast way to color grade your footage after color correction. However, to ensure your LUTs work effectively, here are some important guidelines you should observe when using LUTs:
- Ensure your footage matches from shot to shot, especially if you’re applying LUTs to multiple clips.
- Ensure your exposure is correct before using LUTs. You can use a histogram to help you set the exposure.
- Ensure you apply LUTs to a video that’s been properly color corrected.
- Make small adjustments to things, such as brightness, saturation, contrast, exposure, color temperature, and tint for best results.
- Test out various LUTs before settling for one because shooting conditions can drastically affect how different LUTs look.
Ultimately, LUTs are an excellent way to make your video more cinematic. If you don’t have advanced video editing skills or prior experience working with LUTs, don’t worry. Filmora is a user-friendly video editing software that allows you to quickly apply LUTs with no video editing experience. Just download Filmora for free to get started.
| Zoom In and Zoom Out on YouTube
Abundant Video Effects - Wondershare Filmora
Provide abundant video effects - A creative video editor
Powerful color correction and grading
Detailed tutorials provided by the official channel
YouTube has undoubtedly become the most popular platform for streaming millions of videos to people worldwide. People, influencers, celebrities, and various brands can freely post their videos on YouTube, and with a single click, they can fetch millions of views. Due to the simplicity and exceptional features of YouTube, people across the globe have shifted to this platform to extract various kinds of information comfortably.
Many times, people find it difficult to catch small yet important details from the videos on YouTube. If you want to observe little details in the YouTube videos closely, this article will address easy methods on how to zoom in on YouTube videos quickly.
In this article
Part 1: Why Should You Look Forward to Zoom Your YouTube Video?
Part 2: Effective Methods on How to Zoom in and Out YouTube Videos Easily
Part 1: Why Should You Look Forward to Zoom Your YouTube Video?
There can be various causes to zoom in on YouTube videos as users can clearly see hidden information and details from the video through it. For instance, if you are reviewing a trailer of a particular movie on your YouTube channel, you would be required to zoom in YouTube video many times. For breaking down the trailer, you would need to focus on the backgrounds, props, and other hidden details that are only possible through zooming in and out of the videos.
Moreover, if you are watching a demonstration of the chemistry practical on YouTube videos, readings on the apparatus may not be apparent in it. So here, you can also read and notice precise complicated readings on the videos by just zooming in. Also, in other scenarios, you can read the product’s description in makeup tutorials by using the option of zooming in and out.
To sum up, every regular user of YouTube must know how to zoom in on YouTube videos so that he can quickly focus on the details with a single click. By knowing the methods of zooming in and out, you can comprehensively extract the information through YouTube videos that can make your daily tasks easier.
Part 2: Effective Methods on How to Zoom in and Out YouTube Videos Easily
In this section, we will provide three effective methods to zoom in YouTube videos effortlessly. By applying any of the following methods, you can easily focus on the small details.
Method 1: Zoom In and Out on the YouTube Video Player
Are you looking for easier ways to zoom in and out of the YouTube video? YouTube gives the option on its player for viewing the videos in two modes: Theatre mode and full mode. Through theater mode, you can watch your video in a comparatively zoomed manner, whereas, in full screen, you can watch the video on a full screen of the monitor.
In this particular method, we will provide simple and easy steps for zooming in on the YouTube video player:
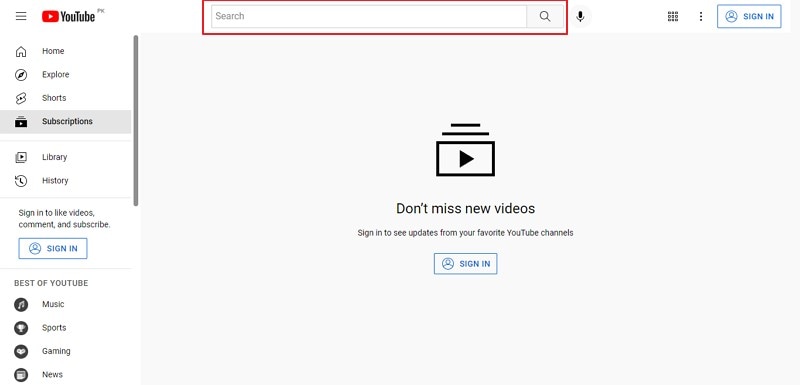
Step 1: Navigate to the YouTube app on your device browser, such as Google Chrome. On its search box, enter the video you want to watch.
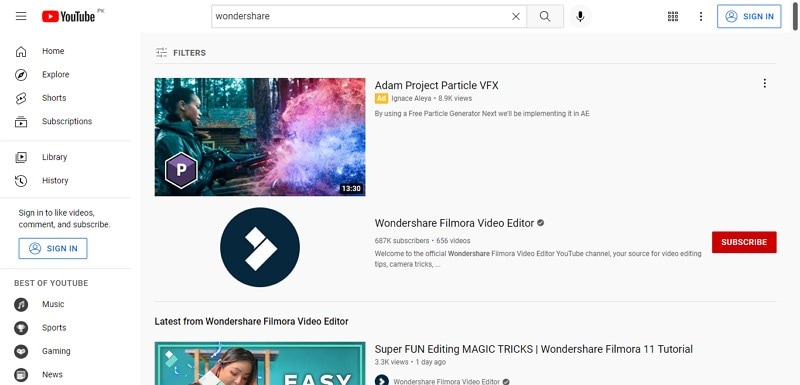
Step 2: Press Enter, and you will see various options related to your desired video. Click on any particular video to watch.
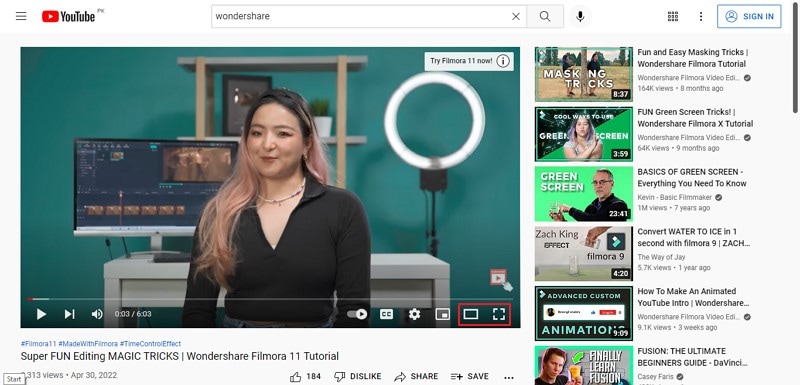
Step 3: On the YouTube video player, you would be able to see two screen mode options on the right side. The first option is “Full Screen” mode, through which you can enjoy watching your videos on a full monitor screen. The second option is “Theatre Mode,” which will display the video in a cinematic look by zooming in to some extent. Explore these options to observe the small details in your YouTube video closely.
Method 2: Zoom In and Out with Browser Zoom Features
To zoom in on YouTube videos, your browser also offers effective ways for the users. By using the browser zoom features, you can quickly zoom in and out of the video without the need for additional help. Moreover, these zoom features are also beneficial for reading eBooks or online documents.
Here are the three ways through which you can instantly zoom in on your favorite YouTube videos easily:
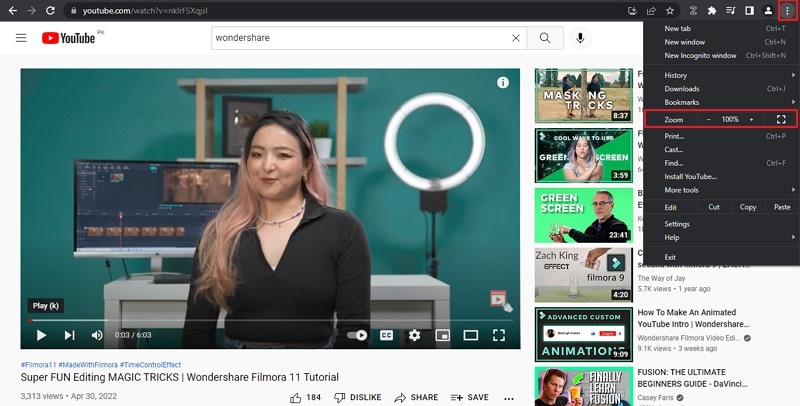
Way 1: The first way to zoom in on video is through browser options. To do so, tap on the “Three-Dot” icon of your browser displayed in the top right corner. From the menu, tap on “Zoom” and control the actions through its small menu.
Way 2: Another way to zoom in and out of the YouTube video is through your mouse pad. Point your cursor to the place where you want to zoom and try to expand the screen from your mouse pad and vice versa for zoom out.

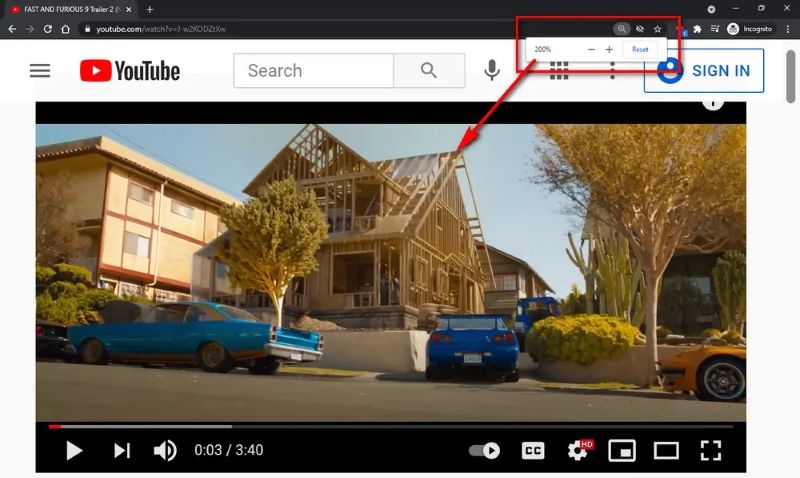
Way 3: On the URL search bar of YouTube, you can see different icons displayed next to it. Simply tap on the “Zoom” icon to control the zoom in and out accordingly.
Method 3: Zoom In on YouTube Video with Browser Extension
In this section, we will use a browser extension that will assist you in zooming in and out on YouTube videos comfortably. We will recommend the Zoom browser extension due to its distinct properties and features. Through its slider, you can zoom in on the YouTube video up to 400 factors with a single swipe.
Moreover, through this special browser extension, you can save the zoomed version of the website and can resume watching the videos from the set zoom value. To save your time, this browser also gives the option to zoom in and out the web pages together with a single click. To use this browser extension to zoom in on Youtube, here are simple steps.
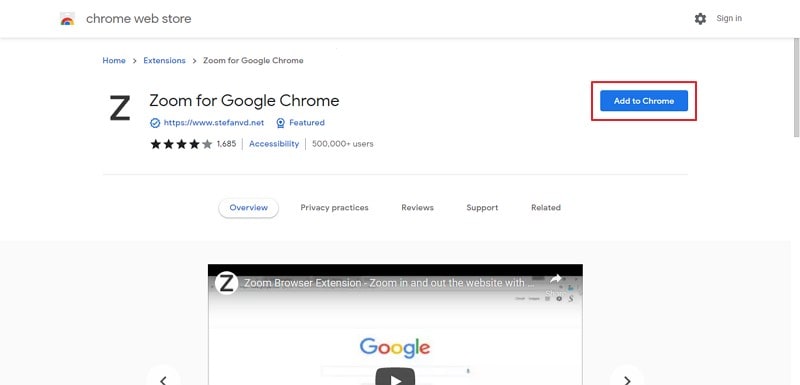
Step 1: Install the Zoom browser extension on your device from the Chrome Store by tapping on the “Add to Chrome” button to download and install the extension.
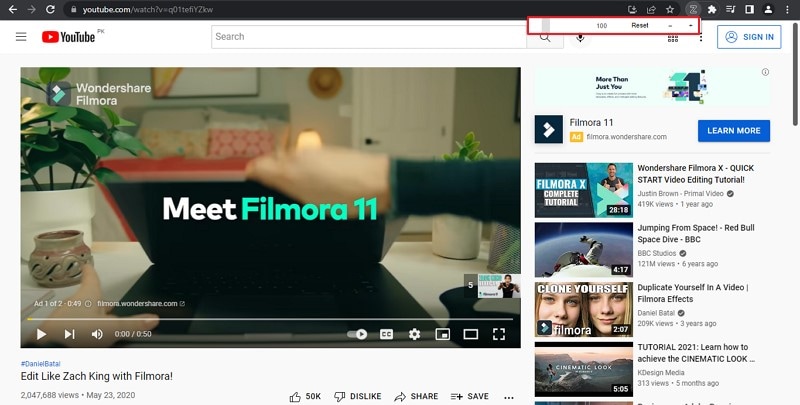
Step 2: Now, open YouTube and play your desired video. Afterward, tap on the icon of extensions from the top and select this particular extension. Through this extension, you can either click on the “+” button or the slider to zoom the video accordingly.
Conclusion
YouTube has become a mainstream channel for watching and creating videos in this era. Many times we miss small yet important details while watching YouTube videos on our devices. To quickly catch up on these essential details, we have offered different and easy methods regarding zoom in on YouTube videos with a single click.
YouTube has undoubtedly become the most popular platform for streaming millions of videos to people worldwide. People, influencers, celebrities, and various brands can freely post their videos on YouTube, and with a single click, they can fetch millions of views. Due to the simplicity and exceptional features of YouTube, people across the globe have shifted to this platform to extract various kinds of information comfortably.
Many times, people find it difficult to catch small yet important details from the videos on YouTube. If you want to observe little details in the YouTube videos closely, this article will address easy methods on how to zoom in on YouTube videos quickly.
In this article
Part 1: Why Should You Look Forward to Zoom Your YouTube Video?
Part 2: Effective Methods on How to Zoom in and Out YouTube Videos Easily
Part 1: Why Should You Look Forward to Zoom Your YouTube Video?
There can be various causes to zoom in on YouTube videos as users can clearly see hidden information and details from the video through it. For instance, if you are reviewing a trailer of a particular movie on your YouTube channel, you would be required to zoom in YouTube video many times. For breaking down the trailer, you would need to focus on the backgrounds, props, and other hidden details that are only possible through zooming in and out of the videos.
Moreover, if you are watching a demonstration of the chemistry practical on YouTube videos, readings on the apparatus may not be apparent in it. So here, you can also read and notice precise complicated readings on the videos by just zooming in. Also, in other scenarios, you can read the product’s description in makeup tutorials by using the option of zooming in and out.
To sum up, every regular user of YouTube must know how to zoom in on YouTube videos so that he can quickly focus on the details with a single click. By knowing the methods of zooming in and out, you can comprehensively extract the information through YouTube videos that can make your daily tasks easier.
Part 2: Effective Methods on How to Zoom in and Out YouTube Videos Easily
In this section, we will provide three effective methods to zoom in YouTube videos effortlessly. By applying any of the following methods, you can easily focus on the small details.
Method 1: Zoom In and Out on the YouTube Video Player
Are you looking for easier ways to zoom in and out of the YouTube video? YouTube gives the option on its player for viewing the videos in two modes: Theatre mode and full mode. Through theater mode, you can watch your video in a comparatively zoomed manner, whereas, in full screen, you can watch the video on a full screen of the monitor.
In this particular method, we will provide simple and easy steps for zooming in on the YouTube video player:
Step 1: Navigate to the YouTube app on your device browser, such as Google Chrome. On its search box, enter the video you want to watch.

Step 2: Press Enter, and you will see various options related to your desired video. Click on any particular video to watch.

Step 3: On the YouTube video player, you would be able to see two screen mode options on the right side. The first option is “Full Screen” mode, through which you can enjoy watching your videos on a full monitor screen. The second option is “Theatre Mode,” which will display the video in a cinematic look by zooming in to some extent. Explore these options to observe the small details in your YouTube video closely.

Method 2: Zoom In and Out with Browser Zoom Features
To zoom in on YouTube videos, your browser also offers effective ways for the users. By using the browser zoom features, you can quickly zoom in and out of the video without the need for additional help. Moreover, these zoom features are also beneficial for reading eBooks or online documents.
Here are the three ways through which you can instantly zoom in on your favorite YouTube videos easily:
Way 1: The first way to zoom in on video is through browser options. To do so, tap on the “Three-Dot” icon of your browser displayed in the top right corner. From the menu, tap on “Zoom” and control the actions through its small menu.

Way 2: Another way to zoom in and out of the YouTube video is through your mouse pad. Point your cursor to the place where you want to zoom and try to expand the screen from your mouse pad and vice versa for zoom out.

Way 3: On the URL search bar of YouTube, you can see different icons displayed next to it. Simply tap on the “Zoom” icon to control the zoom in and out accordingly.

Method 3: Zoom In on YouTube Video with Browser Extension
In this section, we will use a browser extension that will assist you in zooming in and out on YouTube videos comfortably. We will recommend the Zoom browser extension due to its distinct properties and features. Through its slider, you can zoom in on the YouTube video up to 400 factors with a single swipe.
Moreover, through this special browser extension, you can save the zoomed version of the website and can resume watching the videos from the set zoom value. To save your time, this browser also gives the option to zoom in and out the web pages together with a single click. To use this browser extension to zoom in on Youtube, here are simple steps.
Step 1: Install the Zoom browser extension on your device from the Chrome Store by tapping on the “Add to Chrome” button to download and install the extension.

Step 2: Now, open YouTube and play your desired video. Afterward, tap on the icon of extensions from the top and select this particular extension. Through this extension, you can either click on the “+” button or the slider to zoom the video accordingly.

Conclusion
YouTube has become a mainstream channel for watching and creating videos in this era. Many times we miss small yet important details while watching YouTube videos on our devices. To quickly catch up on these essential details, we have offered different and easy methods regarding zoom in on YouTube videos with a single click.
YouTube has undoubtedly become the most popular platform for streaming millions of videos to people worldwide. People, influencers, celebrities, and various brands can freely post their videos on YouTube, and with a single click, they can fetch millions of views. Due to the simplicity and exceptional features of YouTube, people across the globe have shifted to this platform to extract various kinds of information comfortably.
Many times, people find it difficult to catch small yet important details from the videos on YouTube. If you want to observe little details in the YouTube videos closely, this article will address easy methods on how to zoom in on YouTube videos quickly.
In this article
Part 1: Why Should You Look Forward to Zoom Your YouTube Video?
Part 2: Effective Methods on How to Zoom in and Out YouTube Videos Easily
Part 1: Why Should You Look Forward to Zoom Your YouTube Video?
There can be various causes to zoom in on YouTube videos as users can clearly see hidden information and details from the video through it. For instance, if you are reviewing a trailer of a particular movie on your YouTube channel, you would be required to zoom in YouTube video many times. For breaking down the trailer, you would need to focus on the backgrounds, props, and other hidden details that are only possible through zooming in and out of the videos.
Moreover, if you are watching a demonstration of the chemistry practical on YouTube videos, readings on the apparatus may not be apparent in it. So here, you can also read and notice precise complicated readings on the videos by just zooming in. Also, in other scenarios, you can read the product’s description in makeup tutorials by using the option of zooming in and out.
To sum up, every regular user of YouTube must know how to zoom in on YouTube videos so that he can quickly focus on the details with a single click. By knowing the methods of zooming in and out, you can comprehensively extract the information through YouTube videos that can make your daily tasks easier.
Part 2: Effective Methods on How to Zoom in and Out YouTube Videos Easily
In this section, we will provide three effective methods to zoom in YouTube videos effortlessly. By applying any of the following methods, you can easily focus on the small details.
Method 1: Zoom In and Out on the YouTube Video Player
Are you looking for easier ways to zoom in and out of the YouTube video? YouTube gives the option on its player for viewing the videos in two modes: Theatre mode and full mode. Through theater mode, you can watch your video in a comparatively zoomed manner, whereas, in full screen, you can watch the video on a full screen of the monitor.
In this particular method, we will provide simple and easy steps for zooming in on the YouTube video player:
Step 1: Navigate to the YouTube app on your device browser, such as Google Chrome. On its search box, enter the video you want to watch.

Step 2: Press Enter, and you will see various options related to your desired video. Click on any particular video to watch.

Step 3: On the YouTube video player, you would be able to see two screen mode options on the right side. The first option is “Full Screen” mode, through which you can enjoy watching your videos on a full monitor screen. The second option is “Theatre Mode,” which will display the video in a cinematic look by zooming in to some extent. Explore these options to observe the small details in your YouTube video closely.

Method 2: Zoom In and Out with Browser Zoom Features
To zoom in on YouTube videos, your browser also offers effective ways for the users. By using the browser zoom features, you can quickly zoom in and out of the video without the need for additional help. Moreover, these zoom features are also beneficial for reading eBooks or online documents.
Here are the three ways through which you can instantly zoom in on your favorite YouTube videos easily:
Way 1: The first way to zoom in on video is through browser options. To do so, tap on the “Three-Dot” icon of your browser displayed in the top right corner. From the menu, tap on “Zoom” and control the actions through its small menu.

Way 2: Another way to zoom in and out of the YouTube video is through your mouse pad. Point your cursor to the place where you want to zoom and try to expand the screen from your mouse pad and vice versa for zoom out.

Way 3: On the URL search bar of YouTube, you can see different icons displayed next to it. Simply tap on the “Zoom” icon to control the zoom in and out accordingly.

Method 3: Zoom In on YouTube Video with Browser Extension
In this section, we will use a browser extension that will assist you in zooming in and out on YouTube videos comfortably. We will recommend the Zoom browser extension due to its distinct properties and features. Through its slider, you can zoom in on the YouTube video up to 400 factors with a single swipe.
Moreover, through this special browser extension, you can save the zoomed version of the website and can resume watching the videos from the set zoom value. To save your time, this browser also gives the option to zoom in and out the web pages together with a single click. To use this browser extension to zoom in on Youtube, here are simple steps.
Step 1: Install the Zoom browser extension on your device from the Chrome Store by tapping on the “Add to Chrome” button to download and install the extension.

Step 2: Now, open YouTube and play your desired video. Afterward, tap on the icon of extensions from the top and select this particular extension. Through this extension, you can either click on the “+” button or the slider to zoom the video accordingly.

Conclusion
YouTube has become a mainstream channel for watching and creating videos in this era. Many times we miss small yet important details while watching YouTube videos on our devices. To quickly catch up on these essential details, we have offered different and easy methods regarding zoom in on YouTube videos with a single click.
YouTube has undoubtedly become the most popular platform for streaming millions of videos to people worldwide. People, influencers, celebrities, and various brands can freely post their videos on YouTube, and with a single click, they can fetch millions of views. Due to the simplicity and exceptional features of YouTube, people across the globe have shifted to this platform to extract various kinds of information comfortably.
Many times, people find it difficult to catch small yet important details from the videos on YouTube. If you want to observe little details in the YouTube videos closely, this article will address easy methods on how to zoom in on YouTube videos quickly.
In this article
Part 1: Why Should You Look Forward to Zoom Your YouTube Video?
Part 2: Effective Methods on How to Zoom in and Out YouTube Videos Easily
Part 1: Why Should You Look Forward to Zoom Your YouTube Video?
There can be various causes to zoom in on YouTube videos as users can clearly see hidden information and details from the video through it. For instance, if you are reviewing a trailer of a particular movie on your YouTube channel, you would be required to zoom in YouTube video many times. For breaking down the trailer, you would need to focus on the backgrounds, props, and other hidden details that are only possible through zooming in and out of the videos.
Moreover, if you are watching a demonstration of the chemistry practical on YouTube videos, readings on the apparatus may not be apparent in it. So here, you can also read and notice precise complicated readings on the videos by just zooming in. Also, in other scenarios, you can read the product’s description in makeup tutorials by using the option of zooming in and out.
To sum up, every regular user of YouTube must know how to zoom in on YouTube videos so that he can quickly focus on the details with a single click. By knowing the methods of zooming in and out, you can comprehensively extract the information through YouTube videos that can make your daily tasks easier.
Part 2: Effective Methods on How to Zoom in and Out YouTube Videos Easily
In this section, we will provide three effective methods to zoom in YouTube videos effortlessly. By applying any of the following methods, you can easily focus on the small details.
Method 1: Zoom In and Out on the YouTube Video Player
Are you looking for easier ways to zoom in and out of the YouTube video? YouTube gives the option on its player for viewing the videos in two modes: Theatre mode and full mode. Through theater mode, you can watch your video in a comparatively zoomed manner, whereas, in full screen, you can watch the video on a full screen of the monitor.
In this particular method, we will provide simple and easy steps for zooming in on the YouTube video player:
Step 1: Navigate to the YouTube app on your device browser, such as Google Chrome. On its search box, enter the video you want to watch.

Step 2: Press Enter, and you will see various options related to your desired video. Click on any particular video to watch.

Step 3: On the YouTube video player, you would be able to see two screen mode options on the right side. The first option is “Full Screen” mode, through which you can enjoy watching your videos on a full monitor screen. The second option is “Theatre Mode,” which will display the video in a cinematic look by zooming in to some extent. Explore these options to observe the small details in your YouTube video closely.

Method 2: Zoom In and Out with Browser Zoom Features
To zoom in on YouTube videos, your browser also offers effective ways for the users. By using the browser zoom features, you can quickly zoom in and out of the video without the need for additional help. Moreover, these zoom features are also beneficial for reading eBooks or online documents.
Here are the three ways through which you can instantly zoom in on your favorite YouTube videos easily:
Way 1: The first way to zoom in on video is through browser options. To do so, tap on the “Three-Dot” icon of your browser displayed in the top right corner. From the menu, tap on “Zoom” and control the actions through its small menu.

Way 2: Another way to zoom in and out of the YouTube video is through your mouse pad. Point your cursor to the place where you want to zoom and try to expand the screen from your mouse pad and vice versa for zoom out.

Way 3: On the URL search bar of YouTube, you can see different icons displayed next to it. Simply tap on the “Zoom” icon to control the zoom in and out accordingly.

Method 3: Zoom In on YouTube Video with Browser Extension
In this section, we will use a browser extension that will assist you in zooming in and out on YouTube videos comfortably. We will recommend the Zoom browser extension due to its distinct properties and features. Through its slider, you can zoom in on the YouTube video up to 400 factors with a single swipe.
Moreover, through this special browser extension, you can save the zoomed version of the website and can resume watching the videos from the set zoom value. To save your time, this browser also gives the option to zoom in and out the web pages together with a single click. To use this browser extension to zoom in on Youtube, here are simple steps.
Step 1: Install the Zoom browser extension on your device from the Chrome Store by tapping on the “Add to Chrome” button to download and install the extension.

Step 2: Now, open YouTube and play your desired video. Afterward, tap on the icon of extensions from the top and select this particular extension. Through this extension, you can either click on the “+” button or the slider to zoom the video accordingly.

Conclusion
YouTube has become a mainstream channel for watching and creating videos in this era. Many times we miss small yet important details while watching YouTube videos on our devices. To quickly catch up on these essential details, we have offered different and easy methods regarding zoom in on YouTube videos with a single click.
Also read:
- Updated Zoom In and Out on Discord (Desktop + App + Browser Solutions)
- Updated 2024 Approved 6 Instant Mp4 to GIF Online Tools for You
- Updated Detailed Tutorial to Merge Videos in VLC Media Player for 2024
- Updated In 2024, How to Speed Up Pictures on TikTok Slideshow
- New In 2024, How Windows Movie Maker Save MP4 File
- Updated Some Effective Slow Motion Video Editors You Can Try for 2024
- How to Add Text Animation Online
- New Read on to Learn About Multi Object Tracking, Its Types, and Requirements. Youll Also Learn About the Different Approaches Toward Object Tracking
- In 2024, How To Add Text In After Effects
- New In 2024, Achieving GoPro Slow Motion with Quality An In-Depth Overview
- Updated 2024 Approved How to Remove Motion Blur In Photoshop
- New 10 Catchy Pixel Art Wallpapers and How to Custom Your Own with Ease
- New Here, You Will Learn How to Add a Realistic Fire Effect Using Wondershare Filmora. That Will Help to Boost Your Channel and Decorate Your YouTube Channel with Creative and Unique Effects
- Updated In 2024, 3 In-Camera Transitions Tricks To Make Videos
- Updated Funny Content Ideas for YouTube Videos for 2024
- Updated In 2024, Quick Answer What Is a Transparent Logo and Why Do You Need It
- How to Use LUTs in Lumafusion & Free Resource for 2024
- In 2024, Have the Desire to Create a Stylish Glitch Effect to a Text on Your Video? Use Filmora for the Editing, Following the Given Steps Explained in Detail
- New Backup and Organize Your Tons of Footage in Minutes
- Updated In 2024, Expolring Top 6 Best Alternatives to Clownfish Voice Changer
- New Want to Come up with Exciting Sony Vegas Slideshow Templates for Your Next Project on YouTube and Other Mediums Then There Is Something for You
- What Does It Mean to Color Grade Your Images, and Why Is It so Important? Does It Mean the Same Thing as a Color Correction? Read on to Gather All the Information You Need on Color Grading Photography
- 2024 Approved How To Use Motion Blur On Video Star?
- New In 2024, How to Create Your Own LUTs for Your Video
- New Do You Want to Know How to Import or Adjust Clips in Wondershare Filmora? Dont Worry because Importing or Adjusting Video Clips in This Tool Is Pretty Easy
- Updated In 2024, Top 9 Best Solutions To Go For When Creating an AI Thumbnail
- How to Add Slideshow in PowerPoint for 2024
- Updated Detailed Guide to Crop Videos in Sony Vegas Pro for 2024
- How to Make a DIY Vlog or Video for 2024
- New 2024 Approved Best 12 AI Video Generators to Pick
- How to Add Freeze Frame to Your Video From Any Device?
- In 2024, The Complete Guide to Zoho Slides with Ease
- Free Ways to Download Mobile Phone Green Screen Videos and Pictures No Copyright
- Discover the Art of Masking in After Effects A Comprehensive Guide for 2024
- In 2024, Want to Add a Motion Blur Effect to Your Photos? This Step-by-Step Tutorial Will Show You How to Use GIMP Software to Get the Effect You Want
- 2024 Approved 10 Best Free GIF Background Remover for PC and Online
- How to Combine Several Xvid Files Into One Windows, Mac,Android, iPhone & Online for 2024
- 2024 Approved This Article Shares Valuable Insight Into the Best Brand Story Videos. Also, It Highlights the Importance of a Video Maker in Your Brand Story Video Ad-Making Process and Why Filmora Should Be Your Go-To Choice
- Updated In 2024, Splitting Audio From Video in Sony Vegas Step by Step
- 2024 Approved Split a Clip in DaVinci Resolve Step by Step
- New How to Create a DIY Green Screen Video Effect?
- 2024 Approved Ultimate Guide on Magic Effects Video Making
- Updated 2024 Approved Learn to Merge Clips in DaVinci Resolve with Simple Steps
- New In 2024, Best Animated Text Generator
- 2024 Approved How to Make Sony Vegas Freeze Frame
- Updated In 2024, 3D Ray Traced Settings In After Effects
- Remove FRP Lock on X50
- 2024 Approved What Is AI Influencer? | Wondershare Virbo Glossary
- In 2024, Recommended Best Applications for Mirroring Your Infinix Zero 5G 2023 Turbo Screen | Dr.fone
- In 2024, How To Change Your Apple ID on iPhone 13 Pro With or Without Password
- Cellular Network Not Available for Voice Calls On Motorola Moto G04 | Dr.fone
- Vivo G2 Not Receiving Texts? 10 Hassle-Free Solutions Here | Dr.fone
- 3 Solutions to Find Your Honor X50 Current Location of a Mobile Number | Dr.fone
- In 2024, Top 4 SIM Location Trackers To Easily Find Your Lost Xiaomi Redmi Note 12R Device
- How To Fix Unresponsive Phone Touchscreen Of Vivo V27 Pro | Dr.fone
- How to Cast Realme Narzo 60 5G Screen to PC Using WiFi | Dr.fone
- How do i sign a files electronically
- In 2024, Trouble with Apple iPhone 14 Swipe-Up? Try These 11 Solutions | Dr.fone
- In 2024, How to Unlock Apple iPhone 11 Pro Max with/without SIM Card
- 5 Ways to Track OnePlus Nord N30 5G without App | Dr.fone
- In 2024, Android to Apple How To Transfer Photos From Nokia C22 to iPad Easily | Dr.fone
- In 2024, How I Transferred Messages from Lava Blaze 2 5G to iPhone 12/XS (Max) in Seconds | Dr.fone
- How To Transfer Data From iPhone X To Other iPhone 13 devices? | Dr.fone
- In 2024, Disabled Apple iPhone 6s Plus How to Unlock a Disabled Apple iPhone 6s Plus? | Dr.fone
- Top 4 SIM Location Trackers To Easily Find Your Lost Infinix GT 10 Pro Device
- In 2024, How to Unlock Motorola Moto G24 Pattern Lock if Forgotten? 6 Ways
- In 2024, The Updated Method to Bypass Infinix Smart 8 Pro FRP
- In 2024, Is it Possible to Use Miracast with Apple iPhone 12 Pro? | Dr.fone
- Updated What Is AI Voice, In 2024
- Easy Methods How To Transfer Pictures From Apple iPhone 13 to PC | Dr.fone
- In 2024, Full Guide to Catch 100 IV Pokémon Using a Map On Lava Blaze 2 | Dr.fone
- In 2024, Android Unlock Code Sim Unlock Your Motorola Moto G23 Phone and Remove Locked Screen
- How to get the dragon scale and evolution-enabled pokemon On Lava Blaze Curve 5G? | Dr.fone
- How to share/fake gps on Uber for Xiaomi Redmi Note 13 Pro+ 5G | Dr.fone
- How to Unlock Oppo F25 Pro 5G PIN Code/Pattern Lock/Password
- 3 Effective Ways to Bypass Activation Lock on Apple iPhone X
- The Best iSpoofer Alternative to Try On Poco C65 | Dr.fone
- In 2024, Pokemon Go No GPS Signal? Heres Every Possible Solution On Xiaomi 13 Ultra | Dr.fone
- In 2024, How does the stardust trade cost In pokemon go On Nokia C210? | Dr.fone
- In 2024, Best Ways on How to Unlock/Bypass/Swipe/Remove Samsung Galaxy S23+ Fingerprint Lock
- Title: In 2024, Creative Ways to Add Green Screen Effects In Photoshop
- Author: Chloe
- Created at : 2024-05-20 03:38:28
- Updated at : 2024-05-21 03:38:28
- Link: https://ai-editing-video.techidaily.com/in-2024-creative-ways-to-add-green-screen-effects-in-photoshop/
- License: This work is licensed under CC BY-NC-SA 4.0.

