
:max_bytes(150000):strip_icc():format(webp)/netgear-default-password-list-2619154-b581fdcf136848d29e944638cd2ad444.png)
In 2024, Discover How to Download Mobile Phone Green Screen Videos and Pictures for Free. Elevate Your Content with HD Quality Green Screen Frames
Discover How to Download Mobile Phone Green Screen Videos and Pictures for Free. Elevate Your Content with HD Quality Green Screen Frames
The digital landscape is bustling with content creators showcasing their talent, brands promoting their products, and educators teaching various skills. Amidst all this digital hustle, have you ever stopped to wonder how some creators seamlessly integrate themselves into dreamy, otherworldly, or even fantastical backgrounds?
How does one moment show them standing in their living room, and the next, they’re strolling through the sandy beaches of the Maldives or floating in space?
The answer to these mesmerizing effects is the magic of green screens.
Part1:What is Green Screen Footages and Application Scenarios
The concept of the green screen, or the green screen mobile frame, isn’t new. Hollywood has used it for decades to transport actors to distant planets, into the heart of battles, or atop treacherous mountain peaks. The principle is simple: film your subject against a vibrant green backdrop, then use software to replace that green with any video or image you choose.
So, why green?
The color green is distinct, easily distinguishable, and not typically worn as a primary color in clothing. This makes it simpler for software to isolate and replace without accidentally morphing the subject into the new background. The result is a clean, nearly flawless integration of the subject with whatever setting or scene you can imagine.
But it’s not just about transporting subjects to new locations. A green screen mobile frame or video green screen frame allows for interactive presentations, imaginative storytelling, and even sophisticated effects, like adding dynamic weather elements or supernatural phenomena. It can turn a static, dull scene into something vibrant, interactive, and engaging.
Application Scenarios:
- Entertainment & Films: This is the most obvious. From massive Hollywood productions to amateur short films, green screens create different worlds, enhance scenes with visual effects, or simply transport characters to diverse locations.
- Education: Educators use green screens for virtual field trips or to create interactive lessons, making learning more dynamic and interesting.
- Gaming & Streaming: Have you ever seen a game streamer with just their figure visible over the gameplay? That’s a green screen at work.
- Digital Marketing: Brands use it to produce compelling ads without the hefty cost of actual locations or sets.
- Social Media Content: TikTokers, YouTubers, and Instagram influencers employ green screens to add a layer of creativity and uniqueness to their content, standing out in the ever-crowded space.
The magic of green screens is everywhere, bridging the gap between imagination and reality. With the rise of accessible technology and software, what was once restricted to big-budget studios is now at the fingertips of anyone with a camera, a green cloth, and a vision. And with the platforms we’re about to delve into, sourcing green screen mobile frame HD content has never been easier. So, ready to jump into this world?
Part2: Free Websites to Download Mobile Phone Green Screen Videos and Pictures
In today’s digital age, the demand for high-quality visuals is at an all-time high. Green-screen videos and images can elevate your content, whether you’re a budding YouTuber, a professional filmmaker, or someone trying to make a memorable Instagram story. Thankfully, there are numerous platforms where you can find green-screen mobile frame content; even better, they’re free! Let’s dive deeper into these treasure troves:
01Adobe Stock
While Adobe Stock is renowned for its premium visuals, a lesser-known section offers complimentary content. Once in a while, you can find a beautiful green screen mobile frame HD ready for download. The content here is curated, ensuring that even the freebies maintain a high-quality standard. This makes it a great starting point for those new to the green screen world.
02iStock
Another heavyweight in the digital asset market, iStock occasionally surprises its users with free content. By rummaging through their vast library, you might come across a perfect video frame green screen for your next project. It’s a testament to their commitment to cater to all types of users, regardless of budget.
03Videezy
Videezy stands out for its user-friendly interface and many free green screen video frame options. Ranging from simple mobile frames to intricate animations, the platform has a rich variety. This makes Videezy a favorite for both novices and professionals. Its community-driven approach ensures a constant influx of fresh content.
04Pixabay
One can’t discuss free visual content without mentioning Pixabay. This platform is a goldmine for both videos and images. Their collection of background green screen mobile frame assets is extensive. The community-driven nature means there’s a diverse range of content, suitable for different cultural and thematic needs. Plus, the no-copyright angle ensures peace of mind.
05Pexels
Pexels mirrors Pixabay in many ways, offering various video green screen frame content. However, what sets Pexels apart is its emphasis on contemporary and trendy visuals. For those keen on staying ahead of the curve and ensuring their content resonates with younger audiences, Pexels is a go-to resource.
06Coverr
While it might not have the extensive library of the earlier mentions, Coverr compensates with uniqueness. Their green screen video frame content leans more towards the artistic side, making it ideal for projects that require a distinct touch. If you’re after something that stands out and deviates from the norm, Coverr should be on your radar.
07Shutterstock
Typically, Shutterstock would be the last place to look for free content. Known for its premium offerings, the platform occasionally throws in some freebies. It’s like a lucky draw. When you find a green screen frame video without the price tag, rest assured, it’s a high-quality piece.
Part3: Summary
So, there you have it. Green screens are the secret behind those cool videos where anything seems possible. And now, you can make those videos with all these resources too. Dive in, get creative, and have fun with it!
EasyHDR Review: Is This a Good Choice to Create HDR
Any professional photographer knows that “photography” is a broad niche. For example, HDR photography involves taking images in dark and bright areas. But because these images might not show much to the naked eyes, you’ll need an HDR program like EasyHDR. This software can recreate and design incredible HDR photos on Mac and Windows computers. So, this review post advises you whether Easy HDR is worth the money or not. We’ll also advise on the best way to edit and create HDR videos on PC.
Part 1: Summary Box on Easy HDR
| Description | EasyHDR is an HDR photography software for highlighting image details in HDR photos. It supports raw images and batch processing. |
|---|---|
| Pricing | $33 for a lifetime license |
| Operating System | Windows 7/8/10/11 and macOS 10.12 or newer |
| Layout | 4.5/5 |
| Easy to use | 4.8/5 |
| HDQ quality | 4.2/5 |
| Post-processing | 3.5/5 |
Before we dive deeper into this Easy HDRi review, let’s first discuss how this HDR software rates in some critical aspects:
1. Effectiveness - 4.8/5
The HDRi process on this software is very effective, although you shouldn’t have high expectations. It provides manual and automatic lens correction properties, although using the manual option might need a learning curve. Other extras include ghost removal and automatic alignment.
2. Price - 4.7/5
Easy HDR is not necessarily a free program. Although there’s a free demo version, it’s pretty limited in features. Therefore, purchase the premium plan for $33 or $55 for personal and lifetime licenses. As a seasoned HDR editor, you should know that other HDR programs like Aurora HDR cost way more than this.
3. Supported OS - 5/5
This HDR photography program is compatible with Windows and macOS systems, which is a big plus. You can install it on Windows 7 or newer and macOS 10.12 or newer. Sorry, Linux users!
4. Ease of use - 4.8
Easy HDR is one of the most beginner-friendly HDR processing tools despite the advanced management tools. It features automatic lens correction, ghost removal, and HDR merging capabilities.
5. Best for - Beginner HDRi editors
This program’s simple approach makes it perfect for HDRi photographers without prior editing skills. Also, if you’re a beginner on a tight budget, easyHDR is the best software for you.
Our Verdict
Up to this juncture, you might wonder if Easy HDR is worth the money or not. Well, that depends on what you want. If you have minimal HDR editing knowledge, then this is the best professional program for you.
The straightforward layout boasts automatic HDR editing tools to make your work effortless. In addition, it supports a wide array of image formats, including photos taken using your DSLR camera. And the $33/lifetime price should be manageable by many average Joes.
But on the flip side, Easy HDR lacks in-depth post-processing tools. Also, it lacks the all-important “undo” feature, which is vital in HDR image editing. Other than that, it’s the perfect program to make dramatic and realistic HDR photos.
Pros
- Simple layout.
- Make realistic HDR images with automatic tools.
- Easy HDRi Blender and Adobe Lightroom plugins.
- Standalone Easy HDR desktop program.
- Batch processing supported.
- Compatible with multiple image formats, including RAW.
Cons
- It doesn’t have advanced HDR post-processing tools.
- No HDR feature for editing.
Part 2. Detailed Review for Easy HDR
Before diving deeper into the detailed Easy HDR features, it’s important to note that the program has a demo version. You can use this version to practice and study the vital components of easyHDR. But be guided that the demo version exports images with a watermark. In addition, users can’t save HDRi in TIFF format. Let’s get in!
1. High-Quality Bracket Merging
A good quality HDRi software should easily merge different image exposures, making the photo look natural and spectacular. To start incorporating, drag the image brackets to easyHDR and press “Ok” on the pop-up screen. You can now try the different bracket merging effects until you find something that suits your preference.
2. Editing features
EasyHDR goes a step further to provide its users with a comprehensive list of editing features. For example, the “Clone Stamp” tool can remove unwanted objects like cables without blurring the photo. You can also use the “Tone Curve” feature to adjust the brightness of shadows and highlights.
3. Ghost removal
No, this is not the scary ghost that you know. Instead, these ghosting artefacts appear in misaligned photos due to moving objects like leaves, branches, cars, people, etc. With Easy HDR, you can eliminate the “ghosts” manually or automatically. Simply open the photo and turn on “Ghost Removal” to remove them automatically.
4. HDR batch processing
As expected, you can find it pretty tedious to import and merge each HDR bracket individually. For this reason, easyHDR comes with a “Batch Processing” feature that allows users to combine a whole folder of brackets automatically.
5. LDR enhancement
Although we’ve mainly focused on brackets and photos in this post, it’s important to note that easyHDR also works with single images. Instead of having three separate bracketed exposures, LDR (Low Dynamic Range) enhancement allows you to generate exposures from a single JPEG or RAW photo.
Bonus Tips: The Best Way to Edit HDR videos on your Desktop
Like HDR images, HDR videos offer more comprehensive displays in dark and bright surroundings. In short, these videos allow more colourful and detailed highlight representations. Unfortunately, not all HDR editing programs can merge bracketed exposures effortlessly to produce outstanding results. And those that do can cost you an arm and a leg.
With that in mind, we recommend Wondershare Filmora 11 for professional and semi-professional HDR editors. It’s a simple but detailed program that allows users to edit HDR materials quickly and easily. It houses thousands of free effects you’ll use with the Blending Mode to create nice HDR footage. Filmora 11 works with any video format, including RAW footage from your camcorder. And of course, there are many other editing features like color correction, color grading, image stabilization, chroma key/green screen, etc.
Steps to add an HDR effect to a standard video on Filmora 11:
Step1Open the video on Filmora 11

Run Wondershare Filmora 11 on your Mac/Win computer and start a new project. After creating a project, click Import Media to upload the video to edit and move it to the storyboard.
Step2Add a blending mode effect

Next, select the video and choose White as the color overlay. To do that, open the Sample color options and move the While color on the top timeline.

After that, it’s time to change the Blending Mode of the color overlay. To do that, right-click the color track and choose Edit Properties. Then tap Composition and then select Exclusion on the Blending Mode drop-down menu.
Step3Apply the B&W Film color effect

Now tap the Effect tab and search for the B&W Film effect. This film effect should be free to use whether using a paid or free account. After downloading it, add the effect overlay to the video track and export the video.
Step4Import the uploaded video

After creating the video, import it on Filmora 11 and delete the white color overlay and W&B Film effects. Now add the imported video on the first track, then search and apply a Square Blur effect. Also, change the Blending Mode of the footage to Overlay. Meanwhile, click the Effect tab and adjust the Size slider accordingly. For example, you can choose 10.

Don’t stop there. Open the Effects tab and add the Lomo effect to your video. Also, search and add the Luma Sharp effect. Remember that you can retouch these effects accordingly under the Effect tab. And lastly, export the new HDR video. That’s it!
Final Words
There you have it. Easy HDR is arguably the most-beginner friendly program to edit your photos on desktops. Although it doesn’t feature much, the available editing features should be enough to help you create incredible HDR images. And don’t forget to use Wondershare Filmora 11 to apply a cool HDR effect to your footage. Give it a try!
Free Download For Win 7 or later(64-bit)
Free Download For macOS 10.14 or later
Before we dive deeper into this Easy HDRi review, let’s first discuss how this HDR software rates in some critical aspects:
1. Effectiveness - 4.8/5
The HDRi process on this software is very effective, although you shouldn’t have high expectations. It provides manual and automatic lens correction properties, although using the manual option might need a learning curve. Other extras include ghost removal and automatic alignment.
2. Price - 4.7/5
Easy HDR is not necessarily a free program. Although there’s a free demo version, it’s pretty limited in features. Therefore, purchase the premium plan for $33 or $55 for personal and lifetime licenses. As a seasoned HDR editor, you should know that other HDR programs like Aurora HDR cost way more than this.
3. Supported OS - 5/5
This HDR photography program is compatible with Windows and macOS systems, which is a big plus. You can install it on Windows 7 or newer and macOS 10.12 or newer. Sorry, Linux users!
4. Ease of use - 4.8
Easy HDR is one of the most beginner-friendly HDR processing tools despite the advanced management tools. It features automatic lens correction, ghost removal, and HDR merging capabilities.
5. Best for - Beginner HDRi editors
This program’s simple approach makes it perfect for HDRi photographers without prior editing skills. Also, if you’re a beginner on a tight budget, easyHDR is the best software for you.
Our Verdict
Up to this juncture, you might wonder if Easy HDR is worth the money or not. Well, that depends on what you want. If you have minimal HDR editing knowledge, then this is the best professional program for you.
The straightforward layout boasts automatic HDR editing tools to make your work effortless. In addition, it supports a wide array of image formats, including photos taken using your DSLR camera. And the $33/lifetime price should be manageable by many average Joes.
But on the flip side, Easy HDR lacks in-depth post-processing tools. Also, it lacks the all-important “undo” feature, which is vital in HDR image editing. Other than that, it’s the perfect program to make dramatic and realistic HDR photos.
Pros
- Simple layout.
- Make realistic HDR images with automatic tools.
- Easy HDRi Blender and Adobe Lightroom plugins.
- Standalone Easy HDR desktop program.
- Batch processing supported.
- Compatible with multiple image formats, including RAW.
Cons
- It doesn’t have advanced HDR post-processing tools.
- No HDR feature for editing.
Part 2. Detailed Review for Easy HDR
Before diving deeper into the detailed Easy HDR features, it’s important to note that the program has a demo version. You can use this version to practice and study the vital components of easyHDR. But be guided that the demo version exports images with a watermark. In addition, users can’t save HDRi in TIFF format. Let’s get in!
1. High-Quality Bracket Merging
A good quality HDRi software should easily merge different image exposures, making the photo look natural and spectacular. To start incorporating, drag the image brackets to easyHDR and press “Ok” on the pop-up screen. You can now try the different bracket merging effects until you find something that suits your preference.
2. Editing features
EasyHDR goes a step further to provide its users with a comprehensive list of editing features. For example, the “Clone Stamp” tool can remove unwanted objects like cables without blurring the photo. You can also use the “Tone Curve” feature to adjust the brightness of shadows and highlights.
3. Ghost removal
No, this is not the scary ghost that you know. Instead, these ghosting artefacts appear in misaligned photos due to moving objects like leaves, branches, cars, people, etc. With Easy HDR, you can eliminate the “ghosts” manually or automatically. Simply open the photo and turn on “Ghost Removal” to remove them automatically.
4. HDR batch processing
As expected, you can find it pretty tedious to import and merge each HDR bracket individually. For this reason, easyHDR comes with a “Batch Processing” feature that allows users to combine a whole folder of brackets automatically.
5. LDR enhancement
Although we’ve mainly focused on brackets and photos in this post, it’s important to note that easyHDR also works with single images. Instead of having three separate bracketed exposures, LDR (Low Dynamic Range) enhancement allows you to generate exposures from a single JPEG or RAW photo.
Bonus Tips: The Best Way to Edit HDR videos on your Desktop
Like HDR images, HDR videos offer more comprehensive displays in dark and bright surroundings. In short, these videos allow more colourful and detailed highlight representations. Unfortunately, not all HDR editing programs can merge bracketed exposures effortlessly to produce outstanding results. And those that do can cost you an arm and a leg.
With that in mind, we recommend Wondershare Filmora 11 for professional and semi-professional HDR editors. It’s a simple but detailed program that allows users to edit HDR materials quickly and easily. It houses thousands of free effects you’ll use with the Blending Mode to create nice HDR footage. Filmora 11 works with any video format, including RAW footage from your camcorder. And of course, there are many other editing features like color correction, color grading, image stabilization, chroma key/green screen, etc.
Steps to add an HDR effect to a standard video on Filmora 11:
Step1Open the video on Filmora 11
Run Wondershare Filmora 11 on your Mac/Win computer and start a new project. After creating a project, click Import Media to upload the video to edit and move it to the storyboard.
Step2Add a blending mode effect
Next, select the video and choose White as the color overlay. To do that, open the Sample color options and move the While color on the top timeline.
After that, it’s time to change the Blending Mode of the color overlay. To do that, right-click the color track and choose Edit Properties. Then tap Composition and then select Exclusion on the Blending Mode drop-down menu.
Step3Apply the B&W Film color effect
Now tap the Effect tab and search for the B&W Film effect. This film effect should be free to use whether using a paid or free account. After downloading it, add the effect overlay to the video track and export the video.
Step4Import the uploaded video
After creating the video, import it on Filmora 11 and delete the white color overlay and W&B Film effects. Now add the imported video on the first track, then search and apply a Square Blur effect. Also, change the Blending Mode of the footage to Overlay. Meanwhile, click the Effect tab and adjust the Size slider accordingly. For example, you can choose 10.
Don’t stop there. Open the Effects tab and add the Lomo effect to your video. Also, search and add the Luma Sharp effect. Remember that you can retouch these effects accordingly under the Effect tab. And lastly, export the new HDR video. That’s it!
Final Words
There you have it. Easy HDR is arguably the most-beginner friendly program to edit your photos on desktops. Although it doesn’t feature much, the available editing features should be enough to help you create incredible HDR images. And don’t forget to use Wondershare Filmora 11 to apply a cool HDR effect to your footage. Give it a try!
Free Download For Win 7 or later(64-bit)
Free Download For macOS 10.14 or later
Doable Ways to Make Transparent Background in Procreate
Doable Ways to Make Transparent Background in Procreate
An easy yet powerful editor
Numerous effects to choose from
Detailed tutorials provided by the official channel
Figuring out the crucial steps to make the canvas excellent is one of the loveliest things users are performing for exporting the closing Procreate-projects. Once after getting expert with things trick you can be able to position the canvas surprisingly on great back for a memorable moment. You can make the most of it for your procreate mission that you have created.
Out of many essentials tools you have ever used for experiencing the benefits of equipment & skills, the Procreate is a kind of solution that comes with one of the most trustworthy as well as brilliant capability to erase the undesired background from the pictures. It is more than a general tool and there are some specified approaches to do so, but in today possible scenario, you can easily focus around choice of right selections to erase a background at ease. People can explore the chances of creating various attractive methods to work in the PNG structure after removing the desired background.
In this article
01 [How to Delete a White Background with Procreate for the IPad?](#Part 1)
02 [How to Make Transparent Background with Procreate for iPhone?](#Part 2)
03 [How to Create Popping Thumbnails or Profile Photos](#Part 3)
Part 1 How to Delete a White Background with Procreate for the IPad?

In case you are facing discoloration problem too then it is always a better idea to cast image with desired background and remove the objects.
Now turning your background with a lovely image or your own is just a matter of few clicks. With great transparent background procreate, you will be heading towards the satisfaction of obtaining transparent background. With few crucial steps you can stay from the other competitors or it will make your posts viral. With stepwise guidelines on removing the background as well as replacing it with a transparent one in Procreate is what you need the most today.
When it comes to deleting the white-background with a Procreate, then with great selection of tools you can easily create amazing performance for your post. If you are still in a dilemma to make use of the white coloured Background. After tapping on the top-left corner of the screen, you can open-up brilliant level of opportunities to make the most out of it. Are you ready to begin? Next you will learn about how to turn the background into a desired canvas for all your Instagram stories.
The following steps will provide you a quick walkthrough of entire process, stepwise:-
Step 1: First you are required to open the picture with Procreate. Get your desired image for the edit or open your picture & turn-off the overall visibility of background layer by layers-icon, tap it, it is presented on the top-right corner. Here, you will see layer labelled as the background, you need to uncheck the layer’s box for turning-off overall visibility at the bottom of Layers menu.
It is an important step to perform as if you want to deleting any white background from the image otherwise background will be treated as transparent with white-background showing through, thus you will experience no changes to the document. You are not required to remove background from image procreate if your image is not having a background layer.
Step 2: Create the selection at around white area of an image & delete background
For you to perform the step of procreate remove white background, you are required to make selection around white area. For this, open-up the selection-menu and it is placed in the form round icon named ‘S’ at the top-left-corner of the screen. At this menu, choose auto & Add. To create such level of perfection in selection, just hold & tap over any area of white-background at this screen. You can also increase threshold of your selection by moving the fingers/stylus at the right. For the opposite process, you can move the same to the left.You need to adjust the desired threshold until selection-area on your screen lines-up in accordance with an edges of the subject. You are now heading towards the process of make background transparent procreatefor your desired image quickly.
With your current selection still in active state, just tap on wrench-icon it the top-left area of your screen, then navigate to Add-menu, and here tap on the Cut option. Congrats, you have effectively deleted the background from an image.
**Step 3:**Just release the selection in the form of tapping on Selection-menu icon and repeat the process again for negative space-areas & at last clean-up stray-pixels with through an Eraser. You can repeat the process further from the step-2 in case any stray pixels still remains there as it is a normal situation to face while removing the pixels background with ‘remove background on procreate’ option.You can also take the Eraser & then manually erase those stray-pixels in there is any.
Step 4: Export your final work as PNG-file to preserve the transparency
After finishing the task of deleting background from the picture you can easily export your work to a desirable file format. The image you want to export can be in the form of PNG to retain the transparency. Other useful formats you can choose is JPEG but this doesn’tsupport transparency. So, be wise & be careful while choose your file formats.You are now having procreate export transparent backgroundand can also place the same to any sort of backdrop like an app, website, or any other workspace.
Part 2 How to Make Transparent Background with Procreate for iPhone?

Let’s dive-in quickly into the process of making the background transparent with procreate, if you are an iPhone User.
● GO Into an option of Canvas
It is up-to you whether you want to create a new canvas or want to work-upon already saved canvas. In your device through procreate app, you can do the same without any worries.
● Tap onto the option of Layers Panel
This option is located at the top-right corner of your toolbar. This option looks similar to the two-squares on the top of one another.
● Replace dull looking background with transparent background
You can quickly go down to the layers-panel placed at the bottom to choose the background color.Transparent background in procreateis always a good option to consider.
● Put uncheck before the box
At the right of toolbar you can be able to see words ‘Background color’ and if it is checked then you need to uncheck it. Now your goal to make the background completely transparent with procreate make background transparent tool, will be achieved. Now your background is completely transparent and ready to use.
Part 3 How to Create Popping Thumbnails or Profile Photos

There are various tools available in the market to make a popping thumbnail for your YouTube or Instagram pages. Thumbnail maker like Filmora can be an interesting option to choose as it is quick and effective. You can also customized as well as download the thumbnails at no cost with the same. However, they comes with certain limitations like overall size of the image to be downloaded. For better versions you can use premium tools. With better creativity and great imagination you can make the thumbnail as crisp as possible.
● Upload your desired photo to Filmora’s thumbnail maker templates.
You can easily create your video thumbnail, but you need some inspiration and for that you can make use of amazing tool like Filmora. With access to more than 50 free templates you can achieve your goal of making popping thumbnails.
● Adding text, clipart, or perfect quality of background can give it a boost
After picking your template, one can make use of thumbnail to stand out different in terms of adding text, clipart or background. For adding custom background to your thumbnail you can make use of procreate that can remove the background with procreateremove white backgroundfeatures and give you better featured image with nice background. Also to clarify the objectives of your thumbnail you can add titles, and also consider placing the same on the top of any dark color background if your thumbnail is light in color. For making the background darker just choose remove white background procreateas discussed above.
● Just Download your finished product to your device
After polishing the thumbnails with creative stuff, you can download the same to your device or export it to your smartphone.
Voila, you just have create your own custom popping thumbnail. With remove background on procreate, you can never feel disappointed.
****Wondershare Filmora Video Editor App to Remove Unwanted Background Easily**
For Win 7 or later (64-bit)
For macOS 10.12 or later
In case you are searching for any professional tool to remove het background and replace the one with any of your favorite picture then there is a tool for you to consider. With greater different functionalities, you can make any Instagram post or story interesting through the help of Fillmora App. This has set of brilliant solutions to provide with most brilliant picture and video editing features. It is interesting, fun-loving as well as attractive enough to turn any moments extraordinary.
Handy features to enjoy:-
● You can make use of this tool to create custom thumbnails for your YouTube or Instagram page.
● Great varieties of templates for making popping thumbnails
● Greater capability to beautifully construct picture editing animations
● Varieties of Effects for every age group
● Attractive filters, GIFs packs and images to turn any dull looking background into an amazing moment.
● Delete white background quickly
● Right selection of tools to make the editing effective
● Flawless features to crop, cut-up, cut, trim & mix operations.
● Single click operation to turn the images into a beauty mode
● Options to save your creations into your device or virtual space
● Share your creations to your community, to your friends via Facebook, Instagram, YouTube, and Twitter quickly.
It is a greater idea to try this app for making use of its image editing features for deleting the white background in an easy manner.
● Ending Thoughts →
● With great varieties of features it is now very easy for you to create some automated selections in just single tap.
● Deleting the white background through a pro-tool like Procreate is smart, quick & seamless process.
● You are not going to get confused, even if you are using it for the very first time.
● It is the trend that every Instagram user is following for posting better images with nice background options.
Figuring out the crucial steps to make the canvas excellent is one of the loveliest things users are performing for exporting the closing Procreate-projects. Once after getting expert with things trick you can be able to position the canvas surprisingly on great back for a memorable moment. You can make the most of it for your procreate mission that you have created.
Out of many essentials tools you have ever used for experiencing the benefits of equipment & skills, the Procreate is a kind of solution that comes with one of the most trustworthy as well as brilliant capability to erase the undesired background from the pictures. It is more than a general tool and there are some specified approaches to do so, but in today possible scenario, you can easily focus around choice of right selections to erase a background at ease. People can explore the chances of creating various attractive methods to work in the PNG structure after removing the desired background.
In this article
01 [How to Delete a White Background with Procreate for the IPad?](#Part 1)
02 [How to Make Transparent Background with Procreate for iPhone?](#Part 2)
03 [How to Create Popping Thumbnails or Profile Photos](#Part 3)
Part 1 How to Delete a White Background with Procreate for the IPad?
In case you are facing discoloration problem too then it is always a better idea to cast image with desired background and remove the objects.
Now turning your background with a lovely image or your own is just a matter of few clicks. With great transparent background procreate, you will be heading towards the satisfaction of obtaining transparent background. With few crucial steps you can stay from the other competitors or it will make your posts viral. With stepwise guidelines on removing the background as well as replacing it with a transparent one in Procreate is what you need the most today.
When it comes to deleting the white-background with a Procreate, then with great selection of tools you can easily create amazing performance for your post. If you are still in a dilemma to make use of the white coloured Background. After tapping on the top-left corner of the screen, you can open-up brilliant level of opportunities to make the most out of it. Are you ready to begin? Next you will learn about how to turn the background into a desired canvas for all your Instagram stories.
The following steps will provide you a quick walkthrough of entire process, stepwise:-
Step 1: First you are required to open the picture with Procreate. Get your desired image for the edit or open your picture & turn-off the overall visibility of background layer by layers-icon, tap it, it is presented on the top-right corner. Here, you will see layer labelled as the background, you need to uncheck the layer’s box for turning-off overall visibility at the bottom of Layers menu.
It is an important step to perform as if you want to deleting any white background from the image otherwise background will be treated as transparent with white-background showing through, thus you will experience no changes to the document. You are not required to remove background from image procreate if your image is not having a background layer.
Step 2: Create the selection at around white area of an image & delete background
For you to perform the step of procreate remove white background, you are required to make selection around white area. For this, open-up the selection-menu and it is placed in the form round icon named ‘S’ at the top-left-corner of the screen. At this menu, choose auto & Add. To create such level of perfection in selection, just hold & tap over any area of white-background at this screen. You can also increase threshold of your selection by moving the fingers/stylus at the right. For the opposite process, you can move the same to the left.You need to adjust the desired threshold until selection-area on your screen lines-up in accordance with an edges of the subject. You are now heading towards the process of make background transparent procreatefor your desired image quickly.
With your current selection still in active state, just tap on wrench-icon it the top-left area of your screen, then navigate to Add-menu, and here tap on the Cut option. Congrats, you have effectively deleted the background from an image.
**Step 3:**Just release the selection in the form of tapping on Selection-menu icon and repeat the process again for negative space-areas & at last clean-up stray-pixels with through an Eraser. You can repeat the process further from the step-2 in case any stray pixels still remains there as it is a normal situation to face while removing the pixels background with ‘remove background on procreate’ option.You can also take the Eraser & then manually erase those stray-pixels in there is any.
Step 4: Export your final work as PNG-file to preserve the transparency
After finishing the task of deleting background from the picture you can easily export your work to a desirable file format. The image you want to export can be in the form of PNG to retain the transparency. Other useful formats you can choose is JPEG but this doesn’tsupport transparency. So, be wise & be careful while choose your file formats.You are now having procreate export transparent backgroundand can also place the same to any sort of backdrop like an app, website, or any other workspace.
Part 2 How to Make Transparent Background with Procreate for iPhone?
Let’s dive-in quickly into the process of making the background transparent with procreate, if you are an iPhone User.
● GO Into an option of Canvas
It is up-to you whether you want to create a new canvas or want to work-upon already saved canvas. In your device through procreate app, you can do the same without any worries.
● Tap onto the option of Layers Panel
This option is located at the top-right corner of your toolbar. This option looks similar to the two-squares on the top of one another.
● Replace dull looking background with transparent background
You can quickly go down to the layers-panel placed at the bottom to choose the background color.Transparent background in procreateis always a good option to consider.
● Put uncheck before the box
At the right of toolbar you can be able to see words ‘Background color’ and if it is checked then you need to uncheck it. Now your goal to make the background completely transparent with procreate make background transparent tool, will be achieved. Now your background is completely transparent and ready to use.
Part 3 How to Create Popping Thumbnails or Profile Photos
There are various tools available in the market to make a popping thumbnail for your YouTube or Instagram pages. Thumbnail maker like Filmora can be an interesting option to choose as it is quick and effective. You can also customized as well as download the thumbnails at no cost with the same. However, they comes with certain limitations like overall size of the image to be downloaded. For better versions you can use premium tools. With better creativity and great imagination you can make the thumbnail as crisp as possible.
● Upload your desired photo to Filmora’s thumbnail maker templates.
You can easily create your video thumbnail, but you need some inspiration and for that you can make use of amazing tool like Filmora. With access to more than 50 free templates you can achieve your goal of making popping thumbnails.
● Adding text, clipart, or perfect quality of background can give it a boost
After picking your template, one can make use of thumbnail to stand out different in terms of adding text, clipart or background. For adding custom background to your thumbnail you can make use of procreate that can remove the background with procreateremove white backgroundfeatures and give you better featured image with nice background. Also to clarify the objectives of your thumbnail you can add titles, and also consider placing the same on the top of any dark color background if your thumbnail is light in color. For making the background darker just choose remove white background procreateas discussed above.
● Just Download your finished product to your device
After polishing the thumbnails with creative stuff, you can download the same to your device or export it to your smartphone.
Voila, you just have create your own custom popping thumbnail. With remove background on procreate, you can never feel disappointed.
****Wondershare Filmora Video Editor App to Remove Unwanted Background Easily**
For Win 7 or later (64-bit)
For macOS 10.12 or later
In case you are searching for any professional tool to remove het background and replace the one with any of your favorite picture then there is a tool for you to consider. With greater different functionalities, you can make any Instagram post or story interesting through the help of Fillmora App. This has set of brilliant solutions to provide with most brilliant picture and video editing features. It is interesting, fun-loving as well as attractive enough to turn any moments extraordinary.
Handy features to enjoy:-
● You can make use of this tool to create custom thumbnails for your YouTube or Instagram page.
● Great varieties of templates for making popping thumbnails
● Greater capability to beautifully construct picture editing animations
● Varieties of Effects for every age group
● Attractive filters, GIFs packs and images to turn any dull looking background into an amazing moment.
● Delete white background quickly
● Right selection of tools to make the editing effective
● Flawless features to crop, cut-up, cut, trim & mix operations.
● Single click operation to turn the images into a beauty mode
● Options to save your creations into your device or virtual space
● Share your creations to your community, to your friends via Facebook, Instagram, YouTube, and Twitter quickly.
It is a greater idea to try this app for making use of its image editing features for deleting the white background in an easy manner.
● Ending Thoughts →
● With great varieties of features it is now very easy for you to create some automated selections in just single tap.
● Deleting the white background through a pro-tool like Procreate is smart, quick & seamless process.
● You are not going to get confused, even if you are using it for the very first time.
● It is the trend that every Instagram user is following for posting better images with nice background options.
Add Text Animation to A Video Online
Do you want to make a creative video? Do you want your presentation or video to be easy to follow and entertaining? You can take the video to another level with the help of text animation. This article will discuss how to add text animation to online videos. You can use a good video editor from where you can select fresh styles and make the best video from there. One of the simplest ways to elevate your movie from good to excellent is with understandable text animation.
Text animation and short captions can broaden the audience for your content as more consumers view videos without sound these days. It matters what fonts you use in the videos, and they establish the mood and facilitate interaction with most viewers who rely on video captions. Add text, alter the font, add transitions, and use text effects to draw the user’s attention as they scroll. Please continue reading to discover how simple it is to make interactive video titles, words, and supers.
1. Use Kapwing animation text editor
(https://www.kapwing.com/animated-text-video-maker )
You can use the potent online editor Kapwing to add animated text to videos online, utilizing music, videos, GIFs, and images. There are no downloads required because everything is already present inside the browser. Kapwing is a capable tool for content production that is simple enough for everyone to use. The majority of video formats, GIF and image, including avi, png, jpg, gif, MOV, mp4, and more, are supported by Kapwing.
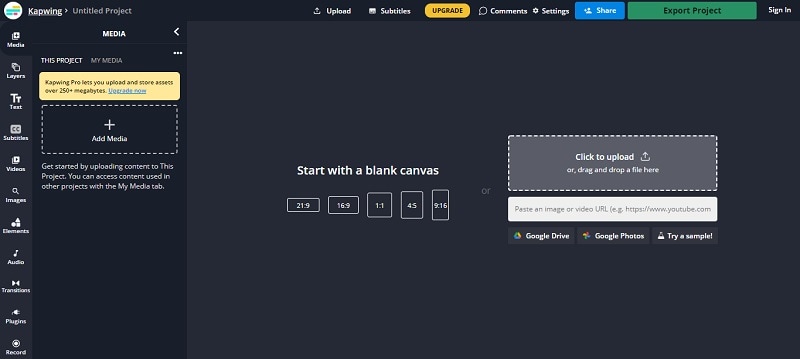
Step1 Upload the Video to Kapwing
You can open Kapwing with the device and tap on “Start Editing” to open up Kapwimg studio. After that, one can use the drag and drop option to upload the video in the studio. You can click on upload or use the link to upload.
If you have a more than 250 MB video, then you will require the Pro version.
Step2 Add the Text
When the video gets uploaded, now you can add your text. You must click the “Text” option on the left and type the text. After that, you can pick your favorite color, background, and color to add style.
You will always want that your text to get animated, but it doesn’t mean that you will have to use explosive fonts or funky or bright, which are very funky. The animation will make your text look attractive, and you can experiment with the colors and fonts to find the best combination.
Step3 Animate the Text
Now the fun part starts; choose the text box present on the right side and click on the “Animate” tab. It will allow the user to select animations like fade, flicker, hue rotates, and many more. Choose the speed according to your requirement, and if you want to change the background and color, you can do it too.
Use “Apply To” for applying this animation in the outro, intro, or both. It will help you to make the text fade out, fade in, or transition out and in with animation. Now the animation library has nine options:
- Drop: It appears on top of the text box
- Flicker: This one is like a candle’s flicker, and text flashes disappear and appear before staying.
- Fade: Opacity can be changed from 0% to 100%.
- Pop:- This grows the text more extensive than the text box and shrinks back to the place.
- Reveal:- Rolls from the left side to the right side
- Wipe:- Rolls from the left side to the right side with a colored background.
- Vibrate: The text box shakes in every direction.
- Hue rotates:- Colour of text cycles through the hue values..
You can use a timeline to adjust the animation’s termination when you set text animation. You can even drag that layer after the start time or use it on end/start time sliders to decrease or increase the time of your video. Text animation can get started when the cursor reaches the start time.
Step4 Export
The video with animated text is now ready to boom. You can click on “Export Video” present at the top and wait for the process. After that, you can download that video and use the links to share it on your social media platform.
2. Use veed.io text video editor
(https://www.veed.io/create/text-video-maker )
Veed is one of the best video editor text effects online, which allows you to add text to online videos. You can easily add style, color, text, and font in a few clicks. You can upload the video and tap the text to get started. Add title and text or select handwriting font. One can select it from templates. Change transparency, alignment, and font size of the text.
This online software is perfect for creating attractive videos on social media. This is free, which omits the usage of expensive software. It is much easier to avoid many complex video editor apps. With the help of VEED, you can create an excellent video without any experience and do it with a few clicks. Let’s see how to add animated text to photos online.
Step1 Upload the video
Tap on “Choose Video” and choose the file you want to upload on VEED. One can even use the drag and drop option from the folder to the editor.
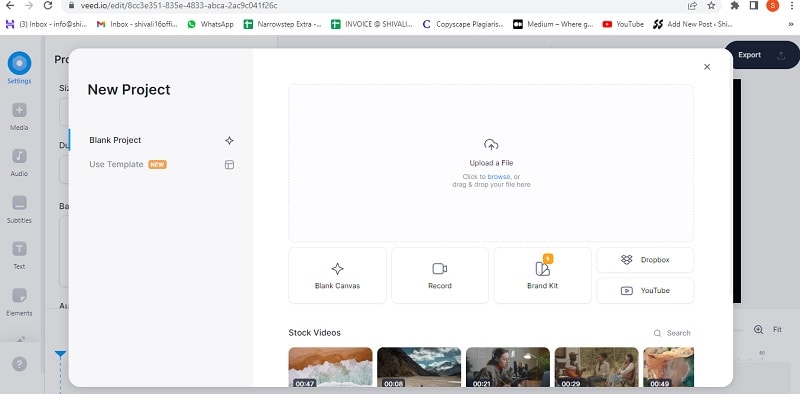
Step2 Add text
After that, you can add the text by tapping on the “Text” option on the left menu. You can select the text style and start typing.
Step3 Export
Save the video with the text you placed by tapping on “Export.” The video gets saved in an MP4 file.
3. Use Animaker text maker
(https://www.animaker.com/text-animation-maker )
The Animaker is one of the best-animated video makers. This app offers the best collection of charts, BGs, and animated characters. With the help of Animaker, you can make the text disappear or appear off-screen in the best way. After you finish your video, you can download the format in MP4.
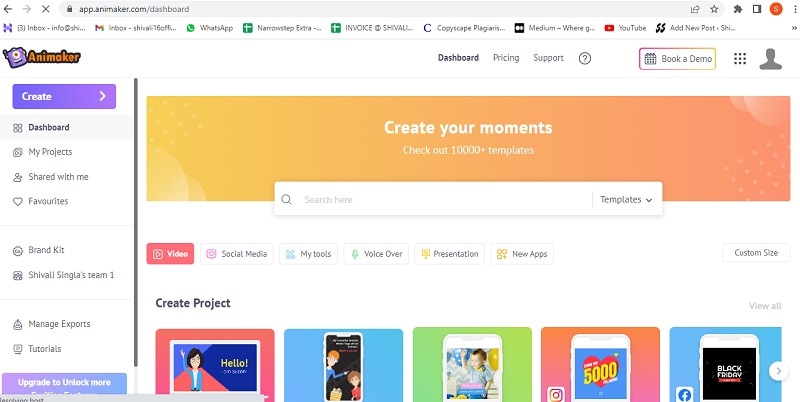
Step1 Upload the video clip
First, you can upload your video clip present on top that you wish to add text animation.
- Tap on the “Upload section” on the bottom left. You can upload your video where you wish to add the animated text.
- The video will get uploaded to “My Files.”
- Click on the uploaded video in the library to load it on the workspace.
Step2 Add text to the video
- You can add text in their text section
- In the next section, one can find two different text types. At the top, you will discover plain text options, and at the bottom, you can find pre-designed boxes seasoned at Animaker.
Let’s see how you can use pre-built text boxes.
- Tap on pre-built designs for your text animation. One can see the text appearing in the center of the workspace, and you can click it and type new text if you want to customize it.
- You can notice widespread options appearing with your text. It is known as the item menu. It will allow the user to modify their text. One can change font size, color, style, etc. Your text will come with pre-defined effects, which will help you to animate text instantly.
- You must have noticed that the purple color bar appears on the timeline, representing the duration of the text visible in the video. For example, if you want that text to get visible between 4rth to 8th seconds, then you will have to drag the edges of that purple bar to the same duration.
To see the scene, you must click on the play button on top of the timeline.
Let’s check the other ways of adding animated text to the video. In the previous one, you have seen how you can add text animation using pre-built boxes. Now you will get to know about doing it by using blank boxes.
- Start tapping the “text section”. Select the bank textbox.
- Click on them and then opt to add new text.
- Opt for clicking the cog icon that is there in the item menu.
- You will notice the settings tab that is on the screen’s right side.
- You can easily opt for the customization of the text in the way you wish. You can start by modifying the style of the font. One can change the size and color of the font as well.
- Use these options and opt for the application of enter and/or exit effects to text. Now, opt to click on the effect option to get more than 50 options. You can select the effect from there.
- Once the animation effect is applied to your timeline, you can notice the pink part in the bar i.e. purple. This completes creating text animation by using Animaker.
Step3 Download the Video
- You can visit the publish option in the right window to download the video.
- Tap on the “download video” option for downloading.
Conclusion
Now, you are aware of how to add text animation to video online and the three best video editors that will help you add animated text to your videos. At this point, you can choose the best one according to your needs and usage. These steps will help you create a unique and good video that will be easy to understand and entertaining.
Free Download For Win 7 or later(64-bit)
Free Download For macOS 10.14 or later
Free Download For macOS 10.14 or later
Also read:
- New Guide to Create an Intro Video with Filmora for 2024
- Beginners Guide About WMV Format and Best WMV Video Editor for 2024
- New How to Create Cinematic Style Videos for 2024
- In 2024, Do You Want to Remove the Unnecessary Scene From Your TikTok Video? This Article Will Help You to Adjust the Length of TikTok Clip by Providing Easy Methods
- Updated 5 Simple Tools to Merge Video and Audio Online
- New 2024 Approved Deep Learning of AI Video Recognition
- Updated In 2024, 12 Best Marketing Slideshow Templates
- New In 2024, VN Video Editor Templates A Game-Changer for Your Videos
- How to Change Video Resolution in Filmora
- Updated You Are at the Right Post if You Are Surfing for a GIF to MP4 Conversion Tool. This Article Will Provide You with the Top Best Converters that Can Help You Convert GIF to MP4 Videos Quickly and Easily
- In 2024, Top Things People Know About Wedding Slideshow
- New 2024 Approved Best Audio Plug-Ins For Video Editors
- New 2024 Approved How to Speed Up Pictures on TikTok Slideshow
- In 2024, FLV Editor for Windows 11/10/8.1/8/7 Easily Edit FLV Videos on PC
- Updated In 2024, Mastering DaVinci Resolve Scopes A Comprehensive Guide
- New In 2024, Frame Rates, Speed, and Wondershare Filmora An Overview
- Complete guide for recovering call logs on Motorola Moto G04
- In 2024, How To Change Your SIM PIN Code on Your Lava Yuva 2 Phone
- In 2024, How Can You Transfer Files From OnePlus 12 To iPhone 15/14/13? | Dr.fone
- 3 Solutions to Hard Reset Nubia Z50 Ultra Phone Using PC | Dr.fone
- 4 Methods to Turn off Life 360 On Infinix Zero 30 5G without Anyone Knowing | Dr.fone
- How to Fix It Motorola Razr 40 Ultra Wont Turn On | Dr.fone
- 2024 Approved Best Video Language Changers to Make Your Videos Accessible
- Proven Ways in How To Hide Location on Life360 For Motorola Edge 40 | Dr.fone
- The Most Useful Tips for Pokemon Go Ultra League On Oppo Reno 10 Pro+ 5G | Dr.fone
- In 2024, How to Unlock Apple ID Activation Lock From iPhone SE (2022)?
- In 2024, How to use Pokemon Go Joystick on Vivo Y77t? | Dr.fone
- How To Deal With the Tecno Pova 5 Pro Screen Black But Still Works? | Dr.fone
- Title: In 2024, Discover How to Download Mobile Phone Green Screen Videos and Pictures for Free. Elevate Your Content with HD Quality Green Screen Frames
- Author: Chloe
- Created at : 2024-04-24 07:08:18
- Updated at : 2024-04-25 07:08:18
- Link: https://ai-editing-video.techidaily.com/in-2024-discover-how-to-download-mobile-phone-green-screen-videos-and-pictures-for-free-elevate-your-content-with-hd-quality-green-screen-frames/
- License: This work is licensed under CC BY-NC-SA 4.0.
