
:max_bytes(150000):strip_icc():format(webp)/GettyImages-664800650-4349941504c24712b81975694798236b.jpg)
In 2024, Do You Want Your Photos and Videos to Give an Old and Vintage Feel? Here Are some Vintage LUTs Premiere Pro Free and Paid Options Available to Download
Do You Want Your Photos and Videos to Give an Old and Vintage Feel? Here Are some Vintage LUTs Premiere Pro Free and Paid Options Available to Download
Whether it is an image or video footage, LUTs can change the look and feel of your content. You can add a new color scheme, change the contrast, or create a new digital media look. Although there are many LUTs options, vintage LUTs are some of the most popular ones. These LUTs can add a nostalgic and warm feeling to your content and are perfect for creating a vintage or retro look.
Vintage LUTs are a great way to add a classic feel to your photos or videos, and they work especially well for old-school-themed projects. Using free vintage LUTs, you can easily add a vintage look to your content without spending too much time editing.
- Part 2: Best Free Vintage LUTs That Can Be Found in The Market
- Part 3: The Best Video Editor to Integrate LUTs - Wondershare Filmora
Part 1: What Are the Diverse Use Cases of LUTs?
LUTs are an array of numbers that helps you to change colors from one color space to another. You can use LUTs for color grading, color correction, or to change the color tone. The section below will highlight where you can use these LUTs.
- Color Grading: LUTs can be used for color grading to adjust the colors of an image to create a specific look or mood. Additionally, you can tweak an entire image’s colors or target specific colors or tones using LUTs.
- Color Correction: Another way is you can use LUTs to color-correct any image or video. It is the process of adjusting the colors of an image to make it look more natural. This technique is often used to correct color temperature, adjust contrast, and fix color imbalances.
- Film Emulation: It can emulate the look of different film stocks, such as Kodak or Fuji. This technique is commonly used in filmmaking to achieve a specific aesthetic or match older films’ looks.
- Special Effects: LUTs can create a wide range of special effects. For instance, a LUT can create the look of a night vision camera or infrared vision. This technique is often used in action movies and video games to create a more 3D experience.
- Still Photography: Furthermore, LUTs can also be used in still photography to adjust the color and tone of an image. It applies a color film that looks like a filter or an effect making the content look more creative.
- 3D Rendering: LUTs are used in 3D rendering to convert colors from one color space to another. Moreover, it can adjust the color and tone of rendered images. This technique can help in animated movies, video games, and visual effects for film and TV.
Free Download For Win 7 or later(64-bit)
Free Download For macOS 10.14 or later
Part 2: Best Free Vintage LUTs That Can Be Found in The Market
We know that LUTs change the perspective and mood of your story. There are many different LUTs to download, but vintage LUTs add more depth to your content. You can choose from different vintage look LUT packs, but here are some of the best.
1. Vintage Looks
Vintage Looks is a LUT pack that offers 10 vintage-style LUTs that can be used to give your media files a classic, old-school look. These LUTs highlight tropical colors, such as shades of blue and yellow. These shades create an old and vintage atmosphere for your photos and videos. You can apply one of the LUTs to your footage and watch your media files transform.

2.Vintage LUTs
Vintage LUTs is a pack of LUTs that can transform your media into a different vintage look. Your results look like they are taken from old Kodak or Fuji films. Moreover, use its monochromatic or B&W LUTs to give your media files the old vintage feel. You can set a different tone by applying these LUTs to your videos and photos for a retro look.

3.50 Vintage Wedding LUTs Pack
The 50 Vintage Wedding LUTs Pack is a collection of 50 high-quality LUTs. These LUTs can add a beautiful vintage-style effect to your photos and videos. Additionally, these LUTs are designed to bring your media a warm, sepia-like tone. It creates a tone giving it a classic, timeless look that is perfect for weddings. Moreover, you can create old-fashioned-themed photos and videos using these LUTs.

4. Vintage Color Grading Video Editing LUTs
It is a pack of 20 LUTs to color-grade your digital media in a vintage feel. Vintage Color Grading Video Editing LUTs overexpose your video to fade its colors. Furthermore, it highlights orange and tan shades to warm your digital files. It will create an overexposed, rich contrast, old classic Hollywood movie feel. It has different styled vintage LUTs that you apply to your videos.

5. Vintage Film LUTs
Another amazing LUT pack that creates an old retro feel to your content is Vintage Film LUTs. Achieve a cinematic style with a vintage feel with multiple vintage presets. These LUTs are designed to replicate the look of the Black Magic Pocket Cinema Camera. Similarly, you can add a classic and timeless look to your photos and videos with this vintage pack.

Empower your videos with a new mood using different LUTs. Filmora now offers 800+ top-quality 3D LUTs cover a broad range of scenarios. Transform your videos with Filmora’s powerful 3D LUTs.
Apply LUT on Videos Apply LUT on Videos Learn More


6. 50 Vintage Cinematic Lightroom Presets and LUTs
50 Vintage Cinematic Lightroom Presets and LUTs is a pack designed to give your digital media an old look. This pack contains 50 different LUTs, each with a different vintage look. It overexposes your footage and increases the contrast to achieve a retro feel. Furthermore, these LUTs add a brown shade to your media, enhancing its vintage feel.

7. Retro Film LUTs
Retro Film LUTs is a vintage LUTs pack that will give your photos and videos an old, rusty look. These LUTs highlight colors like orange and brown to create nostalgia. Furthermore, these LUTs add film grains to your media to create a better vintage look. This pack is perfect for content creators and enthusiasts who want to create something different.

8. Vibrance Colors
Yet another great vintage-style pack for your images and video footage is Vibrance Colors. It focuses on enhancing colors to give an old-school feel. This LUT adds vibrance to your photos and videos to bring the natural feel out of your content. Additionally, increasing vibrance in your content adds the late 80s and early 90s touch to your digital media files.

9. Free LUTs Retro Color
Another vintage LUT free pack is Free LUTs Retro Color. This vintage retro LUT adds warmth and nostalgia to your media. These LUTs modify your footage by fading colors and increasing the muddiness to create a classic retro look. Moreover, you can create a music video, short film, or personal video by adding depth and character to your work.

10. Green Harmony
Last but not least, Green Harmony is a free vintage LUT. This LUT adds a greenish tint to your digital files, giving your content an old sci-fi movie feel. By applying this LUT, your content will resemble The Matrix movie’s iconic color grading. Using this LUT pack, you can take your footage back to the days of old-school sci-fi movies.

Part 3: The Best Video Editor to Integrate LUTs - Wondershare Filmora
Wondershare Filmora is a great video editor that allows you to integrate LUTs into your projects. It offers over 800+ LUTs for download, which can be used for your videos. With its extensive library, choose from cinematic to vintage LUTs that fit your style. You can choose from cinematic or vintage LUTs free download and more to give your content the desired feel.
Add Vintage LUTs on Video For Win 7 or later(64-bit)
Add Vintage LUTs on Video For macOS 10.14 or later
Additionally, you can adjust the intensity of your LUTs with the latest update. The new update gives you more control over color grading and correction. In addition, Filmora comes equipped with a color wheel that enables you to adjust the color scheme of your video content. This helps you create and edit your digital content professionally using this software.

Conclusion
In conclusion, Look-Up Tables are an essential component in video editing. It enables creators to achieve the desired look and feel for their footage. Vintage LUTs, in particular, can add a unique perspective to your story by adding emotions and moods. However, Wondershare Filmora can help to integrate your favorite free vintage LUTs into your content.
Part 1: What Are the Diverse Use Cases of LUTs?
LUTs are an array of numbers that helps you to change colors from one color space to another. You can use LUTs for color grading, color correction, or to change the color tone. The section below will highlight where you can use these LUTs.
- Color Grading: LUTs can be used for color grading to adjust the colors of an image to create a specific look or mood. Additionally, you can tweak an entire image’s colors or target specific colors or tones using LUTs.
- Color Correction: Another way is you can use LUTs to color-correct any image or video. It is the process of adjusting the colors of an image to make it look more natural. This technique is often used to correct color temperature, adjust contrast, and fix color imbalances.
- Film Emulation: It can emulate the look of different film stocks, such as Kodak or Fuji. This technique is commonly used in filmmaking to achieve a specific aesthetic or match older films’ looks.
- Special Effects: LUTs can create a wide range of special effects. For instance, a LUT can create the look of a night vision camera or infrared vision. This technique is often used in action movies and video games to create a more 3D experience.
- Still Photography: Furthermore, LUTs can also be used in still photography to adjust the color and tone of an image. It applies a color film that looks like a filter or an effect making the content look more creative.
- 3D Rendering: LUTs are used in 3D rendering to convert colors from one color space to another. Moreover, it can adjust the color and tone of rendered images. This technique can help in animated movies, video games, and visual effects for film and TV.
Free Download For Win 7 or later(64-bit)
Free Download For macOS 10.14 or later
Part 2: Best Free Vintage LUTs That Can Be Found in The Market
We know that LUTs change the perspective and mood of your story. There are many different LUTs to download, but vintage LUTs add more depth to your content. You can choose from different vintage look LUT packs, but here are some of the best.
1. Vintage Looks
Vintage Looks is a LUT pack that offers 10 vintage-style LUTs that can be used to give your media files a classic, old-school look. These LUTs highlight tropical colors, such as shades of blue and yellow. These shades create an old and vintage atmosphere for your photos and videos. You can apply one of the LUTs to your footage and watch your media files transform.
2.Vintage LUTs
Vintage LUTs is a pack of LUTs that can transform your media into a different vintage look. Your results look like they are taken from old Kodak or Fuji films. Moreover, use its monochromatic or B&W LUTs to give your media files the old vintage feel. You can set a different tone by applying these LUTs to your videos and photos for a retro look.
3.50 Vintage Wedding LUTs Pack
The 50 Vintage Wedding LUTs Pack is a collection of 50 high-quality LUTs. These LUTs can add a beautiful vintage-style effect to your photos and videos. Additionally, these LUTs are designed to bring your media a warm, sepia-like tone. It creates a tone giving it a classic, timeless look that is perfect for weddings. Moreover, you can create old-fashioned-themed photos and videos using these LUTs.
4. Vintage Color Grading Video Editing LUTs
It is a pack of 20 LUTs to color-grade your digital media in a vintage feel. Vintage Color Grading Video Editing LUTs overexpose your video to fade its colors. Furthermore, it highlights orange and tan shades to warm your digital files. It will create an overexposed, rich contrast, old classic Hollywood movie feel. It has different styled vintage LUTs that you apply to your videos.
5. Vintage Film LUTs
Another amazing LUT pack that creates an old retro feel to your content is Vintage Film LUTs. Achieve a cinematic style with a vintage feel with multiple vintage presets. These LUTs are designed to replicate the look of the Black Magic Pocket Cinema Camera. Similarly, you can add a classic and timeless look to your photos and videos with this vintage pack.
Empower your videos with a new mood using different LUTs. Filmora now offers 800+ top-quality 3D LUTs cover a broad range of scenarios. Transform your videos with Filmora’s powerful 3D LUTs.
Apply LUT on Videos Apply LUT on Videos Learn More
6. 50 Vintage Cinematic Lightroom Presets and LUTs
50 Vintage Cinematic Lightroom Presets and LUTs is a pack designed to give your digital media an old look. This pack contains 50 different LUTs, each with a different vintage look. It overexposes your footage and increases the contrast to achieve a retro feel. Furthermore, these LUTs add a brown shade to your media, enhancing its vintage feel.
7. Retro Film LUTs
Retro Film LUTs is a vintage LUTs pack that will give your photos and videos an old, rusty look. These LUTs highlight colors like orange and brown to create nostalgia. Furthermore, these LUTs add film grains to your media to create a better vintage look. This pack is perfect for content creators and enthusiasts who want to create something different.
8. Vibrance Colors
Yet another great vintage-style pack for your images and video footage is Vibrance Colors. It focuses on enhancing colors to give an old-school feel. This LUT adds vibrance to your photos and videos to bring the natural feel out of your content. Additionally, increasing vibrance in your content adds the late 80s and early 90s touch to your digital media files.
9. Free LUTs Retro Color
Another vintage LUT free pack is Free LUTs Retro Color. This vintage retro LUT adds warmth and nostalgia to your media. These LUTs modify your footage by fading colors and increasing the muddiness to create a classic retro look. Moreover, you can create a music video, short film, or personal video by adding depth and character to your work.
10. Green Harmony
Last but not least, Green Harmony is a free vintage LUT. This LUT adds a greenish tint to your digital files, giving your content an old sci-fi movie feel. By applying this LUT, your content will resemble The Matrix movie’s iconic color grading. Using this LUT pack, you can take your footage back to the days of old-school sci-fi movies.
Part 3: The Best Video Editor to Integrate LUTs - Wondershare Filmora
Wondershare Filmora is a great video editor that allows you to integrate LUTs into your projects. It offers over 800+ LUTs for download, which can be used for your videos. With its extensive library, choose from cinematic to vintage LUTs that fit your style. You can choose from cinematic or vintage LUTs free download and more to give your content the desired feel.
Add Vintage LUTs on Video For Win 7 or later(64-bit)
Add Vintage LUTs on Video For macOS 10.14 or later
Additionally, you can adjust the intensity of your LUTs with the latest update. The new update gives you more control over color grading and correction. In addition, Filmora comes equipped with a color wheel that enables you to adjust the color scheme of your video content. This helps you create and edit your digital content professionally using this software.
Conclusion
In conclusion, Look-Up Tables are an essential component in video editing. It enables creators to achieve the desired look and feel for their footage. Vintage LUTs, in particular, can add a unique perspective to your story by adding emotions and moods. However, Wondershare Filmora can help to integrate your favorite free vintage LUTs into your content.
Beginner’s Guide About WMV Format and Best WMV Video Editor
WMV is the default file format for Windows Media Player. It was developed as an alternative to the RealVideo codec for web streaming purposes. WMV can be streamed on the internet and played by various media players. YouTube allows the users to upload WMV file format content.
Now that you know this about WMV format, there are some more details to share, so let’s start. The article understudy will discuss everything in detail; buckle up!
In this article
02 Advantage and Disadvantage of WMV Video Format
03 Best MMV Video Editor - Wondershare Filmora
04 How to Edit WMV Video File?
05 WMV VS. MP4: What’s the Difference?
Part 1. What Is WMV File?
WMV file format is from a sequence of video codecs, and it was developed by Microsoft. The full abbreviation of WMV is ‘Windows Media Video.’ WMV is a compressed file container that was made for the Windows Media Framework. It is mainly used for the video content that is to be sold either online or through HD DVDs and Blu-ray Discs.

WMV format files support the encryption for the use with Digital Rights Management (DRM) systems, protecting the content from copywriting and any unlawful production. The WMV file may contain animation, high-definition videos, TV episodes, or video clips.
WMV compresses large files for better data transmission over a network while maintaining quality standards. It is specifically designed to run on all Windows devices. After standardization by the Society of Motion Pictures and Television Engineering (SMPTE), WMV is now considered to be an open standard format.
Part 2. Advantage and Disadvantage of WMV Video Format
Like everything, the WMV file format has its benefits and drawbacks, but not everyone knows much about them. The following section of this article will talk about the benefits and drawbacks; let’s get started!
Advantages of WMV Format
- WMV format is excellent for web videos as it acquires little disc memory space and thus takes less time in loading.
- The files are compressed and have reduced size; hence it is easy to transfer WMV file format via emails etc.
- The format is widely used on Windows and is suitable for storing short animations as well as compressed videos.
- Do you know anything about the compression ratio? Well, if we compare WMV to MPEG-4, WMV format has a 2x compression ratio.
- The format also works on the Web through Google Drive. Also, the quality of the video is maintained with Windows video format.
Disadvantages of WMV Format
- Although the small size is better but not, every application works with the tiny file size as offered by WMV format.
- If you are a Mac user and wish to play WMV files on your Mac, you need plugins like Flip4Mac.
Part 3. Best MMV Video Editor -Wondershare Filmora
Wondershare Filmora has always been on the top of the list whenever we talk about video editing. The software is used worldwide by professionals and also newbies. This is because Filmora provides an endless range of features that can create captivating videos. Let’s share a few features:
- Stabilize Video: Your video might be shaky, or maybe single footage can be shaky. Do you know a way to fix this? Try Stabilize Video feature from Filmora. This feature helps you to smooth all the shaky scenes in your video.
- Motion Tracking: In the editing world, Motion Tracking is the most fun type of feature. With this feature, you can move objects like text, audio, video, elements, etc., by tracking the movements in your video.
- Auto Highlight: Do you know a feature that will save your time and effort? It’s Auto Highlight. The feature spontaneously extracts the highlight from the clip and saves your video trimming time.
For Win 7 or later (64-bit)
For macOS 10.12 or later
Part 4. How to Edit WMV Video File?
For editing, Wondershare Filmora is an ideal software to use. Now that you know about Filmora and its stunning features, do you have any knowledge about how to use it? Well, don’t worry. We are here to guide you about how you can edit WMV file format videos in Filmora. Just follow the simple steps shared below:
Step 1: Get the Media File
Start by launching the software on your respective device. Once Filmora opens, you can import the media file by drag and drop. Or else, tap on the ‘File’ tab and move to the ‘Import Media’ option. From the submenu, select the ‘Import Media Files’ option to add the WMV format file.

Step 2: Head to Editor Timeline
You should know that editing is only possible when your file is on the timeline. For that, after a successful file import, simply drag and drop the media file to the timeline and let the fun begins.

Step 3: Add Video Effects
Once the file is in the timeline, start editing. You can add various video effects to your WMV video file from this section. You can get effects like Canvas, Cool Film, Four Seasons, etc., and can also add overlays, filters, etc.

Step 4: Use Title Template
Filmora offers you so many different and cool title templates. You only have to select the best template from the options. You can go for School Pack, Channel Subscribe, Romantic Pack, etc. Moreover, add Lower Thirds, Subtitles, Openers, and a lot more.

Step 5: Export the WMV File
After all the editing is complete, get the WMV format file exported to your device. For that, hit the ‘Export’ button and from the ‘Locals’ section, select your preferred output file format.

Part 5. WMV VS. MP4: What’s the Difference?
MP4 is far more popular than the WMV file format. The world is shifting on the internet; MP4 is widely used and loved online. On the other hand, WMV is popular with Windows users, along with DVD and Blu-ray collectors.
If we talk about the supported software for MP4 and WMV, MP4 has bigger support. WMV is supported by fewer video players and online video editing tools. On the contrary, MP4 is supported by all the video players available for both Windows and Mac users; along with that, every online tool also supports MP4 format for video editing.
Now the world demands quality. In terms of quality, MP4 has better quality than WMV. WMV has lost the battle of quality provision against WMV. MP4 is a larger file than WMV in terms of file size. It is less compressed than WMV format, but the compression gives WMV an advantage over MP4.
Having a compressed file format produces files of smaller size, which can be easily stored. Easy storage of video files makes WMV a better option in places where the quality of the video can be compromised.
Bottom Line
After reading this article, we hope that you have increased your knowledge regarding the WMV file format. We talked about the pros and cons of the WMV format. Moreover, we also shared ways to edit a WMV video with the best video editor, Wondershare Filmora.
Let’s tell you more about the video editing software. Wondershare Filmora is not just a Video Editor; it’s also an Audio Editor with various diverse features like Audio Denoise, Silence Detection, etc. The software is easy to use with a drag and drop facility. You can create and edit stunning videos with the multi-track editor.
For Win 7 or later (64-bit)
For macOS 10.12 or later
02 Advantage and Disadvantage of WMV Video Format
03 Best MMV Video Editor - Wondershare Filmora
04 How to Edit WMV Video File?
05 WMV VS. MP4: What’s the Difference?
Part 1. What Is WMV File?
WMV file format is from a sequence of video codecs, and it was developed by Microsoft. The full abbreviation of WMV is ‘Windows Media Video.’ WMV is a compressed file container that was made for the Windows Media Framework. It is mainly used for the video content that is to be sold either online or through HD DVDs and Blu-ray Discs.
WMV format files support the encryption for the use with Digital Rights Management (DRM) systems, protecting the content from copywriting and any unlawful production. The WMV file may contain animation, high-definition videos, TV episodes, or video clips.
WMV compresses large files for better data transmission over a network while maintaining quality standards. It is specifically designed to run on all Windows devices. After standardization by the Society of Motion Pictures and Television Engineering (SMPTE), WMV is now considered to be an open standard format.
Part 2. Advantage and Disadvantage of WMV Video Format
Like everything, the WMV file format has its benefits and drawbacks, but not everyone knows much about them. The following section of this article will talk about the benefits and drawbacks; let’s get started!
Advantages of WMV Format
- WMV format is excellent for web videos as it acquires little disc memory space and thus takes less time in loading.
- The files are compressed and have reduced size; hence it is easy to transfer WMV file format via emails etc.
- The format is widely used on Windows and is suitable for storing short animations as well as compressed videos.
- Do you know anything about the compression ratio? Well, if we compare WMV to MPEG-4, WMV format has a 2x compression ratio.
- The format also works on the Web through Google Drive. Also, the quality of the video is maintained with Windows video format.
Disadvantages of WMV Format
- Although the small size is better but not, every application works with the tiny file size as offered by WMV format.
- If you are a Mac user and wish to play WMV files on your Mac, you need plugins like Flip4Mac.
Part 3. Best MMV Video Editor -Wondershare Filmora
Wondershare Filmora has always been on the top of the list whenever we talk about video editing. The software is used worldwide by professionals and also newbies. This is because Filmora provides an endless range of features that can create captivating videos. Let’s share a few features:
- Stabilize Video: Your video might be shaky, or maybe single footage can be shaky. Do you know a way to fix this? Try Stabilize Video feature from Filmora. This feature helps you to smooth all the shaky scenes in your video.
- Motion Tracking: In the editing world, Motion Tracking is the most fun type of feature. With this feature, you can move objects like text, audio, video, elements, etc., by tracking the movements in your video.
- Auto Highlight: Do you know a feature that will save your time and effort? It’s Auto Highlight. The feature spontaneously extracts the highlight from the clip and saves your video trimming time.
For Win 7 or later (64-bit)
For macOS 10.12 or later
Part 4. How to Edit WMV Video File?
For editing, Wondershare Filmora is an ideal software to use. Now that you know about Filmora and its stunning features, do you have any knowledge about how to use it? Well, don’t worry. We are here to guide you about how you can edit WMV file format videos in Filmora. Just follow the simple steps shared below:
Step 1: Get the Media File
Start by launching the software on your respective device. Once Filmora opens, you can import the media file by drag and drop. Or else, tap on the ‘File’ tab and move to the ‘Import Media’ option. From the submenu, select the ‘Import Media Files’ option to add the WMV format file.
Step 2: Head to Editor Timeline
You should know that editing is only possible when your file is on the timeline. For that, after a successful file import, simply drag and drop the media file to the timeline and let the fun begins.
Step 3: Add Video Effects
Once the file is in the timeline, start editing. You can add various video effects to your WMV video file from this section. You can get effects like Canvas, Cool Film, Four Seasons, etc., and can also add overlays, filters, etc.
Step 4: Use Title Template
Filmora offers you so many different and cool title templates. You only have to select the best template from the options. You can go for School Pack, Channel Subscribe, Romantic Pack, etc. Moreover, add Lower Thirds, Subtitles, Openers, and a lot more.
Step 5: Export the WMV File
After all the editing is complete, get the WMV format file exported to your device. For that, hit the ‘Export’ button and from the ‘Locals’ section, select your preferred output file format.
Part 5. WMV VS. MP4: What’s the Difference?
MP4 is far more popular than the WMV file format. The world is shifting on the internet; MP4 is widely used and loved online. On the other hand, WMV is popular with Windows users, along with DVD and Blu-ray collectors.
If we talk about the supported software for MP4 and WMV, MP4 has bigger support. WMV is supported by fewer video players and online video editing tools. On the contrary, MP4 is supported by all the video players available for both Windows and Mac users; along with that, every online tool also supports MP4 format for video editing.
Now the world demands quality. In terms of quality, MP4 has better quality than WMV. WMV has lost the battle of quality provision against WMV. MP4 is a larger file than WMV in terms of file size. It is less compressed than WMV format, but the compression gives WMV an advantage over MP4.
Having a compressed file format produces files of smaller size, which can be easily stored. Easy storage of video files makes WMV a better option in places where the quality of the video can be compromised.
Bottom Line
After reading this article, we hope that you have increased your knowledge regarding the WMV file format. We talked about the pros and cons of the WMV format. Moreover, we also shared ways to edit a WMV video with the best video editor, Wondershare Filmora.
Let’s tell you more about the video editing software. Wondershare Filmora is not just a Video Editor; it’s also an Audio Editor with various diverse features like Audio Denoise, Silence Detection, etc. The software is easy to use with a drag and drop facility. You can create and edit stunning videos with the multi-track editor.
For Win 7 or later (64-bit)
For macOS 10.12 or later
Liquid Water Text Reveal Intro Offers an Impressive Opening to Any Video Content. Go Through the Detailed Steps to Create Liquid Water Reveal Intro in Wondershare Filmora
Introduction to any video content should be short, crisp, and impressive simultaneously. Hence, video content creators look for the best techniques to create fantastic introduction effects. Wondershare Filmora is the leading video editor equipped with built-in editing features with more than 200 instant modes and preset templates.
With more than 10+ billion stock media, plugin effects, advanced editing functions, etc., it is the first choice of many content creators. Wondershare Filmora comes with a built-in installer that can be quickly downloaded from the official website . Beginners and professionals can start using this creative video editing tool to make videos for personal and professional purposes.
Out of all the amazing effects available in this editing tool, it is easy to go with the liquid water reveal intro effect. It offers unique and engaging video content. Let us understand the detailed steps to create this effect in your next video easily and quickly.

Steps to create liquid water reveal intro
Wondershare Filmora offers multiple advanced capabilities to content creators. There are multiple options when it comes to creating impressive introductions. Let us explore the liquid water text reveal intro option in this section. We’ve bifurcated the different steps for quick understanding of our readers in an easy and effective way.
Free Download For Win 7 or later(64-bit)
Free Download For macOS 10.14 or later
Step1Launching Wondershare Filmora
Before starting to edit the videos with the liquid water text reveal intro, it is necessary to download, install, and launch Wondershare Filmora. It is dedicated software that can be used for Windows or Mac devices. All you need to do is go to the official website of Wondershare Filmora and start the downloading process. The quick steps for the same are:
- Go to the official website of Wondershare Filmora on your Windows or Mac device.
- Select the Windows or Mac version according to your available device.
- Next, locate the “Free Download” button on the official website. It is located on the left side of the web page. It is easy to select the version type and initiate the download process.
- Once downloaded, the Wondershare Filmora Installer package will be available on your device.
- All you need to do is double-click on the installer package and start the installation process.
- Press yes for all the pop-ups initiated, including the “Agree” on the terms and conditions pop-up.
- The installation process will start quickly.
- Once completed, Wondershare Filmora will start and run automatically on your device.

Step2Importing and select the stock video
Once Wondershare Filmora is running on your system, you can start by importing and selecting the stock video. The quick steps for the same are:
- It is easy to download the stock video from any available source.
- Now, import the stock video from the source to the Wondershare Filmora.
- Locate the “Titles” option in the menu bar located next to the “Audio” option.
- Then, drop the default title on track two.

Step3Entering the text
After the successful uploading of the stock video, it is time to add text to the intro. In this step, you can change the font style, and font size, and maintain the text spacing. The quick steps for the same are:
- Start by double-clicking on the default title.
- Enter the text in the space provided, e.g., here, we’ve entered “Liquid.”
- Start text editing by changing the font to “Billion Dreams.”
- Now, change the font size to 250.
- Then, increase the text spacing by five.
- Last, you have to rotate the text according to the needs and align its position accordingly.

Step4Selecting the color
After making the text settings according to your liking or as required in the video, the next step is to select the color. It is easy to select it from the range of options available in the “Sample Color” menu of the tool. The quick steps for the same are:
- Go to the “My Media” option.
- Here, locate the “Sample Color” option and select it.
- Drop black color on track one and take a quick screenshot of it.
- Then, delete both these files from the timeline.

Step5Adding water effect
Now is the time to create the water text effect. It is located in the “Effects” section of Wondershare Filmora, along with numerous other options. You can select it by searching for it in the search bar. The quick steps for the same are:
- Drop the stock video on track one.
- Now, double-click on this video and bring it to half of the screen.
- Next, go to the “Effects” option.
- Search for “Water” and apply the water effect on track two.
- Lastly, extend the duration of this track.

Step6Completing the water effect settings
After adding the water effect to the video, you can adjust the settings like “Emboss” and “Steps” for a realistic and creative feel. The quick steps to complete the water effect settings in the video are:
- Double-click on “Effects.”
- Increase the “Emboss” settings to 0.53.
- Decrease the “Steps” settings to seven.
- Press “OK” to apply changes.

Step7Enabling the Chroma Key and other settings
Next, you have to enable the “Chroma Key” effect in the video. Further, the color pick logo and other settings are adjusted in this step only. The detailed steps for the same are:
- Go to “My Media.”
- Drop the screenshot on track three.
- Now, increase the duration of this track.
- Double-click on it and go to the “Videos” section.
- Locate the “Chroma Key (Green Screen)” effect and enable it.
- Go to the color pick logo and select the white color from the previous screen.
- Reduce the “Edge Thickness” to negative 3.3
- Reduce the “Edge Feather” to 1.1
- Press “OK” to apply these settings.

Step8Adding the stock video clip
The next step in the process of creating liquid water text reveal intro is to add the stock video clip. Here, you can adjust the clip position also. The quick steps for the same are:
- Start by selecting the stock video clip.
- Now, double-click on the stock video clip.
- Open the “Videos” option.
- Next, change the “Y” axis position and drag the clip out of the text.

Step9Adding keyframes and adjusting playheads
Next, you have to add the keyframes and adjust the playheads in the video. In this step, it is easy to add the keyframes from the “Animations” option in Wondershare Filmora. The stock video is incorporated in this step, and playheads are added accordingly. Further, all the clips are made uniform in this step only. The quick steps for completing these features are:
- Start by opening the “Animations” tab.
- Go to the “Add” option to add a keyframe.
- Now, place the playhead at the three seconds position on the timeline.
- Then, bring the stock video to half of the text.
- Next, place the playhead in the eight seconds position and fill the text with the stock footage at the end.
- Again, place playhead but now at the ten seconds position.
- Locate the “Opacity” option and decrease it to zero.
- Last but not least, reduce all clips’ duration to ten seconds for uniformity.

Step10Previewing and export the video
Once done with all the necessary effects and settings, it is time for a quick preview of the created video. The “Render Preview” option in the Wondershare Filmora offers a fast rendering of the made video to help users with a brief overview of the file. It reduces the preview lag, as observed in other tools due to the application of heavy effects and features. After previewing, you can quickly export the video. The quick steps for the same are:
- Click the “Render Preview” option.
- Go through the preview of the created file in detail. Check for any issues or changes required.
- Now, go to the “Export” option for quick exporting of the file with the liquid water text reveal intro.

So, you’re done with creating a liquid water text reveal intro in this way. It is easy to save these steps for quick future reference.
Wrapping Up
Hence, it is easy for Wondershare Filmora users to create liquid water reveal intro in their videos. All you need to do is quickly download and install Wondershare Filmora on your Windows or Mac devices. Once done, it will launch automatically on your system. Next, you can follow all the steps mentioned above one by one to incorporate liquid water text reveal intro in videos.
So, download Wondershare Filmora for your system right now and start creating professional-grade videos today!
Free Download For macOS 10.14 or later
Step1Launching Wondershare Filmora
Before starting to edit the videos with the liquid water text reveal intro, it is necessary to download, install, and launch Wondershare Filmora. It is dedicated software that can be used for Windows or Mac devices. All you need to do is go to the official website of Wondershare Filmora and start the downloading process. The quick steps for the same are:
- Go to the official website of Wondershare Filmora on your Windows or Mac device.
- Select the Windows or Mac version according to your available device.
- Next, locate the “Free Download” button on the official website. It is located on the left side of the web page. It is easy to select the version type and initiate the download process.
- Once downloaded, the Wondershare Filmora Installer package will be available on your device.
- All you need to do is double-click on the installer package and start the installation process.
- Press yes for all the pop-ups initiated, including the “Agree” on the terms and conditions pop-up.
- The installation process will start quickly.
- Once completed, Wondershare Filmora will start and run automatically on your device.
Step2Importing and select the stock video
Once Wondershare Filmora is running on your system, you can start by importing and selecting the stock video. The quick steps for the same are:
- It is easy to download the stock video from any available source.
- Now, import the stock video from the source to the Wondershare Filmora.
- Locate the “Titles” option in the menu bar located next to the “Audio” option.
- Then, drop the default title on track two.
Step3Entering the text
After the successful uploading of the stock video, it is time to add text to the intro. In this step, you can change the font style, and font size, and maintain the text spacing. The quick steps for the same are:
- Start by double-clicking on the default title.
- Enter the text in the space provided, e.g., here, we’ve entered “Liquid.”
- Start text editing by changing the font to “Billion Dreams.”
- Now, change the font size to 250.
- Then, increase the text spacing by five.
- Last, you have to rotate the text according to the needs and align its position accordingly.
Step4Selecting the color
After making the text settings according to your liking or as required in the video, the next step is to select the color. It is easy to select it from the range of options available in the “Sample Color” menu of the tool. The quick steps for the same are:
- Go to the “My Media” option.
- Here, locate the “Sample Color” option and select it.
- Drop black color on track one and take a quick screenshot of it.
- Then, delete both these files from the timeline.
Step5Adding water effect
Now is the time to create the water text effect. It is located in the “Effects” section of Wondershare Filmora, along with numerous other options. You can select it by searching for it in the search bar. The quick steps for the same are:
- Drop the stock video on track one.
- Now, double-click on this video and bring it to half of the screen.
- Next, go to the “Effects” option.
- Search for “Water” and apply the water effect on track two.
- Lastly, extend the duration of this track.
Step6Completing the water effect settings
After adding the water effect to the video, you can adjust the settings like “Emboss” and “Steps” for a realistic and creative feel. The quick steps to complete the water effect settings in the video are:
- Double-click on “Effects.”
- Increase the “Emboss” settings to 0.53.
- Decrease the “Steps” settings to seven.
- Press “OK” to apply changes.
Step7Enabling the Chroma Key and other settings
Next, you have to enable the “Chroma Key” effect in the video. Further, the color pick logo and other settings are adjusted in this step only. The detailed steps for the same are:
- Go to “My Media.”
- Drop the screenshot on track three.
- Now, increase the duration of this track.
- Double-click on it and go to the “Videos” section.
- Locate the “Chroma Key (Green Screen)” effect and enable it.
- Go to the color pick logo and select the white color from the previous screen.
- Reduce the “Edge Thickness” to negative 3.3
- Reduce the “Edge Feather” to 1.1
- Press “OK” to apply these settings.
Step8Adding the stock video clip
The next step in the process of creating liquid water text reveal intro is to add the stock video clip. Here, you can adjust the clip position also. The quick steps for the same are:
- Start by selecting the stock video clip.
- Now, double-click on the stock video clip.
- Open the “Videos” option.
- Next, change the “Y” axis position and drag the clip out of the text.
Step9Adding keyframes and adjusting playheads
Next, you have to add the keyframes and adjust the playheads in the video. In this step, it is easy to add the keyframes from the “Animations” option in Wondershare Filmora. The stock video is incorporated in this step, and playheads are added accordingly. Further, all the clips are made uniform in this step only. The quick steps for completing these features are:
- Start by opening the “Animations” tab.
- Go to the “Add” option to add a keyframe.
- Now, place the playhead at the three seconds position on the timeline.
- Then, bring the stock video to half of the text.
- Next, place the playhead in the eight seconds position and fill the text with the stock footage at the end.
- Again, place playhead but now at the ten seconds position.
- Locate the “Opacity” option and decrease it to zero.
- Last but not least, reduce all clips’ duration to ten seconds for uniformity.
Step10Previewing and export the video
Once done with all the necessary effects and settings, it is time for a quick preview of the created video. The “Render Preview” option in the Wondershare Filmora offers a fast rendering of the made video to help users with a brief overview of the file. It reduces the preview lag, as observed in other tools due to the application of heavy effects and features. After previewing, you can quickly export the video. The quick steps for the same are:
- Click the “Render Preview” option.
- Go through the preview of the created file in detail. Check for any issues or changes required.
- Now, go to the “Export” option for quick exporting of the file with the liquid water text reveal intro.
So, you’re done with creating a liquid water text reveal intro in this way. It is easy to save these steps for quick future reference.
Wrapping Up
Hence, it is easy for Wondershare Filmora users to create liquid water reveal intro in their videos. All you need to do is quickly download and install Wondershare Filmora on your Windows or Mac devices. Once done, it will launch automatically on your system. Next, you can follow all the steps mentioned above one by one to incorporate liquid water text reveal intro in videos.
So, download Wondershare Filmora for your system right now and start creating professional-grade videos today!
How To Add Text In After Effects
In almost every video you come across, you will see text added to the video in different parts. There are various reasons why adding text to videos becomes a necessity. First of all, you can highlight the underlying message or key points in your video. Along with audio and video, the viewers will have another cue point in the form of text that they can retain in their memory for longer. You add animated texts to video to make the video interesting to watch and break the monotony of visual cues only.
Besides, you may have to want credits and add intro as well as outro to your video where adding text is almost a necessity. Text can help your viewer get the context of your video and make sense of the content. After Effects is a popular video editor thanks to its visual effects, text animation animations, and instant video enhancement tools. We will illustrate the different ways of adding text in After Effects in simple steps.
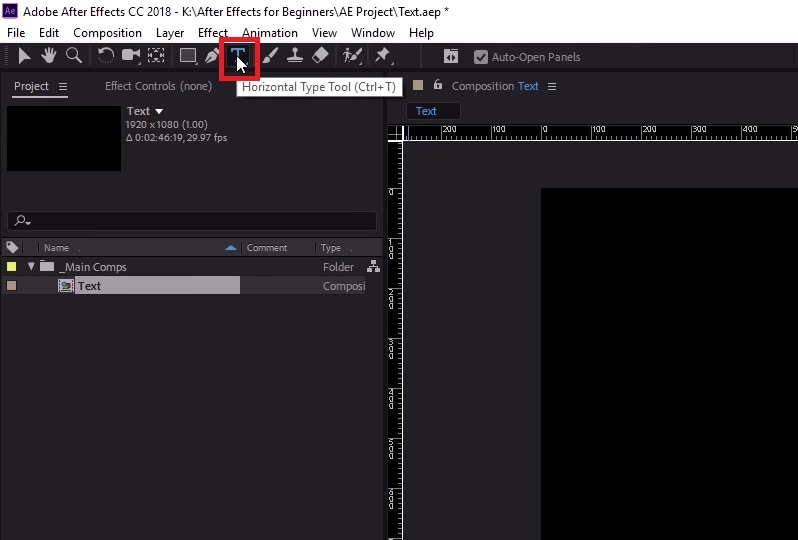
Part 1. Add Text in After Effects with Horizontal Type Tool
Once you have imported your video clip into the Timeline, there are several ways you can add text to your video. First of all, you can right-click on the Timeline and select New> Text to create an empty text layer and add any text you want. Similarly, you can go to Layer> New> Text option to do the same. But the easiest way of adding text in After Effects is by using Horizontal Type Tool. Here are the steps on how you can add text in AE with the type tool.
Step1Once you have imported your video into the Timeline, click on Horizontal Type Tool located in the top bar to add any text. You can press Ctrl+T(Windows) or Command+H(Mac) to get it instantly.
Step2Click on the video where you want to place the text and type your desired text there. After you are done adding your text, press Enter key in Num pad to exit out of the text field in the video.
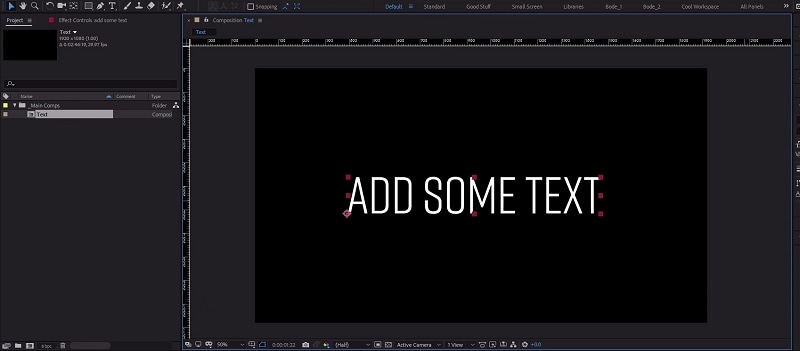
Step3This will automatically create a text layer on Timeline. You can now move the text and place it anywhere you want. You can also modify the text style and add animation which we will illustrate in the next section.
Part 2. Use the Character Panel to Edit Text in AE
When you select Type tool and add your desired text, you get a default style for the text. It is most likely that you have to modify the text style such as changing color, font, and size to fit in your video seamlessly. That is when you have to visit the Character Panel. Character Panel is where you get to edit the font of the text you have typed, increase or decrease the font size, change the font color, and much more. Apart from that, you can increase the spacing between lines when your text is a paragraph instead of a few words. Here are the steps to use Character Panel to edit text in AE.
Step1Once you have typed your text using Horizontal Type tool on the video, click on the text.
Step2Go to Character panel located in the right side of the screen. If it is minimized, click on the panel to expand it.
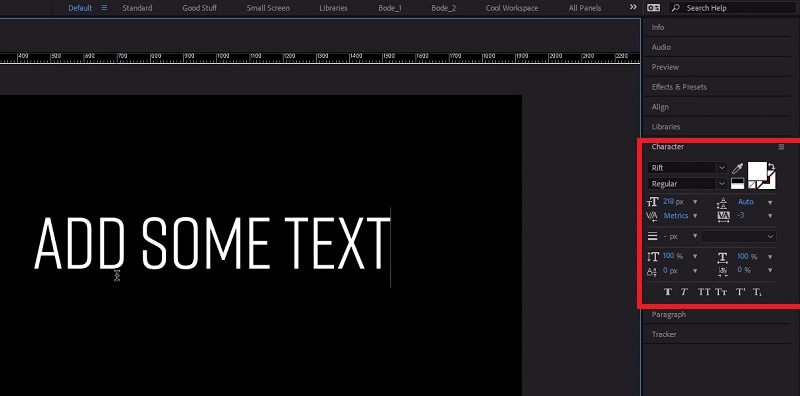
Step3The first option in the panel is the font of the text. By the side of the font is the text color. You can use the color picker tool to choose any color as per your preference.
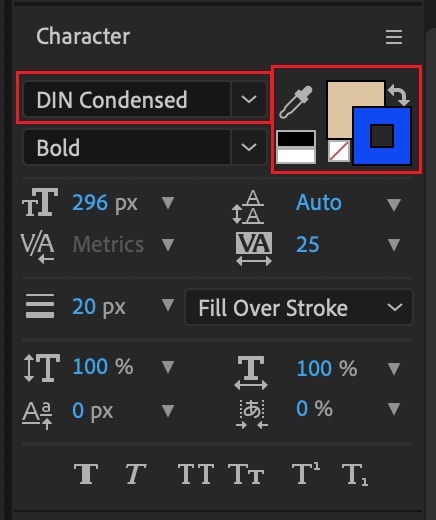
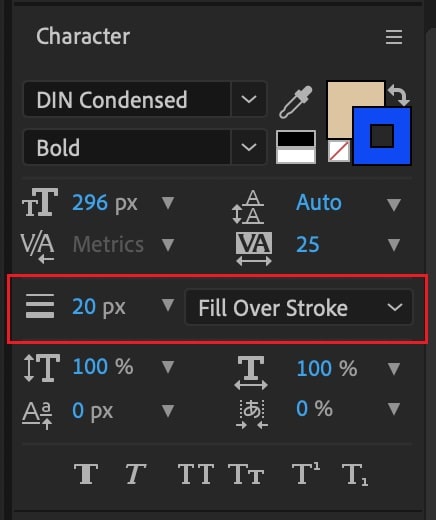
Step4Below the font, you can select the font style such as regular, bold, italics, and likewise. The subsequent part is to change the font size and adjust vertical spacing between lines and horizontal spacing between characters.
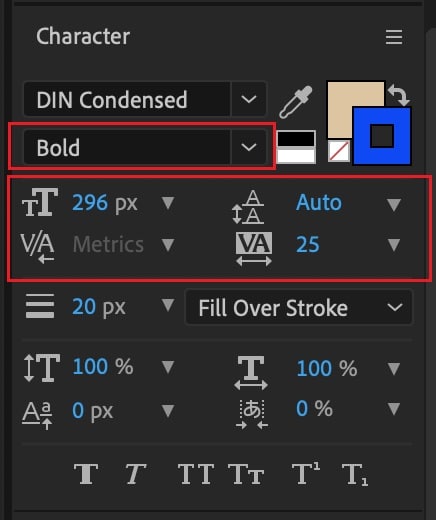
Step5The next section deals with Stroke option as well as fill the text option. You can fill the background of the text with any desired color.
Part 3. Add Animated Text to Video with Animation Presets
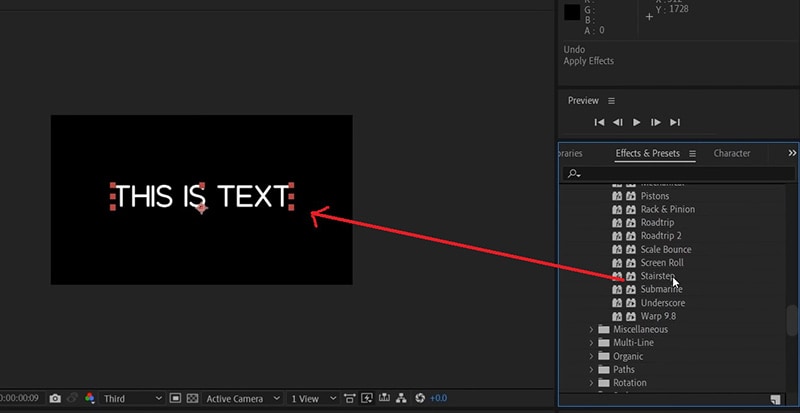
Now that you have added a static text and set the text format as per your preference, it is time to animate the text. A static text in a video does not look appealing, and animated texts make the video eye-catching instantly. You can use text animation presets in After Effects to add animated text to video. Here are the steps to add animated text to video with animation presets and effects.
Step1Click on the text on your video that you want to animate. Go to Effects and Presets panel located on the right side.
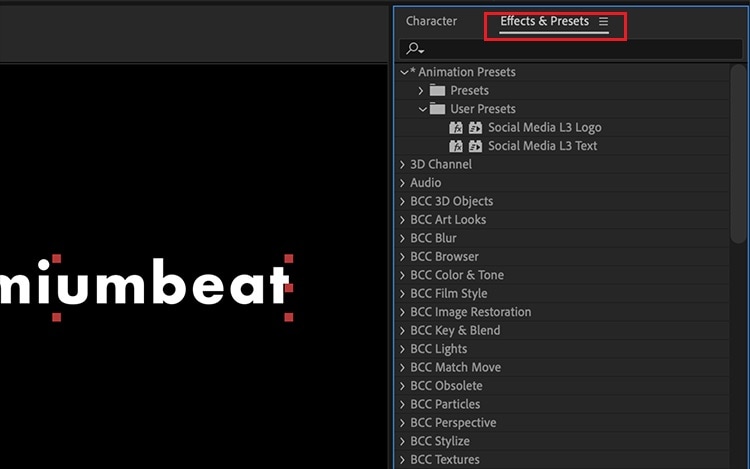
Step2Under Effects and Presets panel, Click on Text option. This will open all the different categories of animation presets available that you can apply to the text on your video.
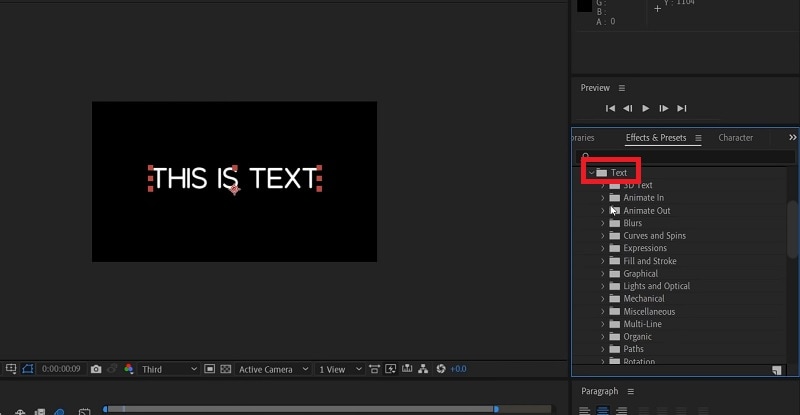
Step3Select any desired animation that you want to apply to the text and drag and drop the animation on the text in the composition window. Play the video and watch the applied animation on the text.
Part 4. Alternative Way to Add Text to Videos
If you are not comfortable with After Effects as a video editor, we recommend Wondershare as the best AE alternative. This is because the user interface of Filmora is super simple and there are loads of text effects and animations available to enhance your video content. Filmora is a professional video editor that is extremely popular among amateur and professional video editors. The application is available for both Windows and Mac users. Here are the steps for adding animated text to video using Filmora.
Step1Install Wondershare Filmora on your computer and launch the application. Click on New Project option on the welcome screen. Otherwise, you can go to File> New Project option.

Step2Go to File> Import Media> Import Media Files to import your video file. You can also drop the video file directly into Project Media folder.

Step3Drag and drop the video file from Project Media folder into the Timeline. If you have multiple video clips, you need to arrange them sequentially on the Timeline.
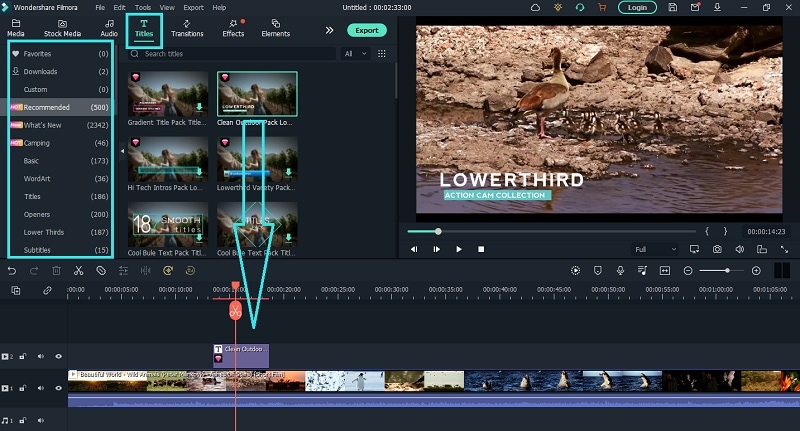
Step4To add text to your video, go to Titles located at the top bar. Check the left panel where you can see different categories of text effects. Select any desired text effect and drop into the Timeline. Make sure that the text layer is above the video layer on Timeline. You can shift the text layer on Timeline to place it where you want it to appear. You can also stretch the duration of the text effect as per your requirements.
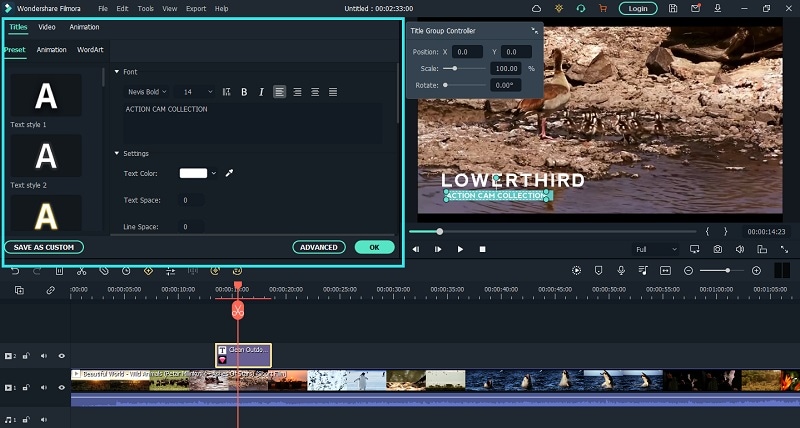
Step5You can edit the text effect by double clicking on the text layer on Timeline. Under Preset tab, you can change the text, font type and size, text color and much more. For further customization, you can click on Advanced button. At last, click on OK button to save the edits done.
The Bottom Line
If you want to add animated text to photo and video, After Effects is a great editor you can use. We have illustrated how you can add text and customize the text and finally, animate it as per your preference. However, if you are looking for AE alternative, we recommend Wondershare Filmora where you can add text to video instantly and choose from a wide range of text effects and animations.
Free Download For Win 7 or later(64-bit)
Free Download For macOS 10.14 or later
Also read:
- Updated Best 12 AI Video Generators to Pick for 2024
- New 2024 Approved Create A Freeze Frame Sequence In Your Videos
- New Top 5 Online Video Converter for Instagram
- Do You Want a LUT that You Can Use for Your High-Definition Content? You Can Use Rec 709 LUT Premiere Pro for Your HD Digital Media to Give the Perfect Result
- New Guaranteed 10 Storyboard Creators To Make Animation Easier for 2024
- 2024 Approved 8 Unexpected Ways to Add Emoji to Photo Online
- Updated How Can Filmora Create an Audio Visualizer Project for a Song? All Steps, From Launching the App to Editing the Text, Are Detailed Here
- Splitting Video in VSDC Step by Step
- Updated 2024 Approved Best Jump Cut Editing Tricks
- How to Make a Slideshow with Icecream Slideshow Maker
- Adobe Premiere Pro Guide to Slow-Down Video
- New Learn to Merge Clips in DaVinci Resolve with Simple Steps for 2024
- New Here, You Will Learn How to Add a Realistic Fire Effect Using Wondershare Filmora. That Will Help to Boost Your Channel and Decorate Your YouTube Channel with Creative and Unique Effects
- New 10 Creative AR Teaching Examples to Tell You What Is AR in Teaching for 2024
- Top Best Free LUTs For Premiere Pro for 2024
- How to Remove Audio From Video Without Watermark for 2024
- New In 2024, How to Make Split Screen Videos in Filmora
- New 2024 Approved Some Leading AI Tools to Replace Sky Backgrounds
- New 2024 Approved Why You Should Master Slideshows In Lightroom, Fresh Insight?
- New In 2024, 4 Solutions to Add White Borders on Mobile and Desktop
- Updated Steps to Rotate Videos in Lightworks
- Updated Top 5 Free Online Video Filter Editors Improve Your Videos with Filters
- The Craziest 10 AI Editors Youve Ever Seen for 2024
- In 2024, Here Are the Steps to Crop a Video in Sony Vegas Pro Step 1 Click on Import and Import the Video to Be Edited. Click on It and Drag-Drop to Timeline
- Updated 2024 Approved How To Use Virtual Green Screen to Shoot Video
- Updated In 2024, 8 Best Sites to Get Glitch Transition for Premiere Pro
- There Are Several Video Players that You Can Use to Watch Videos on Your PC. To Have a Better Experience Viewing Videos and Enhancing Them Across a Similar Platform, You Can Try Out VLC Media Player for PC
- 20 Must-Have Graduation Songs for Slideshow for 2024
- Updated Top 10 Voice Over Generators Windows, Mac, Android, iPhone, and Onli
- Updated Making Slow Motion Videos in Final Cut Pro The Best Methods
- Updated Reversing Time Lapse Videos on iPhone Using Top Applications for 2024
- New 2024 Approved 10 Best Free Video Player for Windows 11
- Updated How to Customize Your Loading Text Effect for 2024
- New The Ultimate Guide to Make a Text Collage for 2024
- New How Can You DIY VHS Overlay in After Effects for 2024
- How To Unlock The Apple iPhone 11 Pro SIM Lock 4 Easy Methods
- In 2024, Does Motorola Moto G34 5G Have Find My Friends? | Dr.fone
- Quick Fixes for Why Is My Vivo Y200 Black and White | Dr.fone
- In 2024, Top IMEI Unlokers for iPhone 12 and Android Phones
- How To Remove Passcode From iPhone 6? Complete Guide | Dr.fone
- In 2024, Lock Your Vivo T2 5G Phone in Style The Top 5 Gesture Lock Screen Apps
- 2024 Approved Create or Find Good Morning/Night GIFs
- New How to Translate YouTube Videos to English Subtitles for 2024
- In 2024, Is GSM Flasher ADB Legit? Full Review To Bypass Your Samsung Galaxy A14 4GFRP Lock
- How to Spy on Text Messages from Computer & Apple iPhone 13 | Dr.fone
- How to Rescue Lost Videos from Find N3
- Ultimate Guide on Samsung Galaxy A23 5G FRP Bypass
- Play HEVC H.265 on Motorola Edge 2023, is it possible?
- How to unlock a disable iPhone XS without a computer
- What Pokémon Evolve with A Dawn Stone For Realme C55? | Dr.fone
- new 2024 Approved The Ever-Changing Era of AI Video Translation A Reality to Be Fulfilled
- 3 Things You Must Know about Fake Snapchat Location On OnePlus 11R | Dr.fone
- 5 Hassle-Free Solutions to Fake Location on Find My Friends Of Xiaomi Redmi 12 5G | Dr.fone
- Does MP4 play on Defy 2?
- Guide to Mirror Your Poco M6 Pro 5G to Other Android devices | Dr.fone
- In 2024, How To Remove Passcode From Apple iPhone 15 Plus? Complete Guide
- In 2024, How Do I Stop Someone From Tracking My Samsung Galaxy M14 5G? | Dr.fone
- How to Bypass FRP from Samsung Galaxy F14 5G?
- Title: In 2024, Do You Want Your Photos and Videos to Give an Old and Vintage Feel? Here Are some Vintage LUTs Premiere Pro Free and Paid Options Available to Download
- Author: Chloe
- Created at : 2024-04-24 07:08:19
- Updated at : 2024-04-25 07:08:19
- Link: https://ai-editing-video.techidaily.com/in-2024-do-you-want-your-photos-and-videos-to-give-an-old-and-vintage-feel-here-are-some-vintage-luts-premiere-pro-free-and-paid-options-available-to-downlo/
- License: This work is licensed under CC BY-NC-SA 4.0.
