:max_bytes(150000):strip_icc():format(webp)/Childlearningonline_WillieBThomas_Getty-3e51600a64d742a0b5db4fadacead069.jpg)
In 2024, Easy Ways to Remove Motion Blur In Photoshop

Easy Ways to Remove Motion Blur In Photoshop
The motion blur effect is created in photos when the picture is taken in poor light conditions or due to a fast-moving object. Moreover, if the shutter speed of the camera is too low, it will also produce a motion blur effect. In such a situation, the captured picture may look out of focus and tedious. In order to fix this issue, this article can help you.
By reading this article, you can learn how to remove motion blur in Photoshop with simple steps. Moreover, we will also provide the best alternatives to Photoshop that you can utilize to remove motion blur from your photos.
Part 1: How to Remove the Motion Blur in Photoshop?
To fix a motion blur in an image, you would require a professional tool such as Adobe Photoshop . Photoshop is a well-recognized tool comprising tons of features for image editing and graphic designing. It offers selection tools that enable you to choose the specific parts of a photo efficiently. You can also add layers to your photo to modify and edit specific areas of the image.
You can also apply appealing filters from this platform to transform an ordinary image drastically. Moreover, using this precise tool, you can also fix motion blur in Photoshop. You can choose the blurry areas of your photo through its selection tools. Thus, with a few clicks, you can eliminate the flaws from your image easily.
Steps to Fix Motion Blur in Photos Using Photoshop
If you are new to Photoshop and don’t know how to fix motion blur in photos, then follow the instructions described below:
Step1 Open the Photoshop tool on your PC or Mac and upload your photo. From the “Layers” section, press “Ctrl + J” or “Command + J” to copy the first layer. Afterward, convert the first layer by choosing the option “Smart Object.”

Step2 Now head to the “Filter” section and tap on “Sharpen” to proceed. Afterward, proceed with the option of “Shake Reduction” by clicking on it. Now Photoshop will automatically reduce the blur effect. From the displayed panel, uncheck the option called “Artifact Suppression.”

Step3 To continue, open the “Advanced” tab from the left panel and enhance the size of your rectangular. Manage the position of the rectangle according to your preference. By doing so, you can see the details of the image clearly.

Step4 From the left panel, manage the options like “Blur Trace Bounds” and “Smoothing” according to your desire. Once done, press the “OK” button. For adding more modifications, add a blank layer and choose the “Clone Stamp Tool.” Afterward, select “Soft Round Brush” from the general brushes.

Step5 Now adjust the Opacity to 100% and Flow to 50%. Moreover, select “Current & Below” as the sample. Press the Alt key to take a sample of any flawless part of your photo and apply it to the blurry area. Make sure that the color of the sample taken is the same as the blurry area in the photo.

Part 2: Remove the Motion Blur with an Alternative to Photoshop
It may be possible that you don’t get satisfactory results from Photoshop removing motion blur. Or, if you find the interface of Photoshop intimidating, it can affect your productivity. For your assistance, this section will bring you the best alternatives to Photoshop.
1. IMAGamigo
IMAGamigo is an online tool that allows you to perform different operations on pictures efficiently. To fix motion blur, it offers a Deblurrer feature. Using this feature, you can automatically remove blur from your photos without any external effort. It also provides other distinct features such as Background Remover, Restorer, Colorizer, Upscale, etc.
To use this tool, first, navigate to its official website. From its tools, select “Deblurrer” to proceed. A new window will open on your screen instantly. Scroll down a little bit and locate the area saying, “Drop Image Here.” Click on this area and upload your image. Afterward, the tool will automatically start analyzing the picture. Once the process gets finished, click on the Download button to save your photo.

2. Vance.AI
This online platform is also a well-trusted tool by professionals and content creators. It provides AI-supported tools such as AI Image Denoiser, AI Image Upscaler, AI Photo Enhancer, etc. You can use its AI Image Sharpener to eliminate motion blur from pictures. It supports all popular image file formats, such as JPEG, PNG, and JPG. Thus, without any installations, you can quickly utilize this tool to fix motion blur photos.
To use this tool, access the official webpage of Vance.AI and select the “AI Image Sharpener” feature. Once done, click on the “Upload Image” option and import your blurry photo. Afterward, a new window will be open from which you can adjust the settings. Select the “Sharpen” option and choose the preferred Sharpen Mode. Afterward, click on the “Start to Process” option. Once the process ends, you can download the picture with a single click.

3. AKVIS Refocus AI
AKVIS is an offline tool that produces high-end results at a fast processing speed. You can find multiple options in this tool, such as Airbrush, Retoucher, Sketch, Decorator, etc. When it comes to fixing blurry pictures, this tool provides an exclusive feature called “Refocus AI.” Through this feature, you can instantly increase the sharpness of your photo. Also, it offers different modes such as Motion Blur, Radial Blur, Refocus-AI, and Tilt-Shift.
To fix motion blur:
Step1 Launch this tool and navigate to its Refocus AI option.
Step2 Select Refocus AI as your mode and upload the blurry picture. The default preset will be AKVIS Default AI.
Step3 Disable the “Image Sharpening” feature and navigate to the “Motion Deblur AI” section.
Step4 From there, adjust your Focus accordingly.
Step5 For more enhancements, enable the Image Sharpening feature and adjust the parameters.

Bonus Tip – How to Add Motion Blur to Your Images?
Do you want to add motion blur to your images? Many people like to intentionally add a motion blur effect in their images to add an artistic element. If you are interested in doing so, the best desktop tool you can try is Wondershare Filmora . This tool offers trending and high-quality effects that you can easily apply to your images.
Free Download For Win 7 or later(64-bit)
Free Download For macOS 10.14 or later
To add a motion blur effect:
Step1 Launch Filmora and create a new project.
Step2 Import your photo on this tool and drop it into the timeline.
Step3 Split the clip where you want to add the blur effect.
Once done, go to the Effects tab and search “Blur.” By doing so, you would be able to check all the blur effects on your screen. Choose and apply the blur effect to the split part of your clip. Once done, hit the Export button.

Conclusion
Photoshop is an excellent tool to edit and modify your pictures in great quality. You can use this article to take guidance to remove motion blur from photos. However, if you are not getting desired results from Photoshop, we have also provided the best alternatives to Photoshop to remove motion blur. Moreover, to create a motion blur effect in your images, you can explore the Wondershare Filmora tool.
Part 1: How to Remove the Motion Blur in Photoshop?
To fix a motion blur in an image, you would require a professional tool such as Adobe Photoshop . Photoshop is a well-recognized tool comprising tons of features for image editing and graphic designing. It offers selection tools that enable you to choose the specific parts of a photo efficiently. You can also add layers to your photo to modify and edit specific areas of the image.
You can also apply appealing filters from this platform to transform an ordinary image drastically. Moreover, using this precise tool, you can also fix motion blur in Photoshop. You can choose the blurry areas of your photo through its selection tools. Thus, with a few clicks, you can eliminate the flaws from your image easily.
Steps to Fix Motion Blur in Photos Using Photoshop
If you are new to Photoshop and don’t know how to fix motion blur in photos, then follow the instructions described below:
Step1 Open the Photoshop tool on your PC or Mac and upload your photo. From the “Layers” section, press “Ctrl + J” or “Command + J” to copy the first layer. Afterward, convert the first layer by choosing the option “Smart Object.”

Step2 Now head to the “Filter” section and tap on “Sharpen” to proceed. Afterward, proceed with the option of “Shake Reduction” by clicking on it. Now Photoshop will automatically reduce the blur effect. From the displayed panel, uncheck the option called “Artifact Suppression.”

Step3 To continue, open the “Advanced” tab from the left panel and enhance the size of your rectangular. Manage the position of the rectangle according to your preference. By doing so, you can see the details of the image clearly.

Step4 From the left panel, manage the options like “Blur Trace Bounds” and “Smoothing” according to your desire. Once done, press the “OK” button. For adding more modifications, add a blank layer and choose the “Clone Stamp Tool.” Afterward, select “Soft Round Brush” from the general brushes.

Step5 Now adjust the Opacity to 100% and Flow to 50%. Moreover, select “Current & Below” as the sample. Press the Alt key to take a sample of any flawless part of your photo and apply it to the blurry area. Make sure that the color of the sample taken is the same as the blurry area in the photo.

Part 2: Remove the Motion Blur with an Alternative to Photoshop
It may be possible that you don’t get satisfactory results from Photoshop removing motion blur. Or, if you find the interface of Photoshop intimidating, it can affect your productivity. For your assistance, this section will bring you the best alternatives to Photoshop.
1. IMAGamigo
IMAGamigo is an online tool that allows you to perform different operations on pictures efficiently. To fix motion blur, it offers a Deblurrer feature. Using this feature, you can automatically remove blur from your photos without any external effort. It also provides other distinct features such as Background Remover, Restorer, Colorizer, Upscale, etc.
To use this tool, first, navigate to its official website. From its tools, select “Deblurrer” to proceed. A new window will open on your screen instantly. Scroll down a little bit and locate the area saying, “Drop Image Here.” Click on this area and upload your image. Afterward, the tool will automatically start analyzing the picture. Once the process gets finished, click on the Download button to save your photo.

2. Vance.AI
This online platform is also a well-trusted tool by professionals and content creators. It provides AI-supported tools such as AI Image Denoiser, AI Image Upscaler, AI Photo Enhancer, etc. You can use its AI Image Sharpener to eliminate motion blur from pictures. It supports all popular image file formats, such as JPEG, PNG, and JPG. Thus, without any installations, you can quickly utilize this tool to fix motion blur photos.
To use this tool, access the official webpage of Vance.AI and select the “AI Image Sharpener” feature. Once done, click on the “Upload Image” option and import your blurry photo. Afterward, a new window will be open from which you can adjust the settings. Select the “Sharpen” option and choose the preferred Sharpen Mode. Afterward, click on the “Start to Process” option. Once the process ends, you can download the picture with a single click.

3. AKVIS Refocus AI
AKVIS is an offline tool that produces high-end results at a fast processing speed. You can find multiple options in this tool, such as Airbrush, Retoucher, Sketch, Decorator, etc. When it comes to fixing blurry pictures, this tool provides an exclusive feature called “Refocus AI.” Through this feature, you can instantly increase the sharpness of your photo. Also, it offers different modes such as Motion Blur, Radial Blur, Refocus-AI, and Tilt-Shift.
To fix motion blur:
Step1 Launch this tool and navigate to its Refocus AI option.
Step2 Select Refocus AI as your mode and upload the blurry picture. The default preset will be AKVIS Default AI.
Step3 Disable the “Image Sharpening” feature and navigate to the “Motion Deblur AI” section.
Step4 From there, adjust your Focus accordingly.
Step5 For more enhancements, enable the Image Sharpening feature and adjust the parameters.

Bonus Tip – How to Add Motion Blur to Your Images?
Do you want to add motion blur to your images? Many people like to intentionally add a motion blur effect in their images to add an artistic element. If you are interested in doing so, the best desktop tool you can try is Wondershare Filmora . This tool offers trending and high-quality effects that you can easily apply to your images.
Free Download For Win 7 or later(64-bit)
Free Download For macOS 10.14 or later
To add a motion blur effect:
Step1 Launch Filmora and create a new project.
Step2 Import your photo on this tool and drop it into the timeline.
Step3 Split the clip where you want to add the blur effect.
Once done, go to the Effects tab and search “Blur.” By doing so, you would be able to check all the blur effects on your screen. Choose and apply the blur effect to the split part of your clip. Once done, hit the Export button.

Conclusion
Photoshop is an excellent tool to edit and modify your pictures in great quality. You can use this article to take guidance to remove motion blur from photos. However, if you are not getting desired results from Photoshop, we have also provided the best alternatives to Photoshop to remove motion blur. Moreover, to create a motion blur effect in your images, you can explore the Wondershare Filmora tool.
Step by Step to Crop Videos with CyberLink PowerDirector
Video Editing is an art form dependent on various elements and factors that are part of your video; this means people, items, or objects in the background can often make or break the viewing experience.
Can you imagine having shot a scene with impeccable attention to detail, but a small uncontrollable action leaves a portion of an unwanted cable or equipment in the frame? Bummer, right? But luckily, due to the power of video editing software, it is not hard to deal with such problems.
A way to work with such clips is to use the crop function while editing, as it can help emphasize or detract attention from a particular part of any video project.
Author’s Note: While filming, try to capture footage in the highest resolution allowed by the available camera hardware; this will give you more room to play with while using the crop function.
To preface, CyberLink PowerDirector is a free video editing tool capable of accomplishing this and providing a professional touch to your video projects. And like other competing software, the program not only allows you to crop into clips but also uses keyframes to modify aspects like panning and zoom. So to help you perform this action, in this article, we list the steps you will need for cropping into video clips with PowerDirector. As an added bonus, we have also included the method to perform the same actions in WonderShare Filmora.
Note: We documented the steps in this guide with PowerDirector 365 and WonderShare Filmora X.
How to Crop Videos with CyberLink PowerDirector?
The idea of cropping into clips has always been an easy action to perform; once you have PowerDirector 365 open, follow the steps listed below.
If you do not already have CyberLink PowerDirector 365, download the software by visiting Cyberlink’s official website.
Step 1: Create a new video project in Cyberlink PowerDirector 365 by choosing Full Mode.

Note: Full Mode in Cyberlink PowerDirector 365 provides access to a full-featured video editing tool, similar to Wondershare Filmora. The other available options cater to distinct video types.
Step 2: Import media onto the Timeline from the Media Library; in this guide, we have gone ahead and used the pre-existing stock footage.

Step 3: Now, click on the video file on the Timeline; this will activate the video toolbar giving you access to the various controls built into PowerDirector 365. Hover over the tools open, following which you need to click on the Crop, Zoom, and Pan option.

Step 4: Pick either corner of the frame visible around the video and set the area you want the clip to focus upon; following this, click Save.
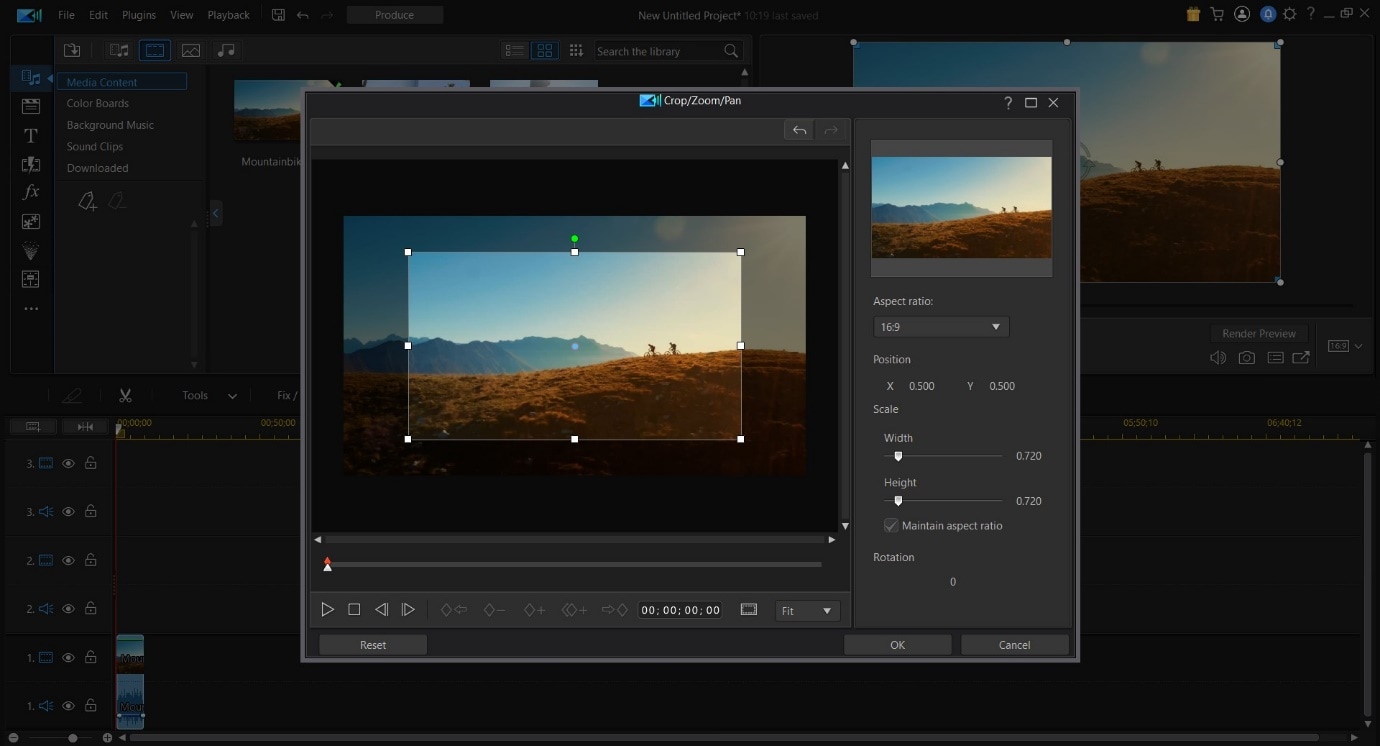
This action will crop the video clip according to your desired size.
Tip:
The activation of Keyframes while cropping will allow you to create an effect that slowly zooms into the footage. To do this, set Keyframe Point 1 at a specific time (say the fifth second) and at one zoom level (say zero) and create Keyframe Point 2 at another time (fifteenth second) and a different zoom level (say fifty). So, between the fifth second and fifteenth second, the zoom will steadily increase and raise emphasis on an object. You can also add an element of position to this action if you want the focus to be on something not in the center of the screen.
Definition: Keyframes while Video Editing is a software-based feature that allows you to set In and Out Points, giving clips between the two positions different properties that change as the playhead continues to move. These properties can be increased zoom, rotation, different colors, or even a gradual pan.
We recommend experimenting with this feature if you want to bring a more dynamic feeling to your video project.
An Easier Way to Crop Video with Wondershare Filmora
While Cyberlink PowerDirector 365 is a powerful video editing tool, in our experience, its menus are not as simple to navigate as some of the other competing video editing tools available, Wondershare Filmora Video Editor included.
An emphasis on quick accessibility is present with Filmora, and we believe this is a huge plus for beginning creators. The use of iconography resemblant to mobile software is another aspect that helps increase familiarity.
If you do not already have Wondershare Filmora, you can download the software by visiting the official website.
Now, to help you learn how to use the Crop Tool and to show you an example of what we mean, here is how you can use the feature Wondershare Filmora to get the desired output.
For Win 7 or later (64-bit)
For macOS 10.14 or later
Once you have the software open, follow the steps listed below.
Step 1: Import the Media File into your Video Project.

Step 2: Drag the clip onto the Timeline and then select it to activate further interactions.

Step 3: Choose the Crop Options (marked in Red) to open the Crop window.
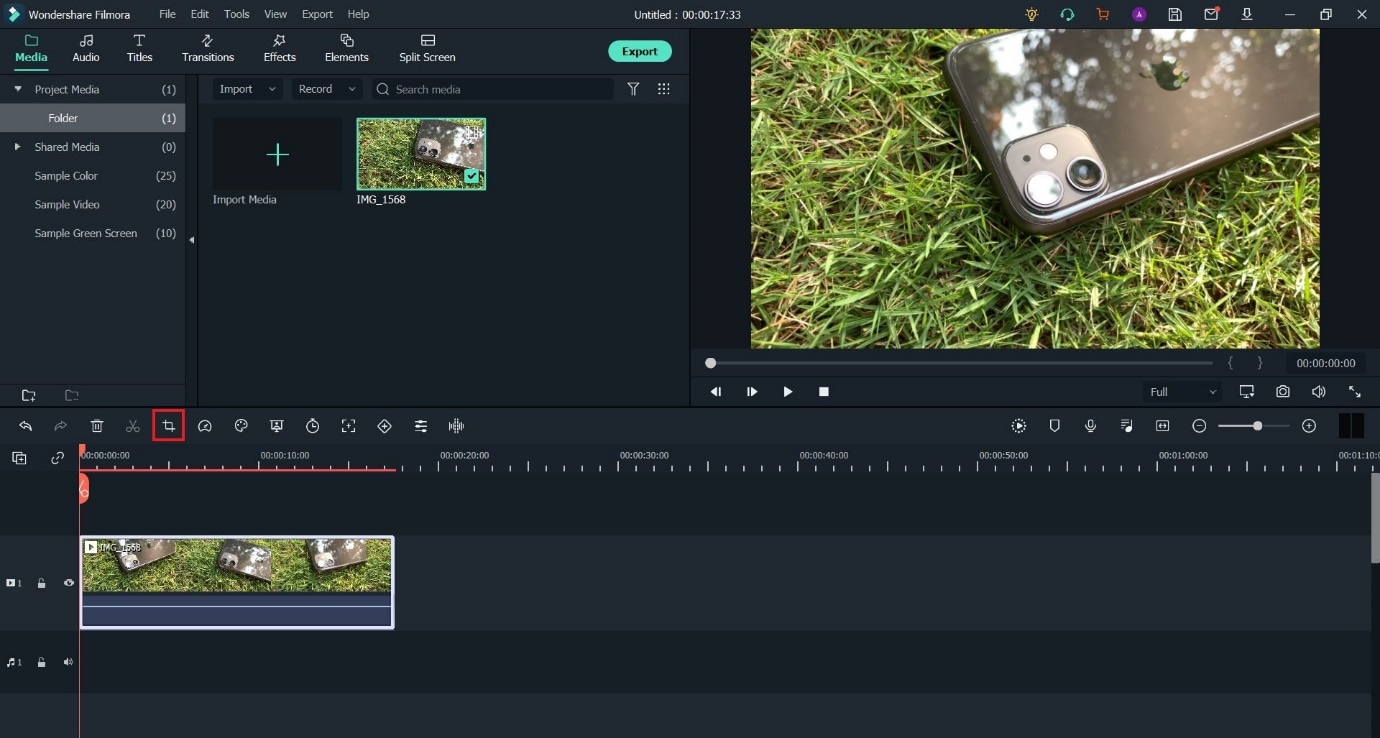
Step 4: Pick any edge within the visible box and resize them to select the portion you want to keep in the clip.
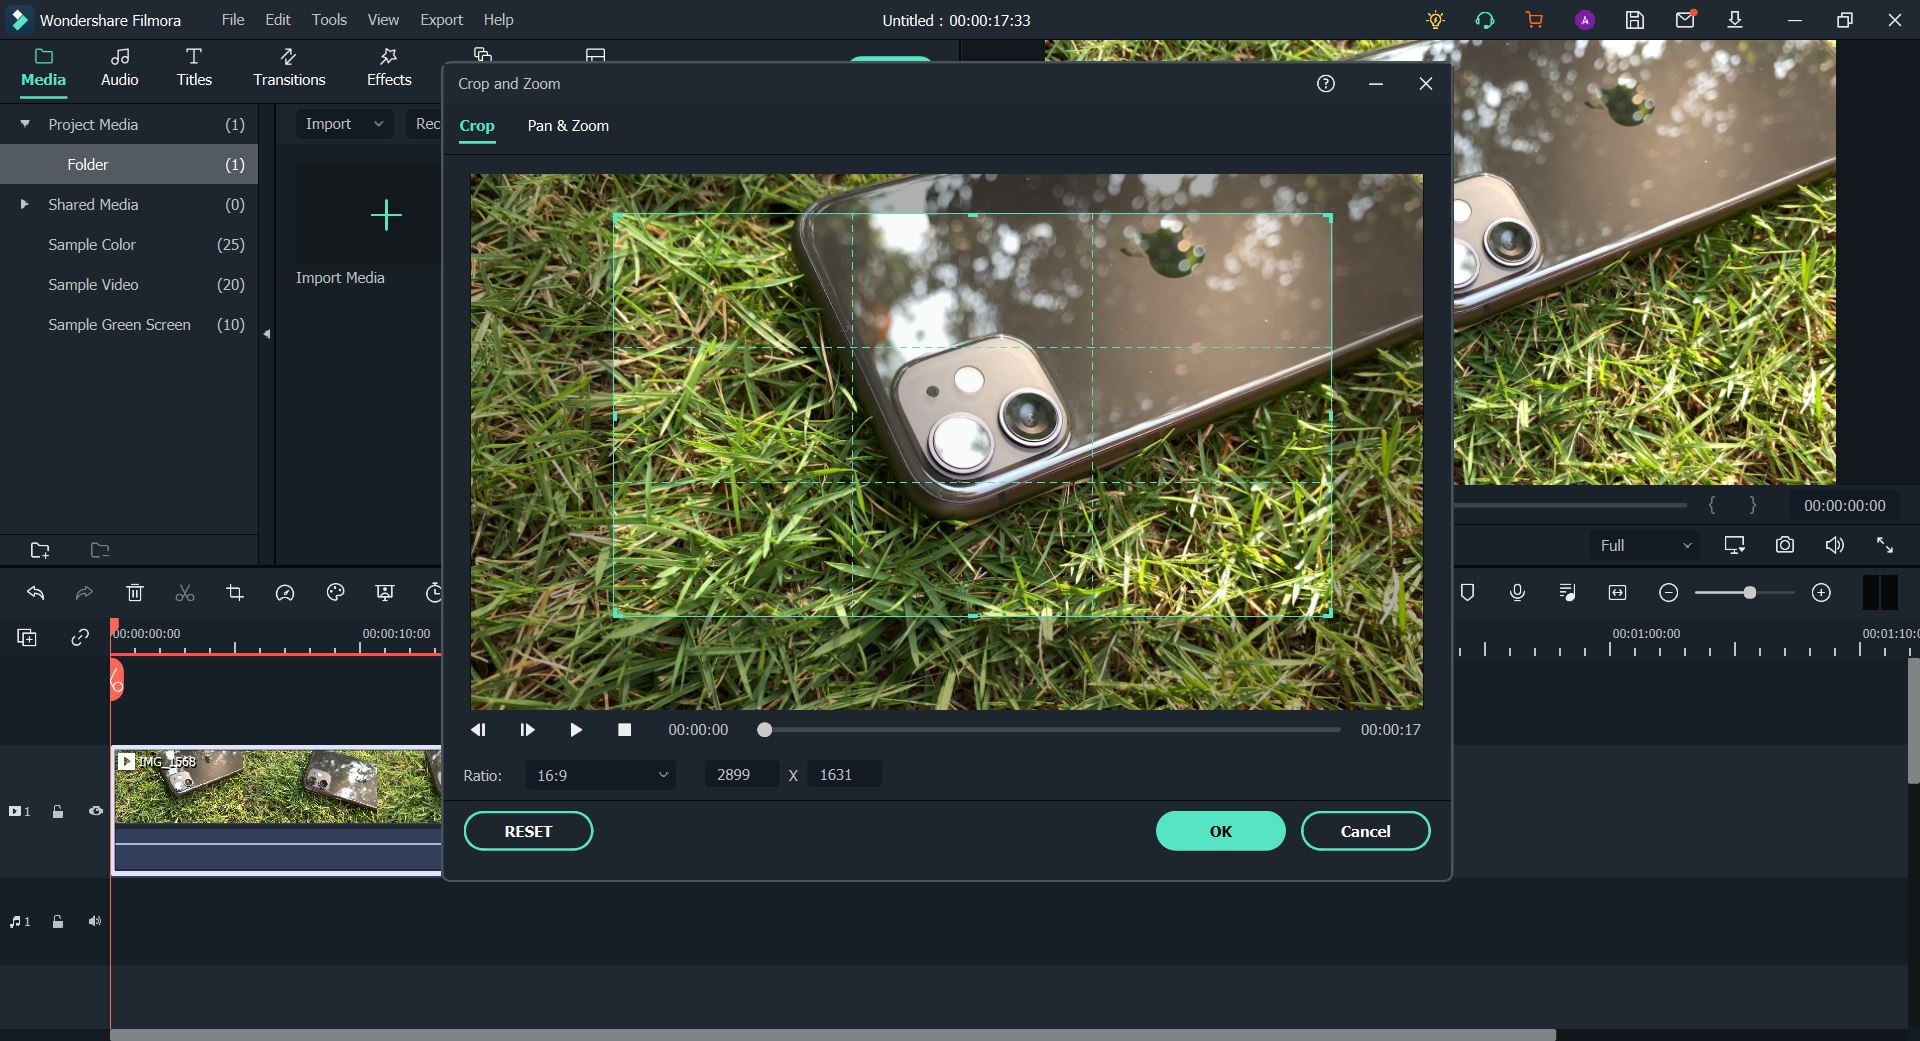
Having read this bit of the guide, we believe you may have noticed how Filmora is more convenient due to the easier access it provides to the crop function.
The Bottom Line
So, at the end of the day, both software listed in this article are fully functional and highly-capable video editing tools, but saving time spent in front of the computer is a huge factor for any video editor.
And Wondershare Filmora does just that with its modern iconography and increased accessibility. With its thoughtful, less-frills approach, Filmora is the one to pick if you do not want to be bogged down by needless menus and have to hunt for actions that will help you create a video that you would want to watch yourself.
Note: Full Mode in Cyberlink PowerDirector 365 provides access to a full-featured video editing tool, similar to Wondershare Filmora. The other available options cater to distinct video types.
Step 2: Import media onto the Timeline from the Media Library; in this guide, we have gone ahead and used the pre-existing stock footage.

Step 3: Now, click on the video file on the Timeline; this will activate the video toolbar giving you access to the various controls built into PowerDirector 365. Hover over the tools open, following which you need to click on the Crop, Zoom, and Pan option.

Step 4: Pick either corner of the frame visible around the video and set the area you want the clip to focus upon; following this, click Save.

This action will crop the video clip according to your desired size.
Tip:
The activation of Keyframes while cropping will allow you to create an effect that slowly zooms into the footage. To do this, set Keyframe Point 1 at a specific time (say the fifth second) and at one zoom level (say zero) and create Keyframe Point 2 at another time (fifteenth second) and a different zoom level (say fifty). So, between the fifth second and fifteenth second, the zoom will steadily increase and raise emphasis on an object. You can also add an element of position to this action if you want the focus to be on something not in the center of the screen.
Definition: Keyframes while Video Editing is a software-based feature that allows you to set In and Out Points, giving clips between the two positions different properties that change as the playhead continues to move. These properties can be increased zoom, rotation, different colors, or even a gradual pan.
We recommend experimenting with this feature if you want to bring a more dynamic feeling to your video project.
An Easier Way to Crop Video with Wondershare Filmora
While Cyberlink PowerDirector 365 is a powerful video editing tool, in our experience, its menus are not as simple to navigate as some of the other competing video editing tools available, Wondershare Filmora Video Editor included.
An emphasis on quick accessibility is present with Filmora, and we believe this is a huge plus for beginning creators. The use of iconography resemblant to mobile software is another aspect that helps increase familiarity.
If you do not already have Wondershare Filmora, you can download the software by visiting the official website.
Now, to help you learn how to use the Crop Tool and to show you an example of what we mean, here is how you can use the feature Wondershare Filmora to get the desired output.
For Win 7 or later (64-bit)
For macOS 10.14 or later
Once you have the software open, follow the steps listed below.
Step 1: Import the Media File into your Video Project.

Step 2: Drag the clip onto the Timeline and then select it to activate further interactions.

Step 3: Choose the Crop Options (marked in Red) to open the Crop window.

Step 4: Pick any edge within the visible box and resize them to select the portion you want to keep in the clip.

Having read this bit of the guide, we believe you may have noticed how Filmora is more convenient due to the easier access it provides to the crop function.
The Bottom Line
So, at the end of the day, both software listed in this article are fully functional and highly-capable video editing tools, but saving time spent in front of the computer is a huge factor for any video editor.
And Wondershare Filmora does just that with its modern iconography and increased accessibility. With its thoughtful, less-frills approach, Filmora is the one to pick if you do not want to be bogged down by needless menus and have to hunt for actions that will help you create a video that you would want to watch yourself.
Note: Full Mode in Cyberlink PowerDirector 365 provides access to a full-featured video editing tool, similar to Wondershare Filmora. The other available options cater to distinct video types.
Step 2: Import media onto the Timeline from the Media Library; in this guide, we have gone ahead and used the pre-existing stock footage.

Step 3: Now, click on the video file on the Timeline; this will activate the video toolbar giving you access to the various controls built into PowerDirector 365. Hover over the tools open, following which you need to click on the Crop, Zoom, and Pan option.

Step 4: Pick either corner of the frame visible around the video and set the area you want the clip to focus upon; following this, click Save.

This action will crop the video clip according to your desired size.
Tip:
The activation of Keyframes while cropping will allow you to create an effect that slowly zooms into the footage. To do this, set Keyframe Point 1 at a specific time (say the fifth second) and at one zoom level (say zero) and create Keyframe Point 2 at another time (fifteenth second) and a different zoom level (say fifty). So, between the fifth second and fifteenth second, the zoom will steadily increase and raise emphasis on an object. You can also add an element of position to this action if you want the focus to be on something not in the center of the screen.
Definition: Keyframes while Video Editing is a software-based feature that allows you to set In and Out Points, giving clips between the two positions different properties that change as the playhead continues to move. These properties can be increased zoom, rotation, different colors, or even a gradual pan.
We recommend experimenting with this feature if you want to bring a more dynamic feeling to your video project.
An Easier Way to Crop Video with Wondershare Filmora
While Cyberlink PowerDirector 365 is a powerful video editing tool, in our experience, its menus are not as simple to navigate as some of the other competing video editing tools available, Wondershare Filmora Video Editor included.
An emphasis on quick accessibility is present with Filmora, and we believe this is a huge plus for beginning creators. The use of iconography resemblant to mobile software is another aspect that helps increase familiarity.
If you do not already have Wondershare Filmora, you can download the software by visiting the official website.
Now, to help you learn how to use the Crop Tool and to show you an example of what we mean, here is how you can use the feature Wondershare Filmora to get the desired output.
For Win 7 or later (64-bit)
For macOS 10.14 or later
Once you have the software open, follow the steps listed below.
Step 1: Import the Media File into your Video Project.

Step 2: Drag the clip onto the Timeline and then select it to activate further interactions.

Step 3: Choose the Crop Options (marked in Red) to open the Crop window.

Step 4: Pick any edge within the visible box and resize them to select the portion you want to keep in the clip.

Having read this bit of the guide, we believe you may have noticed how Filmora is more convenient due to the easier access it provides to the crop function.
The Bottom Line
So, at the end of the day, both software listed in this article are fully functional and highly-capable video editing tools, but saving time spent in front of the computer is a huge factor for any video editor.
And Wondershare Filmora does just that with its modern iconography and increased accessibility. With its thoughtful, less-frills approach, Filmora is the one to pick if you do not want to be bogged down by needless menus and have to hunt for actions that will help you create a video that you would want to watch yourself.
Note: Full Mode in Cyberlink PowerDirector 365 provides access to a full-featured video editing tool, similar to Wondershare Filmora. The other available options cater to distinct video types.
Step 2: Import media onto the Timeline from the Media Library; in this guide, we have gone ahead and used the pre-existing stock footage.

Step 3: Now, click on the video file on the Timeline; this will activate the video toolbar giving you access to the various controls built into PowerDirector 365. Hover over the tools open, following which you need to click on the Crop, Zoom, and Pan option.

Step 4: Pick either corner of the frame visible around the video and set the area you want the clip to focus upon; following this, click Save.

This action will crop the video clip according to your desired size.
Tip:
The activation of Keyframes while cropping will allow you to create an effect that slowly zooms into the footage. To do this, set Keyframe Point 1 at a specific time (say the fifth second) and at one zoom level (say zero) and create Keyframe Point 2 at another time (fifteenth second) and a different zoom level (say fifty). So, between the fifth second and fifteenth second, the zoom will steadily increase and raise emphasis on an object. You can also add an element of position to this action if you want the focus to be on something not in the center of the screen.
Definition: Keyframes while Video Editing is a software-based feature that allows you to set In and Out Points, giving clips between the two positions different properties that change as the playhead continues to move. These properties can be increased zoom, rotation, different colors, or even a gradual pan.
We recommend experimenting with this feature if you want to bring a more dynamic feeling to your video project.
An Easier Way to Crop Video with Wondershare Filmora
While Cyberlink PowerDirector 365 is a powerful video editing tool, in our experience, its menus are not as simple to navigate as some of the other competing video editing tools available, Wondershare Filmora Video Editor included.
An emphasis on quick accessibility is present with Filmora, and we believe this is a huge plus for beginning creators. The use of iconography resemblant to mobile software is another aspect that helps increase familiarity.
If you do not already have Wondershare Filmora, you can download the software by visiting the official website.
Now, to help you learn how to use the Crop Tool and to show you an example of what we mean, here is how you can use the feature Wondershare Filmora to get the desired output.
For Win 7 or later (64-bit)
For macOS 10.14 or later
Once you have the software open, follow the steps listed below.
Step 1: Import the Media File into your Video Project.

Step 2: Drag the clip onto the Timeline and then select it to activate further interactions.

Step 3: Choose the Crop Options (marked in Red) to open the Crop window.

Step 4: Pick any edge within the visible box and resize them to select the portion you want to keep in the clip.

Having read this bit of the guide, we believe you may have noticed how Filmora is more convenient due to the easier access it provides to the crop function.
The Bottom Line
So, at the end of the day, both software listed in this article are fully functional and highly-capable video editing tools, but saving time spent in front of the computer is a huge factor for any video editor.
And Wondershare Filmora does just that with its modern iconography and increased accessibility. With its thoughtful, less-frills approach, Filmora is the one to pick if you do not want to be bogged down by needless menus and have to hunt for actions that will help you create a video that you would want to watch yourself.
Beginner’s Guide About WMV Format and Best WMV Video Editor
WMV is the default file format for Windows Media Player. It was developed as an alternative to the RealVideo codec for web streaming purposes. WMV can be streamed on the internet and played by various media players. YouTube allows the users to upload WMV file format content.
Now that you know this about WMV format, there are some more details to share, so let’s start. The article understudy will discuss everything in detail; buckle up!
In this article
02 Advantage and Disadvantage of WMV Video Format
03 Best MMV Video Editor - Wondershare Filmora
04 How to Edit WMV Video File?
05 WMV VS. MP4: What’s the Difference?
Part 1. What Is WMV File?
WMV file format is from a sequence of video codecs, and it was developed by Microsoft. The full abbreviation of WMV is ‘Windows Media Video.’ WMV is a compressed file container that was made for the Windows Media Framework. It is mainly used for the video content that is to be sold either online or through HD DVDs and Blu-ray Discs.

WMV format files support the encryption for the use with Digital Rights Management (DRM) systems, protecting the content from copywriting and any unlawful production. The WMV file may contain animation, high-definition videos, TV episodes, or video clips.
WMV compresses large files for better data transmission over a network while maintaining quality standards. It is specifically designed to run on all Windows devices. After standardization by the Society of Motion Pictures and Television Engineering (SMPTE), WMV is now considered to be an open standard format.
Part 2. Advantage and Disadvantage of WMV Video Format
Like everything, the WMV file format has its benefits and drawbacks, but not everyone knows much about them. The following section of this article will talk about the benefits and drawbacks; let’s get started!
Advantages of WMV Format
- WMV format is excellent for web videos as it acquires little disc memory space and thus takes less time in loading.
- The files are compressed and have reduced size; hence it is easy to transfer WMV file format via emails etc.
- The format is widely used on Windows and is suitable for storing short animations as well as compressed videos.
- Do you know anything about the compression ratio? Well, if we compare WMV to MPEG-4, WMV format has a 2x compression ratio.
- The format also works on the Web through Google Drive. Also, the quality of the video is maintained with Windows video format.
Disadvantages of WMV Format
- Although the small size is better but not, every application works with the tiny file size as offered by WMV format.
- If you are a Mac user and wish to play WMV files on your Mac, you need plugins like Flip4Mac.
Part 3. Best MMV Video Editor -Wondershare Filmora
Wondershare Filmora has always been on the top of the list whenever we talk about video editing. The software is used worldwide by professionals and also newbies. This is because Filmora provides an endless range of features that can create captivating videos. Let’s share a few features:
- Stabilize Video: Your video might be shaky, or maybe single footage can be shaky. Do you know a way to fix this? Try Stabilize Video feature from Filmora. This feature helps you to smooth all the shaky scenes in your video.
- Motion Tracking: In the editing world, Motion Tracking is the most fun type of feature. With this feature, you can move objects like text, audio, video, elements, etc., by tracking the movements in your video.
- Auto Highlight: Do you know a feature that will save your time and effort? It’s Auto Highlight. The feature spontaneously extracts the highlight from the clip and saves your video trimming time.
For Win 7 or later (64-bit)
For macOS 10.12 or later
Part 4. How to Edit WMV Video File?
For editing, Wondershare Filmora is an ideal software to use. Now that you know about Filmora and its stunning features, do you have any knowledge about how to use it? Well, don’t worry. We are here to guide you about how you can edit WMV file format videos in Filmora. Just follow the simple steps shared below:
Step 1: Get the Media File
Start by launching the software on your respective device. Once Filmora opens, you can import the media file by drag and drop. Or else, tap on the ‘File’ tab and move to the ‘Import Media’ option. From the submenu, select the ‘Import Media Files’ option to add the WMV format file.

Step 2: Head to Editor Timeline
You should know that editing is only possible when your file is on the timeline. For that, after a successful file import, simply drag and drop the media file to the timeline and let the fun begins.

Step 3: Add Video Effects
Once the file is in the timeline, start editing. You can add various video effects to your WMV video file from this section. You can get effects like Canvas, Cool Film, Four Seasons, etc., and can also add overlays, filters, etc.

Step 4: Use Title Template
Filmora offers you so many different and cool title templates. You only have to select the best template from the options. You can go for School Pack, Channel Subscribe, Romantic Pack, etc. Moreover, add Lower Thirds, Subtitles, Openers, and a lot more.

Step 5: Export the WMV File
After all the editing is complete, get the WMV format file exported to your device. For that, hit the ‘Export’ button and from the ‘Locals’ section, select your preferred output file format.

Part 5. WMV VS. MP4: What’s the Difference?
MP4 is far more popular than the WMV file format. The world is shifting on the internet; MP4 is widely used and loved online. On the other hand, WMV is popular with Windows users, along with DVD and Blu-ray collectors.
If we talk about the supported software for MP4 and WMV, MP4 has bigger support. WMV is supported by fewer video players and online video editing tools. On the contrary, MP4 is supported by all the video players available for both Windows and Mac users; along with that, every online tool also supports MP4 format for video editing.
Now the world demands quality. In terms of quality, MP4 has better quality than WMV. WMV has lost the battle of quality provision against WMV. MP4 is a larger file than WMV in terms of file size. It is less compressed than WMV format, but the compression gives WMV an advantage over MP4.
Having a compressed file format produces files of smaller size, which can be easily stored. Easy storage of video files makes WMV a better option in places where the quality of the video can be compromised.
Bottom Line
After reading this article, we hope that you have increased your knowledge regarding the WMV file format. We talked about the pros and cons of the WMV format. Moreover, we also shared ways to edit a WMV video with the best video editor, Wondershare Filmora.
Let’s tell you more about the video editing software. Wondershare Filmora is not just a Video Editor; it’s also an Audio Editor with various diverse features like Audio Denoise, Silence Detection, etc. The software is easy to use with a drag and drop facility. You can create and edit stunning videos with the multi-track editor.
For Win 7 or later (64-bit)
For macOS 10.12 or later
02 Advantage and Disadvantage of WMV Video Format
03 Best MMV Video Editor - Wondershare Filmora
04 How to Edit WMV Video File?
05 WMV VS. MP4: What’s the Difference?
Part 1. What Is WMV File?
WMV file format is from a sequence of video codecs, and it was developed by Microsoft. The full abbreviation of WMV is ‘Windows Media Video.’ WMV is a compressed file container that was made for the Windows Media Framework. It is mainly used for the video content that is to be sold either online or through HD DVDs and Blu-ray Discs.

WMV format files support the encryption for the use with Digital Rights Management (DRM) systems, protecting the content from copywriting and any unlawful production. The WMV file may contain animation, high-definition videos, TV episodes, or video clips.
WMV compresses large files for better data transmission over a network while maintaining quality standards. It is specifically designed to run on all Windows devices. After standardization by the Society of Motion Pictures and Television Engineering (SMPTE), WMV is now considered to be an open standard format.
Part 2. Advantage and Disadvantage of WMV Video Format
Like everything, the WMV file format has its benefits and drawbacks, but not everyone knows much about them. The following section of this article will talk about the benefits and drawbacks; let’s get started!
Advantages of WMV Format
- WMV format is excellent for web videos as it acquires little disc memory space and thus takes less time in loading.
- The files are compressed and have reduced size; hence it is easy to transfer WMV file format via emails etc.
- The format is widely used on Windows and is suitable for storing short animations as well as compressed videos.
- Do you know anything about the compression ratio? Well, if we compare WMV to MPEG-4, WMV format has a 2x compression ratio.
- The format also works on the Web through Google Drive. Also, the quality of the video is maintained with Windows video format.
Disadvantages of WMV Format
- Although the small size is better but not, every application works with the tiny file size as offered by WMV format.
- If you are a Mac user and wish to play WMV files on your Mac, you need plugins like Flip4Mac.
Part 3. Best MMV Video Editor -Wondershare Filmora
Wondershare Filmora has always been on the top of the list whenever we talk about video editing. The software is used worldwide by professionals and also newbies. This is because Filmora provides an endless range of features that can create captivating videos. Let’s share a few features:
- Stabilize Video: Your video might be shaky, or maybe single footage can be shaky. Do you know a way to fix this? Try Stabilize Video feature from Filmora. This feature helps you to smooth all the shaky scenes in your video.
- Motion Tracking: In the editing world, Motion Tracking is the most fun type of feature. With this feature, you can move objects like text, audio, video, elements, etc., by tracking the movements in your video.
- Auto Highlight: Do you know a feature that will save your time and effort? It’s Auto Highlight. The feature spontaneously extracts the highlight from the clip and saves your video trimming time.
For Win 7 or later (64-bit)
For macOS 10.12 or later
Part 4. How to Edit WMV Video File?
For editing, Wondershare Filmora is an ideal software to use. Now that you know about Filmora and its stunning features, do you have any knowledge about how to use it? Well, don’t worry. We are here to guide you about how you can edit WMV file format videos in Filmora. Just follow the simple steps shared below:
Step 1: Get the Media File
Start by launching the software on your respective device. Once Filmora opens, you can import the media file by drag and drop. Or else, tap on the ‘File’ tab and move to the ‘Import Media’ option. From the submenu, select the ‘Import Media Files’ option to add the WMV format file.

Step 2: Head to Editor Timeline
You should know that editing is only possible when your file is on the timeline. For that, after a successful file import, simply drag and drop the media file to the timeline and let the fun begins.

Step 3: Add Video Effects
Once the file is in the timeline, start editing. You can add various video effects to your WMV video file from this section. You can get effects like Canvas, Cool Film, Four Seasons, etc., and can also add overlays, filters, etc.

Step 4: Use Title Template
Filmora offers you so many different and cool title templates. You only have to select the best template from the options. You can go for School Pack, Channel Subscribe, Romantic Pack, etc. Moreover, add Lower Thirds, Subtitles, Openers, and a lot more.

Step 5: Export the WMV File
After all the editing is complete, get the WMV format file exported to your device. For that, hit the ‘Export’ button and from the ‘Locals’ section, select your preferred output file format.

Part 5. WMV VS. MP4: What’s the Difference?
MP4 is far more popular than the WMV file format. The world is shifting on the internet; MP4 is widely used and loved online. On the other hand, WMV is popular with Windows users, along with DVD and Blu-ray collectors.
If we talk about the supported software for MP4 and WMV, MP4 has bigger support. WMV is supported by fewer video players and online video editing tools. On the contrary, MP4 is supported by all the video players available for both Windows and Mac users; along with that, every online tool also supports MP4 format for video editing.
Now the world demands quality. In terms of quality, MP4 has better quality than WMV. WMV has lost the battle of quality provision against WMV. MP4 is a larger file than WMV in terms of file size. It is less compressed than WMV format, but the compression gives WMV an advantage over MP4.
Having a compressed file format produces files of smaller size, which can be easily stored. Easy storage of video files makes WMV a better option in places where the quality of the video can be compromised.
Bottom Line
After reading this article, we hope that you have increased your knowledge regarding the WMV file format. We talked about the pros and cons of the WMV format. Moreover, we also shared ways to edit a WMV video with the best video editor, Wondershare Filmora.
Let’s tell you more about the video editing software. Wondershare Filmora is not just a Video Editor; it’s also an Audio Editor with various diverse features like Audio Denoise, Silence Detection, etc. The software is easy to use with a drag and drop facility. You can create and edit stunning videos with the multi-track editor.
For Win 7 or later (64-bit)
For macOS 10.12 or later
02 Advantage and Disadvantage of WMV Video Format
03 Best MMV Video Editor - Wondershare Filmora
04 How to Edit WMV Video File?
05 WMV VS. MP4: What’s the Difference?
Part 1. What Is WMV File?
WMV file format is from a sequence of video codecs, and it was developed by Microsoft. The full abbreviation of WMV is ‘Windows Media Video.’ WMV is a compressed file container that was made for the Windows Media Framework. It is mainly used for the video content that is to be sold either online or through HD DVDs and Blu-ray Discs.

WMV format files support the encryption for the use with Digital Rights Management (DRM) systems, protecting the content from copywriting and any unlawful production. The WMV file may contain animation, high-definition videos, TV episodes, or video clips.
WMV compresses large files for better data transmission over a network while maintaining quality standards. It is specifically designed to run on all Windows devices. After standardization by the Society of Motion Pictures and Television Engineering (SMPTE), WMV is now considered to be an open standard format.
Part 2. Advantage and Disadvantage of WMV Video Format
Like everything, the WMV file format has its benefits and drawbacks, but not everyone knows much about them. The following section of this article will talk about the benefits and drawbacks; let’s get started!
Advantages of WMV Format
- WMV format is excellent for web videos as it acquires little disc memory space and thus takes less time in loading.
- The files are compressed and have reduced size; hence it is easy to transfer WMV file format via emails etc.
- The format is widely used on Windows and is suitable for storing short animations as well as compressed videos.
- Do you know anything about the compression ratio? Well, if we compare WMV to MPEG-4, WMV format has a 2x compression ratio.
- The format also works on the Web through Google Drive. Also, the quality of the video is maintained with Windows video format.
Disadvantages of WMV Format
- Although the small size is better but not, every application works with the tiny file size as offered by WMV format.
- If you are a Mac user and wish to play WMV files on your Mac, you need plugins like Flip4Mac.
Part 3. Best MMV Video Editor -Wondershare Filmora
Wondershare Filmora has always been on the top of the list whenever we talk about video editing. The software is used worldwide by professionals and also newbies. This is because Filmora provides an endless range of features that can create captivating videos. Let’s share a few features:
- Stabilize Video: Your video might be shaky, or maybe single footage can be shaky. Do you know a way to fix this? Try Stabilize Video feature from Filmora. This feature helps you to smooth all the shaky scenes in your video.
- Motion Tracking: In the editing world, Motion Tracking is the most fun type of feature. With this feature, you can move objects like text, audio, video, elements, etc., by tracking the movements in your video.
- Auto Highlight: Do you know a feature that will save your time and effort? It’s Auto Highlight. The feature spontaneously extracts the highlight from the clip and saves your video trimming time.
For Win 7 or later (64-bit)
For macOS 10.12 or later
Part 4. How to Edit WMV Video File?
For editing, Wondershare Filmora is an ideal software to use. Now that you know about Filmora and its stunning features, do you have any knowledge about how to use it? Well, don’t worry. We are here to guide you about how you can edit WMV file format videos in Filmora. Just follow the simple steps shared below:
Step 1: Get the Media File
Start by launching the software on your respective device. Once Filmora opens, you can import the media file by drag and drop. Or else, tap on the ‘File’ tab and move to the ‘Import Media’ option. From the submenu, select the ‘Import Media Files’ option to add the WMV format file.

Step 2: Head to Editor Timeline
You should know that editing is only possible when your file is on the timeline. For that, after a successful file import, simply drag and drop the media file to the timeline and let the fun begins.

Step 3: Add Video Effects
Once the file is in the timeline, start editing. You can add various video effects to your WMV video file from this section. You can get effects like Canvas, Cool Film, Four Seasons, etc., and can also add overlays, filters, etc.

Step 4: Use Title Template
Filmora offers you so many different and cool title templates. You only have to select the best template from the options. You can go for School Pack, Channel Subscribe, Romantic Pack, etc. Moreover, add Lower Thirds, Subtitles, Openers, and a lot more.

Step 5: Export the WMV File
After all the editing is complete, get the WMV format file exported to your device. For that, hit the ‘Export’ button and from the ‘Locals’ section, select your preferred output file format.

Part 5. WMV VS. MP4: What’s the Difference?
MP4 is far more popular than the WMV file format. The world is shifting on the internet; MP4 is widely used and loved online. On the other hand, WMV is popular with Windows users, along with DVD and Blu-ray collectors.
If we talk about the supported software for MP4 and WMV, MP4 has bigger support. WMV is supported by fewer video players and online video editing tools. On the contrary, MP4 is supported by all the video players available for both Windows and Mac users; along with that, every online tool also supports MP4 format for video editing.
Now the world demands quality. In terms of quality, MP4 has better quality than WMV. WMV has lost the battle of quality provision against WMV. MP4 is a larger file than WMV in terms of file size. It is less compressed than WMV format, but the compression gives WMV an advantage over MP4.
Having a compressed file format produces files of smaller size, which can be easily stored. Easy storage of video files makes WMV a better option in places where the quality of the video can be compromised.
Bottom Line
After reading this article, we hope that you have increased your knowledge regarding the WMV file format. We talked about the pros and cons of the WMV format. Moreover, we also shared ways to edit a WMV video with the best video editor, Wondershare Filmora.
Let’s tell you more about the video editing software. Wondershare Filmora is not just a Video Editor; it’s also an Audio Editor with various diverse features like Audio Denoise, Silence Detection, etc. The software is easy to use with a drag and drop facility. You can create and edit stunning videos with the multi-track editor.
For Win 7 or later (64-bit)
For macOS 10.12 or later
02 Advantage and Disadvantage of WMV Video Format
03 Best MMV Video Editor - Wondershare Filmora
04 How to Edit WMV Video File?
05 WMV VS. MP4: What’s the Difference?
Part 1. What Is WMV File?
WMV file format is from a sequence of video codecs, and it was developed by Microsoft. The full abbreviation of WMV is ‘Windows Media Video.’ WMV is a compressed file container that was made for the Windows Media Framework. It is mainly used for the video content that is to be sold either online or through HD DVDs and Blu-ray Discs.

WMV format files support the encryption for the use with Digital Rights Management (DRM) systems, protecting the content from copywriting and any unlawful production. The WMV file may contain animation, high-definition videos, TV episodes, or video clips.
WMV compresses large files for better data transmission over a network while maintaining quality standards. It is specifically designed to run on all Windows devices. After standardization by the Society of Motion Pictures and Television Engineering (SMPTE), WMV is now considered to be an open standard format.
Part 2. Advantage and Disadvantage of WMV Video Format
Like everything, the WMV file format has its benefits and drawbacks, but not everyone knows much about them. The following section of this article will talk about the benefits and drawbacks; let’s get started!
Advantages of WMV Format
- WMV format is excellent for web videos as it acquires little disc memory space and thus takes less time in loading.
- The files are compressed and have reduced size; hence it is easy to transfer WMV file format via emails etc.
- The format is widely used on Windows and is suitable for storing short animations as well as compressed videos.
- Do you know anything about the compression ratio? Well, if we compare WMV to MPEG-4, WMV format has a 2x compression ratio.
- The format also works on the Web through Google Drive. Also, the quality of the video is maintained with Windows video format.
Disadvantages of WMV Format
- Although the small size is better but not, every application works with the tiny file size as offered by WMV format.
- If you are a Mac user and wish to play WMV files on your Mac, you need plugins like Flip4Mac.
Part 3. Best MMV Video Editor -Wondershare Filmora
Wondershare Filmora has always been on the top of the list whenever we talk about video editing. The software is used worldwide by professionals and also newbies. This is because Filmora provides an endless range of features that can create captivating videos. Let’s share a few features:
- Stabilize Video: Your video might be shaky, or maybe single footage can be shaky. Do you know a way to fix this? Try Stabilize Video feature from Filmora. This feature helps you to smooth all the shaky scenes in your video.
- Motion Tracking: In the editing world, Motion Tracking is the most fun type of feature. With this feature, you can move objects like text, audio, video, elements, etc., by tracking the movements in your video.
- Auto Highlight: Do you know a feature that will save your time and effort? It’s Auto Highlight. The feature spontaneously extracts the highlight from the clip and saves your video trimming time.
For Win 7 or later (64-bit)
For macOS 10.12 or later
Part 4. How to Edit WMV Video File?
For editing, Wondershare Filmora is an ideal software to use. Now that you know about Filmora and its stunning features, do you have any knowledge about how to use it? Well, don’t worry. We are here to guide you about how you can edit WMV file format videos in Filmora. Just follow the simple steps shared below:
Step 1: Get the Media File
Start by launching the software on your respective device. Once Filmora opens, you can import the media file by drag and drop. Or else, tap on the ‘File’ tab and move to the ‘Import Media’ option. From the submenu, select the ‘Import Media Files’ option to add the WMV format file.

Step 2: Head to Editor Timeline
You should know that editing is only possible when your file is on the timeline. For that, after a successful file import, simply drag and drop the media file to the timeline and let the fun begins.

Step 3: Add Video Effects
Once the file is in the timeline, start editing. You can add various video effects to your WMV video file from this section. You can get effects like Canvas, Cool Film, Four Seasons, etc., and can also add overlays, filters, etc.

Step 4: Use Title Template
Filmora offers you so many different and cool title templates. You only have to select the best template from the options. You can go for School Pack, Channel Subscribe, Romantic Pack, etc. Moreover, add Lower Thirds, Subtitles, Openers, and a lot more.

Step 5: Export the WMV File
After all the editing is complete, get the WMV format file exported to your device. For that, hit the ‘Export’ button and from the ‘Locals’ section, select your preferred output file format.

Part 5. WMV VS. MP4: What’s the Difference?
MP4 is far more popular than the WMV file format. The world is shifting on the internet; MP4 is widely used and loved online. On the other hand, WMV is popular with Windows users, along with DVD and Blu-ray collectors.
If we talk about the supported software for MP4 and WMV, MP4 has bigger support. WMV is supported by fewer video players and online video editing tools. On the contrary, MP4 is supported by all the video players available for both Windows and Mac users; along with that, every online tool also supports MP4 format for video editing.
Now the world demands quality. In terms of quality, MP4 has better quality than WMV. WMV has lost the battle of quality provision against WMV. MP4 is a larger file than WMV in terms of file size. It is less compressed than WMV format, but the compression gives WMV an advantage over MP4.
Having a compressed file format produces files of smaller size, which can be easily stored. Easy storage of video files makes WMV a better option in places where the quality of the video can be compromised.
Bottom Line
After reading this article, we hope that you have increased your knowledge regarding the WMV file format. We talked about the pros and cons of the WMV format. Moreover, we also shared ways to edit a WMV video with the best video editor, Wondershare Filmora.
Let’s tell you more about the video editing software. Wondershare Filmora is not just a Video Editor; it’s also an Audio Editor with various diverse features like Audio Denoise, Silence Detection, etc. The software is easy to use with a drag and drop facility. You can create and edit stunning videos with the multi-track editor.
For Win 7 or later (64-bit)
For macOS 10.12 or later
Also read:
- How to Create Video in Text Intro for 2024
- New 6 Instant Mp4 to GIF Online Tools for You for 2024
- Do You Want to Rotate Your TikTok Video to Stylize It More? This Article Will Provide Simple Methods of Rotating TikTok Videos to Improve the Audience Viewing Experience
- In 2024, How To Speed Up Video With Lightworks Video Editor
- New How To Trim Video In Premiere Pro in Different Ways for 2024
- Updated 2024 Approved 6 Best MP4 Mergers to Join Videos Easily
- New 2024 Approved Best 12 AI Video Generators to Pick
- New Do You Want to Rotate Your TikTok Video to Stylize It More? This Article Will Provide Simple Methods of Rotating TikTok Videos to Improve the Audience Viewing Experience
- New Want to Add Motion Effects to Your Texts in Your Video? Learn the Simple Steps to Create Motion Text Effects in Popular Video Editors
- Updated How to Share YouTube Video on Zoom for 2024
- New In 2024, Updated 8 Ways to Merge SRT with MP4
- Convert Slow Motion Videos to Regular Videos in Your iOS Device |A How for 2024
- New 2024 Approved Best Applications That Can Help Apply The Best VHS Camera Effect
- Updated Ultimate Guide on How to Plan and Storyboard a Music Video
- New How to Rotate AVI in Vertical/Portrait Orientation Windows, Mac,Android, iPhone & Online
- Updated In 2024, Guide To Using Free Luts for OBS
- In 2024, Steps to Rotate Videos in Lightworks
- Best Voice Changers for WhatsApp Free Included
- Updated In 2024, How to Combine Several Xvid Files Into One Windows, Mac,Android, iPhone & Online
- 2024 Approved How to Trim Video in Quicktime Player on Mac
- New 2024 Approved Looking For a Cheap Camera to Make Slow Motion Video? Get It Now
- Updated Kdenlive Review – Is It The Best Video Editor, In 2024
- Updated In 2024, Learning Some Perfect Ways to Convert a Slow-Motion Video to Normal
- Updated 2024 Approved 2 Ways to Fade in Text in Premiere Pro
- New Want to Capture Captivating, Detailed Videos? If Yes, Then You Need to Learn the Recording of Super Slow Motion Videos. In This Article, I Will Show You How to Record a Super Slow-Motion Video on Your Android and iPhone
- Updated 2024 Approved How to Make a Slideshow GIF?
- Create Motion Effect with Path Blur In Photoshop for 2024
- Updated How to Use LUTs in Lumafusion & Free Resource
- Are You Wondering How to Slow Down Videos or Speed Them up, Here Are Three Ways to Do It. Speed up or Slow Down Your Videos on PC, Online, and Phone for 2024
- In 2024, Here, You Will Get the Basic Steps to Use the Speed Ramping Effect in Your Videos by Wondershare Filmora Software. In This Article, You Get a Guide to Adding the BCC Glitch Effect to Give Your Sports Montages a More Professional Look
- In 2024, Customize PowerPoint Slideshow Icon in 8 Simple Ways
- How to Unlock Oppo F25 Pro 5G Phone with Broken Screen
- In 2024, How to Get and Use Pokemon Go Promo Codes On Realme GT 3 | Dr.fone
- How To Transfer Data From Apple iPhone 11 Pro Max To Other iPhone 13 devices? | Dr.fone
- Reset pattern lock Tutorial for Honor Magic Vs 2
- In 2024, Easiest Guide How to Clone Vivo S17 Pro Phone? | Dr.fone
- Change Location on Yik Yak For your Infinix Smart 8 to Enjoy More Fun | Dr.fone
- In 2024, Is Fake GPS Location Spoofer a Good Choice On Lava Blaze 2 5G? | Dr.fone
- All You Need To Know About Mega Greninja For Xiaomi Redmi Note 12 Pro 4G | Dr.fone
- The Top 5 Android Apps That Use Fingerprint Sensor to Lock Your Apps On Vivo Y200
- In 2024, How to Track Realme C55 by Phone Number | Dr.fone
- How to Track Apple iPhone 6 Plus Location without Installing Software? | Dr.fone
- In 2024, Android Unlock Code Sim Unlock Your Motorola Moto G34 5G Phone and Remove Locked Screen
- Here are Some of the Best Pokemon Discord Servers to Join On Vivo Y100t | Dr.fone
- How to Transfer Music from Honor Magic 5 Lite to iPod | Dr.fone
- Title: In 2024, Easy Ways to Remove Motion Blur In Photoshop
- Author: Chloe
- Created at : 2024-05-20 03:38:29
- Updated at : 2024-05-21 03:38:29
- Link: https://ai-editing-video.techidaily.com/in-2024-easy-ways-to-remove-motion-blur-in-photoshop/
- License: This work is licensed under CC BY-NC-SA 4.0.

