
:max_bytes(150000):strip_icc():format(webp)/Race-982fb219114a48fb96b9c5a2c6f93847.jpg)
In 2024, Hitfilm Express - A Guide to Download, Install, Key Features
Hitfilm Express - A Guide to Download, Install, Key Features
If you are involved in video editing, you better know the importance of using hitfilm express download. This video editing tool helps the users to perform video editing efficiently. Along with basic features, the program also provides advanced-level functionality that makes edited videos phenomenal. Every casual video editor gets attracted to the hitfilm express download for its extraordinary features. Anyone can download the video editing software from an online platform named FXHome.
The free software is so impressive that it can give tough competition to paid video editing platforms like Studio, Adobe Premiere Pro, and After Effects. For both novice and seasoned youtubers, this platform provides some amusing features like 400+ visual effects, compositing tools presets, and cinematic features to unveil their creativity at its best.
1. How to download and install Hitfilm Express?
People increasingly depend on this software since it is free to download. Available for both Mac and Windows, this software works as exceptional community support. The software comes with documentation and tutorials so that new users don’t face any difficulty getting used to the platform. You can download hitfilm express editing software from any third-party platform, but it is advisable to download the video editor from the official website directly. You only have to ensure that your internet connection is speedy enough for activation.
Here is the step-by-step process for the online installation of HitFilm Express.

- First, go to the official website of HItFilm Express and click the download button.
- You have to fill in the details directly on the registration page. You will get the download URL in your mail address by doing this. Check your inbox to download the installer.
- Now, allow the installation file to run and then follow the steps.
- Once the installation is completed, it’s time to activate the software. A dialog box will appear on opening the program with options like login and activation. Click the “Get Free License” to land on the website.
- After getting into the website, log in to your previously created FXhome account. When you have finally logged in to your account, search the serial code.
- Revert the software and hit the Activate and Unlock button to enter the serial code and opt for software activation. It is how your entire installation process will be completed.
2. Key Features of Hitfilm Express
If you want to take your video editing to the next level like a professional, hitfilm express editing software is your one-stop solution. Here is a wide array of features that provides amateurs to professionals a seamless experience.
**Professional project quality: The UHD support and RAM preview of HitFilm Express provide the users the supreme quality formats. Whatever footage you collect from documentaries captured by high-end cameras or smartphones, HItFilm will manage everything.
**Commentator recorder: Once you click the button, you will easily adjoin voiceover to the uploaded videos without leaving the HitFilm. The HitFilm Express is designed so that your recording will promptly add to a soundtrack so that you can do the finishing touches with the audio effects.
**Integrated timelines: Keep switching from one tab to another, same as you do on the browser, as per your needs. You can edit in one tab, make a composition in the other, and then get back to the editor without the necessity of loading other software.
**Customized playback: You can personalize playback. It will help you get exposed to non-stop playback in the trimmer, thus preventing lagging and making edits easier. It allows you to control the playback quality and make hasty edits.
**Smart search: With the help of HitFilm Express, you can locate your desired keyword quickly. It will also help you find properties for all the effects, media, and timelines. In case you come from a different software system, the algorithm of hitfilm express editor identifies the keyword links and assists you in finding your search.
**Numerous streams: To allow the gamers to have a rejoicing experience, HitFilm allows importing files with multiple audio streams and provides you with complete flexibility over workflow.
**Adjustable trimmer: With HitFilm Express, you can re-trim clips even after adding to the timeline. The moment you double-click the clip, it will automatically get sent to the trimmer panel to allow you to make necessary adjustments. Once you have completed the changes, the clip will be again updated.
**Cinematic outlook: You can prepare your film with the classic cine-effects of HItFilm Express. Choose your most preferred effects like Day For Night, Three-Strip Color, Film Grain, and other styles to give a cinematic edge.
3. How to edit videos with Hitfilm Express?
Editing is cutting and accumulating the selected clips to tell the story better. Editing consists of adding sound effects, transitions, and other visual elements to help it view excellent results.

You have to set up the editor timeline and start importing clips to edit your clips. Use the editor tools like roll, slip, drag, selection, ripple, and others to customize your edit.

- Choose the Set in point button from the point where you want to start the clip. In the timeline, you will notice an orange section representing the part of the clip you want to play.
- Now, skip through, and decide where you want to end the clip. You have to click the Set-out button. You can alternatively use the I and 0 keys as shortcuts.
- Once you get your selected start and endpoint, you can drag down the portion of the video into the timeline. This time, you can get a message that shows the editor settings are different from the adding clip. It is your choice how you want to keep your settings.
- If you find the selected set of a good standard, you can move forward and select “Yes” to ensure that your project gets changed into that setting.
- In the viewer section, you will get to view the final outlook of the video. Here, on the downside of the timeline, you can click on the Zoom bar to see things in detail. Your previews will depend on the selected settings that you have made beforehand.
- If you want to change your default setting, you can come to the hamburger icon for tracking and changing the size of the video to different ones.
- Add a clip to the timeline: Position the play head at the timeline point where you want to start the clip, and then hit the insert clip button.

4. Hitfilm Express Alternative to Edit Videos
Anyone who finds video editing fun filling can try out Filmora . It is an ideal alternative to hitfilm express editing tutorial. Whether you shoot in an entry-level camera or a high-end video camera, Filmora will help you create and edit the most suitable videos. During the video editing procedure, you can experience multiple challenges that help you stay patient and work slowly to come out with the project.

It is the best video editing platform for beginners since it can provide comprehensive support for creating different video formats. The user-friendly interface and powerful editing features make the video editor one of the most used video editing software.
For Win 7 or later (64-bit)
For macOS 10.12 or later
Step-by-step guide for editing videos with Filmora
Step 1: Double click on the Filmora’s icon to start working on your project. Either open the new project or click on the aspect ratio for time-saving editing.
Step 2: Select the “project setting” option to customize the aspect ratio as per your need. Next, you will go to the import media files to choose the import with the instant cutter tool and opt for easy trimming of videos.
You can also use a lens correction tool to improve the quality of videos.
Step 3: Create a new folder and organize the clips alphabetically to increase efficiency.
Step 4: Drag and drop the trimmed videos on the timeline and rearrange them to remove the unnecessary parts. Press the play button to get previews of your added video clips.
Step 5: Now, it’s time to add audio and visual effects to your trimmed footage. You can also add opening titles and subtitles and use text templates to work on the video transition.
Step 6: With the help of a color correction tool, you can make the videos look vivid. It takes enough time and dedication to master color correction for your videos.
Step 7: When you are 100% sure about the final outlook of the project, you have to export the videos on YouTube for fast uploading on social media networks. Otherwise, you can opt for saving the video on the hard drives.
5. FAQs about Hitfilm Express
1.Is Hitfilm Express still free?
Ans: HitFilm Express is still free with alternative paid add-ons. The free video editing software helps make excellent films and video games with the professional-grade VFX. From students, beginners, and gamers to you Tubers – anyone can work on their creativity without spending a penny.
2.Is Hitfilm Express safe to download?
Ans: With more than 5 million active users across 160 countries, HitFilm Express is safe and legit software to download. If you are susceptible to using this platform, it is an excellent option to experience some remarkable features and learn A to Z of video editing.
3.Is Hitfilm Express still worth it?
Ans: IF anyone opts for the paid version, it will be expensive. However, the video editing software has beginner-friendly features like different AI tools for guided editing, 4K support, and others that hardly make any sense compared with other free software.
Looking at its professional features and high-quality editing, it is the most powerful video editing platform.
Conclusion
In a nutshell, HItFilm is an entirely free version of video editing software. Beginners can quickly learn it since the editing features can be easily grasped. To create amateur videos for professional ones, HitFilm Express is your one-stop solution. The customizable effects and compositing layers provide your videos with an excellent cinematic look. Everything you will get without spending any money.
Therefore, if you want to learn the A to Z of video editing for absolutely free, you can blindly rely on the hitfilm express editor.
2. Key Features of Hitfilm Express
If you want to take your video editing to the next level like a professional, hitfilm express editing software is your one-stop solution. Here is a wide array of features that provides amateurs to professionals a seamless experience.
**Professional project quality: The UHD support and RAM preview of HitFilm Express provide the users the supreme quality formats. Whatever footage you collect from documentaries captured by high-end cameras or smartphones, HItFilm will manage everything.
**Commentator recorder: Once you click the button, you will easily adjoin voiceover to the uploaded videos without leaving the HitFilm. The HitFilm Express is designed so that your recording will promptly add to a soundtrack so that you can do the finishing touches with the audio effects.
**Integrated timelines: Keep switching from one tab to another, same as you do on the browser, as per your needs. You can edit in one tab, make a composition in the other, and then get back to the editor without the necessity of loading other software.
**Customized playback: You can personalize playback. It will help you get exposed to non-stop playback in the trimmer, thus preventing lagging and making edits easier. It allows you to control the playback quality and make hasty edits.
**Smart search: With the help of HitFilm Express, you can locate your desired keyword quickly. It will also help you find properties for all the effects, media, and timelines. In case you come from a different software system, the algorithm of hitfilm express editor identifies the keyword links and assists you in finding your search.
**Numerous streams: To allow the gamers to have a rejoicing experience, HitFilm allows importing files with multiple audio streams and provides you with complete flexibility over workflow.
**Adjustable trimmer: With HitFilm Express, you can re-trim clips even after adding to the timeline. The moment you double-click the clip, it will automatically get sent to the trimmer panel to allow you to make necessary adjustments. Once you have completed the changes, the clip will be again updated.
**Cinematic outlook: You can prepare your film with the classic cine-effects of HItFilm Express. Choose your most preferred effects like Day For Night, Three-Strip Color, Film Grain, and other styles to give a cinematic edge.
3. How to edit videos with Hitfilm Express?
Editing is cutting and accumulating the selected clips to tell the story better. Editing consists of adding sound effects, transitions, and other visual elements to help it view excellent results.
You have to set up the editor timeline and start importing clips to edit your clips. Use the editor tools like roll, slip, drag, selection, ripple, and others to customize your edit.
- Choose the Set in point button from the point where you want to start the clip. In the timeline, you will notice an orange section representing the part of the clip you want to play.
- Now, skip through, and decide where you want to end the clip. You have to click the Set-out button. You can alternatively use the I and 0 keys as shortcuts.
- Once you get your selected start and endpoint, you can drag down the portion of the video into the timeline. This time, you can get a message that shows the editor settings are different from the adding clip. It is your choice how you want to keep your settings.
- If you find the selected set of a good standard, you can move forward and select “Yes” to ensure that your project gets changed into that setting.
- In the viewer section, you will get to view the final outlook of the video. Here, on the downside of the timeline, you can click on the Zoom bar to see things in detail. Your previews will depend on the selected settings that you have made beforehand.
- If you want to change your default setting, you can come to the hamburger icon for tracking and changing the size of the video to different ones.
- Add a clip to the timeline: Position the play head at the timeline point where you want to start the clip, and then hit the insert clip button.
4. Hitfilm Express Alternative to Edit Videos
Anyone who finds video editing fun filling can try out Filmora . It is an ideal alternative to hitfilm express editing tutorial. Whether you shoot in an entry-level camera or a high-end video camera, Filmora will help you create and edit the most suitable videos. During the video editing procedure, you can experience multiple challenges that help you stay patient and work slowly to come out with the project.
It is the best video editing platform for beginners since it can provide comprehensive support for creating different video formats. The user-friendly interface and powerful editing features make the video editor one of the most used video editing software.
For Win 7 or later (64-bit)
For macOS 10.12 or later
Step-by-step guide for editing videos with Filmora
Step 1: Double click on the Filmora’s icon to start working on your project. Either open the new project or click on the aspect ratio for time-saving editing.
Step 2: Select the “project setting” option to customize the aspect ratio as per your need. Next, you will go to the import media files to choose the import with the instant cutter tool and opt for easy trimming of videos.
You can also use a lens correction tool to improve the quality of videos.
Step 3: Create a new folder and organize the clips alphabetically to increase efficiency.
Step 4: Drag and drop the trimmed videos on the timeline and rearrange them to remove the unnecessary parts. Press the play button to get previews of your added video clips.
Step 5: Now, it’s time to add audio and visual effects to your trimmed footage. You can also add opening titles and subtitles and use text templates to work on the video transition.
Step 6: With the help of a color correction tool, you can make the videos look vivid. It takes enough time and dedication to master color correction for your videos.
Step 7: When you are 100% sure about the final outlook of the project, you have to export the videos on YouTube for fast uploading on social media networks. Otherwise, you can opt for saving the video on the hard drives.
5. FAQs about Hitfilm Express
1.Is Hitfilm Express still free?
Ans: HitFilm Express is still free with alternative paid add-ons. The free video editing software helps make excellent films and video games with the professional-grade VFX. From students, beginners, and gamers to you Tubers – anyone can work on their creativity without spending a penny.
2.Is Hitfilm Express safe to download?
Ans: With more than 5 million active users across 160 countries, HitFilm Express is safe and legit software to download. If you are susceptible to using this platform, it is an excellent option to experience some remarkable features and learn A to Z of video editing.
3.Is Hitfilm Express still worth it?
Ans: IF anyone opts for the paid version, it will be expensive. However, the video editing software has beginner-friendly features like different AI tools for guided editing, 4K support, and others that hardly make any sense compared with other free software.
Looking at its professional features and high-quality editing, it is the most powerful video editing platform.
Conclusion
In a nutshell, HItFilm is an entirely free version of video editing software. Beginners can quickly learn it since the editing features can be easily grasped. To create amateur videos for professional ones, HitFilm Express is your one-stop solution. The customizable effects and compositing layers provide your videos with an excellent cinematic look. Everything you will get without spending any money.
Therefore, if you want to learn the A to Z of video editing for absolutely free, you can blindly rely on the hitfilm express editor.
How I Got Free After Effects Templates Slideshow with Simple Trick
How I Got Free After Effects Templates Slideshow with Simple Trick
An easy yet powerful editor
Numerous effects to choose from
Detailed tutorials provided by the official channel
Making slide shows is an eminent task for a majority of us. Whether you are a student at a school or University, working at a corporate office or trying to present yourself in a meeting, you will require making slideshows. And the more engaging your slideshow is, the better your presentation is.
One of the many ways for improving your slideshows is by adding after effects templates. And the best part is, you can readily opt for using after effects slideshow template for free. But, how can you get the aftereffect slideshows for free? Or, where can you get free after effect templates?
We have put forth the following discussion where we discuss the different free after effects templates for slides, where can you get them and the solutions to the frequent questions related to it. Lastly, we will also introduce you to the best video editing tool, with which you can use the free after effects template and make amazing sideshow videos.
In this article
01 [10 Best Free After Effects Templates Slideshow](#Part 1)
02 [Where to Get Free After Effects Templates](#Part 2)
03 [FAQ of After Effects Slideshow Template](#Part 3)
Part 1 Best Free After Effects Templates Slideshow
We will begin our discussion by presenting photo slideshows after effects template free download, which means, with the following templates, you can make a slideshow f as many a hundred images and that too, for free.
01Wall Slideshow
Wall Slideshow is free after effects template ideal for making slideshows in which you want to integrate modern essence. It is best suited for creating slideshows of family photographs for occasions, with a touch go modernity. The design of this template is classy but simple at the same time.
One can readily customise the entire template according to their preference, skills and imagination. Also, one can have ultimate control over the colour of the template.
02Old Slideshow
The Old Slideshow is the after effects slideshow template free to download. It is best suitable if you want your slideshow to have a retro style or a retro vibe. Giving such an aura to the slideshow is a recent trend and makes your slideshow look more exciting and updated with the times. One has complete control over the template’s colour and can easily customise every aspect of the template if needed.
03Clean Slideshow
The Clean Slideshow template, as its name suggests, gives you a clean and sophisticated looking slideshow design. It is best for corporate office presentations, school presentations or university slideshows, and it is ideal for any formal or professional purposes. It includes simple texts, a stylish put look, smooth transitional effects and animations. You can customise the template accordingly and make the necessary edits and changes.
04Modern Zoom Telescopic Template Creative Slideshow
Suppose you want your slideshows to look exceptionally incredible. In that case, the Modern Zoom Telescopic Template is the best option among all the other available after effects photo slideshow templates for free. It has an incredible zooming effect that occurs through a transition involving a telescope. So, the entire concept is unique, thereby making your presentation inimitably engaging. It includes numerous light leaks with sleek camera motion.
05Free Elegant Slideshow Template
The Free Elegant Slideshow Template is yet another template ideal for professional use. It is best for making a slideshow for your corporate workplace and office. The elements of this template are elegant and classy. And thus, it is highly suitable for professional purposes. One can readily edit and customise the other features and factors of this template. You can also integrate colours that you prefer to put in your slideshows.

06Travel Slideshow
To portray anything chaotic, dynamic and flowing, the Travel Slideshow is the best template option available for free. Here, the after-effects slide is ideal for making cinematic style slideshow videos that would include an upbeat aura. You can readily update and make the necessary edits in this template and customise it the way you prefer.
07Stylish Spinning Columns Slideshow
For any high-end project requiring slideshow videos, the Stylish Spinning Columns template is the best option. It includes stylish spinning columns, transitional effects and multiple light leaks. You can easily customise the different elements of this template and make the changes according to your preference in this slideshow template.
08Free Dynamic Colourful Slideshow
The Free Dynamic Colourful template has a stylish and modern style of design, and it includes minimalistic typography and the use of vibrant colours. So, to portray anything joyful and ecstatic or to engage the audience more, this template is the best option top pick. These slideshow after-effects are free and thus, make it a more accessible option to use to make the best and the most vibrant slideshows.
This template can serve many purposes and is ideal for professional and informal purposes. You can edit and customise the different elements of this template to make it look the way you want.
09Modern Tile Slideshow
The Modern Tile template is an after effects photo slideshow template that is best suitable for professional and formal use. It is the best option for making sophisticated and formal slideshow videos and presenting them in a corporate office environment.
The design of this template is based on tiles, which its name suggests. The design is unique and includes a 3D tile drop effect as well. You can readily custom and edit the parts and elements of the template to bring about the necessary changes.
10Free Parallax Scrolling Slideshow
Parallax is one of the most commonly used and famous after effect-slide transitions in the present. And you can readily integrate it into your slideshow videos with the Free Parallax Scrolling slideshow template. You can customise the parts where you find changes are necessary. The transitions, video quality and the effects in this template are among the most engaging ones.
If you want to make any slideshow video for your social media platforms, this is the best suitable template.

Part 2 Where to Get Free After Effects Templates
To include the after effects slideshow template, you must know the sources where they are available for free. The after-effects templates are available for free in almost all the video editing and slideshow-making tools, apps, and platforms. However, to name the best among the rest available, Motion Elements is known to have the best collection of free after effects templates for slideshows.
The variety of effects template found in MotionElements is incomparable. You will get the opportunity of choosing among more than 100 after effects templates for your slideshows. There are many other sources, including Adobe, Motion Array, and Rocket Stock.
Part 3 FAQ of After Effects Slideshow Template
There are some questions about After Effects slideshow templates that are commonly asked. So, we will now discuss and present solutions to these FAQs about the slideshow after effects templates.
01How can I make slideshows in the After Effects template?
You will have to open a new project in the app or tool you use to make slideshows. Then, open compositions and import images. The next step is to rinse and then repeat this step to make a slideshow in after effects template.
02Are after effects templates available in Filmora?
Wondershare Filmora Video Editor consists of an innumerable variety of templates and among which there are numerous after effects templates as well. Most importantly, they are available for free so that anyone can use them to make the Ost fantastic slideshow videos.
For Win 7 or later (64-bit)
For macOS 10.12 or later
03Are the after-effects templates arable for free?
One can get the after-effects photo slideshow template free of charge from specific sources, such as Adobe, Motion Array, MotionElements and Filmora.
Filmora is one of the best sources for free after effects slideshow templates. And not just that, it is the best tool for all video editing purposes. If you are a beginner at editing and making slideshow, Filmora can help you develop and nurture your editing skills. Also, if you are a professional, Filmora has the most advanced features that can help you enhance, practise, and put your proficient editing skills into work.
A free version of this tool is available that you can readily use for making slideshow videos. But, if you want to upgrade and opt for better and even more advanced features for editing, you can readily do so with the paid version of Filmora. You get to enjoy the features like using more than 800 templates and filters, having ultimate control over the motion of your videos, compatibility with every device, and the list keeps being unending.
● Ending Thoughts →
● So, in the above discussion, we have covered the following discussion points.
● We examined the ten bests after effects photo slideshow available for free
● We stated the sources where one can get the after-effects templates for slideshows for free.
● We solved the different common questions relating to the after-effects template, and then we introduced the best video editing tool, Filmora.
Making slide shows is an eminent task for a majority of us. Whether you are a student at a school or University, working at a corporate office or trying to present yourself in a meeting, you will require making slideshows. And the more engaging your slideshow is, the better your presentation is.
One of the many ways for improving your slideshows is by adding after effects templates. And the best part is, you can readily opt for using after effects slideshow template for free. But, how can you get the aftereffect slideshows for free? Or, where can you get free after effect templates?
We have put forth the following discussion where we discuss the different free after effects templates for slides, where can you get them and the solutions to the frequent questions related to it. Lastly, we will also introduce you to the best video editing tool, with which you can use the free after effects template and make amazing sideshow videos.
In this article
01 [10 Best Free After Effects Templates Slideshow](#Part 1)
02 [Where to Get Free After Effects Templates](#Part 2)
03 [FAQ of After Effects Slideshow Template](#Part 3)
Part 1 Best Free After Effects Templates Slideshow
We will begin our discussion by presenting photo slideshows after effects template free download, which means, with the following templates, you can make a slideshow f as many a hundred images and that too, for free.
01Wall Slideshow
Wall Slideshow is free after effects template ideal for making slideshows in which you want to integrate modern essence. It is best suited for creating slideshows of family photographs for occasions, with a touch go modernity. The design of this template is classy but simple at the same time.
One can readily customise the entire template according to their preference, skills and imagination. Also, one can have ultimate control over the colour of the template.
02Old Slideshow
The Old Slideshow is the after effects slideshow template free to download. It is best suitable if you want your slideshow to have a retro style or a retro vibe. Giving such an aura to the slideshow is a recent trend and makes your slideshow look more exciting and updated with the times. One has complete control over the template’s colour and can easily customise every aspect of the template if needed.
03Clean Slideshow
The Clean Slideshow template, as its name suggests, gives you a clean and sophisticated looking slideshow design. It is best for corporate office presentations, school presentations or university slideshows, and it is ideal for any formal or professional purposes. It includes simple texts, a stylish put look, smooth transitional effects and animations. You can customise the template accordingly and make the necessary edits and changes.
04Modern Zoom Telescopic Template Creative Slideshow
Suppose you want your slideshows to look exceptionally incredible. In that case, the Modern Zoom Telescopic Template is the best option among all the other available after effects photo slideshow templates for free. It has an incredible zooming effect that occurs through a transition involving a telescope. So, the entire concept is unique, thereby making your presentation inimitably engaging. It includes numerous light leaks with sleek camera motion.
05Free Elegant Slideshow Template
The Free Elegant Slideshow Template is yet another template ideal for professional use. It is best for making a slideshow for your corporate workplace and office. The elements of this template are elegant and classy. And thus, it is highly suitable for professional purposes. One can readily edit and customise the other features and factors of this template. You can also integrate colours that you prefer to put in your slideshows.
06Travel Slideshow
To portray anything chaotic, dynamic and flowing, the Travel Slideshow is the best template option available for free. Here, the after-effects slide is ideal for making cinematic style slideshow videos that would include an upbeat aura. You can readily update and make the necessary edits in this template and customise it the way you prefer.
07Stylish Spinning Columns Slideshow
For any high-end project requiring slideshow videos, the Stylish Spinning Columns template is the best option. It includes stylish spinning columns, transitional effects and multiple light leaks. You can easily customise the different elements of this template and make the changes according to your preference in this slideshow template.
08Free Dynamic Colourful Slideshow
The Free Dynamic Colourful template has a stylish and modern style of design, and it includes minimalistic typography and the use of vibrant colours. So, to portray anything joyful and ecstatic or to engage the audience more, this template is the best option top pick. These slideshow after-effects are free and thus, make it a more accessible option to use to make the best and the most vibrant slideshows.
This template can serve many purposes and is ideal for professional and informal purposes. You can edit and customise the different elements of this template to make it look the way you want.
09Modern Tile Slideshow
The Modern Tile template is an after effects photo slideshow template that is best suitable for professional and formal use. It is the best option for making sophisticated and formal slideshow videos and presenting them in a corporate office environment.
The design of this template is based on tiles, which its name suggests. The design is unique and includes a 3D tile drop effect as well. You can readily custom and edit the parts and elements of the template to bring about the necessary changes.
10Free Parallax Scrolling Slideshow
Parallax is one of the most commonly used and famous after effect-slide transitions in the present. And you can readily integrate it into your slideshow videos with the Free Parallax Scrolling slideshow template. You can customise the parts where you find changes are necessary. The transitions, video quality and the effects in this template are among the most engaging ones.
If you want to make any slideshow video for your social media platforms, this is the best suitable template.
Part 2 Where to Get Free After Effects Templates
To include the after effects slideshow template, you must know the sources where they are available for free. The after-effects templates are available for free in almost all the video editing and slideshow-making tools, apps, and platforms. However, to name the best among the rest available, Motion Elements is known to have the best collection of free after effects templates for slideshows.
The variety of effects template found in MotionElements is incomparable. You will get the opportunity of choosing among more than 100 after effects templates for your slideshows. There are many other sources, including Adobe, Motion Array, and Rocket Stock.
Part 3 FAQ of After Effects Slideshow Template
There are some questions about After Effects slideshow templates that are commonly asked. So, we will now discuss and present solutions to these FAQs about the slideshow after effects templates.
01How can I make slideshows in the After Effects template?
You will have to open a new project in the app or tool you use to make slideshows. Then, open compositions and import images. The next step is to rinse and then repeat this step to make a slideshow in after effects template.
02Are after effects templates available in Filmora?
Wondershare Filmora Video Editor consists of an innumerable variety of templates and among which there are numerous after effects templates as well. Most importantly, they are available for free so that anyone can use them to make the Ost fantastic slideshow videos.
For Win 7 or later (64-bit)
For macOS 10.12 or later
03Are the after-effects templates arable for free?
One can get the after-effects photo slideshow template free of charge from specific sources, such as Adobe, Motion Array, MotionElements and Filmora.
Filmora is one of the best sources for free after effects slideshow templates. And not just that, it is the best tool for all video editing purposes. If you are a beginner at editing and making slideshow, Filmora can help you develop and nurture your editing skills. Also, if you are a professional, Filmora has the most advanced features that can help you enhance, practise, and put your proficient editing skills into work.
A free version of this tool is available that you can readily use for making slideshow videos. But, if you want to upgrade and opt for better and even more advanced features for editing, you can readily do so with the paid version of Filmora. You get to enjoy the features like using more than 800 templates and filters, having ultimate control over the motion of your videos, compatibility with every device, and the list keeps being unending.
● Ending Thoughts →
● So, in the above discussion, we have covered the following discussion points.
● We examined the ten bests after effects photo slideshow available for free
● We stated the sources where one can get the after-effects templates for slideshows for free.
● We solved the different common questions relating to the after-effects template, and then we introduced the best video editing tool, Filmora.
TikTok Face Zoom | Create Your Face Zoom TikTok Now
Abundant Video Effects - Wondershare Filmora
Provide abundant video effects - A creative video editor
Powerful color correction and grading
Detailed tutorials are provided by the official channel
TikTok videos are very popular across the youth of the world. With millions of users in support of the platform, there are many content creators that gained popularity through making small videos on TikTok. These videos are, however, incomplete without the existence of a proper effect on them. To emphasize something across a video, the zoom effect is always preferred in the market.
This article discusses the face zoom effect of TikTok and provides users with the appropriate methods that can be adapted to utilize this function to perfection. With this feature, you can make your perfect videos with an emphasis on the important elements to view on the screen.
In this article
Part 1: What is TikTok Face Zoom?
Part 2: Create A Face Zoom TikTok Video in Minutes
Part 3: Bonus | Create Face Zoom Video in Wondershare Filmora
Part 1: What is TikTok Face Zoom?
The face zoom TikTok effect is referred to the zooming effect that is covered by putting the focus on the facial presence within the video. The use of the face zoom effect on TikTok has a significant utility in highlighting the importance of the person within the video and creating an illusion that would make people watch the video all along.
Many TikTokers like using this effect in scenes where they wish to highlight something new about their face, e.g., new makeup.
Part 2: Create A Face Zoom TikTok Video in Minutes
There are some direct approaches to zooming the face across a TikTok video. To understand these methods, you should go through the provided details and understand the face zoom effect on TikTok.
Method 1: Create A Face Zoom TikTok Video in Minutes
Step 1: Before coming onto adding effects across your TikTok video, you need to record it across the social platform or have it recorded before on your smartphone under the requirements of TikTok.
Step 2: For uploading a video on TikTok, you need to continue by clicking the “+” icon and locating the “Upload” button for adding a pre-recorded video across TikTok.

Step 3: Once you have added the video for editing, navigate into the “Effects” section and find yourselves in the “Visuals” section. Let the cursor of the video be at the point where the facial features are prominent, and you wish to face zoom the video from there. With the cursor across the required place, find the “Zoom” effect in the list and hold the button until you’ve successfully added the effect across the required length of the video.

Step 4: After editing the video and adding the face zoom effect successfully, you need to click on “Save” to preview the video before you click “Next” to share it across the necessary platforms. TikTok provides you with the ability to share your videos across Instagram, Facebook, or WhatsApp.

Method 2: Do Face Zoom Easily by Finding a Face Zoom Video
Step 1: To use the TikTok face zoom effect on your video, you need to launch the platform and click on “Discover” present on the bottom of the screen. In the search bar, you need to type “Face Zoom” to locate the effect across TikTok.

Step 2: Once you have found the effect, open it on another screen. Locate the “Try this effect” button to use a similar effect across your video.

Step 3: Record the video on TikTok by clicking on the red recording button. Make changes to the recorded video and save the video on your device or share it across the social media platforms as desired.

Part 3: Bonus | Create Face Zoom Video in Wondershare Filmora
TikTok produces impressive content that can be commended for many reasons. This, however, does not make the professional video that you might be looking for. What to do if you cannot create such a professional video that would help you get the right reach you are looking for? Wondershare Filmora includes an exceptional experience of using the TikTok face zoom effect across its easy-to-use platform with the right set of tools.
To understand how you can successfully execute the procedure without putting yourselves in any difficulty, go through the steps as shown below:
Step 1: Download and Install Wondershare Filmora
For starters, you need to have Wondershare Filmora installed on your computer. Proceed to launch it and click on the “New Project” button to start a new project.

Step 2: Upload Media
As a new window opens up on the front, you need to click on the arrowhead icon against the “Media” tab to import the video that is to be edited across Wondershare Filmora. On adding it, drag it across the timeline successfully.

Step 3: Track the Face using Motion Tracking
To track the facial features across the video, you need to double-click the video on the timeline and proceed to open the “Motion Tracking” menu that you can find across the pane. Enable the option if necessary and set the position of the box across the “Preview” window that would track the face. Click on “Start Tracking” to successfully motion track the face.

Step 4: Add Magnify Effect to the Face
Proceed into the “Effects” tab and write “Magnify” in the search bar. Select the effect and place it across the video in the timeline. To align the effect with the face, you need to double-click the video and move into the “Motion Tracking” section again. Select the specific magnify effect in the drop-down menu and select “Start Tracking.”

Step 5: Preview and Export the Face Zoom Video
Once you are done editing the video, preview it across the window to check if any edits are required. Once confirmed, click on the “Export” button to save the video across the computer.

Conclusion
The TikTok face zoom effect can be quite impressive if used perfectly. However, since the intent is to highlight the facial parts in the video, the appropriate use of the effect can give an exceptional result. For this, the article has discussed the best methods that can be applied to understanding how to use face zoom in TikTok with ease.
TikTok videos are very popular across the youth of the world. With millions of users in support of the platform, there are many content creators that gained popularity through making small videos on TikTok. These videos are, however, incomplete without the existence of a proper effect on them. To emphasize something across a video, the zoom effect is always preferred in the market.
This article discusses the face zoom effect of TikTok and provides users with the appropriate methods that can be adapted to utilize this function to perfection. With this feature, you can make your perfect videos with an emphasis on the important elements to view on the screen.
In this article
Part 1: What is TikTok Face Zoom?
Part 2: Create A Face Zoom TikTok Video in Minutes
Part 3: Bonus | Create Face Zoom Video in Wondershare Filmora
Part 1: What is TikTok Face Zoom?
The face zoom TikTok effect is referred to the zooming effect that is covered by putting the focus on the facial presence within the video. The use of the face zoom effect on TikTok has a significant utility in highlighting the importance of the person within the video and creating an illusion that would make people watch the video all along.
Many TikTokers like using this effect in scenes where they wish to highlight something new about their face, e.g., new makeup.
Part 2: Create A Face Zoom TikTok Video in Minutes
There are some direct approaches to zooming the face across a TikTok video. To understand these methods, you should go through the provided details and understand the face zoom effect on TikTok.
Method 1: Create A Face Zoom TikTok Video in Minutes
Step 1: Before coming onto adding effects across your TikTok video, you need to record it across the social platform or have it recorded before on your smartphone under the requirements of TikTok.
Step 2: For uploading a video on TikTok, you need to continue by clicking the “+” icon and locating the “Upload” button for adding a pre-recorded video across TikTok.
Step 3: Once you have added the video for editing, navigate into the “Effects” section and find yourselves in the “Visuals” section. Let the cursor of the video be at the point where the facial features are prominent, and you wish to face zoom the video from there. With the cursor across the required place, find the “Zoom” effect in the list and hold the button until you’ve successfully added the effect across the required length of the video.
Step 4: After editing the video and adding the face zoom effect successfully, you need to click on “Save” to preview the video before you click “Next” to share it across the necessary platforms. TikTok provides you with the ability to share your videos across Instagram, Facebook, or WhatsApp.
Method 2: Do Face Zoom Easily by Finding a Face Zoom Video
Step 1: To use the TikTok face zoom effect on your video, you need to launch the platform and click on “Discover” present on the bottom of the screen. In the search bar, you need to type “Face Zoom” to locate the effect across TikTok.
Step 2: Once you have found the effect, open it on another screen. Locate the “Try this effect” button to use a similar effect across your video.
Step 3: Record the video on TikTok by clicking on the red recording button. Make changes to the recorded video and save the video on your device or share it across the social media platforms as desired.
Part 3: Bonus | Create Face Zoom Video in Wondershare Filmora
TikTok produces impressive content that can be commended for many reasons. This, however, does not make the professional video that you might be looking for. What to do if you cannot create such a professional video that would help you get the right reach you are looking for? Wondershare Filmora includes an exceptional experience of using the TikTok face zoom effect across its easy-to-use platform with the right set of tools.
To understand how you can successfully execute the procedure without putting yourselves in any difficulty, go through the steps as shown below:
Step 1: Download and Install Wondershare Filmora
For starters, you need to have Wondershare Filmora installed on your computer. Proceed to launch it and click on the “New Project” button to start a new project.
Step 2: Upload Media
As a new window opens up on the front, you need to click on the arrowhead icon against the “Media” tab to import the video that is to be edited across Wondershare Filmora. On adding it, drag it across the timeline successfully.
Step 3: Track the Face using Motion Tracking
To track the facial features across the video, you need to double-click the video on the timeline and proceed to open the “Motion Tracking” menu that you can find across the pane. Enable the option if necessary and set the position of the box across the “Preview” window that would track the face. Click on “Start Tracking” to successfully motion track the face.
Step 4: Add Magnify Effect to the Face
Proceed into the “Effects” tab and write “Magnify” in the search bar. Select the effect and place it across the video in the timeline. To align the effect with the face, you need to double-click the video and move into the “Motion Tracking” section again. Select the specific magnify effect in the drop-down menu and select “Start Tracking.”
Step 5: Preview and Export the Face Zoom Video
Once you are done editing the video, preview it across the window to check if any edits are required. Once confirmed, click on the “Export” button to save the video across the computer.
Conclusion
The TikTok face zoom effect can be quite impressive if used perfectly. However, since the intent is to highlight the facial parts in the video, the appropriate use of the effect can give an exceptional result. For this, the article has discussed the best methods that can be applied to understanding how to use face zoom in TikTok with ease.
How to Use Visual Effect for Zoom
Zoom, a video calling software, has been quite popular over the last several months and is still one of the most used videos calling applications by millions of people worldwide. The site is a favorite among working professionals, but it is also utilized by individuals to connect with their friends and loved ones. Additionally, despite the app’s abundance of practical built-in tools and functions, it lacks the fun filters and special effects that the majority of users are used to when using a camera. Zoom has ingrained itself in our vocabulary during the last year. It seemed almost inevitable given that everything, from meetings to parties, has moved online.
You don’t need to seek farther than Zoom visual effects to inject a little jazz into the routine Zoom meetings during these hard times. By making adjustments to your Video configuration either before or during a video call, you may add visual effects in Zoom. Zoom meetings may be tedious to conduct over extended periods of time. Additionally, it would be helpful if you recorded the condition of your room before any Zoom meetings. You wouldn’t want to reveal your disorganized space while in a meeting. In these situations, adding visual effects will keep your private area private while also making your Zoom meetings entertaining and exciting. It will also prevent others from seeing your filthy room. This tutorial will walk you through the process of adding visual effects to Zoom step-by-step. In addition, you will get acquainted with the numerous camera functions and visual effects that you may employ during a Zoom video conversation.
- 1. What apps can add visual effect on Zoom?
- 2. How do I add visual effects to Zoom in Mobile?
- 3. How do you download Zoom effects?
Part 1: Popular Visual Effects you can add to Zoom
You may apply one of four main graphic effects to your Zoom meetings. The visual effects that you may use in your next Zoom video chat are briefly summarized below.
1. Visual Backgrounds
Virtual backdrops may transform any plain wall into an artistic setting. Zoom provides you the choice to add photographs to your backdrop in addition to offering you a few pre-made backdrops. Zoom lets you add a movie to your backdrop in addition to simply photographs. With the help of this imaginative feature, gather your pals and enjoy your favorite meme or video. A presentation’s collection of photos, a video, or a single image may all serve as virtual backdrops. A green screen would often be used as your real backdrop and consistent lighting would be required.
To avoid having to reveal your real surroundings while in a conference, you may add any picture or video as a virtual backdrop in Zoom. You have the option of adding own photos and movies or selecting from the pre-existing backdrop films and images. The file type for video backgrounds should be MP4 or MOV, and the resolution should range from 360p to a maximum of 1080p. Ensure that the mirroring of your video is deselected in the Zoom’s Video settings if your backdrop picture has text that may be read. By using virtual backdrops, you may alter the background of your video as it appears to the audience member with whom you are speaking. During the video conference you’re in, the other participants will be able to view your face and body overlaid on the backdrop of your choice.
2. Filters
With these filters, you can have fun in all of your Zoom meetings! Filters are a fun way to spend time with loved ones who are far away, particularly at a period when maintaining social distance is crucial. Filters are the modifications you make to yourself during Zoom meetings (such as a mustache, beard, etc.). They enliven the proceedings and contribute to the fun and memorability of your Zoom meetings.
Your films’ colors may be changed, and video filters can also add new aspects. By selecting a filter appropriate for each event, like team meetings or game nights, you may create the right atmosphere. You may embellish your face in the video with flowers or animal traits by using Zoom’s various filters. Alternately, you might just convert your video’s color to black and white. The video filters from a different program, however, allow you to apply more vibrant filters and place a greater emphasis on special effects.
3. Lighting and Touch-ups
The Lighting function enhances lighting effects and makes adjustments for low light situations to make you seem more professional during a Zoom conference. Similar to this, Touch-up enhances your facial characteristics by making your skin shine, erasing wrinkles, and giving your face a radiant appearance.
On your Zoom videos, changing your lighting and applying touch-ups may improve how you seem. By adjusting your lighting, you can make even dim illumination look bright. By doing touch-ups, you may get a smoother skin texture and get rid of any obvious imperfections.
4. Studio Effects
Zoom has been developing on a new feature called Studio Effects that would give customers the option of using virtual cosmetics in their movies. They are still checking it out before formally releasing it since it is still in beta. However, it is still available to users under the Backgrounds & Filters area. You may adjust the opacity as you like. You have the option to choose a new color or one of the predefined colors. Additionally, you may decide to employ the face effects in all of your next meetings, albeit doing so might be problematic if you use Zoom for business. Don’t worry if you’re running late. Zoom can give your face a natural-looking cosmetic makeover in only one minute!
This function is intended for less formal settings, such as gatherings of friends or family. Anyone who wants to seem more professional during meetings has access to Studio Effects, which offers the choice of various eyebrow colors, beards, and lipsticks. These are a few recently added features. You may add mustaches, beards, and brows in a variety of designs, hues, and intensities. Additionally, you have the option of coloring your lips.
Part 2: How to Add Visual Effects to Zoom
Along with facilitating online meetings, the Zoom program also lets you play with its visual effects. You just need to make a few adjustments to the video settings or utilize another third-party program to be ready to go.
Step1Start a Zoom meeting
You can download Zoom, install it on your computer, and log into your account if you don’t already have it if you don’t already have it.
Step2Tap Background and Filters
After logging in to Zoom, use these settings. - Options > Camera > Video

Step3Faucet Filters
Here, you may play with a variety of visual effects and customize them to suit your tastes. Pick one of the numerous filters that are offered. To activate the filter, tap it.
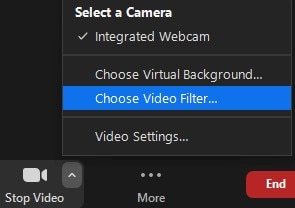
Step4Set Lighting Effects to on
Select “Adjust for low light” in the video options. For your lighting, you may choose between Auto and Manual effects. Zoom will automatically detect and adapt for the lighting in your room if you choose Auto.
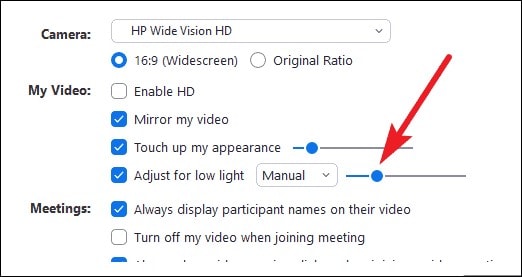
Use Zoom’s noise reduction option to keep your conversation focused during your video conference in addition to adding visual elements. To do this, go to “Audio Settings” and choose “High” under “Suppress background noise.” Once you start speaking during the video conference, this essentially cancels out any background noise.
Part 3: Related FAQs
1. What apps can add visual effect on Zoom?
Following is the list of top three apps that you can use to utilize visual effects Zoom application:
Snap Camera is regarded as the most user-friendly. It is a software that you can download for Windows or Mac that works with live broadcasts and video chats. Because it was created by the people who founded Snapchat, it shares a broad variety of filters with that platform.
Link: Snap Camera
The Mac is the only platform on which CamTwist may be used. You may also use it to give your movies additional filters and unique effects. This program lets you pick from a variety of pre-made effects while also allowing you to create your own.
Link: CamTwist
Another desktop application that lets you change and even blur your backdrop is ManyCam. It enables you to apply digital effects, filters, and 3-D masks to your face. Using this tool, you can also build layers and presets.
Link: ManyCam
2. How do I add visual effects to Zoom in Mobile?
Zoom includes a function that might be useful if you don’t want to tidy up or want to add some entertainment to your calls. You may utilize Zoom virtual backdrops to alter your surroundings and take you to a more pleasant location on both the desktop and mobile apps. After joining one on a mobile device, pick Virtual backdrop by tapping the More icon in the bottom right corner. Choose a photo from the list of choices, or click the plus sign (+) to add a photo or video from your gallery.
3. How do you download Zoom effects?
Pressing the Studio Effects button after installing Zoom for the first time will prompt a pop-up asking you to download the Studio Effects package. Several filters, suited for both business meetings and conversations with friends, let you customize the video and audio during your video calls. To start downloading the Effects bundle, click the Download button. The “Studio Effects” window will appear on the right-hand side of the Background & Filter page after the download is finished. All the face components and choices are available in this Studio Effects window.
Conclusion
The most popular video meeting tool worldwide is Zoom. Family, friends, coworkers, and any two people who want to video chat utilize it. Zoom visual effects are the ideal tool for injecting some humor into otherwise dull Zoom sessions and meetings. A few simple steps will get you a striking backdrop, a humorous filter, and some interesting effects. Since the majority of formal work is now completed from home, Zoom has taken over as the standard video conferencing program. Try out as many of the effects as you like, and use this page as a companion and a map to help you along the way.
- 1. What apps can add visual effect on Zoom?
- 2. How do I add visual effects to Zoom in Mobile?
- 3. How do you download Zoom effects?
Part 1: Popular Visual Effects you can add to Zoom
You may apply one of four main graphic effects to your Zoom meetings. The visual effects that you may use in your next Zoom video chat are briefly summarized below.
1. Visual Backgrounds
Virtual backdrops may transform any plain wall into an artistic setting. Zoom provides you the choice to add photographs to your backdrop in addition to offering you a few pre-made backdrops. Zoom lets you add a movie to your backdrop in addition to simply photographs. With the help of this imaginative feature, gather your pals and enjoy your favorite meme or video. A presentation’s collection of photos, a video, or a single image may all serve as virtual backdrops. A green screen would often be used as your real backdrop and consistent lighting would be required.
To avoid having to reveal your real surroundings while in a conference, you may add any picture or video as a virtual backdrop in Zoom. You have the option of adding own photos and movies or selecting from the pre-existing backdrop films and images. The file type for video backgrounds should be MP4 or MOV, and the resolution should range from 360p to a maximum of 1080p. Ensure that the mirroring of your video is deselected in the Zoom’s Video settings if your backdrop picture has text that may be read. By using virtual backdrops, you may alter the background of your video as it appears to the audience member with whom you are speaking. During the video conference you’re in, the other participants will be able to view your face and body overlaid on the backdrop of your choice.
2. Filters
With these filters, you can have fun in all of your Zoom meetings! Filters are a fun way to spend time with loved ones who are far away, particularly at a period when maintaining social distance is crucial. Filters are the modifications you make to yourself during Zoom meetings (such as a mustache, beard, etc.). They enliven the proceedings and contribute to the fun and memorability of your Zoom meetings.
Your films’ colors may be changed, and video filters can also add new aspects. By selecting a filter appropriate for each event, like team meetings or game nights, you may create the right atmosphere. You may embellish your face in the video with flowers or animal traits by using Zoom’s various filters. Alternately, you might just convert your video’s color to black and white. The video filters from a different program, however, allow you to apply more vibrant filters and place a greater emphasis on special effects.
3. Lighting and Touch-ups
The Lighting function enhances lighting effects and makes adjustments for low light situations to make you seem more professional during a Zoom conference. Similar to this, Touch-up enhances your facial characteristics by making your skin shine, erasing wrinkles, and giving your face a radiant appearance.
On your Zoom videos, changing your lighting and applying touch-ups may improve how you seem. By adjusting your lighting, you can make even dim illumination look bright. By doing touch-ups, you may get a smoother skin texture and get rid of any obvious imperfections.
4. Studio Effects
Zoom has been developing on a new feature called Studio Effects that would give customers the option of using virtual cosmetics in their movies. They are still checking it out before formally releasing it since it is still in beta. However, it is still available to users under the Backgrounds & Filters area. You may adjust the opacity as you like. You have the option to choose a new color or one of the predefined colors. Additionally, you may decide to employ the face effects in all of your next meetings, albeit doing so might be problematic if you use Zoom for business. Don’t worry if you’re running late. Zoom can give your face a natural-looking cosmetic makeover in only one minute!
This function is intended for less formal settings, such as gatherings of friends or family. Anyone who wants to seem more professional during meetings has access to Studio Effects, which offers the choice of various eyebrow colors, beards, and lipsticks. These are a few recently added features. You may add mustaches, beards, and brows in a variety of designs, hues, and intensities. Additionally, you have the option of coloring your lips.
Part 2: How to Add Visual Effects to Zoom
Along with facilitating online meetings, the Zoom program also lets you play with its visual effects. You just need to make a few adjustments to the video settings or utilize another third-party program to be ready to go.
Step1Start a Zoom meeting
You can download Zoom, install it on your computer, and log into your account if you don’t already have it if you don’t already have it.
Step2Tap Background and Filters
After logging in to Zoom, use these settings. - Options > Camera > Video
Step3Faucet Filters
Here, you may play with a variety of visual effects and customize them to suit your tastes. Pick one of the numerous filters that are offered. To activate the filter, tap it.
Step4Set Lighting Effects to on
Select “Adjust for low light” in the video options. For your lighting, you may choose between Auto and Manual effects. Zoom will automatically detect and adapt for the lighting in your room if you choose Auto.
Use Zoom’s noise reduction option to keep your conversation focused during your video conference in addition to adding visual elements. To do this, go to “Audio Settings” and choose “High” under “Suppress background noise.” Once you start speaking during the video conference, this essentially cancels out any background noise.
Part 3: Related FAQs
1. What apps can add visual effect on Zoom?
Following is the list of top three apps that you can use to utilize visual effects Zoom application:
Snap Camera is regarded as the most user-friendly. It is a software that you can download for Windows or Mac that works with live broadcasts and video chats. Because it was created by the people who founded Snapchat, it shares a broad variety of filters with that platform.
Link: Snap Camera
The Mac is the only platform on which CamTwist may be used. You may also use it to give your movies additional filters and unique effects. This program lets you pick from a variety of pre-made effects while also allowing you to create your own.
Link: CamTwist
Another desktop application that lets you change and even blur your backdrop is ManyCam. It enables you to apply digital effects, filters, and 3-D masks to your face. Using this tool, you can also build layers and presets.
Link: ManyCam
2. How do I add visual effects to Zoom in Mobile?
Zoom includes a function that might be useful if you don’t want to tidy up or want to add some entertainment to your calls. You may utilize Zoom virtual backdrops to alter your surroundings and take you to a more pleasant location on both the desktop and mobile apps. After joining one on a mobile device, pick Virtual backdrop by tapping the More icon in the bottom right corner. Choose a photo from the list of choices, or click the plus sign (+) to add a photo or video from your gallery.
3. How do you download Zoom effects?
Pressing the Studio Effects button after installing Zoom for the first time will prompt a pop-up asking you to download the Studio Effects package. Several filters, suited for both business meetings and conversations with friends, let you customize the video and audio during your video calls. To start downloading the Effects bundle, click the Download button. The “Studio Effects” window will appear on the right-hand side of the Background & Filter page after the download is finished. All the face components and choices are available in this Studio Effects window.
Conclusion
The most popular video meeting tool worldwide is Zoom. Family, friends, coworkers, and any two people who want to video chat utilize it. Zoom visual effects are the ideal tool for injecting some humor into otherwise dull Zoom sessions and meetings. A few simple steps will get you a striking backdrop, a humorous filter, and some interesting effects. Since the majority of formal work is now completed from home, Zoom has taken over as the standard video conferencing program. Try out as many of the effects as you like, and use this page as a companion and a map to help you along the way.
Also read:
- 2024 Approved Wondering How to Rotate a Video in Windows at Any Desired Angle and Save It Permanently? Find Out All the Different Ways to Rotate Videos Temporarily as Well as Permanently
- New 2024 Approved How to Be a Good Podcast Host
- New 2024 Approved 10 Catchy Pixel Art Wallpapers and How to Custom Your Own
- How to Zoom in on PowerPoint Easy Ways
- Do You Know How AI Is Helping Video Editors and Enthusiasts? Many Video Editing Software Allows an Auto Reframe Option to Use that Can Help Manage Videos
- 2024 Approved This Article Will Address Your Questions About the Easiest Way to Turn a Blog Into a Podcast. Lets Begin with the Reasons Why You Should Do a Podcast
- New Have You Ever Applied the Gaussian Blur Effect to Your Videos? Read This Article to Find a Reliable and Convenient Tool to Generate the Gaussian Blur Effect
- New 2024 Approved LumaFusion – What Is It and the Best Alternative to Use
- How to Use Kahoot! On Zoom
- Updated In 2024, Where To Find The Best Free Canon LUTs? Learn More
- Discover Vintage LUTs Premiere Pro Free and Paid Options Available
- In 2024, Do You Want to Make Your Photos and Videos Look Different From Others? There Are Many Lightroom LUTs Free, and They Make Your Media Content Stand Out From Others
- What Is the Best Frame Rate for 4K Videos, In 2024
- Updated 3 Best Motion Blur Plugins for Adobe After Effects
- New 2 Actionable Ways to Extract Subtitles From MKV Videos without Quality Loss
- Updated Using One of the Best Converter Tools to Turn GIFs Into PNG or JPG. Here, Learn About the Ten Best Ones for Different Operating Systems, with Details on Features, Prices, and More
- In 2024, This Article Provides Helpful Tips for Creating Better Film Footage in Public Places. Learn How to Choose the Right Angle and Re-Record the Audio with Filmora
- In 2024, Get The Perfect Drone Footage With Free Drone LUTs
- New Easy Guide to Zoom Video in VLC for 2024
- 2024 Approved Finding The Best Ways To Replace Sky in Lightroom
- Do You Like Clouds or Sky and Want to Use Them as a Video Background? Explore This Article to Learn About the Sky Change Video in Filmora
- Updated Green Screen Is a Widely Used Effect in After Effects. Many Professional Photographers Use It to Make Creative Video Effects. This Guide Will Show You How to Use Green Screen to Videos in After Effects
- In 2024, How to Add Subtitles in VLC Media Play
- Updated 2024 Approved Fast Method to Match Color in Photoshop
- New How to Create a Custom Sequence Preset in Premiere Pro for 2024
- 2024 Approved AVI Video Format How to Open, Play, Edit AVI File?
- New Looking for the Best Websites for 3D Text PNG? Weve Covered You with Our Top 8 Picks for Your Upcoming Work
- Updated 3D Ray Traced Settings In After Effects A Comprehensive Guide
- Updated How to Create and Use Adjustment Layers in After Effects
- New In 2024, How to Create Sports Intro and YouTube Endscreen?
- Updated 2024 Approved How To Add Text In After Effects
- How to Get Motion Blur in Roblox, In 2024
- New Best Animated Text Generator
- What Is TS Format and How To Play TS Files, In 2024
- Everything You Need to Know about Lock Screen Settings on your Honor 100 Pro
- In 2024, How To Use Allshare Cast To Turn On Screen Mirroring On Realme C33 2023 | Dr.fone
- In 2024, Ultimate Guide from Xiaomi Redmi Note 12 4G FRP Bypass
- Prank Your Friends! Easy Ways to Fake and Share Google Maps Location On Poco F5 Pro 5G | Dr.fone
- The way to recover deleted photos on Nokia G42 5G without backup.
- Catch or Beat Sleeping Snorlax on Pokemon Go For Vivo Y27 5G | Dr.fone
- In 2024, Can I use iTools gpx file to catch the rare Pokemon On Nokia C22 | Dr.fone
- How to Transfer Data from Asus ROG Phone 8 Pro to Any iOS Devices | Dr.fone
- Bypass iPhone 15 Pro activation lock without previous owner
- Play Store Not Working On Motorola Moto G23? 8 Solutions Inside | Dr.fone
- In 2024, Pokemon Go Error 12 Failed to Detect Location On Realme 11X 5G? | Dr.fone
- In 2024, 7 Fixes to No GPS - Showing Approximate Location on Apple iPhone 8 Waze | Dr.fone
- In 2024, How I Transferred Messages from Motorola Moto G34 5G to iPhone 12/XS (Max) in Seconds | Dr.fone
- Why Your WhatsApp Live Location is Not Updating and How to Fix on your Nokia C210 | Dr.fone
- Undelete lost data from Edge 2023
- Top 10 Nokia C02 Android SIM Unlock APK
- How to Recover Deleted Photos, Videos & Music Files from iPhone 12 Pro | Stellar
- Complete Tutorial to Use VPNa to Fake GPS Location On Samsung Galaxy S24 Ultra | Dr.fone
- Title: In 2024, Hitfilm Express - A Guide to Download, Install, Key Features
- Author: Chloe
- Created at : 2024-05-20 03:38:04
- Updated at : 2024-05-21 03:38:04
- Link: https://ai-editing-video.techidaily.com/in-2024-hitfilm-express-a-guide-to-download-install-key-features/
- License: This work is licensed under CC BY-NC-SA 4.0.
