

In 2024, How Do You Create In-Camera Transitions in Your Videos? A Complete Guide for Beginners to Create These Transitions Using Their Camera at Home
How Do You Create In-Camera Transitions in Your Videos? A Complete Guide for Beginners to Create These Transitions Using Their Camera at Home
You must have seen it in videos when a scene changes to another place or time. How is it possible? Video transitions are a post-production technique that connects two different shots together. And it makes the whole video goes smooth and fluent.
Hopping directly from one clip to the next looks pretty queer. It disturbs the whole dynamics and charm of the video. To avoid this, we use video transitions. This makes the video appear much smoother and more linked.
You may think it is not easy, but after reading this article, you will know how simple it is. All you need is a camera and a few skills. In this article, we will focus on different in-camera transitions and let you know how to edit in a powerful video editor Filmora .
Whip Your Camera
You may have noticed that when an object moves quickly, the camera creates a blurred image of the object. We call it motion blur. The idea with this transition is to cut and paste your shots together by whipping your camera at the end of your first shot and at the beginning of your second one. This effect depends on two aspects. The first is by the speedy motion of the object out of the frame, and the second is by the camera’s movement.
Here is a stepwise guide for you to try
- Plan your shots, where and in what direction you will make the whip.
- Then take the first shot and whip the camera at the end of the shot in the direction the object is moving.
- For the next shot, whip the camera into the action and complete the shot.
- Import both shots in your editing tool and find the point of blur in both.
- Cut and paste them to add a blurring effect to your video.
You can whip your camera in any direction you want. Make sure the movement is fast enough to create a motion blur.
The result would be a smooth transition from the first shot to the second, as in this clip:

Fill The Frame
In this in-camera transition technique, you must fill the frame with an object or subject. Compose the shot with the main subject filling the frame from edge to edge. In this way, those who view the video immediately know what you want them to see.
Here is step-by-step guidance for this transition
- Plan the two shots you are going to take.
- Find a subject or an action that will fill the frame during recording.
- In the first shot, please make the subject move toward the frame so that it fills the frame.
- The second shot will take place at another time or place.
- To record the second shot, cover the frame with an object and then reveal the shot.
- Import both shots into Wondershare Filmora .
- Cut the two shots to the point where the frame is filled and paste these shots together.
Free Download For Win 7 or later(64-bit)
Free Download For macOS 10.14 or later
One important thing is to match the color and brightness of the object or subject. It will provide you with much better results. The video attached below explains all the steps of filling the frame.

Match Cut
In a video, a match cut transitions from one shot to another. During this, the composition of the two shots is matched by action, subject, and subject matter. The goal is to make a visual match between two situations that don’t have a direct link. Here are the steps to creating a match-cut transition in your videos.
- Plan the shot you are going to take.
- Record the action in the first shot, for example, clapping your hands.
- Go to another place or scene to record the second shot.
- Repeat the same action in the second shot.
- Import both camera shots to Wondershare Filmora .
- Cut one shot to another when the action is at its peak.
This way, you can smoothly transition from one place or scene to another. There is a video attached below for a better understanding of the steps.

Final Words
You can use these techniques to create sublime in-camera transitions. Make sure to follow all the steps in the correct order. These transitions will make your videos look more creative and artistic. Plan your ideas, add these transitions to your videos, and create cool videos at home to post on social media.
If you find this article informative, remember to share it with your friends. Which of these transitions did you like the most, and are you going to try them?
Free Download For Win 7 or later(64-bit)
Free Download For macOS 10.14 or later
Free Download For macOS 10.14 or later
One important thing is to match the color and brightness of the object or subject. It will provide you with much better results. The video attached below explains all the steps of filling the frame.
Match Cut
In a video, a match cut transitions from one shot to another. During this, the composition of the two shots is matched by action, subject, and subject matter. The goal is to make a visual match between two situations that don’t have a direct link. Here are the steps to creating a match-cut transition in your videos.
- Plan the shot you are going to take.
- Record the action in the first shot, for example, clapping your hands.
- Go to another place or scene to record the second shot.
- Repeat the same action in the second shot.
- Import both camera shots to Wondershare Filmora .
- Cut one shot to another when the action is at its peak.
This way, you can smoothly transition from one place or scene to another. There is a video attached below for a better understanding of the steps.
Final Words
You can use these techniques to create sublime in-camera transitions. Make sure to follow all the steps in the correct order. These transitions will make your videos look more creative and artistic. Plan your ideas, add these transitions to your videos, and create cool videos at home to post on social media.
If you find this article informative, remember to share it with your friends. Which of these transitions did you like the most, and are you going to try them?
Free Download For Win 7 or later(64-bit)
Free Download For macOS 10.14 or later
How To Fade Audio With Movavi Editor
Movavi Video Editor Plus is the best option if you want to use its user-friendly Movavi fade audio feature set with plenty of functionality. There are versions of the app on Mac and Windows. For all intents and purposes, Movavi fade out music functionality is an excellent piece of this video editing software. The Movavi Video Editor Plus package comes with standard advanced features and functionality. You may also store your work and share your Movavi fade out audio exports across devices that have the software installed.
Looking for how to fade out music in Movavi? We’ve got you solutions to it. The ability to quickly and simply check that the beginning and conclusion of any audio is one of the best Movavi fade audio features. Prior to the audio, there must be a distinct period of quiet. Finding the program, like Movavi Audio fade out, that best suits your requirements is essential whether you want to fade-in, fad-out, trim, crop, clip, or combine audio files or segments of a music. Find out the details in the upcoming sections.
Part 1. How to Fade Audio with Movavi Editor
When the song’s ending is not featured in the video, fade-out is used to provide an added level of professionalism. Even if you’ve never altered a video before, using Movavi Video Editor Plus is simple. A step-by-step tutorial that walks you through all the tools you’ll need is shown to you when the software initially launches. Additionally, you may always search the Movavi official website for advice.
Steps to use Movavi Fade Audio:
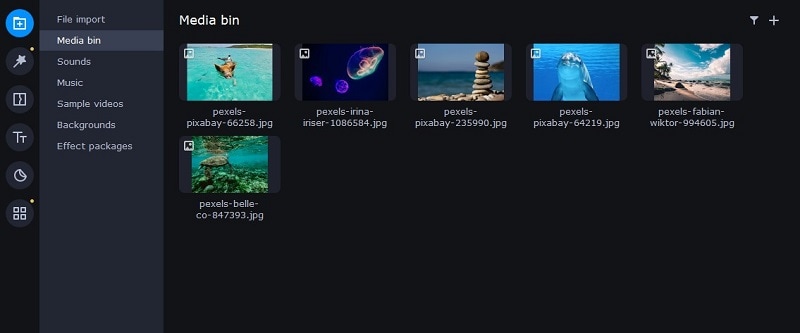
Step1The first step is to import the audio and video files you want to utilize. Drag and drop the files into the software or choose “Add Files” from the Media Bin area to do this. Drag and drop the clip into the timeline after that.
Step2Select the disconnect audio option from the edit menu. Additionally, you can see that the audio and video will no longer be connected by a little connection. Your titles’ location, color, and font may all be changed.
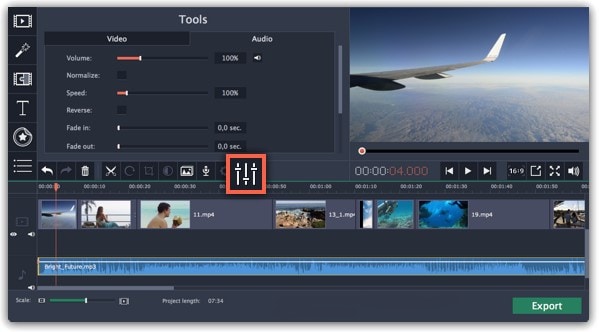
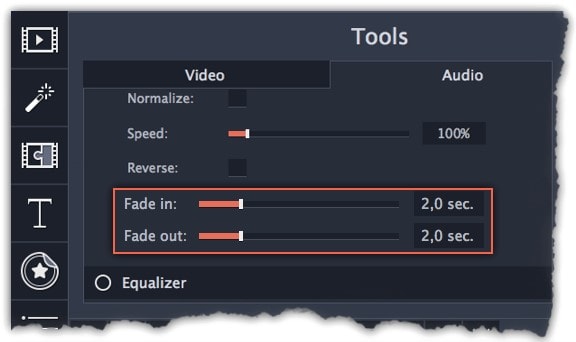
Step3Use the sliders on the Audio tab to set the fade duration by referring to the Audio Properties. Additional options may be used to increase the audio’s loudness, eliminate ambient noise, or even create an echo effect.
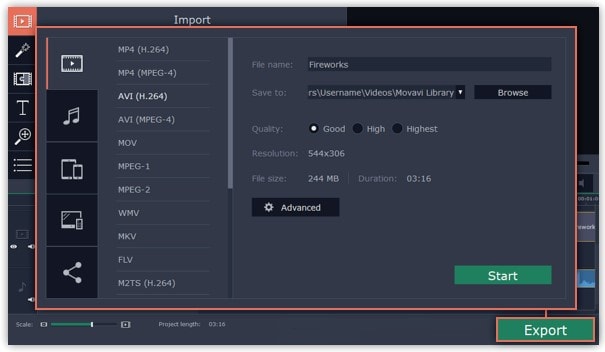
Step4Click on the export option to save this audio as an MP3. Select Audio Export. The MP3 choice is used by default. Select the Save Audio File tab after clicking the Export button. Choose the preferred format and press Start.
Part 2. Movavi Alternative to Fade Audio
Look no further than Filmora by Wondershare if you’re seeking for an effective and user-friendly Movavi audio fade out substitute. This program has all the tools you need to edit, apply special effects, and make titles for videos of a professional caliber. In contrast to Movavi, Filmora gives you the ability to create fade out music without requiring you to install a separate extension. In order to help you understand how to use this function using the Filmora video editing interface, we have enlisted the step-by-step guide for you as well.
Although there are several video editors on the market, Filmora has successfully carved out a position for itself with a variety of intriguing features. The application is appropriate for both new and more experienced users and was designed with novice users in mind. Its user interface (UI), which is rather simple when compared to professional applications. Among all the free video editing programs for beginners, Filmora also offers a far larger selection of effects, customizability, and correction tools, and its screen-splitting capability is much handier than Movavi fade audio feature.
Steps to Fade Out Audio in Filmora:
Step1Install Wondershare Filmora
The straightforward platform to start editing your audio and music files is Filmora, which is available for free. You must first download and install this application on your windows computer in order to utilize it without difficulty. Download the most current edition of this application first. It’s now time to install it on your computer when you’ve completed that. Simply install this program on your computer by following the standard setup instructions if you want to do it fast.
Step2Open Filmora Editor and Import Audio Files
In the step that follows, we’ll show you how to use this platform to fade in and out audio. Filmora may be immediately launched from your desktop or the search bar, then opened as seen below to begin going. By choosing the Video Editor option from the software’s home screen, you may now investigate the basic principles of editing. This will bring up the main interface for Filmora. To import your music and video files, just choose the Import button from the software’s main screen, as seen below:

Step3Load Built-in Audio Editor
You must drag the media files into the program’s timeline after importing them into Filmora. You may modify your media files using every tool in the timeline. To utilize the audio editor in Filmora, just right-click on the specific audio file and choose “Edit Audio” from the list, as seen below.

Step4Use Audio Fade-in/Fade-out
The initial step is to learn how to use Filmora to start fading in and, afterwards, fading out your audio recordings. The best aspect of Filmora is how simple it is to employ these techniques from the timeline. To achieve this, focus on the audio file that you want to change in the timeline; after you’ve picked it, the two icons will show up above the audio file. Drag the first one to the desired duration for the audio fade-in option, as demonstrated:

Step5Edit and Share Video/Sound
In addition to an audio editor, Filmora has a built-in toolset for video editing. You may utilize basic to sophisticated editing techniques inside the program. To choose the basic editor, just click on the video file within the timeline as seen below. There is support for all widely used video and audio formats, including MP3. Click “Export” and choose “File Format” to do this.
By pressing the Format button, choose the required configuration from the list. On a computer, the particular document will be saved to the designated directory.
The Bottom Line
Have you learned how to fade out music in Movavi? If so, then you would also find out that the Movavi fade audio alternative, Filmora , provides a selection of audio editing options in addition to video editing features. The Movavi editor is capable of spicing up your videos and audios, however; Filmora’s workflow is a little more established and well-defined than Movavi’s, which is what propels it to the top of the audio editing field. As a result, Filmora would be the better option if you intend to work as a video editor for a long time.
Free Download For Win 7 or later(64-bit)
Free Download For macOS 10.14 or later
How to Make Split Screen Videos in Filmora
To show the interactions and exchanges of things between the characters are widely seen in movies. It seems they are close to each other, but they aren’t.
In this article, we will go with the video editor, Wondershare Filmora, to make split-screen videos instantly. Let’s move forward to check what you need to make these videos!
Part 1. Prerequisites To Make Split Screen Video To Interact
There is no need to make complex videos. Because nowadays, only short videos get viral and are more trending. The interaction videos should be as simple as passing props or playing with someone!
Split-screen videos are widely used in movies and films because it is a visual way to describe any story. The actions will be based on real-time interactions between the characters. The essential things you are required to make these videos are described as follows:
1. Storyboard
First of all, you have to create a story with your friends and family, with whomever you want to create a video. For this, follow the below steps:
- Make a script of a story by coordination, such as writing all dialogues and actions so that there will be no difficulty during a performance on screen.
- Practice those actions again and again to get a professional look.
- The storyboard should be based on the split screen templates available on Wondershare Filmora , or you can create your customized too.

Free Download For Win 7 or later(64-bit)
Free Download For macOS 10.14 or later
2. Characters on the screen
The friends with whom you are interacting should be on the screen and have assets to record a video wherever they are. It will be one person on one split screen or two persons on one. It all depends upon your story and script.
3. Prop to interact
A prop will be any particular thing used to show interaction and should be present in the homes of both characters.
![]()
Note: The prop can be any object like a tissue roll, mobile phone, or anything seen as a passing object from one character to another.

4. A helper at home
There will be one person at home during video shooting to pretend a friend’s or family’s hand reaching to the other character from off-camera.
For example, while performing a high-five action, insert the hand of any member with whom you are living in the scene, showing as the character adjacent to you. After setting up everything in a row, it’s time to record scenes for the video.

5. Record different takes
To give a professional look to the video, you have to record different takes for each person from different angles. After recording, everyone has to send footage to only one person to edit on Filmora.
After getting things and recording, it’s time to edit it on Wondershare Filmora. For this, follow the lines below!
Part 2. Steps To Edit Split Screen Video in Filmora
Split-screen video editing is as simple as throwing a prop toward someone. Wondershare Filmora with a premium domain will get your back!
Filmora is a more creative and instant platform to edit any video or to give birth to new ideas. One of the prominent features is having ready-to-use templates for editing split-screen video. Meanwhile, you can also do a manual setup for editing. Follow the steps mentioned below to edit a video by using split-screen effects.
Split Screen Effect With Templates
Step1Import footage to Filmora
After picking up the best footage of every character, download the Wondershare Filmora (if you have not already). Then to import the clips, perform the following steps:
Free Download For Win 7 or later(64-bit)
Free Download For macOS 10.14 or later
- First, click on the “Click here to Import Media” button, as shown below.

- Then, select the clips you want to edit from your PC, and then they’ll be shown in the media section of Filmora.
Step2Add split screen effect to the timeline
Before adding the clips to the timeline, add the split screen effect to the timeline by following the below-mentioned steps:
- Click on the two-headed arrow at the upper tab.
- Then the drop-down list of two options will pop up, as shown below.

- Click on the Split Screen option, and it will show many split screen effects.

- Select the effect, whatever suits you, and download it then.
- After downloading, drag and drop the effect on the timeline section.

Step3Add clips to the effect
After adding the effect to the timeline, it’s time to implement it on the clips or footage. For this, follow the below-mentioned steps:
- Drag and drop the clips based on your storyboard in the required section.
- Then import the takes wherever and however you want, according to the storyboard.

If you don’t want any templates to be used in your video, then you can manually make a screen split layout. To do this, check the below section.
Manual Split Screen Layout
If the storyboard is organized in such a way that you can’t find out any of the templates suitable, then you can easily create a customized one for your video. In a customized split screen, you can set the duration and adjust the frame rate according to your choice.
Step1Import the clips
First, you must create a timeline to edit your split-screen video. To do this, take a look at the below steps!
- Click on the Import icon in the main preview when you open Wondershare Filmora.
- Then, import all the clips or footage you want to edit.

Step2Add all footages to the timeline
After importing all the clips of interaction videos into Filmora, our next step is to add our videos to the timeline.
- Simply click on the imported clips present in the project media section.
- Then drag it to the timeline below and drop it in the required track of videos.
Do the above-mentioned steps with all the clips present in the project media block.

Doing so will create a working timeline you can view and edit as you go along the editing process.
Step3Adjust the frame rate of all clips
It is all set that your storyboard is customized, for this you have to resize all the clips manually. To arrange clips according to the size, follow the below-mentioned steps:
- First, double-click on the clip you want to edit in the timeline.
- The Basic settings of the video will open in which you have a lot of options to edit.
- Click on the Transform option, and its setting will pop up on the top left side.
- Find out the Scale option from the settings and check out its range.

Adjust the scale rate according to your choice by sliding from its section.

![]()
Note: Repeat this process with all other clips present in the timeline to adjust them in such a way so that the hands moving from frame to frame will line up.

Step4Adjust the timing of clips
After adjusting the frame, you now have to adjust the timing of the clips. To perform this action, follow the below steps:
- Arrange and move around the clips on the timeline so that the timing of the scene lines up between each shot.
- Drag the edge of the clip to the right side if you want to increase the timing and duration.
- While dragging the edge of the clip to the left side, if you want to decrease the timing of the clip.
![]()
Note: The most important part is the first time a hand is supposed to move from one frame to another.
What to do if there is any lag in the preview?
If you’re experiencing lag during the preview, click on the “render” button on the top right of the timeline. It will help to render for a smooth preview.

Step5Splitting the clips
If the timing in your scene starts to fall out of sync, then do the following steps:
- First, try splitting all of the clips.
- Ensure to split before they start to fall out of sync.

![]()
Note: Splitting the clip before one person’s dialogue is preferred.
Step6Full-screen moment
After splitting the clips according to adjustments and storyboard, you can now make one of the characters’ videos in full screen. For this, follow the below steps:
- First, make another cut in the clips before the next hand-crossing action.
- Take one of the characters’ videos from clips in-between moment and make them full screen.

![]()
Note: You can quickly do full screen by double-clicking on the clip and unchecking the “transform“ heading in the top left window.

Final Results
You’re now free to re-adjust your clips in the next part back into sync. If you still want to make any adjustments in duration or cutting or sizing, you can do it easily. Because it’s a customizable effect. Give a pat on your Back! You did a great job and accomplish the results!

Free Download For Win 7 or later(64-bit)
Free Download For macOS 10.14 or later
Conclusion
An instant way to make split screen video and edit it is hidden in Wondershare Filmora . You can unwrap it by following the above-mentioned steps and giving a new life to your interaction videos.
Enjoy new and creative ideas with your family and friends and make your video trendy by Filmora. If you are an influencer, you can interact with other bloggers and influencers and make split-screen videos. It will be a great treat for you and your social media followers For macOS 10.14 or later
2. Characters on the screen
The friends with whom you are interacting should be on the screen and have assets to record a video wherever they are. It will be one person on one split screen or two persons on one. It all depends upon your story and script.
3. Prop to interact
A prop will be any particular thing used to show interaction and should be present in the homes of both characters.
![]()
Note: The prop can be any object like a tissue roll, mobile phone, or anything seen as a passing object from one character to another.
4. A helper at home
There will be one person at home during video shooting to pretend a friend’s or family’s hand reaching to the other character from off-camera.
For example, while performing a high-five action, insert the hand of any member with whom you are living in the scene, showing as the character adjacent to you. After setting up everything in a row, it’s time to record scenes for the video.
5. Record different takes
To give a professional look to the video, you have to record different takes for each person from different angles. After recording, everyone has to send footage to only one person to edit on Filmora.
After getting things and recording, it’s time to edit it on Wondershare Filmora. For this, follow the lines below!
Part 2. Steps To Edit Split Screen Video in Filmora
Split-screen video editing is as simple as throwing a prop toward someone. Wondershare Filmora with a premium domain will get your back!
Filmora is a more creative and instant platform to edit any video or to give birth to new ideas. One of the prominent features is having ready-to-use templates for editing split-screen video. Meanwhile, you can also do a manual setup for editing. Follow the steps mentioned below to edit a video by using split-screen effects.
Split Screen Effect With Templates
Step1Import footage to Filmora
After picking up the best footage of every character, download the Wondershare Filmora (if you have not already). Then to import the clips, perform the following steps:
Free Download For Win 7 or later(64-bit)
Free Download For macOS 10.14 or later
- First, click on the “Click here to Import Media” button, as shown below.
- Then, select the clips you want to edit from your PC, and then they’ll be shown in the media section of Filmora.
Step2Add split screen effect to the timeline
Before adding the clips to the timeline, add the split screen effect to the timeline by following the below-mentioned steps:
- Click on the two-headed arrow at the upper tab.
- Then the drop-down list of two options will pop up, as shown below.
- Click on the Split Screen option, and it will show many split screen effects.
- Select the effect, whatever suits you, and download it then.
- After downloading, drag and drop the effect on the timeline section.
Step3Add clips to the effect
After adding the effect to the timeline, it’s time to implement it on the clips or footage. For this, follow the below-mentioned steps:
- Drag and drop the clips based on your storyboard in the required section.
- Then import the takes wherever and however you want, according to the storyboard.
If you don’t want any templates to be used in your video, then you can manually make a screen split layout. To do this, check the below section.
Manual Split Screen Layout
If the storyboard is organized in such a way that you can’t find out any of the templates suitable, then you can easily create a customized one for your video. In a customized split screen, you can set the duration and adjust the frame rate according to your choice.
Step1Import the clips
First, you must create a timeline to edit your split-screen video. To do this, take a look at the below steps!
- Click on the Import icon in the main preview when you open Wondershare Filmora.
- Then, import all the clips or footage you want to edit.
Step2Add all footages to the timeline
After importing all the clips of interaction videos into Filmora, our next step is to add our videos to the timeline.
- Simply click on the imported clips present in the project media section.
- Then drag it to the timeline below and drop it in the required track of videos.
Do the above-mentioned steps with all the clips present in the project media block.
Doing so will create a working timeline you can view and edit as you go along the editing process.
Step3Adjust the frame rate of all clips
It is all set that your storyboard is customized, for this you have to resize all the clips manually. To arrange clips according to the size, follow the below-mentioned steps:
- First, double-click on the clip you want to edit in the timeline.
- The Basic settings of the video will open in which you have a lot of options to edit.
- Click on the Transform option, and its setting will pop up on the top left side.
- Find out the Scale option from the settings and check out its range.
Adjust the scale rate according to your choice by sliding from its section.
![]()
Note: Repeat this process with all other clips present in the timeline to adjust them in such a way so that the hands moving from frame to frame will line up.
Step4Adjust the timing of clips
After adjusting the frame, you now have to adjust the timing of the clips. To perform this action, follow the below steps:
- Arrange and move around the clips on the timeline so that the timing of the scene lines up between each shot.
- Drag the edge of the clip to the right side if you want to increase the timing and duration.
- While dragging the edge of the clip to the left side, if you want to decrease the timing of the clip.
![]()
Note: The most important part is the first time a hand is supposed to move from one frame to another.
What to do if there is any lag in the preview?
If you’re experiencing lag during the preview, click on the “render” button on the top right of the timeline. It will help to render for a smooth preview.
Step5Splitting the clips
If the timing in your scene starts to fall out of sync, then do the following steps:
- First, try splitting all of the clips.
- Ensure to split before they start to fall out of sync.
![]()
Note: Splitting the clip before one person’s dialogue is preferred.
Step6Full-screen moment
After splitting the clips according to adjustments and storyboard, you can now make one of the characters’ videos in full screen. For this, follow the below steps:
- First, make another cut in the clips before the next hand-crossing action.
- Take one of the characters’ videos from clips in-between moment and make them full screen.
![]()
Note: You can quickly do full screen by double-clicking on the clip and unchecking the “transform“ heading in the top left window.
Final Results
You’re now free to re-adjust your clips in the next part back into sync. If you still want to make any adjustments in duration or cutting or sizing, you can do it easily. Because it’s a customizable effect. Give a pat on your Back! You did a great job and accomplish the results!
Free Download For Win 7 or later(64-bit)
Free Download For macOS 10.14 or later
Conclusion
An instant way to make split screen video and edit it is hidden in Wondershare Filmora . You can unwrap it by following the above-mentioned steps and giving a new life to your interaction videos.
Enjoy new and creative ideas with your family and friends and make your video trendy by Filmora. If you are an influencer, you can interact with other bloggers and influencers and make split-screen videos. It will be a great treat for you and your social media followers!
Guide To Slowing Down Videos in Snapchat Discussing the Details
Applying slow-motion effects using sophisticated cameras or apps was a matter of the past. In this digital era, mobile technology makes all kinds of video editing right in your palm. Snapchat is one such exciting application that combines editing and social interaction. Primarily, it’s a social media platform to share your moments in one-time played snaps.
Some of its features also include speed modifiers for creating slow-motion videos on Snapchat. The slow-motion Snapchat option is pretty simple to apply to your pre-recorded videos. This guide will teach you how to slow down a Snapchat video to avoid ambiguity. Keep reading and get some mobile apps for slow-motion videos other than Snapchat.
Slow Motion Video Maker Slow your video’s speed with better control of your keyframes to create unique cinematic effects Make A Slow Motion Video More Features

Part 1: How Are Slow-Motion Videos Used by Social Media Users?
Snapchat offers creative sets of features to enhance the impact of captured media. This social media app can instantly slow down your video without any effort. Such videos can retain the viewers’ attention and urge them to explore the details. Plus, slow-motion videos encourage the audience to stay tuned to the upcoming content. Look at the below point to explore the uses of slow motion in Snapchat:
- Creating Comedy: Sometimes, people use slow-motion to turn their captured moments into comedy. For instance, you can add slow motion to your friend’s video of eating noodles. This way, a playful, hilarious, and entertaining element will be added to your content.
- Emphasizing Detail: Social media users usually slow down the video to enhance details. At normal speed, such details can easily be missed. Slowing down the sports, action shots, and fast-paced activities can reveal interesting details.
- Showcasing Skills: Dance and performance art videos can be slowed down with Snapchat. Social media users use slow-motion Snapchat to show talent and skills. Such footage allows viewers to appreciate the performance after watching the details.
- Capturing Nature: Aesthetic lovers use slow-motion effects to make their content appealing. They slow down the falling raindrops, clouds movements, and fluttering of butterfly wings. Capturing the beauty of nature this way resonates with social media users.
- Product Demonstration: Social media influencers showcase the product’s features in slow-motion videos. Snapchat assists them in making detailed and engaging videos with just a swap. Fashion and technology industries are influencing purchasing decisions through such videos.
Part 2: How to Slow Down Videos on Snapchat? A Simple Guide
You might be familiar with this famous social media app. If not, then let us simply tell you that it’s a platform to share fleeting pictures and videos. This top social media app was introduced in 2011, and according to stats, it grows 23% each year.
Some of its essential features include taking pictures and videos by adding filters and lenses. Now, let’s come to the point and learn how to make slow-motion videos on Snapchat:
Step 1
After getting Snapchat on your mobile phone, log in to an account. Open the app and record a video. To record, tap and hold down the “Capture” button at the lower part of the screen. Let it go when you are done recording a suitable clip.

Step 2
You can crop the video by clicking on the “Loop” button on the right side. Otherwise, just swipe the screen from left to right until you get a “Snail” icon. It will be the slow-motion effect that will reduce the speed of your video.

Step 3
Optionally, you can decorate or edit the clip using the right-side toolbar. When you are done editing, touch the “Save” icon at the bottom-left side. It will save the video in your camera roll or Snapchat Memories. Besides using the “Save” icon, you can click the “Next” button to share the video with your friends.

Part 3: Other Ways to Slow Down Videos to Post on Snapchat
The slow-motion effect is no more challenging as many apps are available online to do this. If you are unsatisfied with Snapchat’s motion video, this part is for you. Here, you can pick any app to make slow-motion videos and use plenty of editing features. These apps are useful for creating professional slow-mo videos right with your iOS or Android.
1. CapCut ( Android
This tool has made video creation effortless with video assets and flexible editing. It contains a cloud storage system that allows users to collaborate on projects freely. With its powerful features, users can remove background, split audio, and insert sounds. CapCut offers a feature to turn your normal videos into slow motion and alter the duration of clips.

Key Features
- It enables you to customize the pace of your video scenes separately. You can make slow-motion videos by using its “Speed” slider. Users can also track the previous and the latest video durations.
- The speed ramping features allow you to ensure a smooth transition in slow motions. To do so, you can choose the bullet, montage, and hero presets.
- Apart from making slow-motion videos, users can extract audio from videos. They just have to upload a video, and CapCut will extract original quality sound.
2. InShot ( Android
InShot claims to release your creativity through its video editing features. It offers seamless video trimming, splitting, and merging to get desired media. Users can adjust the speed of clips and add slow-motion or fast motions. Besides, they can insert sound effects, voice-overs, and popular music in their vlogs.

Key Features
- Despite slow-motion Snapchat, you can make a smooth slow motion in this editing app. It offers a speed option from which you can choose any Speed rate for your video.
- InShot tries to make your content breathe with its text and stickers. Users can add animated stickers and text using the timeline functions.
- Another specialty of this app is its aesthetic filters, such as Film and Cinema. Moreover, there are AI effects to provide a professional look to projects.
3. Videoshop ( Android
If you find slowing down videos on Snapchat difficult, try this video editing app. With its advanced editing tools, this versatile app can level up your social media expression. Some of its essential editing features involve rotation, merging, and flipping clips. Users can perform color correction, reverse, and slow down video functions.

Key Features
- Turning videos into fast motion, slow motion, and the reverse is quicker on Videoshop. You can swipe the speed slider towards the left and make a personalized slow-motion video.
- After getting a slow-mo, users can share it on popular social media apps. Some platforms include Snapchat, TikTok, WhatsApp, YouTube, etc.
- Besides, there are unlimited editing features to fine-tune your editing. It offers special effects, lip sync, animated titles, and GIFs to meet diverse needs.
Bonus Part: Guide made to Make Slow Motion Videos Easy with Wondershare Filmora
No doubt, the apps mentioned above are handy video editing tools. Such apps facilitate smartphone users, but what about PC users? For them, Wondershare Filmora is designed as an efficient video editing platform. This application is easy for all users and provides a wide range of editing tools. Beginners or non-tech persons can utilize an AI copilot editor for assistance in editing.
Free Download For Win 7 or later(64-bit)
Free Download For macOS 10.14 or later
How to Make Slow Motion Video with Optical Flow in Filmora
This editing platform can make slow-motion Snapchat videos of high quality. Users can adjust the slow-motion speed, apply speed ramping, or reverse the videos. Let’s explore all these features and get a slow-motion video by following the given steps:
Step 1Access Filmora and Import Media to Start a Project
Go to the official site of Filmora and ensure you install the latest version. Launch and enter the main interface. Click “New Project” and look for “Import” in the media panel. Browse and bring media to Filmora to start editing in the timeline section.

Step 2Discover the Uniform Speed Option
Place your cursor on the media and right-click on it. Look for the “Uniform Speed” option from the list and navigate toward the right-side panel. Alternatively, you can press the “Ctrl + R” key using your keyboard.

Step 3Adjust Speed for Slow Motion video with optical Flow
From Uniform Speed, move the “Speed” slider to the left. Keep moving until you set the desired “Duration” of the video. Afterward, head to the “AI Frame Interpolation” and extend the menu. Choose the “Optical Flow” option from the menu and get a preview of the results.

Step 4Continue Editing or Exporting the File
Lastly, shift to the top right corner and press “Export” if you are done editing. Otherwise, explore other features of Filmora.

Filmora is more than just a simple tool with cutting, trimming, and merging features. It is an AI platform that can generate music, scripts, and images for diverse needs. With its cloud storage, you can start editing where you left off. Smartphone users don’t have to worry because Filmora is now available as a mobile app.
Some Smart and Unique Features of Filmora
Completely exploring Filmora is not possible without knowing its key features. Thus, head down here and get a brief introduction to Filmora’s powerful functionalities.
AI Vocal Remover: Try this hot feature of Filmora to separate vocals from any song. This way, you can effortlessly remove vocals from audio and soundtracks. It enables you to dub videos with fresh and high-quality sound.
AI Copywriting: No more internet surfing for unique content when Filmora is here to help. With the ChatGPT plug-in, Filmora generates YouTube Titles and scripts. The AI-generated content proves engaging and perfectly aligns with your requirements.
Instant Mode: Like other editing apps, Filmora is also equipped with Instant mode. It provides video assets where you just have to upload clips in predesigned video templates. One thing Filmora has done differently is the editing options available until the last moment.
AI Smart Cutout: Who needs to record content with a green screen in this tech-based era? Enable this feature and remove unwanted objects and people with accuracy. Thus, users can make a clean video even when not recorded with a clean background.
Conclusion
Ultimately, the slow-motion filter is one of the options in Snapchat to make attractive snaps. In this guide, you’ve learned how to slow down videos on Snapchat. Besides, there were a few alternatives in the form of mobile apps. In search of a reliable platform, you can trust Filmora to make slow-motion videos easily.
Make A Slow Motion Video Make A Slow Motion Video More Features
Part 1: How Are Slow-Motion Videos Used by Social Media Users?
Snapchat offers creative sets of features to enhance the impact of captured media. This social media app can instantly slow down your video without any effort. Such videos can retain the viewers’ attention and urge them to explore the details. Plus, slow-motion videos encourage the audience to stay tuned to the upcoming content. Look at the below point to explore the uses of slow motion in Snapchat:
- Creating Comedy: Sometimes, people use slow-motion to turn their captured moments into comedy. For instance, you can add slow motion to your friend’s video of eating noodles. This way, a playful, hilarious, and entertaining element will be added to your content.
- Emphasizing Detail: Social media users usually slow down the video to enhance details. At normal speed, such details can easily be missed. Slowing down the sports, action shots, and fast-paced activities can reveal interesting details.
- Showcasing Skills: Dance and performance art videos can be slowed down with Snapchat. Social media users use slow-motion Snapchat to show talent and skills. Such footage allows viewers to appreciate the performance after watching the details.
- Capturing Nature: Aesthetic lovers use slow-motion effects to make their content appealing. They slow down the falling raindrops, clouds movements, and fluttering of butterfly wings. Capturing the beauty of nature this way resonates with social media users.
- Product Demonstration: Social media influencers showcase the product’s features in slow-motion videos. Snapchat assists them in making detailed and engaging videos with just a swap. Fashion and technology industries are influencing purchasing decisions through such videos.
Part 2: How to Slow Down Videos on Snapchat? A Simple Guide
You might be familiar with this famous social media app. If not, then let us simply tell you that it’s a platform to share fleeting pictures and videos. This top social media app was introduced in 2011, and according to stats, it grows 23% each year.
Some of its essential features include taking pictures and videos by adding filters and lenses. Now, let’s come to the point and learn how to make slow-motion videos on Snapchat:
Step 1
After getting Snapchat on your mobile phone, log in to an account. Open the app and record a video. To record, tap and hold down the “Capture” button at the lower part of the screen. Let it go when you are done recording a suitable clip.
Step 2
You can crop the video by clicking on the “Loop” button on the right side. Otherwise, just swipe the screen from left to right until you get a “Snail” icon. It will be the slow-motion effect that will reduce the speed of your video.
Step 3
Optionally, you can decorate or edit the clip using the right-side toolbar. When you are done editing, touch the “Save” icon at the bottom-left side. It will save the video in your camera roll or Snapchat Memories. Besides using the “Save” icon, you can click the “Next” button to share the video with your friends.
Part 3: Other Ways to Slow Down Videos to Post on Snapchat
The slow-motion effect is no more challenging as many apps are available online to do this. If you are unsatisfied with Snapchat’s motion video, this part is for you. Here, you can pick any app to make slow-motion videos and use plenty of editing features. These apps are useful for creating professional slow-mo videos right with your iOS or Android.
1. CapCut ( Android
This tool has made video creation effortless with video assets and flexible editing. It contains a cloud storage system that allows users to collaborate on projects freely. With its powerful features, users can remove background, split audio, and insert sounds. CapCut offers a feature to turn your normal videos into slow motion and alter the duration of clips.
Key Features
- It enables you to customize the pace of your video scenes separately. You can make slow-motion videos by using its “Speed” slider. Users can also track the previous and the latest video durations.
- The speed ramping features allow you to ensure a smooth transition in slow motions. To do so, you can choose the bullet, montage, and hero presets.
- Apart from making slow-motion videos, users can extract audio from videos. They just have to upload a video, and CapCut will extract original quality sound.
2. InShot ( Android
InShot claims to release your creativity through its video editing features. It offers seamless video trimming, splitting, and merging to get desired media. Users can adjust the speed of clips and add slow-motion or fast motions. Besides, they can insert sound effects, voice-overs, and popular music in their vlogs.
Key Features
- Despite slow-motion Snapchat, you can make a smooth slow motion in this editing app. It offers a speed option from which you can choose any Speed rate for your video.
- InShot tries to make your content breathe with its text and stickers. Users can add animated stickers and text using the timeline functions.
- Another specialty of this app is its aesthetic filters, such as Film and Cinema. Moreover, there are AI effects to provide a professional look to projects.
3. Videoshop ( Android
If you find slowing down videos on Snapchat difficult, try this video editing app. With its advanced editing tools, this versatile app can level up your social media expression. Some of its essential editing features involve rotation, merging, and flipping clips. Users can perform color correction, reverse, and slow down video functions.
Key Features
- Turning videos into fast motion, slow motion, and the reverse is quicker on Videoshop. You can swipe the speed slider towards the left and make a personalized slow-motion video.
- After getting a slow-mo, users can share it on popular social media apps. Some platforms include Snapchat, TikTok, WhatsApp, YouTube, etc.
- Besides, there are unlimited editing features to fine-tune your editing. It offers special effects, lip sync, animated titles, and GIFs to meet diverse needs.
Bonus Part: Guide made to Make Slow Motion Videos Easy with Wondershare Filmora
No doubt, the apps mentioned above are handy video editing tools. Such apps facilitate smartphone users, but what about PC users? For them, Wondershare Filmora is designed as an efficient video editing platform. This application is easy for all users and provides a wide range of editing tools. Beginners or non-tech persons can utilize an AI copilot editor for assistance in editing.
Free Download For Win 7 or later(64-bit)
Free Download For macOS 10.14 or later
How to Make Slow Motion Video with Optical Flow in Filmora
This editing platform can make slow-motion Snapchat videos of high quality. Users can adjust the slow-motion speed, apply speed ramping, or reverse the videos. Let’s explore all these features and get a slow-motion video by following the given steps:
Step 1Access Filmora and Import Media to Start a Project
Go to the official site of Filmora and ensure you install the latest version. Launch and enter the main interface. Click “New Project” and look for “Import” in the media panel. Browse and bring media to Filmora to start editing in the timeline section.
Step 2Discover the Uniform Speed Option
Place your cursor on the media and right-click on it. Look for the “Uniform Speed” option from the list and navigate toward the right-side panel. Alternatively, you can press the “Ctrl + R” key using your keyboard.
Step 3Adjust Speed for Slow Motion video with optical Flow
From Uniform Speed, move the “Speed” slider to the left. Keep moving until you set the desired “Duration” of the video. Afterward, head to the “AI Frame Interpolation” and extend the menu. Choose the “Optical Flow” option from the menu and get a preview of the results.
Step 4Continue Editing or Exporting the File
Lastly, shift to the top right corner and press “Export” if you are done editing. Otherwise, explore other features of Filmora.
Filmora is more than just a simple tool with cutting, trimming, and merging features. It is an AI platform that can generate music, scripts, and images for diverse needs. With its cloud storage, you can start editing where you left off. Smartphone users don’t have to worry because Filmora is now available as a mobile app.
Some Smart and Unique Features of Filmora
Completely exploring Filmora is not possible without knowing its key features. Thus, head down here and get a brief introduction to Filmora’s powerful functionalities.
AI Vocal Remover: Try this hot feature of Filmora to separate vocals from any song. This way, you can effortlessly remove vocals from audio and soundtracks. It enables you to dub videos with fresh and high-quality sound.
AI Copywriting: No more internet surfing for unique content when Filmora is here to help. With the ChatGPT plug-in, Filmora generates YouTube Titles and scripts. The AI-generated content proves engaging and perfectly aligns with your requirements.
Instant Mode: Like other editing apps, Filmora is also equipped with Instant mode. It provides video assets where you just have to upload clips in predesigned video templates. One thing Filmora has done differently is the editing options available until the last moment.
AI Smart Cutout: Who needs to record content with a green screen in this tech-based era? Enable this feature and remove unwanted objects and people with accuracy. Thus, users can make a clean video even when not recorded with a clean background.
Conclusion
Ultimately, the slow-motion filter is one of the options in Snapchat to make attractive snaps. In this guide, you’ve learned how to slow down videos on Snapchat. Besides, there were a few alternatives in the form of mobile apps. In search of a reliable platform, you can trust Filmora to make slow-motion videos easily.
Also read:
- Detailed Tutorial to Crop a Video in KineMaster for 2024
- Updated 2024 Approved How To Create 3D Text In Video
- 2024 Approved Add Emoji to Linkedin Post – 5 Tips You Would Like to Know
- Learn About Open Broadcaster Software and How to Perform Obs Color Correction. Also, Explore the Various Aspects of Color Correction Like Contrast, Brightness, Saturation, Among Others
- In 2024, The Complete Guide to Converting GIF to SVG With Ease
- Updated How to Convert Images Into Video - Kapwing Tutorial
- Know How to Make a Video Background Transparent? Export Transparent Background Video After Adding Effects. Steps to Remove White Background From Video for 2024
- New 2024 Approved Complete Tutorial to Make an Impressive Countdown Timer Video
- New Top 7 MP4 Video Editors on Mac Edit MP4 Videos Easily
- Updated Best Text Animations In After Effects
- New 2024 Approved How to Add Echo Effect to Video
- New Explore Our Comprehensive Guide to the 10 Best Cameras . Unlock the World of Advanced Technology Perfect for Capturing Slow-Motion Footage in Various Scenarios
- New In 2024, Spooky Halloween with the Best 15+ Halloween Countdown Video Clips
- In 2024, In This Article, You Will Learn How to Make an Engaging and Creative YouTube Intro to Give a Hook and Recap Information to the Audience by Using Wondershare Filmora
- Learn How to Blur Faces in Your Video on iPhone
- 2024 Approved In This Article, We Introduce You Our Top 5 Picks of Video to Ppt Converter
- Updated Best 8 AR Apps for Android and iOS | Help You See the World of AR
- Deep Learning of AI Video Recognition - Guide
- Updated In 2024, How to Denoise in Final Cut Pro – Reduce Video and Audio Noise
- 2024 Approved 11 Tips to Make Product Ad Videos
- New Lets Learn How to Convert a Normal Video Into a Film Shot in the 1920S with Wondershare Filmora
- Updated 2024 Approved Simple Tricks Make 3D GIF Production of Inspiration Pop up Constantly
- New 2024 Approved How to Convert Time-Lapse to Normal Video
- 2024 Approved Wondering How to Make a Perfect Love Video to Express Your Love for Your Special One and Share with the World? Here Are the Best Love Video Makers with Music
- New Easy Way to Apply Green Screen to YouTube Videos
- New Detailed Guide to Crop Videos in Sony Vegas Pro for 2024
- In 2024, How to Change Aspect Ratio of Video?
- Some of the Top Sites to Replace a Sky Background in Videos for 2024
- 2024 Approved Create Your Own Subscribe Channel Graphics
- 2024 Approved Lets Introduce the Top 5 Applications to Add a Song to a Video for Free with some Amazing Sound and Visual Effects
- In This Article, You Will Learn How to Record Creative Cinematic Videos Using a Smartphone and Edit the Video with Wondershare Filmora
- Updated How To Create The Best AI Thumbnail Using The Right Tools?
- New 2024 Approved 5 Tools to Create a Time-Lapse Video Online
- New Top-Rated Android Apps For Slowing Down Motion for 2024
- 2024 Approved Shoot Video with Virtual Green Screen
- Learn How Video Montages Were Used over Film History with Examples and the Types of Videos for Shorter Montages. Plus, Learn About the Best Software for It for 2024
- Updated Hard to Remove Black Background in After Effects? Heres the Best Way to Deal With It
- New 2024 Approved How to Edit Recorded Video
- Updated How to Merge Audio and Video in VLC Media Player
- Updated A Detailed Guid to Remove Background From a Video in Premier Pro for 2024
- In 2024, How to Use LUTs in Lumafusion & Free LUTs Resource
- New How to Make Custom Lower Thirds with Filmora
- In 2024, 7 Solutions to Cut Video on Mac without Using FFmpeg?
- Best 10 Mock Location Apps Worth Trying On Honor 80 Pro Straight Screen Edition | Dr.fone
- What Pokémon Evolve with A Dawn Stone For Realme GT 3? | Dr.fone
- How To Transfer WhatsApp From Apple iPhone 7 Plus to other iPhone 13 Pro Max devices? | Dr.fone
- How to Resolve Vivo G2 Screen Not Working | Dr.fone
- In 2024, Proven Ways in How To Hide Location on Life360 For Sony Xperia 10 V | Dr.fone
- In 2024, New Multiple Ways How To Remove iCloud Activation Lock On your iPhone 14 Plus
- In 2024, Ultimate Guide from iPhone 12 Pro iCloud Activation Lock Bypass
- Best Methods for Nokia 105 Classic Wont Turn On | Dr.fone
- In 2024, Best Pokemons for PVP Matches in Pokemon Go For Poco X6 Pro | Dr.fone
- Ways to trade pokemon go from far away On OnePlus Nord N30 5G? | Dr.fone
- In 2024, Unlocking the Power of Smart Lock A Beginners Guide for Vivo Y78t Users
- In 2024, The Best Android Unlock Software For Oppo Reno 9A Device Top 5 Picks to Remove Android Locks
- How to Mirror Your Samsung Galaxy XCover 7 Screen to PC with Chromecast | Dr.fone
- Solved Microsoft Excel 2023 File Error The document cannot be saved | Stellar
- How To Check if Your Motorola Moto G34 5G Is Unlocked
- In 2024, Detailed guide of ispoofer for pogo installation On Huawei P60 | Dr.fone
- In 2024, Forgot iPhone Passcode Again? Unlock iPhone 8 Without Passcode Now | Dr.fone
- How to Lock Apps on Vivo Y100i to Protect Your Individual Information
- Use Device Manager to identify malfunctioning your hardware drivers with Windows Device Manager on Windows 11/10
- In 2024, Apple ID Locked or Disabled From iPhone 13? 7 Mehtods You Cant-Miss
- In 2024, How to Mirror PC Screen to Oppo A78 5G Phones? | Dr.fone
- How to retrieve erased videos from X8b
- Hassle-Free Ways to Remove FRP Lock on Samsung Phones with/without a PC
- Updated How to Learn Cartoon Characters Sketch Quickly for 2024
- Title: In 2024, How Do You Create In-Camera Transitions in Your Videos? A Complete Guide for Beginners to Create These Transitions Using Their Camera at Home
- Author: Chloe
- Created at : 2024-06-18 14:30:53
- Updated at : 2024-06-19 14:30:53
- Link: https://ai-editing-video.techidaily.com/in-2024-how-do-you-create-in-camera-transitions-in-your-videos-a-complete-guide-for-beginners-to-create-these-transitions-using-their-camera-at-home/
- License: This work is licensed under CC BY-NC-SA 4.0.
