In 2024, How to Add a Green Screen to Zoom

How to Add a Green Screen to Zoom
If you are a regular user of Zoom app because you have to attend meetings and video conferences every now and then, you should know how to create a green screen for Zoom calls. There are going to be times when you would not want to show what is in your background because it might look distracting. Besides, changing the background from time to time breaks the monotony of your Zoom calls.
Zoom app allows you to change your background and set any available virtual background. However, the effect of virtual background may not be accurate and smooth unless you have a uniform background color. If you use green screen background for Zoom, you can replace it with any virtual background that will look very realistic to your audiences. We will illustrate how to create a green screen background for Zoom.
Part 1. How to add green screen to Zoom on computer?
Regular Zoom users prefer arranging and attending video conferences from their computers. Zoom desktop app makes it more convenient to attend Zoom conference with a wider screen and better visibility. Make sure you have a uniform green screen in your background before attending Zoom call so that you can replace it with any available virtual background on Zoom. Here are the steps on how to create a green screen for Zoom app on your computer.
Step1Open Zoom app and make sure you are logged into your account. Adjust the webcam so that only you and your green screen should be visible in the frame.
Step2Click on Settings (gear icon) located in the top-right corner.
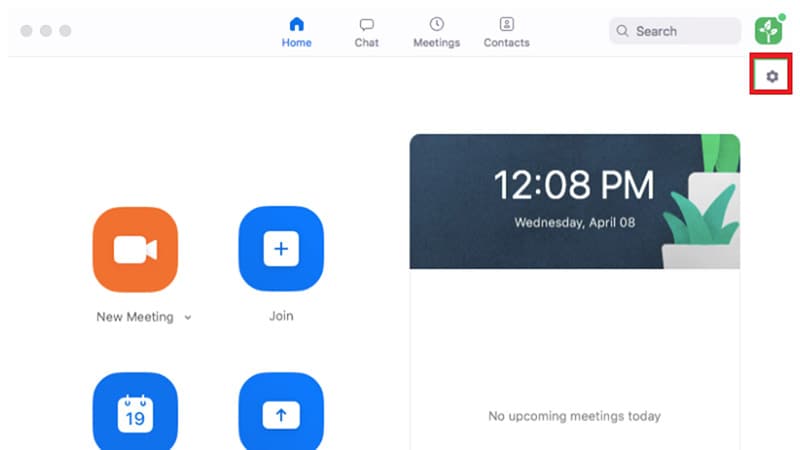
Step3Once Settings window opens, click on Virtual background option on the left panel.
Step4Turn on the option “I have a green screen” located at the bottom. Thereafter, choose a virtual background with which you want to replace the green screen in your video.
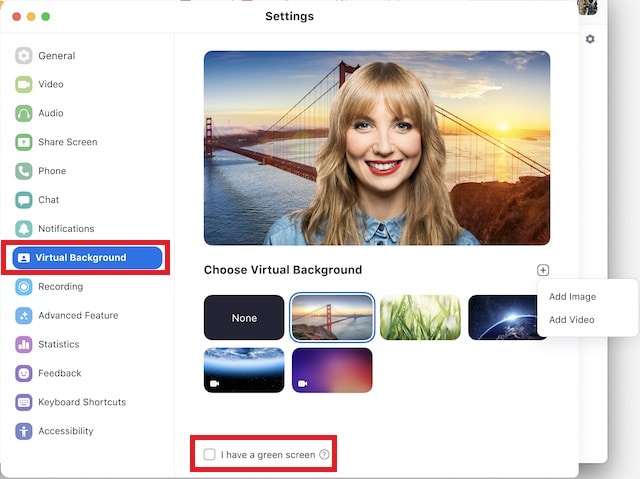
Step5Apart from the present virtual background, you can add photo or video to replace green screen background.
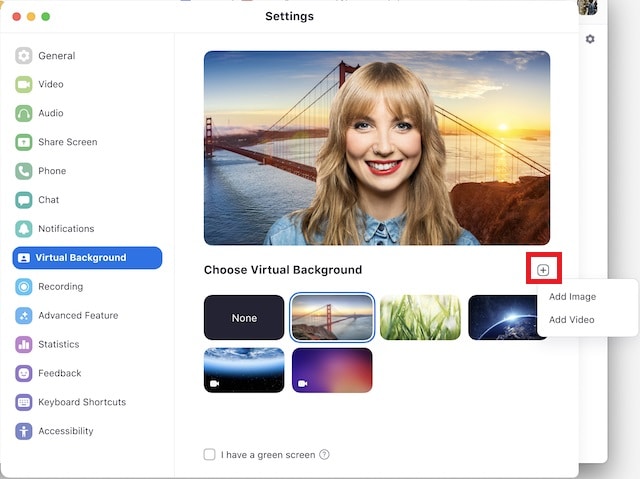
Step6Close Settings window and you will see that your green screen is replaced by your selected virtual background.
Part 2. How to add green screen to Zoom on mobile?
If you are an occasional Zoom user, you are more likely to use your smartphone to attend Zoom conferences. If you want green screen effect on your Zoom call, make sure you have a sizeable green screen in your background. This is because even if you happen to move your phone during the meeting, green screen background should come in the video frame all the time.
It is recommended to use a tripod to keep your smartphone fixed in one spot for better and consistent green screen effect. Here are the steps to answer your question how do you add a green screen to Zoom app on your mobile phone. The steps are the same for Android and iOS users.
Step1Open Zoom app on your smartphone and make sure you are signed into your account.
Step2Start a Zoom meeting and tap on More option located in the bottom-right corner.

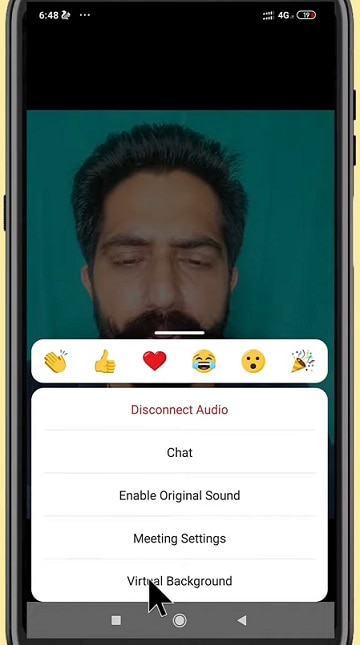
Step3Tap on Virtual background and you can select any preset virtual background.
Step4If you want to replace green screen with a customized background, tap on “+” icon and select any photo or video from your phone.
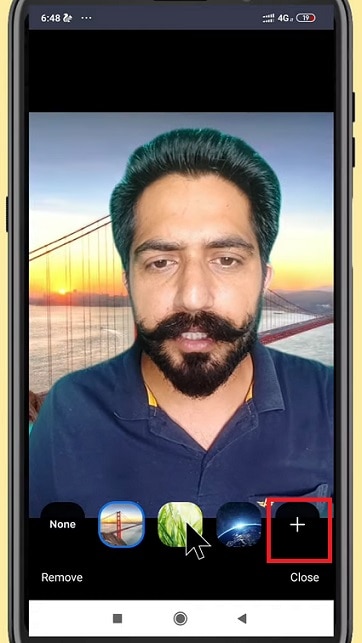
Step5Tap on Close option and the selected virtual background will be applied to your Zoom video.
Part 3. Tips to use green screen on Zoom video
Here are some important tips to use green screen on Zoom video for a better outcome.
Buy Large Green Screen - Since you are going to invest in buying green screen, you should buy a large green screen instead of buying two. Firstly, when you have one large green screen, you can set it up without any wrinkles or overlaps.
Secondly, a large green screen means greater surface area, and even when you slightly change the angle of your camera, your background will still have green screen instead of the exterior wall showing up and ruining virtual background effect.
Buy Green Screen Stand - Along with green screen, you should buy a sizeable green screen stand. A regular green screen stand contains two vertical supports at both ends and one horizontal support where you hand the green screen.
You can buy it according to the size of green screen you have bought. And you need to buy stand because you cannot fix the green screen on the wall properly. If you use any other means, there are going to be wrinkles and uneven virtual background effect.
Green Screen Quality - You can purchase any shade of green screen, but we recommend you opt for vibrant green color for a better outcome. Most importantly, the color should be even across the surface, and there should not be light and dark patches to dampen the virtual background effect and make it look unrealistic. That is why you should not compromise with quality.
Avoid Green Objects - You should not wear anything green. If your green screen has a lighter shade, you can wear deep color dresses and vice versa. Most importantly, you should not keep anything that is green while attending Zoom attending as it will disturb the green screen effect and it will look embarrassing. If you need to keep any green objects in your Zoom meetings, you should have blue screen instead of green screen.
Focus On Lighting - Lighting is extremely important when you want to use green screen. You should place the light so that it spreads evenly across the green screen. Otherwise, there are going to be light and dark patches, and the effect can get disturbed. Make sure you do not cast any shadow on the green screen by positioning the green screen accordingly.
Select A Proper Background - Last but not least, when you change your green screen to any virtual background photo or video, make sure you keep your audiences in mind. If you are attending a meeting, you should keep a professional-looking background. The background should not be distracting and match the theme of your meeting.
Conclusion
We have answered your question, “How do you add a green screen to zoom?” You can use green screen on your Zoom desktop app as well as smartphone app. This will help you to make your usual background cover up with green screen and replace green screen with any virtual background. Keep in mind all the tips we have provided you so that the green screen effect is perfect.
Free Download For Win 7 or later(64-bit)
Free Download For macOS 10.14 or later
Create Dynamic Text Animation in Filmora
Preparation
What you need to prepare:
- A computer (Windows or macOS)
- Your video materials.
- Filmora video editor
Step 1
Download and install the Filmora video editor . Just click the link, hit “Download”, and it will start automatically. Then, open a New Project.
Step 2
Click on the “Titles” tab and drag a Default Title to Track 2 on your Timeline.

Step 3
Double-click on it and change the font to anything you like. Then, enter the text in the box in front of you. While you’re here, you can also edit the text spacing and other features.

Step 4
Now, take a snapshot of the text. Then, double-click on the default title again and change the text to a single letter I. Once again, take a snapshot of this text and then delete the default title from the timeline.

You should have two snapshots in My Media now. One of them should say “FILMORA” and one with the letter “I”.

Step 5
Drag the “FILMORA” snapshot to track 2 and the “I” snapshot to track 3. Then, click on the “Zoom” button and set this to 50%.

Step 6
Double-click on the “I” snapshot from the timeline. Then, input these settings when the window pops up. After that, drag the Playhead 1 second and 15 frames further down the timeline. Then, double-click on the “I” snapshot again, and change the Y-axis value to 0.

Step 7
Copy the “I” snapshot track from the timeline. Then, paste it on Track 4. Next, double-click on this one and change the X-axis position to whichever letter you want. In this case, it’s the letter “M”. As for the Y-Axis, you can change it any way that suits you.

Step 8
Copy this process as often and with as many letters as you want. Then, when you’re done, export the title animation to your computer.

Step 9
Open a new project in Filmora and import the title animation we just created.
Step 10
Drag the custom title animation to Track 2 and drag any video background you have on Track 1.

Step 11
Double-click on the title track, go to the Video tab, and select “Lighten” from the Blending Mode tab.

Step 12
Shift the title clip from Track 2 to Track 3. Then, go to the Effects tab and drag the Dark Film effect to Track 1 on the timeline.

Step 13
Search for the “Blur” effect in the Effects tab. Then, drag “Square Blur” to Track 2 in the timeline.

Step 14
Select the “Cinema” effect from the Effects tab and drag it to Track 4. Double-click on it and change the border height to 0.10.

Step 15
Now, all left is to render the clip and review the final result.

Summary
What you’ve learned:
- Create a professional-level animated text in Filmora in 15 simple steps
- How to add a video background and cinematic effects to your animated title
- Adjust the settings of clips in the Filmora timeline
What you need to prepare:
- A computer (Windows or macOS)
- Your video materials.
- Filmora video editor
Step 1
Download and install the Filmora video editor . Just click the link, hit “Download”, and it will start automatically. Then, open a New Project.
Step 2
Click on the “Titles” tab and drag a Default Title to Track 2 on your Timeline.

Step 3
Double-click on it and change the font to anything you like. Then, enter the text in the box in front of you. While you’re here, you can also edit the text spacing and other features.

Step 4
Now, take a snapshot of the text. Then, double-click on the default title again and change the text to a single letter I. Once again, take a snapshot of this text and then delete the default title from the timeline.

You should have two snapshots in My Media now. One of them should say “FILMORA” and one with the letter “I”.

Step 5
Drag the “FILMORA” snapshot to track 2 and the “I” snapshot to track 3. Then, click on the “Zoom” button and set this to 50%.

Step 6
Double-click on the “I” snapshot from the timeline. Then, input these settings when the window pops up. After that, drag the Playhead 1 second and 15 frames further down the timeline. Then, double-click on the “I” snapshot again, and change the Y-axis value to 0.

Step 7
Copy the “I” snapshot track from the timeline. Then, paste it on Track 4. Next, double-click on this one and change the X-axis position to whichever letter you want. In this case, it’s the letter “M”. As for the Y-Axis, you can change it any way that suits you.

Step 8
Copy this process as often and with as many letters as you want. Then, when you’re done, export the title animation to your computer.

Step 9
Open a new project in Filmora and import the title animation we just created.
Step 10
Drag the custom title animation to Track 2 and drag any video background you have on Track 1.

Step 11
Double-click on the title track, go to the Video tab, and select “Lighten” from the Blending Mode tab.

Step 12
Shift the title clip from Track 2 to Track 3. Then, go to the Effects tab and drag the Dark Film effect to Track 1 on the timeline.

Step 13
Search for the “Blur” effect in the Effects tab. Then, drag “Square Blur” to Track 2 in the timeline.

Step 14
Select the “Cinema” effect from the Effects tab and drag it to Track 4. Double-click on it and change the border height to 0.10.

Step 15
Now, all left is to render the clip and review the final result.

Summary
What you’ve learned:
- Create a professional-level animated text in Filmora in 15 simple steps
- How to add a video background and cinematic effects to your animated title
- Adjust the settings of clips in the Filmora timeline
What you need to prepare:
- A computer (Windows or macOS)
- Your video materials.
- Filmora video editor
Step 1
Download and install the Filmora video editor . Just click the link, hit “Download”, and it will start automatically. Then, open a New Project.
Step 2
Click on the “Titles” tab and drag a Default Title to Track 2 on your Timeline.

Step 3
Double-click on it and change the font to anything you like. Then, enter the text in the box in front of you. While you’re here, you can also edit the text spacing and other features.

Step 4
Now, take a snapshot of the text. Then, double-click on the default title again and change the text to a single letter I. Once again, take a snapshot of this text and then delete the default title from the timeline.

You should have two snapshots in My Media now. One of them should say “FILMORA” and one with the letter “I”.

Step 5
Drag the “FILMORA” snapshot to track 2 and the “I” snapshot to track 3. Then, click on the “Zoom” button and set this to 50%.

Step 6
Double-click on the “I” snapshot from the timeline. Then, input these settings when the window pops up. After that, drag the Playhead 1 second and 15 frames further down the timeline. Then, double-click on the “I” snapshot again, and change the Y-axis value to 0.

Step 7
Copy the “I” snapshot track from the timeline. Then, paste it on Track 4. Next, double-click on this one and change the X-axis position to whichever letter you want. In this case, it’s the letter “M”. As for the Y-Axis, you can change it any way that suits you.

Step 8
Copy this process as often and with as many letters as you want. Then, when you’re done, export the title animation to your computer.

Step 9
Open a new project in Filmora and import the title animation we just created.
Step 10
Drag the custom title animation to Track 2 and drag any video background you have on Track 1.

Step 11
Double-click on the title track, go to the Video tab, and select “Lighten” from the Blending Mode tab.

Step 12
Shift the title clip from Track 2 to Track 3. Then, go to the Effects tab and drag the Dark Film effect to Track 1 on the timeline.

Step 13
Search for the “Blur” effect in the Effects tab. Then, drag “Square Blur” to Track 2 in the timeline.

Step 14
Select the “Cinema” effect from the Effects tab and drag it to Track 4. Double-click on it and change the border height to 0.10.

Step 15
Now, all left is to render the clip and review the final result.

Summary
What you’ve learned:
- Create a professional-level animated text in Filmora in 15 simple steps
- How to add a video background and cinematic effects to your animated title
- Adjust the settings of clips in the Filmora timeline
What you need to prepare:
- A computer (Windows or macOS)
- Your video materials.
- Filmora video editor
Step 1
Download and install the Filmora video editor . Just click the link, hit “Download”, and it will start automatically. Then, open a New Project.
Step 2
Click on the “Titles” tab and drag a Default Title to Track 2 on your Timeline.

Step 3
Double-click on it and change the font to anything you like. Then, enter the text in the box in front of you. While you’re here, you can also edit the text spacing and other features.

Step 4
Now, take a snapshot of the text. Then, double-click on the default title again and change the text to a single letter I. Once again, take a snapshot of this text and then delete the default title from the timeline.

You should have two snapshots in My Media now. One of them should say “FILMORA” and one with the letter “I”.

Step 5
Drag the “FILMORA” snapshot to track 2 and the “I” snapshot to track 3. Then, click on the “Zoom” button and set this to 50%.

Step 6
Double-click on the “I” snapshot from the timeline. Then, input these settings when the window pops up. After that, drag the Playhead 1 second and 15 frames further down the timeline. Then, double-click on the “I” snapshot again, and change the Y-axis value to 0.

Step 7
Copy the “I” snapshot track from the timeline. Then, paste it on Track 4. Next, double-click on this one and change the X-axis position to whichever letter you want. In this case, it’s the letter “M”. As for the Y-Axis, you can change it any way that suits you.

Step 8
Copy this process as often and with as many letters as you want. Then, when you’re done, export the title animation to your computer.

Step 9
Open a new project in Filmora and import the title animation we just created.
Step 10
Drag the custom title animation to Track 2 and drag any video background you have on Track 1.

Step 11
Double-click on the title track, go to the Video tab, and select “Lighten” from the Blending Mode tab.

Step 12
Shift the title clip from Track 2 to Track 3. Then, go to the Effects tab and drag the Dark Film effect to Track 1 on the timeline.

Step 13
Search for the “Blur” effect in the Effects tab. Then, drag “Square Blur” to Track 2 in the timeline.

Step 14
Select the “Cinema” effect from the Effects tab and drag it to Track 4. Double-click on it and change the border height to 0.10.

Step 15
Now, all left is to render the clip and review the final result.

Summary
What you’ve learned:
- Create a professional-level animated text in Filmora in 15 simple steps
- How to add a video background and cinematic effects to your animated title
- Adjust the settings of clips in the Filmora timeline
SRT Not Displaying: How to Open and Use SRT File in VLC?
The VLC media player is one major choice among the various types available, but it has some flaws. Many users search for how to open an SRT file in VLC, as the player shows certain issues related to SRT access.
For example, one may experience errors while trying to download specific subtitle formats, editing them with the videos, and then syncing SRT files with the video playback.
Luckily, there are alternative solutions you can use to view a VLC SRT file- here; we discuss all.
- Possible Causes of SRT Subtitles Not Working Properly in VLC
- Ultimate Tutorial: How to Open SRT Files in VLC [100% Working]
- Method 1: Open SRT Files in VLC on Computers
- Method 2: Open SRT Files in VLC on Android
- Method 3: Open and Add Subtitle to VLC on iPhone (video tutorial)
Part 1: VLC SRT Subtitles Not Working? Fix It with Wondershare Filmora
Yes, VLC does show some issues with the SRT file display, either due to compatibility errors or performance issues. In comparison, Wondershare Filmora 11 is an efficient software for viewing and editing media files and related components. That includes SRT files.
Wondershare Filmora
Filmora is one of the best video editing software options for desktop users, suitable for both Mac and Windows operating systems. It supports different formats related to videos and audios and allows users to transcribe these files with STT support.
Not only can you add subtitles or create them through speech-to-text conversion, but you can also edit separate SRT files. It is simple to embed the SRT file into video files with this software and make some major formatting changes, like font color, size, and style.
Filmora vs. VLC- which is better?
In the context of adding and altering any subtitle file for VLC, Filmora does allow this functionality and even adds to that to improve the user experience. Plus, the software is supported on both Mac and Windows devices, with a high-quality performance guarantee during usage.
VLC player does have multi-OS support, but it is not accessible in some regions. The latter does not support all embedded text formats for video files, like the SRT file. So, accessing and editing it can feel complex for some users. That is not an issue with Filmora, which has a comparatively simple user interface on both versions.
For an easier understanding, here is a table comparing the specifications of the two software types.
| Features | Wondershare Filmora | VLC Player |
|---|---|---|
| Subtitles | SRT, SSA, ASS | SRT, SSF |
| TTS/STT | The software supports both STT (speech-to-text) and TTS (text-to-speech) functions. | It does not support TTS/STT. |
| Video/Audio Support | MP4, FLV, AVI, MOV, MKV, 3GP, WMV, WEBM, VOB, M4A, MP3, WMA, etc.4K supported. | MP4, MKV, WMV, MOV, AVI, HDR, etc.4K supported. |
| Effects | LUTs customization, FX plugin support | Limited. |
| Cross-platform Support | Windows, Mac, iPad | Windows, Mac, Linux, iOS, Android |
Part 2: Possible Causes of SRT Subtitles Not Working Properly in VLC
While users can add subtitles to VLC since the player supports SRT extension files, some issues can cause them not to appear. Here are some potential causes of the error.
SRT files corrupted or empty
In case the SRT file you are trying to access is corrupted or does not contain any content, that will not open in the VLC media player.
The subtitles setting in VLC Media Player is not turned on
Sometimes, the SRT files are password protected or only work on video players that allow permission for it to play. So, if you have not enabled SRT access in the settings of the app, the SRT-formatted text will not appear.
Doesn’t update VLC to the latest version
In cases when the VLC Media Player itself is corrupted or outdated, it cannot allow access to some subtitle formats. You must upgrade it to the latest official version to allow video and SRT file support.
Wrong encoding instead of UTF-8
VLC player app only allows the SRT files that have UTF-8 encoding to play on the platform. Users can view the SRT files on videos if they are using the right encoded text, so make sure that you do not have the wrong encoded file.
Other unknown bugs
Other issues can cause the defect to the VLC player and, therefore, cannot open the VLC SRT file. These include certain unknown bugs and malware- make sure to check your system to find the errors.
Part 3: Ultimate Tutorial: How to Open SRT Files in VLC [100% Working]
If your system is not affected by any or all of these potential issues, the VLC player allows users to access SRT files easily. The software is available on different devices, so let’s discuss the steps on how to open the SRT file in VLC for each type.
Method 1: Open SRT Files in VLC on Computers
VLC is accessible on Windows and Mac computers, including some Linux devices. The process of accessing and opening the SRT files in the media player is mentioned here.
How to open SRT files in VLC on Windows/Mac?
Step1 Download the VLC media player software on your computer from the official site. Complete the installation process following all on-screen instructions.
Step2 Launch VLC on your device. If you have not downloaded the SRT file for your video, do it separately.
Step3 On your device, go to the main file manager (Windows Explorer for Windows users or Finder for macOS users). Organize the video file that you will add the SRT file into and the relevant SRT file into one folder.
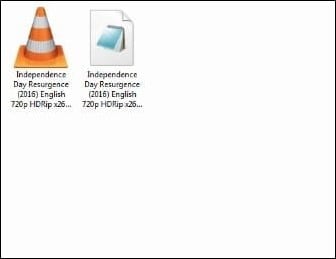
Step4 Drag and drop both video and SRT files into the VLC media player you launched on your computer.
Or, double-click on the video file and choose “Open with VLC media player” from the options.
You can directly click on the File tab on your VLC player software and choose Open File.
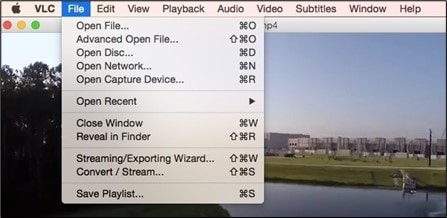
Step5 After the video begins playing on-screen, open the main menu and choose Subtitles > Add Subtitles.
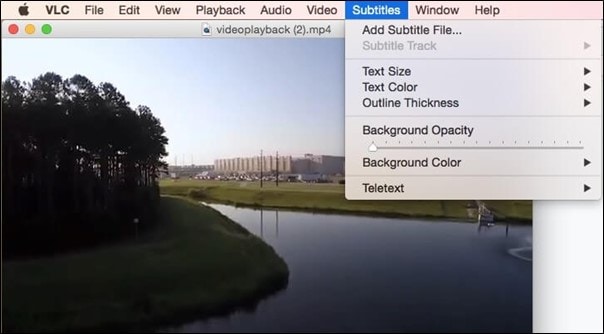
Step6 From your folder, choose the SRT file to upload.
Method 2: Open SRT Files in VLC on Android
It is possible to use the VLC app version on Android smartphones and tablets to view video and SRT files. The application is available for Android users in two versions- this depends on the type of processor running on the device. The compatible processors are Intel x86 and AMRv7 and higher.
How to open SRT files in VLC on Android?
Step1 Download the VLC for Android app on your device.
Step2 Click on the “Pick a File” button and add the video from your storage.
Step3 Tap on the screen in different sections to control specific functions.

Step4 Click on the button at the bottom left and choose the Subtitles option to expand.
Step5 Choose the “Select Subtitle File” option.
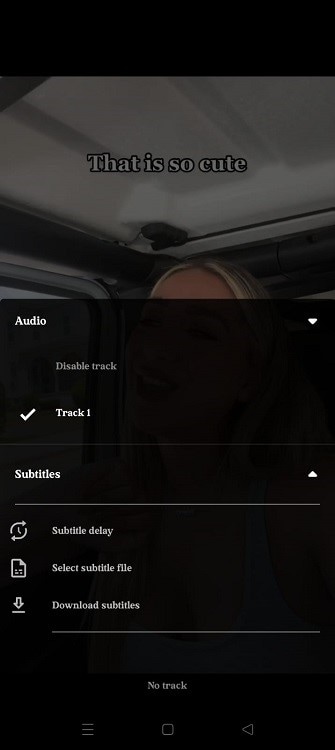
Step6 Choose the folder where the SRT file is saved and open it.
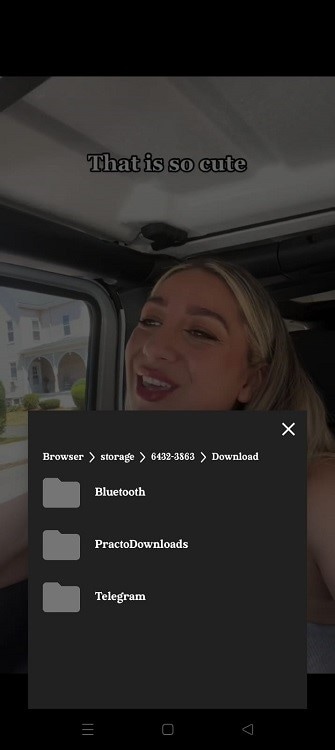
Method 3: Open and Add Subtitle to VLC on iPhone (video tutorial)
Like with Android, a VLC app is available for iPhone devices in different iOS versions. But this version’s process of adding and viewing subtitles is slightly complex.
For a better understanding of how that works, here is a video tutorial that will help you:
https://www.youtube.com/watch?v=iPcwSrvXwN4
Part 4: The Best Alternative to Open and Edit SRT Subtitles for Videos
It is possible to open the subtitle files on VLC, but the editing quality is not the best. Plus, as mentioned, some errors with displaying SRT files can occur. Alternatively, you would have an easier experience opening and editing SRT files for videos with Filmora.
The video editing software allows users to create SRT files into videos directly, embed the file, and even edit its style. Moreover, you can change the alignment of the SRT file with the video playback and even adjust the accompanying voice style. It is accessible on both Mac and Windows OS, is extremely simple to use, and has a wide host of effects for further video editing.
How to open and edit the SRT file with Filmora in videos?
Free Download For Win 7 or later(64-bit)
Free Download For macOS 10.14 or later
Step1 Download, install and launch Filmora software on the device.
Step2 Click on New Project > import the video file from the device and then drag it to the editor timeline.
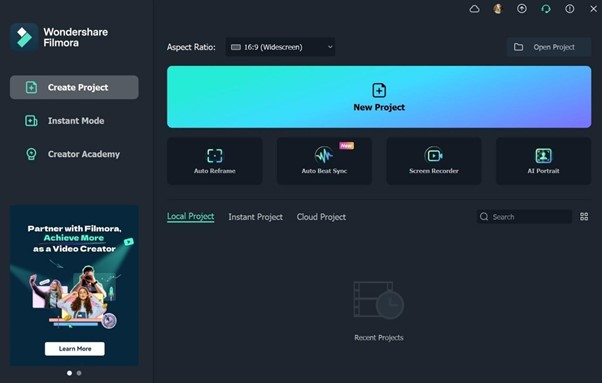
Step3 Press the Media tab to import your saved SRT file.
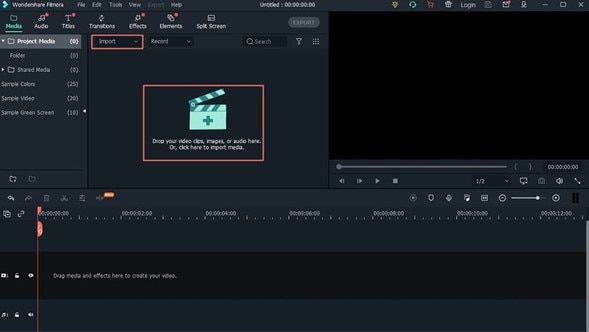
Step4 You can double-click on the added SRT file and clip it.
Alternatively, right-click your cursor on the editor timeline and choose the Advanced Edit option.
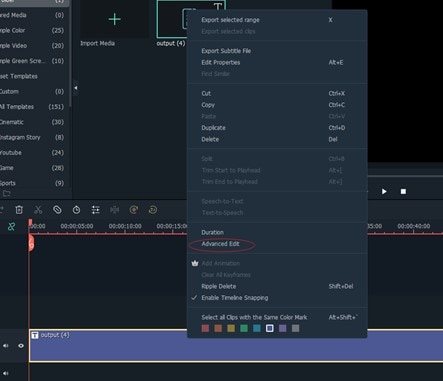
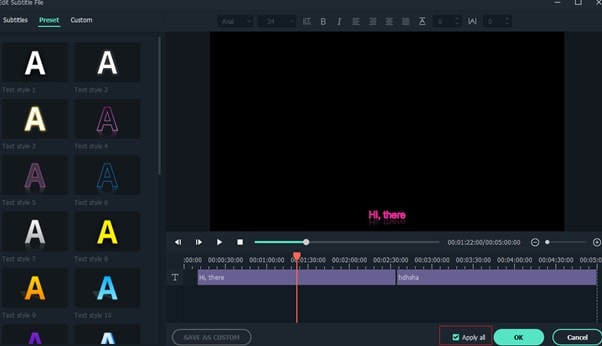
Step5 Make changes to the subtitle as necessary. Change the style, time code, merge/remove/add the SRT file strips, and more. Tap the OK icon to complete.
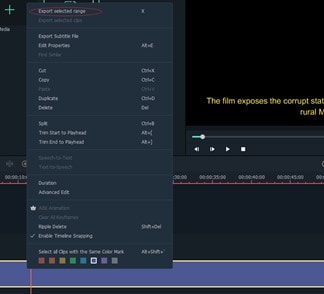
Step6 Right-click on the edited SRT in the Filmora editor timeline and choose the “Export Subtitle File” button.
Final Words
It is possible to open SRT files in the VLC player with specific steps on different devices. Several conditions can cause the error of SRT not displaying to occur, like corrupt SRT file or incompatible encoding support. With an alternative like Filmora, you will have a better experience accessing and editing the SRT files for videos. So, give it a try.
Free Download For Win 7 or later(64-bit)
Free Download For macOS 10.14 or later
- Method 1: Open SRT Files in VLC on Computers
- Method 2: Open SRT Files in VLC on Android
- Method 3: Open and Add Subtitle to VLC on iPhone (video tutorial)
- The Best Alternative to Open and Edit SRT Subtitles for Videos
Part 1: VLC SRT Subtitles Not Working? Fix It with Wondershare Filmora
Yes, VLC does show some issues with the SRT file display, either due to compatibility errors or performance issues. In comparison, Wondershare Filmora 11 is an efficient software for viewing and editing media files and related components. That includes SRT files.
Wondershare Filmora
Filmora is one of the best video editing software options for desktop users, suitable for both Mac and Windows operating systems. It supports different formats related to videos and audios and allows users to transcribe these files with STT support.
Not only can you add subtitles or create them through speech-to-text conversion, but you can also edit separate SRT files. It is simple to embed the SRT file into video files with this software and make some major formatting changes, like font color, size, and style.
Filmora vs. VLC- which is better?
In the context of adding and altering any subtitle file for VLC, Filmora does allow this functionality and even adds to that to improve the user experience. Plus, the software is supported on both Mac and Windows devices, with a high-quality performance guarantee during usage.
VLC player does have multi-OS support, but it is not accessible in some regions. The latter does not support all embedded text formats for video files, like the SRT file. So, accessing and editing it can feel complex for some users. That is not an issue with Filmora, which has a comparatively simple user interface on both versions.
For an easier understanding, here is a table comparing the specifications of the two software types.
| Features | Wondershare Filmora | VLC Player |
|---|---|---|
| Subtitles | SRT, SSA, ASS | SRT, SSF |
| TTS/STT | The software supports both STT (speech-to-text) and TTS (text-to-speech) functions. | It does not support TTS/STT. |
| Video/Audio Support | MP4, FLV, AVI, MOV, MKV, 3GP, WMV, WEBM, VOB, M4A, MP3, WMA, etc.4K supported. | MP4, MKV, WMV, MOV, AVI, HDR, etc.4K supported. |
| Effects | LUTs customization, FX plugin support | Limited. |
| Cross-platform Support | Windows, Mac, iPad | Windows, Mac, Linux, iOS, Android |
Part 2: Possible Causes of SRT Subtitles Not Working Properly in VLC
While users can add subtitles to VLC since the player supports SRT extension files, some issues can cause them not to appear. Here are some potential causes of the error.
SRT files corrupted or empty
In case the SRT file you are trying to access is corrupted or does not contain any content, that will not open in the VLC media player.
The subtitles setting in VLC Media Player is not turned on
Sometimes, the SRT files are password protected or only work on video players that allow permission for it to play. So, if you have not enabled SRT access in the settings of the app, the SRT-formatted text will not appear.
Doesn’t update VLC to the latest version
In cases when the VLC Media Player itself is corrupted or outdated, it cannot allow access to some subtitle formats. You must upgrade it to the latest official version to allow video and SRT file support.
Wrong encoding instead of UTF-8
VLC player app only allows the SRT files that have UTF-8 encoding to play on the platform. Users can view the SRT files on videos if they are using the right encoded text, so make sure that you do not have the wrong encoded file.
Other unknown bugs
Other issues can cause the defect to the VLC player and, therefore, cannot open the VLC SRT file. These include certain unknown bugs and malware- make sure to check your system to find the errors.
Part 3: Ultimate Tutorial: How to Open SRT Files in VLC [100% Working]
If your system is not affected by any or all of these potential issues, the VLC player allows users to access SRT files easily. The software is available on different devices, so let’s discuss the steps on how to open the SRT file in VLC for each type.
Method 1: Open SRT Files in VLC on Computers
VLC is accessible on Windows and Mac computers, including some Linux devices. The process of accessing and opening the SRT files in the media player is mentioned here.
How to open SRT files in VLC on Windows/Mac?
Step1 Download the VLC media player software on your computer from the official site. Complete the installation process following all on-screen instructions.
Step2 Launch VLC on your device. If you have not downloaded the SRT file for your video, do it separately.
Step3 On your device, go to the main file manager (Windows Explorer for Windows users or Finder for macOS users). Organize the video file that you will add the SRT file into and the relevant SRT file into one folder.

Step4 Drag and drop both video and SRT files into the VLC media player you launched on your computer.
Or, double-click on the video file and choose “Open with VLC media player” from the options.
You can directly click on the File tab on your VLC player software and choose Open File.

Step5 After the video begins playing on-screen, open the main menu and choose Subtitles > Add Subtitles.

Step6 From your folder, choose the SRT file to upload.
Method 2: Open SRT Files in VLC on Android
It is possible to use the VLC app version on Android smartphones and tablets to view video and SRT files. The application is available for Android users in two versions- this depends on the type of processor running on the device. The compatible processors are Intel x86 and AMRv7 and higher.
How to open SRT files in VLC on Android?
Step1 Download the VLC for Android app on your device.
Step2 Click on the “Pick a File” button and add the video from your storage.
Step3 Tap on the screen in different sections to control specific functions.

Step4 Click on the button at the bottom left and choose the Subtitles option to expand.
Step5 Choose the “Select Subtitle File” option.

Step6 Choose the folder where the SRT file is saved and open it.

Method 3: Open and Add Subtitle to VLC on iPhone (video tutorial)
Like with Android, a VLC app is available for iPhone devices in different iOS versions. But this version’s process of adding and viewing subtitles is slightly complex.
For a better understanding of how that works, here is a video tutorial that will help you:
https://www.youtube.com/watch?v=iPcwSrvXwN4
Part 4: The Best Alternative to Open and Edit SRT Subtitles for Videos
It is possible to open the subtitle files on VLC, but the editing quality is not the best. Plus, as mentioned, some errors with displaying SRT files can occur. Alternatively, you would have an easier experience opening and editing SRT files for videos with Filmora.
The video editing software allows users to create SRT files into videos directly, embed the file, and even edit its style. Moreover, you can change the alignment of the SRT file with the video playback and even adjust the accompanying voice style. It is accessible on both Mac and Windows OS, is extremely simple to use, and has a wide host of effects for further video editing.
How to open and edit the SRT file with Filmora in videos?
Free Download For Win 7 or later(64-bit)
Free Download For macOS 10.14 or later
Step1 Download, install and launch Filmora software on the device.
Step2 Click on New Project > import the video file from the device and then drag it to the editor timeline.

Step3 Press the Media tab to import your saved SRT file.

Step4 You can double-click on the added SRT file and clip it.
Alternatively, right-click your cursor on the editor timeline and choose the Advanced Edit option.

Step5 Make changes to the subtitle as necessary. Change the style, time code, merge/remove/add the SRT file strips, and more. Tap the OK icon to complete.

Step6 Right-click on the edited SRT in the Filmora editor timeline and choose the “Export Subtitle File” button.

Final Words
It is possible to open SRT files in the VLC player with specific steps on different devices. Several conditions can cause the error of SRT not displaying to occur, like corrupt SRT file or incompatible encoding support. With an alternative like Filmora, you will have a better experience accessing and editing the SRT files for videos. So, give it a try.
Free Download For Win 7 or later(64-bit)
Free Download For macOS 10.14 or later
Top 6 Drones for Videography
Drones are all the rage these days and for good reason. They’re a lot of fun to fly, and they can be a great addition to your toolkit for capturing aerial footage. But with so many different drones on the market, it can be tough to know which one is right for you.

That’s why we’ve put together this guide to the best drones on the market for every budget. Whether you’re looking for an entry-level drone that won’t break the bank or a top-of-the-line model that will let you capture stunning 4K footage, we’ve got you covered. So read on to find the perfect drone for you!
Buyers Guide: The Best 6 Drones on the Market for Every Budget
#1. DJI Air 2S: Among the best options for most people.
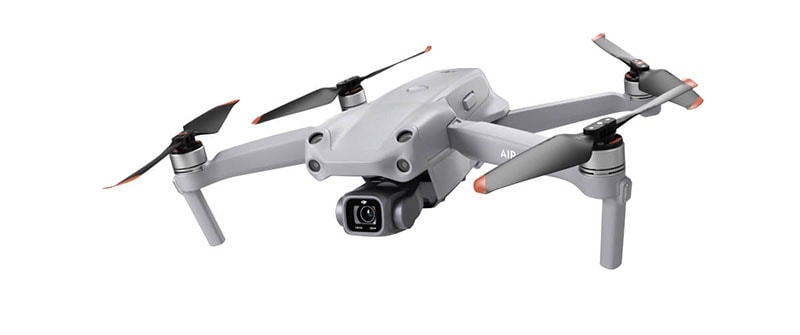
The DJI’s new Air 2S is our top pick. It finds the ideal compromise in terms of size, weight, picture quality, intelligent features, and price. The camera on the Air 2S isn’t as nice as the Mavic 2 Pro’s, which has a variable aperture for more flexible shooting in sunny conditions and includes neutral density filters to help make up for it.
1.3 pounds might not seem like much, but the Air 2S is a force to be reckoned with- it’s durable enough to fly in light winds and can stay up for 30 minutes! Plus, the new collision-avoidance system will keep you safe even when there are trees around, and the 1 inch 20 mp sensor captures amazing 5K video or still photos.
#2. Skydio 2+ Drone: If you want your flights to be handled automatically.

The Skydio 2+ has the best collision-avoidance system, far outperforming any other drone on the market. If you want a drone that can follow your mountain bike off-road or quickly maneuver through obstacles without your help, this is it. Its 27-minute flight time and 6-mile range make it restrictions for some people, but plenty for most. The 1/2.3-inch sensor on this camera is good enough for 4K footage at 60 frames per second, but it’s not as great as the 1-inch sensor in the Air 2S and Evo Lite+. D-log support is also absent, so video professionals might want to keep that in mind.
However, if you can live without D-log and don’t mind the slower sensor, this drone is capable of flying in places where other drones can’t. For certain applications, a smaller sensor may be preferable to having a great one.
#3. DJI Mini 3 Pro: The Best Ultralight Drone for Most People
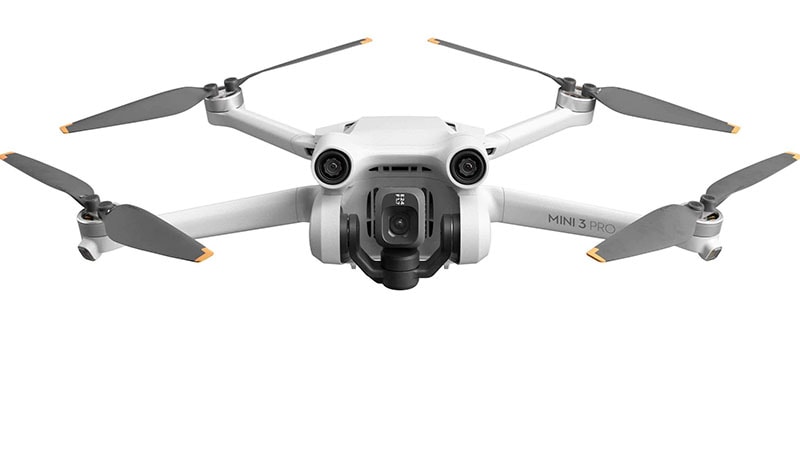
The DJI Mavic Mini 3 Pro is the third version of the name, and it has been greatly improved from its original state. It features a 4K/60p footage with 1/1.3” sensor as well capture 12.1 megapixel RAW photographs. The Mini 3 Pro also has a 48-megapixel mode that improves image quality, but loses some camera functions. A faster F/1.7 lens is now on the front of the drone, and it also incorporates three-direction obstacle avoidance and a gimbal that allows for vertical shooting–all while weighing in at less than 250 grams. This number is important because, in many areas, a drone under 250 grams does not need to be registered (however, you should always check your local laws).
I was ecstatic about the performance of the Mini 3 Pro. It can fly in an impressive 45 minutes when using its extended battery–which is a dramatic improvement from the 32 minutes I got with the standard battery. Not to mention, it’s delightful to fly because it maneuvers so effortlessly in even high winds. The only issue I have with it is that its price has risen since DJI released Mini 2; however, they still sell both models.
#4. DJI Mini 2: Most Affordable Drone
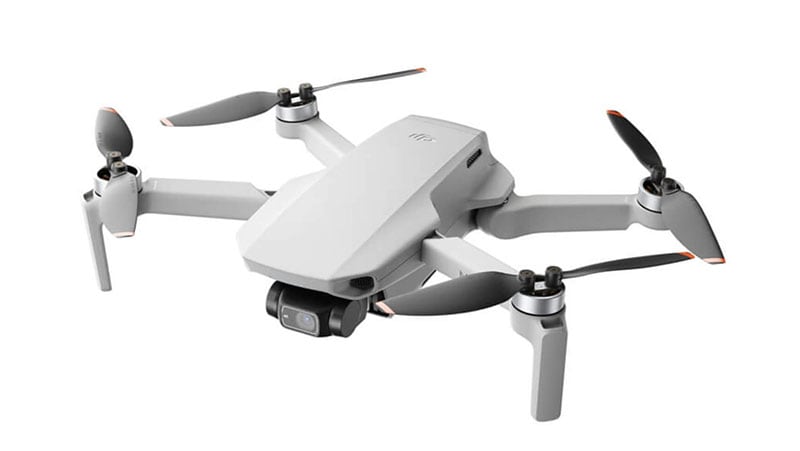
The Mavic Air 2S has advanced collision-avoidance tech, but at a high cost. Even the new Mini 3 Pro sells for $750. If budget is more important to you than features, DJI’s Mini 2 would be your best bet. It flies compared to its larger siblings, though wind gusts that wouldn’t bother bigger drones like the Mavic 2 Pro will ground the Mini. The lack of collision-avoidance sensors makes it better suited for experienced pilots.
Even with those minor drawbacks, the Mini 2 is still a great beginner drone. It’s enjoyable to fly, captures 4K video footage, and can be stored in smaller spaces than many smartphones. And that last part is essential because the best drones are ones that you’ll actually bring with you instead of leaving at home. The Mini 2 only weighs 249 grams so it’s easy to transport, and you don’t even need to register it with the Federal Aviation Administration
#5. DJI Mavic 3: The Most Luxurious Drone
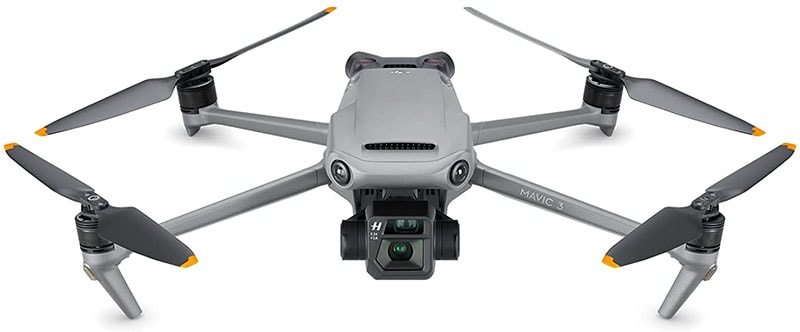
The DJI Mavic 3 Pro is a cut above the rest. It’s the finest drone on the market right now. The new 20-megapixel Four Thirds sensor produces outstanding image and video quality, and 45 miles per hour mobility allows you to follow and track objects without missing a beat.
If you’re willing to spend the money, this drone is definitely worth it. It has a 45-minute flying time and can avoid obstacles in all directions. The Cine model also supports Pro Res video and comes with 1TB of storage space- perfect for filmmakers or anyone who wants to capture high-quality footage.
#6. Autel Evo Lite+: Great for Long Flights
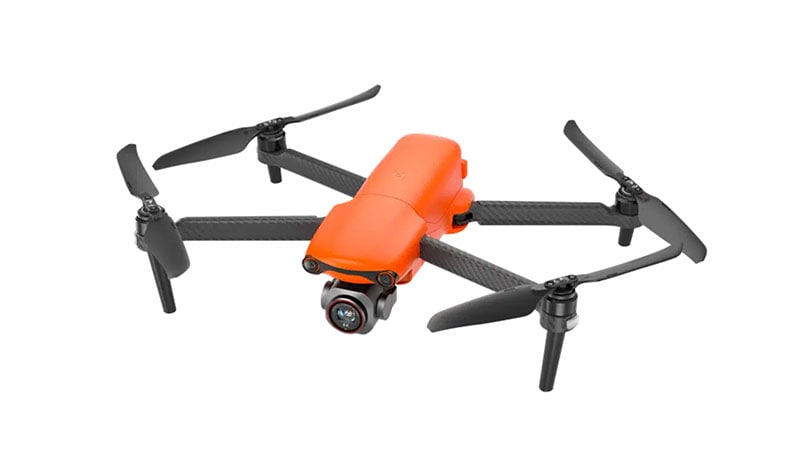
The Evo Lite+ is your best bet if you want to stay airborne as long as possible. Its massive battery provides a 40-minute flight duration, and the additional weight makes it more stable in the wind (though not by much). The Evo Lite+ features a fantastic camera with variable aperture controls, a 1-inch sensor, and night mode for better low-light photos.
The control does resemble an Xbox controller, which is nice, but it lacks the storage capacity for detachable joysticks that you get with DJI drones. It’s still perfectly functional, and Autel’s software will be familiar to anyone who has used a DJI drone.
Some Final Suggestions
Drones can be used for a variety of purposes, from shooting landscapes and cityscapes to capturing footage of sporting events or outdoor activities. They can also be used for wedding videos, real estate videos, and other types of commercial work. And if you’re just looking for some fun footage to add to your home movies, drones are the perfect way to do it.
Of course, not all drones are created equal. If you’re looking for a drone that can shoot high-quality video on a budget, there are a few things you need to keep in mind.
- First, make sure the drone has a high-resolution camera.
- Second, make sure the drone has a long battery life so that you can get plenty of shots without having to recharge.
- Third, make sure the drone is lightweight and easy to control so that you can get the perfect shot every time.
So, what’s the best drone for you? It depends on your budget and your needs. If you want a high-quality camera that can shoot in low light, the DJI Mavic 3 Pro is a perfect choice. If you’re looking for a long-flight drone, the Autel Evo Lite+ is a great option. And if you’re just starting out, the DJI Mini 2 is an affordable and easy-to-use drone that anyone can fly. With that said, happy flying!
Free Download For Win 7 or later(64-bit)
Free Download For macOS 10.14 or later
Free Download For macOS 10.14 or later
Also read:
- 2024 Approved Embrace Creativity in Your Media by Replacing Backgrounds. Learn to Replace the Sky in Lightroom Through the Steps and Details Discussed in This Article
- Bite-Sized Broadcasting Maintaining Quality in Quick Posts for 2024
- Complete Evaluation The DJI Inspire 1 Unveiled
- Download & Install: High-Speed Intel USB 3.0 Drivers for Seamless Windows 11 Integration
- How to Correct Lens Distortion With Filmora
- How to Make Vintage Film Effect 1950S for 2024
- In 2024, What Does Jailbreaking iPhone 12 Pro Max i Do? Get Answers here
- MacBook Air Now Available at an Incredible $280 Deal - Find Out More on ZDNet!
- New How to Make Eye Zoom Transition Effect with Filmora for 2024
- New In 2024, How to Convert Images Into Video - Kapwing Tutorial
- New Something About Skin Care Vlog Ideas
- Professional Zoom Settings Guide for Google Meet
- The Ultimate Walkthrough for Activating Nintendo ID on Nintendo 3DS
- Unwind in a World of Top Stress Busters
- Updated In 2024, Best Audio Waveform Generator
- Upgrade to Newest Brother Scanners Software: Seamless Operations and Compatibility with Windows
- Title: In 2024, How to Add a Green Screen to Zoom
- Author: Chloe
- Created at : 2024-12-11 05:20:48
- Updated at : 2024-12-11 20:48:57
- Link: https://ai-editing-video.techidaily.com/in-2024-how-to-add-a-green-screen-to-zoom/
- License: This work is licensed under CC BY-NC-SA 4.0.