In 2024, How To Add Scrolling Text Effect

How To Add Scrolling Text Effect
Almost every video has some titles and texts to show to the viewers. Instead of showing static texts on the video, everyone loves to add animated texts so that the video looks attractive and engaging. If you want to show credits and titles in intro and outro of the video, you will usually see texts scrolling vertically on the video.
If you want to show any text repeatedly, you can add horizontal scrolling text effect to your video so that the repeated text does not look weird. You will need a video editor to add scrolling rolling text effect to texts and titles in your video. We will illustrate in simple steps how to animate text on scroll using free as well as premium video editors.
Part 1. Add Scrolling Text to Video with Filmora
Wondershare Filmora is a professional video editor and if you are a Windows PC or Mac user, you can use Filmora to add scrolling text effect. In fact, Filmora is the most intuitive video editor where you can add scrolling text effect instantly without any prior experience in video editing.
Filmora has the best collection of text effects and you can add scrolling text anywhere and customize the effect as per your requirements. As a matter of fact, you can create a video with scrolling text effects only from scratch. Here are the steps to add scrolling text to video using Filmora.
Free Download For Win 7 or later(64-bit)
Free Download For macOS 10.14 or later
Step1 Download and install Filmora on your Windows PC or Mac. Launch the application and click on New Project on the welcome screen. You can also go to File> New option to get started.

Step2 Go to File> Import Media option to bring in your video file user Project Media folder. Thereafter, drag and drop the file into Timeline to get started.

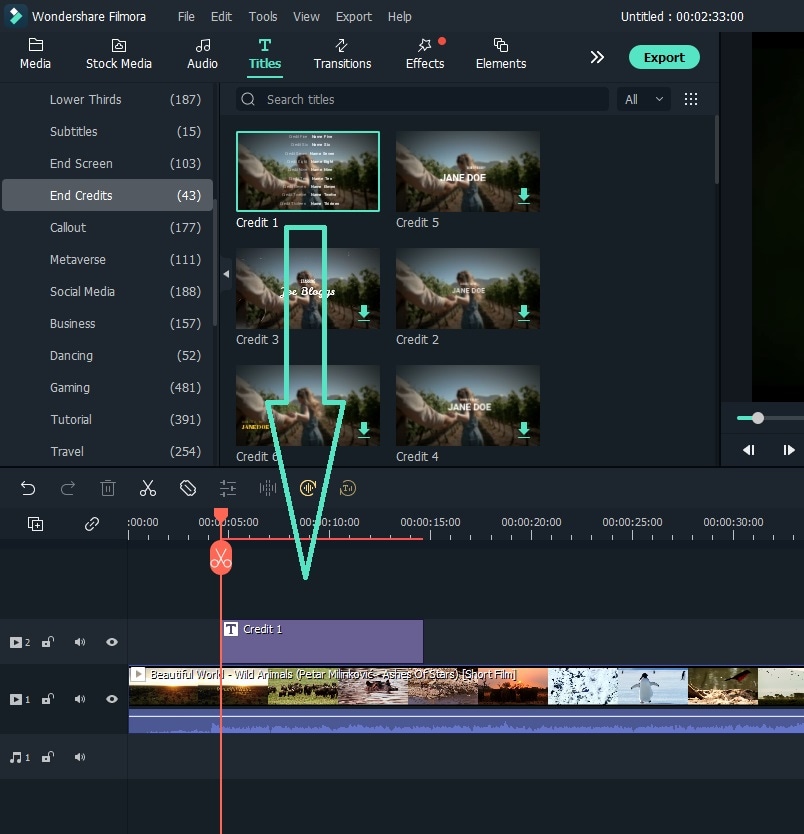
Step3 Go to Titles option located at the top, and on the left panel, go to End Credits option. You will see various scrolling text effects. Place your mouse pointer on them to check their preview.

Step4 Once you are satisfied with any scrolling text effects, drag and drop it into Timeline above the video clip layer. Adjust the position of the text effect so that it appears on the video as expected. You can stretch the duration of the effect as per your preference.
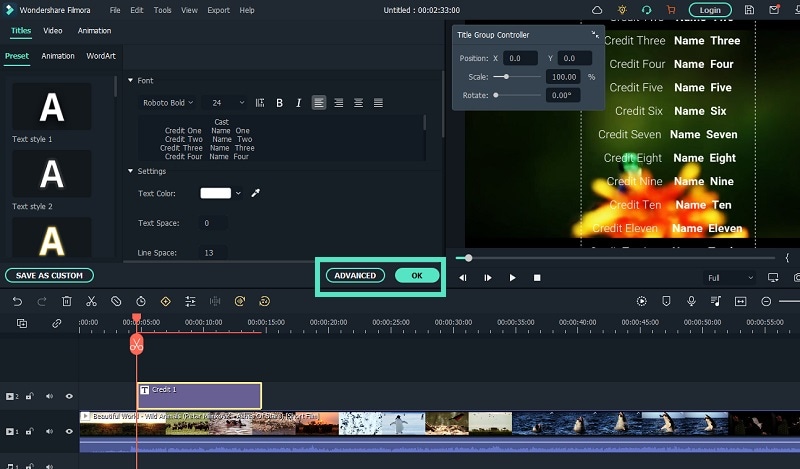
Step5 Double-click on the text layer on Timeline and customize the text and style as you feel. Thereafter, you can click on Advanced button for more customization. Finally, click on OK button.
Part 2. Use After Effects to Create Scrolling Text
Adobe Affect Effects is an extremely popular video editor and there are so many different text effects available to apply to your video. After Effects scrolling text effects come with different variations so that your titles and texts look amazing on the screen. Apart from the available text effects, you can also download and get more text effects from external sources. Here are the steps to add text scroll after effects to your video.
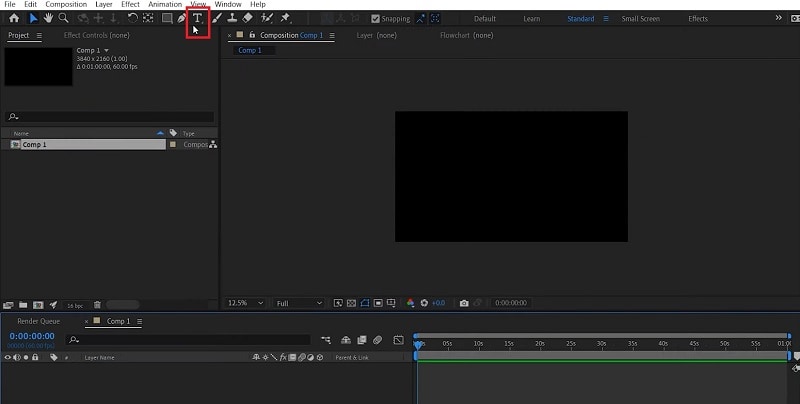
Step1 Launch After Effects and type your text with the Text tool from the top bar.
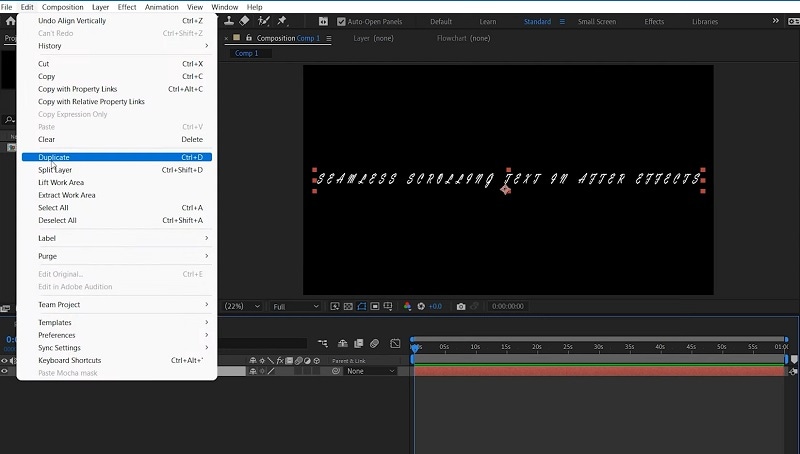
Step2 Duplicate the written text by going to Edit> Duplicate.
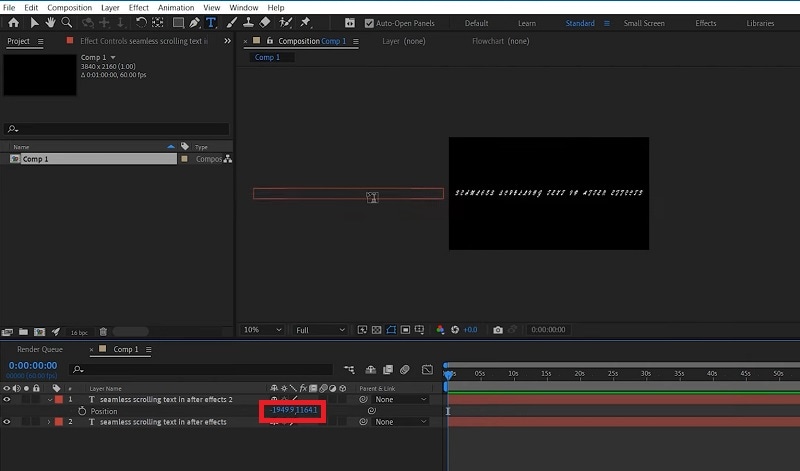
Step3 Move the duplicate text out of the visible screen to the left by changing its position value.
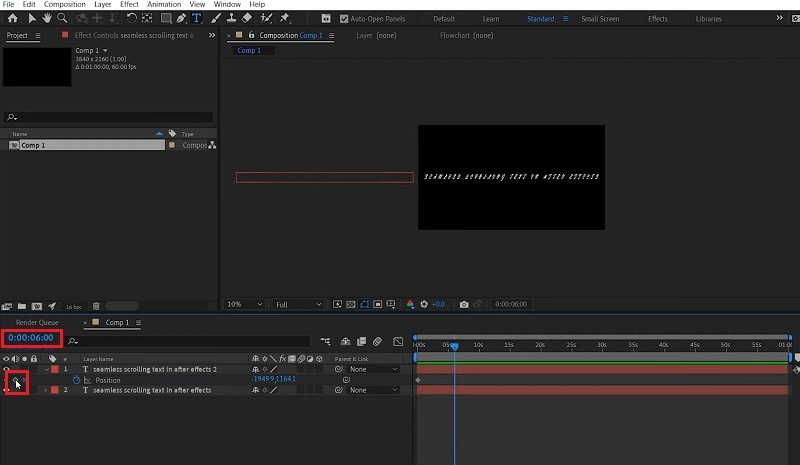
Step4 Turn on Position option and change the duration and add a keyframe.
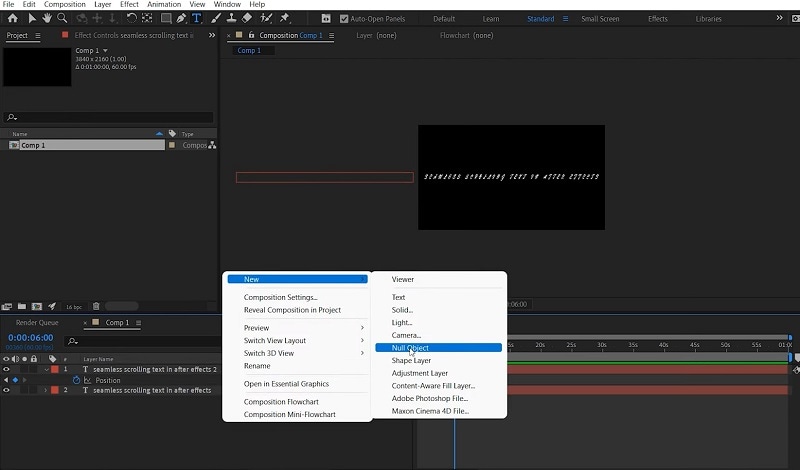
Step5 Right-click on Composition setting and go to New> Null Object. Change the duration and make it the same as the Duplicate layer and add a keyframe there. Besides, move the null object out of the visible screen to the right.
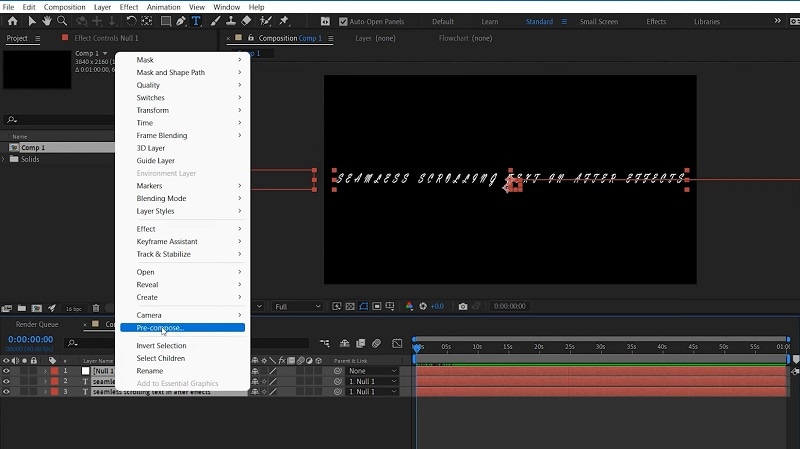
Step6 Select all layers and right-click and select Pre-compose.
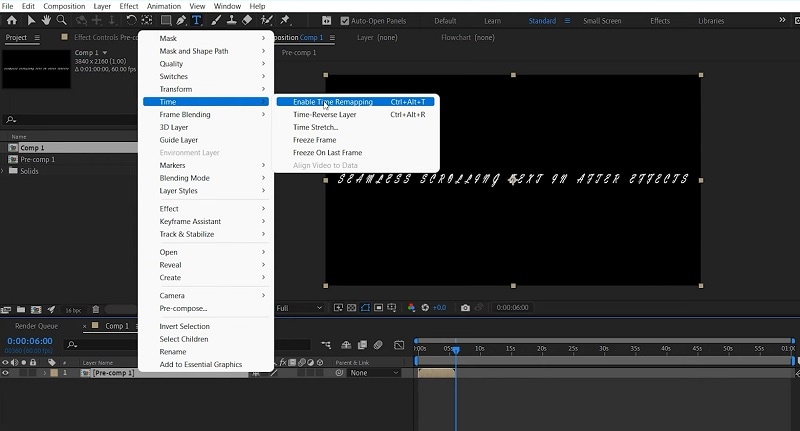
Step7 Right-click on Pre-comp and go to Time> Enable Time Remapping. Play the video and you will see the scrolling effects that you see in end credits in videos.
The above-mentioned steps are for horizontal scrolling text effect. If you want vertical scrolling text After Effects, you have to position the duplicate text and null object vertically and the required text will scroll vertically.
Part 3. Add Scrolling Text Effect with VSDC Free Video Editor
So far, we have mentioned premium video editors to add scrolling effect to the text in your video. Now we are going to mention a free video editor where you can add scrolling effect instantly. If you are a Windows user, you can install VSDC free video editor. There are several scrolling text effects available on the video editor through which you can move the text horizontal and vertical. Here are the steps to animate text on scroll using VSDC free video editor.
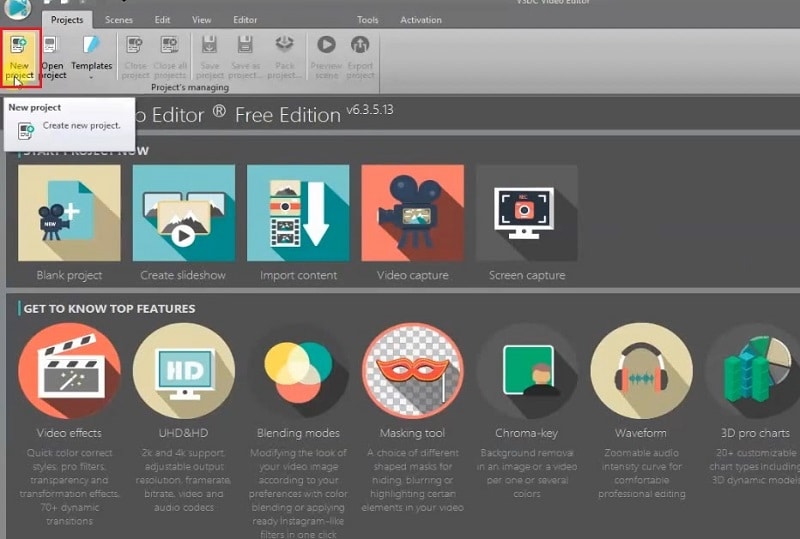
Step1 Install VSDC free video editor and click on New Project option. Click on Finish button and select the video from your hard drive where you want to add text.
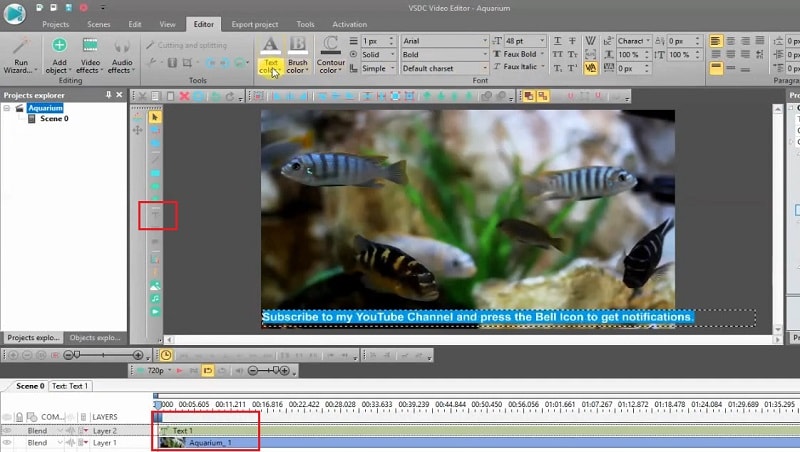
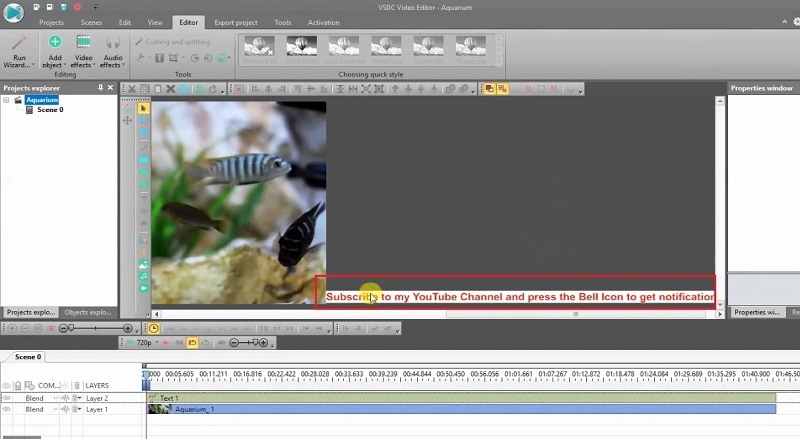
Step2 Select Type tool from the left panel and draw a box on the video where you can type your text. Make sure the text layer is on top of the video layer in Timeline.
Step3 Type your text and if you want to scroll it like horizontal scrolling text After Effects, place the text out of the viewer on the right side.
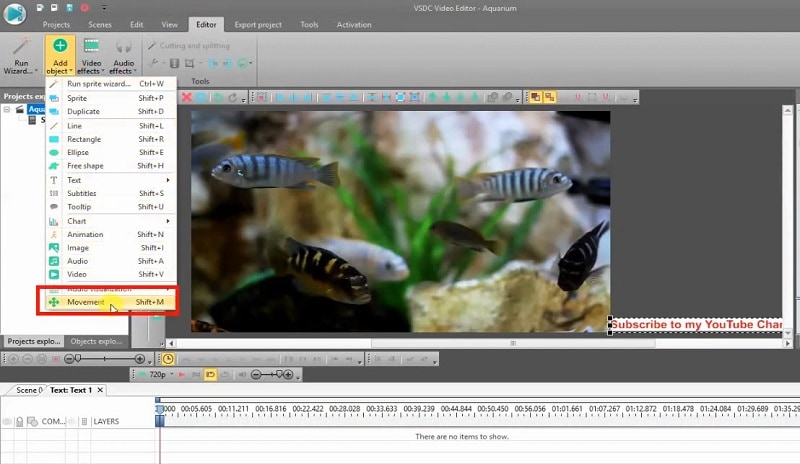
Step4 Double-click on text layer and go to Add Object and click on Movement.
Step5 You will find the mouse pointer change and you have to click on the spot to the left side where you want the text to go in scrolling effect.

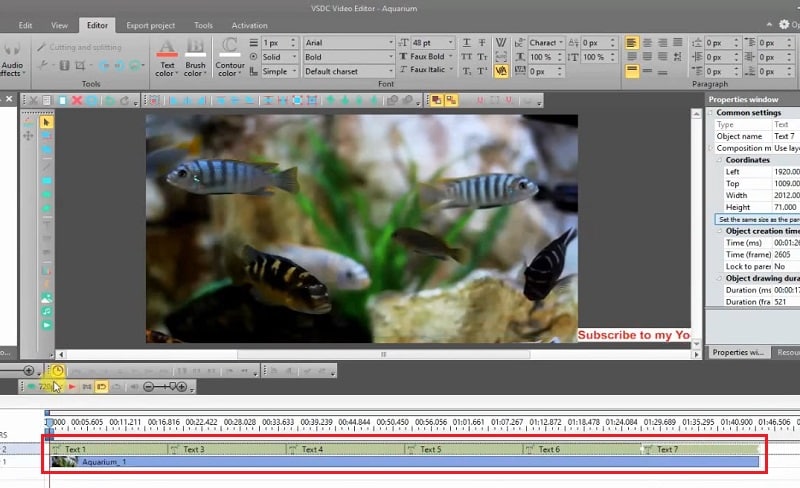
Step6 Shorten the duration of the text layer and then copy the text layer from Timeline. Paste it again and again until you cover the video layer completely so that the scroll effect goes on as long as the video runs.
Takeaway
Adding scrolling text to your video should no more be an issue for you. If you are using After Effects, we have illustrated how you can create horizontal and vertical scrolling effect for text in your video perfectly. If you prefer a free video editor, you can use VSDC free video editor as well. But we recommend Wondershare Filmora where you can add scrolling effects to your text instantly, and there is a wide range of amazing scrolling effects available to apply to your video.
Free Download For macOS 10.14 or later
Step1 Download and install Filmora on your Windows PC or Mac. Launch the application and click on New Project on the welcome screen. You can also go to File> New option to get started.

Step2 Go to File> Import Media option to bring in your video file user Project Media folder. Thereafter, drag and drop the file into Timeline to get started.

Step3 Go to Titles option located at the top, and on the left panel, go to End Credits option. You will see various scrolling text effects. Place your mouse pointer on them to check their preview.

Step4 Once you are satisfied with any scrolling text effects, drag and drop it into Timeline above the video clip layer. Adjust the position of the text effect so that it appears on the video as expected. You can stretch the duration of the effect as per your preference.

Step5 Double-click on the text layer on Timeline and customize the text and style as you feel. Thereafter, you can click on Advanced button for more customization. Finally, click on OK button.

Part 2. Use After Effects to Create Scrolling Text
Adobe Affect Effects is an extremely popular video editor and there are so many different text effects available to apply to your video. After Effects scrolling text effects come with different variations so that your titles and texts look amazing on the screen. Apart from the available text effects, you can also download and get more text effects from external sources. Here are the steps to add text scroll after effects to your video.
Step1 Launch After Effects and type your text with the Text tool from the top bar.

Step2 Duplicate the written text by going to Edit> Duplicate.

Step3 Move the duplicate text out of the visible screen to the left by changing its position value.

Step4 Turn on Position option and change the duration and add a keyframe.

Step5 Right-click on Composition setting and go to New> Null Object. Change the duration and make it the same as the Duplicate layer and add a keyframe there. Besides, move the null object out of the visible screen to the right.

Step6 Select all layers and right-click and select Pre-compose.

Step7 Right-click on Pre-comp and go to Time> Enable Time Remapping. Play the video and you will see the scrolling effects that you see in end credits in videos.

The above-mentioned steps are for horizontal scrolling text effect. If you want vertical scrolling text After Effects, you have to position the duplicate text and null object vertically and the required text will scroll vertically.
Part 3. Add Scrolling Text Effect with VSDC Free Video Editor
So far, we have mentioned premium video editors to add scrolling effect to the text in your video. Now we are going to mention a free video editor where you can add scrolling effect instantly. If you are a Windows user, you can install VSDC free video editor. There are several scrolling text effects available on the video editor through which you can move the text horizontal and vertical. Here are the steps to animate text on scroll using VSDC free video editor.
Step1 Install VSDC free video editor and click on New Project option. Click on Finish button and select the video from your hard drive where you want to add text.

Step2 Select Type tool from the left panel and draw a box on the video where you can type your text. Make sure the text layer is on top of the video layer in Timeline.

Step3 Type your text and if you want to scroll it like horizontal scrolling text After Effects, place the text out of the viewer on the right side.

Step4 Double-click on text layer and go to Add Object and click on Movement.

Step5 You will find the mouse pointer change and you have to click on the spot to the left side where you want the text to go in scrolling effect.

Step6 Shorten the duration of the text layer and then copy the text layer from Timeline. Paste it again and again until you cover the video layer completely so that the scroll effect goes on as long as the video runs.

Takeaway
Adding scrolling text to your video should no more be an issue for you. If you are using After Effects, we have illustrated how you can create horizontal and vertical scrolling effect for text in your video perfectly. If you prefer a free video editor, you can use VSDC free video editor as well. But we recommend Wondershare Filmora where you can add scrolling effects to your text instantly, and there is a wide range of amazing scrolling effects available to apply to your video.
How to Use Rule of Thirds in Video
So you have your work flow sorted out and you’re well on your way with Filmora but you’re not quite happy with your results or something just seems off when you watch your videos back. You may be missing an important element of all visual media and that’s composition. This is where the building blocks of every frame come together to make a visually pleasing piece for the viewer and helps the eyes concentrate on the content rather than trying to figure out what they are looking at.
I’m sure you may have heard of the rule of thirds for art or photography and you may not know or understand what it is. You may even be wondering how the rule of thirds can help you with your video creation. Well, that is what I’m going to show and explain to you today.
What is the rule of thirds
At its core the rule of thirds is a guide to follow whenever you create something visual.
You break an image into thirds both horizontally and vertically, in doing this you are left with nine boxes and four gridlines, the rule states that by placing key elements in line with gridlines you will have an overall better composition.
To gain a better understanding of this here is a visual example of the gridlines and nine boxes.

This may seem simple but is often overlooked due to time restraints and eagerness to get that video out there. By following these guidelines your overall composition will gain interesting and pleasing results that can help with viewer engagement. This is only one piece of the puzzle but as any photography professional or artist will tell you, It’s the small things that add up.
How to use the rule of thirds
To show how to use the rule of thirds I will be showing an image with and without the use of the guidelines. In doing this you will be able to see how impactful this system is and how it can help with your own creations within Filmora .
This will be our scene example, you can see buildings, boats, water and skyline. This may be typical of a backdrop or an insert for a holiday picture amongst many other things.
I will now show this picture with no compositional thought and without the use of the thirds system.

Notice how all the elements are in the scene but it just looks interesting and something just seems off when you look at it. You may find yourself searching for understanding of the image rather than taking the image in and concentrating on what the creator intended. This is seen commonly due to the need to fit every element in the scene but sometimes it is best to sacrifice something you may see as important for the sake of the whole picture.
We will now look at the example image with the rule of thirds in place and see if overall this makes a more interesting scene.

We have aligned the skyline with the first horizontal grid line and aligned the boats with the vertical grid lines. We have sacrificed the crane in the scene but overall I’m sure you can agree that this is more pleasing and makes more sense when you’re viewing this. The whole middle section of the scene now has information within it and the contrast between the middle and the rest of the scene directs your eyes to what was intended to be viewed, This is called effect use of empty space. In doing this you save yourself time from adding more information to direct the viewer.
Placing key elements directly in the center of your scene can seem static and boring but by placing elements to one side or using the first and second horizontal grid lines you create something called Dynamism , where the viewer sees an element along the grid and takes a journey through the rest of the image.
Studies have shown that this is the humans natural way of viewing imagery, we first find something interesting to look at and then journey around that. So by using this rule you are creating a more natural process for your viewer.
Tips when starting using the rule of thirds
The first tip I would say is to view other videos, YouTube is a good starting point. Watch interviews and notice where the chairs are aligned. Watch reviewers and notice where they position themselves in the scene. Lastly watch movies and pause on an interesting scene and try to deconstruct where everything is placed and why they chose that composition.
The idea with the rule is to have it become something you do naturally, by always considering the form you save yourself time in the editing process. The key things you have in your mind whenever you make a scene should be.
1. What is the key element in my scene or what am I trying to make the viewer focus on.
2. where do I intend to place these in my scene?
3. Have I created a balanced scene with enough negative space to direct the eye.
If you consider this with every video you make then in time this will become as natural as drinking water on a hot day. As a practice you could open some old projects and apply this rule to your video to see the results and you may find yourself impressed with the change.
When is it best to not use the rule of thirds?
The rule is very useful when you’re aiming to grab the attention towards a certain element but that being said, when you have a symmetrical scene you can get away with not using the rule as your eyes can make sense of symmetry very well.
Even when working with a symmetrical scene you can incorporate the rule within for elements such as people or key figures but in this situation it is down to the creator to figure what they feel is best in any given shot.
How to Use Rule of Thirds in Filmora
The tools provided within Filmora are generous and one great feature is the crop and size tool.
When inserting an image or movie file you can right click on the timeline and select crop and size bringing up a handy screen with the gridlines already there for you. It’s just a matter of aligning your shot for the best composition.
For reference I will show you what this looks like.
First right click the timeline on the image you want to reposition. Alternatively you can select the desired insert and press Alt+C this will also bring up the same editing box.
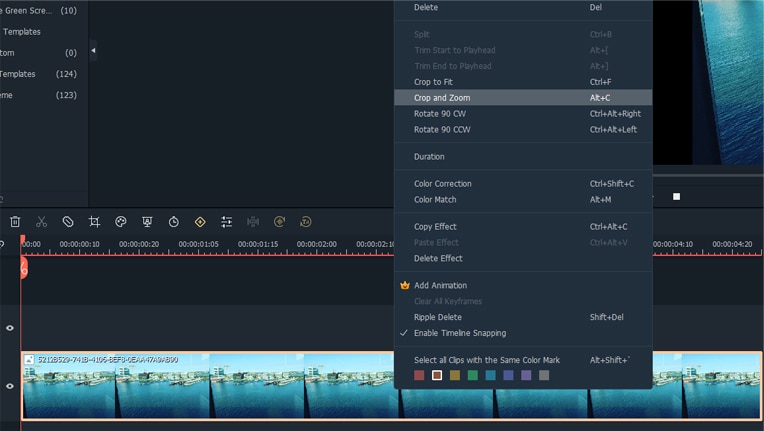
Now click on the crop and zoom option and this editor will appear.
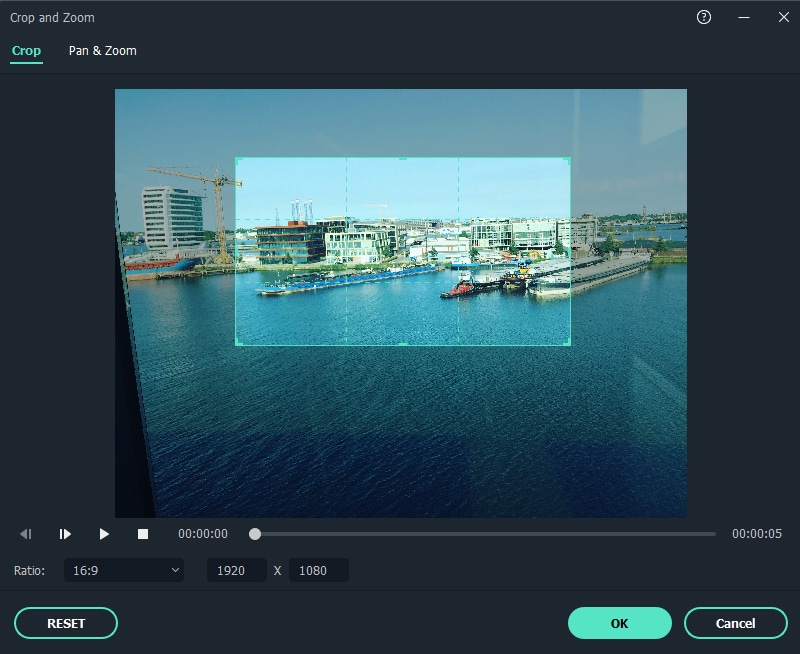
As you can see you are able to align the shot and change the aspect ratio to align with your project. For a better look at the built in grid lines see image below.

Conclusion
To conclude, the rule of thirds is very important within visual media and is tough within the fundamentals of art and photography from beginner level right up to the highest point of education, Practice thinking about your placement of key elements within your videos and how this affects your overall composition. The goal is to have this as an automatic thought when shooting your videos or still images. This is a small change you can make but has a big impact on how a viewer engages your content and in return leaves a positive opinion towards your creativity and eye for detail.
Free Download For Win 7 or later(64-bit)
Free Download For macOS 10.14 or later
Free Download For macOS 10.14 or later
Best Method to Split Video Into Parts Online
Apart from offline editing software, online video splitters are also available with the evolution of technology nowadays. VEED is one of them. It helps you in splitting the video into different parts. The splitter tool is available for deleting a specific part of the video. Even you can save these parts separately. The whole video editor is extremely user-friendly.
Along with the split and trimming of the videos, VEED also offers several tools for editing and adding effects to the images. It is suitable for training video makers and social media managers to demonstrate the products, business presentations, and HR videos. There are camera filters present, including sepia, night vision, fish eye, and many others. This article is actually the guide regarding editing the videos through VEED. As a substitute, Wondershare Filmora is also under discussion that is also available for the same purpose.
How can you split the video clips online from VEED?
VEED also supports different formats such as WMV, AVI, MPEG and others. While editing the videos in VEED, it converts into MP4, which is compatible with most media players. This is the most suitable format for sharing videos on social networking sites. This splitter tool also helps create a GIF file with animation. Even there is also a possibility of creating GIFs from various software. No matter the duration is of the video, VEED can split the video. It is freely available, and you can use it easily from your browser. You don’t need purchasing of premium software for splitting the videos.
Step 1: Select the video and upload it on the VEED. Simply drag and drop your video file in the editor when you click on “Choose video”. After the selection, split or trim on the timeline and drag towards the left side corner to make the clips shorter.

Step 2: Click on where you are looking to split the video or keep moving the slider on the timeline. Now, you need to press the “S” key on the keyboard or click on the button “Split”. It is easy to delete the clips you don’t need anymore.
Step 3: Click on the option of “Export”, and this is the time for saving the new file as the MP4 video file. Simply export them as a single video file. It is the simplest option to use, and you can do all the steps in a few clicks.

An easier way to split the video into parts
An online tool is available for instant tasks and increases efficiency. But unfortunately, it becomes time-consuming whenever the size of your file is a large or unstable internet connection. Here emerges the usage of Filmora Video Editor . It is an incredible tool for creating and editing your images and videos. This also helps maintain the quality of the videos without any concern about their size. All the options of splitting, rotating, resizing, and trimming the videos are also available offline.
For Win 7 or later (64-bit)
For macOS 10.14 or later
Features:
- Cloning of the effects
- Magical effects
- Motion graphics and addition of animation as well
- Splitting of the screen and video clips
- Matching of the colour
- Controls available for adjusting the audios and videos
There is a number of options available for a variety of users. There is Wondershare Filmora Pro for the experts and solutions for the business owners. The whole business plan of Wondershare Filmora is for showcasing your brand. Support centres are available for helping you whenever you face any hurdle. All the new features are updated in the latest version of it. User guides are also available on its official site. For splitting the videos and extracting your favourite scenes, below steps are how to split the videos in Wondershare Filmora:
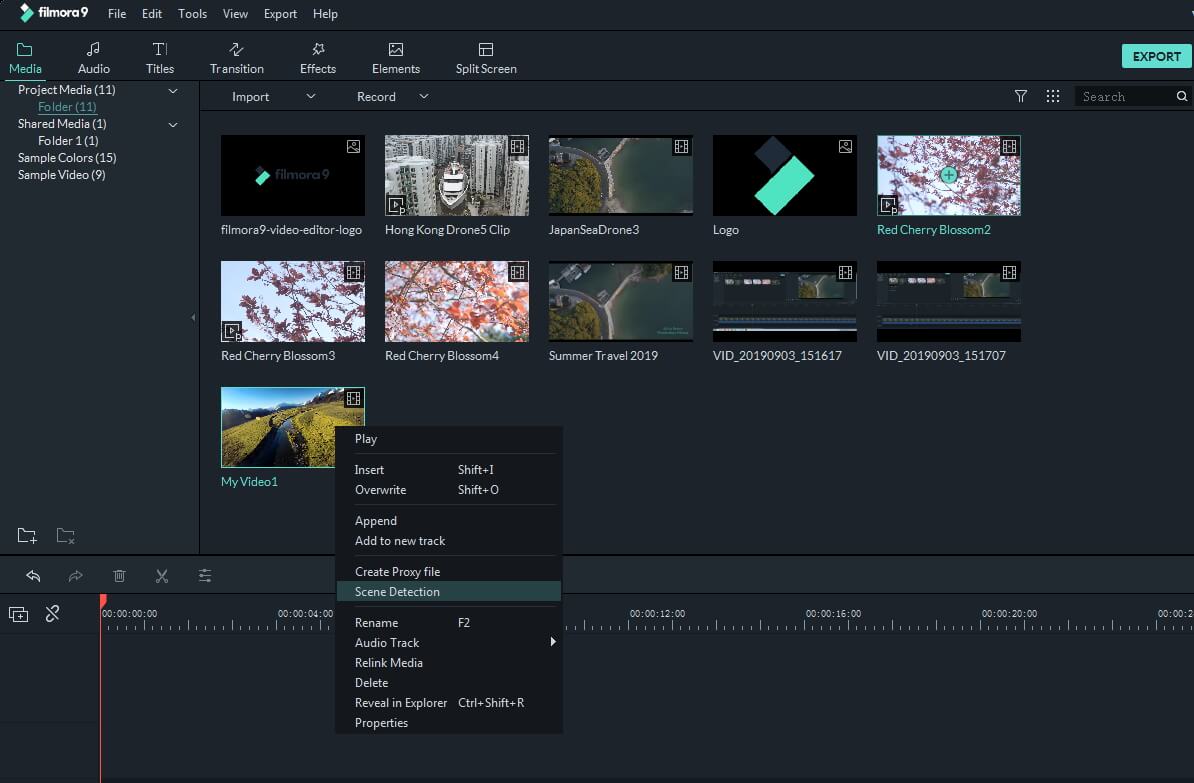
Step 1. To split the videos in Wondershare Filmora, the feature of scene detection is very helpful for this purpose. It automatically makes the parts of the videos depending on the changes of the scene. To enable this feature, right-click on your video clip in your library folder and choose the “scene detection” option for its window.

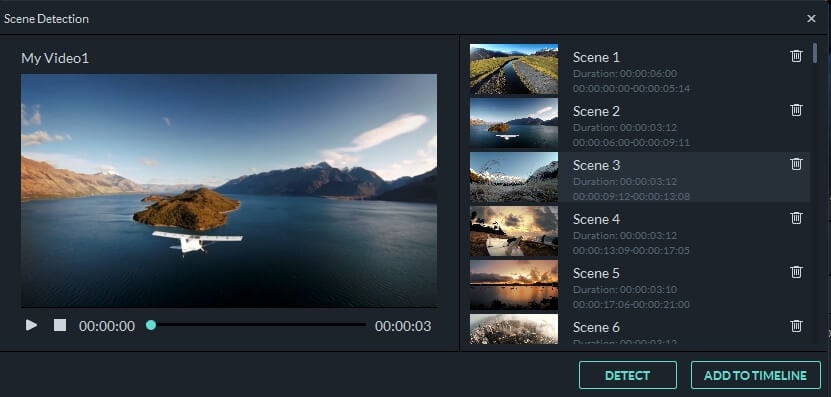
Step 2. Click on “Detect”, and Wondershare Filmora starts dividing the videos into the number of clips depending on changing of the scenes. Click on every small clip for it is easy for you to preview the outcome for its addition on the timeline.
Step 3. For deleting the specific part of the video, its selection is essential and click on the trash icon. Click on “Add on the timeline” for separating the clips and edit them later. The clips you have split can be imported on the timeline, just like in the picture below.
Step 4. After splitting the video files, there are many options to apply to them like rotation, merger, cropping and recording the voice-over. Join the number of segments and add the background music to make the new video.
Wondershare Filmora is on the top ranking in the list of video editing software. Without facing any issues, you can simply create videos as well as edit them as well. You can get quickly a video editor of a professional level in just a smaller number of days of using it. All the tools are just on your timeline, and the simple interface makes it more enjoyable to use.
It is possible for the user to apply every feature in many ways, so Wondershare Filmora is very simple in handling all the functionalities. The whole software is full of fun. It guarantees to deliver highly professional results. Whether online or offline, Wondershare Filmora is also available to bring your imagination into reality. Even you can join the certification program of Wondershare Filmora. Start using it now as you will feel the difference in using it apart from other video editing software.
Step 2: Click on where you are looking to split the video or keep moving the slider on the timeline. Now, you need to press the “S” key on the keyboard or click on the button “Split”. It is easy to delete the clips you don’t need anymore.
Step 3: Click on the option of “Export”, and this is the time for saving the new file as the MP4 video file. Simply export them as a single video file. It is the simplest option to use, and you can do all the steps in a few clicks.

An easier way to split the video into parts
An online tool is available for instant tasks and increases efficiency. But unfortunately, it becomes time-consuming whenever the size of your file is a large or unstable internet connection. Here emerges the usage of Filmora Video Editor . It is an incredible tool for creating and editing your images and videos. This also helps maintain the quality of the videos without any concern about their size. All the options of splitting, rotating, resizing, and trimming the videos are also available offline.
For Win 7 or later (64-bit)
For macOS 10.14 or later
Features:
- Cloning of the effects
- Magical effects
- Motion graphics and addition of animation as well
- Splitting of the screen and video clips
- Matching of the colour
- Controls available for adjusting the audios and videos
There is a number of options available for a variety of users. There is Wondershare Filmora Pro for the experts and solutions for the business owners. The whole business plan of Wondershare Filmora is for showcasing your brand. Support centres are available for helping you whenever you face any hurdle. All the new features are updated in the latest version of it. User guides are also available on its official site. For splitting the videos and extracting your favourite scenes, below steps are how to split the videos in Wondershare Filmora:
Step 1. To split the videos in Wondershare Filmora, the feature of scene detection is very helpful for this purpose. It automatically makes the parts of the videos depending on the changes of the scene. To enable this feature, right-click on your video clip in your library folder and choose the “scene detection” option for its window.

Step 2. Click on “Detect”, and Wondershare Filmora starts dividing the videos into the number of clips depending on changing of the scenes. Click on every small clip for it is easy for you to preview the outcome for its addition on the timeline.

Step 3. For deleting the specific part of the video, its selection is essential and click on the trash icon. Click on “Add on the timeline” for separating the clips and edit them later. The clips you have split can be imported on the timeline, just like in the picture below.

Step 4. After splitting the video files, there are many options to apply to them like rotation, merger, cropping and recording the voice-over. Join the number of segments and add the background music to make the new video.
Wondershare Filmora is on the top ranking in the list of video editing software. Without facing any issues, you can simply create videos as well as edit them as well. You can get quickly a video editor of a professional level in just a smaller number of days of using it. All the tools are just on your timeline, and the simple interface makes it more enjoyable to use.
It is possible for the user to apply every feature in many ways, so Wondershare Filmora is very simple in handling all the functionalities. The whole software is full of fun. It guarantees to deliver highly professional results. Whether online or offline, Wondershare Filmora is also available to bring your imagination into reality. Even you can join the certification program of Wondershare Filmora. Start using it now as you will feel the difference in using it apart from other video editing software.
Step 2: Click on where you are looking to split the video or keep moving the slider on the timeline. Now, you need to press the “S” key on the keyboard or click on the button “Split”. It is easy to delete the clips you don’t need anymore.
Step 3: Click on the option of “Export”, and this is the time for saving the new file as the MP4 video file. Simply export them as a single video file. It is the simplest option to use, and you can do all the steps in a few clicks.

An easier way to split the video into parts
An online tool is available for instant tasks and increases efficiency. But unfortunately, it becomes time-consuming whenever the size of your file is a large or unstable internet connection. Here emerges the usage of Filmora Video Editor . It is an incredible tool for creating and editing your images and videos. This also helps maintain the quality of the videos without any concern about their size. All the options of splitting, rotating, resizing, and trimming the videos are also available offline.
For Win 7 or later (64-bit)
For macOS 10.14 or later
Features:
- Cloning of the effects
- Magical effects
- Motion graphics and addition of animation as well
- Splitting of the screen and video clips
- Matching of the colour
- Controls available for adjusting the audios and videos
There is a number of options available for a variety of users. There is Wondershare Filmora Pro for the experts and solutions for the business owners. The whole business plan of Wondershare Filmora is for showcasing your brand. Support centres are available for helping you whenever you face any hurdle. All the new features are updated in the latest version of it. User guides are also available on its official site. For splitting the videos and extracting your favourite scenes, below steps are how to split the videos in Wondershare Filmora:
Step 1. To split the videos in Wondershare Filmora, the feature of scene detection is very helpful for this purpose. It automatically makes the parts of the videos depending on the changes of the scene. To enable this feature, right-click on your video clip in your library folder and choose the “scene detection” option for its window.

Step 2. Click on “Detect”, and Wondershare Filmora starts dividing the videos into the number of clips depending on changing of the scenes. Click on every small clip for it is easy for you to preview the outcome for its addition on the timeline.

Step 3. For deleting the specific part of the video, its selection is essential and click on the trash icon. Click on “Add on the timeline” for separating the clips and edit them later. The clips you have split can be imported on the timeline, just like in the picture below.

Step 4. After splitting the video files, there are many options to apply to them like rotation, merger, cropping and recording the voice-over. Join the number of segments and add the background music to make the new video.
Wondershare Filmora is on the top ranking in the list of video editing software. Without facing any issues, you can simply create videos as well as edit them as well. You can get quickly a video editor of a professional level in just a smaller number of days of using it. All the tools are just on your timeline, and the simple interface makes it more enjoyable to use.
It is possible for the user to apply every feature in many ways, so Wondershare Filmora is very simple in handling all the functionalities. The whole software is full of fun. It guarantees to deliver highly professional results. Whether online or offline, Wondershare Filmora is also available to bring your imagination into reality. Even you can join the certification program of Wondershare Filmora. Start using it now as you will feel the difference in using it apart from other video editing software.
Step 2: Click on where you are looking to split the video or keep moving the slider on the timeline. Now, you need to press the “S” key on the keyboard or click on the button “Split”. It is easy to delete the clips you don’t need anymore.
Step 3: Click on the option of “Export”, and this is the time for saving the new file as the MP4 video file. Simply export them as a single video file. It is the simplest option to use, and you can do all the steps in a few clicks.

An easier way to split the video into parts
An online tool is available for instant tasks and increases efficiency. But unfortunately, it becomes time-consuming whenever the size of your file is a large or unstable internet connection. Here emerges the usage of Filmora Video Editor . It is an incredible tool for creating and editing your images and videos. This also helps maintain the quality of the videos without any concern about their size. All the options of splitting, rotating, resizing, and trimming the videos are also available offline.
For Win 7 or later (64-bit)
For macOS 10.14 or later
Features:
- Cloning of the effects
- Magical effects
- Motion graphics and addition of animation as well
- Splitting of the screen and video clips
- Matching of the colour
- Controls available for adjusting the audios and videos
There is a number of options available for a variety of users. There is Wondershare Filmora Pro for the experts and solutions for the business owners. The whole business plan of Wondershare Filmora is for showcasing your brand. Support centres are available for helping you whenever you face any hurdle. All the new features are updated in the latest version of it. User guides are also available on its official site. For splitting the videos and extracting your favourite scenes, below steps are how to split the videos in Wondershare Filmora:
Step 1. To split the videos in Wondershare Filmora, the feature of scene detection is very helpful for this purpose. It automatically makes the parts of the videos depending on the changes of the scene. To enable this feature, right-click on your video clip in your library folder and choose the “scene detection” option for its window.

Step 2. Click on “Detect”, and Wondershare Filmora starts dividing the videos into the number of clips depending on changing of the scenes. Click on every small clip for it is easy for you to preview the outcome for its addition on the timeline.

Step 3. For deleting the specific part of the video, its selection is essential and click on the trash icon. Click on “Add on the timeline” for separating the clips and edit them later. The clips you have split can be imported on the timeline, just like in the picture below.

Step 4. After splitting the video files, there are many options to apply to them like rotation, merger, cropping and recording the voice-over. Join the number of segments and add the background music to make the new video.
Wondershare Filmora is on the top ranking in the list of video editing software. Without facing any issues, you can simply create videos as well as edit them as well. You can get quickly a video editor of a professional level in just a smaller number of days of using it. All the tools are just on your timeline, and the simple interface makes it more enjoyable to use.
It is possible for the user to apply every feature in many ways, so Wondershare Filmora is very simple in handling all the functionalities. The whole software is full of fun. It guarantees to deliver highly professional results. Whether online or offline, Wondershare Filmora is also available to bring your imagination into reality. Even you can join the certification program of Wondershare Filmora. Start using it now as you will feel the difference in using it apart from other video editing software.
Guide: Add LUTs in Premiere Pro with Ease
LUTs, fully known as look-up tables, are essential video editing elements. By using LUTs, you can enhance your video quality with improved color grading. Talking about its configuration, LUTs are made of different effects and styles for providing unique visualization.
There is a buzz around adding LUTs to Premiere Pro. Many people often fail to use LUTs due to their complexities. This article comprises detailed information and steps to add LUTs with ease.
Part 1: Why are LUTs Important in Video Editing?
Video editing becomes easier and smarter with LUTs. This specific utility can ensure upscaling video content with improved quality. But why are LUTs important? Here is why:
1. Creative Color Grading
LUTs are known to provide consistent color grading within a video. There are color palettes that are applied to every visual part. Thus, an appropriate visual style is applied to your content, making it more impressive. Moreover, with several creative options, LUTs are adjusted and enhanced to perfection. Color grading becomes special with them.
2. Flexibility and Accuracy
You can change LUTs within desired intensity, blur, sharpness, and lightning. There are also color adjustments with the most flexibility. You can transform your video color gradients as required. The important thing is colors are applied with accuracy and proper details. This way, your video will be more consistent in colors.
3. Advanced AI Functionality
With technological advancement, LUTs are also upgrading with time. The implementation of AI functionality into LUTs makes them more special. The color grading process is fully automated. Thus, videos are analyzed, and LUTs are applied based on the required color criteria. LUTs are also integrated with AI augmented reality to provide realistic experiences.
4. Saves Time
Applying LUT doesn’t take time, and it instantly improves color grading. This way, you don’t need to spend hours on video editing. After all, with LUTs, you can effortlessly upscale video colors and quality. The pre-designed color presets are effective and efficient.
Empower your videos with a new mood using different LUTs. Filmora now offers 100+ top-quality 3D LUTs cover a broad range of scenarios. Transform your videos with Filmora’s powerful 3D LUTs.
Apply LUT on Videos Apply LUT on Videos Learn More

Part 2: How to Add LUTs in Premiere Pro?
LUTs are great video editing tools with extended color grading and schemas. Premiere Pro is a commonly consumed video editing tool with extensive features. Being a new user, you might not be aware of the functionality of LUTs in the platform. To add LUTs to Premiere Pro, you need to follow simple steps:
Step 1: Launch and open Adobe Premiere Pro on your device. Proceed to add the video clip that needs to be edited on the timeline. Navigate to the “Color” workspace from the screen’s top.

Step 2: From the project window on the bottom left, press the “New Item” tab and choose “Adjustment Layer.” Adjust video settings from the available panel, including the “Width,” “Height,” “Timebase,” and “Pixel Aspect Ratio,” and click “OK.”

Step 3: Drag and drop the created adjustment layer from the project window into the timeline and set the length adjacent to the video. Select the adjustment layer, and press “Lumetri Color” from the top in the right-hand panel. From the “Basic Correction” category, set “Input LUT” and proceed to click the “Browse” option from the drop-down menu. Navigate your LUT from the folder and click “Open” to apply desired LUT to the video.

Part 3: What are the Future Prospects of LUTs in Video Editing?
LUTs are already transforming video editing functionalities with automated color grading. This means users don’t have to edit colors, styles, and other elements manually. In the future, LUTs will have amazing prospects. Let’s discuss some of them:
- Cloud Infrastructure: Sharing and collaboration on customized LUTs will be easier in the future. This will be possible due to cloud infrastructure. Hence, video editors worldwide can collaborate and share color insights on projects.
- User-Friendly Interface: LUTs will become more user-friendly in the future. This will make them easy to use and implement in projects. Even beginners will minimal editing knowledge will be able to use them. In contrast, professional editors will streamline their workflows with fast processing.
- Real-time Preview: Using LUTs, users would be able to preview color grading. This way, they will know what their video after LUT would look like. Hence, they can preview different LUT presets and proceed with the desired one.
- Wide Compatibility: The platform compatibility of LUTs will also enhance. After all, you will access them on mobile, web, and desktop devices without problems. You can use LUTs in everyday life by applying them to visual content.
Bonus Part: Wondershare Filmora – An Alternative Haven for Adding LUTs
LUTs are great utility when it comes to video editing environments. Apart from Premiere Pro, several other tools are working to improve the industry. Wondershare Filmora is a video editing software where you can upgrade your videos. You can add different elements, effects, and transitions in Filmora. You can also use and apply LUT presets within Filmora.
Add LUTs on Video For Win 7 or later(64-bit)
Add LUTs on Video For macOS 10.14 or later
There are approximately 100+ LUTs presets in the current version of Filmora. Users can use them to enlighten the colors of videos. Meanwhile, in the new version, there would be additional 100 LUTs. So, in total, you will be getting 200+ LUTs in the new updates provided by Wondershare Filmora. Each LUT is unique in its kind and style.

Key Features of Wondershare Filmora
- Intensity Setting: You can also modify the intensity of your applied colors. This way, you can adjust color saturation on a 0 – 100% scale range. With intensity, there is an option to customize color grading.
- Color Wheel: Within Wondershare Filmora, there is a color wheel for adjusting video colors. Thus, users can set color pallets within their required style. The color grading is then enhanced with the desired customization.
- Optimized Export: The video export facility is optimized with fast processing. You can also set the video format, select resolution, and adjust other settings. The video is exported in the highest of qualities.
- Preview Render: After editing your videos with LUT presets, check color styles using render preview. Render preview allows previewing your final project before exporting it to the device.
Conclusion
Videos are close to all of us, as they store our important visual data. This is why video editing is essential to enhance color grading and schemas. Meanwhile, installing LUTs in Premiere Pro can help improve video quality with minimal effort. A good tool for using LUTs is Wondershare Filmora. After all, Filmora offers 100+ LUT presets, with 100 more to follow soon.
Add LUTs on Video For Win 7 or later(64-bit)
Add LUTs on Video For macOS 10.14 or later
Apply LUT on Videos Apply LUT on Videos Learn More

Part 2: How to Add LUTs in Premiere Pro?
LUTs are great video editing tools with extended color grading and schemas. Premiere Pro is a commonly consumed video editing tool with extensive features. Being a new user, you might not be aware of the functionality of LUTs in the platform. To add LUTs to Premiere Pro, you need to follow simple steps:
Step 1: Launch and open Adobe Premiere Pro on your device. Proceed to add the video clip that needs to be edited on the timeline. Navigate to the “Color” workspace from the screen’s top.

Step 2: From the project window on the bottom left, press the “New Item” tab and choose “Adjustment Layer.” Adjust video settings from the available panel, including the “Width,” “Height,” “Timebase,” and “Pixel Aspect Ratio,” and click “OK.”

Step 3: Drag and drop the created adjustment layer from the project window into the timeline and set the length adjacent to the video. Select the adjustment layer, and press “Lumetri Color” from the top in the right-hand panel. From the “Basic Correction” category, set “Input LUT” and proceed to click the “Browse” option from the drop-down menu. Navigate your LUT from the folder and click “Open” to apply desired LUT to the video.

Part 3: What are the Future Prospects of LUTs in Video Editing?
LUTs are already transforming video editing functionalities with automated color grading. This means users don’t have to edit colors, styles, and other elements manually. In the future, LUTs will have amazing prospects. Let’s discuss some of them:
- Cloud Infrastructure: Sharing and collaboration on customized LUTs will be easier in the future. This will be possible due to cloud infrastructure. Hence, video editors worldwide can collaborate and share color insights on projects.
- User-Friendly Interface: LUTs will become more user-friendly in the future. This will make them easy to use and implement in projects. Even beginners will minimal editing knowledge will be able to use them. In contrast, professional editors will streamline their workflows with fast processing.
- Real-time Preview: Using LUTs, users would be able to preview color grading. This way, they will know what their video after LUT would look like. Hence, they can preview different LUT presets and proceed with the desired one.
- Wide Compatibility: The platform compatibility of LUTs will also enhance. After all, you will access them on mobile, web, and desktop devices without problems. You can use LUTs in everyday life by applying them to visual content.
Bonus Part: Wondershare Filmora – An Alternative Haven for Adding LUTs
LUTs are great utility when it comes to video editing environments. Apart from Premiere Pro, several other tools are working to improve the industry. Wondershare Filmora is a video editing software where you can upgrade your videos. You can add different elements, effects, and transitions in Filmora. You can also use and apply LUT presets within Filmora.
Add LUTs on Video For Win 7 or later(64-bit)
Add LUTs on Video For macOS 10.14 or later
There are approximately 100+ LUTs presets in the current version of Filmora. Users can use them to enlighten the colors of videos. Meanwhile, in the new version, there would be additional 100 LUTs. So, in total, you will be getting 200+ LUTs in the new updates provided by Wondershare Filmora. Each LUT is unique in its kind and style.

Key Features of Wondershare Filmora
- Intensity Setting: You can also modify the intensity of your applied colors. This way, you can adjust color saturation on a 0 – 100% scale range. With intensity, there is an option to customize color grading.
- Color Wheel: Within Wondershare Filmora, there is a color wheel for adjusting video colors. Thus, users can set color pallets within their required style. The color grading is then enhanced with the desired customization.
- Optimized Export: The video export facility is optimized with fast processing. You can also set the video format, select resolution, and adjust other settings. The video is exported in the highest of qualities.
- Preview Render: After editing your videos with LUT presets, check color styles using render preview. Render preview allows previewing your final project before exporting it to the device.
Conclusion
Videos are close to all of us, as they store our important visual data. This is why video editing is essential to enhance color grading and schemas. Meanwhile, installing LUTs in Premiere Pro can help improve video quality with minimal effort. A good tool for using LUTs is Wondershare Filmora. After all, Filmora offers 100+ LUT presets, with 100 more to follow soon.
Add LUTs on Video For Win 7 or later(64-bit)
Add LUTs on Video For macOS 10.14 or later
Also read:
- In 2024, Why Vimeo Slideshow Maker Become Popular
- New Top 4 Free 3D Intro Maker to Use
- In 2024, Level Up Videos By Applying Keyframe with Filmora
- Updated In 2024, How Can You Import and Adjust the Video Clips on Wondershare Filmora?
- New Weve Picked up the Best Online as Well as Offline MOV to GIF Converters . These Converters Are Easy to Use and Have No Limitations on Size. Get Your One
- In 2024, Level Up Videos By Applying Keyframe Like A Pro
- Updated Easily Combine Videos and Audios with 5 Simple Online Tools for 2024
- New What Slideshow Templates Teach You About Aesthetic
- Learn How Video Montages Were Used over Film History with Examples and the Types of Videos for Shorter Montages. Plus, Learn About the Best Software for It for 2024
- Updated 5 Tips for Faster Editing in Filmora Video Editor for 2024
- Updated 12 Best GIF Editors to Use for 2024
- New 2024 Approved How Can You Create Outstanding Educational Teaching Videos?
- Updated In 2024, Doable Ways to Make Transparent Background in Procreate
- Updated 2024 Approved Customize PowerPoint Slideshow Icon in 8 Simple Ways
- 2024 Approved Best Filmic Pro LUTs For Video Editing
- In 2024, Tutorial How To Add Motion Blur in Blender?
- Discover the Best Video Frame Rate Converters for Smooth Playback, Including Online and Offline Options. Learn How to Convert Frame Rates for Free and Elevate Your Video Quality with These Top 8 Tools
- Updated Learn How to Blur Faces in Your Video on iPhone
- Updated In 2024, Reviewing Efectum App and The Best Alternatives for Smartphone Users
- In 2024, We Will Give You the Best-Suggested List of Color Match Generators to Help You Choose From an Efficient Collection Rather than Finding It Aimlessly
- Updated 2024 Approved Frame Rates, Speed, and Wondershare Filmora
- Best Video Editing Courses Online with Certificate for 2024
- In 2024, Learn to Merge Clips in DaVinci Resolve Simple Steps
- Updated 2024 Approved Best 20 Slideshow Makers for Win/Mac/Online Review
- New In 2024, Color Match Game Tips for You
- Updated In 2024, OBS Green Screen Guide
- Updated In 2024, How to Make a Gaming Montage - Guide & Tips
- Do You Want to Create a Motion Blur Effect in Your Videos? Read This Well-Described Guide to Learn How to Add Motion Blur on CapCut on iPhone and Android Devices
- New Discover How to Change Sky Background with The Best Applications? A Review
- New In 2024, Vintage Film Effect 1920S - How to Make
- In 2024, How to Record Super Slow Motion Videos on Your Huawei/Samsung/iPhone?
- Best 8 AR Apps for Android and iOS | Help You See the World of AR
- Updated 2024 Approved How to Speed up a Video on Splice
- The Craziest 10 AI Editors Youve Seen
- 2024 Approved Best Free Video Editing Software for Reddit
- 2024 Approved What Is the Top Filmora Slideshow Templates? Experts Choice
- New Simple Tricks Make 3D GIF Production of Inspiration Pop up Constantly
- Updated 2024 Approved 8 Websites to Find 3D Text PNG
- New 2024 Approved Simple Tricks Make 3D GIF Production of Inspiration Pop Up
- In 2024, Do You Know Adding Subtitles Can Benefit Video Content? Meanwhile, for Adding Subtitles to a Video, Wondershare Filmora Can Help You
- The Right Ways to Slow Down a Video on iPhone
- Best 5 GIF to Video Converters You Cant-Miss
- In 2024, AI Features of Filmora - Silence Detection in Videos
- Updated Why Did Filmora AI Portrait Attract People?
- Learn How to Create Quiz Videos for YouTube that Are Interactive and Can Get Your Audience Engaged with Your Content for 2024
- In 2024, Polish and Enshrine Your Music Videos with the Best Editing Software, Filmora. Add Cuts to Your Beat, Light Leaks, and Much More
- New Using AI to Replace Skies Finding the Right Methods
- Fixing Foneazy MockGo Not Working On Tecno Camon 20 | Dr.fone
- In 2024, How to Transfer Contacts from Infinix GT 10 Pro to Other Android Devices Devices? | Dr.fone
- Prank Your Friends! Easy Ways to Fake and Share Google Maps Location On Itel P55 5G | Dr.fone
- In 2024, Is GSM Flasher ADB Legit? Full Review To Bypass Your HTCFRP Lock
- Preparation to Beat Giovani in Pokemon Go For Apple iPhone 8 | Dr.fone
- Will the iPogo Get You Banned and How to Solve It On Tecno Camon 20 | Dr.fone
- Ultimate Guide from Meizu FRP Bypass
- In 2024, 5 Ways To Teach You To Transfer Files from Vivo X Fold 2 to Other Android Devices Easily | Dr.fone
- 3 Easy Solutions to Hard Reset Oppo A38 | Dr.fone
- Is GSM Flasher ADB Legit? Full Review To Bypass Your Samsung Galaxy A23 5GFRP Lock
- In 2024, How to Get and Use Pokemon Go Promo Codes On Nokia XR21 | Dr.fone
- In 2024, Forgot Pattern Lock? Heres How You Can Unlock Vivo G2 Pattern Lock Screen
- In 2024, How to Remove an AirTag from Your Apple ID Account From Apple iPhone 15 Pro?
- In 2024, Getting the Pokemon Go GPS Signal Not Found 11 Error in Samsung Galaxy A54 5G | Dr.fone
- In 2024, How PGSharp Save You from Ban While Spoofing Pokemon Go On Poco F5 5G? | Dr.fone
- How To Use Special Features - Virtual Location On Samsung Galaxy M14 5G? | Dr.fone
- Complete Guide to Hard Reset Your Honor 100 | Dr.fone
- In 2024, Unova Stone Pokémon Go Evolution List and How Catch Them For Vivo Y27 5G | Dr.fone
- How to Mirror PC Screen to Vivo Y27 5G Phones? | Dr.fone
- In 2024, How to Change Google Play Location On Meizu 21 Pro | Dr.fone
- In 2024, Complete Tutorial to Use VPNa to Fake GPS Location On Realme 12+ 5G | Dr.fone
- In 2024, How to Come up With the Best Pokemon Team On Samsung Galaxy F04? | Dr.fone
- In 2024, 8 Best Apps for Screen Mirroring Vivo Y36i PC | Dr.fone
- How to Cast Itel S23+ Screen to PC Using WiFi | Dr.fone
- New Top 9 Choices for Video Auto Translate
- Top 10 Fixes for Phone Keep Disconnecting from Wi-Fi On OnePlus Ace 3 | Dr.fone
- In 2024, 10 Fake GPS Location Apps on Android Of your OnePlus 11 5G | Dr.fone
- How to Unlock SIM Card on Apple iPhone 6 Plus online without jailbreak
- Home Button Not Working on Honor X50? Here Are Real Fixes | Dr.fone
- In 2024, How to Turn Off Google Location to Stop Tracking You on Xiaomi Redmi 13C 5G | Dr.fone
- Rootjunky APK To Bypass Google FRP Lock For Realme GT 5 Pro
- How to Restore Deleted Nokia C210 Pictures An Easy Method Explained.
- How PGSharp Save You from Ban While Spoofing Pokemon Go On Nokia G22? | Dr.fone
- How To Get Out of DFU Mode on iPhone 13? | Dr.fone
- In 2024, The Magnificent Art of Pokemon Go Streaming On Vivo V27e? | Dr.fone
- In 2024, Two Ways to Track My Boyfriends Vivo V27 Pro without Him Knowing | Dr.fone
- In 2024, How To Check if Your Vivo X100 Is Unlocked
- 8 Workable Fixes to the SIM not provisioned MM#2 Error on Samsung Galaxy M14 5G | Dr.fone
- In 2024, A Quick Guide to Xiaomi Civi 3 Disney 100th Anniversary Edition FRP Bypass Instantly
- In 2024, How to Delete iCloud Account with or without Password from your iPhone 11 Pro Max/Windows/Mac
- How to Change Your Gionee F3 Pro Location on life360 Without Anyone Knowing? | Dr.fone
- In 2024, The Best Android Unlock Software For Samsung Galaxy S24 Ultra Device Top 5 Picks to Remove Android Locks
- A Step-by-Step Guide on Using ADB and Fastboot to Remove FRP Lock on your Oppo A58 4G
- Top 5 Oppo A1x 5G Bypass FRP Tools for PC That Actually Work
- In 2024, The Magnificent Art of Pokemon Go Streaming On Poco F5 Pro 5G? | Dr.fone
- 3 Ways for Android Pokemon Go Spoofing On Realme C33 2023 | Dr.fone
- Title: In 2024, How To Add Scrolling Text Effect
- Author: Chloe
- Created at : 2024-06-09 16:15:07
- Updated at : 2024-06-10 16:15:07
- Link: https://ai-editing-video.techidaily.com/in-2024-how-to-add-scrolling-text-effect/
- License: This work is licensed under CC BY-NC-SA 4.0.


