
In 2024, How to Add Subtitles in VLC Media Play

How to Add Subtitles in VLC Media Play
VLC is a free, open-source, and easy-to-use cross-platform multimedia player that supports numerous audio and video file formats. You can use the program on different devices, including smartphones, TVs, and PCs.
With the VLC media player, you can not only watch your favorite movie or video clip but can also add subtitles to them. This can be useful to improve your video-watching experience, especially if you are playing a foreign film or one with poor audio quality. Moreover, subtitles can also help people with hearing impairments to follow along.
Want to learn how to add subtitles in the VLC media player? Keep reading to find out!
How To Add Subtitle Files In VLC Media Player?
You can download subtitles for the language you want from a subtitle site and enjoy them while watching the movie or video clip in VLC Media Player. However, this method won’t add the SRT file permanently to your videos.
Here’s how you can add subtitles in the VLC media player on your video clip:
Step1 Visit the subtitles website of your choice and download the file for the video you are watching.
Step2 Save the SRT file along with your video in the same folder.
Step3 Right-click the video, click “Open With,” and choose VLC media player. Alternatively, launch the player, click “Media,” and select “Open file…” to import the video.

Step4 VLC Media Player will automatically detect and add the subtitles file. If not, click the “Subtitles” option in the toolbar, select “Sub Track,” and choose the relevant file within the listing.
Step5 The VLC player will now display the subtitles along with your video. However, if it is still unable to find the subtitles file, click “Subtitles” > “Add Subtitles” and manually add the file you’ve downloaded.

![]()
Note: If the subtitles are not playing correctly along the video, you can adjust the playback delay using the G and H keys on your keyboard. This will toggle between 50ms delays.
How To Add Subtitles To Video In VLC Media Player Permanently?
Since the above method only adds subtitles temporarily, you might be looking for a solution to permanently attach the SRT file to your clip to provide a better viewing experience to your viewers or add extra information for those who have difficulty understanding the audio.
Below we’ve provided step-by-step methods to add subtitles to video in the VLC media player on your Windows and Mac.
On Windows
You can permanently embed the subtitles to your video in the VLC media player on your Windows in the following way:
Step1 Launch the VLC media player on your Windows PC/laptop and click “Media.” Scroll down and click the “Stream” option.

Step2 Now, click “Add” in the pop-up menu and choose the video you want to play. To add a subtitles file, check the “Use a Subtitles File” option and click “Browse.” Now, add the relevant SRT file you’ve downloaded.

Step3 Next, click the “Stream” option and choose “Next.” To set the destination for your video, select “File” and click “Add.” A new window will open, click the “Browse” option and enter your footage/video name.
Make sure to set the format as .mp4 or any other video format. Choose the folder for your video and click “Save.” Click the “Next” option to proceed further.
Step4 Check the box next to “Active Transcoding,” click the Wrench icon, and head to the “Subtitles” tab. Check the boxes next to “Subtitles” and “Overlay Subtitles on the Video.
Finally, click the “Save” option, select “Next,” and click “Stream” in the new window. Wait for the processing to complete, and your video with subtitles will be saved to the folder you’ve selected.

On Mac
Here’s how you can permanently add subtitles to your video clip in the VLC media player on your Mac:
Step1 Launch the VLC media player on your Mac and click the “File” option from the top toolbar. Click “Advanced Open File.”

Step2 Now, click “Browse” on the next page and add the video to which you want to attach the subtitles. Checkmark the “Add Subtitles File” option and click “Choose.” Browse and add the SRT file. Click “OK” to confirm.
Step3 Checkmark the “Stream Outputs” option and click “Settings.” Next, click “Browse” in the next window to configure the output file name and folder. Afterward, click “Save” and set the Encapsulation method as “MPEG 4.”
Under the Transcoding tab, checkmark the boxes next to Video and Audio. Next, click “OK” and select “Open.” You can now turn on the subtitles by navigating to “Subtitles” > “Subtitles Track.”

How To Create Subtitles In VLC Media Player?
It is possible to create subtitles in the VLC media player if you’re unable to find an appropriate SRT file online or want to add some extra details by editing the existing one. For this method to work, you will first need to format your file in the SRT format.
Furthermore, you have to rank the text in order with a number and add timestamps in minutes, seconds, and milliseconds to determine the duration. To avoid plain text, you can also add effects to the subtitles by using HTML.
Step1 Launch a text editor on your PC, import your video to the editor, and save it in .srt format.

Step2 Open the VLC media player and play the video. Now, edit the subtitles while matching them with the timestamps.
Step3 Next, add a new line, timestamp, and subtitle for each caption.
Step4 Repeat the process to create and add all the required subtitles.
Bonus Tips: How To Add And Edit Subtitles In The Best VLC Alternative
If you find the above method difficult to understand, we recommend using Filmora . With this software program, you can not only edit your videos to make them engaging and appealing to watch but can also add and edit subtitles to them using the ten pre-build subtitles templates.
Free Download For Win 7 or later(64-bit)
Free Download For macOS 10.14 or later
Filmora can help you to format the subtitles to match your video and add various font styles, such as WordArt, Basic, Titles, and more. In addition, you can create text with different parameters, including color fills, gradient fills, and 12 shadow effects. You can also make your captions alive with the animation effects.
Here’s how you can add and edit subtitles on your videos using Filmora:
Step1 Launch the Filmora software on your PC and click “Create New Project.” Drag and drop your video or select “Click here to import media” to add your video.

Step2 Add the video to the timeline and play it. Listen to the voiceover and press the “M” key to add a marker.
Now, click the “Titles” option and head to the “Subtitles” tab from the left menu. Double-click a subtitle to download and preview it.

Step3 Drag and drop the subtitle you want to use in the timeline and adjust it along the marker point.
Next, double-click the subtitle box in the timeline and type the text from the voiceover. Add color, text template, and adjust the text space.

Step4 Head to the “Advanced” tab, delete the preset text and adjust the one you’ve just typed. You can also add animation effects from the “Animation” tab and click “OK.”

Repeat the process to add and edit the subtitles on your video till the end. Once you are satisfied, click “Export” and save the file on your PC.
Conclusion
In this article, we’ve explored different methods to show you how to add subtitles in the VLC media player to make your videos more engaging and easy to understand, even for those with hearing impairment.
We’ve also provided step-by-step instructions to use Filmora as an alternative to add and edit the subtitles on your video real quickly.
Hopefully, you’ve enjoyed reading this article and can now enjoy watching a video in any language with ease.
How To Add Subtitles To Video In VLC Media Player Permanently?
Since the above method only adds subtitles temporarily, you might be looking for a solution to permanently attach the SRT file to your clip to provide a better viewing experience to your viewers or add extra information for those who have difficulty understanding the audio.
Below we’ve provided step-by-step methods to add subtitles to video in the VLC media player on your Windows and Mac.
On Windows
You can permanently embed the subtitles to your video in the VLC media player on your Windows in the following way:
Step1 Launch the VLC media player on your Windows PC/laptop and click “Media.” Scroll down and click the “Stream” option.

Step2 Now, click “Add” in the pop-up menu and choose the video you want to play. To add a subtitles file, check the “Use a Subtitles File” option and click “Browse.” Now, add the relevant SRT file you’ve downloaded.

Step3 Next, click the “Stream” option and choose “Next.” To set the destination for your video, select “File” and click “Add.” A new window will open, click the “Browse” option and enter your footage/video name.
Make sure to set the format as .mp4 or any other video format. Choose the folder for your video and click “Save.” Click the “Next” option to proceed further.
Step4 Check the box next to “Active Transcoding,” click the Wrench icon, and head to the “Subtitles” tab. Check the boxes next to “Subtitles” and “Overlay Subtitles on the Video.
Finally, click the “Save” option, select “Next,” and click “Stream” in the new window. Wait for the processing to complete, and your video with subtitles will be saved to the folder you’ve selected.

On Mac
Here’s how you can permanently add subtitles to your video clip in the VLC media player on your Mac:
Step1 Launch the VLC media player on your Mac and click the “File” option from the top toolbar. Click “Advanced Open File.”

Step2 Now, click “Browse” on the next page and add the video to which you want to attach the subtitles. Checkmark the “Add Subtitles File” option and click “Choose.” Browse and add the SRT file. Click “OK” to confirm.
Step3 Checkmark the “Stream Outputs” option and click “Settings.” Next, click “Browse” in the next window to configure the output file name and folder. Afterward, click “Save” and set the Encapsulation method as “MPEG 4.”
Under the Transcoding tab, checkmark the boxes next to Video and Audio. Next, click “OK” and select “Open.” You can now turn on the subtitles by navigating to “Subtitles” > “Subtitles Track.”

How To Create Subtitles In VLC Media Player?
It is possible to create subtitles in the VLC media player if you’re unable to find an appropriate SRT file online or want to add some extra details by editing the existing one. For this method to work, you will first need to format your file in the SRT format.
Furthermore, you have to rank the text in order with a number and add timestamps in minutes, seconds, and milliseconds to determine the duration. To avoid plain text, you can also add effects to the subtitles by using HTML.
Step1 Launch a text editor on your PC, import your video to the editor, and save it in .srt format.

Step2 Open the VLC media player and play the video. Now, edit the subtitles while matching them with the timestamps.
Step3 Next, add a new line, timestamp, and subtitle for each caption.
Step4 Repeat the process to create and add all the required subtitles.
Bonus Tips: How To Add And Edit Subtitles In The Best VLC Alternative
If you find the above method difficult to understand, we recommend using Filmora . With this software program, you can not only edit your videos to make them engaging and appealing to watch but can also add and edit subtitles to them using the ten pre-build subtitles templates.
Free Download For Win 7 or later(64-bit)
Free Download For macOS 10.14 or later
Filmora can help you to format the subtitles to match your video and add various font styles, such as WordArt, Basic, Titles, and more. In addition, you can create text with different parameters, including color fills, gradient fills, and 12 shadow effects. You can also make your captions alive with the animation effects.
Here’s how you can add and edit subtitles on your videos using Filmora:
Step1 Launch the Filmora software on your PC and click “Create New Project.” Drag and drop your video or select “Click here to import media” to add your video.

Step2 Add the video to the timeline and play it. Listen to the voiceover and press the “M” key to add a marker.
Now, click the “Titles” option and head to the “Subtitles” tab from the left menu. Double-click a subtitle to download and preview it.

Step3 Drag and drop the subtitle you want to use in the timeline and adjust it along the marker point.
Next, double-click the subtitle box in the timeline and type the text from the voiceover. Add color, text template, and adjust the text space.

Step4 Head to the “Advanced” tab, delete the preset text and adjust the one you’ve just typed. You can also add animation effects from the “Animation” tab and click “OK.”

Repeat the process to add and edit the subtitles on your video till the end. Once you are satisfied, click “Export” and save the file on your PC.
Conclusion
In this article, we’ve explored different methods to show you how to add subtitles in the VLC media player to make your videos more engaging and easy to understand, even for those with hearing impairment.
We’ve also provided step-by-step instructions to use Filmora as an alternative to add and edit the subtitles on your video real quickly.
Hopefully, you’ve enjoyed reading this article and can now enjoy watching a video in any language with ease.
Best Ways to Merge FLV Files [Windows, Mac,Android, iPhone & Online]
It’s typical to download numerous small FLV files of a popular movie from YouTube or other video-sharing sites instead of the entire movie. Let me tell you here that an FLV (Flash Video) is a container format used to transmit video or audio over the internet. At this point, you may want to combine multiple FLV files into one. Combining multiple FLV files to create a masterpiece, like a trailer, is of course a terrific idea. Well, to combine these FLV files, you need a professional FLV merger as your assistant.
So, let me help you here. Filmora Video Editor may be the best FLV combiner for Windows and Mac available nowadays. This clever tool is ideal for users seeking professional editing functions like video merging. The software is available for download on Windows and Mac systems and allows for the lossless merging of FLV, MP4, MOV, WebM, and many more file formats. It makes it a lot easier for you to merge or combine FLV files into a large video collection without compromising on video quality even if you lack technical expertise. And, you can use it to watch a movie or your favorite content without any annoying interruptions.
Now, I’ll show you how to quickly and effortlessly merge your favorite video clips into a new video collection.
For Win 7 or later (64-bit)
For macOS 10.14 or later
A Step-by-Step Guide to Merge FLV files on Windows/Mac using Wondershare Filmora
Step 1: Launch Wondershare Filmora and load FLV files…
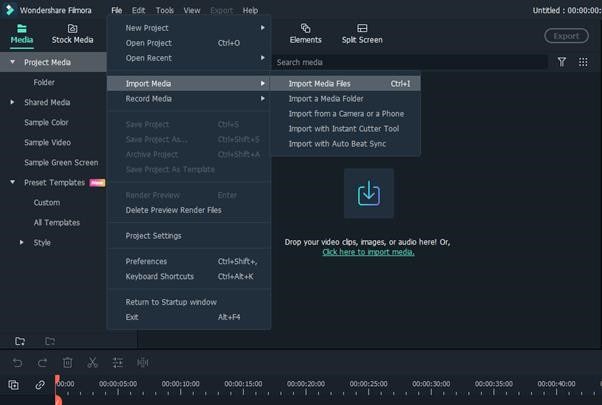
When you run this FLV joiner, simply click “Import” to load all of the local FLV files that you want to merge to the User’s album of this FLV video merger. You can also just drag and drop the target files from your PC into the album.
Step 2: Merge FLV files into one…
At the bottom of this FLV file merger, there lies a Timeline. Drag FLV files from the album to the Timeline and use the slider bar to help you arrange all FLV files in the Timeline without overlapping them. That’s very important as if you put one video to another, the original video will get split. Also, make sure that all FLV files are placed in the sequence in which they are to be played. If not, you can rearrange any video clip with a simple drag-and-drop.

Step 3: Choose the target format as FLV…
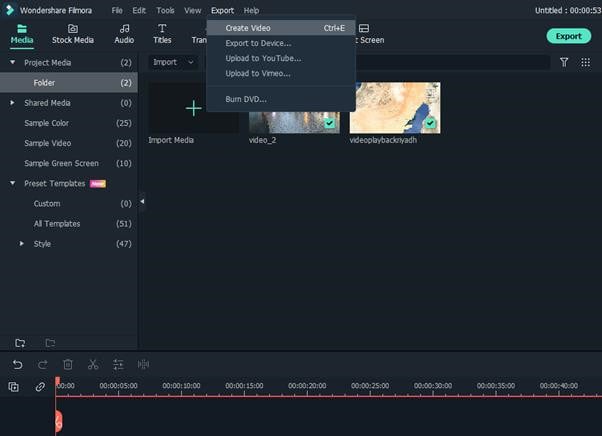
When you are sure that all FLV files are in the correct required order on the Timeline, you can view the effect in real-time in the preview pane. If everything is fine, you are now ready to export this new FLV file. All you have to do is just press the “Create”
button, then go to the “Format” tab > “FLV” output format in the output window.
Step 4: Export a new FLV file…
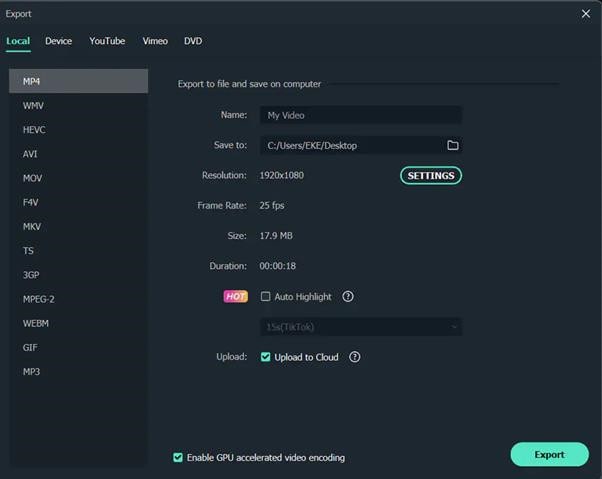
Finally, click the “Create” button to save the settings and export the new FLV file simultaneously. When it’s done, simply navigate to the whole FLV video using the output file path.
Alternative Way to Merge/Combine FLV Files on Windows
Joyoshare Media Cutter (Paid tool to merge FLV Files)
Joyoshare Video Joiner for Windows is a comprehensive and user-friendly audio and video merging software that supports a wide range of file formats such as FLV, F4V, HD,4K, MP4, M4V, M4A, DV, MPEG, FLAV, WMA, and others. It is not only a superb video joiner for joining FLV files in batches without re-encoding, but it is also a video editor thanks to the built-in advanced editing tool. That means you can customize and enhance your FLV files as required before integrating them. The two combing modes (high-speed mode and encoding mode) it employs are also noteworthy. With high-speed mode, you can join an unlimited number of FLV files losslessly and swiftly. You can merge files in different formats without gaps and customize the codec, resolution, bit rate, frame rate, and other parameters of your FLV files while in encoding mode.
A Step-by-Step Guide
Step 1: Add FLV files…
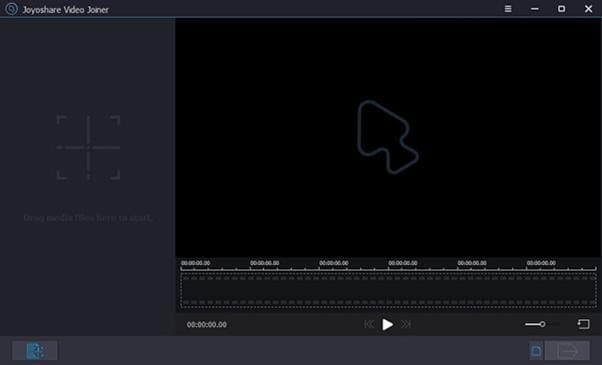
First, go to the Joyoshare website and download the Joyoshare Video Joiner installation package. Install and configure it on your computer. Then, import FLV files into the video joiner. There are two options: click “Open File” to choose them or drag them directly into the software.
Step 2: Choose a merging mode and export format…
You must pick a format from high-speed mode and encoding mode based on your requirements by using the “Format” button. The former is only for combining files of the same format losslessly at 60 X speed. The other is for users who want to modify files while joining files in different formats. With the use of a gear icon beside the selected output format, users can change video settings such as resolution, bit rate, codes, and so on while in encoding mode.
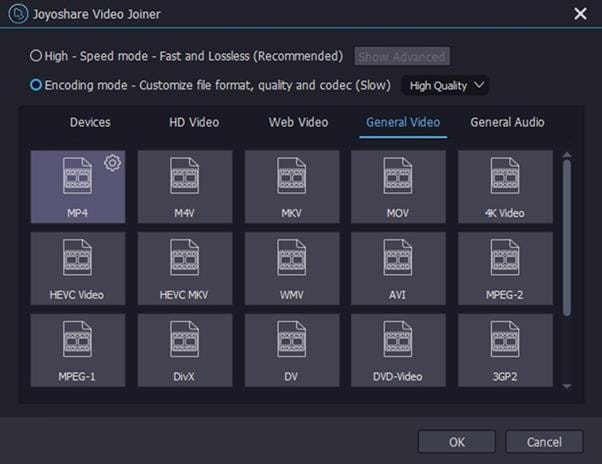
Step 3: Remove undesirable parts…
Once finished choosing mode and format, simply press “OK” to go back to the main screen. Then double-click these FLV files one by one to preview them. You can change the timeline to remove unnecessary sections from your FLV videos. Moreover, renaming and rearranging these video files can also be realized in this step.

Step 4: Edit FLV files (optional)…
The software has an editor that allows you to easily and flexibly enhance your FLV video files by clicking “Edit” next to each file before joining.
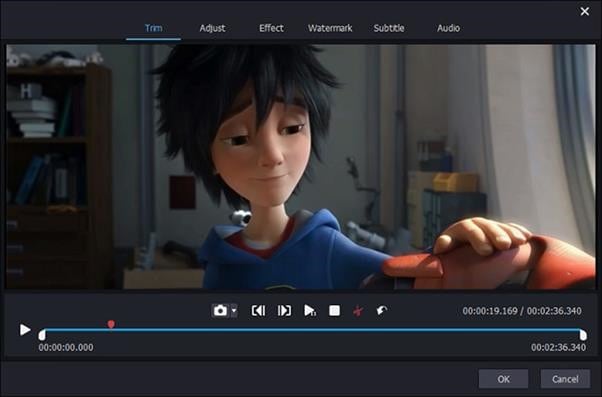
Step 5: Merge FLV files and save…
Finally, all you have to do is press the “Convert” button to enable Joyoshare Video Joiner to begin combining these FLV files. The merged FLV file will be saved as a converted file on your computer.
Format Factory (Free tool to merge FLV Files)
Format Factory is a free Windows video joiner, recorder, converter, downloader, and editor. It supports a wide range of file types, including FLV, MKV, MP4, 3GP, WMV, SWF, AVI, MPG, VOB, WebM, and others. It is not difficult to use it to combine FLV files.
A Step-by-Step Guide
Step 1: Run Format Factory…
After installing Format Factory, go to “Video Joiner & Mux” to proceed.
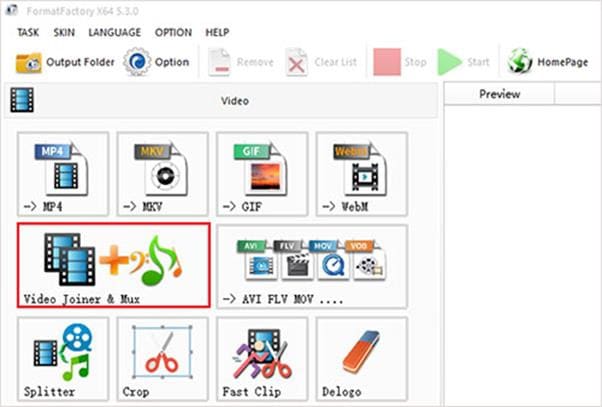
Step 2: Add FLV files…
“Add Files” allows you to import FLV files in batches. When all FLV files have been loaded, click “Clip” to clip and crop FLV files as needed. Then, under “Output Settings,” choose an output format and further customize the output quality.
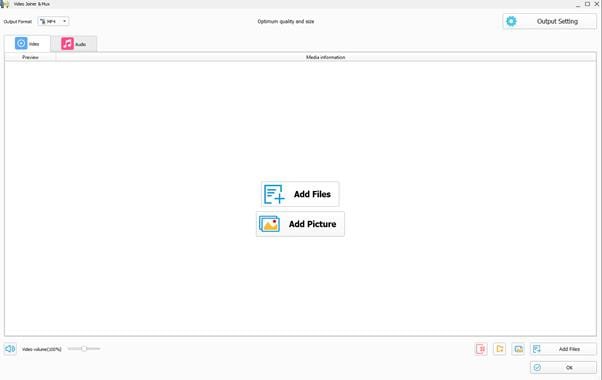
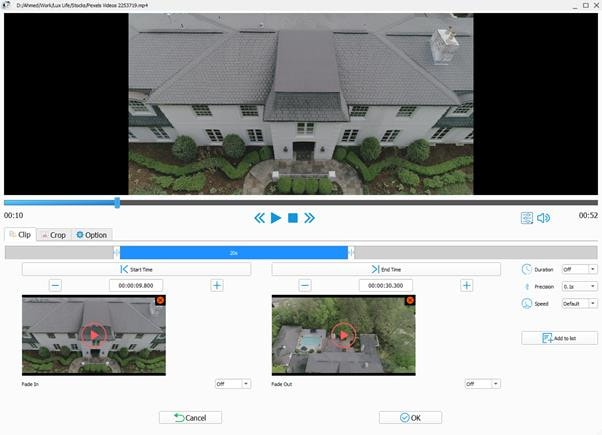
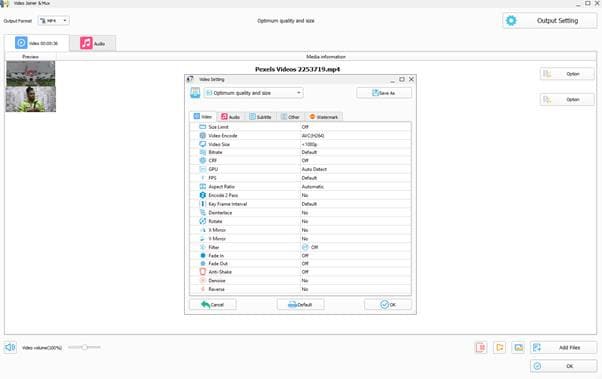
Step 3: Merge files…
Once done, click “OK” to get back to the first window and press “Start” to begin the merging
process.

Alternative Way to Merge/Combine FLV Files on Mac
iDealshare VideoGo (Paid tool to merge FLV Files)
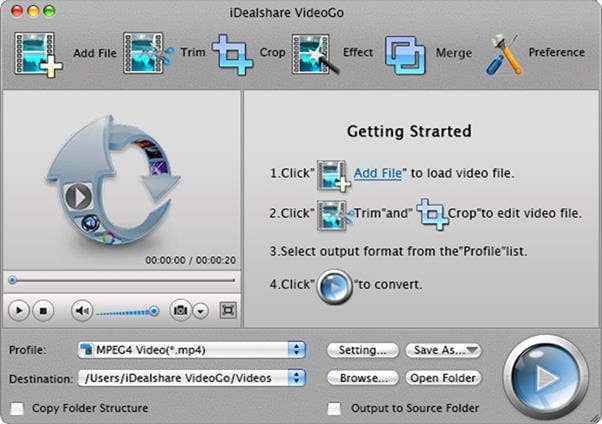
You can use iDealshare VideoGo to convert media files for playback anywhere. It supports a wide range of video formats, both SD and HD. The application also features its own editor, which includes a wide range of activities. It allows you to trim the selected video, crop it, modify the brightness, contrast, and saturation, add text and image watermarks, and manage or add your own subtitles.
A Step-by-Step Guide
Step 1: Import FLV files…
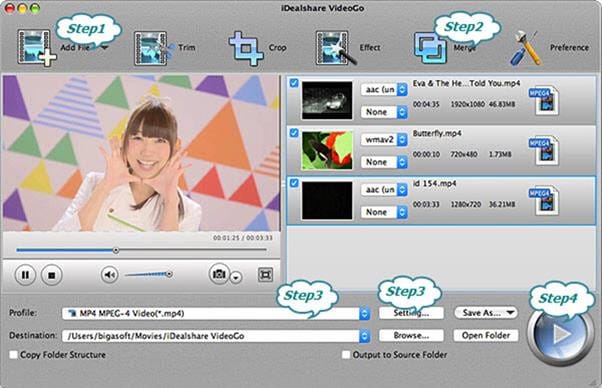
To import the FLV video files that you want to merge, click the “Add File” button or just drag & drop the files.
Step 2: Choose output format…
Choose FLV as the output video format. Select FLV from the “General Video” category from the “Profile” pop-up menu.
Step 3: Merge FLV files…
Select the FLV video files that you wish to merge into one in the main window list, and then choose the “Merge Selected into One” option from the context menu. Click the “Convert” button to start combining the videos.
Faasoft FLV Joiner/Merger (Free tool to merge FLV Files)
Faasoft FLV Joiner/Merger is used to combine FLV files without any re-encoding as well as retain the output quality. Merges FLV files and converts them to more popular formats as well like; MP4, AVI, MOV, WMV, MKV, ASF, ProRes, MXF, OGV, 3GP, etc. to get played on multiple mediums. Apart from FLV files, Faasoft FLV Joiner allows you to merge various kinds of video and audio clips. In addition, this powerful tool works more than just an FLV Merger, i.e.; It is, even more, an in-built video and audio editor, with which, you can optimize any files as per requirement.
A Step-by-Step Guide
Step 1: Load FLV files…
To add FLV files to this Joiner, run FLV Merger and drag and drop the folder containing FLV files to the program’s main screen. If the FLV files you wish to merge are not in the same folder, you can drag them one by one to the software. You should put them together first to save time.
Step 2: List to merge…
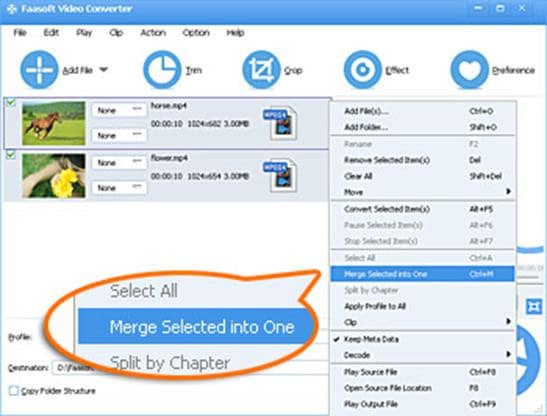
Once all FLV files have loaded, pick them all and choose “Merge Selected into One” from the context menu. In the task list, the combined FLV file will have an extension name similar to “Merge 1.”
Step 3: Convert FLV clips…
Click the “Profile” drop-down button to select “FLV Flash Video Format (*.flv)” from the “Picture & Animation” category as the output format. If you want to re-encode the merged FLV file to another video format, select another output format from the list above.
Step 4: Start joining…
Simply click the round “Convert” button in the bottom right corner and let this fantastic tool do the rest.
2 Ways to Merge/Combine FLV Files on Android
Video Merger by Alyaanah (Paid tool to merge FLV Files)
Video Merger can merge any number of videos together in one video. It also accepts almost any format of videos as input. Some of the input formats for merging that are supported are mp4, mkv, 3gp, 3gpp, mov, flv, avi, mpg, mpeg, m4v, vob, wmv, webm, mts, ts, m2ts, and so on. It can also convert the combined video to a variety of formats. Merged output formats supported include mp4, mkv, mov, avi, 3gp, and others. This application allows you to combine videos with different formats, bitrates, and frame rates into a single video. It also scales multiple videos into a single scale and merges them together. It can also merge videos with different resolutions into one video. The merged videos can also be compressed together maintaining original quality to a smaller sized video than all the original video sizes combined.
Video merger allows you to merge in three different ways as follows;
Side by side:
Choose two files, and they will be merged in a side-by-side format (Horizontal stack).
Top-Bottom:
Choose two files, and they will be merged top to bottom (Vertical stack).
Sequential:
You can select unlimited files and they will be merged one after the other in a sequential format.
VideoChain by Arypex Initiative (Free tool to merge FLV Files)
Now you can combine video files from your Android device camera as well and for free. VideoChain is an easy to learn and use app (with in-built instructions) that allows you to easily combine video clips to create one video using the most advanced encoding techniques. It is an excellent tool for merging video clips from your front and rear cameras, as well as portrait and landscape video files, into a single file. It can combine MP4, MPEG, MKV, FLV, and other video clips with four different quality/compression settings available.
2 Ways to Merge/Combine FLV Files on iPhone
Magisto Video Editor (Paid tool to merge FLV Files)
It is a wonderful app to put FLV clips together on an iPhone. Using this versatile video editing app, you can merge multiple videos and create eye-catching files of up to 5 minutes. You can add text, colors, and even text slides between video frames to the video. The app’s filters can be used to further enhance the files. The app also supports a large library of audio files, which you can use to add music to your video files. And, to use all of the app’s features, you must have a paid subscription.


iMovie (Free tool to merge FLV Files)
iMovie is one of the most popular video editing apps for iOS users. You can edit and merge videos on iMovie with ease. The app is free and secure. If you are looking for a professional way to put two videos together on your iPhone, iMovie can be a good choice. FLV videos can be converted to WMV, M4V, and other popular video formats after merging. You can also modify the video output settings and delete the selected video segments as well.
A Step-by-Step Guide
Step 1: Launch the iMovie app on your iPhone. In the Projects window, press the + button.
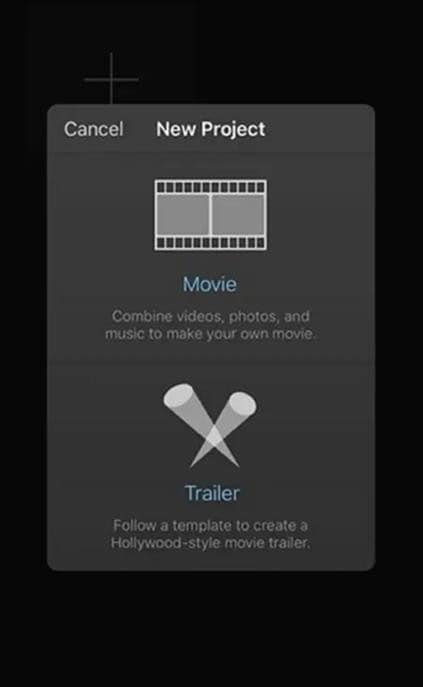
Step 2: In the New Project window, select Movie. Browse through your video clips in the gallery and import them.

Step 3: Tap Create Movie at the iPhone screen’s bottom. The videos will automatically get merged in the iMovie timeline.
Step 4: Select the desired video file. You can include transition effects, background music, and other profiles.
Step 5: Tap Done to combine two videos into one on the iPhone using iMovie.

Step 6: To export your merged video file, tap the Share icon to save the video.
2 Ways to Merge/Combine FLV Files Online
Clideo (Paid online tool to merge FLV Files)
Now you can combine your FLV files online using Clideo’s FLV Merger. It allows you to combine several videos, images, and audio files. You will also be able to download the finished product in any format you want. And, as the tool operates online, it will not consume any of your device’s memory. Each file you add in the free edition can be up to 500 MB in size; if this is insufficient for you, you can always subscribe to Clideo Pro.
A Step-by-Step Guide
Step 1: Upload the FLV files…
Click on the “Choose files” button and select the necessary videos from your device. To add a video from Google Drive or Dropbox, use the little arrow to call a drop-down menu.
Step 2: Merge FLV and other files
To add more content, use the menu with all of the options from the previous stage. Rearrange them as you see fit. Crop the frame using one of the available aspect ratios. Upload a soundtrack, then cut it with the scissors icon and adjust the volume. When you’re done, choose a format and click “Merge.”
Step 3: Save joined FLV
Take a peek at the outcome. If you like it, save it to your device or cloud storage. Otherwise, you can return to editing without having to start over.
Veed’s Video Editor (Free online tool to merge FLV Files)
Now there’s no need to pay for expensive apps like Filmora or Wondershare Uniconvertor. You can merge your FLV files using Veed’s Video Editor. It lets you combine multiple flash videos together and export them as a single video file. You can simply do it all straight from your browser and from any device. Veed’s Video Editor is compatible with Windows XP, Windows 10, Mac, Linux, and all mobile devices. And, it is absolutely free. There’s no need for an account or to download anything.
A Step-by-Step Guide
Step 1: Upload the FLV files…
Select multiple FLV videos after clicking on ‘Choose FLV Files’. You can also drag and drop your videos into the box. They’ll be added to the editor.
Step 2: Start editing or add more videos…
You’ll be directed to the video editor, where you can split, combine, and rearrange your video clips. This is a purely optional step. More videos can be added by clicking the plus (+) sign in the editing window or by selecting “Upload” from the left menu.
Step 3: Export your new video…
You can now save your merged videos as a single MP4 file. Simply select ‘Export,’ and your download will initiate.
FAQs about Merging FLV Files
Question 1: How to combine FLV files?
Answer: To combine FLV files, hold down the Ctrl or Shift key while selecting multiple FLV files in the User’s Album, and then drag and drop to the video track on the Timeline. All FLV files will automatically merge one after the other in order.
Question 2: What browser should be used to Merge FLV?
Answer: You can use any modern browser to Merge FLV, such as Google Chrome, Firefox, Opera, or Safari.
Question 3: How long does it take to Merge FLV files?
Answer: The FLV file merger is quite quick and takes only a few seconds.
So, if you have been looking for the best options on how to merge FLV files on different mediums, the above-listed apps will serve your purpose. Now, check out the supported features, formats, and other merging functions of all the apps and choose the one that best meets your needs.
For macOS 10.14 or later
A Step-by-Step Guide to Merge FLV files on Windows/Mac using Wondershare Filmora
Step 1: Launch Wondershare Filmora and load FLV files…
When you run this FLV joiner, simply click “Import” to load all of the local FLV files that you want to merge to the User’s album of this FLV video merger. You can also just drag and drop the target files from your PC into the album.

Step 2: Merge FLV files into one…
At the bottom of this FLV file merger, there lies a Timeline. Drag FLV files from the album to the Timeline and use the slider bar to help you arrange all FLV files in the Timeline without overlapping them. That’s very important as if you put one video to another, the original video will get split. Also, make sure that all FLV files are placed in the sequence in which they are to be played. If not, you can rearrange any video clip with a simple drag-and-drop.

Step 3: Choose the target format as FLV…
When you are sure that all FLV files are in the correct required order on the Timeline, you can view the effect in real-time in the preview pane. If everything is fine, you are now ready to export this new FLV file. All you have to do is just press the “Create”
button, then go to the “Format” tab > “FLV” output format in the output window.

Step 4: Export a new FLV file…
Finally, click the “Create” button to save the settings and export the new FLV file simultaneously. When it’s done, simply navigate to the whole FLV video using the output file path.

Alternative Way to Merge/Combine FLV Files on Windows
Joyoshare Media Cutter (Paid tool to merge FLV Files)
Joyoshare Video Joiner for Windows is a comprehensive and user-friendly audio and video merging software that supports a wide range of file formats such as FLV, F4V, HD,4K, MP4, M4V, M4A, DV, MPEG, FLAV, WMA, and others. It is not only a superb video joiner for joining FLV files in batches without re-encoding, but it is also a video editor thanks to the built-in advanced editing tool. That means you can customize and enhance your FLV files as required before integrating them. The two combing modes (high-speed mode and encoding mode) it employs are also noteworthy. With high-speed mode, you can join an unlimited number of FLV files losslessly and swiftly. You can merge files in different formats without gaps and customize the codec, resolution, bit rate, frame rate, and other parameters of your FLV files while in encoding mode.
A Step-by-Step Guide
Step 1: Add FLV files…
First, go to the Joyoshare website and download the Joyoshare Video Joiner installation package. Install and configure it on your computer. Then, import FLV files into the video joiner. There are two options: click “Open File” to choose them or drag them directly into the software.

Step 2: Choose a merging mode and export format…
You must pick a format from high-speed mode and encoding mode based on your requirements by using the “Format” button. The former is only for combining files of the same format losslessly at 60 X speed. The other is for users who want to modify files while joining files in different formats. With the use of a gear icon beside the selected output format, users can change video settings such as resolution, bit rate, codes, and so on while in encoding mode.

Step 3: Remove undesirable parts…
Once finished choosing mode and format, simply press “OK” to go back to the main screen. Then double-click these FLV files one by one to preview them. You can change the timeline to remove unnecessary sections from your FLV videos. Moreover, renaming and rearranging these video files can also be realized in this step.

Step 4: Edit FLV files (optional)…
The software has an editor that allows you to easily and flexibly enhance your FLV video files by clicking “Edit” next to each file before joining.

Step 5: Merge FLV files and save…
Finally, all you have to do is press the “Convert” button to enable Joyoshare Video Joiner to begin combining these FLV files. The merged FLV file will be saved as a converted file on your computer.
Format Factory (Free tool to merge FLV Files)
Format Factory is a free Windows video joiner, recorder, converter, downloader, and editor. It supports a wide range of file types, including FLV, MKV, MP4, 3GP, WMV, SWF, AVI, MPG, VOB, WebM, and others. It is not difficult to use it to combine FLV files.
A Step-by-Step Guide
Step 1: Run Format Factory…
After installing Format Factory, go to “Video Joiner & Mux” to proceed.

Step 2: Add FLV files…
“Add Files” allows you to import FLV files in batches. When all FLV files have been loaded, click “Clip” to clip and crop FLV files as needed. Then, under “Output Settings,” choose an output format and further customize the output quality.


Step 3: Merge files…
Once done, click “OK” to get back to the first window and press “Start” to begin the merging
process.

Alternative Way to Merge/Combine FLV Files on Mac
iDealshare VideoGo (Paid tool to merge FLV Files)
You can use iDealshare VideoGo to convert media files for playback anywhere. It supports a wide range of video formats, both SD and HD. The application also features its own editor, which includes a wide range of activities. It allows you to trim the selected video, crop it, modify the brightness, contrast, and saturation, add text and image watermarks, and manage or add your own subtitles.

A Step-by-Step Guide
Step 1: Import FLV files…
To import the FLV video files that you want to merge, click the “Add File” button or just drag & drop the files.
Step 2: Choose output format…
Choose FLV as the output video format. Select FLV from the “General Video” category from the “Profile” pop-up menu.
Step 3: Merge FLV files…
Select the FLV video files that you wish to merge into one in the main window list, and then choose the “Merge Selected into One” option from the context menu. Click the “Convert” button to start combining the videos.

Faasoft FLV Joiner/Merger (Free tool to merge FLV Files)
Faasoft FLV Joiner/Merger is used to combine FLV files without any re-encoding as well as retain the output quality. Merges FLV files and converts them to more popular formats as well like; MP4, AVI, MOV, WMV, MKV, ASF, ProRes, MXF, OGV, 3GP, etc. to get played on multiple mediums. Apart from FLV files, Faasoft FLV Joiner allows you to merge various kinds of video and audio clips. In addition, this powerful tool works more than just an FLV Merger, i.e.; It is, even more, an in-built video and audio editor, with which, you can optimize any files as per requirement.
A Step-by-Step Guide
Step 1: Load FLV files…
To add FLV files to this Joiner, run FLV Merger and drag and drop the folder containing FLV files to the program’s main screen. If the FLV files you wish to merge are not in the same folder, you can drag them one by one to the software. You should put them together first to save time.
Step 2: List to merge…
Once all FLV files have loaded, pick them all and choose “Merge Selected into One” from the context menu. In the task list, the combined FLV file will have an extension name similar to “Merge 1.”

Step 3: Convert FLV clips…
Click the “Profile” drop-down button to select “FLV Flash Video Format (*.flv)” from the “Picture & Animation” category as the output format. If you want to re-encode the merged FLV file to another video format, select another output format from the list above.
Step 4: Start joining…
Simply click the round “Convert” button in the bottom right corner and let this fantastic tool do the rest.
2 Ways to Merge/Combine FLV Files on Android
Video Merger by Alyaanah (Paid tool to merge FLV Files)
Video Merger can merge any number of videos together in one video. It also accepts almost any format of videos as input. Some of the input formats for merging that are supported are mp4, mkv, 3gp, 3gpp, mov, flv, avi, mpg, mpeg, m4v, vob, wmv, webm, mts, ts, m2ts, and so on. It can also convert the combined video to a variety of formats. Merged output formats supported include mp4, mkv, mov, avi, 3gp, and others. This application allows you to combine videos with different formats, bitrates, and frame rates into a single video. It also scales multiple videos into a single scale and merges them together. It can also merge videos with different resolutions into one video. The merged videos can also be compressed together maintaining original quality to a smaller sized video than all the original video sizes combined.
Video merger allows you to merge in three different ways as follows;
Side by side:
Choose two files, and they will be merged in a side-by-side format (Horizontal stack).
Top-Bottom:
Choose two files, and they will be merged top to bottom (Vertical stack).
Sequential:
You can select unlimited files and they will be merged one after the other in a sequential format.
VideoChain by Arypex Initiative (Free tool to merge FLV Files)
Now you can combine video files from your Android device camera as well and for free. VideoChain is an easy to learn and use app (with in-built instructions) that allows you to easily combine video clips to create one video using the most advanced encoding techniques. It is an excellent tool for merging video clips from your front and rear cameras, as well as portrait and landscape video files, into a single file. It can combine MP4, MPEG, MKV, FLV, and other video clips with four different quality/compression settings available.
2 Ways to Merge/Combine FLV Files on iPhone
Magisto Video Editor (Paid tool to merge FLV Files)
It is a wonderful app to put FLV clips together on an iPhone. Using this versatile video editing app, you can merge multiple videos and create eye-catching files of up to 5 minutes. You can add text, colors, and even text slides between video frames to the video. The app’s filters can be used to further enhance the files. The app also supports a large library of audio files, which you can use to add music to your video files. And, to use all of the app’s features, you must have a paid subscription.


iMovie (Free tool to merge FLV Files)
iMovie is one of the most popular video editing apps for iOS users. You can edit and merge videos on iMovie with ease. The app is free and secure. If you are looking for a professional way to put two videos together on your iPhone, iMovie can be a good choice. FLV videos can be converted to WMV, M4V, and other popular video formats after merging. You can also modify the video output settings and delete the selected video segments as well.
A Step-by-Step Guide
Step 1: Launch the iMovie app on your iPhone. In the Projects window, press the + button.

Step 2: In the New Project window, select Movie. Browse through your video clips in the gallery and import them.

Step 3: Tap Create Movie at the iPhone screen’s bottom. The videos will automatically get merged in the iMovie timeline.
Step 4: Select the desired video file. You can include transition effects, background music, and other profiles.
Step 5: Tap Done to combine two videos into one on the iPhone using iMovie.

Step 6: To export your merged video file, tap the Share icon to save the video.
2 Ways to Merge/Combine FLV Files Online
Clideo (Paid online tool to merge FLV Files)
Now you can combine your FLV files online using Clideo’s FLV Merger. It allows you to combine several videos, images, and audio files. You will also be able to download the finished product in any format you want. And, as the tool operates online, it will not consume any of your device’s memory. Each file you add in the free edition can be up to 500 MB in size; if this is insufficient for you, you can always subscribe to Clideo Pro.
A Step-by-Step Guide
Step 1: Upload the FLV files…
Click on the “Choose files” button and select the necessary videos from your device. To add a video from Google Drive or Dropbox, use the little arrow to call a drop-down menu.
Step 2: Merge FLV and other files
To add more content, use the menu with all of the options from the previous stage. Rearrange them as you see fit. Crop the frame using one of the available aspect ratios. Upload a soundtrack, then cut it with the scissors icon and adjust the volume. When you’re done, choose a format and click “Merge.”
Step 3: Save joined FLV
Take a peek at the outcome. If you like it, save it to your device or cloud storage. Otherwise, you can return to editing without having to start over.
Veed’s Video Editor (Free online tool to merge FLV Files)
Now there’s no need to pay for expensive apps like Filmora or Wondershare Uniconvertor. You can merge your FLV files using Veed’s Video Editor. It lets you combine multiple flash videos together and export them as a single video file. You can simply do it all straight from your browser and from any device. Veed’s Video Editor is compatible with Windows XP, Windows 10, Mac, Linux, and all mobile devices. And, it is absolutely free. There’s no need for an account or to download anything.
A Step-by-Step Guide
Step 1: Upload the FLV files…
Select multiple FLV videos after clicking on ‘Choose FLV Files’. You can also drag and drop your videos into the box. They’ll be added to the editor.
Step 2: Start editing or add more videos…
You’ll be directed to the video editor, where you can split, combine, and rearrange your video clips. This is a purely optional step. More videos can be added by clicking the plus (+) sign in the editing window or by selecting “Upload” from the left menu.
Step 3: Export your new video…
You can now save your merged videos as a single MP4 file. Simply select ‘Export,’ and your download will initiate.
FAQs about Merging FLV Files
Question 1: How to combine FLV files?
Answer: To combine FLV files, hold down the Ctrl or Shift key while selecting multiple FLV files in the User’s Album, and then drag and drop to the video track on the Timeline. All FLV files will automatically merge one after the other in order.
Question 2: What browser should be used to Merge FLV?
Answer: You can use any modern browser to Merge FLV, such as Google Chrome, Firefox, Opera, or Safari.
Question 3: How long does it take to Merge FLV files?
Answer: The FLV file merger is quite quick and takes only a few seconds.
So, if you have been looking for the best options on how to merge FLV files on different mediums, the above-listed apps will serve your purpose. Now, check out the supported features, formats, and other merging functions of all the apps and choose the one that best meets your needs.
For macOS 10.14 or later
A Step-by-Step Guide to Merge FLV files on Windows/Mac using Wondershare Filmora
Step 1: Launch Wondershare Filmora and load FLV files…
When you run this FLV joiner, simply click “Import” to load all of the local FLV files that you want to merge to the User’s album of this FLV video merger. You can also just drag and drop the target files from your PC into the album.

Step 2: Merge FLV files into one…
At the bottom of this FLV file merger, there lies a Timeline. Drag FLV files from the album to the Timeline and use the slider bar to help you arrange all FLV files in the Timeline without overlapping them. That’s very important as if you put one video to another, the original video will get split. Also, make sure that all FLV files are placed in the sequence in which they are to be played. If not, you can rearrange any video clip with a simple drag-and-drop.

Step 3: Choose the target format as FLV…
When you are sure that all FLV files are in the correct required order on the Timeline, you can view the effect in real-time in the preview pane. If everything is fine, you are now ready to export this new FLV file. All you have to do is just press the “Create”
button, then go to the “Format” tab > “FLV” output format in the output window.

Step 4: Export a new FLV file…
Finally, click the “Create” button to save the settings and export the new FLV file simultaneously. When it’s done, simply navigate to the whole FLV video using the output file path.

Alternative Way to Merge/Combine FLV Files on Windows
Joyoshare Media Cutter (Paid tool to merge FLV Files)
Joyoshare Video Joiner for Windows is a comprehensive and user-friendly audio and video merging software that supports a wide range of file formats such as FLV, F4V, HD,4K, MP4, M4V, M4A, DV, MPEG, FLAV, WMA, and others. It is not only a superb video joiner for joining FLV files in batches without re-encoding, but it is also a video editor thanks to the built-in advanced editing tool. That means you can customize and enhance your FLV files as required before integrating them. The two combing modes (high-speed mode and encoding mode) it employs are also noteworthy. With high-speed mode, you can join an unlimited number of FLV files losslessly and swiftly. You can merge files in different formats without gaps and customize the codec, resolution, bit rate, frame rate, and other parameters of your FLV files while in encoding mode.
A Step-by-Step Guide
Step 1: Add FLV files…
First, go to the Joyoshare website and download the Joyoshare Video Joiner installation package. Install and configure it on your computer. Then, import FLV files into the video joiner. There are two options: click “Open File” to choose them or drag them directly into the software.

Step 2: Choose a merging mode and export format…
You must pick a format from high-speed mode and encoding mode based on your requirements by using the “Format” button. The former is only for combining files of the same format losslessly at 60 X speed. The other is for users who want to modify files while joining files in different formats. With the use of a gear icon beside the selected output format, users can change video settings such as resolution, bit rate, codes, and so on while in encoding mode.

Step 3: Remove undesirable parts…
Once finished choosing mode and format, simply press “OK” to go back to the main screen. Then double-click these FLV files one by one to preview them. You can change the timeline to remove unnecessary sections from your FLV videos. Moreover, renaming and rearranging these video files can also be realized in this step.

Step 4: Edit FLV files (optional)…
The software has an editor that allows you to easily and flexibly enhance your FLV video files by clicking “Edit” next to each file before joining.

Step 5: Merge FLV files and save…
Finally, all you have to do is press the “Convert” button to enable Joyoshare Video Joiner to begin combining these FLV files. The merged FLV file will be saved as a converted file on your computer.
Format Factory (Free tool to merge FLV Files)
Format Factory is a free Windows video joiner, recorder, converter, downloader, and editor. It supports a wide range of file types, including FLV, MKV, MP4, 3GP, WMV, SWF, AVI, MPG, VOB, WebM, and others. It is not difficult to use it to combine FLV files.
A Step-by-Step Guide
Step 1: Run Format Factory…
After installing Format Factory, go to “Video Joiner & Mux” to proceed.

Step 2: Add FLV files…
“Add Files” allows you to import FLV files in batches. When all FLV files have been loaded, click “Clip” to clip and crop FLV files as needed. Then, under “Output Settings,” choose an output format and further customize the output quality.


Step 3: Merge files…
Once done, click “OK” to get back to the first window and press “Start” to begin the merging
process.

Alternative Way to Merge/Combine FLV Files on Mac
iDealshare VideoGo (Paid tool to merge FLV Files)
You can use iDealshare VideoGo to convert media files for playback anywhere. It supports a wide range of video formats, both SD and HD. The application also features its own editor, which includes a wide range of activities. It allows you to trim the selected video, crop it, modify the brightness, contrast, and saturation, add text and image watermarks, and manage or add your own subtitles.

A Step-by-Step Guide
Step 1: Import FLV files…
To import the FLV video files that you want to merge, click the “Add File” button or just drag & drop the files.
Step 2: Choose output format…
Choose FLV as the output video format. Select FLV from the “General Video” category from the “Profile” pop-up menu.
Step 3: Merge FLV files…
Select the FLV video files that you wish to merge into one in the main window list, and then choose the “Merge Selected into One” option from the context menu. Click the “Convert” button to start combining the videos.

Faasoft FLV Joiner/Merger (Free tool to merge FLV Files)
Faasoft FLV Joiner/Merger is used to combine FLV files without any re-encoding as well as retain the output quality. Merges FLV files and converts them to more popular formats as well like; MP4, AVI, MOV, WMV, MKV, ASF, ProRes, MXF, OGV, 3GP, etc. to get played on multiple mediums. Apart from FLV files, Faasoft FLV Joiner allows you to merge various kinds of video and audio clips. In addition, this powerful tool works more than just an FLV Merger, i.e.; It is, even more, an in-built video and audio editor, with which, you can optimize any files as per requirement.
A Step-by-Step Guide
Step 1: Load FLV files…
To add FLV files to this Joiner, run FLV Merger and drag and drop the folder containing FLV files to the program’s main screen. If the FLV files you wish to merge are not in the same folder, you can drag them one by one to the software. You should put them together first to save time.
Step 2: List to merge…
Once all FLV files have loaded, pick them all and choose “Merge Selected into One” from the context menu. In the task list, the combined FLV file will have an extension name similar to “Merge 1.”

Step 3: Convert FLV clips…
Click the “Profile” drop-down button to select “FLV Flash Video Format (*.flv)” from the “Picture & Animation” category as the output format. If you want to re-encode the merged FLV file to another video format, select another output format from the list above.
Step 4: Start joining…
Simply click the round “Convert” button in the bottom right corner and let this fantastic tool do the rest.
2 Ways to Merge/Combine FLV Files on Android
Video Merger by Alyaanah (Paid tool to merge FLV Files)
Video Merger can merge any number of videos together in one video. It also accepts almost any format of videos as input. Some of the input formats for merging that are supported are mp4, mkv, 3gp, 3gpp, mov, flv, avi, mpg, mpeg, m4v, vob, wmv, webm, mts, ts, m2ts, and so on. It can also convert the combined video to a variety of formats. Merged output formats supported include mp4, mkv, mov, avi, 3gp, and others. This application allows you to combine videos with different formats, bitrates, and frame rates into a single video. It also scales multiple videos into a single scale and merges them together. It can also merge videos with different resolutions into one video. The merged videos can also be compressed together maintaining original quality to a smaller sized video than all the original video sizes combined.
Video merger allows you to merge in three different ways as follows;
Side by side:
Choose two files, and they will be merged in a side-by-side format (Horizontal stack).
Top-Bottom:
Choose two files, and they will be merged top to bottom (Vertical stack).
Sequential:
You can select unlimited files and they will be merged one after the other in a sequential format.
VideoChain by Arypex Initiative (Free tool to merge FLV Files)
Now you can combine video files from your Android device camera as well and for free. VideoChain is an easy to learn and use app (with in-built instructions) that allows you to easily combine video clips to create one video using the most advanced encoding techniques. It is an excellent tool for merging video clips from your front and rear cameras, as well as portrait and landscape video files, into a single file. It can combine MP4, MPEG, MKV, FLV, and other video clips with four different quality/compression settings available.
2 Ways to Merge/Combine FLV Files on iPhone
Magisto Video Editor (Paid tool to merge FLV Files)
It is a wonderful app to put FLV clips together on an iPhone. Using this versatile video editing app, you can merge multiple videos and create eye-catching files of up to 5 minutes. You can add text, colors, and even text slides between video frames to the video. The app’s filters can be used to further enhance the files. The app also supports a large library of audio files, which you can use to add music to your video files. And, to use all of the app’s features, you must have a paid subscription.


iMovie (Free tool to merge FLV Files)
iMovie is one of the most popular video editing apps for iOS users. You can edit and merge videos on iMovie with ease. The app is free and secure. If you are looking for a professional way to put two videos together on your iPhone, iMovie can be a good choice. FLV videos can be converted to WMV, M4V, and other popular video formats after merging. You can also modify the video output settings and delete the selected video segments as well.
A Step-by-Step Guide
Step 1: Launch the iMovie app on your iPhone. In the Projects window, press the + button.

Step 2: In the New Project window, select Movie. Browse through your video clips in the gallery and import them.

Step 3: Tap Create Movie at the iPhone screen’s bottom. The videos will automatically get merged in the iMovie timeline.
Step 4: Select the desired video file. You can include transition effects, background music, and other profiles.
Step 5: Tap Done to combine two videos into one on the iPhone using iMovie.

Step 6: To export your merged video file, tap the Share icon to save the video.
2 Ways to Merge/Combine FLV Files Online
Clideo (Paid online tool to merge FLV Files)
Now you can combine your FLV files online using Clideo’s FLV Merger. It allows you to combine several videos, images, and audio files. You will also be able to download the finished product in any format you want. And, as the tool operates online, it will not consume any of your device’s memory. Each file you add in the free edition can be up to 500 MB in size; if this is insufficient for you, you can always subscribe to Clideo Pro.
A Step-by-Step Guide
Step 1: Upload the FLV files…
Click on the “Choose files” button and select the necessary videos from your device. To add a video from Google Drive or Dropbox, use the little arrow to call a drop-down menu.
Step 2: Merge FLV and other files
To add more content, use the menu with all of the options from the previous stage. Rearrange them as you see fit. Crop the frame using one of the available aspect ratios. Upload a soundtrack, then cut it with the scissors icon and adjust the volume. When you’re done, choose a format and click “Merge.”
Step 3: Save joined FLV
Take a peek at the outcome. If you like it, save it to your device or cloud storage. Otherwise, you can return to editing without having to start over.
Veed’s Video Editor (Free online tool to merge FLV Files)
Now there’s no need to pay for expensive apps like Filmora or Wondershare Uniconvertor. You can merge your FLV files using Veed’s Video Editor. It lets you combine multiple flash videos together and export them as a single video file. You can simply do it all straight from your browser and from any device. Veed’s Video Editor is compatible with Windows XP, Windows 10, Mac, Linux, and all mobile devices. And, it is absolutely free. There’s no need for an account or to download anything.
A Step-by-Step Guide
Step 1: Upload the FLV files…
Select multiple FLV videos after clicking on ‘Choose FLV Files’. You can also drag and drop your videos into the box. They’ll be added to the editor.
Step 2: Start editing or add more videos…
You’ll be directed to the video editor, where you can split, combine, and rearrange your video clips. This is a purely optional step. More videos can be added by clicking the plus (+) sign in the editing window or by selecting “Upload” from the left menu.
Step 3: Export your new video…
You can now save your merged videos as a single MP4 file. Simply select ‘Export,’ and your download will initiate.
FAQs about Merging FLV Files
Question 1: How to combine FLV files?
Answer: To combine FLV files, hold down the Ctrl or Shift key while selecting multiple FLV files in the User’s Album, and then drag and drop to the video track on the Timeline. All FLV files will automatically merge one after the other in order.
Question 2: What browser should be used to Merge FLV?
Answer: You can use any modern browser to Merge FLV, such as Google Chrome, Firefox, Opera, or Safari.
Question 3: How long does it take to Merge FLV files?
Answer: The FLV file merger is quite quick and takes only a few seconds.
So, if you have been looking for the best options on how to merge FLV files on different mediums, the above-listed apps will serve your purpose. Now, check out the supported features, formats, and other merging functions of all the apps and choose the one that best meets your needs.
For macOS 10.14 or later
A Step-by-Step Guide to Merge FLV files on Windows/Mac using Wondershare Filmora
Step 1: Launch Wondershare Filmora and load FLV files…
When you run this FLV joiner, simply click “Import” to load all of the local FLV files that you want to merge to the User’s album of this FLV video merger. You can also just drag and drop the target files from your PC into the album.

Step 2: Merge FLV files into one…
At the bottom of this FLV file merger, there lies a Timeline. Drag FLV files from the album to the Timeline and use the slider bar to help you arrange all FLV files in the Timeline without overlapping them. That’s very important as if you put one video to another, the original video will get split. Also, make sure that all FLV files are placed in the sequence in which they are to be played. If not, you can rearrange any video clip with a simple drag-and-drop.

Step 3: Choose the target format as FLV…
When you are sure that all FLV files are in the correct required order on the Timeline, you can view the effect in real-time in the preview pane. If everything is fine, you are now ready to export this new FLV file. All you have to do is just press the “Create”
button, then go to the “Format” tab > “FLV” output format in the output window.

Step 4: Export a new FLV file…
Finally, click the “Create” button to save the settings and export the new FLV file simultaneously. When it’s done, simply navigate to the whole FLV video using the output file path.

Alternative Way to Merge/Combine FLV Files on Windows
Joyoshare Media Cutter (Paid tool to merge FLV Files)
Joyoshare Video Joiner for Windows is a comprehensive and user-friendly audio and video merging software that supports a wide range of file formats such as FLV, F4V, HD,4K, MP4, M4V, M4A, DV, MPEG, FLAV, WMA, and others. It is not only a superb video joiner for joining FLV files in batches without re-encoding, but it is also a video editor thanks to the built-in advanced editing tool. That means you can customize and enhance your FLV files as required before integrating them. The two combing modes (high-speed mode and encoding mode) it employs are also noteworthy. With high-speed mode, you can join an unlimited number of FLV files losslessly and swiftly. You can merge files in different formats without gaps and customize the codec, resolution, bit rate, frame rate, and other parameters of your FLV files while in encoding mode.
A Step-by-Step Guide
Step 1: Add FLV files…
First, go to the Joyoshare website and download the Joyoshare Video Joiner installation package. Install and configure it on your computer. Then, import FLV files into the video joiner. There are two options: click “Open File” to choose them or drag them directly into the software.

Step 2: Choose a merging mode and export format…
You must pick a format from high-speed mode and encoding mode based on your requirements by using the “Format” button. The former is only for combining files of the same format losslessly at 60 X speed. The other is for users who want to modify files while joining files in different formats. With the use of a gear icon beside the selected output format, users can change video settings such as resolution, bit rate, codes, and so on while in encoding mode.

Step 3: Remove undesirable parts…
Once finished choosing mode and format, simply press “OK” to go back to the main screen. Then double-click these FLV files one by one to preview them. You can change the timeline to remove unnecessary sections from your FLV videos. Moreover, renaming and rearranging these video files can also be realized in this step.

Step 4: Edit FLV files (optional)…
The software has an editor that allows you to easily and flexibly enhance your FLV video files by clicking “Edit” next to each file before joining.

Step 5: Merge FLV files and save…
Finally, all you have to do is press the “Convert” button to enable Joyoshare Video Joiner to begin combining these FLV files. The merged FLV file will be saved as a converted file on your computer.
Format Factory (Free tool to merge FLV Files)
Format Factory is a free Windows video joiner, recorder, converter, downloader, and editor. It supports a wide range of file types, including FLV, MKV, MP4, 3GP, WMV, SWF, AVI, MPG, VOB, WebM, and others. It is not difficult to use it to combine FLV files.
A Step-by-Step Guide
Step 1: Run Format Factory…
After installing Format Factory, go to “Video Joiner & Mux” to proceed.

Step 2: Add FLV files…
“Add Files” allows you to import FLV files in batches. When all FLV files have been loaded, click “Clip” to clip and crop FLV files as needed. Then, under “Output Settings,” choose an output format and further customize the output quality.


Step 3: Merge files…
Once done, click “OK” to get back to the first window and press “Start” to begin the merging
process.

Alternative Way to Merge/Combine FLV Files on Mac
iDealshare VideoGo (Paid tool to merge FLV Files)
You can use iDealshare VideoGo to convert media files for playback anywhere. It supports a wide range of video formats, both SD and HD. The application also features its own editor, which includes a wide range of activities. It allows you to trim the selected video, crop it, modify the brightness, contrast, and saturation, add text and image watermarks, and manage or add your own subtitles.

A Step-by-Step Guide
Step 1: Import FLV files…
To import the FLV video files that you want to merge, click the “Add File” button or just drag & drop the files.
Step 2: Choose output format…
Choose FLV as the output video format. Select FLV from the “General Video” category from the “Profile” pop-up menu.
Step 3: Merge FLV files…
Select the FLV video files that you wish to merge into one in the main window list, and then choose the “Merge Selected into One” option from the context menu. Click the “Convert” button to start combining the videos.

Faasoft FLV Joiner/Merger (Free tool to merge FLV Files)
Faasoft FLV Joiner/Merger is used to combine FLV files without any re-encoding as well as retain the output quality. Merges FLV files and converts them to more popular formats as well like; MP4, AVI, MOV, WMV, MKV, ASF, ProRes, MXF, OGV, 3GP, etc. to get played on multiple mediums. Apart from FLV files, Faasoft FLV Joiner allows you to merge various kinds of video and audio clips. In addition, this powerful tool works more than just an FLV Merger, i.e.; It is, even more, an in-built video and audio editor, with which, you can optimize any files as per requirement.
A Step-by-Step Guide
Step 1: Load FLV files…
To add FLV files to this Joiner, run FLV Merger and drag and drop the folder containing FLV files to the program’s main screen. If the FLV files you wish to merge are not in the same folder, you can drag them one by one to the software. You should put them together first to save time.
Step 2: List to merge…
Once all FLV files have loaded, pick them all and choose “Merge Selected into One” from the context menu. In the task list, the combined FLV file will have an extension name similar to “Merge 1.”

Step 3: Convert FLV clips…
Click the “Profile” drop-down button to select “FLV Flash Video Format (*.flv)” from the “Picture & Animation” category as the output format. If you want to re-encode the merged FLV file to another video format, select another output format from the list above.
Step 4: Start joining…
Simply click the round “Convert” button in the bottom right corner and let this fantastic tool do the rest.
2 Ways to Merge/Combine FLV Files on Android
Video Merger by Alyaanah (Paid tool to merge FLV Files)
Video Merger can merge any number of videos together in one video. It also accepts almost any format of videos as input. Some of the input formats for merging that are supported are mp4, mkv, 3gp, 3gpp, mov, flv, avi, mpg, mpeg, m4v, vob, wmv, webm, mts, ts, m2ts, and so on. It can also convert the combined video to a variety of formats. Merged output formats supported include mp4, mkv, mov, avi, 3gp, and others. This application allows you to combine videos with different formats, bitrates, and frame rates into a single video. It also scales multiple videos into a single scale and merges them together. It can also merge videos with different resolutions into one video. The merged videos can also be compressed together maintaining original quality to a smaller sized video than all the original video sizes combined.
Video merger allows you to merge in three different ways as follows;
Side by side:
Choose two files, and they will be merged in a side-by-side format (Horizontal stack).
Top-Bottom:
Choose two files, and they will be merged top to bottom (Vertical stack).
Sequential:
You can select unlimited files and they will be merged one after the other in a sequential format.
VideoChain by Arypex Initiative (Free tool to merge FLV Files)
Now you can combine video files from your Android device camera as well and for free. VideoChain is an easy to learn and use app (with in-built instructions) that allows you to easily combine video clips to create one video using the most advanced encoding techniques. It is an excellent tool for merging video clips from your front and rear cameras, as well as portrait and landscape video files, into a single file. It can combine MP4, MPEG, MKV, FLV, and other video clips with four different quality/compression settings available.
2 Ways to Merge/Combine FLV Files on iPhone
Magisto Video Editor (Paid tool to merge FLV Files)
It is a wonderful app to put FLV clips together on an iPhone. Using this versatile video editing app, you can merge multiple videos and create eye-catching files of up to 5 minutes. You can add text, colors, and even text slides between video frames to the video. The app’s filters can be used to further enhance the files. The app also supports a large library of audio files, which you can use to add music to your video files. And, to use all of the app’s features, you must have a paid subscription.


iMovie (Free tool to merge FLV Files)
iMovie is one of the most popular video editing apps for iOS users. You can edit and merge videos on iMovie with ease. The app is free and secure. If you are looking for a professional way to put two videos together on your iPhone, iMovie can be a good choice. FLV videos can be converted to WMV, M4V, and other popular video formats after merging. You can also modify the video output settings and delete the selected video segments as well.
A Step-by-Step Guide
Step 1: Launch the iMovie app on your iPhone. In the Projects window, press the + button.

Step 2: In the New Project window, select Movie. Browse through your video clips in the gallery and import them.

Step 3: Tap Create Movie at the iPhone screen’s bottom. The videos will automatically get merged in the iMovie timeline.
Step 4: Select the desired video file. You can include transition effects, background music, and other profiles.
Step 5: Tap Done to combine two videos into one on the iPhone using iMovie.

Step 6: To export your merged video file, tap the Share icon to save the video.
2 Ways to Merge/Combine FLV Files Online
Clideo (Paid online tool to merge FLV Files)
Now you can combine your FLV files online using Clideo’s FLV Merger. It allows you to combine several videos, images, and audio files. You will also be able to download the finished product in any format you want. And, as the tool operates online, it will not consume any of your device’s memory. Each file you add in the free edition can be up to 500 MB in size; if this is insufficient for you, you can always subscribe to Clideo Pro.
A Step-by-Step Guide
Step 1: Upload the FLV files…
Click on the “Choose files” button and select the necessary videos from your device. To add a video from Google Drive or Dropbox, use the little arrow to call a drop-down menu.
Step 2: Merge FLV and other files
To add more content, use the menu with all of the options from the previous stage. Rearrange them as you see fit. Crop the frame using one of the available aspect ratios. Upload a soundtrack, then cut it with the scissors icon and adjust the volume. When you’re done, choose a format and click “Merge.”
Step 3: Save joined FLV
Take a peek at the outcome. If you like it, save it to your device or cloud storage. Otherwise, you can return to editing without having to start over.
Veed’s Video Editor (Free online tool to merge FLV Files)
Now there’s no need to pay for expensive apps like Filmora or Wondershare Uniconvertor. You can merge your FLV files using Veed’s Video Editor. It lets you combine multiple flash videos together and export them as a single video file. You can simply do it all straight from your browser and from any device. Veed’s Video Editor is compatible with Windows XP, Windows 10, Mac, Linux, and all mobile devices. And, it is absolutely free. There’s no need for an account or to download anything.
A Step-by-Step Guide
Step 1: Upload the FLV files…
Select multiple FLV videos after clicking on ‘Choose FLV Files’. You can also drag and drop your videos into the box. They’ll be added to the editor.
Step 2: Start editing or add more videos…
You’ll be directed to the video editor, where you can split, combine, and rearrange your video clips. This is a purely optional step. More videos can be added by clicking the plus (+) sign in the editing window or by selecting “Upload” from the left menu.
Step 3: Export your new video…
You can now save your merged videos as a single MP4 file. Simply select ‘Export,’ and your download will initiate.
FAQs about Merging FLV Files
Question 1: How to combine FLV files?
Answer: To combine FLV files, hold down the Ctrl or Shift key while selecting multiple FLV files in the User’s Album, and then drag and drop to the video track on the Timeline. All FLV files will automatically merge one after the other in order.
Question 2: What browser should be used to Merge FLV?
Answer: You can use any modern browser to Merge FLV, such as Google Chrome, Firefox, Opera, or Safari.
Question 3: How long does it take to Merge FLV files?
Answer: The FLV file merger is quite quick and takes only a few seconds.
So, if you have been looking for the best options on how to merge FLV files on different mediums, the above-listed apps will serve your purpose. Now, check out the supported features, formats, and other merging functions of all the apps and choose the one that best meets your needs.
Top Silence Detection Tools for Better Film Production
When it comes to making videos, audio quality is paramount. It can take an average video and turn it into a masterpiece. Yet, it may be challenging in specific cases, particularly undesired silences or pauses.
Modern silence detection tools are helpful in this situation. They can detect and remove any uncomfortable silences from audio files quickly. Besides, they save time and ensure the result is perfect by automating this procedure.
Today, we will review the top five silence detector tools. We will also discuss their positive and negative sides and the pricing factor. Let’s start!
- Part 2: How to Use Filmora’s Advanced Silence Detection Feature for Better Editing?
- Part 3: Conclusion
Silence Detection For Win 7 or later(64-bit)
Silence Detection For macOS 10.14 or later
Part 1: Top 5 Amazing Tools for Detecting Silence - A Thorough Review
Now, you know the importance of audio accuracy in video editing. So, we can reveal the five most innovative tools for detecting silence.
Anyone can improve video production skills with the help of these specialized tools. Remember, each tool is designed for a specific set of requirements.
01.Savvycut - Silence Detection Tool for Online Use 
Savvycut is a fantastic audio silence remover online. As the name suggests, this tool is suitable for savvy video editors. No installation or downloads are required to use Savvycut. That’s because it is a web-based silence detection tool. Users need to upload video input for fast analysis and silence removal.
Pros
- It has a simple UI with easy video track uploading and processing.
- Savvycut offers quick and efficient silence detection to help editors save time.
- It provides entry-level functionality for free, making it available to everyone.
- This tool can work on many different video formats.
Cons
- You may need premium membership plans to access advanced functions.
- The limited functionality of the free version may be a turnoff for certain people.
02.Kapwing - Silence Detection Tool for Mobile 
This tool offers an AI-driven audio silence detection and removal. Kapwing can also identify and erase silences from audio files in formats like MP3 and WAV. You don’t need to download this tool; it’s accessible online. You only need a web browser and a mobile phone with an internet connection.
Pros
- This tool edits video footage more quickly by automatically cutting any silences.
- It uses AI to improve the sound quality, including background music and more.
Cons
- There have been reports of compatibility concerns with previous versions.
- You may only have access to some of the basic features in the free edition.
03.Adobe Premiere Pro - Silence Detection Tool for Windows 
Adobe Premiere Pro is the third most powerful software on our list. It is a helpful tool to detect and cut silences from video files. This tool works very well on Windows. Thanks to its batch-processing features, it lets you edit several audio files simultaneously.
Pros
- With its efficient batch audio silence remover feature, you may edit many audio files at once.
- It accommodates a wide range of editing requirements.
- Its silence detection parameters are fully customizable.
- The intuitive design makes it simple for users of all skill levels to get up and running.
- This tool allows users to export video clips in various formats, giving them more options.
Cons
- Newcomers to video editing software may find the learning curve to be steep.
- The use of more complex features may need expertise and training.
04.Audacity - Silence Detection Tool for Mac 
Audacity is the best silence detection tool that works well with the macOS system. This tool makes it easier to identify and remove silences in video files. It can improve your video production speed on Mac.
Pros
- It works well with Mac devices and runs smoothly on macOS.
- It has an accessible and user-friendly interface developed with Mac users in mind.
- This tool facilitates quick and easy silence removal, which makes editing a breeze.
Cons
- The pricing is much greater than that of competing silence detection tools.
- It might not have all the bells and whistles we see in competitors.
05.Recut - General Silence Detection Tool
If you’re using Windows, Recut is an excellent silence detection tool. It can help you detect and delete silent spots from audio and videos. If you’re making a video, this tool can make editing the audio a breeze.
Pros
- Suitable for video editors of varying skill levels
- Its user-friendly interface makes silence detection and elimination simple.
- Besides audio silence detection, it provides a suite of tools for effective audio editing.
- It offers various editing features and supports several file types.
- It is available to people on a tight budget since it doesn’t cost much.
Cons
- There aren’t easy ways to get in touch with the Recut’s customer service.
- It might not have all the features that come with other affordable software.
How to Use Filmora’s Advanced Silence Detection Feature for Better Editing?
Filmora provides an easy way to detect and remove silences from your video files. To use the Silence Detection Filmora feature, do the following:
Step1Upload Your Video Clip 
Launch Filmora and add the video clip that contains the track you want to modify for your project.
Step2Find the Silence Detection Feature 
Remember, you will notice the Silence Detection feature in only audio-enabled video clips. Follow the below steps to detect and remove silent gaps from the clip.
- You need to choose the Silence Detection button from the toolbar.
- You will find the video in the Media window. Right-click your media file and choose Silence Detection.
- After selecting the audio or video clip, go to Tools, followed by Audio. You will find the Silence Detection option. The Silence Detection window will appear once you touch this option.
Step3Modify the Settings for the Silence Detection Feature 
You may change the threshold or sensitivity to make it work for you. The sensitivity level determines the size of the pause. Thus, a lower sensitivity level records longer pauses. You can fine-tune three crucial Filmora Silence Detection settings in this step.
First, you should adjust the volume threshold to fix a specific value for silence. This parameter tells the algorithm how loud you want it to be before it becomes annoying. By default, 25% is the volume threshold. It implies that the software will consider segments silent if their volume threshold value is less than 25%.
Now, you should adjust the Minimum Duration option. It tells Filmora how long a period of quiet or low-volume sound should be. Just 0.5 seconds is the default minimum duration. In other words, for 0.5 seconds to be considered quiet, there must be no sound.
You can also set the Softening Buffer value. This setting allows you to add a little delay before and after audible parts begin and finish. With 0.1s set as the default, the softening buffer starts to work. It implies that the beginning and end of the audible parts may each have their own 0.1-second buffering time.
Step4Eliminate Any Found Silences 
Hit the “Analyze” button after you’re happy with the settings. The Filmora will detect and remove the silent areas in your audio track.
The software also highlights segments in two different colors. Seen in black are the portions that do not contain any sound. The highlighted sections indicate the audible portions.
Step5Evaluate Your Work and Adjust 
You can make sure the video segments move without a hitch. Thus, listen to the modified audio track again. You can adjust the clips in the timeline to customize the edit directly if necessary.
Of course, you also have the option to tweak the three audio settings listed in step 3. Next, choose Restart to remove the silent segments from your video.
Step6Export Your Video Clip 
You’ve almost finished fine-tuning your movie using Filmora’s Silence Detection tool. Now, you may export the final video to the timeline. Enjoy a professionally upgraded audio component inside your video.
Conclusion
As you can see, video silence remover tools completely transform video production operations. They make editing processes easier by changing the audio quality. These tools provide efficiency, saving time and effort.
Anyone can detect and remove undesired silences with the help of specialized tools. Remember, the quality of your movies will increase after removing silences. It can offer your viewers a more pleasant audio-visual experience. So, take your films to the next level by mastering the art of precise editing.
Are you looking for an easy way to edit your video clips? Do you have videos that contain many undesired pauses and silences? Check out Filmora’s Silence Detection feature.
Silence Detection For Win 7 or later(64-bit)
Silence Detection For macOS 10.14 or later
Part 1: Top 5 Amazing Tools for Detecting Silence - A Thorough Review
Now, you know the importance of audio accuracy in video editing. So, we can reveal the five most innovative tools for detecting silence.
Anyone can improve video production skills with the help of these specialized tools. Remember, each tool is designed for a specific set of requirements.
01.Savvycut - Silence Detection Tool for Online Use 
Savvycut is a fantastic audio silence remover online. As the name suggests, this tool is suitable for savvy video editors. No installation or downloads are required to use Savvycut. That’s because it is a web-based silence detection tool. Users need to upload video input for fast analysis and silence removal.
Pros
- It has a simple UI with easy video track uploading and processing.
- Savvycut offers quick and efficient silence detection to help editors save time.
- It provides entry-level functionality for free, making it available to everyone.
- This tool can work on many different video formats.
Cons
- You may need premium membership plans to access advanced functions.
- The limited functionality of the free version may be a turnoff for certain people.
02.Kapwing - Silence Detection Tool for Mobile 
This tool offers an AI-driven audio silence detection and removal. Kapwing can also identify and erase silences from audio files in formats like MP3 and WAV. You don’t need to download this tool; it’s accessible online. You only need a web browser and a mobile phone with an internet connection.
Pros
- This tool edits video footage more quickly by automatically cutting any silences.
- It uses AI to improve the sound quality, including background music and more.
Cons
- There have been reports of compatibility concerns with previous versions.
- You may only have access to some of the basic features in the free edition.
03.Adobe Premiere Pro - Silence Detection Tool for Windows 
Adobe Premiere Pro is the third most powerful software on our list. It is a helpful tool to detect and cut silences from video files. This tool works very well on Windows. Thanks to its batch-processing features, it lets you edit several audio files simultaneously.
Pros
- With its efficient batch audio silence remover feature, you may edit many audio files at once.
- It accommodates a wide range of editing requirements.
- Its silence detection parameters are fully customizable.
- The intuitive design makes it simple for users of all skill levels to get up and running.
- This tool allows users to export video clips in various formats, giving them more options.
Cons
- Newcomers to video editing software may find the learning curve to be steep.
- The use of more complex features may need expertise and training.
04.Audacity - Silence Detection Tool for Mac 
Audacity is the best silence detection tool that works well with the macOS system. This tool makes it easier to identify and remove silences in video files. It can improve your video production speed on Mac.
Pros
- It works well with Mac devices and runs smoothly on macOS.
- It has an accessible and user-friendly interface developed with Mac users in mind.
- This tool facilitates quick and easy silence removal, which makes editing a breeze.
Cons
- The pricing is much greater than that of competing silence detection tools.
- It might not have all the bells and whistles we see in competitors.
05.Recut - General Silence Detection Tool
If you’re using Windows, Recut is an excellent silence detection tool. It can help you detect and delete silent spots from audio and videos. If you’re making a video, this tool can make editing the audio a breeze.
Pros
- Suitable for video editors of varying skill levels
- Its user-friendly interface makes silence detection and elimination simple.
- Besides audio silence detection, it provides a suite of tools for effective audio editing.
- It offers various editing features and supports several file types.
- It is available to people on a tight budget since it doesn’t cost much.
Cons
- There aren’t easy ways to get in touch with the Recut’s customer service.
- It might not have all the features that come with other affordable software.
How to Use Filmora’s Advanced Silence Detection Feature for Better Editing?
Filmora provides an easy way to detect and remove silences from your video files. To use the Silence Detection Filmora feature, do the following:
Step1Upload Your Video Clip 
Launch Filmora and add the video clip that contains the track you want to modify for your project.
Step2Find the Silence Detection Feature 
Remember, you will notice the Silence Detection feature in only audio-enabled video clips. Follow the below steps to detect and remove silent gaps from the clip.
- You need to choose the Silence Detection button from the toolbar.
- You will find the video in the Media window. Right-click your media file and choose Silence Detection.
- After selecting the audio or video clip, go to Tools, followed by Audio. You will find the Silence Detection option. The Silence Detection window will appear once you touch this option.
Step3Modify the Settings for the Silence Detection Feature 
You may change the threshold or sensitivity to make it work for you. The sensitivity level determines the size of the pause. Thus, a lower sensitivity level records longer pauses. You can fine-tune three crucial Filmora Silence Detection settings in this step.
First, you should adjust the volume threshold to fix a specific value for silence. This parameter tells the algorithm how loud you want it to be before it becomes annoying. By default, 25% is the volume threshold. It implies that the software will consider segments silent if their volume threshold value is less than 25%.
Now, you should adjust the Minimum Duration option. It tells Filmora how long a period of quiet or low-volume sound should be. Just 0.5 seconds is the default minimum duration. In other words, for 0.5 seconds to be considered quiet, there must be no sound.
You can also set the Softening Buffer value. This setting allows you to add a little delay before and after audible parts begin and finish. With 0.1s set as the default, the softening buffer starts to work. It implies that the beginning and end of the audible parts may each have their own 0.1-second buffering time.
Step4Eliminate Any Found Silences 
Hit the “Analyze” button after you’re happy with the settings. The Filmora will detect and remove the silent areas in your audio track.
The software also highlights segments in two different colors. Seen in black are the portions that do not contain any sound. The highlighted sections indicate the audible portions.
Step5Evaluate Your Work and Adjust 
You can make sure the video segments move without a hitch. Thus, listen to the modified audio track again. You can adjust the clips in the timeline to customize the edit directly if necessary.
Of course, you also have the option to tweak the three audio settings listed in step 3. Next, choose Restart to remove the silent segments from your video.
Step6Export Your Video Clip 
You’ve almost finished fine-tuning your movie using Filmora’s Silence Detection tool. Now, you may export the final video to the timeline. Enjoy a professionally upgraded audio component inside your video.
Conclusion
As you can see, video silence remover tools completely transform video production operations. They make editing processes easier by changing the audio quality. These tools provide efficiency, saving time and effort.
Anyone can detect and remove undesired silences with the help of specialized tools. Remember, the quality of your movies will increase after removing silences. It can offer your viewers a more pleasant audio-visual experience. So, take your films to the next level by mastering the art of precise editing.
Are you looking for an easy way to edit your video clips? Do you have videos that contain many undesired pauses and silences? Check out Filmora’s Silence Detection feature.
2 Effective Ways to Add Text Behind Objects
Adding text behind objects in your videos can be a great way to start your videos. For example, you can do so to create an attractive intro or startup a video. So, if you hope to make a video like a pro, let’s learn how to add text behind objects in your videos by Filmora.

Part 1. What Are The Benefits of Adding Text Behind Objects in Videos?
Your videos must maintain quality to create content worthy of a huge audience. You may have a YouTube channel or be starting down the road. Then you must give this a try because
Give a cool look
Adding text behind an object in a video looks cool! Now, your object could be a silhouette of a person or a huge skyscraper. You can add a text tile behind the object, creating the illusion. Due to this, the text will be flying in real-time.
Show creativity
Blasting your channel with innovative and creative content is the key to building a big audience. But, of course, you can always opt for many ways to create a video showing your creativity. One of those ways is to add text behind your object.
You can create an attractive intro by adding text behind objects that captivate the viewer. It ensures that your subscribers stay tuned to your channel and your content.
Build up a solid audience
Every day can be a real struggle if you are a daily content creator on YouTube. The audience demands good content. But your daily videos can get boring if you do not use new methods to edit your videos.
You can add text behind videos to spice up your intros and hook your daily audience even more. That will show the audience that you are genuinely putting in the effort.
Part 2. What Will You Need To Add Text Behind Videos?
Now there are a few things that you will need to add text behind videos. First, take a look at the basic priorities to perform this feature.
1. A Static Object Video
Adding text behind an object can be tricky if the object isn’t static. For example, the effect will be ruined if an object moves around a lot in a video.
Our goal is to create a smooth text behind the video effect. And this can only be achieved if the target object remains static in the video and does not move about its position.
2. A Video Editing Software - Wondershare Filmora
Once you select a video source, you aim to add it to a video editor. For this purpose, Wondershare Filmora would be your best choice. Wondershare Filmora allows you to create innovative and attractive videos.
Free Download For Win 7 or later(64-bit)
Free Download For macOS 10.14 or later
It has a very engaging system UI, allowing even beginner users to get their hands on it instantly. You will learn how to add text behind your videos with a few simple steps.

Now that you know the requirements for the video, let’s move on to the step-by-step guide to add text to your video.
Part 3. Step-by-Step Guide To Add Text Behind Videos
We look at two examples of how to add text behind videos in Wondershare Filmora.
- A static video with an object that can be easily masked out.
- A video with high contrast and a clean background.
Add Text behind a Static Video
First, we will go with adding text behind a static object. For this, scroll more to get the step-by-step process.
Step1 Download Wondershare Filmora
If you are a beginner just starting in the video editing business, Wondershare Filmora is the best choice. Follow the steps below to download the free version of Wondershare Filmora:
- First, download the Wondershare Filmora on your PC or Mac.
- Open the setup and install the Wondershare Filmora.
After downloading the Wondershare Filmora software, let’s edit the video. Scroll below to learn how to start the editing process!
Step2 Add the Video to the Timeline
We will first look at the static video example. For this, follow the below instructions:
- You have to start by importing your video in the import library.
- From the import library, you can click on the video and drag it down below to the timeline.

![]()
Note: Adding video to the timelines will allow you to create a workspace to edit your video.
Now let’s move on to how we will add the text tile to our video.
Step3 Add the Text Tile
It is time to add the text tile you will animate behind the object. To do that, follow the steps mentioned as such.:
- Go to the Titles icon on the bar above the import library.
- A drop-down option will be available on the left side.
- Scroll down to the Plain text.
- Here, you can see many text tiles to add to your video.
- You can choose anyone you like.
- The most commonly used tile is the Basic 6.
- When you add the text tile to the timeline, you must ensure that the text is of equal length to the video.
- To do that, drag the right corner of the text tile and drag it to the right to match the length of the video.

Step4 Edit the Text Tile
After you have added the text tile you desire, you need to type in the text. For this article, we will keep it simple. We will be typing a simple statement such as “Hello, World.“
- Double-click the Text tile to open the settings menu.
- After the settings menu is opened, type in the text box on the import window.
You will notice changes on the main window that your text has changed.

- After the text appears, you can make the font look as desired.
- Look above the text window, and you will see the type of text font selected.
- Click on the drop-down option and choose whatever you like.
Let’s move on to animate the text tile.
Step5 Animate the text tile
After adding text, it is time to animate it. This animation will decide how your text will appear behind the target object.
- First, you must open the text settings by double-clicking on the text tile in the timeline.
- In the settings opened in the import window, you will have to click on the animation tab in the upper left corner, aside from the Preset
- Now scroll down to where you will see the Right Roll
- Click on Right Roll and then click on the OK in the bottom right corner of the import window.

![]()
Note: You may notice now that the text appears in front of our object. Don’t worry now! We are getting there. With a few simple steps, we will see the results.
Now let us move on to the more significant part of the editing, masking the object. Again, look ahead to see how you can mask the object!
Step6 Mask the Object
To mask our object, we will need to be technical. We will begin by adding the same footage of the static object on our timeline. Follow the steps mentioned below:
- Drag and drop the static object footage above the timeline text. Make sure the text stays in the middle of the sandwich.

- We will hide the video in the first track to simplify things. In addition, this will make our editing easier.
- We will have to look in the effects library to insert the masking effect.
- You can see the Effects icon on the bar at the top.
- Click on the Effects.
- You will see the search bar at the top of the import window.
- In the search bar, type in Image mask.
- Drag the Image mask effect on the video above the text tile.
Now the masking effect has been added. But we would have to adjust so that it stays upon our object.
- Double-click on the video and the settings option will open up.
- Go into the Effects
![]()
Note: You must select your target object’s mask shape exactly as its shape.
- We have to mask out a building, so that we will need a vertical rectangle.

- After you have selected the shape of your object, we will need to convert it to the object’s size so that it only masks the building.
- To do that, scroll down below the import window to the settings.
- Here you can see the X, Y, and width settings.
- First, move the width bar so that it matches the width of the building.

- Now drag the X bar until the mask is confined to the building. You would have created the mask only limited to the building.

- Once you complete this step, click OK in the bottom right corner.
- Now un-hide the original video that you imported in the beginning.
Finally, play the video in the main play window from the beginning.

You have successfully created a text behind the object effect. Now that you know how to add text behind static objects let us move to learn how to add text to a video that has high contrast and a clean background.
Add text behind a high contrast and clean background
Besides the text can be added behind a static object, it can also be added to a clean background with high contrast. But how is it? Let’s dive into it.
Step1 Import the video into the timeline
- Import the video from the location in your PC media.
- When imported, drag and drop it onto the timeline.

Step2 Add the text tile
To add the text to your video, follow the steps mentioned below.
- Click on the titles icon on the bar above the import window.
- On the left drop-down option, scroll down to the titles.
- Select the Plain text option.
- You will notice that multiple options will pop up in the import window.
- Select the text title that suits you best.
- After you have selected the text style, drag and drop it down above your video in the timeline.

- Our next step would be to add the text.
- Double-click on the text tile. Doing so will open the settings menu in the import window.
- Type in the text that you want. For reference, we will keep it simple such as, “Hello world.”
- You can also adjust the font of your text.
- Above the type box, a drop-down option will show you the range of fonts available.
- Select the font you desire.

Now that you have added the text, it is time to animate it.
Step3 Take a snapshot
After typing in the text, you will notice in the main play window that your text still appears in front of your object. Therefore, we want to take it behind the object. To do so, first, you will need to take a snapshot.
Follow the steps mentioned to take a snapshot:
- Hide the main video. You can see the Eye icon aside from your main video in the edit column on the left side of the timeline.
- Click on the Eye icon to hide the main video.
- In the main play window, you will notice that the screen turns black, which leaves only the text on the screen.

- In the main play screen, you can notice a small camera icon.
- This camera icon is used to take snapshots of your screen.
- Click on the camera icon to take a snapshot of your screen.
- Your snapshot will now be saved in the main import window.

Now that we have taken a snapshot, we will need to import it into the timeline. Scroll below for more.
Step4 Add the snapshot
After taking it, your goal is to import it into the timeline. To perform this action, perform the following steps:
- Before adding the snapshot to the timeline, we must delete the main text tile.
- Then drag and drop the snapshot from the import library into the timeline above the video.
- Make sure that the snapshot is aligned well with the length of the video.
- If it is longer than the video, drag it from the right to match the length of the video.
- If its length is smaller than the video, drag it to the right to increase its length.

After adding the snapshot, we will have to change its blending mode.
Step5 Change the blending of the snapshot
To create the effect of your text behind the video, you must alter the main text’s blending mode. In this case, it will be the snapshot we took.
![]()
Note: Changing the blending mode of the snapshot will allow it to blend with the transparent background and will create the effect of the text behind the object in the video.
Follow the steps mentioned below to change the blending of the snapshot:
- Double-click the snapshot.
- If you select the compositing tab, the blending options will pop up.
- From default, it would be set to Normal. Click on the Normal
- It will show a drop-down option.
- Scroll down below until you can see an option labeled Then click on Overlay.

- And press OK in the bottom right corner to confirm your changes.
The text can be blended with the background.
- Click on the Eye icon to un-hide the video from the timeline.
- Now play the video from the start from the main play screen to see the final changes.

Congratulations! The above steps allow you to add text behind objects in your videos.
Conclusion
Modern media is full of creative content. And if you are a content creator that wants to make it through the world of YouTube and video creating, you need to be the best. You can only be the best at what you do if you keep pushing the boundaries of your creativity.
Adding text behind objects could be the first step in making your intros shine with creativity and innovation. It allows you to maintain and build your viewing audience. The more the audience, the more your content gets watched 
It has a very engaging system UI, allowing even beginner users to get their hands on it instantly. You will learn how to add text behind your videos with a few simple steps.

Now that you know the requirements for the video, let’s move on to the step-by-step guide to add text to your video.
Part 3. Step-by-Step Guide To Add Text Behind Videos
We look at two examples of how to add text behind videos in Wondershare Filmora.
- A static video with an object that can be easily masked out.
- A video with high contrast and a clean background.
Add Text behind a Static Video
First, we will go with adding text behind a static object. For this, scroll more to get the step-by-step process.
Step1 Download Wondershare Filmora
If you are a beginner just starting in the video editing business, Wondershare Filmora is the best choice. Follow the steps below to download the free version of Wondershare Filmora:
- First, download the Wondershare Filmora on your PC or Mac.
- Open the setup and install the Wondershare Filmora.
After downloading the Wondershare Filmora software, let’s edit the video. Scroll below to learn how to start the editing process!
Step2 Add the Video to the Timeline
We will first look at the static video example. For this, follow the below instructions:
- You have to start by importing your video in the import library.
- From the import library, you can click on the video and drag it down below to the timeline.

![]()
Note: Adding video to the timelines will allow you to create a workspace to edit your video.
Now let’s move on to how we will add the text tile to our video.
Step3 Add the Text Tile
It is time to add the text tile you will animate behind the object. To do that, follow the steps mentioned as such.:
- Go to the Titles icon on the bar above the import library.
- A drop-down option will be available on the left side.
- Scroll down to the Plain text.
- Here, you can see many text tiles to add to your video.
- You can choose anyone you like.
- The most commonly used tile is the Basic 6.
- When you add the text tile to the timeline, you must ensure that the text is of equal length to the video.
- To do that, drag the right corner of the text tile and drag it to the right to match the length of the video.

Step4 Edit the Text Tile
After you have added the text tile you desire, you need to type in the text. For this article, we will keep it simple. We will be typing a simple statement such as “Hello, World.“
- Double-click the Text tile to open the settings menu.
- After the settings menu is opened, type in the text box on the import window.
You will notice changes on the main window that your text has changed.

- After the text appears, you can make the font look as desired.
- Look above the text window, and you will see the type of text font selected.
- Click on the drop-down option and choose whatever you like.
Let’s move on to animate the text tile.
Step5 Animate the text tile
After adding text, it is time to animate it. This animation will decide how your text will appear behind the target object.
- First, you must open the text settings by double-clicking on the text tile in the timeline.
- In the settings opened in the import window, you will have to click on the animation tab in the upper left corner, aside from the Preset
- Now scroll down to where you will see the Right Roll
- Click on Right Roll and then click on the OK in the bottom right corner of the import window.

![]()
Note: You may notice now that the text appears in front of our object. Don’t worry now! We are getting there. With a few simple steps, we will see the results.
Now let us move on to the more significant part of the editing, masking the object. Again, look ahead to see how you can mask the object!
Step6 Mask the Object
To mask our object, we will need to be technical. We will begin by adding the same footage of the static object on our timeline. Follow the steps mentioned below:
- Drag and drop the static object footage above the timeline text. Make sure the text stays in the middle of the sandwich.

- We will hide the video in the first track to simplify things. In addition, this will make our editing easier.
- We will have to look in the effects library to insert the masking effect.
- You can see the Effects icon on the bar at the top.
- Click on the Effects.
- You will see the search bar at the top of the import window.
- In the search bar, type in Image mask.
- Drag the Image mask effect on the video above the text tile.
Now the masking effect has been added. But we would have to adjust so that it stays upon our object.
- Double-click on the video and the settings option will open up.
- Go into the Effects
![]()
Note: You must select your target object’s mask shape exactly as its shape.
- We have to mask out a building, so that we will need a vertical rectangle.

- After you have selected the shape of your object, we will need to convert it to the object’s size so that it only masks the building.
- To do that, scroll down below the import window to the settings.
- Here you can see the X, Y, and width settings.
- First, move the width bar so that it matches the width of the building.

- Now drag the X bar until the mask is confined to the building. You would have created the mask only limited to the building.

- Once you complete this step, click OK in the bottom right corner.
- Now un-hide the original video that you imported in the beginning.
Finally, play the video in the main play window from the beginning.

You have successfully created a text behind the object effect. Now that you know how to add text behind static objects let us move to learn how to add text to a video that has high contrast and a clean background.
Add text behind a high contrast and clean background
Besides the text can be added behind a static object, it can also be added to a clean background with high contrast. But how is it? Let’s dive into it.
Step1 Import the video into the timeline
- Import the video from the location in your PC media.
- When imported, drag and drop it onto the timeline.

Step2 Add the text tile
To add the text to your video, follow the steps mentioned below.
- Click on the titles icon on the bar above the import window.
- On the left drop-down option, scroll down to the titles.
- Select the Plain text option.
- You will notice that multiple options will pop up in the import window.
- Select the text title that suits you best.
- After you have selected the text style, drag and drop it down above your video in the timeline.

- Our next step would be to add the text.
- Double-click on the text tile. Doing so will open the settings menu in the import window.
- Type in the text that you want. For reference, we will keep it simple such as, “Hello world.”
- You can also adjust the font of your text.
- Above the type box, a drop-down option will show you the range of fonts available.
- Select the font you desire.

Now that you have added the text, it is time to animate it.
Step3 Take a snapshot
After typing in the text, you will notice in the main play window that your text still appears in front of your object. Therefore, we want to take it behind the object. To do so, first, you will need to take a snapshot.
Follow the steps mentioned to take a snapshot:
- Hide the main video. You can see the Eye icon aside from your main video in the edit column on the left side of the timeline.
- Click on the Eye icon to hide the main video.
- In the main play window, you will notice that the screen turns black, which leaves only the text on the screen.

- In the main play screen, you can notice a small camera icon.
- This camera icon is used to take snapshots of your screen.
- Click on the camera icon to take a snapshot of your screen.
- Your snapshot will now be saved in the main import window.

Now that we have taken a snapshot, we will need to import it into the timeline. Scroll below for more.
Step4 Add the snapshot
After taking it, your goal is to import it into the timeline. To perform this action, perform the following steps:
- Before adding the snapshot to the timeline, we must delete the main text tile.
- Then drag and drop the snapshot from the import library into the timeline above the video.
- Make sure that the snapshot is aligned well with the length of the video.
- If it is longer than the video, drag it from the right to match the length of the video.
- If its length is smaller than the video, drag it to the right to increase its length.

After adding the snapshot, we will have to change its blending mode.
Step5 Change the blending of the snapshot
To create the effect of your text behind the video, you must alter the main text’s blending mode. In this case, it will be the snapshot we took.
![]()
Note: Changing the blending mode of the snapshot will allow it to blend with the transparent background and will create the effect of the text behind the object in the video.
Follow the steps mentioned below to change the blending of the snapshot:
- Double-click the snapshot.
- If you select the compositing tab, the blending options will pop up.
- From default, it would be set to Normal. Click on the Normal
- It will show a drop-down option.
- Scroll down below until you can see an option labeled Then click on Overlay.

- And press OK in the bottom right corner to confirm your changes.
The text can be blended with the background.
- Click on the Eye icon to un-hide the video from the timeline.
- Now play the video from the start from the main play screen to see the final changes.

Congratulations! The above steps allow you to add text behind objects in your videos.
Conclusion
Modern media is full of creative content. And if you are a content creator that wants to make it through the world of YouTube and video creating, you need to be the best. You can only be the best at what you do if you keep pushing the boundaries of your creativity.
Adding text behind objects could be the first step in making your intros shine with creativity and innovation. It allows you to maintain and build your viewing audience. The more the audience, the more your content gets watched!
Also read:
- New In 2024, Best 5 PDF to GIF Converters You Should Know
- Updated 2024 Approved Discover Vintage LUTs Premiere Pro Free and Paid Options Available
- New Featuring The Use of Camera Shake in Creating the Best Videos for 2024
- Create a Brand Video to Make Your Business Shine
- New 2024 Approved How to Choose A Nice GoPro for Vlogging?
- New Tutorial to Add Effects with Movavi Slideshow Maker
- Updated Discover a Quick Guide to Add Personalized Video Filters in VN App. Learn How to Use Built-In Filters and Import External Ones for Creative Video Editing
- Updated How to Create Chroma Key Written Text Effects in Filmora for 2024
- Splitting Audio From Video in Sony Vegas Step by Step
- In 2024, Wondering How to Create a Stunning Intro Video with KineMaster? Here Are the Simple Steps to Use KineMaster to Design Your Intro Video in Simple Steps
- Best 8 Educational Video Websites for Teachers for 2024
- New 2024 Approved Easy Ways to Make Procreate GIFs
- Updated How to Create Cinematic Style Videos for 2024
- New Guide To Using Luts Perfectly in Final Cut Pro for 2024
- New 2024 Approved Guide Cropping and Combining Content in Wondershare Filmora Latest
- In 2024, Want to Capture Captivating, Detailed Videos? If Yes, Then You Need to Learn the Recording of Super Slow Motion Videos. In This Article, I Will Show You How to Record a Super Slow-Motion Video on Your Android and iPhone
- Updated Top 5 Tips to Freeze-Frame in After Effects for 2024
- Updated In 2024, Dollar-Store DIY Hacks to Use for Filmmaking on a Budget
- Adobe Premiere Pro Rec 709 LUTs Finding The Best Options
- In 2024, How to Add Photos to Tik Tok Video
- Unlock Your Video Editing Potential With Filmora From Wondershare
- 2024 Approved Vlogs and Travel Content Are Incomplete without a Fast-Motion Effect. Learn Step-by-Step How to Make Fast Motion Video on an iPhone in This Article
- Updated Guide To Selecting and Using the Best Braw Luts for 2024
- Updated How to Make Tutorial Video with Filmora
- How to Stabilize Videos with Google Photos App for Free for 2024
- Updated In 2024, How to Create OBS Slideshow
- Using the Best Templates to Create Slow Motion Videos on CapCut for 2024
- New Difference Between Time Lapse and Hyperlapse
- Updated How to Loop Videos on Android Phones for 2024
- New How to Change Frame Rate in Premiere Pro for 2024
- Updated 2024 Approved Srt File Creator
- Recommended Video Background Changers
- Updated FLV Editor for Windows 11/10/8.1/8/7 Easily Edit FLV Videos on PC for 2024
- In 2024, How to Change/Add Location Filters on Snapchat For your Oppo Find X6 Pro | Dr.fone
- Easy Guide How To Bypass Samsung Galaxy A54 5G FRP Android 10/11/12/13
- In 2024, Forgot Pattern Lock? Heres How You Can Unlock Vivo V29 Pro Pattern Lock Screen
- How to Change Google Play Location On Honor 90 Lite | Dr.fone
- In 2024, How to Bypass Google FRP Lock from Motorola Defy 2 Devices
- In 2024, How to Change/Fake Your Oppo Find X7 Ultra Location on Viber | Dr.fone
- In 2024, Complete Tutorial to Use VPNa to Fake GPS Location On Vivo V30 Pro | Dr.fone
- How to use iSpoofer on Nokia C300? | Dr.fone
- How to Turn Off Find My Apple iPhone 6s when Phone is Broken? | Dr.fone
- How to Repair Broken video files of Samsung Galaxy A05 on Mac?
- In 2024, 3 Ways to Unlock Your iPhone 8 Plus for Free
- How to Reset a Samsung Galaxy M14 5G Phone That Is Locked | Dr.fone
- In 2024, How To Use Special Features - Virtual Location On OnePlus Nord CE 3 5G? | Dr.fone
- In 2024, How Infinix Smart 7 Mirror Screen to PC? | Dr.fone
- In 2024, How to Screen Mirroring Vivo Y36i to PC? | Dr.fone
- How Do I Stop Someone From Tracking My Xiaomi Redmi K70? | Dr.fone
- How To Track IMEI Number Of Vivo Y200e 5G Through Google Earth?
- In 2024, How To Change Your SIM PIN Code on Your Oppo Reno 10 5G Phone
- In 2024, Network Locked SIM Card Inserted On Your Samsung Galaxy M34 Phone? Unlock It Now
- How do I reset my Infinix Hot 30 5G Phone without technical knowledge? | Dr.fone
- How to Transfer Data from Itel P55+ to Any iOS Devices | Dr.fone
- In 2024, How to Delete iCloud Account On Apple iPhone 7 Plus without Password?
- In 2024, How to Come up With the Best Pokemon Team On Realme V30T? | Dr.fone
- Is GSM Flasher ADB Legit? Full Review To Bypass Your Xiaomi Redmi Note 13 Pro 5GFRP Lock
- How to Update Apple iPhone SE without Losing Anything? | Dr.fone
- 5 Ways to Restart Nokia C110 Without Power Button | Dr.fone
- How to Fake GPS on Android without Mock Location For your Tecno Camon 20 Pro 5G | Dr.fone
- In 2024, How to Change/Fake Your Nokia XR21 Location on Viber | Dr.fone
- New Easy Tutorial How to Record and Send Talking Emoji for iPhone
- Best Android Data Recovery - Retrieve Lost Photos from Honor V Purse.
- The Best Android Unlock Software For Vivo V29 Device Top 5 Picks to Remove Android Locks
- 11 Proven Solutions to Fix Google Play Store Not Working Issue on Itel A70 | Dr.fone
- Top 10 Fixes for Phone Keep Disconnecting from Wi-Fi On Vivo Y78+ | Dr.fone
- Title: In 2024, How to Add Subtitles in VLC Media Play
- Author: Chloe
- Created at : 2024-06-26 06:24:08
- Updated at : 2024-06-27 06:24:08
- Link: https://ai-editing-video.techidaily.com/in-2024-how-to-add-subtitles-in-vlc-media-play/
- License: This work is licensed under CC BY-NC-SA 4.0.


