
:max_bytes(150000):strip_icc():format(webp)/dualsenseedge-749ef030e3c84376926d817913be924b.jpg)
In 2024, How to Combine Several Xvid Files Into One Windows, Mac,Android, iPhone & Online
How to Combine Several Xvid Files Into One [Windows, Mac,Android, iPhone & Online]
Best Xvid Merger to Merge/Combine Xvid Files on Windows - Filmora Video Editor
- Importing an Xvid file
There are two ways to import a Xvid file.
Click Import to browse for Xvid videos on your computer and select all Xvid files to load while holding down the Ctrl or Shift key. Drag and drop the Xvid file directly into the program window.
If you want to add images and sounds and merge them seamlessly, do that. All regular image and audio files are supported.

- Drag and drop the Xvid video together
When you load all the Xvid files, they will appear as thumbnails in your album. To merge them, you need to drag and drop them one by one into the video timeline. They are seamlessly merged without gaps. Click the play icon to see the merged Xvid files in the screen on the right.
To change the order, simply drag the video element to the left or right. Note: Do not overlay another video clip. Otherwise, split and paste the original video in its place.

- Improve merged Xvid videos (optional)
You can also do other work to personalize your Xvid video before you export the merged Xvid video. As a powerful and easy-to-use video editor, you can use Wondershare Filmora:
for basic editing (trimming, splitting, rotating, trimming, brightness, contrast, tint adjustment, playback speed, pitch change, etc.). I can do it. Video Customization: Apply transitions, effects, subtitles, PIPs, intros / credits and add background noise. Over 300 templates are provided. Edit like a pro Take your Xvid video editing to the next level with built-in power tools such as jump cut, face off, mosaic, tilt shift, flash and hold.
- Export related Xvid files
You can preview the content you created after making the necessary changes. When you are satisfied, click the “Create” button to save. In the pop-up output window, you can choose the desired format from all common formats such as WMV, MP4, AVI, MOV, MPG, FLV. In addition, in Advanced Settings, you can further select encoder resolution settings such as 1280 x 720, 640 x 480, 1920x1080.
Would you like to burn the merged Xvid files to DVD for viewing on a regular DVD player or big screen TV? Click the DVD tab, set the aspect ratio to 16: 9 or 4: 3, set the TV standard and create a DVD video.

Film / Media File Preparation: Filmora supports a variety of file formats. You can check if your file is supported by Filmora here. Be sure to save the file to your computer or storage drive.
Review System Requirements: Review Filmora’s system requirements to ensure that your Mac meets these requirements for the best user experience.
Create a new project or open a recently used project
1 To create a new project, select a video aspect ratio and click New Project.
2 Click Open Project to open an existing project. Importing

Media Files Imports
video footage, audio, or other media files. To import media files, you can:
1 Click the “+” icon to browse to a local file on your Mac and add a file.
2 Drag and drop the media file into the Media Library area.
3 Import media files from an external device.
4 Import using the Instant Cutter tool.

Media File Placement on the Timeline To place a clip or sequence of other media files, you can:
Drag the video, audio, and images into the timeline window and place them in the order you want. Apply Transitions and Effects
Transitions and effects help make your video more eye-catching. The Transitions and Effects panel contains various transitions and effects that you can apply. Adding a title
Filmora has a number of title templates. What you can do:
1 Select an existing title template in the Title section, enter text and save.
2 Click the text to adjust the text style. You can save it as a custom for later use.

Color Editing
Filmora has multiple color editing options. You can do the following.
Improves video color.
Adjust the white balance.
Tone changes: Contrast, Saturation, Brightness.
2 Match the colors of two different clips.
To edit the color, double-click the clip, click Color, change the parameters, and then click Save. If you need more advanced editing, you can click Details. Edit Audio
Filmora has a complete audio editing solution. You can remove background noise, change audio speed, auto-normalize audio, and more.
Export videos to a supported format or post directly to the social platform.
Another way to combine multiple Xvid files into one using Avidemux
There are many different video formats, and it can be difficult to meet some of them without knowing exactly what they are. For example, Xvid files are Xviden-encoded video file formats that use the Xvid codec, rather than the formats you are used to in everyday life like the MP4 format. This program is used to compress and decompress video to the compression standard MPEG4 ASP, save disk space and file transfer speed, and open this type of file. Many modern DVD and Bluray players can play XVID files. Like a PC, any software program that can decode MPEG4 ASP-encoded video can play XVID files.
This article describes how to combine multiple Xvid files into one using Avidemux, a free video editor and encoder that supports multiple file types. Merging common video and video in Avidemux is not a big deal, but you can learn how to merge different Xvid files with this editor from the detailed article.
Therefore, first you need to change some of the settings for the selected video. Frame rate etc. Next, you need to open the first video clip, find and open the menu file option that displays the drop-down menu at the top left of the screen, and select Attach.
Step 1:
Adding Xvid Video to a program in batch
Before importing an Xvid file, you need to make sure that you have the latest version of Joyoshare Video Joiner installed on your computer. Then it’s up to you to upload the Xvid video. There are two options. Touch the Open File icon in the lower left corner, or drag directly in bulk as needed.
Step 2:
Finish setting the output format
When all the Xvid video files are loaded, click Format in the lower right corner of the main screen and select the output format. Formatting can be set in “Fast Mode” or “Encode Mode”. The only difference between the two modes is that the former is a lossless mode, which provides a 60x speed solution that stitches multiple Xvid files in their original quality, but the output format must be the same as the source video. The latter is a customizable mockup that allows you to choose any format as the output format and customize the output quality by simply clicking on the gear icon.
Step 3:
Cut Xvid Video File When you have finished setting the
output format, tap OK to save and you will be returned to the first interface. You can now crop Xvid videos as needed by simply dragging the timeline.
Step 4
Editing a Xvid file in encode mode
The Joyoshare Video Joiner is equipped with a video editor that works only in encode mode. Therefore, if you want to combine Xvid files, then click the Edit icon next to the Xvid file you just added to crop, crop, mirror, adjust brightness, watermark, apply effects, subtitles, etc. You can edit the video.
2 Ways to Merge/Combine Xvid Files on Android using Wave.video (paid software)
Wave.video allows you to easily combine two or more video clips or images to create longer videos.
To do this, go to https: //wave.video, click the New Video button and select Blank Video.

This will open a video editor and ask you to select a format.
You can then select the Upload Media (from your computer) or Select from Library (Go to Stock Library, Favorites, Purchased, Previous Uploads, and Read My Video Folders) option. The video clip is added to the editor. You can add a second clip by clicking the + sign on the timeline.

Not only can you merge original video clips, but you can also merge with stock footage, video clips, image merges or merges. Multiple images in the video.

If you add multiple video clips or images to your timeline, you can add transitions between them to “glue” them into your story. If you’re happy with how to combine video clips, go to the publishing steps to download the video or share it directly with your social media account.


2 Ways to Merge/Combine Xvid Files on Android using InShot (unpaid software)
How to merge videos on your smartphone
Smartphone apps are less functional and slower on handheld devices, so it’s usually best to edit videos on your computer.
But if you’re trying to make a simple video on the go, your smartphone will do the job. Combining videos on Android phones.
Android users, InShot is a great option for combining multiple videos.
Transitions, effects, stickers, etc. are limited by the free version of the app.
How to get started:
- Open the app and select a video option.
Other options are not related to video.

- Select the videos you want to combine from the library.
Select the videos in the order you want them to appear.

- Crop the clip to crop and polish the video
Tap the video clip section to crop the clip.
- Add a transition effect between video clips
To add a Transition, simply select the white icon on the timeline that ends one video clip and starts another.
Click to see the transitions. Only basic transitions are available in the free version. Super and glitch are available to professional users.

- Insert text to add stickers
The sticker options available in the free version of the app are limited.
- Correct the color of the clip Select the clip and click the Filter option.
Go to the Adjustment tab and modify the lighting, saturation, etc. of the clip.

- Save Video
Click Save in the upper right corner of the screen and select the desired video quality.

Merge/Combine Xvid Files on iPhone using iMovie (unpaid software)
Merge videos with iMovie on iPhone
iMovie is already installed on your iPhone.
Combine multiple video clips into one project in a few simple steps.
The method is as follows:
- Open the app and create a new project
Select Movie from the options displayed on the screen.

2nd Click Media in the upper left.
Select the video files in the order you want them to appear.

- Start editing
Click the white icon in the center of the clip to add a transition effect.

- Select Finish in the upper left corner of the screen.
Video is stored.
Note: You can apply a filter to make all video clips look the same.
Merge/Combine Xvid Files on iPhone using Biteable (paid software)
Merge videos like an expert
Biteable’s video combiner allows you to quickly merge footage and add transition effects.
From flashy dissolves to smoother slide-ins than Barry White eating ice cream, merging videos has never been easier.
Method is as follows:
- Upload video footage
First, log in to Biteable and create a new video project. Alternatively, click this link to sign up and get started in seconds.
Then select Start with Blank Video on the toolbar to start a new project or select a template. The Biteable Video Editor launches.
To add your first footage, tap the canvas, then tap Add Scene> Upload. Select the video you want to add. Then repeat this process to upload the second video.
- Merge and add transitions
This will merge the footage on the timeline. If you want to add a transition, move the mouse pointer to the area between the video clips on the timeline.
Tap the white arrow that appears and swipe up, swipe left, or select a dreamy crossfade effect.
- Click the Preview button to export the merged video
Immediately export the video and later upgrade to a premium membership to remove the small watermark.
https://biteable.com/tools/merge-videos/

Merge/Combine Xvid Files Online using ClipChamp (paid software)
Step 1. Create an account on Clipchamp
Log into your Clipchamp Create account, or join up without spending a dime to get started.

Step 2. Create a brand new task
Click on Create a Video button withinside the pinnacle proper corner. We provide plenty of codecs and templates to pick from.
Before you choose a layout or a template have a clean concept of ways you need to continue consistent with your requirement. Select an element ratio that fits the pleasant in your video.
Your element ratio can vary primarily based totally upon the platform that you`re aiming to submit the video.

Step 3. Add the motion pictures you need to merge
Now that you`ve created a brand new task at the video merger, click on the Add Media button withinside the left toolbar to import video documents into the empty task.
You can pick to tug and drop motion pictures out of your difficult drive, your phone, dropbox, google drive, or different on line storage. You may even upload inventory photos or Gifs from the inventory button at the left toolbar.
Once you`ve imported your media documents they`ll seem withinside the video merger.

Step 4. Add your motion pictures to the video merger timeline
Select the 2 movies and drag them to the editor`s timeline. After adjusting the clips to their accurate positions a inexperienced spotlight will seem round them
indicating that those documents will drop to the timeline in case you allow pass of your click on. You may also upload extra clips sequentially on your timeline relying at the requirement.
You may want to scroll beyond the clips at the timeline to alter them into areas in case your video receives longer. Your clips at the moment are located at the timeline!

Step 5. Resize and rearrange your motion pictures
We have selected a nine:sixteen ratio however our inventory photos is sixteen:nine ratio. You will want to resize your video photos. Click at the preview display then click on Crop to fill.
Drag the video throughout the display to put the video. Repeat this technique for each motion pictures. Since the motion pictures won’t be withinside the series you need them to be in,
you may have to tug and drop them to the favored series. You can trim the video without a doubt through transferring your mouse over to both give up of a clip and dragging them as consistent with your want.


Step 6. Recheck and export
Often even as enhancing or merging our motion pictures we export in a rush and recognize that we had to trim a segment a tad bit more.
This takes place to maximum folks however does now no longer fear as Clipchamp robotically saves your task and you could re-take a look at the complete video earlier than exporting it.
If you are happy with the merge of the two videos, you can click the export button in the upper right corner of the video editor.
Select the resolution for which you want to export the video file and click Next.
You can also change the aspect ratio to suit the needs of other platforms and repeat the export process.

Merge/Combine Xvid Files Online using Kapwing (unpaid software)
Step 1: Upload the video
First, upload the video to Kapwing’s video merging tool. This free tool is available for iPhone, Android, PC, or tablet in Chrome or Safari browser. Click Upload to add the videos one at a time, or select multiple clips to import them all at once.
Kapwing supports major video file types such as MP4, .FLV, .3PG. To embed a video from the web, just copy and paste the link. You can upload photos and GIFs and combine them with videos.

Think of a video that looks great when spliced together into two consecutive videos. This can be a similar color palette, an event or travel video, or a video of the same person. When
videos are uploaded, the video preview shows how they look combined. Kapwing highlights each scene with a purple box during playback.

Step 2: Place the video /photo in the desired order.
Think about which clips are next to each other and work best, and arrange them accordingly. You can drag clips to rearrange them and delete them when you no longer need them.
In the menu on the left, you can choose the format of the finished video (choose 1: 1 (square)), whether to crop the video (choose Fit to Border), and the length.

The video should be a montage photo Kapwing also has the option to crop the video clip to shorten the required section.
Creators can crop videos and remove sections from the center. To crop a clip, first select it and click Edit to open Kapwing Studio.

Drag both ends of the layer to change the timing of the start and end of the clip, or click the timing and use the arrow keys to make fine adjustments.
Besides trimming, you can look at other edits. To remove a section or add a clip in the center, use the split tool above the timeline or type “s” on your keyboard and use the shortcut.
Next, delete the layers you no longer need, drag the clips to combine them, and display them side by side on the timeline.
creators have more control over the montage by editing the scene in Studio. In Studio, you can add music to your montage,
insert title slides, attach endings, watermark corners, and animate.

Step 3: Save the merged video
When you have finished merging the video into the merged video, click Export Video in the upper right corner. Once the video is processed, you will be taken to the download page.
From here, you can save the video to your device or create a free account with your Google or Facebook login credentials to remove the watermark first.
There are two ways to import a Xvid file.
Click Import to browse for Xvid videos on your computer and select all Xvid files to load while holding down the Ctrl or Shift key. Drag and drop the Xvid file directly into the program window.
If you want to add images and sounds and merge them seamlessly, do that. All regular image and audio files are supported.
- Drag and drop the Xvid video together
When you load all the Xvid files, they will appear as thumbnails in your album. To merge them, you need to drag and drop them one by one into the video timeline. They are seamlessly merged without gaps. Click the play icon to see the merged Xvid files in the screen on the right.
To change the order, simply drag the video element to the left or right. Note: Do not overlay another video clip. Otherwise, split and paste the original video in its place.
- Improve merged Xvid videos (optional)
You can also do other work to personalize your Xvid video before you export the merged Xvid video. As a powerful and easy-to-use video editor, you can use Wondershare Filmora:
for basic editing (trimming, splitting, rotating, trimming, brightness, contrast, tint adjustment, playback speed, pitch change, etc.). I can do it. Video Customization: Apply transitions, effects, subtitles, PIPs, intros / credits and add background noise. Over 300 templates are provided. Edit like a pro Take your Xvid video editing to the next level with built-in power tools such as jump cut, face off, mosaic, tilt shift, flash and hold.
- Export related Xvid files
You can preview the content you created after making the necessary changes. When you are satisfied, click the “Create” button to save. In the pop-up output window, you can choose the desired format from all common formats such as WMV, MP4, AVI, MOV, MPG, FLV. In addition, in Advanced Settings, you can further select encoder resolution settings such as 1280 x 720, 640 x 480, 1920x1080.
Would you like to burn the merged Xvid files to DVD for viewing on a regular DVD player or big screen TV? Click the DVD tab, set the aspect ratio to 16: 9 or 4: 3, set the TV standard and create a DVD video.
Film / Media File Preparation: Filmora supports a variety of file formats. You can check if your file is supported by Filmora here. Be sure to save the file to your computer or storage drive.
Review System Requirements: Review Filmora’s system requirements to ensure that your Mac meets these requirements for the best user experience.
Create a new project or open a recently used project
1 To create a new project, select a video aspect ratio and click New Project.
2 Click Open Project to open an existing project. Importing
Media Files Imports
video footage, audio, or other media files. To import media files, you can:
1 Click the “+” icon to browse to a local file on your Mac and add a file.
2 Drag and drop the media file into the Media Library area.
3 Import media files from an external device.
4 Import using the Instant Cutter tool.
Media File Placement on the Timeline To place a clip or sequence of other media files, you can:
Drag the video, audio, and images into the timeline window and place them in the order you want. Apply Transitions and Effects
Transitions and effects help make your video more eye-catching. The Transitions and Effects panel contains various transitions and effects that you can apply. Adding a title
Filmora has a number of title templates. What you can do:
1 Select an existing title template in the Title section, enter text and save.
2 Click the text to adjust the text style. You can save it as a custom for later use.
Color Editing
Filmora has multiple color editing options. You can do the following.
Improves video color.
Adjust the white balance.
Tone changes: Contrast, Saturation, Brightness.
2 Match the colors of two different clips.
To edit the color, double-click the clip, click Color, change the parameters, and then click Save. If you need more advanced editing, you can click Details. Edit Audio
Filmora has a complete audio editing solution. You can remove background noise, change audio speed, auto-normalize audio, and more.
Export videos to a supported format or post directly to the social platform.
Another way to combine multiple Xvid files into one using Avidemux
There are many different video formats, and it can be difficult to meet some of them without knowing exactly what they are. For example, Xvid files are Xviden-encoded video file formats that use the Xvid codec, rather than the formats you are used to in everyday life like the MP4 format. This program is used to compress and decompress video to the compression standard MPEG4 ASP, save disk space and file transfer speed, and open this type of file. Many modern DVD and Bluray players can play XVID files. Like a PC, any software program that can decode MPEG4 ASP-encoded video can play XVID files.
This article describes how to combine multiple Xvid files into one using Avidemux, a free video editor and encoder that supports multiple file types. Merging common video and video in Avidemux is not a big deal, but you can learn how to merge different Xvid files with this editor from the detailed article.
Therefore, first you need to change some of the settings for the selected video. Frame rate etc. Next, you need to open the first video clip, find and open the menu file option that displays the drop-down menu at the top left of the screen, and select Attach.
Step 1:
Adding Xvid Video to a program in batch
Before importing an Xvid file, you need to make sure that you have the latest version of Joyoshare Video Joiner installed on your computer. Then it’s up to you to upload the Xvid video. There are two options. Touch the Open File icon in the lower left corner, or drag directly in bulk as needed.
Step 2:
Finish setting the output format
When all the Xvid video files are loaded, click Format in the lower right corner of the main screen and select the output format. Formatting can be set in “Fast Mode” or “Encode Mode”. The only difference between the two modes is that the former is a lossless mode, which provides a 60x speed solution that stitches multiple Xvid files in their original quality, but the output format must be the same as the source video. The latter is a customizable mockup that allows you to choose any format as the output format and customize the output quality by simply clicking on the gear icon.
Step 3:
Cut Xvid Video File When you have finished setting the
output format, tap OK to save and you will be returned to the first interface. You can now crop Xvid videos as needed by simply dragging the timeline.
Step 4
Editing a Xvid file in encode mode
The Joyoshare Video Joiner is equipped with a video editor that works only in encode mode. Therefore, if you want to combine Xvid files, then click the Edit icon next to the Xvid file you just added to crop, crop, mirror, adjust brightness, watermark, apply effects, subtitles, etc. You can edit the video.
2 Ways to Merge/Combine Xvid Files on Android using Wave.video (paid software)
Wave.video allows you to easily combine two or more video clips or images to create longer videos.
To do this, go to https: //wave.video, click the New Video button and select Blank Video.
This will open a video editor and ask you to select a format.
You can then select the Upload Media (from your computer) or Select from Library (Go to Stock Library, Favorites, Purchased, Previous Uploads, and Read My Video Folders) option. The video clip is added to the editor. You can add a second clip by clicking the + sign on the timeline.
Not only can you merge original video clips, but you can also merge with stock footage, video clips, image merges or merges. Multiple images in the video.
If you add multiple video clips or images to your timeline, you can add transitions between them to “glue” them into your story. If you’re happy with how to combine video clips, go to the publishing steps to download the video or share it directly with your social media account.
2 Ways to Merge/Combine Xvid Files on Android using InShot (unpaid software)
How to merge videos on your smartphone
Smartphone apps are less functional and slower on handheld devices, so it’s usually best to edit videos on your computer.
But if you’re trying to make a simple video on the go, your smartphone will do the job. Combining videos on Android phones.
Android users, InShot is a great option for combining multiple videos.
Transitions, effects, stickers, etc. are limited by the free version of the app.
How to get started:
- Open the app and select a video option.
Other options are not related to video.
- Select the videos you want to combine from the library.
Select the videos in the order you want them to appear.
- Crop the clip to crop and polish the video
Tap the video clip section to crop the clip.
- Add a transition effect between video clips
To add a Transition, simply select the white icon on the timeline that ends one video clip and starts another.
Click to see the transitions. Only basic transitions are available in the free version. Super and glitch are available to professional users.
- Insert text to add stickers
The sticker options available in the free version of the app are limited.
- Correct the color of the clip Select the clip and click the Filter option.
Go to the Adjustment tab and modify the lighting, saturation, etc. of the clip.
- Save Video
Click Save in the upper right corner of the screen and select the desired video quality.
Merge/Combine Xvid Files on iPhone using iMovie (unpaid software)
Merge videos with iMovie on iPhone
iMovie is already installed on your iPhone.
Combine multiple video clips into one project in a few simple steps.
The method is as follows:
- Open the app and create a new project
Select Movie from the options displayed on the screen.
2nd Click Media in the upper left.
Select the video files in the order you want them to appear.
- Start editing
Click the white icon in the center of the clip to add a transition effect.
- Select Finish in the upper left corner of the screen.
Video is stored.
Note: You can apply a filter to make all video clips look the same.
Merge/Combine Xvid Files on iPhone using Biteable (paid software)
Merge videos like an expert
Biteable’s video combiner allows you to quickly merge footage and add transition effects.
From flashy dissolves to smoother slide-ins than Barry White eating ice cream, merging videos has never been easier.
Method is as follows:
- Upload video footage
First, log in to Biteable and create a new video project. Alternatively, click this link to sign up and get started in seconds.
Then select Start with Blank Video on the toolbar to start a new project or select a template. The Biteable Video Editor launches.
To add your first footage, tap the canvas, then tap Add Scene> Upload. Select the video you want to add. Then repeat this process to upload the second video.
- Merge and add transitions
This will merge the footage on the timeline. If you want to add a transition, move the mouse pointer to the area between the video clips on the timeline.
Tap the white arrow that appears and swipe up, swipe left, or select a dreamy crossfade effect.
- Click the Preview button to export the merged video
Immediately export the video and later upgrade to a premium membership to remove the small watermark.
https://biteable.com/tools/merge-videos/
Merge/Combine Xvid Files Online using ClipChamp (paid software)
Step 1. Create an account on Clipchamp
Log into your Clipchamp Create account, or join up without spending a dime to get started.
Step 2. Create a brand new task
Click on Create a Video button withinside the pinnacle proper corner. We provide plenty of codecs and templates to pick from.
Before you choose a layout or a template have a clean concept of ways you need to continue consistent with your requirement. Select an element ratio that fits the pleasant in your video.
Your element ratio can vary primarily based totally upon the platform that you`re aiming to submit the video.
Step 3. Add the motion pictures you need to merge
Now that you`ve created a brand new task at the video merger, click on the Add Media button withinside the left toolbar to import video documents into the empty task.
You can pick to tug and drop motion pictures out of your difficult drive, your phone, dropbox, google drive, or different on line storage. You may even upload inventory photos or Gifs from the inventory button at the left toolbar.
Once you`ve imported your media documents they`ll seem withinside the video merger.
Step 4. Add your motion pictures to the video merger timeline
Select the 2 movies and drag them to the editor`s timeline. After adjusting the clips to their accurate positions a inexperienced spotlight will seem round them
indicating that those documents will drop to the timeline in case you allow pass of your click on. You may also upload extra clips sequentially on your timeline relying at the requirement.
You may want to scroll beyond the clips at the timeline to alter them into areas in case your video receives longer. Your clips at the moment are located at the timeline!
Step 5. Resize and rearrange your motion pictures
We have selected a nine:sixteen ratio however our inventory photos is sixteen:nine ratio. You will want to resize your video photos. Click at the preview display then click on Crop to fill.
Drag the video throughout the display to put the video. Repeat this technique for each motion pictures. Since the motion pictures won’t be withinside the series you need them to be in,
you may have to tug and drop them to the favored series. You can trim the video without a doubt through transferring your mouse over to both give up of a clip and dragging them as consistent with your want.
Step 6. Recheck and export
Often even as enhancing or merging our motion pictures we export in a rush and recognize that we had to trim a segment a tad bit more.
This takes place to maximum folks however does now no longer fear as Clipchamp robotically saves your task and you could re-take a look at the complete video earlier than exporting it.
If you are happy with the merge of the two videos, you can click the export button in the upper right corner of the video editor.
Select the resolution for which you want to export the video file and click Next.
You can also change the aspect ratio to suit the needs of other platforms and repeat the export process.
Merge/Combine Xvid Files Online using Kapwing (unpaid software)
Step 1: Upload the video
First, upload the video to Kapwing’s video merging tool. This free tool is available for iPhone, Android, PC, or tablet in Chrome or Safari browser. Click Upload to add the videos one at a time, or select multiple clips to import them all at once.
Kapwing supports major video file types such as MP4, .FLV, .3PG. To embed a video from the web, just copy and paste the link. You can upload photos and GIFs and combine them with videos.
Think of a video that looks great when spliced together into two consecutive videos. This can be a similar color palette, an event or travel video, or a video of the same person. When
videos are uploaded, the video preview shows how they look combined. Kapwing highlights each scene with a purple box during playback.
Step 2: Place the video /photo in the desired order.
Think about which clips are next to each other and work best, and arrange them accordingly. You can drag clips to rearrange them and delete them when you no longer need them.
In the menu on the left, you can choose the format of the finished video (choose 1: 1 (square)), whether to crop the video (choose Fit to Border), and the length.
The video should be a montage photo Kapwing also has the option to crop the video clip to shorten the required section.
Creators can crop videos and remove sections from the center. To crop a clip, first select it and click Edit to open Kapwing Studio.
Drag both ends of the layer to change the timing of the start and end of the clip, or click the timing and use the arrow keys to make fine adjustments.
Besides trimming, you can look at other edits. To remove a section or add a clip in the center, use the split tool above the timeline or type “s” on your keyboard and use the shortcut.
Next, delete the layers you no longer need, drag the clips to combine them, and display them side by side on the timeline.
creators have more control over the montage by editing the scene in Studio. In Studio, you can add music to your montage,
insert title slides, attach endings, watermark corners, and animate.
Step 3: Save the merged video
When you have finished merging the video into the merged video, click Export Video in the upper right corner. Once the video is processed, you will be taken to the download page.
From here, you can save the video to your device or create a free account with your Google or Facebook login credentials to remove the watermark first.
Trailer Guide for Creators and Developers
Trailers are a popular means to showcase a product you are about to release to the market. Teasers and trailers are traditionally created for movies, but have eventually evolved to include book trailers, game trailers, and app trailers. In this article, we will explain the key details of a trailer, highlight some examples, and show you how to create an effective trailer.
Part 1. What is a Trailer?
A trailer is a type of video commercial advertisement made to advertise and inform audiences about a specific program or item. To persuade customers to view or use the product, it includes a brief series of previews of the entire material. It also serves as a means of creating anticipation for a show or product that is about to hit the market.

Trailers were originally made for cinema movies. Nowadays, trailers are created for different forms of media like shows, apps, programs, video games, and book videos. A typical traditional trailer lasts between 1 to 3 minutes.
Part 2. What Are the Similarities and Differences Between a Teaser and Trailer?
Teasers and trailers can often be confused with each other. After all, they pretty much have the same objective.
Both are created for the purpose of advertising an upcoming show, product, or service. Teasers and trailers are similarly shown to audiences prior to the release of the thing they are advertising. They are meant to show a small portion of the full experience to create curiosity and excitement towards a targeted market. Both videos are typically short in length - taking up only a maximum of 3 minutes in duration.

The differences between them lie in their content, timeline, and duration. A teaser is much shorter than a trailer - the former runs for only 20-30 seconds while the latter can go between 1-3 minutes in length. This is because teasers are typically made before or during the production process of a movie or feature, whilst trailers are commonly made at the end.
For films, movies, and shows, teasers generally capture only a single part of that media. It focuses on the most intense or impactful scene. Trailers are formed from a series of clips depicting striking scenes derived from the beginning, middle, and end of the show. These scenes are normally arranged in a nonlinear structure, allowing viewers to have a general understanding of the story without revealing the entirety of the plot.
Part 3. Examples of good trailers
An excellent trailer is one who can effectively attract and maintain the audience’s attention. It satisfies its objective of showcasing striking and captivating pieces of the main product and entices viewers to experience its entirety. Here are some examples of trailers who have well fulfilled the criteria of a good trailer.
1. The Suicide Squad
The Suicide Squad is a fresh take featuring DC’s anti-heroes assemble in a single chaotic and unconventional team. James Gunn’s iteration on these characters is brought to life in the trailer with a majestic cast including John Cena, Idris Elba, Margot Robbie, and David Dastmalchian. Several key scenes are shown, highlighting its standout characters in the process while portraying the movie’s setting.
2. Raya and the Last Dragon
The trailer starts out innocently and comes with an adorable and surprising twist. The brief 2-minute trailer is packed with relevant scenes that depict the character’s quest without revealing too much. Many action-packed scenes and emotional interactions are satisfactorily squeezed into the trailer. Excitement builds further with Tamara Bubble’s “I’m That Good” playing in the background on the last minute of the video.
3. Men (2022)
Ingenious combination of sound effects and background music play a distinct role in this 2022 trailer. The female lead’s voice echoing from a tunnel, the haunting piano keys gradually building up the suspense, and the common but cleverly used horror audio effects create a chilling ensemble of haunting scenes in the movie. The sounds gradually rise up as more aggressive and energized scenes flash on the screen, and eventually end back into the sombre intro that leaves the audience with questions.
4. The Farewell
Lulu Wang’s dramatic comedy The Farewell is all about a family hiding the truth of a family member’s terminal illness from the person herself. What makes the trailer special is that it steers away from the sad, melancholic direction and veers toward a feel-good movie vibe. The conflict, struggle, and the beliefs featured in the movie are depicted in the trailer. However, the clever placement of interactions and the uplifting music tug at the audience’s heartstrings and urge them to want to see more.
5. Pokémon Go
Pokémon has become a culture to several generations. Becoming a Pokémon trainer is a secret dream that almost all of us have, even as adults. Niantic’s collaboration with the Pokémon franchise brings people closer to that reality by introducing its AR and location-powered app Pokémon Go. The trailer shows people of all ages living out their trainer dreams in the real world and interacting with Pokémon. The different features of the game are dramatized in a real-life setting, inciting more excitement, and pulling out the nostalgia from its market. The trailer keeps the actual app showcase to a minimum, instead focusing on once again selling that dream to audiences and bringing out the inner child in everyone.
Part 4. How to bring your trailer to the next level?
While it may seem intimidating to create a trailer for your upcoming product, there is no need to worry. It is now easier than ever to create a well-crafted trailer by taking advantage of a program’s tools and templates.
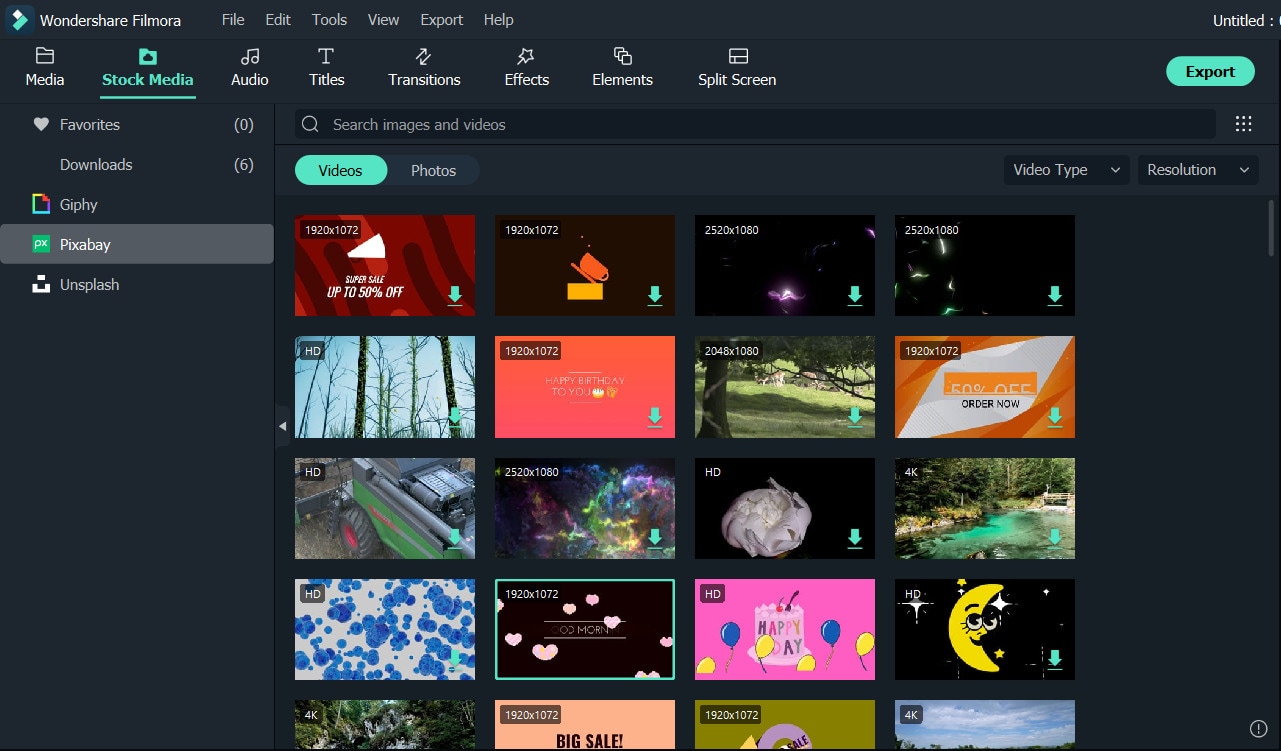
- Stock media
Filmora makes it easy to craft a trailer with only a few clicks. Make use of the program’s media library to gain access to a wealth of resources like stock photos, videos, music, and audio files.
- Keyframing
Keyframing lets you smoothly transition from one scene to another, making it an effective tool for trailers. It is particularly appealing for shows that highlight motion like sports, dancing, and action. Experiment with more than 80 preset templates and create smooth scene transitions with ease.
- Speed Ramping
Speed Ramping is a feature that works perfectly with keyframing. Increase the energy and dynamics in your trailer with 6 preset speed types. You can also customize these templates. There is also no need for concern about the audio - Filmora lets you maintain the audio pitch even when using these features.
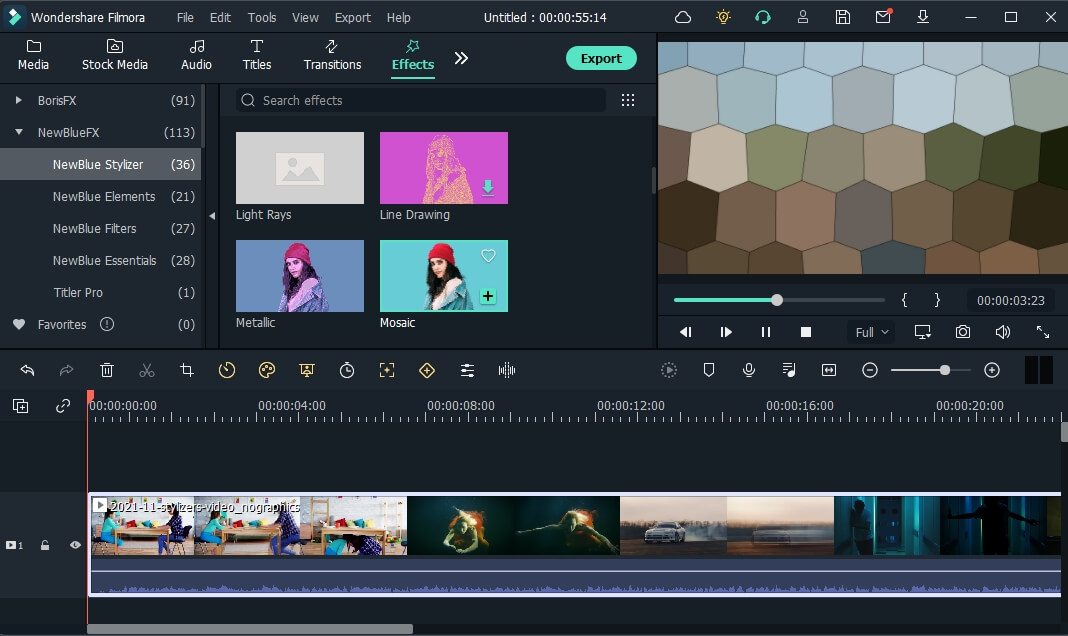
- FX Effects
The program also offers many effects and filters for an extra element in your trailer. The Borix FX is an example of that. Designed in collaboration with the award-winning developer of the same name, Boris FX and its extension Continuum features a wide array of tasteful effects for your convenience. There are over 91 customizable and adjustable presets including types like blurs, stylization, and lights. NewBlue is another option that carries choices of filters, titlers, and stylizers.
Filmora offers different features, tools, and effects to explore that can help make your trailer editing objectives easier and more convenient. Save time and resources by taking advantage of its powerful yet easy-to-use tools.
Free Download For Win 7 or later(64-bit)
Free Download For macOS 10.14 or later
2. Raya and the Last Dragon
The trailer starts out innocently and comes with an adorable and surprising twist. The brief 2-minute trailer is packed with relevant scenes that depict the character’s quest without revealing too much. Many action-packed scenes and emotional interactions are satisfactorily squeezed into the trailer. Excitement builds further with Tamara Bubble’s “I’m That Good” playing in the background on the last minute of the video.
3. Men (2022)
Ingenious combination of sound effects and background music play a distinct role in this 2022 trailer. The female lead’s voice echoing from a tunnel, the haunting piano keys gradually building up the suspense, and the common but cleverly used horror audio effects create a chilling ensemble of haunting scenes in the movie. The sounds gradually rise up as more aggressive and energized scenes flash on the screen, and eventually end back into the sombre intro that leaves the audience with questions.
4. The Farewell
Lulu Wang’s dramatic comedy The Farewell is all about a family hiding the truth of a family member’s terminal illness from the person herself. What makes the trailer special is that it steers away from the sad, melancholic direction and veers toward a feel-good movie vibe. The conflict, struggle, and the beliefs featured in the movie are depicted in the trailer. However, the clever placement of interactions and the uplifting music tug at the audience’s heartstrings and urge them to want to see more.
5. Pokémon Go
Pokémon has become a culture to several generations. Becoming a Pokémon trainer is a secret dream that almost all of us have, even as adults. Niantic’s collaboration with the Pokémon franchise brings people closer to that reality by introducing its AR and location-powered app Pokémon Go. The trailer shows people of all ages living out their trainer dreams in the real world and interacting with Pokémon. The different features of the game are dramatized in a real-life setting, inciting more excitement, and pulling out the nostalgia from its market. The trailer keeps the actual app showcase to a minimum, instead focusing on once again selling that dream to audiences and bringing out the inner child in everyone.
Part 4. How to bring your trailer to the next level?
While it may seem intimidating to create a trailer for your upcoming product, there is no need to worry. It is now easier than ever to create a well-crafted trailer by taking advantage of a program’s tools and templates.
- Stock media
Filmora makes it easy to craft a trailer with only a few clicks. Make use of the program’s media library to gain access to a wealth of resources like stock photos, videos, music, and audio files.
- Keyframing
Keyframing lets you smoothly transition from one scene to another, making it an effective tool for trailers. It is particularly appealing for shows that highlight motion like sports, dancing, and action. Experiment with more than 80 preset templates and create smooth scene transitions with ease.
- Speed Ramping
Speed Ramping is a feature that works perfectly with keyframing. Increase the energy and dynamics in your trailer with 6 preset speed types. You can also customize these templates. There is also no need for concern about the audio - Filmora lets you maintain the audio pitch even when using these features.
- FX Effects
The program also offers many effects and filters for an extra element in your trailer. The Borix FX is an example of that. Designed in collaboration with the award-winning developer of the same name, Boris FX and its extension Continuum features a wide array of tasteful effects for your convenience. There are over 91 customizable and adjustable presets including types like blurs, stylization, and lights. NewBlue is another option that carries choices of filters, titlers, and stylizers.
Filmora offers different features, tools, and effects to explore that can help make your trailer editing objectives easier and more convenient. Save time and resources by taking advantage of its powerful yet easy-to-use tools.
Free Download For Win 7 or later(64-bit)
Free Download For macOS 10.14 or later
Are You Finding It Challenging to Upload and Create a Link for Your Video? Well, This Detailed Upload Video to Link Guide Will Help You with This. Check It Out Now
A well-personalized video is an effective way to get your way around the viewers easily. Besides, you can also easily impress them with your products or services by uniquely pressing them.

Now, imagine if you have an easier way to share your videos with audiences on different platforms! Well, this way you will save a lot of time. For this, you need to upload the video to the link, and then you can share the URL link on various platforms. Keep reading to understand the entire process.
Part 1: Method1: Upload videos to a video hosting platform
The method to upload the video to the link will vary based on the video-sharing platform you are using. Let’s understand this with an example. If you are using YouTube, then you need to follow the below-given steps to upload and generate a link for your video.
- First of all, you need to log into your YouTube channel or account.
- Now, you need to click on the video icon. You can find it on the right-hand side of the screen.
- Then, click on the Upload a Video option.
- Click on the Select Files option and choose the video that you want to upload. You can also drag and drop the video to upload it.
- Once done, click on Publish option to complete the process.
Now, to complete your YouTube video upload share, you need to find the link to your video. For this, you need to click on the pause button and then right-click on the video. Now choose the Copy video URL. Now, you can share that video on other platforms just by pasting the video link.
How To Make Video Private and Public?
- Sign in to your YouTube account.
- Choose the Videos option.
- Now choose the video that you want to update.
- Then you need to click on the down arrow located under Visibility and select Private or Public based on your preference and then click on the Save option.

Different Video Hosting Platforms that You can Use
1. Vimeo
One of the best alternatives to YouTube is Vimeo. This platform allows the user to create, manage and enjoy an easy video upload share process. This platform has more than 250 million active users. It offers different subscription plans, and for unlimited upload limits, webinars, live streaming and more, you can go for its premium package. Some of the impressive features of this platform are:
- Custom CTAs- Calls to Actions
- Support video hosting in 8K quality.
- Easy access to different video editing templates
- CRM- Customer Relationship Management integrations
- Supports content analytics
- video upload share option for social media
2. Streamable

Speaking about Streamable, this is a video editing as well as sharing tool that will allow you to stream videos in 4K quality, and you can even embed the videos. You will have the freedom to upload your videos in different formats and can also resize them in vertical, landscape and square formats. Some unique features of Streamable are:
- Content management tool
- Brand overlay
- Easy-to-customize templates
- Content Library
- Audio capture
- Faster data export and import and more
3. Uscreen
This is an excellent all-in-one platform that helps video creators to sell, manage and market their content while expanding their business. Besides, the platform also helps the users to create mobile and TV apps and offers tools to market the videos. Some features for Uscreen to consider are:
- Different membership options.
- Support offline viewing of content, including videos.
- A professional video player
- You will enjoy full ownership of your audience’s data
- Supports different retention and marketing tools.
- Supports more than 150 hours of video storage and more.
4. Dailymotion

This platform is also called “the home for videos that matter”. Dailymotion is used by many well-known clients such as MLB, CNN and more to host video content. If you are a creator, you can easily upload your videos on this platform for free. Creators can utilize different features available on the platform, such as:
- Easily embeddable and shareable videos
- Easy video sharing using your video link on social media platforms
- You can upload videos of up to 4K quality.
- Password-protected videos
Part 2: Upload your videos to a cloud disk and share to others
As per some studies, more than 85 percent of businesses utilize videos for marketing strategy. Video content is entertaining, easy to understand and can offer better ROI as you can reuse it. However, with the huge volume of these files, it has become more challenging to find a good storage option.

This is where cloud storage comes to play. There are different cloud disk or storage platforms where you can upload video to link and share your videos with others. For example, Google storage or Google Drive. So, let’s know the process of uploading a video to Google Drive.
- First, visit your Google Drive Account and then click on the new option.
- Now, you need to click on File Upload and then select the video that you want to upload.
- You can now see the selected video uploading in the screen’s lower left corner. It will take some time.
- Once done, Google Drive will begin processing the video.
- Once your video is available on Google Drive, you can move it to different folders or change the name.
Now, let’s talk about how to generate a link to your video and share that link with others.
- Open your Google Drive account.
- Choose the video that you want to share and right-click on it.
- Now, you need to click on the Get Link option.
- Then, choose the Anyone with the Link option from the viewer option.
- Now, click on the Copy Link option, and you can now share that link with anyone you want.
There are different reasons that make cloud storage options a perfect choice for video creators or other users. For example:
- You don’t have to worry about data loss.
- Cloud storage is highly scalable.
- There will be no space or storage limit
- The users can enjoy real-time video content updates
- One can access and share videos using any device.
However, some of the cloud storage platforms are not free to use. You will get up to 10GB to 20GB for free. For more storage limits, you will have to buy a subscription plan. For example, if you are using Dropbox, then you will have to pay around USD 20 per month to get up to 3TB of storage.
Besides, there are some content restrictions that you will have to consider. You are not allowed to upload videos that support malicious attacks, hate speech, graphic violence, predatory behavior or videos that promote any dangerous behavior. Besides, the platforms support certain types of video formats, such as OGG, WebM files, WMV, MTS, AVI, and WMV. FLV, 3GPP, MPEG 4, MOV and other file formats.
If you are looking for some free cloud storage platforms, then you can give Google Drive, Dropbox, Box, NeXT cloud, pCloud, Amazon Cloud Drive and OneDrive a try.
Part 3: How to Make Videos That Go Viral?
To make your videos go viral, you will have to make stunning videos by adding some unique special effects. And for this, you can use the Filmora tool. This is a creative video editing tool for a video creator. The platform offers some great features to vloggers, gamers and others. For example, it supports 4K editing, noise removal, advanced text editor, GIF support, video stabilization, equalizer and more. Now, let’s talk about how to use this platform to make or edit a video.
- Open Filmora and choose the desired aspect ratio. Now, click on the New Project option and import the video.
- Then you need to choose the frame rate and resolution for the video.
- Once done, you can go on and transition music between your video clips, or you can use different visual effects.
- Once you are done with editing, you can then explore the videos and then share the videos on different platforms directly from Filmora.
Free Download For Win 7 or later(64-bit)
Free Download For macOS 10.14 or later
FAQs
Why Create a Video Link?
The first reason to consider here is when upload video to link, you can easily share the videos in various formats. Besides, you can share it without worrying about the video size. The video can be shared on multiple platforms and social media channels. It is a faster way to share your video content.
How To Locate the URL of Your Video?
To locate your video URL, you can open the video online. The link that you will see in the browser’s address bar will be the URL of your video. You can then copy the URL and paste it or share it on other platforms. It also applies to YouTube and other video-sharing platforms.
How Do I Get My YouTube Channel’s URL?
You need to sign in to your YouTube Studio. Then from the left Menu, choose Customization and then choose the Basic info. Under the Channel URL option, you can see the URL of your YouTube channel. Now you can copy the Channel URL and share it with others.
Using Adobe After Effects as a Pro-Level Editing Platforms Demands You to Add Expressions in After Effects. If You’re Looking for the Solutions on After Effects How to Add Expressions Then We’ve Got You Covered. Learn More Here
Although After Effects (AE) is a fantastic tool for creating UI animation prototypes, we’re constantly searching for methods to make our process go more quickly. Expressions are supported by AE and allow the designer to animate layers without manually specifying each keyframe by establishing connections between layer parameters or keyframes. We’ll go through the fundamentals of using and defining expressions as well as how to adapt them to your own need.
Part 1. What is After Effects Expression
Expressions are sections of code created in the JavaScript programming languages with the sole objective of changing the layer attributes in After Effects. They can create adaptable rigs and automate repetitive processes. Because of this, developing and modifying the code should be a breeze. There are many phrases that already exist and have for many years, but finding them might be challenging if you aren’t sure what you’re searching for. They may be as small as a single word or integer, or very complicated, including chapters and paragraphs of code.
You may begin forming connections between a property and other layers when you write an expression on that property. By connecting the expressions to the numerical parameters, the expression controllers in the Effects & Presets panel may assist you in better controlling the expressions. Although they are by no means necessary, expressions come in quite handy when attempting to replicate effects like inertia or bouncing without having to specify a ton of extra keyframes. They not only provide many creative possibilities, but they may also streamline your motion design process.
Part 2. Common Expressions in After Effects
An expression is a brief piece of JavaScript code that can be plugged into animated properties in After Effects applications. Expressions evaluate to a single value for a single layer property at a particular instant in time. Below are a few popular expressions.
1. ‘thisComp’
Expressions in After Effects revolve entirely on manipulating values inside an object hierarchy. Objects in this context include the composition, specific layers, and even effects. Values or other things may be contained by an object.
Use thisComp together with some fundamental arithmetic to precisely place things on the screen. This comes in quite helpful when exporting several versions for social media sites and reusing content. To have the logo scale in accordance with the size of the comp, you could even add a similar statement to the Scale option.
2. ‘loopOut’
You can always simply copy and paste keyframes throughout the timeline if you want an animation to repeat. But if you wanted to make adjustments, you’d have to go back and deal with all of those keyframes again. Again, you’d never see Batman using After Effects accomplishing this. You should use the loopOut expression in these circumstances. Even four options may be used to modify how the animation loops.
Again, cycle is the default setting; however, you may also choose from continue, offset, and ping pong. It just requires animating an Ellipse’s Scale and Opacity properties, then adding loopOut to each of them. The two keyframes are immediately cycled; it is plug and play. There are really just four keyframes in total, however the animation lasts the full length of the timeline. Use two keyframes per parameter to keep things simple, or specify which keyframes you want to loop to make things more complicated.
3. ‘random’
As implied by the name, each frame’s value is generated randomly by this expression based on the argument you provide. It will automatically randomize between 0 and 1 if you leave it empty. The parameter will generate a value at random between 0 and the value you provide between the parentheses. It will generate random numbers between the two values you enter.
Another excellent expression for rapidly producing an animation is this one. We often use it to make opacity transitions that flicker. It just takes a few clicks to do this by adding the phrase below to Opacity and keyframing it in and out from 100% Opacity.
4. ‘Wiggle’
One of the few expressions that may be used without keyframes is the Wiggle expression. Watch your shape begin to wiggle by simply adding the phrase to any Transform attribute. It will jiggle between keyframes if you decide to add them.
You will simultaneously move in two dimensions while using this phrase. You may sometimes just need to jiggle one dimension. The After Effects Wiggle expression (also known as AE Wiggle) is an excellent tool for creating erratic item movement, idle character movement, unpredictable camera motion, shaky lettering, and flashing lights.
5. ‘Time’
The greater the value next to “time” below, the quicker your animation will be. Time expression is useful for continuous animation. Utilizing time is one of the fastest and simplest methods to create an animation. Time just creates each second’s numerical value in the timeline. Remember that regardless of the timecode settings, this number begins at zero at the beginning of the comp.
Again, combine this with some simple arithmetic for excellent outcomes. To find a multiplier value that works for the parameter you are animating, play around and explore. Use it to gradually modify a layer’s position or rotation. Time is also very useful for driving animated textures like the Fractal or Turbulent Noise effects. The evolution parameter is increased by a factor of 100 throughout time.
Part 3. How to Add Expressions in After Effects
In Adobe AE, expressions may be added to any kind of layer and any form of layer attribute. Don’t give up; one of the best things about expressions is that you don’t have to be an expert programmer or coder to use them. A variety of transform effects may have expressions applied to them to generate fascinating animation, which might take hours to create from scratch.
While some idioms are brief, simple, and easy to use and comprehend, others are wordy and complex. Even though they can appear difficult, sticking them in their designated spot should work. The process of adding expressions is always the same; the code varies based on your goals. Learning how to apply an Expression effect to your layer is the first step.
Step1 Include your form or image in the timeline. When viewing the layer’s properties, click on the stopwatch of the property you wish to apply the phrase to while holding “Alt” (PC) or “Option” (Mac).

Step2 Make two keyframes for the transformation you’ve selected; in our case, we’ve point it Beginning and the End frames as shown below:

Step3 Go to the Animation menu and choose the Transform option you keyframed in the timeline. We are choosing Scale since it is what we keyframed. Multiple Transform settings may have expressions added to them, but you should do it sequentially.

Step4 A box will show up on the timeline after choosing Add Expression from the menu. In the box, paste your expression. The numerical parameters will become red and a text box will show up in the timeline below the layer. The Expressions will be typed or copied here. By adjusting the values in the code, you may fine-tune the expression; experiment with each to find what works for you.

Part 4. How to Edit Expressions in After Effects
To edit the Expressions in AE, you do need some programming skills to make the most of expressions since they employ JavaScript. However, there are many of excellent starter and expert expression examples, so you can still get a lot done with Premiere Pro without them. When you click the keyframe symbol on the property you wish to apply an expression to, hold down the Alt key to utilize expressions. There will appear an expression box where you may type and amend expressions.
Step1Select the property in the Timeline panel, then choose Animation > Add Expression to add and reveal an expression. To search Expressions and other parts of a property, use the search box in the Timeline panel.

Step2In the Timeline panel or the Effect Controls panel, click the stopwatch button next to the property name using the keyboard shortcut Alt + click for the Windows or Option + click for the MacOS. Four icons are shown under the property while the expression is active, and the value becomes red.

Step3To open the Expression Editor, click within the text box on the Timeline panel. Wherever you wish to alter the phrase, position the cursor. The pick whip may be moved to the name or cost of a property. The resultant expression shows all the values as one if you drag to the name of a property.

Step4Press Enter on the numeric keyboard to end text editing and start the expression.

Conclusion
One of the most popular pieces of software for the post-production of movies is called After Effects. The tools and expressions in AE are used by many video editors and motion graphics creators to produce stunning works of art, animated films, video advertising, distinctive video effects, and many other useful things. Expressions are JavaScript lines of code that let you manipulate data in Adobe After Effects. Even though they don’t have the same flashy name as a kryptonite spear, they may be just as powerful in the proper hands. The fact that they’ll save you a ton of time applies to all of them, regardless of size.
Free Download For Win 7 or later(64-bit)
Free Download For macOS 10.14 or later
Expressions are sections of code created in the JavaScript programming languages with the sole objective of changing the layer attributes in After Effects. They can create adaptable rigs and automate repetitive processes. Because of this, developing and modifying the code should be a breeze. There are many phrases that already exist and have for many years, but finding them might be challenging if you aren’t sure what you’re searching for. They may be as small as a single word or integer, or very complicated, including chapters and paragraphs of code.You may begin forming connections between a property and other layers when you write an expression on that property. By connecting the expressions to the numerical parameters, the expression controllers in the Effects & Presets panel may assist you in better controlling the expressions. Although they are by no means necessary, expressions come in quite handy when attempting to replicate effects like inertia or bouncing without having to specify a ton of extra keyframes. They not only provide many creative possibilities, but they may also streamline your motion design process.
Part 2. Common Expressions in After Effects
An expression is a brief piece of JavaScript code that can be plugged into animated properties in After Effects applications. Expressions evaluate to a single value for a single layer property at a particular instant in time. Below are a few popular expressions.
1. ‘thisComp’
Expressions in After Effects revolve entirely on manipulating values inside an object hierarchy. Objects in this context include the composition, specific layers, and even effects. Values or other things may be contained by an object.
Use thisComp together with some fundamental arithmetic to precisely place things on the screen. This comes in quite helpful when exporting several versions for social media sites and reusing content. To have the logo scale in accordance with the size of the comp, you could even add a similar statement to the Scale option.
2. ‘loopOut’
You can always simply copy and paste keyframes throughout the timeline if you want an animation to repeat. But if you wanted to make adjustments, you’d have to go back and deal with all of those keyframes again. Again, you’d never see Batman using After Effects accomplishing this. You should use the loopOut expression in these circumstances. Even four options may be used to modify how the animation loops.
Again, cycle is the default setting; however, you may also choose from continue, offset, and ping pong. It just requires animating an Ellipse’s Scale and Opacity properties, then adding loopOut to each of them. The two keyframes are immediately cycled; it is plug and play. There are really just four keyframes in total, however the animation lasts the full length of the timeline. Use two keyframes per parameter to keep things simple, or specify which keyframes you want to loop to make things more complicated.
3. ‘random’
As implied by the name, each frame’s value is generated randomly by this expression based on the argument you provide. It will automatically randomize between 0 and 1 if you leave it empty. The parameter will generate a value at random between 0 and the value you provide between the parentheses. It will generate random numbers between the two values you enter.
Another excellent expression for rapidly producing an animation is this one. We often use it to make opacity transitions that flicker. It just takes a few clicks to do this by adding the phrase below to Opacity and keyframing it in and out from 100% Opacity.
4. ‘Wiggle’
One of the few expressions that may be used without keyframes is the Wiggle expression. Watch your shape begin to wiggle by simply adding the phrase to any Transform attribute. It will jiggle between keyframes if you decide to add them.
You will simultaneously move in two dimensions while using this phrase. You may sometimes just need to jiggle one dimension. The After Effects Wiggle expression (also known as AE Wiggle) is an excellent tool for creating erratic item movement, idle character movement, unpredictable camera motion, shaky lettering, and flashing lights.
5. ‘Time’
The greater the value next to “time” below, the quicker your animation will be. Time expression is useful for continuous animation. Utilizing time is one of the fastest and simplest methods to create an animation. Time just creates each second’s numerical value in the timeline. Remember that regardless of the timecode settings, this number begins at zero at the beginning of the comp.
Again, combine this with some simple arithmetic for excellent outcomes. To find a multiplier value that works for the parameter you are animating, play around and explore. Use it to gradually modify a layer’s position or rotation. Time is also very useful for driving animated textures like the Fractal or Turbulent Noise effects. The evolution parameter is increased by a factor of 100 throughout time.
Part 3. How to Add Expressions in After Effects
In Adobe AE, expressions may be added to any kind of layer and any form of layer attribute. Don’t give up; one of the best things about expressions is that you don’t have to be an expert programmer or coder to use them. A variety of transform effects may have expressions applied to them to generate fascinating animation, which might take hours to create from scratch.
While some idioms are brief, simple, and easy to use and comprehend, others are wordy and complex. Even though they can appear difficult, sticking them in their designated spot should work. The process of adding expressions is always the same; the code varies based on your goals. Learning how to apply an Expression effect to your layer is the first step.
Step1 Include your form or image in the timeline. When viewing the layer’s properties, click on the stopwatch of the property you wish to apply the phrase to while holding “Alt” (PC) or “Option” (Mac).
Step2 Make two keyframes for the transformation you’ve selected; in our case, we’ve point it Beginning and the End frames as shown below:
Step3 Go to the Animation menu and choose the Transform option you keyframed in the timeline. We are choosing Scale since it is what we keyframed. Multiple Transform settings may have expressions added to them, but you should do it sequentially.
Step4 A box will show up on the timeline after choosing Add Expression from the menu. In the box, paste your expression. The numerical parameters will become red and a text box will show up in the timeline below the layer. The Expressions will be typed or copied here. By adjusting the values in the code, you may fine-tune the expression; experiment with each to find what works for you.
Part 4. How to Edit Expressions in After Effects
To edit the Expressions in AE, you do need some programming skills to make the most of expressions since they employ JavaScript. However, there are many of excellent starter and expert expression examples, so you can still get a lot done with Premiere Pro without them. When you click the keyframe symbol on the property you wish to apply an expression to, hold down the Alt key to utilize expressions. There will appear an expression box where you may type and amend expressions.
Step1Select the property in the Timeline panel, then choose Animation > Add Expression to add and reveal an expression. To search Expressions and other parts of a property, use the search box in the Timeline panel.
Step2In the Timeline panel or the Effect Controls panel, click the stopwatch button next to the property name using the keyboard shortcut Alt + click for the Windows or Option + click for the MacOS. Four icons are shown under the property while the expression is active, and the value becomes red.
Step3To open the Expression Editor, click within the text box on the Timeline panel. Wherever you wish to alter the phrase, position the cursor. The pick whip may be moved to the name or cost of a property. The resultant expression shows all the values as one if you drag to the name of a property.
Step4Press Enter on the numeric keyboard to end text editing and start the expression.
Conclusion
One of the most popular pieces of software for the post-production of movies is called After Effects. The tools and expressions in AE are used by many video editors and motion graphics creators to produce stunning works of art, animated films, video advertising, distinctive video effects, and many other useful things. Expressions are JavaScript lines of code that let you manipulate data in Adobe After Effects. Even though they don’t have the same flashy name as a kryptonite spear, they may be just as powerful in the proper hands. The fact that they’ll save you a ton of time applies to all of them, regardless of size.
Free Download For Win 7 or later(64-bit)
Free Download For macOS 10.14 or later
Also read:
- Updated The Way to Make Dynamic Video Collages?
- Updated The Background in Your Footage Might Be Bland or Unpleasant. This Article Will Discuss Video Background Templates You Can Use to Spice Things up and Make Your Videos Go Viral
- In 2024, Top 20 Best Text To Speech Software Windows, Mac, Android, iPhone & Online
- New Looking For the Best VHS Video Effect Makers? Get To Know the Top List for 2024
- New Reversing Time Lapse Videos on iPhone Using Top Applications
- 2024 Approved Want to Learn How to Make a Fortnite Montage? This Guide Will Give You the Low-Down on Creating Epic Montage Fortnite Videos that You Can Share with Other Players on Social Media Platforms
- How to Get Motion Blur in Valorant for 2024
- 2024 Approved 3GP Video Format What Is 3GP Format And How To Play It?
- Updated Top 10 Free WhatsApp Video Converter
- In 2024, Learn How to Use 3D Camera Tracking in Adobe After Effects and Take Your Skills to the Next Level
- New 10+ Top Unlimited FCPX Slideshow Templates for 2024
- 2024 Approved Do You Want to Apply BRAW LUTs to Your Pictures and Video Footage? Here We Will Discuss some of the Best Options Available to Help You Choose the Right One
- In 2024, If You Are Trying to Create a Countdown Effect, but Youre Not Sure Where to Start, Then This Post Is Going to Show You some Ways to Create a Countdown Animation for Your Videos
- WMV File Format Has Many Benefits over the Video Industry. If You Are Excited to Know More About the Format and Its Pros and Cons, Then Lets Start the Discussion
- Transforming a Slow-Motion Video to Normal Mastering the Skill
- New How to Create Cinematic Style Videos? Easy Guide for Beginners
- Updated How to Make Stunning Glitch Effect in Photoshop? Ultimate Guide
- New 10 Best Sony LUT for Different Purposes
- In 2024, Android to Apple How To Transfer Photos From Oppo Find N3 Flip to iPad Easily | Dr.fone
- How to Fix Android App Not Installed Error on Samsung Galaxy A23 5G Quickly? | Dr.fone
- How To Remove or Bypass Knox Enrollment Service On Vivo S18
- In 2024, What to do if your Apple iPhone X has bad ESN or blacklisted IMEI?
- How To Upgrade or Downgrade iPhone 13 Pro Max Without Losing Anything? | Dr.fone
- Apply These Techniques to Improve How to Detect Fake GPS Location On OnePlus 12R | Dr.fone
- In 2024, How to Reset a Realme GT 5 Pro Phone that is Locked?
- How To Change Infinix Note 30 VIP Lock Screen Clock in Seconds
- How to Unlock Realme 12 Pro+ 5G Phone without Any Data Loss
- Updated In 2024, How to Stop Animation From Looping in Unity
- In 2024, 9 Best Free Android Monitoring Apps to Monitor Phone Remotely For your Vivo V30 | Dr.fone
- How To Change Your SIM PIN Code on Your Huawei Nova Y71 Phone
- 8 Solutions to Fix Find My Friends Location Not Available On Vivo Y100 5G | Dr.fone
- Unlock android phone if you don't have Vivo S18 Pro fingerprint
- In 2024, How To Unlock Xiaomi Redmi Note 12R Phone Without Password?
- In 2024, Unova Stone Pokémon Go Evolution List and How Catch Them For Oppo A78 | Dr.fone
- Title: In 2024, How to Combine Several Xvid Files Into One Windows, Mac,Android, iPhone & Online
- Author: Chloe
- Created at : 2024-05-20 03:38:06
- Updated at : 2024-05-21 03:38:06
- Link: https://ai-editing-video.techidaily.com/in-2024-how-to-combine-several-xvid-files-into-one-windows-macandroid-iphone-and-online/
- License: This work is licensed under CC BY-NC-SA 4.0.
