:max_bytes(150000):strip_icc():format(webp)/ps6-concept-trailer-64aac5b7323041ad93d7535eccf7df40.png)
In 2024, How to Create Custom Lower Thirds in Filmora

How to Create Custom Lower Thirds in Filmora
As a video creator, there are times when you need to use Lower Thirds. Although many lower-third presets are available, making unique and personalized ones can ensure your video stands out.
So, to empower your inner video creator, this article will show you how to make your own Lower Thirds in Filmora.
Part 1: What is Lower Third
A Lower Third is a mix of motion graphic design and texts that are placed in the lower area of the screen. It provides additional information, such as a person’s name or other relevant information, without distracting the audience from the main content.
Lower Thirds can be used in various settings, such as news broadcasts or interviews, to help provide viewers with additional context.
Part 2: How to Make Your Own Lower Thirds in Filmora
Free Download For Win 7 or later(64-bit)
Free Download For macOS 10.14 or later
(1) A simple line and texts

Step1 Create a simple line
Go to the Media library > Sample Media folder > choose a color sample. For this tutorial, we will select the white color. Then, drag and drop this sample color onto the upper video track.

Double-click the white sample clip to open the settings and scale it to 30%. Then, reposition the white bar to your desired place.

Step2 Mask the white sample
Since we want to create a thin horizontal shape, you need to make some adjustments to the white sample by using an image mask. So, go to the Effect window > Utility > Image Mask. Then, drag and drop the “Image Mask” onto the white color sample.

After that, double-click the white sample on the timeline and find the Image Mask setting. Choose the shape that works best for your needs. For this tutorial, we are going to use this one. Then, adjust the X and Y-axis scale numbers until it becomes a thin white line. Click OK.

Step3 Add a text for your lower thirds
Go to Titles > Plain Text > Basic 6 and drop it onto the second video track above the white line clip. Don’t worry about the exact position yet. We can adjust it later.

Double-click on the text clip to open the settings, then type some text there and adjust the size and font.

Step4 Add animation to the text
Click Advanced > Animation > Up Down 1 animation. Adjust the animation length by dragging the two brackets on the timeline on the right side. Click Ok.

Step5 Add keyframes to the white line clip when entering
Double-click on the white line clip on the timeline to show the animation keyframe setting window. Then, playback the animation of the text, find a position before the text animation starts and move the play head there. Make sure it is close enough to when the texts show up so the white line enters the keyframe right before the text enters.

Click to add a keyframe, double-check to make sure it is the final position you want, and the opacity should be 100 at this point.
After that, move the play head to the left for a few frames and click add again. To make sure the white line is out of the frame before entering, you need to change the Y-axis number. Change the opacity to 0 as the white line starts in transparent color.

These two keyframes will create an effect of the line entering the frame while turning from transparent to white. Playback the animation and adjust the keyframes marks by dragging them to the left or right until you feel the timing looks good.
Step6 Add keyframes to the white line clip when exiting
Playback again to find where the texts disappear, then move the play head to a position after it. Also, make sure it’s close enough to where the texts disappear so you can ensure the white line exits right after the texts disappear. Then, add the keyframe.

You don’t need to change the setting this time because this keyframe is used to keep the position and opacity unchanged.
Instead, move the play head again to the right for a few frames and add another keyframe. Move the texts out of the frame by changing the y-axis number, then change the opacity to 0. This keyframe is used to create the white line animation exiting the frame and turning back to transparent in the meantime.

Playback the video and see how it looks.
(2) A name card with a solid background

Sometimes you might want to create a name card with a solid background like the sample above. To create it, we can use the same method. Here’s how to do it:
Step1 Make the lower third background
Select the white color sample from the sample color folder and drop it onto the upper video track of the video.

Change the scale to 30%, then reposition the white sample to your desired place. Click OK.

Step2 Create an image mask for the lower third background
Drag and drop the Image Mask onto the white sample clip on the timeline.

Double-click on the white sample clip to activate the video setting window and find the Image Mask settings. Then, choose the mask shape you need. You can also adjust its size by changing the X or Y-axis.

Step3 Add some text
Once the background card is in place, go to Titles > Plain Text > ‘Basic 6’ and drop it onto the third video track.

Now, type in the texts as needed. Reposition and scale the texts to make sure they are on top of the background shape.

Step4 Add animation to the text
Click Advanced > Animation > Push. Then, adjust the animation length accordingly. Click Ok.

Double-click on the background clip to show the animation tab setting. Then, playback the text animation and find a position earlier than the start and add a keyframe.

Similar to the tutorial before, move the play head again a few frames earlier to the left and add another keyframe. If you want to have the name card flying in from the left while expanding, you can change the X-axis and scale of the background card to 0. Change the opacity to 0 to create a color change from transparent to white.

To let the background card exit the frame, add two more keyframes to the background card. Add a keyframe with no changes to settings. Move the play head to the right for a few frames and add another keyframe.

If you want the name card to exit to the bottom, change the Y-axis number until it exits. Change the scale and opacity to 0. Then, playback and adjust the keyframes.
Finally, you can add a Subscribe button from the new default Filmora element pack “Social Media.”

Wrapping up
These are two ways you can create your own Lower Thirds in FIlmora. You can also change the keyframe settings to customize your lower thirds even more. Now, it’s time to try it yourself, and let us know what you think!
Free Download For macOS 10.14 or later
(1) A simple line and texts

Step1 Create a simple line
Go to the Media library > Sample Media folder > choose a color sample. For this tutorial, we will select the white color. Then, drag and drop this sample color onto the upper video track.

Double-click the white sample clip to open the settings and scale it to 30%. Then, reposition the white bar to your desired place.

Step2 Mask the white sample
Since we want to create a thin horizontal shape, you need to make some adjustments to the white sample by using an image mask. So, go to the Effect window > Utility > Image Mask. Then, drag and drop the “Image Mask” onto the white color sample.

After that, double-click the white sample on the timeline and find the Image Mask setting. Choose the shape that works best for your needs. For this tutorial, we are going to use this one. Then, adjust the X and Y-axis scale numbers until it becomes a thin white line. Click OK.

Step3 Add a text for your lower thirds
Go to Titles > Plain Text > Basic 6 and drop it onto the second video track above the white line clip. Don’t worry about the exact position yet. We can adjust it later.

Double-click on the text clip to open the settings, then type some text there and adjust the size and font.

Step4 Add animation to the text
Click Advanced > Animation > Up Down 1 animation. Adjust the animation length by dragging the two brackets on the timeline on the right side. Click Ok.

Step5 Add keyframes to the white line clip when entering
Double-click on the white line clip on the timeline to show the animation keyframe setting window. Then, playback the animation of the text, find a position before the text animation starts and move the play head there. Make sure it is close enough to when the texts show up so the white line enters the keyframe right before the text enters.

Click to add a keyframe, double-check to make sure it is the final position you want, and the opacity should be 100 at this point.
After that, move the play head to the left for a few frames and click add again. To make sure the white line is out of the frame before entering, you need to change the Y-axis number. Change the opacity to 0 as the white line starts in transparent color.

These two keyframes will create an effect of the line entering the frame while turning from transparent to white. Playback the animation and adjust the keyframes marks by dragging them to the left or right until you feel the timing looks good.
Step6 Add keyframes to the white line clip when exiting
Playback again to find where the texts disappear, then move the play head to a position after it. Also, make sure it’s close enough to where the texts disappear so you can ensure the white line exits right after the texts disappear. Then, add the keyframe.

You don’t need to change the setting this time because this keyframe is used to keep the position and opacity unchanged.
Instead, move the play head again to the right for a few frames and add another keyframe. Move the texts out of the frame by changing the y-axis number, then change the opacity to 0. This keyframe is used to create the white line animation exiting the frame and turning back to transparent in the meantime.

Playback the video and see how it looks.
(2) A name card with a solid background

Sometimes you might want to create a name card with a solid background like the sample above. To create it, we can use the same method. Here’s how to do it:
Step1 Make the lower third background
Select the white color sample from the sample color folder and drop it onto the upper video track of the video.

Change the scale to 30%, then reposition the white sample to your desired place. Click OK.

Step2 Create an image mask for the lower third background
Drag and drop the Image Mask onto the white sample clip on the timeline.

Double-click on the white sample clip to activate the video setting window and find the Image Mask settings. Then, choose the mask shape you need. You can also adjust its size by changing the X or Y-axis.

Step3 Add some text
Once the background card is in place, go to Titles > Plain Text > ‘Basic 6’ and drop it onto the third video track.

Now, type in the texts as needed. Reposition and scale the texts to make sure they are on top of the background shape.

Step4 Add animation to the text
Click Advanced > Animation > Push. Then, adjust the animation length accordingly. Click Ok.

Double-click on the background clip to show the animation tab setting. Then, playback the text animation and find a position earlier than the start and add a keyframe.

Similar to the tutorial before, move the play head again a few frames earlier to the left and add another keyframe. If you want to have the name card flying in from the left while expanding, you can change the X-axis and scale of the background card to 0. Change the opacity to 0 to create a color change from transparent to white.

To let the background card exit the frame, add two more keyframes to the background card. Add a keyframe with no changes to settings. Move the play head to the right for a few frames and add another keyframe.

If you want the name card to exit to the bottom, change the Y-axis number until it exits. Change the scale and opacity to 0. Then, playback and adjust the keyframes.
Finally, you can add a Subscribe button from the new default Filmora element pack “Social Media.”

Wrapping up
These are two ways you can create your own Lower Thirds in FIlmora. You can also change the keyframe settings to customize your lower thirds even more. Now, it’s time to try it yourself, and let us know what you think!
Top 6 Drones for Videography
Drones are all the rage these days and for good reason. They’re a lot of fun to fly, and they can be a great addition to your toolkit for capturing aerial footage. But with so many different drones on the market, it can be tough to know which one is right for you.

That’s why we’ve put together this guide to the best drones on the market for every budget. Whether you’re looking for an entry-level drone that won’t break the bank or a top-of-the-line model that will let you capture stunning 4K footage, we’ve got you covered. So read on to find the perfect drone for you!
Buyers Guide: The Best 6 Drones on the Market for Every Budget
#1. DJI Air 2S: Among the best options for most people.
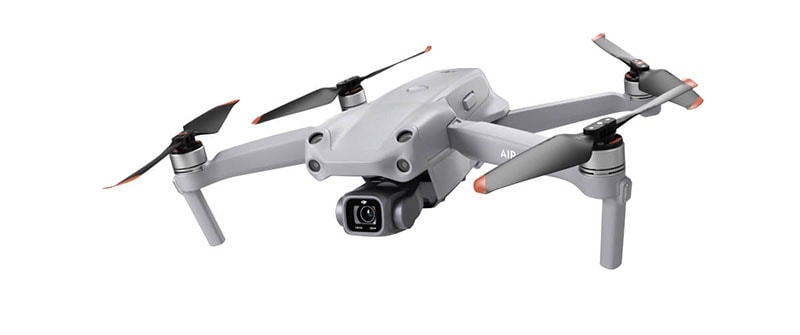
The DJI’s new Air 2S is our top pick. It finds the ideal compromise in terms of size, weight, picture quality, intelligent features, and price. The camera on the Air 2S isn’t as nice as the Mavic 2 Pro’s, which has a variable aperture for more flexible shooting in sunny conditions and includes neutral density filters to help make up for it.
1.3 pounds might not seem like much, but the Air 2S is a force to be reckoned with- it’s durable enough to fly in light winds and can stay up for 30 minutes! Plus, the new collision-avoidance system will keep you safe even when there are trees around, and the 1 inch 20 mp sensor captures amazing 5K video or still photos.
#2. Skydio 2+ Drone: If you want your flights to be handled automatically.

The Skydio 2+ has the best collision-avoidance system, far outperforming any other drone on the market. If you want a drone that can follow your mountain bike off-road or quickly maneuver through obstacles without your help, this is it. Its 27-minute flight time and 6-mile range make it restrictions for some people, but plenty for most. The 1/2.3-inch sensor on this camera is good enough for 4K footage at 60 frames per second, but it’s not as great as the 1-inch sensor in the Air 2S and Evo Lite+. D-log support is also absent, so video professionals might want to keep that in mind.
However, if you can live without D-log and don’t mind the slower sensor, this drone is capable of flying in places where other drones can’t. For certain applications, a smaller sensor may be preferable to having a great one.
#3. DJI Mini 3 Pro: The Best Ultralight Drone for Most People
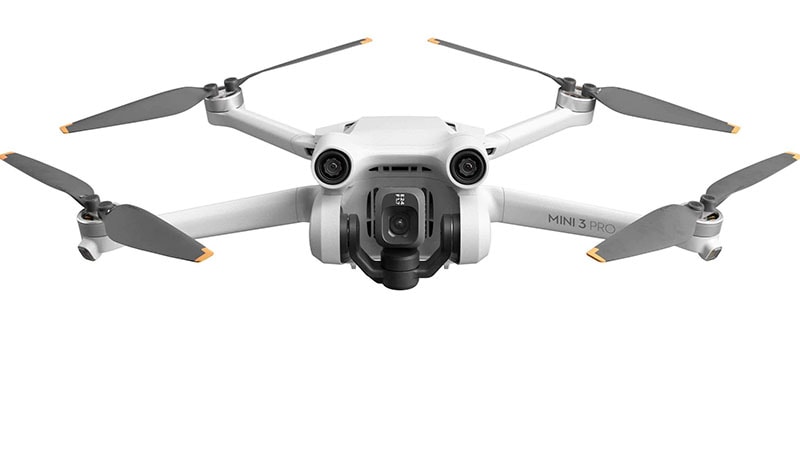
The DJI Mavic Mini 3 Pro is the third version of the name, and it has been greatly improved from its original state. It features a 4K/60p footage with 1/1.3” sensor as well capture 12.1 megapixel RAW photographs. The Mini 3 Pro also has a 48-megapixel mode that improves image quality, but loses some camera functions. A faster F/1.7 lens is now on the front of the drone, and it also incorporates three-direction obstacle avoidance and a gimbal that allows for vertical shooting–all while weighing in at less than 250 grams. This number is important because, in many areas, a drone under 250 grams does not need to be registered (however, you should always check your local laws).
I was ecstatic about the performance of the Mini 3 Pro. It can fly in an impressive 45 minutes when using its extended battery–which is a dramatic improvement from the 32 minutes I got with the standard battery. Not to mention, it’s delightful to fly because it maneuvers so effortlessly in even high winds. The only issue I have with it is that its price has risen since DJI released Mini 2; however, they still sell both models.
#4. DJI Mini 2: Most Affordable Drone
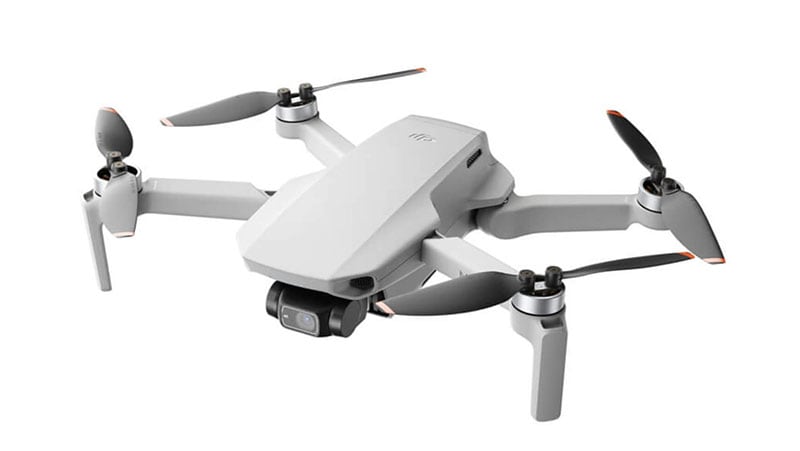
The Mavic Air 2S has advanced collision-avoidance tech, but at a high cost. Even the new Mini 3 Pro sells for $750. If budget is more important to you than features, DJI’s Mini 2 would be your best bet. It flies compared to its larger siblings, though wind gusts that wouldn’t bother bigger drones like the Mavic 2 Pro will ground the Mini. The lack of collision-avoidance sensors makes it better suited for experienced pilots.
Even with those minor drawbacks, the Mini 2 is still a great beginner drone. It’s enjoyable to fly, captures 4K video footage, and can be stored in smaller spaces than many smartphones. And that last part is essential because the best drones are ones that you’ll actually bring with you instead of leaving at home. The Mini 2 only weighs 249 grams so it’s easy to transport, and you don’t even need to register it with the Federal Aviation Administration
#5. DJI Mavic 3: The Most Luxurious Drone
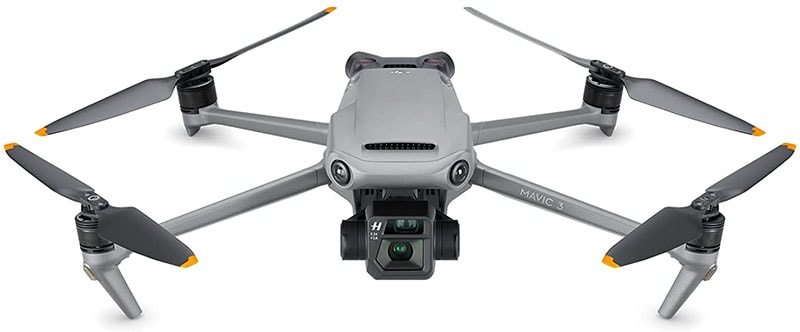
The DJI Mavic 3 Pro is a cut above the rest. It’s the finest drone on the market right now. The new 20-megapixel Four Thirds sensor produces outstanding image and video quality, and 45 miles per hour mobility allows you to follow and track objects without missing a beat.
If you’re willing to spend the money, this drone is definitely worth it. It has a 45-minute flying time and can avoid obstacles in all directions. The Cine model also supports Pro Res video and comes with 1TB of storage space- perfect for filmmakers or anyone who wants to capture high-quality footage.
#6. Autel Evo Lite+: Great for Long Flights
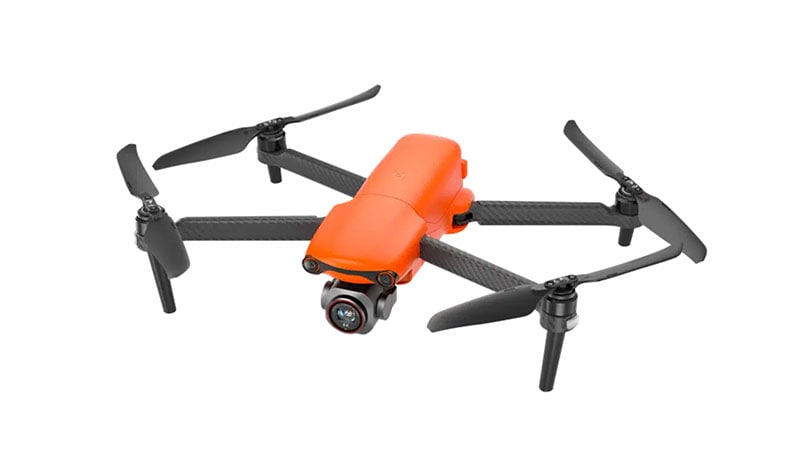
The Evo Lite+ is your best bet if you want to stay airborne as long as possible. Its massive battery provides a 40-minute flight duration, and the additional weight makes it more stable in the wind (though not by much). The Evo Lite+ features a fantastic camera with variable aperture controls, a 1-inch sensor, and night mode for better low-light photos.
The control does resemble an Xbox controller, which is nice, but it lacks the storage capacity for detachable joysticks that you get with DJI drones. It’s still perfectly functional, and Autel’s software will be familiar to anyone who has used a DJI drone.
Some Final Suggestions
Drones can be used for a variety of purposes, from shooting landscapes and cityscapes to capturing footage of sporting events or outdoor activities. They can also be used for wedding videos, real estate videos, and other types of commercial work. And if you’re just looking for some fun footage to add to your home movies, drones are the perfect way to do it.
Of course, not all drones are created equal. If you’re looking for a drone that can shoot high-quality video on a budget, there are a few things you need to keep in mind.
- First, make sure the drone has a high-resolution camera.
- Second, make sure the drone has a long battery life so that you can get plenty of shots without having to recharge.
- Third, make sure the drone is lightweight and easy to control so that you can get the perfect shot every time.
So, what’s the best drone for you? It depends on your budget and your needs. If you want a high-quality camera that can shoot in low light, the DJI Mavic 3 Pro is a perfect choice. If you’re looking for a long-flight drone, the Autel Evo Lite+ is a great option. And if you’re just starting out, the DJI Mini 2 is an affordable and easy-to-use drone that anyone can fly. With that said, happy flying!
Free Download For Win 7 or later(64-bit)
Free Download For macOS 10.14 or later
Free Download For macOS 10.14 or later
After Reading This Article, You Can Add a B-Roll Feature From Filmora and Captivate More Audience. Explanation Video B-Roll and Story-Telling B-Roll Are Well Illustrated
Everyone is bored after watching a simple recorded video in which a character explains or tells a story. No one will watch it for more than 4 minutes!
After looking through this article, you will make your video more fascinating and get more views instantly. It’s all just due to B-roll, which will act as a ninja feature in your video. In this regard, Wondershare Filmora will handle everything.
Scroll more to discover two different types of B-roll videos and get an idea of how to make fascinating B-roll videos.
Part 1. What Is a B-roll?
B-roll is alternative or supplementary video footage that editors can use to intercut in between their main video. In that way, B-roll can add more information to a scene.
An additional footage
It is added as a supplementary video to interact with viewers more closely. This feature helps to give more details of a scene.
Visual representation
When the main explanatory video is too boring, you can add a b-roll to represent the movie’s story visually. It can also add to spice up and beat the energy of the narrative.
Without sound
The B-roll shots are mostly without audio or with little background sound. In most cases, the sound of the primary video is continued while the B-roll footage is just shown.
Act as a filler
The criteria for the B-roll is to provide the situation of the storyline. Additionally, it could be utilized as filler in between scenes in a movie or television program. B-roll may be found almost anywhere!
In this article, you will learn about two main kinds of B-rolls and the steps to edit them on Wondershare Filmora . Stick with us to the end!
Free Download For Win 7 or later(64-bit)
Free Download For macOS 10.14 or later
Part 2. Two Types of B-rolls: Explanation Video B-rolls
When recording any explanatory video, the audience may leave it in the middle of a video if a character explains without any visual representation. When explaining something new, showing the object in B-roll can be more effective than just verbally explaining what the audience is seeing.
Let’s take the video we made about microphones as an example. Instead of just verbally introduce the various mics, we inserted B-roll footage to display what they look like and how they can be used. The combination of the visual footage and the background voiceover presents the mic in a more vivid way. Also, it keeps the audience’s attention.

Goal of the explanation B-roll video
The main goal of this type of B-roll is to show your audience what you are talking about instead of just telling them in a dull way.
Part 3. How to Edit Explanation B-roll Footage on Filmora?
After getting the footage and recording shots for B-roll videos, you need to edit it on the Wondershare Filmora. For this, follow the below-mentioned steps:
Step1Download the Wondershare Filmora
There is no need to do any complex process for editing on any platform. Because we have one platform on which every tool is available.
- First of all, you have to download the Wondershare Filmora .
- Then get access to the entire features.
The premium version has new features and effects plugins that make editing more filmy and fun!
Step2Stock media in Filmora
After downloading, it’s time to edit the B-roll video. If you can’t film your own B-roll, you can use stock footage but make sure you have the license to use them.
Filmora has a unique “stock media” option that enables us to use all these elements and more to boost our videos! To add stock media, follow the below steps:
- Open the app or window of Filmora, which you have installed.
- Head towards the tab on the top right side.
- Then click on the Stock Media option and open it.
- A long list of stock videos and images will pop up.
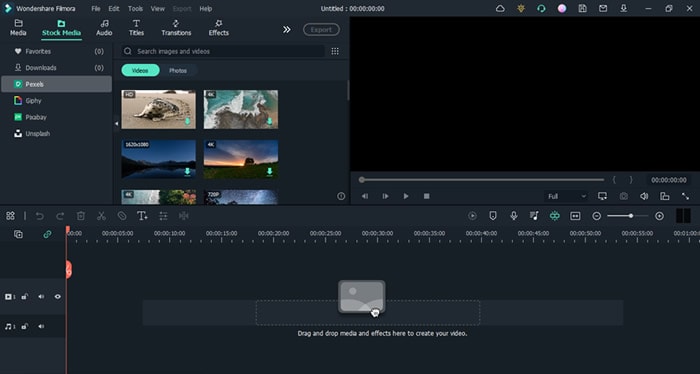
- Select whatever you want, and download it.
- Then drag and drop it in the timeline and insert it between your video.
![]()
Note: Only premium customers will get access to the stock media of the Wondershare Filmora.
Step3Add B-roll in between the main video
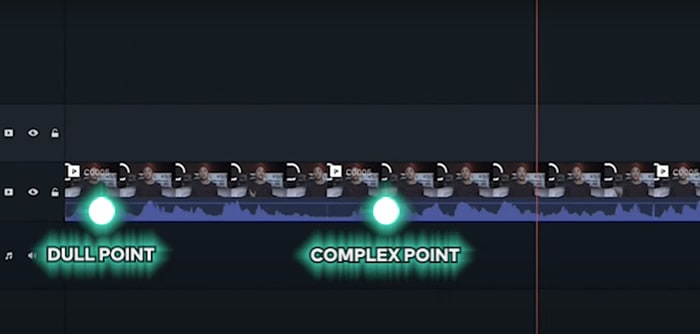
The most difficult and frequent asking situation is how you know when to cut to B-roll. To get to know when to insert B-roll, follow the following steps:
- Watch your edits back and check out where you need.
- Sense about the dull and complex points and cut the main video from there.
- The points can be easily fixed with visual aids.
Part 4. Two Types of B-rolls: Storytelling Video B-rolls
During the creation of short films or any storytelling videos, if a person sits and speaks without showing any character or anything else, it will turn boring. Due to this, you have more chances to lose your audience and viewers.
In visual storytelling, if you will insert more clips with close shots, it will make the environment cool. The crazy thing is that you can make mimic shots easily at home by utilizing household objects. Let’s check out one of the examples.
Example 1. Film B-roll footage with food
So let’s add some b-roll to give it more context even if you have a master shot of yourself looking off frame alone.
Step1Write a script
Before making any video, the first step is to write a script for the whole video. If you will have more than two characters, then make dialogues for everyone and practice it again and again to give a fascinating look.
Then speak to your audience, make sure that what you are speaking is vivid and make everything simple and crystal clear.
Step2Shot a primary video
First of all, make a primary video according to your script by implementing a camera at one side, or you can also change the angle of the camera lens during shooting to have a look from all sides.

As you can see that it’s kind of boring for the audience, but we will make it more unique by implementing closer shots. For this, follow the last step:
Step3Make B-roll shots
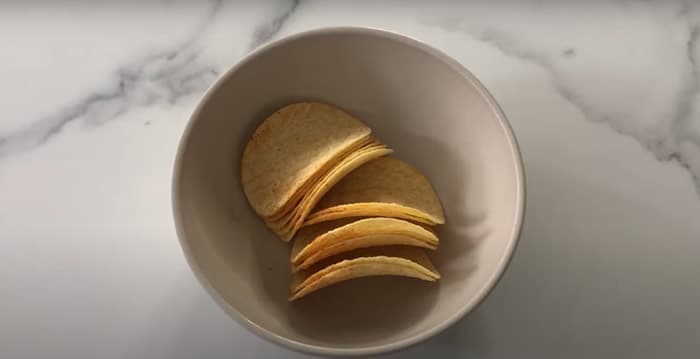
Make closer shots of things which the character have to select and pick up. Check out two B-roll shots for the main video:
- First, make a closer shot of the object (Snacks) that the character is noticing prior.
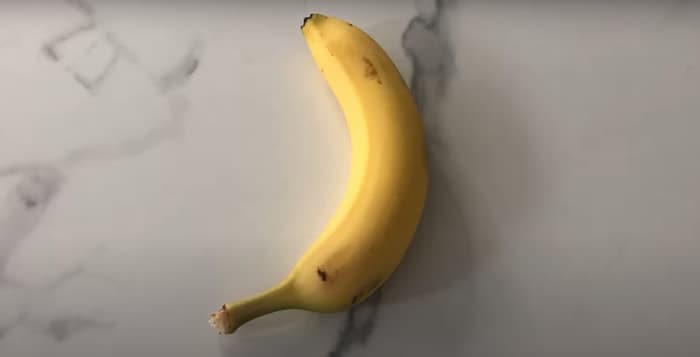
- Second, create more intimate footage of the second object (Banana) which the character will select and grab.
Step4Edit both B-roll footages in Main Video
Now, in the last, insert the B-roll footage in between the primary video from the Filmora and get your results. Enjoy it with your viewers!

Now experiment at home with more daily life activities and create all on Filmora. Check out one more example to create B-roll footage!
Example 2. Make B-roll shots with a cardboard
Try using readily accessible cardboard to create light effects in different shapes and give the film a fantastical place. These methods frequently produce artistic videos that transmit unique moods to viewers.
Only experienced photographers and videographers understand how to use these fundamental tricks to gain viewers into the photos.
The intriguing thing is that if the light is more shaped, it will more accurately reflect the image’s background, setting, and context. Try it out!
Step1Cut the cardboard
You may shape the cardboard any way you desire. We’ll experiment with this by cutting cardboard into the shape of window shades.

Step2Make B-roll footage
Create B-roll footage by moving the cardboard around the light source after giving it shape. The person appears to be seated close to the window and conveys aesthetic vibrancy.

Now, use this B-roll footage in your video and give it a more professional look. The more creative you are, the more audience will attract to you.
Conclusion
Making B-roll shots is creative and fun! You can make all the footage at home by following easy steps. Try out different ones to make your video viral and boost the target audience!
You can easily use Wondershare Filmora during editing and their stock media to save your time in video making. Share your hacks with your audience to get more experience!
Free Download For macOS 10.14 or later
Part 2. Two Types of B-rolls: Explanation Video B-rolls
When recording any explanatory video, the audience may leave it in the middle of a video if a character explains without any visual representation. When explaining something new, showing the object in B-roll can be more effective than just verbally explaining what the audience is seeing.
Let’s take the video we made about microphones as an example. Instead of just verbally introduce the various mics, we inserted B-roll footage to display what they look like and how they can be used. The combination of the visual footage and the background voiceover presents the mic in a more vivid way. Also, it keeps the audience’s attention.

Goal of the explanation B-roll video
The main goal of this type of B-roll is to show your audience what you are talking about instead of just telling them in a dull way.
Part 3. How to Edit Explanation B-roll Footage on Filmora?
After getting the footage and recording shots for B-roll videos, you need to edit it on the Wondershare Filmora. For this, follow the below-mentioned steps:
Step1Download the Wondershare Filmora
There is no need to do any complex process for editing on any platform. Because we have one platform on which every tool is available.
- First of all, you have to download the Wondershare Filmora .
- Then get access to the entire features.
The premium version has new features and effects plugins that make editing more filmy and fun!
Step2Stock media in Filmora
After downloading, it’s time to edit the B-roll video. If you can’t film your own B-roll, you can use stock footage but make sure you have the license to use them.
Filmora has a unique “stock media” option that enables us to use all these elements and more to boost our videos! To add stock media, follow the below steps:
- Open the app or window of Filmora, which you have installed.
- Head towards the tab on the top right side.
- Then click on the Stock Media option and open it.
- A long list of stock videos and images will pop up.

- Select whatever you want, and download it.
- Then drag and drop it in the timeline and insert it between your video.
![]()
Note: Only premium customers will get access to the stock media of the Wondershare Filmora.
Step3Add B-roll in between the main video
The most difficult and frequent asking situation is how you know when to cut to B-roll. To get to know when to insert B-roll, follow the following steps:
- Watch your edits back and check out where you need.
- Sense about the dull and complex points and cut the main video from there.
- The points can be easily fixed with visual aids.

Part 4. Two Types of B-rolls: Storytelling Video B-rolls
During the creation of short films or any storytelling videos, if a person sits and speaks without showing any character or anything else, it will turn boring. Due to this, you have more chances to lose your audience and viewers.
In visual storytelling, if you will insert more clips with close shots, it will make the environment cool. The crazy thing is that you can make mimic shots easily at home by utilizing household objects. Let’s check out one of the examples.
Example 1. Film B-roll footage with food
So let’s add some b-roll to give it more context even if you have a master shot of yourself looking off frame alone.
Step1Write a script
Before making any video, the first step is to write a script for the whole video. If you will have more than two characters, then make dialogues for everyone and practice it again and again to give a fascinating look.
Then speak to your audience, make sure that what you are speaking is vivid and make everything simple and crystal clear.
Step2Shot a primary video
First of all, make a primary video according to your script by implementing a camera at one side, or you can also change the angle of the camera lens during shooting to have a look from all sides.

As you can see that it’s kind of boring for the audience, but we will make it more unique by implementing closer shots. For this, follow the last step:
Step3Make B-roll shots
Make closer shots of things which the character have to select and pick up. Check out two B-roll shots for the main video:
- First, make a closer shot of the object (Snacks) that the character is noticing prior.

- Second, create more intimate footage of the second object (Banana) which the character will select and grab.

Step4Edit both B-roll footages in Main Video
Now, in the last, insert the B-roll footage in between the primary video from the Filmora and get your results. Enjoy it with your viewers!

Now experiment at home with more daily life activities and create all on Filmora. Check out one more example to create B-roll footage!
Example 2. Make B-roll shots with a cardboard
Try using readily accessible cardboard to create light effects in different shapes and give the film a fantastical place. These methods frequently produce artistic videos that transmit unique moods to viewers.
Only experienced photographers and videographers understand how to use these fundamental tricks to gain viewers into the photos.
The intriguing thing is that if the light is more shaped, it will more accurately reflect the image’s background, setting, and context. Try it out!
Step1Cut the cardboard
You may shape the cardboard any way you desire. We’ll experiment with this by cutting cardboard into the shape of window shades.

Step2Make B-roll footage
Create B-roll footage by moving the cardboard around the light source after giving it shape. The person appears to be seated close to the window and conveys aesthetic vibrancy.

Now, use this B-roll footage in your video and give it a more professional look. The more creative you are, the more audience will attract to you.
Conclusion
Making B-roll shots is creative and fun! You can make all the footage at home by following easy steps. Try out different ones to make your video viral and boost the target audience!
You can easily use Wondershare Filmora during editing and their stock media to save your time in video making. Share your hacks with your audience to get more experience!
Make Transparent Background Video Today
End This Problem! Make Transparent Background Video Today
An easy yet powerful editor
Numerous effects to choose from
Detailed tutorials provided by the official channel
How to export transparent video premiere? Making video transparent background online. Steps to remove white background from video.
Have you ever wondered why most shooting of videos are done in white or transparent background? The reasons are that they are simple and easy to shoot. There are various options to add some effects to the videos by removing the white background. New and attractive background can be added with some effects at less cost and time. So, there are various applications which facilitate making video background transparent as well as video without background. So, let’s see some of them along with the steps.
In this article
01 [How to Export Transparent Background Videos in After Effects?](#Part 1)
02 [How to Export Transparent Background Videos in Premiere Pro?](#Part 2)
03 [How to Export Transparent Background Videos in Vsdc](#Part 3)
04 [Best 5 Tool to Make Video Transparent Background Online](#Part 4)
Part 1 How to Export Transparent Background Videos in After Effects?

Working with transparent background is easy and the reason is the flexibility of using a white background and exporting it to other videos. So, let’s learn how to export transparent background videos in After Effects step by step:
● Before exporting the video with transparent background, chose composition. It can be timeline or project panel.
● After this selection, go to application window. Click at composition menu and elect Add to Render Queue.
● You can see that Render Queue window will open with composition in the queue.
● Go to settings and select as required
● Take the cursor on the left side of window and go to the drop down menu. You will find the Output Module settings window.
● Go to format and select QuickTime, the industry standard.
● Staying at Output Module settings window, under Video Output, click Channels
● Select RGB + Alpha
● Click OK
This way you can also export transparent background after effects in After effects. You can easily export your video after effects file with variable alpha layers. With layering you can add variations in the videos through various layering effects. It can used to design a project with better results.
Part 2 How to Export Transparent Background Videos in Premiere Pro?
Sometimes a Transparent Background Video needs some cool effects for some projects. This can be done by exporting a video file in Premiere Pro. The steps to be followed for exporting a transparent background video are as follows:
● Load your video in Premiere Pro with transparent background. Do all the necessary editing so that the overlay is obtained for production.
● When the video is ready, move to the setting part. Here go to file menu and open export setting. Click on media.
● After this, there is need to configure the export setting particularly for transparent background. Just few setting more are required to ensure that the transparent background video or projects are exported well.
● In order to ensure that a video format supports transparency, do the required settings. Go to export format at the right of the window. Set it to Quick time. It is always good to export by using Quick time. However if you don’t need to export using Quick time and need MOV format, you can still do that. You can use the software Adobe Premiere Pro to import the other type of files also.
● Get alpha channel enabled. When the video format is all done, get to same column and you will find ‘Effects’, Video and audio tab. You can get some unique setting through this to export the videos of Premiere Pro.
● Go to “Video Codec” settings and elect the “None” options. This gives the best result outcome for transparent backgrounds. Particularly for transparent video overlay free and animations. For example YouTube subscribe button video animation.
● To enable alpha channel, go to the “Basic Video Settings” options. Get to the “depth” option. Here you can enable the alpha channel in the export settings. After doing that the alpha channel will permit to export transparent video backgrounds.
● Clicking on the button with the” + alpha” option inside the “Depth” setting. This will enable the alpha setting.
● Also check “Render at Maximum Depth”. This will help in obtaining a max depth which will give transparent video smoother and better results. They are good for higher quality videos.
● When all configurations is done, Proceed to export the video. The file from Adobe Premiere Pro gave you can be used. The process can be followed to export the other files also.
Part 3 How to Export Transparent Background Videos in Vsdc
No background video is very difficult to handle as people face trouble to export them due to their formats. Some formats do not support transparency. MOV and Gifs formats are good for transparent background. Vsdc can be used to make video background transparent as well as remove white background video. Following steps should be followed to export transparent background video in Vsdc:
● Open VSDC and go to start screen and click the Import content button. Select the green screen video from PC.
● Go to Project’s settings window and search for Opacity and kept it zero and click Finish.
● Then go to Video effects menu. Move to Transparency and then Background remover. Click Ok.
● The green light borders can be changed through Properties window
● When all things are ready open the Export project tab. From “Media devices” select PC.
● From “Output video formats”, choose MOV.
● Go to preview window and look for “Edit profile” button. Click and change the codec of the video.
● Go to Video settings menu, opt for Video codec >> PNG lossless.
● Lastly click on Apply profile
This way you can have a video after effects export with transparent background. This is just simple to export a video with a transparent background. It can be further used in various applications to create great effects.
Part 4 Best 5 Tool to Make Video Transparent Background Online
Various software offer number of fantastic tools for making video background transparent online. It can export a video by making series of pictures or videos more attractive and memorable.
Some of the tools or the makers to make Transparent Background Video are as under:
01Canva
The online version of canva can be used to edit images and videos. This is one of the widest tools chosen by the users in making and editing videos and images. The best thing is that it can be easily installed at PC and phones. It just needs Javascript in your browser. Transparent background option can be chosen to change the background of the image and make it visually attractive. It has convenient controls that change the background into transparent one easily.
02Online PNG Tools
If you are looking for a tool that can make your video background transparent in just few clicks, then Online PNG tools is the best option. You can upload many files and it allows you to turn them into transparent backgrounds. It is good when a user desire to turn a background easily and the level of perfection required is not much high. It is fast, free and easy to use which makes it an affordable tool.
03LunaPic
It is a free online picture and video editing tool that can effortlessly help in importing, adding effects and customization. Its edit option allows the users to upload the picture and perform the task to turn a background of picture or video transparent. In just few simple steps the required changes can be made. The best thing with this tool is that the output result does not affect the quality. One can also personalize the pictures which has high standards.
04Microsoft Paint
This is from Microsoft and the most widely used tool for pictures and video creation, editing and adding effects. Its drawing and editing tools make it first preference for every beginner and a professional. One can easily turn a picture background transparent through following few steps through ‘Select’ option. Go to ‘Transparent Selection’ from the list and turn an image background transparent. It can also go smooth with other applications to have transparent video format.
05Photoshop
When you are looking for a tool that can work with Windows, Android and iOS for adding transparent background online, then Photoshop shall be a good option. It can add some great effects in flawless manner in very less time. It works excellently on various elements such as brightness, transparent background and customization of pictures. This is a good platform to add visualization to images. One can add transparent background by going to background option.
These are some of the tools that can be used to make transparent background. If you need something like Pro, then you can try Filmora from Wondershare.
Filmora can be defined in number of ways. It is software, an application and a platform that provides an opportunity to a person to expand his creativity with some good picture and video editing tools. The green screen feature makes any background transparent. Variety of sound, text, video effects and animations help the users to make their projects better and presentable.
Wondershare Filmora Video Editor is a free tool that works on Artificial Intelligence. It detects the background and does editing on the same. It can remove the backgrounds from different kinds of images, videos, and presentations. This tool is great for those who need to bring some fantastic changes on the background of the images with no more hassle. It has advantage over the other tools as it works precisely on backgrounds and make sure that no details are disturbed from the original subject.
For Win 7 or later (64-bit)
For macOS 10.12 or later
● Ending Thoughts →
● The background on any image or video plays an important role in creating a visual impact. A background should be such that it may not be difficult to a creator to utilize the original picture, video or subject for its other projects. Hence in order to use them in other themes, exporting of transparent background should be easy. This can be done through various software or applications.
● Various platforms can be used to know the steps of exporting transparent background of images or videos. The selection shall be based on the degree of perfection, affordability, ease of use and volume of work. The various applications that offer exporting transparent background videos are After Effects; Premiere Pro, Vsdc and many more.
● The various tools for making transparent backgrounds are Online PNG Tools, Canva, Photoshop, MS paint, LunaPic and Filmora. Filmora is one of the most popular platforms that have different image and video editing tools. One can easily create, edit and export transparent backgrounds of images and videos through Filmora.
How to export transparent video premiere? Making video transparent background online. Steps to remove white background from video.

Have you ever wondered why most shooting of videos are done in white or transparent background? The reasons are that they are simple and easy to shoot. There are various options to add some effects to the videos by removing the white background. New and attractive background can be added with some effects at less cost and time. So, there are various applications which facilitate making video background transparent as well as video without background. So, let’s see some of them along with the steps.
In this article
01 [How to Export Transparent Background Videos in After Effects?](#Part 1)
02 [How to Export Transparent Background Videos in Premiere Pro?](#Part 2)
03 [How to Export Transparent Background Videos in Vsdc](#Part 3)
04 [Best 5 Tool to Make Video Transparent Background Online](#Part 4)
Part 1 How to Export Transparent Background Videos in After Effects?

Working with transparent background is easy and the reason is the flexibility of using a white background and exporting it to other videos. So, let’s learn how to export transparent background videos in After Effects step by step:
● Before exporting the video with transparent background, chose composition. It can be timeline or project panel.
● After this selection, go to application window. Click at composition menu and elect Add to Render Queue.
● You can see that Render Queue window will open with composition in the queue.
● Go to settings and select as required
● Take the cursor on the left side of window and go to the drop down menu. You will find the Output Module settings window.
● Go to format and select QuickTime, the industry standard.
● Staying at Output Module settings window, under Video Output, click Channels
● Select RGB + Alpha
● Click OK
This way you can also export transparent background after effects in After effects. You can easily export your video after effects file with variable alpha layers. With layering you can add variations in the videos through various layering effects. It can used to design a project with better results.
Part 2 How to Export Transparent Background Videos in Premiere Pro?
Sometimes a Transparent Background Video needs some cool effects for some projects. This can be done by exporting a video file in Premiere Pro. The steps to be followed for exporting a transparent background video are as follows:
● Load your video in Premiere Pro with transparent background. Do all the necessary editing so that the overlay is obtained for production.
● When the video is ready, move to the setting part. Here go to file menu and open export setting. Click on media.
● After this, there is need to configure the export setting particularly for transparent background. Just few setting more are required to ensure that the transparent background video or projects are exported well.
● In order to ensure that a video format supports transparency, do the required settings. Go to export format at the right of the window. Set it to Quick time. It is always good to export by using Quick time. However if you don’t need to export using Quick time and need MOV format, you can still do that. You can use the software Adobe Premiere Pro to import the other type of files also.
● Get alpha channel enabled. When the video format is all done, get to same column and you will find ‘Effects’, Video and audio tab. You can get some unique setting through this to export the videos of Premiere Pro.
● Go to “Video Codec” settings and elect the “None” options. This gives the best result outcome for transparent backgrounds. Particularly for transparent video overlay free and animations. For example YouTube subscribe button video animation.
● To enable alpha channel, go to the “Basic Video Settings” options. Get to the “depth” option. Here you can enable the alpha channel in the export settings. After doing that the alpha channel will permit to export transparent video backgrounds.
● Clicking on the button with the” + alpha” option inside the “Depth” setting. This will enable the alpha setting.
● Also check “Render at Maximum Depth”. This will help in obtaining a max depth which will give transparent video smoother and better results. They are good for higher quality videos.
● When all configurations is done, Proceed to export the video. The file from Adobe Premiere Pro gave you can be used. The process can be followed to export the other files also.
Part 3 How to Export Transparent Background Videos in Vsdc
No background video is very difficult to handle as people face trouble to export them due to their formats. Some formats do not support transparency. MOV and Gifs formats are good for transparent background. Vsdc can be used to make video background transparent as well as remove white background video. Following steps should be followed to export transparent background video in Vsdc:
● Open VSDC and go to start screen and click the Import content button. Select the green screen video from PC.
● Go to Project’s settings window and search for Opacity and kept it zero and click Finish.
● Then go to Video effects menu. Move to Transparency and then Background remover. Click Ok.
● The green light borders can be changed through Properties window
● When all things are ready open the Export project tab. From “Media devices” select PC.
● From “Output video formats”, choose MOV.
● Go to preview window and look for “Edit profile” button. Click and change the codec of the video.
● Go to Video settings menu, opt for Video codec >> PNG lossless.
● Lastly click on Apply profile
This way you can have a video after effects export with transparent background. This is just simple to export a video with a transparent background. It can be further used in various applications to create great effects.
Part 4 Best 5 Tool to Make Video Transparent Background Online
Various software offer number of fantastic tools for making video background transparent online. It can export a video by making series of pictures or videos more attractive and memorable.
Some of the tools or the makers to make Transparent Background Video are as under:
01Canva
The online version of canva can be used to edit images and videos. This is one of the widest tools chosen by the users in making and editing videos and images. The best thing is that it can be easily installed at PC and phones. It just needs Javascript in your browser. Transparent background option can be chosen to change the background of the image and make it visually attractive. It has convenient controls that change the background into transparent one easily.
02Online PNG Tools
If you are looking for a tool that can make your video background transparent in just few clicks, then Online PNG tools is the best option. You can upload many files and it allows you to turn them into transparent backgrounds. It is good when a user desire to turn a background easily and the level of perfection required is not much high. It is fast, free and easy to use which makes it an affordable tool.
03LunaPic
It is a free online picture and video editing tool that can effortlessly help in importing, adding effects and customization. Its edit option allows the users to upload the picture and perform the task to turn a background of picture or video transparent. In just few simple steps the required changes can be made. The best thing with this tool is that the output result does not affect the quality. One can also personalize the pictures which has high standards.
04Microsoft Paint
This is from Microsoft and the most widely used tool for pictures and video creation, editing and adding effects. Its drawing and editing tools make it first preference for every beginner and a professional. One can easily turn a picture background transparent through following few steps through ‘Select’ option. Go to ‘Transparent Selection’ from the list and turn an image background transparent. It can also go smooth with other applications to have transparent video format.
05Photoshop
When you are looking for a tool that can work with Windows, Android and iOS for adding transparent background online, then Photoshop shall be a good option. It can add some great effects in flawless manner in very less time. It works excellently on various elements such as brightness, transparent background and customization of pictures. This is a good platform to add visualization to images. One can add transparent background by going to background option.
These are some of the tools that can be used to make transparent background. If you need something like Pro, then you can try Filmora from Wondershare.
Filmora can be defined in number of ways. It is software, an application and a platform that provides an opportunity to a person to expand his creativity with some good picture and video editing tools. The green screen feature makes any background transparent. Variety of sound, text, video effects and animations help the users to make their projects better and presentable.
Wondershare Filmora Video Editor is a free tool that works on Artificial Intelligence. It detects the background and does editing on the same. It can remove the backgrounds from different kinds of images, videos, and presentations. This tool is great for those who need to bring some fantastic changes on the background of the images with no more hassle. It has advantage over the other tools as it works precisely on backgrounds and make sure that no details are disturbed from the original subject.
For Win 7 or later (64-bit)
For macOS 10.12 or later
● Ending Thoughts →
● The background on any image or video plays an important role in creating a visual impact. A background should be such that it may not be difficult to a creator to utilize the original picture, video or subject for its other projects. Hence in order to use them in other themes, exporting of transparent background should be easy. This can be done through various software or applications.
● Various platforms can be used to know the steps of exporting transparent background of images or videos. The selection shall be based on the degree of perfection, affordability, ease of use and volume of work. The various applications that offer exporting transparent background videos are After Effects; Premiere Pro, Vsdc and many more.
● The various tools for making transparent backgrounds are Online PNG Tools, Canva, Photoshop, MS paint, LunaPic and Filmora. Filmora is one of the most popular platforms that have different image and video editing tools. One can easily create, edit and export transparent backgrounds of images and videos through Filmora.
How to export transparent video premiere? Making video transparent background online. Steps to remove white background from video.

Have you ever wondered why most shooting of videos are done in white or transparent background? The reasons are that they are simple and easy to shoot. There are various options to add some effects to the videos by removing the white background. New and attractive background can be added with some effects at less cost and time. So, there are various applications which facilitate making video background transparent as well as video without background. So, let’s see some of them along with the steps.
In this article
01 [How to Export Transparent Background Videos in After Effects?](#Part 1)
02 [How to Export Transparent Background Videos in Premiere Pro?](#Part 2)
03 [How to Export Transparent Background Videos in Vsdc](#Part 3)
04 [Best 5 Tool to Make Video Transparent Background Online](#Part 4)
Part 1 How to Export Transparent Background Videos in After Effects?

Working with transparent background is easy and the reason is the flexibility of using a white background and exporting it to other videos. So, let’s learn how to export transparent background videos in After Effects step by step:
● Before exporting the video with transparent background, chose composition. It can be timeline or project panel.
● After this selection, go to application window. Click at composition menu and elect Add to Render Queue.
● You can see that Render Queue window will open with composition in the queue.
● Go to settings and select as required
● Take the cursor on the left side of window and go to the drop down menu. You will find the Output Module settings window.
● Go to format and select QuickTime, the industry standard.
● Staying at Output Module settings window, under Video Output, click Channels
● Select RGB + Alpha
● Click OK
This way you can also export transparent background after effects in After effects. You can easily export your video after effects file with variable alpha layers. With layering you can add variations in the videos through various layering effects. It can used to design a project with better results.
Part 2 How to Export Transparent Background Videos in Premiere Pro?
Sometimes a Transparent Background Video needs some cool effects for some projects. This can be done by exporting a video file in Premiere Pro. The steps to be followed for exporting a transparent background video are as follows:
● Load your video in Premiere Pro with transparent background. Do all the necessary editing so that the overlay is obtained for production.
● When the video is ready, move to the setting part. Here go to file menu and open export setting. Click on media.
● After this, there is need to configure the export setting particularly for transparent background. Just few setting more are required to ensure that the transparent background video or projects are exported well.
● In order to ensure that a video format supports transparency, do the required settings. Go to export format at the right of the window. Set it to Quick time. It is always good to export by using Quick time. However if you don’t need to export using Quick time and need MOV format, you can still do that. You can use the software Adobe Premiere Pro to import the other type of files also.
● Get alpha channel enabled. When the video format is all done, get to same column and you will find ‘Effects’, Video and audio tab. You can get some unique setting through this to export the videos of Premiere Pro.
● Go to “Video Codec” settings and elect the “None” options. This gives the best result outcome for transparent backgrounds. Particularly for transparent video overlay free and animations. For example YouTube subscribe button video animation.
● To enable alpha channel, go to the “Basic Video Settings” options. Get to the “depth” option. Here you can enable the alpha channel in the export settings. After doing that the alpha channel will permit to export transparent video backgrounds.
● Clicking on the button with the” + alpha” option inside the “Depth” setting. This will enable the alpha setting.
● Also check “Render at Maximum Depth”. This will help in obtaining a max depth which will give transparent video smoother and better results. They are good for higher quality videos.
● When all configurations is done, Proceed to export the video. The file from Adobe Premiere Pro gave you can be used. The process can be followed to export the other files also.
Part 3 How to Export Transparent Background Videos in Vsdc
No background video is very difficult to handle as people face trouble to export them due to their formats. Some formats do not support transparency. MOV and Gifs formats are good for transparent background. Vsdc can be used to make video background transparent as well as remove white background video. Following steps should be followed to export transparent background video in Vsdc:
● Open VSDC and go to start screen and click the Import content button. Select the green screen video from PC.
● Go to Project’s settings window and search for Opacity and kept it zero and click Finish.
● Then go to Video effects menu. Move to Transparency and then Background remover. Click Ok.
● The green light borders can be changed through Properties window
● When all things are ready open the Export project tab. From “Media devices” select PC.
● From “Output video formats”, choose MOV.
● Go to preview window and look for “Edit profile” button. Click and change the codec of the video.
● Go to Video settings menu, opt for Video codec >> PNG lossless.
● Lastly click on Apply profile
This way you can have a video after effects export with transparent background. This is just simple to export a video with a transparent background. It can be further used in various applications to create great effects.
Part 4 Best 5 Tool to Make Video Transparent Background Online
Various software offer number of fantastic tools for making video background transparent online. It can export a video by making series of pictures or videos more attractive and memorable.
Some of the tools or the makers to make Transparent Background Video are as under:
01Canva
The online version of canva can be used to edit images and videos. This is one of the widest tools chosen by the users in making and editing videos and images. The best thing is that it can be easily installed at PC and phones. It just needs Javascript in your browser. Transparent background option can be chosen to change the background of the image and make it visually attractive. It has convenient controls that change the background into transparent one easily.
02Online PNG Tools
If you are looking for a tool that can make your video background transparent in just few clicks, then Online PNG tools is the best option. You can upload many files and it allows you to turn them into transparent backgrounds. It is good when a user desire to turn a background easily and the level of perfection required is not much high. It is fast, free and easy to use which makes it an affordable tool.
03LunaPic
It is a free online picture and video editing tool that can effortlessly help in importing, adding effects and customization. Its edit option allows the users to upload the picture and perform the task to turn a background of picture or video transparent. In just few simple steps the required changes can be made. The best thing with this tool is that the output result does not affect the quality. One can also personalize the pictures which has high standards.
04Microsoft Paint
This is from Microsoft and the most widely used tool for pictures and video creation, editing and adding effects. Its drawing and editing tools make it first preference for every beginner and a professional. One can easily turn a picture background transparent through following few steps through ‘Select’ option. Go to ‘Transparent Selection’ from the list and turn an image background transparent. It can also go smooth with other applications to have transparent video format.
05Photoshop
When you are looking for a tool that can work with Windows, Android and iOS for adding transparent background online, then Photoshop shall be a good option. It can add some great effects in flawless manner in very less time. It works excellently on various elements such as brightness, transparent background and customization of pictures. This is a good platform to add visualization to images. One can add transparent background by going to background option.
These are some of the tools that can be used to make transparent background. If you need something like Pro, then you can try Filmora from Wondershare.
Filmora can be defined in number of ways. It is software, an application and a platform that provides an opportunity to a person to expand his creativity with some good picture and video editing tools. The green screen feature makes any background transparent. Variety of sound, text, video effects and animations help the users to make their projects better and presentable.
Wondershare Filmora Video Editor is a free tool that works on Artificial Intelligence. It detects the background and does editing on the same. It can remove the backgrounds from different kinds of images, videos, and presentations. This tool is great for those who need to bring some fantastic changes on the background of the images with no more hassle. It has advantage over the other tools as it works precisely on backgrounds and make sure that no details are disturbed from the original subject.
For Win 7 or later (64-bit)
For macOS 10.12 or later
● Ending Thoughts →
● The background on any image or video plays an important role in creating a visual impact. A background should be such that it may not be difficult to a creator to utilize the original picture, video or subject for its other projects. Hence in order to use them in other themes, exporting of transparent background should be easy. This can be done through various software or applications.
● Various platforms can be used to know the steps of exporting transparent background of images or videos. The selection shall be based on the degree of perfection, affordability, ease of use and volume of work. The various applications that offer exporting transparent background videos are After Effects; Premiere Pro, Vsdc and many more.
● The various tools for making transparent backgrounds are Online PNG Tools, Canva, Photoshop, MS paint, LunaPic and Filmora. Filmora is one of the most popular platforms that have different image and video editing tools. One can easily create, edit and export transparent backgrounds of images and videos through Filmora.
How to export transparent video premiere? Making video transparent background online. Steps to remove white background from video.

Have you ever wondered why most shooting of videos are done in white or transparent background? The reasons are that they are simple and easy to shoot. There are various options to add some effects to the videos by removing the white background. New and attractive background can be added with some effects at less cost and time. So, there are various applications which facilitate making video background transparent as well as video without background. So, let’s see some of them along with the steps.
In this article
01 [How to Export Transparent Background Videos in After Effects?](#Part 1)
02 [How to Export Transparent Background Videos in Premiere Pro?](#Part 2)
03 [How to Export Transparent Background Videos in Vsdc](#Part 3)
04 [Best 5 Tool to Make Video Transparent Background Online](#Part 4)
Part 1 How to Export Transparent Background Videos in After Effects?

Working with transparent background is easy and the reason is the flexibility of using a white background and exporting it to other videos. So, let’s learn how to export transparent background videos in After Effects step by step:
● Before exporting the video with transparent background, chose composition. It can be timeline or project panel.
● After this selection, go to application window. Click at composition menu and elect Add to Render Queue.
● You can see that Render Queue window will open with composition in the queue.
● Go to settings and select as required
● Take the cursor on the left side of window and go to the drop down menu. You will find the Output Module settings window.
● Go to format and select QuickTime, the industry standard.
● Staying at Output Module settings window, under Video Output, click Channels
● Select RGB + Alpha
● Click OK
This way you can also export transparent background after effects in After effects. You can easily export your video after effects file with variable alpha layers. With layering you can add variations in the videos through various layering effects. It can used to design a project with better results.
Part 2 How to Export Transparent Background Videos in Premiere Pro?
Sometimes a Transparent Background Video needs some cool effects for some projects. This can be done by exporting a video file in Premiere Pro. The steps to be followed for exporting a transparent background video are as follows:
● Load your video in Premiere Pro with transparent background. Do all the necessary editing so that the overlay is obtained for production.
● When the video is ready, move to the setting part. Here go to file menu and open export setting. Click on media.
● After this, there is need to configure the export setting particularly for transparent background. Just few setting more are required to ensure that the transparent background video or projects are exported well.
● In order to ensure that a video format supports transparency, do the required settings. Go to export format at the right of the window. Set it to Quick time. It is always good to export by using Quick time. However if you don’t need to export using Quick time and need MOV format, you can still do that. You can use the software Adobe Premiere Pro to import the other type of files also.
● Get alpha channel enabled. When the video format is all done, get to same column and you will find ‘Effects’, Video and audio tab. You can get some unique setting through this to export the videos of Premiere Pro.
● Go to “Video Codec” settings and elect the “None” options. This gives the best result outcome for transparent backgrounds. Particularly for transparent video overlay free and animations. For example YouTube subscribe button video animation.
● To enable alpha channel, go to the “Basic Video Settings” options. Get to the “depth” option. Here you can enable the alpha channel in the export settings. After doing that the alpha channel will permit to export transparent video backgrounds.
● Clicking on the button with the” + alpha” option inside the “Depth” setting. This will enable the alpha setting.
● Also check “Render at Maximum Depth”. This will help in obtaining a max depth which will give transparent video smoother and better results. They are good for higher quality videos.
● When all configurations is done, Proceed to export the video. The file from Adobe Premiere Pro gave you can be used. The process can be followed to export the other files also.
Part 3 How to Export Transparent Background Videos in Vsdc
No background video is very difficult to handle as people face trouble to export them due to their formats. Some formats do not support transparency. MOV and Gifs formats are good for transparent background. Vsdc can be used to make video background transparent as well as remove white background video. Following steps should be followed to export transparent background video in Vsdc:
● Open VSDC and go to start screen and click the Import content button. Select the green screen video from PC.
● Go to Project’s settings window and search for Opacity and kept it zero and click Finish.
● Then go to Video effects menu. Move to Transparency and then Background remover. Click Ok.
● The green light borders can be changed through Properties window
● When all things are ready open the Export project tab. From “Media devices” select PC.
● From “Output video formats”, choose MOV.
● Go to preview window and look for “Edit profile” button. Click and change the codec of the video.
● Go to Video settings menu, opt for Video codec >> PNG lossless.
● Lastly click on Apply profile
This way you can have a video after effects export with transparent background. This is just simple to export a video with a transparent background. It can be further used in various applications to create great effects.
Part 4 Best 5 Tool to Make Video Transparent Background Online
Various software offer number of fantastic tools for making video background transparent online. It can export a video by making series of pictures or videos more attractive and memorable.
Some of the tools or the makers to make Transparent Background Video are as under:
01Canva
The online version of canva can be used to edit images and videos. This is one of the widest tools chosen by the users in making and editing videos and images. The best thing is that it can be easily installed at PC and phones. It just needs Javascript in your browser. Transparent background option can be chosen to change the background of the image and make it visually attractive. It has convenient controls that change the background into transparent one easily.
02Online PNG Tools
If you are looking for a tool that can make your video background transparent in just few clicks, then Online PNG tools is the best option. You can upload many files and it allows you to turn them into transparent backgrounds. It is good when a user desire to turn a background easily and the level of perfection required is not much high. It is fast, free and easy to use which makes it an affordable tool.
03LunaPic
It is a free online picture and video editing tool that can effortlessly help in importing, adding effects and customization. Its edit option allows the users to upload the picture and perform the task to turn a background of picture or video transparent. In just few simple steps the required changes can be made. The best thing with this tool is that the output result does not affect the quality. One can also personalize the pictures which has high standards.
04Microsoft Paint
This is from Microsoft and the most widely used tool for pictures and video creation, editing and adding effects. Its drawing and editing tools make it first preference for every beginner and a professional. One can easily turn a picture background transparent through following few steps through ‘Select’ option. Go to ‘Transparent Selection’ from the list and turn an image background transparent. It can also go smooth with other applications to have transparent video format.
05Photoshop
When you are looking for a tool that can work with Windows, Android and iOS for adding transparent background online, then Photoshop shall be a good option. It can add some great effects in flawless manner in very less time. It works excellently on various elements such as brightness, transparent background and customization of pictures. This is a good platform to add visualization to images. One can add transparent background by going to background option.
These are some of the tools that can be used to make transparent background. If you need something like Pro, then you can try Filmora from Wondershare.
Filmora can be defined in number of ways. It is software, an application and a platform that provides an opportunity to a person to expand his creativity with some good picture and video editing tools. The green screen feature makes any background transparent. Variety of sound, text, video effects and animations help the users to make their projects better and presentable.
Wondershare Filmora Video Editor is a free tool that works on Artificial Intelligence. It detects the background and does editing on the same. It can remove the backgrounds from different kinds of images, videos, and presentations. This tool is great for those who need to bring some fantastic changes on the background of the images with no more hassle. It has advantage over the other tools as it works precisely on backgrounds and make sure that no details are disturbed from the original subject.
For Win 7 or later (64-bit)
For macOS 10.12 or later
● Ending Thoughts →
● The background on any image or video plays an important role in creating a visual impact. A background should be such that it may not be difficult to a creator to utilize the original picture, video or subject for its other projects. Hence in order to use them in other themes, exporting of transparent background should be easy. This can be done through various software or applications.
● Various platforms can be used to know the steps of exporting transparent background of images or videos. The selection shall be based on the degree of perfection, affordability, ease of use and volume of work. The various applications that offer exporting transparent background videos are After Effects; Premiere Pro, Vsdc and many more.
● The various tools for making transparent backgrounds are Online PNG Tools, Canva, Photoshop, MS paint, LunaPic and Filmora. Filmora is one of the most popular platforms that have different image and video editing tools. One can easily create, edit and export transparent backgrounds of images and videos through Filmora.
Also read:
- New 9 Best Sparkle Effects Photo and Video Editors You Should Know for 2024
- Effective 10 Ways to Convert YouTube to MOV at Ease PC & Online
- 2024 Approved How to Change the Speed of Video in DaVinci Resolve?
- 2024 Approved Tactics To Make Keynote Slideshow
- New How to Make Subtitle Videos
- Updated Kinetic Typography Text Effect 【EASY&FAST】
- New 2024 Approved Create Your Own Subscribe Channel Graphics
- The Quick and Simple Way to Mirror Video in Premiere Pro
- Updated In 2024, Replacing Sky in Your Pictures Using Online and Offline Tools
- Updated In 2024, 5 Excellent Tools To Convert Video to 60 FPS
- How to Make After Effects Gifs for 2024
- 2024 Approved 3 Ways to Create Motion Text Effects for Your Video
- Updated Camtasia Vs Captivate - Which to Choose for 2024
- 2024 Approved Easily Cut Large Videos Faster on Mac 7 Solutions Included
- How to Merge Videos in HandBrake? Expectation Vs. Reality for 2024
- New In 2024, How to Make Sony Vegas Freeze Frame
- In 2024, Working Out All Important Details of Slowing Down Video in After Effects
- New In 2024, Camtasia Vs Captivate Which Is Better
- New 5 Tried-And-True Methods to GIF Making for 2024
- Updated In 2024, Splice Video Editor Online - Get Your Videos Splice Easily
- Top List The Best Slow Motion Video Editors Available for 2024
- 2024 Approved End Your Struggles with Choppy Playback on DaVinci Resolve. Read This Guide to Find Effective Fixes and Reliable DaVinci Resolve Slow Playback Alternatives
- Updated 2024 Approved How to Make Vintage Film Effect 1950S
- In 2024, Are You Looking for an Ideal Halloween Countdown Video Clip for Your Video? This Article Will Walk You Through the Best Ones You Can Use to Get the Job Done Perfectly
- Updated In 2024, A Complete Guide to Use Distortion Effect in Premiere Pro
- New Premiere Pro Text Effects Beginner Guide for 2024
- How to Send and Fake Live Location on Facebook Messenger Of your Nokia 105 Classic | Dr.fone
- 7 Solutions to Fix Chrome Crashes or Wont Open on Nokia G310 | Dr.fone
- In 2024, 6 Ways To Transfer Contacts From Motorola Moto G23 to iPhone | Dr.fone
- 7 Ways to Lock Apps on Apple iPhone 12 mini and iPad Securely | Dr.fone
- How to Change Spotify Location After Moving to Another Country On Lava Blaze 2 | Dr.fone
- How to Intercept Text Messages on OnePlus Nord CE 3 Lite 5G | Dr.fone
- 6 Fixes to Unfortunately WhatsApp has stopped Error Popups On Xiaomi Redmi Note 12T Pro | Dr.fone
- In 2024, How To Change Oppo Reno 11F 5G Lock Screen Clock in Seconds
- In 2024, 3 Effective Ways to Unlock iCloud Account Without Password From iPhone XR
- Getting the Pokemon Go GPS Signal Not Found 11 Error in Realme C53 | Dr.fone
- Top 7 Skype Hacker to Hack Any Skype Account On your Apple iPhone 13 Pro Max | Dr.fone
- Title: In 2024, How to Create Custom Lower Thirds in Filmora
- Author: Chloe
- Created at : 2024-05-20 03:38:07
- Updated at : 2024-05-21 03:38:07
- Link: https://ai-editing-video.techidaily.com/in-2024-how-to-create-custom-lower-thirds-in-filmora/
- License: This work is licensed under CC BY-NC-SA 4.0.

