:max_bytes(150000):strip_icc():format(webp)/dualsenseedge-749ef030e3c84376926d817913be924b.jpg)
In 2024, How to Create Loop Videos with Filmora

How to Create Loop Videos with Filmora
A loop fashion lookbook will be familiar to you if you are a fashion YouTuber. Here we will show you how to record shots and make a creative lookbook to show off your best outfits in an excellent way with Wondershare Filmora.
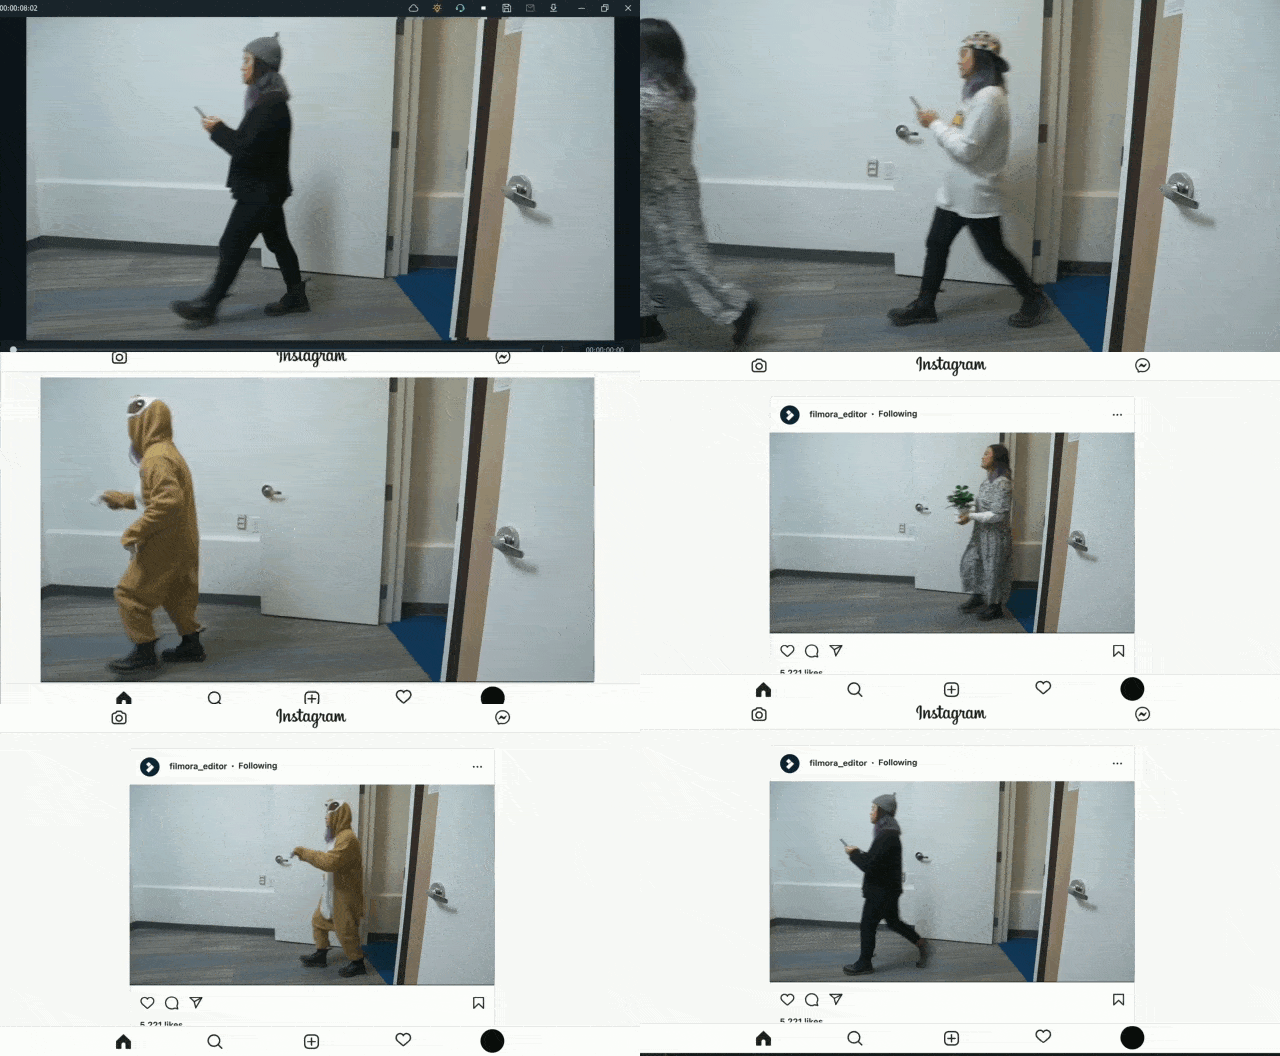
Shots recording for loop masking
The first and most crucial step for creating a good loop video is to record perfect shots. Here are the steps to record video shots for loop videos.
How to create a loop video
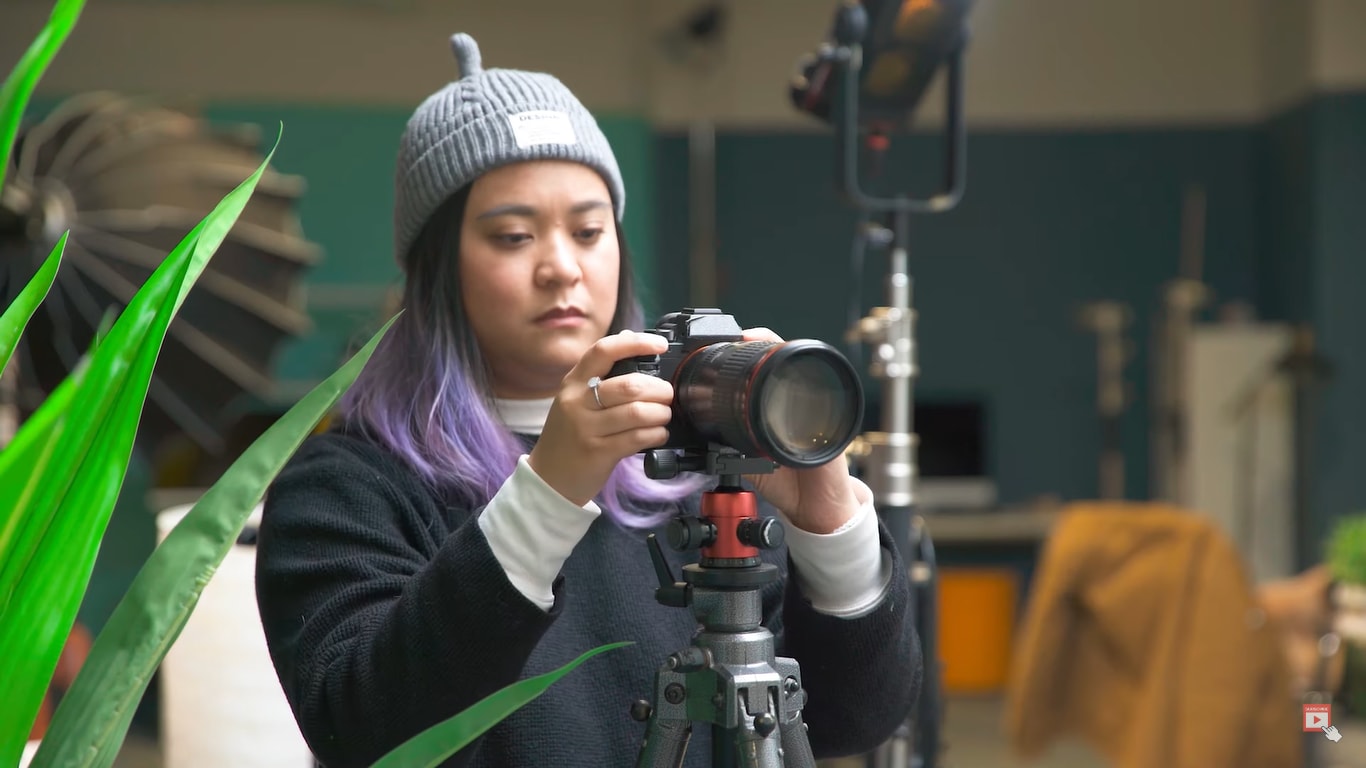
Step1 Set your camera or phone on a tripod. Make sure it stands still and does not move.
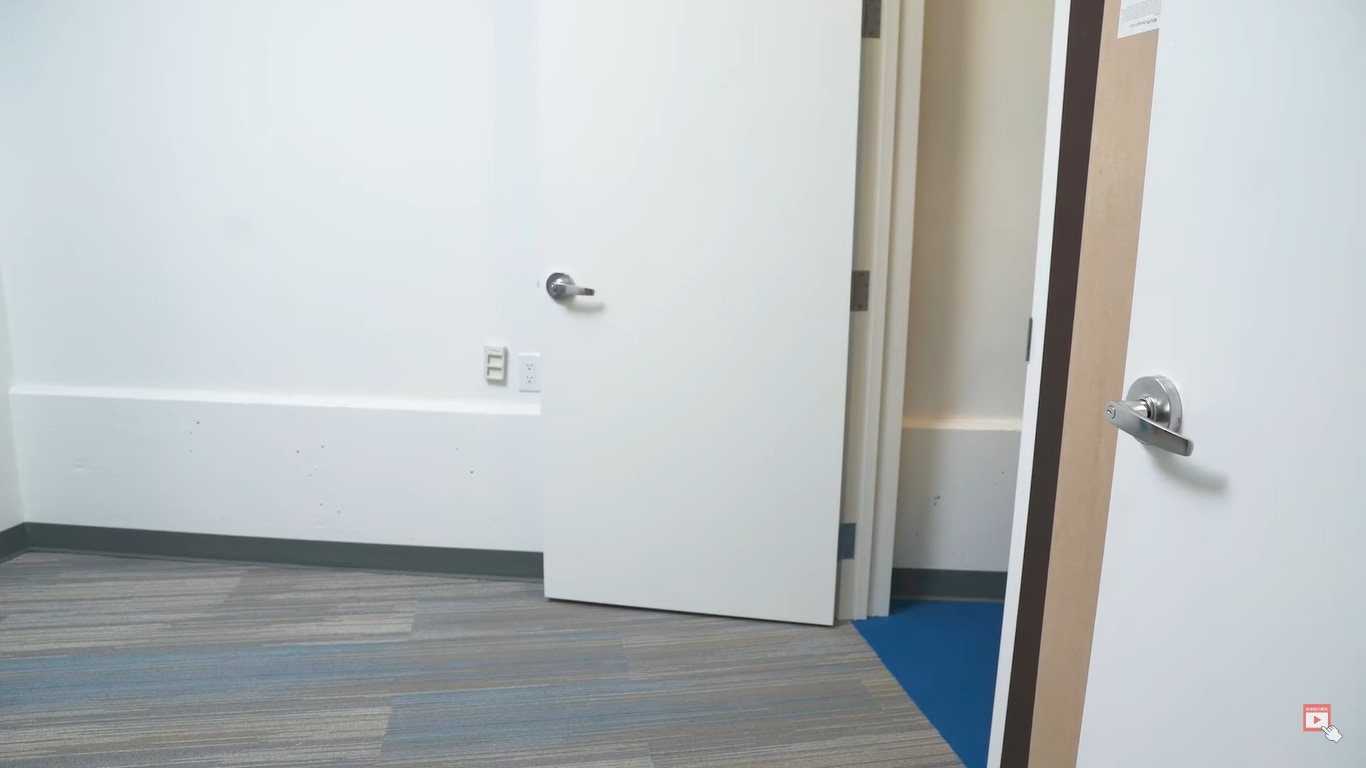
Step2 Set it so that you have a door on one side and enough room for the subject to walk through the door and move out of the frame.
Step3 Make sure all your outfits are ready.

Step4 Start recording on your camera. Walk through the door wearing the first outfit. Change your outfits and repeat the step with all your dresses. It would help if you kept the camera rolling while recording all these clips. Turning the recording on and off with every shot will result in many small movements.
Editing footage with a professional video editor - Wondershare Filmora
After recording the shots, the next step is to edit them. Wondershare Filmora is the best software for this purpose. Creating a loop video using filmora is an easy task.
Free Download For Win 7 or later(64-bit)
Free Download For macOS 10.14 or later
Below is the step-by-step guide on using Wondershare Filmora to create a loop masking or lookbook video.
How to edit a loop lookbook video
Step1 Download and install Wondershare Filmora on your PC or Mac.
Step2 Launch Wondershare Filmora, import the video clip into Filmora and place it on the first track.
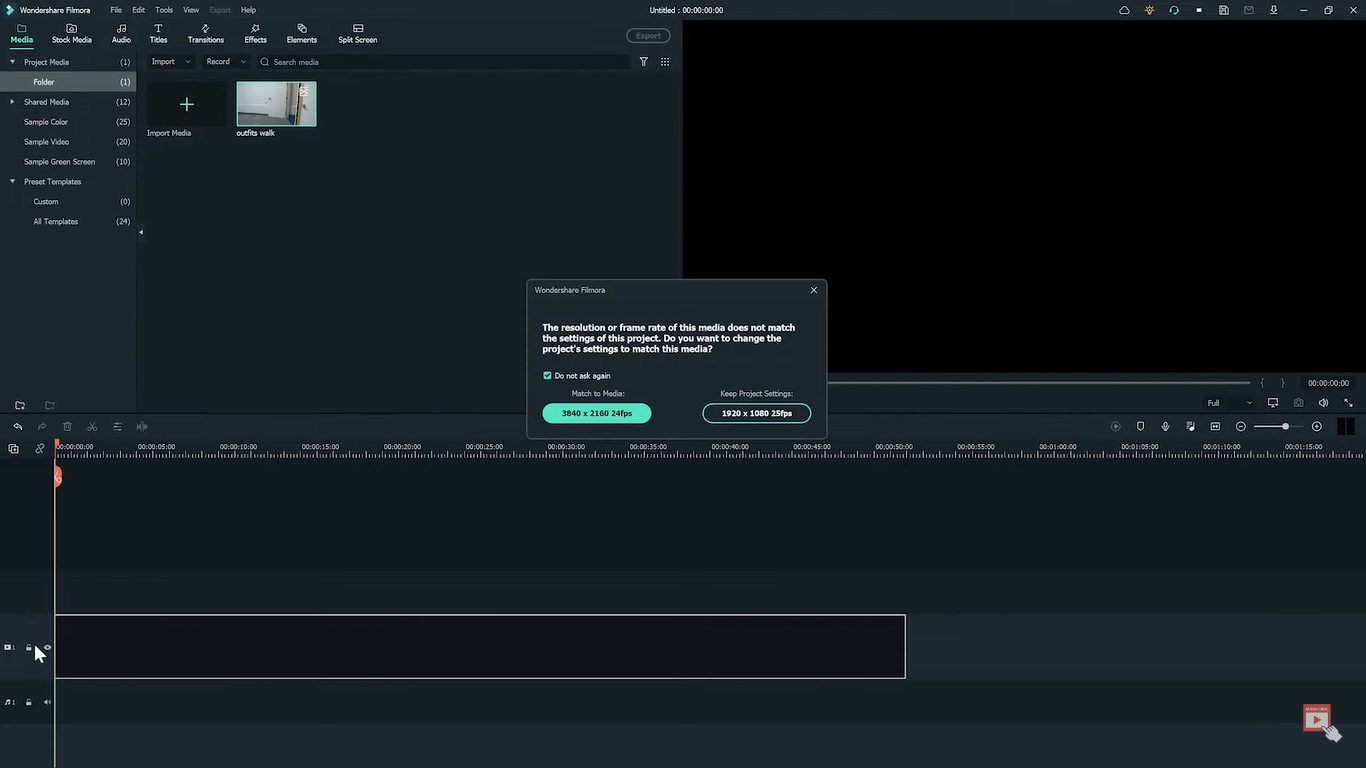
Step3 Find a frame with an empty background, i.e., without the subject, and freeze the frame.
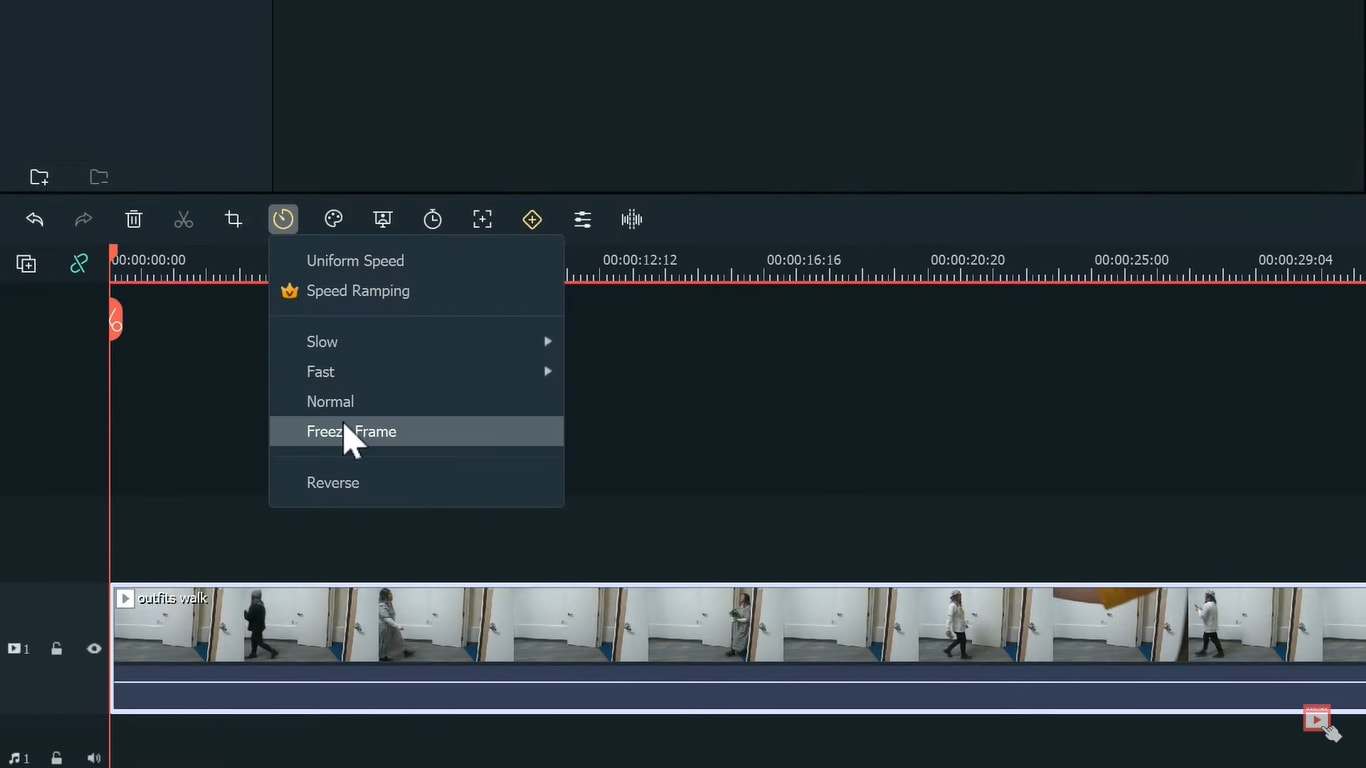
Step4 Extend the frozen frame and cut out the rest of the video.
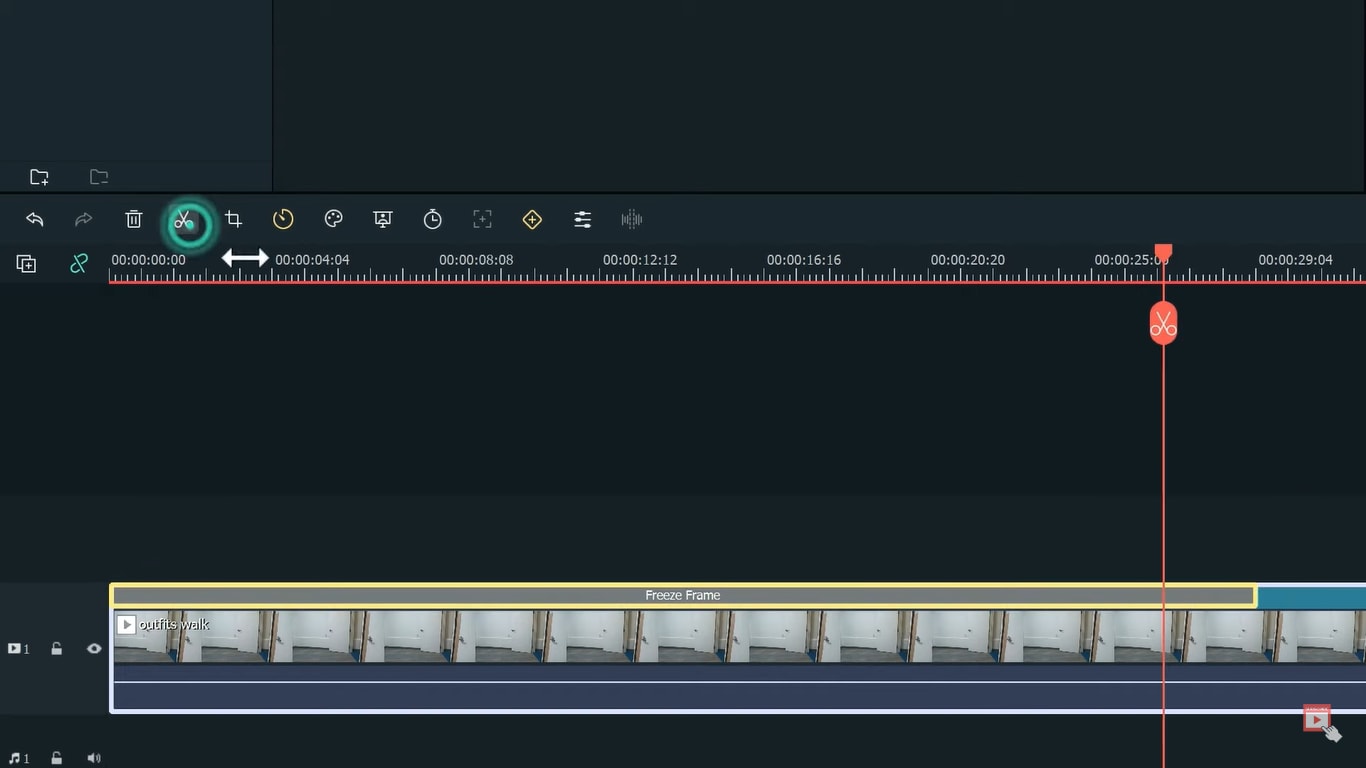
Step5 We are done with the first track so lock it.
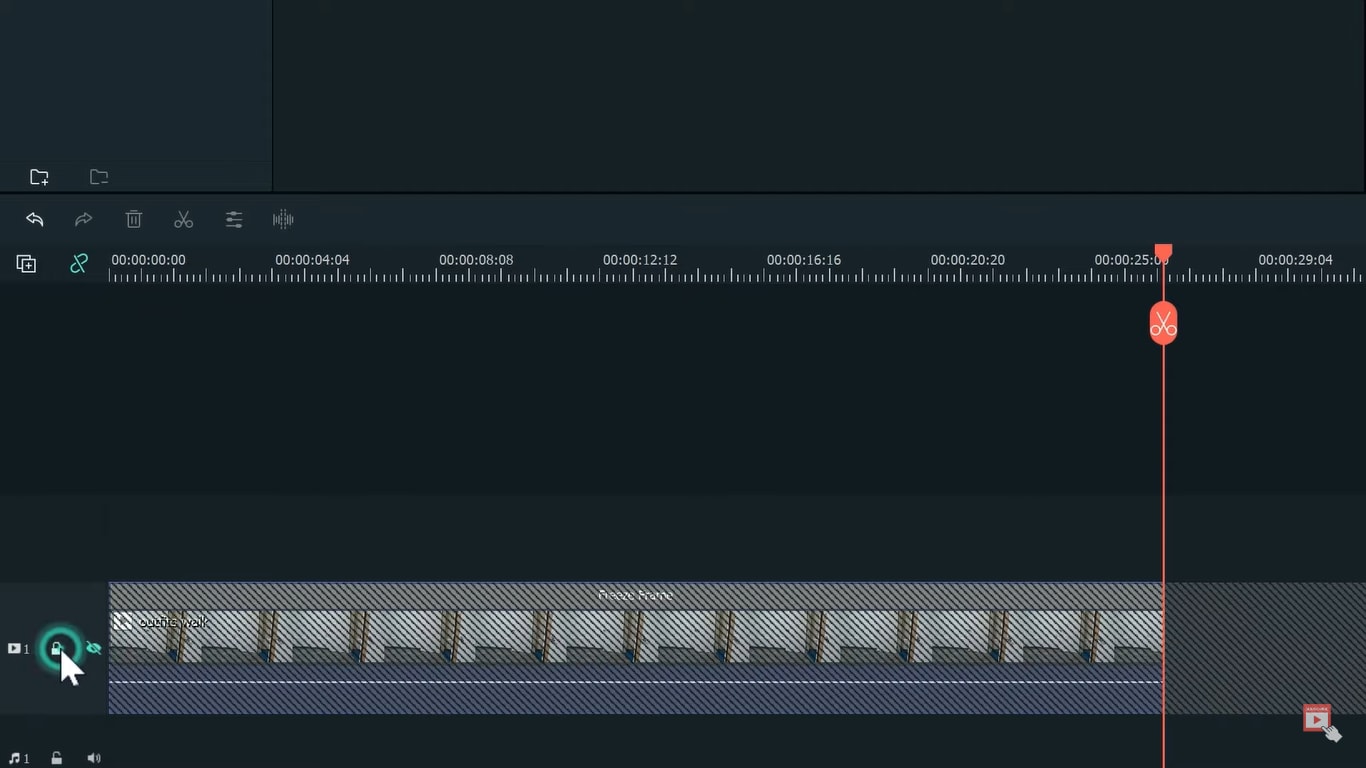
Step6 Import the clip again on the second track. And find the sections of the clips where the subject is walking in the video. Cut the remaining part.
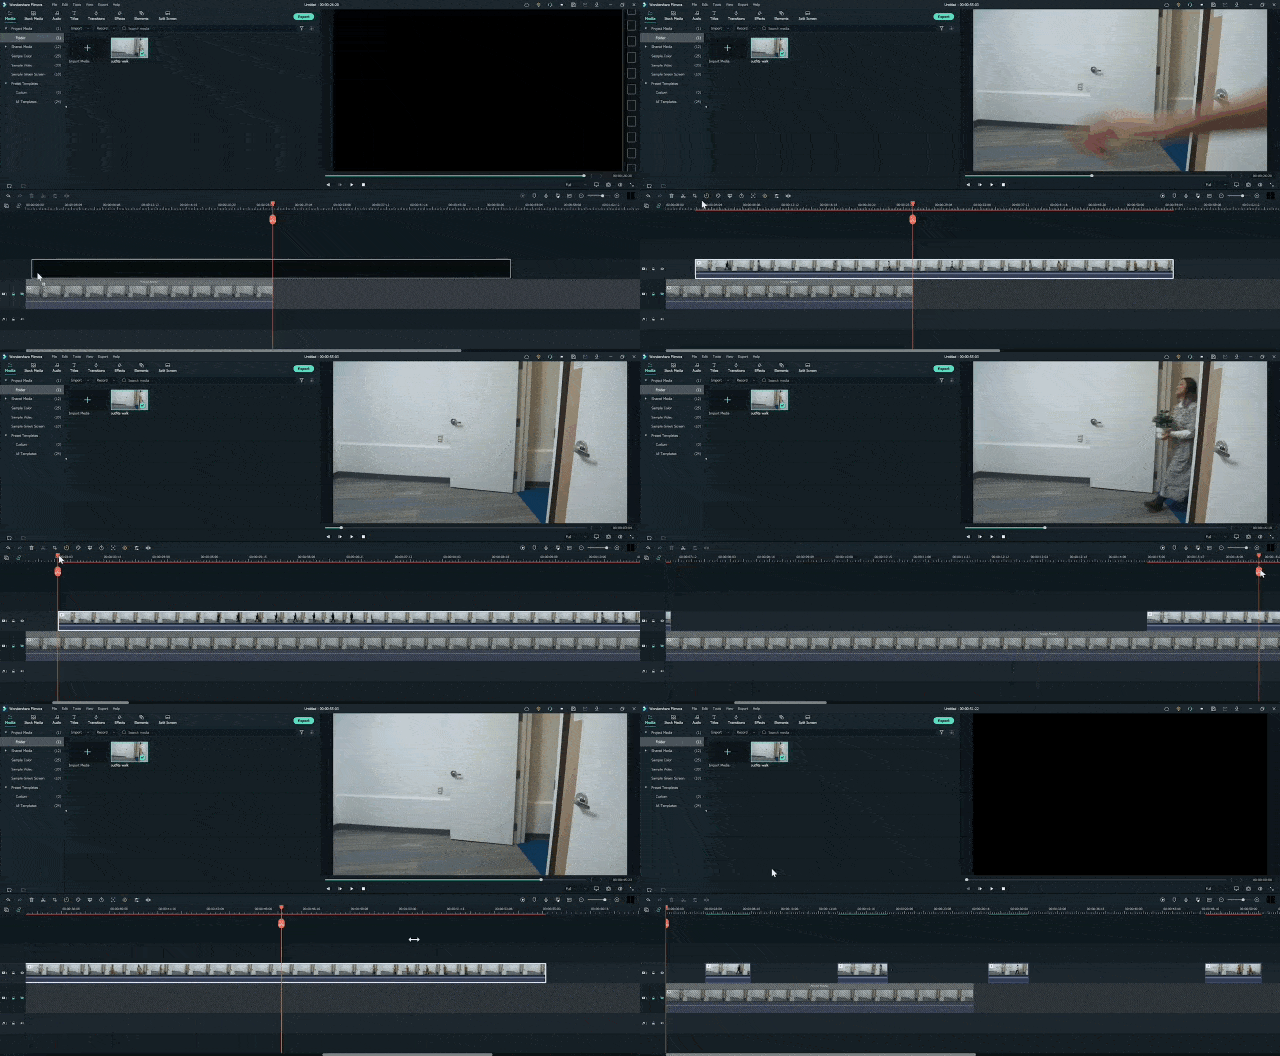
Step7 It will create several small sections on the second track.
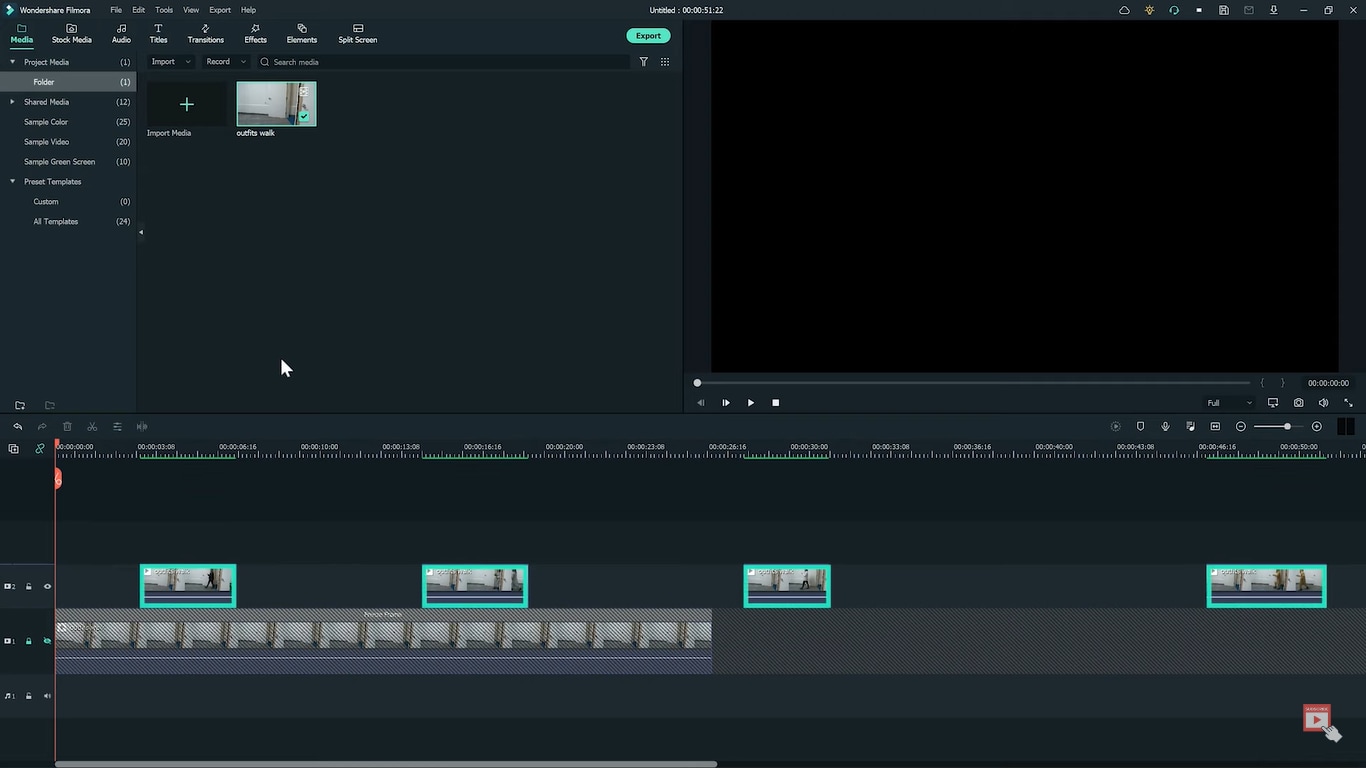
Step8 Put the first clip at the start of the timeline and move the playhead to find the frame containing enough room for the second outfit.
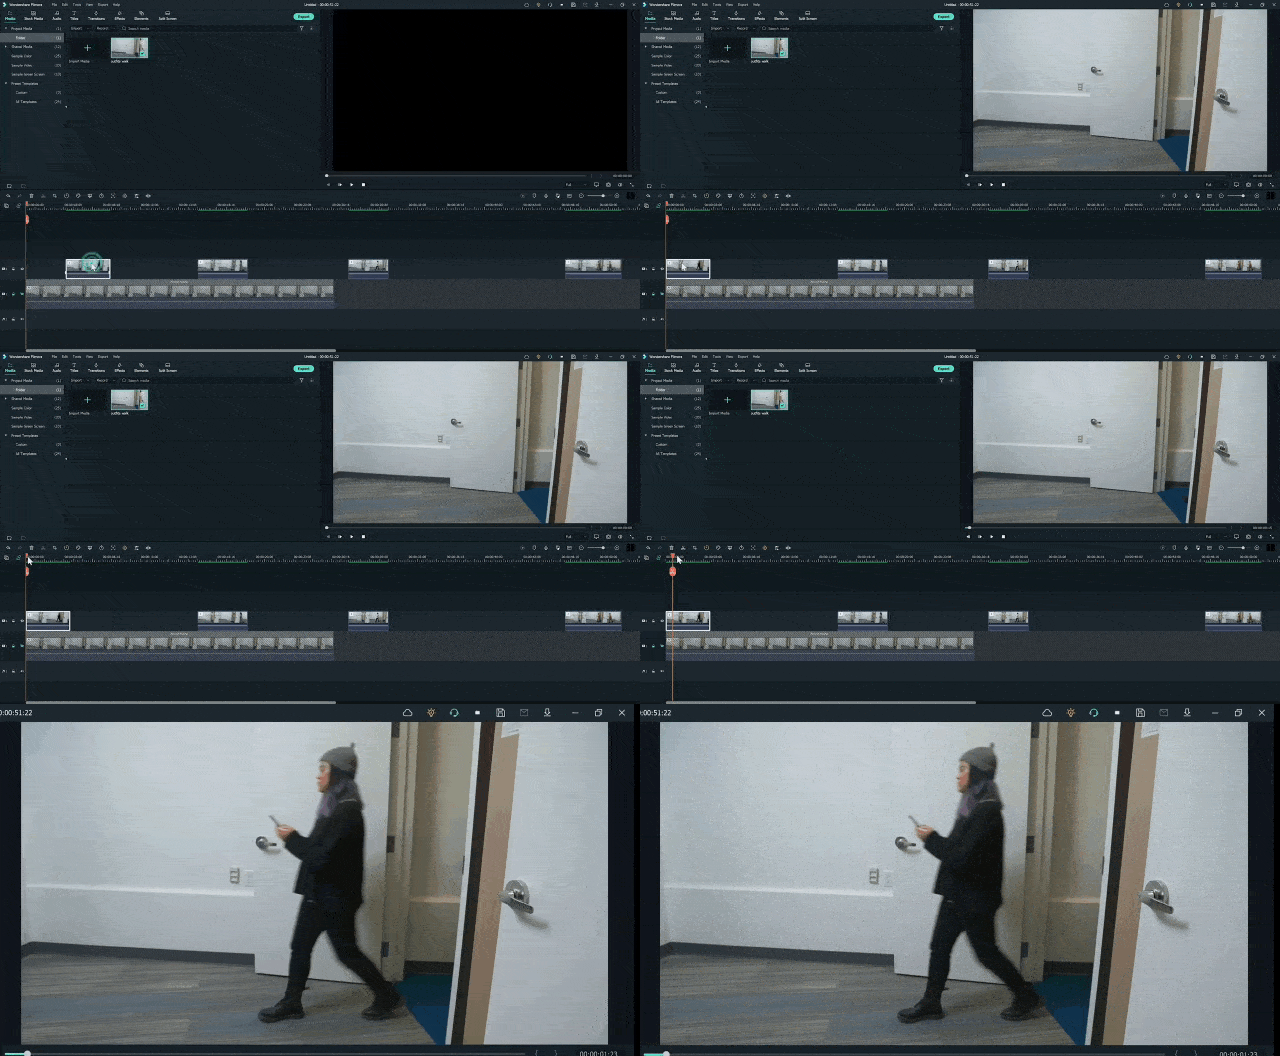
Step9 Move the second outfit to that playhead area.
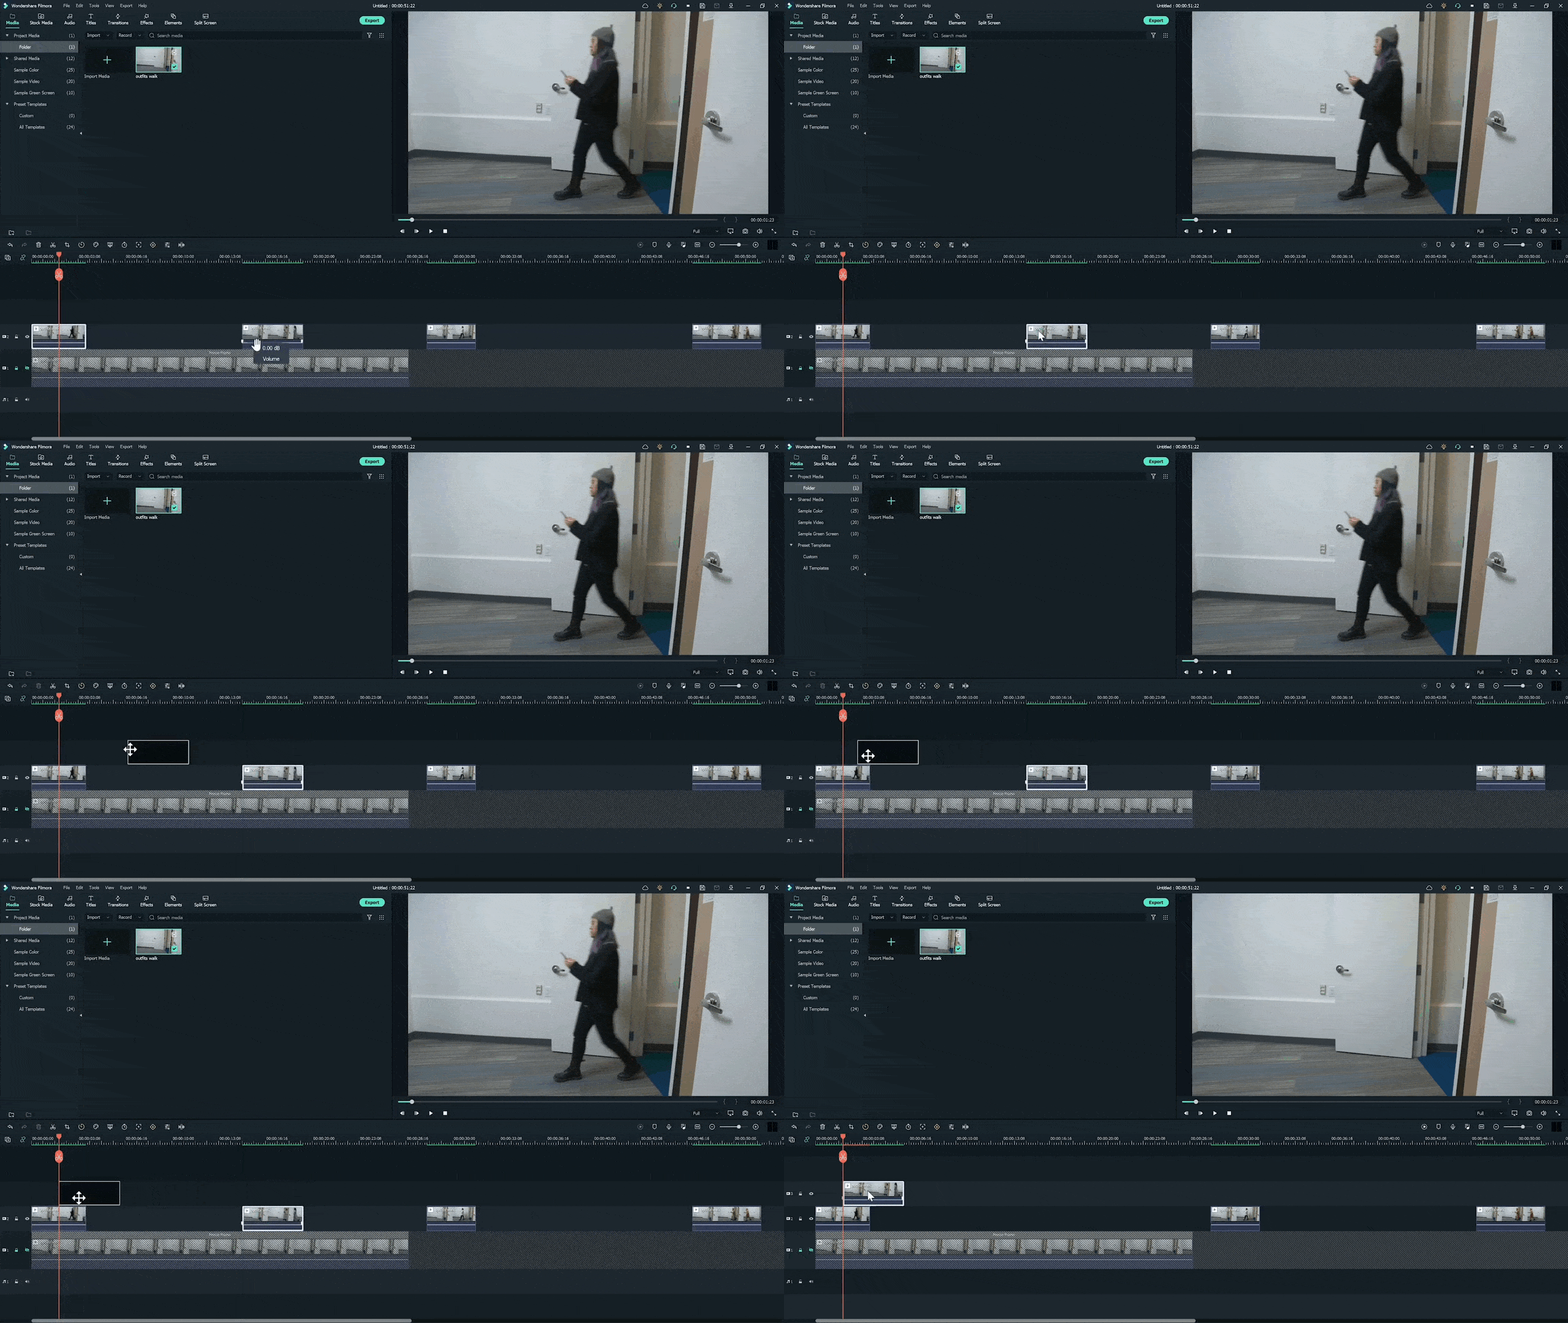
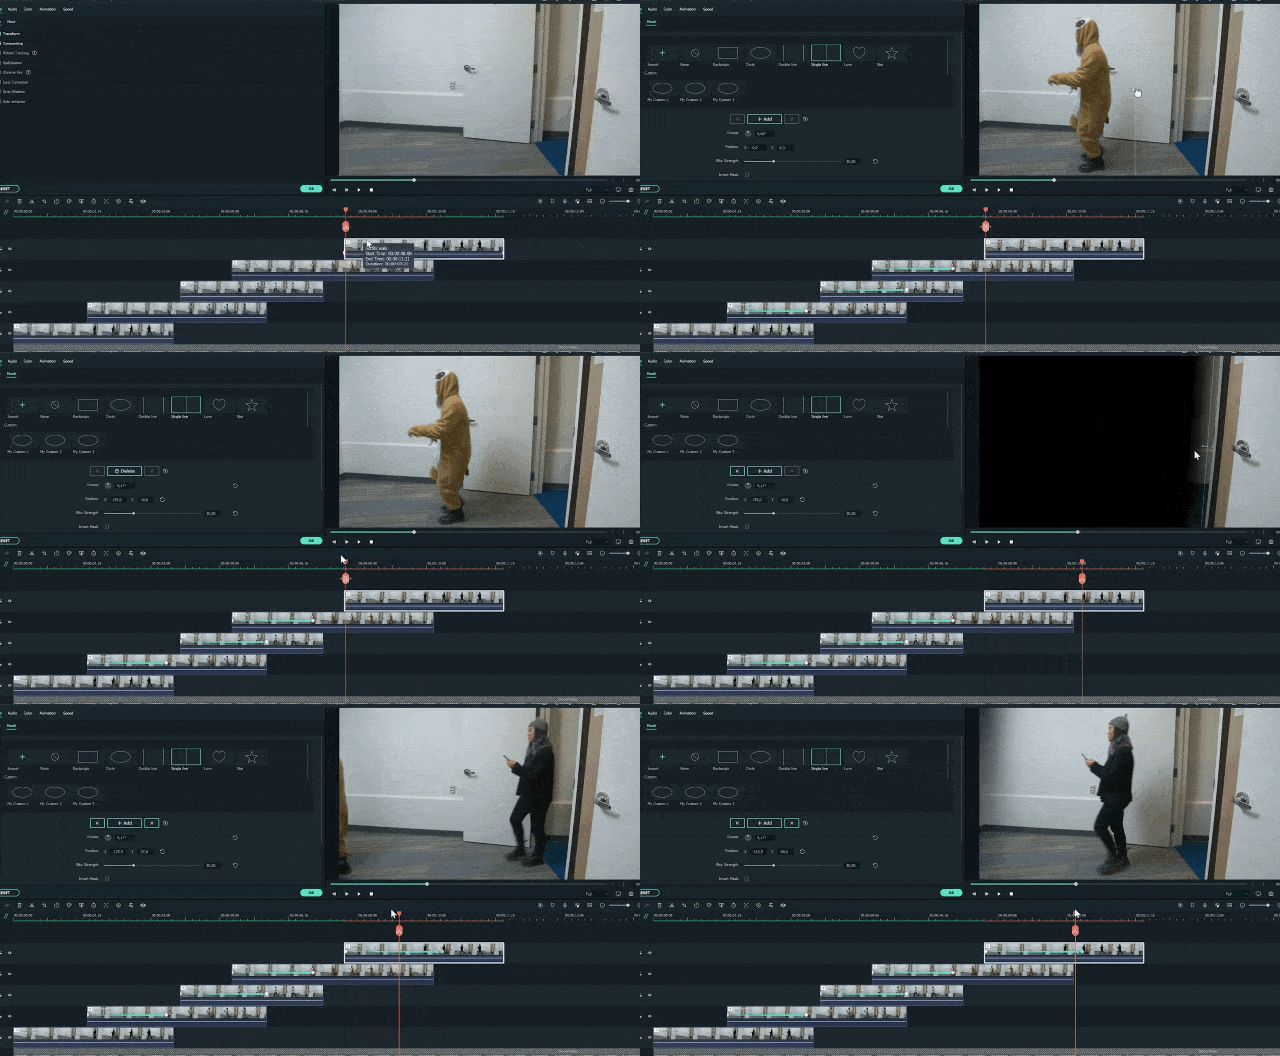
Step10 Double-click on the clip, go to effects, and choose a single-line mask.
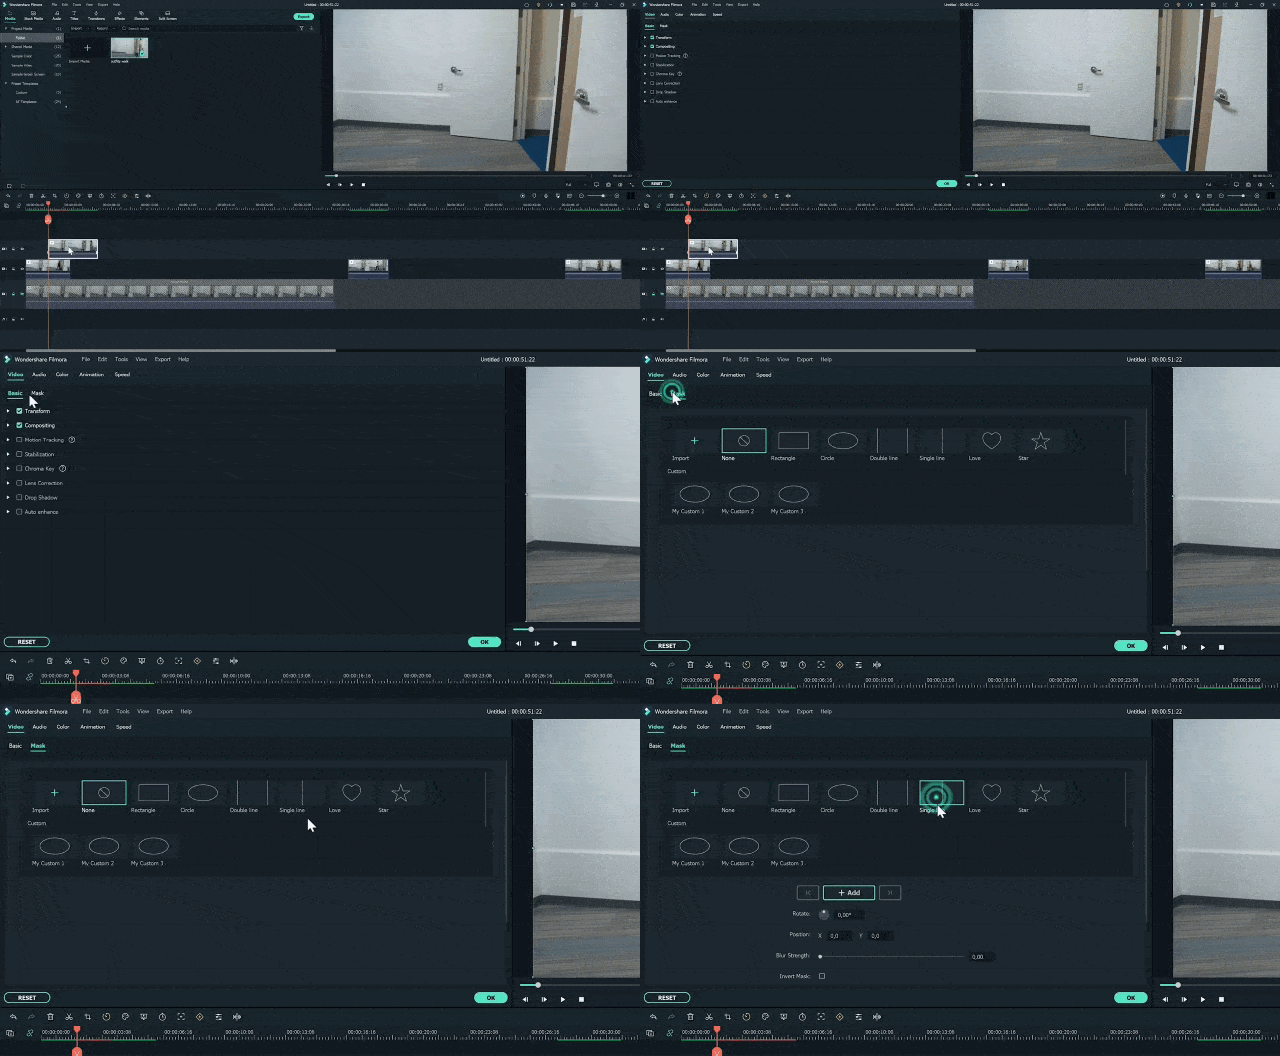
Step11 Drag the mask to the point where it shows the outfit on its right side.
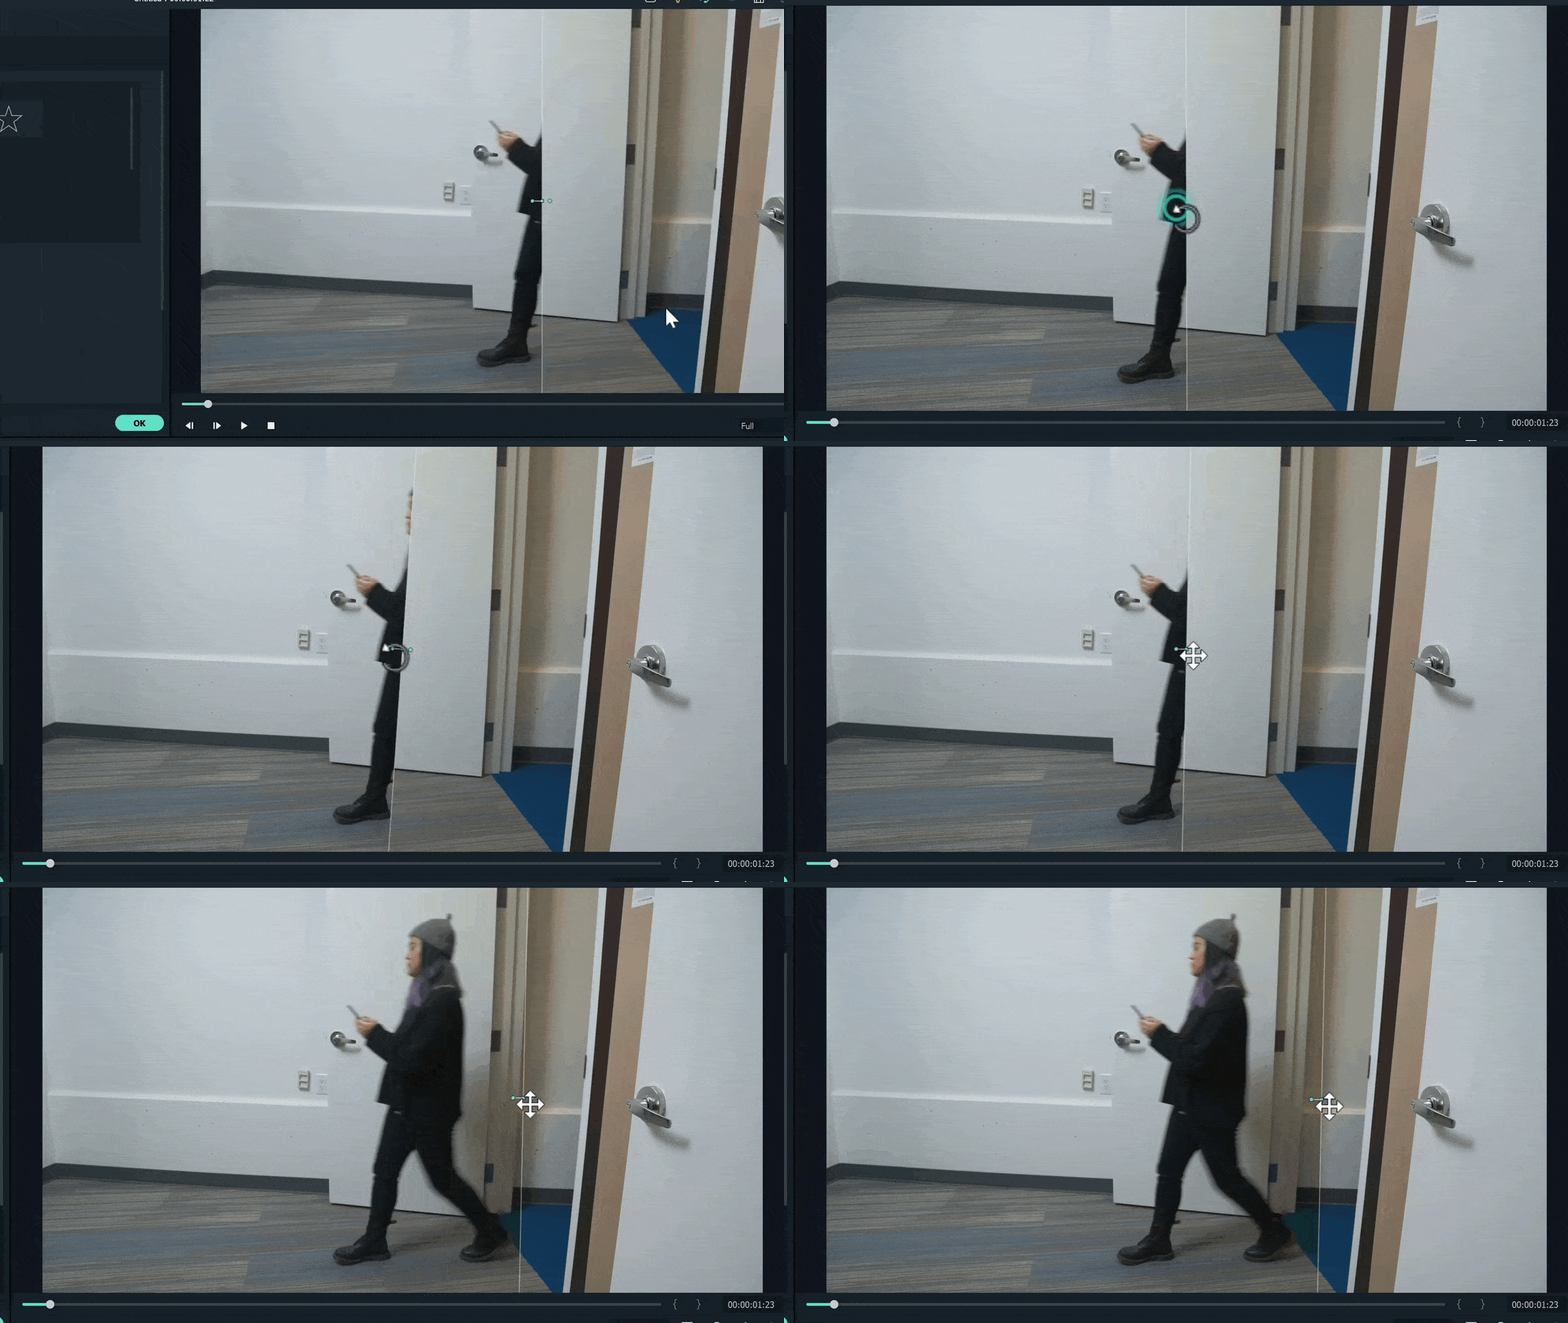
Step12 Blur the mask edges by increasing blur numbers.
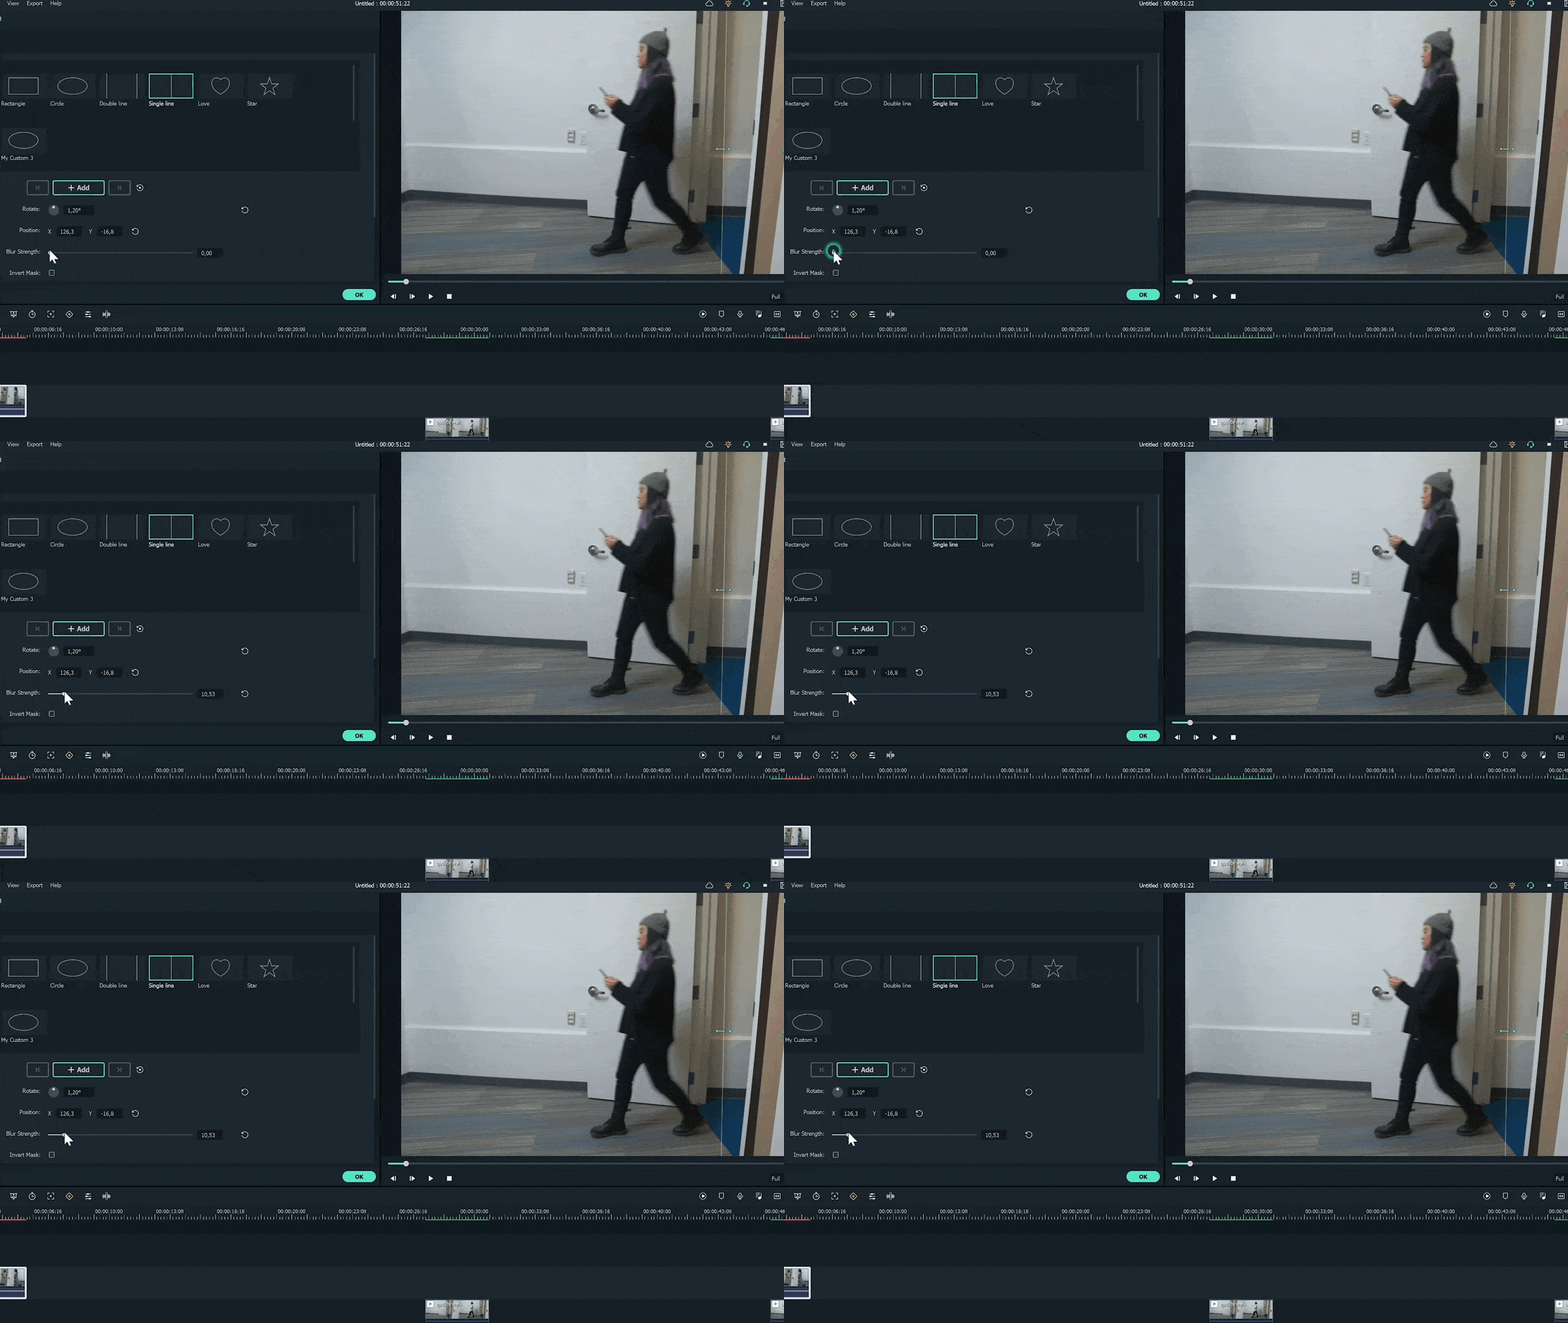
Step13 Click on the add button to add a mask keyframe and move the play head forward until the first outfit leaves the frame.
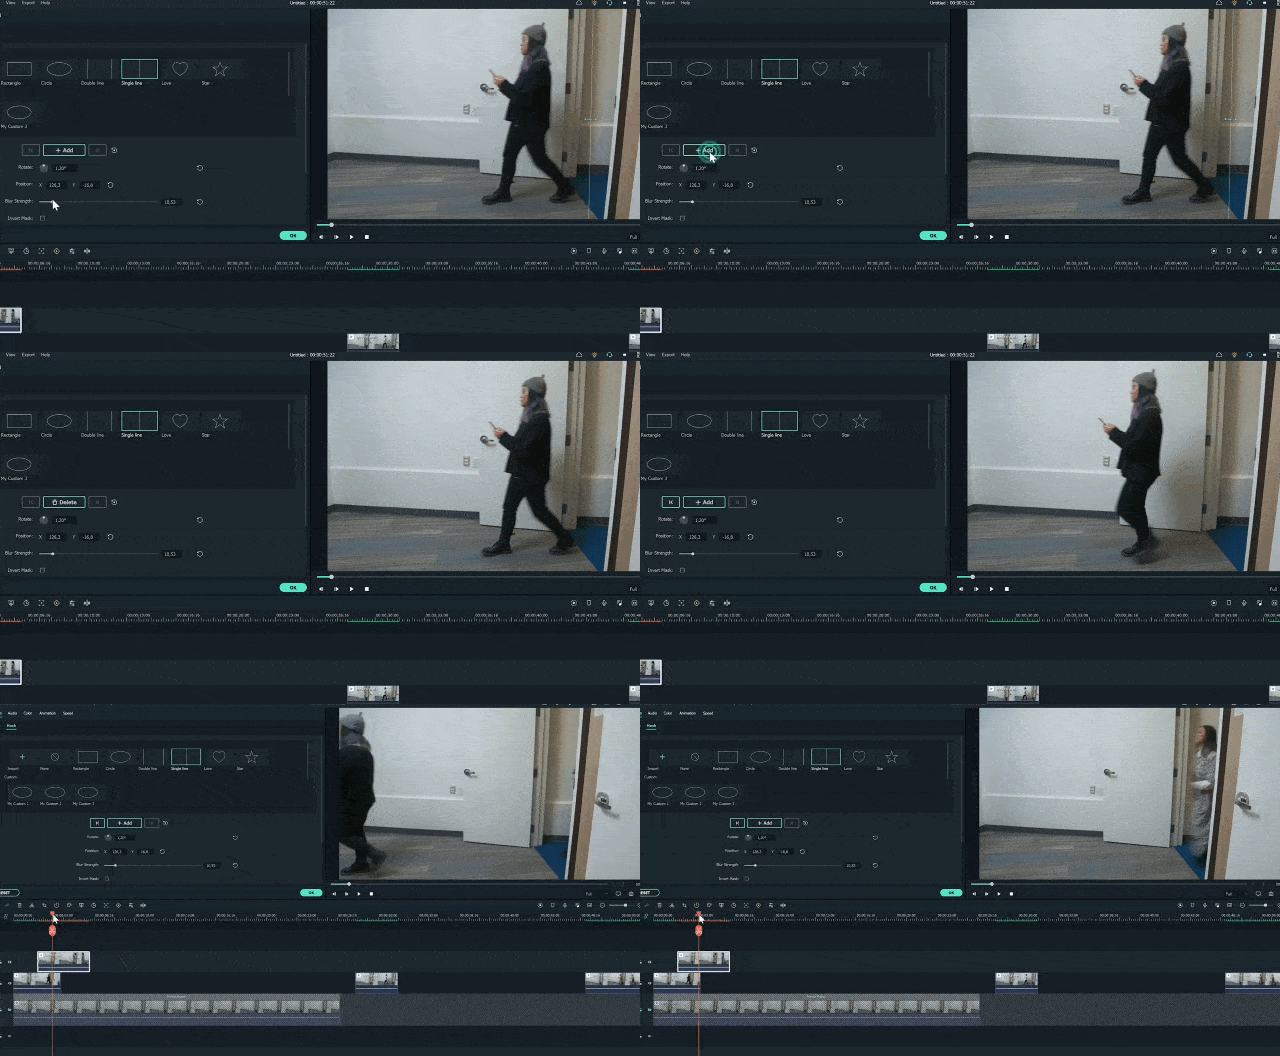
Step14 Move the mask to the left to reveal the entire frame, and repeat the same process with all outfits.
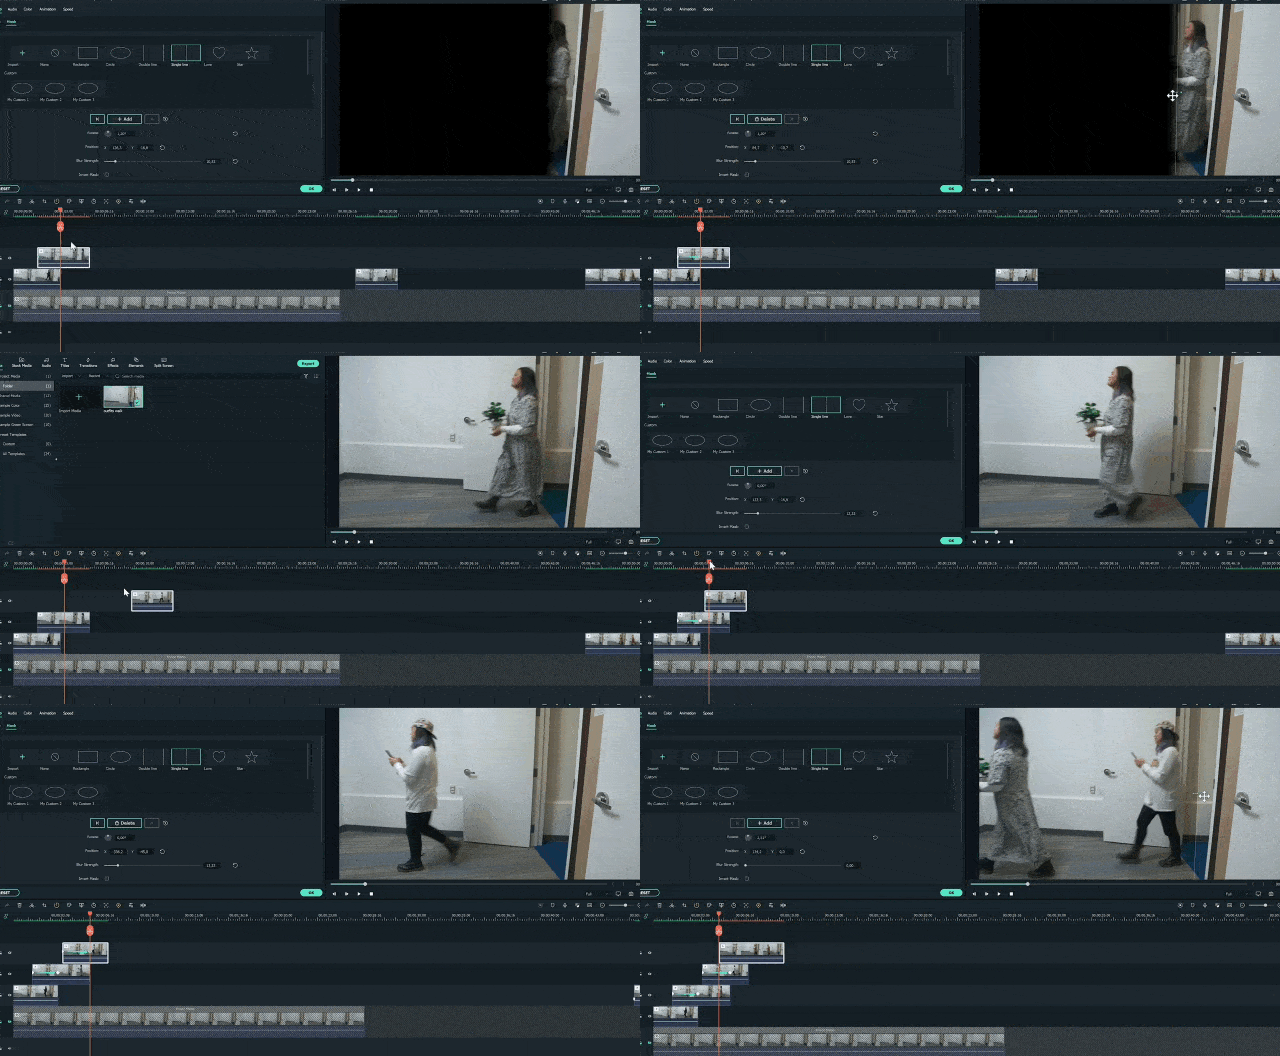
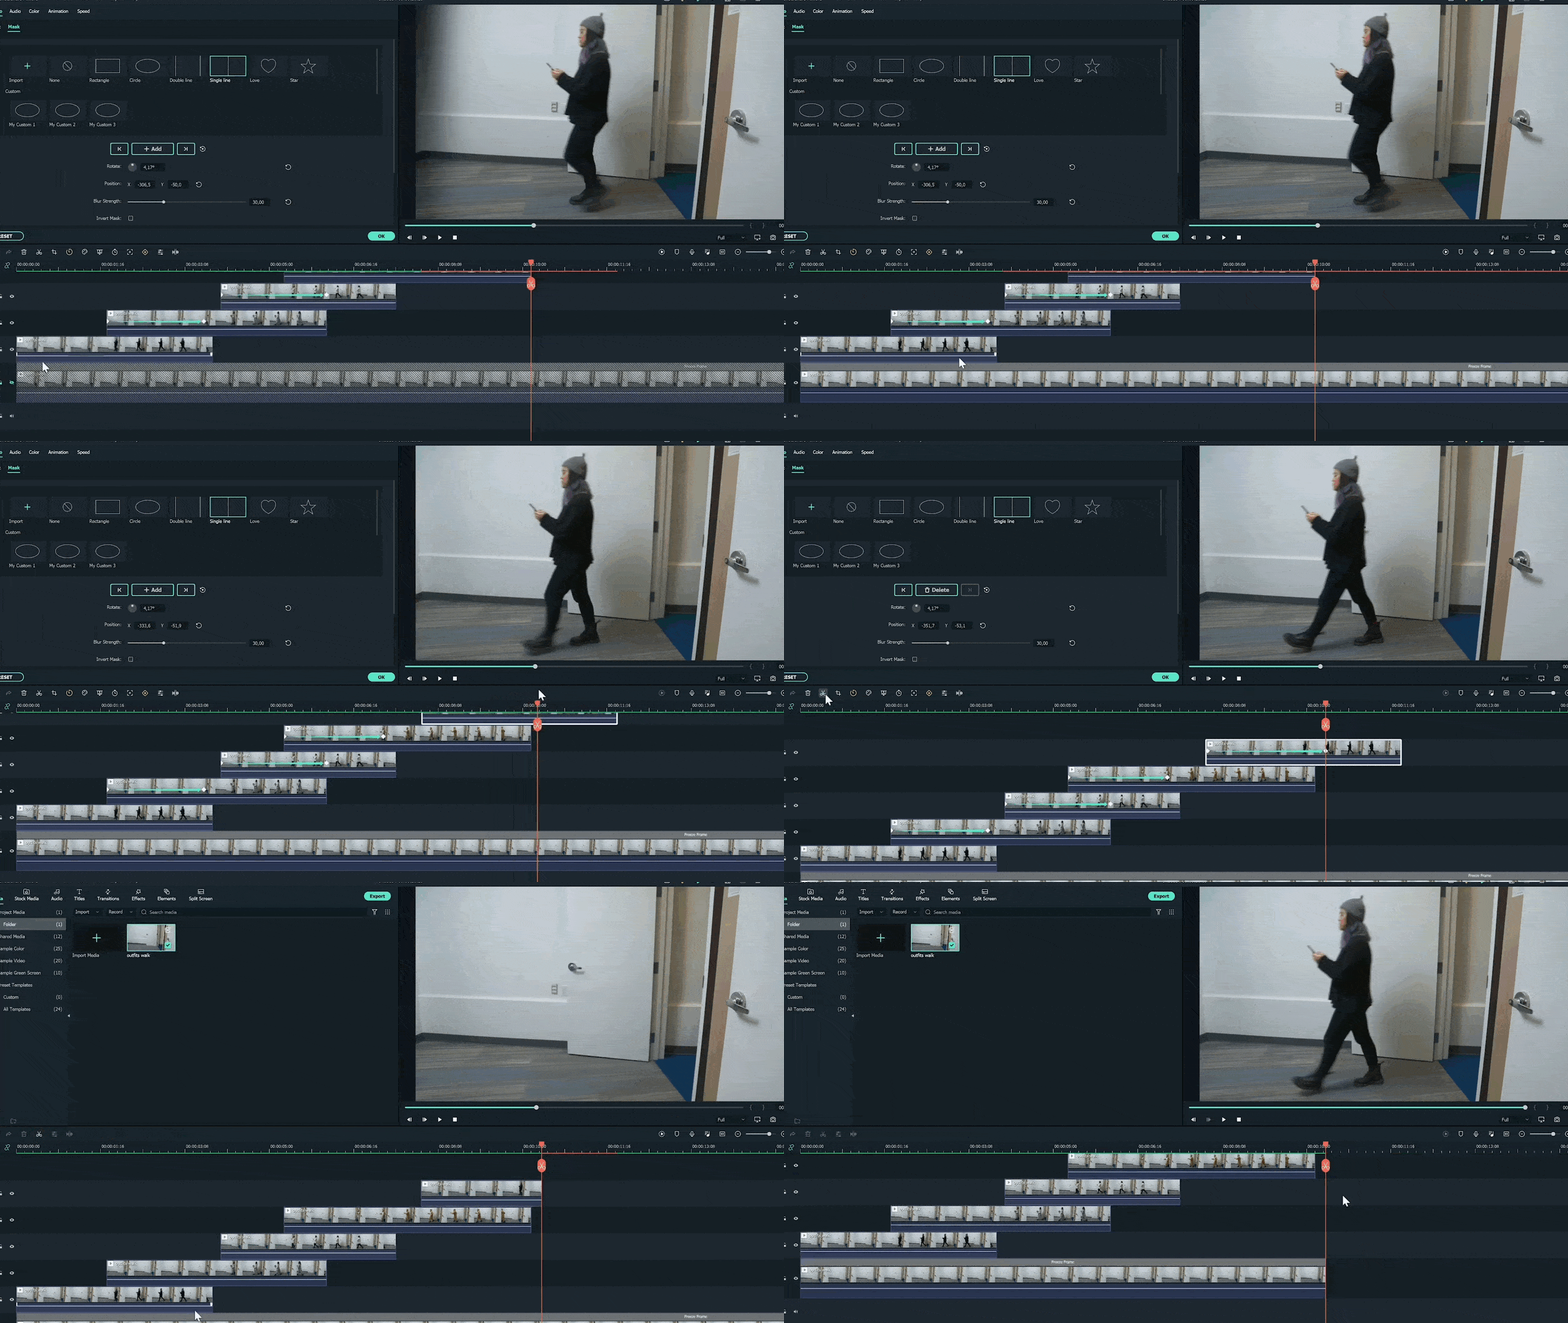
Step15 After finishing all outfits, copy the clip from the first outfit. And paste it on top of all the tracks after the last outfit. And add a mask keyframe to this section too.
Step16 Unlock the first track and move the playhead to find the point where the subject with 4th outfit moves out of the frame. Then, cut the remaining part of the freeze frame on the right.
Step17 Now move the playhead to the first frame and find where it coincides with the last part of the final frame. Cut the previous piece.
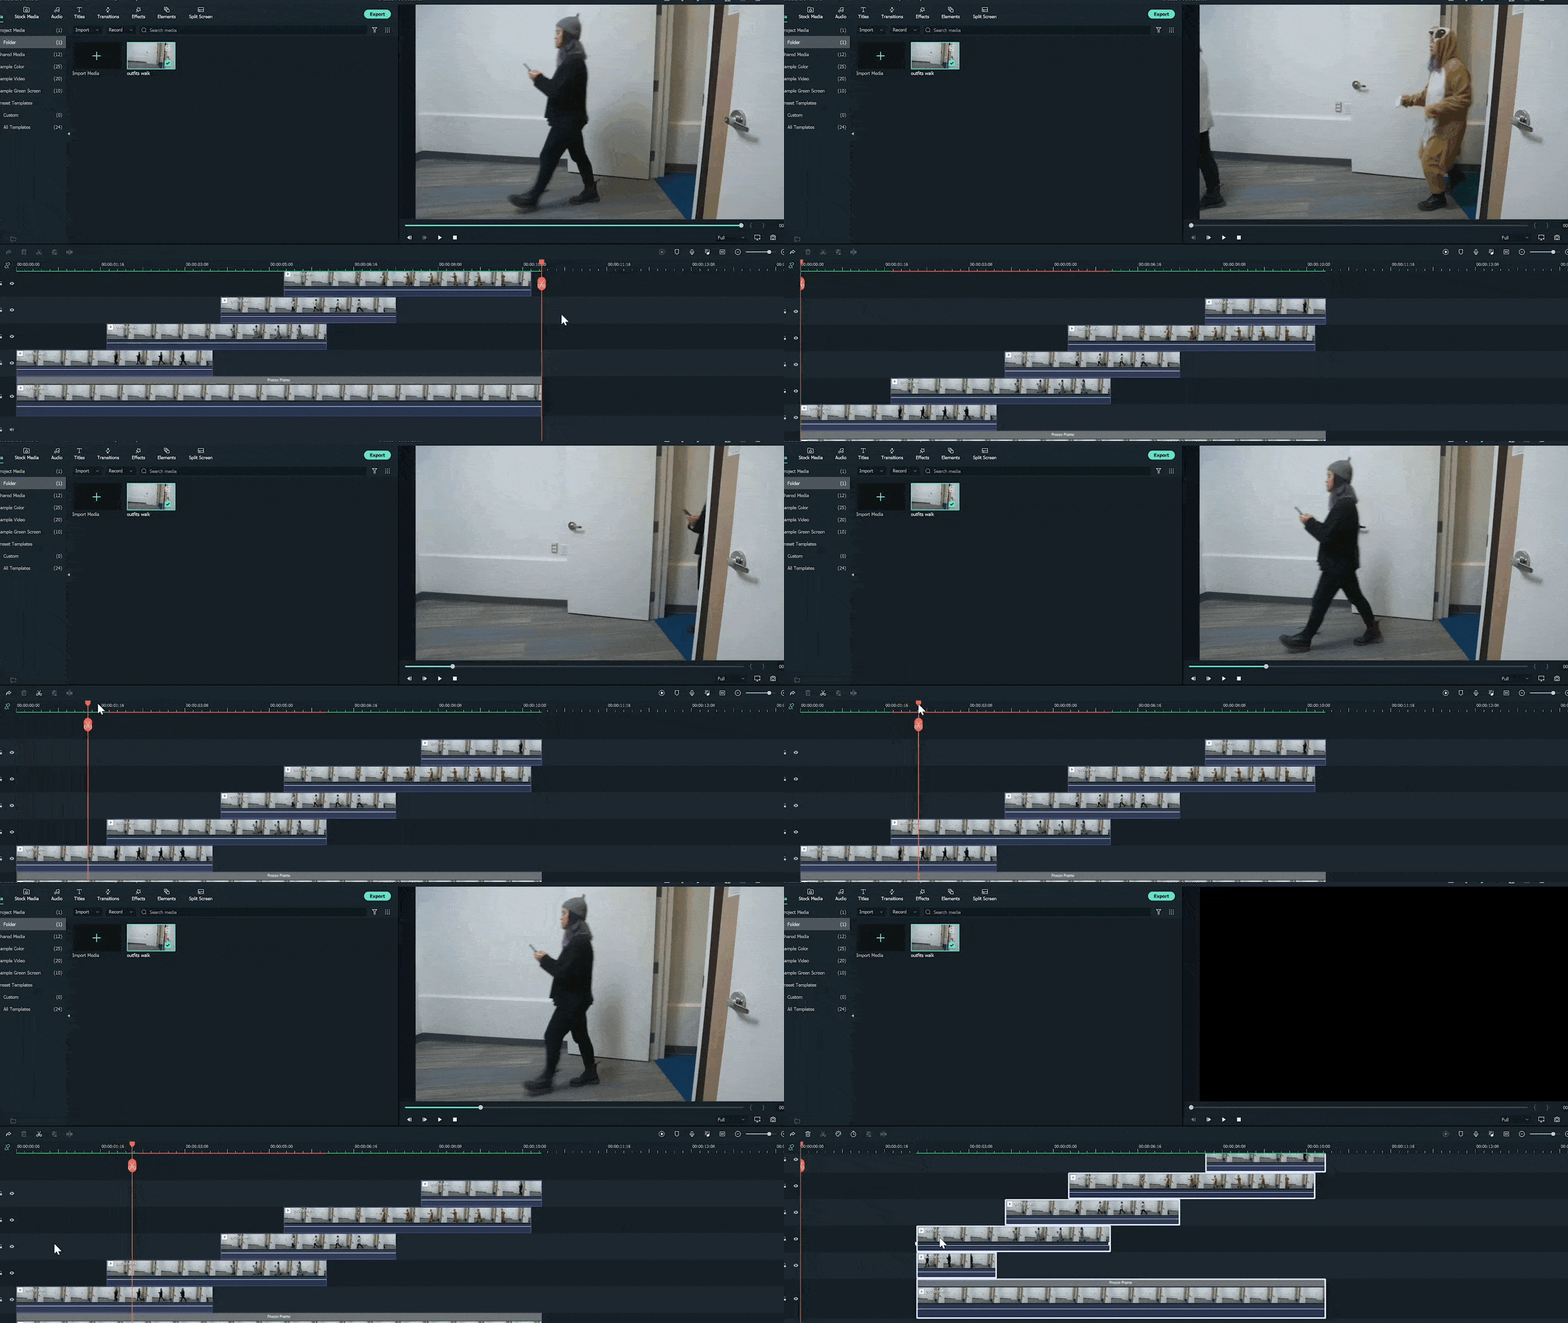
Post it on Instagram, and it will keep playing automatically and act like a loop video. Otherwise, duplicate this edited clip several times to create a longer loop video. Background music plays a vital role in these videos, setting the tone and pace. Follow all the steps in the correct order. Then, create and post loop videos on your social media platforms.
Free Download For macOS 10.14 or later
Below is the step-by-step guide on using Wondershare Filmora to create a loop masking or lookbook video.
How to edit a loop lookbook video
Step1 Download and install Wondershare Filmora on your PC or Mac.
Step2 Launch Wondershare Filmora, import the video clip into Filmora and place it on the first track.

Step3 Find a frame with an empty background, i.e., without the subject, and freeze the frame.

Step4 Extend the frozen frame and cut out the rest of the video.

Step5 We are done with the first track so lock it.

Step6 Import the clip again on the second track. And find the sections of the clips where the subject is walking in the video. Cut the remaining part.

Step7 It will create several small sections on the second track.

Step8 Put the first clip at the start of the timeline and move the playhead to find the frame containing enough room for the second outfit.

Step9 Move the second outfit to that playhead area.

Step10 Double-click on the clip, go to effects, and choose a single-line mask.

Step11 Drag the mask to the point where it shows the outfit on its right side.

Step12 Blur the mask edges by increasing blur numbers.

Step13 Click on the add button to add a mask keyframe and move the play head forward until the first outfit leaves the frame.

Step14 Move the mask to the left to reveal the entire frame, and repeat the same process with all outfits.

Step15 After finishing all outfits, copy the clip from the first outfit. And paste it on top of all the tracks after the last outfit. And add a mask keyframe to this section too.

Step16 Unlock the first track and move the playhead to find the point where the subject with 4th outfit moves out of the frame. Then, cut the remaining part of the freeze frame on the right.

Step17 Now move the playhead to the first frame and find where it coincides with the last part of the final frame. Cut the previous piece.

Post it on Instagram, and it will keep playing automatically and act like a loop video. Otherwise, duplicate this edited clip several times to create a longer loop video. Background music plays a vital role in these videos, setting the tone and pace. Follow all the steps in the correct order. Then, create and post loop videos on your social media platforms.
Easy Steps to Make Glitch Effect with Filmora
You don’t need outdated VCRs or any other broken technology to produce glitch effects. Instead, you can use a video editing program for Mac and PCs, such as Filmora , to transform your videos into glitch-effect masterpieces. You can also use the glitch effects to provide striking shot transitions or opening titles. Keep reading this article on how to apply various glitch video effects in Filmora 11:
Part 1: What is a Glitch Effect?
A glitch effect occurs when a section of your video temporarily changes look or “glitches” for a short while. Although transient glitches are typical, they can occasionally linger for a few seconds or more.

You can use a glitch effect to temporarily change the appearance of the image in the video to give the impression that a machine is processing it. Additionally, it gives your finished piece a fantastic, dreamlike aspect.
Part 2: When Should you Apply a Glitch Effect?
A few years back, we had no choice but to watch glitchy movies on rusty VCR devices. Nowadays, retro video effects are very popular in TV movies and even games. You can use these effects in many ways, like making fake vintage footage or emulating a glitching computer.
Filmmakers frequently employ glitching in their videos to give the impression that a character has been affected by a technical abnormality, is having a flashback, or is being watched by someone else via a digital camera system. Something happens when the person or image flashes, often without their knowledge. In addition, you can apply the glitch effect to a composition to evoke a feeling of dramatic irony.
Part 3: Tutorial to Chromatic Aberration Effect
Chromatic aberration refers to how old lenses tend to split colors. This effect is very common in Old media like VHS or LaserDisc.

Here is a complete breakdown of each component of the Retro look and how you can make your glitch effects in Filmora 11:
Step1 Download Wondersshare Filmora 11 on your Pc by visiting filmora.wondershare.com.

Step2 Open Filmora and click on the Effects tab.
Step3 Search Chromatic aberration and drag the effect right onto your clip. It will give you a fantastic pre-made version of the effect.
Part 4: How to Customize Glitch Effect with Filmora
You can add final touches to your video clips by customizing Filmora’s effects to take your glitch effect to the next level. You can mix and match different effects in your video to create your custom glitch effect in Filmora 11.
Free Download For Win 7 or later(64-bit)
Free Download For macOS 10.14 or later
Step1 Once you have your clip on the timeline, select your clip and click on Edit. Now choose Duplicate to create two more copies.

Step2 Put the new copies on the layer above the others and make sure everything is lined up exactly. To create the glitch effect, separate the color channels on your Clips into the primary colors red, green, and blue.

Step3 Double-click on the top clip.

Go to Color and open the White Balance option to make this layer completely red. Next, drag both Temperature and Tint sliders to a hundred.

Step4 Now click the little eye icon on the timeline to hide the top layer and move on to the middle layer.
Step5 Double-click on your middle clip and go to Color, then select White Balance and set your Temperature to -100 and your Tint to 100.

Step6 Finally, hide this layer just like before. Repeat the same steps for the last clip but make this clip the blue layer by leaving the Temperature at zero and setting the Tint to -100.

Step7 Double-click the clip in the top layer, click the Video Tab, and open the Compositing options. Set the Blending Mode of this top layer to Soft Light.

Now click on the clip in your preview window and move the image over by pressing the left Arrow key on your keyboard a few times. Once you’re happy with the top clip, hide that layer by clicking the eye icon.

Step8 To make the middle layer visible, double-click the clip in your mid layer and set the Blending Mode of this layer to Screen.

Now click on your clip in the preview window and press the Right key as many times as you did before. Finally, make all the layers visible by clicking the eye icon.

Vignette
A vignette is a dark border that fades around the frame’s edges in Filmora. You can easily add a vignette effect to your video by using these steps:
Step1 First, click the Effects Tab and type in Vignette.
Step2 Next, drag the Vignette Radius effect to a layer above your previous three layers.
Step3 Now adjust the length to match the other clips.
VHS static effects
A VHS effect is a grainy distortion that resembles an old analog video cassette recording. To apply the VHS static effects:
Step1 Click the Effects tab.
Step2 Search for the VHS static and drag it to a new layer above everything else.
Step3 Extend one of the effects to match the length of your previous clips.
VCR Distortion
VCR Distortion effect will make your video look highly glitched. To apply this effect:
Step1 Click on the Effects tab.
Step2 Search for VCR Distortion, then drag and drop this effect over your previous layer.
Part 5: Tips to Create Awesome Glitch Effects
- One of the best ways to use the VCR Distortion effect is to cut it short and intersperse it around your video in random parts.
- The glitch Distortion effect is very intense, so we recommend cutting this effect very short and dropping it at random parts of your video.
- You can also use these effects as a sneaky way to hide Cuts in your video.
Summary
You can use glitch effects created or inspired by faulty video equipment as a powerful storytelling tool. These effects can help you change the tone of the entire video by adding a specific visual aesthetic and making the narrative simpler to convey and more approachable for the audience.
We recommend using Filmora 11 for adding built-in glitch effects. You can also use this app to create custom glitch effects within a few minutes.
Free Download For macOS 10.14 or later
Step1 Once you have your clip on the timeline, select your clip and click on Edit. Now choose Duplicate to create two more copies.

Step2 Put the new copies on the layer above the others and make sure everything is lined up exactly. To create the glitch effect, separate the color channels on your Clips into the primary colors red, green, and blue.

Step3 Double-click on the top clip.

Go to Color and open the White Balance option to make this layer completely red. Next, drag both Temperature and Tint sliders to a hundred.

Step4 Now click the little eye icon on the timeline to hide the top layer and move on to the middle layer.
Step5 Double-click on your middle clip and go to Color, then select White Balance and set your Temperature to -100 and your Tint to 100.

Step6 Finally, hide this layer just like before. Repeat the same steps for the last clip but make this clip the blue layer by leaving the Temperature at zero and setting the Tint to -100.

Step7 Double-click the clip in the top layer, click the Video Tab, and open the Compositing options. Set the Blending Mode of this top layer to Soft Light.

Now click on the clip in your preview window and move the image over by pressing the left Arrow key on your keyboard a few times. Once you’re happy with the top clip, hide that layer by clicking the eye icon.

Step8 To make the middle layer visible, double-click the clip in your mid layer and set the Blending Mode of this layer to Screen.

Now click on your clip in the preview window and press the Right key as many times as you did before. Finally, make all the layers visible by clicking the eye icon.

Vignette
A vignette is a dark border that fades around the frame’s edges in Filmora. You can easily add a vignette effect to your video by using these steps:
Step1 First, click the Effects Tab and type in Vignette.
Step2 Next, drag the Vignette Radius effect to a layer above your previous three layers.
Step3 Now adjust the length to match the other clips.
VHS static effects
A VHS effect is a grainy distortion that resembles an old analog video cassette recording. To apply the VHS static effects:
Step1 Click the Effects tab.
Step2 Search for the VHS static and drag it to a new layer above everything else.
Step3 Extend one of the effects to match the length of your previous clips.
VCR Distortion
VCR Distortion effect will make your video look highly glitched. To apply this effect:
Step1 Click on the Effects tab.
Step2 Search for VCR Distortion, then drag and drop this effect over your previous layer.
Part 5: Tips to Create Awesome Glitch Effects
- One of the best ways to use the VCR Distortion effect is to cut it short and intersperse it around your video in random parts.
- The glitch Distortion effect is very intense, so we recommend cutting this effect very short and dropping it at random parts of your video.
- You can also use these effects as a sneaky way to hide Cuts in your video.
Summary
You can use glitch effects created or inspired by faulty video equipment as a powerful storytelling tool. These effects can help you change the tone of the entire video by adding a specific visual aesthetic and making the narrative simpler to convey and more approachable for the audience.
We recommend using Filmora 11 for adding built-in glitch effects. You can also use this app to create custom glitch effects within a few minutes.
General Knowledge About MP4 Format and Best MP4 Video Editor
You all must have taken pictures and made videos at various occasions of life, and it might be someone’s wedding, birthday, or any other party. The images and videos are saved in different file formats, and sometimes sharing file across different platforms get difficult because of this.
What if you want to edit your MP4 video but don’t know much about the MP4 file format? The following article will help you learn more about it. From the introduction to the technical descriptions, all are discussed in detail below.
In this article
02 Why MP4 Video Format Is the Most Popular Video File?
03 Best MP4 Video Editor- Filmora Video Editor
04 How to Edit MP4 Video Files?
05 MOV VS. MP4: What’s the Difference?
Part 1. What Is MP4 Video Format?
MP4 file format is mostly used for video files. The original data is not in MP4 format. The format can also contain audio, video, subtitles, or image data in different streams. All the streams can be decoded by different decoders.
MP4 video format is developed by the Moving Picture Expert Group (MPEG). MP4 file format is compatible with a wide range of software and devices. It has relatively high post-compressed video quality thus takes less space than other formats.
Part 2. Why MP4 Video Format Is the Most Popular Video File?
You all must have heard about various file formats, but can you name the most popular format? Well, it’s MP4 format. Now that you know about the MP4 format, let’s tell you why it’s famous among other formats:
· Compatibility
Do you know something about MP4 compatibility? The file format is extremely compatible with online and also mobile internet browsers. Moreover, you can also find its compatibility with various social media like Facebook, Twitter, Instagram.
· Codecs
The MP4 containers can use codecs like MPEG-4, , . MP4 file format is also suitable for images and audio files.
· Size
Do you know another reason why the MP4 video format is famous? It’s because of the size. MP4 format delivers high-quality video but in a relatively smaller size.
Part 3. Best MP4 Video Editor- Filmora Video Editor
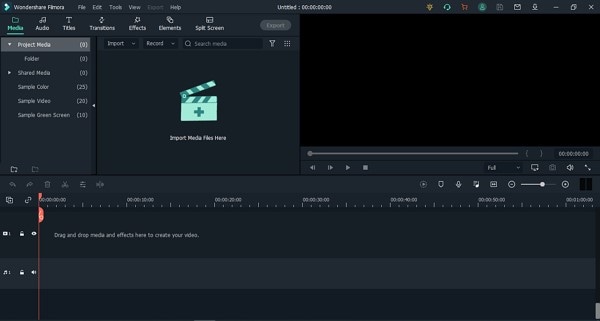
When we talk about MP4 video format editing, Wondershare Filmora Video Editor is the best choice you could ever have. The video editor is easy and straightforward for beginners, and you don’t need any technical expertise to use the Filmora video editor. Moreover, the interface is very clean and intuitive. The software offers a precision cutter.
For Win 7 or later (64-bit)
For macOS 10.12 or later
Do you know any video editor that supports 4k? Filmora does support 4K video resolution and also high definition image quality. Additionally, Filmora has a media library; you can get cool and stunning editing elements, titles, effects, transitions, and a lot more things. Wondershare Filmora offers a wide range of features; let’s discuss a few:
Green Screen Effect
Distractions in videos are very annoying, but with Filmora, you can get rid of this. The Green Screen Effect offered by Filmora helps in removing all the distractions from your video like any unwanted person, irritating light, or whatever.
Motion Tracking
It’s tough to find good software that offers features like motion tracking. Luckily, you have Wondershare Filmora to use the feature. Motion Tracking is among the most anticipated and prominent features of the video editor, which help you track movements in the video.
Split Screen
Are you creating a tutorial? Do try the Split Screen feature of Filmora for creating tutorials, commentary, or even interviews. This classical feature is fantastic and makes your video unique. You can switch between 4 to 6 screen panels.
Transitions and Effects
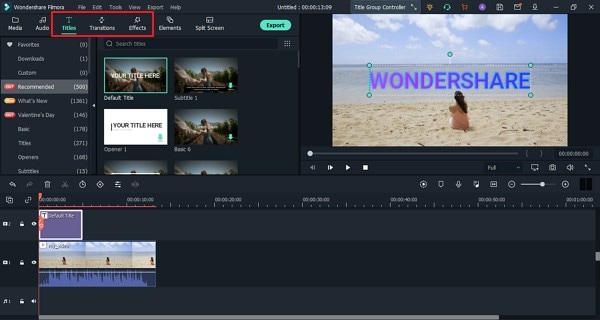
Video Editing is incomplete without effects and transitions. If you are using Filmora Video Editor, you will get a lot of brilliant transitions and effects to add to your video and make it shine. You also get a variety of title and text templates.
Part 4. How to Edit MP4 Video Files?
If you are worried about editing your videos in MP4 file format, let’s share something that will help you. Read the following section of this article to learn more about some tips regarding MP4 editing.
1. Cut the Video
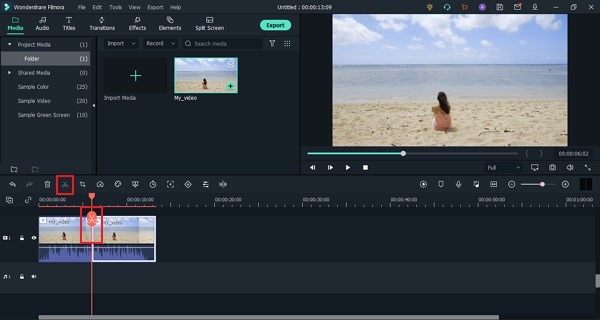
If your video has any rough or extra content, remove it. You can easily cut your MP4 video and remove unwanted parts. Filmora Video Editor offers a ‘Cut’ feature that could be used for this purpose.
2. Join MP4 Videos
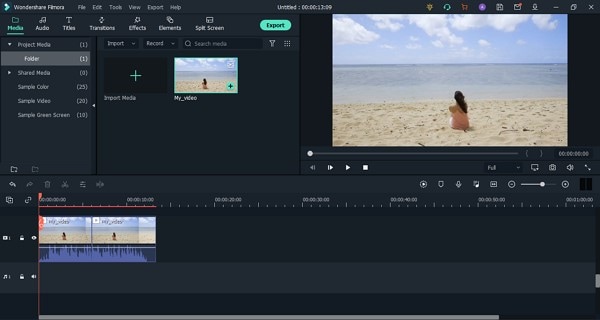
Do you know what else you can do? With Filmora, you can join and combine several MP4 videos with great ease. The software lets you create cool joined videos that look like an entire movie. The feature lets you add your desired videos.
3. Edit Audio of MP4 Video
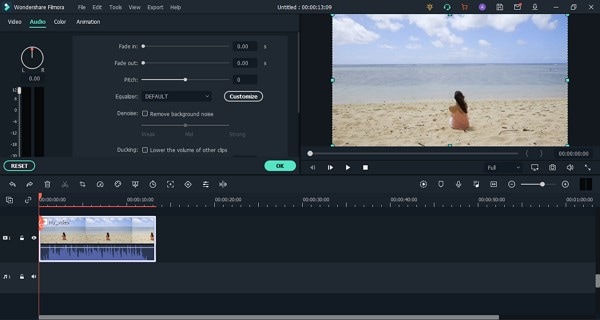
Can you edit audio from Filmora Video Editor? Surprisingly, yes, you can also edit the audio of your MP4 video from this editor. The software lets you adjust the different features of the audio like its Pitch, Speed, Volume, etc.
4. Add Effects, Titles, and Transitions
You can also add stunning effects to your MP4 video while editing it. Moreover, explore Filmora and find the perfect title for your video. Apart from this, you also get tons of cool transitions that you can add for smooth transitioning effects.
Part 5. MOV VS. MP4: What’s the Difference?
There are multiple types of documents that you can have your material saved into. Among them exists MOV and MP4. Do you know the difference between these two? Allow us to help you out by sharing the qualities of MOV and MP4.
MP4
Let us tell you about MP4 first. MP4 is a multimedia storage format mainly used to store videos. It is widely used and can be used is multiple devices. MP4 is the wrapper around the video, not the video itself. If we talk technically, MP4 contains the compressed video data and necessary data files that are required to play the video. MP4 is more compressed than other files types, thus taking less space.
MOV
MOV is a file-saving format that Apple owns. It would not be wrong to say that MOV works best in iOS and macOS devices. MOV files can be converted into MP4 and vices versa if needed. MOV has the best video quality and sound under the same compression level. MOV files are also decoded by MPEG-4 codec, the same as MP4.
Final Words
After reading and learning from the above article, we hope that you have increased your knowledge about the MP4 video format. The article shared various things about MP4, like the factors for its popularity, editing MP4 video, etc. We also introduced a great video editor to edit your MP4 file format videos.
Wondershare Filmora is the best editor for videos when you want to create unique and stunning content. The editor offers a whole new editing world with limitless features. Do you know any good software for Color Match? Its Filmora! The easy-to-use, multi-track, drag, and drop video editor will change your editing game.
If you want to stun your viewers with your videos, then try Wondershare Filmora. You can add brilliant transitions, effects, titles to your video. Apart from this, you also get features like cut, crop, trim, join, split, and many more.
Wondershare Filmora
Get started easily with Filmora’s powerful performance, intuitive interface, and countless effects!
Try It Free Try It Free Try It Free Learn More >

02 Why MP4 Video Format Is the Most Popular Video File?
03 Best MP4 Video Editor- Filmora Video Editor
04 How to Edit MP4 Video Files?
05 MOV VS. MP4: What’s the Difference?
Part 1. What Is MP4 Video Format?
MP4 file format is mostly used for video files. The original data is not in MP4 format. The format can also contain audio, video, subtitles, or image data in different streams. All the streams can be decoded by different decoders.

MP4 video format is developed by the Moving Picture Expert Group (MPEG). MP4 file format is compatible with a wide range of software and devices. It has relatively high post-compressed video quality thus takes less space than other formats.
Part 2. Why MP4 Video Format Is the Most Popular Video File?
You all must have heard about various file formats, but can you name the most popular format? Well, it’s MP4 format. Now that you know about the MP4 format, let’s tell you why it’s famous among other formats:
· Compatibility
Do you know something about MP4 compatibility? The file format is extremely compatible with online and also mobile internet browsers. Moreover, you can also find its compatibility with various social media like Facebook, Twitter, Instagram.
· Codecs
The MP4 containers can use codecs like MPEG-4, , . MP4 file format is also suitable for images and audio files.
· Size
Do you know another reason why the MP4 video format is famous? It’s because of the size. MP4 format delivers high-quality video but in a relatively smaller size.
Part 3. Best MP4 Video Editor- Filmora Video Editor
When we talk about MP4 video format editing, Wondershare Filmora Video Editor is the best choice you could ever have. The video editor is easy and straightforward for beginners, and you don’t need any technical expertise to use the Filmora video editor. Moreover, the interface is very clean and intuitive. The software offers a precision cutter.

For Win 7 or later (64-bit)
For macOS 10.12 or later
Do you know any video editor that supports 4k? Filmora does support 4K video resolution and also high definition image quality. Additionally, Filmora has a media library; you can get cool and stunning editing elements, titles, effects, transitions, and a lot more things. Wondershare Filmora offers a wide range of features; let’s discuss a few:
Green Screen Effect
Distractions in videos are very annoying, but with Filmora, you can get rid of this. The Green Screen Effect offered by Filmora helps in removing all the distractions from your video like any unwanted person, irritating light, or whatever.
Motion Tracking
It’s tough to find good software that offers features like motion tracking. Luckily, you have Wondershare Filmora to use the feature. Motion Tracking is among the most anticipated and prominent features of the video editor, which help you track movements in the video.
Split Screen
Are you creating a tutorial? Do try the Split Screen feature of Filmora for creating tutorials, commentary, or even interviews. This classical feature is fantastic and makes your video unique. You can switch between 4 to 6 screen panels.
Transitions and Effects
Video Editing is incomplete without effects and transitions. If you are using Filmora Video Editor, you will get a lot of brilliant transitions and effects to add to your video and make it shine. You also get a variety of title and text templates.
Part 4. How to Edit MP4 Video Files?
If you are worried about editing your videos in MP4 file format, let’s share something that will help you. Read the following section of this article to learn more about some tips regarding MP4 editing.
1. Cut the Video
If your video has any rough or extra content, remove it. You can easily cut your MP4 video and remove unwanted parts. Filmora Video Editor offers a ‘Cut’ feature that could be used for this purpose.

2. Join MP4 Videos
Do you know what else you can do? With Filmora, you can join and combine several MP4 videos with great ease. The software lets you create cool joined videos that look like an entire movie. The feature lets you add your desired videos.

3. Edit Audio of MP4 Video
Can you edit audio from Filmora Video Editor? Surprisingly, yes, you can also edit the audio of your MP4 video from this editor. The software lets you adjust the different features of the audio like its Pitch, Speed, Volume, etc.

4. Add Effects, Titles, and Transitions
You can also add stunning effects to your MP4 video while editing it. Moreover, explore Filmora and find the perfect title for your video. Apart from this, you also get tons of cool transitions that you can add for smooth transitioning effects.

Part 5. MOV VS. MP4: What’s the Difference?
There are multiple types of documents that you can have your material saved into. Among them exists MOV and MP4. Do you know the difference between these two? Allow us to help you out by sharing the qualities of MOV and MP4.

MP4
Let us tell you about MP4 first. MP4 is a multimedia storage format mainly used to store videos. It is widely used and can be used is multiple devices. MP4 is the wrapper around the video, not the video itself. If we talk technically, MP4 contains the compressed video data and necessary data files that are required to play the video. MP4 is more compressed than other files types, thus taking less space.
MOV
MOV is a file-saving format that Apple owns. It would not be wrong to say that MOV works best in iOS and macOS devices. MOV files can be converted into MP4 and vices versa if needed. MOV has the best video quality and sound under the same compression level. MOV files are also decoded by MPEG-4 codec, the same as MP4.
Final Words
After reading and learning from the above article, we hope that you have increased your knowledge about the MP4 video format. The article shared various things about MP4, like the factors for its popularity, editing MP4 video, etc. We also introduced a great video editor to edit your MP4 file format videos.
Wondershare Filmora is the best editor for videos when you want to create unique and stunning content. The editor offers a whole new editing world with limitless features. Do you know any good software for Color Match? Its Filmora! The easy-to-use, multi-track, drag, and drop video editor will change your editing game.
If you want to stun your viewers with your videos, then try Wondershare Filmora. You can add brilliant transitions, effects, titles to your video. Apart from this, you also get features like cut, crop, trim, join, split, and many more.
Wondershare Filmora
Get started easily with Filmora’s powerful performance, intuitive interface, and countless effects!
Try It Free Try It Free Try It Free Learn More >

02 Why MP4 Video Format Is the Most Popular Video File?
03 Best MP4 Video Editor- Filmora Video Editor
04 How to Edit MP4 Video Files?
05 MOV VS. MP4: What’s the Difference?
Part 1. What Is MP4 Video Format?
MP4 file format is mostly used for video files. The original data is not in MP4 format. The format can also contain audio, video, subtitles, or image data in different streams. All the streams can be decoded by different decoders.

MP4 video format is developed by the Moving Picture Expert Group (MPEG). MP4 file format is compatible with a wide range of software and devices. It has relatively high post-compressed video quality thus takes less space than other formats.
Part 2. Why MP4 Video Format Is the Most Popular Video File?
You all must have heard about various file formats, but can you name the most popular format? Well, it’s MP4 format. Now that you know about the MP4 format, let’s tell you why it’s famous among other formats:
· Compatibility
Do you know something about MP4 compatibility? The file format is extremely compatible with online and also mobile internet browsers. Moreover, you can also find its compatibility with various social media like Facebook, Twitter, Instagram.
· Codecs
The MP4 containers can use codecs like MPEG-4, , . MP4 file format is also suitable for images and audio files.
· Size
Do you know another reason why the MP4 video format is famous? It’s because of the size. MP4 format delivers high-quality video but in a relatively smaller size.
Part 3. Best MP4 Video Editor- Filmora Video Editor
When we talk about MP4 video format editing, Wondershare Filmora Video Editor is the best choice you could ever have. The video editor is easy and straightforward for beginners, and you don’t need any technical expertise to use the Filmora video editor. Moreover, the interface is very clean and intuitive. The software offers a precision cutter.

For Win 7 or later (64-bit)
For macOS 10.12 or later
Do you know any video editor that supports 4k? Filmora does support 4K video resolution and also high definition image quality. Additionally, Filmora has a media library; you can get cool and stunning editing elements, titles, effects, transitions, and a lot more things. Wondershare Filmora offers a wide range of features; let’s discuss a few:
Green Screen Effect
Distractions in videos are very annoying, but with Filmora, you can get rid of this. The Green Screen Effect offered by Filmora helps in removing all the distractions from your video like any unwanted person, irritating light, or whatever.
Motion Tracking
It’s tough to find good software that offers features like motion tracking. Luckily, you have Wondershare Filmora to use the feature. Motion Tracking is among the most anticipated and prominent features of the video editor, which help you track movements in the video.
Split Screen
Are you creating a tutorial? Do try the Split Screen feature of Filmora for creating tutorials, commentary, or even interviews. This classical feature is fantastic and makes your video unique. You can switch between 4 to 6 screen panels.
Transitions and Effects
Video Editing is incomplete without effects and transitions. If you are using Filmora Video Editor, you will get a lot of brilliant transitions and effects to add to your video and make it shine. You also get a variety of title and text templates.
Part 4. How to Edit MP4 Video Files?
If you are worried about editing your videos in MP4 file format, let’s share something that will help you. Read the following section of this article to learn more about some tips regarding MP4 editing.
1. Cut the Video
If your video has any rough or extra content, remove it. You can easily cut your MP4 video and remove unwanted parts. Filmora Video Editor offers a ‘Cut’ feature that could be used for this purpose.

2. Join MP4 Videos
Do you know what else you can do? With Filmora, you can join and combine several MP4 videos with great ease. The software lets you create cool joined videos that look like an entire movie. The feature lets you add your desired videos.

3. Edit Audio of MP4 Video
Can you edit audio from Filmora Video Editor? Surprisingly, yes, you can also edit the audio of your MP4 video from this editor. The software lets you adjust the different features of the audio like its Pitch, Speed, Volume, etc.

4. Add Effects, Titles, and Transitions
You can also add stunning effects to your MP4 video while editing it. Moreover, explore Filmora and find the perfect title for your video. Apart from this, you also get tons of cool transitions that you can add for smooth transitioning effects.

Part 5. MOV VS. MP4: What’s the Difference?
There are multiple types of documents that you can have your material saved into. Among them exists MOV and MP4. Do you know the difference between these two? Allow us to help you out by sharing the qualities of MOV and MP4.

MP4
Let us tell you about MP4 first. MP4 is a multimedia storage format mainly used to store videos. It is widely used and can be used is multiple devices. MP4 is the wrapper around the video, not the video itself. If we talk technically, MP4 contains the compressed video data and necessary data files that are required to play the video. MP4 is more compressed than other files types, thus taking less space.
MOV
MOV is a file-saving format that Apple owns. It would not be wrong to say that MOV works best in iOS and macOS devices. MOV files can be converted into MP4 and vices versa if needed. MOV has the best video quality and sound under the same compression level. MOV files are also decoded by MPEG-4 codec, the same as MP4.
Final Words
After reading and learning from the above article, we hope that you have increased your knowledge about the MP4 video format. The article shared various things about MP4, like the factors for its popularity, editing MP4 video, etc. We also introduced a great video editor to edit your MP4 file format videos.
Wondershare Filmora is the best editor for videos when you want to create unique and stunning content. The editor offers a whole new editing world with limitless features. Do you know any good software for Color Match? Its Filmora! The easy-to-use, multi-track, drag, and drop video editor will change your editing game.
If you want to stun your viewers with your videos, then try Wondershare Filmora. You can add brilliant transitions, effects, titles to your video. Apart from this, you also get features like cut, crop, trim, join, split, and many more.
Wondershare Filmora
Get started easily with Filmora’s powerful performance, intuitive interface, and countless effects!
Try It Free Try It Free Try It Free Learn More >

02 Why MP4 Video Format Is the Most Popular Video File?
03 Best MP4 Video Editor- Filmora Video Editor
04 How to Edit MP4 Video Files?
05 MOV VS. MP4: What’s the Difference?
Part 1. What Is MP4 Video Format?
MP4 file format is mostly used for video files. The original data is not in MP4 format. The format can also contain audio, video, subtitles, or image data in different streams. All the streams can be decoded by different decoders.

MP4 video format is developed by the Moving Picture Expert Group (MPEG). MP4 file format is compatible with a wide range of software and devices. It has relatively high post-compressed video quality thus takes less space than other formats.
Part 2. Why MP4 Video Format Is the Most Popular Video File?
You all must have heard about various file formats, but can you name the most popular format? Well, it’s MP4 format. Now that you know about the MP4 format, let’s tell you why it’s famous among other formats:
· Compatibility
Do you know something about MP4 compatibility? The file format is extremely compatible with online and also mobile internet browsers. Moreover, you can also find its compatibility with various social media like Facebook, Twitter, Instagram.
· Codecs
The MP4 containers can use codecs like MPEG-4, , . MP4 file format is also suitable for images and audio files.
· Size
Do you know another reason why the MP4 video format is famous? It’s because of the size. MP4 format delivers high-quality video but in a relatively smaller size.
Part 3. Best MP4 Video Editor- Filmora Video Editor
When we talk about MP4 video format editing, Wondershare Filmora Video Editor is the best choice you could ever have. The video editor is easy and straightforward for beginners, and you don’t need any technical expertise to use the Filmora video editor. Moreover, the interface is very clean and intuitive. The software offers a precision cutter.

For Win 7 or later (64-bit)
For macOS 10.12 or later
Do you know any video editor that supports 4k? Filmora does support 4K video resolution and also high definition image quality. Additionally, Filmora has a media library; you can get cool and stunning editing elements, titles, effects, transitions, and a lot more things. Wondershare Filmora offers a wide range of features; let’s discuss a few:
Green Screen Effect
Distractions in videos are very annoying, but with Filmora, you can get rid of this. The Green Screen Effect offered by Filmora helps in removing all the distractions from your video like any unwanted person, irritating light, or whatever.
Motion Tracking
It’s tough to find good software that offers features like motion tracking. Luckily, you have Wondershare Filmora to use the feature. Motion Tracking is among the most anticipated and prominent features of the video editor, which help you track movements in the video.
Split Screen
Are you creating a tutorial? Do try the Split Screen feature of Filmora for creating tutorials, commentary, or even interviews. This classical feature is fantastic and makes your video unique. You can switch between 4 to 6 screen panels.
Transitions and Effects
Video Editing is incomplete without effects and transitions. If you are using Filmora Video Editor, you will get a lot of brilliant transitions and effects to add to your video and make it shine. You also get a variety of title and text templates.
Part 4. How to Edit MP4 Video Files?
If you are worried about editing your videos in MP4 file format, let’s share something that will help you. Read the following section of this article to learn more about some tips regarding MP4 editing.
1. Cut the Video
If your video has any rough or extra content, remove it. You can easily cut your MP4 video and remove unwanted parts. Filmora Video Editor offers a ‘Cut’ feature that could be used for this purpose.

2. Join MP4 Videos
Do you know what else you can do? With Filmora, you can join and combine several MP4 videos with great ease. The software lets you create cool joined videos that look like an entire movie. The feature lets you add your desired videos.

3. Edit Audio of MP4 Video
Can you edit audio from Filmora Video Editor? Surprisingly, yes, you can also edit the audio of your MP4 video from this editor. The software lets you adjust the different features of the audio like its Pitch, Speed, Volume, etc.

4. Add Effects, Titles, and Transitions
You can also add stunning effects to your MP4 video while editing it. Moreover, explore Filmora and find the perfect title for your video. Apart from this, you also get tons of cool transitions that you can add for smooth transitioning effects.

Part 5. MOV VS. MP4: What’s the Difference?
There are multiple types of documents that you can have your material saved into. Among them exists MOV and MP4. Do you know the difference between these two? Allow us to help you out by sharing the qualities of MOV and MP4.

MP4
Let us tell you about MP4 first. MP4 is a multimedia storage format mainly used to store videos. It is widely used and can be used is multiple devices. MP4 is the wrapper around the video, not the video itself. If we talk technically, MP4 contains the compressed video data and necessary data files that are required to play the video. MP4 is more compressed than other files types, thus taking less space.
MOV
MOV is a file-saving format that Apple owns. It would not be wrong to say that MOV works best in iOS and macOS devices. MOV files can be converted into MP4 and vices versa if needed. MOV has the best video quality and sound under the same compression level. MOV files are also decoded by MPEG-4 codec, the same as MP4.
Final Words
After reading and learning from the above article, we hope that you have increased your knowledge about the MP4 video format. The article shared various things about MP4, like the factors for its popularity, editing MP4 video, etc. We also introduced a great video editor to edit your MP4 file format videos.
Wondershare Filmora is the best editor for videos when you want to create unique and stunning content. The editor offers a whole new editing world with limitless features. Do you know any good software for Color Match? Its Filmora! The easy-to-use, multi-track, drag, and drop video editor will change your editing game.
If you want to stun your viewers with your videos, then try Wondershare Filmora. You can add brilliant transitions, effects, titles to your video. Apart from this, you also get features like cut, crop, trim, join, split, and many more.
Wondershare Filmora
Get started easily with Filmora’s powerful performance, intuitive interface, and countless effects!
Try It Free Try It Free Try It Free Learn More >

Doable Ways to Create Transparent Background in Procreate
Doable Ways to Make Transparent Background in Procreate
An easy yet powerful editor
Numerous effects to choose from
Detailed tutorials provided by the official channel
Figuring out the crucial steps to make the canvas excellent is one of the loveliest things users are performing for exporting the closing Procreate-projects. Once after getting expert with things trick you can be able to position the canvas surprisingly on great back for a memorable moment. You can make the most of it for your procreate mission that you have created.
Out of many essentials tools you have ever used for experiencing the benefits of equipment & skills, the Procreate is a kind of solution that comes with one of the most trustworthy as well as brilliant capability to erase the undesired background from the pictures. It is more than a general tool and there are some specified approaches to do so, but in today possible scenario, you can easily focus around choice of right selections to erase a background at ease. People can explore the chances of creating various attractive methods to work in the PNG structure after removing the desired background.
In this article
01 [How to Delete a White Background with Procreate for the IPad?](#Part 1)
02 [How to Make Transparent Background with Procreate for iPhone?](#Part 2)
03 [How to Create Popping Thumbnails or Profile Photos](#Part 3)
Part 1 How to Delete a White Background with Procreate for the IPad?

In case you are facing discoloration problem too then it is always a better idea to cast image with desired background and remove the objects.
Now turning your background with a lovely image or your own is just a matter of few clicks. With great transparent background procreate, you will be heading towards the satisfaction of obtaining transparent background. With few crucial steps you can stay from the other competitors or it will make your posts viral. With stepwise guidelines on removing the background as well as replacing it with a transparent one in Procreate is what you need the most today.
When it comes to deleting the white-background with a Procreate, then with great selection of tools you can easily create amazing performance for your post. If you are still in a dilemma to make use of the white coloured Background. After tapping on the top-left corner of the screen, you can open-up brilliant level of opportunities to make the most out of it. Are you ready to begin? Next you will learn about how to turn the background into a desired canvas for all your Instagram stories.
The following steps will provide you a quick walkthrough of entire process, stepwise:-
Step 1: First you are required to open the picture with Procreate. Get your desired image for the edit or open your picture & turn-off the overall visibility of background layer by layers-icon, tap it, it is presented on the top-right corner. Here, you will see layer labelled as the background, you need to uncheck the layer’s box for turning-off overall visibility at the bottom of Layers menu.
It is an important step to perform as if you want to deleting any white background from the image otherwise background will be treated as transparent with white-background showing through, thus you will experience no changes to the document. You are not required to remove background from image procreate if your image is not having a background layer.
Step 2: Create the selection at around white area of an image & delete background
For you to perform the step of procreate remove white background, you are required to make selection around white area. For this, open-up the selection-menu and it is placed in the form round icon named ‘S’ at the top-left-corner of the screen. At this menu, choose auto & Add. To create such level of perfection in selection, just hold & tap over any area of white-background at this screen. You can also increase threshold of your selection by moving the fingers/stylus at the right. For the opposite process, you can move the same to the left.You need to adjust the desired threshold until selection-area on your screen lines-up in accordance with an edges of the subject. You are now heading towards the process of make background transparent procreatefor your desired image quickly.
With your current selection still in active state, just tap on wrench-icon it the top-left area of your screen, then navigate to Add-menu, and here tap on the Cut option. Congrats, you have effectively deleted the background from an image.
**Step 3:**Just release the selection in the form of tapping on Selection-menu icon and repeat the process again for negative space-areas & at last clean-up stray-pixels with through an Eraser. You can repeat the process further from the step-2 in case any stray pixels still remains there as it is a normal situation to face while removing the pixels background with ‘remove background on procreate’ option.You can also take the Eraser & then manually erase those stray-pixels in there is any.
Step 4: Export your final work as PNG-file to preserve the transparency
After finishing the task of deleting background from the picture you can easily export your work to a desirable file format. The image you want to export can be in the form of PNG to retain the transparency. Other useful formats you can choose is JPEG but this doesn’tsupport transparency. So, be wise & be careful while choose your file formats.You are now having procreate export transparent backgroundand can also place the same to any sort of backdrop like an app, website, or any other workspace.
Part 2 How to Make Transparent Background with Procreate for iPhone?

Let’s dive-in quickly into the process of making the background transparent with procreate, if you are an iPhone User.
● GO Into an option of Canvas
It is up-to you whether you want to create a new canvas or want to work-upon already saved canvas. In your device through procreate app, you can do the same without any worries.
● Tap onto the option of Layers Panel
This option is located at the top-right corner of your toolbar. This option looks similar to the two-squares on the top of one another.
● Replace dull looking background with transparent background
You can quickly go down to the layers-panel placed at the bottom to choose the background color.Transparent background in procreateis always a good option to consider.
● Put uncheck before the box
At the right of toolbar you can be able to see words ‘Background color’ and if it is checked then you need to uncheck it. Now your goal to make the background completely transparent with procreate make background transparent tool, will be achieved. Now your background is completely transparent and ready to use.
Part 3 How to Create Popping Thumbnails or Profile Photos

There are various tools available in the market to make a popping thumbnail for your YouTube or Instagram pages. Thumbnail maker like Filmora can be an interesting option to choose as it is quick and effective. You can also customized as well as download the thumbnails at no cost with the same. However, they comes with certain limitations like overall size of the image to be downloaded. For better versions you can use premium tools. With better creativity and great imagination you can make the thumbnail as crisp as possible.
● Upload your desired photo to Filmora’s thumbnail maker templates.
You can easily create your video thumbnail, but you need some inspiration and for that you can make use of amazing tool like Filmora. With access to more than 50 free templates you can achieve your goal of making popping thumbnails.
● Adding text, clipart, or perfect quality of background can give it a boost
After picking your template, one can make use of thumbnail to stand out different in terms of adding text, clipart or background. For adding custom background to your thumbnail you can make use of procreate that can remove the background with procreateremove white backgroundfeatures and give you better featured image with nice background. Also to clarify the objectives of your thumbnail you can add titles, and also consider placing the same on the top of any dark color background if your thumbnail is light in color. For making the background darker just choose remove white background procreateas discussed above.
● Just Download your finished product to your device
After polishing the thumbnails with creative stuff, you can download the same to your device or export it to your smartphone.
Voila, you just have create your own custom popping thumbnail. With remove background on procreate, you can never feel disappointed.
****Wondershare Filmora Video Editor App to Remove Unwanted Background Easily**
For Win 7 or later (64-bit)
For macOS 10.12 or later
In case you are searching for any professional tool to remove het background and replace the one with any of your favorite picture then there is a tool for you to consider. With greater different functionalities, you can make any Instagram post or story interesting through the help of Fillmora App. This has set of brilliant solutions to provide with most brilliant picture and video editing features. It is interesting, fun-loving as well as attractive enough to turn any moments extraordinary.
Handy features to enjoy:-
● You can make use of this tool to create custom thumbnails for your YouTube or Instagram page.
● Great varieties of templates for making popping thumbnails
● Greater capability to beautifully construct picture editing animations
● Varieties of Effects for every age group
● Attractive filters, GIFs packs and images to turn any dull looking background into an amazing moment.
● Delete white background quickly
● Right selection of tools to make the editing effective
● Flawless features to crop, cut-up, cut, trim & mix operations.
● Single click operation to turn the images into a beauty mode
● Options to save your creations into your device or virtual space
● Share your creations to your community, to your friends via Facebook, Instagram, YouTube, and Twitter quickly.
It is a greater idea to try this app for making use of its image editing features for deleting the white background in an easy manner.
● Ending Thoughts →
● With great varieties of features it is now very easy for you to create some automated selections in just single tap.
● Deleting the white background through a pro-tool like Procreate is smart, quick & seamless process.
● You are not going to get confused, even if you are using it for the very first time.
● It is the trend that every Instagram user is following for posting better images with nice background options.
Figuring out the crucial steps to make the canvas excellent is one of the loveliest things users are performing for exporting the closing Procreate-projects. Once after getting expert with things trick you can be able to position the canvas surprisingly on great back for a memorable moment. You can make the most of it for your procreate mission that you have created.
Out of many essentials tools you have ever used for experiencing the benefits of equipment & skills, the Procreate is a kind of solution that comes with one of the most trustworthy as well as brilliant capability to erase the undesired background from the pictures. It is more than a general tool and there are some specified approaches to do so, but in today possible scenario, you can easily focus around choice of right selections to erase a background at ease. People can explore the chances of creating various attractive methods to work in the PNG structure after removing the desired background.
In this article
01 [How to Delete a White Background with Procreate for the IPad?](#Part 1)
02 [How to Make Transparent Background with Procreate for iPhone?](#Part 2)
03 [How to Create Popping Thumbnails or Profile Photos](#Part 3)
Part 1 How to Delete a White Background with Procreate for the IPad?

In case you are facing discoloration problem too then it is always a better idea to cast image with desired background and remove the objects.
Now turning your background with a lovely image or your own is just a matter of few clicks. With great transparent background procreate, you will be heading towards the satisfaction of obtaining transparent background. With few crucial steps you can stay from the other competitors or it will make your posts viral. With stepwise guidelines on removing the background as well as replacing it with a transparent one in Procreate is what you need the most today.
When it comes to deleting the white-background with a Procreate, then with great selection of tools you can easily create amazing performance for your post. If you are still in a dilemma to make use of the white coloured Background. After tapping on the top-left corner of the screen, you can open-up brilliant level of opportunities to make the most out of it. Are you ready to begin? Next you will learn about how to turn the background into a desired canvas for all your Instagram stories.
The following steps will provide you a quick walkthrough of entire process, stepwise:-
Step 1: First you are required to open the picture with Procreate. Get your desired image for the edit or open your picture & turn-off the overall visibility of background layer by layers-icon, tap it, it is presented on the top-right corner. Here, you will see layer labelled as the background, you need to uncheck the layer’s box for turning-off overall visibility at the bottom of Layers menu.
It is an important step to perform as if you want to deleting any white background from the image otherwise background will be treated as transparent with white-background showing through, thus you will experience no changes to the document. You are not required to remove background from image procreate if your image is not having a background layer.
Step 2: Create the selection at around white area of an image & delete background
For you to perform the step of procreate remove white background, you are required to make selection around white area. For this, open-up the selection-menu and it is placed in the form round icon named ‘S’ at the top-left-corner of the screen. At this menu, choose auto & Add. To create such level of perfection in selection, just hold & tap over any area of white-background at this screen. You can also increase threshold of your selection by moving the fingers/stylus at the right. For the opposite process, you can move the same to the left.You need to adjust the desired threshold until selection-area on your screen lines-up in accordance with an edges of the subject. You are now heading towards the process of make background transparent procreatefor your desired image quickly.
With your current selection still in active state, just tap on wrench-icon it the top-left area of your screen, then navigate to Add-menu, and here tap on the Cut option. Congrats, you have effectively deleted the background from an image.
**Step 3:**Just release the selection in the form of tapping on Selection-menu icon and repeat the process again for negative space-areas & at last clean-up stray-pixels with through an Eraser. You can repeat the process further from the step-2 in case any stray pixels still remains there as it is a normal situation to face while removing the pixels background with ‘remove background on procreate’ option.You can also take the Eraser & then manually erase those stray-pixels in there is any.
Step 4: Export your final work as PNG-file to preserve the transparency
After finishing the task of deleting background from the picture you can easily export your work to a desirable file format. The image you want to export can be in the form of PNG to retain the transparency. Other useful formats you can choose is JPEG but this doesn’tsupport transparency. So, be wise & be careful while choose your file formats.You are now having procreate export transparent backgroundand can also place the same to any sort of backdrop like an app, website, or any other workspace.
Part 2 How to Make Transparent Background with Procreate for iPhone?

Let’s dive-in quickly into the process of making the background transparent with procreate, if you are an iPhone User.
● GO Into an option of Canvas
It is up-to you whether you want to create a new canvas or want to work-upon already saved canvas. In your device through procreate app, you can do the same without any worries.
● Tap onto the option of Layers Panel
This option is located at the top-right corner of your toolbar. This option looks similar to the two-squares on the top of one another.
● Replace dull looking background with transparent background
You can quickly go down to the layers-panel placed at the bottom to choose the background color.Transparent background in procreateis always a good option to consider.
● Put uncheck before the box
At the right of toolbar you can be able to see words ‘Background color’ and if it is checked then you need to uncheck it. Now your goal to make the background completely transparent with procreate make background transparent tool, will be achieved. Now your background is completely transparent and ready to use.
Part 3 How to Create Popping Thumbnails or Profile Photos

There are various tools available in the market to make a popping thumbnail for your YouTube or Instagram pages. Thumbnail maker like Filmora can be an interesting option to choose as it is quick and effective. You can also customized as well as download the thumbnails at no cost with the same. However, they comes with certain limitations like overall size of the image to be downloaded. For better versions you can use premium tools. With better creativity and great imagination you can make the thumbnail as crisp as possible.
● Upload your desired photo to Filmora’s thumbnail maker templates.
You can easily create your video thumbnail, but you need some inspiration and for that you can make use of amazing tool like Filmora. With access to more than 50 free templates you can achieve your goal of making popping thumbnails.
● Adding text, clipart, or perfect quality of background can give it a boost
After picking your template, one can make use of thumbnail to stand out different in terms of adding text, clipart or background. For adding custom background to your thumbnail you can make use of procreate that can remove the background with procreateremove white backgroundfeatures and give you better featured image with nice background. Also to clarify the objectives of your thumbnail you can add titles, and also consider placing the same on the top of any dark color background if your thumbnail is light in color. For making the background darker just choose remove white background procreateas discussed above.
● Just Download your finished product to your device
After polishing the thumbnails with creative stuff, you can download the same to your device or export it to your smartphone.
Voila, you just have create your own custom popping thumbnail. With remove background on procreate, you can never feel disappointed.
****Wondershare Filmora Video Editor App to Remove Unwanted Background Easily**
For Win 7 or later (64-bit)
For macOS 10.12 or later
In case you are searching for any professional tool to remove het background and replace the one with any of your favorite picture then there is a tool for you to consider. With greater different functionalities, you can make any Instagram post or story interesting through the help of Fillmora App. This has set of brilliant solutions to provide with most brilliant picture and video editing features. It is interesting, fun-loving as well as attractive enough to turn any moments extraordinary.
Handy features to enjoy:-
● You can make use of this tool to create custom thumbnails for your YouTube or Instagram page.
● Great varieties of templates for making popping thumbnails
● Greater capability to beautifully construct picture editing animations
● Varieties of Effects for every age group
● Attractive filters, GIFs packs and images to turn any dull looking background into an amazing moment.
● Delete white background quickly
● Right selection of tools to make the editing effective
● Flawless features to crop, cut-up, cut, trim & mix operations.
● Single click operation to turn the images into a beauty mode
● Options to save your creations into your device or virtual space
● Share your creations to your community, to your friends via Facebook, Instagram, YouTube, and Twitter quickly.
It is a greater idea to try this app for making use of its image editing features for deleting the white background in an easy manner.
● Ending Thoughts →
● With great varieties of features it is now very easy for you to create some automated selections in just single tap.
● Deleting the white background through a pro-tool like Procreate is smart, quick & seamless process.
● You are not going to get confused, even if you are using it for the very first time.
● It is the trend that every Instagram user is following for posting better images with nice background options.
Figuring out the crucial steps to make the canvas excellent is one of the loveliest things users are performing for exporting the closing Procreate-projects. Once after getting expert with things trick you can be able to position the canvas surprisingly on great back for a memorable moment. You can make the most of it for your procreate mission that you have created.
Out of many essentials tools you have ever used for experiencing the benefits of equipment & skills, the Procreate is a kind of solution that comes with one of the most trustworthy as well as brilliant capability to erase the undesired background from the pictures. It is more than a general tool and there are some specified approaches to do so, but in today possible scenario, you can easily focus around choice of right selections to erase a background at ease. People can explore the chances of creating various attractive methods to work in the PNG structure after removing the desired background.
In this article
01 [How to Delete a White Background with Procreate for the IPad?](#Part 1)
02 [How to Make Transparent Background with Procreate for iPhone?](#Part 2)
03 [How to Create Popping Thumbnails or Profile Photos](#Part 3)
Part 1 How to Delete a White Background with Procreate for the IPad?

In case you are facing discoloration problem too then it is always a better idea to cast image with desired background and remove the objects.
Now turning your background with a lovely image or your own is just a matter of few clicks. With great transparent background procreate, you will be heading towards the satisfaction of obtaining transparent background. With few crucial steps you can stay from the other competitors or it will make your posts viral. With stepwise guidelines on removing the background as well as replacing it with a transparent one in Procreate is what you need the most today.
When it comes to deleting the white-background with a Procreate, then with great selection of tools you can easily create amazing performance for your post. If you are still in a dilemma to make use of the white coloured Background. After tapping on the top-left corner of the screen, you can open-up brilliant level of opportunities to make the most out of it. Are you ready to begin? Next you will learn about how to turn the background into a desired canvas for all your Instagram stories.
The following steps will provide you a quick walkthrough of entire process, stepwise:-
Step 1: First you are required to open the picture with Procreate. Get your desired image for the edit or open your picture & turn-off the overall visibility of background layer by layers-icon, tap it, it is presented on the top-right corner. Here, you will see layer labelled as the background, you need to uncheck the layer’s box for turning-off overall visibility at the bottom of Layers menu.
It is an important step to perform as if you want to deleting any white background from the image otherwise background will be treated as transparent with white-background showing through, thus you will experience no changes to the document. You are not required to remove background from image procreate if your image is not having a background layer.
Step 2: Create the selection at around white area of an image & delete background
For you to perform the step of procreate remove white background, you are required to make selection around white area. For this, open-up the selection-menu and it is placed in the form round icon named ‘S’ at the top-left-corner of the screen. At this menu, choose auto & Add. To create such level of perfection in selection, just hold & tap over any area of white-background at this screen. You can also increase threshold of your selection by moving the fingers/stylus at the right. For the opposite process, you can move the same to the left.You need to adjust the desired threshold until selection-area on your screen lines-up in accordance with an edges of the subject. You are now heading towards the process of make background transparent procreatefor your desired image quickly.
With your current selection still in active state, just tap on wrench-icon it the top-left area of your screen, then navigate to Add-menu, and here tap on the Cut option. Congrats, you have effectively deleted the background from an image.
**Step 3:**Just release the selection in the form of tapping on Selection-menu icon and repeat the process again for negative space-areas & at last clean-up stray-pixels with through an Eraser. You can repeat the process further from the step-2 in case any stray pixels still remains there as it is a normal situation to face while removing the pixels background with ‘remove background on procreate’ option.You can also take the Eraser & then manually erase those stray-pixels in there is any.
Step 4: Export your final work as PNG-file to preserve the transparency
After finishing the task of deleting background from the picture you can easily export your work to a desirable file format. The image you want to export can be in the form of PNG to retain the transparency. Other useful formats you can choose is JPEG but this doesn’tsupport transparency. So, be wise & be careful while choose your file formats.You are now having procreate export transparent backgroundand can also place the same to any sort of backdrop like an app, website, or any other workspace.
Part 2 How to Make Transparent Background with Procreate for iPhone?

Let’s dive-in quickly into the process of making the background transparent with procreate, if you are an iPhone User.
● GO Into an option of Canvas
It is up-to you whether you want to create a new canvas or want to work-upon already saved canvas. In your device through procreate app, you can do the same without any worries.
● Tap onto the option of Layers Panel
This option is located at the top-right corner of your toolbar. This option looks similar to the two-squares on the top of one another.
● Replace dull looking background with transparent background
You can quickly go down to the layers-panel placed at the bottom to choose the background color.Transparent background in procreateis always a good option to consider.
● Put uncheck before the box
At the right of toolbar you can be able to see words ‘Background color’ and if it is checked then you need to uncheck it. Now your goal to make the background completely transparent with procreate make background transparent tool, will be achieved. Now your background is completely transparent and ready to use.
Part 3 How to Create Popping Thumbnails or Profile Photos

There are various tools available in the market to make a popping thumbnail for your YouTube or Instagram pages. Thumbnail maker like Filmora can be an interesting option to choose as it is quick and effective. You can also customized as well as download the thumbnails at no cost with the same. However, they comes with certain limitations like overall size of the image to be downloaded. For better versions you can use premium tools. With better creativity and great imagination you can make the thumbnail as crisp as possible.
● Upload your desired photo to Filmora’s thumbnail maker templates.
You can easily create your video thumbnail, but you need some inspiration and for that you can make use of amazing tool like Filmora. With access to more than 50 free templates you can achieve your goal of making popping thumbnails.
● Adding text, clipart, or perfect quality of background can give it a boost
After picking your template, one can make use of thumbnail to stand out different in terms of adding text, clipart or background. For adding custom background to your thumbnail you can make use of procreate that can remove the background with procreateremove white backgroundfeatures and give you better featured image with nice background. Also to clarify the objectives of your thumbnail you can add titles, and also consider placing the same on the top of any dark color background if your thumbnail is light in color. For making the background darker just choose remove white background procreateas discussed above.
● Just Download your finished product to your device
After polishing the thumbnails with creative stuff, you can download the same to your device or export it to your smartphone.
Voila, you just have create your own custom popping thumbnail. With remove background on procreate, you can never feel disappointed.
****Wondershare Filmora Video Editor App to Remove Unwanted Background Easily**
For Win 7 or later (64-bit)
For macOS 10.12 or later
In case you are searching for any professional tool to remove het background and replace the one with any of your favorite picture then there is a tool for you to consider. With greater different functionalities, you can make any Instagram post or story interesting through the help of Fillmora App. This has set of brilliant solutions to provide with most brilliant picture and video editing features. It is interesting, fun-loving as well as attractive enough to turn any moments extraordinary.
Handy features to enjoy:-
● You can make use of this tool to create custom thumbnails for your YouTube or Instagram page.
● Great varieties of templates for making popping thumbnails
● Greater capability to beautifully construct picture editing animations
● Varieties of Effects for every age group
● Attractive filters, GIFs packs and images to turn any dull looking background into an amazing moment.
● Delete white background quickly
● Right selection of tools to make the editing effective
● Flawless features to crop, cut-up, cut, trim & mix operations.
● Single click operation to turn the images into a beauty mode
● Options to save your creations into your device or virtual space
● Share your creations to your community, to your friends via Facebook, Instagram, YouTube, and Twitter quickly.
It is a greater idea to try this app for making use of its image editing features for deleting the white background in an easy manner.
● Ending Thoughts →
● With great varieties of features it is now very easy for you to create some automated selections in just single tap.
● Deleting the white background through a pro-tool like Procreate is smart, quick & seamless process.
● You are not going to get confused, even if you are using it for the very first time.
● It is the trend that every Instagram user is following for posting better images with nice background options.
Figuring out the crucial steps to make the canvas excellent is one of the loveliest things users are performing for exporting the closing Procreate-projects. Once after getting expert with things trick you can be able to position the canvas surprisingly on great back for a memorable moment. You can make the most of it for your procreate mission that you have created.
Out of many essentials tools you have ever used for experiencing the benefits of equipment & skills, the Procreate is a kind of solution that comes with one of the most trustworthy as well as brilliant capability to erase the undesired background from the pictures. It is more than a general tool and there are some specified approaches to do so, but in today possible scenario, you can easily focus around choice of right selections to erase a background at ease. People can explore the chances of creating various attractive methods to work in the PNG structure after removing the desired background.
In this article
01 [How to Delete a White Background with Procreate for the IPad?](#Part 1)
02 [How to Make Transparent Background with Procreate for iPhone?](#Part 2)
03 [How to Create Popping Thumbnails or Profile Photos](#Part 3)
Part 1 How to Delete a White Background with Procreate for the IPad?

In case you are facing discoloration problem too then it is always a better idea to cast image with desired background and remove the objects.
Now turning your background with a lovely image or your own is just a matter of few clicks. With great transparent background procreate, you will be heading towards the satisfaction of obtaining transparent background. With few crucial steps you can stay from the other competitors or it will make your posts viral. With stepwise guidelines on removing the background as well as replacing it with a transparent one in Procreate is what you need the most today.
When it comes to deleting the white-background with a Procreate, then with great selection of tools you can easily create amazing performance for your post. If you are still in a dilemma to make use of the white coloured Background. After tapping on the top-left corner of the screen, you can open-up brilliant level of opportunities to make the most out of it. Are you ready to begin? Next you will learn about how to turn the background into a desired canvas for all your Instagram stories.
The following steps will provide you a quick walkthrough of entire process, stepwise:-
Step 1: First you are required to open the picture with Procreate. Get your desired image for the edit or open your picture & turn-off the overall visibility of background layer by layers-icon, tap it, it is presented on the top-right corner. Here, you will see layer labelled as the background, you need to uncheck the layer’s box for turning-off overall visibility at the bottom of Layers menu.
It is an important step to perform as if you want to deleting any white background from the image otherwise background will be treated as transparent with white-background showing through, thus you will experience no changes to the document. You are not required to remove background from image procreate if your image is not having a background layer.
Step 2: Create the selection at around white area of an image & delete background
For you to perform the step of procreate remove white background, you are required to make selection around white area. For this, open-up the selection-menu and it is placed in the form round icon named ‘S’ at the top-left-corner of the screen. At this menu, choose auto & Add. To create such level of perfection in selection, just hold & tap over any area of white-background at this screen. You can also increase threshold of your selection by moving the fingers/stylus at the right. For the opposite process, you can move the same to the left.You need to adjust the desired threshold until selection-area on your screen lines-up in accordance with an edges of the subject. You are now heading towards the process of make background transparent procreatefor your desired image quickly.
With your current selection still in active state, just tap on wrench-icon it the top-left area of your screen, then navigate to Add-menu, and here tap on the Cut option. Congrats, you have effectively deleted the background from an image.
**Step 3:**Just release the selection in the form of tapping on Selection-menu icon and repeat the process again for negative space-areas & at last clean-up stray-pixels with through an Eraser. You can repeat the process further from the step-2 in case any stray pixels still remains there as it is a normal situation to face while removing the pixels background with ‘remove background on procreate’ option.You can also take the Eraser & then manually erase those stray-pixels in there is any.
Step 4: Export your final work as PNG-file to preserve the transparency
After finishing the task of deleting background from the picture you can easily export your work to a desirable file format. The image you want to export can be in the form of PNG to retain the transparency. Other useful formats you can choose is JPEG but this doesn’tsupport transparency. So, be wise & be careful while choose your file formats.You are now having procreate export transparent backgroundand can also place the same to any sort of backdrop like an app, website, or any other workspace.
Part 2 How to Make Transparent Background with Procreate for iPhone?

Let’s dive-in quickly into the process of making the background transparent with procreate, if you are an iPhone User.
● GO Into an option of Canvas
It is up-to you whether you want to create a new canvas or want to work-upon already saved canvas. In your device through procreate app, you can do the same without any worries.
● Tap onto the option of Layers Panel
This option is located at the top-right corner of your toolbar. This option looks similar to the two-squares on the top of one another.
● Replace dull looking background with transparent background
You can quickly go down to the layers-panel placed at the bottom to choose the background color.Transparent background in procreateis always a good option to consider.
● Put uncheck before the box
At the right of toolbar you can be able to see words ‘Background color’ and if it is checked then you need to uncheck it. Now your goal to make the background completely transparent with procreate make background transparent tool, will be achieved. Now your background is completely transparent and ready to use.
Part 3 How to Create Popping Thumbnails or Profile Photos

There are various tools available in the market to make a popping thumbnail for your YouTube or Instagram pages. Thumbnail maker like Filmora can be an interesting option to choose as it is quick and effective. You can also customized as well as download the thumbnails at no cost with the same. However, they comes with certain limitations like overall size of the image to be downloaded. For better versions you can use premium tools. With better creativity and great imagination you can make the thumbnail as crisp as possible.
● Upload your desired photo to Filmora’s thumbnail maker templates.
You can easily create your video thumbnail, but you need some inspiration and for that you can make use of amazing tool like Filmora. With access to more than 50 free templates you can achieve your goal of making popping thumbnails.
● Adding text, clipart, or perfect quality of background can give it a boost
After picking your template, one can make use of thumbnail to stand out different in terms of adding text, clipart or background. For adding custom background to your thumbnail you can make use of procreate that can remove the background with procreateremove white backgroundfeatures and give you better featured image with nice background. Also to clarify the objectives of your thumbnail you can add titles, and also consider placing the same on the top of any dark color background if your thumbnail is light in color. For making the background darker just choose remove white background procreateas discussed above.
● Just Download your finished product to your device
After polishing the thumbnails with creative stuff, you can download the same to your device or export it to your smartphone.
Voila, you just have create your own custom popping thumbnail. With remove background on procreate, you can never feel disappointed.
****Wondershare Filmora Video Editor App to Remove Unwanted Background Easily**
For Win 7 or later (64-bit)
For macOS 10.12 or later
In case you are searching for any professional tool to remove het background and replace the one with any of your favorite picture then there is a tool for you to consider. With greater different functionalities, you can make any Instagram post or story interesting through the help of Fillmora App. This has set of brilliant solutions to provide with most brilliant picture and video editing features. It is interesting, fun-loving as well as attractive enough to turn any moments extraordinary.
Handy features to enjoy:-
● You can make use of this tool to create custom thumbnails for your YouTube or Instagram page.
● Great varieties of templates for making popping thumbnails
● Greater capability to beautifully construct picture editing animations
● Varieties of Effects for every age group
● Attractive filters, GIFs packs and images to turn any dull looking background into an amazing moment.
● Delete white background quickly
● Right selection of tools to make the editing effective
● Flawless features to crop, cut-up, cut, trim & mix operations.
● Single click operation to turn the images into a beauty mode
● Options to save your creations into your device or virtual space
● Share your creations to your community, to your friends via Facebook, Instagram, YouTube, and Twitter quickly.
It is a greater idea to try this app for making use of its image editing features for deleting the white background in an easy manner.
● Ending Thoughts →
● With great varieties of features it is now very easy for you to create some automated selections in just single tap.
● Deleting the white background through a pro-tool like Procreate is smart, quick & seamless process.
● You are not going to get confused, even if you are using it for the very first time.
● It is the trend that every Instagram user is following for posting better images with nice background options.
Also read:
- In 2024, In Todays Article, We Are Going to Show You How Adding a Simple Lower Third to Your Video Can Add a Degree of Professionalism and Polish to Your Videos While Giving It a Higher Perceived Value
- Updated In 2024, Quick Answer Why Did Filmora AI Portrait Attract People?
- Updated How Does the YouTube AI Algorithm Work
- New Best 12 AI Video Generators to Pick for 2024
- Updated In 2024, Benefits of Live Streaming on YouTube
- New How to Loop a Video with iMovie on Mac and iPhone
- New 2024 Approved How to Speed Up and Slow Down a Video
- In 2024, Video Editors Use Transitions to Tie Their Shots and Clips Together Into a Cohesive, Polished Program. Learn the Best Method to Create a Smooth Cut Transition Effect
- Updated 2024 Approved Art of Time Manipulation A Guide to After Effects Slow Motion Mastery
- 2024 Approved Steps to Remove Background Noise From Video Sony Vegas
- 2024 Approved Do You Want to Make Your Video Look Like Its From the 90S? Then, Make Sure to Add Vintage Overlays and VHS Sound Effects to Give It the Old Feel
- 2024 Approved 10 Best Audio Visualizers Windows, Mac, Android, iPhone & Online
- Overview of FPS for YouTube Videos
- New Best Slow Motion Camera Apps for Best Content Creation for 2024
- In 2024, Discover the Top 5 Online Tools for Merging Videos and Audios Quickly and Easily. Streamline Your Editing Process and Create Seamless Multimedia Content
- New Top Things People Know About Wedding Slideshow for 2024
- In 2024, Pokemon Go Error 12 Failed to Detect Location On Realme 11 5G? | Dr.fone
- 8 Best Apps for Screen Mirroring Honor Magic 5 Lite PC | Dr.fone
- 3 Methods to Mirror Nokia C02 to Roku | Dr.fone
- Undelete lost call logs from C22
- Full Guide How To Fix Connection Is Not Private on Honor Magic Vs 2 | Dr.fone
- How to Remove iPhone 12 Pro Max SIM Lock?
- How To Fix Unresponsive Phone Touchscreen Of Tecno Spark 20 Pro+ | Dr.fone
- 9 Solutions to Fix Process System Isnt Responding Error on Honor X50i+ | Dr.fone
- How To Fake GPS On Vivo Y28 5G For Mobile Legends? | Dr.fone
- Unlocking iPhone XS Passcode without a Computer | Dr.fone
- How to Unlock Poco C55 Phone with Broken Screen
- Title: In 2024, How to Create Loop Videos with Filmora
- Author: Chloe
- Created at : 2024-05-20 03:38:34
- Updated at : 2024-05-21 03:38:34
- Link: https://ai-editing-video.techidaily.com/in-2024-how-to-create-loop-videos-with-filmora/
- License: This work is licensed under CC BY-NC-SA 4.0.

