
:max_bytes(150000):strip_icc():format(webp)/african-american-woman-opening-packages-of-shoes-on-sofa-580503483-5a735094d8fdd50036b63f8a.jpg)
In 2024, How to Cut Videos on Mac without Using FFmpeg?
How to Cut Videos on Mac without Using FFmpeg?
Tiktok, Instagram reels, and Ads are well-known short video platforms that are popular due to their ease of use. Making film collections for entertainment purposes is a popular trend. As the previous user mentioned, sometimes all you want is a section of your movie, which can be the highlight or any other part you want to keep. Long videos are no longer a problem with such a video cutter for Mac. If that’s what you’re looking for, you might want to look into some of the software that’s available here.
HOW TO CUT VIDEO ON MAC WITHOUT USING FFMPEG?
What are FFmpeg and its cons for cut videos?
Without transcoding the media, FFmpeg can cut, trim, and extract videos. This is an excellent method for preserving original quality and avoiding generation loss.
Because of how keyframes work, it is impossible to cut at an exact point in time using FFmpeg without transcoding the video. As a result, you’re left with a cut at the nearest keyframe.
BEST FREE FFMPEG ALTERNATIVE TO CUT VIDEO ON MAC

FILMORA VIDEO EDITOR
Supported OS: Windows and Mac
Filmora Video Editor is another well-known video editor that is widely used for video editing. It was released two decades ago to provide low-cost video editing software. Aside from video cutting and joining, it has some great features such as adding filters, titles, texts, and so on. You can also record your voice or live music, mix audio and video tracks, and do other things. It is simple to use and is available for both Mac and Windows users.
Filmora includes an instant cutter tool that can be used throughout clip import and is designed for use with large amounts of high-resolution content. As the names indicate, it is very simple and serves only one purpose. You can drag multiple clips onto its window, but only if the Merge sub-mode is enabled. Trim mode is only for trimming the ends of a single clip, and its interface only displays one clip in the left-size source tray. You can Add Segments, which creates a new clip based on your trimmed original, but you can’t split a clip explicitly.
For Win 7 or later (64-bit)
For macOS 10.14 or later
Features:
- All editing tools and features are well-displayed in the main windows, which can be found and used easily;
- Very easy to cut or trim video files just with a few clicks;
- Lots of filters, overlays, motion graphics, titles, and more special effects can be added to the video.
- More features like Picture in Picture and Green Screen and Split Screen can be used to make videos more unique.
Pros:
- Intuitive Interface
- Easy To Use
- Great Features
- Affordable Perpetual License
- Great Final Video Results
- Faster Renders And Previews
- Supports Screen Capturing
- Support Wide Range Of File Formats
- User Support Is Good
Cons:
- Lacks Advanced Feature
- Free Version Has Watermark
- Not Available For Linux And Phones
- Pricing Is Expensive
- Software Lagging
Steps On How To Cut Video On Mac Using Filmora Video Editor
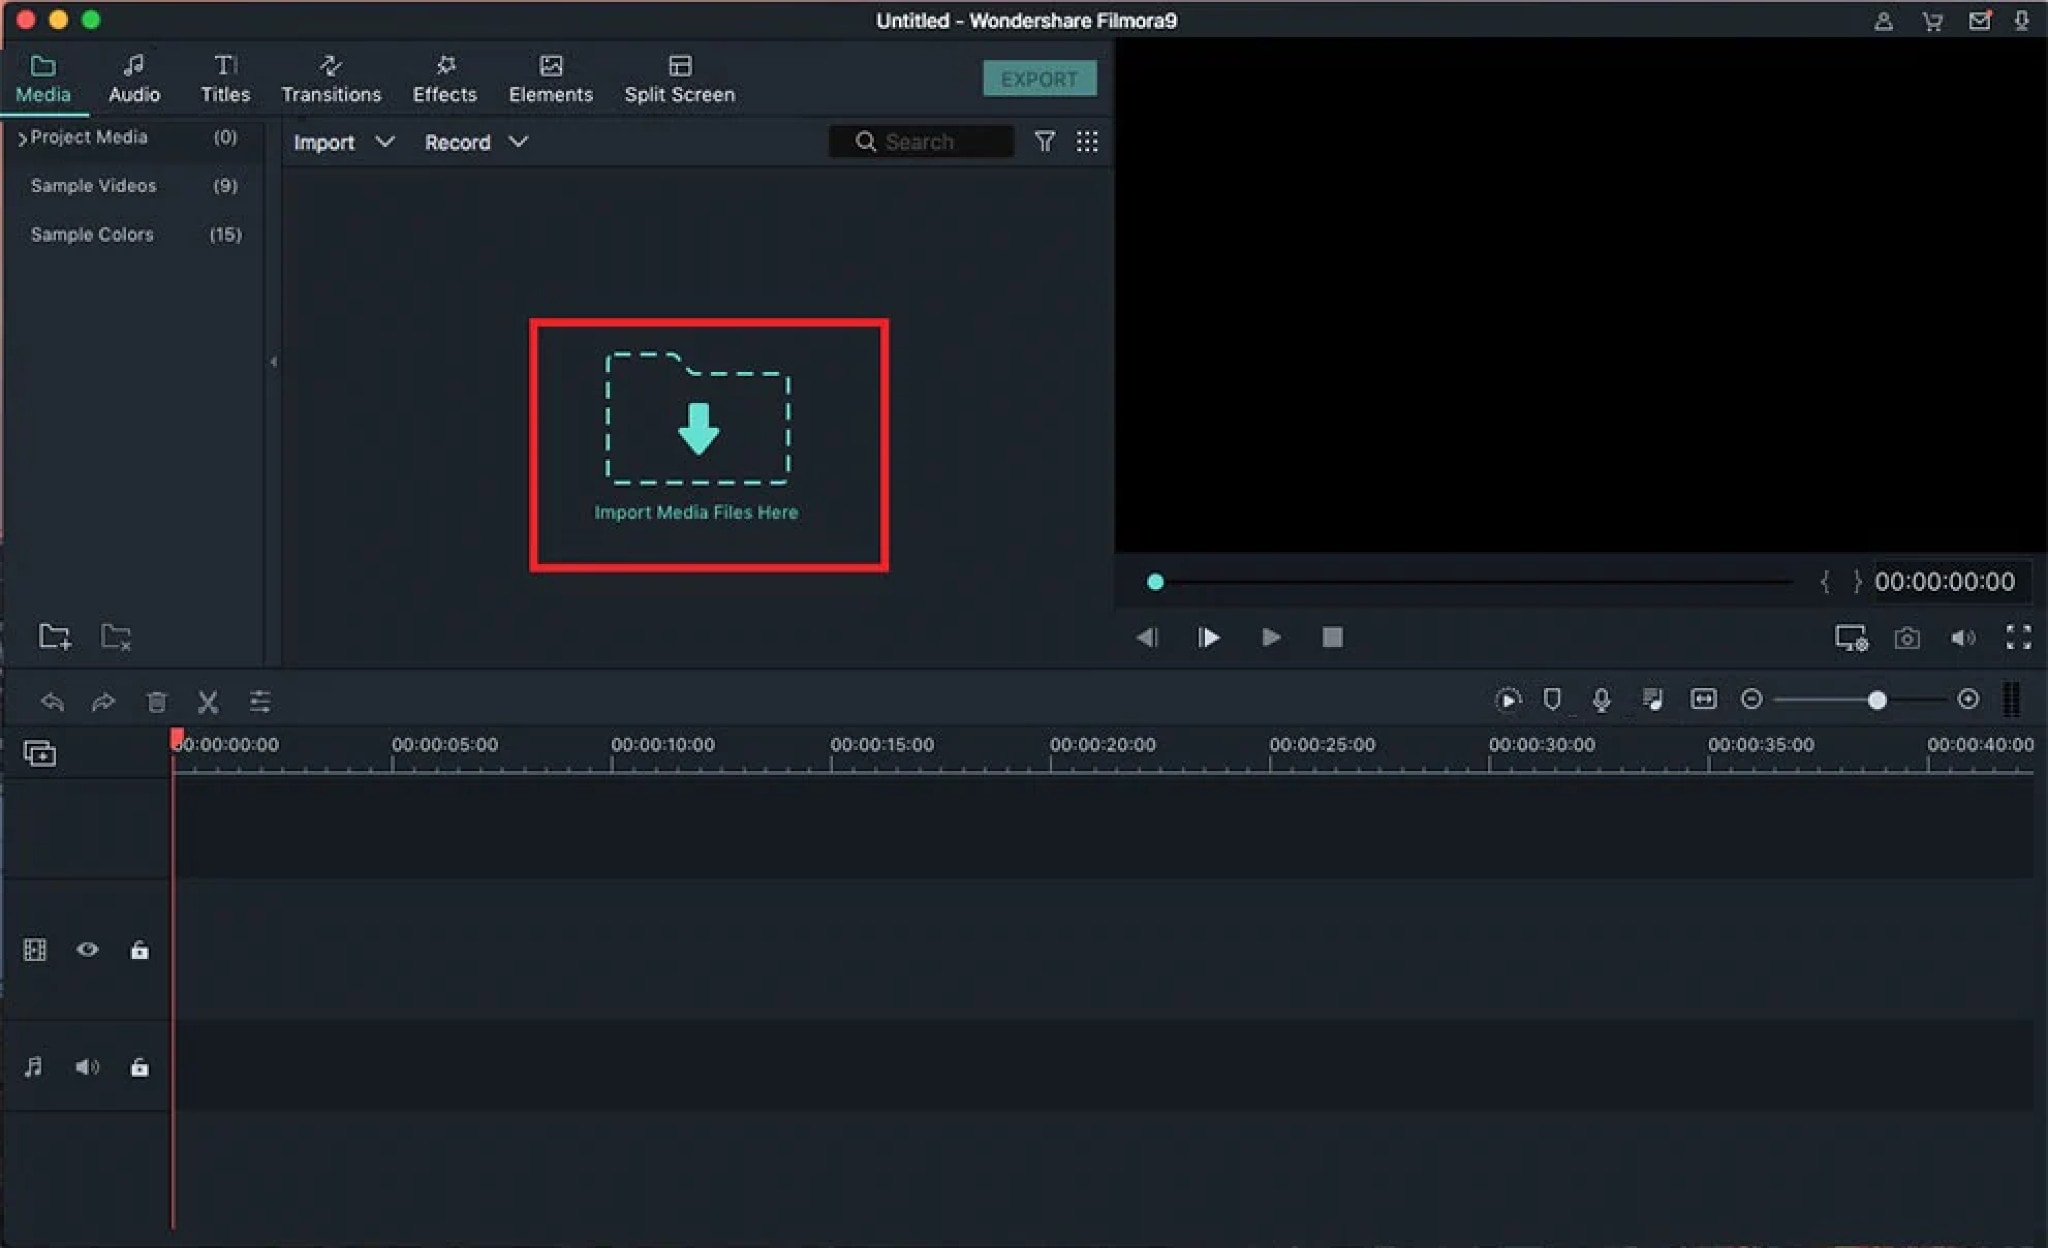
Step 1: Import Video Files
You will begin by importing the video files into the project window of your program through dragging and dropping.
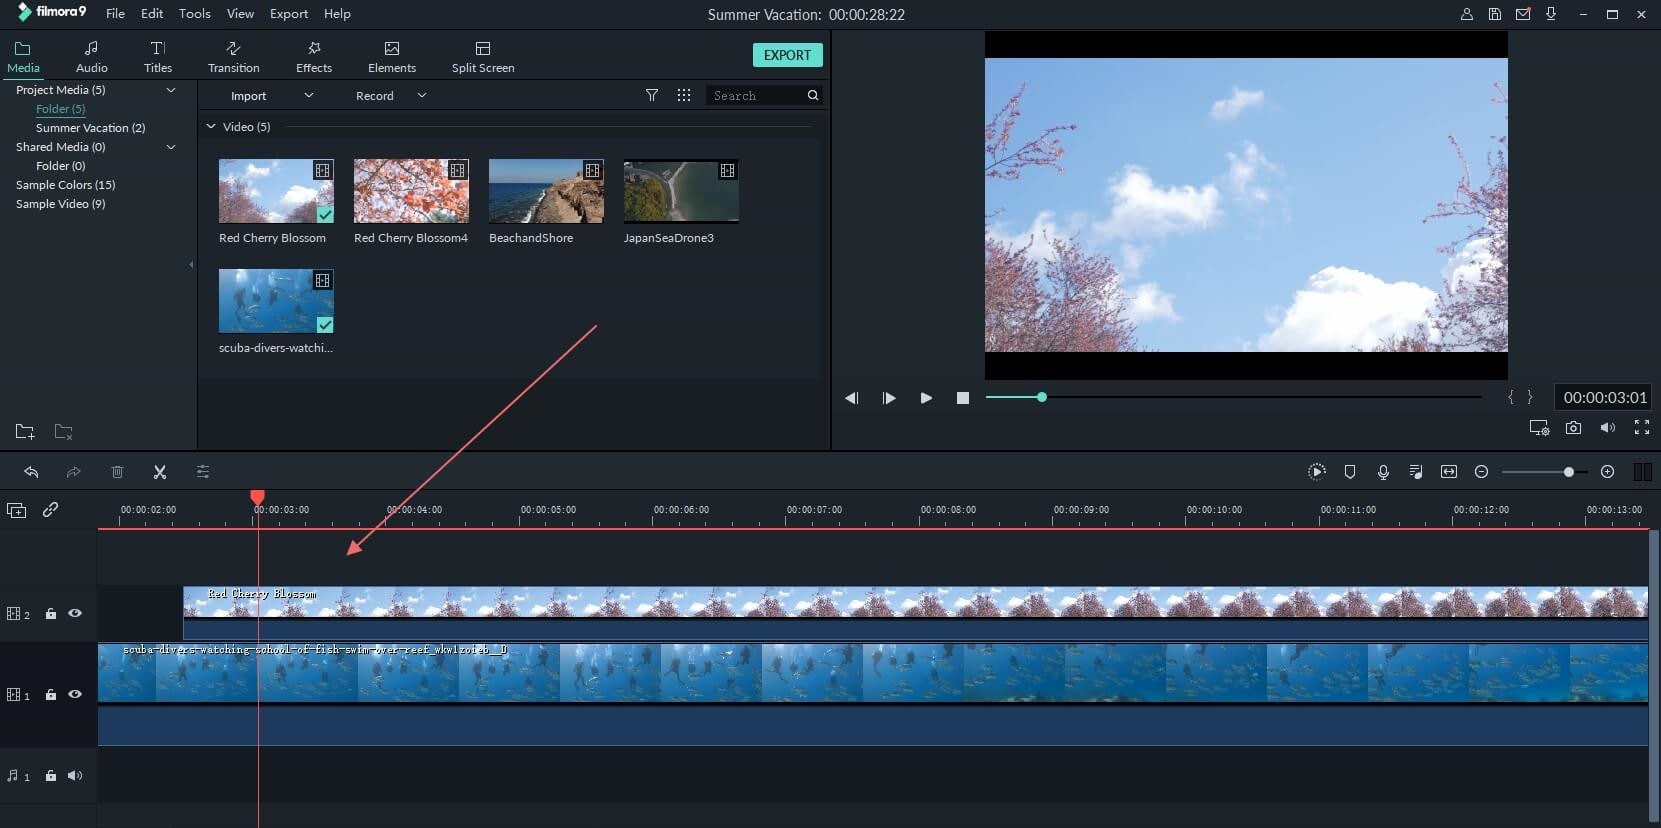
Step 2: Add Video To The Timeline
Drag and dropping are the easiest way to add the video to the timeline.
Step 3: Cut Video
If you want to trim the video, just move the cursor at the beginning or end of the video. When the cursor becomes a cross, move it forward or backward. Trimming only allows you to cut the beginning or end of a video.
If you need to cut a section of a video, you should follow do this: move the cursor at the beginning of the video section you want to cut, then click the scissors icon > Next, move the cursor to the end of the video section you want to cut and click scissors icon > Right-click on the video section you want to cut and click “Delete“.
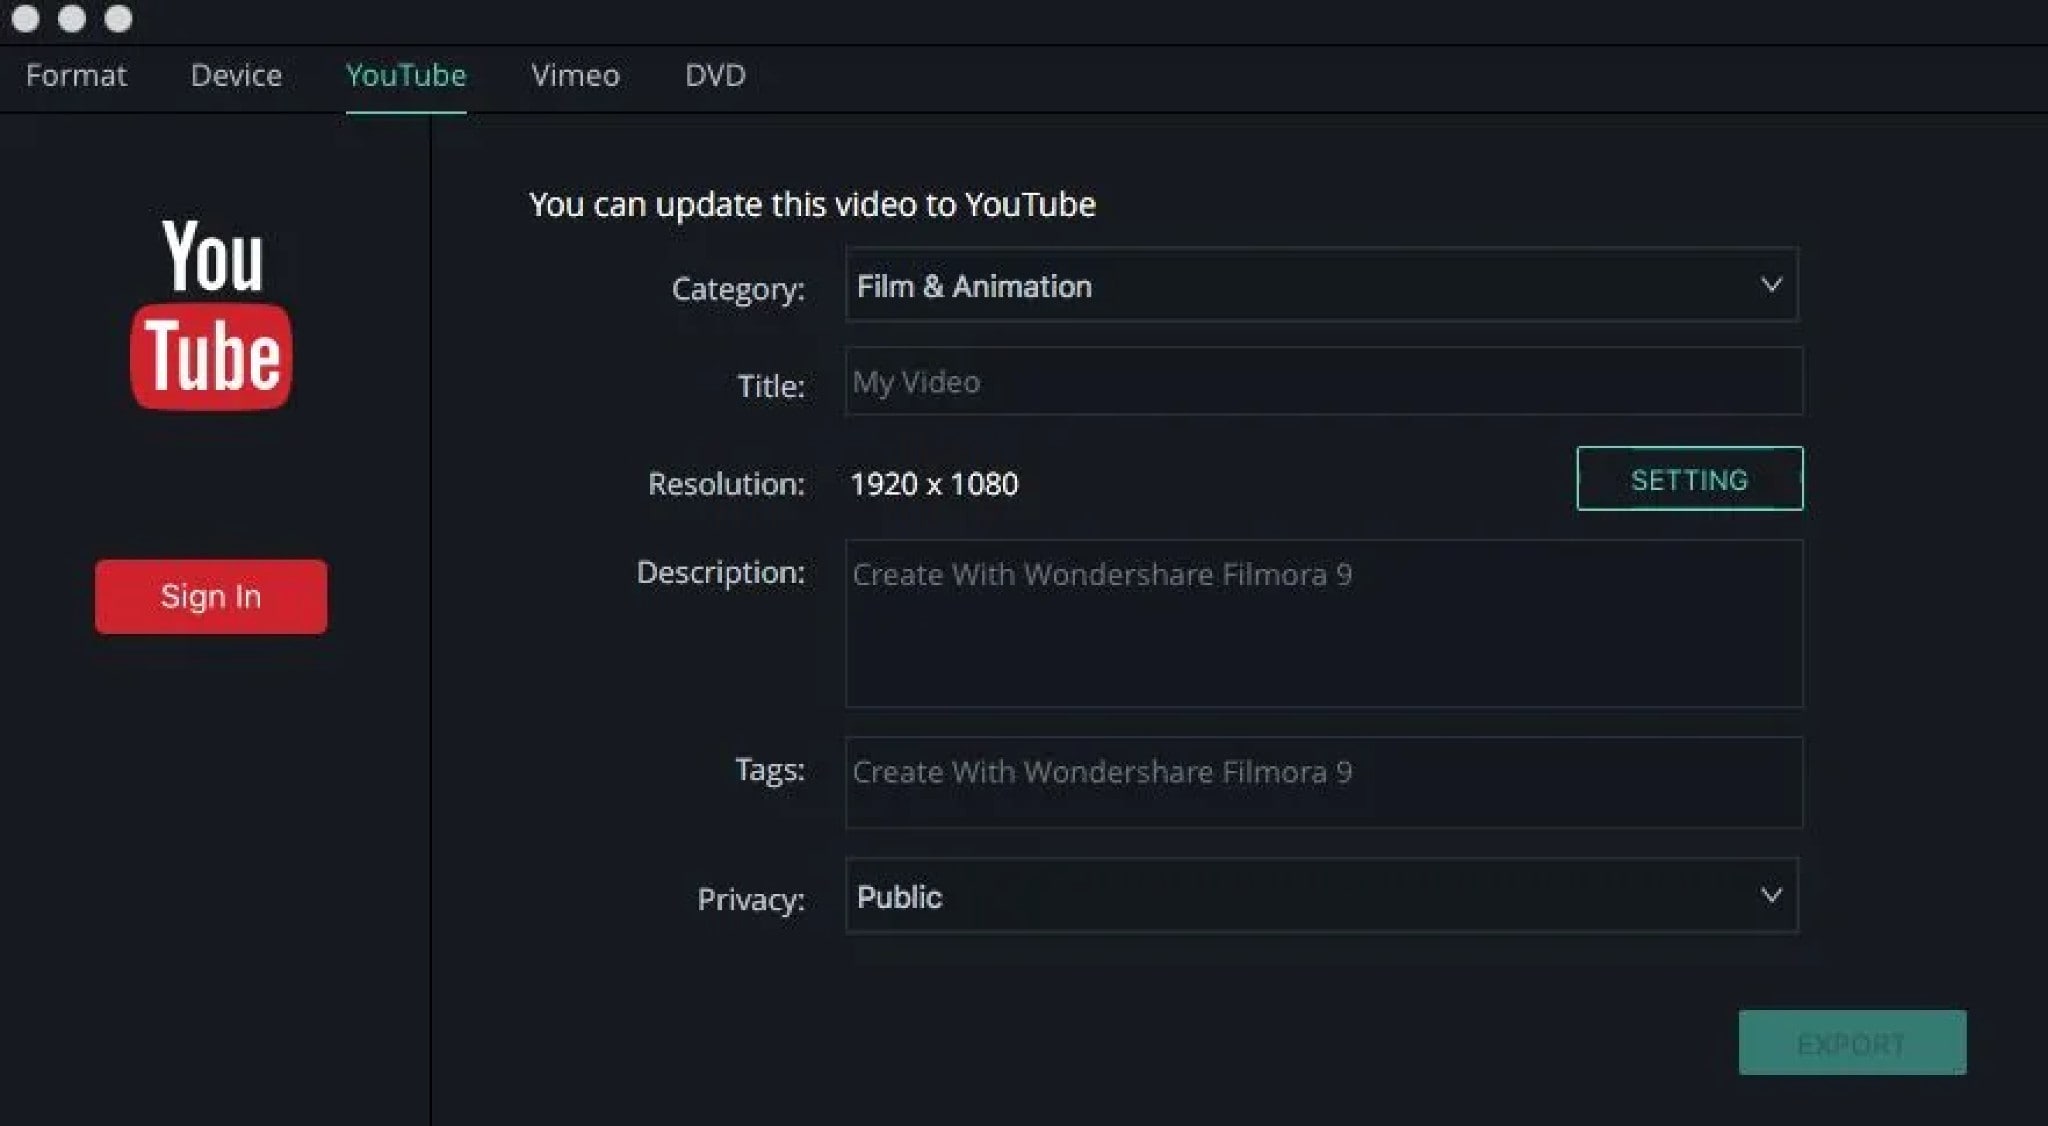
Step 4: Export the Video
To export your video, click the “export” button and choose the local tab. After selecting the output device and format, just click “Create” to save it.
HANDBRAKE
Supported OS: Linux, Windows, and Mac
HandBrake is a multithreaded video transcoder that is unfastened and open source. It can compress and convert nearly any virtual media layout to another. HandBrake is able to rip encrypted DVDs the usage of libdvdcss (libdvdcss is covered with the VLC media participant on macOS and AnyDVD/DVD forty three on Windows).
This software program additionally enables batch processing, which converts a couple of video files at the same time. Additionally, a plethora of presets are available to guide you to the preferred output without having to tinker with a plethora of options.
Handbrake is a powerful and excellent video converter for Windows, Mac, and Linux that should not be overlooked. It provides all of the necessary features in a simple tool that gives the user complete control over the output. Before we get into the specifics, here’s a rundown of Handbrake’s advantages and disadvantages.
Features:
- Support of chapter selections
- Support of subtitles
- Integrated bitrate calculator
- Picture deinterlacing, cropping, and scaling
- Live Video Preview
Pros:
- HandBrake has a very simple layout which makes the video converter very easy to use, even for those who are converting videos for the first time.
- The live preview helps.
- The fact that the software is free and has device presets for iOS and Android certainly makes HandBrake a welcome video converter.
- The queuing tray for batch conversions is particularly nice.
- People who convert a lot of videos will find it very helpful.
Cons:
- On the flip side, the settings are not always easy to deal with.
- It takes a lot of time and then there are errors. The latest version fixes some old bugs but there are hiccups.
- The live preview is for up to four minutes of a video.
- It is futile for very long videos.
- The settings interface and that of the live preview could be better.
- The open-source software also doesn’t support all video formats.
- Given the diversity of devices and the multitude of formats in use today, HandBrake needs more compatibility.
Steps On How To Compress Video Using Handbrake
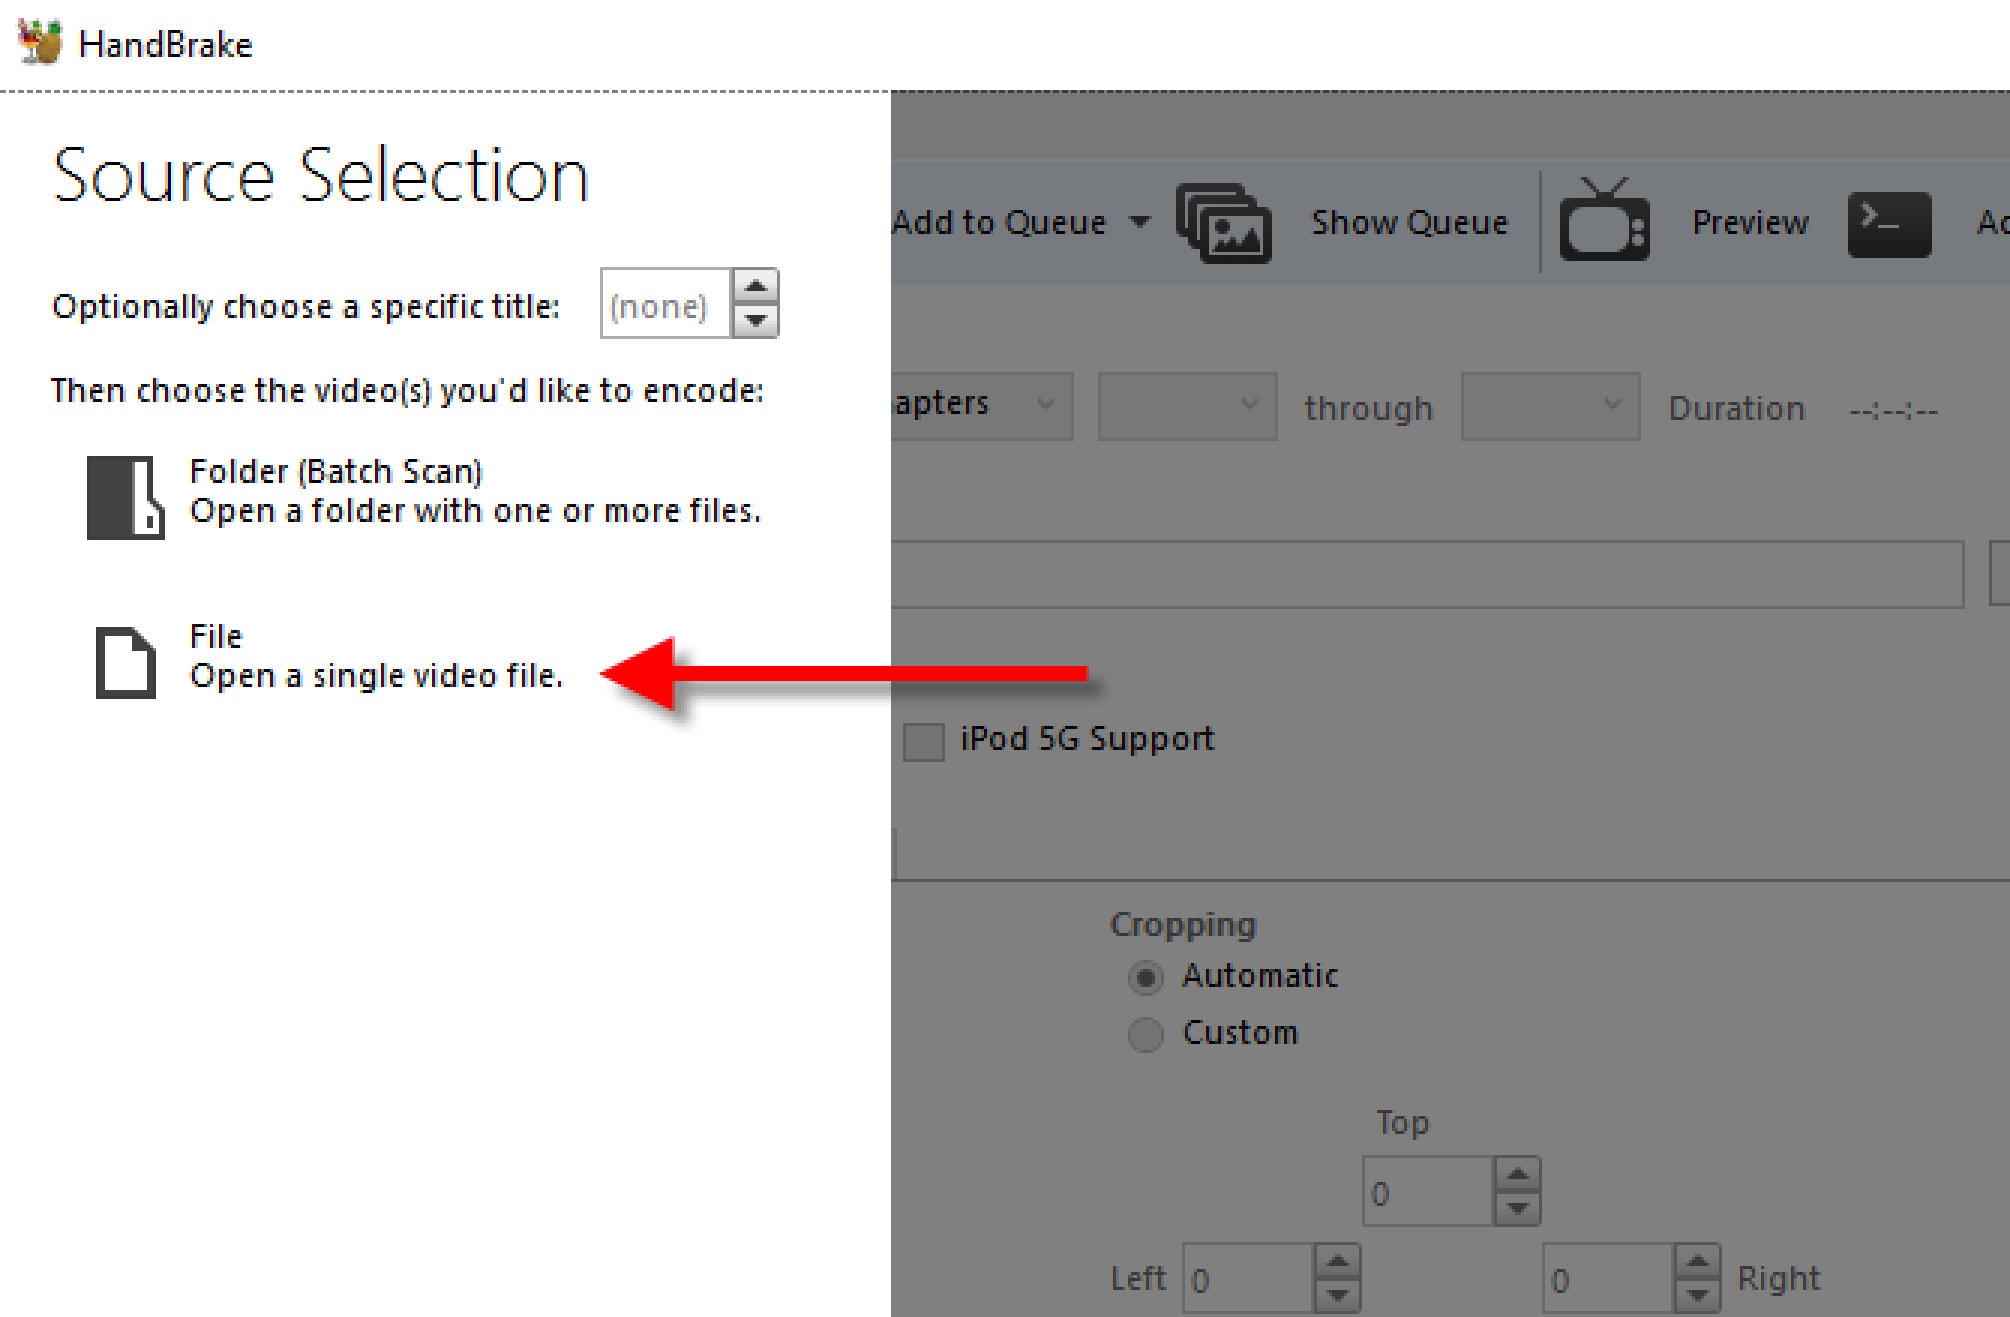
- After you download and install Handbrake, open the app. On the left side, under ‘Source Selection’, click ‘File’. Select the file from the folder and then click ‘open’.
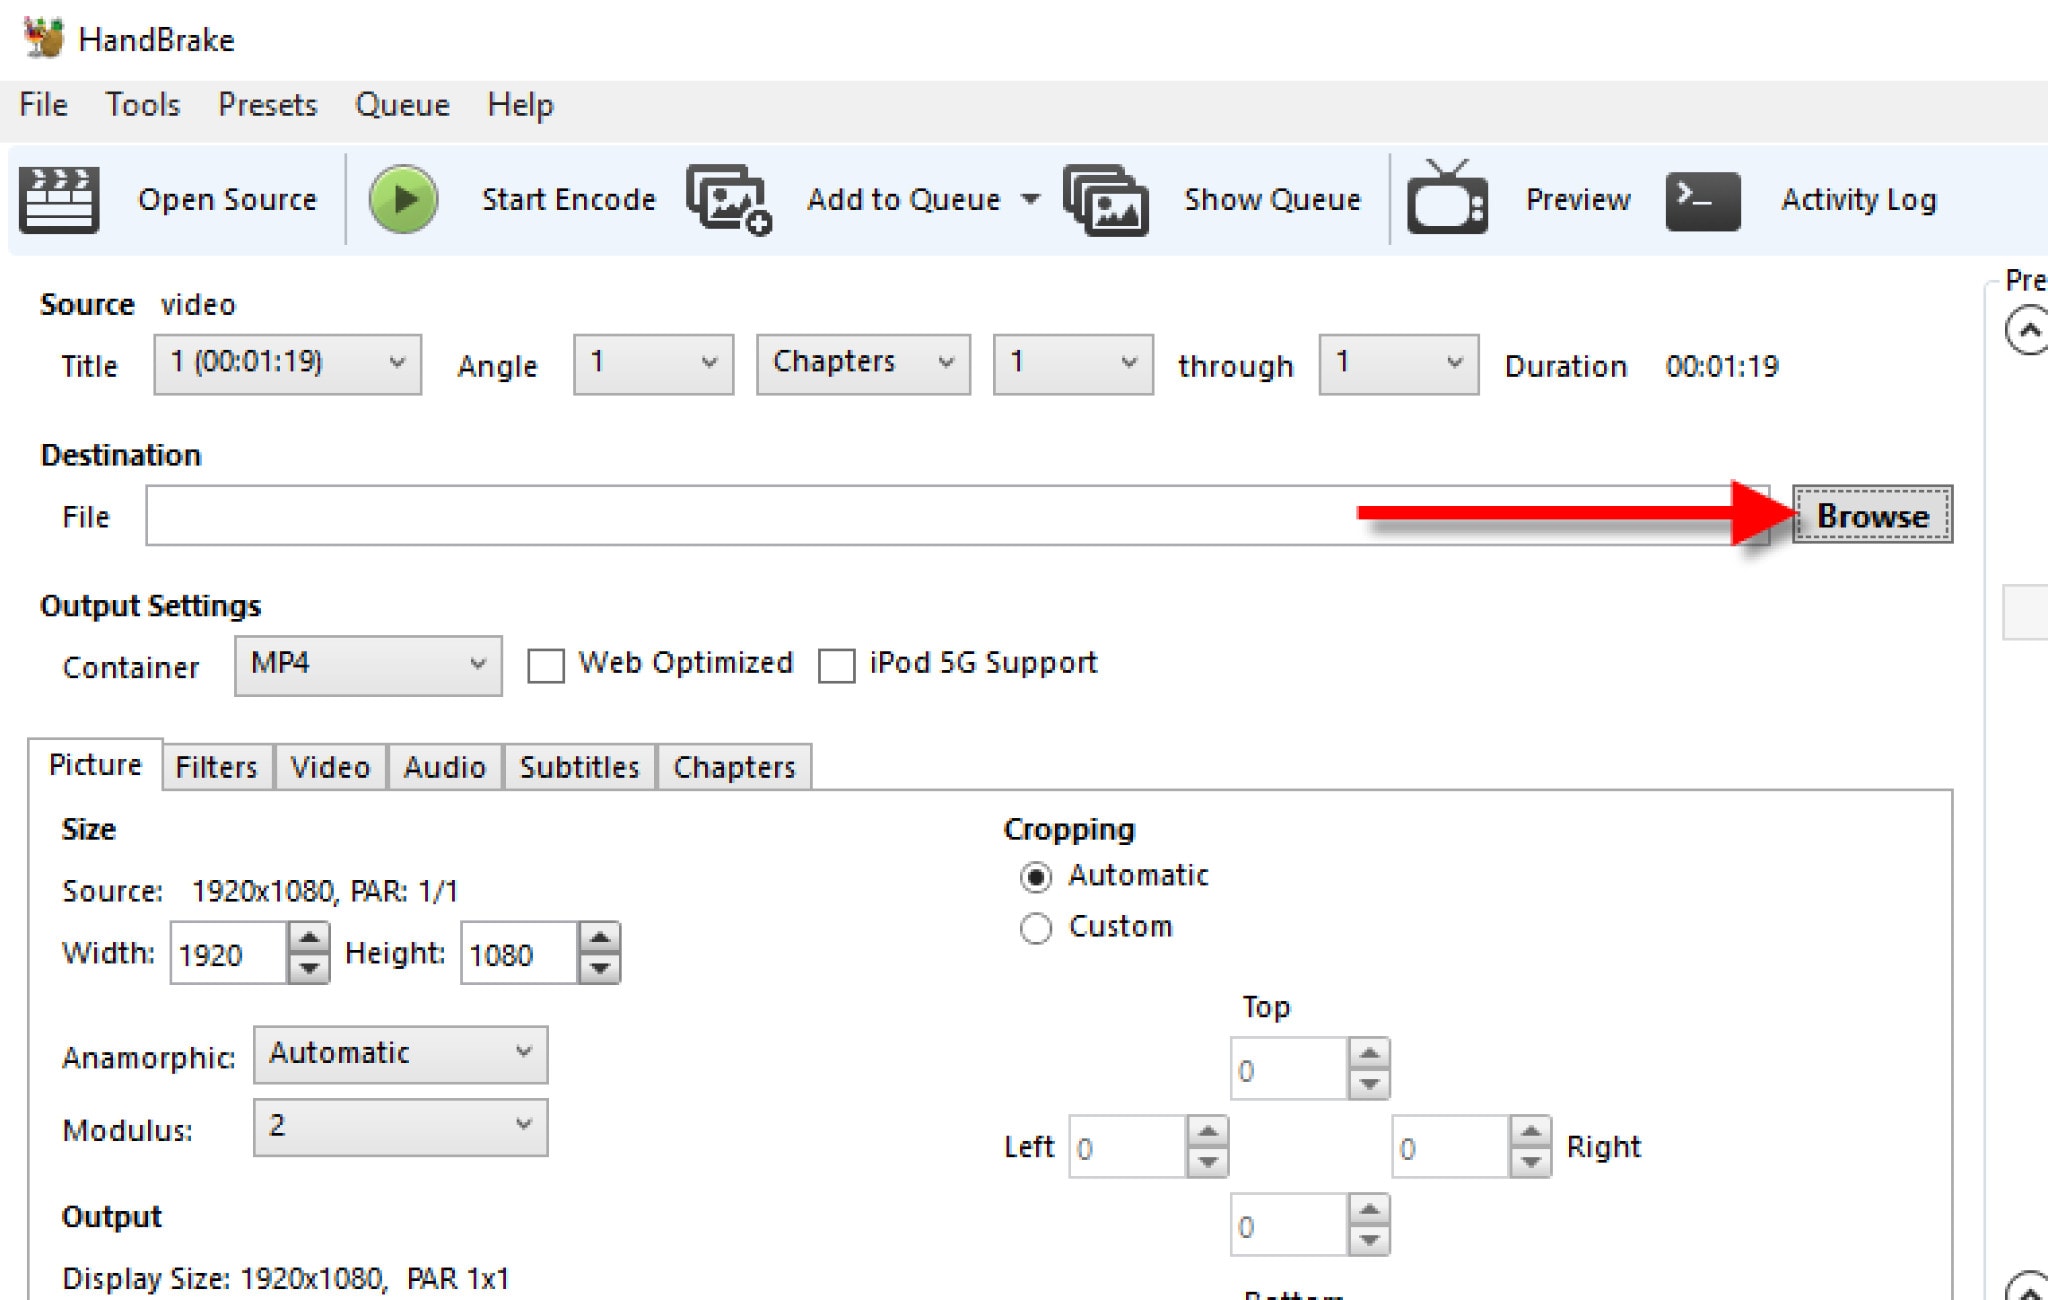
- Choose where you want the compressed video to be saved by clicking ‘Browse’.
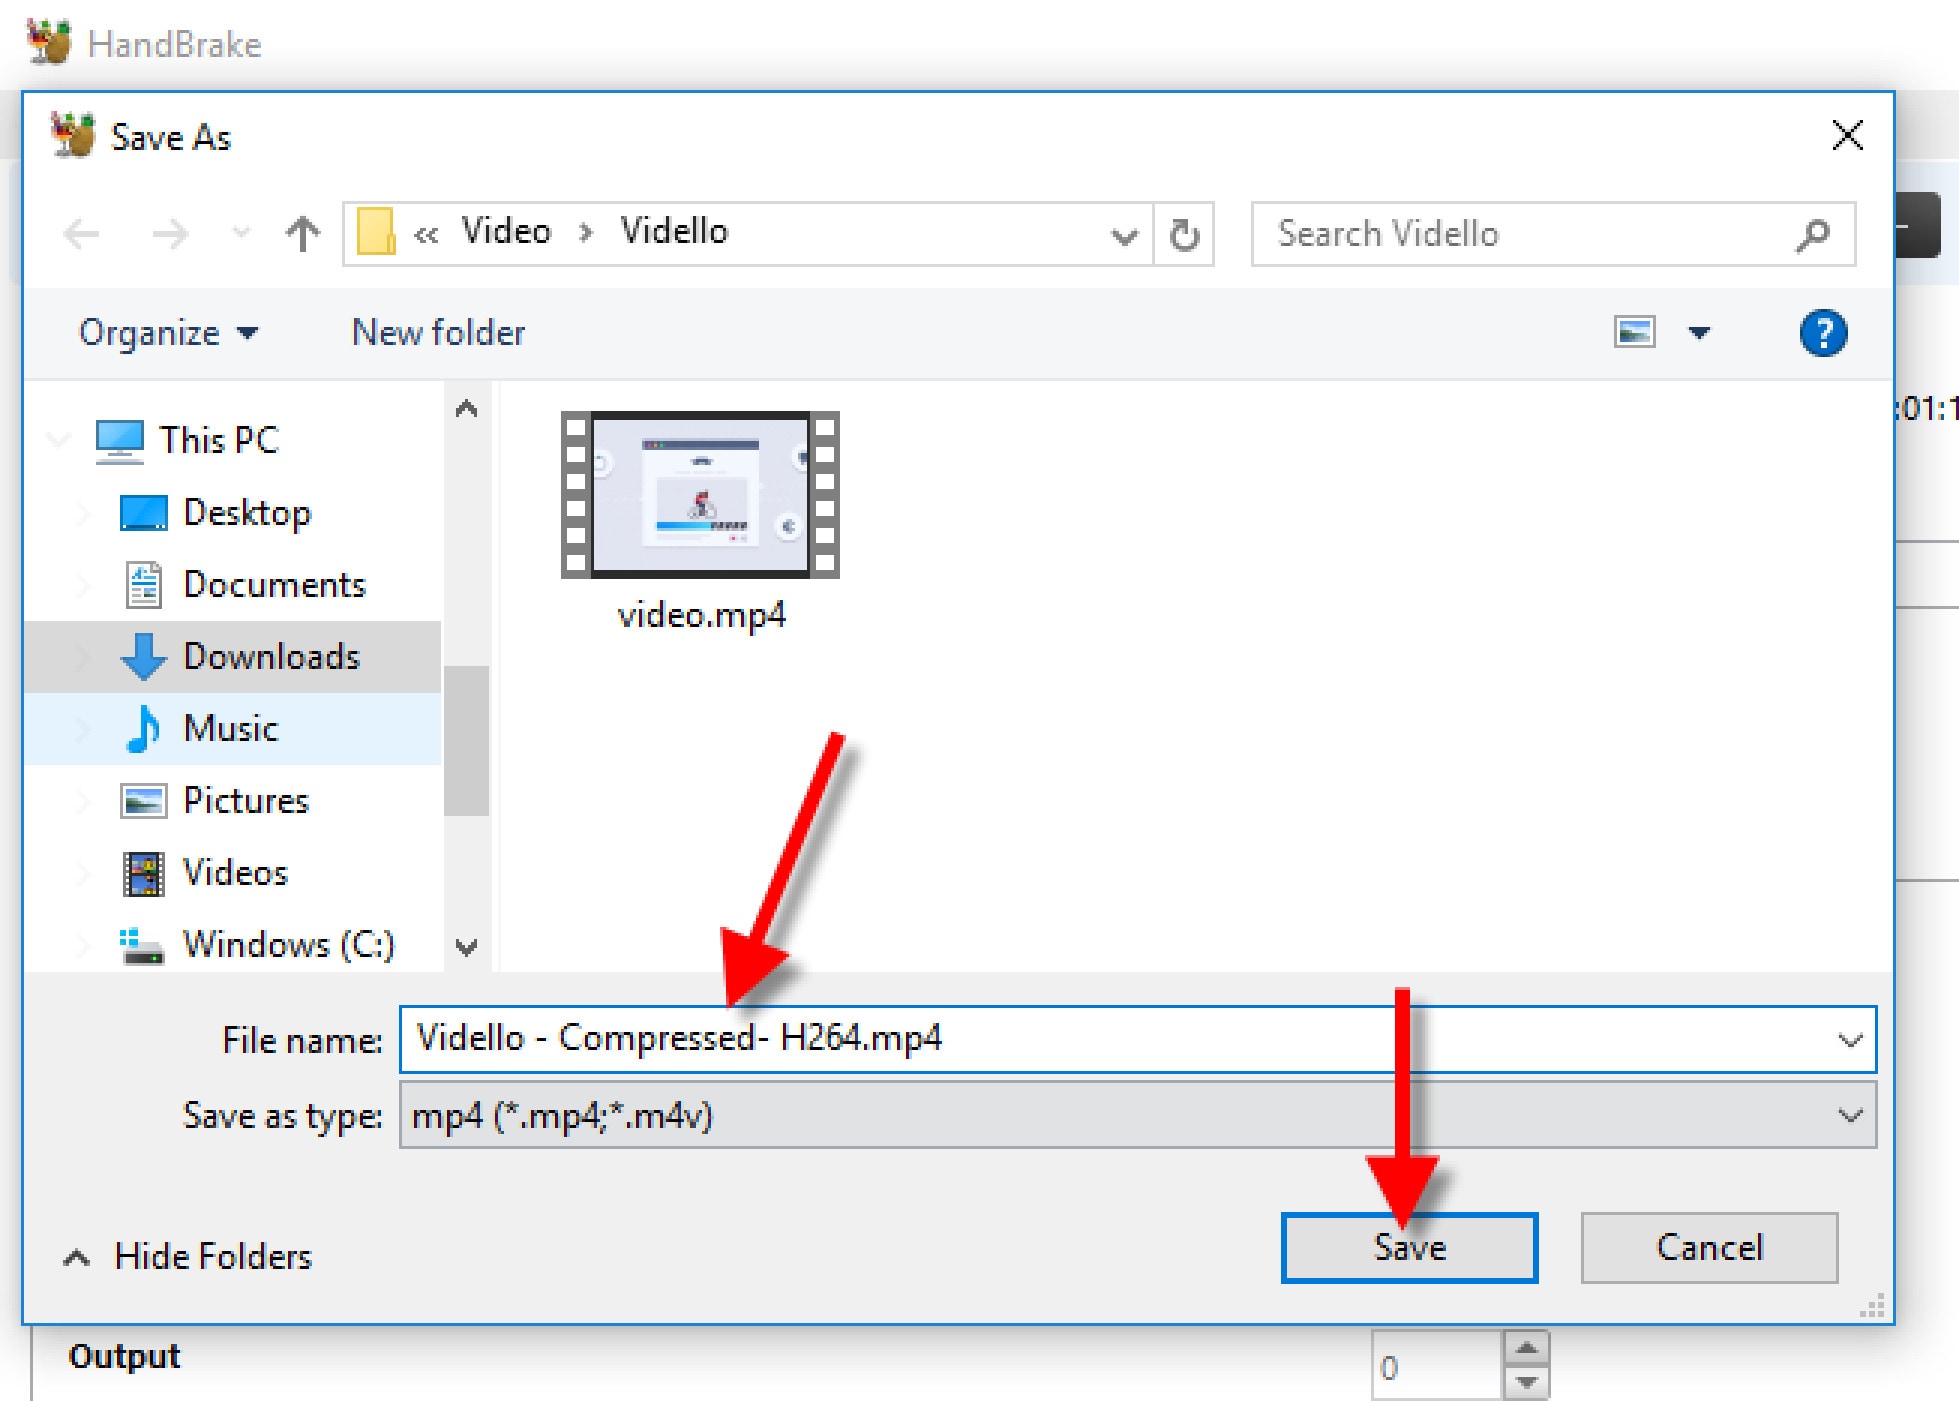
- Enter a name for the video, and click ‘Save’.
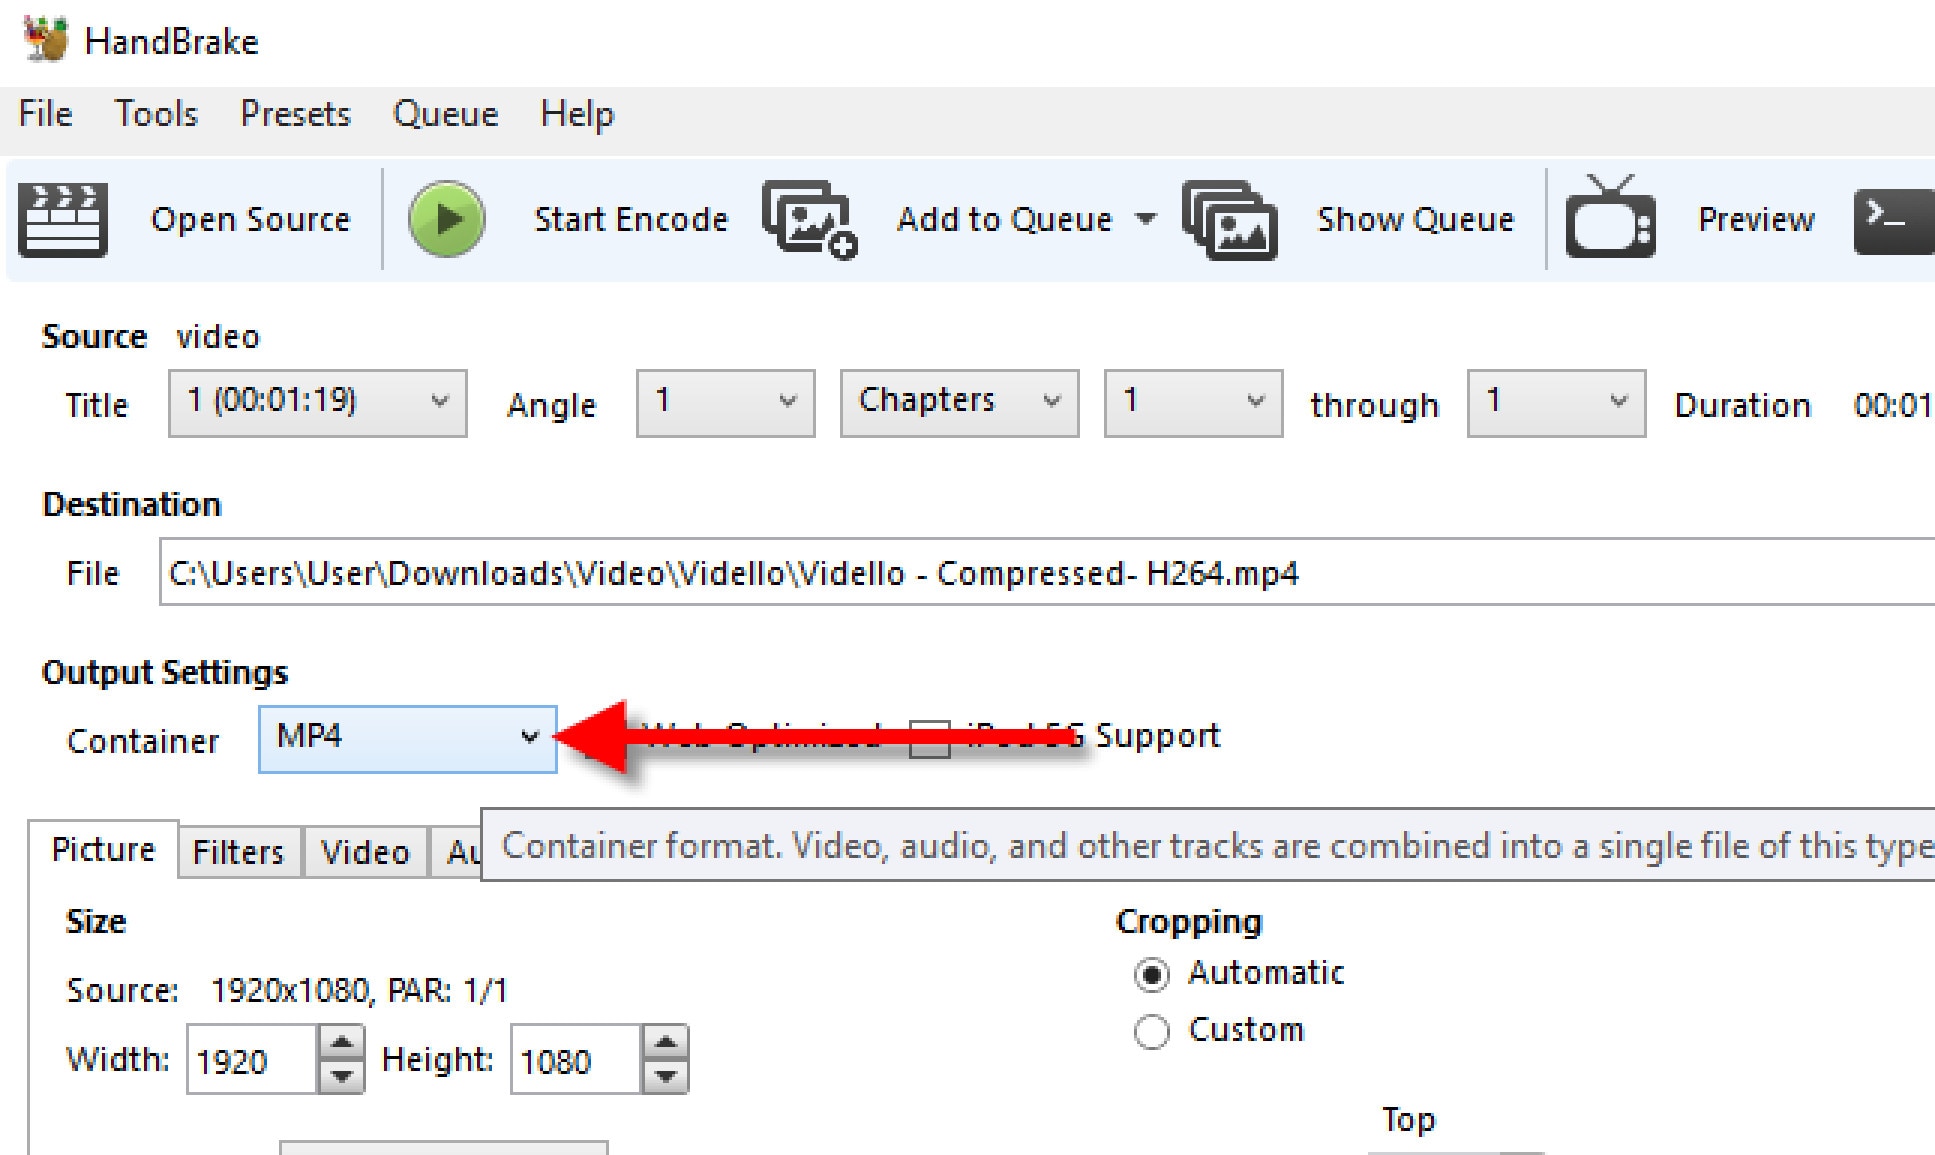
- Under ‘Output Settings’, choose MP4 for ‘Container’.
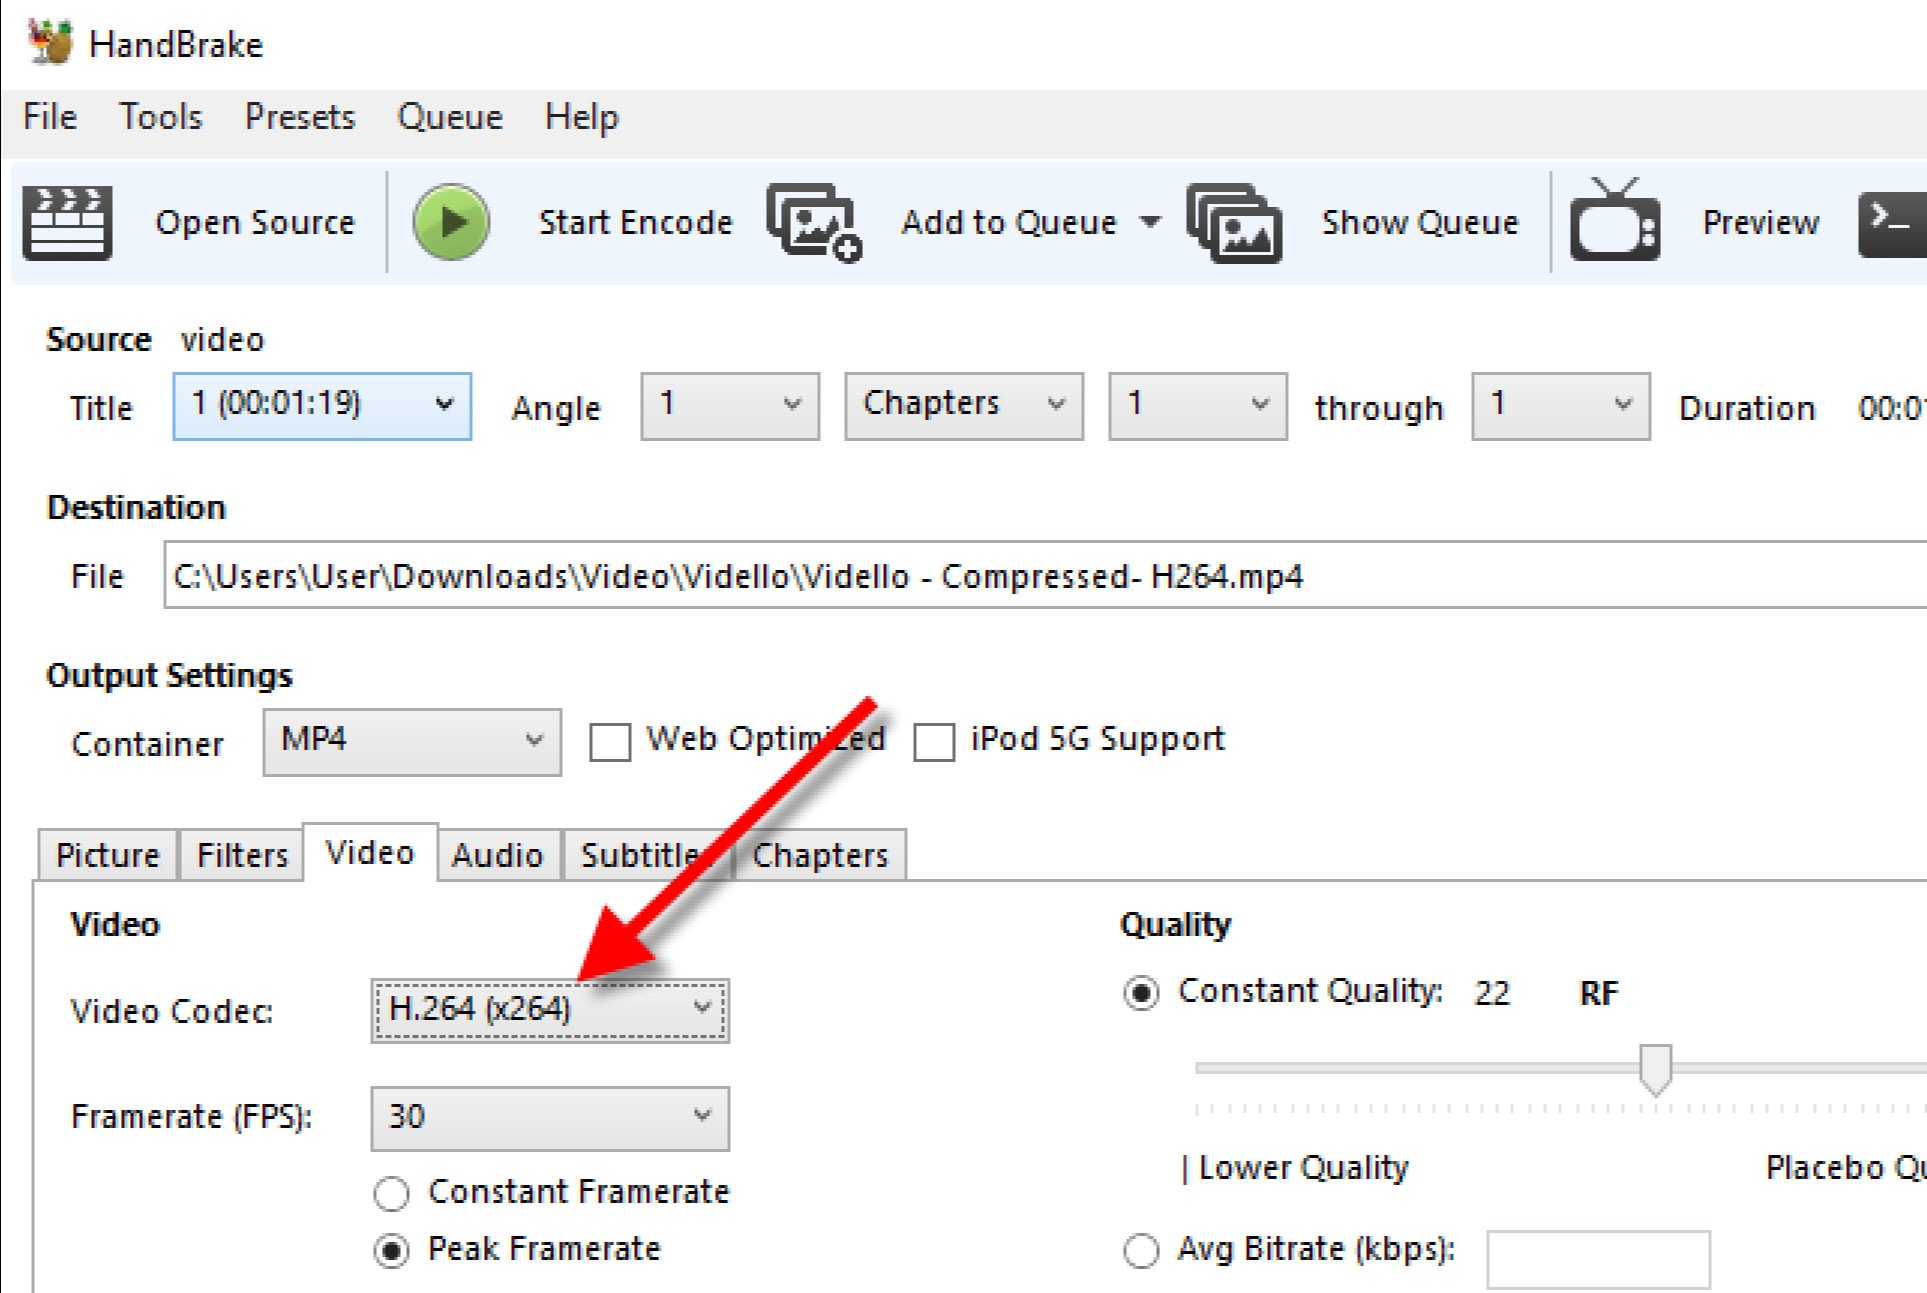
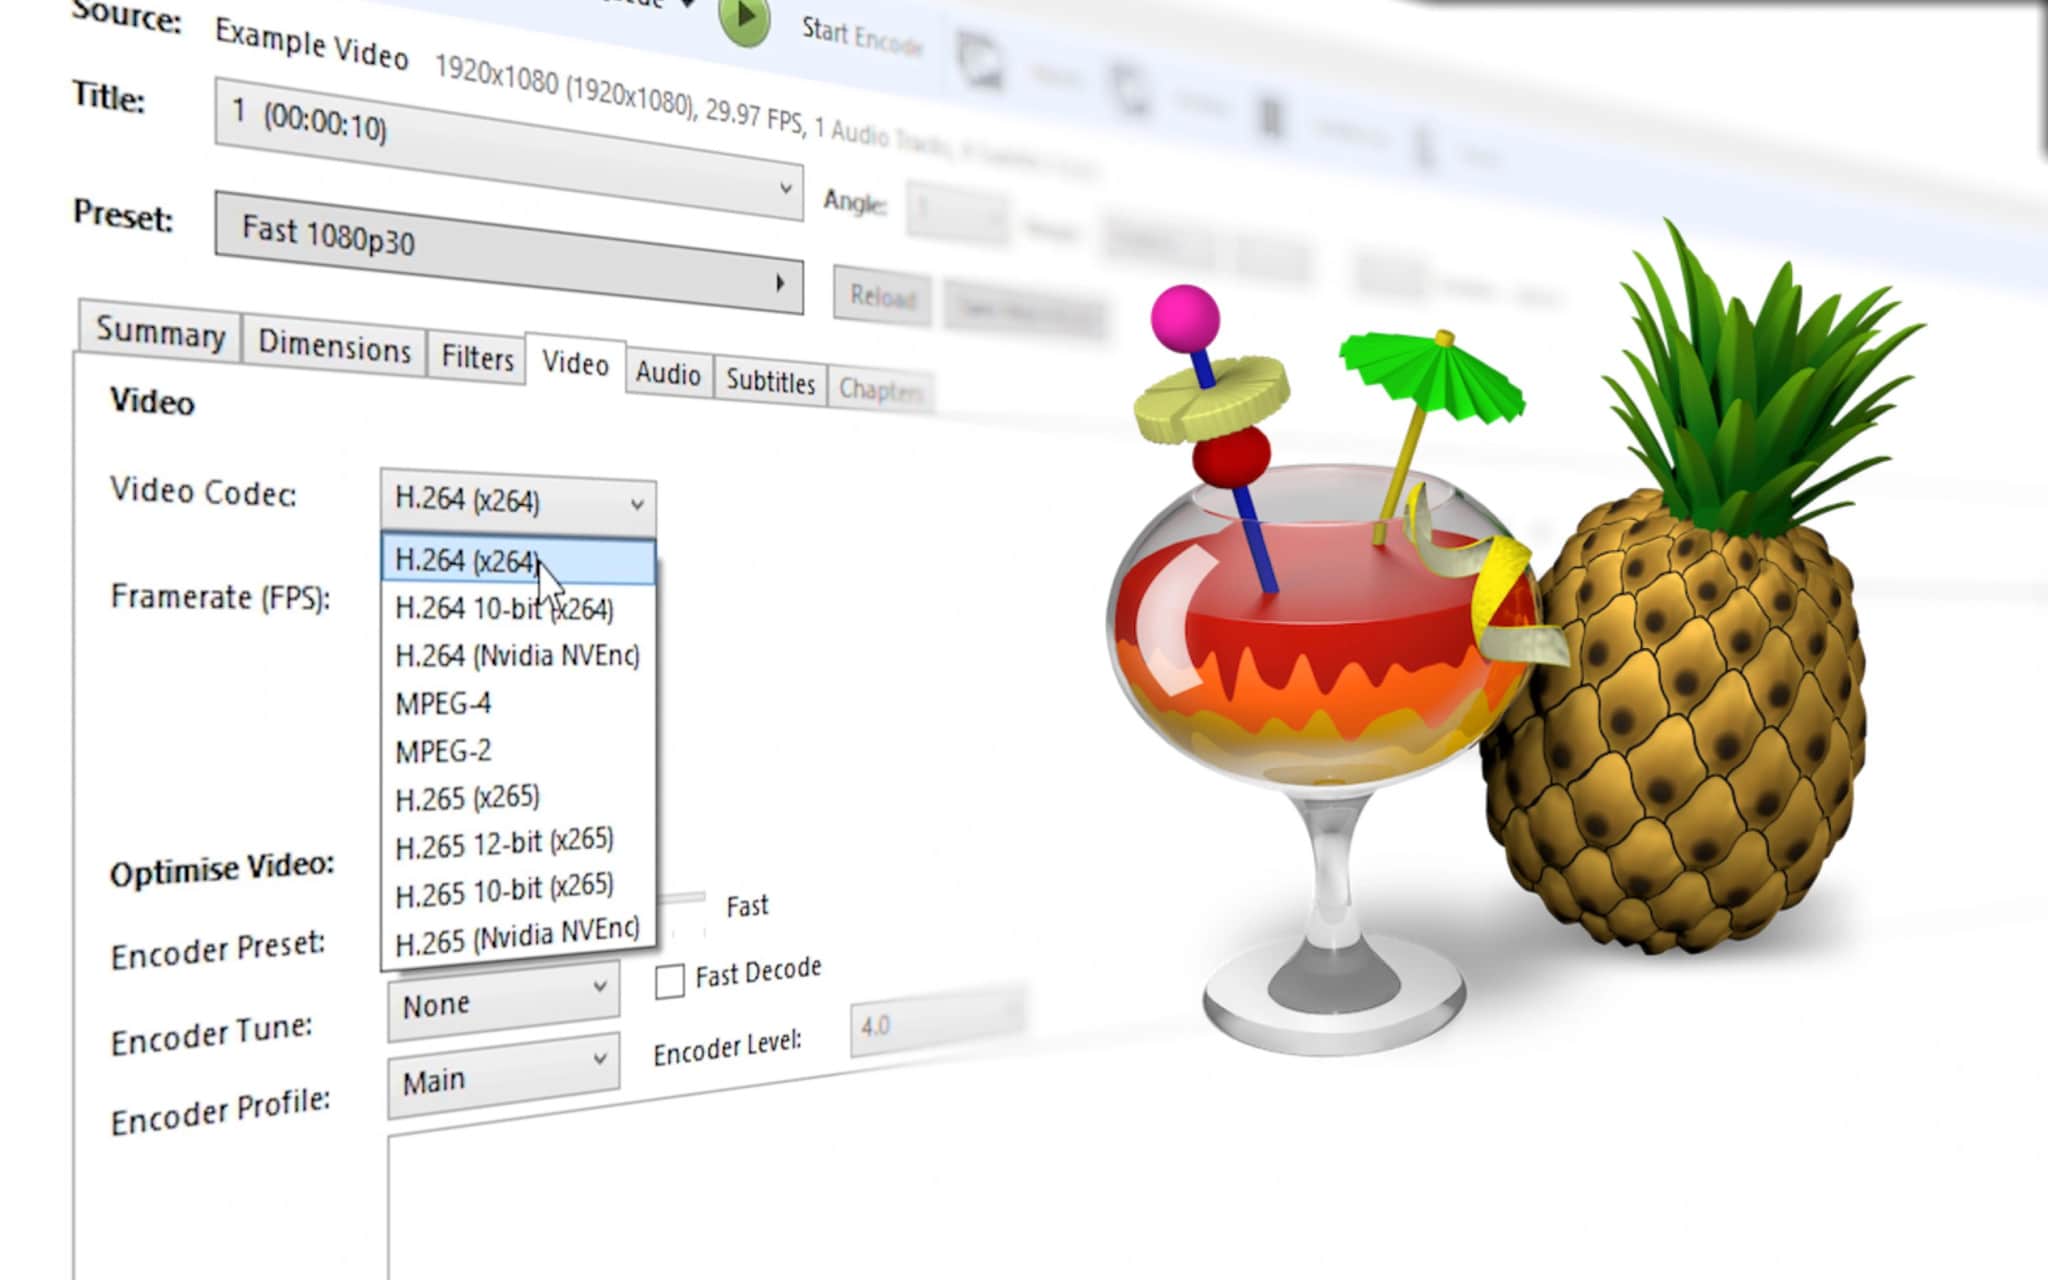
- Click the ‘Video’ tab, under it, is the ‘Video Codec’, choose (x264).
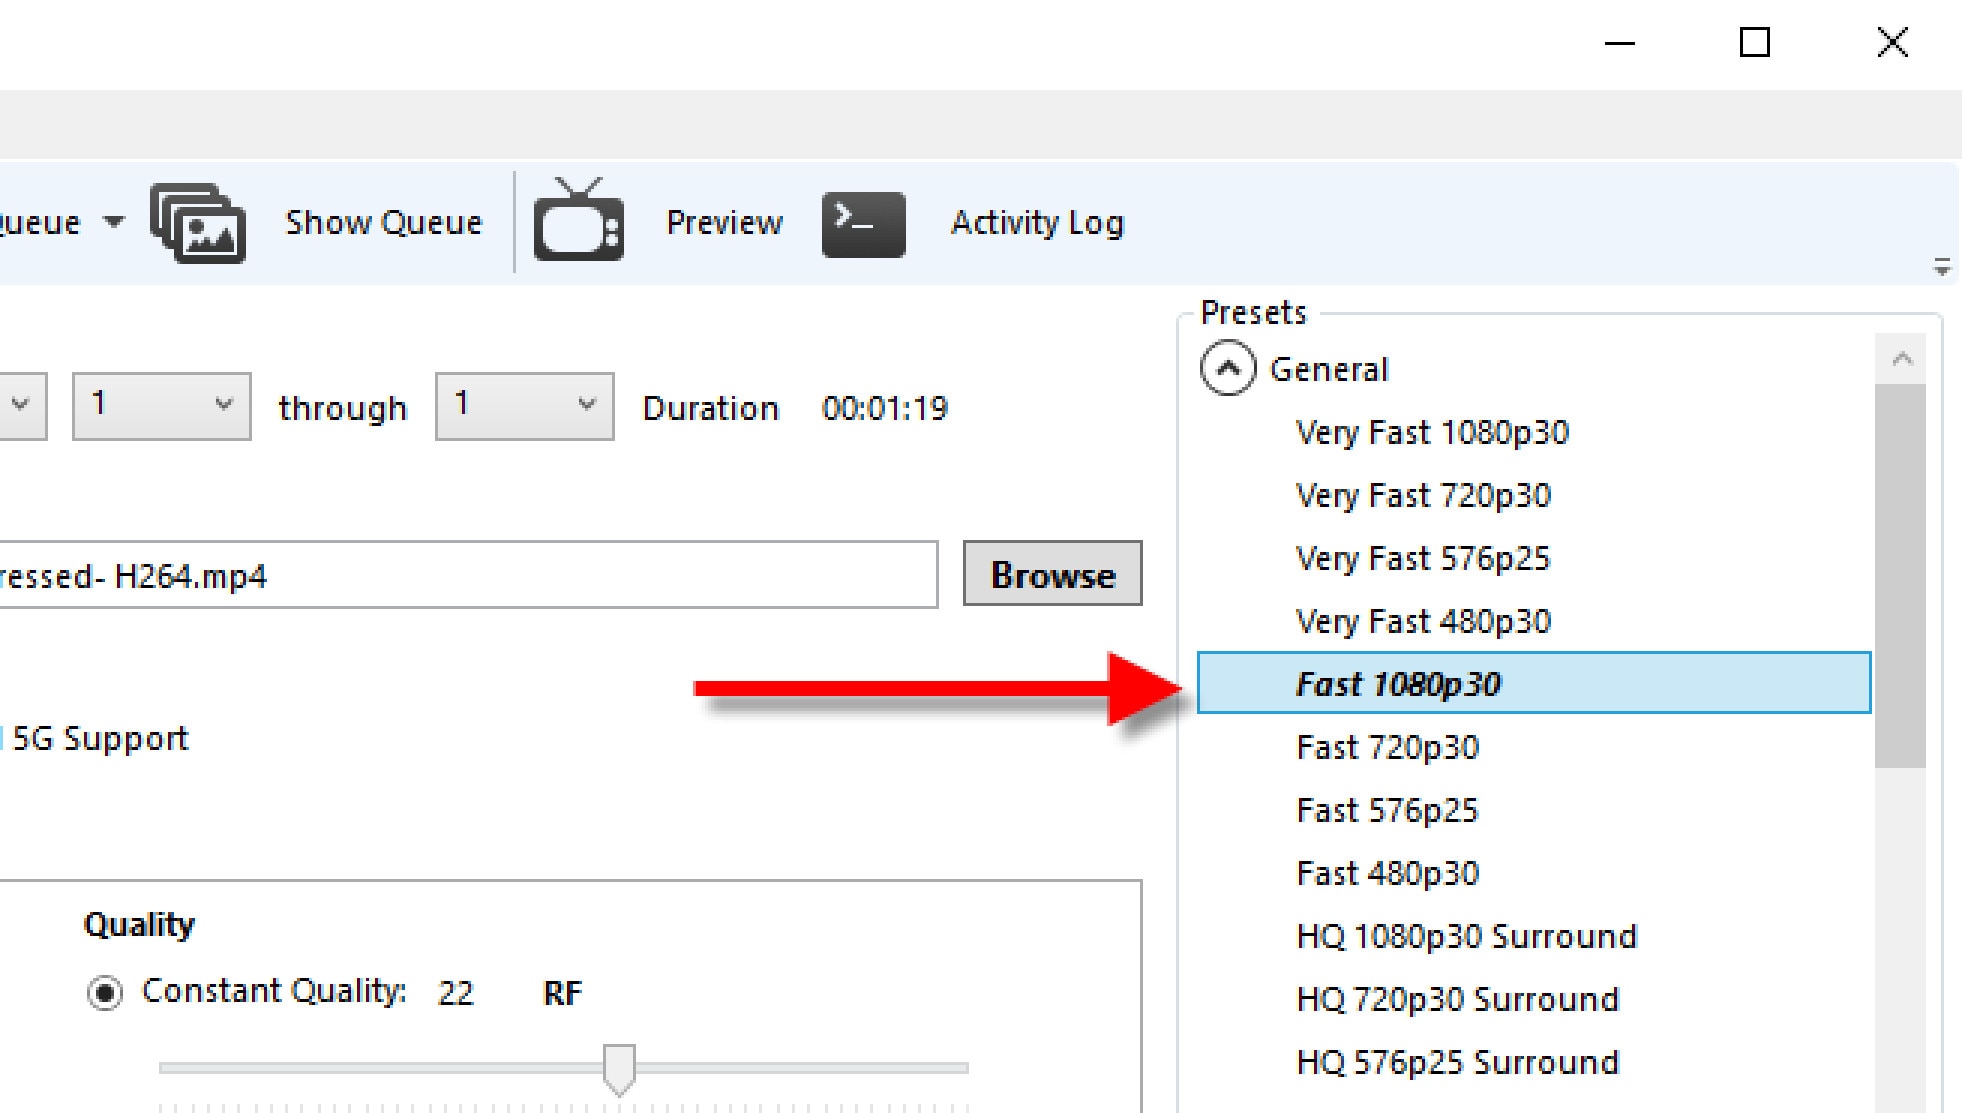
- Select a Preset from the ‘Preset Drawer’. We recommend you choose Fast1030p 30 for high quality.
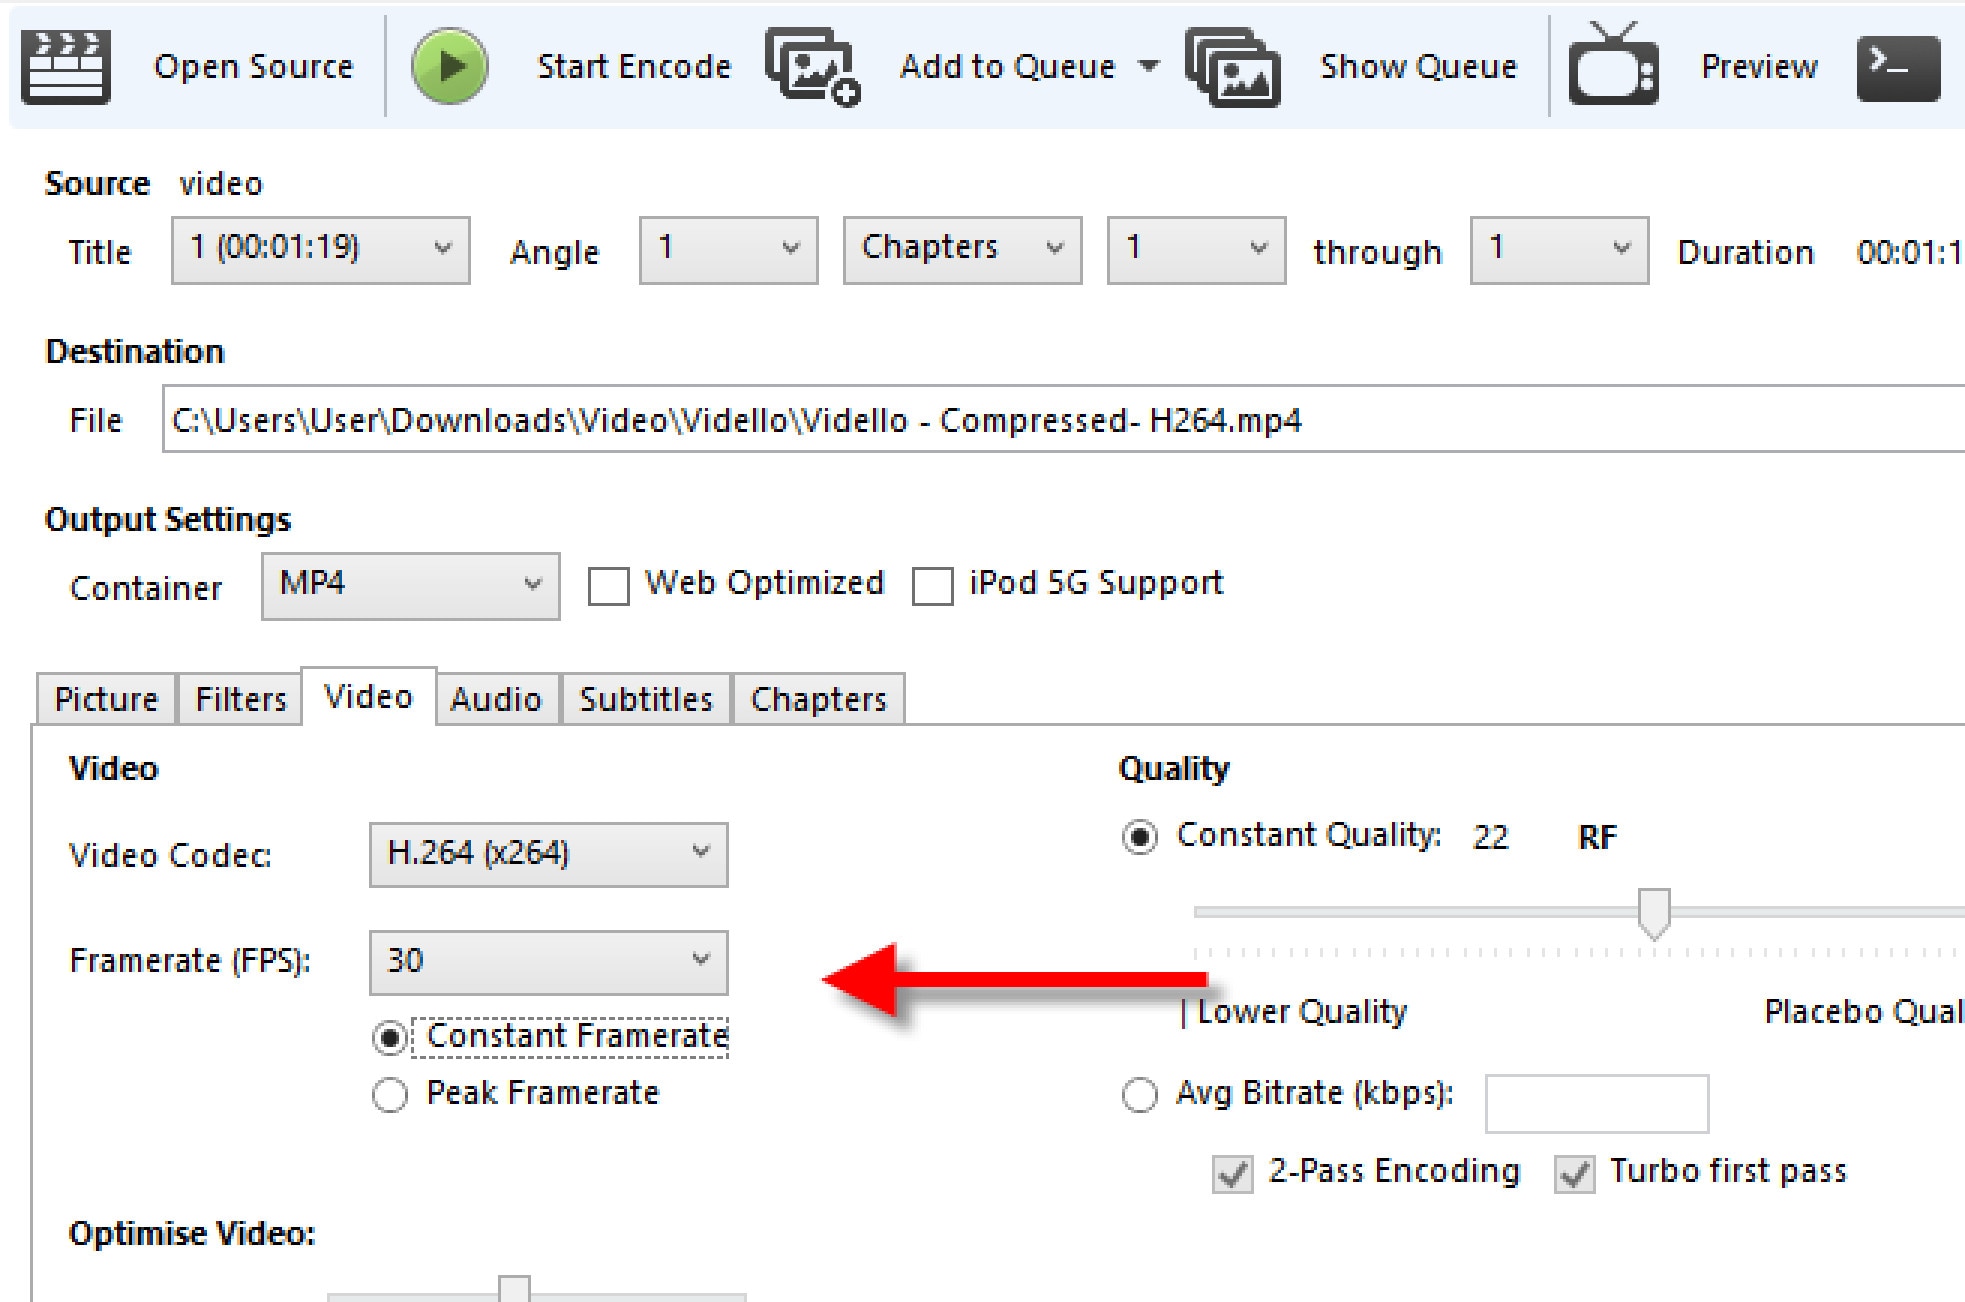
- Choose the ‘framerate’, depending on your source video i.e. NTSC (29.97fps), then make it 30fps by choosing 30. Also, tick the ‘Constant Framerate’ to ensure better compatibility.
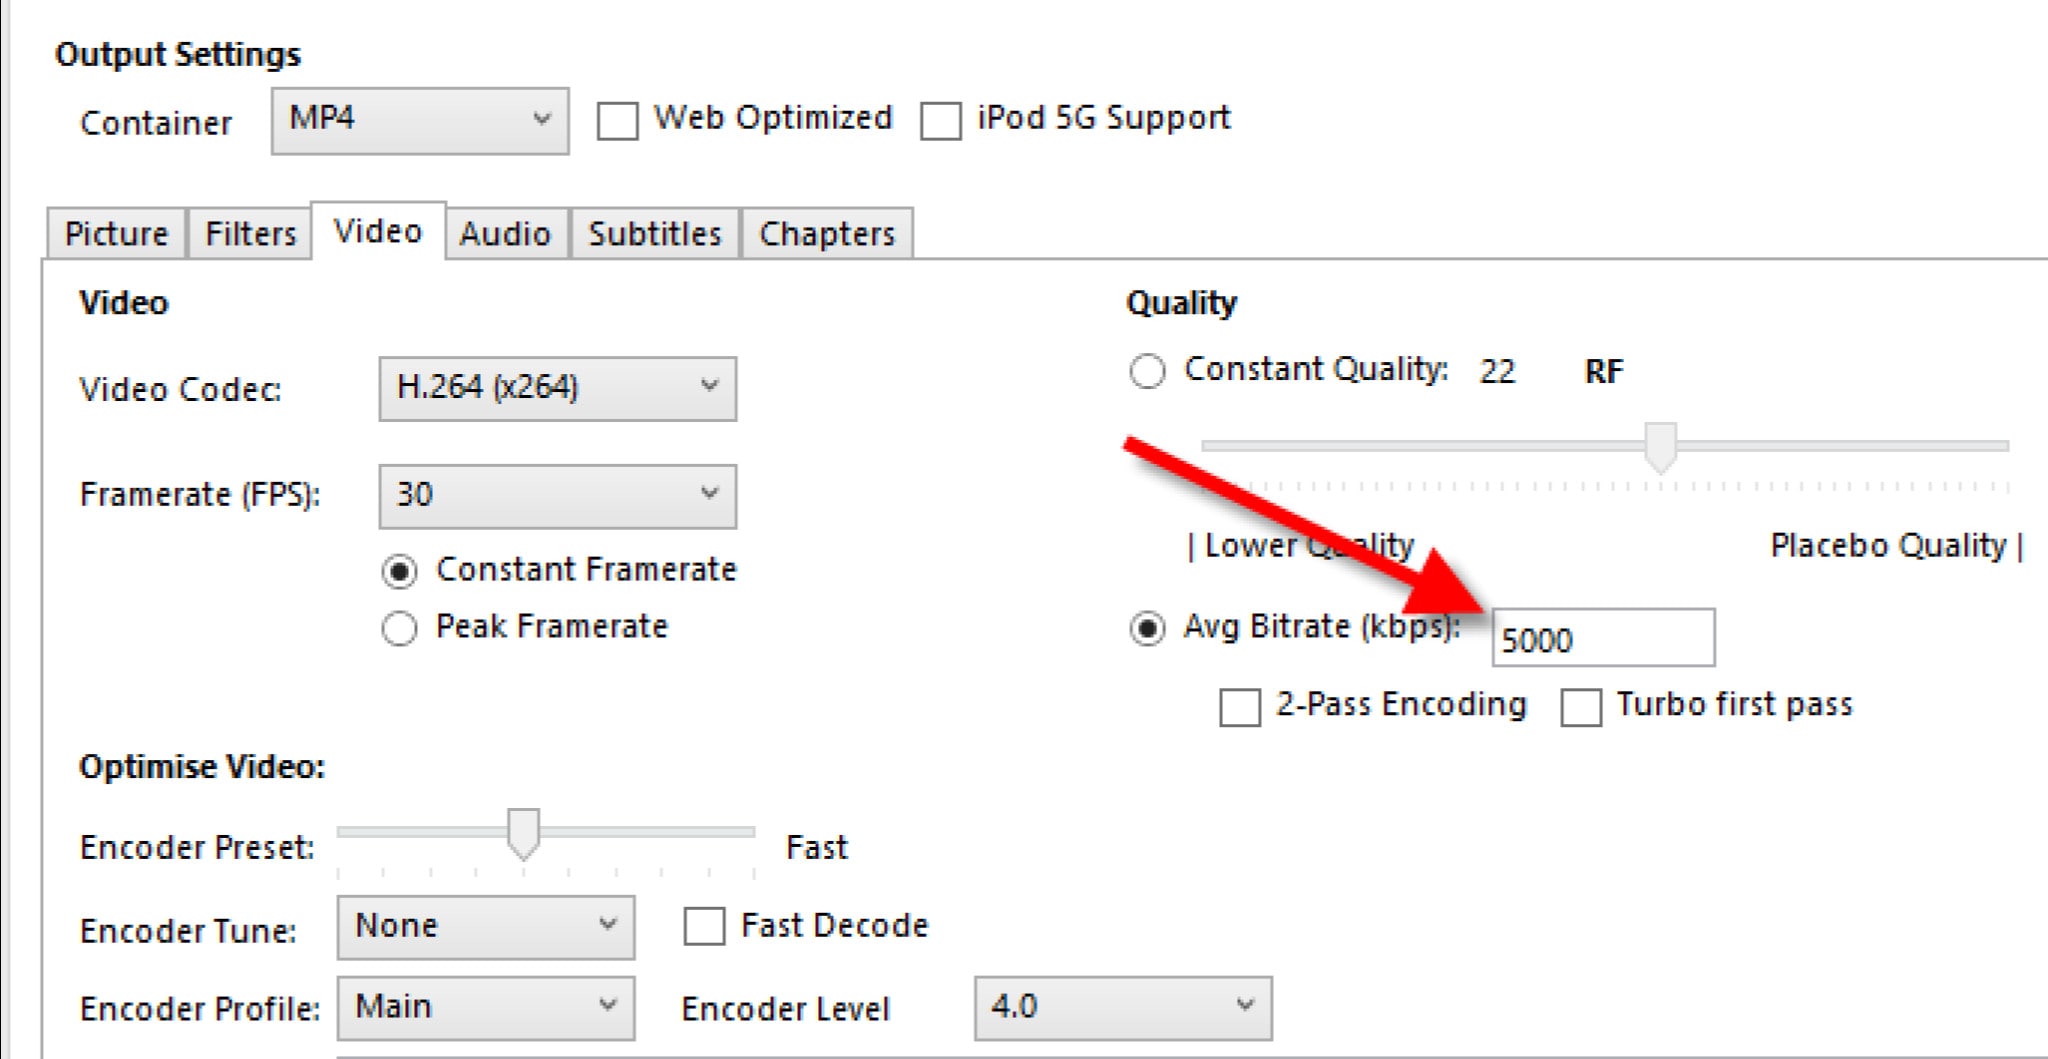
- Enter an ‘Average Bitrate (kbps)’ for the video between 5,000-10,000 (take note: higher bitrate has higher quality video but will take longer to upload and download).
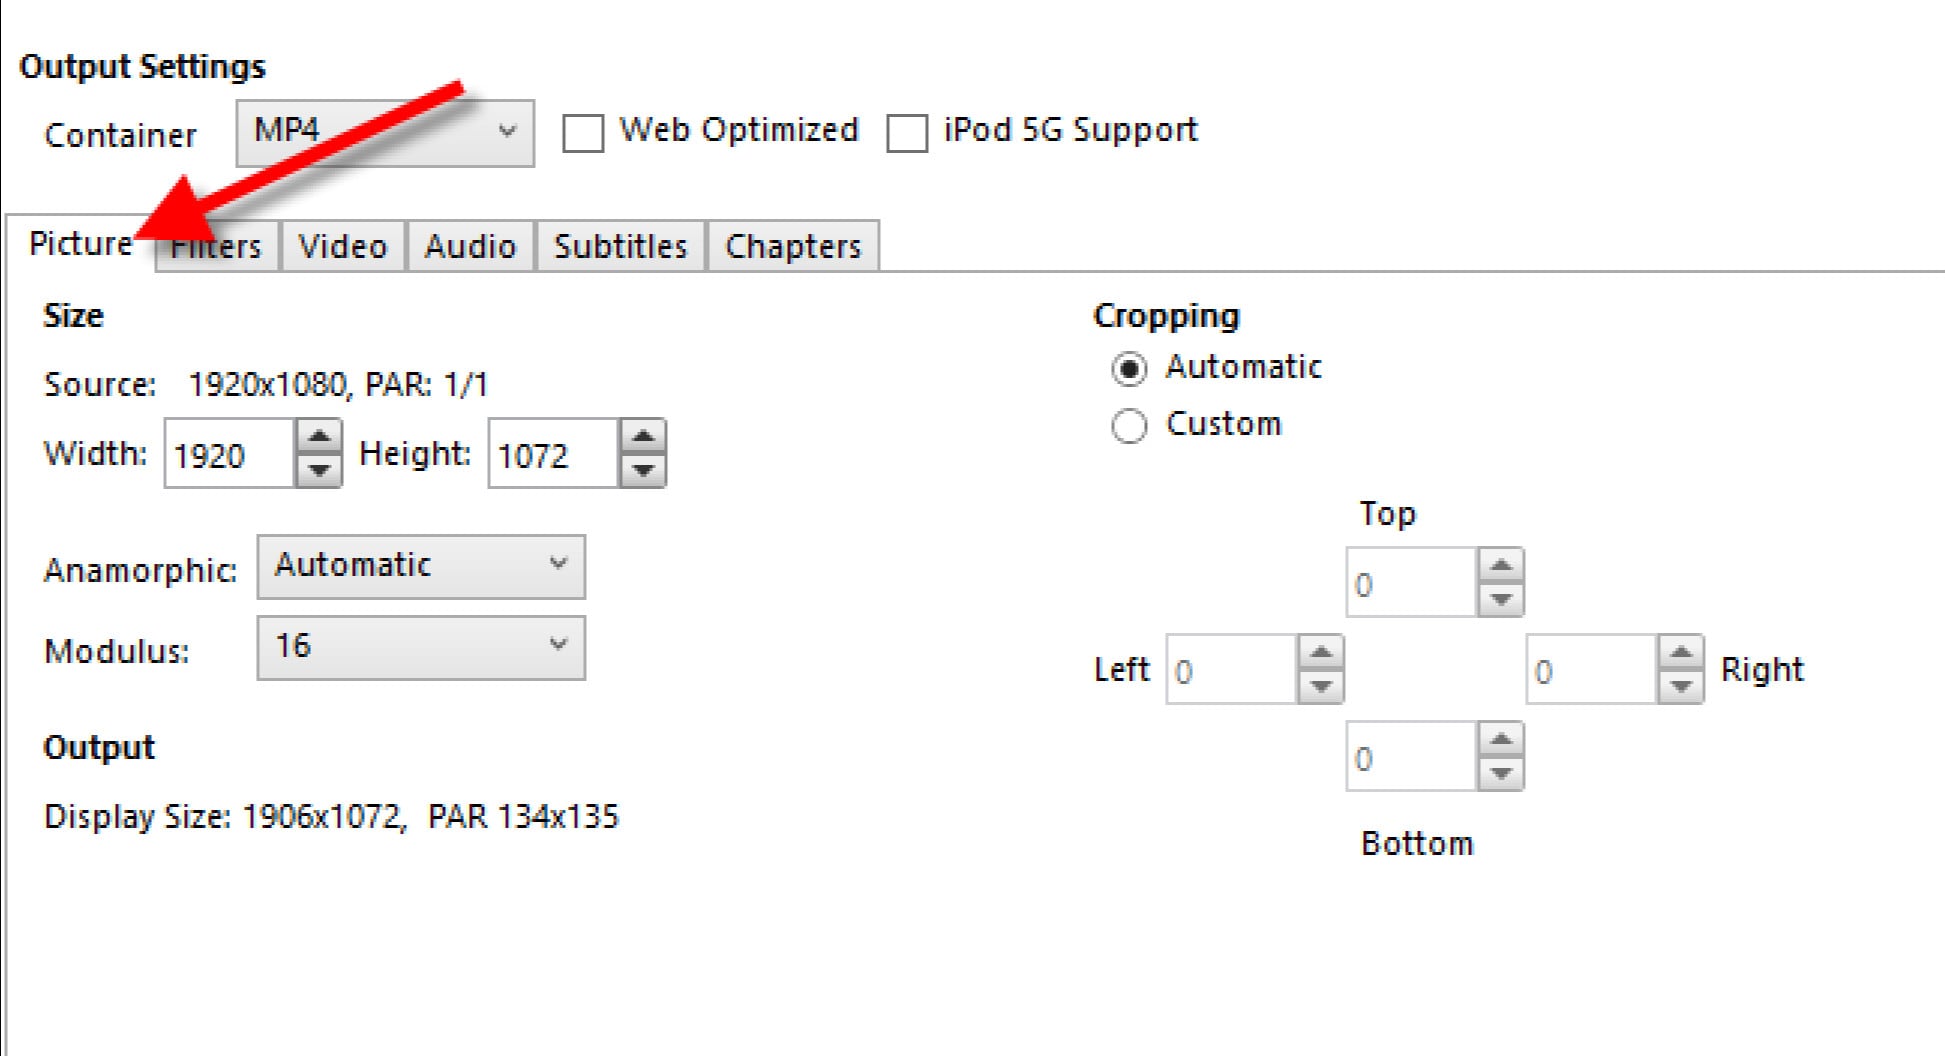
- Click the ‘Picture’ tab if you want to change the video frame size or resolution.
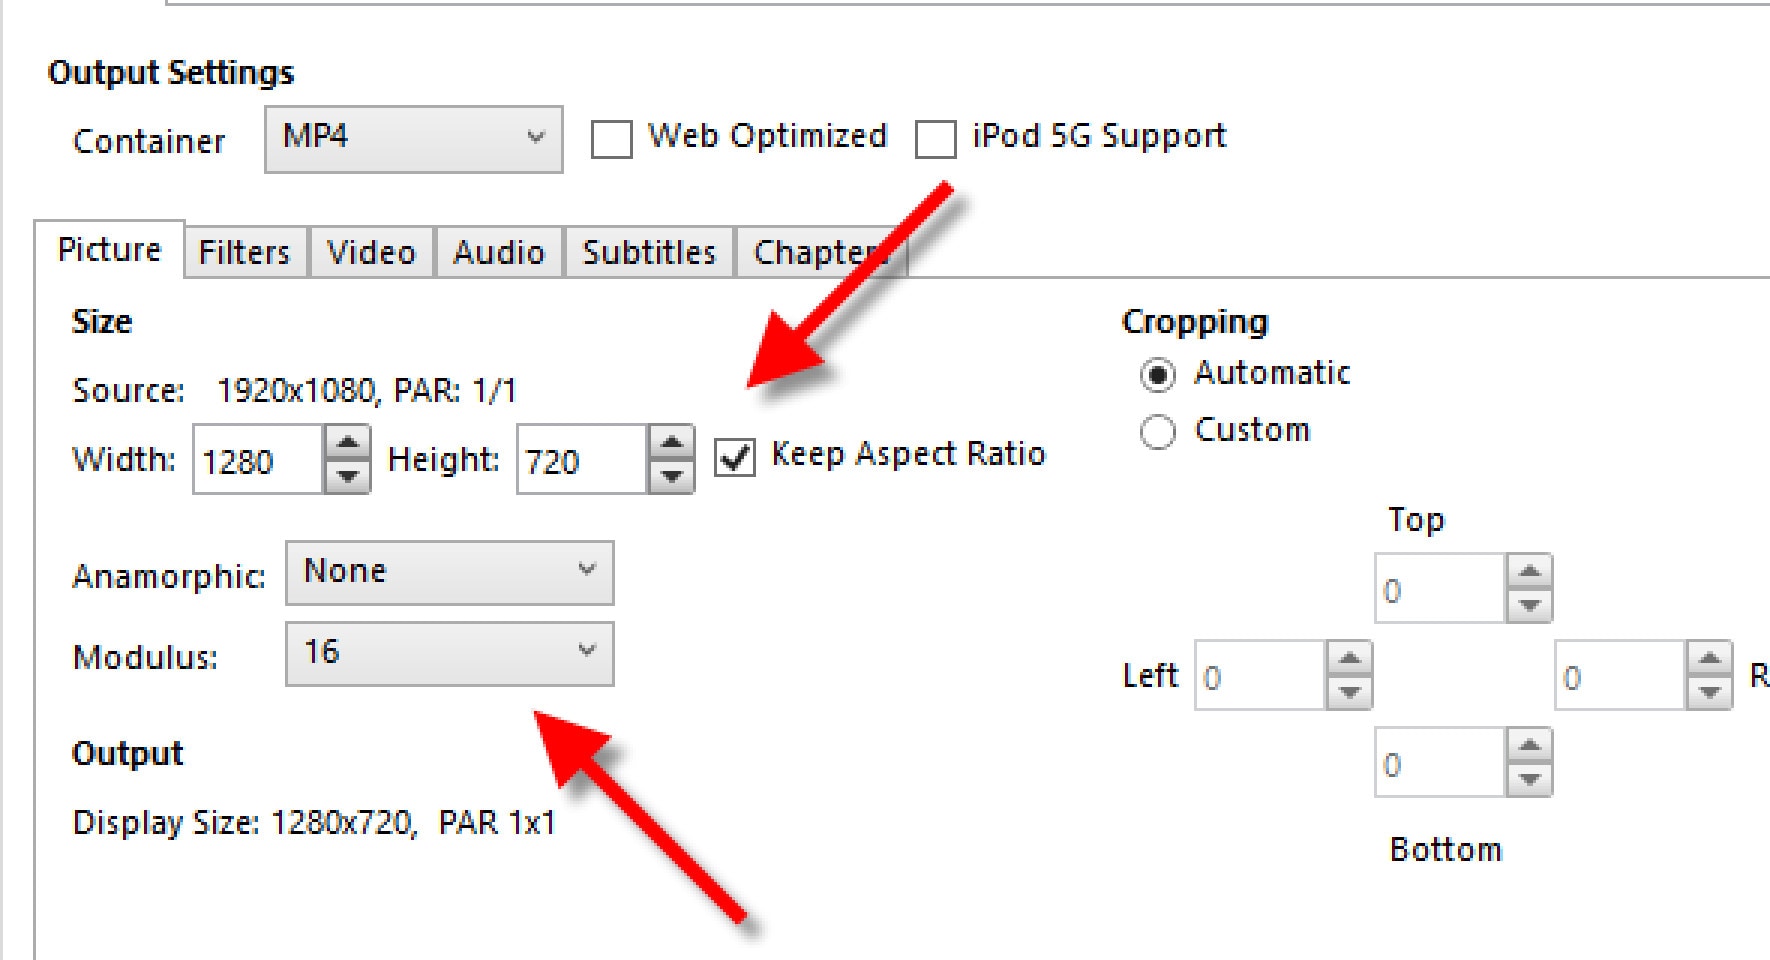

Change ‘Anamorphic’ to ‘None’, and ‘Modulus’ to ‘16’. And tick ‘Keep Aspect Ratio’. Use the arrow down on Width to change from 1920 (full HD) down to 1280.
Select the ‘Audio’ tab and choose 48 for the Samplerate. Choose Stereo for Mixdown. Choose 320 for your audio Bitrate.
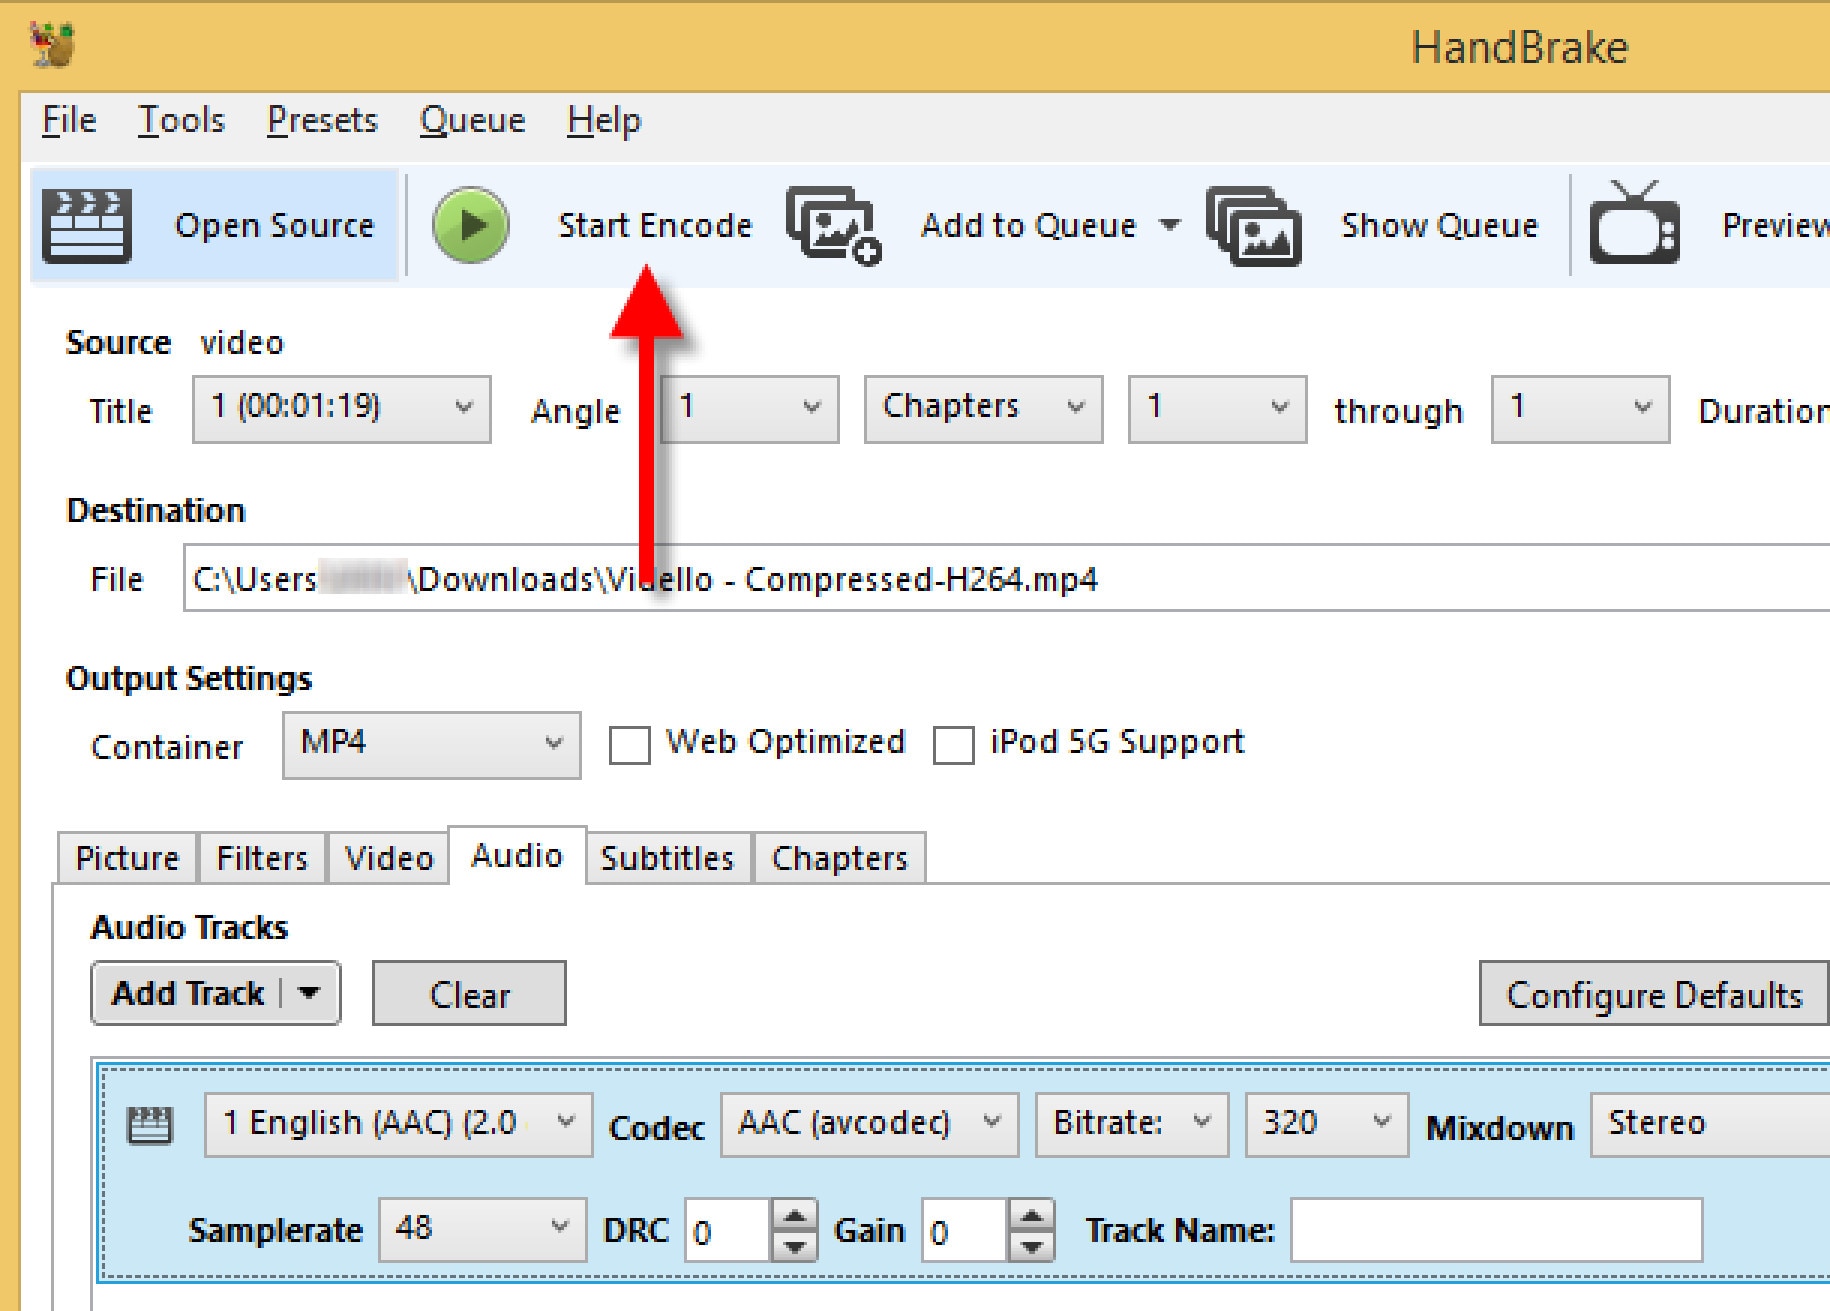
- Hit the ‘Start Encode’ button and wait until the video has finished compressing. Handbrake will let you know when it has finished.
SHUTTER ENCODER
Supported OS: Mac, Linux, and Windows
Shutter Encoder offers a complimentary codec and conversion tool for everyone that was created in collaboration with video editors.
Convert your videos, images, and audio files to OP-Atom format, which is compatible with Avid Media Composer and Pro Tools. Encode your files, replace audio, burn to DVD, analyze audio volume, download web videos, and create your own timelapse.
Analyze audio loudness, replace audio, author DVDs and Blu-rays, create image sequences, download web videos, and more. Everything is done as simply and efficiently as possible
Shutter Encoder makes use of Java as well as other tools such as 7za, VLC, FFmpeg, ExifTool, MKVMerge (part of MKVToolNix), MediaInfo, DVDAuthor, youtube-dl, and others.
Shutter Encoder offers advanced users the option to tailor the conversion individually. You can, for example, manually change the bitrate of audio and video, but you can also set a file size limit and perform the conversion based on that. Further work techniques, such as the ability to enable hardware of the computer itself and complete the conversion according to a predefined profile, are available in a separate box.
Features:
- Without conversion: Cut without re-encoding, Replace audio, Rewrap, Conform, Merge, Subtitling (create subtitles for a video), Video inserts
- Sound conversion: WAV, AIFF, FLAC, MP3, AC3, OPUS, OGG
- Editing codecs: DNxHD, DNxHR, Apple ProRes, QT Animation, Uncompressed YUV
- Output codecs: , DV PAL, XDCAM HD422, AVC-Intra 100, XAVC, HAP, , VP9, AV1, OGV, MJPEG, Xvid, WMV, MPEG
- Archiving codec: FFV1
- Image creation: JPEG, PNG, TIF, TGA, DPX, BPM, ICO, WEBP
- Burn & Rip: DVD, Blu-ray, DVD RIP
- Analysis: Loudness & True Peak, Audio normalization, Cut detection, Black detection
- Download web videos using youtube-dl
Pros:
- Conversion according to profiles
- Extensive advanced options
- Built-in editing capabilities
Cons:
- Limited preview capability
Steps On How To Use Shutter Encoder
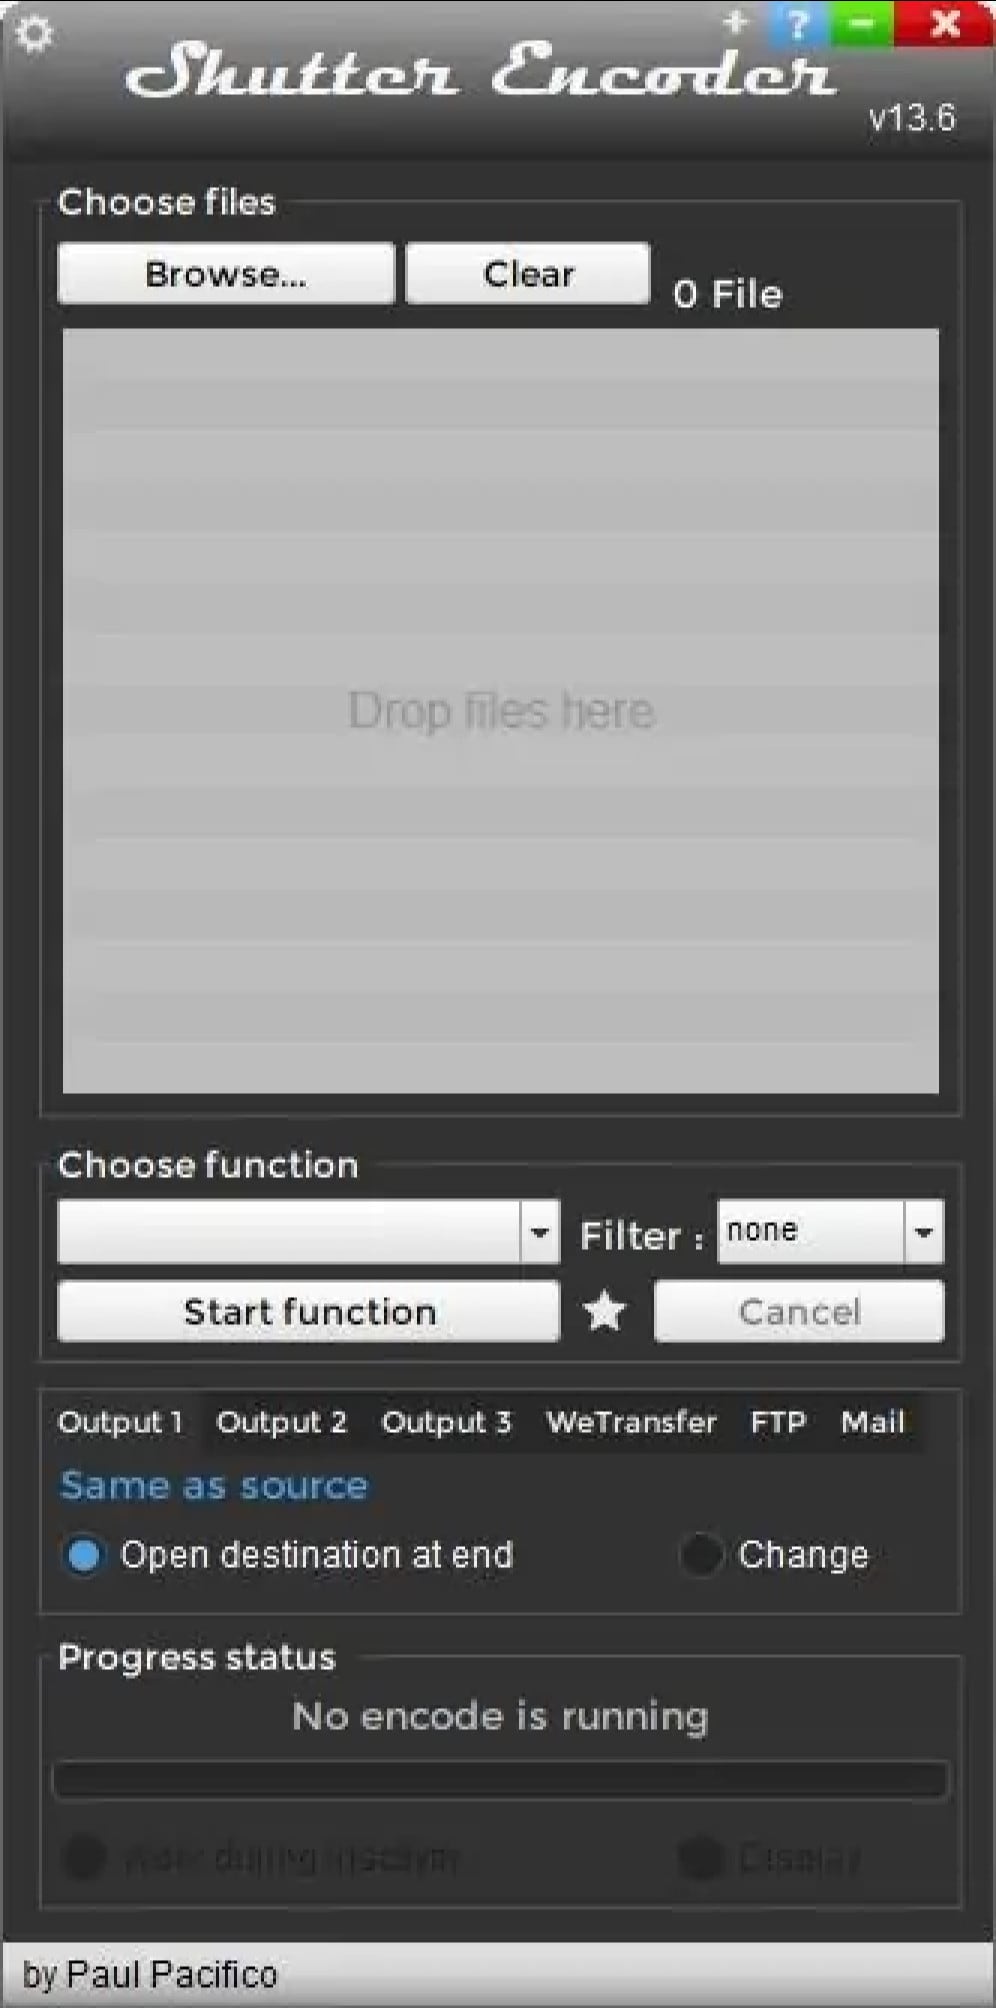
- To start, drag the video from your file manager and drop it onto the Shutter Encoder window, or use the ‘Browse’ button available in the upper left-hand side corner of the window to add a video.
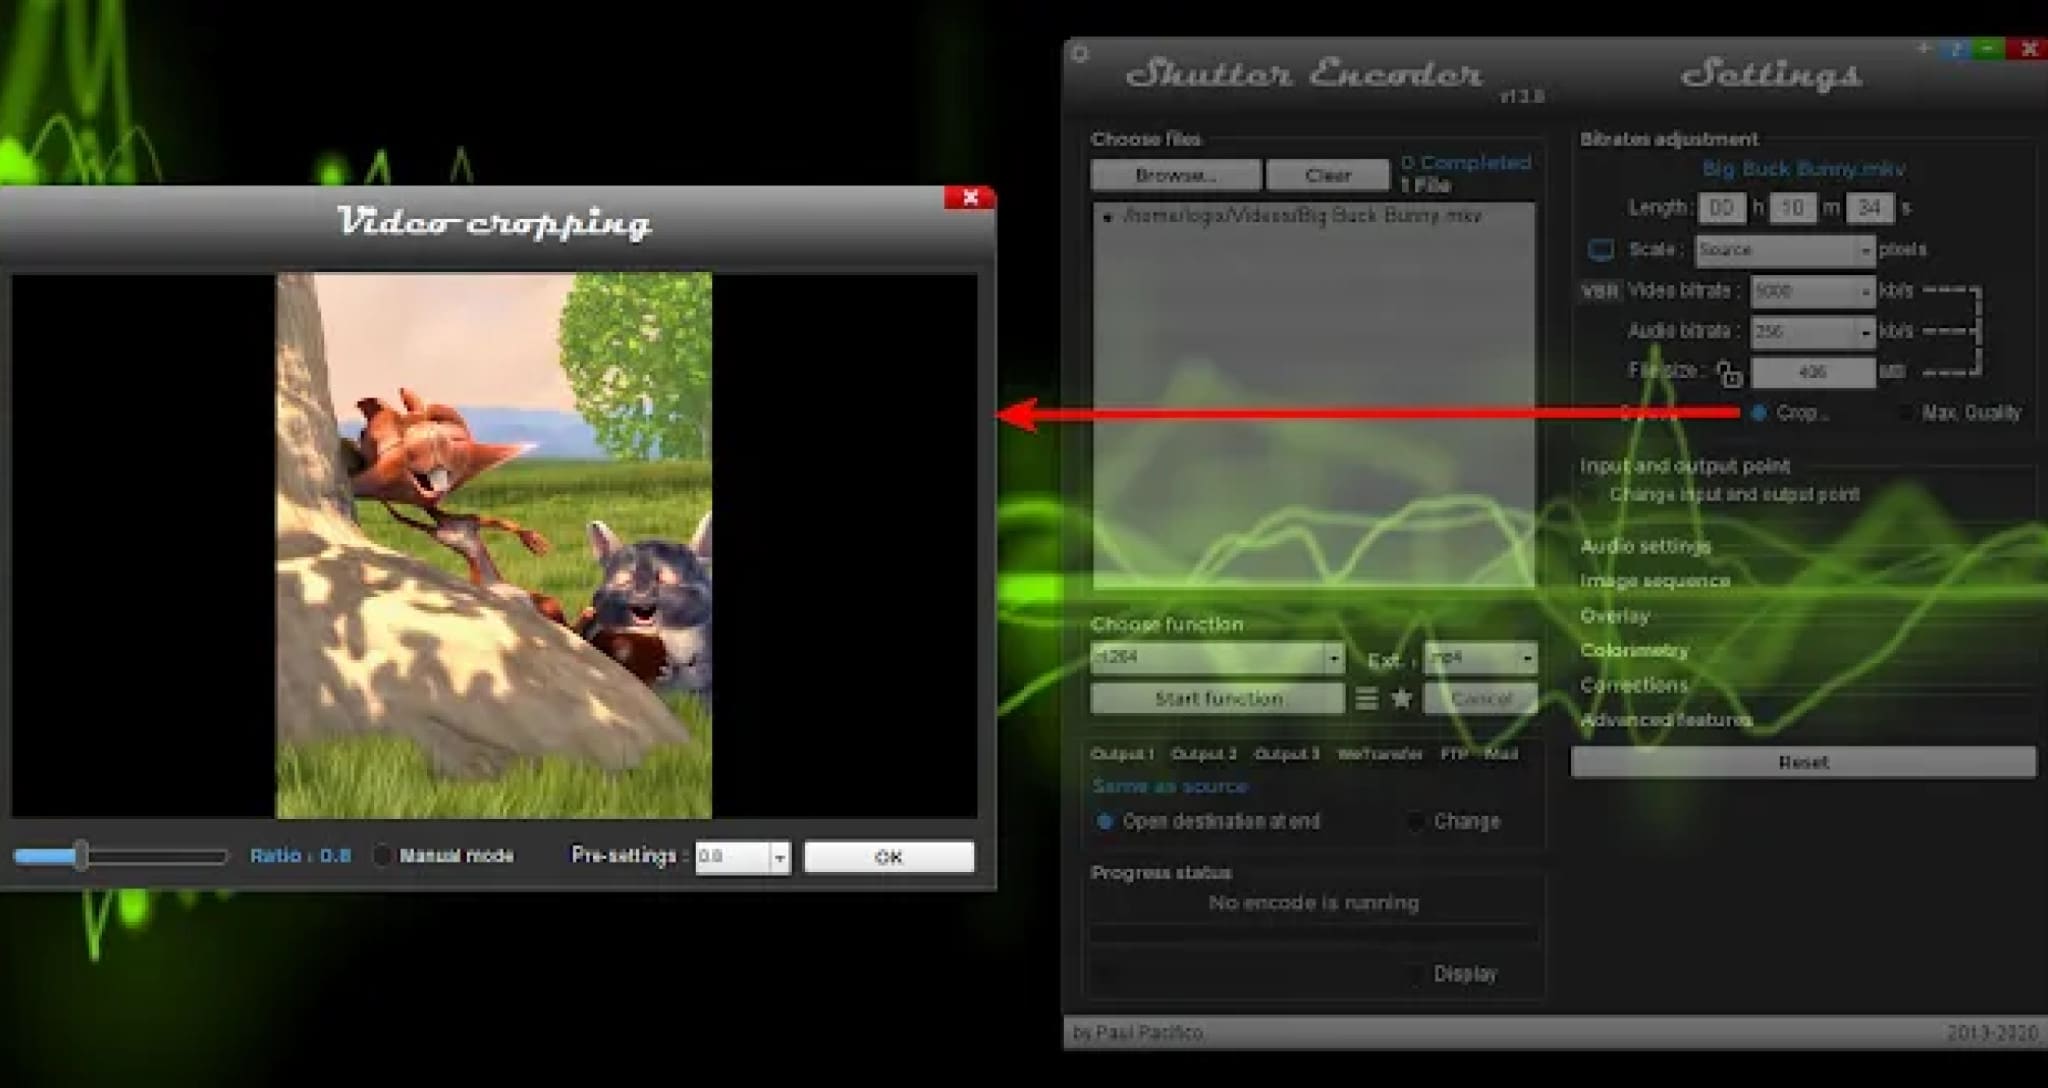
- Next, from the ‘Choose function’ drop-down menu, scroll to (it’s the first under Output codecs). You will now see some new options in a new panel that appears on the right-hand side of the Shutter Encoder window. From there, if you want to crop the video, click the Crop checkbox:
A new window will pop up where you can use your mouse to crop the video to the desired size. If you want to change it to a predefined, fixed-size ratio value, uncheck the ‘Manual mode’ box, and you’ll be able to choose a ratio from the ‘Pre-settings’ drop-down.
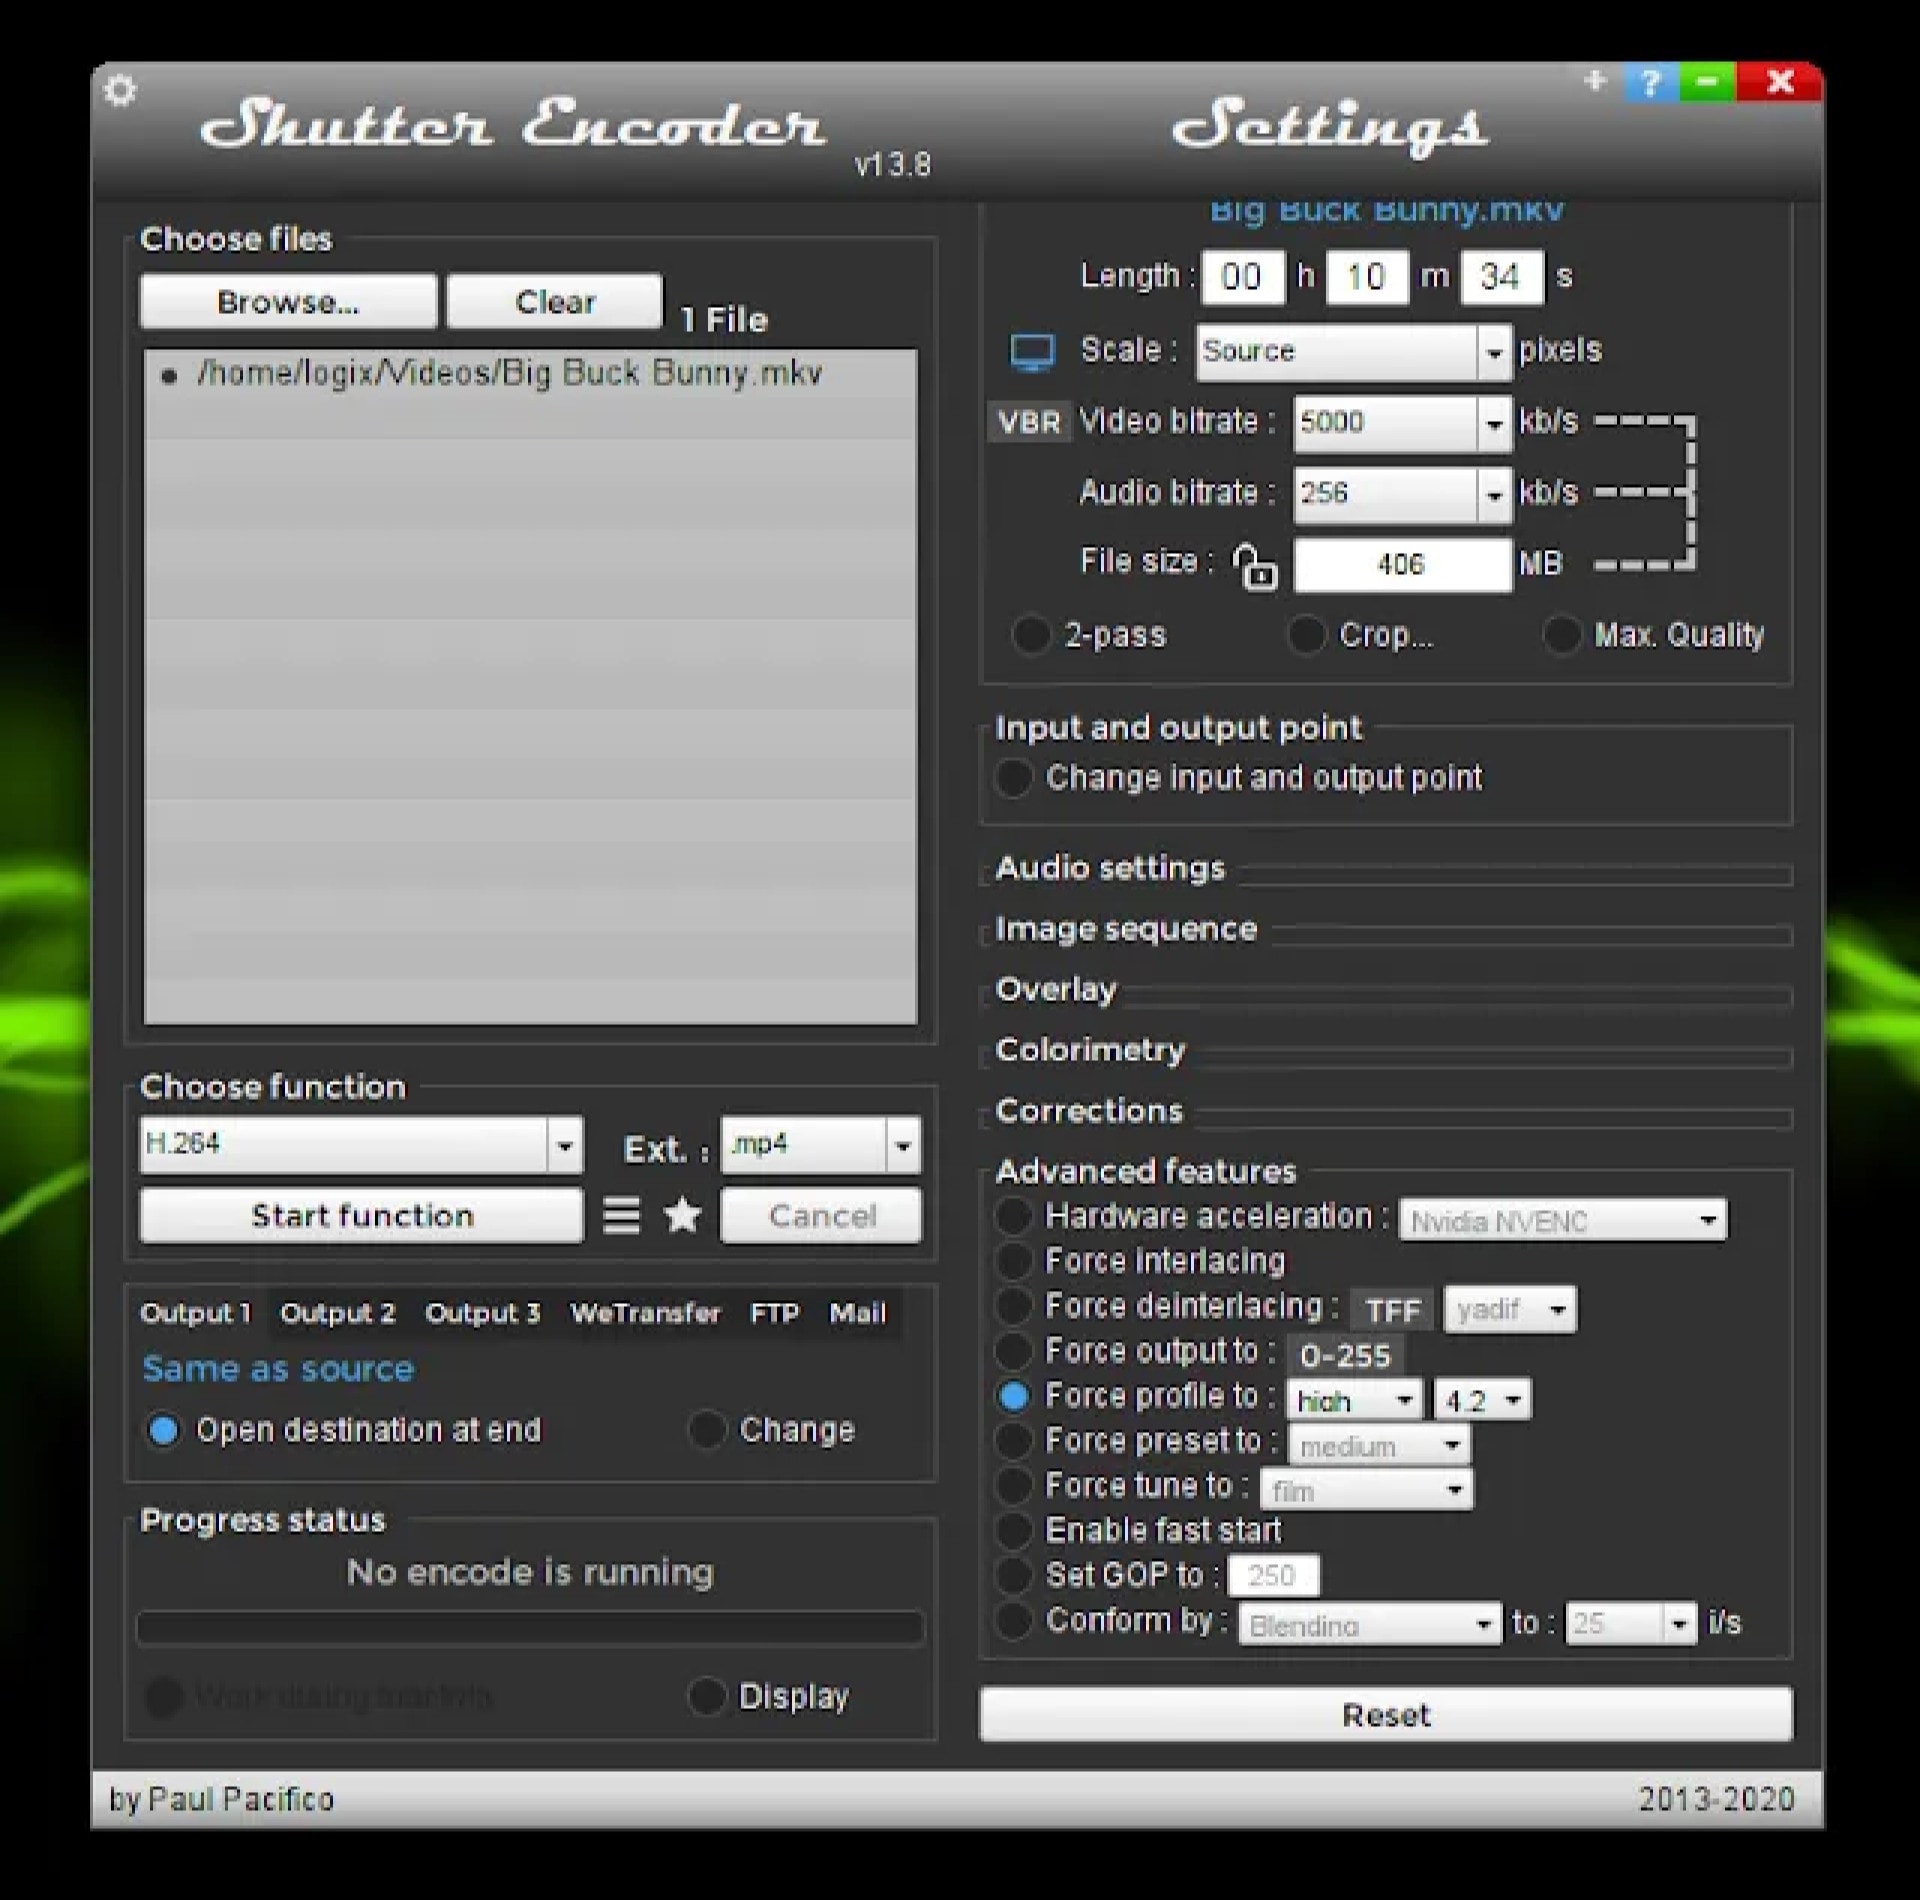
Next, if you want to change the profile, expand the ‘Advanced features’ item in the Shutter Encoder sidebar, check the box for the Force profile option, then change the profile to what you want to use:
- When you’re done with the video adjustments you want to make, click the ‘Start function’ button, and Shutter Encoder will begin encoding your new video.
AVIDEMUX
Supported OS: Linux, BSD, Mac OS X, and Microsoft Windows
Avidemux offers three fundamental operations: cutting, encoding, and filtering. Cutting allows users to copy, paste, save, or delete a specific part of a video and is incredibly beneficial when users are only interested in a small portion of a video or want to remove commercials from a TV show that they have recorded.
Encoding, on the other contrary, is the way of transforming a video to various formats so that it can be played on different players. Users of Avidemux can use this feature on videos they want to use for business or archive for personal use. They could also use this to convert a video that they intend to post online.
Users can also use Avidemux to filter their videos, which include incorporating subtitles and color profiles, deinterlacing, resizing and sharpening the image of a video, and increasing or decreasing the overall volume of the audio.
Meanwhile, Avidemux has task automation features that make video processing and editing quick and painless. A feature called Joblist allows users to organize their projects in a queue so that they can access their files from a single location. They can use this queue to handle videos in bulk as well.
Features:
- Multiple Formats
- Video Filters
- Advanced Interlacing
- Full Editing Control
- Simple Interface
- Open Source
Pros:
- Covers standard formats.
- All essential features are present.
- Surprisingly advanced filtering, processing, editing, and filtering controls.
- The interface is easy to learn.
- Open-source
Cons:
- The interface is very legacy and needs remodeling
- No longer updated
- No support
Steps On How To Cut Videos On Avidemux:
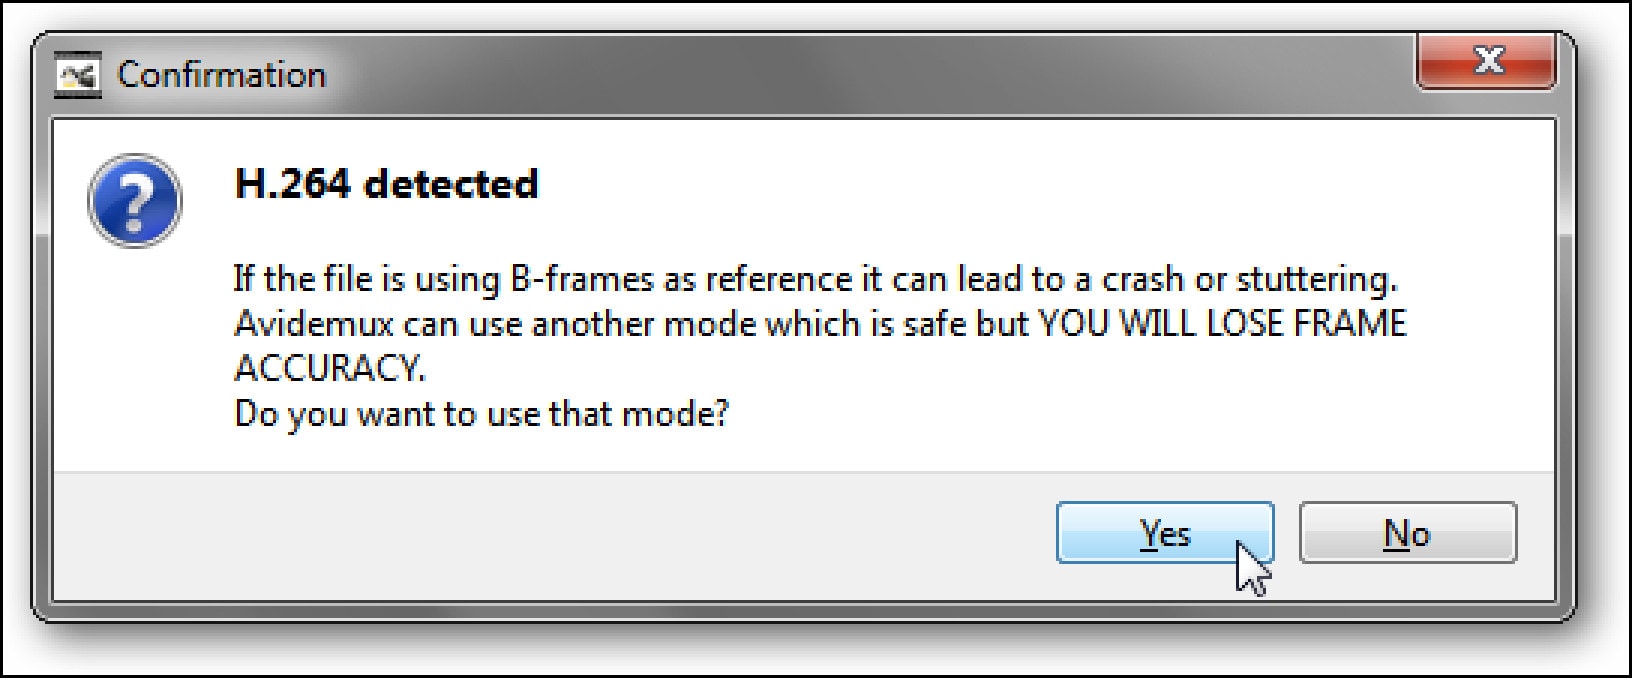
- Open up Avidemux, and load the video file that you want to work with. If you get a prompt like this one: we recommend clicking Yes to use the safer mode.


Find the portion of the video that you’d like to isolate. Get as close as you can to the start of the clip you want to cut.
You want it to read I; if it isn’t framed type I, then use the single left and right arrow buttons to go forward or backward one frame until you find an appropriate I frame.
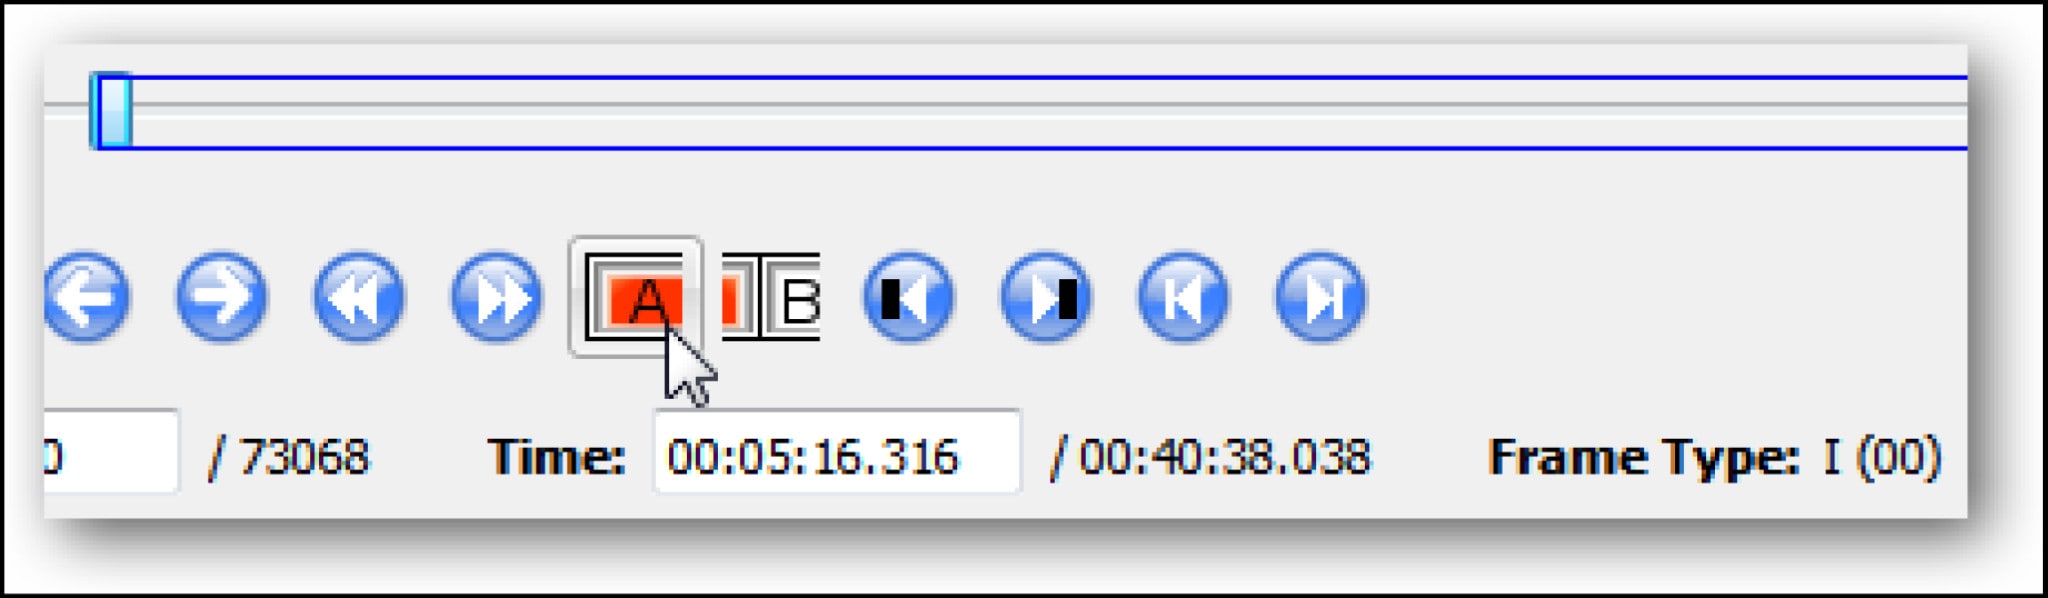
- Once you’ve found the right starting frame, click the button with the A over a red bar. This will set the start of the clip.
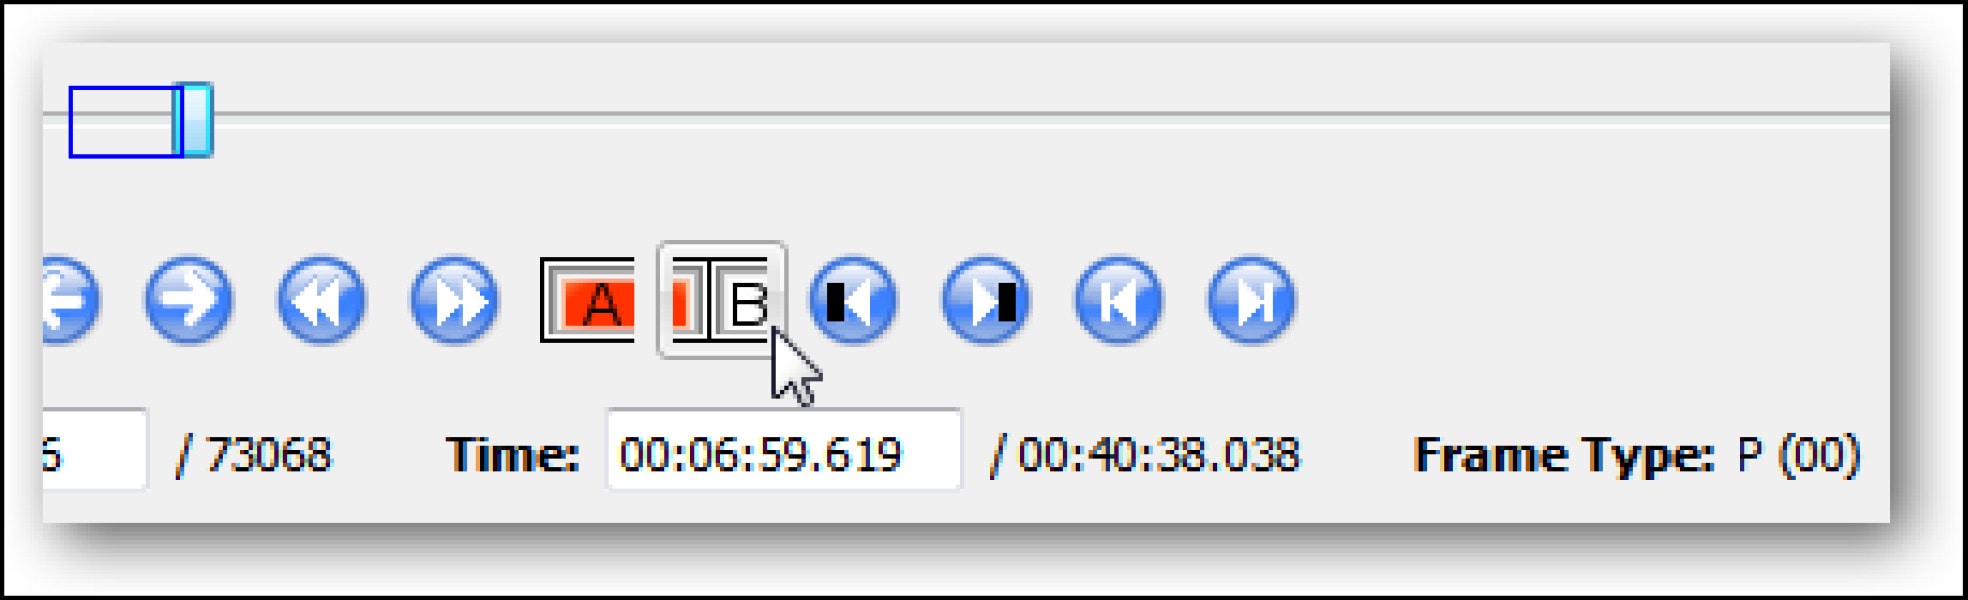
- Advance to where you want your clip to end. Click on the button with a B when you’ve found the appropriate frame. This frame can be of any type.
- You can now save the clip, either by going to File –> Save –> Save Video, or by pressing Ctrl+S. Give the file a name, and Avidemux will prepare your clip.
BEST PAID FFMPEG ALTERNATIVE TO CUT VIDEO ON MAC
JOYOSHARE MEDIA CUTTER
Supported OS: Mac and Windows
The best video cutting tool is Joyoshare Media Cutter for Windows (or Mac). As a professional video trimmer, it allows you to cut your media files at a 60X faster rate, allowing you to clip a 60-minute video or audio file in just one minute. The interface design is also simple and clean, allowing you to do it quickly.
Another noteworthy feature is the ability to easily cut and merge both video and audio without sacrificing quality. The cropper supports a variety of video and audio formats, including AVI, MP4, MPEG, VOB, WMV, ASF, RM, RMVB, 3GP, MP3, WMA, M4R, and others, allowing you to save the file in any format and on any device, including Apple.
More notably, this is a capable all-in-one video cutter. In addition to cutting videos and audio, it can convert all popular video formats, extract audio from video files, and merge video and audio files from the same source into a new one.
Features:
Convert to Any File Format
Merge Video and Audio Files into Multiple Formats
Improved Accuracy & Efficiency in Cutting Videos
60X Fast Conversion
Pros:
- Offers an easy way to cut, merge, and convert video files
- Blazing fast video-cutting and file-conversion speed
- Supports multiple audio and video file formats
Cons:
- Can only merge videos from the same source. That means you can’t use the program to merge separate videos from your gallery.
- The program doesn’t offer an easy way to remove an unwanted part of a video if it’s in the middle of the video. The only way to do that is by cutting the section before and after the video, then merging them into one.
Steps:
Step 1: Adding Video
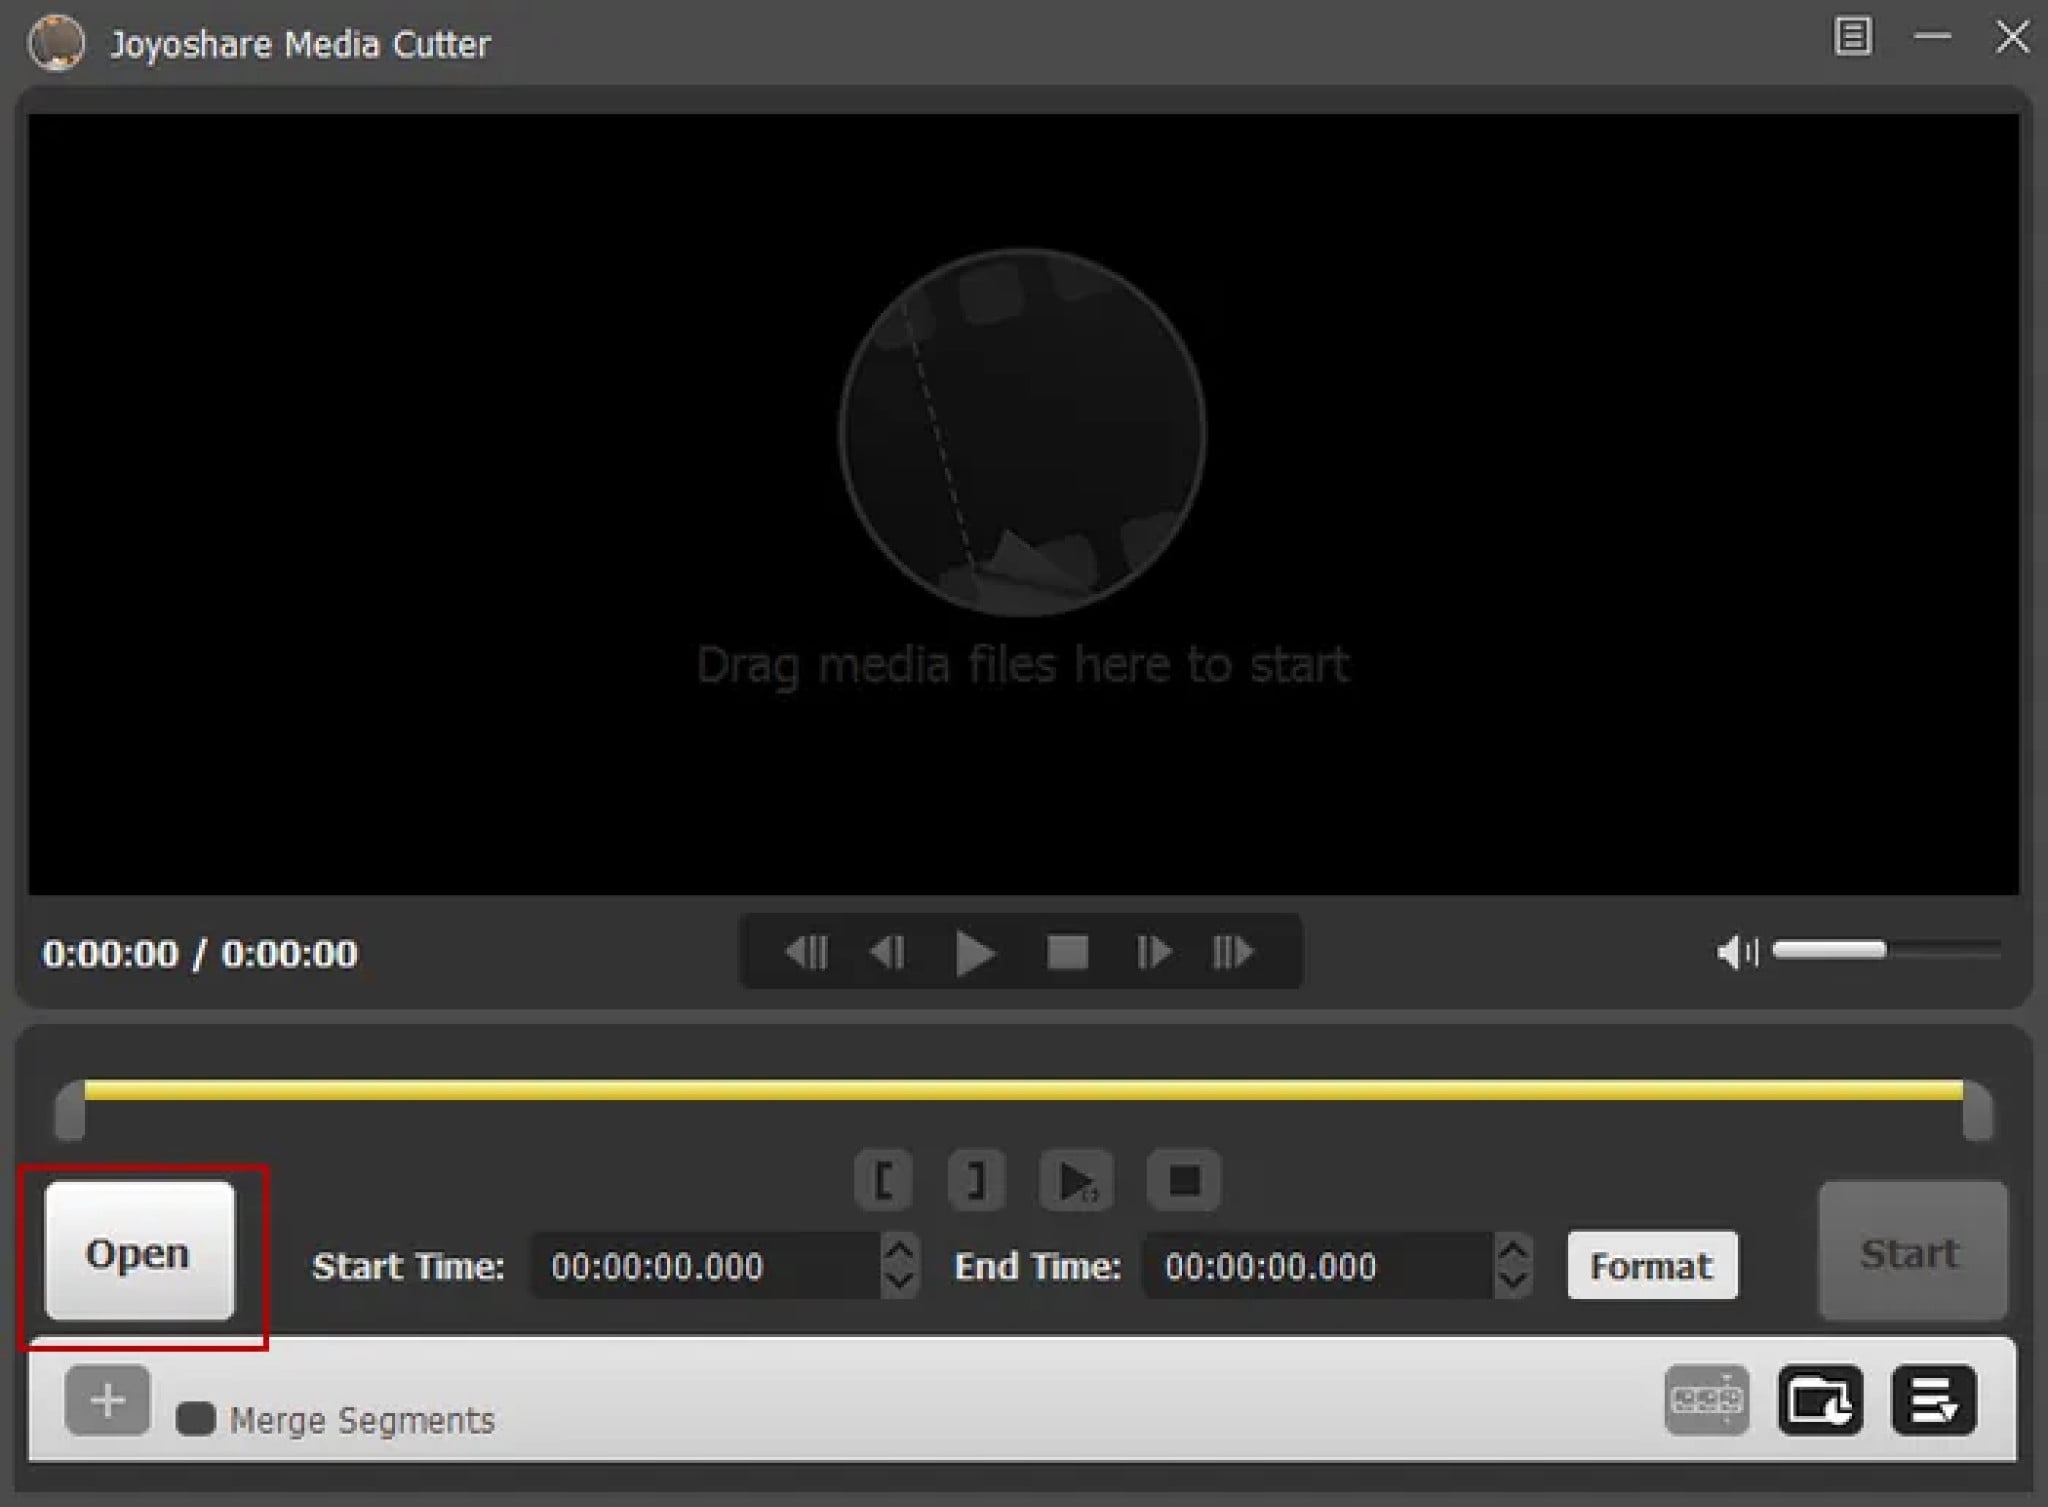
To add a video, click the “Open” button. Locate the video you want to trim from your collection and open it. Alternatively, you can use the drag-and-drop feature.
Step 2: Select the Segment to Be Trimmed
At the bottom of the Joyoshare video window, you’ll be able to see a time slider through which you can skip to your desired timeframe. Move the slider handles attached to the yellow timeline bar to set the starting and ending points of your video.
Once you’ve set your desired starting point, click on the “[” button to highlight the starting segment, then move the right-hand slider to select the ending point, and click the ] button to set the end segment.
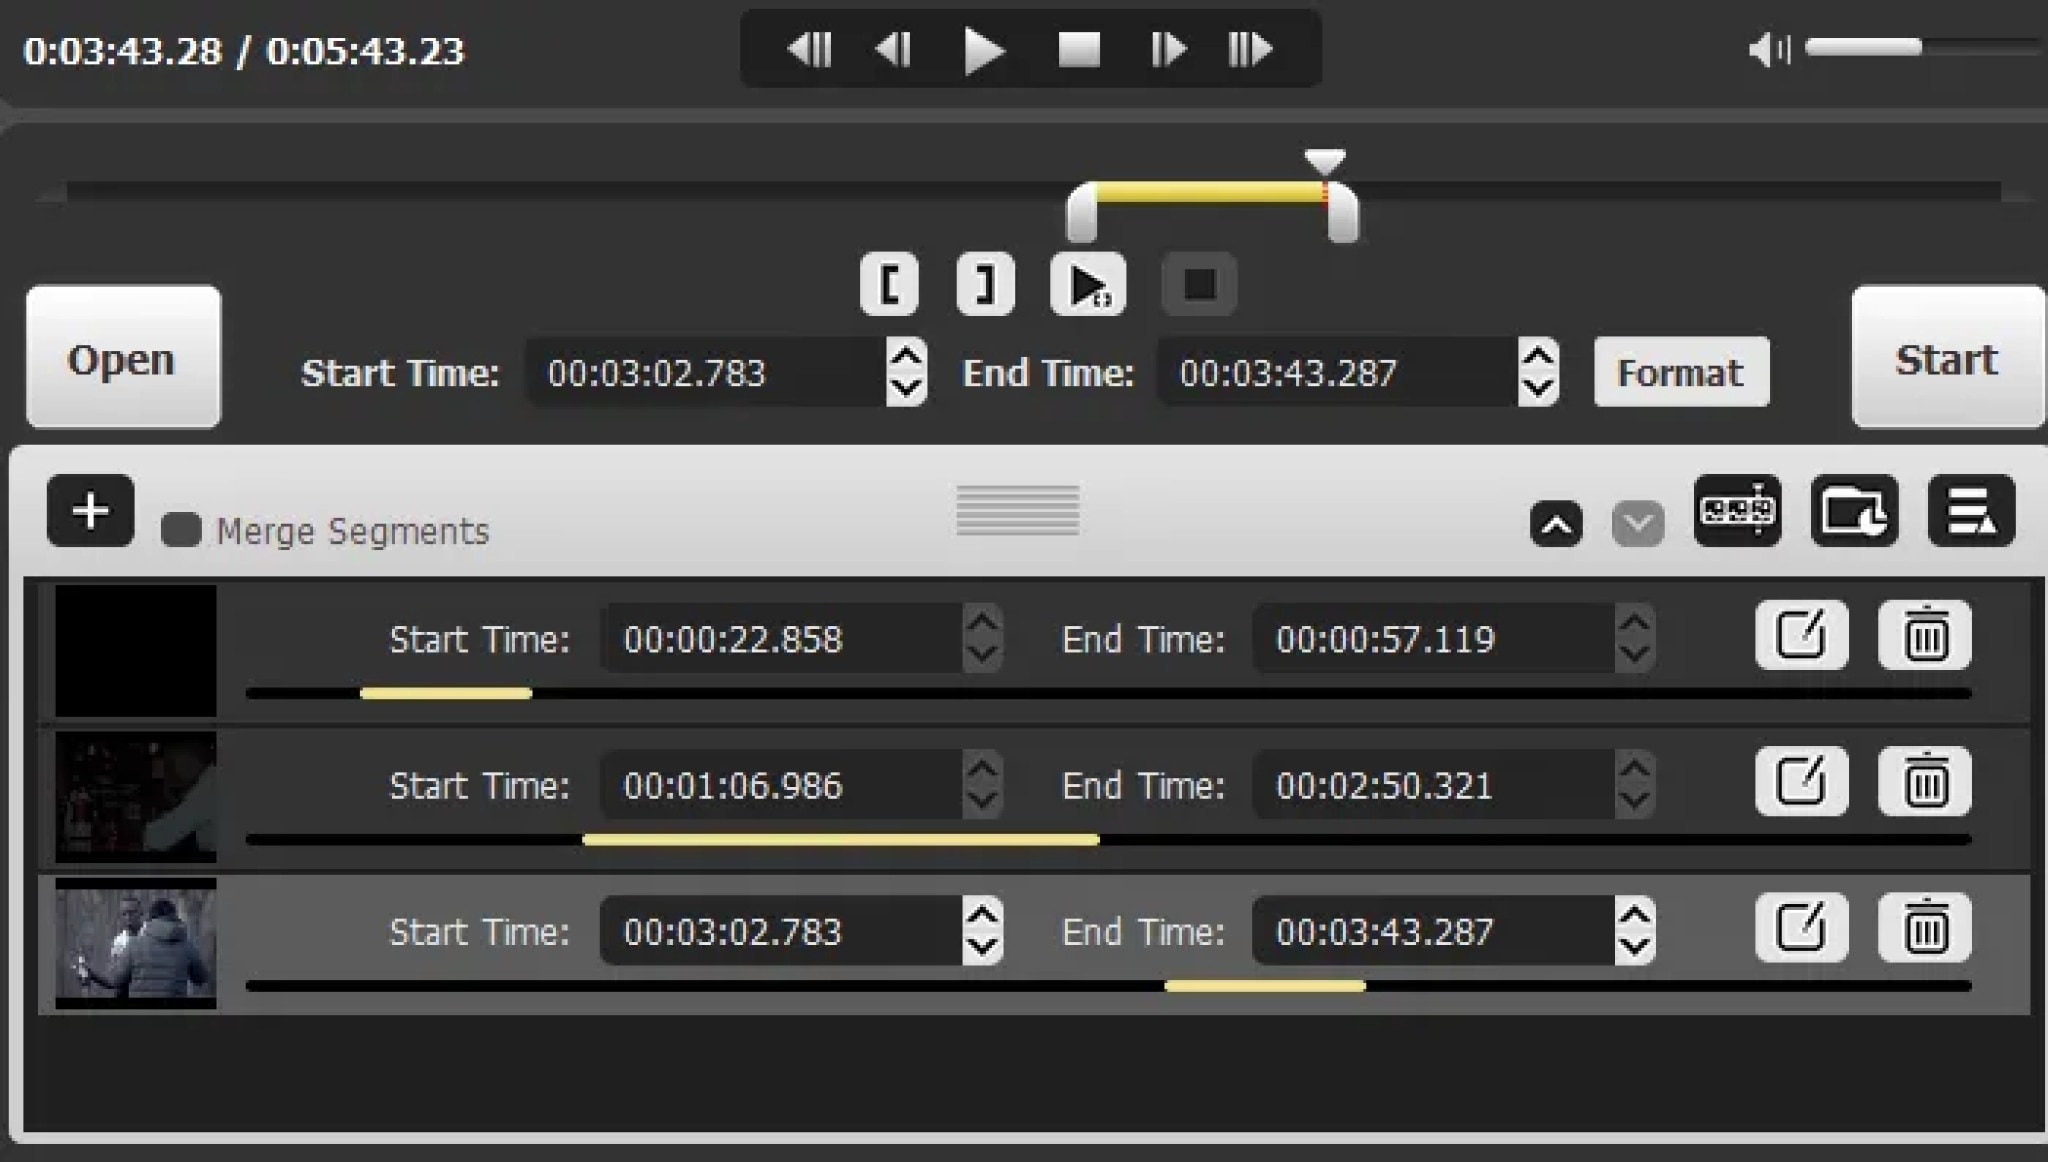
Step 3: Choose Your Desired Output Format and Destination Folder
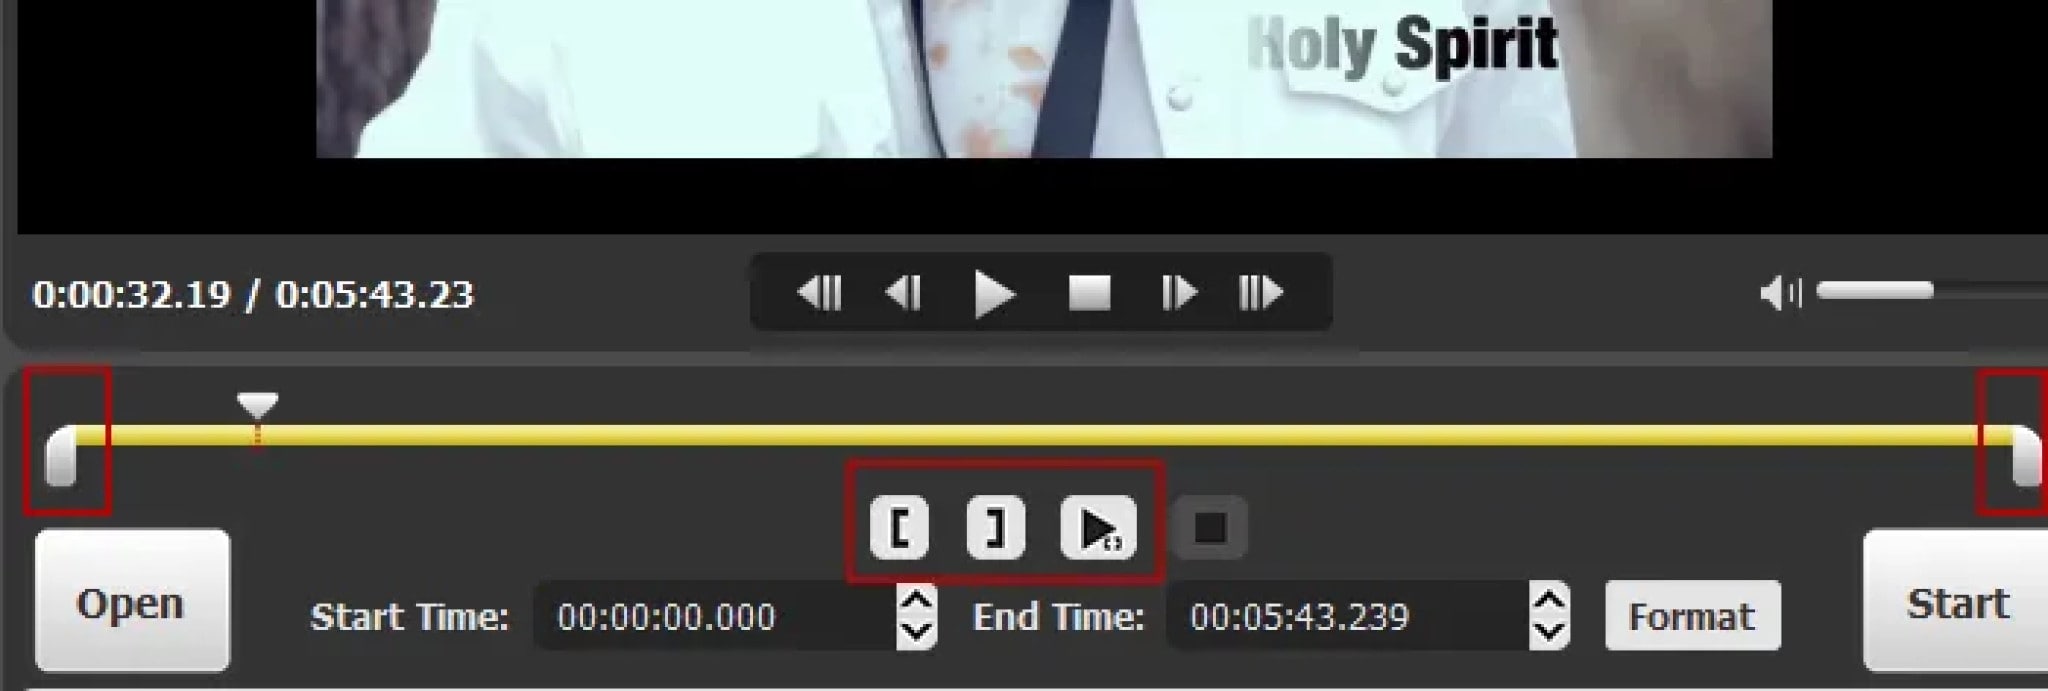
Click the “Format” button, and a new window will pop up where you’ll be able to choose your preferred output format.
Step 4: Trim the Video
Click the “Start” button to begin trimming the segment. Wait for a minute for the program to finalize trimming the segment, then click the save button. That’s it! You’ve successfully trimmed your first video.
If you wish to cut and merge several segments, click the “+” icon at the bottom of the segments tab, then follow the above procedure to create several segments.
MOVAVI VIDEO EDITOR
Supported OS: Mac and Windows
Movavi Video Editor for Mac and Windows is a simple-to-use yet effective video editor and cutter. Aside from cutting and joining short videos, it can apply various video effects, add music and titles, and so on to make your movie more visually appealing. The video cutter tool has an easy-to-use interface and outstanding instructional videos, so you can get started quickly.
Movavi comes with a bunch of video editing controls into a straightforward, user-friendly interface. PiP, chroma-key, titling, basic keyframing, and even motion tracking are included. It isn’t as feature-rich or as fast as most of the competition, but it allows you to easily create visually appealing work.
The tool is not free, but it does offer a limited-time free trial to users. However, it is a little irritating when the ad appears after you install and launch the trial version.
Features:
- Media Library
- Templates
- Upload video or audio file
- Video and image management
- Title Editor
- Trim & Slice
- Video Effect
- Slow Motion & Time Effect
- Social Sharing
- Brand Overlay
- Text Overlay
- Audio Tools
- Speed Adjustment
- Split / Merge
- Video Stabilization
Pros:
- Easy-to-understand user interface
- Transitions with sound
- Motion tracking and picture-in-picture tools
- Chroma keying
- Quick movie-creation tool
Cons:
- Lacks advanced trim modes and clip pre-trimming
- Rendering on the slow side
- Not compatible with Apple Silicon M1
Steps:
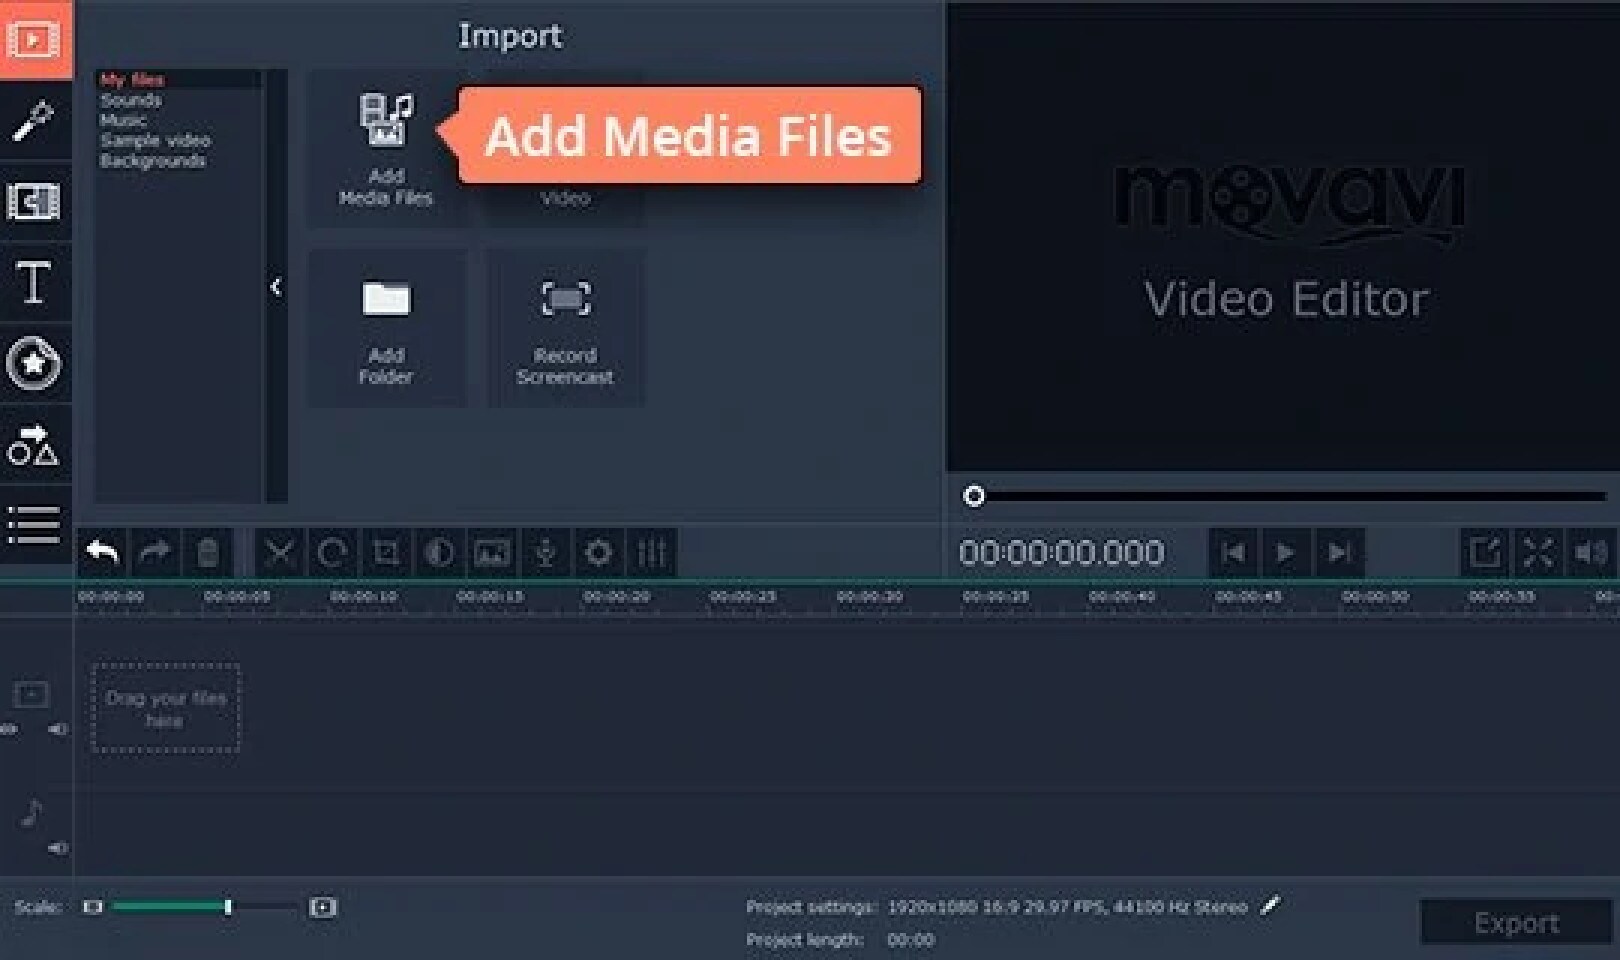
- Add Video Files
Launch Movavi’s MP4 trimmer, click the Add Media Files button, and upload the MP4 files you want to work with. The videos you’ve added will appear on the Timeline in the lower part of the program window.
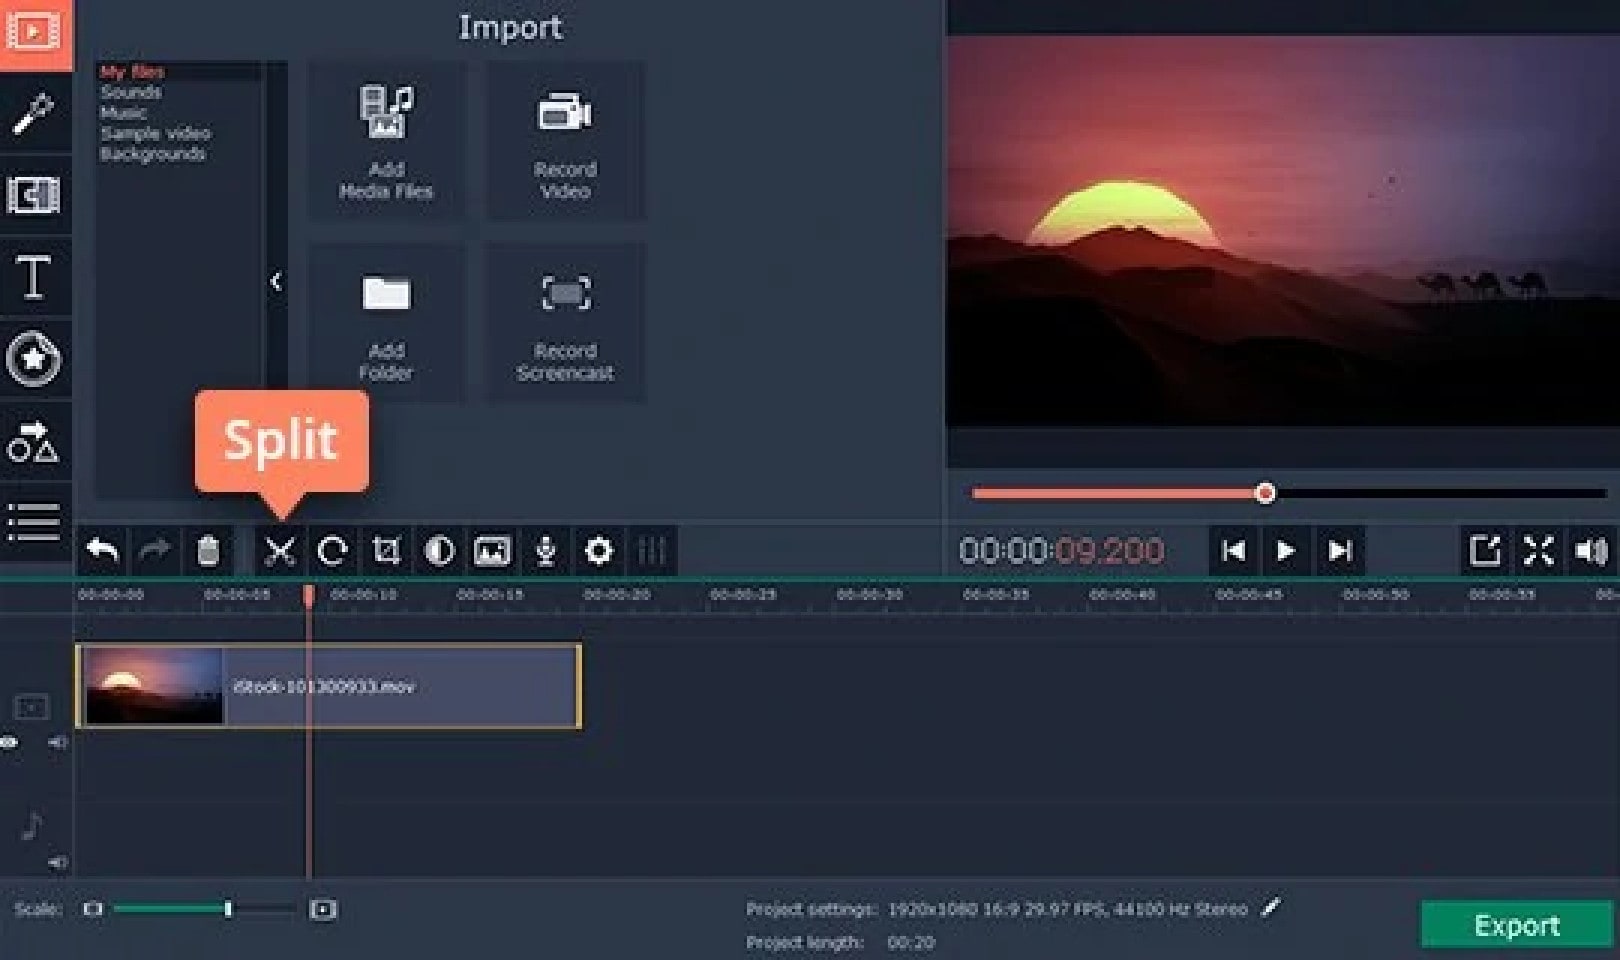
- Cut And Trim Your Videos

So how to cut MP4 video with Movavi Video Editor Plus? If you want to snip a video into two or more parts, click the file on the Timeline and move the red marker to the place where you want to make the first cut. Then click the Split button with the scissors icon or hit Ctrl+B. Repeat the process as many times as you need.
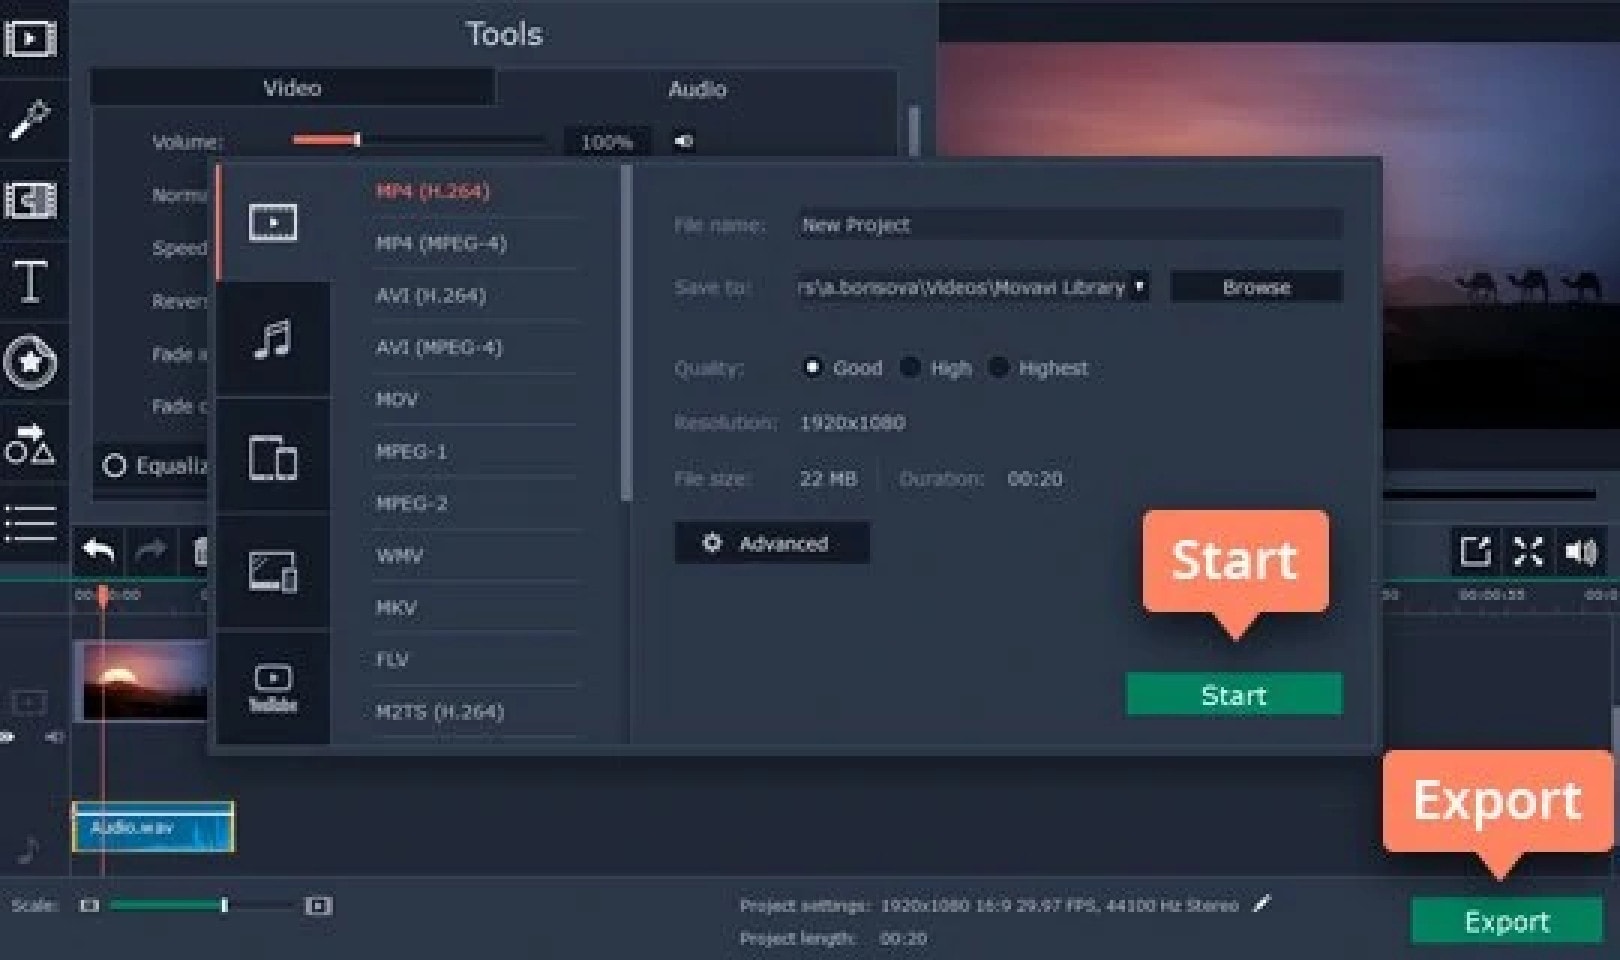
If you want to trim your video clip, select the file on the Timeline and then just pull the edge of the clip to shorten it as shown in the picture.
- Save The Result
All that’s left to do is save your edited video. Click the Export button, choose the appropriate video format, and hit Start.
XILISOFT VIDEO CUTTER

Supported OS: Mac and Windows
Xilisoft Video Cutter is an effective programming cutter that lets you choose and cut your preferred segments in a single file as well as cut out the segments you don’t like. It is compatible with almost all popular video formats, including VCD, AVI, MPEG, MP4, WMV, 3GP, /MPEG-4 AVC, /PSP AVC, MOV, ASF, and others. It enables you to precisely set the start and end points.
While the software cannot cut segments from multiple input files at the same time, it can cut your selected source video into the number of clips you require in a single step. Xilisoft Video Cutter goes beyond standard cutting or slicing by allowing you to convert your video input files to a variety of well-known codecs. It is possible to convert the entire source file or just a specific segment, but this requires removing those unnecessary parts that frequently cause problems (TV advertisements, trailers, etc.).
Features:
Easily Cut Video Clips
Multi-trim Video to Whole
Output Clips to Multiple Formats
Instant Preview
Clear Timeline
Advanced Editing
1-2-3 Interface
Multilingual Interface
Pros:
Supports all of the most widely used video file formats
Converts your videos between formats
Simple cutting interface
Allows for multiple cuttings from a single source file
Cons:
Does not support batch processing
Steps On How To Cut Your Favored Segments:
- Add Source Video File

Click the “Open“ button on the main interface, and select a video file in the pop-up window.
- Set Clip Segments
Click “Play” and click the “Set Start Point” and “Set End Point” buttons successively during playing the video to set the start point and endpoint of the clip.
You can also set several segments. Click the “Show Advanced Mode” button and click the “New Clip” button in advanced mode to set the start and endpoints of the segments. Repeat the above steps to set several segments.
Tip: To delete a segment, please choose the segment in the segment list, and click the “Delete Clip” button on the toolbar; to adjust the segment order, please choose the segment and click the “Move Up” or “Move Down” button to adjust its order.
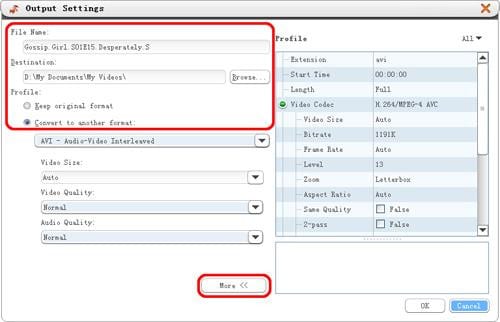
- Output Settings
Click the “Cut” button at the bottom of the window to open the “Output Settings” window.
- Start Cutting
Click the “OK” button to start video cutting. During cutting, you can check the cutting status by dragging the process bar or canceling the cutting. Tip: After cutting is done, click the “Open Output Folder” button to open the destination folder to check the clippings. Click the “Done” button to go back to the main window.
WHICH SHOULD I CHOOSE: FREE OR PAID VIDEO CUTTER ON MAC?
Whether you choose Free or Paid Video Cutter, it still depends on your edit and navigation if the project will succeed like what you’re anticipating. Beginners in the industry can go for Free Video Cutters to practice the craft without worrying about the monthly subscription.
However, if you’re a professional, I highly suggest that you choose Paid Video Cutter to lessen the hassle and create amazing output.
FAQS ABOUT CUTTING VIDEOS
- How can I cut a video without losing quality?
Trimming VLC through LosslessCut
LosslessCut is an open-source video cutter that runs on Windows, Linux, and Mac. Like Filmora, this software also allows you to cut videos without re-encoding, so there is no loss of quality.
- Who is the best video cutter?
Filmora is one of the best video cutter software that allows you to change the aesthetic of your video with one click. It comes with a wide range of video effects that enable you to make clips look good. Features: This tool provides fast editing processing and adjustable preview quality.
- Why does trimming videos reduce quality?
In most cases, trimming only causes a minor loss of video quality. And there is no clear causal relationship between trimming and losing video quality. The main factors that influence video quality are Resolution, Bitrate, and Frame size.
If you are longing to pick up the best video cutter for Mac, you are supposed to evaluate it from different aspects, like operating interface, cutting features, output quality, post-processing ability, etc. Frankly speaking, there is no fixed answer. Everything depends on your actual requirements. If you want to cut videos on Mac with the forthright method, iMovie can be your top priority. If you prefer top-leading editing features, Blender is competitive enough for you.
Conclusion:
There you have it! Here is the alternative software to cut/shorten your video without using FFmpeg. All these editors cater to different needs, so be sure to try them out, understand your requirements, and use the right one for your project!
FILMORA VIDEO EDITOR
Supported OS: Windows and Mac
Filmora Video Editor is another well-known video editor that is widely used for video editing. It was released two decades ago to provide low-cost video editing software. Aside from video cutting and joining, it has some great features such as adding filters, titles, texts, and so on. You can also record your voice or live music, mix audio and video tracks, and do other things. It is simple to use and is available for both Mac and Windows users.
Filmora includes an instant cutter tool that can be used throughout clip import and is designed for use with large amounts of high-resolution content. As the names indicate, it is very simple and serves only one purpose. You can drag multiple clips onto its window, but only if the Merge sub-mode is enabled. Trim mode is only for trimming the ends of a single clip, and its interface only displays one clip in the left-size source tray. You can Add Segments, which creates a new clip based on your trimmed original, but you can’t split a clip explicitly.
For Win 7 or later (64-bit)
For macOS 10.14 or later
Features:
- All editing tools and features are well-displayed in the main windows, which can be found and used easily;
- Very easy to cut or trim video files just with a few clicks;
- Lots of filters, overlays, motion graphics, titles, and more special effects can be added to the video.
- More features like Picture in Picture and Green Screen and Split Screen can be used to make videos more unique.
Pros:
- Intuitive Interface
- Easy To Use
- Great Features
- Affordable Perpetual License
- Great Final Video Results
- Faster Renders And Previews
- Supports Screen Capturing
- Support Wide Range Of File Formats
- User Support Is Good
Cons:
- Lacks Advanced Feature
- Free Version Has Watermark
- Not Available For Linux And Phones
- Pricing Is Expensive
- Software Lagging
Steps On How To Cut Video On Mac Using Filmora Video Editor
Step 1: Import Video Files
You will begin by importing the video files into the project window of your program through dragging and dropping.
Step 2: Add Video To The Timeline
Drag and dropping are the easiest way to add the video to the timeline.
Step 3: Cut Video
If you want to trim the video, just move the cursor at the beginning or end of the video. When the cursor becomes a cross, move it forward or backward. Trimming only allows you to cut the beginning or end of a video.
If you need to cut a section of a video, you should follow do this: move the cursor at the beginning of the video section you want to cut, then click the scissors icon > Next, move the cursor to the end of the video section you want to cut and click scissors icon > Right-click on the video section you want to cut and click “Delete“.
Step 4: Export the Video
To export your video, click the “export” button and choose the local tab. After selecting the output device and format, just click “Create” to save it.
HANDBRAKE
Supported OS: Linux, Windows, and Mac
HandBrake is a multithreaded video transcoder that is unfastened and open source. It can compress and convert nearly any virtual media layout to another. HandBrake is able to rip encrypted DVDs the usage of libdvdcss (libdvdcss is covered with the VLC media participant on macOS and AnyDVD/DVD forty three on Windows).
This software program additionally enables batch processing, which converts a couple of video files at the same time. Additionally, a plethora of presets are available to guide you to the preferred output without having to tinker with a plethora of options.
Handbrake is a powerful and excellent video converter for Windows, Mac, and Linux that should not be overlooked. It provides all of the necessary features in a simple tool that gives the user complete control over the output. Before we get into the specifics, here’s a rundown of Handbrake’s advantages and disadvantages.
Features:
- Support of chapter selections
- Support of subtitles
- Integrated bitrate calculator
- Picture deinterlacing, cropping, and scaling
- Live Video Preview
Pros:
- HandBrake has a very simple layout which makes the video converter very easy to use, even for those who are converting videos for the first time.
- The live preview helps.
- The fact that the software is free and has device presets for iOS and Android certainly makes HandBrake a welcome video converter.
- The queuing tray for batch conversions is particularly nice.
- People who convert a lot of videos will find it very helpful.
Cons:
- On the flip side, the settings are not always easy to deal with.
- It takes a lot of time and then there are errors. The latest version fixes some old bugs but there are hiccups.
- The live preview is for up to four minutes of a video.
- It is futile for very long videos.
- The settings interface and that of the live preview could be better.
- The open-source software also doesn’t support all video formats.
- Given the diversity of devices and the multitude of formats in use today, HandBrake needs more compatibility.
Steps On How To Compress Video Using Handbrake
- After you download and install Handbrake, open the app. On the left side, under ‘Source Selection’, click ‘File’. Select the file from the folder and then click ‘open’.
- Choose where you want the compressed video to be saved by clicking ‘Browse’.
- Enter a name for the video, and click ‘Save’.
- Under ‘Output Settings’, choose MP4 for ‘Container’.
- Click the ‘Video’ tab, under it, is the ‘Video Codec’, choose (x264).
- Select a Preset from the ‘Preset Drawer’. We recommend you choose Fast1030p 30 for high quality.
- Choose the ‘framerate’, depending on your source video i.e. NTSC (29.97fps), then make it 30fps by choosing 30. Also, tick the ‘Constant Framerate’ to ensure better compatibility.
- Enter an ‘Average Bitrate (kbps)’ for the video between 5,000-10,000 (take note: higher bitrate has higher quality video but will take longer to upload and download).
- Click the ‘Picture’ tab if you want to change the video frame size or resolution.
Change ‘Anamorphic’ to ‘None’, and ‘Modulus’ to ‘16’. And tick ‘Keep Aspect Ratio’. Use the arrow down on Width to change from 1920 (full HD) down to 1280.
Select the ‘Audio’ tab and choose 48 for the Samplerate. Choose Stereo for Mixdown. Choose 320 for your audio Bitrate.
- Hit the ‘Start Encode’ button and wait until the video has finished compressing. Handbrake will let you know when it has finished.
SHUTTER ENCODER
Supported OS: Mac, Linux, and Windows
Shutter Encoder offers a complimentary codec and conversion tool for everyone that was created in collaboration with video editors.
Convert your videos, images, and audio files to OP-Atom format, which is compatible with Avid Media Composer and Pro Tools. Encode your files, replace audio, burn to DVD, analyze audio volume, download web videos, and create your own timelapse.
Analyze audio loudness, replace audio, author DVDs and Blu-rays, create image sequences, download web videos, and more. Everything is done as simply and efficiently as possible
Shutter Encoder makes use of Java as well as other tools such as 7za, VLC, FFmpeg, ExifTool, MKVMerge (part of MKVToolNix), MediaInfo, DVDAuthor, youtube-dl, and others.
Shutter Encoder offers advanced users the option to tailor the conversion individually. You can, for example, manually change the bitrate of audio and video, but you can also set a file size limit and perform the conversion based on that. Further work techniques, such as the ability to enable hardware of the computer itself and complete the conversion according to a predefined profile, are available in a separate box.
Features:
- Without conversion: Cut without re-encoding, Replace audio, Rewrap, Conform, Merge, Subtitling (create subtitles for a video), Video inserts
- Sound conversion: WAV, AIFF, FLAC, MP3, AC3, OPUS, OGG
- Editing codecs: DNxHD, DNxHR, Apple ProRes, QT Animation, Uncompressed YUV
- Output codecs: , DV PAL, XDCAM HD422, AVC-Intra 100, XAVC, HAP, , VP9, AV1, OGV, MJPEG, Xvid, WMV, MPEG
- Archiving codec: FFV1
- Image creation: JPEG, PNG, TIF, TGA, DPX, BPM, ICO, WEBP
- Burn & Rip: DVD, Blu-ray, DVD RIP
- Analysis: Loudness & True Peak, Audio normalization, Cut detection, Black detection
- Download web videos using youtube-dl
Pros:
- Conversion according to profiles
- Extensive advanced options
- Built-in editing capabilities
Cons:
- Limited preview capability
Steps On How To Use Shutter Encoder
- To start, drag the video from your file manager and drop it onto the Shutter Encoder window, or use the ‘Browse’ button available in the upper left-hand side corner of the window to add a video.
- Next, from the ‘Choose function’ drop-down menu, scroll to (it’s the first under Output codecs). You will now see some new options in a new panel that appears on the right-hand side of the Shutter Encoder window. From there, if you want to crop the video, click the Crop checkbox:
A new window will pop up where you can use your mouse to crop the video to the desired size. If you want to change it to a predefined, fixed-size ratio value, uncheck the ‘Manual mode’ box, and you’ll be able to choose a ratio from the ‘Pre-settings’ drop-down.
Next, if you want to change the profile, expand the ‘Advanced features’ item in the Shutter Encoder sidebar, check the box for the Force profile option, then change the profile to what you want to use:
- When you’re done with the video adjustments you want to make, click the ‘Start function’ button, and Shutter Encoder will begin encoding your new video.
AVIDEMUX
Supported OS: Linux, BSD, Mac OS X, and Microsoft Windows
Avidemux offers three fundamental operations: cutting, encoding, and filtering. Cutting allows users to copy, paste, save, or delete a specific part of a video and is incredibly beneficial when users are only interested in a small portion of a video or want to remove commercials from a TV show that they have recorded.
Encoding, on the other contrary, is the way of transforming a video to various formats so that it can be played on different players. Users of Avidemux can use this feature on videos they want to use for business or archive for personal use. They could also use this to convert a video that they intend to post online.
Users can also use Avidemux to filter their videos, which include incorporating subtitles and color profiles, deinterlacing, resizing and sharpening the image of a video, and increasing or decreasing the overall volume of the audio.
Meanwhile, Avidemux has task automation features that make video processing and editing quick and painless. A feature called Joblist allows users to organize their projects in a queue so that they can access their files from a single location. They can use this queue to handle videos in bulk as well.
Features:
- Multiple Formats
- Video Filters
- Advanced Interlacing
- Full Editing Control
- Simple Interface
- Open Source
Pros:
- Covers standard formats.
- All essential features are present.
- Surprisingly advanced filtering, processing, editing, and filtering controls.
- The interface is easy to learn.
- Open-source
Cons:
- The interface is very legacy and needs remodeling
- No longer updated
- No support
Steps On How To Cut Videos On Avidemux:
- Open up Avidemux, and load the video file that you want to work with. If you get a prompt like this one: we recommend clicking Yes to use the safer mode.
Find the portion of the video that you’d like to isolate. Get as close as you can to the start of the clip you want to cut.
You want it to read I; if it isn’t framed type I, then use the single left and right arrow buttons to go forward or backward one frame until you find an appropriate I frame.
- Once you’ve found the right starting frame, click the button with the A over a red bar. This will set the start of the clip.
- Advance to where you want your clip to end. Click on the button with a B when you’ve found the appropriate frame. This frame can be of any type.
- You can now save the clip, either by going to File –> Save –> Save Video, or by pressing Ctrl+S. Give the file a name, and Avidemux will prepare your clip.
BEST PAID FFMPEG ALTERNATIVE TO CUT VIDEO ON MAC
JOYOSHARE MEDIA CUTTER
Supported OS: Mac and Windows
The best video cutting tool is Joyoshare Media Cutter for Windows (or Mac). As a professional video trimmer, it allows you to cut your media files at a 60X faster rate, allowing you to clip a 60-minute video or audio file in just one minute. The interface design is also simple and clean, allowing you to do it quickly.
Another noteworthy feature is the ability to easily cut and merge both video and audio without sacrificing quality. The cropper supports a variety of video and audio formats, including AVI, MP4, MPEG, VOB, WMV, ASF, RM, RMVB, 3GP, MP3, WMA, M4R, and others, allowing you to save the file in any format and on any device, including Apple.
More notably, this is a capable all-in-one video cutter. In addition to cutting videos and audio, it can convert all popular video formats, extract audio from video files, and merge video and audio files from the same source into a new one.
Features:
Convert to Any File Format
Merge Video and Audio Files into Multiple Formats
Improved Accuracy & Efficiency in Cutting Videos
60X Fast Conversion
Pros:
- Offers an easy way to cut, merge, and convert video files
- Blazing fast video-cutting and file-conversion speed
- Supports multiple audio and video file formats
Cons:
- Can only merge videos from the same source. That means you can’t use the program to merge separate videos from your gallery.
- The program doesn’t offer an easy way to remove an unwanted part of a video if it’s in the middle of the video. The only way to do that is by cutting the section before and after the video, then merging them into one.
Steps:
Step 1: Adding Video
To add a video, click the “Open” button. Locate the video you want to trim from your collection and open it. Alternatively, you can use the drag-and-drop feature.
Step 2: Select the Segment to Be Trimmed
At the bottom of the Joyoshare video window, you’ll be able to see a time slider through which you can skip to your desired timeframe. Move the slider handles attached to the yellow timeline bar to set the starting and ending points of your video.
Once you’ve set your desired starting point, click on the “[” button to highlight the starting segment, then move the right-hand slider to select the ending point, and click the ] button to set the end segment.
Step 3: Choose Your Desired Output Format and Destination Folder
Click the “Format” button, and a new window will pop up where you’ll be able to choose your preferred output format.
Step 4: Trim the Video
Click the “Start” button to begin trimming the segment. Wait for a minute for the program to finalize trimming the segment, then click the save button. That’s it! You’ve successfully trimmed your first video.
If you wish to cut and merge several segments, click the “+” icon at the bottom of the segments tab, then follow the above procedure to create several segments.
MOVAVI VIDEO EDITOR
Supported OS: Mac and Windows
Movavi Video Editor for Mac and Windows is a simple-to-use yet effective video editor and cutter. Aside from cutting and joining short videos, it can apply various video effects, add music and titles, and so on to make your movie more visually appealing. The video cutter tool has an easy-to-use interface and outstanding instructional videos, so you can get started quickly.
Movavi comes with a bunch of video editing controls into a straightforward, user-friendly interface. PiP, chroma-key, titling, basic keyframing, and even motion tracking are included. It isn’t as feature-rich or as fast as most of the competition, but it allows you to easily create visually appealing work.
The tool is not free, but it does offer a limited-time free trial to users. However, it is a little irritating when the ad appears after you install and launch the trial version.
Features:
- Media Library
- Templates
- Upload video or audio file
- Video and image management
- Title Editor
- Trim & Slice
- Video Effect
- Slow Motion & Time Effect
- Social Sharing
- Brand Overlay
- Text Overlay
- Audio Tools
- Speed Adjustment
- Split / Merge
- Video Stabilization
Pros:
- Easy-to-understand user interface
- Transitions with sound
- Motion tracking and picture-in-picture tools
- Chroma keying
- Quick movie-creation tool
Cons:
- Lacks advanced trim modes and clip pre-trimming
- Rendering on the slow side
- Not compatible with Apple Silicon M1
Steps:
- Add Video Files
Launch Movavi’s MP4 trimmer, click the Add Media Files button, and upload the MP4 files you want to work with. The videos you’ve added will appear on the Timeline in the lower part of the program window.
- Cut And Trim Your Videos
So how to cut MP4 video with Movavi Video Editor Plus? If you want to snip a video into two or more parts, click the file on the Timeline and move the red marker to the place where you want to make the first cut. Then click the Split button with the scissors icon or hit Ctrl+B. Repeat the process as many times as you need.
If you want to trim your video clip, select the file on the Timeline and then just pull the edge of the clip to shorten it as shown in the picture.
- Save The Result
All that’s left to do is save your edited video. Click the Export button, choose the appropriate video format, and hit Start.
XILISOFT VIDEO CUTTER
Supported OS: Mac and Windows
Xilisoft Video Cutter is an effective programming cutter that lets you choose and cut your preferred segments in a single file as well as cut out the segments you don’t like. It is compatible with almost all popular video formats, including VCD, AVI, MPEG, MP4, WMV, 3GP, /MPEG-4 AVC, /PSP AVC, MOV, ASF, and others. It enables you to precisely set the start and end points.
While the software cannot cut segments from multiple input files at the same time, it can cut your selected source video into the number of clips you require in a single step. Xilisoft Video Cutter goes beyond standard cutting or slicing by allowing you to convert your video input files to a variety of well-known codecs. It is possible to convert the entire source file or just a specific segment, but this requires removing those unnecessary parts that frequently cause problems (TV advertisements, trailers, etc.).
Features:
Easily Cut Video Clips
Multi-trim Video to Whole
Output Clips to Multiple Formats
Instant Preview
Clear Timeline
Advanced Editing
1-2-3 Interface
Multilingual Interface
Pros:
Supports all of the most widely used video file formats
Converts your videos between formats
Simple cutting interface
Allows for multiple cuttings from a single source file
Cons:
Does not support batch processing
Steps On How To Cut Your Favored Segments:
- Add Source Video File
Click the “Open“ button on the main interface, and select a video file in the pop-up window.
- Set Clip Segments
Click “Play” and click the “Set Start Point” and “Set End Point” buttons successively during playing the video to set the start point and endpoint of the clip.
You can also set several segments. Click the “Show Advanced Mode” button and click the “New Clip” button in advanced mode to set the start and endpoints of the segments. Repeat the above steps to set several segments.
Tip: To delete a segment, please choose the segment in the segment list, and click the “Delete Clip” button on the toolbar; to adjust the segment order, please choose the segment and click the “Move Up” or “Move Down” button to adjust its order.
- Output Settings
Click the “Cut” button at the bottom of the window to open the “Output Settings” window.
- Start Cutting
Click the “OK” button to start video cutting. During cutting, you can check the cutting status by dragging the process bar or canceling the cutting. Tip: After cutting is done, click the “Open Output Folder” button to open the destination folder to check the clippings. Click the “Done” button to go back to the main window.
WHICH SHOULD I CHOOSE: FREE OR PAID VIDEO CUTTER ON MAC?
Whether you choose Free or Paid Video Cutter, it still depends on your edit and navigation if the project will succeed like what you’re anticipating. Beginners in the industry can go for Free Video Cutters to practice the craft without worrying about the monthly subscription.
However, if you’re a professional, I highly suggest that you choose Paid Video Cutter to lessen the hassle and create amazing output.
FAQS ABOUT CUTTING VIDEOS
- How can I cut a video without losing quality?
Trimming VLC through LosslessCut
LosslessCut is an open-source video cutter that runs on Windows, Linux, and Mac. Like Filmora, this software also allows you to cut videos without re-encoding, so there is no loss of quality.
- Who is the best video cutter?
Filmora is one of the best video cutter software that allows you to change the aesthetic of your video with one click. It comes with a wide range of video effects that enable you to make clips look good. Features: This tool provides fast editing processing and adjustable preview quality.
- Why does trimming videos reduce quality?
In most cases, trimming only causes a minor loss of video quality. And there is no clear causal relationship between trimming and losing video quality. The main factors that influence video quality are Resolution, Bitrate, and Frame size.
If you are longing to pick up the best video cutter for Mac, you are supposed to evaluate it from different aspects, like operating interface, cutting features, output quality, post-processing ability, etc. Frankly speaking, there is no fixed answer. Everything depends on your actual requirements. If you want to cut videos on Mac with the forthright method, iMovie can be your top priority. If you prefer top-leading editing features, Blender is competitive enough for you.
Conclusion:
There you have it! Here is the alternative software to cut/shorten your video without using FFmpeg. All these editors cater to different needs, so be sure to try them out, understand your requirements, and use the right one for your project!
8 Unexpected Ways to Add Emoji to Photo Online
8 Unexpected Ways to Add Emoji to Photo Online
An easy yet powerful editor
Numerous effects to choose from
Detailed tutorials provided by the official channel
Using text based utilities to deliver your messages is a common aspect. To level up your creativity and add emojis to pictures online for better information engagement, be here to learn the how-tos!
In this article
01 [Did You Know That Emoji Users Are Scientifically Proven to Be More Likable?](#Part 1)
02 [Eight Best Websites to Add Emoji to Photo Online](#Part 2)
03 [Add Emoji to Photo Online Q&A](#Part 3)
Part 1 Did You Know That Emoji Users Are Scientifically Proven to Be More Likable?
The credibility of emojis in the realm of graphic design and editing is not wary of an introduction. From sparking up personal images with an extra element of fun and entertainment, to supplementing professional edits for effective business promotion strategies, emojis can adhere to just any graphic design concern you can possibly think of.
Diving further into the usage expanse, let us proceed to discuss about some of the most prominent advantages of working with emojis to uplift a graphic artwork in the following section:
01Improved Message Clarity
Regardless of the domain of application, emojis are known to amplify the appearance and clarity of your content with a simple graphic add-on. Circulating you information through a text message may often sound uninteresting and under the line. On the other hand, including a suitable emoji caters to define a relation between the text message and the information it intends to convey.
Effective information delivery becomes additionally important when your content is aimed at addressing professional constraints. While the general class of viewers finds it difficult to exactly interpret audio-visual elements, images go well with the diverse audience categories.
People who choose to complement a text-based interaction with emojis to address their audience, easily succeed in establishing a strong emotional connect among their viewers and the message being conveyed. This works to a positively accelerated response from their audience.
02Emojis Boast of a Universal Credibility
The era of technological revolutions have made the globe a small place to contact and . Thanks to the advent of digital communication platforms, you can reach out to a diversified range of audience to deliver your content. Such flexibilities may often render your text based information inaccessible to specific classes of viewers on account of demographic and language constraints.
Emojis on the other hand, are free from the aforesaid limitations and have a universal impact on every viewer group, irrespective of geographical and native communication boundaries. True that the recent updates in platform interfaces have worked towards including language translators, the service is often partially or completely inaccurate. In the light of these circumstances, using emojis is of great help with globally accepted and understood symbols.
03Emojis Add Life to Your Content
Using plain text to convey your message is an outdated strategy in today’s times, owing to the obvious disadvantage of bland interaction. Text centered information often fails to establish a cohesive connect with its audience, often resulting the information getting unnoticed or wrongly interpreted. On the contrary, emojis work to add the missing emotional connection between the audience and the message being delivered.
These graphic elements help to add the humanistic feel to your information, as the viewers of today take emojis as an integral part of personal and professional interactions across digital communication platforms. If you are aiming at an increased audience viewership of your information, message or brand, try hands at making them expressive with the use of these eye catching graphic elements.
04Ensure Audience Engagement
Emojis are an effective means to draw the attention of your potential audience towards the content you are aiming to deliver. While a boring, plain text may go unnoticed; emojis cater to attract the viewers for sparing a look at what you have to say. This can explicitly offer great help in case you want to converse with people on digital and social media platforms to address a call-to-action strategy in future.
Talking in the light of viewer responses, a member within your audience would ideally prefer using an emoji to express a point in the comment section, instead of typing an entire string of words. Emojis have managed to become a habituated communication tool on digital and social media platforms, with people having developed a tendency to use the light action emojis instead of recursive typing to express their views.
05Make Your Content Stand Ahead of the Line
This particular merit of using emojis comes handy when you need to address an accelerated competition to make sure that your brand stands stable in the dynamic marketing environment. While the latter is flooded with product choices competitive to your brand, you will obviously need to put in some extra effort to get noticed.
Working towards the same, you can experiment with adding cohesive and relatable emojis aside of your product logo to signify the activity or the message that the latter is aimed at conveying. If you are still confused what to add, try seeking help from the emoji centered product campaigns of leading market brands.
Part 2 Eight Best Websites to Add Emoji to Photo Online
As already stated, emojis have become an integral part of modern day communications, particularly on social media platforms and chat service utilities ever since their advent. While these graphic elements work to uplift your ordinary conversations on a personal level, their professional significance has earned an equal recognition.
Having talked enough about the benefits of including emojis in text based communication, let us divert our attention to discuss about the credibility of these elements towards image editing applications. Complementing your cherished images with emojis can help to bring life and emotion to the normally quiet still captures.
When looking for alternatives and solutions to combine images and emojis together, the IT market comes to your rescue with a diversity of applications and third party software programs. If however, you are wishing to escape the hustle of downloading heavy apps that may bundle up your device’s storage, there are a host of online tools available across the web to undertake the job to put emoji on picture online in spic and span process.
Looking through the suitability of the above fact, here’s an analysis of some of the best online solutions to add emoji on photo online with utmost ease:
01Image Online
First in the list is this amazing online platform that allows you to add emoji to photo online free of cost. The utility has a quick, 2-step process to spark up your photos with expressive emojis. The website requires you to simply upload a desired image from the local media gallery of your device to its editing workspace, either by selecting the photo or dragging and dropping the same on the tool’s welcome interface.
When you have uploaded the image, you can proceed to pick the most suitable emoji for the latter from the list of options that pops up. As you finalize your choice, the selected emoji appears on the image. You are allowed to adjust the position of the added emoji by dragging it to a desired location within the image. When you have finished making all the arrangements; move ahead to download the image to your device in either of the JPG or PNG file formats.
The tool further permits you to add a series of emojis to the uploaded image, while simultaneously changing their size. The increment in size however, weakens the clarity of then added emojis. As compensation, you are allowed to alter the emoji transparency, while adding custom effects to the same.

02Canva
This one is an advanced graphic editing utility that you can work with to create and edit image centered information elements, like, cards, posters, resume, social media posts and stories, etc. when the talk is about adding emojis to still photos using Canva, it is important to note that the tool does now allow a direct access to its collection of these graphic elements.
To work with adding emojis to your images with this online utility, you will have to launch the emoji application of the platform. You can do this by tapping the ‘More’ icon in the tool’s opening interface, followed by choosing the ‘Emoji’ option from the drop down menu that follows next. This will make the ‘Emoji’ tab appear in the sidebar at the left.
You can now choose a desired image from your device gallery and click on the ‘Uploads’ to add the same to the online e tool’s working interface. As the image gets uploaded, you can move ahead with clicking on a suitable emoji to add it to the same. The tool allows you to add several emojis in one picture, while changing their size and color by selecting the emoji and picking the color from the palette that appears at the top. There is also an option to flip the emojis.

03PiZap
Moving ahead with the list, there comes the PiZap online tool that is best known for its image editing credibility. As a part of the photo editing process, the platform allows you to add emojis and stickers to the uploaded images. All you need to do is, launch the app in your preferred browser, upload a desired image and tap the ‘Stickers’ option within the sidebar at the left of the workspace.
Choose ‘Emoji’ from the list of options that appears next, followed by picking the desired one from the available choices. Once the emojis have been added, you can proceed to customize them by changing their color, making adjustments in transparency, flipping them over and increasing their size without a blur. All this can be done by clicking on the emoji and selecting the desired customization option.
Working with the freed version of the tool, you get to access a restricted number of emojis. The entire set of the same can however be accessed through a paid subscription of the utility. This website further requires you to sign into the editor program to download the customized image that includes your selected emoji. An exclusive feature of this tool is that it allows you to create emojis of your own and add them to the desired images.

04Kapwing
Another member in the list is the Kapwing website, which you can work with to add emojis to your photos. As is obvious, you do not require downloading the tool, since the latter works online to sort out the concern. The utility, however asks you for a free signup to start working with its interface, which is a no worry task with your Google credentials.
When it comes to the emoji collection housed by the utility, you get to access a library of over 250 different emojis to select from and apply to your images. The tool further allows you to work with custom emoji packs that are available across different software platforms. The website has a quick and easy navigation path and facilitates you with a free usage.
To work towards the concern of adding emojis, you will have to start with uploading a desired image to the website, followed by selecting an emoji from the tool’s media library to include it within the image. The website does not impose a limit on the number of emojis that can be added to the uploaded photos.

05Pixelied
This one is a decent photo editor website that you can work with to customize your images with emojis that have a class ahead of the normally available options. The editing interface of the platform is extremely easy to work with and does not require you to be a professional graphic editor.
As far as the emoji collection of the website, the platform permits you to make a choice from more than 300 different emoji options. Having a resolution higher than the customary options of allied solutions, the emojis offered by the site have a much better visual appearance. You can further, choose and add as many emojis as you like to the images.
Talking of the operational flexibility of the website, editing images with emojis son the latter is a super easy task, with you having ton just upload the images at the required space and look for a suitable emoji within the site’s search field. A huge list of emojis pops up as you enter a related search term, and you can pick the on you like the most. You can save the edited image by hitting the ‘Download’ button.

06Photofunny
Proceeding further in the list of image editing websites to add emojis online, there comes the Photofunny editor tool. Working within the utility, you are allowed to customize your images with the most extensive range of latest emojis covering a series of content genres. The editing process takes just a blink’s time to decorate your photos with these highly expressive graphic elements.
The website greets you with the simplest of working interfaces, where the image editing job is limited to merely uploading the photo and selecting the emoji. The website is convenient work upon in any of your preferred devices, including MacOs and Windows compatible systems and Android or Apple smartphones. You can pick several emojis to add on a single photo and access an updated emoji library, absolutely free of cost.
If that’s not enough, the website permits you to save the edited image locally to the media gallery of your device. You are additionally, granted the liberty to export your creation to a diversity of social media platforms, including, WhatsApp, Facebook and Instagram.

07Toolxox.com
Another storehouse of image editing utilities is the aforesaid website that promises of making the photo customization process an absolutely fun activity with its diverse collection of emoji alternatives. In addition to the standard and customary smileys, you can access a plethora of recently launched emojis on the website to edit your images with, and the best thing is all this comes for free!
Limited not just to the facility of image customization, the site renders some classic choices to edit emojis as well. As you begin with the task of complementing your stills with emojis, all you need to do is, import the image to the website’s workspace, followed by selecting and clicking on a preferred emoji to add it to the photo.
Once you have included the emoji you can experiment with changing the latter’s size, make adjustments in transparency and drag the emoji at a desired point within the image. You can further add custom emojis from your device to the images and download the created edits in JPG and PNG formats.
As far as the suitability of the working interface is concerned, the site makes sure to render an easy and comfortable user experience in whatever task you choose to work with.

08Lunapic
Last in the list is the Lunapic website that caters effectively to the concern of adding emojis to spark up the otherwise normal images. The aforesaid site work differently in comparison to its counterparts in the sense that the latter allows you to edit locally saved images with emojis, along with letting you import pictures from different online platforms to customize and save on your device.
The website further has a feature to edit image faces with emojis to add a funny element to the photos. You can choose from a diversity of emoji options ranging from the simplest smileys to the most sophisticated and purpose specific graphic elements. You can pick as many numbers of emojis as you like to uplift your photos with a catchy look. The website greets you with a free access and a welcoming user interface.
If you wish to further edit the emojis, the website allows you to change their size and skin tone, adjust transparency effects and set the emoji at a desired spot within the image. As you finish the editing process, the website lets you download the customized photo to your device in either of the PNG or JPG formats.
Part 3 Add Emoji to Photo Online Q&A
● Is it possible to create emojis from scratch?
While the online sources and the IT market offer a hoard of apps and tools that comprise of the most extensive emoji varieties, they may be instances when nothing looks apt with the image context. In such cases, you can actually prefer creating emojis of your own. What’s best is, there is an equal diversity of tools that let you create personalized emojis with utmost ease.
● How can emojis be downloaded free of cost?
If the inbuilt emoji library of your editor application falls short of fetching the exact emoji of your choice, there are hoards of online sources from where you can download specific emoji packs to suit your image editing preferences. The best thing about these sites is their free access and periodically updated libraries that house all the latest emoji options.
● Is there a copyright on emojis?
When the talk is centered on copyright protection, the answer to the query is a ‘Yes’ in special reference to individual emojis. But the contradictory fact is, a wide range of such emojis does not land within copyright constraints owing to a variety of reasons. The bottom line is, you can access most of these elements without an official permission.
● What is the universally accepted emoji size for image editing concerns?
With reference to the latest update in emoji size resolutions, the apt pixel dimensions have been set to a 128 x 128 configuration. This is a good 4 times increment to the previous size constraints of 32 x 32 pixels. The resolution works effectively to keep the affordable image quality intact.
● What is the best software alternative to edit pictures with emojis online?
When browsing through the IT market for an affordable editor program to add emojis to photos online, working with the Wondershare Filmora Video Editor image editor program can be an intelligent choice, considering the fact that the software’s editing library is a storehouse of the latest and updated emoji options that are way ahead of the customary smileys.
For Win 7 or later (64-bit)
For macOS 10.12 or later
● Ending Thoughts →
● Editing images to add emojis is both, a creative and fun activity that caters to make your otherwise ordinary photos stand out of the crowd.
● Browsing through the web, you can conveniently access a series of websites that allow you to customize your images with emojis, absolutely free of cost.
● If you are keen on looking for a software alternative to address the concern of adding emojis to still captures, one of the most extensive emoji libraries is housed by Wondershare Filmora.
Using text based utilities to deliver your messages is a common aspect. To level up your creativity and add emojis to pictures online for better information engagement, be here to learn the how-tos!
In this article
01 [Did You Know That Emoji Users Are Scientifically Proven to Be More Likable?](#Part 1)
02 [Eight Best Websites to Add Emoji to Photo Online](#Part 2)
03 [Add Emoji to Photo Online Q&A](#Part 3)
Part 1 Did You Know That Emoji Users Are Scientifically Proven to Be More Likable?
The credibility of emojis in the realm of graphic design and editing is not wary of an introduction. From sparking up personal images with an extra element of fun and entertainment, to supplementing professional edits for effective business promotion strategies, emojis can adhere to just any graphic design concern you can possibly think of.
Diving further into the usage expanse, let us proceed to discuss about some of the most prominent advantages of working with emojis to uplift a graphic artwork in the following section:
01Improved Message Clarity
Regardless of the domain of application, emojis are known to amplify the appearance and clarity of your content with a simple graphic add-on. Circulating you information through a text message may often sound uninteresting and under the line. On the other hand, including a suitable emoji caters to define a relation between the text message and the information it intends to convey.
Effective information delivery becomes additionally important when your content is aimed at addressing professional constraints. While the general class of viewers finds it difficult to exactly interpret audio-visual elements, images go well with the diverse audience categories.
People who choose to complement a text-based interaction with emojis to address their audience, easily succeed in establishing a strong emotional connect among their viewers and the message being conveyed. This works to a positively accelerated response from their audience.
02Emojis Boast of a Universal Credibility
The era of technological revolutions have made the globe a small place to contact and . Thanks to the advent of digital communication platforms, you can reach out to a diversified range of audience to deliver your content. Such flexibilities may often render your text based information inaccessible to specific classes of viewers on account of demographic and language constraints.
Emojis on the other hand, are free from the aforesaid limitations and have a universal impact on every viewer group, irrespective of geographical and native communication boundaries. True that the recent updates in platform interfaces have worked towards including language translators, the service is often partially or completely inaccurate. In the light of these circumstances, using emojis is of great help with globally accepted and understood symbols.
03Emojis Add Life to Your Content
Using plain text to convey your message is an outdated strategy in today’s times, owing to the obvious disadvantage of bland interaction. Text centered information often fails to establish a cohesive connect with its audience, often resulting the information getting unnoticed or wrongly interpreted. On the contrary, emojis work to add the missing emotional connection between the audience and the message being delivered.
These graphic elements help to add the humanistic feel to your information, as the viewers of today take emojis as an integral part of personal and professional interactions across digital communication platforms. If you are aiming at an increased audience viewership of your information, message or brand, try hands at making them expressive with the use of these eye catching graphic elements.
04Ensure Audience Engagement
Emojis are an effective means to draw the attention of your potential audience towards the content you are aiming to deliver. While a boring, plain text may go unnoticed; emojis cater to attract the viewers for sparing a look at what you have to say. This can explicitly offer great help in case you want to converse with people on digital and social media platforms to address a call-to-action strategy in future.
Talking in the light of viewer responses, a member within your audience would ideally prefer using an emoji to express a point in the comment section, instead of typing an entire string of words. Emojis have managed to become a habituated communication tool on digital and social media platforms, with people having developed a tendency to use the light action emojis instead of recursive typing to express their views.
05Make Your Content Stand Ahead of the Line
This particular merit of using emojis comes handy when you need to address an accelerated competition to make sure that your brand stands stable in the dynamic marketing environment. While the latter is flooded with product choices competitive to your brand, you will obviously need to put in some extra effort to get noticed.
Working towards the same, you can experiment with adding cohesive and relatable emojis aside of your product logo to signify the activity or the message that the latter is aimed at conveying. If you are still confused what to add, try seeking help from the emoji centered product campaigns of leading market brands.
Part 2 Eight Best Websites to Add Emoji to Photo Online
As already stated, emojis have become an integral part of modern day communications, particularly on social media platforms and chat service utilities ever since their advent. While these graphic elements work to uplift your ordinary conversations on a personal level, their professional significance has earned an equal recognition.
Having talked enough about the benefits of including emojis in text based communication, let us divert our attention to discuss about the credibility of these elements towards image editing applications. Complementing your cherished images with emojis can help to bring life and emotion to the normally quiet still captures.
When looking for alternatives and solutions to combine images and emojis together, the IT market comes to your rescue with a diversity of applications and third party software programs. If however, you are wishing to escape the hustle of downloading heavy apps that may bundle up your device’s storage, there are a host of online tools available across the web to undertake the job to put emoji on picture online in spic and span process.
Looking through the suitability of the above fact, here’s an analysis of some of the best online solutions to add emoji on photo online with utmost ease:
01Image Online
First in the list is this amazing online platform that allows you to add emoji to photo online free of cost. The utility has a quick, 2-step process to spark up your photos with expressive emojis. The website requires you to simply upload a desired image from the local media gallery of your device to its editing workspace, either by selecting the photo or dragging and dropping the same on the tool’s welcome interface.
When you have uploaded the image, you can proceed to pick the most suitable emoji for the latter from the list of options that pops up. As you finalize your choice, the selected emoji appears on the image. You are allowed to adjust the position of the added emoji by dragging it to a desired location within the image. When you have finished making all the arrangements; move ahead to download the image to your device in either of the JPG or PNG file formats.
The tool further permits you to add a series of emojis to the uploaded image, while simultaneously changing their size. The increment in size however, weakens the clarity of then added emojis. As compensation, you are allowed to alter the emoji transparency, while adding custom effects to the same.
02Canva
This one is an advanced graphic editing utility that you can work with to create and edit image centered information elements, like, cards, posters, resume, social media posts and stories, etc. when the talk is about adding emojis to still photos using Canva, it is important to note that the tool does now allow a direct access to its collection of these graphic elements.
To work with adding emojis to your images with this online utility, you will have to launch the emoji application of the platform. You can do this by tapping the ‘More’ icon in the tool’s opening interface, followed by choosing the ‘Emoji’ option from the drop down menu that follows next. This will make the ‘Emoji’ tab appear in the sidebar at the left.
You can now choose a desired image from your device gallery and click on the ‘Uploads’ to add the same to the online e tool’s working interface. As the image gets uploaded, you can move ahead with clicking on a suitable emoji to add it to the same. The tool allows you to add several emojis in one picture, while changing their size and color by selecting the emoji and picking the color from the palette that appears at the top. There is also an option to flip the emojis.
03PiZap
Moving ahead with the list, there comes the PiZap online tool that is best known for its image editing credibility. As a part of the photo editing process, the platform allows you to add emojis and stickers to the uploaded images. All you need to do is, launch the app in your preferred browser, upload a desired image and tap the ‘Stickers’ option within the sidebar at the left of the workspace.
Choose ‘Emoji’ from the list of options that appears next, followed by picking the desired one from the available choices. Once the emojis have been added, you can proceed to customize them by changing their color, making adjustments in transparency, flipping them over and increasing their size without a blur. All this can be done by clicking on the emoji and selecting the desired customization option.
Working with the freed version of the tool, you get to access a restricted number of emojis. The entire set of the same can however be accessed through a paid subscription of the utility. This website further requires you to sign into the editor program to download the customized image that includes your selected emoji. An exclusive feature of this tool is that it allows you to create emojis of your own and add them to the desired images.
04Kapwing
Another member in the list is the Kapwing website, which you can work with to add emojis to your photos. As is obvious, you do not require downloading the tool, since the latter works online to sort out the concern. The utility, however asks you for a free signup to start working with its interface, which is a no worry task with your Google credentials.
When it comes to the emoji collection housed by the utility, you get to access a library of over 250 different emojis to select from and apply to your images. The tool further allows you to work with custom emoji packs that are available across different software platforms. The website has a quick and easy navigation path and facilitates you with a free usage.
To work towards the concern of adding emojis, you will have to start with uploading a desired image to the website, followed by selecting an emoji from the tool’s media library to include it within the image. The website does not impose a limit on the number of emojis that can be added to the uploaded photos.
05Pixelied
This one is a decent photo editor website that you can work with to customize your images with emojis that have a class ahead of the normally available options. The editing interface of the platform is extremely easy to work with and does not require you to be a professional graphic editor.
As far as the emoji collection of the website, the platform permits you to make a choice from more than 300 different emoji options. Having a resolution higher than the customary options of allied solutions, the emojis offered by the site have a much better visual appearance. You can further, choose and add as many emojis as you like to the images.
Talking of the operational flexibility of the website, editing images with emojis son the latter is a super easy task, with you having ton just upload the images at the required space and look for a suitable emoji within the site’s search field. A huge list of emojis pops up as you enter a related search term, and you can pick the on you like the most. You can save the edited image by hitting the ‘Download’ button.
06Photofunny
Proceeding further in the list of image editing websites to add emojis online, there comes the Photofunny editor tool. Working within the utility, you are allowed to customize your images with the most extensive range of latest emojis covering a series of content genres. The editing process takes just a blink’s time to decorate your photos with these highly expressive graphic elements.
The website greets you with the simplest of working interfaces, where the image editing job is limited to merely uploading the photo and selecting the emoji. The website is convenient work upon in any of your preferred devices, including MacOs and Windows compatible systems and Android or Apple smartphones. You can pick several emojis to add on a single photo and access an updated emoji library, absolutely free of cost.
If that’s not enough, the website permits you to save the edited image locally to the media gallery of your device. You are additionally, granted the liberty to export your creation to a diversity of social media platforms, including, WhatsApp, Facebook and Instagram.
07Toolxox.com
Another storehouse of image editing utilities is the aforesaid website that promises of making the photo customization process an absolutely fun activity with its diverse collection of emoji alternatives. In addition to the standard and customary smileys, you can access a plethora of recently launched emojis on the website to edit your images with, and the best thing is all this comes for free!
Limited not just to the facility of image customization, the site renders some classic choices to edit emojis as well. As you begin with the task of complementing your stills with emojis, all you need to do is, import the image to the website’s workspace, followed by selecting and clicking on a preferred emoji to add it to the photo.
Once you have included the emoji you can experiment with changing the latter’s size, make adjustments in transparency and drag the emoji at a desired point within the image. You can further add custom emojis from your device to the images and download the created edits in JPG and PNG formats.
As far as the suitability of the working interface is concerned, the site makes sure to render an easy and comfortable user experience in whatever task you choose to work with.
08Lunapic
Last in the list is the Lunapic website that caters effectively to the concern of adding emojis to spark up the otherwise normal images. The aforesaid site work differently in comparison to its counterparts in the sense that the latter allows you to edit locally saved images with emojis, along with letting you import pictures from different online platforms to customize and save on your device.
The website further has a feature to edit image faces with emojis to add a funny element to the photos. You can choose from a diversity of emoji options ranging from the simplest smileys to the most sophisticated and purpose specific graphic elements. You can pick as many numbers of emojis as you like to uplift your photos with a catchy look. The website greets you with a free access and a welcoming user interface.
If you wish to further edit the emojis, the website allows you to change their size and skin tone, adjust transparency effects and set the emoji at a desired spot within the image. As you finish the editing process, the website lets you download the customized photo to your device in either of the PNG or JPG formats.
Part 3 Add Emoji to Photo Online Q&A
● Is it possible to create emojis from scratch?
While the online sources and the IT market offer a hoard of apps and tools that comprise of the most extensive emoji varieties, they may be instances when nothing looks apt with the image context. In such cases, you can actually prefer creating emojis of your own. What’s best is, there is an equal diversity of tools that let you create personalized emojis with utmost ease.
● How can emojis be downloaded free of cost?
If the inbuilt emoji library of your editor application falls short of fetching the exact emoji of your choice, there are hoards of online sources from where you can download specific emoji packs to suit your image editing preferences. The best thing about these sites is their free access and periodically updated libraries that house all the latest emoji options.
● Is there a copyright on emojis?
When the talk is centered on copyright protection, the answer to the query is a ‘Yes’ in special reference to individual emojis. But the contradictory fact is, a wide range of such emojis does not land within copyright constraints owing to a variety of reasons. The bottom line is, you can access most of these elements without an official permission.
● What is the universally accepted emoji size for image editing concerns?
With reference to the latest update in emoji size resolutions, the apt pixel dimensions have been set to a 128 x 128 configuration. This is a good 4 times increment to the previous size constraints of 32 x 32 pixels. The resolution works effectively to keep the affordable image quality intact.
● What is the best software alternative to edit pictures with emojis online?
When browsing through the IT market for an affordable editor program to add emojis to photos online, working with the Wondershare Filmora Video Editor image editor program can be an intelligent choice, considering the fact that the software’s editing library is a storehouse of the latest and updated emoji options that are way ahead of the customary smileys.
For Win 7 or later (64-bit)
For macOS 10.12 or later
● Ending Thoughts →
● Editing images to add emojis is both, a creative and fun activity that caters to make your otherwise ordinary photos stand out of the crowd.
● Browsing through the web, you can conveniently access a series of websites that allow you to customize your images with emojis, absolutely free of cost.
● If you are keen on looking for a software alternative to address the concern of adding emojis to still captures, one of the most extensive emoji libraries is housed by Wondershare Filmora.
4 Ways to Add White Border to Video on Mobile and Desktop
Would you like to add white borders to your videos?
Are you looking to put white backgrounds to your videos without cutting them?
You have seen many videos with attractive borders on different social media platforms (Instagram, YouTube, Facebook, LinkedIn, etc.) Adding borders allows you to create an evocative effect and also adjust the cropping issues. It plays a good role in redesigning a video. It should be noted that a border can change the entire style of the video.
There are hundreds of video editing software that allow adding borders to the videos for mobile and desktop. In this article, we shall discuss different ways to add white borders in movies used on different social media platforms.

4 Ways to Add White Borders to Video
The following 4 ways can be used to add white borders to the videos.
- Add a white border to the video on the computer (using Filmora)
- Add a white border to the video online
- Add a white border to the video on Android
- Add a white border to the video on iOS
Add a white border to the video on the computer (using Filmora)
Filmora Video Editor is one of the best video editing software. It allows editing the videos in a professional way. It has built-in editing features like splitting/cutting, trimming, cropping, adding watermark, changing speed, recording voice, and many more Along with this, you can rely on this application to add borders with different colors including white borders, black borders, colored border, and customized border. Add white borders on a computer, all this can be done in a few simple steps.
For Win 7 or later (64-bit)
For macOS 10.14 or later
Let’s download the free Wonder Share Filmora 11 software to proceed.
- Go to media, and import the video from your storage.
- Drag the video into the timeline.

- Select the video by clicking on the video.
- Hit the effects You can select the colorful effects from the panel.
- Now, write borders in the search engine. You will find various borders styles in the panel.
- Select the white border at the top of the panel.
- Simply drag and drop the border to the video/image.

- You will see the white border on the selected video.

- You can change the color of the border.
- Select the video by double-clicking on it.
- Hit the Effect tab from the Image and then click on Borders.
- Here you can change the color of your borders.
- Hit the OK

Add A White Border To The Video Online
You can change white borders without launching software by editing online. Kapwing is an online video editing tool that is used to edit videos, images, and GIFs. It is very easy to use and the good thing about Kapwing is, it’s free and you don’t need to sign up or add watermarks to your edited videos/images.
However, it allows you to edit a video up to 250MB or you can only upload a video of almost 7 minutes in length. What you would need is to have a good internet connection and a Web.
Let’s start editing to add white borders step by step:
- Visit Kapwing collage maker and hit start collage maker
- You will see the below window.

- Click on Add media and select the desired video or image.
- Drag and drop the video into the timeline.

- Click on the video and drag the 4 corners to resize your video.
- It will eventually provide you with a white background and you can use it as a white border.

- Hit the Lock ratio tab once you got satisfied with your image borders.
- Double click the border to set the background color.

- You can change the background colors of your choice.

Add a white border to the video on Android
You can add white borders to your videos using android. BeeCut is a very simple and useful application for video editing. It presents a lot of stylish and beautiful frames and effects to make your video amazing. Along with this, it allows you to add text, filters, transitions, and many features to make your video stand out. It is very easy to use as takes a few steps to add frames to your video in android. To start the process follow these steps;
- Launch BeeCut on your mobile/android.
- Open the app and click on Media.
- Hit on Import file.

- Drag the video into the timeline or hit the +
- Hit the overlays
- Select your desired border.

- Drag the desired overlay border over the timeline. Here you can edit your design (change color, effect, etc.)
- Now, hit the export tab and choose the quality and format of your video.
- Save the file on your android.
Add a white border to the video on iOS
The PicsArt app is commonly used to edit videos on iPhone as well as on android. It is a very simple app, even a layman can use PicsArt and make professional white borders. This app is familiar among Instagram users. It changes the rectangular video or image into a square format. The aspect ratio of 1:1 is used for Instagram videos. It not only adds borders to the videos but also provides editing features like cut, resize, rotate, trims, text, etc. Let’s start with step-by-step instructions to add white borders to the video.
- Go to the app store and download the PicsArt app.
- Open the app and select the desired video.
- Hit the Fit tab from the bottom center.

- Select the color tool from the bottom.
- Choose the white color for white borders and you can also choose the desired color.
- Hit the ütab and the video will be saved to your phone gallery or you can directly share the video on Instagram.

Conclusion:
In the above content, we have introduced four methods to add white borders in your videos using windows, android, iPhone, and online. All the methods are free to use.
Wonder Share Filmora 11 is highly recommended to get the best and most professional results. It not only allows you to add borders but also provides you with an advanced editing panel. You can easily edit your videos and share with your social circle.
4 Ways to Add White Borders to Video
The following 4 ways can be used to add white borders to the videos.
- Add a white border to the video on the computer (using Filmora)
- Add a white border to the video online
- Add a white border to the video on Android
- Add a white border to the video on iOS
Add a white border to the video on the computer (using Filmora)
Filmora Video Editor is one of the best video editing software. It allows editing the videos in a professional way. It has built-in editing features like splitting/cutting, trimming, cropping, adding watermark, changing speed, recording voice, and many more Along with this, you can rely on this application to add borders with different colors including white borders, black borders, colored border, and customized border. Add white borders on a computer, all this can be done in a few simple steps.
For Win 7 or later (64-bit)
For macOS 10.14 or later
Let’s download the free Wonder Share Filmora 11 software to proceed.
- Go to media, and import the video from your storage.
- Drag the video into the timeline.
- Select the video by clicking on the video.
- Hit the effects You can select the colorful effects from the panel.
- Now, write borders in the search engine. You will find various borders styles in the panel.
- Select the white border at the top of the panel.
- Simply drag and drop the border to the video/image.
- You will see the white border on the selected video.
- You can change the color of the border.
- Select the video by double-clicking on it.
- Hit the Effect tab from the Image and then click on Borders.
- Here you can change the color of your borders.
- Hit the OK
Add A White Border To The Video Online
You can change white borders without launching software by editing online. Kapwing is an online video editing tool that is used to edit videos, images, and GIFs. It is very easy to use and the good thing about Kapwing is, it’s free and you don’t need to sign up or add watermarks to your edited videos/images.
However, it allows you to edit a video up to 250MB or you can only upload a video of almost 7 minutes in length. What you would need is to have a good internet connection and a Web.
Let’s start editing to add white borders step by step:
- Visit Kapwing collage maker and hit start collage maker
- You will see the below window.
- Click on Add media and select the desired video or image.
- Drag and drop the video into the timeline.
- Click on the video and drag the 4 corners to resize your video.
- It will eventually provide you with a white background and you can use it as a white border.
- Hit the Lock ratio tab once you got satisfied with your image borders.
- Double click the border to set the background color.
- You can change the background colors of your choice.
Add a white border to the video on Android
You can add white borders to your videos using android. BeeCut is a very simple and useful application for video editing. It presents a lot of stylish and beautiful frames and effects to make your video amazing. Along with this, it allows you to add text, filters, transitions, and many features to make your video stand out. It is very easy to use as takes a few steps to add frames to your video in android. To start the process follow these steps;
- Launch BeeCut on your mobile/android.
- Open the app and click on Media.
- Hit on Import file.
- Drag the video into the timeline or hit the +
- Hit the overlays
- Select your desired border.
- Drag the desired overlay border over the timeline. Here you can edit your design (change color, effect, etc.)
- Now, hit the export tab and choose the quality and format of your video.
- Save the file on your android.
Add a white border to the video on iOS
The PicsArt app is commonly used to edit videos on iPhone as well as on android. It is a very simple app, even a layman can use PicsArt and make professional white borders. This app is familiar among Instagram users. It changes the rectangular video or image into a square format. The aspect ratio of 1:1 is used for Instagram videos. It not only adds borders to the videos but also provides editing features like cut, resize, rotate, trims, text, etc. Let’s start with step-by-step instructions to add white borders to the video.
- Go to the app store and download the PicsArt app.
- Open the app and select the desired video.
- Hit the Fit tab from the bottom center.
- Select the color tool from the bottom.
- Choose the white color for white borders and you can also choose the desired color.
- Hit the ütab and the video will be saved to your phone gallery or you can directly share the video on Instagram.
Conclusion:
In the above content, we have introduced four methods to add white borders in your videos using windows, android, iPhone, and online. All the methods are free to use.
Wonder Share Filmora 11 is highly recommended to get the best and most professional results. It not only allows you to add borders but also provides you with an advanced editing panel. You can easily edit your videos and share with your social circle.
Here Is a Guide on How You Can Resize Videos via Handbrake and Wondershare Filmora. The Former Is a Lightweight Tool Perfect for Batch Resizing Videos, While the Latter Is a Powerful Free Video Editing Software
Videos are a great medium to share thoughts, concepts, guides, and memories, but regardless of how far technology has come getting them online can pose an issue sometimes. These obstacles often tend to be because either a video clip is too long or the amount of data in it is so high that the service just cannot upload the file to its servers and make it available for the intended receiver.
To solve this issue, users often need to resize a video so that the data cap, which behaved as a restriction, is no longer applicable. Now, there exist multiple software that can do this, and most video editor programs include the ability to export videos in less data-hungry sizes or formats.
So, if you ever face a similar issue, here is a guide on how you can resize videos via Handbrake and Wondershare Filmora. The former is a lightweight tool perfect for batch resizing videos, while the latter is a powerful free video editing software.
How to resize video with Handbrake
Open Handbrake and follow the steps listed below.
Once open, the software will present you with options to either import a single video file for resize or a whole batch via folder selection.
Note: If you do not have Handbrake, you can download it by visiting the official website. Also, you will need Windows .NET Framework 6.0 to use Handbrake. If your system does not have the correct config Handbrake will let you know and fail to launch.
Once you have imported the video file, the software will present you with two choices.
- Option 1: Use a preset available in the application — the best choice for beginners to choose for beginners.
- Option 2: Set a custom resolution via the Dimensions Tab.
Note: To ensure the resize is perfect, find out which file format plays best with the end location of your video and convert the video clip to that version.

How your screen will look once you have imported a video file.
How to Resize Video via Option 1
Step 1: Import Video File by choosing
- Single Import, or
- Batch Import

Step 2: Choose a Preset in Handbrake.

Step 3: Click on Start Encode after choosing the desired preset.

Step 4: Wait for the Encode to finish. The application shows progress in a bar at the bottom of the screen.

Step 5: Click on Browse in the bottom right corner to enter the Save File dialogue. At this point, you can set a file name and select a new save location.


How to Resize Video via Option 2
Step 1: Import Video File by choosing
- Single Import, or
- Batch Import

Step 2: Click on the Dimensions Tab to open up a dialog box that will let you edit video resolution.


The Dimensions Dialog Box
Step 3: Modify resolution to ensure the clip you get is in the right setup.
Note: If you see 1920 x 1080 on your screen, the first number (1920) stands for the width of the video file, while the second number (1080) stands for the height.

Tip
The one thing to keep in mind while using Option 2 is to ensure that the aspect ratio of the video file is maintained; this will prevent the final video from looking like its skewed and prevent it from becoming too tall or too wide
Via Option 2 you can also add borders to the final video if desired, while resizing it to your liked resolution.
An easier way to resize video with Wondershare Filmora
While the resize feature in Handbrake is capable of working on multiple video files at once, the user interface of the application may seem daunting to some. Hence, if you’re just starting to learn, we recommend accessing more user-friendly software, say Wondershare Filmora Video Editor . You can resize videos in the video editor by following the steps we have detailed below.
For Win 7 or later (64-bit)
For macOS 10.14 or later
Just keep in mind, when using WonderShare Filmora the resize option appears at the end of the video editing process — during the export action.
Step 1: Import a video file into Wondershare Filmora.

Step 2: Drag the video file onto the timeline and then choose Export from the top bar.
Author’s Notes: Here, I recommend using the Export to Device option as having a local copy which you then manually upload to services like YouTube is a process that you can have more control over.

Step 3: Choose the video file format (marked in Red) and then choose the resolution you require (marked in Yellow).

Tip
If you press on the settings tab (marked in Yellow, in the image above) and choose custom you can modify more aspects of your video file. Including the configuration used by the audio components.

Choose Custom under the Settings Option to customise Video Details with more precision
Step 4: Click on Export once you’ve decided on the resolution.

With this you will now have a video file that has been resized to a size or converted to a format that will hopefully function well with your desired platform.
Note: You can also reset the resolution of an entire project before hand in Wondershare Filmora by choosing the right configuration from the Project Settings option, found under the File Tab.

The Bottom Line
Having read this piece, you may have noticed that software capable of resizing videos can prove quite useful. Wondershare Filmora is this, plus a lot more, its convenient and intuitive user interface is also something we believe will feel welcoming to users. Speaking of Handbrake, while effective and great for batch encoding — if you want to resize more than one video we recommend having Handbrake handy — its bare-bones interface can be intimidating. Regardless, both programs are convenient to utilize and perfectly capable of doing the task at hand with relative ease.
How your screen will look once you have imported a video file.
How to Resize Video via Option 1
Step 1: Import Video File by choosing
- Single Import, or
- Batch Import
Step 2: Choose a Preset in Handbrake.
Step 3: Click on Start Encode after choosing the desired preset.
Step 4: Wait for the Encode to finish. The application shows progress in a bar at the bottom of the screen.
Step 5: Click on Browse in the bottom right corner to enter the Save File dialogue. At this point, you can set a file name and select a new save location.
How to Resize Video via Option 2
Step 1: Import Video File by choosing
- Single Import, or
- Batch Import
Step 2: Click on the Dimensions Tab to open up a dialog box that will let you edit video resolution.
The Dimensions Dialog Box
Step 3: Modify resolution to ensure the clip you get is in the right setup.
Note: If you see 1920 x 1080 on your screen, the first number (1920) stands for the width of the video file, while the second number (1080) stands for the height.
Tip
The one thing to keep in mind while using Option 2 is to ensure that the aspect ratio of the video file is maintained; this will prevent the final video from looking like its skewed and prevent it from becoming too tall or too wide
Via Option 2 you can also add borders to the final video if desired, while resizing it to your liked resolution.
An easier way to resize video with Wondershare Filmora
While the resize feature in Handbrake is capable of working on multiple video files at once, the user interface of the application may seem daunting to some. Hence, if you’re just starting to learn, we recommend accessing more user-friendly software, say Wondershare Filmora Video Editor . You can resize videos in the video editor by following the steps we have detailed below.
For Win 7 or later (64-bit)
For macOS 10.14 or later
Just keep in mind, when using WonderShare Filmora the resize option appears at the end of the video editing process — during the export action.
Step 1: Import a video file into Wondershare Filmora.
Step 2: Drag the video file onto the timeline and then choose Export from the top bar.
Author’s Notes: Here, I recommend using the Export to Device option as having a local copy which you then manually upload to services like YouTube is a process that you can have more control over.
Step 3: Choose the video file format (marked in Red) and then choose the resolution you require (marked in Yellow).
Tip
If you press on the settings tab (marked in Yellow, in the image above) and choose custom you can modify more aspects of your video file. Including the configuration used by the audio components.
Choose Custom under the Settings Option to customise Video Details with more precision
Step 4: Click on Export once you’ve decided on the resolution.
With this you will now have a video file that has been resized to a size or converted to a format that will hopefully function well with your desired platform.
Note: You can also reset the resolution of an entire project before hand in Wondershare Filmora by choosing the right configuration from the Project Settings option, found under the File Tab.
The Bottom Line
Having read this piece, you may have noticed that software capable of resizing videos can prove quite useful. Wondershare Filmora is this, plus a lot more, its convenient and intuitive user interface is also something we believe will feel welcoming to users. Speaking of Handbrake, while effective and great for batch encoding — if you want to resize more than one video we recommend having Handbrake handy — its bare-bones interface can be intimidating. Regardless, both programs are convenient to utilize and perfectly capable of doing the task at hand with relative ease.
Also read:
- How to Create a Vacation Slideshow in 5 Minutes for 2024
- Updated Create Kinetice Typography Text Effect in Filmora
- The Top 10 Effective SRT Editors Online
- New How to Create Vintage Film Effect 1920S
- Splitting Video Into Frames with the FFmpeg Step by Step for 2024
- New Have You Recently Experienced Motion Blur in Games? Do You Wish to Learn More About It? This Article Provides an Overview and the Need for Motion Blur Gaming
- New Deleting White Background in Photoshop Is Hard? No for 2024
- How to Loop a Video in PowerPoint
- Updated How Can You Get VHS Filter and Glitch Filter to Your Images or Videos?
- Updated In 2024, How to Do Masking in After Effects Alternative Provided
- Spooky Halloween with the Best 15+ Halloween Countdown Video Clips for 2024
- How to Google Meet Green Screen for 2024
- New Looking for Ways to Compress Your Videos for Instagram? Keep Reading to Know About some of the Best Video Compressors for Instagram
- New Mastering Video Speed Control Slow Down, Speed Up, and Edit with Ease
- Do You Wish to Know How FFmpeg Can Remove Audio From a Video? If Yes, Keep Scrolling This Guide to Remove Audio From Video with FFmpeg and Other Alternative Software
- New 2024 Approved How to Trim Video in Quicktime Player on Mac
- Updated In 2024, How to Create Liquid Water Reveal Intro?
- How to Splice Videos Together on iPhone
- You Need to Follow Certain Steps to Complete Your Project. In the Section Below, We Will Discuss in Detail the Steps to Make a Movie From Windows Movie Maker
- Updated Premiere Pro Text Effects Beginner Guide
- Updated Here We Are, Now the Main Topic of Interest of This Article - How to Put Together Several Videos so that They Become One? This Case, Unlike Other Possibilities We Discussed Above, Is More Complicated, so We Will Study This Feature Step by Step
- What Can Be Better than Converting Apple Video Format Into Other Formats so that You Can Use the Files Easily. We Have a Few Options that You Can Use for This Purpose
- In 2024, Want to Make a Fun and Cinematic Video with an Introductory Text Title? Learn the Stages of Editing with Filmora for This Effect Here
- New How to Customize Your Loading Text Effect, In 2024
- Updated The Ultimate Guide to Make a Text Collage for 2024
- Updated How to Create a Smooth Cut Transition Effect for 2024
- New Are You in Search for a Step-by-Step Guide to How to Add Effects in TikTok? Here It Is. To Add some Flavor to Your TikTok Videos. Use These How to Add Effect to TikTok Recommendations
- 2024 Approved Do You Want to Edit a TikTok After Posting? This Article Will Provide Multiple Methods Through Which You Can Do It in No Time
- Calls on Samsung Galaxy M34 Go Straight to Voicemail? 12 Fixes | Dr.fone
- In 2024, How Do You Unlock your Apple iPhone 8? Learn All 4 Methods
- In 2024, Lock Your ZTE Axon 40 Lite Phone in Style The Top 5 Gesture Lock Screen Apps
- Android Unlock Code Sim Unlock Your OnePlus Nord CE 3 Lite 5G Phone and Remove Locked Screen
- Additional Tips About Sinnoh Stone For Infinix Note 30 5G | Dr.fone
- Galaxy F15 5G Music Recovery - Recover Deleted Music from Galaxy F15 5G
- How to recover old videos from your Xiaomi
- 3 Ways to Unlock iPhone 6s Plus without Passcode or Face ID | Dr.fone
- Easy Ways to Manage Your Xiaomi Redmi K70 Pro Location Settings | Dr.fone
- In 2024, Unova Stone Pokémon Go Evolution List and How Catch Them For Poco F5 5G | Dr.fone
- In 2024, A Working Guide For Pachirisu Pokemon Go Map On Motorola Edge 40 | Dr.fone
- How to Unlock Vivo S18 Phone Password Without Factory Reset?
- In 2024, Planning to Use a Pokemon Go Joystick on Xiaomi Civi 3? | Dr.fone
- 15 Best Strongest Pokémon To Use in Pokémon GO PvP Leagues For Tecno Spark Go (2024) | Dr.fone
- iPogo will be the new iSpoofer On Motorola Edge 2023? | Dr.fone
- How to Fix Life360 Shows Wrong Location On Nokia C22? | Dr.fone
- How to Fix Android.Process.Media Has Stopped on Tecno Phantom V Flip | Dr.fone
- How To Leave a Life360 Group On Honor X50 GT Without Anyone Knowing? | Dr.fone
- How to Fake GPS on Android without Mock Location For your Oppo Reno 11F 5G | Dr.fone
- In 2024, iSpoofer is not working On Google Pixel 8? Fixed | Dr.fone
- Ultimate Guide to Catch the Regional-Located Pokemon For Tecno Pop 7 Pro | Dr.fone
- How to Unlock iPhone XR with/without SIM Card
- How To Bypass Google FRP on Reno 10 Pro 5G
- iSpoofer is not working On Vivo V30? Fixed | Dr.fone
- 4 Ways to Transfer Music from Poco C51 to iPhone | Dr.fone
- In 2024, Android Unlock Code Sim Unlock Your Huawei Nova Y91 Phone and Remove Locked Screen
- In 2024, How to Transfer Contacts from Nokia 105 Classic to Other Android Devices Using Bluetooth? | Dr.fone
- Title: In 2024, How to Cut Videos on Mac without Using FFmpeg?
- Author: Chloe
- Created at : 2024-05-20 03:38:08
- Updated at : 2024-05-21 03:38:08
- Link: https://ai-editing-video.techidaily.com/in-2024-how-to-cut-videos-on-mac-without-using-ffmpeg/
- License: This work is licensed under CC BY-NC-SA 4.0.
