
In 2024, How to DIY VHS Overlay in After Effects?

How to DIY VHS Overlay in After Effects?
The 90s generation is familiar with Video Home System video. Today, Moviemakers use VHS static overlay to give their videos an antique and vintage look.
The VHS glitch overlay has become increasingly popular as it changes the video’s theme, tone, and whole look. Let’s see how we can add DIY VHS overlay in after effects-
Part 1:Step by Step DIY VHS Overlay in After Effects?
The retro “VHS Look” has become relatively trendy in recent years. The memories associated with the popular VHS trend has helped the trend make a comeback. Creating this effect in After Effects may seem to be a complicated process if you have not tried it before. But we have made it easier for you to add VHS overlay in Adobe After Effects. Follow the steps to add it in after effects-
Before you begin, download and install VHS preset if you haven’t already. Remember that VHS preset only works with After Effects CC 2018 and up. So, make sure you have the recent version of After Effects or the one not older than the 2018 version.
Step 1: To create a VHS look on your video, drop any video of your choice into the project panel and give it a name, let’s say, “VCR static overlay”. Set the width and height to 1920 and 1080 px, respectively.
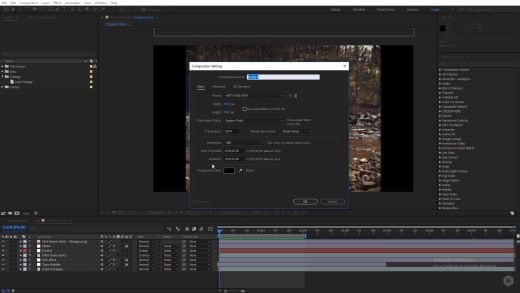
Step 2: Right-click on your video and select New Comp from Selection. Drag your video to a new composition and then go to Lumetri Color < Basic Correction. Add some contrast. You can set it to 50 or any other number of your choice. Then bring the white level down to -55.
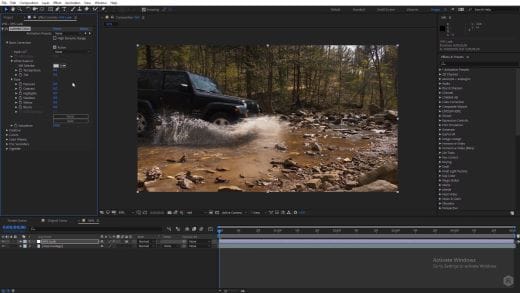
Then open the Creative tab. Increase the faded film to 40. Set sharpening to -70. Bring vibrance to -30.
Note: Here, I changed the number to get the effect I wanted. You can change the numbers and set the values as per your requirements.
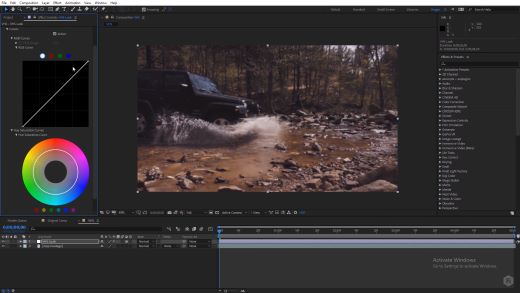
Now, click on the Curves option. Drag down the white curve and then align it with the original curve. Move the green curve up a bit and bring down the blue curve. Then comes the Vignette tab. Open it and set the number to -1.
Step 3: Now, we will give our video a subtle RGB spit appearance. For that, we need to use the Channel Blur effect twice. First, go to Effect < Blur & Sharpen < Channel Blur. Set red blurriness to 20. Turn on the repeat edge pixels. Then change the Blur Dimensions from horizontal and vertical to vertical.
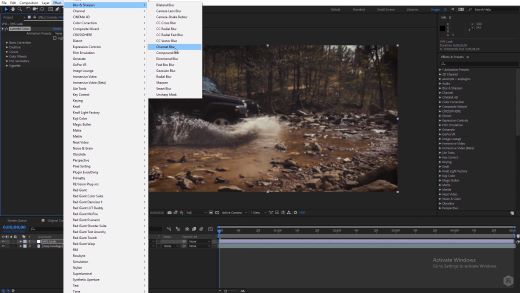
Step 4: Again, go to Effect < Blur & Sharpen < Channel Blur. Set blue blurriness to 30. Repeat the process of checking the repeat edge pixels box. Change the Blue Dimensions from horizontal and vertical to horizontal.
Step 5: Next comes giving the video artificial sharpening look using Unsharp Mask. So, go to Effect < Blur & Sharpen < Unsharp Mask. Under the Unmask Mask menu, set the amount to 100 and the radius to 10.
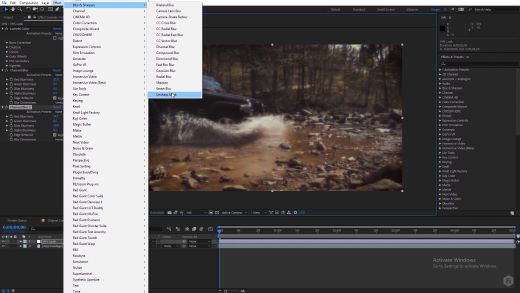
Step 6: To add a font to your video, simply search VHS font on Google. Look for the one you want to use in your video and download it. To give your video that authentic VHS-style look, we suggest downloading free VCR OSD Mono font and installing the font on your system.
Step 7: Go to Layer < New < Solid and choose any color. We chose white. Now, under Effects & Presets, search for a number. Drag it to the white solid. Choose the font VCR OSD Mono. You can change the number to time or date. You can also add time manually. Select the text tool, go to the source text, hold alt, and click on the stopwatch. Write “timeToCurrentFormat() and time will be displayed on the video. Let us say we want to see the date on the video instead of time. So, change the time to date. Drag the date to the bottom right of the video to give it the look of an old VHS tape.
If you are a beginner and want a simple VHS effect, you can follow these easy steps and create the VHS video that will transport you back to the 90s.
BONUS TIP: How to Add VHS Overlays and Glitch Effects to Make Retro Videos in Filmora Video Editor?
Do you remember the look of the VHS and miss it? You can bring your memories back! With Wondershare Filmora, you can add this effect easily to your videos. Adding a VHS overlay transparent brings drama and creates an atmosphere of distortion. It can significantly change the appearance and feel of your video.
So, if you want to create professional-looking VHS overlay free, the only thing you need is Filmora video editing software . Filmora allows you to add three different overlay VHS effects that you can use along with other overlays to create retro videos.
For Win 7 or later (64-bit)
For macOS 10.12 or later
Do you want to add retro videos on Filmora? It is simple!
To create a VHS overlay video, you should first download the Filmora app for free if you haven’t! Let’s learn how the effect can transform your video. You will have to choose various effects and values to get the final VHS overlay video. These effects can be added to any lyric video, intro, outro, and many others.
Let’s look at the steps:
Open your draft in Filmora software and select sample colors from the Media tab on the top left.
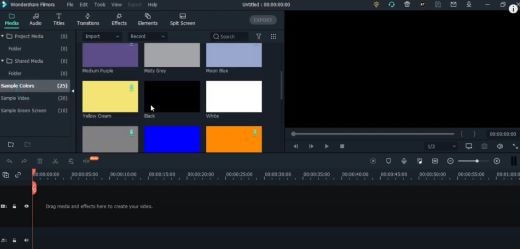
You can drag and drop the photo on a track on the timeline. Then adjust the trim handles to change the duration to match the section of the video to be transformed.
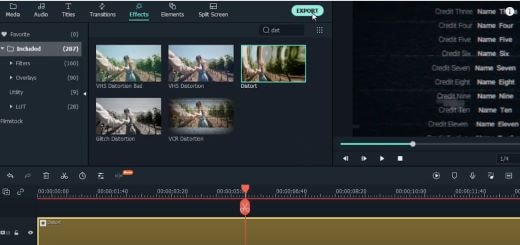
In sequence, add these three overlays by dragging them from the Effects panel at the top to their own individual tracks on the timeline: VHS Distortion Bad (alpha = 25), VHS Distortion (alpha = 35), and VHS Rewind (alpha = 10).
You can also add effects like Strong Glitch, Chromatic Aberration, Glitch Distortion, Distort, etc., to enhance the vintage look of the video.
When finished, click export and choose the format and target folder to save the processed file with the added effects.
The smart generation has access to HD videos and high-tech devices, yet VHS is an exciting concept for them. The videos created with this effect resemble those from the 90s era. You have to customize everything when you add a VHS effect, including the title, background noise, overlay, and credits.
By choosing a video-editing software like Wondershare Filmora, users can make such videos and add retro glitch overlay professionally. You can also access Filmstock to download any video effects, stock media, templates, or sound effects for Filmora.
Conclusion
Video editing is now easy and fun. The trend of VCR overlay is now back as VHR overlay. With Wondershare Filmora, you can easily create classic videos with 90’s effects. Take your video editing to the next big level with Filmora Video Editor. We can help you make the best use of this tool to create glitch effect videos and add a VHS tape overlay.
Versatile Video Editor - Wondershare Filmora
An easy yet powerful editor
Numerous effects to choose from
Detailed tutorials provided by the official channel
For macOS 10.12 or later
Do you want to add retro videos on Filmora? It is simple!
To create a VHS overlay video, you should first download the Filmora app for free if you haven’t! Let’s learn how the effect can transform your video. You will have to choose various effects and values to get the final VHS overlay video. These effects can be added to any lyric video, intro, outro, and many others.
Let’s look at the steps:
Open your draft in Filmora software and select sample colors from the Media tab on the top left.

You can drag and drop the photo on a track on the timeline. Then adjust the trim handles to change the duration to match the section of the video to be transformed.
In sequence, add these three overlays by dragging them from the Effects panel at the top to their own individual tracks on the timeline: VHS Distortion Bad (alpha = 25), VHS Distortion (alpha = 35), and VHS Rewind (alpha = 10).
You can also add effects like Strong Glitch, Chromatic Aberration, Glitch Distortion, Distort, etc., to enhance the vintage look of the video.
When finished, click export and choose the format and target folder to save the processed file with the added effects.

The smart generation has access to HD videos and high-tech devices, yet VHS is an exciting concept for them. The videos created with this effect resemble those from the 90s era. You have to customize everything when you add a VHS effect, including the title, background noise, overlay, and credits.
By choosing a video-editing software like Wondershare Filmora, users can make such videos and add retro glitch overlay professionally. You can also access Filmstock to download any video effects, stock media, templates, or sound effects for Filmora.
Conclusion
Video editing is now easy and fun. The trend of VCR overlay is now back as VHR overlay. With Wondershare Filmora, you can easily create classic videos with 90’s effects. Take your video editing to the next big level with Filmora Video Editor. We can help you make the best use of this tool to create glitch effect videos and add a VHS tape overlay.
Versatile Video Editor - Wondershare Filmora
An easy yet powerful editor
Numerous effects to choose from
Detailed tutorials provided by the official channel
For macOS 10.12 or later
Do you want to add retro videos on Filmora? It is simple!
To create a VHS overlay video, you should first download the Filmora app for free if you haven’t! Let’s learn how the effect can transform your video. You will have to choose various effects and values to get the final VHS overlay video. These effects can be added to any lyric video, intro, outro, and many others.
Let’s look at the steps:
Open your draft in Filmora software and select sample colors from the Media tab on the top left.

You can drag and drop the photo on a track on the timeline. Then adjust the trim handles to change the duration to match the section of the video to be transformed.
In sequence, add these three overlays by dragging them from the Effects panel at the top to their own individual tracks on the timeline: VHS Distortion Bad (alpha = 25), VHS Distortion (alpha = 35), and VHS Rewind (alpha = 10).
You can also add effects like Strong Glitch, Chromatic Aberration, Glitch Distortion, Distort, etc., to enhance the vintage look of the video.
When finished, click export and choose the format and target folder to save the processed file with the added effects.

The smart generation has access to HD videos and high-tech devices, yet VHS is an exciting concept for them. The videos created with this effect resemble those from the 90s era. You have to customize everything when you add a VHS effect, including the title, background noise, overlay, and credits.
By choosing a video-editing software like Wondershare Filmora, users can make such videos and add retro glitch overlay professionally. You can also access Filmstock to download any video effects, stock media, templates, or sound effects for Filmora.
Conclusion
Video editing is now easy and fun. The trend of VCR overlay is now back as VHR overlay. With Wondershare Filmora, you can easily create classic videos with 90’s effects. Take your video editing to the next big level with Filmora Video Editor. We can help you make the best use of this tool to create glitch effect videos and add a VHS tape overlay.
Versatile Video Editor - Wondershare Filmora
An easy yet powerful editor
Numerous effects to choose from
Detailed tutorials provided by the official channel
For macOS 10.12 or later
Do you want to add retro videos on Filmora? It is simple!
To create a VHS overlay video, you should first download the Filmora app for free if you haven’t! Let’s learn how the effect can transform your video. You will have to choose various effects and values to get the final VHS overlay video. These effects can be added to any lyric video, intro, outro, and many others.
Let’s look at the steps:
Open your draft in Filmora software and select sample colors from the Media tab on the top left.

You can drag and drop the photo on a track on the timeline. Then adjust the trim handles to change the duration to match the section of the video to be transformed.
In sequence, add these three overlays by dragging them from the Effects panel at the top to their own individual tracks on the timeline: VHS Distortion Bad (alpha = 25), VHS Distortion (alpha = 35), and VHS Rewind (alpha = 10).
You can also add effects like Strong Glitch, Chromatic Aberration, Glitch Distortion, Distort, etc., to enhance the vintage look of the video.
When finished, click export and choose the format and target folder to save the processed file with the added effects.

The smart generation has access to HD videos and high-tech devices, yet VHS is an exciting concept for them. The videos created with this effect resemble those from the 90s era. You have to customize everything when you add a VHS effect, including the title, background noise, overlay, and credits.
By choosing a video-editing software like Wondershare Filmora, users can make such videos and add retro glitch overlay professionally. You can also access Filmstock to download any video effects, stock media, templates, or sound effects for Filmora.
Conclusion
Video editing is now easy and fun. The trend of VCR overlay is now back as VHR overlay. With Wondershare Filmora, you can easily create classic videos with 90’s effects. Take your video editing to the next big level with Filmora Video Editor. We can help you make the best use of this tool to create glitch effect videos and add a VHS tape overlay.
Versatile Video Editor - Wondershare Filmora
An easy yet powerful editor
Numerous effects to choose from
Detailed tutorials provided by the official channel
How to Add Text to Video
If you are making an instructional or explainer video, you will often find that you need to add text to various sections of the video. Depending on the tool you use, the process of adding text to a video can be simple or complicated.
In this article, we will share with you the different options you have when you want to add text elements to a video project.
Add Text to a Video Online
One of the easiest ways that you can add text to any video is to use a free online solution. There are many online tools to choose from but VEED is a free solution that is easy to use and offers a wide range of features to choose from.
Here’s how you can use VEED to add text to your video;
Step1Go to https://www.veed.io/ on any browser to access the video editing tool. Click on “Upload Your Video” to open a new project. In the new project screen that appears, tap on “Upload a file” to add your video.

Step2Once the video is open, click on the “Text” tab on the left and then select the type of text you want to add to the video.

Step3Type in your text and then use the options below the text box to choose the font style, size, and color of the text. You can also use the duration icons below the text to indicate where you want the text to appear during playback.

Step4When you’re happy with the changes, click on the “Export” button at the top to save the changes and download the video.
Add Text to Video on Computer
While online tools like VEED can come in handy when you want to make simple changes to a video, you will often find that they don’t have the necessary features to customize the text in various ways. For that, we recommend Wondershare Filmora, a desktop editing suite that has a lot of useful features.
Filmora combines its wealth of editing features and a simple user interface to make it one of the most effective video editors in the market. Here’s how you can add text to any video using Filmora.
Step1Download and install Wondershare Filmora onto your computer. Open the program and then click on the “Import” button to start. You can also just drag and drop the video to the main window to open it.
Step2Once the video is open in Filmora, you will need to drag it to the timeline panel before you can start to edit it.

Step3Click on the “Titles” tab at the top to open the text and title presets that you will need to add text to the document. Filmora offers more than 200 text effects to choose from. Just double-click on one of the presents to select it and then the preview window to see it in real-time.

Step4If you like the preset that you have selected, place the cursor on the position in the timeline where you would like to add the text and then drag and drop the title track above the video in the timeline.

Step5If you would like to change the duration of the text simply drag the edge of the timeline until you get the length that you desire. Filmora also allows you to edit and customize the text. To do that, double-click on the “Title” time frame to get some customization options.
Step6Once you are happy with all the changes you have made, click on “Export” and choose an output format to save and export your video.

Add text to Video on iPhone
One of the easiest ways to edit a video on an iPhone is to use iMovie. This simple and effective solution can help you edit videos on your iPhone in numerous ways including adding text and subtitles. The following are simple steps to help you use iMovie to add text to a video on an iPhone;
Step1Open the video clip that you would like to add text to. Once the video is open, click on the Text icon from the options at the bottom of the screen.
![]()
Step2Select the style you would like to use from the list of templates.

Step3A sample text will appear on the screen. Tap on it and then select “Edit” to enter the desired text. Tap “Done” once you are done typing.

Step4To move the text to the desired location, simply tap on it again and reposition it. You also have the option to increase or decrease the size of the text as desired using the pinch motion. If you want to change the color or font, tap on the “T” that will appear below the clip and choose “Aa” to change the font or the multicolored circle to change color.

You also have numerous other options in terms of effects including text-shadow. Just tap on the “three-dot icon” to access these features.
Add Text to Video on Android
The best way to add a video on Android devices is to use third-party apps. The good news is that there are several very useful video editing apps that you can use for this purpose. In this guide, we will show you how you can add text to a video on Android using two of the most effective solution.
Using the PowerDirector by Cyberlink
PowerDirector is a video editing app that allows you to edit various aspects of the video including adding text to the video. Available on the Google Play Store, this app has a wealth of additional features that include trimming, rotating clips, and even adjusting the color, brightness, and saturation.
Here’s how you can use PowerDirector to add text to your video;
Step1Install PowerDirector on your device. Open it and tap “New Project” at the top. Select an aspect ratio depending on the video project you are working on and enter a project name.

Step2Select the video that you would like to edit from the folders that show up on the screen. The video will be added to the main timeline of the project.
Step3Select the video layer and then tap on the layer mask from the left sidebar. Select the text tab at the top and then choose the text style that you want to add to the video. Tap on the “+” button inside the style to add the text style you have selected.

Step4Type in the text that you want to add to the video on the text box and then tap on the “T” icon at the top-right corner of the text box to customize the text.
You can use PowerDirector to change the font, color, and text size or even add effects like Text shadow.

Step5When you’re done editing the video, tap on the “Export” icon at the top-right corner of the screen and choose if you would like to save the video on the device or share it via a social media app.

Free Download For Win 7 or later(64-bit)
Free Download For macOS 10.14 or later
Free Download For macOS 10.14 or later
Learn How to Blur a Still or Moving Part of Video
Create High-Quality Video - Wondershare Filmora
An easy and powerful YouTube video editor
Numerous video and audio effects to choose from
Detailed tutorials provided by the official channel
Adding a blur effect to your video is vital, especially if you have added unwanted things that could ruin its quality. It often looks awkward when there’s something wrong in the background of your video. Various video editing programs allow you to blur a moving or still part of your video if you don’t want viewers to see it. With that in mind, we’ll look at how to blur part of a video using Filmora.
In this article
01 How to Blur a Part of a Video Using Filmora
02 How to Blur a Moving Part of a Video Using Filmora
03 How to Blur Part of a Video Using OpenShot
There are several ways you can blur part of a video. Filmora allows you to blur a still and moving part of a video. The software is user-friendly and comes with an aesthetically pleasing interface. You don’t have to be tech-savvy to learn how to blur out part of a video with Filmora. You can also use OpenShot to blur part of a video.
How to Blur a Part of a Video Using Filmora
Both Mac and PC owners can use this video editing software to blur part of a video. Here is how to blur a part of video using Filmora.
- Download and install Wondershare Filmora on your device. If you had already installed Filmora on your computer, double-click the program to launch it.
- Next, you need to drag and drop the video file you wish to blur into the Media Library. Alternatively, you could also navigate to the File tab and click it, then choose Import Media and select the Import Media Files option. Find the video you want to edit and select it. You can now hit the Open button to import the video file to Media Library
- After your video file is on Filmora’s Media Library, drag and drop it into the Timeline; this is where the program allows you to assemble effects and media files for your video project.

- Click on the Effects tab; this will allow you to browse through Filmora’s collection of visual effects. Select Utility on the drop-down menu located on the left side of your screen.

- The program will display a range of effects; select the Mosaic option. You can also type in Mosaic in the search bar to find the effect swiftly.
- Drag the Mosaic effect to above the video clip on your Timeline. Dragging the border of your Mosaic clip allows you to adjust its length.
- A small blurred area will appear in the preview window.

- Lock the main tracks.
- Now, click the Mosaic layer to modify the Mosaic size and area. Move it to the part of the video that you would like to blur.
- Double-clicking on the Mosaic clip will allow you to change the mosaic type and adjust the opacity and blur amount. You can choose from six different Mosaic types. Adjusting the opacity allows you to set the degree to which you can see through the blurred area. The blur amount lets you control the intensity of the blur.

- You can now save your blurred video. Click on the File tab and select ‘Save Project.’ Doing this will save your project to the default file. Choose ‘Save Project As’ to save your video to another destination of your choice.
How to Blur a Moving Part of a Video Using Filmora
You can also blur a moving part of your video with Filmora; this program allows you to add the motion-tracking mosaic to any moving object in your video that you do not want your viewers to see. You can use stickers, mosaic, or anything you download on the internet to hide any unwanted moving object.
With that in mind, here is how to blur a moving part of a video using Filmora:
- Run Filmora on your device.
- Import your video into Filmora’s Media Library.
- Drag your video to the Timeline.

- Now, double-click the video in the Timeline. Doing this will open the editing menu.
- Check the box that’s right next to Motion Tracking; this tool allows you to track movement in a video and then have objects like text, images, videos, or elements follow this movement.

- A tracker box will appear on your preview window; move it over the moving object you would like to track. You can increase or reduce the size of the tracker box. Hit the Start Tracking button to render the effect.

- Wait until the tracking process is complete. The duration of this process will depend on the length of your video. You’ll have to do some trimming if other objects block the moving part you’re tracking from time to time.

- WNow, select the Add Mosaic option.
- Choose the Mosaic type you prefer and adjust the opacity and blur amount to ensure the object is unrecognizable.
- Now, select the moving part of the video you want to blur and click OK.
- The object is now blurred, and the mosaic layer will follow its movement everywhere it goes.
- Playback your video to check the result. Filmora allows you to fine-tune the position and size of the object that’s following the track in your Preview Window without restarting tracking. Additionally, you can switch the follower anytime you want.
- When you have finished blurring the moving part on your video, click File > Save Project or Save Project As to save your video.
For Win 7 or later (64-bit)
For macOS 10.12 or later
How to Blur Part of a Video Using OpenShot
Designed for Windows, Mac, and Linux, OpenShot is a free, open-source, and cross-platform video editor. While there’s no predefined function or filter in this tool to help you blur part of a video, OpenShot has another way of blurring static parts of your video: it uses an image.
OpenShot blur part of video is free, and you’ll use its open-source programs as a base program for the edition of the video and GIMP Image Manipulation software to edit photos. Follow the guide below to learn how to blur out something in a video using OpenShot.
Step 1: Download OpenShot and install it on your device.

Step 2: Take a screenshot from your video, where the part you want to blur is easily visible. You can do this by going to a relevant frame and utilizing Save Current Frame with a camera icon, located on the right side of the video preview window in a standard program configuration.

Step 3: Be sure to save your video screenshot on your computer.
Step 4: Since you have exported a relevant frame from your video as a screenshot, you need to open it in a photo editor that can handle PNG pics and transparency, like the GIMP Image Manipulation program. Use any selection tool to select the area of the picture you want to blur on the video. Depending on your preferences, you can choose the free select tool, the ellipse select tool, or the rectangle select tool.

Step 5: In the blur filters submenu, open the Pixelize tool and adjust the options that suit your preferences. You can use CTRL-Z to cancel the operation, and repeat it until you find the best combination of blurring settings.
Step 6: When you are satisfied with blurring, right-click on the blurred area and select Invert in the Select submenu; this will allow you to select the entire part of the frame that has not been blurred, which is the part you would like to get rid of because you will only have to use the blurred part of your video overlay where necessary.
Step 7: Now, cut the section of the picture you do not want to keep. You can do this by using CTRL-X. The blurred filter for your video is now ready.

Step 8: If after cutting you notice a plain color rather than a checkerboard canvas representing transparency, use CTRL-Z to cancel the cut. Then, use CTRL-I to invert the selection again to get control of the blurred selection again, and copy or cut it using CTRL-X or CTRL-C.
Step 9: Create another image using CTRL-N, and ensure you have navigated to the advanced options and selected transparency as the fill-in color, and paste your selection there.
Step 10: You now have a perfect photo with full transparency, which is represented by a checkerboard canvas, except for the section of the video frames you would like to blur that should be pixelized.
Step 11: Use the Export option under the File menu to export the photo to your PC as a . PNG file. To save a picture with a transparency channel, you need to use the . PNG extension.
Step 12: Now return to OpenShot video editor and import the generated picture with a pixelized portion in the OpenShot video project. Next, add the picture as an overlay track. Make sure it’s above the video track.
Step 13: If the program asks you to import the photo as an image sequence, select the NO option because you need to import a still photo, and not a video sequence.
Step 14: The picture will be displayed before the video, blurring only the portion of the video where you modified the frame. The other parts of the video won’t be touched. You can make adjustments to ensure the picture track is only displayed at required moments. And that’s how to blur part of a video using OpenShot.
Conclusion
● Now that you know how to blur out part of a video, you can have fun and censor anything you want in your clips. Use Filmora to blur moving and still parts on your video.
Adding a blur effect to your video is vital, especially if you have added unwanted things that could ruin its quality. It often looks awkward when there’s something wrong in the background of your video. Various video editing programs allow you to blur a moving or still part of your video if you don’t want viewers to see it. With that in mind, we’ll look at how to blur part of a video using Filmora.
In this article
01 How to Blur a Part of a Video Using Filmora
02 How to Blur a Moving Part of a Video Using Filmora
03 How to Blur Part of a Video Using OpenShot
There are several ways you can blur part of a video. Filmora allows you to blur a still and moving part of a video. The software is user-friendly and comes with an aesthetically pleasing interface. You don’t have to be tech-savvy to learn how to blur out part of a video with Filmora. You can also use OpenShot to blur part of a video.
How to Blur a Part of a Video Using Filmora
Both Mac and PC owners can use this video editing software to blur part of a video. Here is how to blur a part of video using Filmora.
- Download and install Wondershare Filmora on your device. If you had already installed Filmora on your computer, double-click the program to launch it.
- Next, you need to drag and drop the video file you wish to blur into the Media Library. Alternatively, you could also navigate to the File tab and click it, then choose Import Media and select the Import Media Files option. Find the video you want to edit and select it. You can now hit the Open button to import the video file to Media Library
- After your video file is on Filmora’s Media Library, drag and drop it into the Timeline; this is where the program allows you to assemble effects and media files for your video project.

- Click on the Effects tab; this will allow you to browse through Filmora’s collection of visual effects. Select Utility on the drop-down menu located on the left side of your screen.

- The program will display a range of effects; select the Mosaic option. You can also type in Mosaic in the search bar to find the effect swiftly.
- Drag the Mosaic effect to above the video clip on your Timeline. Dragging the border of your Mosaic clip allows you to adjust its length.
- A small blurred area will appear in the preview window.

- Lock the main tracks.
- Now, click the Mosaic layer to modify the Mosaic size and area. Move it to the part of the video that you would like to blur.
- Double-clicking on the Mosaic clip will allow you to change the mosaic type and adjust the opacity and blur amount. You can choose from six different Mosaic types. Adjusting the opacity allows you to set the degree to which you can see through the blurred area. The blur amount lets you control the intensity of the blur.

- You can now save your blurred video. Click on the File tab and select ‘Save Project.’ Doing this will save your project to the default file. Choose ‘Save Project As’ to save your video to another destination of your choice.
How to Blur a Moving Part of a Video Using Filmora
You can also blur a moving part of your video with Filmora; this program allows you to add the motion-tracking mosaic to any moving object in your video that you do not want your viewers to see. You can use stickers, mosaic, or anything you download on the internet to hide any unwanted moving object.
With that in mind, here is how to blur a moving part of a video using Filmora:
- Run Filmora on your device.
- Import your video into Filmora’s Media Library.
- Drag your video to the Timeline.

- Now, double-click the video in the Timeline. Doing this will open the editing menu.
- Check the box that’s right next to Motion Tracking; this tool allows you to track movement in a video and then have objects like text, images, videos, or elements follow this movement.

- A tracker box will appear on your preview window; move it over the moving object you would like to track. You can increase or reduce the size of the tracker box. Hit the Start Tracking button to render the effect.

- Wait until the tracking process is complete. The duration of this process will depend on the length of your video. You’ll have to do some trimming if other objects block the moving part you’re tracking from time to time.

- WNow, select the Add Mosaic option.
- Choose the Mosaic type you prefer and adjust the opacity and blur amount to ensure the object is unrecognizable.
- Now, select the moving part of the video you want to blur and click OK.
- The object is now blurred, and the mosaic layer will follow its movement everywhere it goes.
- Playback your video to check the result. Filmora allows you to fine-tune the position and size of the object that’s following the track in your Preview Window without restarting tracking. Additionally, you can switch the follower anytime you want.
- When you have finished blurring the moving part on your video, click File > Save Project or Save Project As to save your video.
For Win 7 or later (64-bit)
For macOS 10.12 or later
How to Blur Part of a Video Using OpenShot
Designed for Windows, Mac, and Linux, OpenShot is a free, open-source, and cross-platform video editor. While there’s no predefined function or filter in this tool to help you blur part of a video, OpenShot has another way of blurring static parts of your video: it uses an image.
OpenShot blur part of video is free, and you’ll use its open-source programs as a base program for the edition of the video and GIMP Image Manipulation software to edit photos. Follow the guide below to learn how to blur out something in a video using OpenShot.
Step 1: Download OpenShot and install it on your device.

Step 2: Take a screenshot from your video, where the part you want to blur is easily visible. You can do this by going to a relevant frame and utilizing Save Current Frame with a camera icon, located on the right side of the video preview window in a standard program configuration.

Step 3: Be sure to save your video screenshot on your computer.
Step 4: Since you have exported a relevant frame from your video as a screenshot, you need to open it in a photo editor that can handle PNG pics and transparency, like the GIMP Image Manipulation program. Use any selection tool to select the area of the picture you want to blur on the video. Depending on your preferences, you can choose the free select tool, the ellipse select tool, or the rectangle select tool.

Step 5: In the blur filters submenu, open the Pixelize tool and adjust the options that suit your preferences. You can use CTRL-Z to cancel the operation, and repeat it until you find the best combination of blurring settings.
Step 6: When you are satisfied with blurring, right-click on the blurred area and select Invert in the Select submenu; this will allow you to select the entire part of the frame that has not been blurred, which is the part you would like to get rid of because you will only have to use the blurred part of your video overlay where necessary.
Step 7: Now, cut the section of the picture you do not want to keep. You can do this by using CTRL-X. The blurred filter for your video is now ready.

Step 8: If after cutting you notice a plain color rather than a checkerboard canvas representing transparency, use CTRL-Z to cancel the cut. Then, use CTRL-I to invert the selection again to get control of the blurred selection again, and copy or cut it using CTRL-X or CTRL-C.
Step 9: Create another image using CTRL-N, and ensure you have navigated to the advanced options and selected transparency as the fill-in color, and paste your selection there.
Step 10: You now have a perfect photo with full transparency, which is represented by a checkerboard canvas, except for the section of the video frames you would like to blur that should be pixelized.
Step 11: Use the Export option under the File menu to export the photo to your PC as a . PNG file. To save a picture with a transparency channel, you need to use the . PNG extension.
Step 12: Now return to OpenShot video editor and import the generated picture with a pixelized portion in the OpenShot video project. Next, add the picture as an overlay track. Make sure it’s above the video track.
Step 13: If the program asks you to import the photo as an image sequence, select the NO option because you need to import a still photo, and not a video sequence.
Step 14: The picture will be displayed before the video, blurring only the portion of the video where you modified the frame. The other parts of the video won’t be touched. You can make adjustments to ensure the picture track is only displayed at required moments. And that’s how to blur part of a video using OpenShot.
Conclusion
● Now that you know how to blur out part of a video, you can have fun and censor anything you want in your clips. Use Filmora to blur moving and still parts on your video.
Adding a blur effect to your video is vital, especially if you have added unwanted things that could ruin its quality. It often looks awkward when there’s something wrong in the background of your video. Various video editing programs allow you to blur a moving or still part of your video if you don’t want viewers to see it. With that in mind, we’ll look at how to blur part of a video using Filmora.
In this article
01 How to Blur a Part of a Video Using Filmora
02 How to Blur a Moving Part of a Video Using Filmora
03 How to Blur Part of a Video Using OpenShot
There are several ways you can blur part of a video. Filmora allows you to blur a still and moving part of a video. The software is user-friendly and comes with an aesthetically pleasing interface. You don’t have to be tech-savvy to learn how to blur out part of a video with Filmora. You can also use OpenShot to blur part of a video.
How to Blur a Part of a Video Using Filmora
Both Mac and PC owners can use this video editing software to blur part of a video. Here is how to blur a part of video using Filmora.
- Download and install Wondershare Filmora on your device. If you had already installed Filmora on your computer, double-click the program to launch it.
- Next, you need to drag and drop the video file you wish to blur into the Media Library. Alternatively, you could also navigate to the File tab and click it, then choose Import Media and select the Import Media Files option. Find the video you want to edit and select it. You can now hit the Open button to import the video file to Media Library
- After your video file is on Filmora’s Media Library, drag and drop it into the Timeline; this is where the program allows you to assemble effects and media files for your video project.

- Click on the Effects tab; this will allow you to browse through Filmora’s collection of visual effects. Select Utility on the drop-down menu located on the left side of your screen.

- The program will display a range of effects; select the Mosaic option. You can also type in Mosaic in the search bar to find the effect swiftly.
- Drag the Mosaic effect to above the video clip on your Timeline. Dragging the border of your Mosaic clip allows you to adjust its length.
- A small blurred area will appear in the preview window.

- Lock the main tracks.
- Now, click the Mosaic layer to modify the Mosaic size and area. Move it to the part of the video that you would like to blur.
- Double-clicking on the Mosaic clip will allow you to change the mosaic type and adjust the opacity and blur amount. You can choose from six different Mosaic types. Adjusting the opacity allows you to set the degree to which you can see through the blurred area. The blur amount lets you control the intensity of the blur.

- You can now save your blurred video. Click on the File tab and select ‘Save Project.’ Doing this will save your project to the default file. Choose ‘Save Project As’ to save your video to another destination of your choice.
How to Blur a Moving Part of a Video Using Filmora
You can also blur a moving part of your video with Filmora; this program allows you to add the motion-tracking mosaic to any moving object in your video that you do not want your viewers to see. You can use stickers, mosaic, or anything you download on the internet to hide any unwanted moving object.
With that in mind, here is how to blur a moving part of a video using Filmora:
- Run Filmora on your device.
- Import your video into Filmora’s Media Library.
- Drag your video to the Timeline.

- Now, double-click the video in the Timeline. Doing this will open the editing menu.
- Check the box that’s right next to Motion Tracking; this tool allows you to track movement in a video and then have objects like text, images, videos, or elements follow this movement.

- A tracker box will appear on your preview window; move it over the moving object you would like to track. You can increase or reduce the size of the tracker box. Hit the Start Tracking button to render the effect.

- Wait until the tracking process is complete. The duration of this process will depend on the length of your video. You’ll have to do some trimming if other objects block the moving part you’re tracking from time to time.

- WNow, select the Add Mosaic option.
- Choose the Mosaic type you prefer and adjust the opacity and blur amount to ensure the object is unrecognizable.
- Now, select the moving part of the video you want to blur and click OK.
- The object is now blurred, and the mosaic layer will follow its movement everywhere it goes.
- Playback your video to check the result. Filmora allows you to fine-tune the position and size of the object that’s following the track in your Preview Window without restarting tracking. Additionally, you can switch the follower anytime you want.
- When you have finished blurring the moving part on your video, click File > Save Project or Save Project As to save your video.
For Win 7 or later (64-bit)
For macOS 10.12 or later
How to Blur Part of a Video Using OpenShot
Designed for Windows, Mac, and Linux, OpenShot is a free, open-source, and cross-platform video editor. While there’s no predefined function or filter in this tool to help you blur part of a video, OpenShot has another way of blurring static parts of your video: it uses an image.
OpenShot blur part of video is free, and you’ll use its open-source programs as a base program for the edition of the video and GIMP Image Manipulation software to edit photos. Follow the guide below to learn how to blur out something in a video using OpenShot.
Step 1: Download OpenShot and install it on your device.

Step 2: Take a screenshot from your video, where the part you want to blur is easily visible. You can do this by going to a relevant frame and utilizing Save Current Frame with a camera icon, located on the right side of the video preview window in a standard program configuration.

Step 3: Be sure to save your video screenshot on your computer.
Step 4: Since you have exported a relevant frame from your video as a screenshot, you need to open it in a photo editor that can handle PNG pics and transparency, like the GIMP Image Manipulation program. Use any selection tool to select the area of the picture you want to blur on the video. Depending on your preferences, you can choose the free select tool, the ellipse select tool, or the rectangle select tool.

Step 5: In the blur filters submenu, open the Pixelize tool and adjust the options that suit your preferences. You can use CTRL-Z to cancel the operation, and repeat it until you find the best combination of blurring settings.
Step 6: When you are satisfied with blurring, right-click on the blurred area and select Invert in the Select submenu; this will allow you to select the entire part of the frame that has not been blurred, which is the part you would like to get rid of because you will only have to use the blurred part of your video overlay where necessary.
Step 7: Now, cut the section of the picture you do not want to keep. You can do this by using CTRL-X. The blurred filter for your video is now ready.

Step 8: If after cutting you notice a plain color rather than a checkerboard canvas representing transparency, use CTRL-Z to cancel the cut. Then, use CTRL-I to invert the selection again to get control of the blurred selection again, and copy or cut it using CTRL-X or CTRL-C.
Step 9: Create another image using CTRL-N, and ensure you have navigated to the advanced options and selected transparency as the fill-in color, and paste your selection there.
Step 10: You now have a perfect photo with full transparency, which is represented by a checkerboard canvas, except for the section of the video frames you would like to blur that should be pixelized.
Step 11: Use the Export option under the File menu to export the photo to your PC as a . PNG file. To save a picture with a transparency channel, you need to use the . PNG extension.
Step 12: Now return to OpenShot video editor and import the generated picture with a pixelized portion in the OpenShot video project. Next, add the picture as an overlay track. Make sure it’s above the video track.
Step 13: If the program asks you to import the photo as an image sequence, select the NO option because you need to import a still photo, and not a video sequence.
Step 14: The picture will be displayed before the video, blurring only the portion of the video where you modified the frame. The other parts of the video won’t be touched. You can make adjustments to ensure the picture track is only displayed at required moments. And that’s how to blur part of a video using OpenShot.
Conclusion
● Now that you know how to blur out part of a video, you can have fun and censor anything you want in your clips. Use Filmora to blur moving and still parts on your video.
Adding a blur effect to your video is vital, especially if you have added unwanted things that could ruin its quality. It often looks awkward when there’s something wrong in the background of your video. Various video editing programs allow you to blur a moving or still part of your video if you don’t want viewers to see it. With that in mind, we’ll look at how to blur part of a video using Filmora.
In this article
01 How to Blur a Part of a Video Using Filmora
02 How to Blur a Moving Part of a Video Using Filmora
03 How to Blur Part of a Video Using OpenShot
There are several ways you can blur part of a video. Filmora allows you to blur a still and moving part of a video. The software is user-friendly and comes with an aesthetically pleasing interface. You don’t have to be tech-savvy to learn how to blur out part of a video with Filmora. You can also use OpenShot to blur part of a video.
How to Blur a Part of a Video Using Filmora
Both Mac and PC owners can use this video editing software to blur part of a video. Here is how to blur a part of video using Filmora.
- Download and install Wondershare Filmora on your device. If you had already installed Filmora on your computer, double-click the program to launch it.
- Next, you need to drag and drop the video file you wish to blur into the Media Library. Alternatively, you could also navigate to the File tab and click it, then choose Import Media and select the Import Media Files option. Find the video you want to edit and select it. You can now hit the Open button to import the video file to Media Library
- After your video file is on Filmora’s Media Library, drag and drop it into the Timeline; this is where the program allows you to assemble effects and media files for your video project.

- Click on the Effects tab; this will allow you to browse through Filmora’s collection of visual effects. Select Utility on the drop-down menu located on the left side of your screen.

- The program will display a range of effects; select the Mosaic option. You can also type in Mosaic in the search bar to find the effect swiftly.
- Drag the Mosaic effect to above the video clip on your Timeline. Dragging the border of your Mosaic clip allows you to adjust its length.
- A small blurred area will appear in the preview window.

- Lock the main tracks.
- Now, click the Mosaic layer to modify the Mosaic size and area. Move it to the part of the video that you would like to blur.
- Double-clicking on the Mosaic clip will allow you to change the mosaic type and adjust the opacity and blur amount. You can choose from six different Mosaic types. Adjusting the opacity allows you to set the degree to which you can see through the blurred area. The blur amount lets you control the intensity of the blur.

- You can now save your blurred video. Click on the File tab and select ‘Save Project.’ Doing this will save your project to the default file. Choose ‘Save Project As’ to save your video to another destination of your choice.
How to Blur a Moving Part of a Video Using Filmora
You can also blur a moving part of your video with Filmora; this program allows you to add the motion-tracking mosaic to any moving object in your video that you do not want your viewers to see. You can use stickers, mosaic, or anything you download on the internet to hide any unwanted moving object.
With that in mind, here is how to blur a moving part of a video using Filmora:
- Run Filmora on your device.
- Import your video into Filmora’s Media Library.
- Drag your video to the Timeline.

- Now, double-click the video in the Timeline. Doing this will open the editing menu.
- Check the box that’s right next to Motion Tracking; this tool allows you to track movement in a video and then have objects like text, images, videos, or elements follow this movement.

- A tracker box will appear on your preview window; move it over the moving object you would like to track. You can increase or reduce the size of the tracker box. Hit the Start Tracking button to render the effect.

- Wait until the tracking process is complete. The duration of this process will depend on the length of your video. You’ll have to do some trimming if other objects block the moving part you’re tracking from time to time.

- WNow, select the Add Mosaic option.
- Choose the Mosaic type you prefer and adjust the opacity and blur amount to ensure the object is unrecognizable.
- Now, select the moving part of the video you want to blur and click OK.
- The object is now blurred, and the mosaic layer will follow its movement everywhere it goes.
- Playback your video to check the result. Filmora allows you to fine-tune the position and size of the object that’s following the track in your Preview Window without restarting tracking. Additionally, you can switch the follower anytime you want.
- When you have finished blurring the moving part on your video, click File > Save Project or Save Project As to save your video.
For Win 7 or later (64-bit)
For macOS 10.12 or later
How to Blur Part of a Video Using OpenShot
Designed for Windows, Mac, and Linux, OpenShot is a free, open-source, and cross-platform video editor. While there’s no predefined function or filter in this tool to help you blur part of a video, OpenShot has another way of blurring static parts of your video: it uses an image.
OpenShot blur part of video is free, and you’ll use its open-source programs as a base program for the edition of the video and GIMP Image Manipulation software to edit photos. Follow the guide below to learn how to blur out something in a video using OpenShot.
Step 1: Download OpenShot and install it on your device.

Step 2: Take a screenshot from your video, where the part you want to blur is easily visible. You can do this by going to a relevant frame and utilizing Save Current Frame with a camera icon, located on the right side of the video preview window in a standard program configuration.

Step 3: Be sure to save your video screenshot on your computer.
Step 4: Since you have exported a relevant frame from your video as a screenshot, you need to open it in a photo editor that can handle PNG pics and transparency, like the GIMP Image Manipulation program. Use any selection tool to select the area of the picture you want to blur on the video. Depending on your preferences, you can choose the free select tool, the ellipse select tool, or the rectangle select tool.

Step 5: In the blur filters submenu, open the Pixelize tool and adjust the options that suit your preferences. You can use CTRL-Z to cancel the operation, and repeat it until you find the best combination of blurring settings.
Step 6: When you are satisfied with blurring, right-click on the blurred area and select Invert in the Select submenu; this will allow you to select the entire part of the frame that has not been blurred, which is the part you would like to get rid of because you will only have to use the blurred part of your video overlay where necessary.
Step 7: Now, cut the section of the picture you do not want to keep. You can do this by using CTRL-X. The blurred filter for your video is now ready.

Step 8: If after cutting you notice a plain color rather than a checkerboard canvas representing transparency, use CTRL-Z to cancel the cut. Then, use CTRL-I to invert the selection again to get control of the blurred selection again, and copy or cut it using CTRL-X or CTRL-C.
Step 9: Create another image using CTRL-N, and ensure you have navigated to the advanced options and selected transparency as the fill-in color, and paste your selection there.
Step 10: You now have a perfect photo with full transparency, which is represented by a checkerboard canvas, except for the section of the video frames you would like to blur that should be pixelized.
Step 11: Use the Export option under the File menu to export the photo to your PC as a . PNG file. To save a picture with a transparency channel, you need to use the . PNG extension.
Step 12: Now return to OpenShot video editor and import the generated picture with a pixelized portion in the OpenShot video project. Next, add the picture as an overlay track. Make sure it’s above the video track.
Step 13: If the program asks you to import the photo as an image sequence, select the NO option because you need to import a still photo, and not a video sequence.
Step 14: The picture will be displayed before the video, blurring only the portion of the video where you modified the frame. The other parts of the video won’t be touched. You can make adjustments to ensure the picture track is only displayed at required moments. And that’s how to blur part of a video using OpenShot.
Conclusion
● Now that you know how to blur out part of a video, you can have fun and censor anything you want in your clips. Use Filmora to blur moving and still parts on your video.
Step by Step to Resize Video in Davinci Resolve
While editing videos, you may change the aspect ratio of the video to change the size of the video to upload on different platforms like YouTube, Facebook, Pinterest, and Instagram. Videos come in different sizes and shapes. Some videos are portraits while the others are landscapes. Similarly, videos are captured in different places with different devices. So, we need to set a certain size of the video.
Definitely, a very large video can make delays in the work, similarly, a small size video can result in low resolution and bad quality. Resizing a video saves a lot of time and money whether you have a business, a YouTube channel, a short film, or a feature film. Today, we shall discuss how to resize the videos?
The two free ways to resize the video…
Here are a number of tools used in the market to resize the videos. We are going to teach How to resize the video in Davinci resolve and Fimora wondershare. Once you have mastered How to resize a video, it would be as simple as the ‘click’.
Now the good news is, you can dramatically export the videos in the same resolution in a very short time.
Let’s dive in !
Part 1. How to resize video in Davinci Resolve
Davinci Resolve is a very powerful tool to edit videos. Let’s suppose, you have some videos shots and all the videos have different sizes, some of the videos fit in the timeline and some are out of the timeline. No matter, you are going to make a video on the same scale with the same size.
Resize the video can be done in three ways:
- Zoom in zoom out
- Cropping
- Retime and scaling
1. Zoom in and Zoom out
First of all, select the videos in your timeline. You should stay in the middle of the frame to set it because it’s too wide. The timeline moves forward and backward. Let your video be 4k, go to the bottom-right corner and click on timeline format. Select timeline resolution, select ultra HD, or whatever you want from the drop-down list.
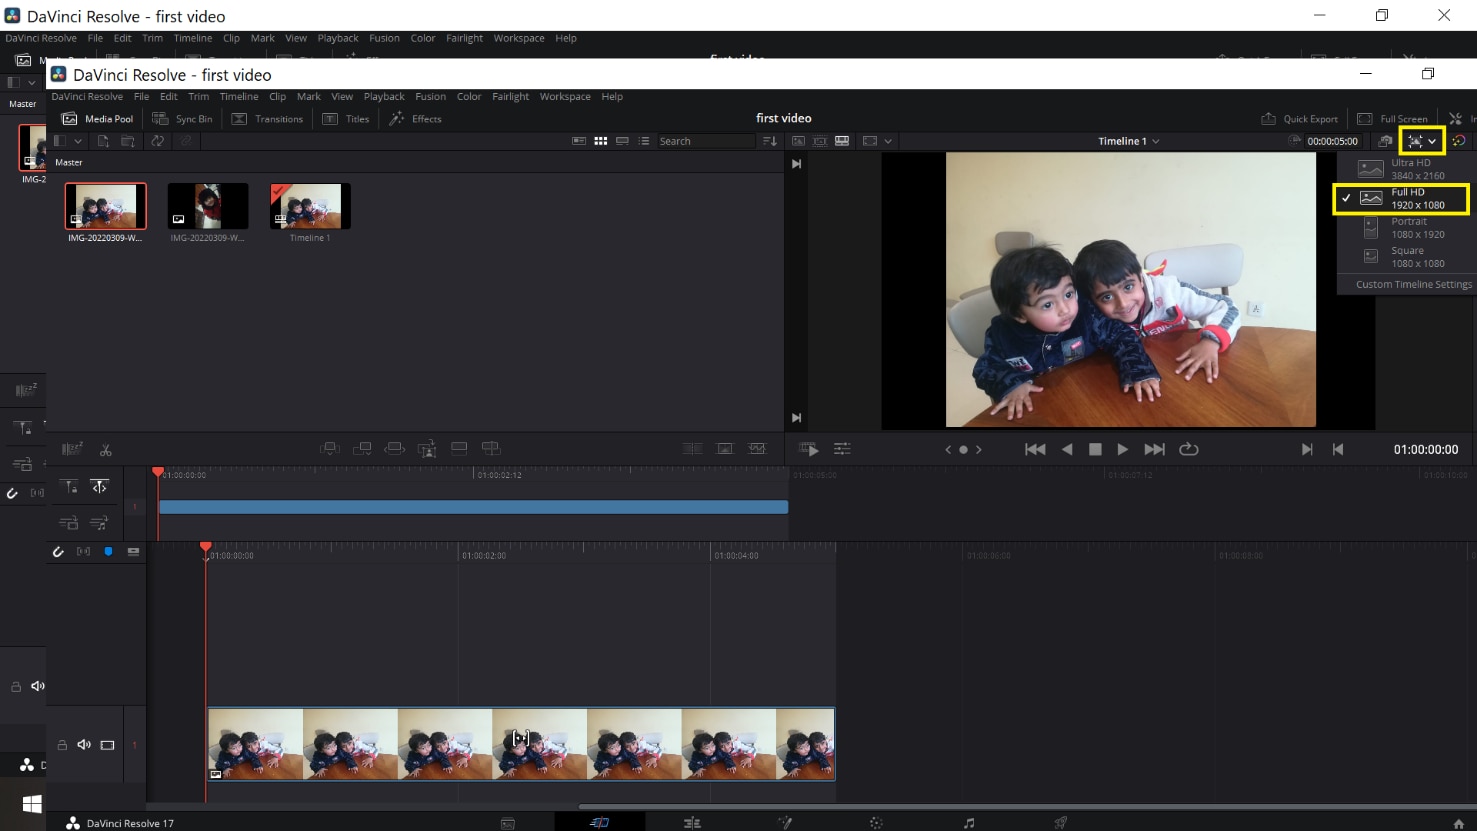
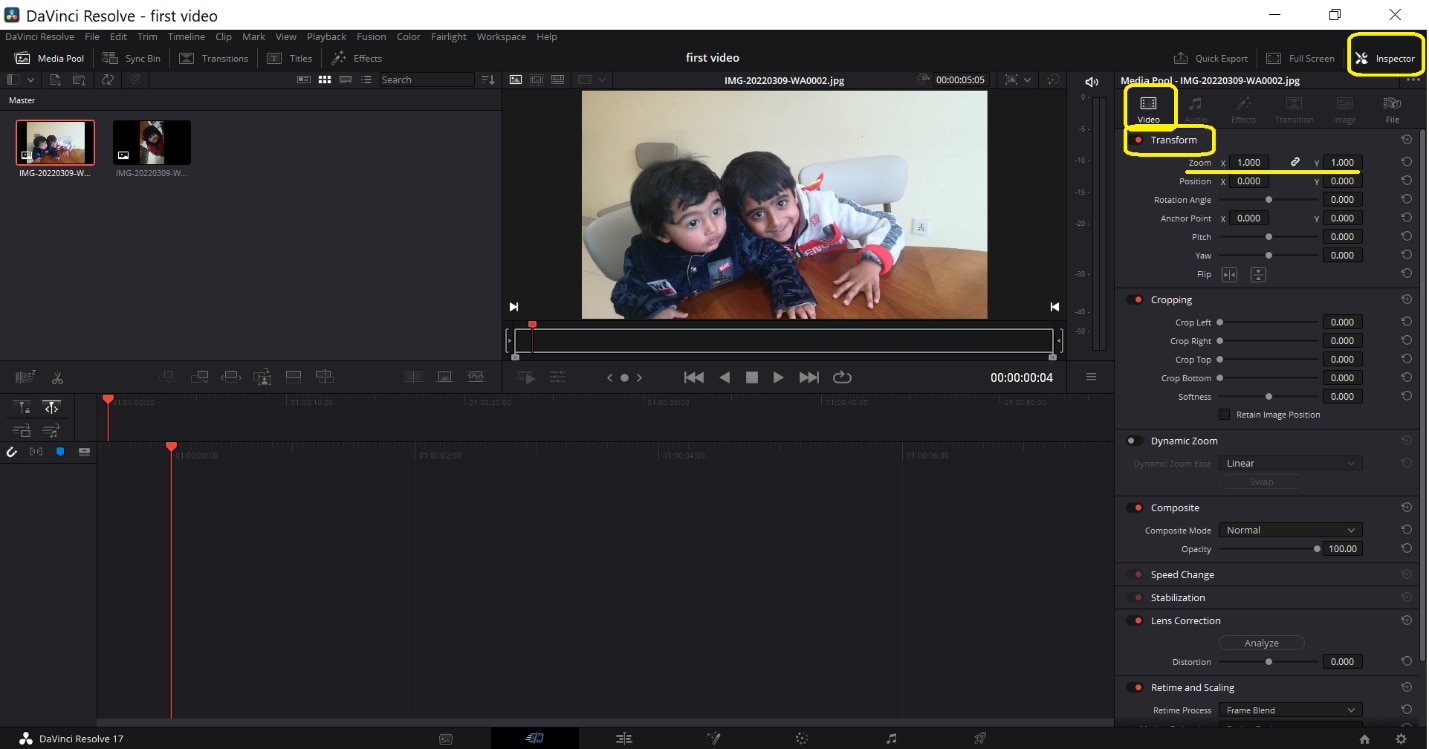
Go to the inspector from the up-right corner and select Transform under the video section. Here you can resize your image. Place the mouse over zoom x (Horizontal) and zoom y (vertical) values to drag left or right for zoom in or zoom out. The video can be resized accordingly.
Here you can also change its rotation.
2. Cropping
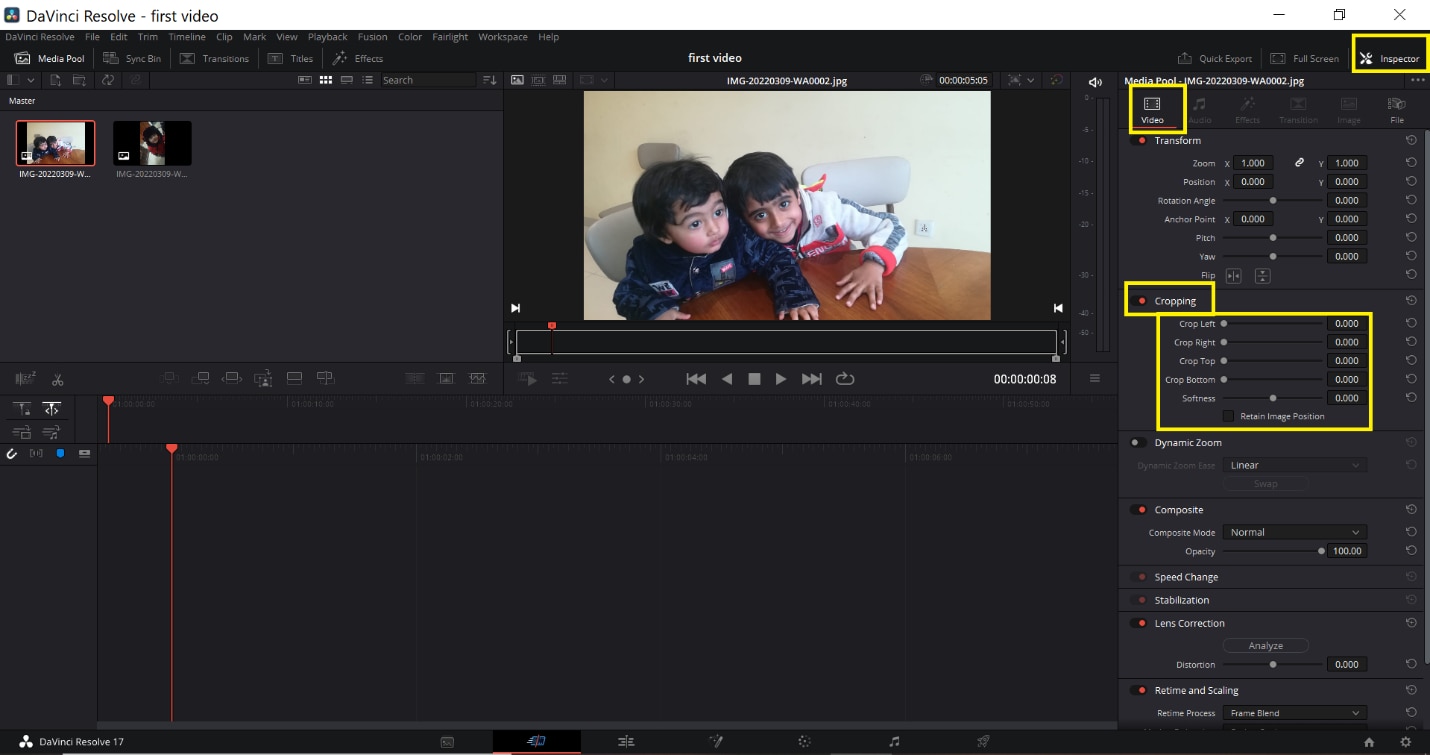
Go to the inspector from the up-right corner and select Transform. Now choose Cropping. Here are four options Crop left, crop right, crop Bottom, and crop Top. You can drag the scale from left to right to adjust the crop settings according to the desired result.
3. Retime and scaling
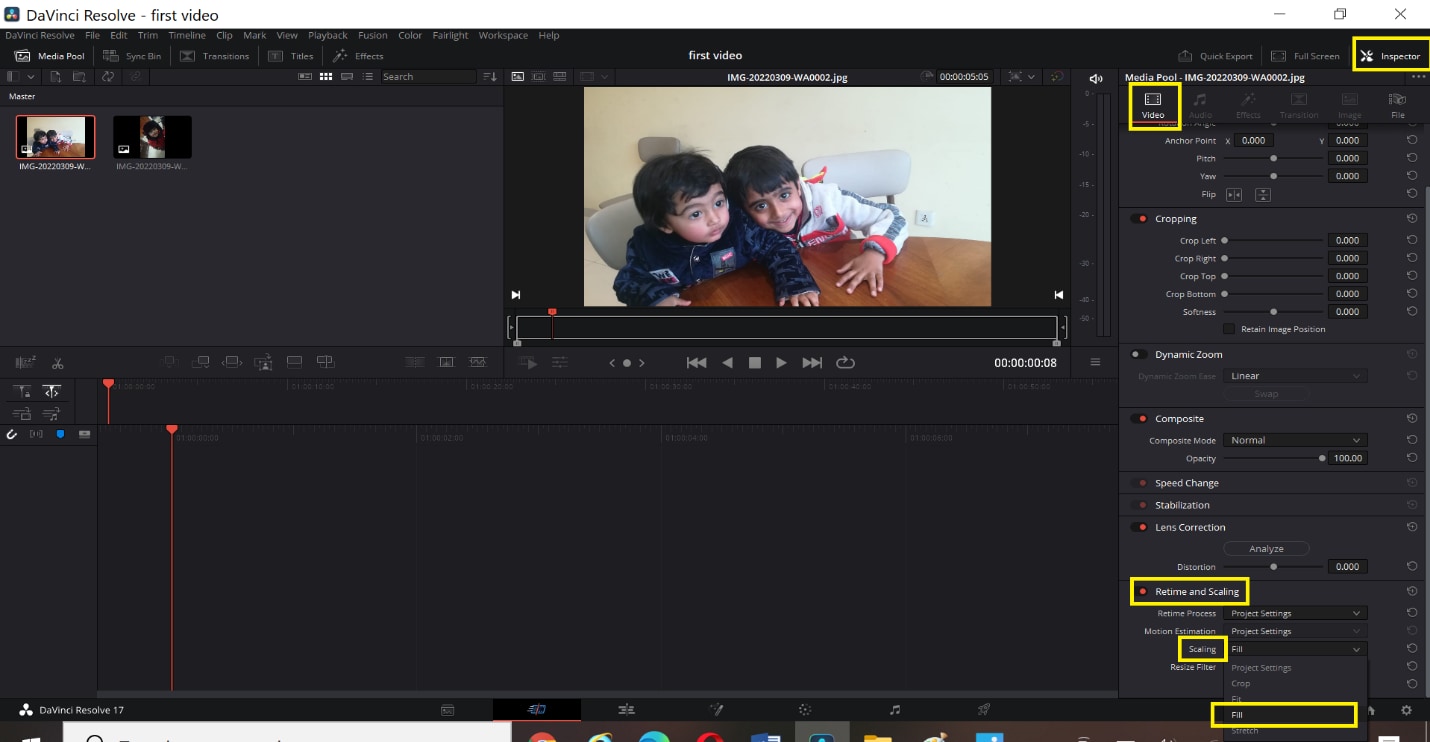
Go to the inspector from the up-right corner and select retime and scaling. You can choose stretch, Fit, Fill, or crop for cropping the video from the drop-down list.
- The Crop function is used to remove the unnecessary or uneven part of the video.
- The Fit function is to have the video auto-center and the selected clips are formatted according to the screen dimensions.
- Stretch Function allows changing the length of the certain clip at a certain duration.
After transforming, cropping, and resizing the videos, you can copy the same settings without repeating the above steps for each video.
Part 2. An alternative way to resize videos with Wondershare
Filmora Video Editor is another great video editing software. It is very easy to use. It offers many different features to resize the videos. Moreover, it allows zooming in the video to highlight the best part of your video. It allows the edited video to export on other devices or YouTube channels.
For Win 7 or later (64-bit)
For macOS 10.14 or later
You can resize your video in three ways:
- Resize video by cropping
- Scale in Scale-out
- Resize by changing Aspect Ratio
1. Resize video by cropping
- Import the videos from your storage by using the import button.
- Drag the videos in the timeline.
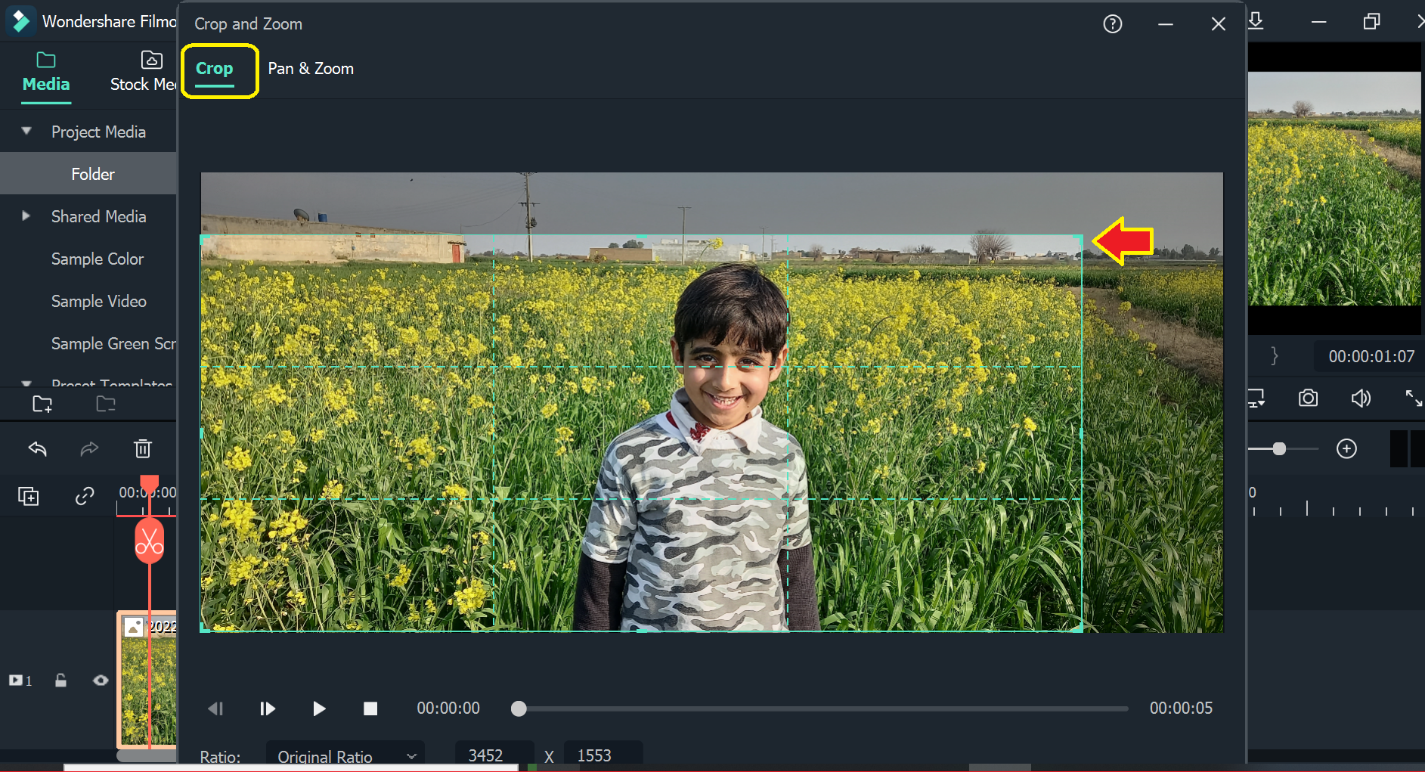
- Right-click on the desired video, crop and zoom option will appear in the menu.
- Select crop tab.
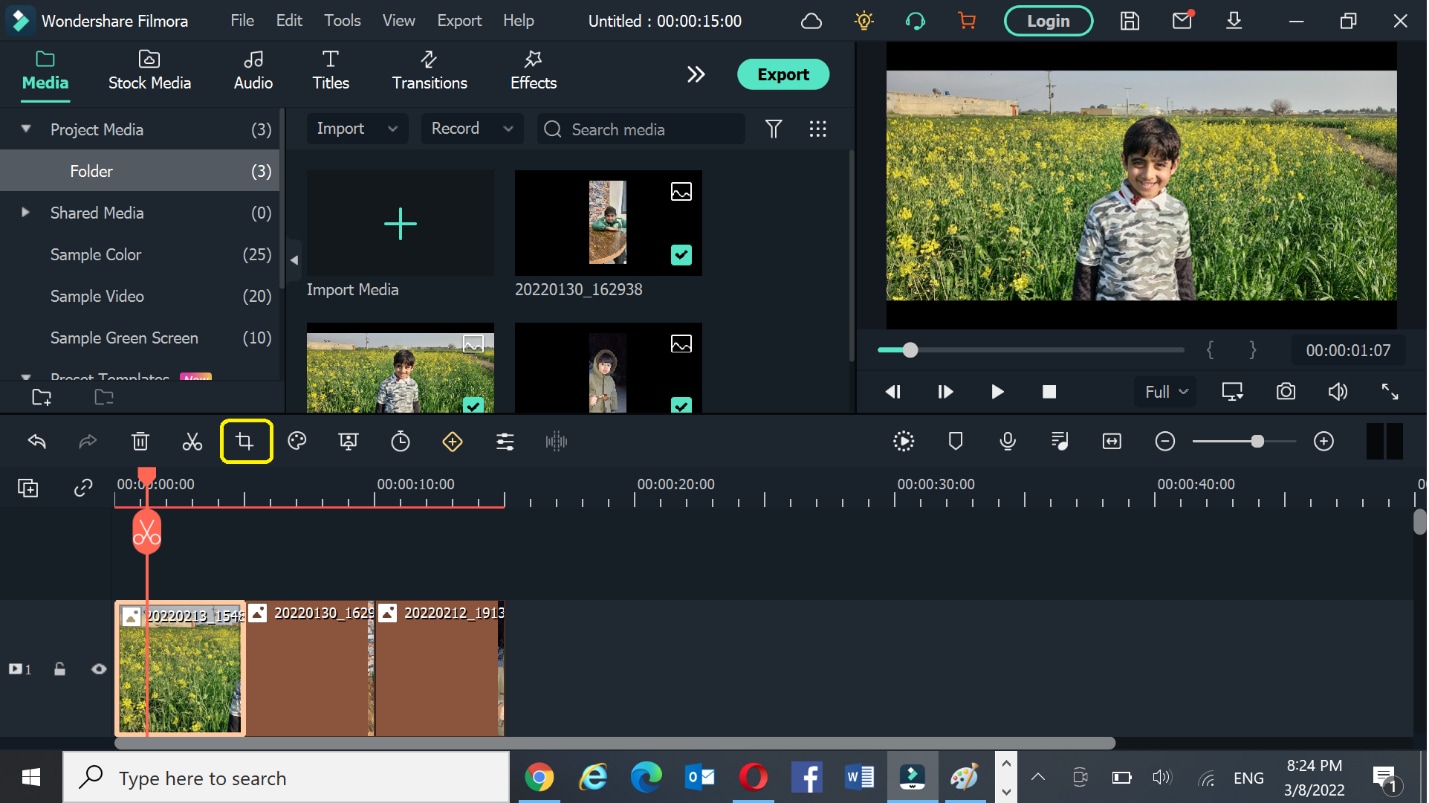
- Grab the corner of the crop inwards, and move to adjust as desired.
- Press the OK tab and your video is cropped.
2. Scale-in and scale-out
- Select the video in the timeline.
- Select the settings
- Click on the Transform tab under image section**.**
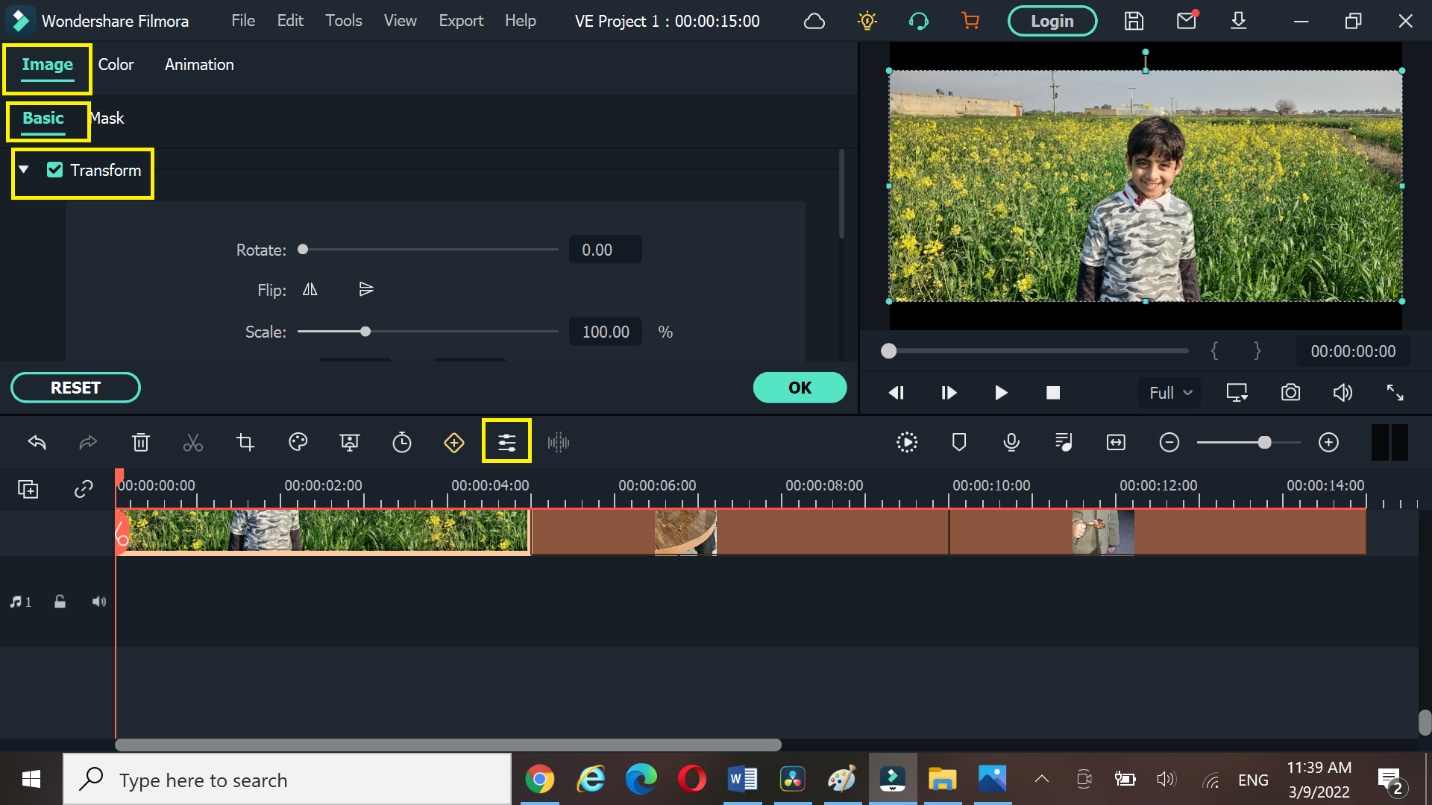
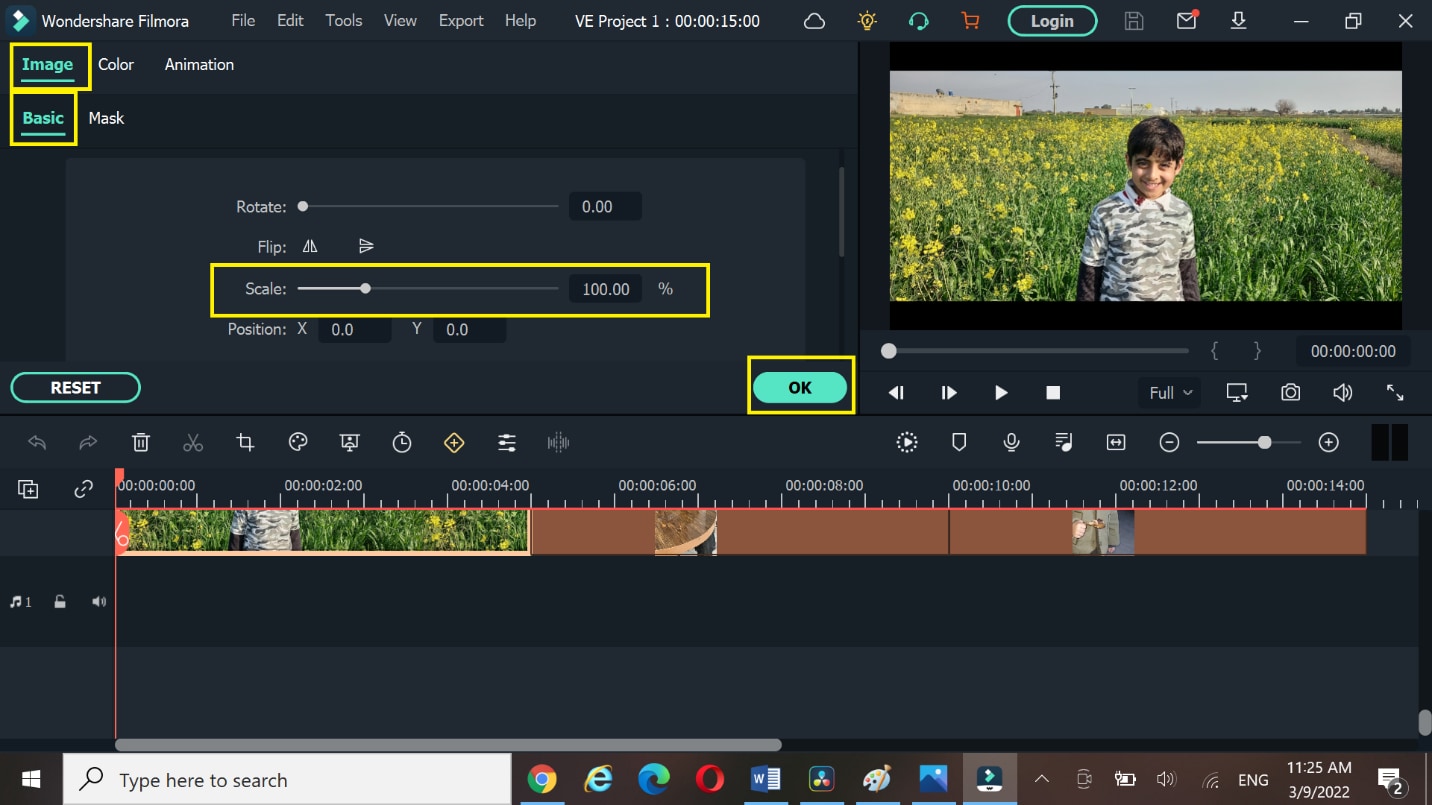
- Move the pointer from left to right on the Scale to zoom in and zoom out the video. You can remove the unwanted portion of the video.
- Press OK tab.
3. Resize video by changing aspect ratio
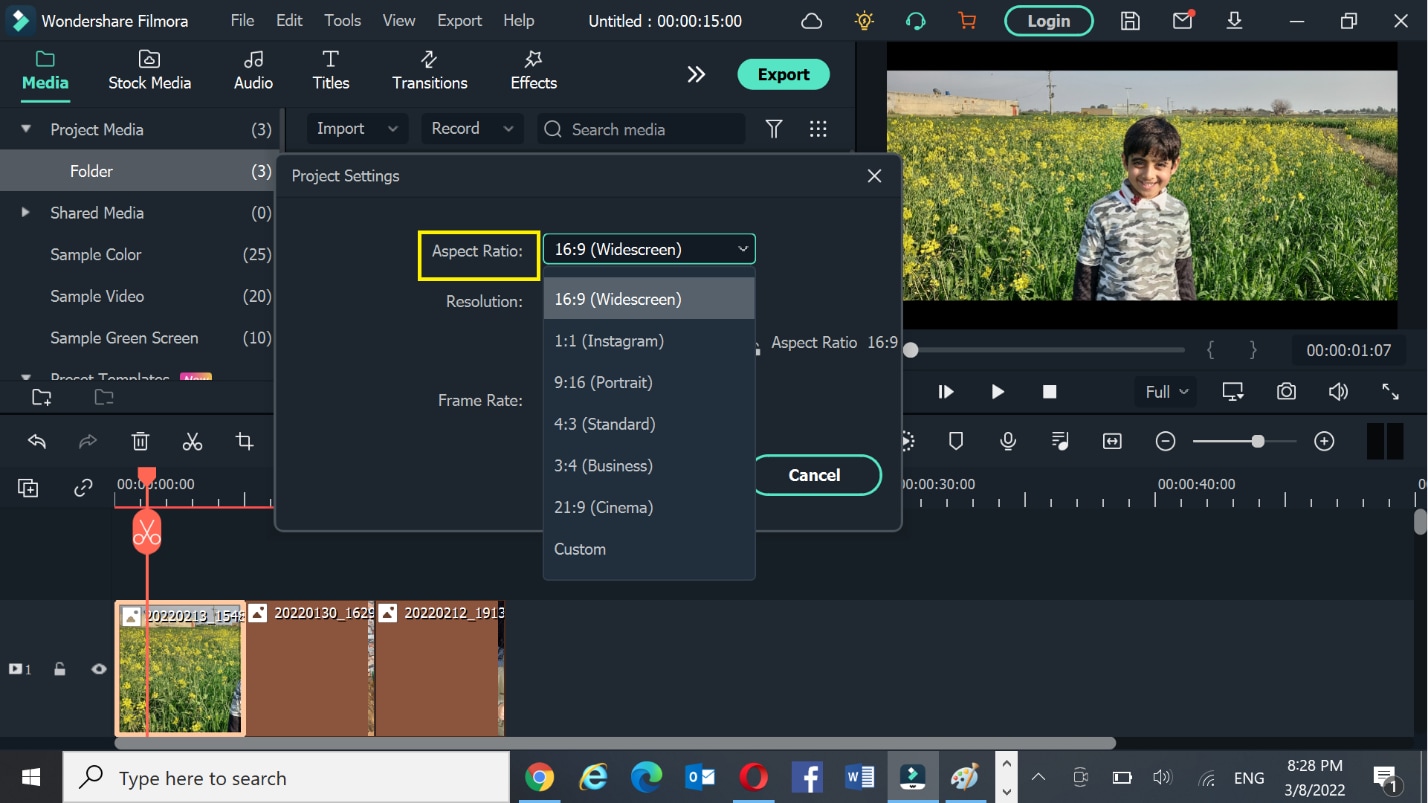
Some videos are 4k, 6k, and 8k but exporting them in the same resolution and waiting for a long time is really difficult. You need to resize the video to change its width and height. As different social media platforms require a different sizes for videos. We can say, resizing the video in terms of Giga bites and mega bites. You can do it by changing the Project Aspect Ratio. It is a very powerful technique to resize the videos in the timeline.
You can change the Project Aspect ratio like 16:9(wide-screen), 1:1(Instagram), 9:16(Portrait), 4:3(standard), 21:9(Cinema), or custom.
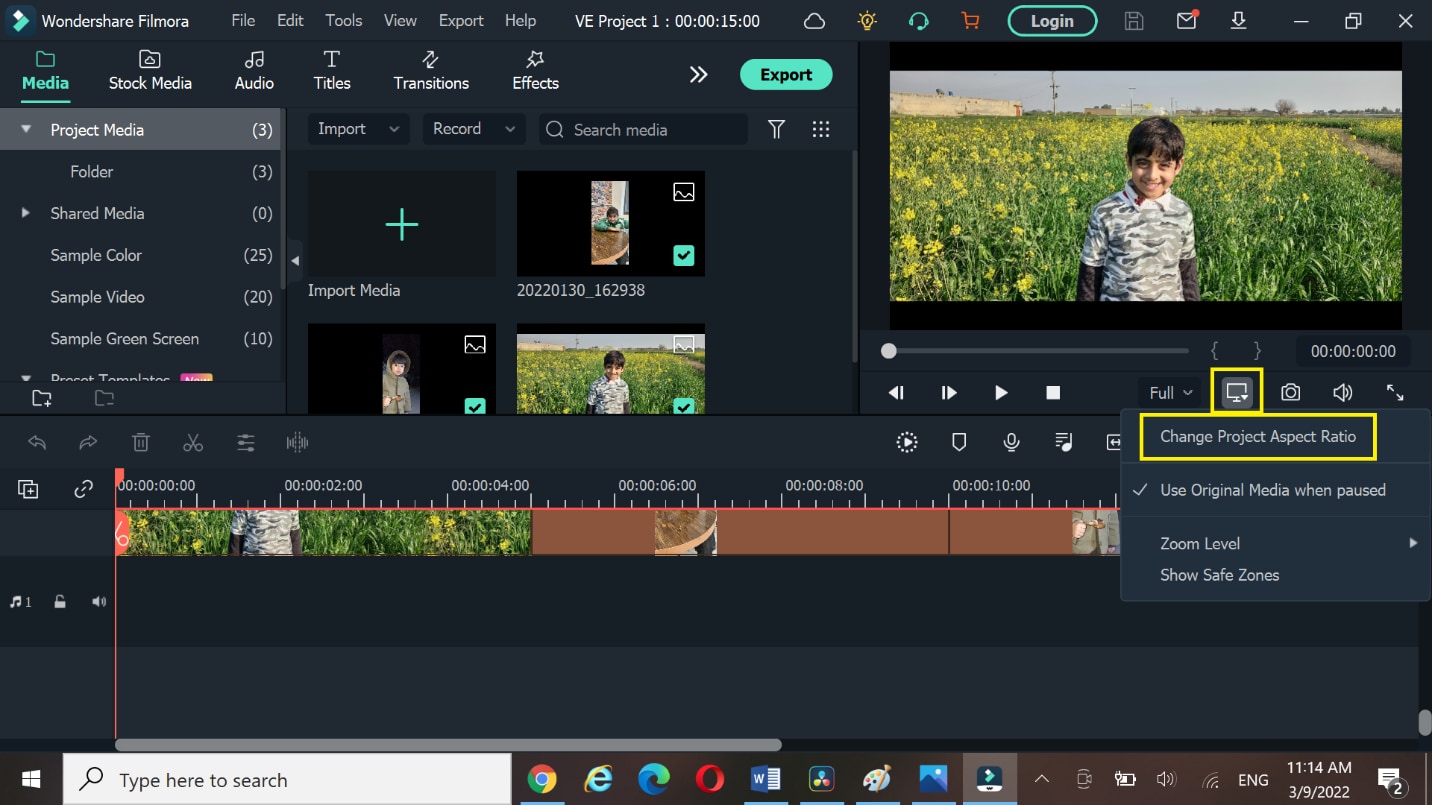
- Select the Aspect Ratio
- Change the ratio 16:9, 1:1, 9:16, 4:3, 21:9, or custom as desired.
- Select OK.
Conclusion
At this time, every business is using marketing to boost the economy, but video marketing is at its climax. Therefore, it is essential to take advantage of video editing tools to increase productivity and efficiency of work.
The Davinci Resolve and Filmora Wonder Share are the best video editing tools to resize the videos. You can easily use these tools on your laptop, tablets, or smartphones in a very short time. Along with this, you can share your compressed videos on different social media platforms like Facebook, Twitter, YouTube, Instagram, and LinkedIn. Moreover, you can enjoy the magical effects of these free tools at the ease of your smartphone. It is beneficial at both small and large businesses for the following
- Time saver
- Economical
- Good video quality
- Presentable
- Increase engagement
Hope the content would be useful for you. If you like the article please leave a comment.
Go to the inspector from the up-right corner and select Transform under the video section. Here you can resize your image. Place the mouse over zoom x (Horizontal) and zoom y (vertical) values to drag left or right for zoom in or zoom out. The video can be resized accordingly.
Here you can also change its rotation.

2. Cropping
Go to the inspector from the up-right corner and select Transform. Now choose Cropping. Here are four options Crop left, crop right, crop Bottom, and crop Top. You can drag the scale from left to right to adjust the crop settings according to the desired result.

3. Retime and scaling
Go to the inspector from the up-right corner and select retime and scaling. You can choose stretch, Fit, Fill, or crop for cropping the video from the drop-down list.
- The Crop function is used to remove the unnecessary or uneven part of the video.
- The Fit function is to have the video auto-center and the selected clips are formatted according to the screen dimensions.
- Stretch Function allows changing the length of the certain clip at a certain duration.

After transforming, cropping, and resizing the videos, you can copy the same settings without repeating the above steps for each video.
Part 2. An alternative way to resize videos with Wondershare
Filmora Video Editor is another great video editing software. It is very easy to use. It offers many different features to resize the videos. Moreover, it allows zooming in the video to highlight the best part of your video. It allows the edited video to export on other devices or YouTube channels.
For Win 7 or later (64-bit)
For macOS 10.14 or later
You can resize your video in three ways:
- Resize video by cropping
- Scale in Scale-out
- Resize by changing Aspect Ratio
1. Resize video by cropping
- Import the videos from your storage by using the import button.
- Drag the videos in the timeline.
- Right-click on the desired video, crop and zoom option will appear in the menu.
- Select crop tab.

- Grab the corner of the crop inwards, and move to adjust as desired.
- Press the OK tab and your video is cropped.

2. Scale-in and scale-out
- Select the video in the timeline.
- Select the settings
- Click on the Transform tab under image section**.**

- Move the pointer from left to right on the Scale to zoom in and zoom out the video. You can remove the unwanted portion of the video.
- Press OK tab.

3. Resize video by changing aspect ratio
Some videos are 4k, 6k, and 8k but exporting them in the same resolution and waiting for a long time is really difficult. You need to resize the video to change its width and height. As different social media platforms require a different sizes for videos. We can say, resizing the video in terms of Giga bites and mega bites. You can do it by changing the Project Aspect Ratio. It is a very powerful technique to resize the videos in the timeline.
You can change the Project Aspect ratio like 16:9(wide-screen), 1:1(Instagram), 9:16(Portrait), 4:3(standard), 21:9(Cinema), or custom.

- Select the Aspect Ratio
- Change the ratio 16:9, 1:1, 9:16, 4:3, 21:9, or custom as desired.
- Select OK.

Conclusion
At this time, every business is using marketing to boost the economy, but video marketing is at its climax. Therefore, it is essential to take advantage of video editing tools to increase productivity and efficiency of work.
The Davinci Resolve and Filmora Wonder Share are the best video editing tools to resize the videos. You can easily use these tools on your laptop, tablets, or smartphones in a very short time. Along with this, you can share your compressed videos on different social media platforms like Facebook, Twitter, YouTube, Instagram, and LinkedIn. Moreover, you can enjoy the magical effects of these free tools at the ease of your smartphone. It is beneficial at both small and large businesses for the following
- Time saver
- Economical
- Good video quality
- Presentable
- Increase engagement
Hope the content would be useful for you. If you like the article please leave a comment.
Go to the inspector from the up-right corner and select Transform under the video section. Here you can resize your image. Place the mouse over zoom x (Horizontal) and zoom y (vertical) values to drag left or right for zoom in or zoom out. The video can be resized accordingly.
Here you can also change its rotation.

2. Cropping
Go to the inspector from the up-right corner and select Transform. Now choose Cropping. Here are four options Crop left, crop right, crop Bottom, and crop Top. You can drag the scale from left to right to adjust the crop settings according to the desired result.

3. Retime and scaling
Go to the inspector from the up-right corner and select retime and scaling. You can choose stretch, Fit, Fill, or crop for cropping the video from the drop-down list.
- The Crop function is used to remove the unnecessary or uneven part of the video.
- The Fit function is to have the video auto-center and the selected clips are formatted according to the screen dimensions.
- Stretch Function allows changing the length of the certain clip at a certain duration.

After transforming, cropping, and resizing the videos, you can copy the same settings without repeating the above steps for each video.
Part 2. An alternative way to resize videos with Wondershare
Filmora Video Editor is another great video editing software. It is very easy to use. It offers many different features to resize the videos. Moreover, it allows zooming in the video to highlight the best part of your video. It allows the edited video to export on other devices or YouTube channels.
For Win 7 or later (64-bit)
For macOS 10.14 or later
You can resize your video in three ways:
- Resize video by cropping
- Scale in Scale-out
- Resize by changing Aspect Ratio
1. Resize video by cropping
- Import the videos from your storage by using the import button.
- Drag the videos in the timeline.
- Right-click on the desired video, crop and zoom option will appear in the menu.
- Select crop tab.

- Grab the corner of the crop inwards, and move to adjust as desired.
- Press the OK tab and your video is cropped.

2. Scale-in and scale-out
- Select the video in the timeline.
- Select the settings
- Click on the Transform tab under image section**.**

- Move the pointer from left to right on the Scale to zoom in and zoom out the video. You can remove the unwanted portion of the video.
- Press OK tab.

3. Resize video by changing aspect ratio
Some videos are 4k, 6k, and 8k but exporting them in the same resolution and waiting for a long time is really difficult. You need to resize the video to change its width and height. As different social media platforms require a different sizes for videos. We can say, resizing the video in terms of Giga bites and mega bites. You can do it by changing the Project Aspect Ratio. It is a very powerful technique to resize the videos in the timeline.
You can change the Project Aspect ratio like 16:9(wide-screen), 1:1(Instagram), 9:16(Portrait), 4:3(standard), 21:9(Cinema), or custom.

- Select the Aspect Ratio
- Change the ratio 16:9, 1:1, 9:16, 4:3, 21:9, or custom as desired.
- Select OK.

Conclusion
At this time, every business is using marketing to boost the economy, but video marketing is at its climax. Therefore, it is essential to take advantage of video editing tools to increase productivity and efficiency of work.
The Davinci Resolve and Filmora Wonder Share are the best video editing tools to resize the videos. You can easily use these tools on your laptop, tablets, or smartphones in a very short time. Along with this, you can share your compressed videos on different social media platforms like Facebook, Twitter, YouTube, Instagram, and LinkedIn. Moreover, you can enjoy the magical effects of these free tools at the ease of your smartphone. It is beneficial at both small and large businesses for the following
- Time saver
- Economical
- Good video quality
- Presentable
- Increase engagement
Hope the content would be useful for you. If you like the article please leave a comment.
Go to the inspector from the up-right corner and select Transform under the video section. Here you can resize your image. Place the mouse over zoom x (Horizontal) and zoom y (vertical) values to drag left or right for zoom in or zoom out. The video can be resized accordingly.
Here you can also change its rotation.

2. Cropping
Go to the inspector from the up-right corner and select Transform. Now choose Cropping. Here are four options Crop left, crop right, crop Bottom, and crop Top. You can drag the scale from left to right to adjust the crop settings according to the desired result.

3. Retime and scaling
Go to the inspector from the up-right corner and select retime and scaling. You can choose stretch, Fit, Fill, or crop for cropping the video from the drop-down list.
- The Crop function is used to remove the unnecessary or uneven part of the video.
- The Fit function is to have the video auto-center and the selected clips are formatted according to the screen dimensions.
- Stretch Function allows changing the length of the certain clip at a certain duration.

After transforming, cropping, and resizing the videos, you can copy the same settings without repeating the above steps for each video.
Part 2. An alternative way to resize videos with Wondershare
Filmora Video Editor is another great video editing software. It is very easy to use. It offers many different features to resize the videos. Moreover, it allows zooming in the video to highlight the best part of your video. It allows the edited video to export on other devices or YouTube channels.
For Win 7 or later (64-bit)
For macOS 10.14 or later
You can resize your video in three ways:
- Resize video by cropping
- Scale in Scale-out
- Resize by changing Aspect Ratio
1. Resize video by cropping
- Import the videos from your storage by using the import button.
- Drag the videos in the timeline.
- Right-click on the desired video, crop and zoom option will appear in the menu.
- Select crop tab.

- Grab the corner of the crop inwards, and move to adjust as desired.
- Press the OK tab and your video is cropped.

2. Scale-in and scale-out
- Select the video in the timeline.
- Select the settings
- Click on the Transform tab under image section**.**

- Move the pointer from left to right on the Scale to zoom in and zoom out the video. You can remove the unwanted portion of the video.
- Press OK tab.

3. Resize video by changing aspect ratio
Some videos are 4k, 6k, and 8k but exporting them in the same resolution and waiting for a long time is really difficult. You need to resize the video to change its width and height. As different social media platforms require a different sizes for videos. We can say, resizing the video in terms of Giga bites and mega bites. You can do it by changing the Project Aspect Ratio. It is a very powerful technique to resize the videos in the timeline.
You can change the Project Aspect ratio like 16:9(wide-screen), 1:1(Instagram), 9:16(Portrait), 4:3(standard), 21:9(Cinema), or custom.

- Select the Aspect Ratio
- Change the ratio 16:9, 1:1, 9:16, 4:3, 21:9, or custom as desired.
- Select OK.

Conclusion
At this time, every business is using marketing to boost the economy, but video marketing is at its climax. Therefore, it is essential to take advantage of video editing tools to increase productivity and efficiency of work.
The Davinci Resolve and Filmora Wonder Share are the best video editing tools to resize the videos. You can easily use these tools on your laptop, tablets, or smartphones in a very short time. Along with this, you can share your compressed videos on different social media platforms like Facebook, Twitter, YouTube, Instagram, and LinkedIn. Moreover, you can enjoy the magical effects of these free tools at the ease of your smartphone. It is beneficial at both small and large businesses for the following
- Time saver
- Economical
- Good video quality
- Presentable
- Increase engagement
Hope the content would be useful for you. If you like the article please leave a comment.
Also read:
- Get Creative with These 10 Video Editing App With Templates
- How to Edit GoPro Videos on Mac for 2024
- 2024 Approved How to DIY VHS Overlay in After Effects?
- Updated Top 10 Fun Discord Bots You Need
- New Top Tools To Create Blend Image Collage
- New How to Do Datamoshing Effect in After Effects?
- A Complete Guide to the Best Brand Story Videos for 2024
- New In 2024, How to Create a Bokeh Effect
- New 2024 Approved Easy Ways to Make Procreate GIFs
- 2024 Approved How to Add Camera Shake to Video in Adobe After Effects
- New Final Cut Pro - How to Download and Install It for 2024
- New In 2024, Best Video Editing Courses Online with Certificate
- How to Create Loop Videos Using Filmora for 2024
- 2024 Approved Expolring Top 6 Best Alternatives to Clownfish Voice Changer
- Best Tools To Create Blend Image Collage for 2024
- Updated In 2024, Best 9 Amv Makers for Computer
- Updated 20 Fantastic Video Background Templates to Make Your Video Go Viral for 2024
- New 2024 Approved Best 15 Subtitle Apps 2023 Windows, Mac, iPhone, Android & Online
- Updated 2024 Approved How to Make Eye Zoom Transition Effect with Filmora
- New In 2024, Zoom In and Out on Snapchat
- In 2024, Speed Control Is Frequently Used in Video Editing. By Speed up or Slow Down the Video Speed, You Can Achieve Different Visual Results. This Article Will Show You How to Control the Speed of a Video
- 2024 Approved Want to Give a Bold and Colorful Look to Your Ad or Abstract Art Project? This Quick and Easy Tutorial Teaches How to Create a Risograph Effect in Photoshop
- Updated 2024 Approved How to Crop a Video in Davinci Resolve Step by Step
- All You Need To Know About Mega Greninja For Google Pixel 8 | Dr.fone
- How To Reset iPhone XR Without iTunes? | Dr.fone
- In 2024, How To Use Allshare Cast To Turn On Screen Mirroring On OnePlus Nord CE 3 Lite 5G | Dr.fone
- Which is the Best Fake GPS Joystick App On Poco M6 Pro 5G? | Dr.fone
- Rootjunky APK To Bypass Google FRP Lock For Oppo Reno 11 Pro 5G
- In 2024, How to Unlock iPhone 13 Pro with a Mask On
- Possible solutions to restore deleted contacts from OnePlus .
- Motorola Edge 40 Pro Tutorial - Bypass Lock Screen,Security Password Pin,Fingerprint,Pattern
- How To Upgrade or Downgrade iPhone 11 Pro Max Without Losing Data? | Dr.fone
- Top 10 Fixes for Phone Keep Disconnecting from Wi-Fi On Itel A70 | Dr.fone
- 5 Easy Ways to Change Location on YouTube TV On Apple iPhone X | Dr.fone
- 4 Ways to Transfer Music from Vivo V30 to iPhone | Dr.fone
- Unlock a disable iPhone 6s Plus without itunes or icloud
- In 2024, The Ultimate Guide to Get the Rare Candy on Pokemon Go Fire Red On Motorola Edge+ (2023) | Dr.fone
- How to Erase an iPhone 12 Pro Max without Apple ID?
- In 2024, 3 Ways to Track Sony Xperia 5 V without Them Knowing | Dr.fone
- Title: In 2024, How to DIY VHS Overlay in After Effects?
- Author: Chloe
- Created at : 2024-06-26 06:23:54
- Updated at : 2024-06-27 06:23:54
- Link: https://ai-editing-video.techidaily.com/in-2024-how-to-diy-vhs-overlay-in-after-effects/
- License: This work is licensed under CC BY-NC-SA 4.0.

