:max_bytes(150000):strip_icc():format(webp)/tiktok-messages-889fef4cdfac41babb84770288f32cf2.jpg)
In 2024, How to Get VHS Filter and Glitch Filter to Your Images or Videos?

How to Get VHS Filter and Glitch Filter to Your Images or Videos?
A glitch in the video or an image gives the notion of an error in the video recording process, and it was not accepted in the media industry. However, presently, creative professionals are incorporating the VHS filters to give a vintage impression. The visual distortions are used by gamers and streaming creators extensively.
For this very reason, the article discusses the procedure to create a glitch filter in Photoshop, Instagram, TikTok, and in one of your impeccable travel videos. Time to start!
In this article
01 How to Make VHS Filter in Photoshop?
02 How to Get VHS Filter in Instagram?
03 How to Get VHS Filter in TikTok?
04 How to Add VHS Effects to your Travel Video?
Part 1: How to Make VHS Filter in Photoshop?
There are a lot of steps associated with VHS filter Photoshop. The procedure can be tricky for a beginner in the industry. Therefore, we have sketched out a guide to make a VHS image filter in Photoshop. Follow it carefully to have desirable results.
Step 1: Open Photoshop
Open Photoshop from your computer and click on “New.” Use the “Custom” option from the windows that appear. After that, click on “File” and launch the imagery. Drag and drop that picture to the customized workspace.

Step 2: Apply the Transformation
Head to the “Edit” from the top panel and press “Transform” from there. Click on “Scale” from the context menu. The user is recommended to set the scale as required using arrows from the mouse. After that, apply the transformation.

Step 3: Changing the Parameters
Now, right-click on your layer to click on “Brightness and Contrast.” Change it as you need. After that, move on to the “Curves” and play with the graphs of the picture. Change the “Solid Color” as well. Make the color white and change the opacity levels.

Step 4: Adding Noise
Moving on, click on the first layer and navigate to the “Filter” bar on the top of the interface. Hit “Noise” and then “Add Noise.” Make the necessary changes as you like and press “Enter.” Scroll up to the “File” and hit “Open Recent” to launch the VHS texture photo. Drag and drop the texture to the photo layer that we are working on.

Step 5: Inserting VHS Texture
Resize the VHS texture and then apply the transformation. By default, the blend mode is “Normal.” Change it to “Darken” from the right panel. The picture will get dark. Again, change the mode to “Screen.” Moving on, input another VHS Filter texture and drag and drop it to the layer we are working on. Resize it and apply the transformation.

Step 6: Altering the Blend Mode
Alter the blend mode to “Darker” and then to “Screen.” Apply another filter and then drag and drop the layer. Change the blend mode to “Screen.” Pick up the eraser from the left panel of tools and make necessary edits.

Step 7: Duplicating the Layer
Duplicate the photo layer and move it up. Again, click on “Filter” then “Noise” to add the noise as needed. Alter the blend mode to “Soft Light” and set the opacity value. After that, add any solid color and switch the blend mode back to Soft Light.

Step 8: Playing with the Layers
Duplicate the layer again to change the color. After that, double click the layer and deselect “R.” Move to left or right. Perform the same procedure for the rest of the layers. Use the erase tool to offer fine imprinting to the transition. Duplicate the final layer and deselect “R” and “C.” Move left and right.

Step 9: Final Process
Use the eraser tool one last time, and you are done with the VCR filter.
Part 2: How to Get VHS Filter in Instagram?
Now that you know how to add glitch filter Photoshop let us move on to Instagram. The sub-section of this write-up shall focus on VHS filter Instagram. If you are an Instagram user wishing to get a retro VHS filter, follow our lead.
Step 1: Finding the Filters
The first step revolves around clicking on the Instagram app to open it. Navigate to the “Story.” The user will find a number of filters in the top panel along a circle.

Step 2: Picking the Vintage Filter
Swipe right towards those filters until a “Search” option is seen. Type “Vintage DV” and press “Enter,” where several VHS video filters will be displayed. Pick one and save it to your camera roll.

Step 3: Using the VHS Filter
Head back to the “Story” and select the “Effects” option. Select the filter that you saved and initiate the recording process. You have got the VHS filter for videos.

Part 3: How to Get VHS Filter in TikTok?
The following section of the write-up shall highlight finding and getting the 90s VHS filter in TikTok. So, what are we waiting for? Let us start the procedure.
Find the VHS Filter in TikTok
Step 1: Navigate to the App
Use your computer to launch the TikTok application. As soon as the interface appears, click on “Trends” in the bottom left corner.
Step 2: Open the Effects
Type Retro VHS in the search bar and click on the second result that is displayed. Click on the “Effects” that says, “VHS Retro.”
Step 3: Add in Favorites
Add it to the favorites and then tap on the video icon located at the center of the screen.

Use the VHS Filter in TikTok
Step 1: Deactivating the Filter</p
With the camera open, click on “Effects” right next to the camera icon. The filter is activated, but we need to deactivate it by clicking on the stop icon with the effects. Click anywhere on the screen to exit the “Effects” panel.
Step 2: Recording Process
Now, click on the red video sign and begin recording for some seconds without the filter. It is important to record the video by pointing at the targeted person. After the first part of the video is recorded, head back to the “Effects” menu and navigate to the tab that says, “Add to Favorites.”

Step 3: Publishing the Video
Choose the Retro VHS Filter and point the camera at the person that needs the filter. Hit the “Register” button. Make the recording and press the red popcorn. Hit “Next” and “Publish” the video finally.

Part 4: How to Add VHS Effects to your Travel Video?
With vacation season on, bloggers are into adding VHS photo filters to their videos to be uploaded on YouTube channels. The section shall convey the detailed procedure of adding a glitch effect filter to the travel and vacation videos in Wondershare Filmora .
For Win 7 or later (64-bit)
For macOS 10.12 or later
Step 1: Initiating the Process
Begin the process by launching Wondershare Filmora. For starters, let us work on the perfect music for the video. The Audio tab shows an awful collection. Choose the “Young and Bright” category for the music.

Step 2: Picking the Music
Select any music and drag and drop it to the timeline. Now, trim the music into 15 seconds long. Now, input the travel videos to start their editing. Set the order for the video afterward.

Step 3: Choosing the Overlays
Navigate to the “Effects” panel and search for VHS. The software would offer multiple choices to pick from. Choose different overlays and place them onto the video tracks as you like.

Step 4: Adding the Transition
To add the transition, head to the “Transition” tab and find VHS. Drag and drop the transitions among the cuts between the video clips. Adjust their duration as needed. Preview the video, and the mission is accomplished.

Final Thoughts
Grabbing the attention of the audience is not as easy as it sounds. The creative industry uses a vast range of effects to compel the viewers to be on the edge of their seats. The article introduced the VHS filter while covering its procedure. If you are a TikTok, Instagram, or Photoshop user, we have got you. Wondershare Filmora helps perfectly to add the glitch filter to the vacation videos.
Versatile Video Editor - Wondershare Filmora
An easy yet powerful editor
Numerous effects to choose from
Detailed tutorials provided by the official channel
02 How to Get VHS Filter in Instagram?
03 How to Get VHS Filter in TikTok?
04 How to Add VHS Effects to your Travel Video?
Part 1: How to Make VHS Filter in Photoshop?
There are a lot of steps associated with VHS filter Photoshop. The procedure can be tricky for a beginner in the industry. Therefore, we have sketched out a guide to make a VHS image filter in Photoshop. Follow it carefully to have desirable results.
Step 1: Open Photoshop
Open Photoshop from your computer and click on “New.” Use the “Custom” option from the windows that appear. After that, click on “File” and launch the imagery. Drag and drop that picture to the customized workspace.

Step 2: Apply the Transformation
Head to the “Edit” from the top panel and press “Transform” from there. Click on “Scale” from the context menu. The user is recommended to set the scale as required using arrows from the mouse. After that, apply the transformation.

Step 3: Changing the Parameters
Now, right-click on your layer to click on “Brightness and Contrast.” Change it as you need. After that, move on to the “Curves” and play with the graphs of the picture. Change the “Solid Color” as well. Make the color white and change the opacity levels.

Step 4: Adding Noise
Moving on, click on the first layer and navigate to the “Filter” bar on the top of the interface. Hit “Noise” and then “Add Noise.” Make the necessary changes as you like and press “Enter.” Scroll up to the “File” and hit “Open Recent” to launch the VHS texture photo. Drag and drop the texture to the photo layer that we are working on.

Step 5: Inserting VHS Texture
Resize the VHS texture and then apply the transformation. By default, the blend mode is “Normal.” Change it to “Darken” from the right panel. The picture will get dark. Again, change the mode to “Screen.” Moving on, input another VHS Filter texture and drag and drop it to the layer we are working on. Resize it and apply the transformation.

Step 6: Altering the Blend Mode
Alter the blend mode to “Darker” and then to “Screen.” Apply another filter and then drag and drop the layer. Change the blend mode to “Screen.” Pick up the eraser from the left panel of tools and make necessary edits.

Step 7: Duplicating the Layer
Duplicate the photo layer and move it up. Again, click on “Filter” then “Noise” to add the noise as needed. Alter the blend mode to “Soft Light” and set the opacity value. After that, add any solid color and switch the blend mode back to Soft Light.

Step 8: Playing with the Layers
Duplicate the layer again to change the color. After that, double click the layer and deselect “R.” Move to left or right. Perform the same procedure for the rest of the layers. Use the erase tool to offer fine imprinting to the transition. Duplicate the final layer and deselect “R” and “C.” Move left and right.

Step 9: Final Process
Use the eraser tool one last time, and you are done with the VCR filter.
Part 2: How to Get VHS Filter in Instagram?
Now that you know how to add glitch filter Photoshop let us move on to Instagram. The sub-section of this write-up shall focus on VHS filter Instagram. If you are an Instagram user wishing to get a retro VHS filter, follow our lead.
Step 1: Finding the Filters
The first step revolves around clicking on the Instagram app to open it. Navigate to the “Story.” The user will find a number of filters in the top panel along a circle.

Step 2: Picking the Vintage Filter
Swipe right towards those filters until a “Search” option is seen. Type “Vintage DV” and press “Enter,” where several VHS video filters will be displayed. Pick one and save it to your camera roll.

Step 3: Using the VHS Filter
Head back to the “Story” and select the “Effects” option. Select the filter that you saved and initiate the recording process. You have got the VHS filter for videos.

Part 3: How to Get VHS Filter in TikTok?
The following section of the write-up shall highlight finding and getting the 90s VHS filter in TikTok. So, what are we waiting for? Let us start the procedure.
Find the VHS Filter in TikTok
Step 1: Navigate to the App
Use your computer to launch the TikTok application. As soon as the interface appears, click on “Trends” in the bottom left corner.
Step 2: Open the Effects
Type Retro VHS in the search bar and click on the second result that is displayed. Click on the “Effects” that says, “VHS Retro.”
Step 3: Add in Favorites
Add it to the favorites and then tap on the video icon located at the center of the screen.

Use the VHS Filter in TikTok
Step 1: Deactivating the Filter</p
With the camera open, click on “Effects” right next to the camera icon. The filter is activated, but we need to deactivate it by clicking on the stop icon with the effects. Click anywhere on the screen to exit the “Effects” panel.
Step 2: Recording Process
Now, click on the red video sign and begin recording for some seconds without the filter. It is important to record the video by pointing at the targeted person. After the first part of the video is recorded, head back to the “Effects” menu and navigate to the tab that says, “Add to Favorites.”

Step 3: Publishing the Video
Choose the Retro VHS Filter and point the camera at the person that needs the filter. Hit the “Register” button. Make the recording and press the red popcorn. Hit “Next” and “Publish” the video finally.

Part 4: How to Add VHS Effects to your Travel Video?
With vacation season on, bloggers are into adding VHS photo filters to their videos to be uploaded on YouTube channels. The section shall convey the detailed procedure of adding a glitch effect filter to the travel and vacation videos in Wondershare Filmora .
For Win 7 or later (64-bit)
For macOS 10.12 or later
Step 1: Initiating the Process
Begin the process by launching Wondershare Filmora. For starters, let us work on the perfect music for the video. The Audio tab shows an awful collection. Choose the “Young and Bright” category for the music.

Step 2: Picking the Music
Select any music and drag and drop it to the timeline. Now, trim the music into 15 seconds long. Now, input the travel videos to start their editing. Set the order for the video afterward.

Step 3: Choosing the Overlays
Navigate to the “Effects” panel and search for VHS. The software would offer multiple choices to pick from. Choose different overlays and place them onto the video tracks as you like.

Step 4: Adding the Transition
To add the transition, head to the “Transition” tab and find VHS. Drag and drop the transitions among the cuts between the video clips. Adjust their duration as needed. Preview the video, and the mission is accomplished.

Final Thoughts
Grabbing the attention of the audience is not as easy as it sounds. The creative industry uses a vast range of effects to compel the viewers to be on the edge of their seats. The article introduced the VHS filter while covering its procedure. If you are a TikTok, Instagram, or Photoshop user, we have got you. Wondershare Filmora helps perfectly to add the glitch filter to the vacation videos.
Versatile Video Editor - Wondershare Filmora
An easy yet powerful editor
Numerous effects to choose from
Detailed tutorials provided by the official channel
02 How to Get VHS Filter in Instagram?
03 How to Get VHS Filter in TikTok?
04 How to Add VHS Effects to your Travel Video?
Part 1: How to Make VHS Filter in Photoshop?
There are a lot of steps associated with VHS filter Photoshop. The procedure can be tricky for a beginner in the industry. Therefore, we have sketched out a guide to make a VHS image filter in Photoshop. Follow it carefully to have desirable results.
Step 1: Open Photoshop
Open Photoshop from your computer and click on “New.” Use the “Custom” option from the windows that appear. After that, click on “File” and launch the imagery. Drag and drop that picture to the customized workspace.

Step 2: Apply the Transformation
Head to the “Edit” from the top panel and press “Transform” from there. Click on “Scale” from the context menu. The user is recommended to set the scale as required using arrows from the mouse. After that, apply the transformation.

Step 3: Changing the Parameters
Now, right-click on your layer to click on “Brightness and Contrast.” Change it as you need. After that, move on to the “Curves” and play with the graphs of the picture. Change the “Solid Color” as well. Make the color white and change the opacity levels.

Step 4: Adding Noise
Moving on, click on the first layer and navigate to the “Filter” bar on the top of the interface. Hit “Noise” and then “Add Noise.” Make the necessary changes as you like and press “Enter.” Scroll up to the “File” and hit “Open Recent” to launch the VHS texture photo. Drag and drop the texture to the photo layer that we are working on.

Step 5: Inserting VHS Texture
Resize the VHS texture and then apply the transformation. By default, the blend mode is “Normal.” Change it to “Darken” from the right panel. The picture will get dark. Again, change the mode to “Screen.” Moving on, input another VHS Filter texture and drag and drop it to the layer we are working on. Resize it and apply the transformation.

Step 6: Altering the Blend Mode
Alter the blend mode to “Darker” and then to “Screen.” Apply another filter and then drag and drop the layer. Change the blend mode to “Screen.” Pick up the eraser from the left panel of tools and make necessary edits.

Step 7: Duplicating the Layer
Duplicate the photo layer and move it up. Again, click on “Filter” then “Noise” to add the noise as needed. Alter the blend mode to “Soft Light” and set the opacity value. After that, add any solid color and switch the blend mode back to Soft Light.

Step 8: Playing with the Layers
Duplicate the layer again to change the color. After that, double click the layer and deselect “R.” Move to left or right. Perform the same procedure for the rest of the layers. Use the erase tool to offer fine imprinting to the transition. Duplicate the final layer and deselect “R” and “C.” Move left and right.

Step 9: Final Process
Use the eraser tool one last time, and you are done with the VCR filter.
Part 2: How to Get VHS Filter in Instagram?
Now that you know how to add glitch filter Photoshop let us move on to Instagram. The sub-section of this write-up shall focus on VHS filter Instagram. If you are an Instagram user wishing to get a retro VHS filter, follow our lead.
Step 1: Finding the Filters
The first step revolves around clicking on the Instagram app to open it. Navigate to the “Story.” The user will find a number of filters in the top panel along a circle.

Step 2: Picking the Vintage Filter
Swipe right towards those filters until a “Search” option is seen. Type “Vintage DV” and press “Enter,” where several VHS video filters will be displayed. Pick one and save it to your camera roll.

Step 3: Using the VHS Filter
Head back to the “Story” and select the “Effects” option. Select the filter that you saved and initiate the recording process. You have got the VHS filter for videos.

Part 3: How to Get VHS Filter in TikTok?
The following section of the write-up shall highlight finding and getting the 90s VHS filter in TikTok. So, what are we waiting for? Let us start the procedure.
Find the VHS Filter in TikTok
Step 1: Navigate to the App
Use your computer to launch the TikTok application. As soon as the interface appears, click on “Trends” in the bottom left corner.
Step 2: Open the Effects
Type Retro VHS in the search bar and click on the second result that is displayed. Click on the “Effects” that says, “VHS Retro.”
Step 3: Add in Favorites
Add it to the favorites and then tap on the video icon located at the center of the screen.

Use the VHS Filter in TikTok
Step 1: Deactivating the Filter</p
With the camera open, click on “Effects” right next to the camera icon. The filter is activated, but we need to deactivate it by clicking on the stop icon with the effects. Click anywhere on the screen to exit the “Effects” panel.
Step 2: Recording Process
Now, click on the red video sign and begin recording for some seconds without the filter. It is important to record the video by pointing at the targeted person. After the first part of the video is recorded, head back to the “Effects” menu and navigate to the tab that says, “Add to Favorites.”

Step 3: Publishing the Video
Choose the Retro VHS Filter and point the camera at the person that needs the filter. Hit the “Register” button. Make the recording and press the red popcorn. Hit “Next” and “Publish” the video finally.

Part 4: How to Add VHS Effects to your Travel Video?
With vacation season on, bloggers are into adding VHS photo filters to their videos to be uploaded on YouTube channels. The section shall convey the detailed procedure of adding a glitch effect filter to the travel and vacation videos in Wondershare Filmora .
For Win 7 or later (64-bit)
For macOS 10.12 or later
Step 1: Initiating the Process
Begin the process by launching Wondershare Filmora. For starters, let us work on the perfect music for the video. The Audio tab shows an awful collection. Choose the “Young and Bright” category for the music.

Step 2: Picking the Music
Select any music and drag and drop it to the timeline. Now, trim the music into 15 seconds long. Now, input the travel videos to start their editing. Set the order for the video afterward.

Step 3: Choosing the Overlays
Navigate to the “Effects” panel and search for VHS. The software would offer multiple choices to pick from. Choose different overlays and place them onto the video tracks as you like.

Step 4: Adding the Transition
To add the transition, head to the “Transition” tab and find VHS. Drag and drop the transitions among the cuts between the video clips. Adjust their duration as needed. Preview the video, and the mission is accomplished.

Final Thoughts
Grabbing the attention of the audience is not as easy as it sounds. The creative industry uses a vast range of effects to compel the viewers to be on the edge of their seats. The article introduced the VHS filter while covering its procedure. If you are a TikTok, Instagram, or Photoshop user, we have got you. Wondershare Filmora helps perfectly to add the glitch filter to the vacation videos.
Versatile Video Editor - Wondershare Filmora
An easy yet powerful editor
Numerous effects to choose from
Detailed tutorials provided by the official channel
02 How to Get VHS Filter in Instagram?
03 How to Get VHS Filter in TikTok?
04 How to Add VHS Effects to your Travel Video?
Part 1: How to Make VHS Filter in Photoshop?
There are a lot of steps associated with VHS filter Photoshop. The procedure can be tricky for a beginner in the industry. Therefore, we have sketched out a guide to make a VHS image filter in Photoshop. Follow it carefully to have desirable results.
Step 1: Open Photoshop
Open Photoshop from your computer and click on “New.” Use the “Custom” option from the windows that appear. After that, click on “File” and launch the imagery. Drag and drop that picture to the customized workspace.

Step 2: Apply the Transformation
Head to the “Edit” from the top panel and press “Transform” from there. Click on “Scale” from the context menu. The user is recommended to set the scale as required using arrows from the mouse. After that, apply the transformation.

Step 3: Changing the Parameters
Now, right-click on your layer to click on “Brightness and Contrast.” Change it as you need. After that, move on to the “Curves” and play with the graphs of the picture. Change the “Solid Color” as well. Make the color white and change the opacity levels.

Step 4: Adding Noise
Moving on, click on the first layer and navigate to the “Filter” bar on the top of the interface. Hit “Noise” and then “Add Noise.” Make the necessary changes as you like and press “Enter.” Scroll up to the “File” and hit “Open Recent” to launch the VHS texture photo. Drag and drop the texture to the photo layer that we are working on.

Step 5: Inserting VHS Texture
Resize the VHS texture and then apply the transformation. By default, the blend mode is “Normal.” Change it to “Darken” from the right panel. The picture will get dark. Again, change the mode to “Screen.” Moving on, input another VHS Filter texture and drag and drop it to the layer we are working on. Resize it and apply the transformation.

Step 6: Altering the Blend Mode
Alter the blend mode to “Darker” and then to “Screen.” Apply another filter and then drag and drop the layer. Change the blend mode to “Screen.” Pick up the eraser from the left panel of tools and make necessary edits.

Step 7: Duplicating the Layer
Duplicate the photo layer and move it up. Again, click on “Filter” then “Noise” to add the noise as needed. Alter the blend mode to “Soft Light” and set the opacity value. After that, add any solid color and switch the blend mode back to Soft Light.

Step 8: Playing with the Layers
Duplicate the layer again to change the color. After that, double click the layer and deselect “R.” Move to left or right. Perform the same procedure for the rest of the layers. Use the erase tool to offer fine imprinting to the transition. Duplicate the final layer and deselect “R” and “C.” Move left and right.

Step 9: Final Process
Use the eraser tool one last time, and you are done with the VCR filter.
Part 2: How to Get VHS Filter in Instagram?
Now that you know how to add glitch filter Photoshop let us move on to Instagram. The sub-section of this write-up shall focus on VHS filter Instagram. If you are an Instagram user wishing to get a retro VHS filter, follow our lead.
Step 1: Finding the Filters
The first step revolves around clicking on the Instagram app to open it. Navigate to the “Story.” The user will find a number of filters in the top panel along a circle.

Step 2: Picking the Vintage Filter
Swipe right towards those filters until a “Search” option is seen. Type “Vintage DV” and press “Enter,” where several VHS video filters will be displayed. Pick one and save it to your camera roll.

Step 3: Using the VHS Filter
Head back to the “Story” and select the “Effects” option. Select the filter that you saved and initiate the recording process. You have got the VHS filter for videos.

Part 3: How to Get VHS Filter in TikTok?
The following section of the write-up shall highlight finding and getting the 90s VHS filter in TikTok. So, what are we waiting for? Let us start the procedure.
Find the VHS Filter in TikTok
Step 1: Navigate to the App
Use your computer to launch the TikTok application. As soon as the interface appears, click on “Trends” in the bottom left corner.
Step 2: Open the Effects
Type Retro VHS in the search bar and click on the second result that is displayed. Click on the “Effects” that says, “VHS Retro.”
Step 3: Add in Favorites
Add it to the favorites and then tap on the video icon located at the center of the screen.

Use the VHS Filter in TikTok
Step 1: Deactivating the Filter</p
With the camera open, click on “Effects” right next to the camera icon. The filter is activated, but we need to deactivate it by clicking on the stop icon with the effects. Click anywhere on the screen to exit the “Effects” panel.
Step 2: Recording Process
Now, click on the red video sign and begin recording for some seconds without the filter. It is important to record the video by pointing at the targeted person. After the first part of the video is recorded, head back to the “Effects” menu and navigate to the tab that says, “Add to Favorites.”

Step 3: Publishing the Video
Choose the Retro VHS Filter and point the camera at the person that needs the filter. Hit the “Register” button. Make the recording and press the red popcorn. Hit “Next” and “Publish” the video finally.

Part 4: How to Add VHS Effects to your Travel Video?
With vacation season on, bloggers are into adding VHS photo filters to their videos to be uploaded on YouTube channels. The section shall convey the detailed procedure of adding a glitch effect filter to the travel and vacation videos in Wondershare Filmora .
For Win 7 or later (64-bit)
For macOS 10.12 or later
Step 1: Initiating the Process
Begin the process by launching Wondershare Filmora. For starters, let us work on the perfect music for the video. The Audio tab shows an awful collection. Choose the “Young and Bright” category for the music.

Step 2: Picking the Music
Select any music and drag and drop it to the timeline. Now, trim the music into 15 seconds long. Now, input the travel videos to start their editing. Set the order for the video afterward.

Step 3: Choosing the Overlays
Navigate to the “Effects” panel and search for VHS. The software would offer multiple choices to pick from. Choose different overlays and place them onto the video tracks as you like.

Step 4: Adding the Transition
To add the transition, head to the “Transition” tab and find VHS. Drag and drop the transitions among the cuts between the video clips. Adjust their duration as needed. Preview the video, and the mission is accomplished.

Final Thoughts
Grabbing the attention of the audience is not as easy as it sounds. The creative industry uses a vast range of effects to compel the viewers to be on the edge of their seats. The article introduced the VHS filter while covering its procedure. If you are a TikTok, Instagram, or Photoshop user, we have got you. Wondershare Filmora helps perfectly to add the glitch filter to the vacation videos.
Versatile Video Editor - Wondershare Filmora
An easy yet powerful editor
Numerous effects to choose from
Detailed tutorials provided by the official channel
Detailed Tutorial to Crop a Video in KineMaster
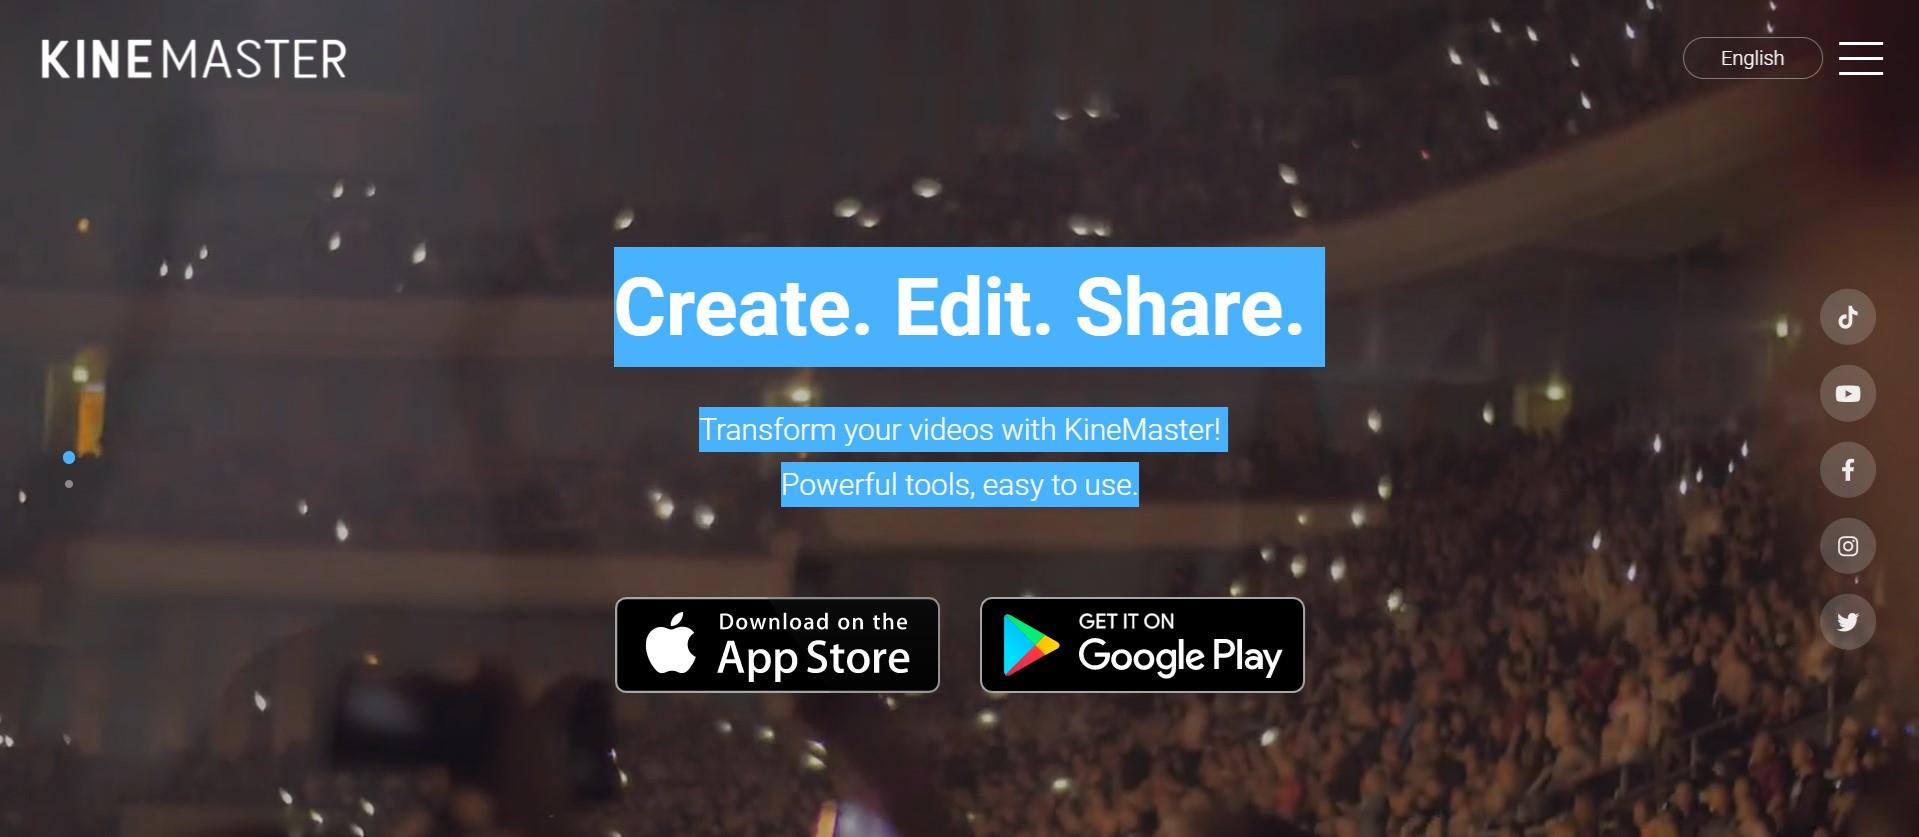
“Create. Edit. Share. Transform your videos with KineMaster! Powerful tools, easy to use.” – a few words we read when we come up with the official web-site of KineMaster, a mobile video editing application.
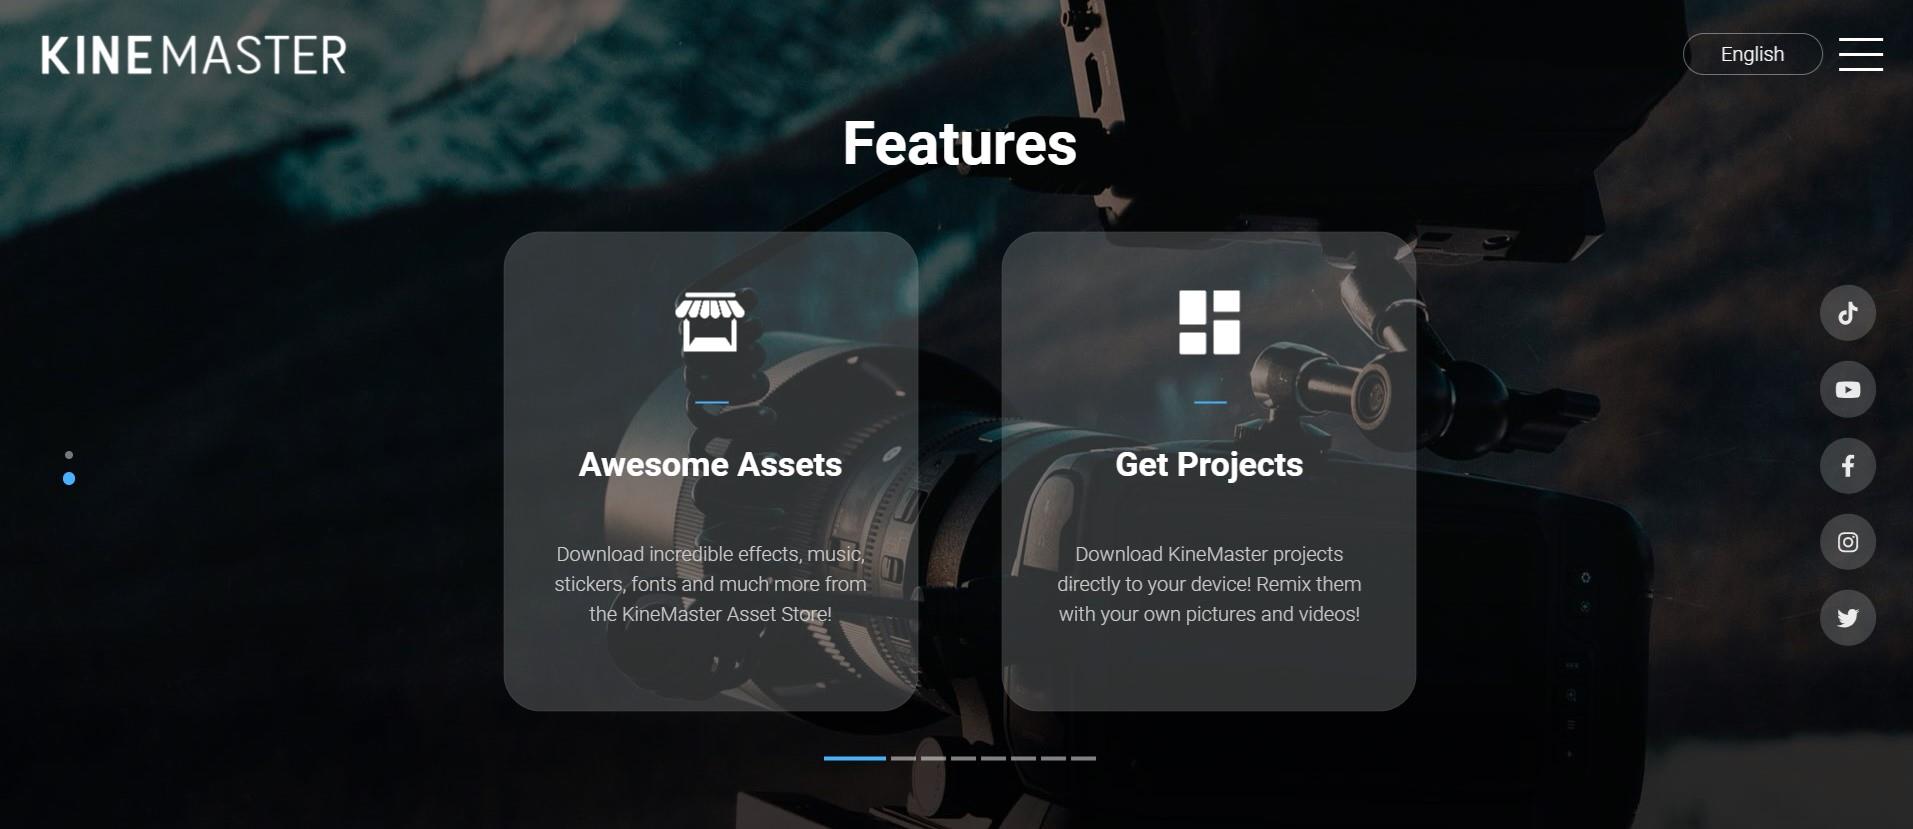
Scrolling down, we see a rich list of all the features KineMaster offers to its users, such as: Assets, Projects, Backup and Share, Blending Modes, Reverse, Chroma Key, High Resolution, Video Layers. Simply put, on KineMaster, you can download projects, add more than 2 500 effects, use powerful tools, add cinematic color, etc…
This many features make you think – how come it is possible to do all that on a mobile phone? How come Kinemaster is not only a software you can download, pay for, and use on your computer, which, on its behalf, should also be a powerful one? It would be a logical question, but remember, we are in 2022 already, so, no limits are put to the technology of today! On Google Play Store, in the description of the abovementioned app, it reads: “KineMaster makes video editing fun on your phone, tablet, or Chromebook!” – So, why not use this opportunity, to explore new ways of making our content better and as appealing as ever for our viewers?
Even though Kinemaster deserves a bigger article with more explanation of each tool, for now, we will only be focusing on cropping a video in this app. First off, why crop a video at all? – well, sometimes we have a wonderful footage but the aspect ratio just doesn’t work for us. It might be because we want to upload our clip on a platform needing a specific aspect ratio, or, we just need to crop and pan (which means to move around within a clip or an image) because we don’t like some things shown in the original video – we might as well need to zoom in and out, in order to get the best out of our footage. For whatever reason, when you need or just wish to crop a video, it should not be a big deal, and let’s see how KineMaster makes it a good and easy experience.
So, the first thing we do in almost every situation is to access the platform or an application itself! – you guessed it right, download KineMaster from Google Play Store! Once you have it on your phone, open it and enjoy the introduction of the app itself.
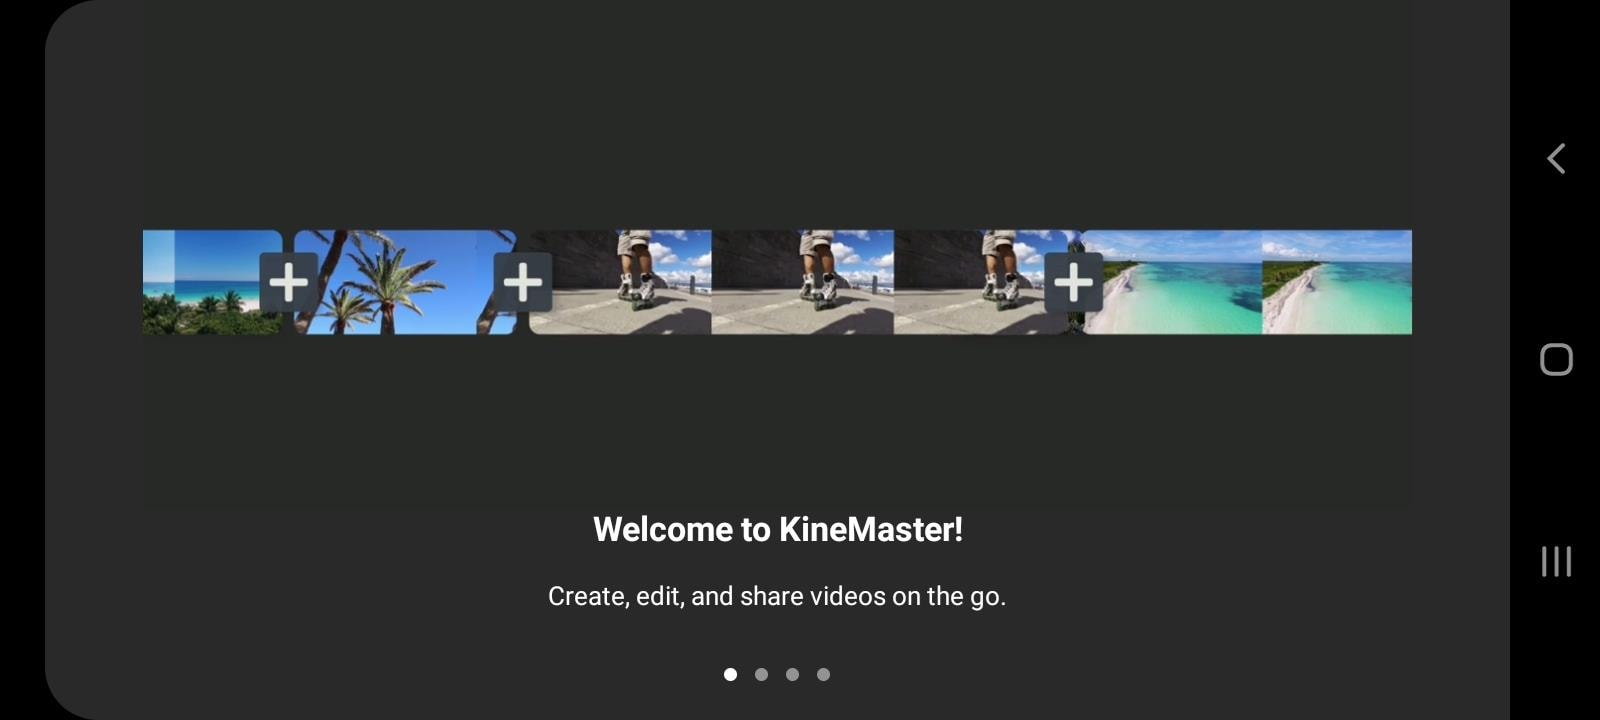
The interesting fact you will notice is that the layout of the app is horizontal, not vertical, unlike in most cases. So, it makes you feel like you are at least close to what video editors who work on their computers represent. The interface of the app is quite enjoyable for your eyes, as it is kind of fun, as well.
It is needless to say that, if you are going to do a specific “operation” to the video, such as cropping, you will already have figured out which one of your footage you want to crop and pan. So, it’s wise to jump on the button which says: Create New.
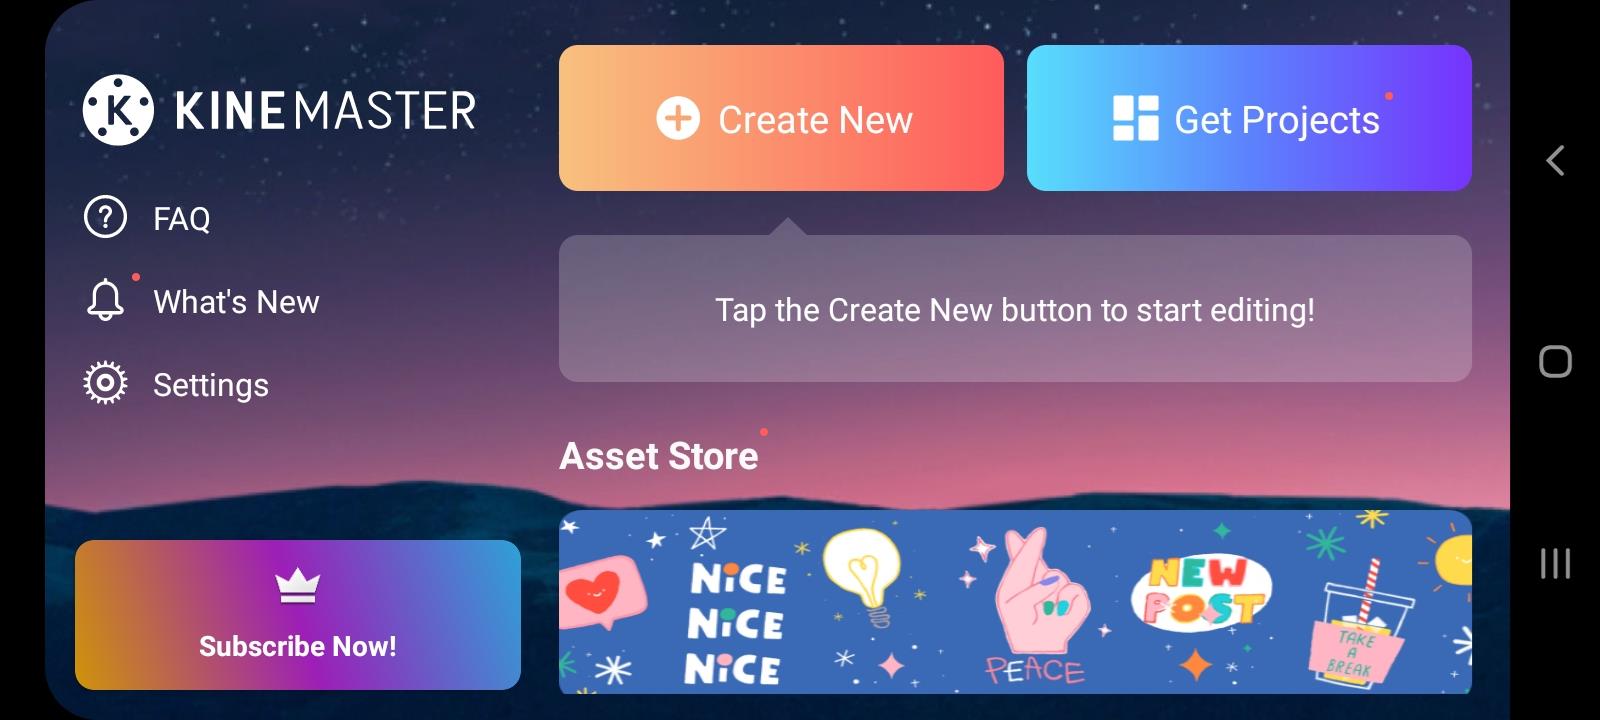
This will take you to the editor. Even though in the media section you will find the video you want to work on, but you might be struggling to notice a Crop button. It is because unfortunately, it’s not possible to crop your video right away in KineMaster – first, you will need to add a background, for example, a black one.
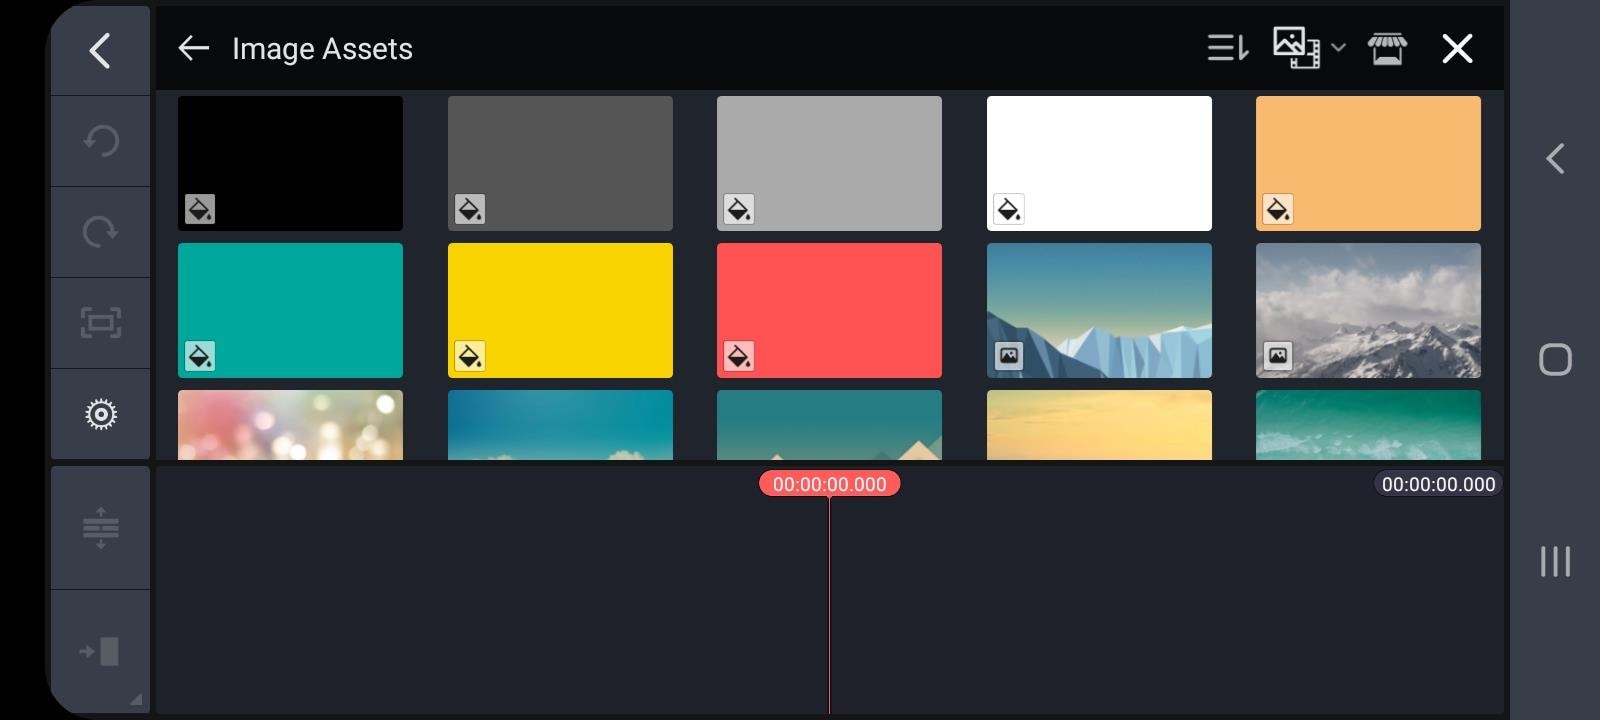
Then, you will go back to the menu and find Media section again to add the video clip you want to crop.
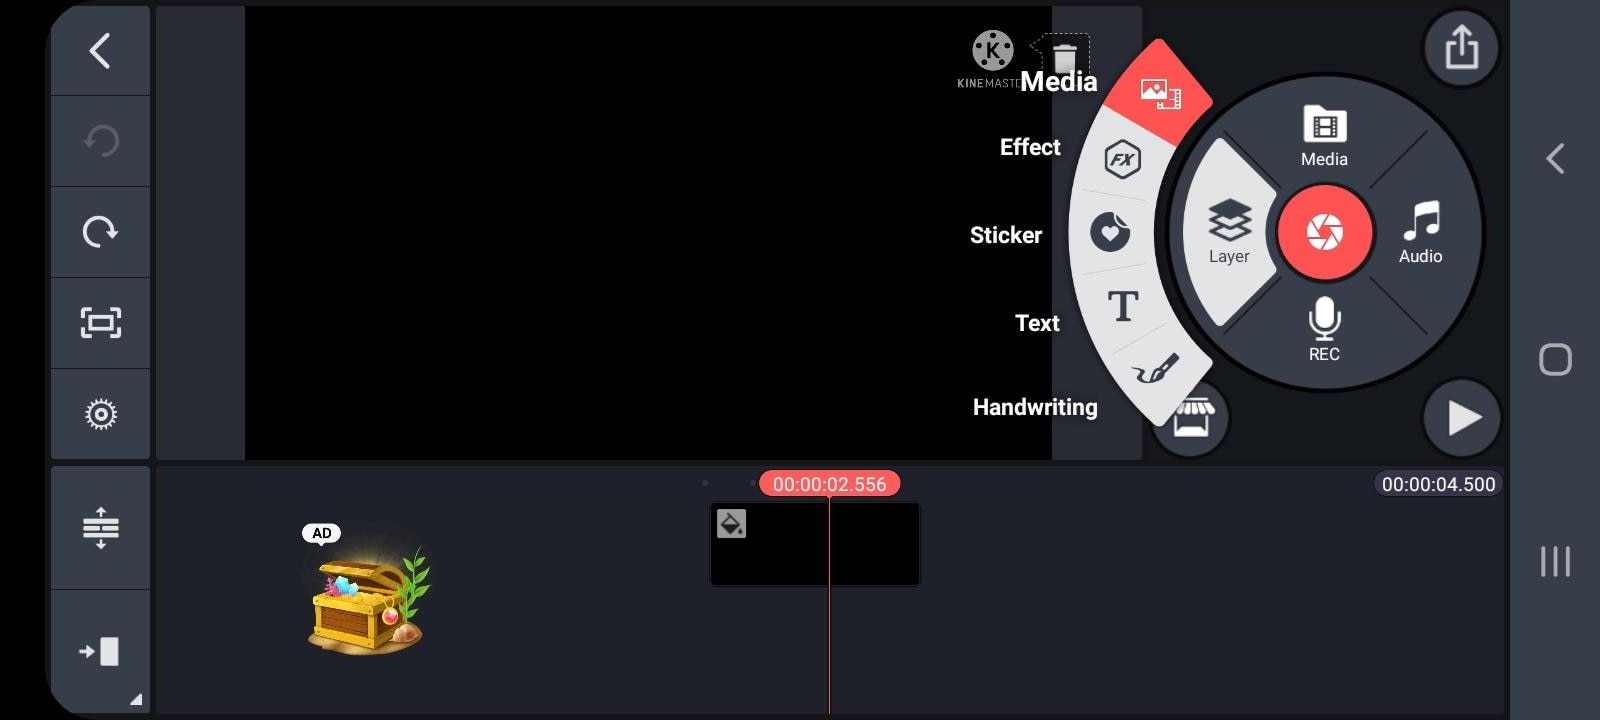
After adding it to the editor, you need to tap on the video file which has appeared in the sequence – this will show you different features you can use on the right. You have to scroll down a little and Voila! – here you find Cropping. After having clicked on that, a little cropping window will appear on the screen.
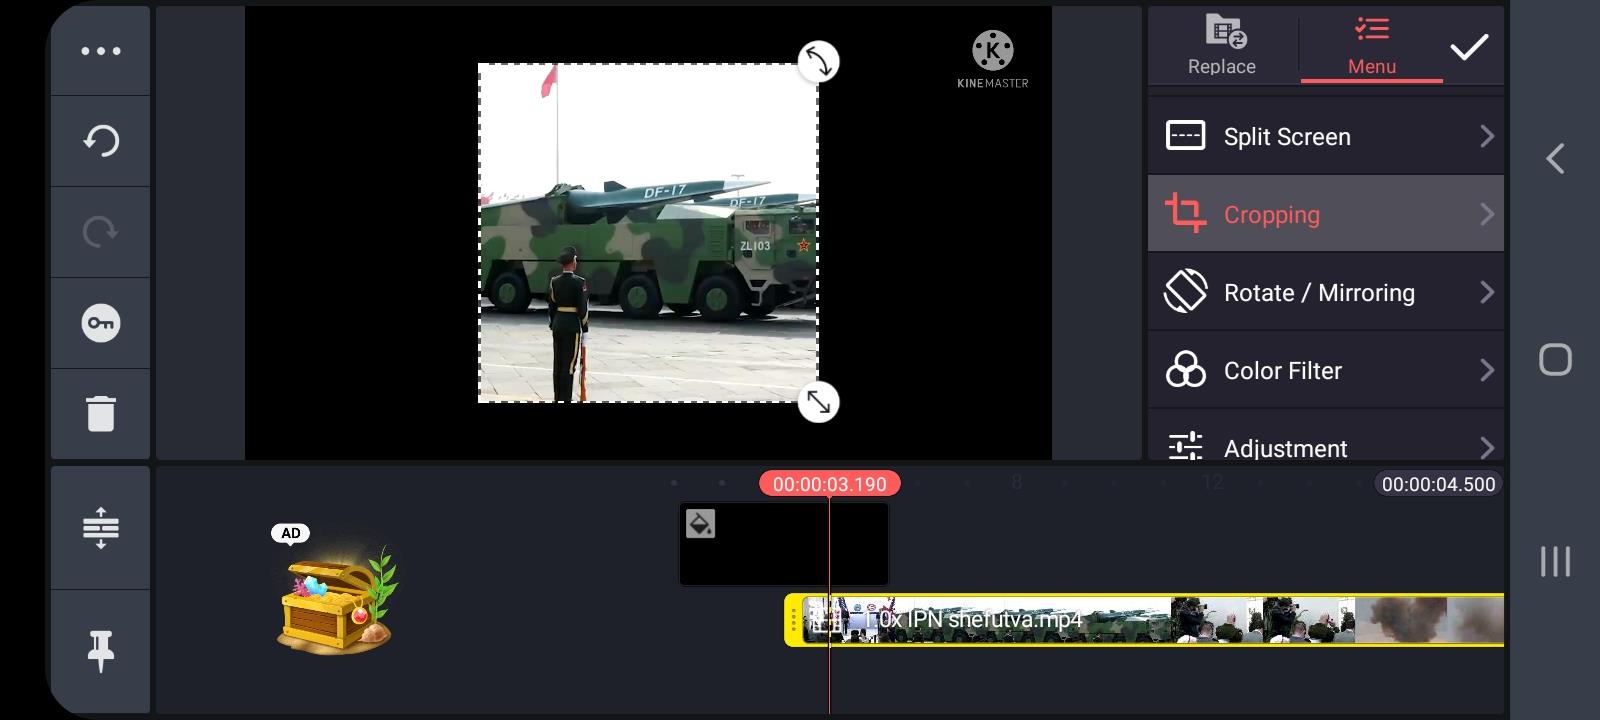
You can resize the clip, and in order to crop the video, turning on the mask option is needed.
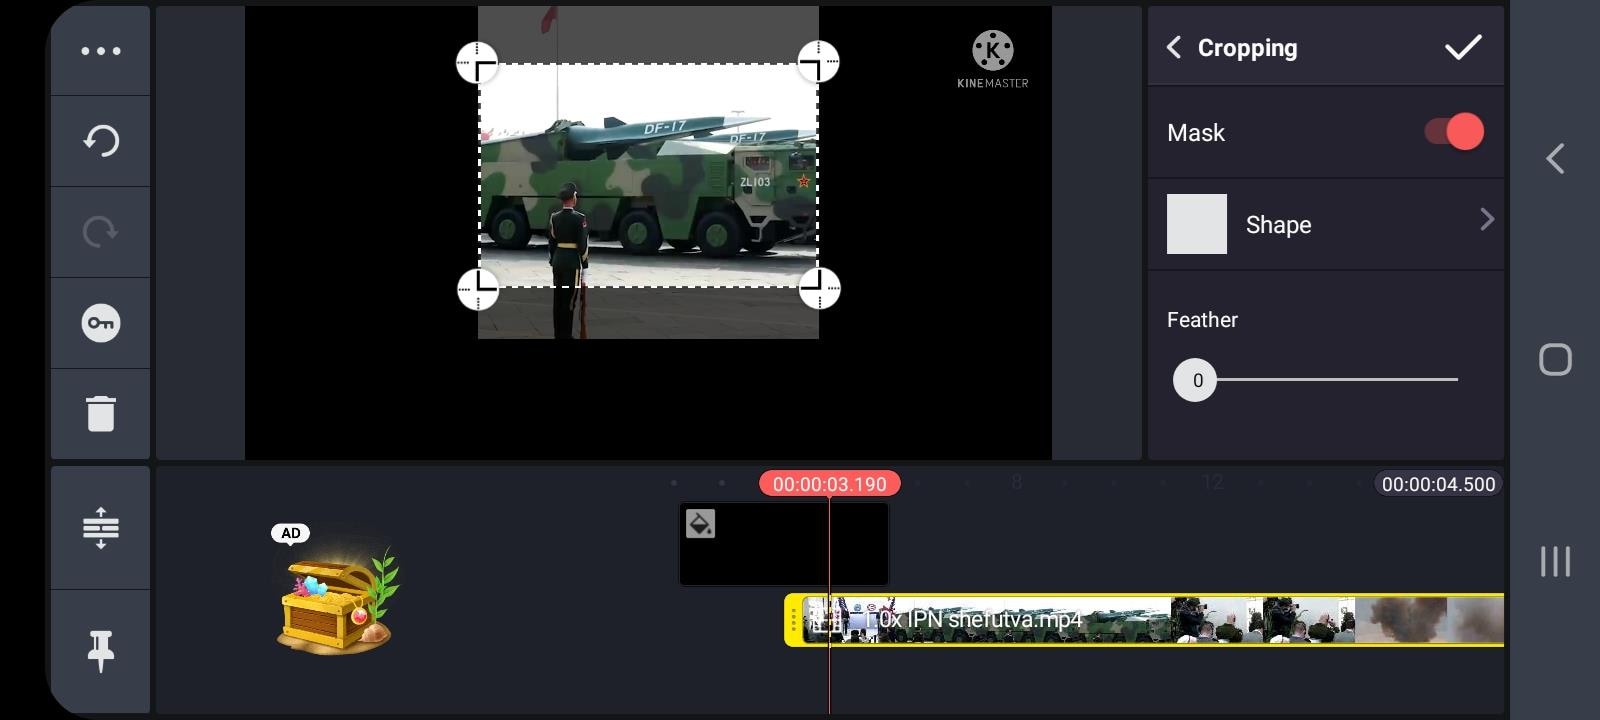
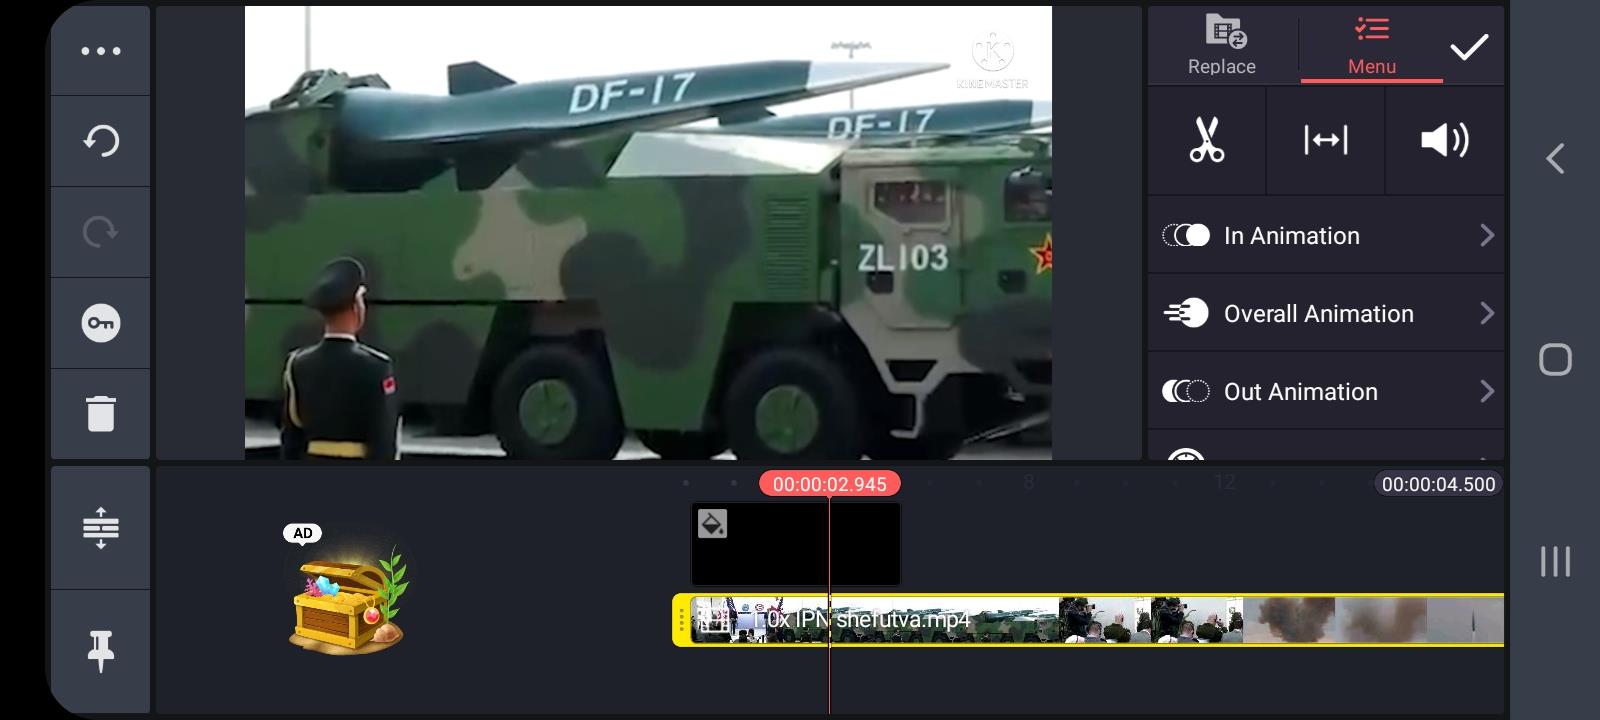
After you have finished cropping and resizing it to your liking, you need to click on the icon on the top right, and it will take you to the Save and Share page.
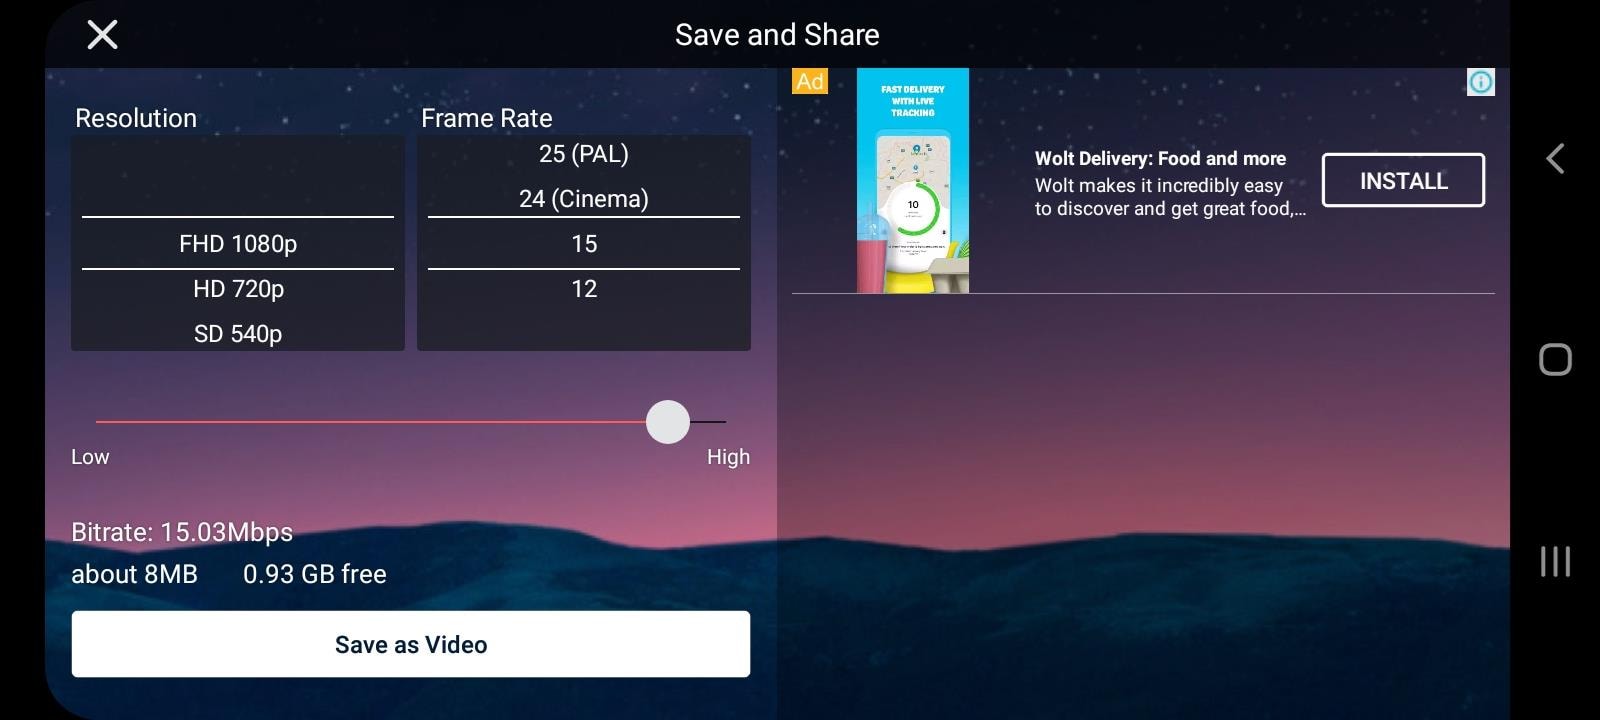
There, you will choose the Resolution and Frame rate, and Save as Video.
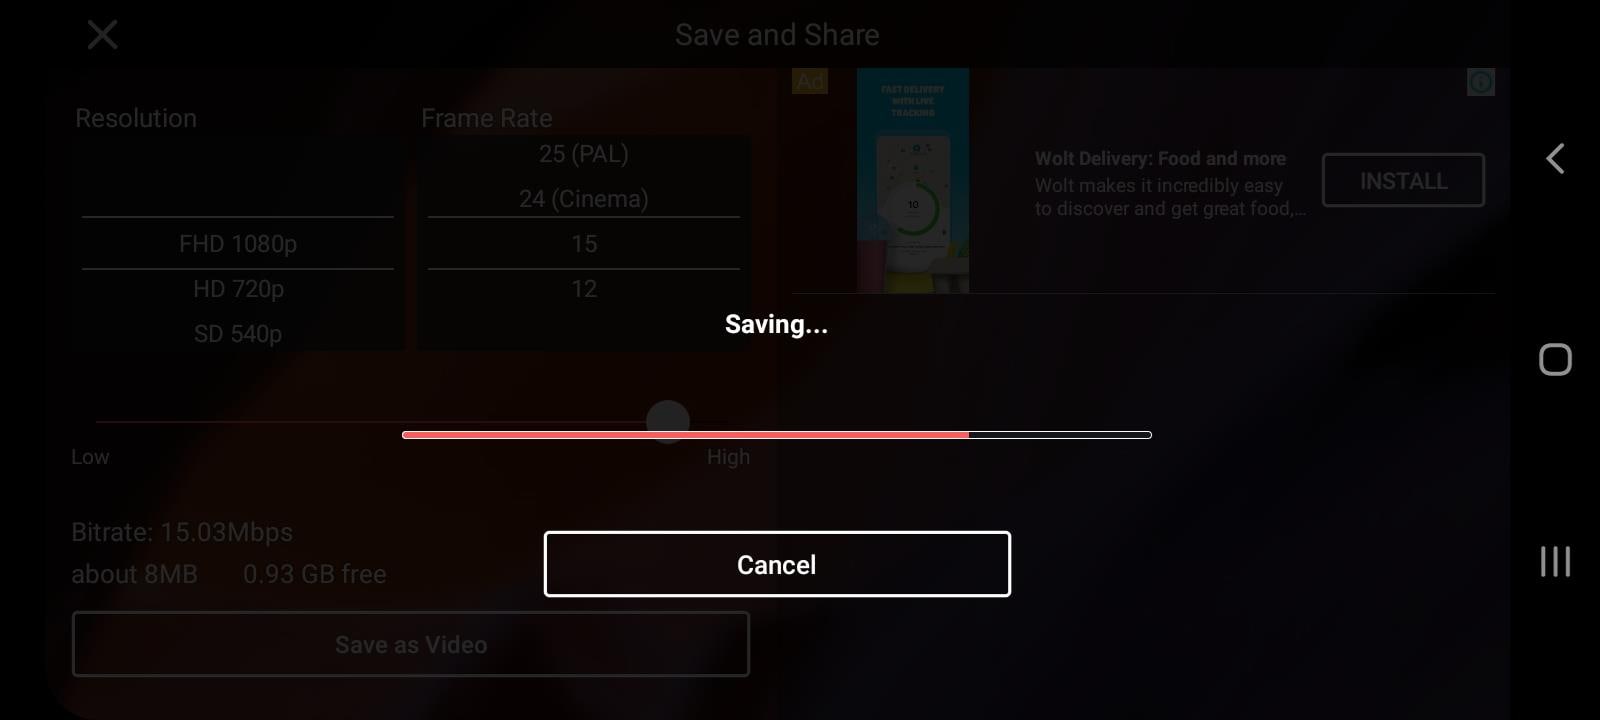
You can check your new cropped video on your gallery.
An easier way to crop video in Wondershare Filmora
An alternate way of cropping your video would be Filmora Video Editor , which is a software you can download and install on your computer and use its features only then. You can also try your hand at this very handy computer program which has an easy and user-friendly interface.
For Win 7 or later (64-bit)
For macOS 10.14 or later
Frist, as mentioned, you need to download and install Wondershare Filmora X. To add your files, you will need to click on Import Media Files Here.

You will choose your clip(s) you would like to crop and then drag and drop it in the sequence.

Above your video in the sequence you will see little icons and find a Crop one.

After clicking on it, a new window will open – it’s for Crop and Zoom, where you can choose a needed ratio or do it manually (for it, you have to select Custom first).

After clicking OK, your video will be cropped as you like. Then, you can proceed with Exporting it – click on Export, choose your preferred settings, and save the video at last.

So, in this article, you have learned how to crop a video using a mobile app KineMaster, as well as using a software – Wondershare Filmora X. of course, there are many other ways in which you can crop your video and make the best out of it. The technology and innovation gives us the opportunity to have great results with as little work as just a few minutes. You might need to crop your video for your channel on Youtube, or for your page on social media, or an official web-page of your company; last but not least is cropping and editing your video for your own pleasure, which is also a great way to interact with the virtual world around us.
Scrolling down, we see a rich list of all the features KineMaster offers to its users, such as: Assets, Projects, Backup and Share, Blending Modes, Reverse, Chroma Key, High Resolution, Video Layers. Simply put, on KineMaster, you can download projects, add more than 2 500 effects, use powerful tools, add cinematic color, etc…

This many features make you think – how come it is possible to do all that on a mobile phone? How come Kinemaster is not only a software you can download, pay for, and use on your computer, which, on its behalf, should also be a powerful one? It would be a logical question, but remember, we are in 2022 already, so, no limits are put to the technology of today! On Google Play Store, in the description of the abovementioned app, it reads: “KineMaster makes video editing fun on your phone, tablet, or Chromebook!” – So, why not use this opportunity, to explore new ways of making our content better and as appealing as ever for our viewers?
Even though Kinemaster deserves a bigger article with more explanation of each tool, for now, we will only be focusing on cropping a video in this app. First off, why crop a video at all? – well, sometimes we have a wonderful footage but the aspect ratio just doesn’t work for us. It might be because we want to upload our clip on a platform needing a specific aspect ratio, or, we just need to crop and pan (which means to move around within a clip or an image) because we don’t like some things shown in the original video – we might as well need to zoom in and out, in order to get the best out of our footage. For whatever reason, when you need or just wish to crop a video, it should not be a big deal, and let’s see how KineMaster makes it a good and easy experience.
So, the first thing we do in almost every situation is to access the platform or an application itself! – you guessed it right, download KineMaster from Google Play Store! Once you have it on your phone, open it and enjoy the introduction of the app itself.

The interesting fact you will notice is that the layout of the app is horizontal, not vertical, unlike in most cases. So, it makes you feel like you are at least close to what video editors who work on their computers represent. The interface of the app is quite enjoyable for your eyes, as it is kind of fun, as well.
It is needless to say that, if you are going to do a specific “operation” to the video, such as cropping, you will already have figured out which one of your footage you want to crop and pan. So, it’s wise to jump on the button which says: Create New.

This will take you to the editor. Even though in the media section you will find the video you want to work on, but you might be struggling to notice a Crop button. It is because unfortunately, it’s not possible to crop your video right away in KineMaster – first, you will need to add a background, for example, a black one.

Then, you will go back to the menu and find Media section again to add the video clip you want to crop.

After adding it to the editor, you need to tap on the video file which has appeared in the sequence – this will show you different features you can use on the right. You have to scroll down a little and Voila! – here you find Cropping. After having clicked on that, a little cropping window will appear on the screen.

You can resize the clip, and in order to crop the video, turning on the mask option is needed.


After you have finished cropping and resizing it to your liking, you need to click on the icon on the top right, and it will take you to the Save and Share page.

There, you will choose the Resolution and Frame rate, and Save as Video.

You can check your new cropped video on your gallery.
An easier way to crop video in Wondershare Filmora
An alternate way of cropping your video would be Filmora Video Editor , which is a software you can download and install on your computer and use its features only then. You can also try your hand at this very handy computer program which has an easy and user-friendly interface.
For Win 7 or later (64-bit)
For macOS 10.14 or later
Frist, as mentioned, you need to download and install Wondershare Filmora X. To add your files, you will need to click on Import Media Files Here.

You will choose your clip(s) you would like to crop and then drag and drop it in the sequence.

Above your video in the sequence you will see little icons and find a Crop one.

After clicking on it, a new window will open – it’s for Crop and Zoom, where you can choose a needed ratio or do it manually (for it, you have to select Custom first).

After clicking OK, your video will be cropped as you like. Then, you can proceed with Exporting it – click on Export, choose your preferred settings, and save the video at last.

So, in this article, you have learned how to crop a video using a mobile app KineMaster, as well as using a software – Wondershare Filmora X. of course, there are many other ways in which you can crop your video and make the best out of it. The technology and innovation gives us the opportunity to have great results with as little work as just a few minutes. You might need to crop your video for your channel on Youtube, or for your page on social media, or an official web-page of your company; last but not least is cropping and editing your video for your own pleasure, which is also a great way to interact with the virtual world around us.
Scrolling down, we see a rich list of all the features KineMaster offers to its users, such as: Assets, Projects, Backup and Share, Blending Modes, Reverse, Chroma Key, High Resolution, Video Layers. Simply put, on KineMaster, you can download projects, add more than 2 500 effects, use powerful tools, add cinematic color, etc…

This many features make you think – how come it is possible to do all that on a mobile phone? How come Kinemaster is not only a software you can download, pay for, and use on your computer, which, on its behalf, should also be a powerful one? It would be a logical question, but remember, we are in 2022 already, so, no limits are put to the technology of today! On Google Play Store, in the description of the abovementioned app, it reads: “KineMaster makes video editing fun on your phone, tablet, or Chromebook!” – So, why not use this opportunity, to explore new ways of making our content better and as appealing as ever for our viewers?
Even though Kinemaster deserves a bigger article with more explanation of each tool, for now, we will only be focusing on cropping a video in this app. First off, why crop a video at all? – well, sometimes we have a wonderful footage but the aspect ratio just doesn’t work for us. It might be because we want to upload our clip on a platform needing a specific aspect ratio, or, we just need to crop and pan (which means to move around within a clip or an image) because we don’t like some things shown in the original video – we might as well need to zoom in and out, in order to get the best out of our footage. For whatever reason, when you need or just wish to crop a video, it should not be a big deal, and let’s see how KineMaster makes it a good and easy experience.
So, the first thing we do in almost every situation is to access the platform or an application itself! – you guessed it right, download KineMaster from Google Play Store! Once you have it on your phone, open it and enjoy the introduction of the app itself.

The interesting fact you will notice is that the layout of the app is horizontal, not vertical, unlike in most cases. So, it makes you feel like you are at least close to what video editors who work on their computers represent. The interface of the app is quite enjoyable for your eyes, as it is kind of fun, as well.
It is needless to say that, if you are going to do a specific “operation” to the video, such as cropping, you will already have figured out which one of your footage you want to crop and pan. So, it’s wise to jump on the button which says: Create New.

This will take you to the editor. Even though in the media section you will find the video you want to work on, but you might be struggling to notice a Crop button. It is because unfortunately, it’s not possible to crop your video right away in KineMaster – first, you will need to add a background, for example, a black one.

Then, you will go back to the menu and find Media section again to add the video clip you want to crop.

After adding it to the editor, you need to tap on the video file which has appeared in the sequence – this will show you different features you can use on the right. You have to scroll down a little and Voila! – here you find Cropping. After having clicked on that, a little cropping window will appear on the screen.

You can resize the clip, and in order to crop the video, turning on the mask option is needed.


After you have finished cropping and resizing it to your liking, you need to click on the icon on the top right, and it will take you to the Save and Share page.

There, you will choose the Resolution and Frame rate, and Save as Video.

You can check your new cropped video on your gallery.
An easier way to crop video in Wondershare Filmora
An alternate way of cropping your video would be Filmora Video Editor , which is a software you can download and install on your computer and use its features only then. You can also try your hand at this very handy computer program which has an easy and user-friendly interface.
For Win 7 or later (64-bit)
For macOS 10.14 or later
Frist, as mentioned, you need to download and install Wondershare Filmora X. To add your files, you will need to click on Import Media Files Here.

You will choose your clip(s) you would like to crop and then drag and drop it in the sequence.

Above your video in the sequence you will see little icons and find a Crop one.

After clicking on it, a new window will open – it’s for Crop and Zoom, where you can choose a needed ratio or do it manually (for it, you have to select Custom first).

After clicking OK, your video will be cropped as you like. Then, you can proceed with Exporting it – click on Export, choose your preferred settings, and save the video at last.

So, in this article, you have learned how to crop a video using a mobile app KineMaster, as well as using a software – Wondershare Filmora X. of course, there are many other ways in which you can crop your video and make the best out of it. The technology and innovation gives us the opportunity to have great results with as little work as just a few minutes. You might need to crop your video for your channel on Youtube, or for your page on social media, or an official web-page of your company; last but not least is cropping and editing your video for your own pleasure, which is also a great way to interact with the virtual world around us.
Scrolling down, we see a rich list of all the features KineMaster offers to its users, such as: Assets, Projects, Backup and Share, Blending Modes, Reverse, Chroma Key, High Resolution, Video Layers. Simply put, on KineMaster, you can download projects, add more than 2 500 effects, use powerful tools, add cinematic color, etc…

This many features make you think – how come it is possible to do all that on a mobile phone? How come Kinemaster is not only a software you can download, pay for, and use on your computer, which, on its behalf, should also be a powerful one? It would be a logical question, but remember, we are in 2022 already, so, no limits are put to the technology of today! On Google Play Store, in the description of the abovementioned app, it reads: “KineMaster makes video editing fun on your phone, tablet, or Chromebook!” – So, why not use this opportunity, to explore new ways of making our content better and as appealing as ever for our viewers?
Even though Kinemaster deserves a bigger article with more explanation of each tool, for now, we will only be focusing on cropping a video in this app. First off, why crop a video at all? – well, sometimes we have a wonderful footage but the aspect ratio just doesn’t work for us. It might be because we want to upload our clip on a platform needing a specific aspect ratio, or, we just need to crop and pan (which means to move around within a clip or an image) because we don’t like some things shown in the original video – we might as well need to zoom in and out, in order to get the best out of our footage. For whatever reason, when you need or just wish to crop a video, it should not be a big deal, and let’s see how KineMaster makes it a good and easy experience.
So, the first thing we do in almost every situation is to access the platform or an application itself! – you guessed it right, download KineMaster from Google Play Store! Once you have it on your phone, open it and enjoy the introduction of the app itself.

The interesting fact you will notice is that the layout of the app is horizontal, not vertical, unlike in most cases. So, it makes you feel like you are at least close to what video editors who work on their computers represent. The interface of the app is quite enjoyable for your eyes, as it is kind of fun, as well.
It is needless to say that, if you are going to do a specific “operation” to the video, such as cropping, you will already have figured out which one of your footage you want to crop and pan. So, it’s wise to jump on the button which says: Create New.

This will take you to the editor. Even though in the media section you will find the video you want to work on, but you might be struggling to notice a Crop button. It is because unfortunately, it’s not possible to crop your video right away in KineMaster – first, you will need to add a background, for example, a black one.

Then, you will go back to the menu and find Media section again to add the video clip you want to crop.

After adding it to the editor, you need to tap on the video file which has appeared in the sequence – this will show you different features you can use on the right. You have to scroll down a little and Voila! – here you find Cropping. After having clicked on that, a little cropping window will appear on the screen.

You can resize the clip, and in order to crop the video, turning on the mask option is needed.


After you have finished cropping and resizing it to your liking, you need to click on the icon on the top right, and it will take you to the Save and Share page.

There, you will choose the Resolution and Frame rate, and Save as Video.

You can check your new cropped video on your gallery.
An easier way to crop video in Wondershare Filmora
An alternate way of cropping your video would be Filmora Video Editor , which is a software you can download and install on your computer and use its features only then. You can also try your hand at this very handy computer program which has an easy and user-friendly interface.
For Win 7 or later (64-bit)
For macOS 10.14 or later
Frist, as mentioned, you need to download and install Wondershare Filmora X. To add your files, you will need to click on Import Media Files Here.

You will choose your clip(s) you would like to crop and then drag and drop it in the sequence.

Above your video in the sequence you will see little icons and find a Crop one.

After clicking on it, a new window will open – it’s for Crop and Zoom, where you can choose a needed ratio or do it manually (for it, you have to select Custom first).

After clicking OK, your video will be cropped as you like. Then, you can proceed with Exporting it – click on Export, choose your preferred settings, and save the video at last.

So, in this article, you have learned how to crop a video using a mobile app KineMaster, as well as using a software – Wondershare Filmora X. of course, there are many other ways in which you can crop your video and make the best out of it. The technology and innovation gives us the opportunity to have great results with as little work as just a few minutes. You might need to crop your video for your channel on Youtube, or for your page on social media, or an official web-page of your company; last but not least is cropping and editing your video for your own pleasure, which is also a great way to interact with the virtual world around us.
How to Upload Videos to Twitch? Here’s a Guide for Beginner
Recently, Twitch announced that its users can now upload video to Twitch, and there is no need to broadcast or live stream on Twitch anymore. Uploading videos to Twitch can be an excellent way to share your videos with your audience.

Besides this, you don’t need to upload videos on other video-sharing sites. But if you are using this platform for the first time, then you must be wondering how to upload video to Twitch. Don’t worry, as we have got your back. Keep reading to explore the process, and it is quite easy.
Part 1: How to Upload Videos to Twitch?
- First of all, you need to open Twitch in any browser. Just type twitch.tv in the browser’s address bar and click on Enter. Then you need to log into your account.
- Once done, you can see your account with your profile picture in the screen’s top-right corner. You can find it next to the Get Bits option. Click on it to access the drop-down menu.
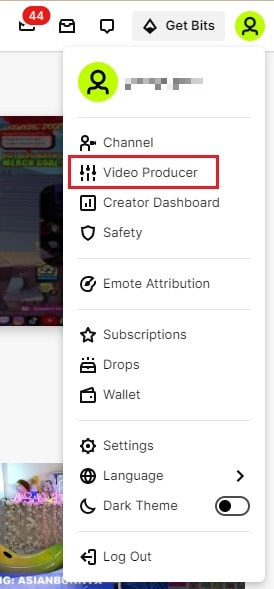
- Then you need to choose the Video Producer option available in the drop-down menu. A new page will open, and you can see the Creator Dashboard from where you can begin uploading your video or hosting a channel on twitch. If this option is unavailable, then you can’t upload your videos.
- Now, you need to click on the upload option. If you have not uploaded any video, you will find this area blank. You can just drag and drop your desired video to upload video to twitch.

- Choose the video that you want to upload and click on the Open option.
- Now, the upload process will begin. Wait for a few seconds to finish the process. Once done, click on the video, and the details window will come up.
- Here you need to edit your video’s metadata information. You can set a title, the category and a description for your video. Besides you can also edit the language and thumbnail here.
- After that, you can click on the Save Changes option that you can find in the upper right corner.
- Now you need to click on the Publish button to post your video on your channel. You can follow the process while hosting a channel on twitch to upload the videos.
Part 2: Why can’t you upload videos to twitch?
Well, it may be noted that not all Twitch users can upload video to twitch. For now, this feature is only available for Twitch partners and affiliates. So, first, you need to become an affiliate or partner, and then you can easily upload your videos. Besides, you should also keep the video upload guidelines in mind to avoid any issues.
- You can only upload video formats like 1080P videos, videos with up to 190mbps bit rate. The platform supports FLV, MOV, AVI and MP4 file formats.
- Besides, using one account, you can upload only 5 videos simultaneously. And within 24 hours, you can do a maximum of 100 uploads.
Now you know that only Twitch partners or affiliates can upload video to twitch, it is crucial for you to know how to become a Twitch affiliate or partner. Have a look at the below-given section for your answer.
Part 3: How to be a twitch affiliate or partner?
In general, streamers on Twitch can’t earn money from their content, and they can only make money from donations. However, if you have more followers, consistent viewers and hosting a channel on twitch regularly, then you can try to become a Twitch affiliate or partner. Some benefits that you can enjoy with this are:
- You will be able to sell your games
- You can get subscriptions.
- You will enjoy chargeback protection.
- It will be easier for you to get Twitch Bits.
- You can now earn revenue through advertisements.
To become an affiliate on Twitch, first of all, you need to monetize your content, i.e., stream. Now, let’s have a look at some requirements to become an affiliate.

- You must have at least 50 followers.
- Make sure you have completed a minimum of 500 total minutes broadcast within one month or in the last 30 days.
- In the last 30 days, you should have at least seven unique broadcast days.
- At least 3 viewers per stream in the last 30 days.
Steps to Become an Affiliate
- Visit the Twitch website and log into your account.
- Find the Notifications icon and click on it.
- There you can see the Get Started option. Click on it.
- Sign the affiliate agreement and then give your tax information.
- Then choose your payment location to complete the procedure.
Requirements For Becoming a Partner
Once you receive your affiliate status, you can become a partner. But there are some requirements that you need to keep in your mind.
- You must have 75 average unique viewers per day in the last 30 days.
- Have streamed or hosting a channel on twitch for 12 days in the last 30 days.
- You need to stream for 25 hours in 30 days.
Steps to Follow
- Visit Twitch and log into your account.
- Now click on your Profile icon and then click on the Creator Dashboard option.
- Click on the arrow mark located near Insights and then click on Achievements.
- Click on the Apply option located under the Patch to Partner tab.
Once applied, Twitch will reply to your application within 7 business days. Well, if you face rejection, then you need to build a stronger audience and apply for it again later.
What Do You Mean Stay Active?
Chat is an important part of Twitch, and it lets you interact with your fellow members of the community as well as streamers. By keeping your chat active, you can let others know that you are ready to interact with them. This, in turn, can help you to increase your followers.
Part 4: What’s The Alternative to Twitch for Creators?
1. YouTube Gaming
Well, even though YouTube Gaming lacks in-game overlays, it offers other features. The platform offers live gaming broadcasts, channels, chat rooms and more. Here the viewers don’t need to subscribe to watch the content.
2. Smashcast
If you are a gaming fan, you must have heard about Hitbox and Azubu. They came together to form Smashcast. This provides the users with perfect JavaScript and HTML integration. If you are a gaming partner, esports team, viewer, organizer or streamer, then this platform will be an excellent option for you. Compared to Twitch, Smashcast offers better quality esports streams.
3. Facebook Gaming

Facebook also has introduced its own gaming and streaming platform. Facebook Gaming comes with an easy-to-navigate interface. It has a chat room and also allows you to watch videos from different social media platforms, like Twitter, Instagram, and YouTube. Besides, it offers some amazing features, such as different monetization options, interactive live-streaming, simple streaming setup, stream analytics and more.
4. DLive
While YouTube and Twitch have some high bars for monetization, they don’t offer sufficient profit to the creators. DLive is here to solve that issue. This platform rewards content creators as well as viewers. It charges a flat fee and takes around 20 percent of total revenue. On the other hand, viewers also get rewards for their engagement.
5. Ustream
This platform offers more than just gaming video streams, such as sports news, live streams, talk shows, podcasts and more. Some reviews say Ustream provides users with a better and faster streaming service. Besides, it is available for different platforms, such as PS4, Mac, Windows, iOS, and Android.
6. Vimeo

Vimeo has all the features, such as a live chat system and other features that a streaming platform must have. You can easily access its analytic dashboard to know your audience in a better way. It also has many integrations such as Figma, Meta, WordPress, Shopify and more. So, uploading videos directly from your website to Vimeo will not be a challenging task.
FAQs
How Long Do My Videos Stay on Twitch?
The answer is that it depends. If you are a Twitch Prime user, Turbo user or a Twitch partner, then once you upload video to twitch, it will stay for 60 days. For regular broadcasters, their videos will remain active for 14 days. Just follow the above-mentioned steps to successfully upload your videos.
Can I Upload Videos to Twitch?
You can upload your video to twitch if you become a Twitch affiliate or Partner. Regular streamers don’t have this feature for now. Just meet the criteria required for this and apply for an affiliate. This can be a great way to promote your brand as you can leverage this amazing form of influenced marketing.
Free Download For Win 7 or later(64-bit)
Free Download For macOS 10.14 or later
Free Download For macOS 10.14 or later
How to Zoom in on PowerPoint [Easy Ways]
How often have you wished you could zoom in to more fully illustrate a point on a slide during a PowerPoint presentation? If you use PowerPoint for Windows and are a subscription to Microsoft 365, you have access to that function! There is a lot going on in some Microsoft PowerPoint presentations. It may include a lot of little details or significant information like PowerPoint slide zoom, and altering it would be impractical. If this occurs, you may make a zoom shape and utilize the expand animation to focus on the information you’re describing in more depth. By doing this, you can maintain the overall picture while concentrating on the key points of the talk.
You are giving a presentation at a meeting and have a number of possibilities. Zoom in PowerPoint Presentation enables you to create an introduction slide that includes thumbnails for the slides you wish to skip to in any order to discuss those choices throughout your meeting. It builds a navigable interactive dashboard for your presentation. When you leave the opening slide and go through all the slides in a part, you are immediately returned to the beginning. So where does PowerPoint’s magic reside? PowerPoint The most recent addition to the lengthy and ever-expanding list of new functions is Zoom. Zoom is incredible since it effectively turns a slide or many slides from your project into a changeable hotspot. A hotspot is a clickable item that connects to a certain area, in case you forgot. You will thus be directed to that slide if you choose it as a hotspot when you click on the item.
Part 1: 3 Techniques to Zoom PowerPoint Presentations
Microsoft is always developing new tools to help you create and construct amazing presentations. The PowerPoint Zoom function is one of them. It is not the straightforward zoom capability that has been a part of PowerPoint for a long time. Zoom in PowerPoint is a useful feature that enables you to go right to the information you want and promotes an interactive presentation that is seamless. You just need to be aware of three distinct sorts of Zooms to do it quickly and easily. They are described below:
1. Use the View tab Zoom command
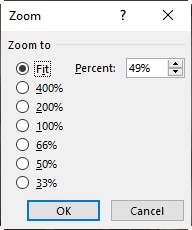
PowerPoint’s Zoom feature is a clever tool for creating and watching presentations. When the text or item you wish to deal with is too tiny for you to view, the Zoom tool might be useful. On the screen, a slide will look bigger as you zoom in, and smaller when you zoom away. Choose the appropriate zoom level in the “Zoom” dialog box by typing a number into the “Percent:” spinner or selecting an option from the “Zoom to” section. Click the “OK” button to apply the chosen magnification level after setting it.
Step1Zoom in with the View Dialog Box
Additionally, you may access the Zoom dialog box and choose a different zoom level by clicking the Zoom button on the View tab of the ribbon. choose the Ribbon’s “View” tab. the “Zoom” button from the “Zoom” button group, and then.

Step2Click the Zoom Button
Zoom in by going to the View tab attributes. Select Zoom in from the View menu after clicking. There will be a Zoom window where you may choose or input the zoom level. More options for adjusting the zoom level are available under the Zoom group on the View tab of the ribbon.

Step3Click Fit to Window
Additionally, if you choose Fit, Presentation will resize the window to a proper size.
2. Use the Zoom Slider at The Bottom of the Screen
In PowerPoint, the Status Bar’s lower-right application window has the Zoom slider. This tool lets you adjust the slide’s magnification level. This just modifies your sense of how near or far away the slide looks onscreen; the slide itself is unaffected in any way.
Step1Click the Zoom In (+) button on the status bar
The horizontal scroll bar will then display underneath the slide if you zoom in on the slide until it can no longer fit horizontally on the screen. The slide may then be thoroughly examined at the selected magnification level by using it to scroll left and right.

Step2Click the Zoom Out (-) button on the status bar
Changing the magnification level is simple using PowerPoint’s Zoom slider. Click and move the slider left, toward the minus sign, to reduce the magnification level. To the left of the zoom slider is a percentage that represents the magnification level.
Step3Fit to the Window
Click the “Fit slide to current window” button to the right of the Zoom slider to force the slide to fit inside the view’s available slide area.

3. The Ctrl + Mouse Spin Wheel Shortcut
Ctrl + scroll wheel is a typical shortcut for zooming in Windows. Open the worksheet or presentation you wish to save with the desired zoom level, then complete the procedures listed below:
Step1Launch PowerPoint on your Windows computer and go to the slide of the presentation you want to zoom in or out on.
Step2To zoom in on a slide in PowerPoint, just hold the CTRL key on your keyboard while spinning your mouse wheel in an upwards direction.

Step3In a similar manner, to zoom out on your presentation, hold down the CTRL key on your computer while dragging the mouse wheel downward as seen below.

After that, you will be able to get the desired value to Zoom in or out on your PowerPoint presentation.
Conclusion
Are you prepared to use the new PowerPoint zoom feature in Microsoft Office to bring your presentation to life? To comprehend it, you must first view the aforementioned ways. A zoom bar or zoom slider may be used in Microsoft Office programs, such as PowerPoint, to rapidly and efficiently zoom in and out of documents. The zoom slider should look like the image on this page and is often in the bottom right corner of the program window. You will continue with the presentation when you have finished the zoom. This implies that you will be able to skip through undesired slides and material.
How often have you wished you could zoom in to more fully illustrate a point on a slide during a PowerPoint presentation? If you use PowerPoint for Windows and are a subscription to Microsoft 365, you have access to that function! There is a lot going on in some Microsoft PowerPoint presentations. It may include a lot of little details or significant information like PowerPoint slide zoom, and altering it would be impractical. If this occurs, you may make a zoom shape and utilize the expand animation to focus on the information you’re describing in more depth. By doing this, you can maintain the overall picture while concentrating on the key points of the talk.
You are giving a presentation at a meeting and have a number of possibilities. Zoom in PowerPoint Presentation enables you to create an introduction slide that includes thumbnails for the slides you wish to skip to in any order to discuss those choices throughout your meeting. It builds a navigable interactive dashboard for your presentation. When you leave the opening slide and go through all the slides in a part, you are immediately returned to the beginning. So where does PowerPoint’s magic reside? PowerPoint The most recent addition to the lengthy and ever-expanding list of new functions is Zoom. Zoom is incredible since it effectively turns a slide or many slides from your project into a changeable hotspot. A hotspot is a clickable item that connects to a certain area, in case you forgot. You will thus be directed to that slide if you choose it as a hotspot when you click on the item.
Part 1: 3 Techniques to Zoom PowerPoint Presentations
Microsoft is always developing new tools to help you create and construct amazing presentations. The PowerPoint Zoom function is one of them. It is not the straightforward zoom capability that has been a part of PowerPoint for a long time. Zoom in PowerPoint is a useful feature that enables you to go right to the information you want and promotes an interactive presentation that is seamless. You just need to be aware of three distinct sorts of Zooms to do it quickly and easily. They are described below:
1. Use the View tab Zoom command
PowerPoint’s Zoom feature is a clever tool for creating and watching presentations. When the text or item you wish to deal with is too tiny for you to view, the Zoom tool might be useful. On the screen, a slide will look bigger as you zoom in, and smaller when you zoom away. Choose the appropriate zoom level in the “Zoom” dialog box by typing a number into the “Percent:” spinner or selecting an option from the “Zoom to” section. Click the “OK” button to apply the chosen magnification level after setting it.
Step1Zoom in with the View Dialog Box
Additionally, you may access the Zoom dialog box and choose a different zoom level by clicking the Zoom button on the View tab of the ribbon. choose the Ribbon’s “View” tab. the “Zoom” button from the “Zoom” button group, and then.

Step2Click the Zoom Button
Zoom in by going to the View tab attributes. Select Zoom in from the View menu after clicking. There will be a Zoom window where you may choose or input the zoom level. More options for adjusting the zoom level are available under the Zoom group on the View tab of the ribbon.

Step3Click Fit to Window
Additionally, if you choose Fit, Presentation will resize the window to a proper size.

2. Use the Zoom Slider at The Bottom of the Screen
In PowerPoint, the Status Bar’s lower-right application window has the Zoom slider. This tool lets you adjust the slide’s magnification level. This just modifies your sense of how near or far away the slide looks onscreen; the slide itself is unaffected in any way.
Step1Click the Zoom In (+) button on the status bar
The horizontal scroll bar will then display underneath the slide if you zoom in on the slide until it can no longer fit horizontally on the screen. The slide may then be thoroughly examined at the selected magnification level by using it to scroll left and right.

Step2Click the Zoom Out (-) button on the status bar
Changing the magnification level is simple using PowerPoint’s Zoom slider. Click and move the slider left, toward the minus sign, to reduce the magnification level. To the left of the zoom slider is a percentage that represents the magnification level.
Step3Fit to the Window
Click the “Fit slide to current window” button to the right of the Zoom slider to force the slide to fit inside the view’s available slide area.

3. The Ctrl + Mouse Spin Wheel Shortcut
Ctrl + scroll wheel is a typical shortcut for zooming in Windows. Open the worksheet or presentation you wish to save with the desired zoom level, then complete the procedures listed below:
Step1Launch PowerPoint on your Windows computer and go to the slide of the presentation you want to zoom in or out on.
Step2To zoom in on a slide in PowerPoint, just hold the CTRL key on your keyboard while spinning your mouse wheel in an upwards direction.

Step3In a similar manner, to zoom out on your presentation, hold down the CTRL key on your computer while dragging the mouse wheel downward as seen below.

After that, you will be able to get the desired value to Zoom in or out on your PowerPoint presentation.
Conclusion
Are you prepared to use the new PowerPoint zoom feature in Microsoft Office to bring your presentation to life? To comprehend it, you must first view the aforementioned ways. A zoom bar or zoom slider may be used in Microsoft Office programs, such as PowerPoint, to rapidly and efficiently zoom in and out of documents. The zoom slider should look like the image on this page and is often in the bottom right corner of the program window. You will continue with the presentation when you have finished the zoom. This implies that you will be able to skip through undesired slides and material.
Also read:
- In 2024, AVI Video Format How to Open, Play, Edit AVI File?
- Try These 10 Music Video Templates To Make Your Work Easy for 2024
- How To Change Text In Premiere Pro
- 7 Solutions to Cut Video on Mac without Using FFmpeg, In 2024
- New 2024 Approved 4 Ways to Loop a Video on Vimeo
- Updated How To Create The Best AI Thumbnail Using The Right Tools?
- New Go Through This Guide on All Steps in Freezing Frame Sequences in Videos Using Filmora. Details Include Splitting the Clip, Reversing Speed, and More
- Updated In 2024, How Does the YouTube AI Algorithm Work - AI EXPLAINED
- In 2024, Montage Makes It Easy to Create and Share Videos. This Article Will Explain What It Can Do and Show You Examples of Movies that Use Montage
- New Gifs Can Convey Your Emotions in a Way that Words Cannot, so They Are Becoming a Popular Way to Express Yourself, and You Must Know How to Make a Gif and You Wont Believe that Its Not Difficult to Do
- In 2024, Have You Tried Creating an Engaging Video? Try Out Impressive AI Video Ideas that Give You a Clue on How to Create an Attention Catching Video. Here Is a Breakdown of What an AI Video Idea Generator Is and How to Utilize It Efficiently
- M31 LUT (Teal and Orange LUT) Free Download for 2024
- New How to Share YouTube Video on Zoom for 2024
- Updated Overview of Perfect Moody LUTs for VN Editor
- 2024 Approved 10 Top Free GIF Background Remover for PC and Online
- How to Create a Custom Sequence Preset in Premiere Pro
- Updated Discover the Ultimate LUTs for Wondershare Filmora Uncover the Answer
- How to Speed Up Video with Canva Online Tool for 2024
- In 2024, 7 Ways Add Subtitles to MKV Videos on All Platforms
- 5 Excellent Tools To Convert Video to 60 FPS for 2024
- Updated How to Trim Video in Quicktime Player on Mac
- New Create Kinetice Typography Text Effect in Filmora for 2024
- In 2024, 15 Best Free Cinematic LUTs for Your Film
- New How to Use Blender Green Screen
- Updated 2024 Approved Top LUTs for Sony HLG to Download
- In 2024, Are You Looking for an Ideal Halloween Countdown Video Clip for Your Video? This Article Will Walk You Through the Best Ones You Can Use to Get the Job Done Perfectly
- Updated Top 10 Text to Robot Voice Generators Windows, Mac, Android, iPhone
- New In 2024, How to Create An Eye-Catching Intro Videos with InVideo
- Updated Quickly Turn Any Video Into a Paper Rip Effect
- Easy Ways to Make Procreate GIFs
- Updated How to Create Your Own LOL Montage Video
- 2024 Approved Want to Learn How to Add VHS Green Screen to Your Videos? This Guide Will Cover All the Details You Need to Know to Add This Effect to Your Videos and Make Them Stand Out
- Updated In 2024, Detailed Steps to Add Border to Video Using Premiere Pro
- How to Upload Videos to Twitch? Heres a Guide for Beginner for 2024
- New In 2024, How to Share YouTube Video on Zoom?
- In 2024, Guide To Scaling and Setting Videos in Filmora | Tutorial
- Updated 4 Methods to Merge MP4 and MP3
- Updated How to Create an Instant Slideshow on Mac
- Updated Best Youtube Video Meme Maker
- Updated 5 Excellent Tools To Convert Video to 60 FPS for 2024
- New In 2024, Level Up Videos By Applying Keyframe Like A Pro
- Updated 2024 Approved Customize PowerPoint Slideshow Icon in Simple Ways
- In 2024, Planning to Use a Pokemon Go Joystick on Honor Magic Vs 2? | Dr.fone
- Unlock Your Device iCloud DNS Bypass Explained and Tested, Plus Easy Alternatives On iPhone 13 Pro Max
- In 2024, What Pokémon Evolve with A Dawn Stone For Honor X50i+? | Dr.fone
- In 2024, How to Change Your Apple iPhone 12 Pro Location on life360 Without Anyone Knowing? | Dr.fone
- 3 Easy Solutions to Hard Reset Xiaomi Redmi 13C 5G | Dr.fone
- 3 Effective Ways to Bypass Activation Lock on Apple iPhone 14 Pro Max
- Why Your Vivo X90S Screen Might be Unresponsive and How to Fix It | Dr.fone
- Latest way to get Shiny Meltan Box in Pokémon Go Mystery Box On Vivo V29 Pro | Dr.fone
- In 2024, Learn How To Lock Stolen Your Apple iPhone SE Properly
- Methods to Change GPS Location On OnePlus Open | Dr.fone
- In 2024, How to Use Pokémon Emerald Master Ball Cheat On Samsung Galaxy XCover 6 Pro Tactical Edition | Dr.fone
- In 2024, What Pokémon Evolve with A Dawn Stone For Tecno Spark 20C? | Dr.fone
- A Step-by-Step Guide to Finding Your Apple ID From Your iPhone 15
- Where Is the Best Place to Catch Dratini On Tecno Camon 20 | Dr.fone
- How to get the dragon scale and evolution-enabled pokemon On Realme Narzo 60 5G? | Dr.fone
- How to rescue lost call logs from Motorola Moto G Stylus (2023)
- In 2024, Best 3 Nokia G22 Emulator for Mac to Run Your Wanted Android Apps | Dr.fone
- Latest Guide How To Bypass Xiaomi Redmi 13C 5G FRP Without Computer
- Full Guide on Mirroring Your Honor X9b to Your PC/Mac | Dr.fone
- Title: In 2024, How to Get VHS Filter and Glitch Filter to Your Images or Videos?
- Author: Chloe
- Created at : 2024-05-20 03:38:09
- Updated at : 2024-05-21 03:38:09
- Link: https://ai-editing-video.techidaily.com/in-2024-how-to-get-vhs-filter-and-glitch-filter-to-your-images-or-videos/
- License: This work is licensed under CC BY-NC-SA 4.0.

