:max_bytes(150000):strip_icc():format(webp)/camera-56e0976d3df78c5ba0566b37.jpg)
In 2024, How to Loop Videos with iMovie

How to Loop Videos with iMovie
If you are a video creator, there are times when you have to loop a video. This is to extend the duration of the original video. For instance, you have a stock video of a short duration. You want it to be the background in your video throughout. You have to extend the duration of the stock video by playing it in a loop.
If you are a macOS user, you can use iMovie to loop your video. iMovie comes pre-install on macOS devices. iMovie happens to be one of the most preferred video editors among beginners. In fact, iMovie comes pre-installed on iPhones and iPads. You can easily loop your video on your mobile devices as well. We will illustrate how to loop a video on iMovie on iPhone as well as on Mac.
Part 1. How to loop a video on iMovie iPhone
iMovie by Apple comes pre-installed on iPhone and iPad. Naturally, it is one of the most widely used video editors by iPhone users. iMovie app has options for basic and even advanced levels of video editing. Looping a video on iMovie involves a few simple steps that everyone can perform easily. Here are the steps on how to loop a video in the iMovie app on your iPhone.
Step1 Launch the iMovie app on your iPhone. If you have uninstalled or disabled the app, you can always go to App Store to install it again.

Step2 If you are opening the app for the first time, you will get a welcome screen. Follow the on-screen instructions to land on the home screen of the app.
Step3 Tap on New Project “+” icon and select the Movie option to get started. This will take you to the phone media gallery to select a media file to get started.

Step4 You should tap on the Video option and select the video that you want to put into a loop. After selecting a video, tap on Create Movie option.

Step5 Tap on the video on the timeline to select the video and tap on the Duplicate option. You will see that the duration of the video has doubled. You can tap on Duplicate as many times as you want to increase the video duration.

Step6 Once you are done with the iMovie loop, tap on the Done option located in the top-left corner. Thereafter, tap on the Share icon at the bottom.

Step7 You will get a pop-up where you have to tap on the Save Video option. The edited video will be saved on your iPhone. You can open the new video from the Photos app.

Part 2. Loop Videos on Mac with iMovie
Editing a video on a Mac is always more comfortable than on an iPhone because of the larger screen. iMovie from Apple comes pre-installed on Mac as well, and hence, you can get started right away. It is completely free to use, and hence, you do not need to install any third-party video editor. Here are the steps on how to loop an iMovie video in simple steps.
Step1 Open the iMovie app from the Applications folder.
Step2 Click on Create New option and then click on the Movie option.

Step3 Bring in the required video under Movie Library by dragging the file from Finder on your Mac. You can also go to File> Import Media option and select the required video. You can also select the required media file from Events or Photos under the Libraries section.

Step4 Drag and drop the video on your timeline. When you want to loop the video, drag and drop the video clip again on the timeline. Make sure there is no gap between the first clip and the second clip on the timeline. You can drag and drop the video clip multiple times on the timeline to increase its duration.

Step5 Once you are done, go to File> Share> File option. Choose the destination to save the edited video.

Part 3. iMovie Alternative to Loop Videos on Mac
If you are looking for an iMovie alternative to perform iMovie loop video action easily, we recommend Wondershare Filmora . Filmora is available for both Mac and Windows. Filmora is a better video editor than iMovie. It is a premium video editor and it has more features and functionalities.
You can loop any video as many times as you want instantly. Besides, you can edit your video clip as per your requirements before looping the edited video. The user interface is highly intuitive for everyone. Hence, it has huge popularity among Mac users. You can also save the looped video in different file formats. Here are the steps to loop a video on Filmora.
Free Download For Win 7 or later(64-bit)
Free Download For macOS 10.14 or later
Step1 Download and install Wondershare Filmora. Launch Filmora and click on New Project on the welcome screen.

Step2 Drag and drop the video file from Finder on Mac to the Project Media folder on Filmora. Thereafter, drop the video file into the timeline.

Step3 Drag and drop the video clip into the timeline again. Make sure that there is no gap between the clips. Besides, make sure that they are on the same channel for looping. You can drag and drop the video into the timeline multiple times.

Step4 You can zoom out the timeline for better viewing. Play the video to check its output on Viewer. Finally, click on the Export button and save the video in the desired file format on your Mac.
The Bottom Line
If you want to loop a video on your Mac, iMovie is the most preferred option. The same is applicable to iPhone users as well. iMovie comes pre-installed, and it is completely free to use. That is why you can loop any video instantly. Wondershare Filmora is the best alternative to iMovie to edit and loop your video.
Free Download For macOS 10.14 or later
Step1 Download and install Wondershare Filmora. Launch Filmora and click on New Project on the welcome screen.

Step2 Drag and drop the video file from Finder on Mac to the Project Media folder on Filmora. Thereafter, drop the video file into the timeline.

Step3 Drag and drop the video clip into the timeline again. Make sure that there is no gap between the clips. Besides, make sure that they are on the same channel for looping. You can drag and drop the video into the timeline multiple times.

Step4 You can zoom out the timeline for better viewing. Play the video to check its output on Viewer. Finally, click on the Export button and save the video in the desired file format on your Mac.
The Bottom Line
If you want to loop a video on your Mac, iMovie is the most preferred option. The same is applicable to iPhone users as well. iMovie comes pre-installed, and it is completely free to use. That is why you can loop any video instantly. Wondershare Filmora is the best alternative to iMovie to edit and loop your video.
Best 10 Mind-Blowing Video Collage Maker for PC
10 Mind-Blowing Video Collage Maker for PC
An easy yet powerful editor
Numerous effects to choose from
Detailed tutorials provided by the official channel
Video collages are a great way to play multiple short videos at the same time. These collages can be used for different purposes and platforms like social media platforms, online video sharing sites, brand promotion, announcing an event or a service, and similar others.
Whatever may be the situation, you would need a good and feature-packed tool for creating such a collage so that videos look perfect in a frame, background audio can be added, and other customizations can be done. Keep reading below to learn about the best video collage maker for PC.
In this article
01 [Top 10 Video Collage Makers for Pc](#Part 1)
02 [Alternatives to Video Collage Maker for Pc](#Part 2)
Part 1 Top 10 video collage makers for PC
Among the long list of tools available, below we have shortlisted the top 10 PC tools that can be used for creating a video collage.
01**Wondershare Filmora Video Editor **
This Windows and Mac-based software is the best choice when it comes to creating a simple video collage in an effortless manner.
Key features
● Create a video collage using the split-screen feature of the software.
● Excellent video editing tool supporting advanced features for creating professional-looking videos.
● Support customizable animation options along with precise editing functions.
● Support to multiple audio-related features like automatic audio sync, audio compression, audio transitions, and more.
● Offers of stock collection of images, and other media files.
● Windows and Mac support.
For Win 7 or later (64-bit)
For macOS 10.12 or later
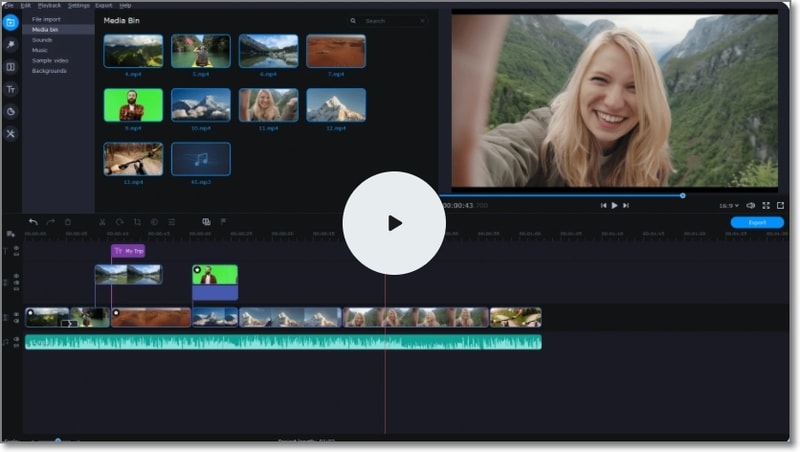
04Movavi Video Editor Plus
Unleash your creativity and make stunning videos including video collages using this excellent software.
Key features:
● Create stunning video collages with multiple video customization options.
● Allows adding titles, transitions, stickers, and filters.
● Option to apply chroma-key for changing the background.
● Option for creating automatic video collages.
● User-friendly interface.
● Windows and Mac support.
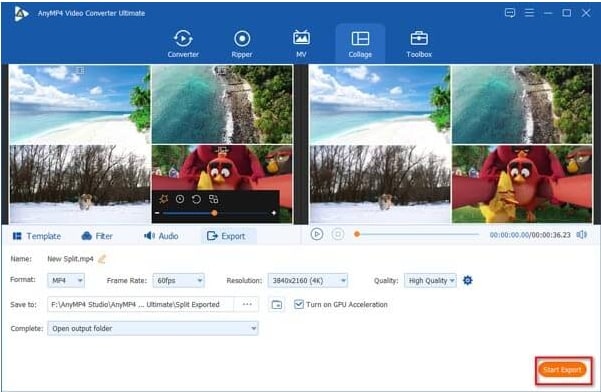
05Aiseesoft Video Converter Ultimate
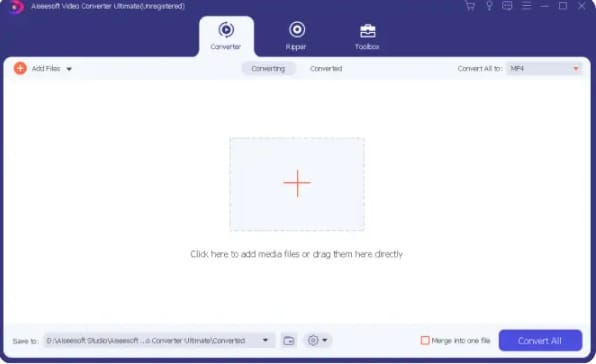
Though the name suggests the software to be a video conversion tool, it is a multi-tasking software that can perform a variety of functions including video collage making and thus can be considered as a decent video collage app for PC.
Key features
● A feature-rich program that can also be used for creating a video collage.
● Allows performing a variety of features like video conversion, editing, compression, and more.
● Option for editing the video effects and also editing ID3 info.
● Create interesting GIF animations.
● Simple and easy-to-understand layout.
● Windows and Mac support.
06Cidade Video Collage Studio
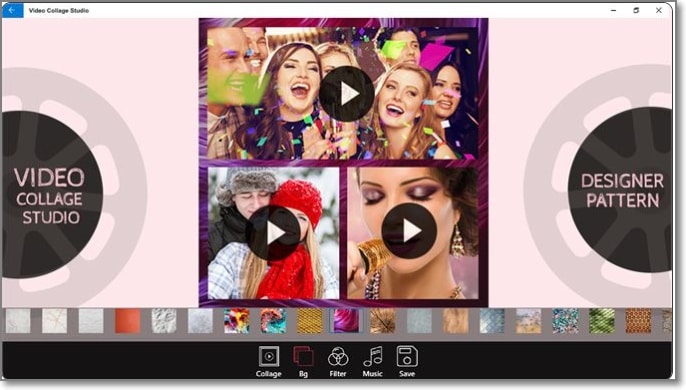
Using this intuitive tool, you can quickly create a video collage by combining all your favorite videos in one place.
Key features
● Create a video collage by combining multiple videos or creating a video grid.
● Intuitive and user-friendly interface.
● Multiple-grid options to choose from.
● Allows applying effects like Sepia, Lomo, and others.
● Background audio or music files can be added.
● Option to change the background color and also preview the video.
07Blu-ray Master Video Converter Ultimate
This is a video toolbox supporting multiple functions that also include creating a video collage.
Key feature
● Create a video collage using high-quality videos.
● Support customizing and editing videos using several built-in tools.
● Video conversion to over 500 formats supported.
● Multiple layouts and templates for video collage are available.
● Almost all video, image, and audio formats are supported.
08Adobe Premiere Elements
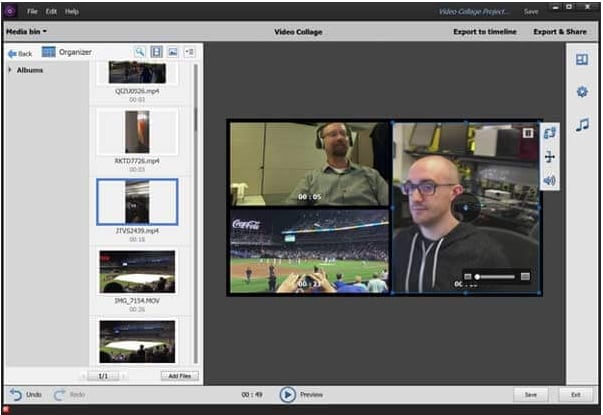
If you are looking for an advanced and professional tool for creating a video collage and for other video editing needs, this is the right choice.
Key features:
● Create professional-looking collages using high-quality video files.
● The interface is clean with support for advanced functions.
● Option for adding multiple video effects.
● Comes with help documents and guides to help you with the software functions.
● Windows and Mac support.
09Collage Maker
For creating a simple video collage on your Windows system this is a good tool to consider.
Key features
● Simple and basic collage-making tool.
● Comes with customizable and adjustable layout options.
● Option to add stickers ad text to the collage.
● Allows mixing videos, and images along with the music file.

1010. iMovie
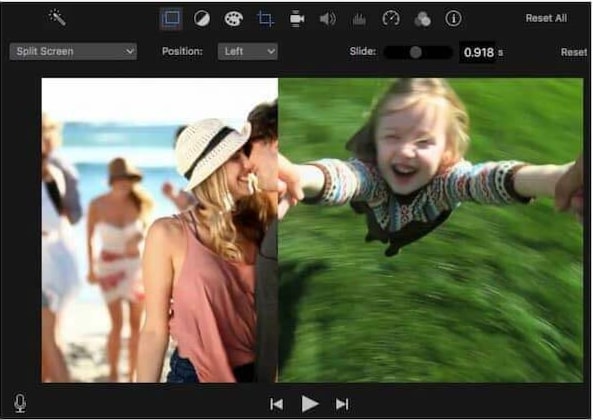
For Mac users, iMovie is the default video editing tool that is pre-installed on the system. Besides editing functions, the tool can also perform other tasks like creating a video collage.
Key features:
● Allows to quickly create a video collage.
● Intuitive interface.
● Comes pre-installed with Mac systems.
● Transitions and other effects can be added.
Part 2 Alternatives to video collage maker for PC
If you do not want to download any additional software on your PC for creating a video collage, there are alternatives available in form of online tools and phone-based apps. The online tools are free and simple to use supporting all basic and needed functions. Some of the popular names in the category include FastReels, Typito, Kapwing, and more.
Apps are a great option when you want to create a collage on your mobile phone. Multiple apps for the task are available on the Google play store and Apple Store. Some of the widely used ones are PicStich, PicPlayPost Movie Video Editor, Mojo, and others.
● Ending Thoughts →
● Video collages are an interesting way to combine and play short multiple videos or play them in a grid.
● There are several PC-based video collage maker tools available like Wondershare Filmora, and others.
● As alternatives, you can use online tools or phone-based apps for creating a video collage.
Video collages are a great way to play multiple short videos at the same time. These collages can be used for different purposes and platforms like social media platforms, online video sharing sites, brand promotion, announcing an event or a service, and similar others.

Whatever may be the situation, you would need a good and feature-packed tool for creating such a collage so that videos look perfect in a frame, background audio can be added, and other customizations can be done. Keep reading below to learn about the best video collage maker for PC.
In this article
01 [Top 10 Video Collage Makers for Pc](#Part 1)
02 [Alternatives to Video Collage Maker for Pc](#Part 2)
Part 1 Top 10 video collage makers for PC
Among the long list of tools available, below we have shortlisted the top 10 PC tools that can be used for creating a video collage.
01**Wondershare Filmora Video Editor **
This Windows and Mac-based software is the best choice when it comes to creating a simple video collage in an effortless manner.
Key features
● Create a video collage using the split-screen feature of the software.
● Excellent video editing tool supporting advanced features for creating professional-looking videos.
● Support customizable animation options along with precise editing functions.
● Support to multiple audio-related features like automatic audio sync, audio compression, audio transitions, and more.
● Offers of stock collection of images, and other media files.
● Windows and Mac support.
For Win 7 or later (64-bit)
For macOS 10.12 or later
04Movavi Video Editor Plus
Unleash your creativity and make stunning videos including video collages using this excellent software.
Key features:
● Create stunning video collages with multiple video customization options.
● Allows adding titles, transitions, stickers, and filters.
● Option to apply chroma-key for changing the background.
● Option for creating automatic video collages.
● User-friendly interface.
● Windows and Mac support.

05Aiseesoft Video Converter Ultimate
Though the name suggests the software to be a video conversion tool, it is a multi-tasking software that can perform a variety of functions including video collage making and thus can be considered as a decent video collage app for PC.
Key features
● A feature-rich program that can also be used for creating a video collage.
● Allows performing a variety of features like video conversion, editing, compression, and more.
● Option for editing the video effects and also editing ID3 info.
● Create interesting GIF animations.
● Simple and easy-to-understand layout.
● Windows and Mac support.

06Cidade Video Collage Studio
Using this intuitive tool, you can quickly create a video collage by combining all your favorite videos in one place.
Key features
● Create a video collage by combining multiple videos or creating a video grid.
● Intuitive and user-friendly interface.
● Multiple-grid options to choose from.
● Allows applying effects like Sepia, Lomo, and others.
● Background audio or music files can be added.
● Option to change the background color and also preview the video.

07Blu-ray Master Video Converter Ultimate
This is a video toolbox supporting multiple functions that also include creating a video collage.
Key feature
● Create a video collage using high-quality videos.
● Support customizing and editing videos using several built-in tools.
● Video conversion to over 500 formats supported.
● Multiple layouts and templates for video collage are available.
● Almost all video, image, and audio formats are supported.

08Adobe Premiere Elements
If you are looking for an advanced and professional tool for creating a video collage and for other video editing needs, this is the right choice.
Key features:
● Create professional-looking collages using high-quality video files.
● The interface is clean with support for advanced functions.
● Option for adding multiple video effects.
● Comes with help documents and guides to help you with the software functions.
● Windows and Mac support.

09Collage Maker
For creating a simple video collage on your Windows system this is a good tool to consider.
Key features
● Simple and basic collage-making tool.
● Comes with customizable and adjustable layout options.
● Option to add stickers ad text to the collage.
● Allows mixing videos, and images along with the music file.

1010. iMovie
For Mac users, iMovie is the default video editing tool that is pre-installed on the system. Besides editing functions, the tool can also perform other tasks like creating a video collage.
Key features:
● Allows to quickly create a video collage.
● Intuitive interface.
● Comes pre-installed with Mac systems.
● Transitions and other effects can be added.

Part 2 Alternatives to video collage maker for PC
If you do not want to download any additional software on your PC for creating a video collage, there are alternatives available in form of online tools and phone-based apps. The online tools are free and simple to use supporting all basic and needed functions. Some of the popular names in the category include FastReels, Typito, Kapwing, and more.
Apps are a great option when you want to create a collage on your mobile phone. Multiple apps for the task are available on the Google play store and Apple Store. Some of the widely used ones are PicStich, PicPlayPost Movie Video Editor, Mojo, and others.
● Ending Thoughts →
● Video collages are an interesting way to combine and play short multiple videos or play them in a grid.
● There are several PC-based video collage maker tools available like Wondershare Filmora, and others.
● As alternatives, you can use online tools or phone-based apps for creating a video collage.
Video collages are a great way to play multiple short videos at the same time. These collages can be used for different purposes and platforms like social media platforms, online video sharing sites, brand promotion, announcing an event or a service, and similar others.

Whatever may be the situation, you would need a good and feature-packed tool for creating such a collage so that videos look perfect in a frame, background audio can be added, and other customizations can be done. Keep reading below to learn about the best video collage maker for PC.
In this article
01 [Top 10 Video Collage Makers for Pc](#Part 1)
02 [Alternatives to Video Collage Maker for Pc](#Part 2)
Part 1 Top 10 video collage makers for PC
Among the long list of tools available, below we have shortlisted the top 10 PC tools that can be used for creating a video collage.
01**Wondershare Filmora Video Editor **
This Windows and Mac-based software is the best choice when it comes to creating a simple video collage in an effortless manner.
Key features
● Create a video collage using the split-screen feature of the software.
● Excellent video editing tool supporting advanced features for creating professional-looking videos.
● Support customizable animation options along with precise editing functions.
● Support to multiple audio-related features like automatic audio sync, audio compression, audio transitions, and more.
● Offers of stock collection of images, and other media files.
● Windows and Mac support.
For Win 7 or later (64-bit)
For macOS 10.12 or later
04Movavi Video Editor Plus
Unleash your creativity and make stunning videos including video collages using this excellent software.
Key features:
● Create stunning video collages with multiple video customization options.
● Allows adding titles, transitions, stickers, and filters.
● Option to apply chroma-key for changing the background.
● Option for creating automatic video collages.
● User-friendly interface.
● Windows and Mac support.

05Aiseesoft Video Converter Ultimate
Though the name suggests the software to be a video conversion tool, it is a multi-tasking software that can perform a variety of functions including video collage making and thus can be considered as a decent video collage app for PC.
Key features
● A feature-rich program that can also be used for creating a video collage.
● Allows performing a variety of features like video conversion, editing, compression, and more.
● Option for editing the video effects and also editing ID3 info.
● Create interesting GIF animations.
● Simple and easy-to-understand layout.
● Windows and Mac support.

06Cidade Video Collage Studio
Using this intuitive tool, you can quickly create a video collage by combining all your favorite videos in one place.
Key features
● Create a video collage by combining multiple videos or creating a video grid.
● Intuitive and user-friendly interface.
● Multiple-grid options to choose from.
● Allows applying effects like Sepia, Lomo, and others.
● Background audio or music files can be added.
● Option to change the background color and also preview the video.

07Blu-ray Master Video Converter Ultimate
This is a video toolbox supporting multiple functions that also include creating a video collage.
Key feature
● Create a video collage using high-quality videos.
● Support customizing and editing videos using several built-in tools.
● Video conversion to over 500 formats supported.
● Multiple layouts and templates for video collage are available.
● Almost all video, image, and audio formats are supported.

08Adobe Premiere Elements
If you are looking for an advanced and professional tool for creating a video collage and for other video editing needs, this is the right choice.
Key features:
● Create professional-looking collages using high-quality video files.
● The interface is clean with support for advanced functions.
● Option for adding multiple video effects.
● Comes with help documents and guides to help you with the software functions.
● Windows and Mac support.

09Collage Maker
For creating a simple video collage on your Windows system this is a good tool to consider.
Key features
● Simple and basic collage-making tool.
● Comes with customizable and adjustable layout options.
● Option to add stickers ad text to the collage.
● Allows mixing videos, and images along with the music file.

1010. iMovie
For Mac users, iMovie is the default video editing tool that is pre-installed on the system. Besides editing functions, the tool can also perform other tasks like creating a video collage.
Key features:
● Allows to quickly create a video collage.
● Intuitive interface.
● Comes pre-installed with Mac systems.
● Transitions and other effects can be added.

Part 2 Alternatives to video collage maker for PC
If you do not want to download any additional software on your PC for creating a video collage, there are alternatives available in form of online tools and phone-based apps. The online tools are free and simple to use supporting all basic and needed functions. Some of the popular names in the category include FastReels, Typito, Kapwing, and more.
Apps are a great option when you want to create a collage on your mobile phone. Multiple apps for the task are available on the Google play store and Apple Store. Some of the widely used ones are PicStich, PicPlayPost Movie Video Editor, Mojo, and others.
● Ending Thoughts →
● Video collages are an interesting way to combine and play short multiple videos or play them in a grid.
● There are several PC-based video collage maker tools available like Wondershare Filmora, and others.
● As alternatives, you can use online tools or phone-based apps for creating a video collage.
Video collages are a great way to play multiple short videos at the same time. These collages can be used for different purposes and platforms like social media platforms, online video sharing sites, brand promotion, announcing an event or a service, and similar others.

Whatever may be the situation, you would need a good and feature-packed tool for creating such a collage so that videos look perfect in a frame, background audio can be added, and other customizations can be done. Keep reading below to learn about the best video collage maker for PC.
In this article
01 [Top 10 Video Collage Makers for Pc](#Part 1)
02 [Alternatives to Video Collage Maker for Pc](#Part 2)
Part 1 Top 10 video collage makers for PC
Among the long list of tools available, below we have shortlisted the top 10 PC tools that can be used for creating a video collage.
01**Wondershare Filmora Video Editor **
This Windows and Mac-based software is the best choice when it comes to creating a simple video collage in an effortless manner.
Key features
● Create a video collage using the split-screen feature of the software.
● Excellent video editing tool supporting advanced features for creating professional-looking videos.
● Support customizable animation options along with precise editing functions.
● Support to multiple audio-related features like automatic audio sync, audio compression, audio transitions, and more.
● Offers of stock collection of images, and other media files.
● Windows and Mac support.
For Win 7 or later (64-bit)
For macOS 10.12 or later
04Movavi Video Editor Plus
Unleash your creativity and make stunning videos including video collages using this excellent software.
Key features:
● Create stunning video collages with multiple video customization options.
● Allows adding titles, transitions, stickers, and filters.
● Option to apply chroma-key for changing the background.
● Option for creating automatic video collages.
● User-friendly interface.
● Windows and Mac support.

05Aiseesoft Video Converter Ultimate
Though the name suggests the software to be a video conversion tool, it is a multi-tasking software that can perform a variety of functions including video collage making and thus can be considered as a decent video collage app for PC.
Key features
● A feature-rich program that can also be used for creating a video collage.
● Allows performing a variety of features like video conversion, editing, compression, and more.
● Option for editing the video effects and also editing ID3 info.
● Create interesting GIF animations.
● Simple and easy-to-understand layout.
● Windows and Mac support.

06Cidade Video Collage Studio
Using this intuitive tool, you can quickly create a video collage by combining all your favorite videos in one place.
Key features
● Create a video collage by combining multiple videos or creating a video grid.
● Intuitive and user-friendly interface.
● Multiple-grid options to choose from.
● Allows applying effects like Sepia, Lomo, and others.
● Background audio or music files can be added.
● Option to change the background color and also preview the video.

07Blu-ray Master Video Converter Ultimate
This is a video toolbox supporting multiple functions that also include creating a video collage.
Key feature
● Create a video collage using high-quality videos.
● Support customizing and editing videos using several built-in tools.
● Video conversion to over 500 formats supported.
● Multiple layouts and templates for video collage are available.
● Almost all video, image, and audio formats are supported.

08Adobe Premiere Elements
If you are looking for an advanced and professional tool for creating a video collage and for other video editing needs, this is the right choice.
Key features:
● Create professional-looking collages using high-quality video files.
● The interface is clean with support for advanced functions.
● Option for adding multiple video effects.
● Comes with help documents and guides to help you with the software functions.
● Windows and Mac support.

09Collage Maker
For creating a simple video collage on your Windows system this is a good tool to consider.
Key features
● Simple and basic collage-making tool.
● Comes with customizable and adjustable layout options.
● Option to add stickers ad text to the collage.
● Allows mixing videos, and images along with the music file.

1010. iMovie
For Mac users, iMovie is the default video editing tool that is pre-installed on the system. Besides editing functions, the tool can also perform other tasks like creating a video collage.
Key features:
● Allows to quickly create a video collage.
● Intuitive interface.
● Comes pre-installed with Mac systems.
● Transitions and other effects can be added.

Part 2 Alternatives to video collage maker for PC
If you do not want to download any additional software on your PC for creating a video collage, there are alternatives available in form of online tools and phone-based apps. The online tools are free and simple to use supporting all basic and needed functions. Some of the popular names in the category include FastReels, Typito, Kapwing, and more.
Apps are a great option when you want to create a collage on your mobile phone. Multiple apps for the task are available on the Google play store and Apple Store. Some of the widely used ones are PicStich, PicPlayPost Movie Video Editor, Mojo, and others.
● Ending Thoughts →
● Video collages are an interesting way to combine and play short multiple videos or play them in a grid.
● There are several PC-based video collage maker tools available like Wondershare Filmora, and others.
● As alternatives, you can use online tools or phone-based apps for creating a video collage.
Little Tricks to Create Canva Slideshow No One Is Telling You
Little Tricks to Create Canva Slideshow No One is Telling You
An easy yet powerful editor
Numerous effects to choose from
Detailed tutorials provided by the official channel
You can make slideshows in innumerable ways. And we all are aware of how important it is to present slideshows, no matter what our profession or purpose is. And one of the ways of making slideshows is by using the canvas slideshow.
You can make the best type of slideshows on any device you prefer with Canva. So, in the following discussion, we will be talking about how you can make a slideshow on a PC or Mac with Canvas. Then, we will point out the steps for adding music to your slideshow in Canva. We will also mention how you can turn a slideshow into a video with Canva.
Lastly, we will discuss the answers and solutions to some common questions regarding converting slides to digital, following with the discussion of the best video editing tool for slideshow videos. So, without o further ado, let us get started with our discussion.
In this article
01 [How to Make a Slideshow on a PC or Mac with Canva?](#Part 1)
02 [How to Add Music to Your Slideshow in This Canva?](#Part 2)
03 [How to Turn Your Slideshows into Videos with Canva?](#Part 3)
04 [FAQ of Converting Slides to Digital](#Part 4)
Part 1 How to Make a Slideshow on a PC or Mac with Canva?
You can make the best Canva slide show in just five simple steps. You can choose any device for making a slideshow with canva. The best choice is to use a PC or Mac to get the entire display, thereby helping you make better edits, changes and integrations in your slideshows.
So, let us start the discussion with the five simple steps for making a slideshow on PC or Mac with Canva. The steps are as follows.
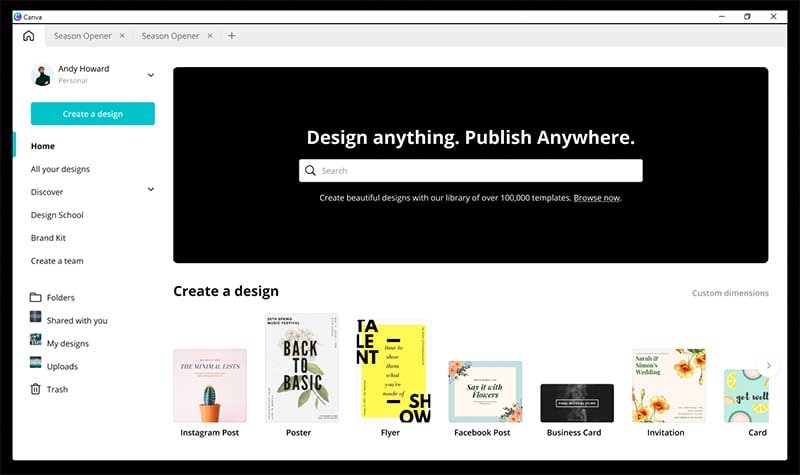
● Step 1: Launch the application
The first step is to download, launch and install the application of Canva on your preferred device, that is, either your PC or your Mac. The application is available for free, and you need not pay any charges for downloading and installing Canva on your Mac or PC.
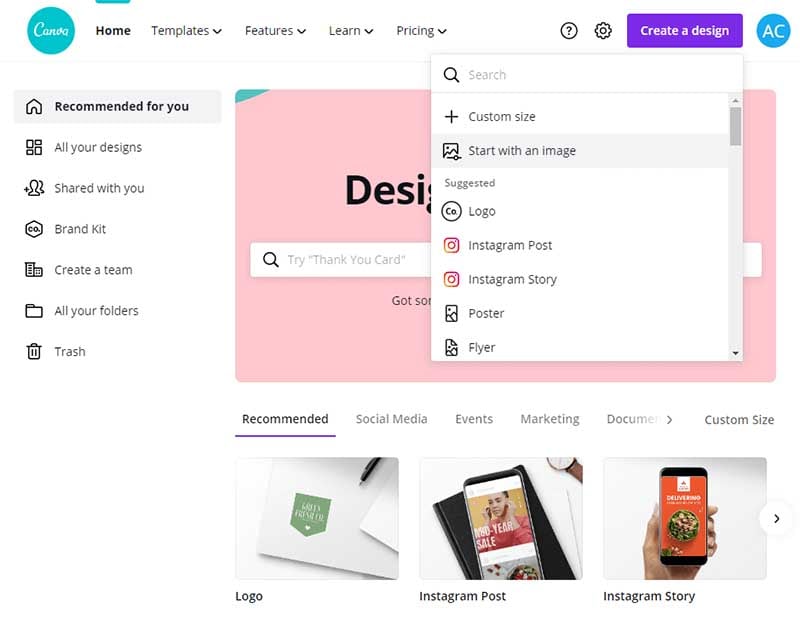
● Step 2: Choose the template
The next step is to choose the template you want for your sideshow. Choose from among the many canva slideshow templates that are available.

● Step 3: Make the required edits with the features of Canva.
There are numerous features available at Canva. Use them to make the necessary edits and integrations in your slideshow. Use the different features and make your slideshow the way you want. You can add images, texts and designs to your slideshow at Canva.
● Step 4: Customize accordingly
You can add your images and change the templates and designs at Canva. It helps in bringing more uniqueness, creativity and originality, as you can integrate your imagination, skills and creativity in the slideshow you are making at Canva.
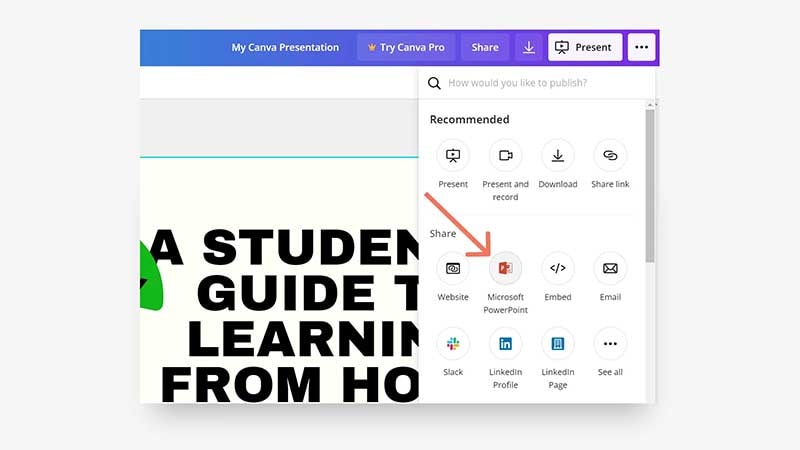
● Step 5: Save your work and export
All the hard work is finfish by now. Now you have to have the slideshow that you have made so far. And then, share it in whichever file format you prefer on any social media platform or other places you want.
Part 2 How to Add Music to Your Slideshow in This Canva?
You can customize your slideshow at Canva in numerous ways. And one of the ways is by adding music to your slideshow in Canva. A slideshow in canva can have music in it, which can be any music. You can record yourself or even integrate any readymade music file.
You need only a single step to add music to your slideshow at Canva. The steps for making the slideshow remain the same, and you can refer to the steps mentioned above for reference. In the above steps, pause at Step 3.
You can add the required music file or media file at that step. In the next step, that is, in Step 4, you can customize that media file. You can integrate any audio file that you record for your slideshow.

Part 3 How to Turn Your Slideshows into Videos with Canva?
We have discussed the steps for making canva photo slideshow. The steps are simple to perform and easy to follow. But what if you need or want to turn that slideshow into a video? You definitely can do so! The steps for this, too, are straightforward and effortless.
So, now we will discuss the steps for turning slideshows at Canva into videos. There are four simple steps for this, and they are as follows.
● Step 1: Choose your preferred presentation type
By this, we mean that you must decide the size of your presentation. It is better to determine the type of presentation, for it helps in better and faster making of your presentation.
● Step 2: Integrate all the components you want in your presentation
Then, integrate all the images, soundtracks, texts, designs and templates and all the other necessary components you want to be present in your presentation. You can use numerous features in your presentation at Canva.
● Step 3: Customize the presentation based on your choice and needs
You can change the components of your presentation according to your needs and choice, and you can bring about as much customization as you want. So, customize according to and as much you want.
● Step 4: Download and share
Lastly, save the presentation. Then go to the blue bar, and in the options present in the top right corner, you will find “presenting”. You can save your file from there, and then the “Download” option will help you download the file to your device.
Part 4 FAQ of Converting Slides to Digital
Now, we will discuss solutions or answers to the common questions relating to converting slides into digital format. Here are the frequently asked issues or questions regarding this aspect.
01How do I convert my slides to digital?
We can recommend a few ways in which you can digitise your old slides. The methods are as follows.
● Hiring a proficient professional at this work is the easiest and the most effective method.
● A slide copier tool or application can also effectively serve this purpose.
● Use a device that converts the images or slides digitally.
● Use a flatbed scanner to scan your slides.
● Photographing your slides is an intelligent way to digitise your old slides.
02Can I use Filmora to turn my slides to digital?
You can readily use Filmora to transform your slideshows into slideshow videos, digitising your slides effectively. You have to make your slideshow at Filmora, edit and customise it according to your preference and then save, share or download the file. It will automatically turn your slide into digital format or help you make a successful slideshow video.
03What is the best method for turning slides into digital?
The most effortless method is to hire a professional, and it will guarantee saucerful results. But, if you want to do it yourself, you can readily opt for Filmora. It is the best video editing application that can readily help you digitise your slides.
04Can I turn my slideshow into videos?
Yes, you can effortlessly turn your slideshows into videos. You need a video editing tool that enables you to share and download your slideshow in a video format. And the best tool for it is Filmora. You can unhesitant opt for Filmora if you want to turn your slideshows into videos and share them effortlessly on any platform.
Now, we will discuss the best video editing tool or application, Wondershare Filmora Video Editor . You can use this tool to make the best slideshows and convert them into videos. You have the liberty f using any device for editing and making slideshow videos. You can customise as much you want and use the tons of features for editing available in the tool.
For Win 7 or later (64-bit)
For macOS 10.12 or later
You can opt for the free version. It has tools and features that are more than sufficient for making the most incredible slideshow videos. And when you choose its paid version, you are bestowed with the most advanced professional tools and features for editing. You can use the 800+ filters available, the texts, designs, templates, and other components for editing at Filmora.
So, if you want to make the best and the most incredible slideshows videos, you can readily opt for Filmora!
● Ending Thoughts →
● So, this was all about the different aspects and factors of a slideshow at Canva. Let us have a quick recap of the topic and discussions we have touched on in the above discussion.
● The five steps for making A slideshow in canva on your PC or Mac.
● The steps for adding music to your slideshow at Canva, also, how can you turn your slideshows into videos in Canva in four simple steps
● Lastly, we have discussed the answers or solutions to the common questions relating to converting slides to digital. And we have ended our discussion by introducing the best video editing tool, Filmora, that can help you make the most fantastic slideshows on any device, be it a PC or Mac.
You can make slideshows in innumerable ways. And we all are aware of how important it is to present slideshows, no matter what our profession or purpose is. And one of the ways of making slideshows is by using the canvas slideshow.
You can make the best type of slideshows on any device you prefer with Canva. So, in the following discussion, we will be talking about how you can make a slideshow on a PC or Mac with Canvas. Then, we will point out the steps for adding music to your slideshow in Canva. We will also mention how you can turn a slideshow into a video with Canva.
Lastly, we will discuss the answers and solutions to some common questions regarding converting slides to digital, following with the discussion of the best video editing tool for slideshow videos. So, without o further ado, let us get started with our discussion.
In this article
01 [How to Make a Slideshow on a PC or Mac with Canva?](#Part 1)
02 [How to Add Music to Your Slideshow in This Canva?](#Part 2)
03 [How to Turn Your Slideshows into Videos with Canva?](#Part 3)
04 [FAQ of Converting Slides to Digital](#Part 4)
Part 1 How to Make a Slideshow on a PC or Mac with Canva?
You can make the best Canva slide show in just five simple steps. You can choose any device for making a slideshow with canva. The best choice is to use a PC or Mac to get the entire display, thereby helping you make better edits, changes and integrations in your slideshows.
So, let us start the discussion with the five simple steps for making a slideshow on PC or Mac with Canva. The steps are as follows.
● Step 1: Launch the application
The first step is to download, launch and install the application of Canva on your preferred device, that is, either your PC or your Mac. The application is available for free, and you need not pay any charges for downloading and installing Canva on your Mac or PC.

● Step 2: Choose the template
The next step is to choose the template you want for your sideshow. Choose from among the many canva slideshow templates that are available.

● Step 3: Make the required edits with the features of Canva.
There are numerous features available at Canva. Use them to make the necessary edits and integrations in your slideshow. Use the different features and make your slideshow the way you want. You can add images, texts and designs to your slideshow at Canva.

● Step 4: Customize accordingly
You can add your images and change the templates and designs at Canva. It helps in bringing more uniqueness, creativity and originality, as you can integrate your imagination, skills and creativity in the slideshow you are making at Canva.
● Step 5: Save your work and export
All the hard work is finfish by now. Now you have to have the slideshow that you have made so far. And then, share it in whichever file format you prefer on any social media platform or other places you want.

Part 2 How to Add Music to Your Slideshow in This Canva?
You can customize your slideshow at Canva in numerous ways. And one of the ways is by adding music to your slideshow in Canva. A slideshow in canva can have music in it, which can be any music. You can record yourself or even integrate any readymade music file.
You need only a single step to add music to your slideshow at Canva. The steps for making the slideshow remain the same, and you can refer to the steps mentioned above for reference. In the above steps, pause at Step 3.
You can add the required music file or media file at that step. In the next step, that is, in Step 4, you can customize that media file. You can integrate any audio file that you record for your slideshow.

Part 3 How to Turn Your Slideshows into Videos with Canva?
We have discussed the steps for making canva photo slideshow. The steps are simple to perform and easy to follow. But what if you need or want to turn that slideshow into a video? You definitely can do so! The steps for this, too, are straightforward and effortless.
So, now we will discuss the steps for turning slideshows at Canva into videos. There are four simple steps for this, and they are as follows.
● Step 1: Choose your preferred presentation type
By this, we mean that you must decide the size of your presentation. It is better to determine the type of presentation, for it helps in better and faster making of your presentation.
● Step 2: Integrate all the components you want in your presentation
Then, integrate all the images, soundtracks, texts, designs and templates and all the other necessary components you want to be present in your presentation. You can use numerous features in your presentation at Canva.
● Step 3: Customize the presentation based on your choice and needs
You can change the components of your presentation according to your needs and choice, and you can bring about as much customization as you want. So, customize according to and as much you want.
● Step 4: Download and share
Lastly, save the presentation. Then go to the blue bar, and in the options present in the top right corner, you will find “presenting”. You can save your file from there, and then the “Download” option will help you download the file to your device.
Part 4 FAQ of Converting Slides to Digital
Now, we will discuss solutions or answers to the common questions relating to converting slides into digital format. Here are the frequently asked issues or questions regarding this aspect.
01How do I convert my slides to digital?
We can recommend a few ways in which you can digitise your old slides. The methods are as follows.
● Hiring a proficient professional at this work is the easiest and the most effective method.
● A slide copier tool or application can also effectively serve this purpose.
● Use a device that converts the images or slides digitally.
● Use a flatbed scanner to scan your slides.
● Photographing your slides is an intelligent way to digitise your old slides.
02Can I use Filmora to turn my slides to digital?
You can readily use Filmora to transform your slideshows into slideshow videos, digitising your slides effectively. You have to make your slideshow at Filmora, edit and customise it according to your preference and then save, share or download the file. It will automatically turn your slide into digital format or help you make a successful slideshow video.
03What is the best method for turning slides into digital?
The most effortless method is to hire a professional, and it will guarantee saucerful results. But, if you want to do it yourself, you can readily opt for Filmora. It is the best video editing application that can readily help you digitise your slides.
04Can I turn my slideshow into videos?
Yes, you can effortlessly turn your slideshows into videos. You need a video editing tool that enables you to share and download your slideshow in a video format. And the best tool for it is Filmora. You can unhesitant opt for Filmora if you want to turn your slideshows into videos and share them effortlessly on any platform.
Now, we will discuss the best video editing tool or application, Wondershare Filmora Video Editor . You can use this tool to make the best slideshows and convert them into videos. You have the liberty f using any device for editing and making slideshow videos. You can customise as much you want and use the tons of features for editing available in the tool.
For Win 7 or later (64-bit)
For macOS 10.12 or later
You can opt for the free version. It has tools and features that are more than sufficient for making the most incredible slideshow videos. And when you choose its paid version, you are bestowed with the most advanced professional tools and features for editing. You can use the 800+ filters available, the texts, designs, templates, and other components for editing at Filmora.
So, if you want to make the best and the most incredible slideshows videos, you can readily opt for Filmora!
● Ending Thoughts →
● So, this was all about the different aspects and factors of a slideshow at Canva. Let us have a quick recap of the topic and discussions we have touched on in the above discussion.
● The five steps for making A slideshow in canva on your PC or Mac.
● The steps for adding music to your slideshow at Canva, also, how can you turn your slideshows into videos in Canva in four simple steps
● Lastly, we have discussed the answers or solutions to the common questions relating to converting slides to digital. And we have ended our discussion by introducing the best video editing tool, Filmora, that can help you make the most fantastic slideshows on any device, be it a PC or Mac.
You can make slideshows in innumerable ways. And we all are aware of how important it is to present slideshows, no matter what our profession or purpose is. And one of the ways of making slideshows is by using the canvas slideshow.
You can make the best type of slideshows on any device you prefer with Canva. So, in the following discussion, we will be talking about how you can make a slideshow on a PC or Mac with Canvas. Then, we will point out the steps for adding music to your slideshow in Canva. We will also mention how you can turn a slideshow into a video with Canva.
Lastly, we will discuss the answers and solutions to some common questions regarding converting slides to digital, following with the discussion of the best video editing tool for slideshow videos. So, without o further ado, let us get started with our discussion.
In this article
01 [How to Make a Slideshow on a PC or Mac with Canva?](#Part 1)
02 [How to Add Music to Your Slideshow in This Canva?](#Part 2)
03 [How to Turn Your Slideshows into Videos with Canva?](#Part 3)
04 [FAQ of Converting Slides to Digital](#Part 4)
Part 1 How to Make a Slideshow on a PC or Mac with Canva?
You can make the best Canva slide show in just five simple steps. You can choose any device for making a slideshow with canva. The best choice is to use a PC or Mac to get the entire display, thereby helping you make better edits, changes and integrations in your slideshows.
So, let us start the discussion with the five simple steps for making a slideshow on PC or Mac with Canva. The steps are as follows.
● Step 1: Launch the application
The first step is to download, launch and install the application of Canva on your preferred device, that is, either your PC or your Mac. The application is available for free, and you need not pay any charges for downloading and installing Canva on your Mac or PC.

● Step 2: Choose the template
The next step is to choose the template you want for your sideshow. Choose from among the many canva slideshow templates that are available.

● Step 3: Make the required edits with the features of Canva.
There are numerous features available at Canva. Use them to make the necessary edits and integrations in your slideshow. Use the different features and make your slideshow the way you want. You can add images, texts and designs to your slideshow at Canva.

● Step 4: Customize accordingly
You can add your images and change the templates and designs at Canva. It helps in bringing more uniqueness, creativity and originality, as you can integrate your imagination, skills and creativity in the slideshow you are making at Canva.
● Step 5: Save your work and export
All the hard work is finfish by now. Now you have to have the slideshow that you have made so far. And then, share it in whichever file format you prefer on any social media platform or other places you want.

Part 2 How to Add Music to Your Slideshow in This Canva?
You can customize your slideshow at Canva in numerous ways. And one of the ways is by adding music to your slideshow in Canva. A slideshow in canva can have music in it, which can be any music. You can record yourself or even integrate any readymade music file.
You need only a single step to add music to your slideshow at Canva. The steps for making the slideshow remain the same, and you can refer to the steps mentioned above for reference. In the above steps, pause at Step 3.
You can add the required music file or media file at that step. In the next step, that is, in Step 4, you can customize that media file. You can integrate any audio file that you record for your slideshow.

Part 3 How to Turn Your Slideshows into Videos with Canva?
We have discussed the steps for making canva photo slideshow. The steps are simple to perform and easy to follow. But what if you need or want to turn that slideshow into a video? You definitely can do so! The steps for this, too, are straightforward and effortless.
So, now we will discuss the steps for turning slideshows at Canva into videos. There are four simple steps for this, and they are as follows.
● Step 1: Choose your preferred presentation type
By this, we mean that you must decide the size of your presentation. It is better to determine the type of presentation, for it helps in better and faster making of your presentation.
● Step 2: Integrate all the components you want in your presentation
Then, integrate all the images, soundtracks, texts, designs and templates and all the other necessary components you want to be present in your presentation. You can use numerous features in your presentation at Canva.
● Step 3: Customize the presentation based on your choice and needs
You can change the components of your presentation according to your needs and choice, and you can bring about as much customization as you want. So, customize according to and as much you want.
● Step 4: Download and share
Lastly, save the presentation. Then go to the blue bar, and in the options present in the top right corner, you will find “presenting”. You can save your file from there, and then the “Download” option will help you download the file to your device.
Part 4 FAQ of Converting Slides to Digital
Now, we will discuss solutions or answers to the common questions relating to converting slides into digital format. Here are the frequently asked issues or questions regarding this aspect.
01How do I convert my slides to digital?
We can recommend a few ways in which you can digitise your old slides. The methods are as follows.
● Hiring a proficient professional at this work is the easiest and the most effective method.
● A slide copier tool or application can also effectively serve this purpose.
● Use a device that converts the images or slides digitally.
● Use a flatbed scanner to scan your slides.
● Photographing your slides is an intelligent way to digitise your old slides.
02Can I use Filmora to turn my slides to digital?
You can readily use Filmora to transform your slideshows into slideshow videos, digitising your slides effectively. You have to make your slideshow at Filmora, edit and customise it according to your preference and then save, share or download the file. It will automatically turn your slide into digital format or help you make a successful slideshow video.
03What is the best method for turning slides into digital?
The most effortless method is to hire a professional, and it will guarantee saucerful results. But, if you want to do it yourself, you can readily opt for Filmora. It is the best video editing application that can readily help you digitise your slides.
04Can I turn my slideshow into videos?
Yes, you can effortlessly turn your slideshows into videos. You need a video editing tool that enables you to share and download your slideshow in a video format. And the best tool for it is Filmora. You can unhesitant opt for Filmora if you want to turn your slideshows into videos and share them effortlessly on any platform.
Now, we will discuss the best video editing tool or application, Wondershare Filmora Video Editor . You can use this tool to make the best slideshows and convert them into videos. You have the liberty f using any device for editing and making slideshow videos. You can customise as much you want and use the tons of features for editing available in the tool.
For Win 7 or later (64-bit)
For macOS 10.12 or later
You can opt for the free version. It has tools and features that are more than sufficient for making the most incredible slideshow videos. And when you choose its paid version, you are bestowed with the most advanced professional tools and features for editing. You can use the 800+ filters available, the texts, designs, templates, and other components for editing at Filmora.
So, if you want to make the best and the most incredible slideshows videos, you can readily opt for Filmora!
● Ending Thoughts →
● So, this was all about the different aspects and factors of a slideshow at Canva. Let us have a quick recap of the topic and discussions we have touched on in the above discussion.
● The five steps for making A slideshow in canva on your PC or Mac.
● The steps for adding music to your slideshow at Canva, also, how can you turn your slideshows into videos in Canva in four simple steps
● Lastly, we have discussed the answers or solutions to the common questions relating to converting slides to digital. And we have ended our discussion by introducing the best video editing tool, Filmora, that can help you make the most fantastic slideshows on any device, be it a PC or Mac.
You can make slideshows in innumerable ways. And we all are aware of how important it is to present slideshows, no matter what our profession or purpose is. And one of the ways of making slideshows is by using the canvas slideshow.
You can make the best type of slideshows on any device you prefer with Canva. So, in the following discussion, we will be talking about how you can make a slideshow on a PC or Mac with Canvas. Then, we will point out the steps for adding music to your slideshow in Canva. We will also mention how you can turn a slideshow into a video with Canva.
Lastly, we will discuss the answers and solutions to some common questions regarding converting slides to digital, following with the discussion of the best video editing tool for slideshow videos. So, without o further ado, let us get started with our discussion.
In this article
01 [How to Make a Slideshow on a PC or Mac with Canva?](#Part 1)
02 [How to Add Music to Your Slideshow in This Canva?](#Part 2)
03 [How to Turn Your Slideshows into Videos with Canva?](#Part 3)
04 [FAQ of Converting Slides to Digital](#Part 4)
Part 1 How to Make a Slideshow on a PC or Mac with Canva?
You can make the best Canva slide show in just five simple steps. You can choose any device for making a slideshow with canva. The best choice is to use a PC or Mac to get the entire display, thereby helping you make better edits, changes and integrations in your slideshows.
So, let us start the discussion with the five simple steps for making a slideshow on PC or Mac with Canva. The steps are as follows.
● Step 1: Launch the application
The first step is to download, launch and install the application of Canva on your preferred device, that is, either your PC or your Mac. The application is available for free, and you need not pay any charges for downloading and installing Canva on your Mac or PC.

● Step 2: Choose the template
The next step is to choose the template you want for your sideshow. Choose from among the many canva slideshow templates that are available.

● Step 3: Make the required edits with the features of Canva.
There are numerous features available at Canva. Use them to make the necessary edits and integrations in your slideshow. Use the different features and make your slideshow the way you want. You can add images, texts and designs to your slideshow at Canva.

● Step 4: Customize accordingly
You can add your images and change the templates and designs at Canva. It helps in bringing more uniqueness, creativity and originality, as you can integrate your imagination, skills and creativity in the slideshow you are making at Canva.
● Step 5: Save your work and export
All the hard work is finfish by now. Now you have to have the slideshow that you have made so far. And then, share it in whichever file format you prefer on any social media platform or other places you want.

Part 2 How to Add Music to Your Slideshow in This Canva?
You can customize your slideshow at Canva in numerous ways. And one of the ways is by adding music to your slideshow in Canva. A slideshow in canva can have music in it, which can be any music. You can record yourself or even integrate any readymade music file.
You need only a single step to add music to your slideshow at Canva. The steps for making the slideshow remain the same, and you can refer to the steps mentioned above for reference. In the above steps, pause at Step 3.
You can add the required music file or media file at that step. In the next step, that is, in Step 4, you can customize that media file. You can integrate any audio file that you record for your slideshow.

Part 3 How to Turn Your Slideshows into Videos with Canva?
We have discussed the steps for making canva photo slideshow. The steps are simple to perform and easy to follow. But what if you need or want to turn that slideshow into a video? You definitely can do so! The steps for this, too, are straightforward and effortless.
So, now we will discuss the steps for turning slideshows at Canva into videos. There are four simple steps for this, and they are as follows.
● Step 1: Choose your preferred presentation type
By this, we mean that you must decide the size of your presentation. It is better to determine the type of presentation, for it helps in better and faster making of your presentation.
● Step 2: Integrate all the components you want in your presentation
Then, integrate all the images, soundtracks, texts, designs and templates and all the other necessary components you want to be present in your presentation. You can use numerous features in your presentation at Canva.
● Step 3: Customize the presentation based on your choice and needs
You can change the components of your presentation according to your needs and choice, and you can bring about as much customization as you want. So, customize according to and as much you want.
● Step 4: Download and share
Lastly, save the presentation. Then go to the blue bar, and in the options present in the top right corner, you will find “presenting”. You can save your file from there, and then the “Download” option will help you download the file to your device.
Part 4 FAQ of Converting Slides to Digital
Now, we will discuss solutions or answers to the common questions relating to converting slides into digital format. Here are the frequently asked issues or questions regarding this aspect.
01How do I convert my slides to digital?
We can recommend a few ways in which you can digitise your old slides. The methods are as follows.
● Hiring a proficient professional at this work is the easiest and the most effective method.
● A slide copier tool or application can also effectively serve this purpose.
● Use a device that converts the images or slides digitally.
● Use a flatbed scanner to scan your slides.
● Photographing your slides is an intelligent way to digitise your old slides.
02Can I use Filmora to turn my slides to digital?
You can readily use Filmora to transform your slideshows into slideshow videos, digitising your slides effectively. You have to make your slideshow at Filmora, edit and customise it according to your preference and then save, share or download the file. It will automatically turn your slide into digital format or help you make a successful slideshow video.
03What is the best method for turning slides into digital?
The most effortless method is to hire a professional, and it will guarantee saucerful results. But, if you want to do it yourself, you can readily opt for Filmora. It is the best video editing application that can readily help you digitise your slides.
04Can I turn my slideshow into videos?
Yes, you can effortlessly turn your slideshows into videos. You need a video editing tool that enables you to share and download your slideshow in a video format. And the best tool for it is Filmora. You can unhesitant opt for Filmora if you want to turn your slideshows into videos and share them effortlessly on any platform.
Now, we will discuss the best video editing tool or application, Wondershare Filmora Video Editor . You can use this tool to make the best slideshows and convert them into videos. You have the liberty f using any device for editing and making slideshow videos. You can customise as much you want and use the tons of features for editing available in the tool.
For Win 7 or later (64-bit)
For macOS 10.12 or later
You can opt for the free version. It has tools and features that are more than sufficient for making the most incredible slideshow videos. And when you choose its paid version, you are bestowed with the most advanced professional tools and features for editing. You can use the 800+ filters available, the texts, designs, templates, and other components for editing at Filmora.
So, if you want to make the best and the most incredible slideshows videos, you can readily opt for Filmora!
● Ending Thoughts →
● So, this was all about the different aspects and factors of a slideshow at Canva. Let us have a quick recap of the topic and discussions we have touched on in the above discussion.
● The five steps for making A slideshow in canva on your PC or Mac.
● The steps for adding music to your slideshow at Canva, also, how can you turn your slideshows into videos in Canva in four simple steps
● Lastly, we have discussed the answers or solutions to the common questions relating to converting slides to digital. And we have ended our discussion by introducing the best video editing tool, Filmora, that can help you make the most fantastic slideshows on any device, be it a PC or Mac.
How to Make a Movie with Windows Movie Maker?
Are you interested in making movies? Well, If your answer is yes, you’re in luck! Windows Movie Maker is a great way to make movies on your computer. You can use it to create family videos, school projects, or even movies for fun. This might seem like too much work, but trust us, it’s not! With this amazing program, anyone can make movies on windows. There are only a few things to keep in mind, and you’ll be on your way to becoming a movie maker in no time.
Video Windows Movie Maker makes it easy to put your movies together. You just have to drag and drop the video clips you want to use into the movie maker. Then, you need to follow certain steps to complete your project. In the section below, we will discuss in detail the steps to make a movie from Windows Movie Maker.
Let’s get started.
How to Make a Video with Windows Movie Maker
Here are the steps you need to take to make movies on windows 10:
Step1 Import Media Into Movie Maker
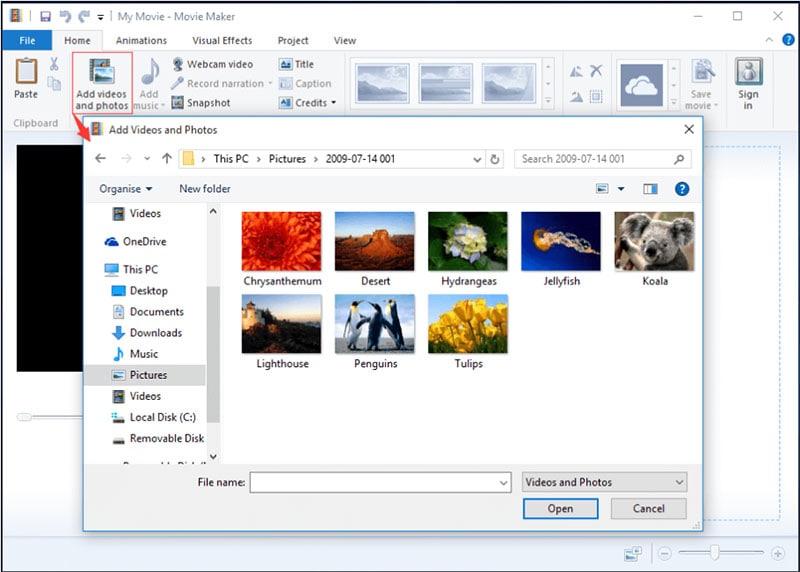
The first thing you need to do is get all of your video footage and images into Windows Movie Maker.
Media file formats can be imported into this program:
- Audio Files: aif, .aifc, .aiff, .asf, .au, .mp2, .mp3, .mpa, .snd, .wav, and .wma
- Image Files: .bmp, .dib, .emf, .gif, .jfif, .jpe, .jpeg, .jpg, .png, .tif, .tiff, and .wmf
- Movie Files: asf, .avi, dvr-ms, .m1v, .mp2, .mp2v, .mpe, .mpeg, .mpg, .mpv2, .wm, and .wmv
To import media:
- Click “File” > “Import into collections.”
- Browse to the location of the file you want to import, select it, and then click “Open.”
Your selected file will now appear in the “Collections” pane. You can double-click on the imported file to preview it. If you’re happy with what you see, great! You can now move on to step two. If the files are not good, no worries - you can always delete them and try again. Just right-click on the file and select “Delete,” or press the “Delete” key on your keyboard.
Step2 Basic Editing from Timeline
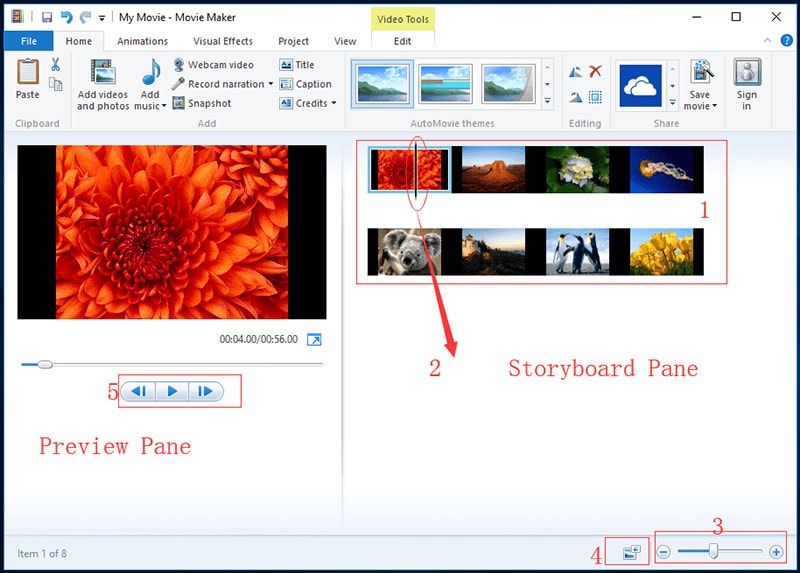
After you have imported all of your desired clips and images into Windows Movie Maker, it is time to start editing them into your movie. Here are the things that you need to do to edit your clips and images:
- For cutting the image, you need to select the part of the image that you want to cut. To do this, just click on the image and drag it to where you want it to be cut. The cutting process will automatically happen when you release your mouse button.
- To combine the images, you need to select the images that you want to combine. To do this, click on one image and then hold down the “Ctrl” key while clicking on the other images that you want to combine. Once you have selected all the images you want to combine, just right-click on any of the selected images and choose “Combine Clips.”
- To split clips in the timeline, select the clip you want to split by clicking on it. Then, position your mouse cursor to where you want to split the clip and click on the “Split Clip” button. The clip will be automatically split into two separate clips.
By doing these minor things, you can edit your clips and images in the timeline according to your preference. Now, you are one step closer to creating your very own movie!
Step3 Add Video Effects
Video effects are a great way to make your movies look more professional. Windows Movie Maker has various built-in effects that you can use to improve the quality of your videos. These effects can be applied to your movie’s video and audio tracks. Moreover, they can add transitions between clips and even change the way your video looks.
There are hundreds of different effects that you can use in Windows Movie Maker. So experiment with them until you find a style that suits your needs. With a bit of practice, you’ll be making movies that look like they were made by a professional in no time!
To add video effects in the video movie maker windows:
- Select the clip you want to modify, and then click on the “Effects” tab. From there, you can browse through the available effects and preview them before adding them to your project.
- Once you’ve found an effect you like, simply drag and drop it onto the clip.
- You can also add multiple effects to a single clip if you want.
- Just remember that too many effects can make your video look cluttered and difficult to watch. So be sure to use them sparingly.
When you’re happy with your added effects, click on the “Ok” button to save your changes.
Step4 Edit Audio & Titles
Audio and Title are both crucial aspects when you want to make movie windows 10 movie perfectly. You can edit both of these in Windows Movie Maker. Editing is one of the most creative aspects of making a movie. In Windows Movie Maker, you easily edit your audio and titles in the video. Even if you want to do the editing multiple times, you can do so without any problem. All you need to do is have the latest version of Windows Movie Maker installed on your computer.
To Edit the Audio & Tiles:
- Go to the ‘Home’ tab and click on the ‘Add music’ button.
- Find the audio file that you want to add to your movie. You can either use a song from your personal collection or look for one online.
- Once you have found the perfect audio, drag and drop it into the timeline.
- If you want to edit the audio, right-click on it and select ‘Edit’. You can then make changes to the audio, such as volume, duration, etc.
- To add titles, go to the ‘Home’ tab and click on the ‘Add title’ button.
- A new window will open where you can type in the text for your title. You can also change the font, color, and size of the text.
- Once you are happy with your title, click on the ‘OK’ button, and it will be added to your timeline.
- If you want to edit the title, simply double-click on it and make changes as needed.
Step5 Export and Save Video
The last step that you need to follow after completing the video is to export and save it. It is always important to save your work so that you can access it later or make changes if needed.
To export and save the video:
- Click on File
- Click on Save movie
- Choose the quality and file size that you want
- Give the video a name
- Save it to your computer
Movie Maker Alternative to Create Videos
Filmora is a video creating and editing software developed by Wondershare. Although it is not as widely known as some of its competitors, it has many features that make it a great alternative to Windows Movie Maker. Anyone can use this software to create high-quality videos, from beginners to professionals. The software is compatible with both Windows and Mac operating systems.
One of the great things about Filmora is that it is very user-friendly. The interface is straightforward and easy to navigate and comes with top-notch editing features and rich effects. So, if you have never used video editing software before, you can figure out how to use Filmora easily. Another plus is that free trials are available to try out the software before you commit to buying it.
Steps to Edit Video with Filmora
Now that you know a little bit more about this movie maker alternative, let’s go over the steps to edit videos with Filmora.
Free Download For Win 7 or later(64-bit)
Free Download For macOS 10.14 or later
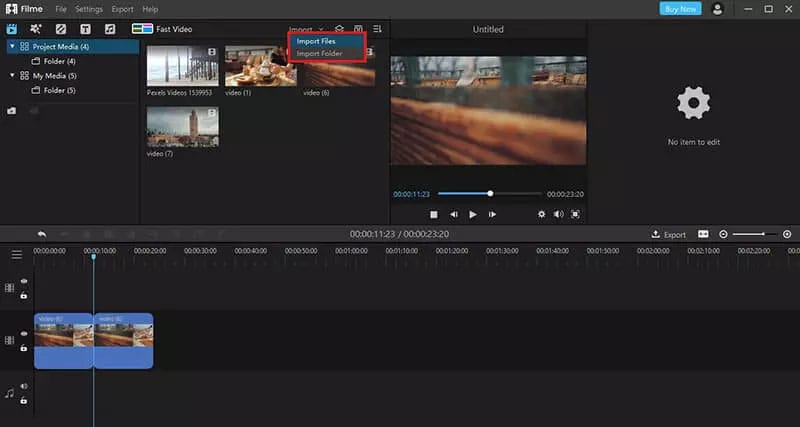
Step1 Import your video into the software. You can do this by clicking on “Import” and selecting the file from your computer.

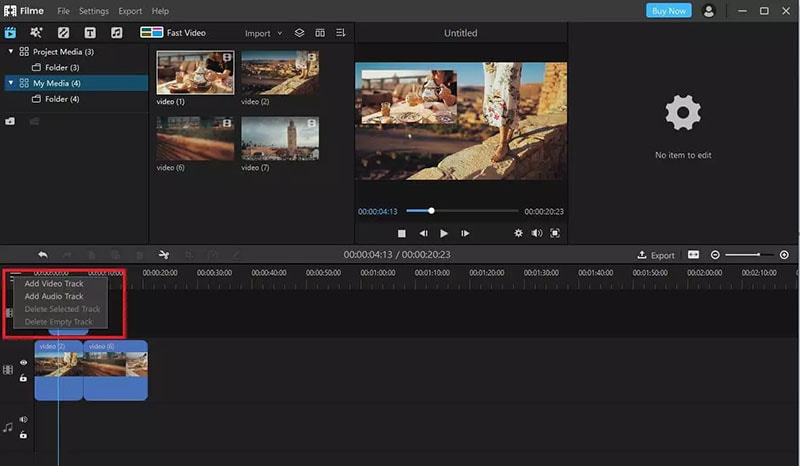
Step2 Once your video is imported, you can see it in the “Project Library”. You can drag and drop it from here into the “Video Timeline” located at the bottom of the screen.

Step3 Now that your video is in the timeline, you can start editing it. To do this, simply click on the item in the timeline you want to edit and then make your changes in the “Video Inspector” panel on the screen’s right-hand side.

You can make changes, including cropping the video, adjusting the volume, adding filters and effects, and more.
Step4 Once you are happy with your edits, you can preview your video by clicking on the “Play” button in the tight and save it if it seems perfect to you.
If you are satisfied with what you see, then you can go ahead and export your video. To do this, click on “File” located in the top left-hand corner of the screen and then select “Export”. From here, you can choose what format you want to export your video and where you want to save it on your computer.
Conclusion
If you’re looking for an easy way to make movies on your Windows computer, then you should definitely check out Windows Movie Maker. This free from Microsoft makes it simple to create and edit videos, and it’s perfect for beginners. Another alternative for making movies on Windows is to use the Filmora video editor. This program is more robust and has multiple features just like Movie Maker.
Free Download For macOS 10.14 or later
Step1 Import your video into the software. You can do this by clicking on “Import” and selecting the file from your computer.

Step2 Once your video is imported, you can see it in the “Project Library”. You can drag and drop it from here into the “Video Timeline” located at the bottom of the screen.

Step3 Now that your video is in the timeline, you can start editing it. To do this, simply click on the item in the timeline you want to edit and then make your changes in the “Video Inspector” panel on the screen’s right-hand side.

You can make changes, including cropping the video, adjusting the volume, adding filters and effects, and more.
Step4 Once you are happy with your edits, you can preview your video by clicking on the “Play” button in the tight and save it if it seems perfect to you.
If you are satisfied with what you see, then you can go ahead and export your video. To do this, click on “File” located in the top left-hand corner of the screen and then select “Export”. From here, you can choose what format you want to export your video and where you want to save it on your computer.
Conclusion
If you’re looking for an easy way to make movies on your Windows computer, then you should definitely check out Windows Movie Maker. This free from Microsoft makes it simple to create and edit videos, and it’s perfect for beginners. Another alternative for making movies on Windows is to use the Filmora video editor. This program is more robust and has multiple features just like Movie Maker.
Also read:
- How to Use Lumetri Color in After Effects for 2024
- Updated How to Livestream Zoom on Facebook?
- New How Does the YouTube AI Algorithm Work for 2024
- Video Marketing Is Adopted by Most Companies in This Digital Era. In This Post, We Are Going to Share some Useful Tips to Create a Better Product Video Ads to Help Prompt Business
- GIF Splitting Into Frames Is an Interesting Activity to Do with the Right Tools. Convert GIFs Into Frames Easily with Tools and Use Them as Needed
- Updated 2024 Approved Doable Ways to Create Transparent Background in Procreate
- New How to Make Video Slow Motion?
- New How to Make a Slideshow with Icecream Slideshow Maker
- Updated What If YouTube Zoom to Fill Not Working, In 2024
- New Filmora Is a Great Video Editor that Many Users Are Making Intro Video with It. This Article Will Guide You How to Create an Intro Video with Filmora
- Updated 2024 Approved How To Make Split Screen Videos in Filmora
- New Top 11 Best Video Editing Apps for iPhone for 2024
- How to Add Filter to Video in Premiere Pro?
- 2024 Approved How To Add Text In After Effects
- 2024 Approved WebM to GIF Converters (Online and Offline Solutions)
- In 2024, Best Text Animations In After Effects
- New Splice Video Editor Online - Get Your Videos Splice Easily
- New What Is Animated GIF
- New Discord Is Becoming More Popular with Time with Millions of Users. Are You Thinking of Getting a GIF for Discord Profile? If Yes, Learn From This Piece Since We Have a Conclusive Summary of Getting a GIF Profile Picture for Discord
- 2024 Approved Replacing Sky in Your Pictures Using Online and Offline Tools
- How to Create Your Own LOL Montage Video for 2024
- How to Create Sports Intro and YouTube Endscreen, In 2024
- In 2024, Do You Want to Make Your Background Disappear and Replace with an Attractive Background? Here Is How to Add a Green Screen to Zoom App and Add Any Virtual Background of Your Choice
- 2024 Approved How to Convert Videos to Slow Motion? Complete Guide
- Updated How To Edit Youtube Videos In Simple Steps
- New In 2024, Tips for Choosing Location and Scheduling Music Video
- In 2024, Want to Add a Motion Blur Effect to Your Photos? This Step-by-Step Tutorial Will Show You How to Use GIMP Software to Get the Effect You Want
- Updated 2024 Approved Discover the Ultimate LUTs for Wondershare Filmora Uncover the Answer
- Do You Waste Time Making Transparent Background in Paint for 2024
- Updated 2024 Approved Finding The Best LUTs for Wondershare Filmora
- 2024 Approved How to Create a Slideshow GIF?
- Updated How to Add Font Effect
- 2024 Approved M31 LUT (Teal and Orange LUT) Free Download
- Updated Have You Ever Tried to Remove the Transparent Background of Gif and Failed? This Blog Will Help You with This Issue. Also, We Will Discuss How to Create Animated Gifs and the Best Tools for Them
- New How to Convert SRT to DOCX
- New In 2024, How to Shoot Cinematic Footage From a Smartphone
- New Create Glitch Text Effect
- Fixes for Apps Keep Crashing on Oppo Reno 8T 5G | Dr.fone
- In 2024, How Do You Get Sun Stone Evolutions in Pokémon For Oppo Reno 11F 5G? | Dr.fone
- How to Unlock Verizon iPhone 8 Plus
- In 2024, Ways to stop parent tracking your Oppo Reno 11 Pro 5G | Dr.fone
- Motorola Edge 40 Pro can’t play AVCHD .mts video
- Why Your WhatsApp Live Location is Not Updating and How to Fix on your Apple iPhone 15 Plus | Dr.fone
- Authentication Error Occurred on Infinix Note 30 5G? Here Are 10 Proven Fixes | Dr.fone
- In 2024, How to Lock Apps on Motorola Edge 2023 to Protect Your Individual Information
- Ultimate Guide on Samsung Galaxy F04 FRP Bypass
- How To Transfer Data From iPhone 14 To Android? | Dr.fone
- Which is the Best Fake GPS Joystick App On Apple iPhone 6s Plus? | Dr.fone
- Title: In 2024, How to Loop Videos with iMovie
- Author: Chloe
- Created at : 2024-05-20 03:38:09
- Updated at : 2024-05-21 03:38:09
- Link: https://ai-editing-video.techidaily.com/in-2024-how-to-loop-videos-with-imovie/
- License: This work is licensed under CC BY-NC-SA 4.0.

