
:max_bytes(150000):strip_icc():format(webp)/samsung-unveils-new-products-at-its-annual-unpacked-event-1200186175-0a17180ae84e47f488f43d3afbb7daa6.jpg)
In 2024, How to Make a Slideshow on iPhone
How to Make a Slideshow on iPhone
How to Make a Slideshow on iPhone
An easy yet powerful editor
Numerous effects to choose from
Detailed tutorials provided by the official channel
Slideshows are acceptable ways to easily sum up your amazing trip or excellent events instead of showing-off whole bunch of photos to all your surroundings. You can easily pick up beautiful moments in order to put them all together to easily create some beautiful videos.
For making a slideshow on iPhone, you can add a slice of music, effects and other ingredients to make it looks amazing. The Photo Slideshow iPhone Maker is a kind of app that can easily create beautiful music videos from you existing pictures and this also comes with amazing qualities to enhance your appearance on the go. With a rich music library and amazing effects, you can differently apply background music to your slideshow or video. With just a drag & drop facility and some tools to define your slideshow making, it is an easy process to consider.
In this article
01 [How to Make a Slideshow on iPhone](#Part 1)
02 [How to Save Slideshow on iPhone](#Part 2)
03 [How to Share Slideshow on iPhone](#Part 3)
04 [How to Send a Slideshow on iPhone](#Part 4)
05 [8 Free Slideshow Maker for iPhone](#Part 5)
Part 1 How to Make a Slideshow on iPhone
The iPhone is one of the most amazing devices that are capable of doing so many things, like making a picture slideshow or quickly adding pictures to turn up the normal pictures into life-long memories, you can do a lot of things. In case you are looking for a way to make a slideshow quickly then Photos app in iPhone can help you a lot. On the other hand, if you need something else, you can take help of other apps on the market once after downloading any one of your choice.

Here, we are talking about making slideshow on iPhone to collect tons of memories and later on sharing it with your friends of family members. Right from adding music, converting the transitions or quickly polishing any existing video, here is how you can easily make a Slideshow on iPhone with Photos app:
● Open Photos app & then select desired album that you want to use in your slideshow.
● Tap on pictures you need to start making a slideshow.
● After selecting a starting picture, tap on Share-button on the bottom left.
● Scroll down, and choose Slideshow.
● Your slideshow will automatically starts playing.
● In order to further edit the settings of your slideshow, tap on the screen & then tap pause icon at bottom centre of your screen
● Tap Options to refine your steps of how to create a slideshow on iPhone.
● Then edit Theme, Music, and choose speed of the slideshow.
● After making desirable changes, tap done and enjoy playing it.
● If you want to share the slideshow created, tap on the pause button again & then select AirPlay-icon in upper-right corner of your screen.
● Tap on the name of your device you would like to Air Play the slideshow to.
● Once you are done with playing a slideshow, tap done in upper-left corner in order to end your slideshow.
Your device can save these settings automatically if you want to your album as the slideshow. For more glory, you can add filters in a polished manner to finish the steps to create slide show on iPhone.
Part 2 How to Save Slideshow on iPhone
Once after creating the slideshow with your iPhone device, if you want to know how to save a slideshow on iPhone then you need to be little tricky because there is no way to save the slideshow created by directly using the Photos App. You can instead make use of iPhone screen recording feature to save it when your slideshow plays. You can later on trim the desired video with perfect start & end. With the photos app, you can only save your memories as a slideshow and it is just like a curated collection of pictures with ‘Year in review’.

Here is the complete assistance on how to save slideshow on iPhone:-
● Tap done on the top-left corner with your project
● Tap Share icon.
● Select the Save Video option.
● The iMovie will easily export as well as save desired slideshow in Photos app.
Part 3 How to Share Slideshow on iPhone
In order to create as well as share the desired slideshow of your photos in the Apple’s Photos app, you just need to choose shots from the device and add some special themes with the selected fonts & background music and at last share final product with your friends. The photos app of your iPhone mainly offers slightly two different kinds of slideshows with regular one allowing you to easily change theme, duration of the music added to a certain number of choices but on the other hand memory movie can allow you to modify the theme to tweak music, font, length and music at no worries.

This is how you can share a slideshow on iPhone:
If you want to know how to share slideshow on iPhone, tap share icon at the corner, and then use share screen feature to choose the desired destination like Messages, OneDrive, YouTube, Mail, Facebook, and others. The Photos application will then automatically export the desired movie to the services like: Facebook.
At last your app will preview its slideshow & then lets you easily include text, location, tag people, etc. Now, you are finished with the process to share the slideshow, tap on the share & explore your slideshow easily.
Part 4 How to Send a Slideshow on iPhone
If you are curious to know more about the process to send a slideshow on iPhone device then it is the not so difficult. With some consistency in your slideshow you can export your video to share with your loved ones in a smooth manner. Besides various transitions & effects, one can easily add stickers, text, before sending the video with share option. If you want to send the completed slideshow then quickly tap on the share icon and then choose any destination like Messages, OneDrive, YouTube, Mail, Facebook, etc. this will automatically export deliver the slideshow to your friends.

Part 5 Free Slideshow Maker for iPhone
On next we are heading towards the process to find out few amazing free slideshow makers for an iPhone. There are multiple apps are present in the market, out of which you can choose the one as per your need and comfort. So let’s begin with the discussion of each & every app, one by one:
01Vimory
The highlighted features of Vimory
● A unique Slideshow Maker
● Video-Editor
● Photo-Editor
● Giving you a feature to directly export the slideshow to Social Media
● Output at 4k
● Animated slideshow making
● Some incredible effects
● Superfast image editor
● Comes with stylish text and transitions
The Vimory offers you multiple ways to make some beautiful videos through the pictures one can easily add music track right from the app. It is the fantastic app for creating a slideshow on iPhone with significant effects, pretty amazing frames, fashionable filters and compelling music.
02PicPlayPost
The highlighted features of PicPlayPost
● Ability to Createalmost 30-minute slideshows.
● Built-in live video wallpapers.
● Record the slideshow video in HD with 1080P & 4K HD option.
● Trim, slow-down, speed up the videos
● Full featured editing capabilities
Entirely known for an ability to import the photos, add multiple texts, stickers, slide transition, &choose some amazing background music. This comes with an option to share your creations to your device gallery, Gmail, Facebook, YouTube, Messenger, Twitter, WhatsApp, Google Photos, and many more.
03Slide Lab
Highlighted features of Slidelab
● A complete Slideshow Editor
● Easy to import Option
● Music Tracks
● Comes with many video Tracks
● Audio Editing
One of the most amazing apps to turn your pictures into a realistic slideshow containing music, an extensive collection of multiple transitions to avoid sudden-jumps, in-app music library and an option to choose the in-app purchase in order to remove watermark.
04iMovie
Some of the most amazing features of iMovie:
● Ability to customize the movie studio logos, credits and cast names.
● Adjust the titles by changing the font, colour, location and size.
● Enhancing your movie by slowing-down or speeding-up desired clip.
● Easily add picture inside the picture, green-screen,& a split-screen effect.
One of the finest Photo slideshow maker through iPhone, iMovie is the fantastic slideshow maker. As compared to various other apps on the market this comes with useful features to make the slideshow simplistic yet attractive. Its frills-free interface can easily charms-up your slideshow making experience.
05Viva Video
The highlighted features of Viva Video
● Great varieties of Video Editing Tools
● Amazing Trendy Frames
● Aesthetics-Filters
● Edit any Music
● Sticker &typing option.
● Straightforward and easy to understand
● Wide range of audio tracks, effects and themes
This app is mix of free and a paid subscription and with the later one you can add some amazing effects and themes with professional editing features.
06Movavi Clips Easy Video Editor
The highlighted features of Movavi
● Edit any footage on a handy timeline
● Intuitive interface
● Movie maker without any ads
● Quick & precise
● Ability to trim and cut audios
This app is available for both iOS &Android users. If you want to know how to make a slideshow on iPhone with this app then interestingly it is very easy for you to do that.Movavi can deliver you amazing video editing experience and usually comes with some fine quality of effects and themes.
07Magisto Video Editor and Maker
The highlighted features of Magisto
● Easily create a moving photo slideshow or a video collage
● Ready-made templates
● Video Editing features like: cut, merge, trim, or reorder.
● Customization options available with editing of text, fonts, orientation, colors etc.
08MoShow Slideshow Photo & Video
● Easily Adjust Slideshow-timing
● Access few exclusive video-templates.
● Create GIFs as well as looping videos.
● Fine collection of templates
● Built-in music-options
Wondershare Filmora Video Editor can be used for making high quality videos and editing them. The styling, custom options and ease of adding effects in the video make this app popular. The application is well equipped with a wide variety of slideshow making tools.
For Win 7 or later (64-bit)
For macOS 10.12 or later
Key features
● Audio mixing feature
● Tilt shift
● Multiple video clips layer facility
● Adding and editing text feature
● Preview frame wise
● Video stabilizer
In terms of true quality of artificial intelligence technology, this app is the finest one on the list of all the apps for making an iPhone slideshow. If you are curious about the process to create slideshow on iPhone thenfinally you are getting rich collection of features in it like: stabilization, object-detection option, stylish effects, filters, and many more to outshine any average looking slideshow or a video collage.You can easily make collage or a short movie with Magisto video editor with great combination of special effects, graphics and filters.
● Ending Thoughts →
● Make use of some user friendly or light apps to create a slideshow of small sizes
● You can move further onto heavy duty apps for making long videos
● Some apps are having a possible number of features to offer you affordable options
● However, other promising apps like Filmora can give you amazing options to create some logical slideshows for any occasion and at no hidden cost. You can make use of Filmora to adding plenty of designing features to your video.
Slideshows are acceptable ways to easily sum up your amazing trip or excellent events instead of showing-off whole bunch of photos to all your surroundings. You can easily pick up beautiful moments in order to put them all together to easily create some beautiful videos.
For making a slideshow on iPhone, you can add a slice of music, effects and other ingredients to make it looks amazing. The Photo Slideshow iPhone Maker is a kind of app that can easily create beautiful music videos from you existing pictures and this also comes with amazing qualities to enhance your appearance on the go. With a rich music library and amazing effects, you can differently apply background music to your slideshow or video. With just a drag & drop facility and some tools to define your slideshow making, it is an easy process to consider.
In this article
01 [How to Make a Slideshow on iPhone](#Part 1)
02 [How to Save Slideshow on iPhone](#Part 2)
03 [How to Share Slideshow on iPhone](#Part 3)
04 [How to Send a Slideshow on iPhone](#Part 4)
05 [8 Free Slideshow Maker for iPhone](#Part 5)
Part 1 How to Make a Slideshow on iPhone
The iPhone is one of the most amazing devices that are capable of doing so many things, like making a picture slideshow or quickly adding pictures to turn up the normal pictures into life-long memories, you can do a lot of things. In case you are looking for a way to make a slideshow quickly then Photos app in iPhone can help you a lot. On the other hand, if you need something else, you can take help of other apps on the market once after downloading any one of your choice.
Here, we are talking about making slideshow on iPhone to collect tons of memories and later on sharing it with your friends of family members. Right from adding music, converting the transitions or quickly polishing any existing video, here is how you can easily make a Slideshow on iPhone with Photos app:
● Open Photos app & then select desired album that you want to use in your slideshow.
● Tap on pictures you need to start making a slideshow.
● After selecting a starting picture, tap on Share-button on the bottom left.
● Scroll down, and choose Slideshow.
● Your slideshow will automatically starts playing.
● In order to further edit the settings of your slideshow, tap on the screen & then tap pause icon at bottom centre of your screen
● Tap Options to refine your steps of how to create a slideshow on iPhone.
● Then edit Theme, Music, and choose speed of the slideshow.
● After making desirable changes, tap done and enjoy playing it.
● If you want to share the slideshow created, tap on the pause button again & then select AirPlay-icon in upper-right corner of your screen.
● Tap on the name of your device you would like to Air Play the slideshow to.
● Once you are done with playing a slideshow, tap done in upper-left corner in order to end your slideshow.
Your device can save these settings automatically if you want to your album as the slideshow. For more glory, you can add filters in a polished manner to finish the steps to create slide show on iPhone.
Part 2 How to Save Slideshow on iPhone
Once after creating the slideshow with your iPhone device, if you want to know how to save a slideshow on iPhone then you need to be little tricky because there is no way to save the slideshow created by directly using the Photos App. You can instead make use of iPhone screen recording feature to save it when your slideshow plays. You can later on trim the desired video with perfect start & end. With the photos app, you can only save your memories as a slideshow and it is just like a curated collection of pictures with ‘Year in review’.
Here is the complete assistance on how to save slideshow on iPhone:-
● Tap done on the top-left corner with your project
● Tap Share icon.
● Select the Save Video option.
● The iMovie will easily export as well as save desired slideshow in Photos app.
Part 3 How to Share Slideshow on iPhone
In order to create as well as share the desired slideshow of your photos in the Apple’s Photos app, you just need to choose shots from the device and add some special themes with the selected fonts & background music and at last share final product with your friends. The photos app of your iPhone mainly offers slightly two different kinds of slideshows with regular one allowing you to easily change theme, duration of the music added to a certain number of choices but on the other hand memory movie can allow you to modify the theme to tweak music, font, length and music at no worries.
This is how you can share a slideshow on iPhone:
If you want to know how to share slideshow on iPhone, tap share icon at the corner, and then use share screen feature to choose the desired destination like Messages, OneDrive, YouTube, Mail, Facebook, and others. The Photos application will then automatically export the desired movie to the services like: Facebook.
At last your app will preview its slideshow & then lets you easily include text, location, tag people, etc. Now, you are finished with the process to share the slideshow, tap on the share & explore your slideshow easily.
Part 4 How to Send a Slideshow on iPhone
If you are curious to know more about the process to send a slideshow on iPhone device then it is the not so difficult. With some consistency in your slideshow you can export your video to share with your loved ones in a smooth manner. Besides various transitions & effects, one can easily add stickers, text, before sending the video with share option. If you want to send the completed slideshow then quickly tap on the share icon and then choose any destination like Messages, OneDrive, YouTube, Mail, Facebook, etc. this will automatically export deliver the slideshow to your friends.
Part 5 Free Slideshow Maker for iPhone
On next we are heading towards the process to find out few amazing free slideshow makers for an iPhone. There are multiple apps are present in the market, out of which you can choose the one as per your need and comfort. So let’s begin with the discussion of each & every app, one by one:
01Vimory
The highlighted features of Vimory
● A unique Slideshow Maker
● Video-Editor
● Photo-Editor
● Giving you a feature to directly export the slideshow to Social Media
● Output at 4k
● Animated slideshow making
● Some incredible effects
● Superfast image editor
● Comes with stylish text and transitions
The Vimory offers you multiple ways to make some beautiful videos through the pictures one can easily add music track right from the app. It is the fantastic app for creating a slideshow on iPhone with significant effects, pretty amazing frames, fashionable filters and compelling music.
02PicPlayPost
The highlighted features of PicPlayPost
● Ability to Createalmost 30-minute slideshows.
● Built-in live video wallpapers.
● Record the slideshow video in HD with 1080P & 4K HD option.
● Trim, slow-down, speed up the videos
● Full featured editing capabilities
Entirely known for an ability to import the photos, add multiple texts, stickers, slide transition, &choose some amazing background music. This comes with an option to share your creations to your device gallery, Gmail, Facebook, YouTube, Messenger, Twitter, WhatsApp, Google Photos, and many more.
03Slide Lab
Highlighted features of Slidelab
● A complete Slideshow Editor
● Easy to import Option
● Music Tracks
● Comes with many video Tracks
● Audio Editing
One of the most amazing apps to turn your pictures into a realistic slideshow containing music, an extensive collection of multiple transitions to avoid sudden-jumps, in-app music library and an option to choose the in-app purchase in order to remove watermark.
04iMovie
Some of the most amazing features of iMovie:
● Ability to customize the movie studio logos, credits and cast names.
● Adjust the titles by changing the font, colour, location and size.
● Enhancing your movie by slowing-down or speeding-up desired clip.
● Easily add picture inside the picture, green-screen,& a split-screen effect.
One of the finest Photo slideshow maker through iPhone, iMovie is the fantastic slideshow maker. As compared to various other apps on the market this comes with useful features to make the slideshow simplistic yet attractive. Its frills-free interface can easily charms-up your slideshow making experience.
05Viva Video
The highlighted features of Viva Video
● Great varieties of Video Editing Tools
● Amazing Trendy Frames
● Aesthetics-Filters
● Edit any Music
● Sticker &typing option.
● Straightforward and easy to understand
● Wide range of audio tracks, effects and themes
This app is mix of free and a paid subscription and with the later one you can add some amazing effects and themes with professional editing features.
06Movavi Clips Easy Video Editor
The highlighted features of Movavi
● Edit any footage on a handy timeline
● Intuitive interface
● Movie maker without any ads
● Quick & precise
● Ability to trim and cut audios
This app is available for both iOS &Android users. If you want to know how to make a slideshow on iPhone with this app then interestingly it is very easy for you to do that.Movavi can deliver you amazing video editing experience and usually comes with some fine quality of effects and themes.
07Magisto Video Editor and Maker
The highlighted features of Magisto
● Easily create a moving photo slideshow or a video collage
● Ready-made templates
● Video Editing features like: cut, merge, trim, or reorder.
● Customization options available with editing of text, fonts, orientation, colors etc.
08MoShow Slideshow Photo & Video
● Easily Adjust Slideshow-timing
● Access few exclusive video-templates.
● Create GIFs as well as looping videos.
● Fine collection of templates
● Built-in music-options
Wondershare Filmora Video Editor can be used for making high quality videos and editing them. The styling, custom options and ease of adding effects in the video make this app popular. The application is well equipped with a wide variety of slideshow making tools.
For Win 7 or later (64-bit)
For macOS 10.12 or later
Key features
● Audio mixing feature
● Tilt shift
● Multiple video clips layer facility
● Adding and editing text feature
● Preview frame wise
● Video stabilizer
In terms of true quality of artificial intelligence technology, this app is the finest one on the list of all the apps for making an iPhone slideshow. If you are curious about the process to create slideshow on iPhone thenfinally you are getting rich collection of features in it like: stabilization, object-detection option, stylish effects, filters, and many more to outshine any average looking slideshow or a video collage.You can easily make collage or a short movie with Magisto video editor with great combination of special effects, graphics and filters.
● Ending Thoughts →
● Make use of some user friendly or light apps to create a slideshow of small sizes
● You can move further onto heavy duty apps for making long videos
● Some apps are having a possible number of features to offer you affordable options
● However, other promising apps like Filmora can give you amazing options to create some logical slideshows for any occasion and at no hidden cost. You can make use of Filmora to adding plenty of designing features to your video.
How To Split Screen On Tiktok
TikTok is probably the most popular video-sharing app in the world right now. Many TikTokers have become famous for making videos that have a significant impact and encourage creativity and new ideas. One of the most popular TikTok trends is the split-screen effect. You’ve probably seen a lot of TikTok split-screen videos with cool effects that made you wonder how the user split their screen. Becoming skilled in using TikTok effects is not as difficult as it might look. It only requires a significant amount of practice. Read on as we show you how to make a TikTok split-screen video.
Using CapCut To Split Screen
CapCut is the official free TikTok Video Maker and Video Editor with Music for TikTok that is multifunctional. Its interface is quite similar and easy to use.
CapCut includes free advanced capabilities such as keyframe animation, stabilization, and Picture-in-Picture (PIP). These are in addition to its fundamental functions, such as video editing, adding stickers, text, and music.
Steps to Split Screen Video with CapCut On Android and IOS Devices
- To use the app, you need to install it first. iPhone and Android users can download CapCut. Navigate to the appropriate app store of your choice and download CapCut.
- After installation, launch the app.
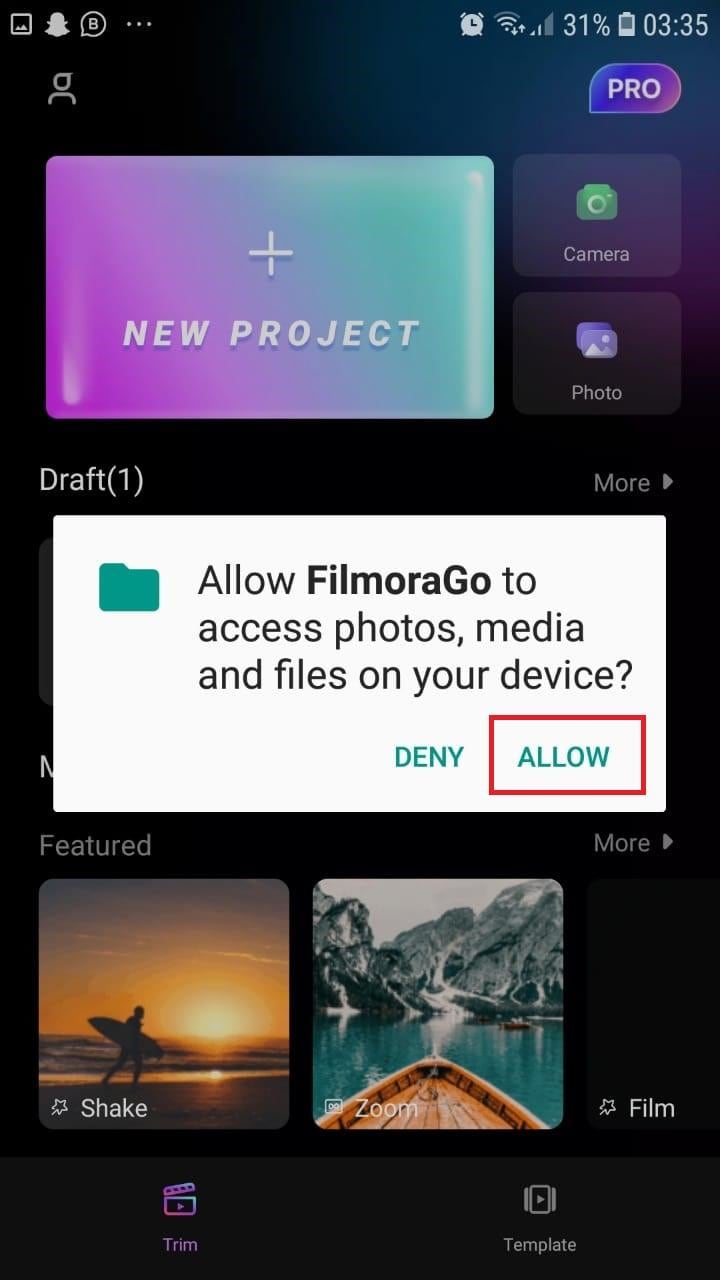
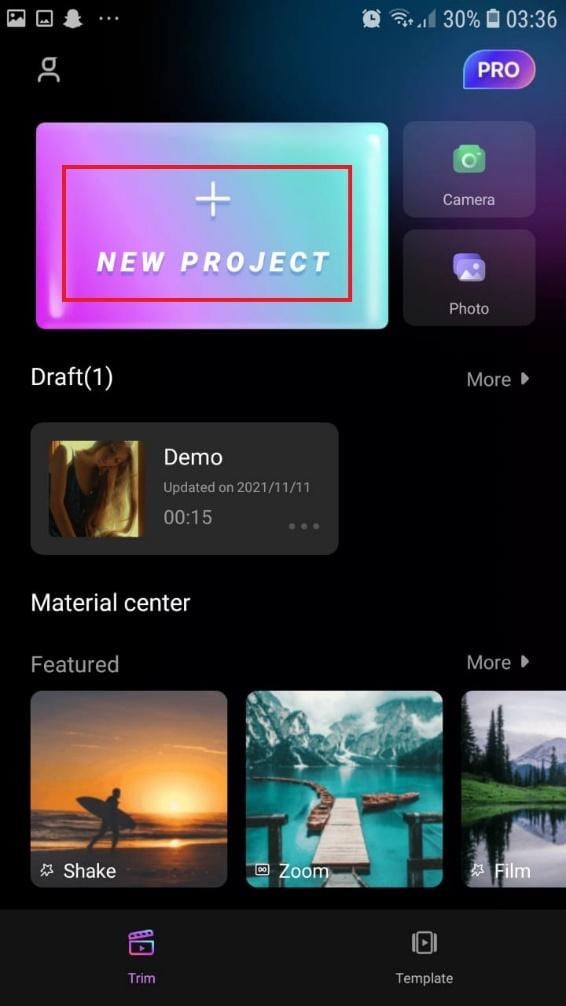
- Then go ahead and grant CapCut permission to view your camera roll. Incorporating video clips into your project has never been easier. Go to the app’s main screen and select “New Project“ from the drop-down menu.
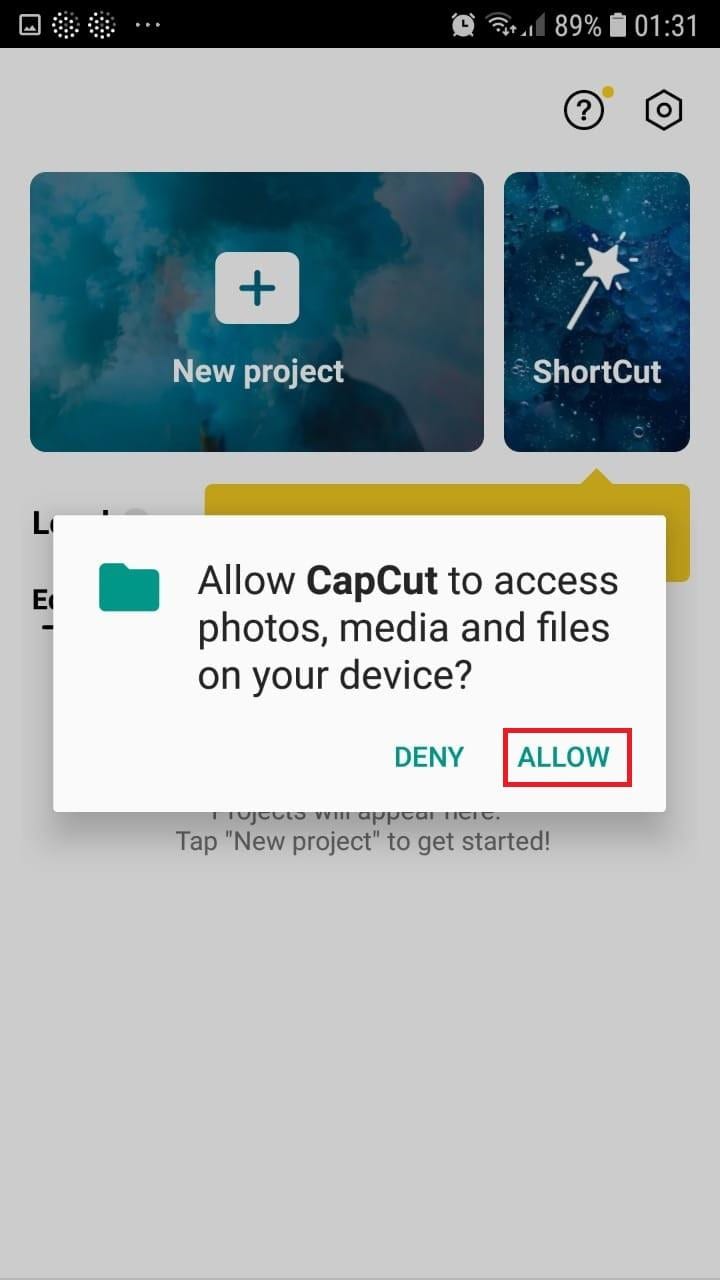
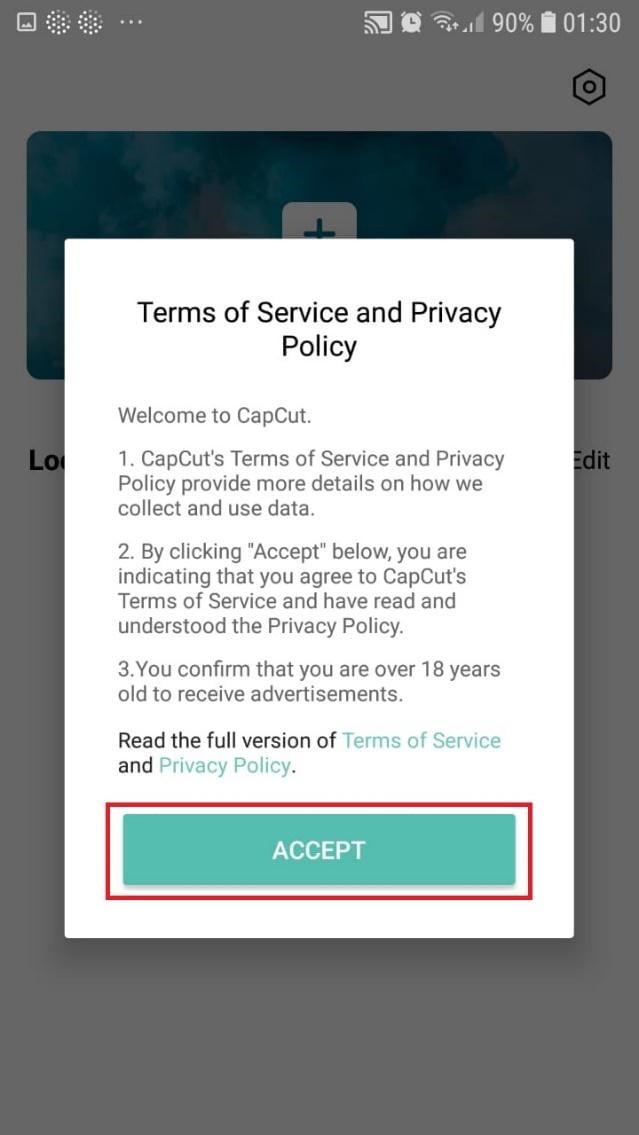
- To confirm your selection, click the green Accept This confirms that CapCut requires access to your photographs to function correctly. Tap on the button on the following pop-up window to gain access to all the photos. This is a one-time process that must be carried out the first time you launch the application.
- Begin a New Project. After opening the app, press the “New Project“ icon to bring up a new screen showing your device’s videos.

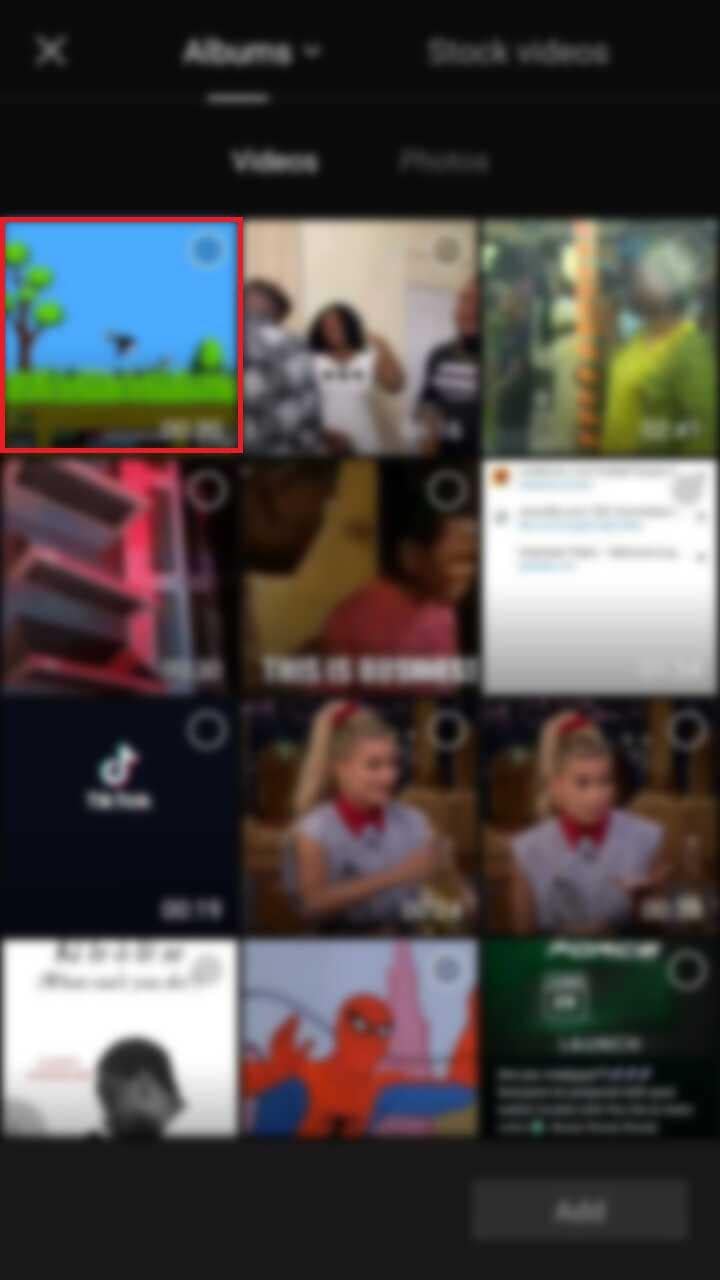
- Choose a video clip. Locate the desired video clip for your project by scrolling through the pages displaying your camera roll. Tap the video’s thumbnail and then tap the “Add“ icon in the screen’s lower part.
- Get familiar with your workspace. Upon uploading your first clip, CapCut leads you to the primary workspace. This is where you will spend most of your time within the app. The preview panel, the timeline, and the toolbar are in order from top to bottom.
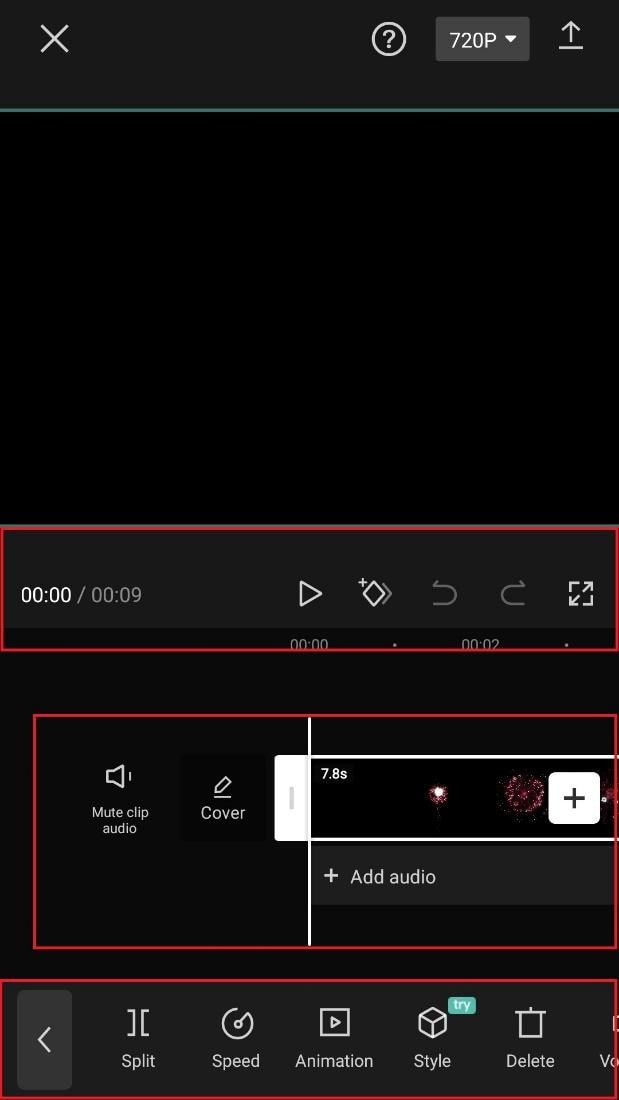
- View the toolbar and timeline. They represent your screen’s bottom half. The timeline, located below the preview panel, is where you’ll make all your adjustments. You can access all your video editing tools, including split, text, audio, effects, stickers, and more, on the toolbar at the bottom of your screen.
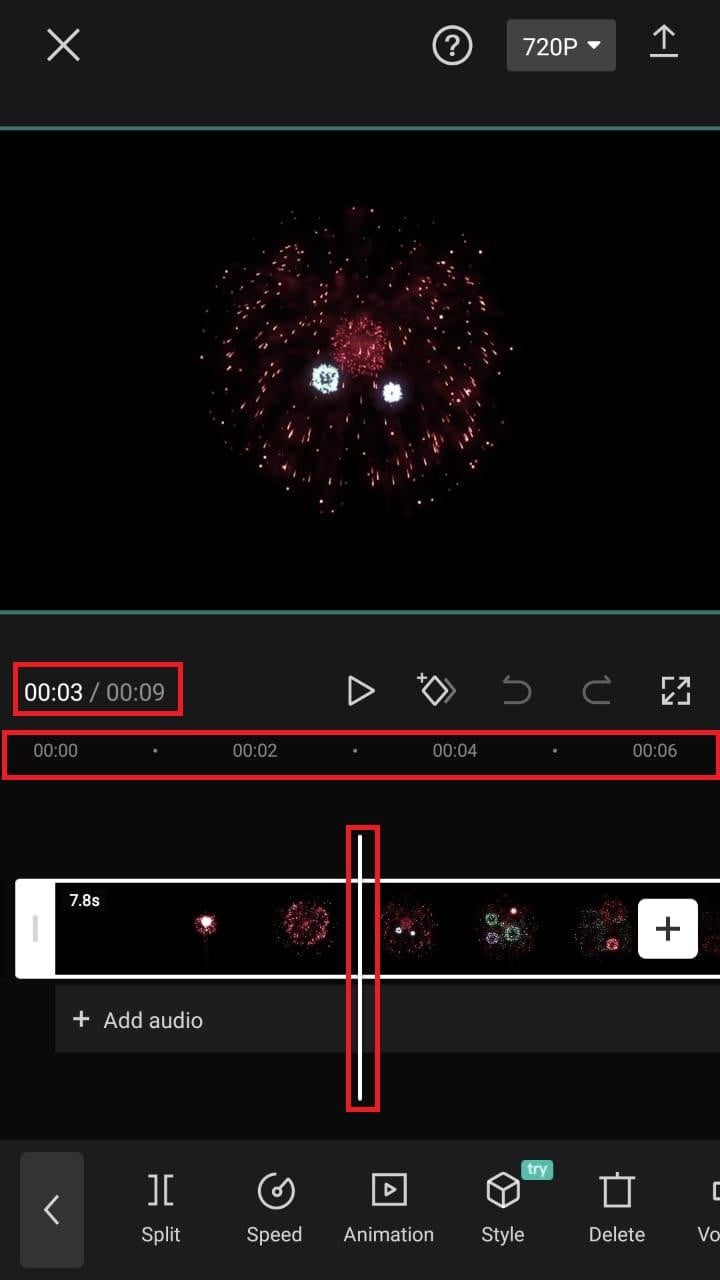
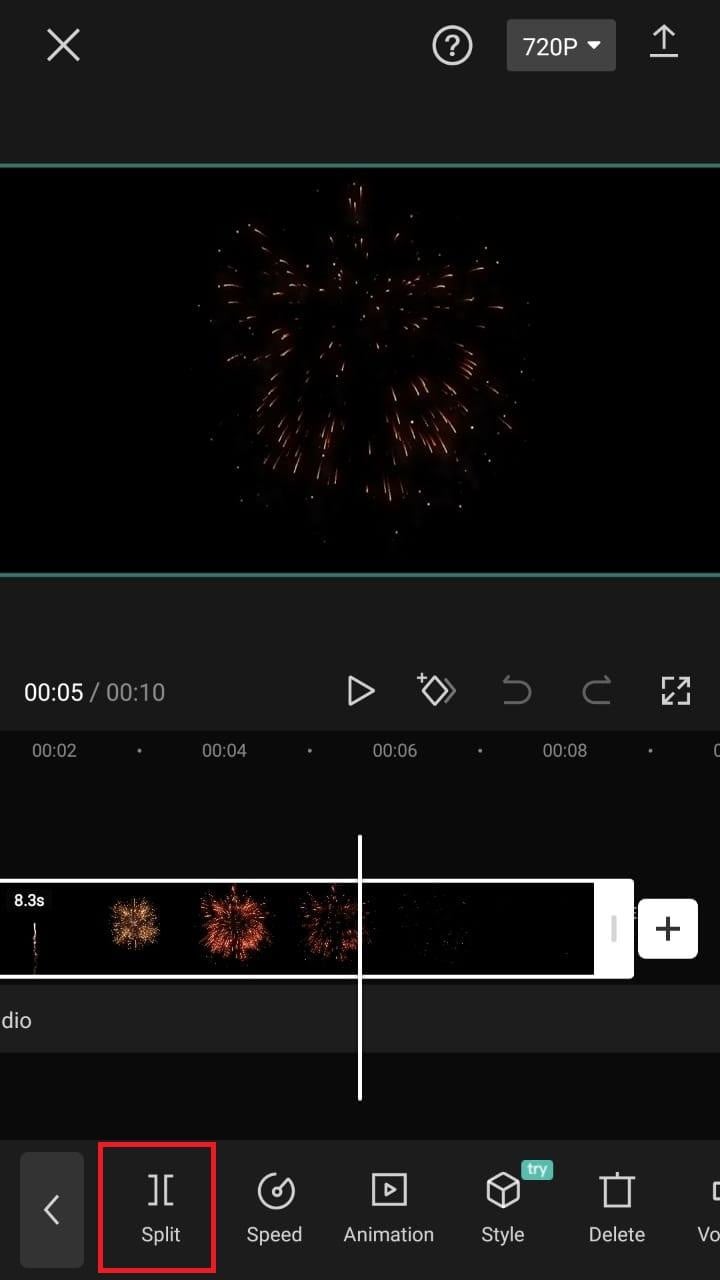
- Split video clips. To split a video clip in half, move the play head to the desired location on the timeline. Tap on your clip, then press the “Split“ toolbar icon. Your result now shows two different clips, not just one.
A Better Split-Screen Effect Video Editor
Filmora is one of the best free HD video makers and video editors with several functionalities, including text, backgrounds, filters, special effects, emoji, audio, and special effects.
Filmora is a feature-packed video editor which has a variety of tools to work with. With this video editor, producing memes, videos with images, pictures, music, stickers, and sound effects and editing videos for YouTube, Twitter, WhatsApp, Facebook, TikTok, and Instagram is simple and entertaining.
Free Download For Win 7 or later(64-bit)
Free Download For macOS 10.14 or later
Steps to Split Screen Video with Filmora
- Download Filmora from the App store
- After installation, launch it.
- Click on “Continue” to continue to use the app.

- Click on Allow to grant Filmora access to your photos and videos.
- You can now tap on “New Project” with the + Symbol.
- Select your desired video and tap on “Next” at the bottom right of your screen
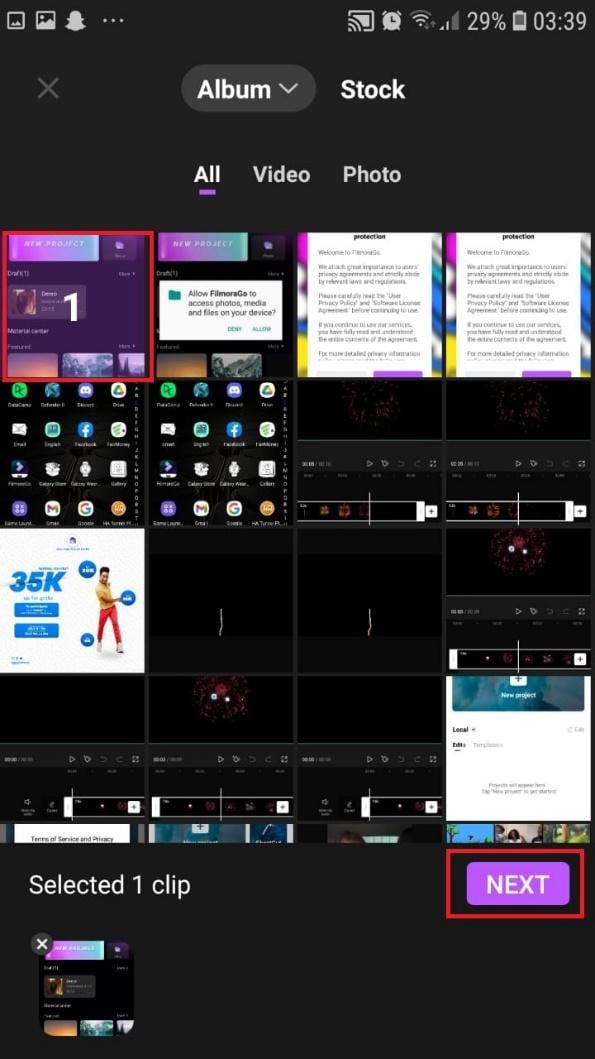
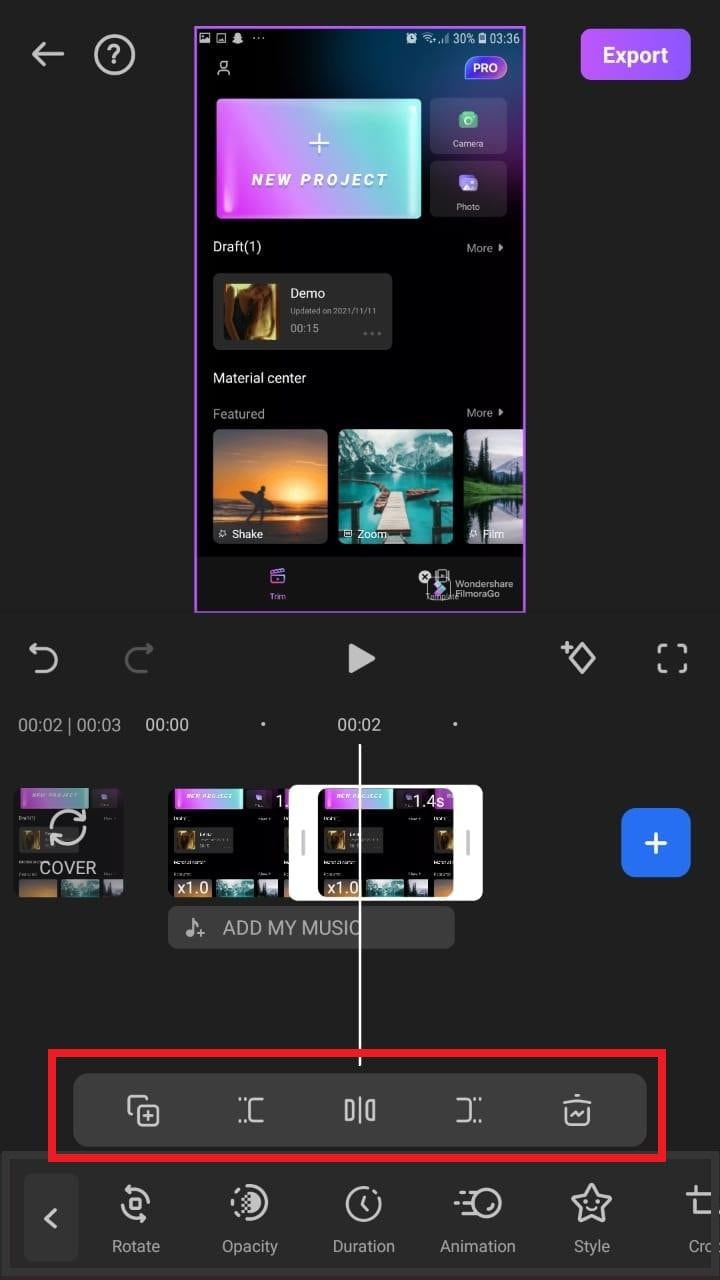
- You can select various options from the bottom of your screen to edit the selected video the way you like.

- Click on trim, and then you will see the different split-screen and collage feature options. Pick any that appeals to you.
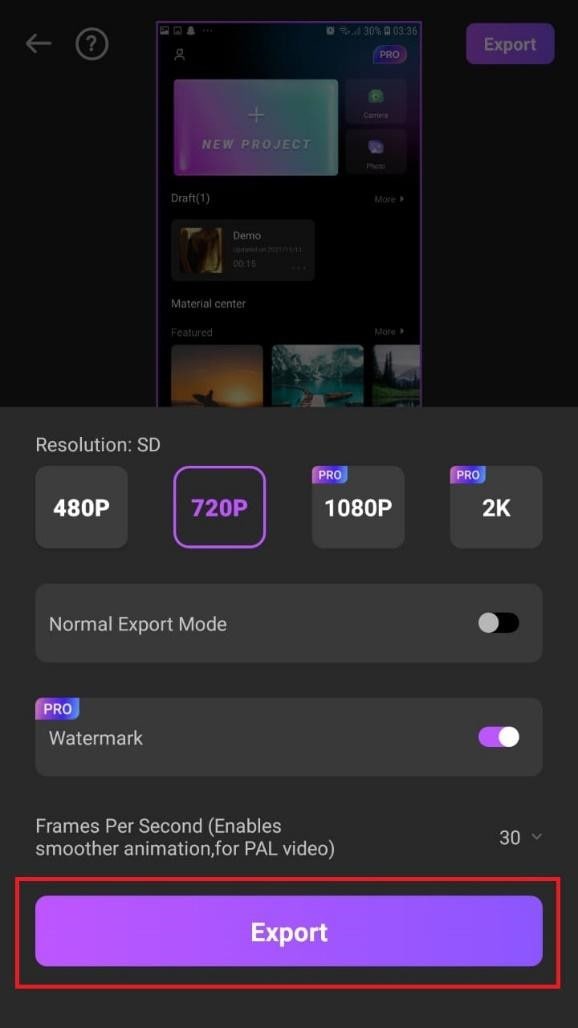
- When you are done with the editing, tap on “Export” at the top right of your screen.

- Go ahead and tap on “Export” on the next screen. Your video will be successfully exported and saved to your camera roll.
Using Filmora is very efficient in splitting your videos and making collage features for TikTok. It is a very simplified app available on both the Google Play Store and Apple Appstore.
Conclusion
TikTok is a platform that users use worldwide to create and share content. It could be pictures, videos, reels, or any other media type. Some people create videos for their audience on TikTok to educate them, while others do it to entertain them.
In any case, the goal is to build a more significant following on TikTok and garner greater attention from its users. You could even make money off the app.
One of the methods to impress your fans and explore multiple possibilities to build unique reels is to use the TikTok split-screen and collage feature effect available on TikTok. Although there are a few different ways to create a Split Screen on TikTok, the steps highlighted in this article are the most straightforward.
Free Download For macOS 10.14 or later
Steps to Split Screen Video with Filmora
- Download Filmora from the App store
- After installation, launch it.
- Click on “Continue” to continue to use the app.
- Click on Allow to grant Filmora access to your photos and videos.
- You can now tap on “New Project” with the + Symbol.
- Select your desired video and tap on “Next” at the bottom right of your screen
- You can select various options from the bottom of your screen to edit the selected video the way you like.
- Click on trim, and then you will see the different split-screen and collage feature options. Pick any that appeals to you.
- When you are done with the editing, tap on “Export” at the top right of your screen.
- Go ahead and tap on “Export” on the next screen. Your video will be successfully exported and saved to your camera roll.
Using Filmora is very efficient in splitting your videos and making collage features for TikTok. It is a very simplified app available on both the Google Play Store and Apple Appstore.
Conclusion
TikTok is a platform that users use worldwide to create and share content. It could be pictures, videos, reels, or any other media type. Some people create videos for their audience on TikTok to educate them, while others do it to entertain them.
In any case, the goal is to build a more significant following on TikTok and garner greater attention from its users. You could even make money off the app.
One of the methods to impress your fans and explore multiple possibilities to build unique reels is to use the TikTok split-screen and collage feature effect available on TikTok. Although there are a few different ways to create a Split Screen on TikTok, the steps highlighted in this article are the most straightforward.
| Change Speed of a Video on iPhone
Versatile Video Editor - Wondershare Filmora
An easy and powerful editor
Numerous effects to choose from
Detailed tutorials provided by the official channel
Do you want to know how to slow down a video on iPhone? Or maybe you want to know how to speed a video up on iPhone.
There might be times you need to speed up or slow down a video that you shoot on iPhone. There are apps and built-in option that allows you to adjust the video’s speed.
This guide will help you out of this problem with step by step process to speed up and slow down iPhone videos.
Let’s get started.
Best Free App for Changing Video Speed on iPhone
Want to know how to slow a video down on iPhone or speed it up? There are numerous apps that let you do this, but not all of them are free and intuitive. However, there’s one such option that stands out from the crowd for its free access and variety of other video editing tools.
Wondershare Filmora is an iOS app available on Apple App Store. You can download the app and install it on your iPhone.
It is essentially a video editing app with an intuitive interface. It can help you speed up videos, slow down videos, or record slowmo iPhone videos that can be shared on social media platforms.
In addition to changing video speed, you can do some basic video editing as well. It includes text effects, stickers effects, music, PIP, and more.
How to Slow Down A Video on iPhone?
Looking for how to slow down a video on iPhone? Keep reading and you’ll find out shortly exactly how to do it.
Have you ever seen a movie trailer and thought that the slow-motion effect looked really cool? Well, you can get the same effect on any of your videos. You can even reverse the effect and speed up your video to create some interesting video effects.
Whatever your reason for slowing down a video, it’s easy to change the speed of your clip using iMovie on iPhone.
Here’s how you can do it:
- You need to have iMovie app installed on your iPhone. If it’s already installed, launch iMovie on your iPhone and start a new project.
- Now, tap the plus sign that’s at the start of the Projects screen.

- Now, a pop-up window will appear where you need to select Movie.

- Now, find and select the video you want to slow down and tap Create Movie button at the center bottom of the screen.

- Now move the playhead to the start of the timeline and tap to select the video. At this point, you’ll see the timeline highlighted in yellow color.
- Look at the bottom of the screen and you’ll find the Speed button with the speedometer icon. Tap the Speed icon and a sliding bar will appear.

- To slow down the video, move the sliding bar to the left side, which’s towards the tortoise. It indicates that the speed of the video will decrease.

- Now click the Play button to preview and then tap Done.
How to Speed Up Videos on iPhone?
Do you want to know how to speed up a video on iPhone? Keep reading to find out.
There are plenty of reasons why you might want to speed up a video. Maybe it’s an educational video that is really slow and boring or it has been recorded in slo-mo. It might be the reason that the video is long and slow, and your audience will get bored midway.
Whatever the reason, speeding up a video is easy to do on iPhone.
Let’s look into two different methods to speed up video on iPhone.
The first method works for videos originally recorded in slo-mo mode on iPhone.
Speed up slo-mo videos using the Photos app
The easiest way to speed up slo-mo videos is using the Photos app that comes pre-installed on iPhone.
Just follow these steps to speed up slo-mo videos:
- Open the Photos app on your iPhone.
- Tap Albums.
- Now, scroll down and tap Slo-mo.

- Tap the slo-mo video you want to speed up.
- Once the video is open, tap Edit.
- You’ll see a set of vertical lines on the bottom of the screen. The vertical lines indicate the video’s speed at that point. Closer lines mean normal speed and a wider distance between lines indicates that the section is in slow motion.

- You can hold and drag a bar and bring it closer to the other one to speed up the slo-mo section of the video. Bringing the lines closer indicates the video is at normal speed.
- Once you have changed the speed, tap Done.

Speed up iPhone videos using iMovie app
Here’s how you can speed up a video on iPhone with iMovie app:
- Launch iMovie on your iPhone and start a new project.
- Now, tap the plus sign visible at the start of the Projects screen.
- A pop-up screen will appear where you need to select Movie.
- Now, you can find and select the video you’re looking to speed up on iPhone. Once sleected, tap Create Movie button at the center bottom of the screen.
- Now move the playhead to the start of the timeline and tap to select the video. At this point, you’ll see the timeline highlighted in yellow color.
- Look at the bottom of the screen and you’ll find the Speed icon. Tap the Speed icon and a sliding bar will appear with a tortoise on its left side and a hare on the right side.
- To speed up the time-lapse video, move the slider to the right side.
- Now click the Play button to preview and then tap Done.
After increasing the speed of the video on iPhone, you can save it or share on your social media accounts or with your friends via messaging apps.
Bonus Tip: How to Change up the speed of a video in Wondershare Filmora
In case you have a video stored on your computer and you need to adjust its speed, you can use Wondershare Filmora.
With Wondershare Filmora, you have the ability to adjust a video’s speed. Flipping through your editing options will reveal your options for doing so. You can increase or decrease the speed of the video with just a few simple clicks.
There are plenty of options around how much you can speed up/down. In fact, you can set a custom speed.
Let’s see how you can slow down and speed up a video using Wondershare Filmora.
How to speed a video up with Filmora
Follow these steps to increase the speed of the video using Wondershare Filmora:
- Download and install Wondershare Filmora on your computer.
- Launch Filmora and click the on new project, or you can just drag and drop the file that you want to edit.

- Click the Import button to load your file or drag and drop the file directly.

- Once imported, you need to drag the file to the timeline.

- Now that the video is on timeline, you need to click the Speed icon and select the Fast option. You can increase the speed by 2x, 4x, 8x, and so on. You can also set a custom speed using Custom Speed option.

- Save the file and use it the way you want.
How to slow down a video using Filmora
To slow down a video using Filmora, you need to follow the below steps:
- Make sure you have Wondershare Filmora installed on your computer.
- Launch Filmora and click the Import button. The browse file window will appear where you need to select the file you want to slow down. You can also drag and drop the file directly.
- Once imported to the media library, drag the file to the timeline.
- Now that the video is on the timeline, click the Speed icon. Since you want to slow down the video, select the Slow option. Filmora lets you slow down a video by 0.5x, 0.25x, 0.1x, 0.05x, and 0.01x. You can also set a custom speed.
- Now, click the Render button to apply the settings.
- Save the file and use it the way you want.
Conclusion
That’s really it! Changing video playback speed on your iPhone couldn’t be simpler, and it will help you save time by leaving you with shorter videos to edit.
We explained the step-by-step process to let you know how to slow down a video on iPhone or speed it up. With the help of a built-in method to speed up slo-mo video and using apps like iMovie and Filmora, you can easily speed up or slow down videos on your iPhone.
When it comes to changing the video’s speed on your computer, Wondershare Filmora is an excellent choice.
We hope this guide helps you to change the speed of videos on your iPhone – without scratching your head.
Do you want to know how to slow down a video on iPhone? Or maybe you want to know how to speed a video up on iPhone.
There might be times you need to speed up or slow down a video that you shoot on iPhone. There are apps and built-in option that allows you to adjust the video’s speed.
This guide will help you out of this problem with step by step process to speed up and slow down iPhone videos.
Let’s get started.
Best Free App for Changing Video Speed on iPhone
Want to know how to slow a video down on iPhone or speed it up? There are numerous apps that let you do this, but not all of them are free and intuitive. However, there’s one such option that stands out from the crowd for its free access and variety of other video editing tools.
Wondershare Filmora is an iOS app available on Apple App Store. You can download the app and install it on your iPhone.
It is essentially a video editing app with an intuitive interface. It can help you speed up videos, slow down videos, or record slowmo iPhone videos that can be shared on social media platforms.
In addition to changing video speed, you can do some basic video editing as well. It includes text effects, stickers effects, music, PIP, and more.
How to Slow Down A Video on iPhone?
Looking for how to slow down a video on iPhone? Keep reading and you’ll find out shortly exactly how to do it.
Have you ever seen a movie trailer and thought that the slow-motion effect looked really cool? Well, you can get the same effect on any of your videos. You can even reverse the effect and speed up your video to create some interesting video effects.
Whatever your reason for slowing down a video, it’s easy to change the speed of your clip using iMovie on iPhone.
Here’s how you can do it:
- You need to have iMovie app installed on your iPhone. If it’s already installed, launch iMovie on your iPhone and start a new project.
- Now, tap the plus sign that’s at the start of the Projects screen.
- Now, a pop-up window will appear where you need to select Movie.
- Now, find and select the video you want to slow down and tap Create Movie button at the center bottom of the screen.
- Now move the playhead to the start of the timeline and tap to select the video. At this point, you’ll see the timeline highlighted in yellow color.
- Look at the bottom of the screen and you’ll find the Speed button with the speedometer icon. Tap the Speed icon and a sliding bar will appear.
- To slow down the video, move the sliding bar to the left side, which’s towards the tortoise. It indicates that the speed of the video will decrease.
- Now click the Play button to preview and then tap Done.
How to Speed Up Videos on iPhone?
Do you want to know how to speed up a video on iPhone? Keep reading to find out.
There are plenty of reasons why you might want to speed up a video. Maybe it’s an educational video that is really slow and boring or it has been recorded in slo-mo. It might be the reason that the video is long and slow, and your audience will get bored midway.
Whatever the reason, speeding up a video is easy to do on iPhone.
Let’s look into two different methods to speed up video on iPhone.
The first method works for videos originally recorded in slo-mo mode on iPhone.
Speed up slo-mo videos using the Photos app
The easiest way to speed up slo-mo videos is using the Photos app that comes pre-installed on iPhone.
Just follow these steps to speed up slo-mo videos:
- Open the Photos app on your iPhone.
- Tap Albums.
- Now, scroll down and tap Slo-mo.
- Tap the slo-mo video you want to speed up.
- Once the video is open, tap Edit.
- You’ll see a set of vertical lines on the bottom of the screen. The vertical lines indicate the video’s speed at that point. Closer lines mean normal speed and a wider distance between lines indicates that the section is in slow motion.
- You can hold and drag a bar and bring it closer to the other one to speed up the slo-mo section of the video. Bringing the lines closer indicates the video is at normal speed.
- Once you have changed the speed, tap Done.
Speed up iPhone videos using iMovie app
Here’s how you can speed up a video on iPhone with iMovie app:
- Launch iMovie on your iPhone and start a new project.
- Now, tap the plus sign visible at the start of the Projects screen.
- A pop-up screen will appear where you need to select Movie.
- Now, you can find and select the video you’re looking to speed up on iPhone. Once sleected, tap Create Movie button at the center bottom of the screen.
- Now move the playhead to the start of the timeline and tap to select the video. At this point, you’ll see the timeline highlighted in yellow color.
- Look at the bottom of the screen and you’ll find the Speed icon. Tap the Speed icon and a sliding bar will appear with a tortoise on its left side and a hare on the right side.
- To speed up the time-lapse video, move the slider to the right side.
- Now click the Play button to preview and then tap Done.
After increasing the speed of the video on iPhone, you can save it or share on your social media accounts or with your friends via messaging apps.
Bonus Tip: How to Change up the speed of a video in Wondershare Filmora
In case you have a video stored on your computer and you need to adjust its speed, you can use Wondershare Filmora.
With Wondershare Filmora, you have the ability to adjust a video’s speed. Flipping through your editing options will reveal your options for doing so. You can increase or decrease the speed of the video with just a few simple clicks.
There are plenty of options around how much you can speed up/down. In fact, you can set a custom speed.
Let’s see how you can slow down and speed up a video using Wondershare Filmora.
How to speed a video up with Filmora
Follow these steps to increase the speed of the video using Wondershare Filmora:
- Download and install Wondershare Filmora on your computer.
- Launch Filmora and click the on new project, or you can just drag and drop the file that you want to edit.
- Click the Import button to load your file or drag and drop the file directly.
- Once imported, you need to drag the file to the timeline.
- Now that the video is on timeline, you need to click the Speed icon and select the Fast option. You can increase the speed by 2x, 4x, 8x, and so on. You can also set a custom speed using Custom Speed option.
- Save the file and use it the way you want.
How to slow down a video using Filmora
To slow down a video using Filmora, you need to follow the below steps:
- Make sure you have Wondershare Filmora installed on your computer.
- Launch Filmora and click the Import button. The browse file window will appear where you need to select the file you want to slow down. You can also drag and drop the file directly.
- Once imported to the media library, drag the file to the timeline.
- Now that the video is on the timeline, click the Speed icon. Since you want to slow down the video, select the Slow option. Filmora lets you slow down a video by 0.5x, 0.25x, 0.1x, 0.05x, and 0.01x. You can also set a custom speed.
- Now, click the Render button to apply the settings.
- Save the file and use it the way you want.
Conclusion
That’s really it! Changing video playback speed on your iPhone couldn’t be simpler, and it will help you save time by leaving you with shorter videos to edit.
We explained the step-by-step process to let you know how to slow down a video on iPhone or speed it up. With the help of a built-in method to speed up slo-mo video and using apps like iMovie and Filmora, you can easily speed up or slow down videos on your iPhone.
When it comes to changing the video’s speed on your computer, Wondershare Filmora is an excellent choice.
We hope this guide helps you to change the speed of videos on your iPhone – without scratching your head.
Using Track Matte and Tracking in Adobe After Effects: Reviewing All Possibilities
The realm of video editing has seen significant progress in recent years. With premium tools such as Adobe After Effects, you can take your videos to the next level. However, not every tool is easy to navigate. Some features in popular video editing software can be hard to get around.
The following guide provides valuable insight on how to use Track Matte in After Effects. Explore the endless possibilities of Track Mattes After Effects and Mask Tracking in After Effects. Also, discover a simple alternative to make After Effects mask tracking easy.
AI Smart Masking Spice up your video content with the endless possibilities of AI masking functions!
Free Download Free Download Learn More

Part 1: How to Utilize Track Mattes in Adobe After Effects?
After Effects by Adobe is a software application dedicated to visual effects and motion graphics for videos. The tool is commonly used in the post-production process of videos. The wide toolset of After Effects can be useful in filmmaking, video gaming, and TV. After Effects offers everything you need to take your creative inspirations to the next level.
- Motion Graphics: After Effects lets users animate characters and backgrounds in videos. You can generate 3-dimensional models from 2D animations. After Effects also supports the animation of logos to bring your elements to life.
- Rotoscoping: You can remove elements or drop new ones in your video using After Effects. The Roto Brush Tool can easily separate the background and foreground. You can then replace unwanted objects and replace them with new elements.
- Motion Tracking: Tracking the movement of an object is quite simple in After Effects. You can pin any element to a moving object. The smooth dynamics can enhance the overall result of the footage.
- VFX and Special Effects: After Effects is the perfect tool to add special effects to your videos. Its VFX tool lets users add magic to the footage. You can make objects disappear, control the weather, stabilize your video, and more.
Using Track Mattes in After Effects
In Adobe After Effects, a track matte is a layer that defines the transparency of another layer. It acts as a stencil, determining which parts of the underlying layer are visible and which are transparent. Track mattes are used for creating various effects such as text animations, transitions, and seamlessly composing multiple layers. After Effects offers four Track Matte options:
![]()
- Alpha Matte: Alpha matte in After Effects allows white areas in the matte layer to become visible while black areas become transparent. Effectively, this helps the underlying layer to show through.
- Alpha Inverted Matte: In an alpha inverted matte, black areas in the matte layer are visible, and white areas are transparent. It reverses the transparency values to create unique effects.
- Luma Matte: A luma matte uses the brightness values of the matte layer to determine visibility. Bright areas in the matte layer are visible, while dark areas are transparent.
- Luma Inverted Matte: The luma inverted matte works opposite to the luma matte. The top layer’s dark areas are visible, while bright areas are transparent.
![]()
You can use any of the track mattes in After Effects according to your requirements. Following is a step-by-step guide on how to use track mattes:
Step 1
To apply a track matte to your video, you must work with two layers. The top layer acts as the alpha or the luminance layer. The bottom layer acts as the fill. Once you have identified the layers, you can proceed to the next step.
Step 2
Go to the “Modes” column and open the dropdown menu next to “Layer List.” Here, select the layer you wish to use as the track matte.
![]()
Step 3
You will see two toggle switches once you select your layer. You can use these switches and the available options to set the transparency for the Track Matte. You can add alpha matte in After Effects or other types from here.
![]()
Part 2: Performing Mask Tracking With Adobe After Effects: Reviewing the Steps
Another remarkable feature that After Effects offers is mask tracking. Using After Effects mask tracking, you can automatically animate a mask’s position, shape, or path. This is done to match the movement of an object in a video clip. You can now easily deal with complex or fast-moving footage with this feature. To use Track Mask in After Effects, you can follow these steps:
Step 1
Import the footage you wish to edit in After Effects. Select the clip you wish to track from the timeline. Then, select the “Pen” tool from the top toolbar or press G on your keyboard. Select the area around the object you wish to mask in the footage.
![]()
Step 2
Now, open the layer and right-click on the mask name to select “Track Mask.” This will open the mask tracker in the tracker panel at the right. Open the dropdown menu next to the “Method” option. Here, you can find a range of options for tracking methods. Choose the one according to your requirements. If the object isn’t moving much, you can choose a simple option such as “Position.”
![]()
Step 3
Tap the “Analyze Forward” icon and let the tracker analyze the frames in the clip. Once the process has finished, you can restart your clip and set “Mask Mode” from the timeline to “Subtract.” This will remove the selected object from the clip.
![]()
Step 4
To fill in the details, go to the “Window” menu from the top and select “Content Aware Fill.” Once you see the panel on the screen, set the “Alpha Extension” slider to a number of your choice and click on “Generate Fill Layer.”
![]()
Part 3: How to Make Masking Easy? Try Wondershare Filmora
Although After Effects is a great tool for professional-quality video editing, it is not everyone’s cup of tea. Features such as motion track masks in After Effects are challenging to navigate. Novice users can face trouble getting around the complex masking process in After Effects. For a simpler alternative, you can try Wondershare Filmora .
Filmora is the complete solution when it comes to video editing. The multi-platform tool offers a range of useful features for video and audio manipulation. With thousands of built-in templates and presets, Filmora can help users kick-start their creative journey. You can use this easy-to-use tool as the perfect alternative to After Effects mask tracking.
Free Download For Win 7 or later(64-bit)
Free Download For macOS 10.14 or later
Main Highlights of Wondershare Filmora
Filmora offers a comprehensive toolset to help users make the most of their media files. Some useful resources provided by Wondershare Filmora include:
- AI Text-Based Editing: Filmora allows users to convert audio from videos into editable text. This can help you easily modify your video content. The feature can be used for quick transcriptions, subtitles, and translations.
![]()
- Speed Ramping: Using Filmora, users can apply professional speed effects in footage. You can adjust your video speed and create unique cinematic effects in no time. Filmora also helps maintain the audio pitch to avoid abrupt changes.
![]()
- Compound Clip: Filmora can help users merge multiple clips into a single footage. You can obtain complete control over the integrated clip for editing. This can help users manage and adjust multiple clips easily.
![]()
- AI Vocal Remover: The Vocal Remover tool of Filmora offers AI power to separate vocals and music from any audio. You can get separate acapella and vocals for various purposes. From karaoke to creative dubs, everything is now possible with Filmora.
![]()
Using AI Smart Masking in Filmora – A Step-by-Step Guide
Filmora offers an AI-powered masking feature for users. This allows automatic recognition and selection of objects in videos. You can create seamless transitions, color-correct elements, remove background, and more. The tool can easily detect and separate objects, so you don’t have to put in manual effort. Here is the step-by-step guide for AI smart masking using Filmora:
Step 1: Import Footage in Filmora
Install and launch Wondershare Filmora on your device. From the homepage, tap “New Project” and go to the “File” tab from the top. Tap “Import Media” in the dropdown menu and insert your video clips into the timeline.
![]()
Step 2: Enable AI Mask
Select your clip in the timeline and go to the “Video” tab from the right panel. Select the “Mask” option and tap the “AI Mask” icon. Under the section, you can choose from options such as “Select Character” or “Smart Brush.” Select one according to your requirements and hit “Add Mask.”
![]()
Step 3: Adjust Mask Settings and Export File
After you apply the masking option, you can adjust other mask settings. Filmora allows users to set the expansion range, blur strength, opacity, and other aspects. Once satisfied with the results, tap the “Export” button from the top-right corner and choose a pathway to save your video.
![]()
Free Download For Win 7 or later(64-bit)
Free Download For macOS 10.14 or later
Conclusion
Adobe After Effects is an industry-standard tool for video editing and manipulation. Track Mattes and Track Masks in After Effects are valuable tools that can help elevate your video’s potential. For a simple and effective alternative, you can try Wondershare Filmora. The tool uses smart masking using AI to make the process easier.
Free Download Free Download Learn More
Part 1: How to Utilize Track Mattes in Adobe After Effects?
After Effects by Adobe is a software application dedicated to visual effects and motion graphics for videos. The tool is commonly used in the post-production process of videos. The wide toolset of After Effects can be useful in filmmaking, video gaming, and TV. After Effects offers everything you need to take your creative inspirations to the next level.
- Motion Graphics: After Effects lets users animate characters and backgrounds in videos. You can generate 3-dimensional models from 2D animations. After Effects also supports the animation of logos to bring your elements to life.
- Rotoscoping: You can remove elements or drop new ones in your video using After Effects. The Roto Brush Tool can easily separate the background and foreground. You can then replace unwanted objects and replace them with new elements.
- Motion Tracking: Tracking the movement of an object is quite simple in After Effects. You can pin any element to a moving object. The smooth dynamics can enhance the overall result of the footage.
- VFX and Special Effects: After Effects is the perfect tool to add special effects to your videos. Its VFX tool lets users add magic to the footage. You can make objects disappear, control the weather, stabilize your video, and more.
Using Track Mattes in After Effects
In Adobe After Effects, a track matte is a layer that defines the transparency of another layer. It acts as a stencil, determining which parts of the underlying layer are visible and which are transparent. Track mattes are used for creating various effects such as text animations, transitions, and seamlessly composing multiple layers. After Effects offers four Track Matte options:
![]()
- Alpha Matte: Alpha matte in After Effects allows white areas in the matte layer to become visible while black areas become transparent. Effectively, this helps the underlying layer to show through.
- Alpha Inverted Matte: In an alpha inverted matte, black areas in the matte layer are visible, and white areas are transparent. It reverses the transparency values to create unique effects.
- Luma Matte: A luma matte uses the brightness values of the matte layer to determine visibility. Bright areas in the matte layer are visible, while dark areas are transparent.
- Luma Inverted Matte: The luma inverted matte works opposite to the luma matte. The top layer’s dark areas are visible, while bright areas are transparent.
![]()
You can use any of the track mattes in After Effects according to your requirements. Following is a step-by-step guide on how to use track mattes:
Step 1
To apply a track matte to your video, you must work with two layers. The top layer acts as the alpha or the luminance layer. The bottom layer acts as the fill. Once you have identified the layers, you can proceed to the next step.
Step 2
Go to the “Modes” column and open the dropdown menu next to “Layer List.” Here, select the layer you wish to use as the track matte.
![]()
Step 3
You will see two toggle switches once you select your layer. You can use these switches and the available options to set the transparency for the Track Matte. You can add alpha matte in After Effects or other types from here.
![]()
Part 2: Performing Mask Tracking With Adobe After Effects: Reviewing the Steps
Another remarkable feature that After Effects offers is mask tracking. Using After Effects mask tracking, you can automatically animate a mask’s position, shape, or path. This is done to match the movement of an object in a video clip. You can now easily deal with complex or fast-moving footage with this feature. To use Track Mask in After Effects, you can follow these steps:
Step 1
Import the footage you wish to edit in After Effects. Select the clip you wish to track from the timeline. Then, select the “Pen” tool from the top toolbar or press G on your keyboard. Select the area around the object you wish to mask in the footage.
![]()
Step 2
Now, open the layer and right-click on the mask name to select “Track Mask.” This will open the mask tracker in the tracker panel at the right. Open the dropdown menu next to the “Method” option. Here, you can find a range of options for tracking methods. Choose the one according to your requirements. If the object isn’t moving much, you can choose a simple option such as “Position.”
![]()
Step 3
Tap the “Analyze Forward” icon and let the tracker analyze the frames in the clip. Once the process has finished, you can restart your clip and set “Mask Mode” from the timeline to “Subtract.” This will remove the selected object from the clip.
![]()
Step 4
To fill in the details, go to the “Window” menu from the top and select “Content Aware Fill.” Once you see the panel on the screen, set the “Alpha Extension” slider to a number of your choice and click on “Generate Fill Layer.”
![]()
Part 3: How to Make Masking Easy? Try Wondershare Filmora
Although After Effects is a great tool for professional-quality video editing, it is not everyone’s cup of tea. Features such as motion track masks in After Effects are challenging to navigate. Novice users can face trouble getting around the complex masking process in After Effects. For a simpler alternative, you can try Wondershare Filmora .
Filmora is the complete solution when it comes to video editing. The multi-platform tool offers a range of useful features for video and audio manipulation. With thousands of built-in templates and presets, Filmora can help users kick-start their creative journey. You can use this easy-to-use tool as the perfect alternative to After Effects mask tracking.
Free Download For Win 7 or later(64-bit)
Free Download For macOS 10.14 or later
Main Highlights of Wondershare Filmora
Filmora offers a comprehensive toolset to help users make the most of their media files. Some useful resources provided by Wondershare Filmora include:
- AI Text-Based Editing: Filmora allows users to convert audio from videos into editable text. This can help you easily modify your video content. The feature can be used for quick transcriptions, subtitles, and translations.
![]()
- Speed Ramping: Using Filmora, users can apply professional speed effects in footage. You can adjust your video speed and create unique cinematic effects in no time. Filmora also helps maintain the audio pitch to avoid abrupt changes.
![]()
- Compound Clip: Filmora can help users merge multiple clips into a single footage. You can obtain complete control over the integrated clip for editing. This can help users manage and adjust multiple clips easily.
![]()
- AI Vocal Remover: The Vocal Remover tool of Filmora offers AI power to separate vocals and music from any audio. You can get separate acapella and vocals for various purposes. From karaoke to creative dubs, everything is now possible with Filmora.
![]()
Using AI Smart Masking in Filmora – A Step-by-Step Guide
Filmora offers an AI-powered masking feature for users. This allows automatic recognition and selection of objects in videos. You can create seamless transitions, color-correct elements, remove background, and more. The tool can easily detect and separate objects, so you don’t have to put in manual effort. Here is the step-by-step guide for AI smart masking using Filmora:
Step 1: Import Footage in Filmora
Install and launch Wondershare Filmora on your device. From the homepage, tap “New Project” and go to the “File” tab from the top. Tap “Import Media” in the dropdown menu and insert your video clips into the timeline.
![]()
Step 2: Enable AI Mask
Select your clip in the timeline and go to the “Video” tab from the right panel. Select the “Mask” option and tap the “AI Mask” icon. Under the section, you can choose from options such as “Select Character” or “Smart Brush.” Select one according to your requirements and hit “Add Mask.”
![]()
Step 3: Adjust Mask Settings and Export File
After you apply the masking option, you can adjust other mask settings. Filmora allows users to set the expansion range, blur strength, opacity, and other aspects. Once satisfied with the results, tap the “Export” button from the top-right corner and choose a pathway to save your video.
![]()
Free Download For Win 7 or later(64-bit)
Free Download For macOS 10.14 or later
Conclusion
Adobe After Effects is an industry-standard tool for video editing and manipulation. Track Mattes and Track Masks in After Effects are valuable tools that can help elevate your video’s potential. For a simple and effective alternative, you can try Wondershare Filmora. The tool uses smart masking using AI to make the process easier.
Also read:
- 2024 Approved Top 20 Best Text To Speech Software Windows, Mac, Android, iPhone & Online
- In 2024, The Ultimate Guide to Use LUTS to Color Grade on iPhone
- Updated 2024 Approved How to Use the Logo Intro Templates for Your Next Video
- Updated In 2024, Add Stylish Text to Videos
- 2024 Approved Learn to Use Montage with These Movies
- 2024 Approved Step by Step to Split Clips in VLC
- New In 2024, Best Free Video Editing Software for Reddit
- New 2024 Approved Progressive Solutions to Add VHS Effects to Video with Ease
- Do You Seek a Guide to Add Motion in Blender? This Article Explains the Blender Motion Blur Effect in Detail and Helps You Master It
- New How to Combine Several Xvid Files Into One Windows, Mac,Android, iPhone & Online
- Updated Create Kinetice Typography Text Effect in Filmora for 2024
- 2024 Approved Step by Step to Rotate Videos in Davinci Resolve
- How to Add Selective Color Effect to Your Videos
- 2024 Approved Do You Want to Know Where You Can Find Online Video Editing Courses? In This Article, We Have Provided 15 Options for Your Various Demand. We Also Recommend a Great Video Editor to Help You Start Your Video Editing Journey with Ease
- New In 2024, Step by Step to Cut Videos in Lightworks
- In 2024, The Most Efficient Ways to Manage Your Timeline
- Updated How Long Does It Take To Edit Videos
- Updated How to Make a Video with My Phone
- How to Add Text Effects in Adobe Premiere Pro?
- New In 2024, Add Subtitles To Videos With Kapwing Step by Step
- New In 2024, Come And Pick! Best MOV to GIF Converters
- EasyHDR Review Is This a Good Choice to Create HDR for 2024
- Vintage Film Effect 1920S - How to Make
- New In 2024, Make Time-Lapse Video on MacBook Complete Guide
- Updated 2024 Approved How to Add Text Effects in Adobe Premiere Pro?
- Updated In 2024, 10 Best Free Spanish Text To Speech Converter Software Windows, Mac, Android, iPhone, & Online
- In 2024, VSDC Free Video Editor Review
- 2024 Approved Create the Night-to-Day Effect Videos
- Track Mattes The Ultimate Guide For After Effects for 2024
- 2024 Approved This Article Introduces How Sheila Become a Youtuber and How She Started Video Editing
- New 2024 Approved Detailed Tutorial to Crop a Video Using Openshot?
- 6 Fixes to Unfortunately WhatsApp has stopped Error Popups On Motorola Moto G73 5G | Dr.fone
- In 2024, How to Reset a Vivo T2 Pro 5G Phone that is Locked?
- Nubia Z50 Ultra Not Connecting to Wi-Fi? 12 Quick Ways to Fix | Dr.fone
- How To Use Allshare Cast To Turn On Screen Mirroring On Xiaomi Redmi Note 12 Pro 5G | Dr.fone
- Top 4 Ways to Trace Apple iPhone 15 Location | Dr.fone
- How do i add my signature to .xls files
- New 2024 Approved Learn How to Draw Cartoons Step by Step with This Guide
- How Can Honor X9bMirror Share to PC? | Dr.fone
- How To Transfer Data From Apple iPhone 12 To Other iPhone 15 Pro devices? | Dr.fone
- In 2024, Easy Ways to Manage Your Infinix Note 30i Location Settings | Dr.fone
- Still Using Pattern Locks with Realme Narzo N53? Tips, Tricks and Helpful Advice
- Why Your WhatsApp Live Location is Not Updating and How to Fix on your Oppo Find X6 | Dr.fone
- In 2024, Why is iPogo not working On Samsung Galaxy F34 5G? Fixed | Dr.fone
- How does the stardust trade cost In pokemon go On Realme GT Neo 5? | Dr.fone
- Realme GT 5 Not Receiving Texts? 10 Hassle-Free Solutions Here | Dr.fone
- In 2024, 3 Effective Methods to Fake GPS location on Android For your Vivo X Flip | Dr.fone
- Possible ways to recover deleted files from Asus ROG Phone 8
- In 2024, How to Cast Honor 90 Pro to Computer for iPhone and Android? | Dr.fone
- Recover iPhone 14 Pro Data From iTunes Backup | Dr.fone
- In 2024, Top 10 AI Subtitle Translators for Content Creators
- In 2024, How to Unlock AT&T Apple iPhone 11 with 3 Methods
- iPhone 8 Plus Asking for Passcode after iOS 17/14 Update, What to Do?
- How To Do OnePlus Nord 3 5G Screen Sharing | Dr.fone
- Xiaomi Redmi K70 can’t play AVCHD .mts video
- In 2024, Complete Review & Guide to Techeligible FRP Bypass and More For Samsung Galaxy A15 4G
- The Magnificent Art of Pokemon Go Streaming On Realme GT 5 (240W)? | Dr.fone
- Title: In 2024, How to Make a Slideshow on iPhone
- Author: Chloe
- Created at : 2024-05-20 03:37:55
- Updated at : 2024-05-21 03:37:55
- Link: https://ai-editing-video.techidaily.com/in-2024-how-to-make-a-slideshow-on-iphone/
- License: This work is licensed under CC BY-NC-SA 4.0.
