
In 2024, How to Make Coin Magic With Filmora

How to Make Coin Magic With Filmora
Do you want to become a magician in your videos? Now, everyone can look like a magician with the magic of editing. This article will show you how to do a cool coin trick in Filmora 11 .
Part 1: What is the filmmaking technique “Cutting on action”
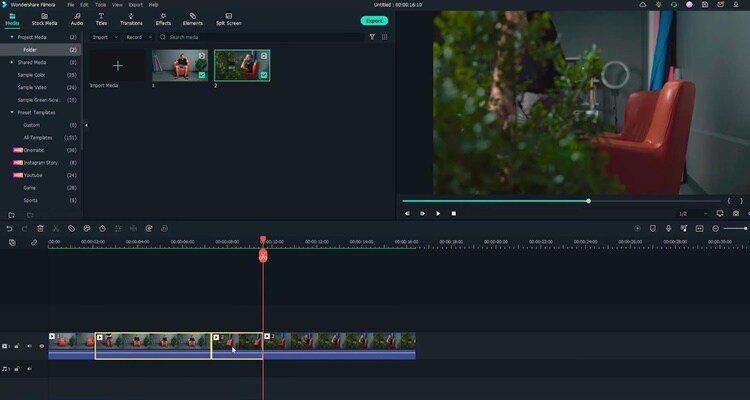
Cutting on action is a technique the editors use to cut in the middle of an action to another shot that matches the first shot’s action. Typically, the subject starts an action in one shot and continues the action in another, creating a smooth transition. For example, when you make the coin trick video, you need to cut on the tapping so it can trick the eyes, and the cut won’t be noticeable.
Part 2: Things You Need to Prepare for The Coin Magic Trick
- Glass and two coins

- Set the phone on a tripod. Because utilizing a tripod can significantly improve the recording’s stability.

Part 3: Start Filming
Step1 Firstly, you must show the coin and the bottom of the glass.

Step2 After that, you need to hold the coin with the fingers part of one hand and tap down on the coin. Make sure it looks like the coin is going through straight to the glass.

Step3 You need someone else to drop the other coin from the top. Meanwhile, you are pretending to tap a coin on the glass. You don’t need to worry about someone else hand in the frame. Since you can remove it easily with the masking feature in Filmora.

Step4 It would help if you had a second shot for a clean plate of the background. You can record background for 20 seconds.

Part 4: Bring the clips into Filmora 11
Step1 If you have not downloaded Filmora, you can visit filmora.wondershare.com to download Filmora’s new version.
Step2 Drag and drop the clip onto the first track of the timeline.Afterward, move the playhead to the right and find the spot where you tapped the coin last time before your friend drops the other coin. Additionally, make sure it is in the middle of the tapping action and cut.
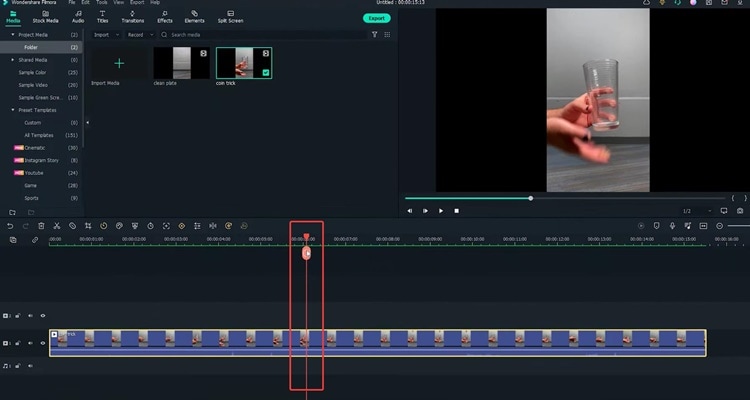
Step3 Then move the playhead to the right and find the spot where your friend drops the coin while you tap without the coin in your hand. Make sure it is in the middle of the tapping action, and the position of your hand roughly matches that in the last cut and make a cut.
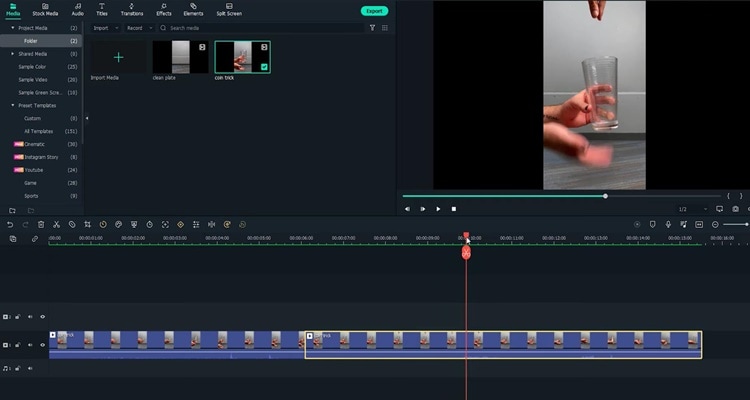
Step4 Now you need to delete the middle part and play it back. Indeed, cutting on action is the key to creating the illusion that the action is continued without editing.
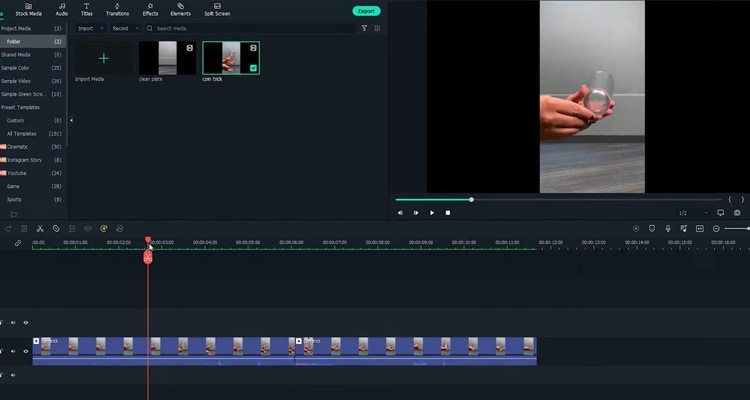
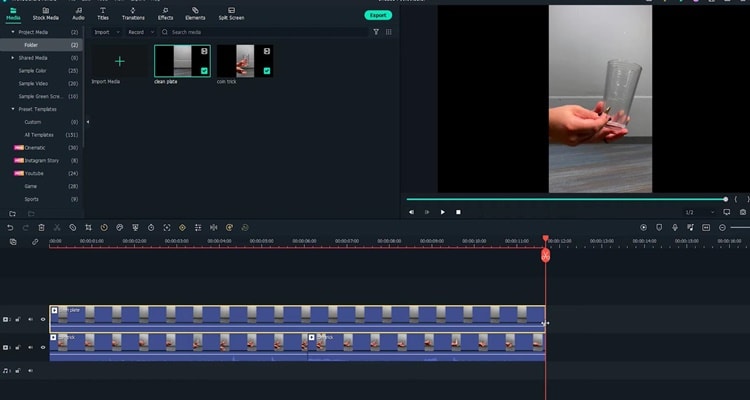
Step5 Next, you must remove your friend’s hand in the frame with the Filmora masking feature. Afterwards. drag and drop the clean plate video onto the second track of the timeline.
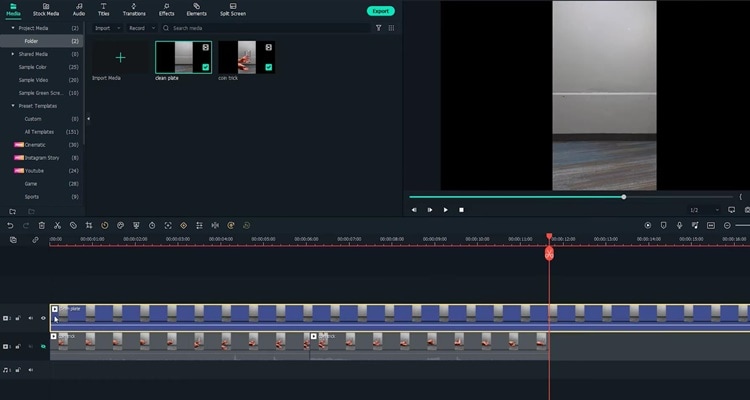
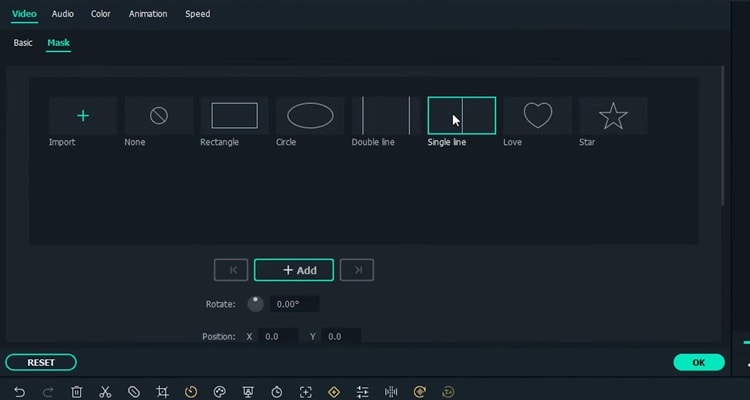
Step6 Next, double-click the clip to open the setting video. Find the Mask Section and select the single line.
Step7 Here you can see the mask is applied.First, adjust the angle and position of the mask to only show the top part of the frame. Then you have to change the Blur Strength to add more blur to the edge of the mask.
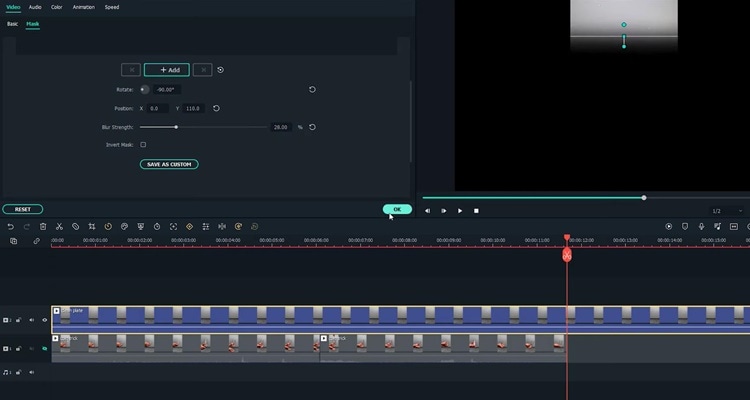
Step8 With the mask finalized, unhide the first video track and adjust the length of the clip on the timeline. Finally, playback the video and see how it looks.
Summary
That’s how to make a coin move through a glass-like MAGIC with the cutting on action editing technique. You can pay close attention to the steps above and follow each step for perfect results.
Free Download For Win 7 or later(64-bit)
Free Download For macOS 10.14 or later
Free Download For macOS 10.14 or later
TOP 6 Online Video Speed Controller for Chrome, Safari, Firefox
Social media and video streaming apps like Facebook, Instagram and YouTube let the user control the video speed, but the speed controls are not smart enough. What if you want to watch the YouTube video at more than 2x speed? That’s where the video speed controller comes in.
AI speed control For Win 7 or later(64-bit)
AI speed control For macOS 10.14 or later
These speed controllers let you speed control video at your liking. If you want to take control of video playback speeds, you can go for the video speed controller download options. Let’s discuss some of the best speed controllers apps and extensions.
- Video Speed Controller
- YouTube Playback Speed Control
- Accelerate for Safari
- Playback Speed
- SpeedUp
- PlayerFab All-in-One
TOP 6 Online Video Speed Controller
01 Video Speed Controller
Video speed controller Chrome extension is one of the best speed control video extensions. You can adjust the playback speed, navigate forward or backward, and control HTML5 audio/video using keyboard shortcuts. The best thing about this speed controller extension is its ability to rewind video for a few seconds without changing playback speeds.
Customizable speed control video adjustments.
Easy shortcuts using a keyboard.
Simple user interface to control the video speed.
Sometime forget settings
02 YouTube Playback Speed Control
If you are looking for the video speed controller download, YouTube Playback Speed Control comes with plenty of speed control video options. The simple pressing of ‘+’ key to increase and ‘-’ to decrease playback speed makes it a favorite extension of every browser user. It is one of the best speed controller extension without any annoying popups on your streaming screen.
Control YouTube video playback speed using keyboard shortcuts.
Customize the keyboard buttons used for controlling playback speed.
Functional with HTML5 YouTube players embedded in other websites.
Doesn’t work with other video streaming options.
03 Accelerate for Safari
If you are a Mac, iPhone or iPad user, you can also download the video speed controller Safari. Accelate for Safari also supports Picture-in-Picture and AirPlay, which means you are not bound to stay in Safari browser to stream the video at your preferred pace. You can play the video in the background and continue browsing. The great thing about this video speed controller Safari extension is that it works with all the streaming and video platforms.
Customize video playback speed and controls in Safari.
Supports keyboard shortcuts for various video controls including play/pause and speed adjustment.
Compatible with major video platforms like YouTube, Netflix, Hulu, and more.
First time setup could be a hassle if you are not techie enough. 04 Playback Speed
04 Playback Speed
If you use Firefox like millions of others but feel sad that we haven’t mentioned video speed controller Firefox extension, well, you shouldn’t be. Playback Speed is one of the best speed controller extension on Firefox that lets you customize the playback controls. Another great thing, you won’t see annoying pop ups as its control center is next to the video link search bar. The setup is easier and the settings user interface is pleasing on the eyes with slider controls.
Play HTML5 videos on YouTube at customizable speeds.
Simple and one touch user interface to control settings
Slow playback speed options are limited.
Limited function availability across other streaming platforms.
05 SpeedUp
SpeedUp is a popular video speed controller Firefox extension with hundreds of downloads. There are many extensions that ask for tracking permission across all websites but SpeedUp doesn’t track any activity even on the video platform. Another great thing is that you can enable in-video buttons to control the video as per your preference. If you use a Firefox browser, you use go for the video speed controller download.
Control speed of all the video streaming platforms and websites.
Support for HTML5 videos on any website.
simple user interface provided by Speedify. Disadvantages
The speed playback buttons could be clumsy sometimes.
06 PlayerFab All-in-One
PlayerFab lets you play back local videos, DVD/Blu-ray/UHD discs, and videos from Amazon and Netflix, and other streaming platforms. As a streaming playback platform, it lets you watch and play videos in one place. All you have to do is type the name of the movie/show, and it will play the video while giving you access to video playback controls.
You can watch videos in FHD, and it supports EAC3 5.1 audio quality.
All in one solution for all the streaming platforms.
Lets you adjust the playback speed.
Hi-Res Audio and Video support.
Lifetime license for premium features needs one time purchase.
Conclusion
If you are looking for a video speed controller that lets you speed control video, we have discussed some of the best video speed controller download options. We have chosen some of the best speed controller extensions for Google Chrome, Mozilla Firefox and Safari.
If you are looking for a speed controller extension, you can download any of the extensions mentioned. However, all these free chrome extensions have some compromises. If you don’t want to compromise on features and control access, you can purchase PlayerFab All-in-One.
Want to Speed up Your Video to Shorten Its Duration and Make It More Entertaining? Here Is How to Speed up Videos in Final Cut Pro. Get a Better Alternative to FCP to Speed up Videos
When there are certain boring but necessary parts in your video, you need to speed them up. Similarly, you may need to reduce the duration of the entire video. Speeding up the video is your only option when you do not want to cut any part. You must have also observed that certain videos look funny when you speed them up. To speed up videos, you will need a video editor that does not degrade the video quality.
Final Cut Pro is a popular choice to speed up video without distorting the pitch. Many think that the video quality can degrade when they change the speed of the video clip. This concern can be taken care of when you alter the video speed with Final Cut Pro. Instead of changing the speed of the entire video, you can change the speed of specific parts. We will illustrate how to speed up the video using Final Cut Pro and suggest a better choice than FCP.
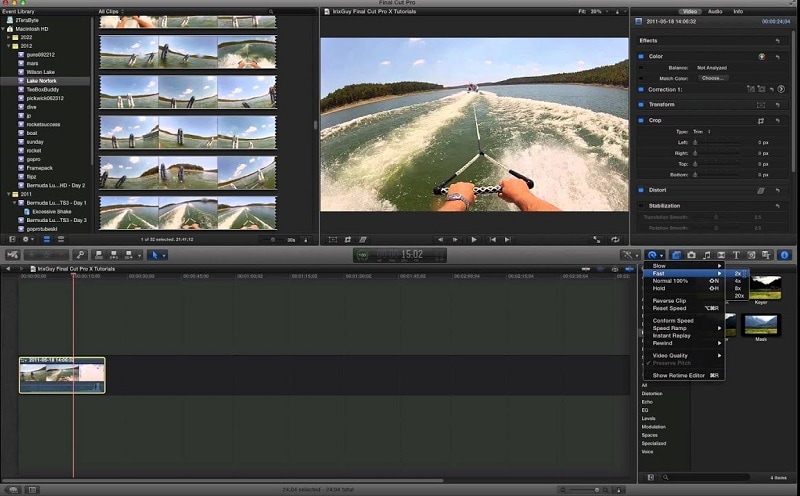
Part I. Speed Up Video using Final Cut Pro
Final Cut Pro by Apple is one of Mac users’ most popular video editors. Many video creators purchase MacBooks for editing their videos in Final Cut Pro. The video editor is suitable for beginners as well as professionals. FCP, as a video editor, is super fast in rendering and processing video while exporting. Here are the steps for the Final Cut Pro speed-up clip.
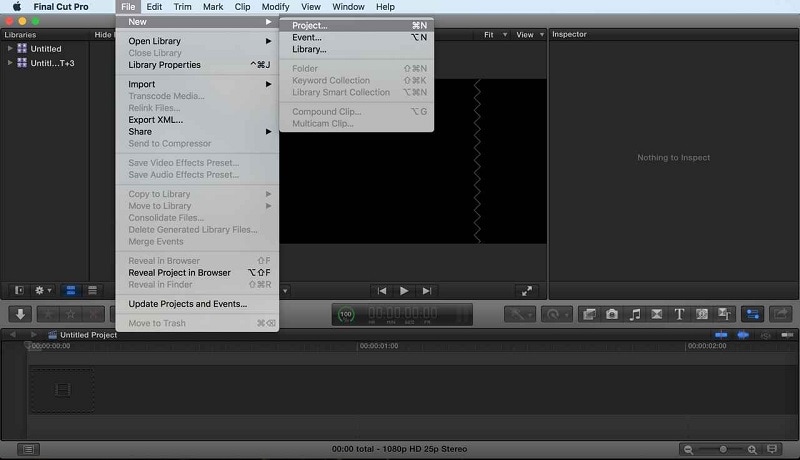
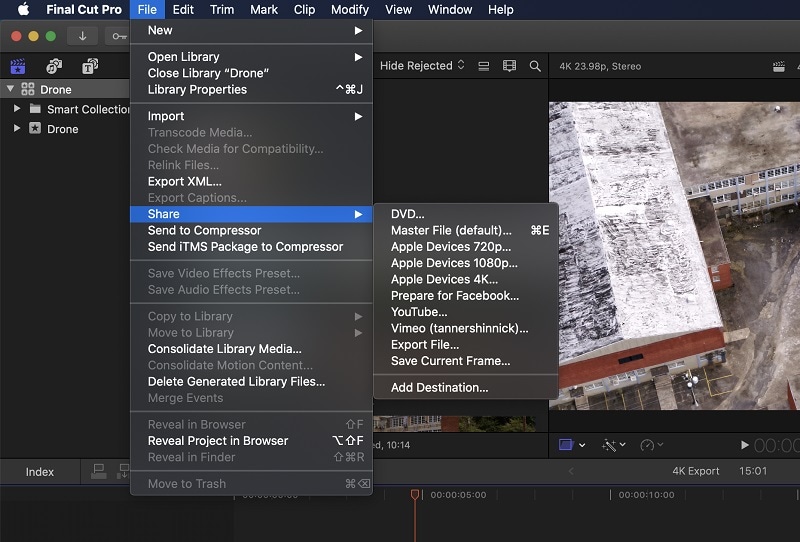
Step1 Open FCP. Navigate to File>New> and tap Project to start a new project.
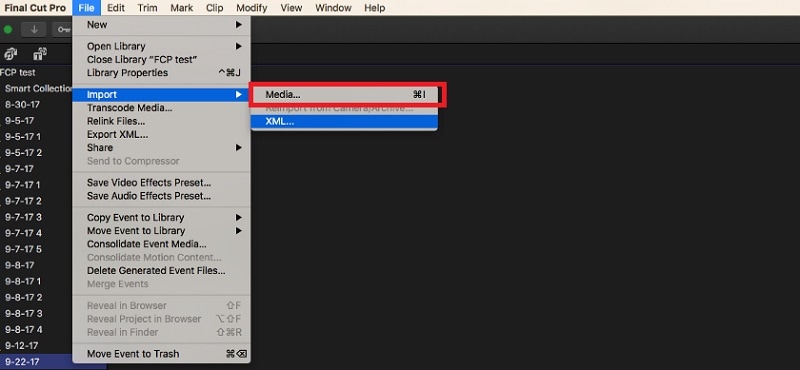
Step2 Go to File>Import> Media and fetch your video clip. After that, drag/drop the video clip into the timeline.
Step3 Choose the video clip from the timeline. Click on the Speedometer(Retime) icon at the top of the timeline.
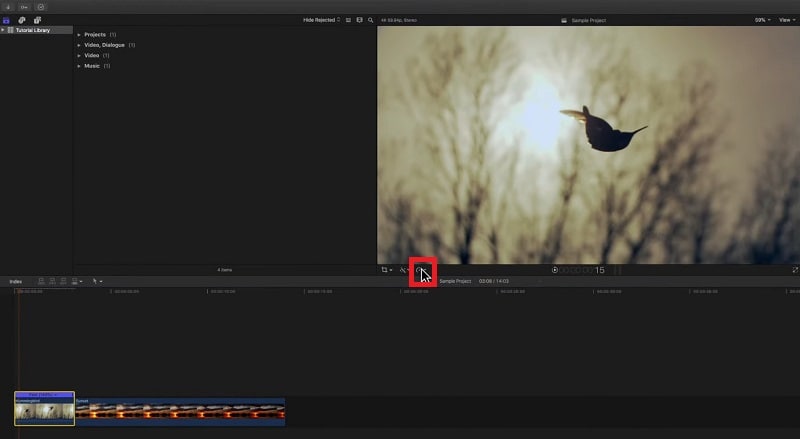
Step4 Tap the Speedometer icon, to get the drop-drop menu. For the Final Cut Pro speed-up video, go to Fast and select the speed. You get to choose from 2X to 20X.
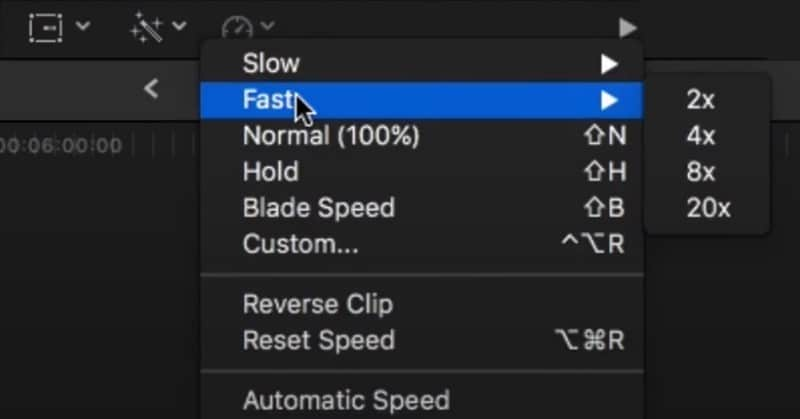
If you want to customize the speed-up rate, you can click on the Custom option. Enter any desired percentage speed.
Step5 Now, play the video.
Part II. Tips for Speeding Up Video in Final Cut Pro
You have to keep a few points in mind when you speed up videos in Final Cut Pro. This ensures that the video does not get distorted while speeding up a section. Here are some tips to follow to speed up the video in FCP.
Adjust The Pitch of Sped-Up Clips -
By default, Final Cut Pro preserves the pitch of the audio even when you change the speed of the video. However, you may want to change the pitch per the video’s speed. This is because you might want to make the audio sound funny. You need to turn off the Preserve Pitch option from Retime menu. Once you do that, the pitch of the sped-up clip adjusts itself as per the change in speed.
Speeding Up Video by Adjusting Frame Rate -
You can shoot at a low frame rate for the scene you want to speed up. The frame rate should be lower than the overall video project’s frame rate.
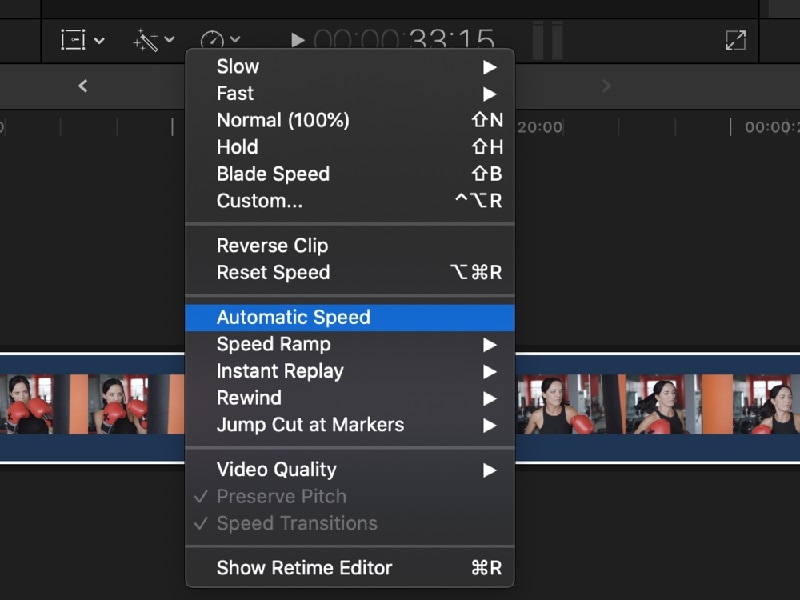
You can add the scene to your video project on the timeline. Then you need to choose Automatic Speed from Retime menu. This will increase the frame rate from the scene to the video project frame rate. Once the frame rate increases, the video will speed up automatically.
Smoothen Out the Sped-Up Video -
Sometimes, the overall video may look old when you speed up a particular portion. That is why there are two options available on Final Cut Pro. The first option is frame blending which is more suitable for the slow-motion clip.
The second option is the optical flow that smoothens out the sped-up clip. It adds in-between frames by analyzing the directional movement of pixels. You can find the option from Video Quality present in the Retime menu.
Part III. The Right Final Cut Pro Alternative for Changing Speed - Filmora
Final Cut Pro has a steep learning curve. Unless you have some experience in video editing, you will find the user interface slightly complicated. Besides, Final Cut Pro is only available for Mac users since it is an Apple product.
Many people look for a Final Cut Pro alternative to change the speed of the video. Wondershare Filmora is the best choice over Final Cut Pro to change the speed of video Final Cut Pro.
Wondershare Filmora is a professional video editor that is available for Windows and Mac users. The video editor is suitable for beginners as well as experienced video creators. The popularity of Filmora is due to its super intuitive user interface. You get almost all the features of FCP in Filmora.
In comparison, there are more video effects, elements, and stock media files available to enhance your videos. You get the latest effects from time to time so that you can have the trending elements in the video, you can also save the edited video in different video file formats as per your requirements, and even record video through a webcam and capture the screen using Filmora.
Several AI effects, stickers, and elements are available to enhance your videos. Most users find it easier to edit videos on Filmora over Final Cut Pro.
Free Download For Win 7 or later(64-bit)
Free Download For macOS 10.14 or later
How to Change Video Speed in Filmora?
Changing video speed in Filmora is super easy. You can speed up your video as per your requirements in a number of ways. That is why Filmora happens to be a better option than Final Cut Pro. We will illustrate all the different methods to change video speed in Filmora.
You can watch this video to understand how to change video speed in Filmora.
Method 1. The Simplest Way - Click “2x-100x” Speed Options
Just like Final Cut Pro, you can choose from preset speed options to change video speed. This is undoubtedly the easiest way to change video speed instantly. While Final Cut Pro offers 2X to 20X speed options, Filmora has 2X to 100X speed presets. Here are the steps to speed up video by choosing a preset speed option.
Step1 Download, install and simply Launch Filmora. Tap Create New Project option.

Step2 Go to File> Import Media> Import Media Files and choose the video file. The selected video will be imported into the Project Media folder. Alternatively, you can also use the drag/drop function.

Step3 Drag and drop the video file onto the timeline. Select the video clip from the timeline and click on the Speed (timer icon) option at the top of the timeline. If you want to speed up a portion of the video, you need to split the video clip.

Step4 From the menu, go to Fast and select any speed option as per your requirements. Thereafter, play the video to see the changes.

Step5 Press Export to save the video file in your desired file format.
Method 2. Use Uniform Speed to Change Speed
If you want to customize the video speed uniformly, there is a dedicated option called Uniform Speed in Filmora. This means you do not want to choose from the preset speed options. You may want to set the speed of the video to 3X, but it is not available in the preset options.
That is where Uniform Speed comes in handy, and you can set any speed from 0.01X to 100X. Here are the steps to follow.
Step1 Once you have dropped the video file onto the timeline, click on the Speed(timer) icon.
Step2 Click on the Uniform Speed option. This will open the Uniform Speed tab above the timeline.

Step3 Adjust the speed slider to set the desired speed as per your requirements. The duration will change as per the speed you set, and you can set the duration below the speed slider. Just like Final Cut Pro, you can turn on Ripple and Audio Pitch as per your preference.

Step4 Once you are satisfied with the speed, click on the Ok button. Thereafter, tap Export to save the edited video file.
Method 3. Use Speed Ramping to Change Speed
There is a unique way to change your video speed called speed ramping. You can speed up some parts and slow down the other parts, like crests and troughs in a graph.
The speed ramping feature comes with several graphical presets. You can choose from the presets and customize the speed as per your requirements. Check the steps to use speed ramping to change your video speed.
Step1 Drag and drop the video file onto the timeline. Click on the Speed(timer) icon at the top of the timeline.
Step2 Click on Speed Ramping option. This will open Speed Ramping above the timeline.

Step3 Select from the available preset as per your requirements. Otherwise, you can select Customize option and edit the nodes as needed.
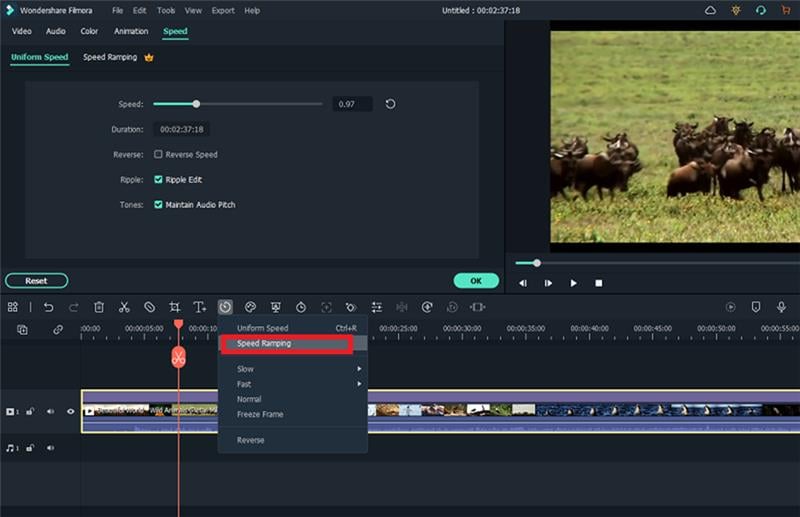
Step4 Once satisfied with the result, click on the Ok button. Finally, tap Export
Conclusion
There are some videos where you may have to speed up certain parts. In detail, we have illustrated how to speed up the video in Final Cut Pro. However, if you do not have Final Cut Pro or are unsatisfied with FCP, Wondershare Filmora is a great choice. Most importantly, the steps for all the different methods are very simple for everyone to follow.
Free Download For macOS 10.14 or later
How to Change Video Speed in Filmora?
Changing video speed in Filmora is super easy. You can speed up your video as per your requirements in a number of ways. That is why Filmora happens to be a better option than Final Cut Pro. We will illustrate all the different methods to change video speed in Filmora.
You can watch this video to understand how to change video speed in Filmora.
Method 1. The Simplest Way - Click “2x-100x” Speed Options
Just like Final Cut Pro, you can choose from preset speed options to change video speed. This is undoubtedly the easiest way to change video speed instantly. While Final Cut Pro offers 2X to 20X speed options, Filmora has 2X to 100X speed presets. Here are the steps to speed up video by choosing a preset speed option.
Step1 Download, install and simply Launch Filmora. Tap Create New Project option.

Step2 Go to File> Import Media> Import Media Files and choose the video file. The selected video will be imported into the Project Media folder. Alternatively, you can also use the drag/drop function.

Step3 Drag and drop the video file onto the timeline. Select the video clip from the timeline and click on the Speed (timer icon) option at the top of the timeline. If you want to speed up a portion of the video, you need to split the video clip.

Step4 From the menu, go to Fast and select any speed option as per your requirements. Thereafter, play the video to see the changes.

Step5 Press Export to save the video file in your desired file format.
Method 2. Use Uniform Speed to Change Speed
If you want to customize the video speed uniformly, there is a dedicated option called Uniform Speed in Filmora. This means you do not want to choose from the preset speed options. You may want to set the speed of the video to 3X, but it is not available in the preset options.
That is where Uniform Speed comes in handy, and you can set any speed from 0.01X to 100X. Here are the steps to follow.
Step1 Once you have dropped the video file onto the timeline, click on the Speed(timer) icon.
Step2 Click on the Uniform Speed option. This will open the Uniform Speed tab above the timeline.

Step3 Adjust the speed slider to set the desired speed as per your requirements. The duration will change as per the speed you set, and you can set the duration below the speed slider. Just like Final Cut Pro, you can turn on Ripple and Audio Pitch as per your preference.

Step4 Once you are satisfied with the speed, click on the Ok button. Thereafter, tap Export to save the edited video file.
Method 3. Use Speed Ramping to Change Speed
There is a unique way to change your video speed called speed ramping. You can speed up some parts and slow down the other parts, like crests and troughs in a graph.
The speed ramping feature comes with several graphical presets. You can choose from the presets and customize the speed as per your requirements. Check the steps to use speed ramping to change your video speed.
Step1 Drag and drop the video file onto the timeline. Click on the Speed(timer) icon at the top of the timeline.
Step2 Click on Speed Ramping option. This will open Speed Ramping above the timeline.

Step3 Select from the available preset as per your requirements. Otherwise, you can select Customize option and edit the nodes as needed.

Step4 Once satisfied with the result, click on the Ok button. Finally, tap Export
Conclusion
There are some videos where you may have to speed up certain parts. In detail, we have illustrated how to speed up the video in Final Cut Pro. However, if you do not have Final Cut Pro or are unsatisfied with FCP, Wondershare Filmora is a great choice. Most importantly, the steps for all the different methods are very simple for everyone to follow.
How to Use the Logo Intro Templates for Your Next Video
Almost every business has a logo, which they use to depict their character and unique values. However, static logos are soon becoming a thing of the past. Companies are now turning to animated logos to wow their audience. Perhaps a logo intro is the missing piece you need to create a buzz around your brand and grab the attention of any onlooker.
The article below will discuss the importance of logo reveals, how they can benefit your company and how to make one for yourself.

Importance of Logo Reveals in Your Intro Video
- First and foremost, logo reveal add some spice to your image. A slight motion could go a long way in giving the viewer a unique perspective on your logo.
- Secondly, logo reveal intro videos set you apart from your competitors. Any slight similarities between logos can be easily forgotten when you create an animated clip of your logo. Logo reveals also boost brand awareness because the animation is etched in your clients’ minds, making it easy to remember.
- Lastly, free logo intro templates evoke positive emotions, which cause your audience to associate your brand with good things.
Benefits of Using Logo Reveal Intro Video With Templates
- The first benefit of using a logo intro template is that it is pretty fast to make. In less than 5 minutes, you will have your video ready to use. You don’t need to go through a learning curve to make the video. The pre-made templates make your work easy, taking the tedium out of the entire process.
- As you continue trying to put your business out there, it would help to consider the cost. A free logo intro template is an affordable way to spread the word about your business and won’t leave a massive dent in your pockets.
- Lastly, logo reveal intro videos with templates are fun to design. It is interesting to see all the shapes and forms come together to form the final result.
How To Make a Logo Reveal Intro Video With Templates
Now that you know what a logo reveal is and how it can benefit your company, you are probably very eager to learn how to make one for yourself. Wondershare Filmora is an example of an efficient tool you can use to create a logo reveal intro video with templates.
Free Download For Win 7 or later(64-bit)
Free Download For macOS 10.14 or later
Since this platform has numerous features, we will only discuss the template feature. Wondershare Filmora has more than 1000 templates you can use to create a stunning logo reveal video. If you are unsatisfied with the stock videos within the template, you can replace them with unique videos from your internal storage.
A bonus point is that Filmora allows you to share your favorite templates with other creators who want to give creating a logo reveal video a trial.
How-to steps
Below is a simple step-by-step guide to making a logo reveal intro video with Filmora.
Step1 Upload videos from your internal storage.
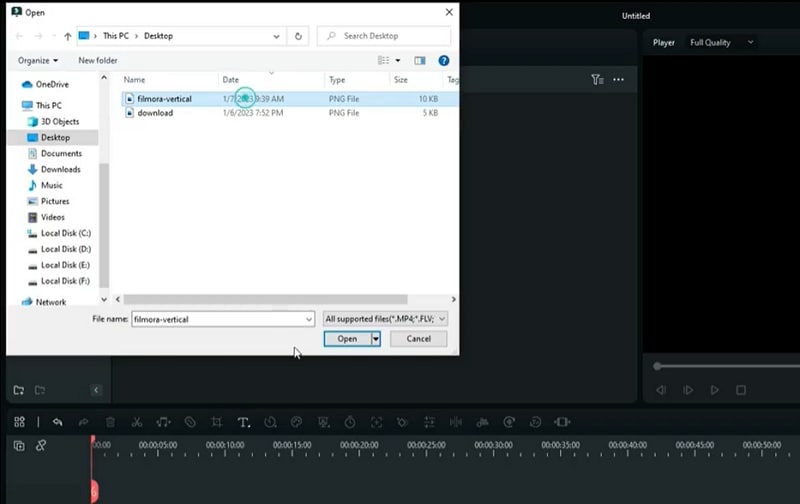
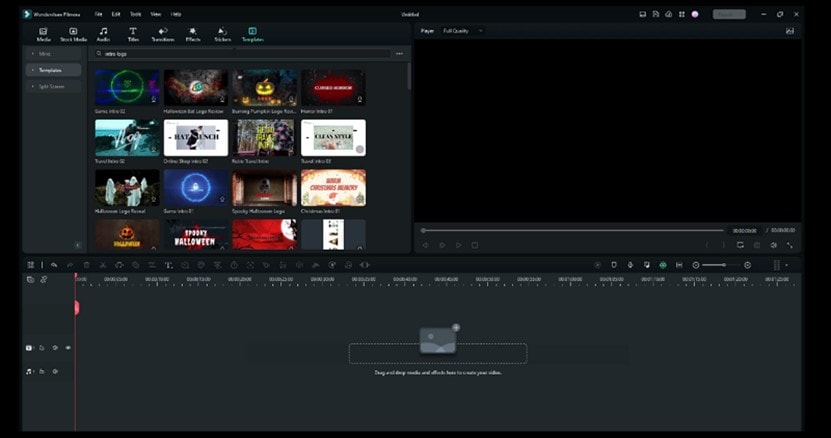
Step2 Select the “Templates” tab and type “Intro logo” in the search bar to narrow down your search.
Step3 Choose a template that tickles your fancy and drag it to the track below.
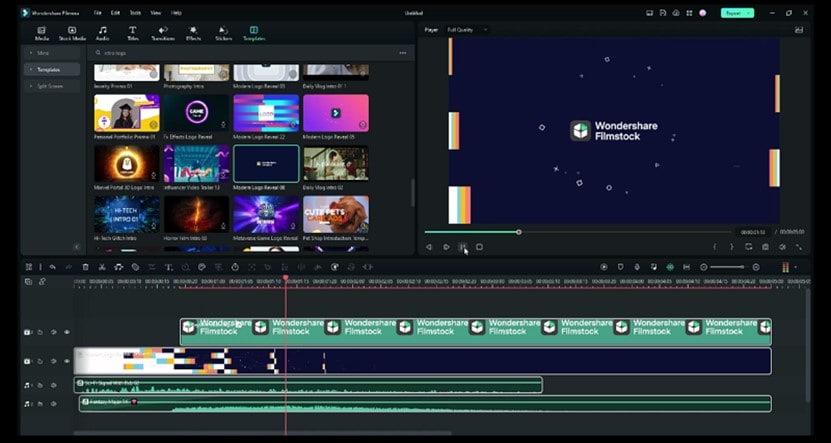
Step4 Drag your own logo to the track to replace the sample one.

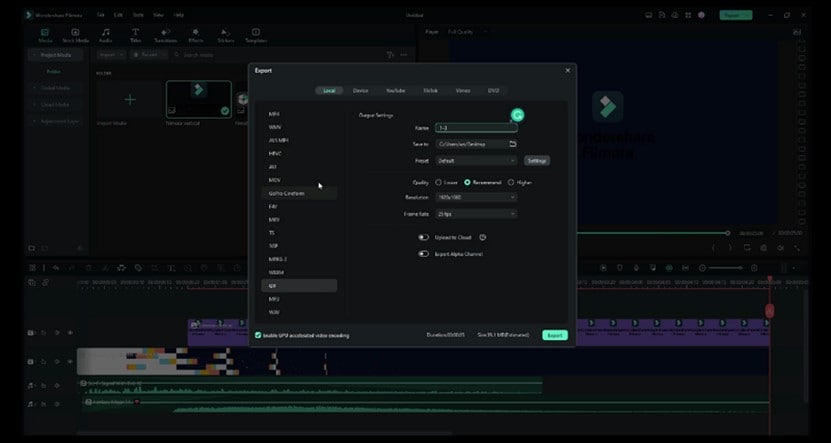
Step5 Export your video as an MP4 and save a copy to your internal storage.
Tips for a Fantastic Logo Intro
We hope the comprehensive guide above was easy to follow and inspired you to try your hand at creating your own logo reveal video. Without further ado, let’s discuss some tips for a fantastic logo intro.
- Start by conducting ample research to find as many intro videos as possible before attempting to make your own. Watching and learning will allow you to figure out what works and what you shouldn’t do. You might also discover many resources to make a fantastic intro video you missed.
- Understand what message your company intends to send and tailor your intro video to portray it as accurately as possible. For instance, you could create a fun video to relay that your brand is easygoing.
- It wouldn’t be a great idea to show your entire logo all at once. You could create anticipation by showing tiny bits of your logo in each frame till the final logo covers the screen.
- Design your video in a manner that keeps your audience glued to the screen. The dynamism will keep the viewer watching because they don’t want to miss what comes next.
- Though it is not mandatory, you could end the video on a dark background, such as pitch black, to ensure your logo is clearly visible to your audience.
- The most important tip is to keep the video short, so you don’t bore your audience. The average attention span for most viewers is shorter than 15 seconds, meaning any video longer than that will cause them to click away from your video.
People Also Ask
Before we bid you goodbye, let’s answer some commonly asked questions about template intro logo and logo reveals.
Q1. What Is a Logo Intro?
You have probably seen a logo intro before, even though you didn’t know what you were looking at. A logo intro is a short clip of a company’s logo that features before a movie.
Recently, companies have started warming up to logo intros to create a lasting impression on their visitors and prospective clients. You could use a logo intro to portray your unique character and encapsulate what you stand for. In addition, a logo intro is a sure way to gain a competitive advantage over your rivals.
Q2. What Is a Logo Reveal?
Contrary to the logo intro that features at the beginning of the clip, a logo reveal comes at the tail end. This short animation is a depiction of your logo, which helps cement your marketing strategy and display your brand in a more interactive manner.
A logo reveal is also known as a logo stinger or sting. Since the average attention span of Internet users is pretty short, it would be a great idea to keep the logo reveal to a maximum of 10 seconds. The shorter the video, the higher the chance your audience will grasp your message and remember your brand.
Q3. What Are the 5 Rules of a Good Logo?
You cannot create an unforgettable logo reveal without designing the logo first. Since your company logo appears on almost anything concerning your business, it would be wise to make a valiant effort to ensure it fits the bill. Below are some of the qualities of a good logo.
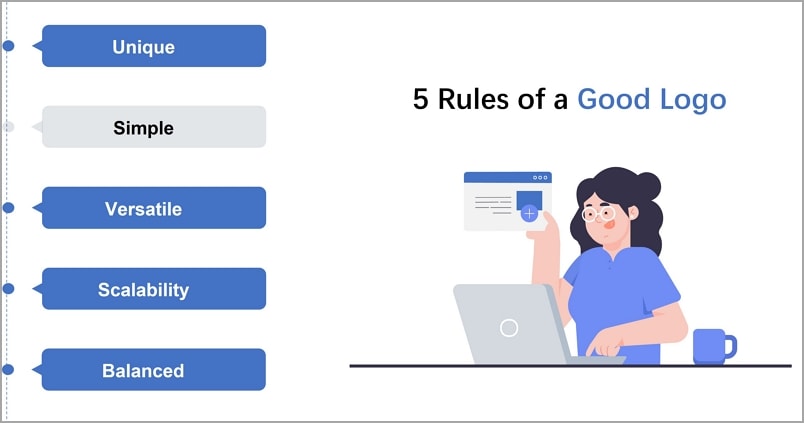
Unique
It would be a shame if your logo looked like someone else’s. Ensure your logo is your own creation and can easily be associated with your brand. Copying someone else’s logo could make your audience mistake you for someone else.
Simple
Complex logos are hard to recognize. They are also much harder to enlarge or reduce. It would help to incorporate strong lines and letters into your logo as opposed to thinner ones.
Versatile
Your logo should look good with or without colour. If you must add colour, ensure you don’t exceed four colours in the design. Remember that printing your logo when it contains too many colours becomes an expensive affair.
Scalability
It would help to ensure that your logo looks good in a big or small size. Remember that you will use your logo on letterheads and perhaps on large banners.
Balanced
Lastly, you should ensure that no element within your logo overpowers the rest. Ensure you keep all the elements in the centre because an asymmetrical logo with all the details in the corner doesn’t look aesthetically pleasing.
Q4. What Are the 7 Elements of a Good Logo?
The seven elements of a good logo include the following.

Simplicity
A simple design is far more superior to an overly complicated one. You could draw inspiration from brands like Nike.
Memorability
A good logo is one that your audience can remember off-head. Simple doesn’t always have to mean simplistic.
Timelessness
Trends come and go, but a timeless logo will remain appropriate in the years to come. It is not uncommon for some brands to retain their logos for more than a decade.
Relevance
It would be wise to ensure your logo relates to your industry in one way or the other.
High-quality typography
The wrong font on your logo can negatively impact your business. Your typography should also be easy to read from afar.
Well-balanced colors
Your choice of colors can subconsciously influence your target audience’s buying decisions and how they perceive you. For instance, blue communicates honesty and reliability, while yellow elicits feelings of happiness.
Versatility
Lastly, it would be wise to ensure that you can use your logo in numerous instances, like on a letterhead or on your social media platforms.
Conclusion
We cannot dispute a logo’s importance to your overall brand image. Your logo helps you communicate your unique message to your target audience and prospective clients. Instead of sticking with the bland, old-fashioned static logo, you have now learned a new way to animate your logo and add some spice. We hope the suggestions in this article will help you create an excellent logo reveal intro video that keeps your audience hooked and craving more.
Free Download For macOS 10.14 or later
Since this platform has numerous features, we will only discuss the template feature. Wondershare Filmora has more than 1000 templates you can use to create a stunning logo reveal video. If you are unsatisfied with the stock videos within the template, you can replace them with unique videos from your internal storage.
A bonus point is that Filmora allows you to share your favorite templates with other creators who want to give creating a logo reveal video a trial.
How-to steps
Below is a simple step-by-step guide to making a logo reveal intro video with Filmora.
Step1 Upload videos from your internal storage.

Step2 Select the “Templates” tab and type “Intro logo” in the search bar to narrow down your search.

Step3 Choose a template that tickles your fancy and drag it to the track below.

Step4 Drag your own logo to the track to replace the sample one.

Step5 Export your video as an MP4 and save a copy to your internal storage.

Tips for a Fantastic Logo Intro
We hope the comprehensive guide above was easy to follow and inspired you to try your hand at creating your own logo reveal video. Without further ado, let’s discuss some tips for a fantastic logo intro.
- Start by conducting ample research to find as many intro videos as possible before attempting to make your own. Watching and learning will allow you to figure out what works and what you shouldn’t do. You might also discover many resources to make a fantastic intro video you missed.
- Understand what message your company intends to send and tailor your intro video to portray it as accurately as possible. For instance, you could create a fun video to relay that your brand is easygoing.
- It wouldn’t be a great idea to show your entire logo all at once. You could create anticipation by showing tiny bits of your logo in each frame till the final logo covers the screen.
- Design your video in a manner that keeps your audience glued to the screen. The dynamism will keep the viewer watching because they don’t want to miss what comes next.
- Though it is not mandatory, you could end the video on a dark background, such as pitch black, to ensure your logo is clearly visible to your audience.
- The most important tip is to keep the video short, so you don’t bore your audience. The average attention span for most viewers is shorter than 15 seconds, meaning any video longer than that will cause them to click away from your video.
People Also Ask
Before we bid you goodbye, let’s answer some commonly asked questions about template intro logo and logo reveals.
Q1. What Is a Logo Intro?
You have probably seen a logo intro before, even though you didn’t know what you were looking at. A logo intro is a short clip of a company’s logo that features before a movie.
Recently, companies have started warming up to logo intros to create a lasting impression on their visitors and prospective clients. You could use a logo intro to portray your unique character and encapsulate what you stand for. In addition, a logo intro is a sure way to gain a competitive advantage over your rivals.
Q2. What Is a Logo Reveal?
Contrary to the logo intro that features at the beginning of the clip, a logo reveal comes at the tail end. This short animation is a depiction of your logo, which helps cement your marketing strategy and display your brand in a more interactive manner.
A logo reveal is also known as a logo stinger or sting. Since the average attention span of Internet users is pretty short, it would be a great idea to keep the logo reveal to a maximum of 10 seconds. The shorter the video, the higher the chance your audience will grasp your message and remember your brand.
Q3. What Are the 5 Rules of a Good Logo?
You cannot create an unforgettable logo reveal without designing the logo first. Since your company logo appears on almost anything concerning your business, it would be wise to make a valiant effort to ensure it fits the bill. Below are some of the qualities of a good logo.

Unique
It would be a shame if your logo looked like someone else’s. Ensure your logo is your own creation and can easily be associated with your brand. Copying someone else’s logo could make your audience mistake you for someone else.
Simple
Complex logos are hard to recognize. They are also much harder to enlarge or reduce. It would help to incorporate strong lines and letters into your logo as opposed to thinner ones.
Versatile
Your logo should look good with or without colour. If you must add colour, ensure you don’t exceed four colours in the design. Remember that printing your logo when it contains too many colours becomes an expensive affair.
Scalability
It would help to ensure that your logo looks good in a big or small size. Remember that you will use your logo on letterheads and perhaps on large banners.
Balanced
Lastly, you should ensure that no element within your logo overpowers the rest. Ensure you keep all the elements in the centre because an asymmetrical logo with all the details in the corner doesn’t look aesthetically pleasing.
Q4. What Are the 7 Elements of a Good Logo?
The seven elements of a good logo include the following.

Simplicity
A simple design is far more superior to an overly complicated one. You could draw inspiration from brands like Nike.
Memorability
A good logo is one that your audience can remember off-head. Simple doesn’t always have to mean simplistic.
Timelessness
Trends come and go, but a timeless logo will remain appropriate in the years to come. It is not uncommon for some brands to retain their logos for more than a decade.
Relevance
It would be wise to ensure your logo relates to your industry in one way or the other.
High-quality typography
The wrong font on your logo can negatively impact your business. Your typography should also be easy to read from afar.
Well-balanced colors
Your choice of colors can subconsciously influence your target audience’s buying decisions and how they perceive you. For instance, blue communicates honesty and reliability, while yellow elicits feelings of happiness.
Versatility
Lastly, it would be wise to ensure that you can use your logo in numerous instances, like on a letterhead or on your social media platforms.
Conclusion
We cannot dispute a logo’s importance to your overall brand image. Your logo helps you communicate your unique message to your target audience and prospective clients. Instead of sticking with the bland, old-fashioned static logo, you have now learned a new way to animate your logo and add some spice. We hope the suggestions in this article will help you create an excellent logo reveal intro video that keeps your audience hooked and craving more.
Also read:
- [Updated] 2024 Approved Enter the World of Online Promotion Exclusive Free YouTube Banner Access
- [Updated] In 2024, Elite Gaming Setup Essentials Revealed
- 2024 Approved How to Color Grading in Final Cut Pro
- 2024 Approved Leveraging Wirecast for High Impact, Engaging Social Media Streams
- 2024 Approved This Article Talks in Detail About How to Export iMovie Video From iPhone, Mac, Etc. It Also Covers the Process of Using iMovie Alternative to Edit Videos on Mac. Check Out Now
- Do You Know There Are Websites to Download Free Glitch Transition Effects for Premiere Pro? You Can Easily Download Them and Make Awesome Videos for 2024
- Eliminating iPhone/Android Issues with FB Message Video Sharing for 2024
- Explore the Boundaries of Visual Storytelling in Windows Photos + Story Remix
- How To Quickly Create A Screen Print Effect In Photoshop Detailed Guide for 2024
- In 2024, Jumpstart Your Match Game Quick, Effective Hacks for Tinder Profiles
- In 2024, Vintage Film Effect 1980S - How to Create
- New Easy Way to Add Transitions to Videos for 2024
- New How to Easily Create a Free Eye-Catching Intro Videos with Invideo
- New In 2024, HDR Photography How to Use HDR Mode on Your Android Devices
- Solved: Troubleshooting Silent Issues in Apex Legends - Get the Audio Back
- Troubleshooting a Nonfunctional Dell Wireless Keypad – Solutions Inside
- Troubleshooting Error Code 0X80070422 in Windows 11 Update Process: Expert Tips
- Title: In 2024, How to Make Coin Magic With Filmora
- Author: Chloe
- Created at : 2025-01-20 09:27:19
- Updated at : 2025-01-24 07:09:14
- Link: https://ai-editing-video.techidaily.com/in-2024-how-to-make-coin-magic-with-filmora/
- License: This work is licensed under CC BY-NC-SA 4.0.