
In 2024, How to Make Fortnite Thumbnail with Motion Blur?

How to Make Fortnite Thumbnail with Motion Blur?
Motion blur has been a provocative effect used in filming and video making. The effect has made a popular mark globally for its realistic base. This is why motion blur is integrated into every other platform directed at creativity. The motion blur effect in creating thumbnails is another highlight of this effect. While many tools provide this service, finding the best one is essential.
In this article, we will work on the best methods to make a Fortnite motion blur thumbnail. With the help of these methods, you will be able to design the perfect Fortnite thumbnail for your video.

Part 1: How to Add Motion Blur to Fortnite Thumbnail?
There are many ways to add motion blur to Fortnite thumbnails, as stated above. In this article, we will be providing appropriate methods for users of all types. From smartphone to online and desktop solutions, this article has it all.
Way 1: Make Motion Blur Fortnite Thumbnail with Picsart (Smartphone)
For the first method, we will be discussing an appropriate way that can be used to make motion blur in Fortnite thumbnails. Picsart is a known mobile application providing unique photo editing services. This photo editor is a complete package containing some of the best tools. Integrated with artificial intelligence, this tool presents a perfect platform to perform motion blur on Fortnite thumbnails.
Steps to Perform Motion Blur on Fortnite Thumbnail with Picsart
We will proceed to observe the step-by-step guide on performing motion blur on Fortnite thumbnails with the help of Picsart:
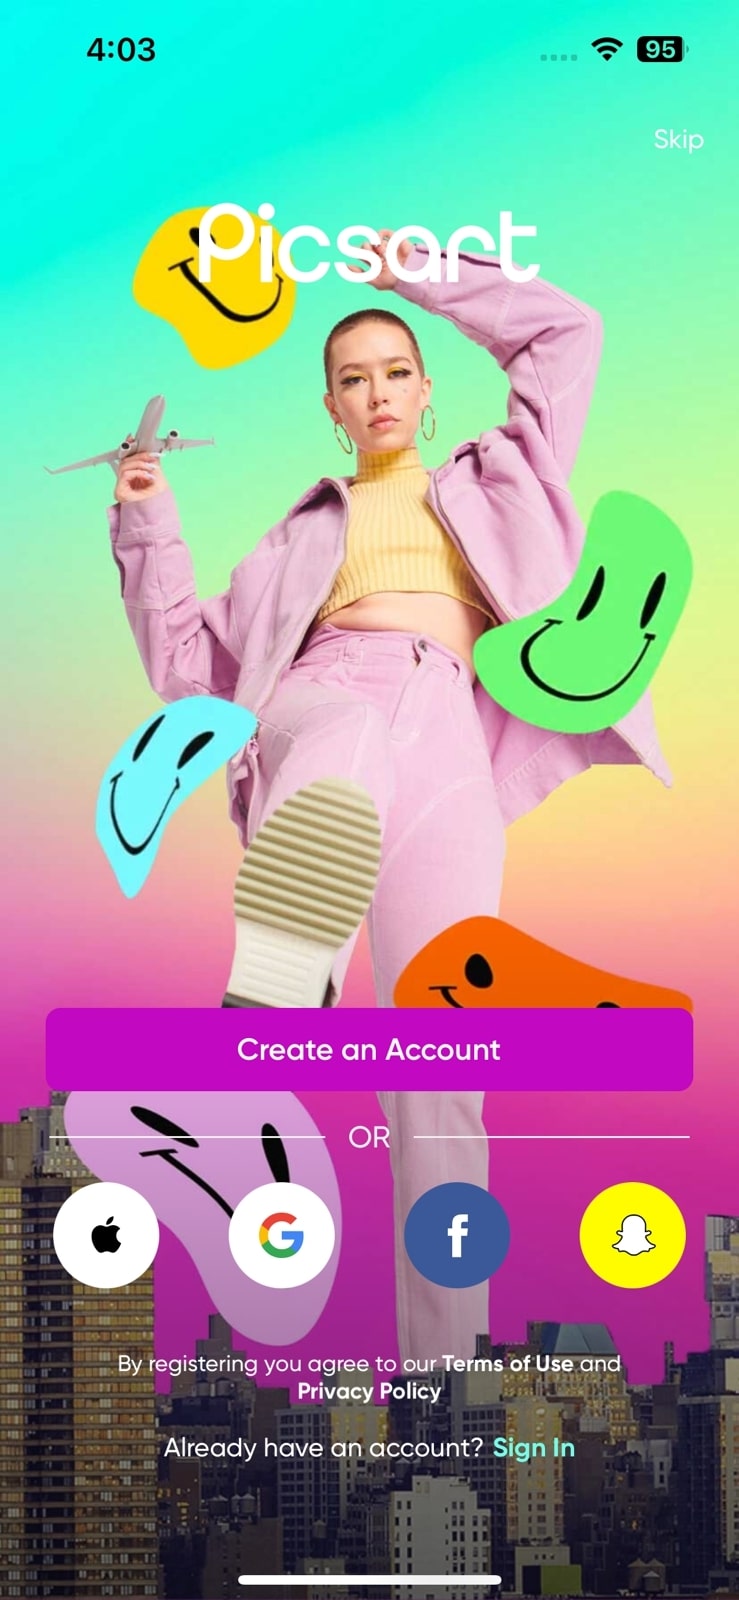
Step1 Launch Picsart on Smartphone
Download and install Picsart on your phone and proceed to launch it. As it opens, sign in to the tool, if required, and redirect to the next screen.
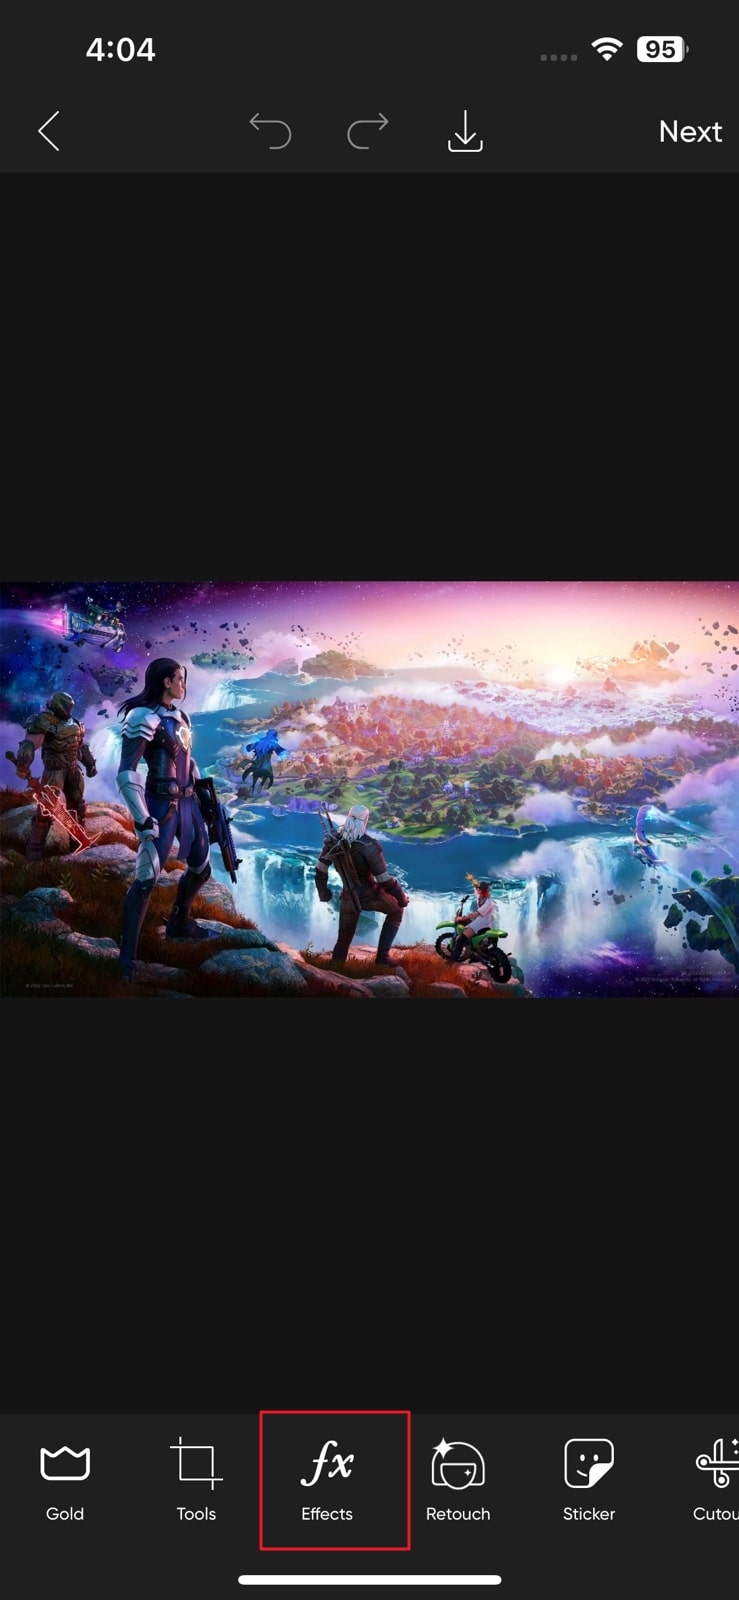
Step2 Proceed to Effects Tab After Importing Thumbnail
You will have to import the created Fortnite thumbnail that is to be edited. After importing the thumbnail, select “Effects” from the bottom panel of the application.
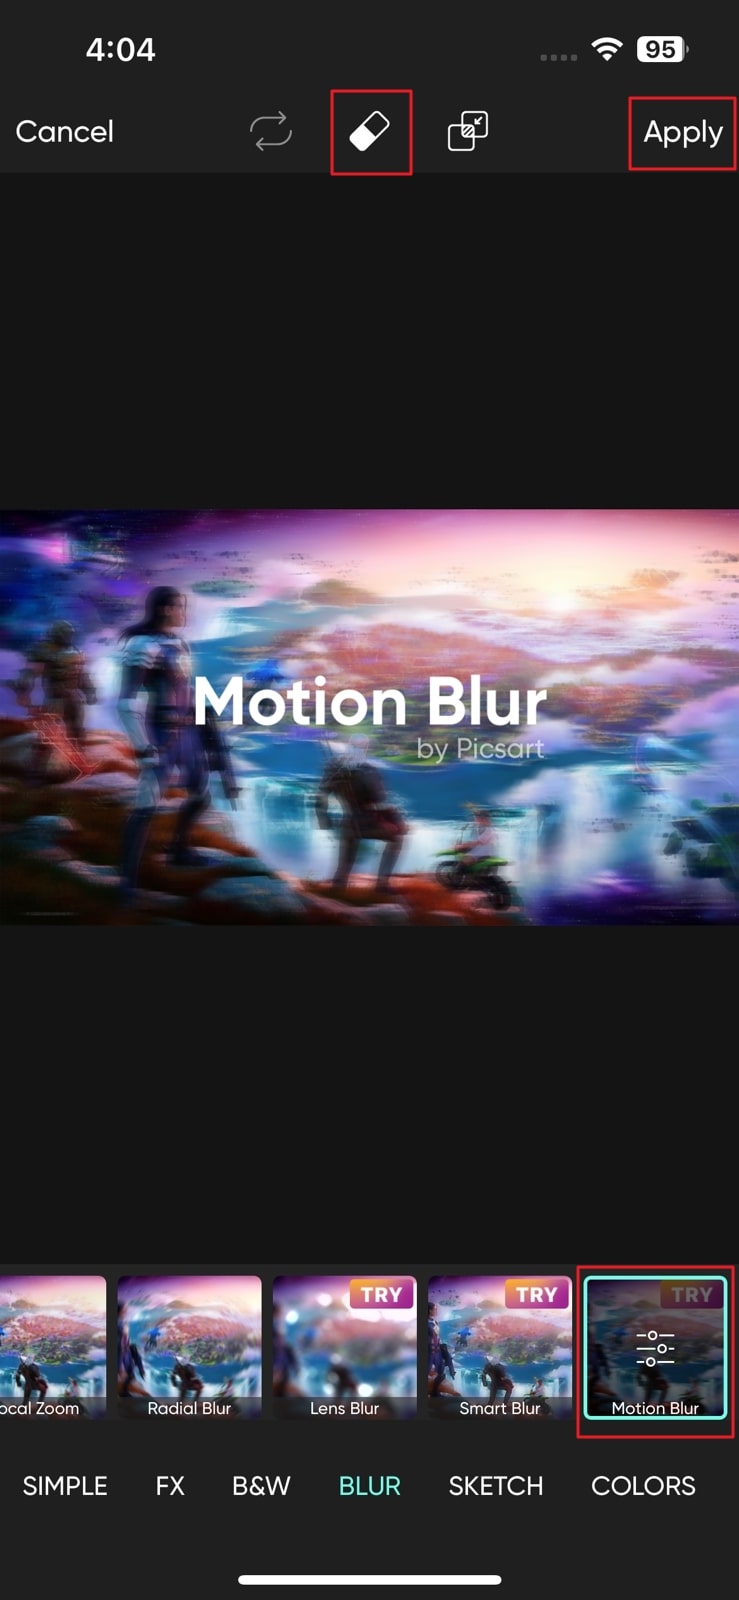
Step3 Add Motion Blur and Export
On the next screen, look for the “Blur” section from the bottom and find the “Motion Blur” effect. As it is added, you can use the “Erase” button on the top to adjust the motion blur effect on the image according to the objects. Once done, tap on the “Apply” button to conclude by adding motion blur.
Way 2: Make Motion Blur Fortnite Thumbnail with Fotor (Online)
If you are not a fan of smartphone applications, you can consider opting for online methods. While these platforms do not require installing anything on your desktop, they are easy to manage. Fotor is a great online photo editor featuring exceptional services for enhancing photos. It allows you to make all appropriate edits by including effects, transitions, and other photo enhancements. You can also find its designer for improving your Fortnite thumbnails.
Steps to Add Motion Blur on Fortnite Thumbnail with Fotor
For those who want to know how to create the Fortnite thumbnail motion blur effect with Fotor. The following steps are proper directions for them to follow:
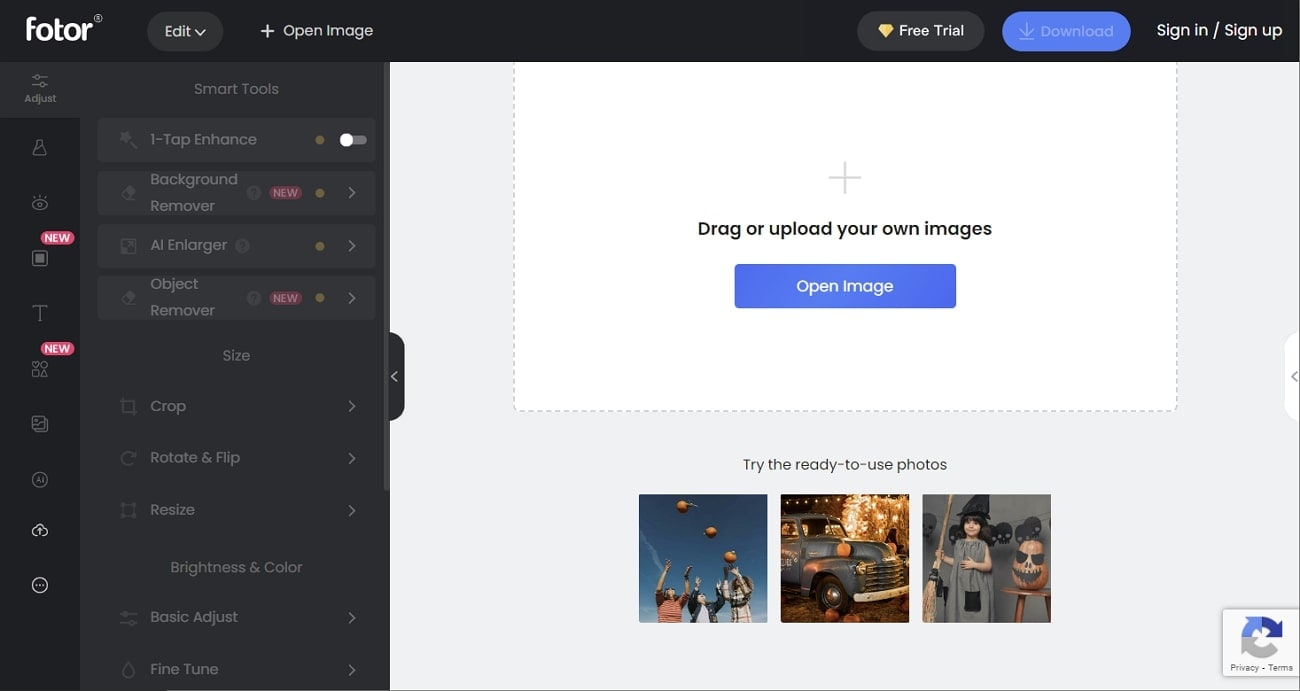
Step1 Open Fotor on the Web
You must open the Fotor Photo Editor on your web browser. Then, proceed to import the thumbnail template that you want to edit.
Step2 Add Motion Blur on Photo
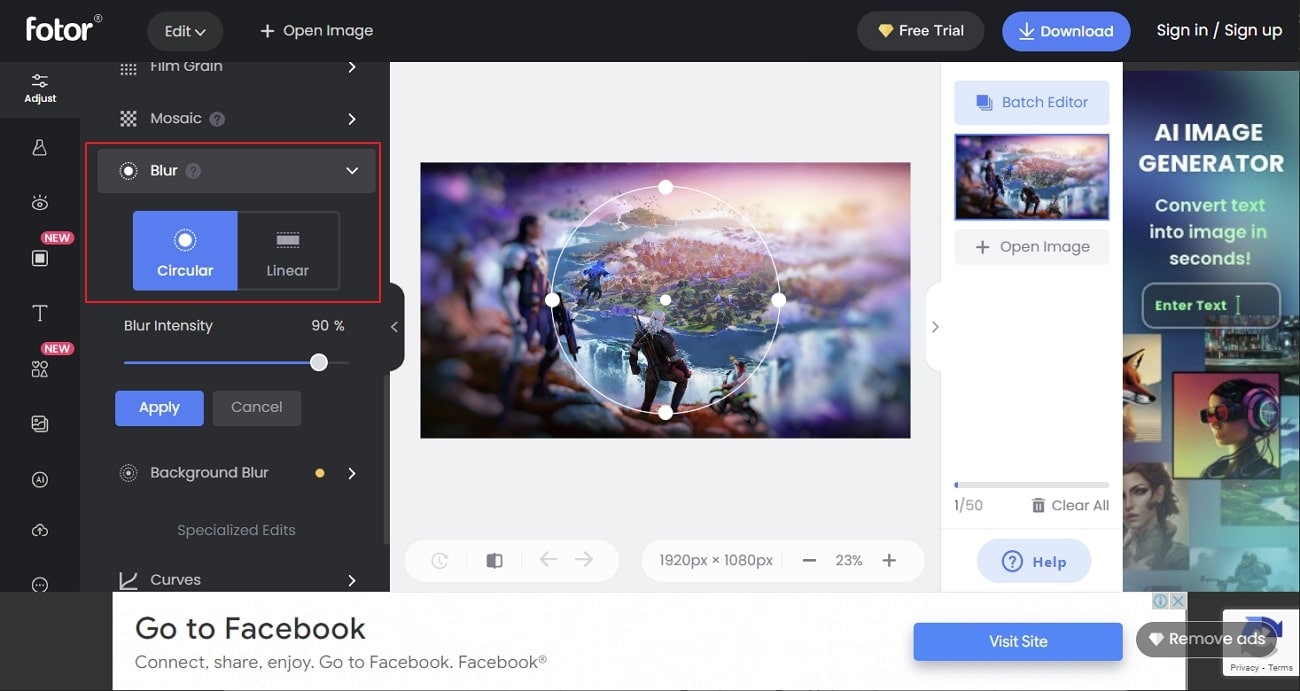
In the “Adjust” tab, look for the “Blur” option for including motion blur within the photo. You can select “Circular” or “Linear” blur, per the requirements.
Step3 Manage Intensity and Download
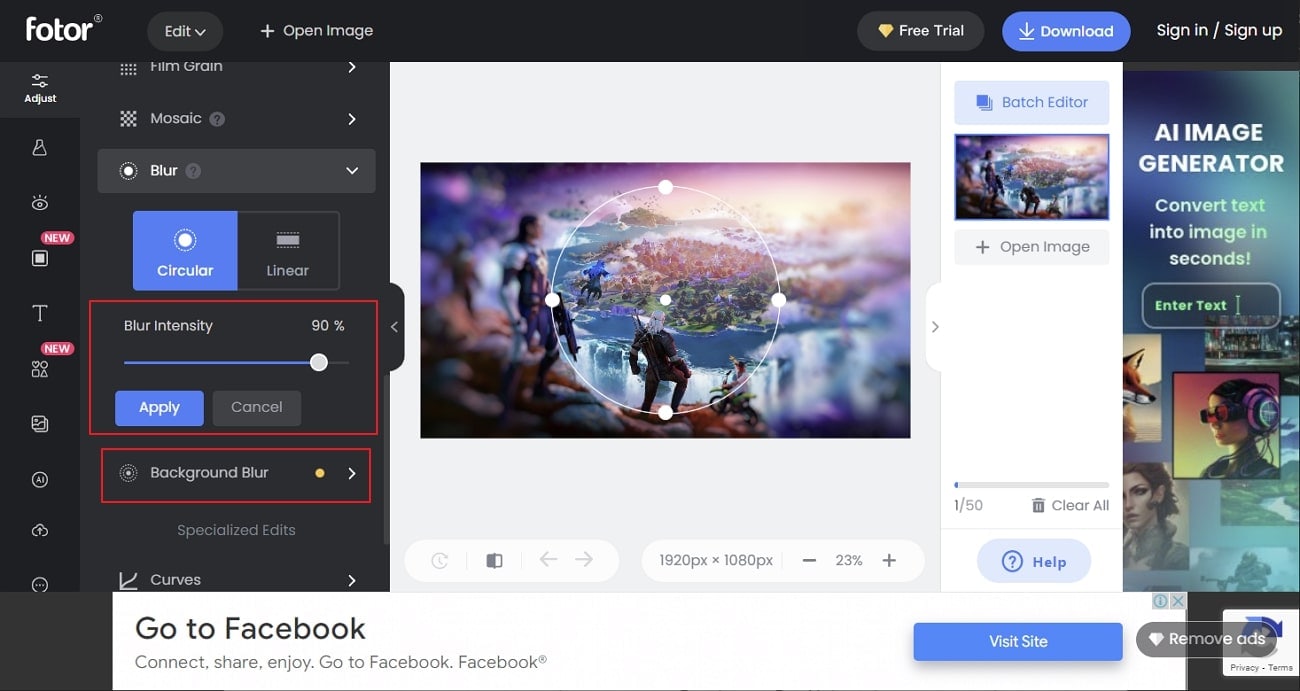
Continue to set the “Blur Intensity” and make changes by clicking “Apply.” If you wish to blur your background, consider using the “Background Blur” option in the list. Once the editing completes, click “Download” to export the Fortnite thumbnail.
Way 3: Make Motion Blur Fortnite Thumbnail with Photoshop (Desktop)
Adobe Photoshop stands among one of the best and most professional tools designed to enhance the quality of your photos. Although it is based on users who are professionals in editing, it gives a detailed set of options to make the most creative idea out of a photo. While adjusting the blur effect, it offers multiple settings for highlighting the image’s objects and colors.
Steps to Implement Motion Blur Effect on Fortnite Thumbnail with Photoshop
You might have come to know much about Photoshop. We will now see a guide explaining how to add a Fortnite motion blur thumbnail using Photoshop:
Step1 Start Adobe Photoshop and Add Thumbnail
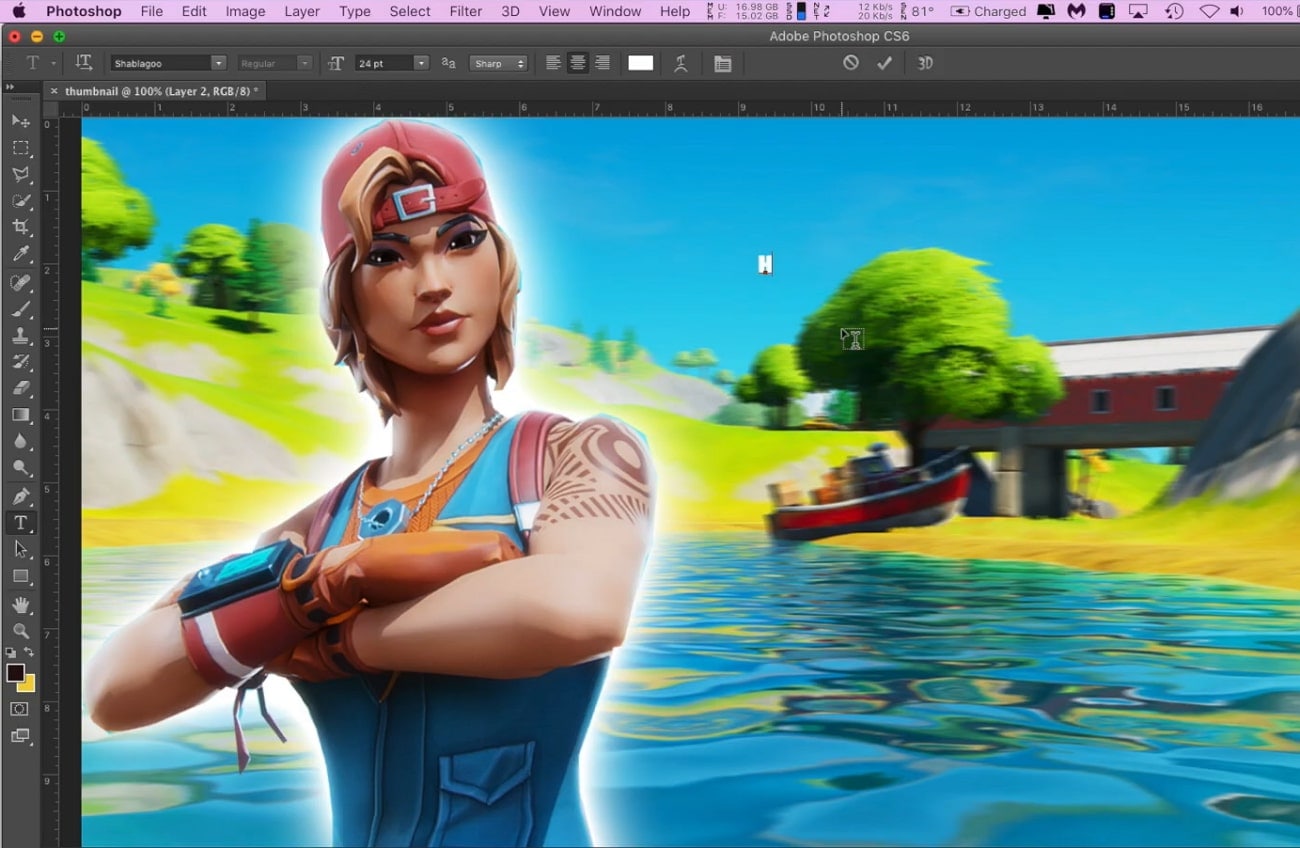
You must start Adobe Photoshop on your desktop after downloading and installing it. Proceed to import the thumbnail that you wish to edit. Make the initial adjustments on the photo to continue adding motion blur.
Step2 Create a Separate Object Layer
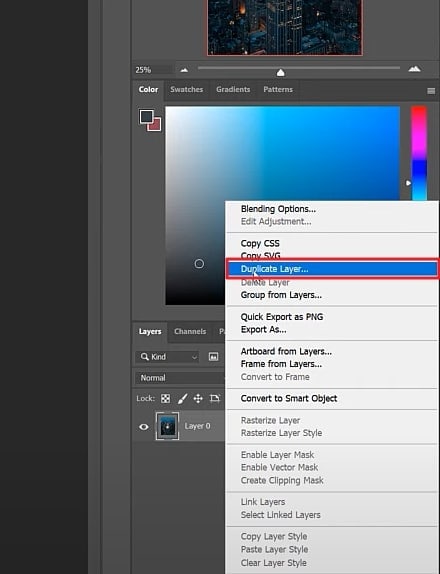
To start with the process, right-click and create a duplicate layer by selecting the respective option from the drop-down menu. Use the “Polygonal Lasso” tool to mark the object you want to exempt from the motion blur. Once done, use the “Layer Mask” button to isolate the object.
Step3 Add Motion Blur to Object
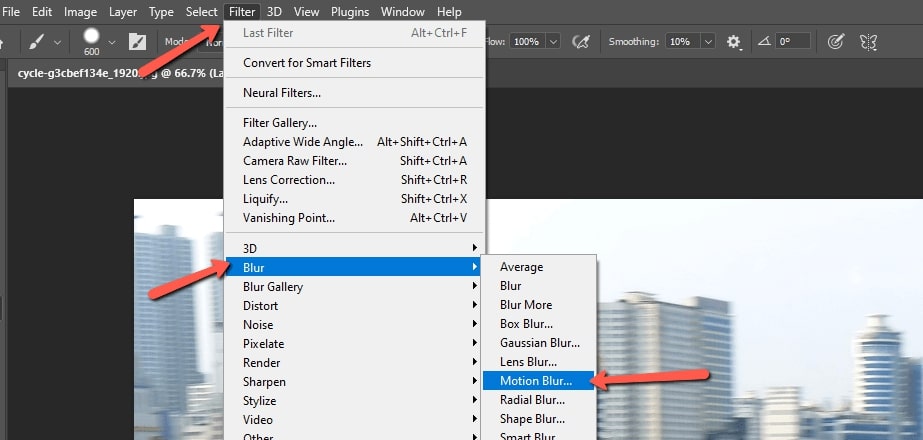
Create another duplicate layer and proceed to the “Filter” tab. Look for “Blur Gallery” in the options and select “Motion Blur” from the following menu. You must set the “Angle,” “Distance,” and other appropriate settings to continue. Once done, save the Fortnite thumbnail with the added motion blur.
Last Words
Many tools can be used to add motion blur within photos and videos. As you create a thumbnail for Fortnite, you will need a proper tool to help you add motion blur. We have discussed several tools in this article for adding motion blur.
Also, these applications serve their purpose for a respective device or platform. This is why they can be considered the best way to add a Fortnite motion blur thumbnail. You can select any option to add the respective effect for perfect results.
Motion blur has been a provocative effect used in filming and video making. The effect has made a popular mark globally for its realistic base. This is why motion blur is integrated into every other platform directed at creativity. The motion blur effect in creating thumbnails is another highlight of this effect. While many tools provide this service, finding the best one is essential.
In this article, we will work on the best methods to make a Fortnite motion blur thumbnail. With the help of these methods, you will be able to design the perfect Fortnite thumbnail for your video.

Part 1: How to Add Motion Blur to Fortnite Thumbnail?
There are many ways to add motion blur to Fortnite thumbnails, as stated above. In this article, we will be providing appropriate methods for users of all types. From smartphone to online and desktop solutions, this article has it all.
Way 1: Make Motion Blur Fortnite Thumbnail with Picsart (Smartphone)
For the first method, we will be discussing an appropriate way that can be used to make motion blur in Fortnite thumbnails. Picsart is a known mobile application providing unique photo editing services. This photo editor is a complete package containing some of the best tools. Integrated with artificial intelligence, this tool presents a perfect platform to perform motion blur on Fortnite thumbnails.
Steps to Perform Motion Blur on Fortnite Thumbnail with Picsart
We will proceed to observe the step-by-step guide on performing motion blur on Fortnite thumbnails with the help of Picsart:
Step1 Launch Picsart on Smartphone
Download and install Picsart on your phone and proceed to launch it. As it opens, sign in to the tool, if required, and redirect to the next screen.

Step2 Proceed to Effects Tab After Importing Thumbnail
You will have to import the created Fortnite thumbnail that is to be edited. After importing the thumbnail, select “Effects” from the bottom panel of the application.

Step3 Add Motion Blur and Export
On the next screen, look for the “Blur” section from the bottom and find the “Motion Blur” effect. As it is added, you can use the “Erase” button on the top to adjust the motion blur effect on the image according to the objects. Once done, tap on the “Apply” button to conclude by adding motion blur.

Way 2: Make Motion Blur Fortnite Thumbnail with Fotor (Online)
If you are not a fan of smartphone applications, you can consider opting for online methods. While these platforms do not require installing anything on your desktop, they are easy to manage. Fotor is a great online photo editor featuring exceptional services for enhancing photos. It allows you to make all appropriate edits by including effects, transitions, and other photo enhancements. You can also find its designer for improving your Fortnite thumbnails.
Steps to Add Motion Blur on Fortnite Thumbnail with Fotor
For those who want to know how to create the Fortnite thumbnail motion blur effect with Fotor. The following steps are proper directions for them to follow:
Step1 Open Fotor on the Web
You must open the Fotor Photo Editor on your web browser. Then, proceed to import the thumbnail template that you want to edit.

Step2 Add Motion Blur on Photo
In the “Adjust” tab, look for the “Blur” option for including motion blur within the photo. You can select “Circular” or “Linear” blur, per the requirements.

Step3 Manage Intensity and Download
Continue to set the “Blur Intensity” and make changes by clicking “Apply.” If you wish to blur your background, consider using the “Background Blur” option in the list. Once the editing completes, click “Download” to export the Fortnite thumbnail.

Way 3: Make Motion Blur Fortnite Thumbnail with Photoshop (Desktop)
Adobe Photoshop stands among one of the best and most professional tools designed to enhance the quality of your photos. Although it is based on users who are professionals in editing, it gives a detailed set of options to make the most creative idea out of a photo. While adjusting the blur effect, it offers multiple settings for highlighting the image’s objects and colors.
Steps to Implement Motion Blur Effect on Fortnite Thumbnail with Photoshop
You might have come to know much about Photoshop. We will now see a guide explaining how to add a Fortnite motion blur thumbnail using Photoshop:
Step1 Start Adobe Photoshop and Add Thumbnail
You must start Adobe Photoshop on your desktop after downloading and installing it. Proceed to import the thumbnail that you wish to edit. Make the initial adjustments on the photo to continue adding motion blur.

Step2 Create a Separate Object Layer
To start with the process, right-click and create a duplicate layer by selecting the respective option from the drop-down menu. Use the “Polygonal Lasso” tool to mark the object you want to exempt from the motion blur. Once done, use the “Layer Mask” button to isolate the object.

Step3 Add Motion Blur to Object
Create another duplicate layer and proceed to the “Filter” tab. Look for “Blur Gallery” in the options and select “Motion Blur” from the following menu. You must set the “Angle,” “Distance,” and other appropriate settings to continue. Once done, save the Fortnite thumbnail with the added motion blur.

Last Words
Many tools can be used to add motion blur within photos and videos. As you create a thumbnail for Fortnite, you will need a proper tool to help you add motion blur. We have discussed several tools in this article for adding motion blur.
Also, these applications serve their purpose for a respective device or platform. This is why they can be considered the best way to add a Fortnite motion blur thumbnail. You can select any option to add the respective effect for perfect results.
Best Youtube Video Meme Maker
The memes in videos have become a common practice now. Majority of YouTube videos you come across today have certain memes in them that audiences can relate to and get entertained. If you are a video creator, you can embed the trending memes in your video to enhance your video content as well as add variety to your video. You can create YouTube meme video with animated memes as well as meme images.
If you do not want to take the pain of creating YouTube meme video from scratch, you should use a YouTube video meme maker. This is because a meme maker comes with video meme templates which you can use to make any desired meme video instantly in a few steps. Besides, you can add stock meme images and GIFs as well as meme titles to your video. Here are the steps to create funny YouTube videos from YouTube meme template.
Part 1. Create YouTube Meme Video on Computer
If you are using your computer to create meme videos for YouTube, you will need a professional YouTube video meme maker. We recommend Wondershare Filmora which is available for both Windows and Mac users. Filmora is an extremely popular video editor among YouTubers thanks to its super intuitive user interface and wide range of video effects.
There are many video templates and stock memes available that you can embed into your video as well as edit them instantly. Therefore, you can save yourself from the burden of collecting popular meme clips and images from the internet and adding them to your video. You can create YouTube shorts and regular video meme in a few steps like a professional without prior experience. Here are the steps to create a meme video for YouTube.
Free Download For Win 7 or later(64-bit)
Free Download For macOS 10.14 or later
Step1 Download and install Filmora on your computer as per your operating system. Launch the application and click on New Project button on the welcome screen. Alternatively, you can go to File> New Project option to get started.

Step2 You can import your video from File> Import Media> Import Media files. Thereafter, drop the video clips on Timeline and add funny elements, trending memes and animated texts.

Alternatively, you can start from scratch and select a video template from Stock Media> Pexels> Videos. You can also check out video templates from Pixabay. There are also background photos available to create YouTube shorts meme videos.
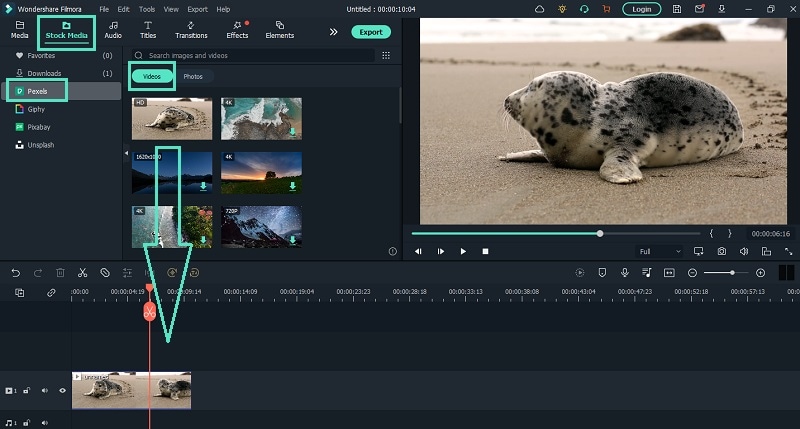
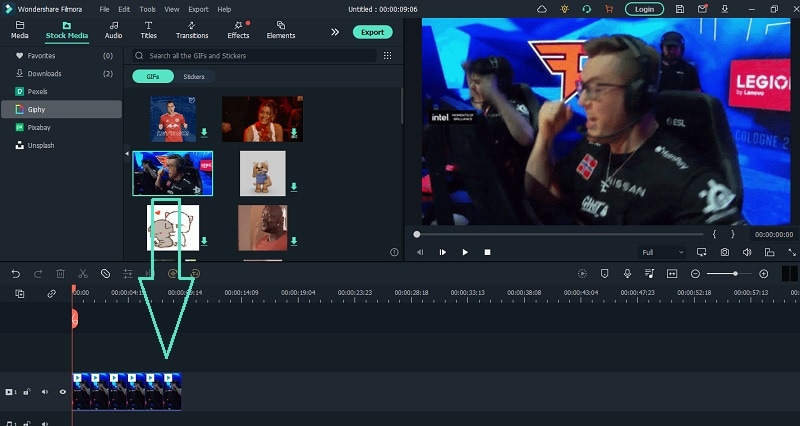
Step3 If you want to include trending animated memes in your video, you need to go to Stock Media> GIPHY. Drag and drop your selected GIFs on the Timeline and arrange them properly. If the meme duration is short, you can copy and paste it multiple times on the Timeline for the meme to play for a longer duration.
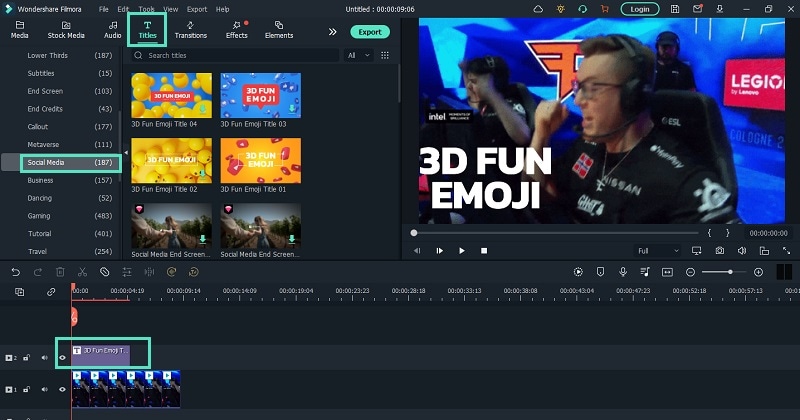
Step4 If you want to add funny titles to your meme video, head over to Titles> Social Media and select any desired title template and drop it on the Timeline above the video clips. These title templates come with a background which you can select and delete from the Viewer so that the background video shows up.
Step5 Move around the text to place them in the perfect place on the video From the Viewer. Double-click on the Title template located on the Timeline and edit the title as per your meme text. You can select different styles, animations, WordArt and much more. Click on Ok button when you are done. Adjust the duration of the title as long as you want it to appear in the video.
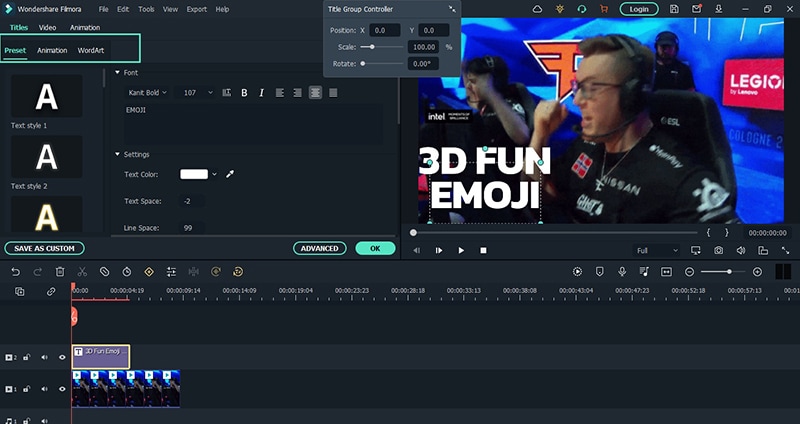
You can also check out Elements, Effects, and Audio options located at the top to add them to your video wherever appropriate.
Step6 Once you have completed creating YouTube meme video, click on Export button and save the video in your desired file format.
Part 2. How to Make Meme video for YouTube Online
If you do not want to download a premium meme maker for your YouTube videos, you can use an online meme maker where you can get to edit YouTube meme template. Veed.io is a popular online video editor where you can create YouTube video meme from its video templates instantly. In fact, you can edit your video and add meme videos and images wherever you feel like.
You get stock meme templates from GIPHY, and you can make use of the animated stickers to create creative YouTube video memes. There are also featured elements available that can go along with your meme video perfectly. Moreover, you can make meme video from any YouTube video by pasting its URL and cutting out clips to make memes. Here are the steps to create YouTube meme videos using Veed.io.
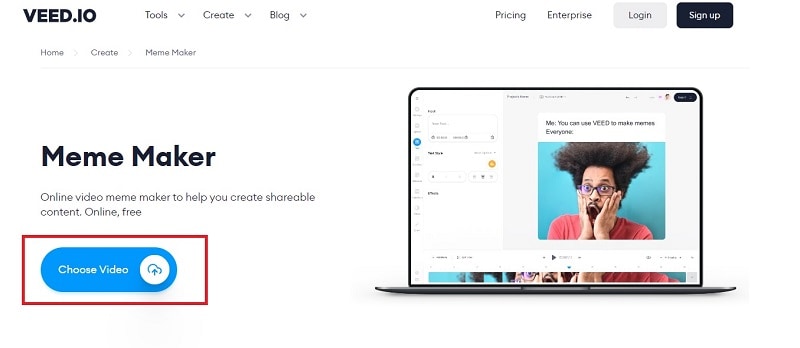
Step1 Open your web browser and visit “www.veed.io/create/meme-maker” . Click on Choose Video button to get started.
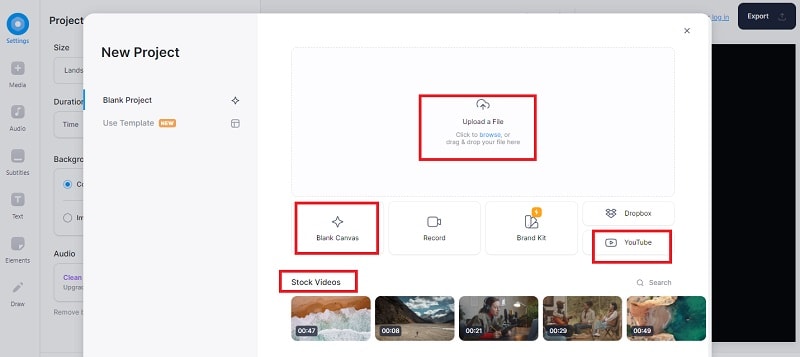
Step2 You can drop your video and add meme content in between by click on Upload a Video option. You can paste YouTube video URL by clicking on YouTube button. You can also select a stock video to get started. If you want to make YouTube meme video from scratch, you can click on Blank Canvas.
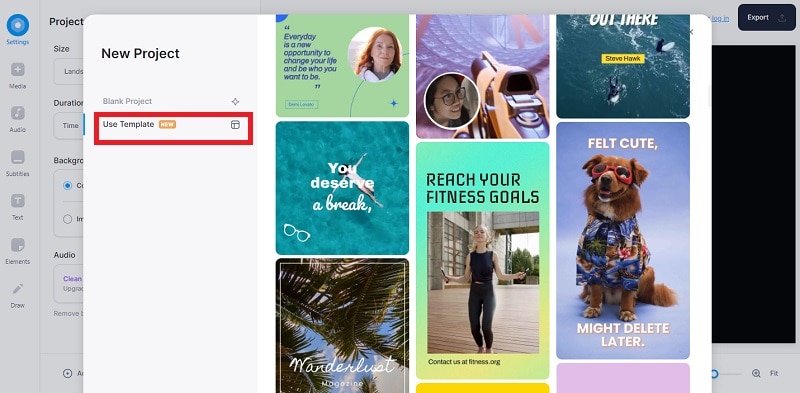
If you want to start creating meme video by selecting a video template and editing it as per your requirements, go to Use Template option from the left panel. Check out different video templates and select as per your preference.
Step3 If you have selected a video template, click on Start Editing button on the next screen.
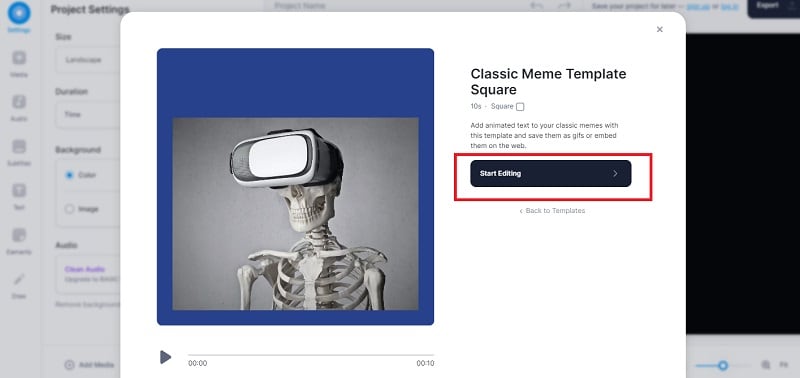
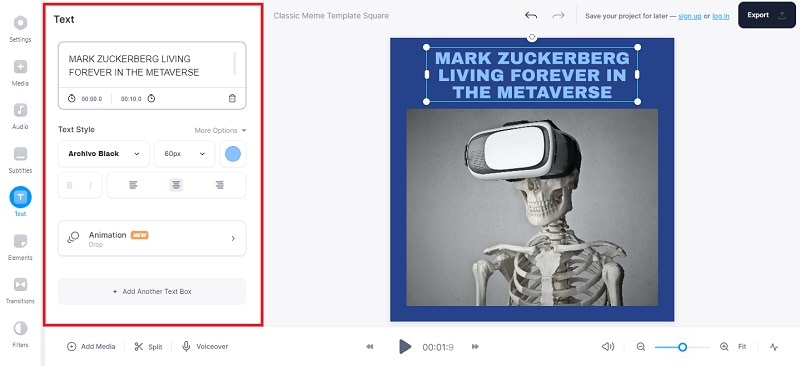
Thereafter, you can edit every element of the video template by double-clicking on them in the Viewer.
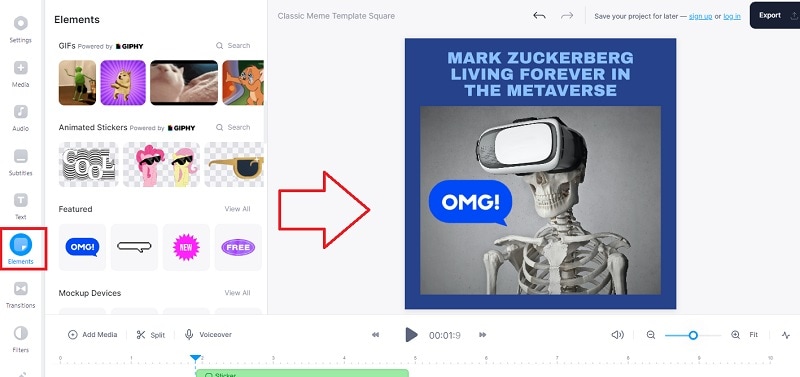
Step4 Go to Elements from the left panel and check out GIFs by GIPHY, Animated Stickers and Featured Stickers. You can add any element to your video template to make the meme stand out easily. Drag and drop the element on the video template in the Viewer.
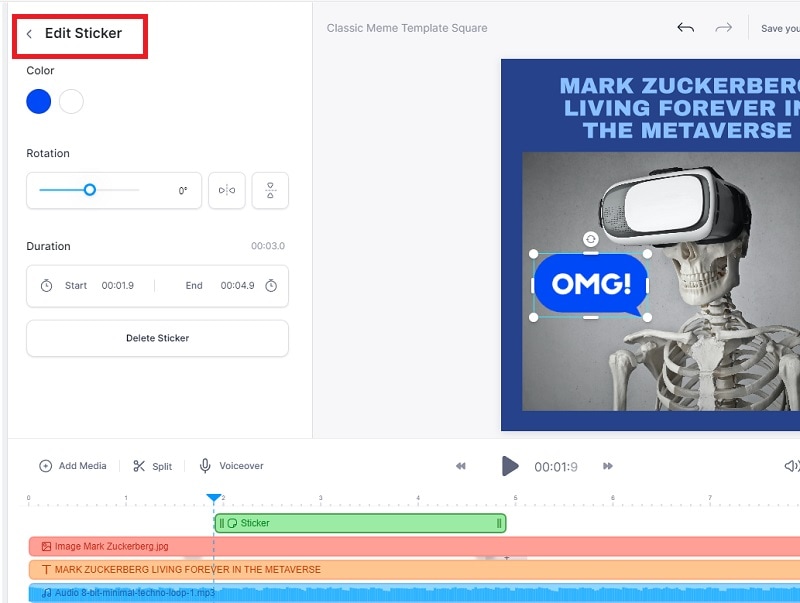
You can even edit the element you bring into your video template as per your requirements so that it fits perfectly in the overall video content seamlessly.
Step5 If you are satisfied with YouTube meme video you have created, click on Export button in the top-right corner and save it on your storage device.
Conclusion
Making YouTube meme videos and going viral is no more a game of the professionals. If you prefer an online video editor, Veed.io meme maker has video templates as well as option to import YouTube video to edit and include funny elements to make creative meme videos. If you want more templates and elements for meme videos, we recommend Wondershare Filmora where you can create professional YouTube meme videos in a few minutes with a few simple steps.
Free Download For macOS 10.14 or later
Step1 Download and install Filmora on your computer as per your operating system. Launch the application and click on New Project button on the welcome screen. Alternatively, you can go to File> New Project option to get started.

Step2 You can import your video from File> Import Media> Import Media files. Thereafter, drop the video clips on Timeline and add funny elements, trending memes and animated texts.

Alternatively, you can start from scratch and select a video template from Stock Media> Pexels> Videos. You can also check out video templates from Pixabay. There are also background photos available to create YouTube shorts meme videos.

Step3 If you want to include trending animated memes in your video, you need to go to Stock Media> GIPHY. Drag and drop your selected GIFs on the Timeline and arrange them properly. If the meme duration is short, you can copy and paste it multiple times on the Timeline for the meme to play for a longer duration.

Step4 If you want to add funny titles to your meme video, head over to Titles> Social Media and select any desired title template and drop it on the Timeline above the video clips. These title templates come with a background which you can select and delete from the Viewer so that the background video shows up.

Step5 Move around the text to place them in the perfect place on the video From the Viewer. Double-click on the Title template located on the Timeline and edit the title as per your meme text. You can select different styles, animations, WordArt and much more. Click on Ok button when you are done. Adjust the duration of the title as long as you want it to appear in the video.

You can also check out Elements, Effects, and Audio options located at the top to add them to your video wherever appropriate.
Step6 Once you have completed creating YouTube meme video, click on Export button and save the video in your desired file format.
Part 2. How to Make Meme video for YouTube Online
If you do not want to download a premium meme maker for your YouTube videos, you can use an online meme maker where you can get to edit YouTube meme template. Veed.io is a popular online video editor where you can create YouTube video meme from its video templates instantly. In fact, you can edit your video and add meme videos and images wherever you feel like.
You get stock meme templates from GIPHY, and you can make use of the animated stickers to create creative YouTube video memes. There are also featured elements available that can go along with your meme video perfectly. Moreover, you can make meme video from any YouTube video by pasting its URL and cutting out clips to make memes. Here are the steps to create YouTube meme videos using Veed.io.
Step1 Open your web browser and visit “www.veed.io/create/meme-maker” . Click on Choose Video button to get started.

Step2 You can drop your video and add meme content in between by click on Upload a Video option. You can paste YouTube video URL by clicking on YouTube button. You can also select a stock video to get started. If you want to make YouTube meme video from scratch, you can click on Blank Canvas.

If you want to start creating meme video by selecting a video template and editing it as per your requirements, go to Use Template option from the left panel. Check out different video templates and select as per your preference.

Step3 If you have selected a video template, click on Start Editing button on the next screen.

Thereafter, you can edit every element of the video template by double-clicking on them in the Viewer.

Step4 Go to Elements from the left panel and check out GIFs by GIPHY, Animated Stickers and Featured Stickers. You can add any element to your video template to make the meme stand out easily. Drag and drop the element on the video template in the Viewer.

You can even edit the element you bring into your video template as per your requirements so that it fits perfectly in the overall video content seamlessly.

Step5 If you are satisfied with YouTube meme video you have created, click on Export button in the top-right corner and save it on your storage device.
Conclusion
Making YouTube meme videos and going viral is no more a game of the professionals. If you prefer an online video editor, Veed.io meme maker has video templates as well as option to import YouTube video to edit and include funny elements to make creative meme videos. If you want more templates and elements for meme videos, we recommend Wondershare Filmora where you can create professional YouTube meme videos in a few minutes with a few simple steps.
How to Google Meet Green Screen
Google meet green screen is the latest addition to the virtual meeting app. It is a crucial feature as it allows users to maintain a semblance of privacy through virtual backgrounds. This video communication app has been a popular choice for classrooms and workplaces since the COVID 19 pandemic of 2019. Since then, Google meet has seen an increase of 3 million users per day since 2020.
The green screen for Google meet has come in handy for its millions of active users across the globe. It is an important feature that safeguards the privacy of its user in the cyber world. Google meet green screen allows you to alter the meeting’s background in real-time, similar to how movies employ the famous green curtain behind the performers during filming. You can use this feature to immediately insert a backdrop image of your choice by activating the green screen provided in the browser extension Visual Effects for Google Meet.
Uses of Google Meet Green Screen
The Google Meet Green Screen feature keeps things interesting in corporate meetings. It also allows users to hide their backgrounds which can often be a source of discomfort or vulnerability. The green screen for Google Meet is a handy feature as you can now attend meetings without worrying about the background.
Virtual Green Screens, Blur, Pixelate, Inverse, Contrast and More! This extension allows you to apply effects like Blur, Pixelate and Inverse to your camera live during Google Meets. And you can use the Virtual Green Screen feature to mask whatever you would not fancy appearing in your videos’ background.
Green screen from Google helps you limit distractions or make video calls more fun, you can now blur or replace your background or replace it with an image, an immersive background, or a video. You can also apply styles to customize your video with various light, color filters and stylized backgrounds.
How to Use Green Screen on Google Meet
With Google Meet Green Screen, you can create a virtual background by either uploading photographs from their PC or using the extension’s stock photos. You can utilize an office background as a backdrop for business meetings. Teachers can add a classroom background to their online classes. Parties and vacation backgrounds from other nations might be used for informal encounters with friends.
For a get-together with friends, users might choose a Hawaii theme or an office wall for business chats. You can create and save as many background photos as you want with Google Meet Green Screen. In addition to all of this, it offers a picture-in-picture (floating window) function that users can enable if desired.
How to use green screen for Google Meet: A guide
You can select a virtual background before beginning a meeting or during an ongoing video conversation. However, this feature is only available on the desktop currently. You can follow the steps given below to use the Green Screen for Google Meet.
Prior to a video call
- Go to Google Meet and select a meeting.
- Change the background of your self-view by clicking Change Background in the bottom right corner.
- Click Blur your background to totally blur your background.
- Click Somewhat blur your background to blur your background slightly.
- Click background to select a previously downloaded backdrop.
- Click Add to add your own image as a background.
- Click on Join Now.
During a video conference
- Click More at the bottom of the page.
- Select Change Background from the drop-down menu.
- Click Blur your background to totally blur your background.
- Click Somewhat blur your background to blur your background slightly.
- Click a background to select a previously downloaded backdrop.
- Click Add to add your own image as a background.
Extra Tips
How to Add Green Screen to Meeting Video
Prior to a video call
- Go to Google Meet and select a meeting.
- Change the background of your self-view by clicking Change Background in the bottom right corner. Click Blur your background to totally blur your background. …
- Click Add to add your own image as a background.
- Click on Join Now.
Filmora
If you’re just starting out with video editing, or just want a simple program that works, Wondershare Filmora might be what you’re looking for. It has the essential tools, and anyone can learn to use it easily.
Wondershare Filmora is the one of best video editing software with cool features that compares to other competing video editing Softwares. Many video editing programs claim to offer professional results; Filmora is one of a few consumer-level tools that actually delivers.
For Win 7 or later (64-bit)
For macOS 10.12 or later
Installation Steps
- Click the icon in the center of the Media Library to add files directly.
- Go File > Import Media > Import Media Files.
- Drag and drop to the Media Library directly.
While importing a media file, Wondershar Filmora may ask you if you wish to create a proxy file to accelerate the editing process. Select “Yes” to have a fast video editing experience.
You can also import video clips using your Touch Bar controls if your computer has Touch Bar.
Record a media file
Apart from the videos shot by your digital devices, you can also directly import media files by recording video from your webcam, capturing the computer screen, or recording a voice-over.
Record computer screen:
Click the “Record” option, and choose “Record PC Screen” to get the built-in Wondershare Screen Recorder. Hit the red button to get started. If you want to stop the recording, you can hit F9.
Record videos from webcam:
Also, click the “Record” option, and choose “Record from Webcam”. In the pop-up Video Recording window, click the red button to start recording and click it again to stop recording. Then click OK to save the recorded video file.
Record voice-over:
Choose “Record a voiceover” under the Record menu. It would be better to connect a microphone to your Mac for a better result. Hit the Record button, and it leaves you 3 seconds to get ready.
All the recorded media files will be saved into Media Library automatically and you can drag them to the Timeline for editing.
Conclusion
The zoom meeting green screen for Google background feature essentially allows users to display an image or a video in place of the actual background during video calls. The feature is especially helpful when you are video conferencing in a messy room. The feature is starting to gain popularity among users and is also available on WebEx for iOS. While Google Meet does not come with a built-in feature to blur or obscure the existing background while on camera, there are still ways you can do it. Luckily, there are a bunch of third-party tools that can build a virtual background for you without a green screen. One of the popular tools you can use is ChromaCam and can be configured in just a few minutes.
How to Apply Video Filters : Mobile and Desktop
In the digital age, video editing has become an increasingly popular way for people to express themselves. Technological advances make it easy to apply video filters and effects. In this article, we will find how you can use iPhone video filters, AI video filter, and cartoon video filter in 2024 through filmora quickly and easily. We will discuss the latest version of Filmora – one of the most influential and user-friendly video editors today.
Part 1 Apply Video Filters on Mobile Devices
Applying video filters on mobile devices is a simple process that can significantly enhance the overall look of your videos.
Step1: Download Filmora in the app store
First, you must download a video editing app with different filters. One popular option is Filmora, which can be found in the app store.
Step2: Import your videos
Once you have downloaded the app, you can begin importing your videos. It can typically do this by selecting the “Import” option within the app and choosing the desired videos from your library. You may also record videos directly within the app if desired.
Step3: Add video filter effects
After importing your videos, you can start adding video filter effects. Filmora and similar apps typically offer various filters, such as vintage, black and white, or cinematic effects. To apply a filter, select the desired effect and adjust any accompanying settings to achieve the desired look.
With a few easy and quick taps on your mobile device, you can transform your video filters for iPhone to create visually stunning content.
Part 2 Apply Video Filters on Desktop
To apply video filters on your desktop, you can follow these steps using the software Filmora
Create AI Filter For Win 7 or later(64-bit)
Create AI Filter For macOS 10.14 or later
Step 1: Download Filmora
Start by downloading and installing the Filmora software onto your desktop. This software provides a range of video editing tools, including video filters.
Step 2: Import your videos
Open Filmora and import the videos you want to apply filters to. You can do this by clicking the “Import” button and selecting the video files from your computer.
Step 3: Add video filter effects in 2 ways
Filmora offers two main ways to add video filters to your footage.
1. Add filters in the Effects panel
First, you can add filters in the Effects panel. To do this, select the video clip you want to apply a filter to and click on the “Effects” tab in the upper-left corner.
Please browse through the available filters and click on one to apply it to your video. You can preview the effects in real-time and adjust the intensity or other settings.
2. Add luts and presets in the Color panel
Second, add LUTs (Look-Up Tables) and presets in the Color panel. LUTs are predefined color grading settings that can give your videos a specific look or style. Select the video reel and click the “Color” tab to add a LUT or preset.
Then, click the “LUT” or “Presets” button and choose the desired effect from the available options. Like the Effects panel, you can adjust the settings to customize the product further.
Following these steps, you can easily apply video filters to your footage using Filmora on your desktop. Explore the various options and experiment with different effects to amplify the visual appeal of your videos.
Summary
In the modern digital era, Filmora will be the best video filter editor, thanks to its intuitive interface and comprehensive feature set designed specifically for beginners and professionals! Whether looking to add a subtle touch of personalization to stand out amongst the crowd or simply wanting to enhance the overall quality of production being worked no matter the, rest assured that you are capable of doing the same without breaking the sweat and effort expended hereinabove described stepwise fashion!
Also read:
- [New] Fuel Fascination with Imagery The Most Motivating IG Shots for 2024
- [Updated] Free Banner Templates & Makers for YouTube for 2024
- 2024 Approved AudioTest Review
- EasyHDR Review Is This a Good Choice to Create HDR for 2024
- Full-Spectrum Data Salvage System: Next-Level Technical Assistance for Complete Data Recovery
- How To Add Motion Blur In Davinci Resolve?
- How to Easily Update the Intel HD Graphics Vectors in Your System for Optimal Performance
- How To Leave a Life360 Group On Itel P55 Without Anyone Knowing? | Dr.fone
- How to Use Frame Blending in Premiere Pro
- In 2024, Breaking Down Live Mastering Four Fundamental Recording Techniques
- In 2024, How to Loop a Video in Canva Editor
- In 2024, How to Reset your Samsung Galaxy A05 Lock Screen Password
- New Create Chroma Key Written Text Effects in Filmora
- New How to Convert Images Into Video - Kapwing Tutorial for 2024
- Solutions for Windows 11 BSOD Issues – A Comprehensive Approach
- Solve Gaming Interruptions: Preventing Mid-Game PC Shutdowns on Various Windows Editions
- Title: In 2024, How to Make Fortnite Thumbnail with Motion Blur?
- Author: Chloe
- Created at : 2025-01-17 06:53:20
- Updated at : 2025-01-23 21:24:40
- Link: https://ai-editing-video.techidaily.com/in-2024-how-to-make-fortnite-thumbnail-with-motion-blur/
- License: This work is licensed under CC BY-NC-SA 4.0.