In 2024, How to Make Hand Shake Effect with Final Cut Pro

How to Make Hand Shake Effect with Final Cut Pro
Are you struggling to attract audiences to your videos? If so, you may consider adding effects to them during your editing process. Most video editing software includes preset video effects to create and publish attractive videos quickly. For example, Final Cut Pro is a video editing software for Apple devices and includes lots of editing tools and video effects. Here is a detailed guide on how to apply the Final Cut Pro camera shake effect to your videos.
- What are hand shake effects for
- What kind of shots are best for such an effect
- Is it better to hand shake when shooting or add the effects
Part1: When Do You Need a Hand Shake Effect?

Adding effects to your videos is a great way to make them more impactful. However, you need to apply them correctly for them to be effective. The following information explores different aspects of the Final Cut Pro camera shake effect, including its definition, why video creators use it, and how best to apply it.
What are hand shake effects for?
Hand shake effects are video adjustments you apply to specific scenes that make the shot vibrate. Depending on the software you use, there are multiple variations of the effect. In addition, developers refer to it by different names. For example, Final Cut Pro users know it as the earthquake effect, which is a preset video effect in most versions of the software.
Typically, video creators use the Final Cut Pro camera shake effect to add energy to their videos. As such, their scenes are more dramatic and encourage you to pay more attention to the video. For example, you can apply the effect to indicate the arrival of the villain in your video. In addition, the effect will be more impactful if the villain is a giant.
You can also use the camera shake video effect for the following purposes:
- Break the monotony in a scene. Applying this scene after a long dialogue scene will give your audience a brief respite, allowing them to regain their focus.
- The camera shake effect can also be an effective tool to build your brand identity. Instead of applying it during the screenplay, you can use it in the end credits to introduce your logo to audiences. Furthermore, you can include a creative sound track for additional emphasis.
What kind of shots are best for such an effect?
The best shot to apply the camera shake effect are still shots. This is because they give you extra creative room with the scene since the subjects are facing the camera directly from a level angle. As such, you can customize unique motion patterns for each subject when applying the camera shake effect.
Is it better to hand shake when shooting or add the effects?
Although it may seem tempting to physically shake the camera when shooting, most filmmakers prefer to add the effect during editing. This is because shaking the camera during shooting may result in unusable shots in post-production. For example, shooting a car scene from a hand-held camera in the passenger seat often results in shaky footage. As such, video creators mount the camera on a tripod to capture still shots and then add the camera shake during post-production.
Part2: How to Add a hand shake effect with FCPX?
The following is a step-to-step guide on how to add a hand shake effect on Final Cut Pro X. However, you need to meet the following requirements for the process to work.
A licensed copy of Final Cut Pro X
The camera shake effect is only available with the full version of Final Cut Pro X. In addition, you will access all variations of the effect with the full version.
A compatible video file
Apple’s Final Cut Pro X is compatible with the following video file formats:
- QuickTime formats.
- Apple ProRes
- Apple Animation Codec
- XF-AVC
- Container files, such as3GP, AVI, and MP4.
Camera shake effect plugins
The video editing software comes with preset camera shake effects, which you can find in the Effects Browser. However, you can also download compatible plugins from established sources, such as the Camera Shake Effects pack from Motion Array.
Once you have everything in place, follow the below steps.
- Import your desired video clip to the Final Cut Pro X workspace. Your video will appear in the timeline section at the bottom of your workspace.
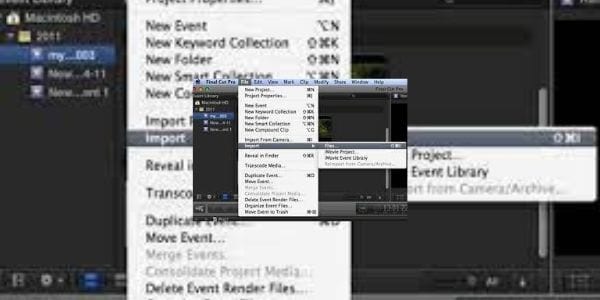
- Select the section where you want to add the camera shake effect. In addition, you need to set the in and out points from the timeline. For example, Mac users can set these points by pressing the Iand O keys, respectively.
- Then, select the Shakefrom the Effects browser and search for Hand Held.

- Drag the effect over your selection to apply the effect.
- You can also make additional adjustments to your hand-held shake effect from the inspector panel.
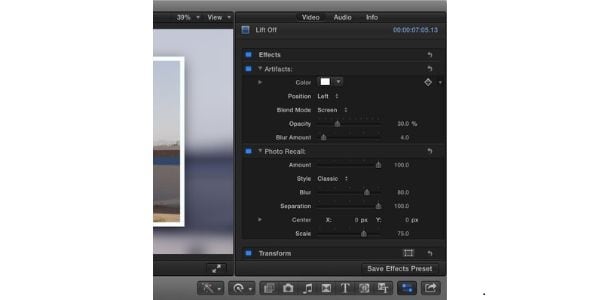
For example, you can prevent black borders from appearing with the effect by increasing the Scale attribute to 105%. Scroll to the bottom right section of your workspace to the Inspector Panel, and click on Scale to make the adjustment.
Part3: How to add hand shake effect in the simplest way?
If the above guide is too complicated for you, Wondershare Filmora offers you the simplest way to add the hand shake effect to your videos.

The program is a stand-alone video editor for Windows and macOS users. It comes with a variety of preset camera shaking effects, including
- Up-down shaking
- Extreme shaking
- Chaos shaking
- Sideways shaking
Free Download For Win 7 or later(64-bit)
Free Download For macOS 10.14 or later
The above effects offer various shaking intensities and patterns to help you achieve your desired effect. In addition, you will need to purchase a license to access the different versions of the hand shake video effect. Once you have Wondershare Filmora running on your device, follow the below steps to add the hand shake effect to your videos.
1. Import your video
Click on the Import tab on your user interface and select Import Media Files. Then, drag and drop the files you want to edit to your timeline from the resulting window.
2. Applying Wondershare Filmora’s hand shake effect
Click on the Effects tab from the user interface and then select Filters. Next, proceed to the Shake subcategory to view all available presets. Currently, the program has eight camera shake presets, which you can preview using the pop-up thumbnail on your workspace.
Once you identify your desired effect, drag and drop it over the video selection, you want to apply it. You can make further adjustments using the sliders on the effect’s sub menu. For example, you can vary the duration of the effect by adjusting the frequency and intensity sliders.
Finally, click on Ok to apply the hand shake effect to your video and save the changes.
3. Exporting your final project
Wondershare Filmora allows you to export your completed projects to external locations, such as external hard drives and cloud storage. In addition, you can directly upload your videos to YouTube and Vimeo from the workspace.
Here is how to export videos from Filmora:
- Click on the Exporttab from the program’s main menu.
- Identify your file destination from the options on the Export The latest version of Filmora allows file exports to your local storage, YouTube, Vimeo, and DVD.
- Select your file format from the left menu and click Exporton the bottom right corner to finalize the process. Some of the available file formats include MP4, WMV, and FLV.
Kindly note that the above guide is for the latest version of Wondershare Filmora. As such, confirm that you have the latest edition before using it. Alternatively, you can download the latest version for free from the Filmora website.
FAQs
1. What are the minimum system requirements to run Film Cut Pro X?
According to Apple, your device needs to have the below minimum system requirements.
- 4 gigabytes of RAM. However, running the program on a device with 8 GB RAM allows you to work with 4K videos and perform 360-degree video editing seamlessly.
- A dedicated graphics processing unit with at least 1 GB of VRAM.
- About 4.5 GB of storage space for Final Cut Pro’s system files.
- An active internet connection to enable access to online customer support and additional features.
- You will also need a Blu-ray recorder to export videos directly to DVDs.
- Finally, your device should be running macOS 11.5.1 or later.
2. Can you import custom hand shake effects to Final Cut Pro?
Yes, you can import custom hand shake effects to your licensed version of Final Cut Pro. However, always install custom plugins from verifiable sites to prevent the installation of malicious software such as spyware. Some of the sites to consider consist of Motion Array, Studio Binder, and FCPX Free. For example, you can check out these 10 free plugins for Final Cut Pro from Filmora .
- A licensed copy of Final Cut Pro X
- A compatible video file
- Camera shake effect plugins
- How to add hand shake effect in the simplest way
Part1: When Do You Need a Hand Shake Effect?

Adding effects to your videos is a great way to make them more impactful. However, you need to apply them correctly for them to be effective. The following information explores different aspects of the Final Cut Pro camera shake effect, including its definition, why video creators use it, and how best to apply it.
What are hand shake effects for?
Hand shake effects are video adjustments you apply to specific scenes that make the shot vibrate. Depending on the software you use, there are multiple variations of the effect. In addition, developers refer to it by different names. For example, Final Cut Pro users know it as the earthquake effect, which is a preset video effect in most versions of the software.
Typically, video creators use the Final Cut Pro camera shake effect to add energy to their videos. As such, their scenes are more dramatic and encourage you to pay more attention to the video. For example, you can apply the effect to indicate the arrival of the villain in your video. In addition, the effect will be more impactful if the villain is a giant.
You can also use the camera shake video effect for the following purposes:
- Break the monotony in a scene. Applying this scene after a long dialogue scene will give your audience a brief respite, allowing them to regain their focus.
- The camera shake effect can also be an effective tool to build your brand identity. Instead of applying it during the screenplay, you can use it in the end credits to introduce your logo to audiences. Furthermore, you can include a creative sound track for additional emphasis.
What kind of shots are best for such an effect?
The best shot to apply the camera shake effect are still shots. This is because they give you extra creative room with the scene since the subjects are facing the camera directly from a level angle. As such, you can customize unique motion patterns for each subject when applying the camera shake effect.
Is it better to hand shake when shooting or add the effects?
Although it may seem tempting to physically shake the camera when shooting, most filmmakers prefer to add the effect during editing. This is because shaking the camera during shooting may result in unusable shots in post-production. For example, shooting a car scene from a hand-held camera in the passenger seat often results in shaky footage. As such, video creators mount the camera on a tripod to capture still shots and then add the camera shake during post-production.
Part2: How to Add a hand shake effect with FCPX?
The following is a step-to-step guide on how to add a hand shake effect on Final Cut Pro X. However, you need to meet the following requirements for the process to work.
A licensed copy of Final Cut Pro X

The camera shake effect is only available with the full version of Final Cut Pro X. In addition, you will access all variations of the effect with the full version.
A compatible video file
Apple’s Final Cut Pro X is compatible with the following video file formats:
- QuickTime formats.
- Apple ProRes
- Apple Animation Codec
- XF-AVC
- Container files, such as3GP, AVI, and MP4.
Camera shake effect plugins
The video editing software comes with preset camera shake effects, which you can find in the Effects Browser. However, you can also download compatible plugins from established sources, such as the Camera Shake Effects pack from Motion Array.
Once you have everything in place, follow the below steps.
- Import your desired video clip to the Final Cut Pro X workspace. Your video will appear in the timeline section at the bottom of your workspace.

- Select the section where you want to add the camera shake effect. In addition, you need to set the in and out points from the timeline. For example, Mac users can set these points by pressing the Iand O keys, respectively.
- Then, select the Shakefrom the Effects browser and search for Hand Held.

- Drag the effect over your selection to apply the effect.
- You can also make additional adjustments to your hand-held shake effect from the inspector panel.

For example, you can prevent black borders from appearing with the effect by increasing the Scale attribute to 105%. Scroll to the bottom right section of your workspace to the Inspector Panel, and click on Scale to make the adjustment.
Part3: How to add hand shake effect in the simplest way?
If the above guide is too complicated for you, Wondershare Filmora offers you the simplest way to add the hand shake effect to your videos.

The program is a stand-alone video editor for Windows and macOS users. It comes with a variety of preset camera shaking effects, including
- Up-down shaking
- Extreme shaking
- Chaos shaking
- Sideways shaking
Free Download For Win 7 or later(64-bit)
Free Download For macOS 10.14 or later
The above effects offer various shaking intensities and patterns to help you achieve your desired effect. In addition, you will need to purchase a license to access the different versions of the hand shake video effect. Once you have Wondershare Filmora running on your device, follow the below steps to add the hand shake effect to your videos.
1. Import your video
Click on the Import tab on your user interface and select Import Media Files. Then, drag and drop the files you want to edit to your timeline from the resulting window.
2. Applying Wondershare Filmora’s hand shake effect
Click on the Effects tab from the user interface and then select Filters. Next, proceed to the Shake subcategory to view all available presets. Currently, the program has eight camera shake presets, which you can preview using the pop-up thumbnail on your workspace.
Once you identify your desired effect, drag and drop it over the video selection, you want to apply it. You can make further adjustments using the sliders on the effect’s sub menu. For example, you can vary the duration of the effect by adjusting the frequency and intensity sliders.
Finally, click on Ok to apply the hand shake effect to your video and save the changes.
3. Exporting your final project
Wondershare Filmora allows you to export your completed projects to external locations, such as external hard drives and cloud storage. In addition, you can directly upload your videos to YouTube and Vimeo from the workspace.
Here is how to export videos from Filmora:
- Click on the Exporttab from the program’s main menu.
- Identify your file destination from the options on the Export The latest version of Filmora allows file exports to your local storage, YouTube, Vimeo, and DVD.
- Select your file format from the left menu and click Exporton the bottom right corner to finalize the process. Some of the available file formats include MP4, WMV, and FLV.
Kindly note that the above guide is for the latest version of Wondershare Filmora. As such, confirm that you have the latest edition before using it. Alternatively, you can download the latest version for free from the Filmora website.
FAQs
1. What are the minimum system requirements to run Film Cut Pro X?
According to Apple, your device needs to have the below minimum system requirements.
- 4 gigabytes of RAM. However, running the program on a device with 8 GB RAM allows you to work with 4K videos and perform 360-degree video editing seamlessly.
- A dedicated graphics processing unit with at least 1 GB of VRAM.
- About 4.5 GB of storage space for Final Cut Pro’s system files.
- An active internet connection to enable access to online customer support and additional features.
- You will also need a Blu-ray recorder to export videos directly to DVDs.
- Finally, your device should be running macOS 11.5.1 or later.
2. Can you import custom hand shake effects to Final Cut Pro?
Yes, you can import custom hand shake effects to your licensed version of Final Cut Pro. However, always install custom plugins from verifiable sites to prevent the installation of malicious software such as spyware. Some of the sites to consider consist of Motion Array, Studio Binder, and FCPX Free. For example, you can check out these 10 free plugins for Final Cut Pro from Filmora .
How to Animate Your Designs With Canva GIF
How to Animate Your Designs With Canva GIF
An easy yet powerful editor
Numerous effects to choose from
Detailed tutorials provided by the official channel
If you are using social media daily in 2022, you must come across GIFs and maybe wonder how to make one. GIFs are the most helpful and eye-catching advertisements that can connect you with your followers through your choices. GIFs stand in the middle of images and videos. The biggest reason we use GIFs is that it represents the story or the expression in a flash. Besides, GIFs are smaller files to load and are perfect for your mobile.
In recent years, GIFs have taken the limelight in the market. The web’s most popular GIF database, GIPHY, has taken over 300 million daily active users. In 2018, Google bought the keyboard app and GIF archive to search for GIFs, Tenor. The app Tenor now has over 400 million GIF searches per day. Thus, you can realize the demand for creating GIFs is increasing now. Canva GIF is a great place to design your own GIFs.
After you create a GIF in Canva, you can use it in many fun ways in business, like promoting new sales on your products or a blog post, announcing a new webinar. In addition, you may announce your Instagram or Facebook live, share your point of view, advertise new launches, etc. In this article, we will discuss making GIFs and animating designs with GIF in Canva.
In this article
01 [How to Create a GIF in Canva](#Part 1)
02 [How to Animate Your Designs With Canva GIF](#Part 2)
Part 1 How to Create a GIF in Canva
Canva GIF has made creating your own GIFs very easy. It is one of the best GIF makers online. The plus point of using Canva to make online GIFs is that you do not require creating an account. You can straight get to work. However, if you wish to try out their premium designs and templates, you need a subscription to their premium plan. Let us now talk about making GIF in Canva and some of its tools and features to make your GIF more eye-catching.
Follow the steps below:
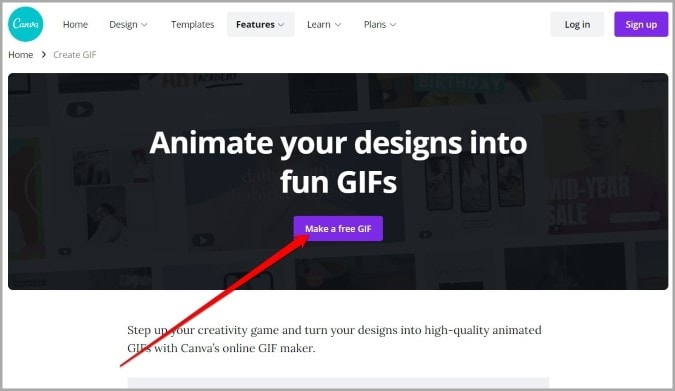
● Go to the web browser. Navigate to Canva. Open the GIF maker page on Canva. Select the “Make a free GIF” button to get started.
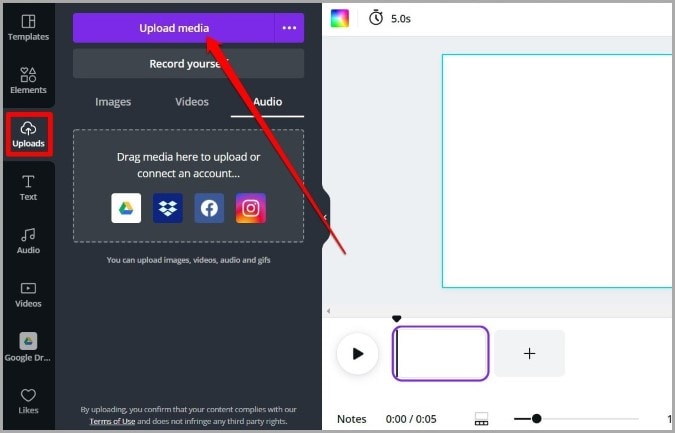
● On the left, go to the “Uploads” tab. Then, click on the “Upload media button” to add images.
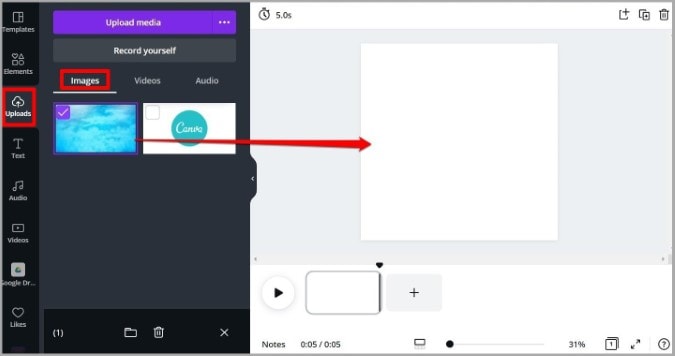
● After the images are added, they will arrive under the “Images” tab. Now you have to drag and drop the images in the GIF maker.
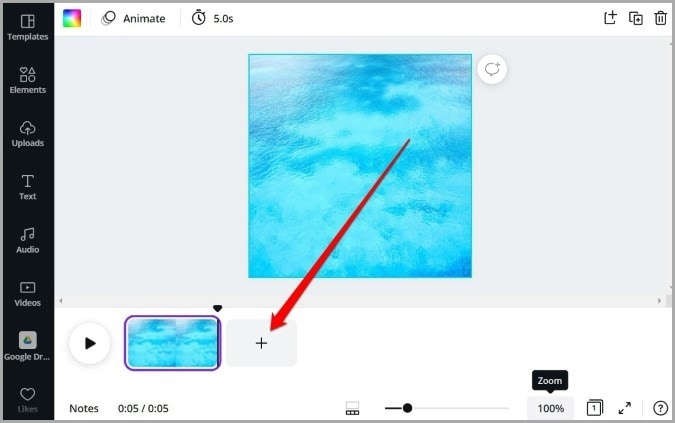
● Next, click on the “+” button in the timeline and add the next picture. You have to repeat this step if you want to add more pictures.
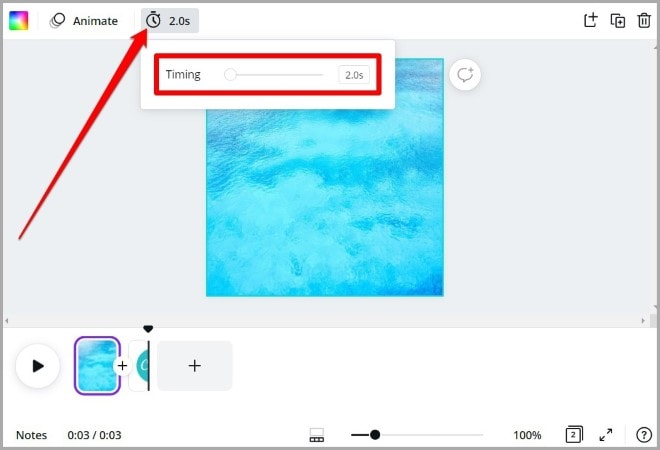
● Now click on the clock icon present in the toolbar at the top. This is for defining the “duration” for how long the image will appear in the GIF. The timer can be set anywhere from 0.1 seconds to 30 seconds.
Adding Elements:
After you add the images, you need to make a GIF in Canva; you can put life into your GIF by adding multiple elements. Follow the steps to know more.
● Switch to the “Elements” tab present at the left. Now, you can explore the extensive library of Canva filled with stickers, photos, graphics, charts, etc. In addition, you can check out the “Graphics” tab for GIFs and select designs, stickers, badgers, and more of your choices.
● You have to select, drag, and drop the elements you want in your GIF. After you add them, resize, rotate, move and fit them as per your choice.

Adding Texts:
Besides graphics and stickers, you may also add text to your GIF to convey a message and make it more descriptive. Check out how.
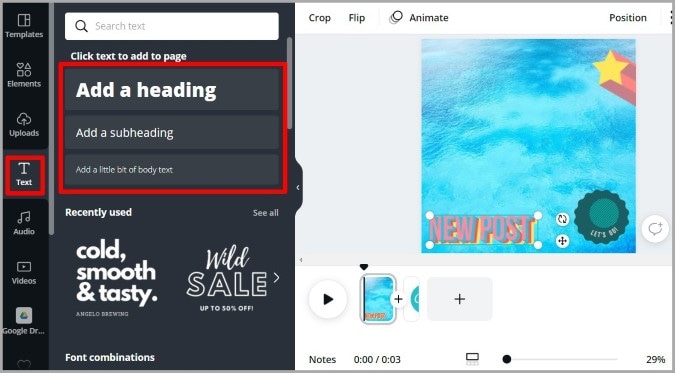
● Click on the “Text” tab at the left. Next, select the type of texting you want, i.e., heading, sub-heading, or regular text.
● Now, you require to choose a “Text style.” Canva has more than a hundred styles and designs. Select any one of them of your choice and add it to your GIF.
● After you select the style, you can edit the text inside it. Change the font size, style, color, spacing, position, and more from the toolbar at the top. You may also animate it or add more effects to it and make it eye-catching. Use all the tools and edit accordingly.
Preview and download your GIF in Canva
After you have edited the images, preview the GIF using the “Play” button from the timeline. If you are satisfied with the GIF, it’s time to download it.
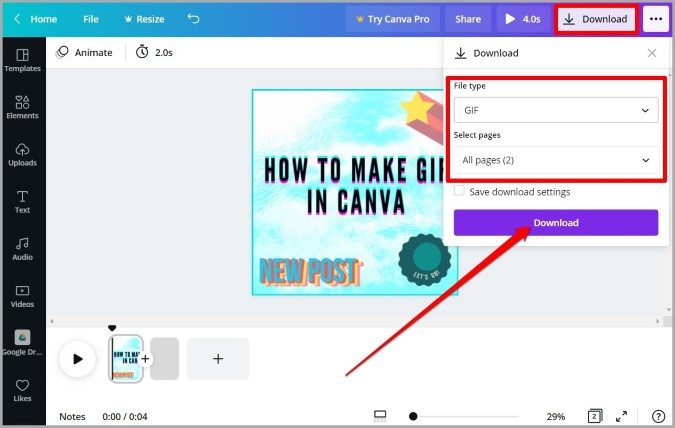
Click on the “Download button” present at the top right corner. Next, you need to go to the “File type” and select “GIF”. Select all the pages that you wish to include in your GIF. Then click on the “Download” tab. Your GIF will get successfully downloaded.
Pro Tips:
Keep it simple- The more clean and simple designs and GIFs you prepare, the more effective it looks. Also, you must focus on the message you want to convey to your audience to connect better.
Design page limit- The limit to animate design is less than ten pages. So, you need to decide and design accordingly.
Posting GIFs to Facebook- For uploading GIFs to Facebook, you have to upload them on a site like gimphy.com to hose the GIF for you.
Part 1 How to Animate Your Designs With Canva GIF
As you have already seen how to make a GIF on Canva, let’s talk about animating GIFs. You can always make your designs and GIFs look more attractive and over the top. You can use Canva to animate your designs with Canva GIFs
Follow the steps to do so:
● Select your dimension
Go to your web browser open Canva. Click on “Create a design” and select “Animated Social Media”. Then resize accordingly.
After you select the “Animated Social Media” template, a timer pops up. Here you can select for how long you need the frames to be. Using this function, you change the speed i.e., create faster or slower GIFs.
● Design your frames
Now you are about to design the first frame. When you have set everything, duplicate the first frame. In the second frame, you can move, replace or adjust graphics, which you want according to your choice.
● Change the speed of the slides
Next, you have to edit the timer and choose how long you want them to be going. It is present at the top of both of the graphics. The graphic will move faster if you shorten the time frame. You can select a slightly slower time frame to make the frameless distracting.
● Download
At the end, download the finished images and GIFs by selecting all the pages. Then, you can play it from the Downloads folder by simply pressing the space bar.
● Filmora
Apart from using Canva GIF maker, you can also use Wondershare Filmora Video Editor for making GIFs and videos. Filmora is considered one of the best video editing tools that can turn your videos into GIF images. Moreover, it has fabulous animation effects and texts. Filmora video editor has the following features:

Wondershare Filmora - Best Video Editor for Mac/Windows
5,481,435 people have downloaded it.
Build unique custom animations without breaking a sweat.
Focus on creating epic stories and leave the details to Filmora’s auto features.
Start a creative adventure with drag & drop effects and endless possibilities.
Filmora simplifies advanced features to save you time and effort.
Filmora cuts out repetition so you can move on to your next creative breakthrough.
● Add texts, titles, and animations in just a few clicks.
● Export to GIF format or other trending video formats
● More than 300 built-in outstanding visual effects are available.
Benefits of using Filmora to create GIFs and animated videos:
● Any technical and non-technical person can handle it. In addition, it is easy to use.
● You can create GIFs here on popular video formats such as .wav, .mpeg, .wmv, .mp4, .mkv, .evo, .dat, .avi, and more. There will not be any issues present while saving.
● The best part of this software tool is that you can edit .gif files with basic editing tools like color correction, splitting, rotation, cropping, combining two or more frames, speeding up the frame motion, or slowing it down requirement.
● You can edit files with interesting elements and graphics.
Filmora is a user-friendly software that is available for installation on their official website. You can turn videos into GIFs, edit them, and download them on your system.
● Key Takeaways from This Episode →
● Canva GIF is a great platform for designing your own GIFs.
● There are various features available to create eye-catching GIFs.
● Besides, Filmora software can also be used to create GIFs out of videos.
If you are using social media daily in 2022, you must come across GIFs and maybe wonder how to make one. GIFs are the most helpful and eye-catching advertisements that can connect you with your followers through your choices. GIFs stand in the middle of images and videos. The biggest reason we use GIFs is that it represents the story or the expression in a flash. Besides, GIFs are smaller files to load and are perfect for your mobile.
In recent years, GIFs have taken the limelight in the market. The web’s most popular GIF database, GIPHY, has taken over 300 million daily active users. In 2018, Google bought the keyboard app and GIF archive to search for GIFs, Tenor. The app Tenor now has over 400 million GIF searches per day. Thus, you can realize the demand for creating GIFs is increasing now. Canva GIF is a great place to design your own GIFs.
After you create a GIF in Canva, you can use it in many fun ways in business, like promoting new sales on your products or a blog post, announcing a new webinar. In addition, you may announce your Instagram or Facebook live, share your point of view, advertise new launches, etc. In this article, we will discuss making GIFs and animating designs with GIF in Canva.
In this article
01 [How to Create a GIF in Canva](#Part 1)
02 [How to Animate Your Designs With Canva GIF](#Part 2)
Part 1 How to Create a GIF in Canva
Canva GIF has made creating your own GIFs very easy. It is one of the best GIF makers online. The plus point of using Canva to make online GIFs is that you do not require creating an account. You can straight get to work. However, if you wish to try out their premium designs and templates, you need a subscription to their premium plan. Let us now talk about making GIF in Canva and some of its tools and features to make your GIF more eye-catching.
Follow the steps below:
● Go to the web browser. Navigate to Canva. Open the GIF maker page on Canva. Select the “Make a free GIF” button to get started.

● On the left, go to the “Uploads” tab. Then, click on the “Upload media button” to add images.

● After the images are added, they will arrive under the “Images” tab. Now you have to drag and drop the images in the GIF maker.

● Next, click on the “+” button in the timeline and add the next picture. You have to repeat this step if you want to add more pictures.

● Now click on the clock icon present in the toolbar at the top. This is for defining the “duration” for how long the image will appear in the GIF. The timer can be set anywhere from 0.1 seconds to 30 seconds.

Adding Elements:
After you add the images, you need to make a GIF in Canva; you can put life into your GIF by adding multiple elements. Follow the steps to know more.
● Switch to the “Elements” tab present at the left. Now, you can explore the extensive library of Canva filled with stickers, photos, graphics, charts, etc. In addition, you can check out the “Graphics” tab for GIFs and select designs, stickers, badgers, and more of your choices.
● You have to select, drag, and drop the elements you want in your GIF. After you add them, resize, rotate, move and fit them as per your choice.

Adding Texts:
Besides graphics and stickers, you may also add text to your GIF to convey a message and make it more descriptive. Check out how.
● Click on the “Text” tab at the left. Next, select the type of texting you want, i.e., heading, sub-heading, or regular text.
● Now, you require to choose a “Text style.” Canva has more than a hundred styles and designs. Select any one of them of your choice and add it to your GIF.
● After you select the style, you can edit the text inside it. Change the font size, style, color, spacing, position, and more from the toolbar at the top. You may also animate it or add more effects to it and make it eye-catching. Use all the tools and edit accordingly.

Preview and download your GIF in Canva
After you have edited the images, preview the GIF using the “Play” button from the timeline. If you are satisfied with the GIF, it’s time to download it.
Click on the “Download button” present at the top right corner. Next, you need to go to the “File type” and select “GIF”. Select all the pages that you wish to include in your GIF. Then click on the “Download” tab. Your GIF will get successfully downloaded.

Pro Tips:
Keep it simple- The more clean and simple designs and GIFs you prepare, the more effective it looks. Also, you must focus on the message you want to convey to your audience to connect better.
Design page limit- The limit to animate design is less than ten pages. So, you need to decide and design accordingly.
Posting GIFs to Facebook- For uploading GIFs to Facebook, you have to upload them on a site like gimphy.com to hose the GIF for you.
Part 1 How to Animate Your Designs With Canva GIF
As you have already seen how to make a GIF on Canva, let’s talk about animating GIFs. You can always make your designs and GIFs look more attractive and over the top. You can use Canva to animate your designs with Canva GIFs
Follow the steps to do so:
● Select your dimension
Go to your web browser open Canva. Click on “Create a design” and select “Animated Social Media”. Then resize accordingly.
After you select the “Animated Social Media” template, a timer pops up. Here you can select for how long you need the frames to be. Using this function, you change the speed i.e., create faster or slower GIFs.
● Design your frames
Now you are about to design the first frame. When you have set everything, duplicate the first frame. In the second frame, you can move, replace or adjust graphics, which you want according to your choice.
● Change the speed of the slides
Next, you have to edit the timer and choose how long you want them to be going. It is present at the top of both of the graphics. The graphic will move faster if you shorten the time frame. You can select a slightly slower time frame to make the frameless distracting.
● Download
At the end, download the finished images and GIFs by selecting all the pages. Then, you can play it from the Downloads folder by simply pressing the space bar.
● Filmora
Apart from using Canva GIF maker, you can also use Wondershare Filmora Video Editor for making GIFs and videos. Filmora is considered one of the best video editing tools that can turn your videos into GIF images. Moreover, it has fabulous animation effects and texts. Filmora video editor has the following features:

Wondershare Filmora - Best Video Editor for Mac/Windows
5,481,435 people have downloaded it.
Build unique custom animations without breaking a sweat.
Focus on creating epic stories and leave the details to Filmora’s auto features.
Start a creative adventure with drag & drop effects and endless possibilities.
Filmora simplifies advanced features to save you time and effort.
Filmora cuts out repetition so you can move on to your next creative breakthrough.
● Add texts, titles, and animations in just a few clicks.
● Export to GIF format or other trending video formats
● More than 300 built-in outstanding visual effects are available.
Benefits of using Filmora to create GIFs and animated videos:
● Any technical and non-technical person can handle it. In addition, it is easy to use.
● You can create GIFs here on popular video formats such as .wav, .mpeg, .wmv, .mp4, .mkv, .evo, .dat, .avi, and more. There will not be any issues present while saving.
● The best part of this software tool is that you can edit .gif files with basic editing tools like color correction, splitting, rotation, cropping, combining two or more frames, speeding up the frame motion, or slowing it down requirement.
● You can edit files with interesting elements and graphics.
Filmora is a user-friendly software that is available for installation on their official website. You can turn videos into GIFs, edit them, and download them on your system.
● Key Takeaways from This Episode →
● Canva GIF is a great platform for designing your own GIFs.
● There are various features available to create eye-catching GIFs.
● Besides, Filmora software can also be used to create GIFs out of videos.
If you are using social media daily in 2022, you must come across GIFs and maybe wonder how to make one. GIFs are the most helpful and eye-catching advertisements that can connect you with your followers through your choices. GIFs stand in the middle of images and videos. The biggest reason we use GIFs is that it represents the story or the expression in a flash. Besides, GIFs are smaller files to load and are perfect for your mobile.
In recent years, GIFs have taken the limelight in the market. The web’s most popular GIF database, GIPHY, has taken over 300 million daily active users. In 2018, Google bought the keyboard app and GIF archive to search for GIFs, Tenor. The app Tenor now has over 400 million GIF searches per day. Thus, you can realize the demand for creating GIFs is increasing now. Canva GIF is a great place to design your own GIFs.
After you create a GIF in Canva, you can use it in many fun ways in business, like promoting new sales on your products or a blog post, announcing a new webinar. In addition, you may announce your Instagram or Facebook live, share your point of view, advertise new launches, etc. In this article, we will discuss making GIFs and animating designs with GIF in Canva.
In this article
01 [How to Create a GIF in Canva](#Part 1)
02 [How to Animate Your Designs With Canva GIF](#Part 2)
Part 1 How to Create a GIF in Canva
Canva GIF has made creating your own GIFs very easy. It is one of the best GIF makers online. The plus point of using Canva to make online GIFs is that you do not require creating an account. You can straight get to work. However, if you wish to try out their premium designs and templates, you need a subscription to their premium plan. Let us now talk about making GIF in Canva and some of its tools and features to make your GIF more eye-catching.
Follow the steps below:
● Go to the web browser. Navigate to Canva. Open the GIF maker page on Canva. Select the “Make a free GIF” button to get started.

● On the left, go to the “Uploads” tab. Then, click on the “Upload media button” to add images.

● After the images are added, they will arrive under the “Images” tab. Now you have to drag and drop the images in the GIF maker.

● Next, click on the “+” button in the timeline and add the next picture. You have to repeat this step if you want to add more pictures.

● Now click on the clock icon present in the toolbar at the top. This is for defining the “duration” for how long the image will appear in the GIF. The timer can be set anywhere from 0.1 seconds to 30 seconds.

Adding Elements:
After you add the images, you need to make a GIF in Canva; you can put life into your GIF by adding multiple elements. Follow the steps to know more.
● Switch to the “Elements” tab present at the left. Now, you can explore the extensive library of Canva filled with stickers, photos, graphics, charts, etc. In addition, you can check out the “Graphics” tab for GIFs and select designs, stickers, badgers, and more of your choices.
● You have to select, drag, and drop the elements you want in your GIF. After you add them, resize, rotate, move and fit them as per your choice.

Adding Texts:
Besides graphics and stickers, you may also add text to your GIF to convey a message and make it more descriptive. Check out how.
● Click on the “Text” tab at the left. Next, select the type of texting you want, i.e., heading, sub-heading, or regular text.
● Now, you require to choose a “Text style.” Canva has more than a hundred styles and designs. Select any one of them of your choice and add it to your GIF.
● After you select the style, you can edit the text inside it. Change the font size, style, color, spacing, position, and more from the toolbar at the top. You may also animate it or add more effects to it and make it eye-catching. Use all the tools and edit accordingly.

Preview and download your GIF in Canva
After you have edited the images, preview the GIF using the “Play” button from the timeline. If you are satisfied with the GIF, it’s time to download it.
Click on the “Download button” present at the top right corner. Next, you need to go to the “File type” and select “GIF”. Select all the pages that you wish to include in your GIF. Then click on the “Download” tab. Your GIF will get successfully downloaded.

Pro Tips:
Keep it simple- The more clean and simple designs and GIFs you prepare, the more effective it looks. Also, you must focus on the message you want to convey to your audience to connect better.
Design page limit- The limit to animate design is less than ten pages. So, you need to decide and design accordingly.
Posting GIFs to Facebook- For uploading GIFs to Facebook, you have to upload them on a site like gimphy.com to hose the GIF for you.
Part 1 How to Animate Your Designs With Canva GIF
As you have already seen how to make a GIF on Canva, let’s talk about animating GIFs. You can always make your designs and GIFs look more attractive and over the top. You can use Canva to animate your designs with Canva GIFs
Follow the steps to do so:
● Select your dimension
Go to your web browser open Canva. Click on “Create a design” and select “Animated Social Media”. Then resize accordingly.
After you select the “Animated Social Media” template, a timer pops up. Here you can select for how long you need the frames to be. Using this function, you change the speed i.e., create faster or slower GIFs.
● Design your frames
Now you are about to design the first frame. When you have set everything, duplicate the first frame. In the second frame, you can move, replace or adjust graphics, which you want according to your choice.
● Change the speed of the slides
Next, you have to edit the timer and choose how long you want them to be going. It is present at the top of both of the graphics. The graphic will move faster if you shorten the time frame. You can select a slightly slower time frame to make the frameless distracting.
● Download
At the end, download the finished images and GIFs by selecting all the pages. Then, you can play it from the Downloads folder by simply pressing the space bar.
● Filmora
Apart from using Canva GIF maker, you can also use Wondershare Filmora Video Editor for making GIFs and videos. Filmora is considered one of the best video editing tools that can turn your videos into GIF images. Moreover, it has fabulous animation effects and texts. Filmora video editor has the following features:

Wondershare Filmora - Best Video Editor for Mac/Windows
5,481,435 people have downloaded it.
Build unique custom animations without breaking a sweat.
Focus on creating epic stories and leave the details to Filmora’s auto features.
Start a creative adventure with drag & drop effects and endless possibilities.
Filmora simplifies advanced features to save you time and effort.
Filmora cuts out repetition so you can move on to your next creative breakthrough.
● Add texts, titles, and animations in just a few clicks.
● Export to GIF format or other trending video formats
● More than 300 built-in outstanding visual effects are available.
Benefits of using Filmora to create GIFs and animated videos:
● Any technical and non-technical person can handle it. In addition, it is easy to use.
● You can create GIFs here on popular video formats such as .wav, .mpeg, .wmv, .mp4, .mkv, .evo, .dat, .avi, and more. There will not be any issues present while saving.
● The best part of this software tool is that you can edit .gif files with basic editing tools like color correction, splitting, rotation, cropping, combining two or more frames, speeding up the frame motion, or slowing it down requirement.
● You can edit files with interesting elements and graphics.
Filmora is a user-friendly software that is available for installation on their official website. You can turn videos into GIFs, edit them, and download them on your system.
● Key Takeaways from This Episode →
● Canva GIF is a great platform for designing your own GIFs.
● There are various features available to create eye-catching GIFs.
● Besides, Filmora software can also be used to create GIFs out of videos.
If you are using social media daily in 2022, you must come across GIFs and maybe wonder how to make one. GIFs are the most helpful and eye-catching advertisements that can connect you with your followers through your choices. GIFs stand in the middle of images and videos. The biggest reason we use GIFs is that it represents the story or the expression in a flash. Besides, GIFs are smaller files to load and are perfect for your mobile.
In recent years, GIFs have taken the limelight in the market. The web’s most popular GIF database, GIPHY, has taken over 300 million daily active users. In 2018, Google bought the keyboard app and GIF archive to search for GIFs, Tenor. The app Tenor now has over 400 million GIF searches per day. Thus, you can realize the demand for creating GIFs is increasing now. Canva GIF is a great place to design your own GIFs.
After you create a GIF in Canva, you can use it in many fun ways in business, like promoting new sales on your products or a blog post, announcing a new webinar. In addition, you may announce your Instagram or Facebook live, share your point of view, advertise new launches, etc. In this article, we will discuss making GIFs and animating designs with GIF in Canva.
In this article
01 [How to Create a GIF in Canva](#Part 1)
02 [How to Animate Your Designs With Canva GIF](#Part 2)
Part 1 How to Create a GIF in Canva
Canva GIF has made creating your own GIFs very easy. It is one of the best GIF makers online. The plus point of using Canva to make online GIFs is that you do not require creating an account. You can straight get to work. However, if you wish to try out their premium designs and templates, you need a subscription to their premium plan. Let us now talk about making GIF in Canva and some of its tools and features to make your GIF more eye-catching.
Follow the steps below:
● Go to the web browser. Navigate to Canva. Open the GIF maker page on Canva. Select the “Make a free GIF” button to get started.

● On the left, go to the “Uploads” tab. Then, click on the “Upload media button” to add images.

● After the images are added, they will arrive under the “Images” tab. Now you have to drag and drop the images in the GIF maker.

● Next, click on the “+” button in the timeline and add the next picture. You have to repeat this step if you want to add more pictures.

● Now click on the clock icon present in the toolbar at the top. This is for defining the “duration” for how long the image will appear in the GIF. The timer can be set anywhere from 0.1 seconds to 30 seconds.

Adding Elements:
After you add the images, you need to make a GIF in Canva; you can put life into your GIF by adding multiple elements. Follow the steps to know more.
● Switch to the “Elements” tab present at the left. Now, you can explore the extensive library of Canva filled with stickers, photos, graphics, charts, etc. In addition, you can check out the “Graphics” tab for GIFs and select designs, stickers, badgers, and more of your choices.
● You have to select, drag, and drop the elements you want in your GIF. After you add them, resize, rotate, move and fit them as per your choice.

Adding Texts:
Besides graphics and stickers, you may also add text to your GIF to convey a message and make it more descriptive. Check out how.
● Click on the “Text” tab at the left. Next, select the type of texting you want, i.e., heading, sub-heading, or regular text.
● Now, you require to choose a “Text style.” Canva has more than a hundred styles and designs. Select any one of them of your choice and add it to your GIF.
● After you select the style, you can edit the text inside it. Change the font size, style, color, spacing, position, and more from the toolbar at the top. You may also animate it or add more effects to it and make it eye-catching. Use all the tools and edit accordingly.

Preview and download your GIF in Canva
After you have edited the images, preview the GIF using the “Play” button from the timeline. If you are satisfied with the GIF, it’s time to download it.
Click on the “Download button” present at the top right corner. Next, you need to go to the “File type” and select “GIF”. Select all the pages that you wish to include in your GIF. Then click on the “Download” tab. Your GIF will get successfully downloaded.

Pro Tips:
Keep it simple- The more clean and simple designs and GIFs you prepare, the more effective it looks. Also, you must focus on the message you want to convey to your audience to connect better.
Design page limit- The limit to animate design is less than ten pages. So, you need to decide and design accordingly.
Posting GIFs to Facebook- For uploading GIFs to Facebook, you have to upload them on a site like gimphy.com to hose the GIF for you.
Part 1 How to Animate Your Designs With Canva GIF
As you have already seen how to make a GIF on Canva, let’s talk about animating GIFs. You can always make your designs and GIFs look more attractive and over the top. You can use Canva to animate your designs with Canva GIFs
Follow the steps to do so:
● Select your dimension
Go to your web browser open Canva. Click on “Create a design” and select “Animated Social Media”. Then resize accordingly.
After you select the “Animated Social Media” template, a timer pops up. Here you can select for how long you need the frames to be. Using this function, you change the speed i.e., create faster or slower GIFs.
● Design your frames
Now you are about to design the first frame. When you have set everything, duplicate the first frame. In the second frame, you can move, replace or adjust graphics, which you want according to your choice.
● Change the speed of the slides
Next, you have to edit the timer and choose how long you want them to be going. It is present at the top of both of the graphics. The graphic will move faster if you shorten the time frame. You can select a slightly slower time frame to make the frameless distracting.
● Download
At the end, download the finished images and GIFs by selecting all the pages. Then, you can play it from the Downloads folder by simply pressing the space bar.
● Filmora
Apart from using Canva GIF maker, you can also use Wondershare Filmora Video Editor for making GIFs and videos. Filmora is considered one of the best video editing tools that can turn your videos into GIF images. Moreover, it has fabulous animation effects and texts. Filmora video editor has the following features:

Wondershare Filmora - Best Video Editor for Mac/Windows
5,481,435 people have downloaded it.
Build unique custom animations without breaking a sweat.
Focus on creating epic stories and leave the details to Filmora’s auto features.
Start a creative adventure with drag & drop effects and endless possibilities.
Filmora simplifies advanced features to save you time and effort.
Filmora cuts out repetition so you can move on to your next creative breakthrough.
● Add texts, titles, and animations in just a few clicks.
● Export to GIF format or other trending video formats
● More than 300 built-in outstanding visual effects are available.
Benefits of using Filmora to create GIFs and animated videos:
● Any technical and non-technical person can handle it. In addition, it is easy to use.
● You can create GIFs here on popular video formats such as .wav, .mpeg, .wmv, .mp4, .mkv, .evo, .dat, .avi, and more. There will not be any issues present while saving.
● The best part of this software tool is that you can edit .gif files with basic editing tools like color correction, splitting, rotation, cropping, combining two or more frames, speeding up the frame motion, or slowing it down requirement.
● You can edit files with interesting elements and graphics.
Filmora is a user-friendly software that is available for installation on their official website. You can turn videos into GIFs, edit them, and download them on your system.
● Key Takeaways from This Episode →
● Canva GIF is a great platform for designing your own GIFs.
● There are various features available to create eye-catching GIFs.
● Besides, Filmora software can also be used to create GIFs out of videos.
How To Change Speed of Video in Final Cut Pro?
When there are certain boring but necessary parts in your video, you need to speed them up. Similarly, you may need to reduce the duration of the entire video. Speeding up the video is your only option when you do not want to cut any part. You must have also observed that certain videos look funny when you speed them up. To speed up videos, you will need a video editor that does not degrade the video quality.
Final Cut Pro is a popular choice to speed up video without distorting the pitch. Many think that the video quality can degrade when they change the speed of the video clip. This concern can be taken care of when you alter the video speed with Final Cut Pro. Instead of changing the speed of the entire video, you can change the speed of specific parts. We will illustrate how to speed up the video using Final Cut Pro and suggest a better choice than FCP.
Part I. Speed Up Video using Final Cut Pro
Final Cut Pro by Apple is one of Mac users’ most popular video editors. Many video creators purchase MacBooks for editing their videos in Final Cut Pro. The video editor is suitable for beginners as well as professionals. FCP, as a video editor, is super fast in rendering and processing video while exporting. Here are the steps for the Final Cut Pro speed-up clip.
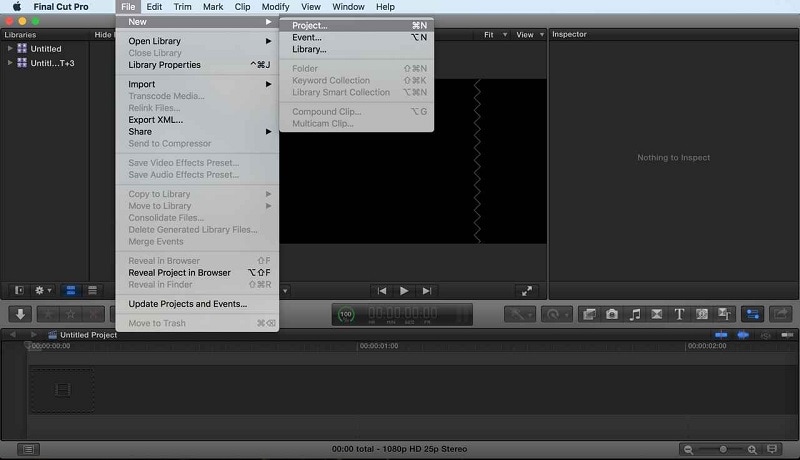
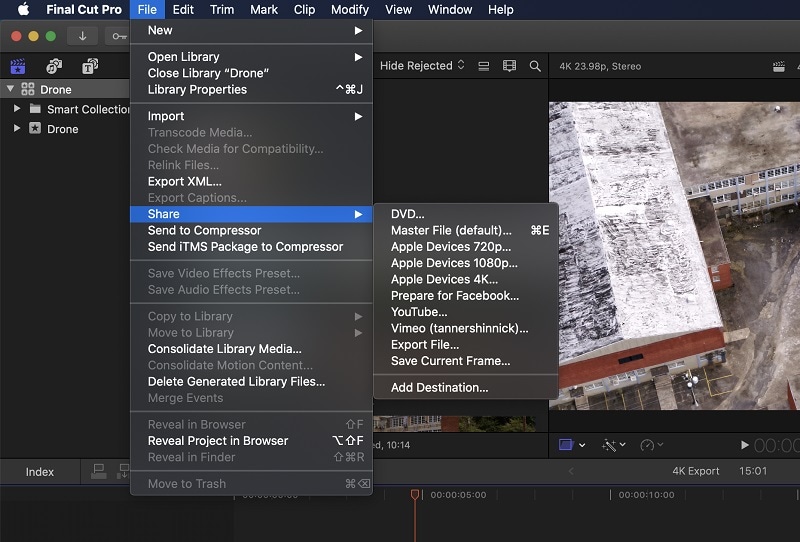
Step1 Open FCP. Navigate to File>New> and tap Project to start a new project.
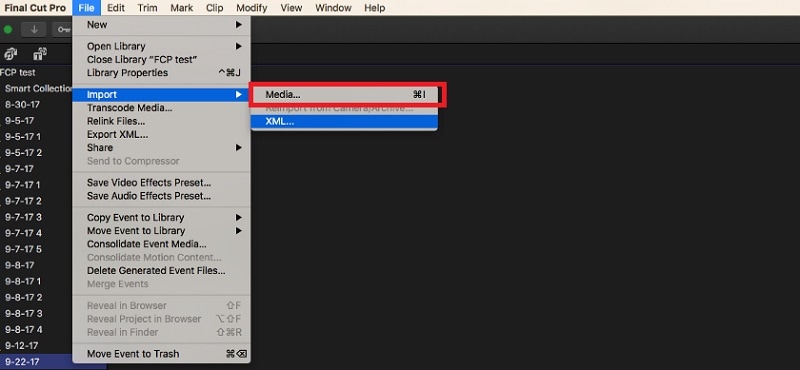
Step2 Go to File>Import> Media and fetch your video clip. After that, drag/drop the video clip into the timeline.
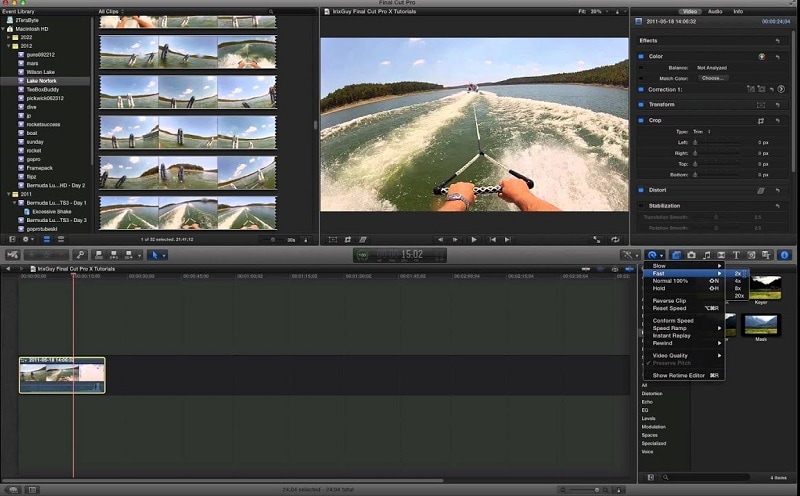
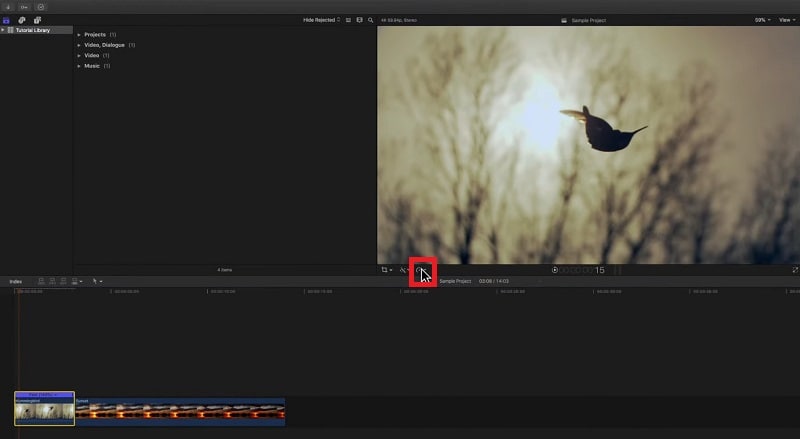
Step3 Choose the video clip from the timeline. Click on the Speedometer(Retime) icon at the top of the timeline.
Step4 Tap the Speedometer icon, to get the drop-drop menu. For the Final Cut Pro speed-up video, go to Fast and select the speed. You get to choose from 2X to 20X.
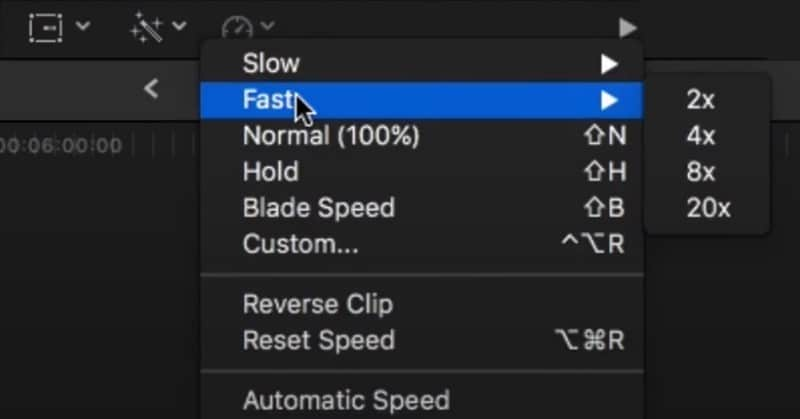
If you want to customize the speed-up rate, you can click on the Custom option. Enter any desired percentage speed.
Step5 Now, play the video.
Part II. Tips for Speeding Up Video in Final Cut Pro
You have to keep a few points in mind when you speed up videos in Final Cut Pro. This ensures that the video does not get distorted while speeding up a section. Here are some tips to follow to speed up the video in FCP.
Adjust The Pitch of Sped-Up Clips -
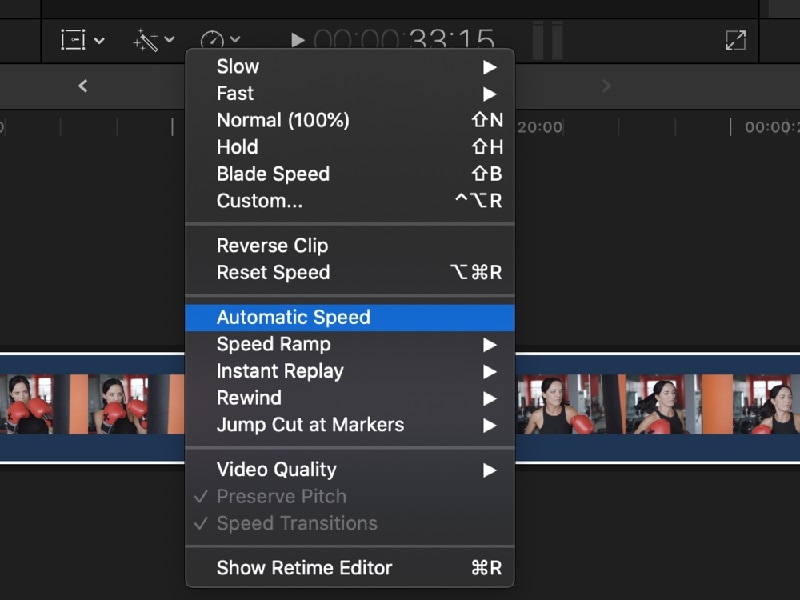
By default, Final Cut Pro preserves the pitch of the audio even when you change the speed of the video. However, you may want to change the pitch per the video’s speed. This is because you might want to make the audio sound funny. You need to turn off the Preserve Pitch option from Retime menu. Once you do that, the pitch of the sped-up clip adjusts itself as per the change in speed.
Speeding Up Video by Adjusting Frame Rate -
You can shoot at a low frame rate for the scene you want to speed up. The frame rate should be lower than the overall video project’s frame rate.
You can add the scene to your video project on the timeline. Then you need to choose Automatic Speed from Retime menu. This will increase the frame rate from the scene to the video project frame rate. Once the frame rate increases, the video will speed up automatically.
Smoothen Out the Sped-Up Video -
Sometimes, the overall video may look old when you speed up a particular portion. That is why there are two options available on Final Cut Pro. The first option is frame blending which is more suitable for the slow-motion clip.
The second option is the optical flow that smoothens out the sped-up clip. It adds in-between frames by analyzing the directional movement of pixels. You can find the option from Video Quality present in the Retime menu.
Part III. The Right Final Cut Pro Alternative for Changing Speed - Filmora
Final Cut Pro has a steep learning curve. Unless you have some experience in video editing, you will find the user interface slightly complicated. Besides, Final Cut Pro is only available for Mac users since it is an Apple product.
Many people look for a Final Cut Pro alternative to change the speed of the video. Wondershare Filmora is the best choice over Final Cut Pro to change the speed of video Final Cut Pro.
Wondershare Filmora is a professional video editor that is available for Windows and Mac users. The video editor is suitable for beginners as well as experienced video creators. The popularity of Filmora is due to its super intuitive user interface. You get almost all the features of FCP in Filmora.
In comparison, there are more video effects, elements, and stock media files available to enhance your videos. You get the latest effects from time to time so that you can have the trending elements in the video, you can also save the edited video in different video file formats as per your requirements, and even record video through a webcam and capture the screen using Filmora.
Several AI effects, stickers, and elements are available to enhance your videos. Most users find it easier to edit videos on Filmora over Final Cut Pro.
Free Download For Win 7 or later(64-bit)
Free Download For macOS 10.14 or later
How to Change Video Speed in Filmora?
Changing video speed in Filmora is super easy. You can speed up your video as per your requirements in a number of ways. That is why Filmora happens to be a better option than Final Cut Pro. We will illustrate all the different methods to change video speed in Filmora.
You can watch this video to understand how to change video speed in Filmora.
Method 1. The Simplest Way - Click “2x-100x” Speed Options
Just like Final Cut Pro, you can choose from preset speed options to change video speed. This is undoubtedly the easiest way to change video speed instantly. While Final Cut Pro offers 2X to 20X speed options, Filmora has 2X to 100X speed presets. Here are the steps to speed up video by choosing a preset speed option.
Step1 Download, install and simply Launch Filmora. Tap Create New Project option.

Step2 Go to File> Import Media> Import Media Files and choose the video file. The selected video will be imported into the Project Media folder. Alternatively, you can also use the drag/drop function.

Step3 Drag and drop the video file onto the timeline. Select the video clip from the timeline and click on the Speed (timer icon) option at the top of the timeline. If you want to speed up a portion of the video, you need to split the video clip.

Step4 From the menu, go to Fast and select any speed option as per your requirements. Thereafter, play the video to see the changes.

Step5 Press Export to save the video file in your desired file format.
Method 2. Use Uniform Speed to Change Speed
If you want to customize the video speed uniformly, there is a dedicated option called Uniform Speed in Filmora. This means you do not want to choose from the preset speed options. You may want to set the speed of the video to 3X, but it is not available in the preset options.
That is where Uniform Speed comes in handy, and you can set any speed from 0.01X to 100X. Here are the steps to follow.
Step1 Once you have dropped the video file onto the timeline, click on the Speed(timer) icon.
Step2 Click on the Uniform Speed option. This will open the Uniform Speed tab above the timeline.

Step3 Adjust the speed slider to set the desired speed as per your requirements. The duration will change as per the speed you set, and you can set the duration below the speed slider. Just like Final Cut Pro, you can turn on Ripple and Audio Pitch as per your preference.

Step4 Once you are satisfied with the speed, click on the Ok button. Thereafter, tap Export to save the edited video file.
Method 3. Use Speed Ramping to Change Speed
There is a unique way to change your video speed called speed ramping. You can speed up some parts and slow down the other parts, like crests and troughs in a graph.
The speed ramping feature comes with several graphical presets. You can choose from the presets and customize the speed as per your requirements. Check the steps to use speed ramping to change your video speed.
Step1 Drag and drop the video file onto the timeline. Click on the Speed(timer) icon at the top of the timeline.
Step2 Click on Speed Ramping option. This will open Speed Ramping above the timeline.

Step3 Select from the available preset as per your requirements. Otherwise, you can select Customize option and edit the nodes as needed.

Step4 Once satisfied with the result, click on the Ok button. Finally, tap Export
Conclusion
There are some videos where you may have to speed up certain parts. In detail, we have illustrated how to speed up the video in Final Cut Pro. However, if you do not have Final Cut Pro or are unsatisfied with FCP, Wondershare Filmora is a great choice. Most importantly, the steps for all the different methods are very simple for everyone to follow.
Free Download For macOS 10.14 or later
How to Change Video Speed in Filmora?
Changing video speed in Filmora is super easy. You can speed up your video as per your requirements in a number of ways. That is why Filmora happens to be a better option than Final Cut Pro. We will illustrate all the different methods to change video speed in Filmora.
You can watch this video to understand how to change video speed in Filmora.
Method 1. The Simplest Way - Click “2x-100x” Speed Options
Just like Final Cut Pro, you can choose from preset speed options to change video speed. This is undoubtedly the easiest way to change video speed instantly. While Final Cut Pro offers 2X to 20X speed options, Filmora has 2X to 100X speed presets. Here are the steps to speed up video by choosing a preset speed option.
Step1 Download, install and simply Launch Filmora. Tap Create New Project option.

Step2 Go to File> Import Media> Import Media Files and choose the video file. The selected video will be imported into the Project Media folder. Alternatively, you can also use the drag/drop function.

Step3 Drag and drop the video file onto the timeline. Select the video clip from the timeline and click on the Speed (timer icon) option at the top of the timeline. If you want to speed up a portion of the video, you need to split the video clip.

Step4 From the menu, go to Fast and select any speed option as per your requirements. Thereafter, play the video to see the changes.

Step5 Press Export to save the video file in your desired file format.
Method 2. Use Uniform Speed to Change Speed
If you want to customize the video speed uniformly, there is a dedicated option called Uniform Speed in Filmora. This means you do not want to choose from the preset speed options. You may want to set the speed of the video to 3X, but it is not available in the preset options.
That is where Uniform Speed comes in handy, and you can set any speed from 0.01X to 100X. Here are the steps to follow.
Step1 Once you have dropped the video file onto the timeline, click on the Speed(timer) icon.
Step2 Click on the Uniform Speed option. This will open the Uniform Speed tab above the timeline.

Step3 Adjust the speed slider to set the desired speed as per your requirements. The duration will change as per the speed you set, and you can set the duration below the speed slider. Just like Final Cut Pro, you can turn on Ripple and Audio Pitch as per your preference.

Step4 Once you are satisfied with the speed, click on the Ok button. Thereafter, tap Export to save the edited video file.
Method 3. Use Speed Ramping to Change Speed
There is a unique way to change your video speed called speed ramping. You can speed up some parts and slow down the other parts, like crests and troughs in a graph.
The speed ramping feature comes with several graphical presets. You can choose from the presets and customize the speed as per your requirements. Check the steps to use speed ramping to change your video speed.
Step1 Drag and drop the video file onto the timeline. Click on the Speed(timer) icon at the top of the timeline.
Step2 Click on Speed Ramping option. This will open Speed Ramping above the timeline.

Step3 Select from the available preset as per your requirements. Otherwise, you can select Customize option and edit the nodes as needed.

Step4 Once satisfied with the result, click on the Ok button. Finally, tap Export
Conclusion
There are some videos where you may have to speed up certain parts. In detail, we have illustrated how to speed up the video in Final Cut Pro. However, if you do not have Final Cut Pro or are unsatisfied with FCP, Wondershare Filmora is a great choice. Most importantly, the steps for all the different methods are very simple for everyone to follow.
Ultimate Guide on How To Plan and Storyboard a Music Video
Do you want to bring your music to life on the big screen? Do you want to create something visually striking? Making a music video seems like a big task. Sometimes, the artist you’re working with might not have a clear idea for their music video. It’s your job to help guide the creative process.
But don’t worry! This guide is going to make it easy for you to plan and storyboard your music video step by step with the help of Filmora . So let’s get started and make an amazing music video together!
Plan and develop initial ideas
The first and essential step in creating a music video is planning. This is where you will lay the foundation of your music video. You need to figure out what your video is about and what you want to convey to the audience. It involves a concept or theme for the video, research, and reference material. You can also explore different ideas to make your video unique and engaging.
Step1Research and gather information
You can begin by researching and gathering information from other music videos. This will help you to know what has been done before and what is currently popular. You can also figure out how you can do it differently.
Step2Brainstorm and concept development
Once you understand the current trends and styles in the music video. It’s time to start brainstorming ideas. You can do it alone or with the help of your team. But remember that you have to think out of the box to make it creative.
Step3Consider the lyrics and message
In the planning stage, it is also important to consider the lyrics and message of the song. It would be best if you plan according to the feel and vibe of the song. It will help you to create a concept tied to the song and will help enhance its meaning.
Step4Experiment and find the right direction
Once you have a general concept, it’s time to develop it further. You can do it by creating rough sketches or storyboards. You can also film test footage to see how the concept will look on screen.
Step5Effort and attention to detail
Remember, this step is the foundation of your music video. So, take your time and don’t rush through it. By putting in effort and attention to detail, you’ll be able to create a visually stunning and closely tied to the song’s music video.
Choose a style for your music video
While creating ideas for the music video, it’s also important to consider the style of the music video. There are two main styles of music videos:
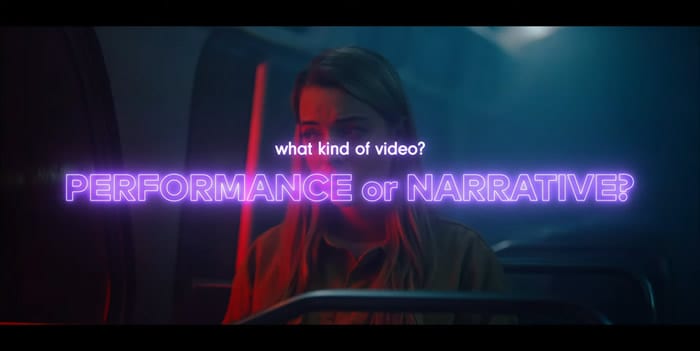
1.Performance-style music video
If you want to showcase energy and charisma in your music video, go for a performance-style music video. This video style focuses on you and your band performing live in front of an audience. You can shoot a video in a single take with minimal cuts or feature different angles and shots. The key is to capture the raw energy and emotion of the performance.
2.Narrative-style music video
A narrative-style music video tells a story or conveys a message along with the music. The story can be a visual representation of the lyrics or a multi-layered narrative. You can choose this style to convey a deeper message or story.
You can shoot this video in different locations and can include different scenes. The main motive is to create a video that emotionally connects with the audience.
Once you have an idea of what you want your music video to be about, you can put together a treatment to show the artist what your initial plan for the music video is.
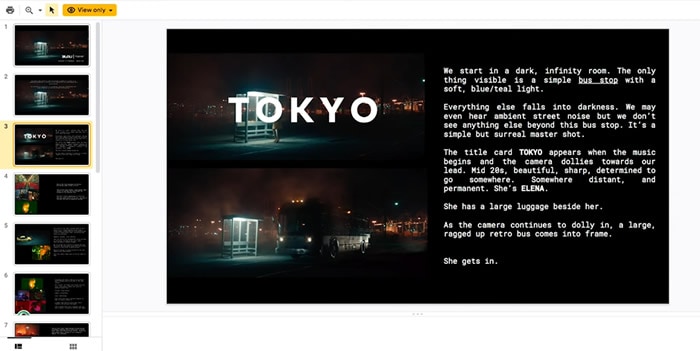
If the artist approves the direction of the video, it’s time to move on to storyboarding!
Storyboard your music video
Once you are done with the style and concept of the video, the next step is storyboarding! It allows you to break down your music video visually and highlight key visual moments. It can save time and money and convey a clear idea to the team. You can do this on paper, a computer, or a tablet, whatever works best for you. Let’s see how to do it with the help of Filmora .
Free Download For Win 7 or later(64-bit)
Free Download For macOS 10.14 or later
Step1Draw your ideas
You are supposed to break your video idea into different scenes. For each scene, you should draw a picture of what the shot will look like and draw them within the rectangles.
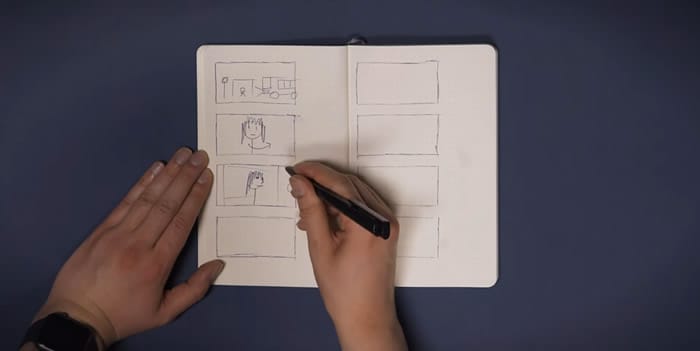
Step2Take pictures
After doing your storyboarding on paper, take photos of each shot in a sequence and import them to your computer.
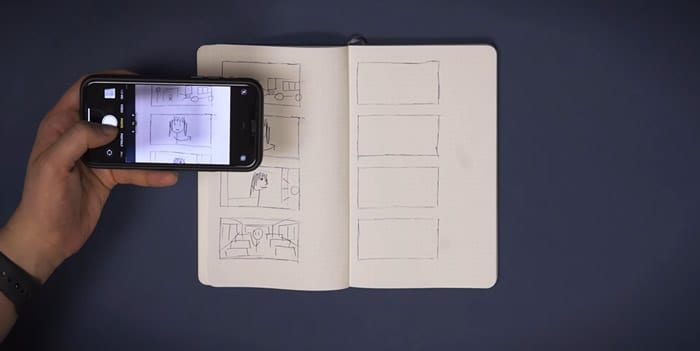
Before going to the next step, make sure to download Wondershare Filmora. It is powerful editing software that can help you easily make a storyboard. With its wide range of features, you can also customize your clips with special effects, transitions, and more.

Free Download For Win 7 or later(64-bit)
Free Download For macOS 10.14 or later
Step3Import pictures to Filmora
Now import all the scenes and music to Filmora. You can also create separate folders if you have multiple concepts for a single video.
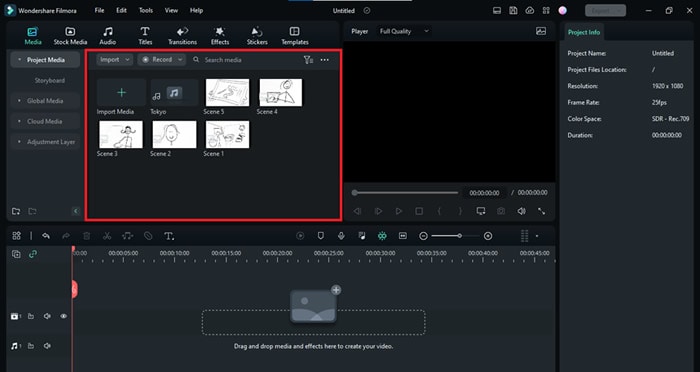
Step4Drop your media onto the timeline
Drag and drop the song to the audio timeline. Then press shift, select all images, and drop them into the picture timeline. If you realize you are missing enough clips to complete the song, you can draw and add more shots.
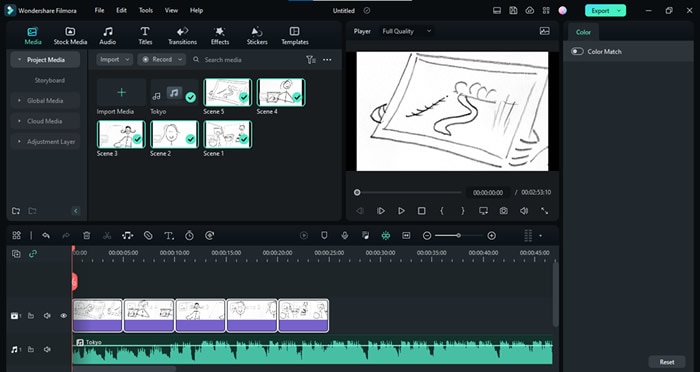
Step5Adjust the frame
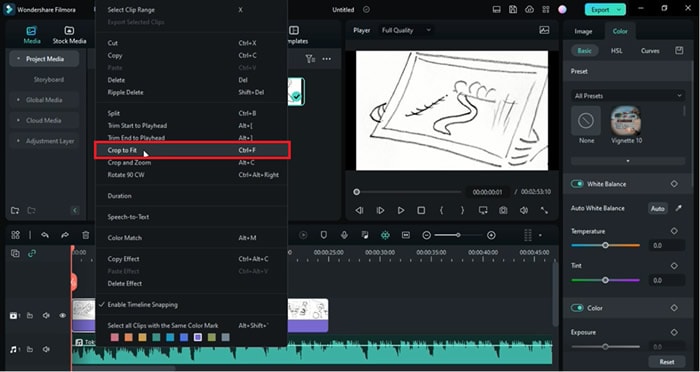
You can right-click on the picture’s timeline and select Crop to fit to adjust the image on the screen. You can also adjust the scenes according to the song.
Step6Add effects
You can also simulate transitions and effects in the clips. Let’s suppose you want to show a zoom-in shot. Then you would click on the picture frame and the keyframe option just above the timeline. Now keyframe the position and scale of the clip according to you.
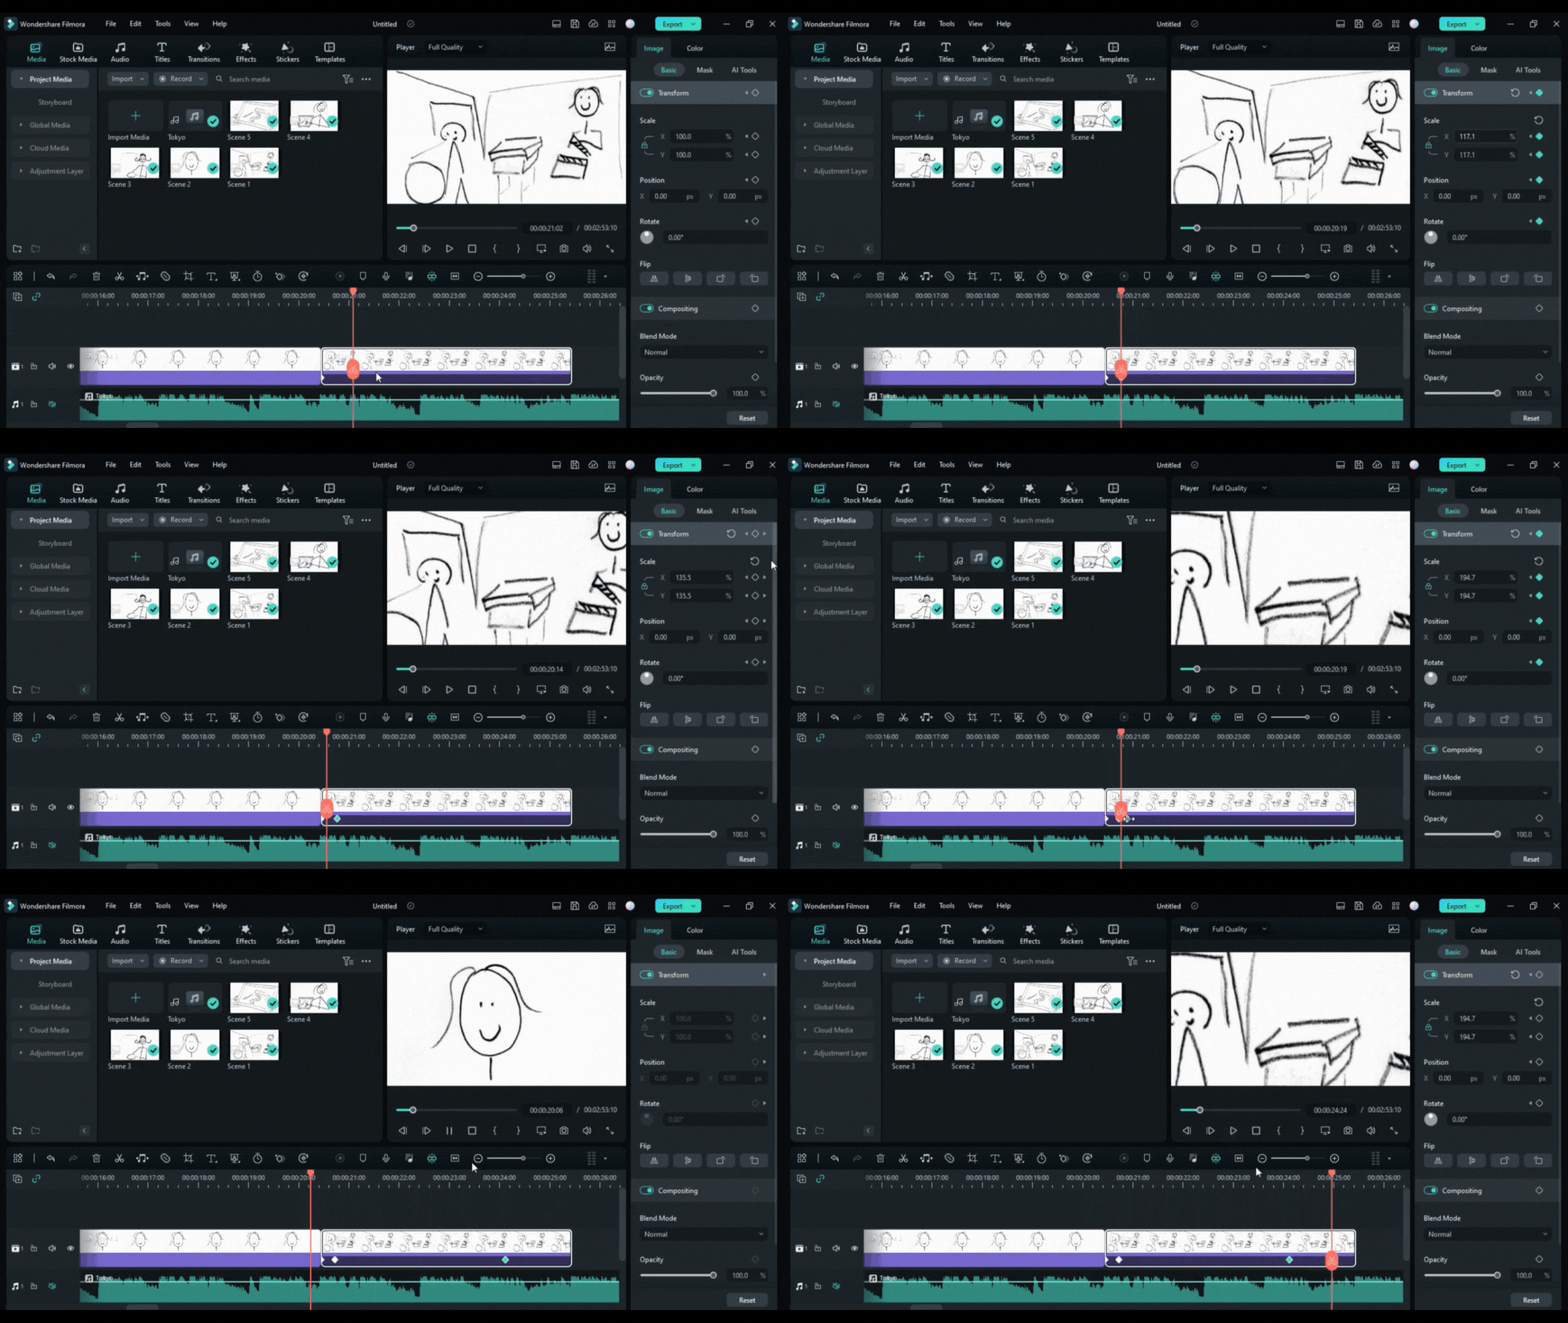
Once you feel like your clips sync with the song, you are ready to start planning for the production of your music video.
Conclusion
We hope this blog has given you a better understanding of how planning and storyboarding can help make your music videos better. You can ensure that your vision is clearly communicated to the audience by planning and storyboarding your music videos properly. Now that you know what to do, it’s time to put that knowledge into action. Take a pencil and paper and start sketching the shots and scenes you want to create.
Free Download For macOS 10.14 or later

Step1Draw your ideas
You are supposed to break your video idea into different scenes. For each scene, you should draw a picture of what the shot will look like and draw them within the rectangles.

Step2Take pictures
After doing your storyboarding on paper, take photos of each shot in a sequence and import them to your computer.

Before going to the next step, make sure to download Wondershare Filmora. It is powerful editing software that can help you easily make a storyboard. With its wide range of features, you can also customize your clips with special effects, transitions, and more.

Free Download For Win 7 or later(64-bit)
Free Download For macOS 10.14 or later
Step3Import pictures to Filmora
Now import all the scenes and music to Filmora. You can also create separate folders if you have multiple concepts for a single video.

Step4Drop your media onto the timeline
Drag and drop the song to the audio timeline. Then press shift, select all images, and drop them into the picture timeline. If you realize you are missing enough clips to complete the song, you can draw and add more shots.

Step5Adjust the frame
You can right-click on the picture’s timeline and select Crop to fit to adjust the image on the screen. You can also adjust the scenes according to the song.

Step6Add effects
You can also simulate transitions and effects in the clips. Let’s suppose you want to show a zoom-in shot. Then you would click on the picture frame and the keyframe option just above the timeline. Now keyframe the position and scale of the clip according to you.

Once you feel like your clips sync with the song, you are ready to start planning for the production of your music video.
Conclusion
We hope this blog has given you a better understanding of how planning and storyboarding can help make your music videos better. You can ensure that your vision is clearly communicated to the audience by planning and storyboarding your music videos properly. Now that you know what to do, it’s time to put that knowledge into action. Take a pencil and paper and start sketching the shots and scenes you want to create.
Also read:
- 2024 Approved Step by Step to Rotate Videos Using Handbrake
- New 2024 Approved Camtasia vs Final Cut Pro
- How to Make Transparent Background in Canva for 2024
- New Easy Way to Apply Green Screen to YouTube Videos
- New In 2024, How To Cut Videos For Instagram On Mac
- In 2024, How To Edit Youtube Videos In Simple Steps
- 2024 Approved What Are AR Emoji Stickers & How to Add Them to Your Video
- In 2024, Use The Best LUTs for Lightroom
- In 2024, Creative Ways to Add Green Screen Effects In Photoshop
- How to Put Emoji on Mac That Take Less Than 10 Mins
- 2024 Approved Using the Best Templates to Create Slow Motion Videos on CapCut
- Updated In 2024, Detailed Steps to Rotate Videos in Davinci Resolve
- Video Editors Use Transitions to Tie Their Shots and Clips Together Into a Cohesive, Polished Program. Learn the Best Method to Create a Smooth Cut Transition Effect for 2024
- New Getting To Know More About the Video Editing Interface of Wondershare Filmora
- Updated 15 Stunning GIF Splitter Examples You Need to Bookmark
- Want to Make a Fun and Cinematic Video with an Introductory Text Title? Learn the Stages of Editing with Filmora for This Effect Here
- New In 2024, Best Tools To Create Blend Image Collage
- New 2024 Approved Using the Best Templates to Create Slow Motion Videos on CapCut
- Updated Learn How to Create a Kinetic Typography Text Effect in Filmora, One of the Best Video Editors for All Skill Levels. Check Out This Simple Step-by-Step Guide
- In 2024, Top 10 Free Spanish Text To Speech Converter Websites
- In 2024, How To Change Speed of Video in Final Cut Pro?
- 2024 Approved Top 10 Transparent Image Online Tools That Help You A Lot
- Updated 15 Stunning GIF Splitter Examples You Need to Bookmark for 2024
- In 2024, Blender Tips - How to Make Blender Render Transparent Background
- How to Create Intro with Renderforest for 2024
- Updated 2024 Approved Online Video Makers
- New In 2024, How to Put Emoji on Mac That Take Less Than 10 Mins
- 2024 Approved Did You Know Cameras Have a Built-In Feature to Shoot Slow-Motion Clips? This Article Is About Using Sony S&Q to Capture Slow-Motion Scenes
- New 2024 Approved Top 20 Best Text To Speech Software Windows, Mac, Android, iPhone & Online
- In 2024, Do You Know Anything About the Video Format Supported by WhatsApp? If Not, Then This Is the Right Time to Learn About WhatsApp-Supported Video Formats
- 2024 Approved Quickly Turn Any Video Into a Paper Rip Effect
- The Complete Guide to Zoho Slides with Ease
- New Gimp Green Screen
- New What If YouTube Zoom to Fill Not Working for 2024
- New How to Create a Bokeh Effect
- Discover the Best Video Filter Software . Elevate Your Video Editing with Top Contenders Like Filmora, DaVinci Resolve, HitFilm Express, and More for 2024
- New How to Create Liquid Water Reveal Intro?
- In 2024, How to Unlock Apple ID On your Apple iPhone 6 without Security Questions?
- In 2024, Hassle-Free Ways to Remove FRP Lock on Vivo Y27 4G Phones with/without a PC
- How to Come up With the Best Pokemon Team On Oppo Reno 11 5G? | Dr.fone
- In 2024, How to Change Your Location on Apple iPhone 7 Plus | Dr.fone
- In 2024, Will Pokémon Go Ban the Account if You Use PGSharp On OnePlus Ace 2 Pro | Dr.fone
- How to Restore Deleted Lava Storm 5G Contacts An Easy Method Explained.
- In 2024, How to Check Distance and Radius on Google Maps For your Nokia 105 Classic | Dr.fone
- 4 Ways to Transfer Contacts from Apple iPhone 6s Plus to iPhone Quickly | Dr.fone
- How To Create an Apple Developer Account On iPhone SE (2020)
- How To Transfer Data From Apple iPhone SE (2020) To Other iPhone 11 Pro Max devices? | Dr.fone
- In 2024, 15 Best Strongest Pokémon To Use in Pokémon GO PvP Leagues For Oppo A78 | Dr.fone
- How to Change Your Motorola Edge 40 Neo Location on life360 Without Anyone Knowing? | Dr.fone
- Updated Top 10 Free and Best Text-to-Speech Generators
- How to get back lost contacts from Samsung Galaxy A05.
- How to Unlock Realme GT 5 Phone Forgot Password
- Detailed guide of ispoofer for pogo installation On Samsung Galaxy A14 5G | Dr.fone
- Why is iPogo not working On Apple iPhone 15? Fixed | Dr.fone
- How to Restore Deleted Samsung Galaxy XCover 7 Pictures An Easy Method Explained.
- Top Apps and Online Tools To Track Vivo X Fold 2 Phone With/Without IMEI Number
- The Ultimate Guide to Oppo Reno 11F 5G Pattern Lock Screen Everything You Need to Know
- Can I use iTools gpx file to catch the rare Pokemon On Vivo Y78t | Dr.fone
- Title: In 2024, How to Make Hand Shake Effect with Final Cut Pro
- Author: Chloe
- Created at : 2024-04-24 07:08:12
- Updated at : 2024-04-25 07:08:12
- Link: https://ai-editing-video.techidaily.com/in-2024-how-to-make-hand-shake-effect-with-final-cut-pro/
- License: This work is licensed under CC BY-NC-SA 4.0.

