
:max_bytes(150000):strip_icc():format(webp)/how-to-use-remote-access-on-your-samsung-smart-tv-4688935-01-29c7de5dc77e4747a8070d12f0c3d84c.jpg)
In 2024, How to Perfectly Use Canva Color Match?
How to Use Canva Color Match
How to Perfectly Use Canva Color Match?
An easy yet powerful editor
Numerous effects to choose from
Detailed tutorials provided by the official channel
Color combination is the essential thing that you need to keep in mind designing. It helps create eye-catchy designs and can create a positive impact on the target audience.

This is the greatest secret of creating attractive and wonderful designs. Reading further will help you to understand the Canva color match in detail. So, without any further dues, let’s get started!
In this article
01 [What is the Canva Color Picker?](#Part 1)
02 [Why Use the Color Match Tool?](#Part 2)
03 [How to Use Color Match in Canva to Match Your Brand](#Part 3)
04 [Alternative to Canva Color Match](#Part 4)
Part 1 What is the Canva Color Picker?
Canva is one of the simplest and easiest ways of creating great and eye-catchy graphic designs. Color combinations help us to make these designs more attractive. But earlier, there were some limitations in Canva regarding the color picker tool; designers had to use browser extensions like ColorZilla to match the color combinations perfectly. They faced many problems while selecting the perfect color of their choice while designing their pins, social media content, logos, online invitations, etc. They had to find the perfect color code of their choice from an external source and paste it into the Canva, which was simply very time-consuming.
The most-awaited color picker tool was introduced in Canva at the end of November 202This new design tool makes the design very convenient while using Canva for graphic designing. With this tool, you don’t need to spend hours searching for the right color that matches the background. Color picker helps you to find a perfect color match according to the image, logo, or anything else uploaded on Canva.

But before using this new color match tool, you must ensure that:
● You are using the updated version of the Canva desktop app.
● You have the latest version of the browsers like Chrome, Mozilla, Internet Explorer, etc.
Part 2 Why Use the Color Match Tool?

This color match tool is the most-demanded feature that has been updated on Canva. It helps choose the perfect color match very efficiently without wasting time and effort. It works like an eyedropper tool available in graphic designing software like Photoshop. It is elementary and valuable to use, and it saves a lot of time in creating attractive and wonderful designs.
It helps determine the different colors available in a particular image uploaded on the Canva app. You can easily choose the appropriate color by placing the tool in the place that has your desired color. It is a compassionate tool, so you should be very careful while choosing the color of your choice. You can press the ‘Esc’ button to exit the command without choosing any color.
This color match tool magically helps select the desired color in seconds without using any external color picker browser extension. This tool is readily available on the color pallet in the updated version of the Canva desktop app.
Part 3 How to Use Color Match in Canva to Match Your Brand
The color match tool is now inbuilt in the Canva desktop app, which is very easy and convenient. You need to download the Canva desktop app to use this feature from the official website of Canva.

The designers need to follow the simple steps given below to use the color match tool (eyedropper tool) in the updated version of the Canva desktop app:
● First of all, open the Canva desktop app.
● After this, open any design or image of your choice that you want to edit. This color match tool can work on any type of image, regardless of the shape and size.
● Now, select the particular part of the image whose color you want to change.
● After this, click on the color block available at the top corner to open the color customization options.
● A color pallet will open.
● On the top of the color pallet, you will see a ‘+’ (add new color) button, this button has a colorful square outline.
● After this, a color chart will appear under that button. You will see the color code written over there and an eyedropper tool will be available next to that color code (hex code).
● Click on this eyedropper tool and select the color of your choice either from the image or any other color available in Canva.
● After selecting the color tap on the particular part of the image whose color you want to change.
This is how you can change the color using the new color picker tool available in Canva and enjoy editing your images using the new Canva desktop app.
Part 4 Alternative to Canva Color Match
As we all know, Canva is the most accessible online graphic designing platform used for image editing and video editing. But there are certain limitations of using it, so here we have listed some of the other graphic designing tools for both image and video editing that can be used as an alternative to the Canva app:
● Visme: It is a drag and drops editing and graphic designing tool. Using; this tool is effortless to use, and you can easily create attractive presentations, infographics, social media graphics, logos, etc. This tool can be used by anyone like students (to create their school activities), educators (to create easy to learn infographics), business people (to create attractive presentations), graphic designers (to create different content), etc.
It contains a lot of features like:
● Data Visualization Tools
● Variety of Professionally Designed Easy to Use Templates
● Infographic Maker
● A Large Number of Editing Tools
● Animation Feature with Hover Effects
● Analytics Feature
● Adobe Spark: It is an online tool launched by Adobe. Although it can’t compete with professional software like Photoshop and Illustrator, it can be treated as the best alternative for Canva. It is used to create social media posts, logos, and graphic designs easily and efficiently. The only limitation it has is that non-designers and newcomers can’t use it without any knowledge of graphic design.
● PicMonkey: PicMonkey is another great alternative to Canva, just like Visme. It has many features that help both professional and non-professional designers create attractive and wonderful designs very easily and efficiently. It has many exciting features like photo re-toucher, pattern & effects tools, etc., just like Photoshop, but it is relatively easier to use and can be used by anyone who wants to create beautiful and creative graphic designs.
● ****Wondershare Filmora Video Editor **: Filmora is a video editing software and can be used as an alternative to Canva if you create and edit the videos to medium & advanced levels. It is used to create and edit short videos for social media and ad campaigns very quickly, with many features available in professional software like Adobe Premiere Pro. It is easy-to-use with an intuitive user interface that is very helpful for non-professional and less experienced video editors.
For Win 7 or later (64-bit)
For macOS 10.12 or later
● Key Takeaways from This Episode →
● It can be concluded that Canva is a fantastic graphic designing tool for all the non-professionals and newcomers in the field of design. It helps people create attractive and creative designs with less effort and less time consumption.
● No doubt, everything has its pros and cons. Similarly, Canva also has certain limitations compared to the other professional graphic designing tools like Photoshop, Illustrator, etc.
● But still, it is continuously updating and removing those limitations. For example- the new color match tool is introduced to this platform for easy and convenient graphic designing.
● This color match tool (eyedropper tool) was demanded by the designers who use Canva for their graphics and creating attractive social media posts, infographics, video editing, etc.
Color combination is the essential thing that you need to keep in mind designing. It helps create eye-catchy designs and can create a positive impact on the target audience.
This is the greatest secret of creating attractive and wonderful designs. Reading further will help you to understand the Canva color match in detail. So, without any further dues, let’s get started!
In this article
01 [What is the Canva Color Picker?](#Part 1)
02 [Why Use the Color Match Tool?](#Part 2)
03 [How to Use Color Match in Canva to Match Your Brand](#Part 3)
04 [Alternative to Canva Color Match](#Part 4)
Part 1 What is the Canva Color Picker?
Canva is one of the simplest and easiest ways of creating great and eye-catchy graphic designs. Color combinations help us to make these designs more attractive. But earlier, there were some limitations in Canva regarding the color picker tool; designers had to use browser extensions like ColorZilla to match the color combinations perfectly. They faced many problems while selecting the perfect color of their choice while designing their pins, social media content, logos, online invitations, etc. They had to find the perfect color code of their choice from an external source and paste it into the Canva, which was simply very time-consuming.
The most-awaited color picker tool was introduced in Canva at the end of November 202This new design tool makes the design very convenient while using Canva for graphic designing. With this tool, you don’t need to spend hours searching for the right color that matches the background. Color picker helps you to find a perfect color match according to the image, logo, or anything else uploaded on Canva.
But before using this new color match tool, you must ensure that:
● You are using the updated version of the Canva desktop app.
● You have the latest version of the browsers like Chrome, Mozilla, Internet Explorer, etc.
Part 2 Why Use the Color Match Tool?
This color match tool is the most-demanded feature that has been updated on Canva. It helps choose the perfect color match very efficiently without wasting time and effort. It works like an eyedropper tool available in graphic designing software like Photoshop. It is elementary and valuable to use, and it saves a lot of time in creating attractive and wonderful designs.
It helps determine the different colors available in a particular image uploaded on the Canva app. You can easily choose the appropriate color by placing the tool in the place that has your desired color. It is a compassionate tool, so you should be very careful while choosing the color of your choice. You can press the ‘Esc’ button to exit the command without choosing any color.
This color match tool magically helps select the desired color in seconds without using any external color picker browser extension. This tool is readily available on the color pallet in the updated version of the Canva desktop app.
Part 3 How to Use Color Match in Canva to Match Your Brand
The color match tool is now inbuilt in the Canva desktop app, which is very easy and convenient. You need to download the Canva desktop app to use this feature from the official website of Canva.
The designers need to follow the simple steps given below to use the color match tool (eyedropper tool) in the updated version of the Canva desktop app:
● First of all, open the Canva desktop app.
● After this, open any design or image of your choice that you want to edit. This color match tool can work on any type of image, regardless of the shape and size.
● Now, select the particular part of the image whose color you want to change.
● After this, click on the color block available at the top corner to open the color customization options.
● A color pallet will open.
● On the top of the color pallet, you will see a ‘+’ (add new color) button, this button has a colorful square outline.
● After this, a color chart will appear under that button. You will see the color code written over there and an eyedropper tool will be available next to that color code (hex code).
● Click on this eyedropper tool and select the color of your choice either from the image or any other color available in Canva.
● After selecting the color tap on the particular part of the image whose color you want to change.
This is how you can change the color using the new color picker tool available in Canva and enjoy editing your images using the new Canva desktop app.
Part 4 Alternative to Canva Color Match
As we all know, Canva is the most accessible online graphic designing platform used for image editing and video editing. But there are certain limitations of using it, so here we have listed some of the other graphic designing tools for both image and video editing that can be used as an alternative to the Canva app:
● Visme: It is a drag and drops editing and graphic designing tool. Using; this tool is effortless to use, and you can easily create attractive presentations, infographics, social media graphics, logos, etc. This tool can be used by anyone like students (to create their school activities), educators (to create easy to learn infographics), business people (to create attractive presentations), graphic designers (to create different content), etc.
It contains a lot of features like:
● Data Visualization Tools
● Variety of Professionally Designed Easy to Use Templates
● Infographic Maker
● A Large Number of Editing Tools
● Animation Feature with Hover Effects
● Analytics Feature
● Adobe Spark: It is an online tool launched by Adobe. Although it can’t compete with professional software like Photoshop and Illustrator, it can be treated as the best alternative for Canva. It is used to create social media posts, logos, and graphic designs easily and efficiently. The only limitation it has is that non-designers and newcomers can’t use it without any knowledge of graphic design.
● PicMonkey: PicMonkey is another great alternative to Canva, just like Visme. It has many features that help both professional and non-professional designers create attractive and wonderful designs very easily and efficiently. It has many exciting features like photo re-toucher, pattern & effects tools, etc., just like Photoshop, but it is relatively easier to use and can be used by anyone who wants to create beautiful and creative graphic designs.
● ****Wondershare Filmora Video Editor **: Filmora is a video editing software and can be used as an alternative to Canva if you create and edit the videos to medium & advanced levels. It is used to create and edit short videos for social media and ad campaigns very quickly, with many features available in professional software like Adobe Premiere Pro. It is easy-to-use with an intuitive user interface that is very helpful for non-professional and less experienced video editors.
For Win 7 or later (64-bit)
For macOS 10.12 or later
● Key Takeaways from This Episode →
● It can be concluded that Canva is a fantastic graphic designing tool for all the non-professionals and newcomers in the field of design. It helps people create attractive and creative designs with less effort and less time consumption.
● No doubt, everything has its pros and cons. Similarly, Canva also has certain limitations compared to the other professional graphic designing tools like Photoshop, Illustrator, etc.
● But still, it is continuously updating and removing those limitations. For example- the new color match tool is introduced to this platform for easy and convenient graphic designing.
● This color match tool (eyedropper tool) was demanded by the designers who use Canva for their graphics and creating attractive social media posts, infographics, video editing, etc.
Why You Should Master Slideshows In Lightroom, Fresh Insight?
Why You Should Master Slideshows in Lightroom, Fresh Insight
An easy yet powerful editor
Numerous effects to choose from
Detailed tutorials provided by the official channel
Adobe Lightroom is an image manipulation software which is developed by Adobe Inc. It is used for editing, importing, saving and sharing a large no. of digital images. Lightroom editing functions include HSL, colour grading, lens correction, white balance, the transformation of spot removal, red-eye correction and adjustment brushing. Lightroom has a feature of slideshow module which you must have heard about it before.
The process of creating a slideshow video can be time-consuming but once you have created it, you can rewind your memories in just 3-4 minutes. If you want you can share the video on your social media accounts.
In this article
01 [What is Lightroom and What Advantages Does It Have for Making Slideshows](#Part 1)
02 [What Does Slideshows in Lightroom Do to Different Groups of People](#Part 2)
03 [How to Create a Professional-looking Slideshow with Lightroom](#Part 3)
04 [Hot FAQs About Slideshows in Lightroom](#Part 4)
Part 1 What is lightroom and what advantages does it have for making slideshows?
Lightroom helps in editing the images and it allows the users to edit the images by using external features. Photographers usually like working on the lightroom because it is a very popular and easy tool. It is perfect for beginners and graphic designers who are looking for an easy and straightforward editor.
Lightroom is used for image retouching. Lightroom includes improving the color tone, color balance, cropping, filters, removing red-eye effect, and many more things. Lightroom supports some the image formats like JPEG, PSD, PNG and TIFF. You can also edit the raw images.
Advantages
● Easy to use - The lightroom interface is less complex, which makes it easy to use especially for the newcomers.
● Tidy interface - In lightroom, it is easier to search for images as it gathers the metadata on each image on its own. So you can find the image with a very specific date, time, resolution, model, etc.
● Editing capabilities - With editing capabilities like contrast, exposure, clarity, warmth, and saturation, Lightroom can give the desired look to the image which photographers want to create.
Part 2 What do slideshows in Lightroom do to a different group of people?
01Enable or Disable People View
If you are a beginner and people view is disabled, all pre-existing face model data is deleted from lightroom servers. Lightroom will no longer analyze new images and will not group them in clusters automatically. You need to enable it so that the lightroom desktop can analyze images in the cloud to identify people and form clusters in people’s view.
02View people in your photos
● In the My Photos panel at the upper-left side of the screen, select People to view the people view. You can access People clusters in which each cluster contains images of a particular person. Below the cover photo of each cluster, you can see the total number of photos for each person.
● To view photos of that person you can click on any cluster. In the cluster at the upper right corner of the screen, you can view the total number of photos.
03Sort options in People View
To sort People clusters follow the steps:
● In the My Photos panel at the upper left side of the screen, select People to view People View.
● Click on the three dots at the upper right corner of the screen, from the drop-down list select Sort By, and then select the following option:
● First Name: Sort the clusters in the alphabetical order of the first name.
● Last Name: Sort the clusters in the alphabetical order of the last name.
● Count: Sort the clusters with the highest number of photos to the least no. of photos in a cluster.
Part 3 How to create a professional-looking slideshow with Lightroom?
Do you know that you can create a professional-looking slideshow using lightroom? Here are some steps that you can follow to make a professional-looking slideshow.
Step 1 - Photo selection
The first thing you have to do is select the images you want to include in making the slideshow. There are a lot of ways to do this in Lightroom.
● In the grid view select the photos you want to include. Select CTRL (CMD) key and click on each image.
● Add those images to Quick Collection because it is easiest to work with. Click the B key to add them to the quick collection.
● It will be added to the collection panel when you will name the collection for the slideshow.

Step 2 - Arrange the photos
Now, it is time for arranging the photos in a sequence in which you want them to watch in a slideshow. If you want to rearrange them simply drag and drop each image in the grid view where you want to make them appear in a slideshow.
Try to arrange the photos in such a way so that they can tell a story to the viewers who are watching it.
Step 3 – Create a slideshow
Once you have arranged the photos in a sequence, then create a slideshow.
● Click on the ‘slideshow’ menu given at the top of your screen.
● This will lead you to the slideshow module view in lightroom.
● Click on the ‘Create Slideshow’ given at the top right of the central panel.
● Add a name to your slideshow and then click on create.
● Once you have created it and named your slideshow, all the changes will be automatically saved in lightroom.

Step 4 – Select a template for a slideshow
From the template browser given on the left-hand side panel, you can select a template for your slideshow. Before adding anything, do a run-through on your slideshow to see how it looks.
Step 5 – Designing the lightroom slideshow
You can customize your slideshow to make it more professional. You can make following changes or enrichments by using the features given at the right-hand side panel:
● Titles - You can add text, company logo, introduction or any other important information. You can easily add these things in your slideshow in lightroom.
● Watermarks and overlays - You can add watermarks and custom overlay text in every slide you want to by using the overlays windows.
● Layout - You can change the spacing for each slide by unselecting the Link All Box and selecting the ratio which you prefer. Although the program automatically sets the spacing for each slide.
● Options – You can add a frame or you can change the border it allows you to select how your images are going to be displayed in each slide.
● Background – You can add a background to enhance an image, not to divert attention from it. You can add an image as your background or add any colour as your background. You can create background by using various options available.
● Music – You can add music of your choice using an mp3 file.
● Transitions - Setting a transitions between the slides can really make a huge impact on your overall experience. You can use the auto option or you can set the transitions manually.
Step - 6 Completion of slideshow
Once you have made all the desired changes, you can press “Play” option to run the slideshow. If you still want to make any changes you can go back and change whatever you like. Once it’s done and you are happy with the results it’s time to export the slideshow in the form of video or PDF.

Part 4 Hot FAQs about slideshow in lightroom
Q1. How can you make a slideshow in lightroom?
A. You can create a slideshow by using the slideshow module in lightroom, where you can select templates, layouts, add tiles or songs, choose transitions and playback options.
Q2. Where is the slideshow module in lightroom?
A. Start by clicking on ‘slideshow’ option given at the top menu of your screen. This will open the slideshow module view in lightroom. The right and left panels in slideshow module will look different than the ones in the library module.
Q3. How can you change the sequence of the photos in slideshow lightroom?
A. You can control the order of the photos in a Lightroom folder by dragging and dropping each image from one place to the other in the filmstrip view. To rearrange grab the image and drag on it until you see a black bar appear between two images.
Q4. What is the transition effect in slideshow?
A. Transitions are often called – the movement you see when slide changes to another slide in a slideshow. They are different from animation effect. You can set it manually or with an auto option.
Q5. How to make your slideshow more attractive?
A. There are a lot of options to make your look slideshow more attractive. By using the beautiful template, layouts, background and adding transitions with the perfect time ratio. This will enhance the look of your slideshow and will make it more attractive.
If you are not able to follow the interface of lightroom you can consider Filmora for making attractive slideshows. Wondershare Filmora Video Editor allows you to crop, pan and zoom the slideshow automatically or manually by applying pan and zoom photo placement. It has its own music track and sound effect gallery that allows you to customize the slideshows. Filmora allows you to record your own voiceovers as well. It has also fade-in, fade-out effects with amazing transitions. It exports the videos at resolutions of up to 4K.
For Win 7 or later (64-bit)
For macOS 10.12 or later
● Ending Thoughts →
● Adobe Lightroom is one of the best software for making slideshows due to its amazing features like color grading, red eye correction, transformation of spot removal, white balance etc.
● Lightroom has a feature of slideshow module in which you can create quality slideshow presentations for your business.
● If you are not able to use lightroom you can consider using Filmora for creating amazing slideshows.
Adobe Lightroom is an image manipulation software which is developed by Adobe Inc. It is used for editing, importing, saving and sharing a large no. of digital images. Lightroom editing functions include HSL, colour grading, lens correction, white balance, the transformation of spot removal, red-eye correction and adjustment brushing. Lightroom has a feature of slideshow module which you must have heard about it before.
The process of creating a slideshow video can be time-consuming but once you have created it, you can rewind your memories in just 3-4 minutes. If you want you can share the video on your social media accounts.
In this article
01 [What is Lightroom and What Advantages Does It Have for Making Slideshows](#Part 1)
02 [What Does Slideshows in Lightroom Do to Different Groups of People](#Part 2)
03 [How to Create a Professional-looking Slideshow with Lightroom](#Part 3)
04 [Hot FAQs About Slideshows in Lightroom](#Part 4)
Part 1 What is lightroom and what advantages does it have for making slideshows?
Lightroom helps in editing the images and it allows the users to edit the images by using external features. Photographers usually like working on the lightroom because it is a very popular and easy tool. It is perfect for beginners and graphic designers who are looking for an easy and straightforward editor.
Lightroom is used for image retouching. Lightroom includes improving the color tone, color balance, cropping, filters, removing red-eye effect, and many more things. Lightroom supports some the image formats like JPEG, PSD, PNG and TIFF. You can also edit the raw images.
Advantages
● Easy to use - The lightroom interface is less complex, which makes it easy to use especially for the newcomers.
● Tidy interface - In lightroom, it is easier to search for images as it gathers the metadata on each image on its own. So you can find the image with a very specific date, time, resolution, model, etc.
● Editing capabilities - With editing capabilities like contrast, exposure, clarity, warmth, and saturation, Lightroom can give the desired look to the image which photographers want to create.
Part 2 What do slideshows in Lightroom do to a different group of people?
01Enable or Disable People View
If you are a beginner and people view is disabled, all pre-existing face model data is deleted from lightroom servers. Lightroom will no longer analyze new images and will not group them in clusters automatically. You need to enable it so that the lightroom desktop can analyze images in the cloud to identify people and form clusters in people’s view.
02View people in your photos
● In the My Photos panel at the upper-left side of the screen, select People to view the people view. You can access People clusters in which each cluster contains images of a particular person. Below the cover photo of each cluster, you can see the total number of photos for each person.
● To view photos of that person you can click on any cluster. In the cluster at the upper right corner of the screen, you can view the total number of photos.
03Sort options in People View
To sort People clusters follow the steps:
● In the My Photos panel at the upper left side of the screen, select People to view People View.
● Click on the three dots at the upper right corner of the screen, from the drop-down list select Sort By, and then select the following option:
● First Name: Sort the clusters in the alphabetical order of the first name.
● Last Name: Sort the clusters in the alphabetical order of the last name.
● Count: Sort the clusters with the highest number of photos to the least no. of photos in a cluster.
Part 3 How to create a professional-looking slideshow with Lightroom?
Do you know that you can create a professional-looking slideshow using lightroom? Here are some steps that you can follow to make a professional-looking slideshow.
Step 1 - Photo selection
The first thing you have to do is select the images you want to include in making the slideshow. There are a lot of ways to do this in Lightroom.
● In the grid view select the photos you want to include. Select CTRL (CMD) key and click on each image.
● Add those images to Quick Collection because it is easiest to work with. Click the B key to add them to the quick collection.
● It will be added to the collection panel when you will name the collection for the slideshow.
Step 2 - Arrange the photos
Now, it is time for arranging the photos in a sequence in which you want them to watch in a slideshow. If you want to rearrange them simply drag and drop each image in the grid view where you want to make them appear in a slideshow.
Try to arrange the photos in such a way so that they can tell a story to the viewers who are watching it.
Step 3 – Create a slideshow
Once you have arranged the photos in a sequence, then create a slideshow.
● Click on the ‘slideshow’ menu given at the top of your screen.
● This will lead you to the slideshow module view in lightroom.
● Click on the ‘Create Slideshow’ given at the top right of the central panel.
● Add a name to your slideshow and then click on create.
● Once you have created it and named your slideshow, all the changes will be automatically saved in lightroom.
Step 4 – Select a template for a slideshow
From the template browser given on the left-hand side panel, you can select a template for your slideshow. Before adding anything, do a run-through on your slideshow to see how it looks.
Step 5 – Designing the lightroom slideshow
You can customize your slideshow to make it more professional. You can make following changes or enrichments by using the features given at the right-hand side panel:
● Titles - You can add text, company logo, introduction or any other important information. You can easily add these things in your slideshow in lightroom.
● Watermarks and overlays - You can add watermarks and custom overlay text in every slide you want to by using the overlays windows.
● Layout - You can change the spacing for each slide by unselecting the Link All Box and selecting the ratio which you prefer. Although the program automatically sets the spacing for each slide.
● Options – You can add a frame or you can change the border it allows you to select how your images are going to be displayed in each slide.
● Background – You can add a background to enhance an image, not to divert attention from it. You can add an image as your background or add any colour as your background. You can create background by using various options available.
● Music – You can add music of your choice using an mp3 file.
● Transitions - Setting a transitions between the slides can really make a huge impact on your overall experience. You can use the auto option or you can set the transitions manually.
Step - 6 Completion of slideshow
Once you have made all the desired changes, you can press “Play” option to run the slideshow. If you still want to make any changes you can go back and change whatever you like. Once it’s done and you are happy with the results it’s time to export the slideshow in the form of video or PDF.
Part 4 Hot FAQs about slideshow in lightroom
Q1. How can you make a slideshow in lightroom?
A. You can create a slideshow by using the slideshow module in lightroom, where you can select templates, layouts, add tiles or songs, choose transitions and playback options.
Q2. Where is the slideshow module in lightroom?
A. Start by clicking on ‘slideshow’ option given at the top menu of your screen. This will open the slideshow module view in lightroom. The right and left panels in slideshow module will look different than the ones in the library module.
Q3. How can you change the sequence of the photos in slideshow lightroom?
A. You can control the order of the photos in a Lightroom folder by dragging and dropping each image from one place to the other in the filmstrip view. To rearrange grab the image and drag on it until you see a black bar appear between two images.
Q4. What is the transition effect in slideshow?
A. Transitions are often called – the movement you see when slide changes to another slide in a slideshow. They are different from animation effect. You can set it manually or with an auto option.
Q5. How to make your slideshow more attractive?
A. There are a lot of options to make your look slideshow more attractive. By using the beautiful template, layouts, background and adding transitions with the perfect time ratio. This will enhance the look of your slideshow and will make it more attractive.
If you are not able to follow the interface of lightroom you can consider Filmora for making attractive slideshows. Wondershare Filmora Video Editor allows you to crop, pan and zoom the slideshow automatically or manually by applying pan and zoom photo placement. It has its own music track and sound effect gallery that allows you to customize the slideshows. Filmora allows you to record your own voiceovers as well. It has also fade-in, fade-out effects with amazing transitions. It exports the videos at resolutions of up to 4K.
For Win 7 or later (64-bit)
For macOS 10.12 or later
● Ending Thoughts →
● Adobe Lightroom is one of the best software for making slideshows due to its amazing features like color grading, red eye correction, transformation of spot removal, white balance etc.
● Lightroom has a feature of slideshow module in which you can create quality slideshow presentations for your business.
● If you are not able to use lightroom you can consider using Filmora for creating amazing slideshows.
Using VN Editor To Add Luts for Video Editing
We all know we can use LUTs to improve our digital content’s color grading and tone. By applying LUTs, you can achieve various creative effects, from vintage to cinematic styles. These LUTs can be easily accessed and applied through photo and video editing software on your computers. However, with the rise of social media and the growing demand for unique content has increased.
Many websites and online communities offer a wide range of LUTs for users to download and use freely. With this high demand, there are mobile applications that provide LUT functionality. Moreover, one such application for mobile devices is VN Editor. You can search for VN LUTs free download to access many free LUTs on the internet that you can use.
- Part 2: Filter for VN - LUTs Presets: A Great Option for LUT Editing in VN Editor
- Part 3: How to Add LUTs in VN Editor?
Part 1: Best Options in LUTs That You Can Find in VN Editor?
VN Editor is a great application that allows you to add or apply LUTs. With this tool, you can easily import your LUTs and apply them to your digital media. There are many VN LUTs available, both paid and free. Here is a list of some of the best paid and free LUTs that you can use in VN Editor.
1.Cinematic LUT by Alexey_P
Enhance your videos with the Cinematic LUT, giving them a professional and cinematic look. This LUT adds a touch of cinematic magic to your footage by highlighting rich and deep colors. The warm tones create a cinematic atmosphere, transporting your audience into a movie-like world. Furthermore, this is a suitable LUT pack for shooting a short film or a travel vlog.

2.5 Free Vintage LUTs
You can give your viewers a retro feel with this Vintage LUT pack. This LUT pack brings back the nostalgic charm of old photographs and videos. It provides a soft, warm color palette with desaturation tones, giving your videos a vintage look. Moreover, this pack offers five different vintage LUTs, that you can use for your media files. Additionally, you can recreate an old retro look using these LUTs.

3.Food LUTs
Make your food videos and photography look even more appetizing with this pack. These LUTs enhance your food’s colors, making them vibrant and mouthwatering. Moreover, it brings out the natural hues of the ingredients, making them appear fresh. It is an excellent LUT pack, from showcasing culinary creations to sharing recipes or running a food blog.

4. Moody Video LUTs
Moody LUTs is an amazing color preset pack of 15 to create a moody and dramatic atmosphere. You can use this pack to add deep contrasts, shadows, and cool tones to your videos. In addition to this, it creates a sense of mystery and intensity with its color grading. It’s perfect for storytelling, fashion shoots, or adding a touch of drama to your media content.

5. Night Sky Lightroom Presets and LUTs
It is an incredible color preset and LUTs pack to enhance the beauty of the night sky. This pack offers 10 LUTs for free and 25 LUTs in the paid version. It intensifies the greens, blues and adds a subtle glow to your digital media. Additionally, you can transform ordinary nighttime media into breathtaking moments. This pack will beautify your night sky by highlighting the details and enhancing the color tones.

Part 2: Filter for VN - LUTs Presets: A Great Option for LUT Editing in VN Editor
Introducing Filter for VN - LUTs Presets , an exceptional companion app for VN Editor. This companion application is available on Android devices. You can import LUTs directly into your VN Editor for color grading using this app. Furthermore, this app has a collection of over 1000 free LUTs. These LUTs are used as color presets to transform your media in different styles and tones.
Additionally, this app offers different LUTs for the night sky, cinematic look, and more. Similarly, there are many cinematic LUTs for VN video editing that you can use. Moreover, you can use diverse color filters to bring a fresh perspective to your stories. You can apply and use different color filters using this application. In addition to this, it even offers 4K support, ensuring ultra-high-definition and crisp videos.

Part 3: How to Add LUTs in VN Editor?
If you want to apply LUTs for VN Editor, then follow these steps. Following these simple steps, you can easily import, apply, and save LUTs using the VN Editor app.
Step1 Importing LUTs
Install the VN Editor and open the app to select the “+” icon, and a new window will appear. From there, you can choose the “Creation Kits” option to select “Filters.” After selecting the Filters option, go to the “My Filter” section. You will see the “Import Filter” button, which allows you to import your LUT from the desired location.

Step2Applying LUTs and Adjusting Intensity
After selecting your desired LUT, your LUT will be imported into the VN Editor. After that, you can find your desired LUT in the “Filters” section. You can select your LUT and apply it to your media file. Adjust the intensity of the LUT according to your preference.

Step3Saving the File
After making your adjustments, tap the “Save” button. Your file will be saved with the applied LUT and your desired modifications.

Empower your videos with a new mood using different LUTs. Filmora now offers 100+ top-quality 3D LUTs cover a broad range of scenarios. Transform your videos with Filmora’s powerful 3D LUTs.
Apply LUT on Videos Apply LUT on Videos Learn More


Conclusion
In conclusion, LUTs have proven to be incredibly useful tools on computers for color grading. The availability of different LUTs on the internet has expanded the creative possibilities. The high demand for LUTs resulted in the development of excellent mobile apps, such as VN Editor. Many free LUTs for VN Editor are available, each with different styles and tones, including cinematic and more.
Part 1: Best Options in LUTs That You Can Find in VN Editor?
VN Editor is a great application that allows you to add or apply LUTs. With this tool, you can easily import your LUTs and apply them to your digital media. There are many VN LUTs available, both paid and free. Here is a list of some of the best paid and free LUTs that you can use in VN Editor.
1.Cinematic LUT by Alexey_P
Enhance your videos with the Cinematic LUT, giving them a professional and cinematic look. This LUT adds a touch of cinematic magic to your footage by highlighting rich and deep colors. The warm tones create a cinematic atmosphere, transporting your audience into a movie-like world. Furthermore, this is a suitable LUT pack for shooting a short film or a travel vlog.
2.5 Free Vintage LUTs
You can give your viewers a retro feel with this Vintage LUT pack. This LUT pack brings back the nostalgic charm of old photographs and videos. It provides a soft, warm color palette with desaturation tones, giving your videos a vintage look. Moreover, this pack offers five different vintage LUTs, that you can use for your media files. Additionally, you can recreate an old retro look using these LUTs.
3.Food LUTs
Make your food videos and photography look even more appetizing with this pack. These LUTs enhance your food’s colors, making them vibrant and mouthwatering. Moreover, it brings out the natural hues of the ingredients, making them appear fresh. It is an excellent LUT pack, from showcasing culinary creations to sharing recipes or running a food blog.
4. Moody Video LUTs
Moody LUTs is an amazing color preset pack of 15 to create a moody and dramatic atmosphere. You can use this pack to add deep contrasts, shadows, and cool tones to your videos. In addition to this, it creates a sense of mystery and intensity with its color grading. It’s perfect for storytelling, fashion shoots, or adding a touch of drama to your media content.
5. Night Sky Lightroom Presets and LUTs
It is an incredible color preset and LUTs pack to enhance the beauty of the night sky. This pack offers 10 LUTs for free and 25 LUTs in the paid version. It intensifies the greens, blues and adds a subtle glow to your digital media. Additionally, you can transform ordinary nighttime media into breathtaking moments. This pack will beautify your night sky by highlighting the details and enhancing the color tones.
Part 2: Filter for VN - LUTs Presets: A Great Option for LUT Editing in VN Editor
Introducing Filter for VN - LUTs Presets , an exceptional companion app for VN Editor. This companion application is available on Android devices. You can import LUTs directly into your VN Editor for color grading using this app. Furthermore, this app has a collection of over 1000 free LUTs. These LUTs are used as color presets to transform your media in different styles and tones.
Additionally, this app offers different LUTs for the night sky, cinematic look, and more. Similarly, there are many cinematic LUTs for VN video editing that you can use. Moreover, you can use diverse color filters to bring a fresh perspective to your stories. You can apply and use different color filters using this application. In addition to this, it even offers 4K support, ensuring ultra-high-definition and crisp videos.
Part 3: How to Add LUTs in VN Editor?
If you want to apply LUTs for VN Editor, then follow these steps. Following these simple steps, you can easily import, apply, and save LUTs using the VN Editor app.
Step1 Importing LUTs
Install the VN Editor and open the app to select the “+” icon, and a new window will appear. From there, you can choose the “Creation Kits” option to select “Filters.” After selecting the Filters option, go to the “My Filter” section. You will see the “Import Filter” button, which allows you to import your LUT from the desired location.
Step2Applying LUTs and Adjusting Intensity
After selecting your desired LUT, your LUT will be imported into the VN Editor. After that, you can find your desired LUT in the “Filters” section. You can select your LUT and apply it to your media file. Adjust the intensity of the LUT according to your preference.
Step3Saving the File
After making your adjustments, tap the “Save” button. Your file will be saved with the applied LUT and your desired modifications.
Empower your videos with a new mood using different LUTs. Filmora now offers 100+ top-quality 3D LUTs cover a broad range of scenarios. Transform your videos with Filmora’s powerful 3D LUTs.
Apply LUT on Videos Apply LUT on Videos Learn More
Conclusion
In conclusion, LUTs have proven to be incredibly useful tools on computers for color grading. The availability of different LUTs on the internet has expanded the creative possibilities. The high demand for LUTs resulted in the development of excellent mobile apps, such as VN Editor. Many free LUTs for VN Editor are available, each with different styles and tones, including cinematic and more.
Top 12 AI Video Generators to Pick
Top 12 AI Video Generators to Pick
An easy yet powerful editor
Numerous effects to choose from
Detailed tutorials provided by the official channel
It is a fact that video editing can sometimes be laborious and time-consuming. Even when using the best video editing software, it still requires human effort to get an impressive result. But luckily for us, the invention of the AI video generator has now made a lot of things easier. The AI video generators are the next level as they allow users to automate video creation and editing without compromising quality.
This article will discuss the best AI text to video generators for free that will help make your life easier. Thus, this will soon help you create engaging videos for your personal or business use in just a few clicks.
In this article
01 [What Is an AI Video Generator](#Part 1)
02 [How Does the AI Video Maker Work](#Part 2)
03 [The 12 Best AI Video Generator](#Part 3)
Part 1 What Is an AI Video Generator
AI video generator is the process of using artificial intelligence (AI) to create professional videos. With an AI video generator for free, you do not need any equipment, an editing studio, or a premium video editing application to be able to create a video.
All that is required is that you feed input to the AI tool, and it will automatically help you generate a video. You can edit a blog post into a video within a few minutes with any of these tools listed. In addition, it won’t incur any high costs for video productions because the AI tool will help you carry out most of the tasks.
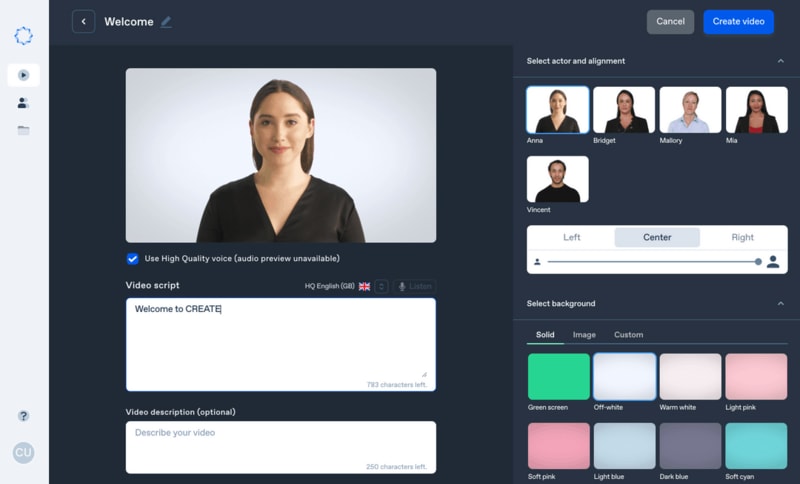
Part 2 How Does the AI Video Maker Work
Professional AI video editors, are trained by showing them various examples and then providing them feedback by telling them what is wrong and good. The machine then takes note of it and remembers it. However, as the machine continues to learn, it picks the results and then improves itself based on the feedback. Ultimately the device becomes very good or even better than the human that creates it. Here are some breakdowns of the ways video editors work:
● The AI video maker tool, can augment your videos with AR effects, including AR masks, face and color filters, face touch-ups, etc. The tool uses neural networks and computer vision to interrupt, extract, and understand the video content.
● This AI subtitle generator can allow interviews to be delivered and analyzed to the editor fully transcribed, searchable by word or even sentences. Video editors can use AI for keyword extraction, speech-to-text conversion, facial recognition, sentiment analysis, image recognition, and emotion detection.
● AI-video editors can pull sections of a video clip from any source automatically. These AI systems can also detect emotions that allow the creation of warm, appealing videos.
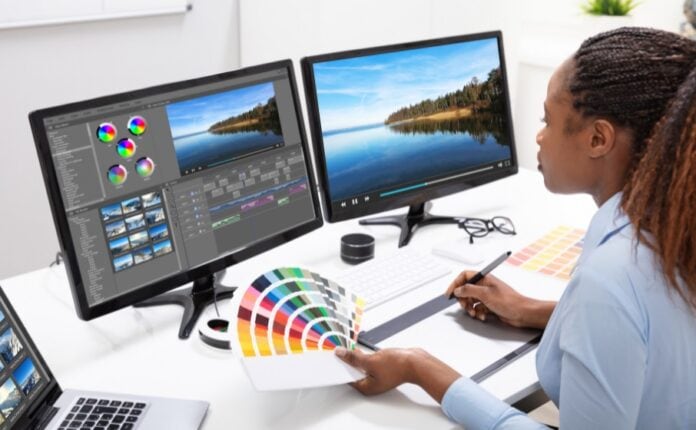
Part 3 The 12 Best AI Video Generator
There are top AI video generators for free that you can choose from for your video editing. These video editors complete work quickly and easily. In addition, if you need video editing software to help you edit your generated videos after generating them, we recommend that you try out Filmora from Wondershare. Wondershare Filmora Video Editor is a perfect video editing software with tons of new features, like keyframing, split video, and adding animations and effects to help you carry out your video editing seamlessly.
For Win 7 or later (64-bit)
For macOS 10.12 or later
01Sora
Sora is an artificial intelligence model that generates videos with textual descriptions, developed by OpenAI. It is a US-based artificial intelligence research organization. Sora stands out as a game-changing platform. It can seamlessly convert text into captivating videos, blending convenience with creativity.
Features
● With Sora, transforming written content into engaging videos is swift and efficient.
● Unlike traditional video editing tools, Sora is designed for users of all levels, eliminating the need for prior video production experience.
● Sora offers a plethora of customization options.
● Generates videos up to 60 seconds long
● Generates complex scenes with multiple characters, motions, and accurate details of the subject
● Creates multiple shots within a single generated video
● Generating videos from text instructions by utilizing the recaptioning technique from DALL·E 3
Pros
● Highly realistic video generation with impressive visual quality
● Text-based control over the content of the video, allowing for precise video generation
● A highly versatile tool that handles a wide range of prompts and styles
Cons
● Lacks implicit understanding of the rules of physics
This software is best realistic and imaginative scenes.
02Wondershare Filmora
Wondershare Filmora is a highly efficient video editing software that comes with AI text to video generation. The software is friendly to both beginner and intermediate creations, offering you a wide range of intuitive features.
Pricing
● Subscription Plan: US$19.99 per month
● Cross-Platform Plan: US$69.99 per year
● Perpetual Plan: US$19.99 Onetime Payment
Features
● User-friendly interface that is easy to learn and use
● Wide range of features for creating and editing videos, including transitions, effects, and text overlays.
● Large stock library of royalty-free music and stock footage
● Readily available templates and presets to quickly generate videos
● Easily export videos directly to popular platforms like YouTube and TikTok
Pros
● User-friendly interface with a learning curve suitable for all kinds of creators
● Extensive library of free and paid assets to enhance your videos
● Wide range of features for video editing
Cons
● Lacks advanced features for AI video prompt generation
This software is best for video creation and editing for freelancers, SMBs, markters.
For Win 7 or later (64-bit)
For macOS 10.12 or later
How to Use Filmora’s AI to Video Feature : AI Video Prompt Sample
Here is a brief step-by-step guide on how to use Filmora to generate AI videos. The process is as simple as writing a text prompt and getting the video ready:
Step 1: Lauch Filmora AI Text-to-Video Features
Once you launch on your PC Filmora, click the AI Text-to-Video option to start the video generation process.
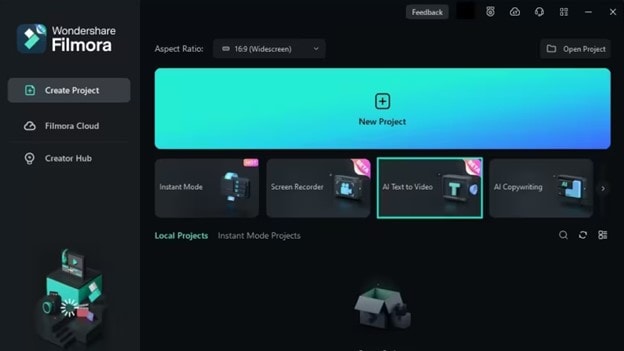
Step 2: Add a Text Prompt or Video Script
On the AI Text-to-Video video, add your text prompt. You can also modify other settings such as text language and video voice. Then click the Text to Video button at the bottom to prompt Filmora to generate the video.
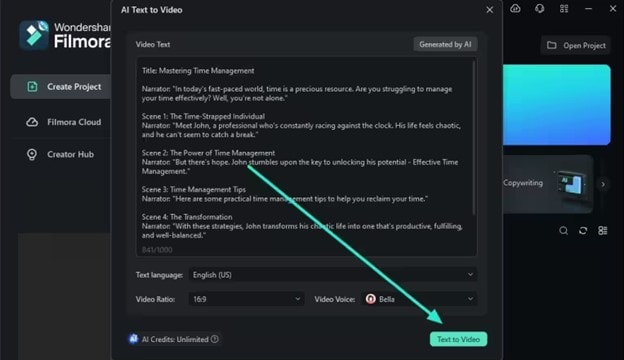
Step 3: Preview the Generated Video
Filmora generates the video based on your prompt and a new editing window. You can now a preview video and make any further editing needed.
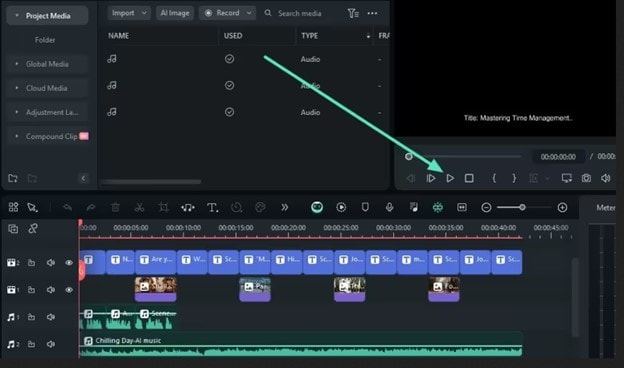
AI Video Prompt Sample Using Filmora
Prompt: A young man at his 20s is sitting on a piece of cloud in the sky, reading a book.
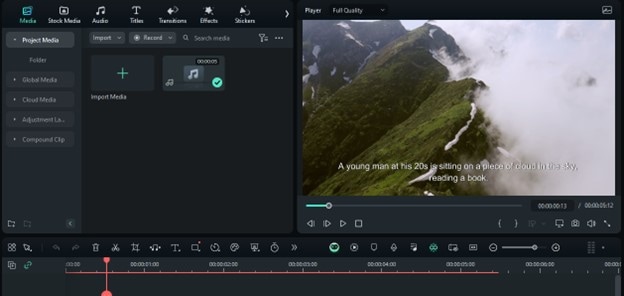
When prompted to generate a video of a young man in his 20s sitting on a piece of cloud in the sky, reading a book, Filmora generated a narration video from the point of view of the young man as shown above.
03Synthesia
This is a web-app video generator AI from a text supporting AI-driven video creation used by experts and beginners. Rather than filming content utilizing a microphone and camera, this software AI technology helps to simulate human presenters and real-life videos. Thus, it saves video creators hours of work.
Pricing
● Personal Plan: $30 monthly
● Corporate Plan: custom pricing
Features
● Over 40 supported languages
● Allows template customizations
● Allows users to make their avatars
● It has 50 built-in presenters
● Allows you to create realistic AI videos
● Offers live chat support
● Allows download in Mp4
● Enables users to create videos automatically using integrations with APIs
● Allows the addition of backgrounds
● Users can share their videos on other social media platforms
● Allows the addition of images, shapes, and texts to videos
Pros
● Great for beginners are you do not need prior knowledge
Cons
● It supports only front-facing poses
This software is best for freelancers, agencies, marketers, and content creators looking to create high-quality video content.
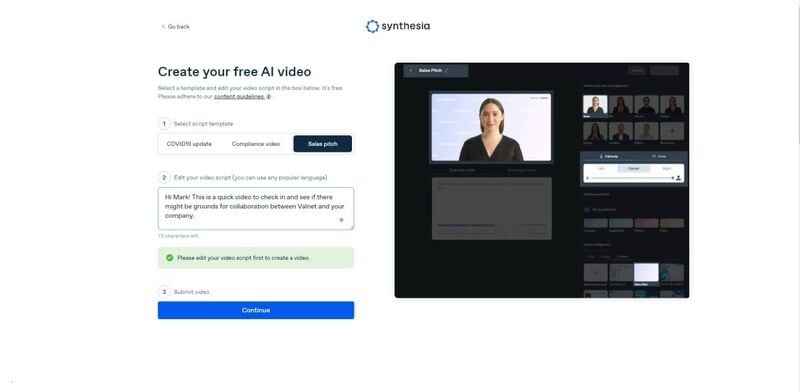
04Synths Video
This is an AI video-generating tool primarily concerned with helping users drive leads and traffic from YouTube. It is an AI YouTube title generator that allows users to create professional-looking videos from blog posts on YouTube.
Pricing
● YouTube Start: $399 monthly.
● Premium Custom Package: Custom Pricing.
Features
● Video generation from URLs
● It has built-in integration with YouTube
● 20+ avatars are available
● Allows video upload in HD quality
● Over 40+ languages supported
Cons
● No free plan is available
Best for the owners of YouTube channels.
05Rephrase.ai
Rephrase.ai is a video editing software that uses a sophisticated deep learning engine to create professional videos.
Pricing
● Starter plan: $25 monthly
● Enterprise plan: Custom Pricing
Features
● Produces high-resolution videos
● Supports functionality for presenter customization
● Multiple-use cases supported
● Allows users to select their preferred AI voice
● Support varieties of video editing tools
Cons
● It has a complex pricing plan
It is best for agencies seeking to create customizable and personalized professional videos for marketing and advertising.
06Lumen5
Lumen5 is one of the top AI video-creating tools available for beginners and uses Natural Language Processing algorithms to convert text into high-quality videos.
Pricing
● Free Plan
● Creator plan: $15 monthly.
● Premium plan: $79 monthly.
● Business plan: $199 monthly.
● Enterprise plan: Custom Pricing.
Features
● Transforms text to video within minutes
● Numerous templates are available
● Allows customization of videos resolution, color, and font
Cons
● Limited features in the free plan
Best for beginners who are looking to generate short-duration of videos for social media platforms.
07Designs.ai
This is an AI-powered video maker that is useful for users that do not have any experience in design.
Pricing
● Basic plan: $29 monthly
● Pro plan: $69 monthly
● Enterprise plan: Custom Pricing
Features
● It has an attractive and modern user interface
● Allows the creation of videos from pre-designed templates
● Helps video creation from your custom video files
● Over 20 languages supported
● Coverts texts to video
Cons
● Only allows video download in a paid plan.
This tool is best for creators and designers who are willing to create quick AI videos.
08InVideo
This is a perfect AI generator used for creating explainers or marketing videos easily and quickly. The platform helps produce high-quality videos with varieties of style options to make the ideal video according to your requirements.
Pricing
● Free: Free with watermarks on your videos.
● Business: $15 monthly with no watermarks.
● Unlimited: $30 monthly with unlimited video exports.
Features
● Very affordable
● Comprises an online drag-and-drop video editor
● Over 50 AI-powered themes that help to convert text to video in 3 minutes
● Full iStock media library available in all plans
Cons
● Requires internet connection to use
09Pictory.ai
This AI subtitle generator converts your text and turns it into an AI-generated video. This program is simple and easy to get started, requiring no software download. Paste your text into the editor and get started.
Pricing
● Free trial: Only use 3 videos.
● Standard Plan: $29 per month.
● Premium Plan: $59 per month.
Features
● It has a simple user interface.
● Over 6M licensed Shutterstock available
● Unlimited and affordable videos in the premium plan
Cons
● It is quite expensive compared to other tools
10Veed.io
Veed.io is not specifically an AI video generator but a video editing tool that utilizes AI to simplify the entire process and allows users to create high-quality videos within seconds.
Pricing
● Free: Free with watermarks!
● Basic: $18 monthly.
● Pro: $30 monthly
Features
● It has lots of video templates and a music library to choose
● Easy to learn, user-friendly interface
● Video rendering times are quite fast
● The basic plan has a high-quality resolution
Cons
● Not a typical AI video generator
● Not for beginners
11Wisecut
This free AI video generator platform allows you to turn your text into video. Type in your text and choose a voice actor, and then Wisecut will take care of the rest. It offers excellent editing tools for users to tweak your video until it’s just right.
Pricing
● Basic: Free.
● Professional: $57 per month.
Features
● This platform is easy to use
● It has a simple drag and drops user-interface
● Allows auto subtitles and auto cut silences
● Allows integration with YouTube
● Subtitles auto-translation
● Excellent video quality
Cons
● Has limited effects
12Flexclip
FlexClip makes video creation and editing easy with-it millions of royalty-free stock media and thousands of templates for you to choose from.
Pricing
● Free
● Basic: $5.99 per month.
● Plus: $9.99 per month
● Business: $19.99 per month.
Features
● Thousands of available templates
● Simple tool for creating and editing videos
● Use for creating engaging videos
● Provides millions of royalty stock media
● Versatile and Flexible
Cons
● Not for beginners
● Ending Thoughts →
● In this post, we have listed the top text to video generators that you can choose from to help you perform tasks within minutes.
● The report also explains all you need to know about video AI generators and recommends Filmora as a perfect tool for editing your videos.
It is a fact that video editing can sometimes be laborious and time-consuming. Even when using the best video editing software, it still requires human effort to get an impressive result. But luckily for us, the invention of the AI video generator has now made a lot of things easier. The AI video generators are the next level as they allow users to automate video creation and editing without compromising quality.
This article will discuss the best AI text to video generators for free that will help make your life easier. Thus, this will soon help you create engaging videos for your personal or business use in just a few clicks.
In this article
01 [What Is an AI Video Generator](#Part 1)
02 [How Does the AI Video Maker Work](#Part 2)
03 [The 12 Best AI Video Generator](#Part 3)
Part 1 What Is an AI Video Generator
AI video generator is the process of using artificial intelligence (AI) to create professional videos. With an AI video generator for free, you do not need any equipment, an editing studio, or a premium video editing application to be able to create a video.
All that is required is that you feed input to the AI tool, and it will automatically help you generate a video. You can edit a blog post into a video within a few minutes with any of these tools listed. In addition, it won’t incur any high costs for video productions because the AI tool will help you carry out most of the tasks.
Part 2 How Does the AI Video Maker Work
Professional AI video editors, are trained by showing them various examples and then providing them feedback by telling them what is wrong and good. The machine then takes note of it and remembers it. However, as the machine continues to learn, it picks the results and then improves itself based on the feedback. Ultimately the device becomes very good or even better than the human that creates it. Here are some breakdowns of the ways video editors work:
● The AI video maker tool, can augment your videos with AR effects, including AR masks, face and color filters, face touch-ups, etc. The tool uses neural networks and computer vision to interrupt, extract, and understand the video content.
● This AI subtitle generator can allow interviews to be delivered and analyzed to the editor fully transcribed, searchable by word or even sentences. Video editors can use AI for keyword extraction, speech-to-text conversion, facial recognition, sentiment analysis, image recognition, and emotion detection.
● AI-video editors can pull sections of a video clip from any source automatically. These AI systems can also detect emotions that allow the creation of warm, appealing videos.
Part 3 The 12 Best AI Video Generator
There are top AI video generators for free that you can choose from for your video editing. These video editors complete work quickly and easily. In addition, if you need video editing software to help you edit your generated videos after generating them, we recommend that you try out Filmora from Wondershare. Wondershare Filmora Video Editor is a perfect video editing software with tons of new features, like keyframing, split video, and adding animations and effects to help you carry out your video editing seamlessly.
For Win 7 or later (64-bit)
For macOS 10.12 or later
01Sora
Sora is an artificial intelligence model that generates videos with textual descriptions, developed by OpenAI. It is a US-based artificial intelligence research organization. Sora stands out as a game-changing platform. It can seamlessly convert text into captivating videos, blending convenience with creativity.
Features
● With Sora, transforming written content into engaging videos is swift and efficient.
● Unlike traditional video editing tools, Sora is designed for users of all levels, eliminating the need for prior video production experience.
● Sora offers a plethora of customization options.
● Generates videos up to 60 seconds long
● Generates complex scenes with multiple characters, motions, and accurate details of the subject
● Creates multiple shots within a single generated video
● Generating videos from text instructions by utilizing the recaptioning technique from DALL·E 3
Pros
● Highly realistic video generation with impressive visual quality
● Text-based control over the content of the video, allowing for precise video generation
● A highly versatile tool that handles a wide range of prompts and styles
Cons
● Lacks implicit understanding of the rules of physics
This software is best realistic and imaginative scenes.
02Wondershare Filmora
Wondershare Filmora is a highly efficient video editing software that comes with AI text to video generation. The software is friendly to both beginner and intermediate creations, offering you a wide range of intuitive features.
Pricing
● Subscription Plan: US$19.99 per month
● Cross-Platform Plan: US$69.99 per year
● Perpetual Plan: US$19.99 Onetime Payment
Features
● User-friendly interface that is easy to learn and use
● Wide range of features for creating and editing videos, including transitions, effects, and text overlays.
● Large stock library of royalty-free music and stock footage
● Readily available templates and presets to quickly generate videos
● Easily export videos directly to popular platforms like YouTube and TikTok
Pros
● User-friendly interface with a learning curve suitable for all kinds of creators
● Extensive library of free and paid assets to enhance your videos
● Wide range of features for video editing
Cons
● Lacks advanced features for AI video prompt generation
This software is best for video creation and editing for freelancers, SMBs, markters.
For Win 7 or later (64-bit)
For macOS 10.12 or later
How to Use Filmora’s AI to Video Feature : AI Video Prompt Sample
Here is a brief step-by-step guide on how to use Filmora to generate AI videos. The process is as simple as writing a text prompt and getting the video ready:
Step 1: Lauch Filmora AI Text-to-Video Features
Once you launch on your PC Filmora, click the AI Text-to-Video option to start the video generation process.
Step 2: Add a Text Prompt or Video Script
On the AI Text-to-Video video, add your text prompt. You can also modify other settings such as text language and video voice. Then click the Text to Video button at the bottom to prompt Filmora to generate the video.
Step 3: Preview the Generated Video
Filmora generates the video based on your prompt and a new editing window. You can now a preview video and make any further editing needed.
AI Video Prompt Sample Using Filmora
Prompt: A young man at his 20s is sitting on a piece of cloud in the sky, reading a book.
When prompted to generate a video of a young man in his 20s sitting on a piece of cloud in the sky, reading a book, Filmora generated a narration video from the point of view of the young man as shown above.
03Synthesia
This is a web-app video generator AI from a text supporting AI-driven video creation used by experts and beginners. Rather than filming content utilizing a microphone and camera, this software AI technology helps to simulate human presenters and real-life videos. Thus, it saves video creators hours of work.
Pricing
● Personal Plan: $30 monthly
● Corporate Plan: custom pricing
Features
● Over 40 supported languages
● Allows template customizations
● Allows users to make their avatars
● It has 50 built-in presenters
● Allows you to create realistic AI videos
● Offers live chat support
● Allows download in Mp4
● Enables users to create videos automatically using integrations with APIs
● Allows the addition of backgrounds
● Users can share their videos on other social media platforms
● Allows the addition of images, shapes, and texts to videos
Pros
● Great for beginners are you do not need prior knowledge
Cons
● It supports only front-facing poses
This software is best for freelancers, agencies, marketers, and content creators looking to create high-quality video content.
04Synths Video
This is an AI video-generating tool primarily concerned with helping users drive leads and traffic from YouTube. It is an AI YouTube title generator that allows users to create professional-looking videos from blog posts on YouTube.
Pricing
● YouTube Start: $399 monthly.
● Premium Custom Package: Custom Pricing.
Features
● Video generation from URLs
● It has built-in integration with YouTube
● 20+ avatars are available
● Allows video upload in HD quality
● Over 40+ languages supported
Cons
● No free plan is available
Best for the owners of YouTube channels.
05Rephrase.ai
Rephrase.ai is a video editing software that uses a sophisticated deep learning engine to create professional videos.
Pricing
● Starter plan: $25 monthly
● Enterprise plan: Custom Pricing
Features
● Produces high-resolution videos
● Supports functionality for presenter customization
● Multiple-use cases supported
● Allows users to select their preferred AI voice
● Support varieties of video editing tools
Cons
● It has a complex pricing plan
It is best for agencies seeking to create customizable and personalized professional videos for marketing and advertising.
06Lumen5
Lumen5 is one of the top AI video-creating tools available for beginners and uses Natural Language Processing algorithms to convert text into high-quality videos.
Pricing
● Free Plan
● Creator plan: $15 monthly.
● Premium plan: $79 monthly.
● Business plan: $199 monthly.
● Enterprise plan: Custom Pricing.
Features
● Transforms text to video within minutes
● Numerous templates are available
● Allows customization of videos resolution, color, and font
Cons
● Limited features in the free plan
Best for beginners who are looking to generate short-duration of videos for social media platforms.
07Designs.ai
This is an AI-powered video maker that is useful for users that do not have any experience in design.
Pricing
● Basic plan: $29 monthly
● Pro plan: $69 monthly
● Enterprise plan: Custom Pricing
Features
● It has an attractive and modern user interface
● Allows the creation of videos from pre-designed templates
● Helps video creation from your custom video files
● Over 20 languages supported
● Coverts texts to video
Cons
● Only allows video download in a paid plan.
This tool is best for creators and designers who are willing to create quick AI videos.
08InVideo
This is a perfect AI generator used for creating explainers or marketing videos easily and quickly. The platform helps produce high-quality videos with varieties of style options to make the ideal video according to your requirements.
Pricing
● Free: Free with watermarks on your videos.
● Business: $15 monthly with no watermarks.
● Unlimited: $30 monthly with unlimited video exports.
Features
● Very affordable
● Comprises an online drag-and-drop video editor
● Over 50 AI-powered themes that help to convert text to video in 3 minutes
● Full iStock media library available in all plans
Cons
● Requires internet connection to use
09Pictory.ai
This AI subtitle generator converts your text and turns it into an AI-generated video. This program is simple and easy to get started, requiring no software download. Paste your text into the editor and get started.
Pricing
● Free trial: Only use 3 videos.
● Standard Plan: $29 per month.
● Premium Plan: $59 per month.
Features
● It has a simple user interface.
● Over 6M licensed Shutterstock available
● Unlimited and affordable videos in the premium plan
Cons
● It is quite expensive compared to other tools
10Veed.io
Veed.io is not specifically an AI video generator but a video editing tool that utilizes AI to simplify the entire process and allows users to create high-quality videos within seconds.
Pricing
● Free: Free with watermarks!
● Basic: $18 monthly.
● Pro: $30 monthly
Features
● It has lots of video templates and a music library to choose
● Easy to learn, user-friendly interface
● Video rendering times are quite fast
● The basic plan has a high-quality resolution
Cons
● Not a typical AI video generator
● Not for beginners
11Wisecut
This free AI video generator platform allows you to turn your text into video. Type in your text and choose a voice actor, and then Wisecut will take care of the rest. It offers excellent editing tools for users to tweak your video until it’s just right.
Pricing
● Basic: Free.
● Professional: $57 per month.
Features
● This platform is easy to use
● It has a simple drag and drops user-interface
● Allows auto subtitles and auto cut silences
● Allows integration with YouTube
● Subtitles auto-translation
● Excellent video quality
Cons
● Has limited effects
12Flexclip
FlexClip makes video creation and editing easy with-it millions of royalty-free stock media and thousands of templates for you to choose from.
Pricing
● Free
● Basic: $5.99 per month.
● Plus: $9.99 per month
● Business: $19.99 per month.
Features
● Thousands of available templates
● Simple tool for creating and editing videos
● Use for creating engaging videos
● Provides millions of royalty stock media
● Versatile and Flexible
Cons
● Not for beginners
● Ending Thoughts →
● In this post, we have listed the top text to video generators that you can choose from to help you perform tasks within minutes.
● The report also explains all you need to know about video AI generators and recommends Filmora as a perfect tool for editing your videos.
Also read:
- New 2024 Approved Top 5 Video Filter Software Improve Your Videos with Filters
- In This Article, You Will Learn How to Record Creative Cinematic Videos Using a Smartphone and Edit the Video with Wondershare Filmora
- New Are You Looking for Software to Convert Word to SRT Format? Here Is a Complete Guide About It
- New 2024 Approved Best Guide of 8 Photo Collage Apps for PC
- In 2024, Looking for the Best Quiz-Making Tools? Read Our Full Review to Find Out the 10 Best Video Quiz Makers Available
- 20 Must-Have Graduation Songs for Slideshow
- Updated How to Make Discord GIF PFP? Solved for 2024
- New In 2024, Easily Sync Audio With Video With Filmora
- Tips & Tricks To Perfectly Use the Audio Mixer in Filmora
- Updated Create Glitch Text Effect
- New The Availability of the Slow-Motion Feature on the iPhone Is Often Debated. This Article Will Guide You on How to Slow Down a Video on iPhone
- New What Is a Transparent Logo and Why Do You Need It
- New In 2024, How to Make a Movie with Windows Movie Maker?
- New Best 10 Tools To Make Quiz Videos for 2024
- In 2024, How to Google Meet Green Screen
- Updated Ideas That Will Help You Out in Converting AVI to GIF
- New Get to Know How Excellent Sparkle Video Effects Can Significantly Impact Different Projects. Its Miraculous. Read Below to Learn More and Add Sparkle Effect to Your Videos
- Looking for the Steps to Add Transitions Effects in Premiere Pro? Here Are the Steps to Add and Edit Transitions in Premiere Pro and an Alternative Way to Video Transitions for 2024
- What Is Motion Tracking and How to Use It for 2024
- In 2024, Have You Ever Applied the Gaussian Blur Effect to Your Videos? Read This Article to Find a Reliable and Convenient Tool to Generate the Gaussian Blur Effect
- Updated SRT File Translation Could Be a Tedious Task if You Dont Know the Right Steps. Lets Discuss Few Effective Ways to Do It Like a Pro
- Updated In 2024, Best AR Video App - Top 10 Picks
- In 2024, Online Calculate and Change Video Aspect Ratio
- How To Make A Video Longer
- Add Camera Shake to Video in Adobe After Effects
- New Do You Want a LUT that You Can Use for Your High-Definition Content? You Can Use Rec 709 LUT Premiere Pro for Your HD Digital Media to Give the Perfect Result
- How to Animate Designs With Canva GIF for 2024
- Updated How to Split a Video Into Parts on All Platforms
- Updated End This Problem! Make Transparent Background Video Today for 2024
- New 4 Ways for Rotating Your GoPro Videos Professionally
- In 2024, Step by Step to Split a Clip in VLC
- New 6 Ways to Mimic Professional Filming Gears
- 4 Easy Ways for Your OnePlus Nord CE 3 Lite 5G Hard Reset | Dr.fone
- Where Is the Best Place to Catch Dratini On Honor Magic5 Ultimate | Dr.fone
- Complete Tutorial to Use GPS Joystick to Fake GPS Location On Realme C67 4G | Dr.fone
- In 2024, 5 Ways To Teach You To Transfer Files from ZTE Axon 40 Lite to Other Android Devices Easily | Dr.fone
- Solutions to Spy on Oppo Reno 8T with and without jailbreak | Dr.fone
- 4 solution to get rid of pokemon fail to detect location On Apple iPhone 14 | Dr.fone
- In 2024, Top 15 Augmented Reality Games Like Pokémon GO To Play On Apple iPhone 7 | Dr.fone
- 8 Quick Fixes Unfortunately, Snapchat has Stopped on Vivo S17t | Dr.fone
- How to Simulate GPS Movement in AR games On OnePlus Ace 2V? | Dr.fone
- In 2024, 3 Easy Ways to Factory Reset a Locked Apple iPhone XS Without iTunes | Dr.fone
- In 2024, Where Is the Best Place to Catch Dratini On Samsung Galaxy S23+ | Dr.fone
- Best 10 Mock Location Apps Worth Trying On Xiaomi Redmi A2 | Dr.fone
- Recommended Best Applications for Mirroring Your Nokia 130 Music Screen | Dr.fone
- Hassle-Free Ways to Remove FRP Lock on Sony Xperia 1 V Phones with/without a PC
- In 2024, Still Using Pattern Locks with Poco C51? Tips, Tricks and Helpful Advice
- How to retrieve erased videos from C02
- Fix the Error of Unfortunately the Process.com.android.phone Has Stopped on Vivo X100 Pro | Dr.fone
- 4 Ways to Transfer Music from Motorola Edge 2023 to iPhone | Dr.fone
- In 2024, How to Transfer Contacts from OnePlus Nord 3 5G To Phone | Dr.fone
- In 2024, How to Transfer Apps from Vivo T2 5G to Another | Dr.fone
- What is Fake GPS Location Pro and Is It Good On Samsung Galaxy M14 4G? | Dr.fone
- 6 Ways to Change Spotify Location On Your Infinix Hot 40i | Dr.fone
- How Can I Unlock My iPhone 8 After Forgetting my PIN Code?
- How To Remove Screen Lock PIN On Infinix Zero 30 5G Like A Pro 5 Easy Ways
- Title: In 2024, How to Perfectly Use Canva Color Match?
- Author: Chloe
- Created at : 2024-05-20 03:38:11
- Updated at : 2024-05-21 03:38:11
- Link: https://ai-editing-video.techidaily.com/in-2024-how-to-perfectly-use-canva-color-match/
- License: This work is licensed under CC BY-NC-SA 4.0.
