
:max_bytes(150000):strip_icc():format(webp)/178665671_HighRes-56a532a83df78cf77286de1b.jpg)
In 2024, How to Remove Audio From Video on Mac? Free and Official Solutions
How to Remove Audio From Video on Mac? Free and Official Solutions
Videography is getting into a trend nowadays. Everyone is recording videos for different reasons. However, when shooting outside, background sounds and noise reduce video quality.
You can remove audio from your video on Mac devices using different software. For instance, you can go for iMovie to remove sound from video on Mac. Filmora also allows you to remove audio from video on Mac.
Method 1: Use online and free solutions to mute audio in videos
1. Canva
Canva is a free design platform for anyone. It has both web and app versions. A very user-friendly graphic design tool that is easy to use, even for those with no design experience.
Canva offers a wide selection of templates and over 1 million templates. A library of over 2 million stock photos and illustrations for free. It also has a paid option at an affordable price.
An Ultimate Guide to How to remove audio from video in Canva?
To remove audio from your video in Canva, you can do so by following these simple steps:
Step1 Open the video in Canva.

Step2 Click on the “Audio” tab in the toolbar and remove the audio.

Step3 Save the video in desired option.
2. Clideo
Clideo is a cloud-based video editing tool that offers a simple yet powerful way to edit videos. With Cleo, you can trim, crop, merge, and audio or text to their videos.
Its user-friendly interface makes it easy to edit videos. Clideo offers a variety of effects and transitions that let you create videos that look unique. It supports a wide range of video formats, making it easy to export your videos.
An Ultimate Guide to How to remove audio from video in Clideo?
This online video editor offers a straightforward way to remove audio from any video file.
Here’s how you can do it:
Step1 Go to clideo.com and upload the video from which you want to remove the audio. You can either drag and drop the file into the designated area or click the “Choose file” button.

Step2 Once the video is uploaded, select the “Mute” option from the toolbar above the video player.

Step3 Click on “Export” to save the video without audio.

3. Ezgif
Ezgif.com is a great online resource for creating and editing GIF images. This online software has a user-friendly interface.
You can upload images or video files from your computer or a URL, and Ezgif will create a GIF for you. It lets you edit your GIFs before you download them. You can crop, resize, rotate, and reverse your GIFs and add text, filters, audio, and other effects.
How to remove audio from video in Ezgif?
To remove audio from a video using Ezgif, follow the steps below;
Step1 Upload the video to the website.

Step2 Once the video is uploaded, select the “Audio” tab and click on the “Remove audio” button.

Step3 It will remove the audio from the video, and you can download the new video file.
Method2: Use Apple official tools to remove audio from videos
1.QuickTime
QuickTime is a video editor that comes installed on all Mac computers. It is easy to use yet packed with features that allow you to create, edit, and share your work.
QuickTime includes a basic set of video editing features perfect for simple tasks like trimming a clip or adding a title. You can export your video in various formats or upload it directly to YouTube.
An Ultimate Guide to How to remove audio from video in QuickTime?
You can remove and mute the audio from video in Quicktime as follows:
Step1 Open the video with “QuickTime Player,” from which you want to remove the audio.

Step2 Select “Edit” from the taskbar and click “Remove Audio.”

Step3 Now select ‘File” and then click “Save.” It will save the muted video.

2. iMovie:
iMovie is a video editing software application by Apple Inc. It was released in 1999 as a Mac OS. iMovie is a cross-platform application with the Mac OS X operating system and iOS.
It is easy to use and free. You can use iMovie to make movies from your photos and video clips. You can add titles, transitions, filters, text, background music, audio, color correction, animations, and video effects.
How to remove audio from video in iMovie?
There are a few different ways that you can remove audio from video in iMovie.
Step1 Click on the “Movie” button. Select the video whose audio is to be removed.

Step2 Now press and hold the timeline. Some options will appear. Click on the “Volume” button.

Step3 Mute the audio.

Step4 Now release the timeline and click the “arrow “button.

Step5 Save the muted file on your Mac by clicking “Save.”

Step6 Muted videos will get exported to your library.

3. Final Cut Pro
Final Cut Pro is a powerful video editor that allows users to create professional-quality videos. With its intuitive design and wide range of features, Final Cut Pro is the perfect tool for anyone looking to create videos for personal or professional use.
Final Cut Pro is a professional-grade video editing software for some of the biggest Hollywood movies. It’s also become a favorite among YouTubers and filmmakers.
How to remove audio from video in Final Cut Pro?
You can remove audio from your video in either of two ways.
Step1 Open the video from which the audio is to be removed.

Step2 Now select the timeline.

Step3 Double-click on the timeline. It will detach the audio from the video.
Now press the “Delete key” on the keyboard. The audio will get removed.

Method 3: Use Filmora to remove audio from the video
Filmora
If you’re looking for easy-to-use video editing software, Filmora is a great option. It’s simple to use yet still offers a wide range of features. Plus, it’s affordable and supports both Windows and Mac computers.
Free Download For Win 7 or later(64-bit)
Free Download For macOS 10.14 or later
An Ultimate Guide to How to remove audio from video in Filmora?
One way is to mute the audio track. To do this, follow the given steps.
Step1 Open a new project in Filmora.

Step2 Click on the audio track in the timeline.

Step3 Now, click the mute button.

Another way to remove the audio from a video is to delete the audio track. To do this:
Step1 Click on the audio track in the timeline
Step2 Press the delete key on your keyboard.

Step3 Click on the export button.

Special Features:
#Silent Detection
With silence detection, you can quickly and easily find the silent moments in your footage. It is great for finding those perfect moments of silence that can impact your film much.
#Audio Ducking
Audio Ducking is a feature in Filmora that automatically lowers the volume of an audio track when another audio track is getting played. It can help ensure that dialog is always audible, even when other sounds are playing in the background.
#TTS and STT
TTS and STT are two features in Filmora that you can use to create subtitles for your video.
TTS stands for text-to-speech, meaning you can create subtitles by typing in the text you want to speak in the video.
STT stands for speech-to-text, meaning you can create subtitles by recording your voice and having Filmora transcribe the text.
Conclusion
Here you go, the best solutions to remove audio from video on Mac. You may choose anyone as per your need.
However, Wondershare Filmora is recommended due to its cross-platform nature and unlimited features.
Free Download For macOS 10.14 or later
An Ultimate Guide to How to remove audio from video in Filmora?
One way is to mute the audio track. To do this, follow the given steps.
Step1 Open a new project in Filmora.
Step2 Click on the audio track in the timeline.
Step3 Now, click the mute button.
Another way to remove the audio from a video is to delete the audio track. To do this:
Step1 Click on the audio track in the timeline
Step2 Press the delete key on your keyboard.
Step3 Click on the export button.
Special Features:
#Silent Detection
With silence detection, you can quickly and easily find the silent moments in your footage. It is great for finding those perfect moments of silence that can impact your film much.
#Audio Ducking
Audio Ducking is a feature in Filmora that automatically lowers the volume of an audio track when another audio track is getting played. It can help ensure that dialog is always audible, even when other sounds are playing in the background.
#TTS and STT
TTS and STT are two features in Filmora that you can use to create subtitles for your video.
TTS stands for text-to-speech, meaning you can create subtitles by typing in the text you want to speak in the video.
STT stands for speech-to-text, meaning you can create subtitles by recording your voice and having Filmora transcribe the text.
Conclusion
Here you go, the best solutions to remove audio from video on Mac. You may choose anyone as per your need.
However, Wondershare Filmora is recommended due to its cross-platform nature and unlimited features.
3 In-Camera Transitions Tricks To Make Videos Like a Pro
You must have seen it in videos when a scene changes to another place or time. How is it possible? Video transitions are a post-production technique that connects two different shots together. And it makes the whole video goes smooth and fluent.
Hopping directly from one clip to the next looks pretty queer. It disturbs the whole dynamics and charm of the video. To avoid this, we use video transitions. This makes the video appear much smoother and more linked.
You may think it is not easy, but after reading this article, you will know how simple it is. All you need is a camera and a few skills. In this article, we will focus on different in-camera transitions and let you know how to edit in a powerful video editor Filmora .
Whip Your Camera
You may have noticed that when an object moves quickly, the camera creates a blurred image of the object. We call it motion blur. The idea with this transition is to cut and paste your shots together by whipping your camera at the end of your first shot and at the beginning of your second one. This effect depends on two aspects. The first is by the speedy motion of the object out of the frame, and the second is by the camera’s movement.
Here is a stepwise guide for you to try
- Plan your shots, where and in what direction you will make the whip.
- Then take the first shot and whip the camera at the end of the shot in the direction the object is moving.
- For the next shot, whip the camera into the action and complete the shot.
- Import both shots in your editing tool and find the point of blur in both.
- Cut and paste them to add a blurring effect to your video.
You can whip your camera in any direction you want. Make sure the movement is fast enough to create a motion blur.
The result would be a smooth transition from the first shot to the second, as in this clip:

Fill The Frame
In this in-camera transition technique, you must fill the frame with an object or subject. Compose the shot with the main subject filling the frame from edge to edge. In this way, those who view the video immediately know what you want them to see.
Here is step-by-step guidance for this transition
- Plan the two shots you are going to take.
- Find a subject or an action that will fill the frame during recording.
- In the first shot, please make the subject move toward the frame so that it fills the frame.
- The second shot will take place at another time or place.
- To record the second shot, cover the frame with an object and then reveal the shot.
- Import both shots into Wondershare Filmora .
- Cut the two shots to the point where the frame is filled and paste these shots together.
Free Download For Win 7 or later(64-bit)
Free Download For macOS 10.14 or later
One important thing is to match the color and brightness of the object or subject. It will provide you with much better results. The video attached below explains all the steps of filling the frame.

Match Cut
In a video, a match cut transitions from one shot to another. During this, the composition of the two shots is matched by action, subject, and subject matter. The goal is to make a visual match between two situations that don’t have a direct link. Here are the steps to creating a match-cut transition in your videos.
- Plan the shot you are going to take.
- Record the action in the first shot, for example, clapping your hands.
- Go to another place or scene to record the second shot.
- Repeat the same action in the second shot.
- Import both camera shots to Wondershare Filmora .
- Cut one shot to another when the action is at its peak.
This way, you can smoothly transition from one place or scene to another. There is a video attached below for a better understanding of the steps.

Final Words
You can use these techniques to create sublime in-camera transitions. Make sure to follow all the steps in the correct order. These transitions will make your videos look more creative and artistic. Plan your ideas, add these transitions to your videos, and create cool videos at home to post on social media.
If you find this article informative, remember to share it with your friends. Which of these transitions did you like the most, and are you going to try them?
Free Download For Win 7 or later(64-bit)
Free Download For macOS 10.14 or later
Free Download For macOS 10.14 or later
One important thing is to match the color and brightness of the object or subject. It will provide you with much better results. The video attached below explains all the steps of filling the frame.
Match Cut
In a video, a match cut transitions from one shot to another. During this, the composition of the two shots is matched by action, subject, and subject matter. The goal is to make a visual match between two situations that don’t have a direct link. Here are the steps to creating a match-cut transition in your videos.
- Plan the shot you are going to take.
- Record the action in the first shot, for example, clapping your hands.
- Go to another place or scene to record the second shot.
- Repeat the same action in the second shot.
- Import both camera shots to Wondershare Filmora .
- Cut one shot to another when the action is at its peak.
This way, you can smoothly transition from one place or scene to another. There is a video attached below for a better understanding of the steps.
Final Words
You can use these techniques to create sublime in-camera transitions. Make sure to follow all the steps in the correct order. These transitions will make your videos look more creative and artistic. Plan your ideas, add these transitions to your videos, and create cool videos at home to post on social media.
If you find this article informative, remember to share it with your friends. Which of these transitions did you like the most, and are you going to try them?
Free Download For Win 7 or later(64-bit)
Free Download For macOS 10.14 or later
Little Tricks to Make Canva Slideshow No One Is Telling You
Little Tricks to Create Canva Slideshow No One is Telling You
An easy yet powerful editor
Numerous effects to choose from
Detailed tutorials provided by the official channel
You can make slideshows in innumerable ways. And we all are aware of how important it is to present slideshows, no matter what our profession or purpose is. And one of the ways of making slideshows is by using the canvas slideshow.
You can make the best type of slideshows on any device you prefer with Canva. So, in the following discussion, we will be talking about how you can make a slideshow on a PC or Mac with Canvas. Then, we will point out the steps for adding music to your slideshow in Canva. We will also mention how you can turn a slideshow into a video with Canva.
Lastly, we will discuss the answers and solutions to some common questions regarding converting slides to digital, following with the discussion of the best video editing tool for slideshow videos. So, without o further ado, let us get started with our discussion.
In this article
01 [How to Make a Slideshow on a PC or Mac with Canva?](#Part 1)
02 [How to Add Music to Your Slideshow in This Canva?](#Part 2)
03 [How to Turn Your Slideshows into Videos with Canva?](#Part 3)
04 [FAQ of Converting Slides to Digital](#Part 4)
Part 1 How to Make a Slideshow on a PC or Mac with Canva?
You can make the best Canva slide show in just five simple steps. You can choose any device for making a slideshow with canva. The best choice is to use a PC or Mac to get the entire display, thereby helping you make better edits, changes and integrations in your slideshows.
So, let us start the discussion with the five simple steps for making a slideshow on PC or Mac with Canva. The steps are as follows.
● Step 1: Launch the application
The first step is to download, launch and install the application of Canva on your preferred device, that is, either your PC or your Mac. The application is available for free, and you need not pay any charges for downloading and installing Canva on your Mac or PC.

● Step 2: Choose the template
The next step is to choose the template you want for your sideshow. Choose from among the many canva slideshow templates that are available.

● Step 3: Make the required edits with the features of Canva.
There are numerous features available at Canva. Use them to make the necessary edits and integrations in your slideshow. Use the different features and make your slideshow the way you want. You can add images, texts and designs to your slideshow at Canva.

● Step 4: Customize accordingly
You can add your images and change the templates and designs at Canva. It helps in bringing more uniqueness, creativity and originality, as you can integrate your imagination, skills and creativity in the slideshow you are making at Canva.
● Step 5: Save your work and export
All the hard work is finfish by now. Now you have to have the slideshow that you have made so far. And then, share it in whichever file format you prefer on any social media platform or other places you want.

Part 2 How to Add Music to Your Slideshow in This Canva?
You can customize your slideshow at Canva in numerous ways. And one of the ways is by adding music to your slideshow in Canva. A slideshow in canva can have music in it, which can be any music. You can record yourself or even integrate any readymade music file.
You need only a single step to add music to your slideshow at Canva. The steps for making the slideshow remain the same, and you can refer to the steps mentioned above for reference. In the above steps, pause at Step 3.
You can add the required music file or media file at that step. In the next step, that is, in Step 4, you can customize that media file. You can integrate any audio file that you record for your slideshow.

Part 3 How to Turn Your Slideshows into Videos with Canva?
We have discussed the steps for making canva photo slideshow. The steps are simple to perform and easy to follow. But what if you need or want to turn that slideshow into a video? You definitely can do so! The steps for this, too, are straightforward and effortless.
So, now we will discuss the steps for turning slideshows at Canva into videos. There are four simple steps for this, and they are as follows.
● Step 1: Choose your preferred presentation type
By this, we mean that you must decide the size of your presentation. It is better to determine the type of presentation, for it helps in better and faster making of your presentation.
● Step 2: Integrate all the components you want in your presentation
Then, integrate all the images, soundtracks, texts, designs and templates and all the other necessary components you want to be present in your presentation. You can use numerous features in your presentation at Canva.
● Step 3: Customize the presentation based on your choice and needs
You can change the components of your presentation according to your needs and choice, and you can bring about as much customization as you want. So, customize according to and as much you want.
● Step 4: Download and share
Lastly, save the presentation. Then go to the blue bar, and in the options present in the top right corner, you will find “presenting”. You can save your file from there, and then the “Download” option will help you download the file to your device.
Part 4 FAQ of Converting Slides to Digital
Now, we will discuss solutions or answers to the common questions relating to converting slides into digital format. Here are the frequently asked issues or questions regarding this aspect.
01How do I convert my slides to digital?
We can recommend a few ways in which you can digitise your old slides. The methods are as follows.
● Hiring a proficient professional at this work is the easiest and the most effective method.
● A slide copier tool or application can also effectively serve this purpose.
● Use a device that converts the images or slides digitally.
● Use a flatbed scanner to scan your slides.
● Photographing your slides is an intelligent way to digitise your old slides.
02Can I use Filmora to turn my slides to digital?
You can readily use Filmora to transform your slideshows into slideshow videos, digitising your slides effectively. You have to make your slideshow at Filmora, edit and customise it according to your preference and then save, share or download the file. It will automatically turn your slide into digital format or help you make a successful slideshow video.
03What is the best method for turning slides into digital?
The most effortless method is to hire a professional, and it will guarantee saucerful results. But, if you want to do it yourself, you can readily opt for Filmora. It is the best video editing application that can readily help you digitise your slides.
04Can I turn my slideshow into videos?
Yes, you can effortlessly turn your slideshows into videos. You need a video editing tool that enables you to share and download your slideshow in a video format. And the best tool for it is Filmora. You can unhesitant opt for Filmora if you want to turn your slideshows into videos and share them effortlessly on any platform.
Now, we will discuss the best video editing tool or application, Wondershare Filmora Video Editor . You can use this tool to make the best slideshows and convert them into videos. You have the liberty f using any device for editing and making slideshow videos. You can customise as much you want and use the tons of features for editing available in the tool.
For Win 7 or later (64-bit)
For macOS 10.12 or later
You can opt for the free version. It has tools and features that are more than sufficient for making the most incredible slideshow videos. And when you choose its paid version, you are bestowed with the most advanced professional tools and features for editing. You can use the 800+ filters available, the texts, designs, templates, and other components for editing at Filmora.
So, if you want to make the best and the most incredible slideshows videos, you can readily opt for Filmora!
● Ending Thoughts →
● So, this was all about the different aspects and factors of a slideshow at Canva. Let us have a quick recap of the topic and discussions we have touched on in the above discussion.
● The five steps for making A slideshow in canva on your PC or Mac.
● The steps for adding music to your slideshow at Canva, also, how can you turn your slideshows into videos in Canva in four simple steps
● Lastly, we have discussed the answers or solutions to the common questions relating to converting slides to digital. And we have ended our discussion by introducing the best video editing tool, Filmora, that can help you make the most fantastic slideshows on any device, be it a PC or Mac.
You can make slideshows in innumerable ways. And we all are aware of how important it is to present slideshows, no matter what our profession or purpose is. And one of the ways of making slideshows is by using the canvas slideshow.
You can make the best type of slideshows on any device you prefer with Canva. So, in the following discussion, we will be talking about how you can make a slideshow on a PC or Mac with Canvas. Then, we will point out the steps for adding music to your slideshow in Canva. We will also mention how you can turn a slideshow into a video with Canva.
Lastly, we will discuss the answers and solutions to some common questions regarding converting slides to digital, following with the discussion of the best video editing tool for slideshow videos. So, without o further ado, let us get started with our discussion.
In this article
01 [How to Make a Slideshow on a PC or Mac with Canva?](#Part 1)
02 [How to Add Music to Your Slideshow in This Canva?](#Part 2)
03 [How to Turn Your Slideshows into Videos with Canva?](#Part 3)
04 [FAQ of Converting Slides to Digital](#Part 4)
Part 1 How to Make a Slideshow on a PC or Mac with Canva?
You can make the best Canva slide show in just five simple steps. You can choose any device for making a slideshow with canva. The best choice is to use a PC or Mac to get the entire display, thereby helping you make better edits, changes and integrations in your slideshows.
So, let us start the discussion with the five simple steps for making a slideshow on PC or Mac with Canva. The steps are as follows.
● Step 1: Launch the application
The first step is to download, launch and install the application of Canva on your preferred device, that is, either your PC or your Mac. The application is available for free, and you need not pay any charges for downloading and installing Canva on your Mac or PC.
● Step 2: Choose the template
The next step is to choose the template you want for your sideshow. Choose from among the many canva slideshow templates that are available.
● Step 3: Make the required edits with the features of Canva.
There are numerous features available at Canva. Use them to make the necessary edits and integrations in your slideshow. Use the different features and make your slideshow the way you want. You can add images, texts and designs to your slideshow at Canva.
● Step 4: Customize accordingly
You can add your images and change the templates and designs at Canva. It helps in bringing more uniqueness, creativity and originality, as you can integrate your imagination, skills and creativity in the slideshow you are making at Canva.
● Step 5: Save your work and export
All the hard work is finfish by now. Now you have to have the slideshow that you have made so far. And then, share it in whichever file format you prefer on any social media platform or other places you want.
Part 2 How to Add Music to Your Slideshow in This Canva?
You can customize your slideshow at Canva in numerous ways. And one of the ways is by adding music to your slideshow in Canva. A slideshow in canva can have music in it, which can be any music. You can record yourself or even integrate any readymade music file.
You need only a single step to add music to your slideshow at Canva. The steps for making the slideshow remain the same, and you can refer to the steps mentioned above for reference. In the above steps, pause at Step 3.
You can add the required music file or media file at that step. In the next step, that is, in Step 4, you can customize that media file. You can integrate any audio file that you record for your slideshow.
Part 3 How to Turn Your Slideshows into Videos with Canva?
We have discussed the steps for making canva photo slideshow. The steps are simple to perform and easy to follow. But what if you need or want to turn that slideshow into a video? You definitely can do so! The steps for this, too, are straightforward and effortless.
So, now we will discuss the steps for turning slideshows at Canva into videos. There are four simple steps for this, and they are as follows.
● Step 1: Choose your preferred presentation type
By this, we mean that you must decide the size of your presentation. It is better to determine the type of presentation, for it helps in better and faster making of your presentation.
● Step 2: Integrate all the components you want in your presentation
Then, integrate all the images, soundtracks, texts, designs and templates and all the other necessary components you want to be present in your presentation. You can use numerous features in your presentation at Canva.
● Step 3: Customize the presentation based on your choice and needs
You can change the components of your presentation according to your needs and choice, and you can bring about as much customization as you want. So, customize according to and as much you want.
● Step 4: Download and share
Lastly, save the presentation. Then go to the blue bar, and in the options present in the top right corner, you will find “presenting”. You can save your file from there, and then the “Download” option will help you download the file to your device.
Part 4 FAQ of Converting Slides to Digital
Now, we will discuss solutions or answers to the common questions relating to converting slides into digital format. Here are the frequently asked issues or questions regarding this aspect.
01How do I convert my slides to digital?
We can recommend a few ways in which you can digitise your old slides. The methods are as follows.
● Hiring a proficient professional at this work is the easiest and the most effective method.
● A slide copier tool or application can also effectively serve this purpose.
● Use a device that converts the images or slides digitally.
● Use a flatbed scanner to scan your slides.
● Photographing your slides is an intelligent way to digitise your old slides.
02Can I use Filmora to turn my slides to digital?
You can readily use Filmora to transform your slideshows into slideshow videos, digitising your slides effectively. You have to make your slideshow at Filmora, edit and customise it according to your preference and then save, share or download the file. It will automatically turn your slide into digital format or help you make a successful slideshow video.
03What is the best method for turning slides into digital?
The most effortless method is to hire a professional, and it will guarantee saucerful results. But, if you want to do it yourself, you can readily opt for Filmora. It is the best video editing application that can readily help you digitise your slides.
04Can I turn my slideshow into videos?
Yes, you can effortlessly turn your slideshows into videos. You need a video editing tool that enables you to share and download your slideshow in a video format. And the best tool for it is Filmora. You can unhesitant opt for Filmora if you want to turn your slideshows into videos and share them effortlessly on any platform.
Now, we will discuss the best video editing tool or application, Wondershare Filmora Video Editor . You can use this tool to make the best slideshows and convert them into videos. You have the liberty f using any device for editing and making slideshow videos. You can customise as much you want and use the tons of features for editing available in the tool.
For Win 7 or later (64-bit)
For macOS 10.12 or later
You can opt for the free version. It has tools and features that are more than sufficient for making the most incredible slideshow videos. And when you choose its paid version, you are bestowed with the most advanced professional tools and features for editing. You can use the 800+ filters available, the texts, designs, templates, and other components for editing at Filmora.
So, if you want to make the best and the most incredible slideshows videos, you can readily opt for Filmora!
● Ending Thoughts →
● So, this was all about the different aspects and factors of a slideshow at Canva. Let us have a quick recap of the topic and discussions we have touched on in the above discussion.
● The five steps for making A slideshow in canva on your PC or Mac.
● The steps for adding music to your slideshow at Canva, also, how can you turn your slideshows into videos in Canva in four simple steps
● Lastly, we have discussed the answers or solutions to the common questions relating to converting slides to digital. And we have ended our discussion by introducing the best video editing tool, Filmora, that can help you make the most fantastic slideshows on any device, be it a PC or Mac.
How to Zoom Webcam on PC
Making certain our digital presence is the best it can be pays dividends as more and more of what we do online; similar is the case with how to zoom out webcam windows 10. The majority of experts advise against using the built-in camera that comes with your laptop or computer and instead advocate getting a webcam or an HD camera. These, however, may be hard to come by and pricy if you locate a nice one. If the built-in camera on your laptop doesn’t perform effectively during Zoom meetings, you may want to consider about investing in a separate, better webcam. Webcams offer automatic settings that are intended to function with the largest variety of lighting situations possible. This suggests that they average out a great number of responses to the content of the frame. Because of this, we have incorporated basic PC webcam zooming settings. These answers may be found in the portions that follow.
It’s vital to know how to zoom in on a webcam before visiting there. The camera wasn’t always as vital as it is today, and only very large corporations could afford to employ it as a convenience. But today, nearly everyone, from huge organizations to little firms, acknowledges its value. Everybody needs a webcam that works properly. The camera control software you are using determines the zoom function. The resolution of your picture window and the capabilities of the application dictate how far you can zoom in on the webcam’s video image. You can zoom in and out on camera photos using tools like YouCam and Windows Live Messenger. The most critical camera capabilities for the ideal video conferencing experience are zoom in and zoom out, which at first look may appear trivial. Here, we’ll walk you through each step, in detail. Continue reading, and we’ll check your understanding of webcam zoom in and zoom out skills!
Way 1: Zoom with Windows Live Messenger
When utilizing a camera for video conferencing, you may zoom in on a user’s face to get rid of the background. Webcam settings are not accessible by default in Microsoft Windows. However, camera zoom settings may be changed in instant chat systems. Through an instant messaging tool, such as Windows Live Messenger, you may simply access these options. This application provides private offline chat, video messaging, image and video sharing, and video chatting.
Step1Start Windows Live Messenger on your PC or laptop first. Enter your login name and password by clicking the “Sign In” button.

Step2On the top menu bar, pick “Tools.” And then select the “Audio and Video Setup”. Drag the slider next to “Speaker” to modify the speaker volume. Drag the slider next to “Microphone” to modify the microphone sensitivity. Press “Next.”

Step3From the drop-down list, pick the webcam. The “Camera Control” option is situated on the top; pick “Webcam Settings” after that.
Step4Now, to alter the zoom settings, drag the “Zoom” slider. To zoom in or out, drag the slider to the left or right. Press “OK.”
Way 2: Use Windows 10 Camera App
Wondering how to zoom your camera in the Windows 10 Camera app? The Camera app enables you to zoom in or out on your webcam in both image and video modes. To accomplish so, click or push the Magnification button, and then use the slider to modify the webcam’s zoom level. To operate the zoom feature manually, pick “Manual Zoom.” In the preview window, a square appears when you pick this option. To zoom in on a specific region of the capture window, drag the square there. To expand the image that was acquired by the webcam, slide the slider bar. In simply, The Camera app enables you zoom in or out of photographs and movies shot with your webcam. To do this, click on the “Zoom” button and drag the slider to the left or right as appropriate on your Windows 10 camera. the following steps:
Step1To open the “Start Menu,” make a right-click on “Start.” Now, to access the Camera app, type “Camera App” into the start menu’s search box.

Step2Tap the Camera Control icon when you start or join a meeting. To zoom and pan the camera to the appropriate spot, utilize the icons on the Camera Control panel.
![]()
Step3To exit the Camera Control window and return to the Meeting Controls, touch outside of it.
Way 3: Zoom with YouCam
Unfortunately, the default cameras or webcams bundled with the majority of Windows laptops and desktops don’t have an automatic zoom option. In fact, the only method to adjust their crop is to switch from “Standard” to “Widescreen,” which does slightly zoom in on you but not in the manner we’d want. This makes it inescapable that the only method to manually alter a webcam’s magnification is to acquire one separately and apply its software settings. , like YouCam. YouCam provides video calling, streaming, and broadcasting. includes an integrated app. To employ Zoom with YouCam, refer to the methods given below:
Step1Launch the YouCam camera program and activate the webcam.

Step2In the camera preview window, pick Settings. Then, select “Enable Video Zoom” from the menu.
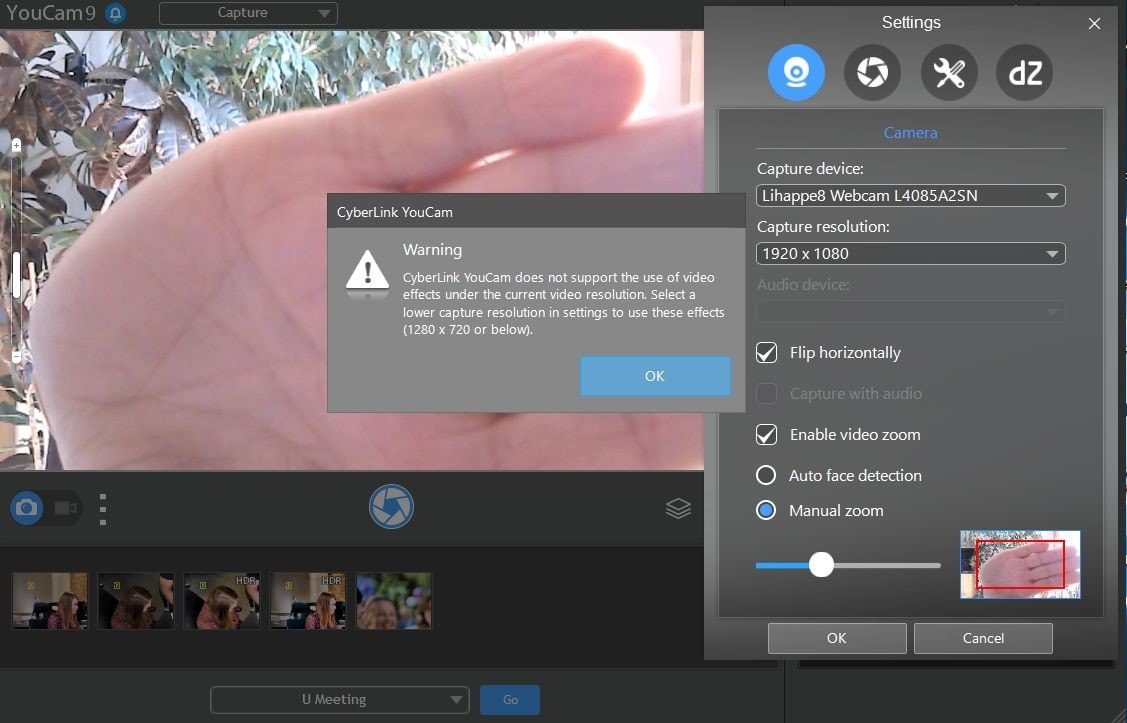
Step3Select “Automatic Face Detection” from the menu. As you wander about in the capture window, the camera watches your face and automatically zooms in on your photo as shown above.
Step4To handle the zoom feature manually, pick “Manual Zoom.” In the preview window, a square appears when you pick this option. To zoom in on a specific region of the capture window, drag the square there. To expand the image that was acquired by the webcam, slide the slider bar.

Way 4: Use iGlasses on Mac
For the perfect webcam look on a MAC, install the Chrome plugin iGlasses for video effects and style tweaks. Your videos will appear better on Zoom as a consequence. You may instantly enhance the appearance of your video interactions by utilizing the digital zoom on your iGlasses. Digital pan, tilt, and zoom are all possible with easy controls. For Macs that support it, an Apple Remote may be used to operate. iGlasses will become an option in Zoom’s video settings when it has been installed. You may improve your camera by altering the settings in iGlasses. You may experiment with a range of amusing effects, like 3-D distortions, using the virtual camera. Let’s learn how to utilize iGlasses on a Mac:
Step1Installing Ecamm’s iGlasses on a MacBook in the first step.
Step2To activate the camera, go to your video settings and pick iGlasses.
Step3Choose the Zoom window and execute the appropriate operations using the Zoom and Flip options. You may now zoom in and out using the camera on your MacBook as you like.

Conclusion
In conclusion, so many people currently take part in online conferences and virtual meetings. You want to create a lasting impression, don’t you? Not or whether you are the host of an online meeting or event, you must now maintain a professional image to prevent turning off attendees. You have discovered how to utilize the tools at your disposal to boost the zoom in and out quality of your camera in this post. However, as will be explained in the sections ahead, you may do it without the third-party plugins. With just one quick plugin, you can significantly transform how you look on a camera. Hence, try out the easy method from the above enlisted ones to get hold on your PC webcam to zoom in or out purposes.
Making certain our digital presence is the best it can be pays dividends as more and more of what we do online; similar is the case with how to zoom out webcam windows 10. The majority of experts advise against using the built-in camera that comes with your laptop or computer and instead advocate getting a webcam or an HD camera. These, however, may be hard to come by and pricy if you locate a nice one. If the built-in camera on your laptop doesn’t perform effectively during Zoom meetings, you may want to consider about investing in a separate, better webcam. Webcams offer automatic settings that are intended to function with the largest variety of lighting situations possible. This suggests that they average out a great number of responses to the content of the frame. Because of this, we have incorporated basic PC webcam zooming settings. These answers may be found in the portions that follow.
It’s vital to know how to zoom in on a webcam before visiting there. The camera wasn’t always as vital as it is today, and only very large corporations could afford to employ it as a convenience. But today, nearly everyone, from huge organizations to little firms, acknowledges its value. Everybody needs a webcam that works properly. The camera control software you are using determines the zoom function. The resolution of your picture window and the capabilities of the application dictate how far you can zoom in on the webcam’s video image. You can zoom in and out on camera photos using tools like YouCam and Windows Live Messenger. The most critical camera capabilities for the ideal video conferencing experience are zoom in and zoom out, which at first look may appear trivial. Here, we’ll walk you through each step, in detail. Continue reading, and we’ll check your understanding of webcam zoom in and zoom out skills!
Way 1: Zoom with Windows Live Messenger
When utilizing a camera for video conferencing, you may zoom in on a user’s face to get rid of the background. Webcam settings are not accessible by default in Microsoft Windows. However, camera zoom settings may be changed in instant chat systems. Through an instant messaging tool, such as Windows Live Messenger, you may simply access these options. This application provides private offline chat, video messaging, image and video sharing, and video chatting.
Step1Start Windows Live Messenger on your PC or laptop first. Enter your login name and password by clicking the “Sign In” button.
Step2On the top menu bar, pick “Tools.” And then select the “Audio and Video Setup”. Drag the slider next to “Speaker” to modify the speaker volume. Drag the slider next to “Microphone” to modify the microphone sensitivity. Press “Next.”
Step3From the drop-down list, pick the webcam. The “Camera Control” option is situated on the top; pick “Webcam Settings” after that.
Step4Now, to alter the zoom settings, drag the “Zoom” slider. To zoom in or out, drag the slider to the left or right. Press “OK.”
Way 2: Use Windows 10 Camera App
Wondering how to zoom your camera in the Windows 10 Camera app? The Camera app enables you to zoom in or out on your webcam in both image and video modes. To accomplish so, click or push the Magnification button, and then use the slider to modify the webcam’s zoom level. To operate the zoom feature manually, pick “Manual Zoom.” In the preview window, a square appears when you pick this option. To zoom in on a specific region of the capture window, drag the square there. To expand the image that was acquired by the webcam, slide the slider bar. In simply, The Camera app enables you zoom in or out of photographs and movies shot with your webcam. To do this, click on the “Zoom” button and drag the slider to the left or right as appropriate on your Windows 10 camera. the following steps:
Step1To open the “Start Menu,” make a right-click on “Start.” Now, to access the Camera app, type “Camera App” into the start menu’s search box.
Step2Tap the Camera Control icon when you start or join a meeting. To zoom and pan the camera to the appropriate spot, utilize the icons on the Camera Control panel.
![]()
Step3To exit the Camera Control window and return to the Meeting Controls, touch outside of it.
Way 3: Zoom with YouCam
Unfortunately, the default cameras or webcams bundled with the majority of Windows laptops and desktops don’t have an automatic zoom option. In fact, the only method to adjust their crop is to switch from “Standard” to “Widescreen,” which does slightly zoom in on you but not in the manner we’d want. This makes it inescapable that the only method to manually alter a webcam’s magnification is to acquire one separately and apply its software settings. , like YouCam. YouCam provides video calling, streaming, and broadcasting. includes an integrated app. To employ Zoom with YouCam, refer to the methods given below:
Step1Launch the YouCam camera program and activate the webcam.
Step2In the camera preview window, pick Settings. Then, select “Enable Video Zoom” from the menu.
Step3Select “Automatic Face Detection” from the menu. As you wander about in the capture window, the camera watches your face and automatically zooms in on your photo as shown above.
Step4To handle the zoom feature manually, pick “Manual Zoom.” In the preview window, a square appears when you pick this option. To zoom in on a specific region of the capture window, drag the square there. To expand the image that was acquired by the webcam, slide the slider bar.
Way 4: Use iGlasses on Mac
For the perfect webcam look on a MAC, install the Chrome plugin iGlasses for video effects and style tweaks. Your videos will appear better on Zoom as a consequence. You may instantly enhance the appearance of your video interactions by utilizing the digital zoom on your iGlasses. Digital pan, tilt, and zoom are all possible with easy controls. For Macs that support it, an Apple Remote may be used to operate. iGlasses will become an option in Zoom’s video settings when it has been installed. You may improve your camera by altering the settings in iGlasses. You may experiment with a range of amusing effects, like 3-D distortions, using the virtual camera. Let’s learn how to utilize iGlasses on a Mac:
Step1Installing Ecamm’s iGlasses on a MacBook in the first step.
Step2To activate the camera, go to your video settings and pick iGlasses.
Step3Choose the Zoom window and execute the appropriate operations using the Zoom and Flip options. You may now zoom in and out using the camera on your MacBook as you like.
Conclusion
In conclusion, so many people currently take part in online conferences and virtual meetings. You want to create a lasting impression, don’t you? Not or whether you are the host of an online meeting or event, you must now maintain a professional image to prevent turning off attendees. You have discovered how to utilize the tools at your disposal to boost the zoom in and out quality of your camera in this post. However, as will be explained in the sections ahead, you may do it without the third-party plugins. With just one quick plugin, you can significantly transform how you look on a camera. Hence, try out the easy method from the above enlisted ones to get hold on your PC webcam to zoom in or out purposes.
Also read:
- Updated The Craziest 10 AI Editors Youve Ever Seen for 2024
- Updated 2024 Approved How to Slow Down Time-Lapse Videos on iPhone
- Read Through This Post to Know What Frame Rate Is, the Different Variations, and Why 60FPS Is Superior. Also, Know the Tools Available to Make the Conversion for 2024
- Updated 2024 Approved Benefits of Live Streaming on YouTube
- 8 Unexpected Ways to Add Emoji to Photo Online for 2024
- New In 2024, Do You Know Anything About the Video Format Supported by WhatsApp? If Not, Then This Is the Right Time to Learn About WhatsApp-Supported Video Formats
- Updated In 2024, 4 Solutions to Crop a Video on Android Easily
- 2024 Approved Can You Enhance Your Drone Footage with Cinematic Drone LUTs? This Article Discusses Top Drone LUTs Recommendations to Simplify Video Editing
- 2024 Approved Ultimate Guide on Magic Effects Video Making
- Are You Curious About Finding a Good iPhone Slow-Motion App? Discover the Top-Rated Applications in the Market that Will Help You Create the Perfect Video for 2024
- New 2024 Approved How to Create Educational Teaching Videos in An Outstanding Way?
- 2024 Approved Planning and Storyboarding Is the Most Important Part of Creating a Music Video. Here Are some Easy Tips for Planning and Storyboarding a Music Video in Filmora
- In 2024, 8 Top Premiere Pro Slideshow Templates
- Updated In 2024, Best 20 Slideshow Makers for Win/Mac/Online Review
- Updated Is Augmented Reality Conferencing the Future of Workplace Collaboration for 2024
- 5 Solutions For Poco F5 5G Unlock Without Password
- 7 Solutions to Fix Error Code 963 on Google Play Of Nokia 105 Classic | Dr.fone
- How To Fix iPhone 12 Unavailable Issue With Ease | Dr.fone
- Reasons for Tecno Spark 10C Stuck on Boot Screen and Ways To Fix Them | Dr.fone
- In 2024, 9 Best Free Android Monitoring Apps to Monitor Phone Remotely For your Realme Note 50 | Dr.fone
- The way to get back lost music from P55+
- Remove Device Supervision From your iPhone 7 Plus | Dr.fone
- The Ultimate Guide to Unlocking Apple Watch Or iPhone 6 from iCloud
- In 2024, Is pgsharp legal when you are playing pokemon On Vivo S18 Pro? | Dr.fone
- In 2024, 15 Best Strongest Pokémon To Use in Pokémon GO PvP Leagues For Samsung Galaxy S24 Ultra | Dr.fone
- Title: In 2024, How to Remove Audio From Video on Mac? Free and Official Solutions
- Author: Chloe
- Created at : 2024-04-24 07:08:12
- Updated at : 2024-04-25 07:08:12
- Link: https://ai-editing-video.techidaily.com/in-2024-how-to-remove-audio-from-video-on-mac-free-and-official-solutions/
- License: This work is licensed under CC BY-NC-SA 4.0.
