
:max_bytes(150000):strip_icc():format(webp)/sofya-NomETWcv2Fo-unsplash-be3fc2855a7e477db0273993fd22e822.jpg)
In 2024, How to Use Visual Effect for Zoom
How to Use Visual Effect for Zoom
Zoom, a video calling software, has been quite popular over the last several months and is still one of the most used videos calling applications by millions of people worldwide. The site is a favorite among working professionals, but it is also utilized by individuals to connect with their friends and loved ones. Additionally, despite the app’s abundance of practical built-in tools and functions, it lacks the fun filters and special effects that the majority of users are used to when using a camera. Zoom has ingrained itself in our vocabulary during the last year. It seemed almost inevitable given that everything, from meetings to parties, has moved online.
You don’t need to seek farther than Zoom visual effects to inject a little jazz into the routine Zoom meetings during these hard times. By making adjustments to your Video configuration either before or during a video call, you may add visual effects in Zoom. Zoom meetings may be tedious to conduct over extended periods of time. Additionally, it would be helpful if you recorded the condition of your room before any Zoom meetings. You wouldn’t want to reveal your disorganized space while in a meeting. In these situations, adding visual effects will keep your private area private while also making your Zoom meetings entertaining and exciting. It will also prevent others from seeing your filthy room. This tutorial will walk you through the process of adding visual effects to Zoom step-by-step. In addition, you will get acquainted with the numerous camera functions and visual effects that you may employ during a Zoom video conversation.
- 1. What apps can add visual effect on Zoom?
- 2. How do I add visual effects to Zoom in Mobile?
- 3. How do you download Zoom effects?
Part 1: Popular Visual Effects you can add to Zoom
You may apply one of four main graphic effects to your Zoom meetings. The visual effects that you may use in your next Zoom video chat are briefly summarized below.
1. Visual Backgrounds
Virtual backdrops may transform any plain wall into an artistic setting. Zoom provides you the choice to add photographs to your backdrop in addition to offering you a few pre-made backdrops. Zoom lets you add a movie to your backdrop in addition to simply photographs. With the help of this imaginative feature, gather your pals and enjoy your favorite meme or video. A presentation’s collection of photos, a video, or a single image may all serve as virtual backdrops. A green screen would often be used as your real backdrop and consistent lighting would be required.
To avoid having to reveal your real surroundings while in a conference, you may add any picture or video as a virtual backdrop in Zoom. You have the option of adding own photos and movies or selecting from the pre-existing backdrop films and images. The file type for video backgrounds should be MP4 or MOV, and the resolution should range from 360p to a maximum of 1080p. Ensure that the mirroring of your video is deselected in the Zoom’s Video settings if your backdrop picture has text that may be read. By using virtual backdrops, you may alter the background of your video as it appears to the audience member with whom you are speaking. During the video conference you’re in, the other participants will be able to view your face and body overlaid on the backdrop of your choice.
2. Filters
With these filters, you can have fun in all of your Zoom meetings! Filters are a fun way to spend time with loved ones who are far away, particularly at a period when maintaining social distance is crucial. Filters are the modifications you make to yourself during Zoom meetings (such as a mustache, beard, etc.). They enliven the proceedings and contribute to the fun and memorability of your Zoom meetings.
Your films’ colors may be changed, and video filters can also add new aspects. By selecting a filter appropriate for each event, like team meetings or game nights, you may create the right atmosphere. You may embellish your face in the video with flowers or animal traits by using Zoom’s various filters. Alternately, you might just convert your video’s color to black and white. The video filters from a different program, however, allow you to apply more vibrant filters and place a greater emphasis on special effects.
3. Lighting and Touch-ups
The Lighting function enhances lighting effects and makes adjustments for low light situations to make you seem more professional during a Zoom conference. Similar to this, Touch-up enhances your facial characteristics by making your skin shine, erasing wrinkles, and giving your face a radiant appearance.
On your Zoom videos, changing your lighting and applying touch-ups may improve how you seem. By adjusting your lighting, you can make even dim illumination look bright. By doing touch-ups, you may get a smoother skin texture and get rid of any obvious imperfections.
4. Studio Effects
Zoom has been developing on a new feature called Studio Effects that would give customers the option of using virtual cosmetics in their movies. They are still checking it out before formally releasing it since it is still in beta. However, it is still available to users under the Backgrounds & Filters area. You may adjust the opacity as you like. You have the option to choose a new color or one of the predefined colors. Additionally, you may decide to employ the face effects in all of your next meetings, albeit doing so might be problematic if you use Zoom for business. Don’t worry if you’re running late. Zoom can give your face a natural-looking cosmetic makeover in only one minute!
This function is intended for less formal settings, such as gatherings of friends or family. Anyone who wants to seem more professional during meetings has access to Studio Effects, which offers the choice of various eyebrow colors, beards, and lipsticks. These are a few recently added features. You may add mustaches, beards, and brows in a variety of designs, hues, and intensities. Additionally, you have the option of coloring your lips.
Part 2: How to Add Visual Effects to Zoom
Along with facilitating online meetings, the Zoom program also lets you play with its visual effects. You just need to make a few adjustments to the video settings or utilize another third-party program to be ready to go.
Step1Start a Zoom meeting
You can download Zoom, install it on your computer, and log into your account if you don’t already have it if you don’t already have it.
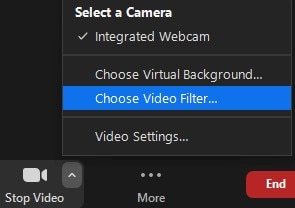
Step2Tap Background and Filters
After logging in to Zoom, use these settings. - Options > Camera > Video

Step3Faucet Filters
Here, you may play with a variety of visual effects and customize them to suit your tastes. Pick one of the numerous filters that are offered. To activate the filter, tap it.
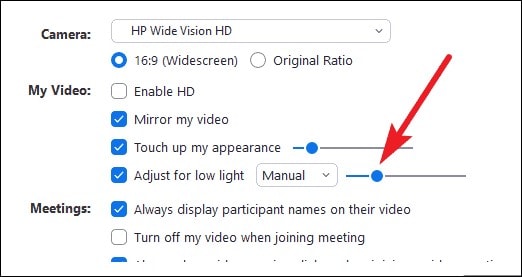
Step4Set Lighting Effects to on
Select “Adjust for low light” in the video options. For your lighting, you may choose between Auto and Manual effects. Zoom will automatically detect and adapt for the lighting in your room if you choose Auto.
Use Zoom’s noise reduction option to keep your conversation focused during your video conference in addition to adding visual elements. To do this, go to “Audio Settings” and choose “High” under “Suppress background noise.” Once you start speaking during the video conference, this essentially cancels out any background noise.
Part 3: Related FAQs
1. What apps can add visual effect on Zoom?
Following is the list of top three apps that you can use to utilize visual effects Zoom application:
Snap Camera is regarded as the most user-friendly. It is a software that you can download for Windows or Mac that works with live broadcasts and video chats. Because it was created by the people who founded Snapchat, it shares a broad variety of filters with that platform.
Link: Snap Camera
The Mac is the only platform on which CamTwist may be used. You may also use it to give your movies additional filters and unique effects. This program lets you pick from a variety of pre-made effects while also allowing you to create your own.
Link: CamTwist
Another desktop application that lets you change and even blur your backdrop is ManyCam. It enables you to apply digital effects, filters, and 3-D masks to your face. Using this tool, you can also build layers and presets.
Link: ManyCam
2. How do I add visual effects to Zoom in Mobile?
Zoom includes a function that might be useful if you don’t want to tidy up or want to add some entertainment to your calls. You may utilize Zoom virtual backdrops to alter your surroundings and take you to a more pleasant location on both the desktop and mobile apps. After joining one on a mobile device, pick Virtual backdrop by tapping the More icon in the bottom right corner. Choose a photo from the list of choices, or click the plus sign (+) to add a photo or video from your gallery.
3. How do you download Zoom effects?
Pressing the Studio Effects button after installing Zoom for the first time will prompt a pop-up asking you to download the Studio Effects package. Several filters, suited for both business meetings and conversations with friends, let you customize the video and audio during your video calls. To start downloading the Effects bundle, click the Download button. The “Studio Effects” window will appear on the right-hand side of the Background & Filter page after the download is finished. All the face components and choices are available in this Studio Effects window.
Conclusion
The most popular video meeting tool worldwide is Zoom. Family, friends, coworkers, and any two people who want to video chat utilize it. Zoom visual effects are the ideal tool for injecting some humor into otherwise dull Zoom sessions and meetings. A few simple steps will get you a striking backdrop, a humorous filter, and some interesting effects. Since the majority of formal work is now completed from home, Zoom has taken over as the standard video conferencing program. Try out as many of the effects as you like, and use this page as a companion and a map to help you along the way.
- 1. What apps can add visual effect on Zoom?
- 2. How do I add visual effects to Zoom in Mobile?
- 3. How do you download Zoom effects?
Part 1: Popular Visual Effects you can add to Zoom
You may apply one of four main graphic effects to your Zoom meetings. The visual effects that you may use in your next Zoom video chat are briefly summarized below.
1. Visual Backgrounds
Virtual backdrops may transform any plain wall into an artistic setting. Zoom provides you the choice to add photographs to your backdrop in addition to offering you a few pre-made backdrops. Zoom lets you add a movie to your backdrop in addition to simply photographs. With the help of this imaginative feature, gather your pals and enjoy your favorite meme or video. A presentation’s collection of photos, a video, or a single image may all serve as virtual backdrops. A green screen would often be used as your real backdrop and consistent lighting would be required.
To avoid having to reveal your real surroundings while in a conference, you may add any picture or video as a virtual backdrop in Zoom. You have the option of adding own photos and movies or selecting from the pre-existing backdrop films and images. The file type for video backgrounds should be MP4 or MOV, and the resolution should range from 360p to a maximum of 1080p. Ensure that the mirroring of your video is deselected in the Zoom’s Video settings if your backdrop picture has text that may be read. By using virtual backdrops, you may alter the background of your video as it appears to the audience member with whom you are speaking. During the video conference you’re in, the other participants will be able to view your face and body overlaid on the backdrop of your choice.
2. Filters
With these filters, you can have fun in all of your Zoom meetings! Filters are a fun way to spend time with loved ones who are far away, particularly at a period when maintaining social distance is crucial. Filters are the modifications you make to yourself during Zoom meetings (such as a mustache, beard, etc.). They enliven the proceedings and contribute to the fun and memorability of your Zoom meetings.
Your films’ colors may be changed, and video filters can also add new aspects. By selecting a filter appropriate for each event, like team meetings or game nights, you may create the right atmosphere. You may embellish your face in the video with flowers or animal traits by using Zoom’s various filters. Alternately, you might just convert your video’s color to black and white. The video filters from a different program, however, allow you to apply more vibrant filters and place a greater emphasis on special effects.
3. Lighting and Touch-ups
The Lighting function enhances lighting effects and makes adjustments for low light situations to make you seem more professional during a Zoom conference. Similar to this, Touch-up enhances your facial characteristics by making your skin shine, erasing wrinkles, and giving your face a radiant appearance.
On your Zoom videos, changing your lighting and applying touch-ups may improve how you seem. By adjusting your lighting, you can make even dim illumination look bright. By doing touch-ups, you may get a smoother skin texture and get rid of any obvious imperfections.
4. Studio Effects
Zoom has been developing on a new feature called Studio Effects that would give customers the option of using virtual cosmetics in their movies. They are still checking it out before formally releasing it since it is still in beta. However, it is still available to users under the Backgrounds & Filters area. You may adjust the opacity as you like. You have the option to choose a new color or one of the predefined colors. Additionally, you may decide to employ the face effects in all of your next meetings, albeit doing so might be problematic if you use Zoom for business. Don’t worry if you’re running late. Zoom can give your face a natural-looking cosmetic makeover in only one minute!
This function is intended for less formal settings, such as gatherings of friends or family. Anyone who wants to seem more professional during meetings has access to Studio Effects, which offers the choice of various eyebrow colors, beards, and lipsticks. These are a few recently added features. You may add mustaches, beards, and brows in a variety of designs, hues, and intensities. Additionally, you have the option of coloring your lips.
Part 2: How to Add Visual Effects to Zoom
Along with facilitating online meetings, the Zoom program also lets you play with its visual effects. You just need to make a few adjustments to the video settings or utilize another third-party program to be ready to go.
Step1Start a Zoom meeting
You can download Zoom, install it on your computer, and log into your account if you don’t already have it if you don’t already have it.
Step2Tap Background and Filters
After logging in to Zoom, use these settings. - Options > Camera > Video
Step3Faucet Filters
Here, you may play with a variety of visual effects and customize them to suit your tastes. Pick one of the numerous filters that are offered. To activate the filter, tap it.
Step4Set Lighting Effects to on
Select “Adjust for low light” in the video options. For your lighting, you may choose between Auto and Manual effects. Zoom will automatically detect and adapt for the lighting in your room if you choose Auto.
Use Zoom’s noise reduction option to keep your conversation focused during your video conference in addition to adding visual elements. To do this, go to “Audio Settings” and choose “High” under “Suppress background noise.” Once you start speaking during the video conference, this essentially cancels out any background noise.
Part 3: Related FAQs
1. What apps can add visual effect on Zoom?
Following is the list of top three apps that you can use to utilize visual effects Zoom application:
Snap Camera is regarded as the most user-friendly. It is a software that you can download for Windows or Mac that works with live broadcasts and video chats. Because it was created by the people who founded Snapchat, it shares a broad variety of filters with that platform.
Link: Snap Camera
The Mac is the only platform on which CamTwist may be used. You may also use it to give your movies additional filters and unique effects. This program lets you pick from a variety of pre-made effects while also allowing you to create your own.
Link: CamTwist
Another desktop application that lets you change and even blur your backdrop is ManyCam. It enables you to apply digital effects, filters, and 3-D masks to your face. Using this tool, you can also build layers and presets.
Link: ManyCam
2. How do I add visual effects to Zoom in Mobile?
Zoom includes a function that might be useful if you don’t want to tidy up or want to add some entertainment to your calls. You may utilize Zoom virtual backdrops to alter your surroundings and take you to a more pleasant location on both the desktop and mobile apps. After joining one on a mobile device, pick Virtual backdrop by tapping the More icon in the bottom right corner. Choose a photo from the list of choices, or click the plus sign (+) to add a photo or video from your gallery.
3. How do you download Zoom effects?
Pressing the Studio Effects button after installing Zoom for the first time will prompt a pop-up asking you to download the Studio Effects package. Several filters, suited for both business meetings and conversations with friends, let you customize the video and audio during your video calls. To start downloading the Effects bundle, click the Download button. The “Studio Effects” window will appear on the right-hand side of the Background & Filter page after the download is finished. All the face components and choices are available in this Studio Effects window.
Conclusion
The most popular video meeting tool worldwide is Zoom. Family, friends, coworkers, and any two people who want to video chat utilize it. Zoom visual effects are the ideal tool for injecting some humor into otherwise dull Zoom sessions and meetings. A few simple steps will get you a striking backdrop, a humorous filter, and some interesting effects. Since the majority of formal work is now completed from home, Zoom has taken over as the standard video conferencing program. Try out as many of the effects as you like, and use this page as a companion and a map to help you along the way.
How to Make Random Letter Reveal Intro?
The introductions in the video can create a major feel for the rest of the video in the viewers’ minds. So, most film and video makers focus on developing different styles of appealing and visually vibrant intro title formats for their projects.
Currently, one of the unique types of title format that is popular today among Youtubers and filmmakers is the style of random letters appearing on screen until the main title forms.

Wondering how to have the same effect for your video? This process will work easily with certain software tools, the most user-friendly and simple being the Wondershare Filmora software. Let’s understand the steps that go into this process here.
1. Launch Filmora on your Device
On Filmora’s official website, you can get the latest software version when you click on the Download button at the top or in the description box. After you do so, the free software will download automatically into your device in an installer format.
Free Download For Win 7 or later(64-bit)
Free Download For macOS 10.14 or later
From the Downloads section of your browser, double-click on it and press the Install button when it appears. Give the necessary permissions that it prompts.

Then, the software will start the installation instantly, likely taking a few seconds to complete.
2. Add the Default Title and Edit its Font
After Filmora launches, click on the “Create New Project” button on the homepage of the editor. Then, click on the Title tab from the top toolbar and choose the default title available here. Drag it and drop it onto the editing timeline below on Track 1.
Double-click on the title on the timeline, which will open the text editing window. Under the Text’s Preset tab, you will find the parameters for changing the main fault. Adjust the font style to the Impact style (or any bold title style you prefer), and click on the text field to add your custom title.
Following that, click on the text size option and change it to 15. Scroll down the menu to the Text Spacing section. Change the value to 20 and tap on the OK button afterward.

3. Split the title
On the editing timeline, tap on the Track 1 clip and click on the Snapshot icon at the far right side of the toolbar just above the timeline. This will automatically save in the media library section.
Then, take hold of the playhead on the timeline at the 3rd frame mark. Then, tap on the Scissor icon on the play head, which will split the clip into two portions. Click on the part following the 3rd frame mark and delete it.

4. Copy the clipped section multiple times
Then, double-click on the amount still available on the timeline to open the title editor section again. Make changes to the title you added here, only keeping the first letter.
Click on this clipped section on the timeline and copy it. Next, keep copying this clip multiple times continuously until the length of the collection on Track 1 to the 5-second mark.
Following that, zoom in on the timeline for a better view of these clipped parts. Choose the last clip that you copied and drag it to expand its time duration to the 6:15 mark.

5. Change the character of each clip
After making the previous edits, use your cursor to move to the first part of the timeline instead of zooming outward. Tap on the first clip that you had edited and double-click on it. In the text editing window, change the character to another random alphabet.

Repeat the same for all the split parts following the first one, changing the character to any random alphabet. At this time, ensure that you do not make two consecutive letters have the same alphabet, as that will put off the effect. However, keep the last elongated clip the same character as you originally put it.
6. Export the first letter clip
Then, please tap on the Export button at the top of the screen and add a name, like the first letter of your title. Click on the Settings button on this page to adjust the resolution and quality of the clip to the highest resolution for the best results.
Press Export again to save it to your device.
7. Edit the second letter clip and so on
After exporting the first file that will ultimately become the first letter of your random letter reveal intro title, you have to make the second letter-related clip.
For this, tap on the last clip on the timeline and double-click on it. Change the text in this clip to the second letter of your title. After doing this, go back to the first clip of your collection and double-click on it after selling it. Tap on the text field and give it another random letter.

Like with the first clip, continue doing this step for all of the next clips, except for the final clip. Then, export it in the same manner as the first clip.
Now that you know how to edit the first and second letters in sequence, repeat this process for all of the letters of your title to create a full clip for all of the intro title letters. When you are done, please select these clips and press the Delete button to remove them from the timeline.

8. Add all clips back to Filmora
Now it’s time to add all of the clips to Filmora and merge them into one cohesive intro title.
For this, click on My Media and go to Project Media. Right-click on the library section and press the Import button. This will take you to your device storage. Find the location where you saved all cut clips, and select them all. Press the Open button, and all of them will import into Filmora.

9. Drag the Snapshot to Timeline
Tap on the Snapshot you saved earlier sitting on the media library and drag it onto the Track 1 of the editing timeline. Double-click on it to open the video editing window.
Click on the Opacity option in the Video editing section and change it to 20%. Press the OK button after that.

10. Drop the Clip into the Timeline
Select the first letter clip from the media library section and drag it onto the timeline. Drop it above the Snapshot in Track 2 part. Then, choose the first Snapshot clip and increase its duration to the 8-second mark.
Next, double-click on the first letter clip on the Track 2 section to open its editing window. Click on the Blending Mode option and choose Screen from the drop-down menu.

Then, right-click on the first letter clip in the timeline and choose the Copy Effects option from the next drop-down menu. Move the playhead to the ending position on the timeline and change the value on the relevant axis of Position until it matches its letter position on the original title.
See the preview playing on the side for a better reference while adjusting the position.
11. Drop the next clips
Following this, click on the second letter clip and drag and drop it onto Track 3 on the timeline. Make sure to move the playhead to mark the starting position of this letter at the 5th frame mark.
Tap on this clip and move your playhead to the end position. Then, right-click on it and choose the Paste Effects option. Double-click on this clip on the timeline and change the position axis value until the letter aligns with its original position per the snapshot. Again, look at the Preview to ensure you align them correctly.

Repeat this with all the other letters, making sure to change the starting position for each consecutive one-two frame forward.
12. Hide and elongate each clip with snapshots
Then, click on the Snapshot clip on Track 1 and delete it. Following that, click the Hide icon on Track 3, Track 4, and onwards till the last one. Then, move the playhead to the end of the Track 2 clip and click on the Snapshot icon.
Choose the saved snapshot in the library window and drag-and-drop it behind Track 2 clip so it continues into it. Double-click on this Snapshot and choose Screen under Blending Mode. Then, right-click on this Snapshot and select “Copy Effects” from the menu.

Then, hide the Track 2 clip, unhide the Track 3 and Track 4 clip, and take a snapshot of that. As you did with Track 1’s screenshot, take this snapshot and place it beside Track 3 clip. Right-click on it and tap on “Paste Effects”. Repeat this one by one for all the clips after unhiding them for their particular step.
13. Finishing touches to Opacity
Finally, unhide all the clips and move the playhead to the 8-second mark. Click on the Scissor icon to Split them all at this position and remove the excess. Then, place the playhead at the beginning of Track 3 and double-click on it. Tap the Animation tab this time and adjust the Opacity to 0. Then, move the playhead ten frames forward and increase the Opacity to 100. Repeat this for all of the steps.

14. Preview and Export
After everything, tap on the Render Preview icon. Make sure to move the second clip on Track 2 as the starting point of the video by moving it to the beginning position. Now, press the Play button under the Preview player.

Conclusion
Finally, you are ready to use the same tactics as explained to optimize the quality and style of your video introduction title. Besides this, you can utilize other preset title options on video projects via Filmora. Try out multiple options and practice this particular approach on different video projects. Then, prepare stunning, visually captivating movies, vlogs, and documentaries quickly.
Free Download For macOS 10.14 or later
From the Downloads section of your browser, double-click on it and press the Install button when it appears. Give the necessary permissions that it prompts.
Then, the software will start the installation instantly, likely taking a few seconds to complete.
2. Add the Default Title and Edit its Font
After Filmora launches, click on the “Create New Project” button on the homepage of the editor. Then, click on the Title tab from the top toolbar and choose the default title available here. Drag it and drop it onto the editing timeline below on Track 1.
Double-click on the title on the timeline, which will open the text editing window. Under the Text’s Preset tab, you will find the parameters for changing the main fault. Adjust the font style to the Impact style (or any bold title style you prefer), and click on the text field to add your custom title.
Following that, click on the text size option and change it to 15. Scroll down the menu to the Text Spacing section. Change the value to 20 and tap on the OK button afterward.
3. Split the title
On the editing timeline, tap on the Track 1 clip and click on the Snapshot icon at the far right side of the toolbar just above the timeline. This will automatically save in the media library section.
Then, take hold of the playhead on the timeline at the 3rd frame mark. Then, tap on the Scissor icon on the play head, which will split the clip into two portions. Click on the part following the 3rd frame mark and delete it.
4. Copy the clipped section multiple times
Then, double-click on the amount still available on the timeline to open the title editor section again. Make changes to the title you added here, only keeping the first letter.
Click on this clipped section on the timeline and copy it. Next, keep copying this clip multiple times continuously until the length of the collection on Track 1 to the 5-second mark.
Following that, zoom in on the timeline for a better view of these clipped parts. Choose the last clip that you copied and drag it to expand its time duration to the 6:15 mark.
5. Change the character of each clip
After making the previous edits, use your cursor to move to the first part of the timeline instead of zooming outward. Tap on the first clip that you had edited and double-click on it. In the text editing window, change the character to another random alphabet.
Repeat the same for all the split parts following the first one, changing the character to any random alphabet. At this time, ensure that you do not make two consecutive letters have the same alphabet, as that will put off the effect. However, keep the last elongated clip the same character as you originally put it.
6. Export the first letter clip
Then, please tap on the Export button at the top of the screen and add a name, like the first letter of your title. Click on the Settings button on this page to adjust the resolution and quality of the clip to the highest resolution for the best results.
Press Export again to save it to your device.
7. Edit the second letter clip and so on
After exporting the first file that will ultimately become the first letter of your random letter reveal intro title, you have to make the second letter-related clip.
For this, tap on the last clip on the timeline and double-click on it. Change the text in this clip to the second letter of your title. After doing this, go back to the first clip of your collection and double-click on it after selling it. Tap on the text field and give it another random letter.
Like with the first clip, continue doing this step for all of the next clips, except for the final clip. Then, export it in the same manner as the first clip.
Now that you know how to edit the first and second letters in sequence, repeat this process for all of the letters of your title to create a full clip for all of the intro title letters. When you are done, please select these clips and press the Delete button to remove them from the timeline.
8. Add all clips back to Filmora
Now it’s time to add all of the clips to Filmora and merge them into one cohesive intro title.
For this, click on My Media and go to Project Media. Right-click on the library section and press the Import button. This will take you to your device storage. Find the location where you saved all cut clips, and select them all. Press the Open button, and all of them will import into Filmora.
9. Drag the Snapshot to Timeline
Tap on the Snapshot you saved earlier sitting on the media library and drag it onto the Track 1 of the editing timeline. Double-click on it to open the video editing window.
Click on the Opacity option in the Video editing section and change it to 20%. Press the OK button after that.
10. Drop the Clip into the Timeline
Select the first letter clip from the media library section and drag it onto the timeline. Drop it above the Snapshot in Track 2 part. Then, choose the first Snapshot clip and increase its duration to the 8-second mark.
Next, double-click on the first letter clip on the Track 2 section to open its editing window. Click on the Blending Mode option and choose Screen from the drop-down menu.
Then, right-click on the first letter clip in the timeline and choose the Copy Effects option from the next drop-down menu. Move the playhead to the ending position on the timeline and change the value on the relevant axis of Position until it matches its letter position on the original title.
See the preview playing on the side for a better reference while adjusting the position.
11. Drop the next clips
Following this, click on the second letter clip and drag and drop it onto Track 3 on the timeline. Make sure to move the playhead to mark the starting position of this letter at the 5th frame mark.
Tap on this clip and move your playhead to the end position. Then, right-click on it and choose the Paste Effects option. Double-click on this clip on the timeline and change the position axis value until the letter aligns with its original position per the snapshot. Again, look at the Preview to ensure you align them correctly.
Repeat this with all the other letters, making sure to change the starting position for each consecutive one-two frame forward.
12. Hide and elongate each clip with snapshots
Then, click on the Snapshot clip on Track 1 and delete it. Following that, click the Hide icon on Track 3, Track 4, and onwards till the last one. Then, move the playhead to the end of the Track 2 clip and click on the Snapshot icon.
Choose the saved snapshot in the library window and drag-and-drop it behind Track 2 clip so it continues into it. Double-click on this Snapshot and choose Screen under Blending Mode. Then, right-click on this Snapshot and select “Copy Effects” from the menu.
Then, hide the Track 2 clip, unhide the Track 3 and Track 4 clip, and take a snapshot of that. As you did with Track 1’s screenshot, take this snapshot and place it beside Track 3 clip. Right-click on it and tap on “Paste Effects”. Repeat this one by one for all the clips after unhiding them for their particular step.
13. Finishing touches to Opacity
Finally, unhide all the clips and move the playhead to the 8-second mark. Click on the Scissor icon to Split them all at this position and remove the excess. Then, place the playhead at the beginning of Track 3 and double-click on it. Tap the Animation tab this time and adjust the Opacity to 0. Then, move the playhead ten frames forward and increase the Opacity to 100. Repeat this for all of the steps.
14. Preview and Export
After everything, tap on the Render Preview icon. Make sure to move the second clip on Track 2 as the starting point of the video by moving it to the beginning position. Now, press the Play button under the Preview player.
Conclusion
Finally, you are ready to use the same tactics as explained to optimize the quality and style of your video introduction title. Besides this, you can utilize other preset title options on video projects via Filmora. Try out multiple options and practice this particular approach on different video projects. Then, prepare stunning, visually captivating movies, vlogs, and documentaries quickly.
Top 10 Free WhatsApp Video Converter 2023
WhatsApp is one of the most popular apps for global users. It is a simple tool for sending messages and instant videos, and also sharing statuses. However, there is a size limit to sharing video files via WhatsApp. Plus, the app supports only certain types of video file formats.
At this point, using a high-quality WhatsApp video converter is a proper way to go. This article will let you know not only the best software but also web-based tools to convert WhatsApp video in any situation.
Which Video Formats Does WhatsApp Support?
“WhatsApp only allows me to send (a) video of maximum (of) 17 MB size, of duration 2:50 minutes. But my cousin has sent me a video of 35 MB, with (a) 5:40 minutes duration. How has this been possible?”
Indeed, WhatsApp has size and format-related restrictions, like a 16 MB size limit. However, you can access the WhatsApp Web version to share longer videos since it allows a size limit of 64 MB. Alternatively, you can reduce video size for WhatsApp with converter tools to compress, convert, and optimize video files**.**
The Best Video Formats for WhatsApp
This platform only supports specific video codec or format types that suits the pre-set compression standards.
WhatsApp-supported video formats
AVI, MP4, MOV, MKV, FLV audio codec, and 3 GP (/MPEG-4 video codec encoding).
WhatsApp allowed file size
16MB
To make sure that videos transfer safely and smoothly via WhatsApp, make the necessary size and codec conversion.
Best 5 Software to convert video for WhatsApp
Specific WhatsApp video converter types come in software versions for Mac or Windows users. You can download and launch them to use the features without network connection.
WinX HD Video Converter Deluxe
WinX HD Video Converter Deluxe is a user-friendly tool to convert video for WhatsApp, from different formats and devices. You can expect high-quality video output, reaching 4K to 8K resolution. Make necessary video codec and size changes to compress videos fit for WhatsApp-based sharing.

Converting Speed: High.
Compatible Platforms: WhatsApp, YouTube, Facebook, Instagram, Email, etc.
Supported Formats: MP4, GoPro devices, MKV, Drone devices, MOV, MTS, AVI, etc.
Rating: 3.6/5 (Top Ten Reviews)
Main Features:
- Multiple file sizes for conversion.
- Resolution up to 1080p or 4K.
- Change frame rate.
- The open-source platform is fit for Mac and Windows.
Pros
- No significant quality loss during conversions.
- Reduce GB-based sizes to MB.
- Stable compression process.
Cons
- Not for free.
- Limited advanced editor settings.
Filmora
Filmora is a high-quality WhatsApp video converter, it enables you convert any types of videos for WhatsApp, YouTube, also TikTok. Besides, Filmora is best for video editing functions, like cutting, trimming, rotating, compressing, and more. Also, get advanced editing functions like color correction, background removal, audio visualization, etc., before converting files in the WhatsApp-support format of choice.
Free Download For Win 7 or later(64-bit)
Free Download For macOS 10.14 or later

Converting Speed: High.
Compatible Platforms: YouTube, Vimeo, WhatsApp, etc.
Supported Formats: MKV, MP4, MOV, AVI, WMV, F4V, MP3, etc.
Rating: 8/10 (TrustRadius)
Main Features:
- Compress video during output as per file format type.
- Cut the size of the video to reduce the size.
- Advanced editing like background removal.
- High-quality HD resolution.
Pros
- Convert to different formats.
- Adjust the speed of the video.
- Trim file size.
Cons
- Advanced functions like watermark removal are available in premium plans.
- At least 10 GB of disk space is necessary for the device.
Wondershare Uniconverter
This software for Mac and Windows users is useful for converting different file formats into different output files. Here, you can add videos from the device library or cloud storage. Later, make conversion choices like video format type, scale size, etc.

Converting Speed: High
Compatible Platforms: WhatsApp, YouTube, etc.
Supported Formats: MP4 (Standard/4K), MKV, AVI, AVCHD, FLV, MP3, etc.
Rating: 5/5 (GetApp)
Main Features:
- Split screen video support.
- Adjust the frame rate of videos.
- Customize video filters.
- Converts HD and SD files.
Pros
- Video quality remains the same during conversion.
- Compress files to smaller sizes.
- Automated conversion.
Cons
- Advanced features like watermark removal require payment.
- Limited access to cloud storage.
HandBrake
HandBrake is a user-friendly and open-source WhatsApp video converter fit for different devices. You can convert and even edit the video files for other devices and compress the size without quality loss. See a preview before completing the changes.

Converting Speed: Medium-High.
Compatible Platforms: All browser types on Linux, Windows, and Mac devices.
Supported Formats: MKV, MP4 (mainly M4V), and WebM.
Rating: 4/5 (TechRadar)
Main Features:
- Make chapter markers on files.
- Many pre-set video filters are available.
- Live preview of the video before conversion.
- Convert Blu-ray and DVD video files.
Pros
- Open-source platform.
- Batch scanning and encoding files in queues.
- CFR and VFR-based compatibility.
Cons
- No direct conversion of the file to WhatsApp.
- Limited variety in output file format choices.
Freemake Video Converter
Freemake is a top-notch video converter tool that users can try to create and compress different file formats for free. Download the output file in any form and high-resolution quality.

Converting Speed: High.
Compatible Platforms: YouTube, Vimeo, WhatsApp, etc.
Supported Formats: AVI, MP4, WMV, MKV, 3GP, MP3, DVD, FLV, SWF, MOV, Divx, MTS, etc.
Rating: 4.5/5 (TechRadar)
Main Features:
- Supports multiple video codecs like MPEG4, and AV1.
- Batch processing is possible.
- Edit videos by rotation, trimming, etc.
- Encode the videos.
Pros
- No extra cost for conversions.
- Users can convert bigger files as well.
- Supports videos from different devices and online platforms, like Vimeo.
Cons
- Users cannot directly prepare/send WhatsApp videos.
- It is mainly allowed on Windows.
Top 5 Online Video Converter for WhatsApp
Online tools are available that allow users to convert videos to WhatsApp format. The top 5 of them are listed here.
FlexClip
FlexiClip offers an online WhatsApp video converter for free to quickly change file formats into WhatsApp-supported options. In addition, you can use this tool to make other types of conversions like audio and image files.

Converting Speed: Medium-High.
Supported Formats: MOV, MP4, AVI, etc.
Rating: 4.4/5 (TrustPilot)
Main Features:
- Create video for social media marketing.
- Pre-set templates are available.
- Multiple stock images and videos are available.
- Rich-quality overlays and transitions.
Pros
- Dynamic types of vector elements are available.
- 1000+ text-based animations/pre-set styles present.
- High-quality transitions.
Cons
- Registration is vital to export files.
- It is hard to edit pre-saved videos.
Online Converter
This is a free WhatsApp video converter web service for users to change files to suit the WhatsApp platform quickly. In addition, you can decide the resolution of the video for output and even cut files based on timestamps.

Converting Speed: Medium-High.
Supported Formats: AVI, MOV, MP4, etc.
Rating: 3.6/5 (TrustPilot)
Main Features:
- Convert any file suitable for WhatsApp.
- Support cloud-based file insertion.
- Time-based video cutting for editing.
- Enable or disable the background audio track.
Pros
- Convert multiple files at a time.
- Different resolution-based choices are available.
- Add video URL to convert.
Cons
- Limited advanced settings.
- Does not support diverse file formats.
Clideo
Clideo is a suitable WhatsApp video converter that mainly compresses the files to WhatsApp-appropriate sizes. Moreover, you can insert your video file from cloud storage and quickly convert multiple files.

Converting Speed: Medium.
Supported Formats: MP4, AVI, WMV, VOB, MOV, etc.
Rating: 4.8/5 (TrustPilot)
Main Features:
- See preview before conversion.
- Automated file size-reducing parameters.
- Support file sizes upto 500 MB.
- Add a file from any device.
Pros
- Fast processing.
- Encryption-protected files.
- Intuitive interface.
Cons
- The uploading and conversion process can take a long time.
- The watermark is visible.
Kapwing
Kapwing’s online conversion tool can change video files and make them WhatsApp-compatible quickly. Users can customize different aspects of exporting feature, like ratio, video length, and frame rate.

Converting Speed: Very High.
Supported Formats: FLV, WAV, MOV, WMV, MP4, AVI, etc.
Rating: 4.7/5 (TrustPilot)
Main Features:
- Change the file format, type, size, and frame rate.
- Convert to MP4 from different formats.
- Upload by clicking the necessary button on the screen or drag the file and drop.
- Choose aspect ratios like 16:9 or 1:1.
Pros
- AI-powered conversion.
- Online converter tool available for free.
- Convert video to image format as well.
Cons
- A limited variety of formats are supported.
- Registered members can remove watermarks.
Aconvert
This is a speedy WhatsApp video converter that users can try out on any device quickly. It supports a wide range of input and output format options for conversion/compression.

Converting Speed: Medium-High
Supported Formats: Multiple types, like AVI, MKV, MOV, MPEG, PNG, JPG, PDF, etc.
Rating: 100/100 (Scam Detector)
Main Features:
- Add at least files for converting.
- Insert files from computers, tablets, or mobile phones.
- Size and status information is visible during conversion.
- The original file size cannot extend beyond 40 MB in size.
Pros
- Multiple types of formats are supported, like images, videos, ebooks, etc.
- No installation or registration is necessary.
- Batch conversion is allowed.
Cons
- Not available in some regions.
- The speed is standard-level.
Hot FAQs on Converting Videos for WhatsApp
1. How can I send a 10-minute video on WhatsApp?
Users can directly send videos with 10-minute-length via WhatsApp if the file size is 16 MB or lower. Otherwise, you can compress the file using a video converter for WhatsApp. Alternatively, you can upload your file into your Cloud account and copy the link to send.
2. How to convert YouTube videos to WhatsApp?
You can directly copy the YouTube-based video link below the Share button on its page, paste it into the chat, and send it. Alternatively, you can use a reliable converter tool to download YouTube videos in one of the supported video formats (e.g., MP4). Then, share them via WhatsApp chat.
3. How to Send Videos on WhatsApp Without Compressing?
WhatsApp compresses the video files automatically when users insert and send them via the Gallery icon within chats. However, you can avoid reducing video quality or compressing them if you send it by clicking on the Document icon > My Media Files/whichever folder the file is in.
Final Words
Overall, multiple online and software-based tools help convert video files to suit WhatsApp-based restrictions. Among them, Filmora is all-in-one software to cut and edit videos for sharing correctly. For online-based conversion, Kapwing is a usable alternative, in our opinion. To make your choice, though, go through all options carefully.
- WinX HD Video Converter Deluxe
- Filmora
- Wondershare Uniconverter
- HandBrake
- Freemake Video Converter
- Top 5 Online Video Converter for WhatsApp
Which Video Formats Does WhatsApp Support?
“WhatsApp only allows me to send (a) video of maximum (of) 17 MB size, of duration 2:50 minutes. But my cousin has sent me a video of 35 MB, with (a) 5:40 minutes duration. How has this been possible?”
Indeed, WhatsApp has size and format-related restrictions, like a 16 MB size limit. However, you can access the WhatsApp Web version to share longer videos since it allows a size limit of 64 MB. Alternatively, you can reduce video size for WhatsApp with converter tools to compress, convert, and optimize video files**.**
The Best Video Formats for WhatsApp
This platform only supports specific video codec or format types that suits the pre-set compression standards.
WhatsApp-supported video formats
AVI, MP4, MOV, MKV, FLV audio codec, and 3 GP (/MPEG-4 video codec encoding).
WhatsApp allowed file size
16MB
To make sure that videos transfer safely and smoothly via WhatsApp, make the necessary size and codec conversion.
Best 5 Software to convert video for WhatsApp
Specific WhatsApp video converter types come in software versions for Mac or Windows users. You can download and launch them to use the features without network connection.
WinX HD Video Converter Deluxe
WinX HD Video Converter Deluxe is a user-friendly tool to convert video for WhatsApp, from different formats and devices. You can expect high-quality video output, reaching 4K to 8K resolution. Make necessary video codec and size changes to compress videos fit for WhatsApp-based sharing.
Converting Speed: High.
Compatible Platforms: WhatsApp, YouTube, Facebook, Instagram, Email, etc.
Supported Formats: MP4, GoPro devices, MKV, Drone devices, MOV, MTS, AVI, etc.
Rating: 3.6/5 (Top Ten Reviews)
Main Features:
- Multiple file sizes for conversion.
- Resolution up to 1080p or 4K.
- Change frame rate.
- The open-source platform is fit for Mac and Windows.
Pros
- No significant quality loss during conversions.
- Reduce GB-based sizes to MB.
- Stable compression process.
Cons
- Not for free.
- Limited advanced editor settings.
Filmora
Filmora is a high-quality WhatsApp video converter, it enables you convert any types of videos for WhatsApp, YouTube, also TikTok. Besides, Filmora is best for video editing functions, like cutting, trimming, rotating, compressing, and more. Also, get advanced editing functions like color correction, background removal, audio visualization, etc., before converting files in the WhatsApp-support format of choice.
Free Download For Win 7 or later(64-bit)
Free Download For macOS 10.14 or later
Converting Speed: High.
Compatible Platforms: YouTube, Vimeo, WhatsApp, etc.
Supported Formats: MKV, MP4, MOV, AVI, WMV, F4V, MP3, etc.
Rating: 8/10 (TrustRadius)
Main Features:
- Compress video during output as per file format type.
- Cut the size of the video to reduce the size.
- Advanced editing like background removal.
- High-quality HD resolution.
Pros
- Convert to different formats.
- Adjust the speed of the video.
- Trim file size.
Cons
- Advanced functions like watermark removal are available in premium plans.
- At least 10 GB of disk space is necessary for the device.
Wondershare Uniconverter
This software for Mac and Windows users is useful for converting different file formats into different output files. Here, you can add videos from the device library or cloud storage. Later, make conversion choices like video format type, scale size, etc.
Converting Speed: High
Compatible Platforms: WhatsApp, YouTube, etc.
Supported Formats: MP4 (Standard/4K), MKV, AVI, AVCHD, FLV, MP3, etc.
Rating: 5/5 (GetApp)
Main Features:
- Split screen video support.
- Adjust the frame rate of videos.
- Customize video filters.
- Converts HD and SD files.
Pros
- Video quality remains the same during conversion.
- Compress files to smaller sizes.
- Automated conversion.
Cons
- Advanced features like watermark removal require payment.
- Limited access to cloud storage.
HandBrake
HandBrake is a user-friendly and open-source WhatsApp video converter fit for different devices. You can convert and even edit the video files for other devices and compress the size without quality loss. See a preview before completing the changes.
Converting Speed: Medium-High.
Compatible Platforms: All browser types on Linux, Windows, and Mac devices.
Supported Formats: MKV, MP4 (mainly M4V), and WebM.
Rating: 4/5 (TechRadar)
Main Features:
- Make chapter markers on files.
- Many pre-set video filters are available.
- Live preview of the video before conversion.
- Convert Blu-ray and DVD video files.
Pros
- Open-source platform.
- Batch scanning and encoding files in queues.
- CFR and VFR-based compatibility.
Cons
- No direct conversion of the file to WhatsApp.
- Limited variety in output file format choices.
Freemake Video Converter
Freemake is a top-notch video converter tool that users can try to create and compress different file formats for free. Download the output file in any form and high-resolution quality.
Converting Speed: High.
Compatible Platforms: YouTube, Vimeo, WhatsApp, etc.
Supported Formats: AVI, MP4, WMV, MKV, 3GP, MP3, DVD, FLV, SWF, MOV, Divx, MTS, etc.
Rating: 4.5/5 (TechRadar)
Main Features:
- Supports multiple video codecs like MPEG4, and AV1.
- Batch processing is possible.
- Edit videos by rotation, trimming, etc.
- Encode the videos.
Pros
- No extra cost for conversions.
- Users can convert bigger files as well.
- Supports videos from different devices and online platforms, like Vimeo.
Cons
- Users cannot directly prepare/send WhatsApp videos.
- It is mainly allowed on Windows.
Top 5 Online Video Converter for WhatsApp
Online tools are available that allow users to convert videos to WhatsApp format. The top 5 of them are listed here.
FlexClip
FlexiClip offers an online WhatsApp video converter for free to quickly change file formats into WhatsApp-supported options. In addition, you can use this tool to make other types of conversions like audio and image files.
Converting Speed: Medium-High.
Supported Formats: MOV, MP4, AVI, etc.
Rating: 4.4/5 (TrustPilot)
Main Features:
- Create video for social media marketing.
- Pre-set templates are available.
- Multiple stock images and videos are available.
- Rich-quality overlays and transitions.
Pros
- Dynamic types of vector elements are available.
- 1000+ text-based animations/pre-set styles present.
- High-quality transitions.
Cons
- Registration is vital to export files.
- It is hard to edit pre-saved videos.
Online Converter
This is a free WhatsApp video converter web service for users to change files to suit the WhatsApp platform quickly. In addition, you can decide the resolution of the video for output and even cut files based on timestamps.
Converting Speed: Medium-High.
Supported Formats: AVI, MOV, MP4, etc.
Rating: 3.6/5 (TrustPilot)
Main Features:
- Convert any file suitable for WhatsApp.
- Support cloud-based file insertion.
- Time-based video cutting for editing.
- Enable or disable the background audio track.
Pros
- Convert multiple files at a time.
- Different resolution-based choices are available.
- Add video URL to convert.
Cons
- Limited advanced settings.
- Does not support diverse file formats.
Clideo
Clideo is a suitable WhatsApp video converter that mainly compresses the files to WhatsApp-appropriate sizes. Moreover, you can insert your video file from cloud storage and quickly convert multiple files.
Converting Speed: Medium.
Supported Formats: MP4, AVI, WMV, VOB, MOV, etc.
Rating: 4.8/5 (TrustPilot)
Main Features:
- See preview before conversion.
- Automated file size-reducing parameters.
- Support file sizes upto 500 MB.
- Add a file from any device.
Pros
- Fast processing.
- Encryption-protected files.
- Intuitive interface.
Cons
- The uploading and conversion process can take a long time.
- The watermark is visible.
Kapwing
Kapwing’s online conversion tool can change video files and make them WhatsApp-compatible quickly. Users can customize different aspects of exporting feature, like ratio, video length, and frame rate.
Converting Speed: Very High.
Supported Formats: FLV, WAV, MOV, WMV, MP4, AVI, etc.
Rating: 4.7/5 (TrustPilot)
Main Features:
- Change the file format, type, size, and frame rate.
- Convert to MP4 from different formats.
- Upload by clicking the necessary button on the screen or drag the file and drop.
- Choose aspect ratios like 16:9 or 1:1.
Pros
- AI-powered conversion.
- Online converter tool available for free.
- Convert video to image format as well.
Cons
- A limited variety of formats are supported.
- Registered members can remove watermarks.
Aconvert
This is a speedy WhatsApp video converter that users can try out on any device quickly. It supports a wide range of input and output format options for conversion/compression.
Converting Speed: Medium-High
Supported Formats: Multiple types, like AVI, MKV, MOV, MPEG, PNG, JPG, PDF, etc.
Rating: 100/100 (Scam Detector)
Main Features:
- Add at least files for converting.
- Insert files from computers, tablets, or mobile phones.
- Size and status information is visible during conversion.
- The original file size cannot extend beyond 40 MB in size.
Pros
- Multiple types of formats are supported, like images, videos, ebooks, etc.
- No installation or registration is necessary.
- Batch conversion is allowed.
Cons
- Not available in some regions.
- The speed is standard-level.
Hot FAQs on Converting Videos for WhatsApp
1. How can I send a 10-minute video on WhatsApp?
Users can directly send videos with 10-minute-length via WhatsApp if the file size is 16 MB or lower. Otherwise, you can compress the file using a video converter for WhatsApp. Alternatively, you can upload your file into your Cloud account and copy the link to send.
2. How to convert YouTube videos to WhatsApp?
You can directly copy the YouTube-based video link below the Share button on its page, paste it into the chat, and send it. Alternatively, you can use a reliable converter tool to download YouTube videos in one of the supported video formats (e.g., MP4). Then, share them via WhatsApp chat.
3. How to Send Videos on WhatsApp Without Compressing?
WhatsApp compresses the video files automatically when users insert and send them via the Gallery icon within chats. However, you can avoid reducing video quality or compressing them if you send it by clicking on the Document icon > My Media Files/whichever folder the file is in.
Final Words
Overall, multiple online and software-based tools help convert video files to suit WhatsApp-based restrictions. Among them, Filmora is all-in-one software to cut and edit videos for sharing correctly. For online-based conversion, Kapwing is a usable alternative, in our opinion. To make your choice, though, go through all options carefully.
How to Make Split Screen Videos in Filmora
To show the interactions and exchanges of things between the characters are widely seen in movies. It seems they are close to each other, but they aren’t.
In this article, we will go with the video editor, Wondershare Filmora, to make split-screen videos instantly. Let’s move forward to check what you need to make these videos!
Part 1. Prerequisites To Make Split Screen Video To Interact
There is no need to make complex videos. Because nowadays, only short videos get viral and are more trending. The interaction videos should be as simple as passing props or playing with someone!
Split-screen videos are widely used in movies and films because it is a visual way to describe any story. The actions will be based on real-time interactions between the characters. The essential things you are required to make these videos are described as follows:
1. Storyboard
First of all, you have to create a story with your friends and family, with whomever you want to create a video. For this, follow the below steps:
- Make a script of a story by coordination, such as writing all dialogues and actions so that there will be no difficulty during a performance on screen.
- Practice those actions again and again to get a professional look.
- The storyboard should be based on the split screen templates available on Wondershare Filmora , or you can create your customized too.

Free Download For Win 7 or later(64-bit)
Free Download For macOS 10.14 or later
2. Characters on the screen
The friends with whom you are interacting should be on the screen and have assets to record a video wherever they are. It will be one person on one split screen or two persons on one. It all depends upon your story and script.
3. Prop to interact
A prop will be any particular thing used to show interaction and should be present in the homes of both characters.
![]()
Note: The prop can be any object like a tissue roll, mobile phone, or anything seen as a passing object from one character to another.

4. A helper at home
There will be one person at home during video shooting to pretend a friend’s or family’s hand reaching to the other character from off-camera.
For example, while performing a high-five action, insert the hand of any member with whom you are living in the scene, showing as the character adjacent to you. After setting up everything in a row, it’s time to record scenes for the video.

5. Record different takes
To give a professional look to the video, you have to record different takes for each person from different angles. After recording, everyone has to send footage to only one person to edit on Filmora.
After getting things and recording, it’s time to edit it on Wondershare Filmora. For this, follow the lines below!
Part 2. Steps To Edit Split Screen Video in Filmora
Split-screen video editing is as simple as throwing a prop toward someone. Wondershare Filmora with a premium domain will get your back!
Filmora is a more creative and instant platform to edit any video or to give birth to new ideas. One of the prominent features is having ready-to-use templates for editing split-screen video. Meanwhile, you can also do a manual setup for editing. Follow the steps mentioned below to edit a video by using split-screen effects.
Split Screen Effect With Templates
Step1Import footage to Filmora
After picking up the best footage of every character, download the Wondershare Filmora (if you have not already). Then to import the clips, perform the following steps:
Free Download For Win 7 or later(64-bit)
Free Download For macOS 10.14 or later
- First, click on the “Click here to Import Media” button, as shown below.

- Then, select the clips you want to edit from your PC, and then they’ll be shown in the media section of Filmora.
Step2Add split screen effect to the timeline
Before adding the clips to the timeline, add the split screen effect to the timeline by following the below-mentioned steps:
- Click on the two-headed arrow at the upper tab.
- Then the drop-down list of two options will pop up, as shown below.

- Click on the Split Screen option, and it will show many split screen effects.

- Select the effect, whatever suits you, and download it then.
- After downloading, drag and drop the effect on the timeline section.

Step3Add clips to the effect
After adding the effect to the timeline, it’s time to implement it on the clips or footage. For this, follow the below-mentioned steps:
- Drag and drop the clips based on your storyboard in the required section.
- Then import the takes wherever and however you want, according to the storyboard.

If you don’t want any templates to be used in your video, then you can manually make a screen split layout. To do this, check the below section.
Manual Split Screen Layout
If the storyboard is organized in such a way that you can’t find out any of the templates suitable, then you can easily create a customized one for your video. In a customized split screen, you can set the duration and adjust the frame rate according to your choice.
Step1Import the clips
First, you must create a timeline to edit your split-screen video. To do this, take a look at the below steps!
- Click on the Import icon in the main preview when you open Wondershare Filmora.
- Then, import all the clips or footage you want to edit.

Step2Add all footages to the timeline
After importing all the clips of interaction videos into Filmora, our next step is to add our videos to the timeline.
- Simply click on the imported clips present in the project media section.
- Then drag it to the timeline below and drop it in the required track of videos.
Do the above-mentioned steps with all the clips present in the project media block.

Doing so will create a working timeline you can view and edit as you go along the editing process.
Step3Adjust the frame rate of all clips
It is all set that your storyboard is customized, for this you have to resize all the clips manually. To arrange clips according to the size, follow the below-mentioned steps:
- First, double-click on the clip you want to edit in the timeline.
- The Basic settings of the video will open in which you have a lot of options to edit.
- Click on the Transform option, and its setting will pop up on the top left side.
- Find out the Scale option from the settings and check out its range.

Adjust the scale rate according to your choice by sliding from its section.

![]()
Note: Repeat this process with all other clips present in the timeline to adjust them in such a way so that the hands moving from frame to frame will line up.

Step4Adjust the timing of clips
After adjusting the frame, you now have to adjust the timing of the clips. To perform this action, follow the below steps:
- Arrange and move around the clips on the timeline so that the timing of the scene lines up between each shot.
- Drag the edge of the clip to the right side if you want to increase the timing and duration.
- While dragging the edge of the clip to the left side, if you want to decrease the timing of the clip.
![]()
Note: The most important part is the first time a hand is supposed to move from one frame to another.
What to do if there is any lag in the preview?
If you’re experiencing lag during the preview, click on the “render” button on the top right of the timeline. It will help to render for a smooth preview.

Step5Splitting the clips
If the timing in your scene starts to fall out of sync, then do the following steps:
- First, try splitting all of the clips.
- Ensure to split before they start to fall out of sync.

![]()
Note: Splitting the clip before one person’s dialogue is preferred.
Step6Full-screen moment
After splitting the clips according to adjustments and storyboard, you can now make one of the characters’ videos in full screen. For this, follow the below steps:
- First, make another cut in the clips before the next hand-crossing action.
- Take one of the characters’ videos from clips in-between moment and make them full screen.

![]()
Note: You can quickly do full screen by double-clicking on the clip and unchecking the “transform“ heading in the top left window.

Final Results
You’re now free to re-adjust your clips in the next part back into sync. If you still want to make any adjustments in duration or cutting or sizing, you can do it easily. Because it’s a customizable effect. Give a pat on your Back! You did a great job and accomplish the results!

Free Download For Win 7 or later(64-bit)
Free Download For macOS 10.14 or later
Conclusion
An instant way to make split screen video and edit it is hidden in Wondershare Filmora . You can unwrap it by following the above-mentioned steps and giving a new life to your interaction videos.
Enjoy new and creative ideas with your family and friends and make your video trendy by Filmora. If you are an influencer, you can interact with other bloggers and influencers and make split-screen videos. It will be a great treat for you and your social media followers!
Free Download For macOS 10.14 or later
2. Characters on the screen
The friends with whom you are interacting should be on the screen and have assets to record a video wherever they are. It will be one person on one split screen or two persons on one. It all depends upon your story and script.
3. Prop to interact
A prop will be any particular thing used to show interaction and should be present in the homes of both characters.
![]()
Note: The prop can be any object like a tissue roll, mobile phone, or anything seen as a passing object from one character to another.
4. A helper at home
There will be one person at home during video shooting to pretend a friend’s or family’s hand reaching to the other character from off-camera.
For example, while performing a high-five action, insert the hand of any member with whom you are living in the scene, showing as the character adjacent to you. After setting up everything in a row, it’s time to record scenes for the video.
5. Record different takes
To give a professional look to the video, you have to record different takes for each person from different angles. After recording, everyone has to send footage to only one person to edit on Filmora.
After getting things and recording, it’s time to edit it on Wondershare Filmora. For this, follow the lines below!
Part 2. Steps To Edit Split Screen Video in Filmora
Split-screen video editing is as simple as throwing a prop toward someone. Wondershare Filmora with a premium domain will get your back!
Filmora is a more creative and instant platform to edit any video or to give birth to new ideas. One of the prominent features is having ready-to-use templates for editing split-screen video. Meanwhile, you can also do a manual setup for editing. Follow the steps mentioned below to edit a video by using split-screen effects.
Split Screen Effect With Templates
Step1Import footage to Filmora
After picking up the best footage of every character, download the Wondershare Filmora (if you have not already). Then to import the clips, perform the following steps:
Free Download For Win 7 or later(64-bit)
Free Download For macOS 10.14 or later
- First, click on the “Click here to Import Media” button, as shown below.
- Then, select the clips you want to edit from your PC, and then they’ll be shown in the media section of Filmora.
Step2Add split screen effect to the timeline
Before adding the clips to the timeline, add the split screen effect to the timeline by following the below-mentioned steps:
- Click on the two-headed arrow at the upper tab.
- Then the drop-down list of two options will pop up, as shown below.
- Click on the Split Screen option, and it will show many split screen effects.
- Select the effect, whatever suits you, and download it then.
- After downloading, drag and drop the effect on the timeline section.
Step3Add clips to the effect
After adding the effect to the timeline, it’s time to implement it on the clips or footage. For this, follow the below-mentioned steps:
- Drag and drop the clips based on your storyboard in the required section.
- Then import the takes wherever and however you want, according to the storyboard.
If you don’t want any templates to be used in your video, then you can manually make a screen split layout. To do this, check the below section.
Manual Split Screen Layout
If the storyboard is organized in such a way that you can’t find out any of the templates suitable, then you can easily create a customized one for your video. In a customized split screen, you can set the duration and adjust the frame rate according to your choice.
Step1Import the clips
First, you must create a timeline to edit your split-screen video. To do this, take a look at the below steps!
- Click on the Import icon in the main preview when you open Wondershare Filmora.
- Then, import all the clips or footage you want to edit.
Step2Add all footages to the timeline
After importing all the clips of interaction videos into Filmora, our next step is to add our videos to the timeline.
- Simply click on the imported clips present in the project media section.
- Then drag it to the timeline below and drop it in the required track of videos.
Do the above-mentioned steps with all the clips present in the project media block.
Doing so will create a working timeline you can view and edit as you go along the editing process.
Step3Adjust the frame rate of all clips
It is all set that your storyboard is customized, for this you have to resize all the clips manually. To arrange clips according to the size, follow the below-mentioned steps:
- First, double-click on the clip you want to edit in the timeline.
- The Basic settings of the video will open in which you have a lot of options to edit.
- Click on the Transform option, and its setting will pop up on the top left side.
- Find out the Scale option from the settings and check out its range.
Adjust the scale rate according to your choice by sliding from its section.
![]()
Note: Repeat this process with all other clips present in the timeline to adjust them in such a way so that the hands moving from frame to frame will line up.
Step4Adjust the timing of clips
After adjusting the frame, you now have to adjust the timing of the clips. To perform this action, follow the below steps:
- Arrange and move around the clips on the timeline so that the timing of the scene lines up between each shot.
- Drag the edge of the clip to the right side if you want to increase the timing and duration.
- While dragging the edge of the clip to the left side, if you want to decrease the timing of the clip.
![]()
Note: The most important part is the first time a hand is supposed to move from one frame to another.
What to do if there is any lag in the preview?
If you’re experiencing lag during the preview, click on the “render” button on the top right of the timeline. It will help to render for a smooth preview.
Step5Splitting the clips
If the timing in your scene starts to fall out of sync, then do the following steps:
- First, try splitting all of the clips.
- Ensure to split before they start to fall out of sync.
![]()
Note: Splitting the clip before one person’s dialogue is preferred.
Step6Full-screen moment
After splitting the clips according to adjustments and storyboard, you can now make one of the characters’ videos in full screen. For this, follow the below steps:
- First, make another cut in the clips before the next hand-crossing action.
- Take one of the characters’ videos from clips in-between moment and make them full screen.
![]()
Note: You can quickly do full screen by double-clicking on the clip and unchecking the “transform“ heading in the top left window.
Final Results
You’re now free to re-adjust your clips in the next part back into sync. If you still want to make any adjustments in duration or cutting or sizing, you can do it easily. Because it’s a customizable effect. Give a pat on your Back! You did a great job and accomplish the results!
Free Download For Win 7 or later(64-bit)
Free Download For macOS 10.14 or later
Conclusion
An instant way to make split screen video and edit it is hidden in Wondershare Filmora . You can unwrap it by following the above-mentioned steps and giving a new life to your interaction videos.
Enjoy new and creative ideas with your family and friends and make your video trendy by Filmora. If you are an influencer, you can interact with other bloggers and influencers and make split-screen videos. It will be a great treat for you and your social media followers!
Also read:
- New How to Create Your Own Subscribe Channel Graphics for 2024
- In 2024, Tactics To Make Keynote Slideshow
- Updated Kdenlive Review – Is It The Best Video Editor, In 2024
- Updated 2 Actionable Ways to Extract Subtitles From MKV Videos without Quality Loss
- 2024 Approved Wondering How to Replace Sky in After Effects? Learn How
- Updated In 2024, Best Method to Split the Video Into Parts Online
- New In 2024, Top 10 Picks for Flawless Slow Motion Video Generation
- New In Todays Article, We Are Going to Show You How Adding a Simple Lower Third to Your Video Can Add a Degree of Professionalism and Polish to Your Videos While Giving It a Higher Perceived Value
- Updated Understanding The Best Tools for Changing Sky Background
- Updated If Youre Trying to Create a Countdown Effect, but Youre Not Sure Where to Start, Then This Post Is Going to Show You some Ways to Create a Countdown Animation for Your Videos
- 2024 Approved Step by Step to Crop Videos Using Lightworks
- New How to Create an URL for Your Video?
- How to Add a Green Screen to Zoom for 2024
- New What Is the Top Filmora Slideshow Templates? Experts Choice
- New Splitting a Video in VSDC Step by Step
- Which is the Best Fake GPS Joystick App On Asus ROG Phone 8 Pro? | Dr.fone
- How To Repair iPhone SE (2022) System? | Dr.fone
- In 2024, Ways to trade pokemon go from far away On Apple iPhone 15? | Dr.fone
- In 2024, Easy Steps on How To Create a New Apple ID Account On Apple iPhone 12 mini | Dr.fone
- In 2024, Top 5 Xiaomi 14 Bypass FRP Tools for PC That Actually Work
- In 2024, Forgot Pattern Lock? Heres How You Can Unlock Infinix Hot 30i Pattern Lock Screen
- How to fix iCloud lock on your Apple iPhone 7 and iPad
- Guide How To Unbrick a Bricked Google Pixel 8 Pro Phone | Dr.fone
- New All About 3D Medical Animation And Its Uses
- 10 Free Location Spoofers to Fake GPS Location on your Poco C65 | Dr.fone
- Title: In 2024, How to Use Visual Effect for Zoom
- Author: Chloe
- Created at : 2024-04-24 07:08:13
- Updated at : 2024-04-25 07:08:13
- Link: https://ai-editing-video.techidaily.com/in-2024-how-to-use-visual-effect-for-zoom/
- License: This work is licensed under CC BY-NC-SA 4.0.
