
In 2024, How to Zoom Video in VLC Media Player

How to Zoom Video in VLC Media Player
Even though VLC Media Player is not the default video player in any operating system, most users install VLC Player separately on their computers. This is because VLC Media Player offers several useful and advanced features that the default media player like Windows Media Player lacks. There are situations when users need to zoom into certain parts of a video, and that is where VLC zoom in video feature comes in handy.
You may need to zoom into videos to pay attention to details and focus on parts around the subject that others are missing out. For example, you have recorded a video, and you have played it on VLC to zoom in and ensure that there is nothing distracting before you publish the video. Now, we will illustrate all the different ways on how to zoom in VLC Media Player. We will also suggest a better alternative to zoom into videos easily.
Part 1: Zoom VLC Video Using Interactive Zoom
VLC Media Player comes with Interactive Zoom feature that lets you zoom into a section of a video irrespective of its resolution. You can use Interactive Zoom feature to zoom nearly eight times the original size of the video. While you zoom your video with Interactive Zoom option, VLC Media Player zooms the video digitally, and if the video resolution is not high, you can see some deterioration in video quality as you zoom in. Here are the steps on how to VLC zoom with Interactive Zoom.
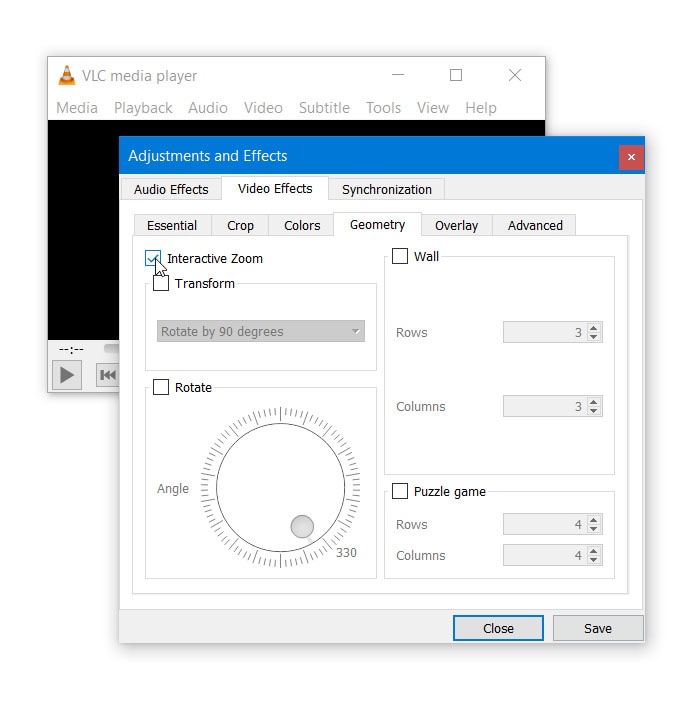
Step1First, you have to enable Interactive Zoom feature. Launch VLC Player and go to Tools menu option.
Step2Select Effects and Filters and you will see Adjustments and Effects window open.
Step3Go to Video Effects tab and then go to Geometry tab.
Step4Turn on Interactive Zoom option. Click on Save and Close buttons.
Step5Play a video and you will see a Picture in Picture window in the top-left corner where you can see live preview of the video. You will notice a rectangular box that you can drag around the PiP window to zoom that section of the video.
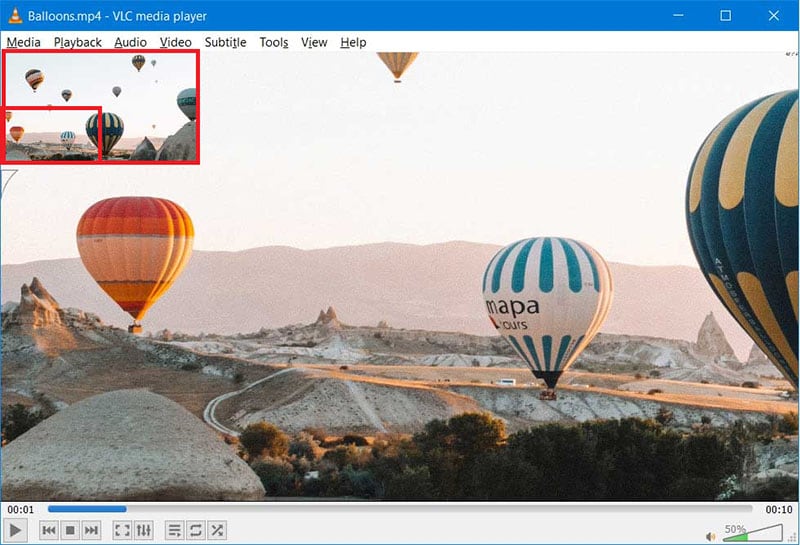
Step6Wherever you place the rectangular box in PiP window, that part will be zoomed and shown outside the PiP window. You can increase or decrease the level of magnification from the vertical slider present below PiP window.
Part 2: Zoom Video Using VLC Video Menu
Apart from Interactive Zoom, there is also an inbuilt Zoom option available under Video Menu. While Interactive Zoom is for detailed zooming, Zoom through Video menu on VLC is for instant zooming. Moreover, Zoom through Video menu is effective only when you view the video on VLC Player. If you are watching the video on full screen, the zooming effect will not be easily noticeable. Here are the steps on how to zoom in VLC player using VLC Video menu.
Step1Open VLC Media player in windowed mode and play the desired video.
Step2Go to Video menu and select Zoom option.
Step3You will come across several options such as 1:4 quarter, 1:2 half, 1:1 original, and 2:1 double. You can select from one of them as per your requirements.
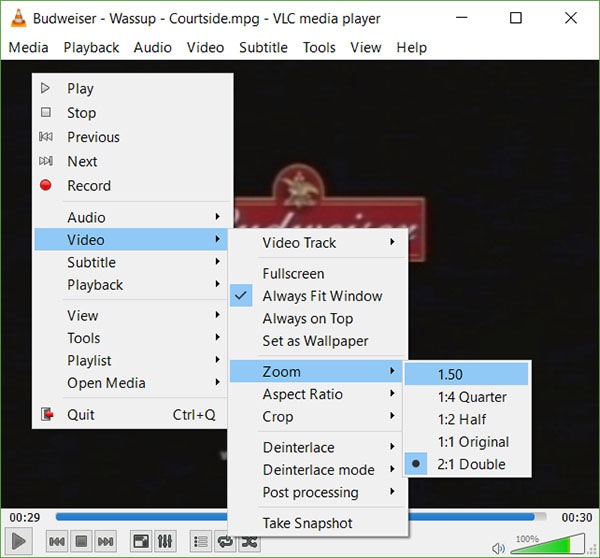
Otherwise, you can press Shift + Z keys together to try out different zoom options.
Part 3: Zoom VLC Video Using Magnifier
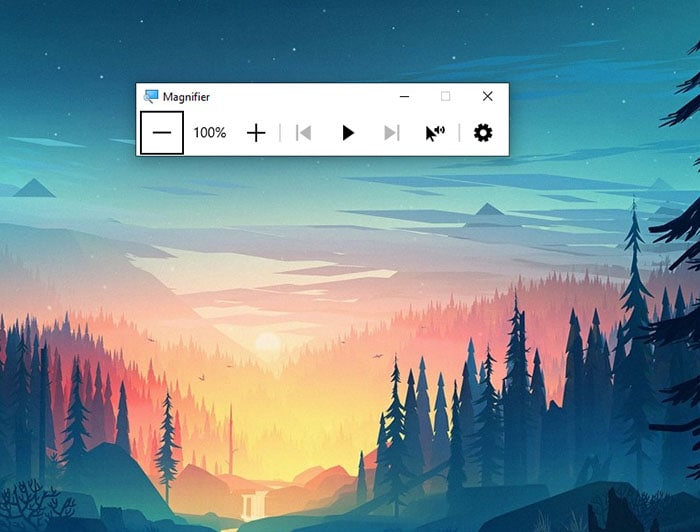
If you are using VLC Media Player on your Windows desktop computer, you can use the inbuilt Magnifier tool to zoom into a video that you are playing on VLC. You can zoom into videos to read any text in the background but this leads to low resolution and distortion. You can zoom in by 16 times which is the highest among all the three methods. Here are the steps on how to VLC zoom video using Magnifier tool.
Step1Open VLC Player and play the desired video.
Step2Go to Start menu on Windows and search for “Magnifier”.
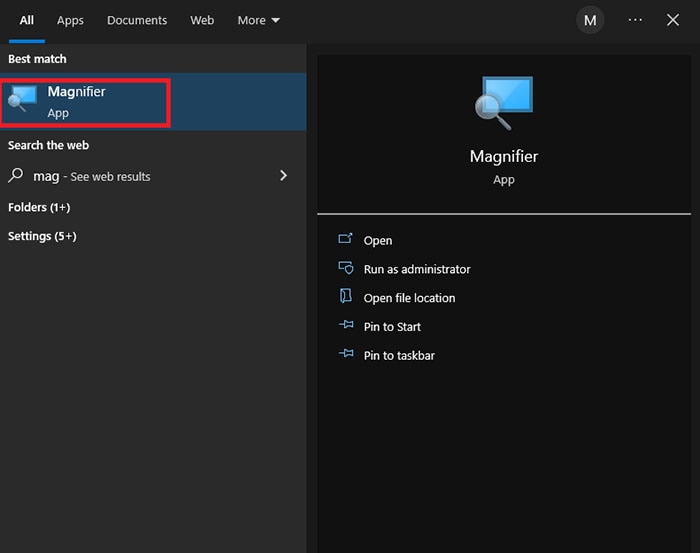
Step3Click on Magnifier App. Once it opens, place the mouse pointer on the video and you will see its magnified version.
Step4Press Windows and “+” keys to zoom in while press Windows and “-“ keys to zoom out.
Part 4: VLC Alternative to Zoom in Videos
If you are not satisfied with VLC Player zoom feature, you can use a video editor to zoom into your video conveniently so that you can check any focused section on your video. You can also read any text on the video comfortably. We recommend Wondershare Filmora as an alternative to VLC Media Player for zooming into videos. Filmora is a professional video editor and here is the list of the steps on how to zoom into videos with Filmora.
Step 1: Download and install Wondershare Filmora and it is available for Windows and Mac users.
Free Download For Win 7 or later(64-bit)
Free Download For macOS 10.14 or later
Step 2: Launch Wondershare and click on New Project option.
Step 3: Import your video on Filmora into Project Media folder by drag and drop option.

Step 4: Drag and drop the video file into Timeline. Click on Crop icon on the top bar of Timeline.
Step 5: Go to Pan & Zoom tab and move the rectangular box and play the video to watch its magnified video. You can also export the video after cropping in your desired file format.

Conclusion
There are several scenarios when you need to zoom into a video to focus on the details. VLC Media Player comes with instant zoom as well as detailed zoom options to satisfy your requirements. You can even use Magnifier App on Windows to zoom into videos. But for the best result, we recommend Wondershare Filmora as the best VLC Player alternative for zooming videos.
Free Download For macOS 10.14 or later
Step 2: Launch Wondershare and click on New Project option.
Step 3: Import your video on Filmora into Project Media folder by drag and drop option.

Step 4: Drag and drop the video file into Timeline. Click on Crop icon on the top bar of Timeline.
Step 5: Go to Pan & Zoom tab and move the rectangular box and play the video to watch its magnified video. You can also export the video after cropping in your desired file format.

Conclusion
There are several scenarios when you need to zoom into a video to focus on the details. VLC Media Player comes with instant zoom as well as detailed zoom options to satisfy your requirements. You can even use Magnifier App on Windows to zoom into videos. But for the best result, we recommend Wondershare Filmora as the best VLC Player alternative for zooming videos.
You Can Use It to Fix Videos that Are Not Aligned Properly or that Have Been Filmed Upside Down. A Handbrake Is a Popular Tool because It Is Easy to Use and It Has a Variety of Features
Handbrake is a video editing tool that allows you to rotate videos. It is a free and open source software that is available on Windows, Mac, and Linux. It is used to convert video files from one format to another. You can use it to compress videos, add subtitles, or create chapters. It also allows you to rotate videos in different directions. You can use it to fix videos that are not aligned properly or that have been filmed upside down. A handbrake is a popular tool because it is easy to use and it has a variety of features.
Step-by-step on how to rotate videos using Handbrake
When you import a video into the Handbrake software, it will by default be in a “landscape” orientation, with the long edge of the video oriented horizontally. If you want to rotate the video 90 degrees counterclockwise so that it appears “vertical,” or if you want to rotate it 180 degrees so that it is upside down, you can do so by following these two steps:
Step 1: Open the Handbrake software and import your video.
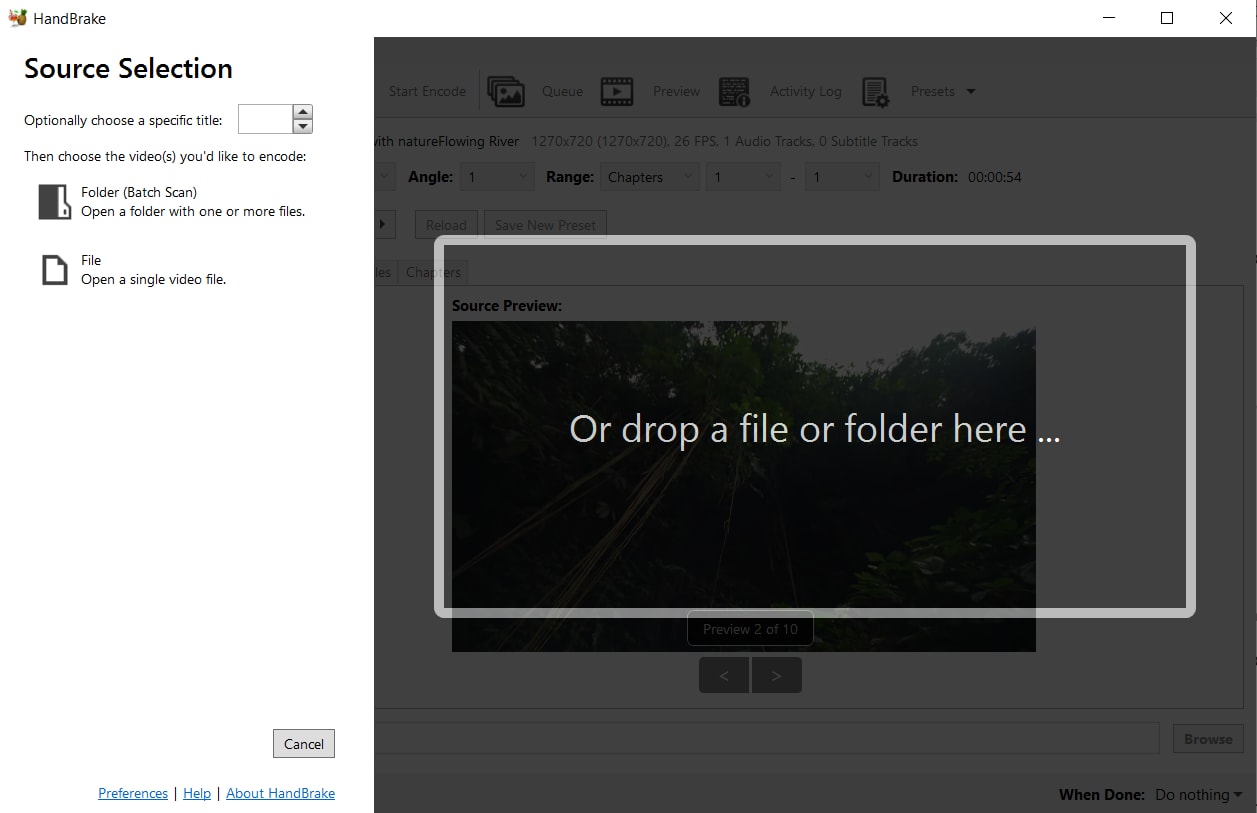
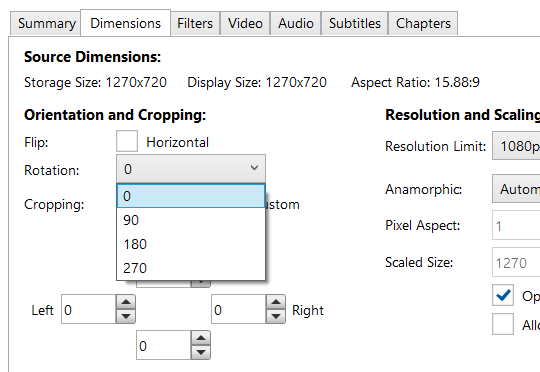
Step 2: Click on the “Dimensions” tab at the top of the Handbrake window.

Step 3: Under the “Orientation and Cropping” section, click on one of the options in the “Rotate” menu.
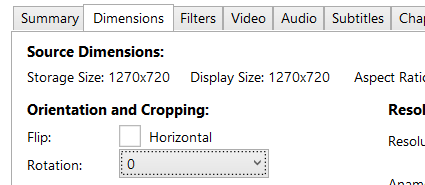
Step 4: If you want to rotate a video 90 degrees counterclockwise, select “90 Degrees CW (Counter-Clockwise).” If you want to rotate the video 180 degrees so that it is upside down, select “180 Degrees.”
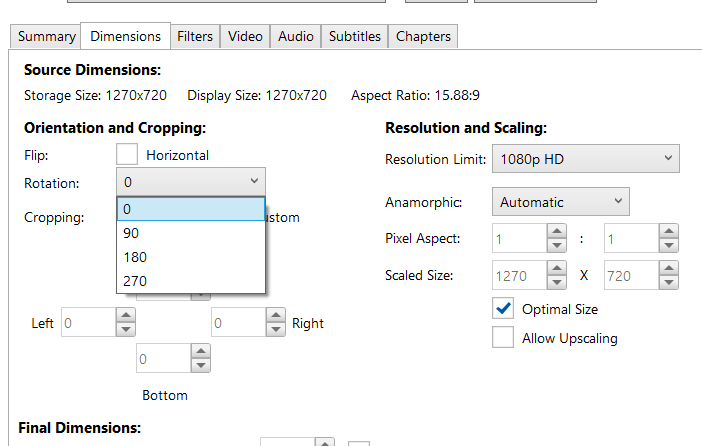
Step 5: Click on the “Preview” button at the bottom of the Handbrake window to see a preview of how your rotated video will look. When you are satisfied with the rotation, click on the “Start Encode” button to begin the encoding process.
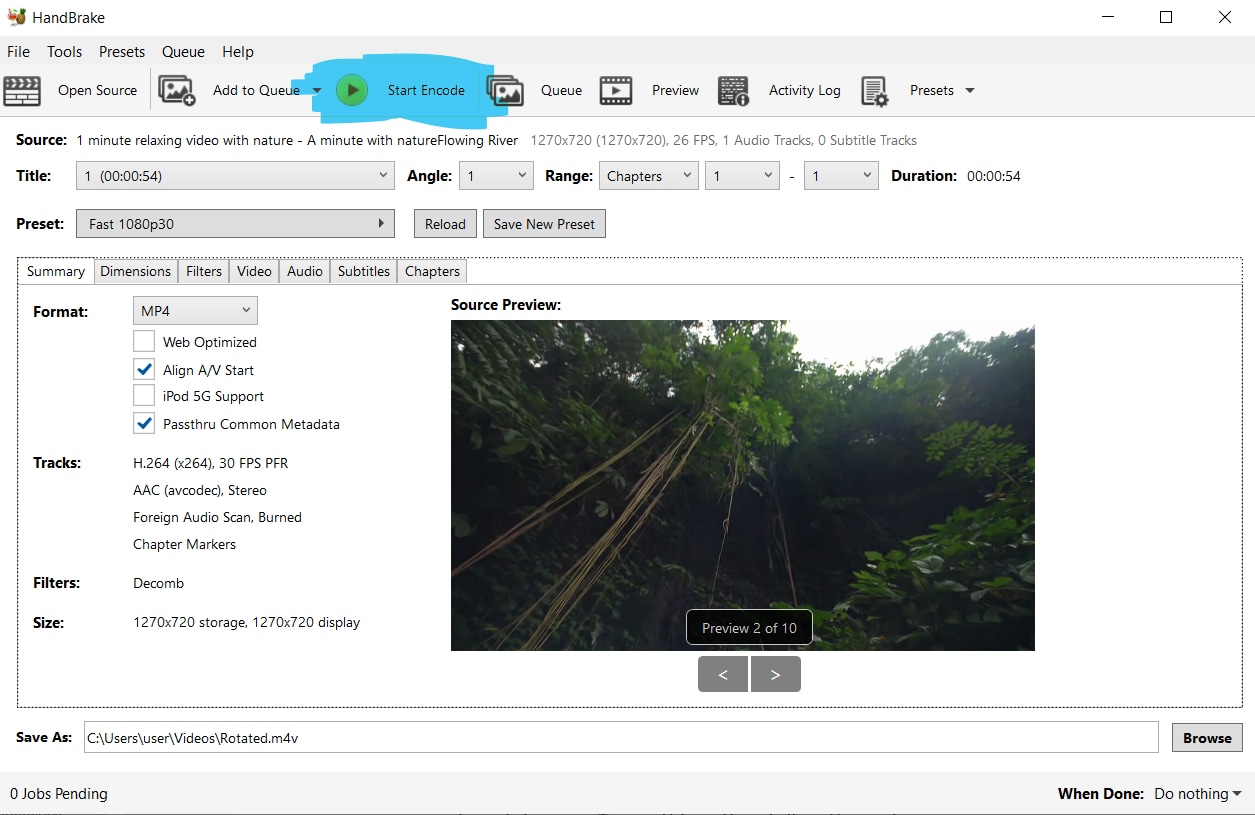
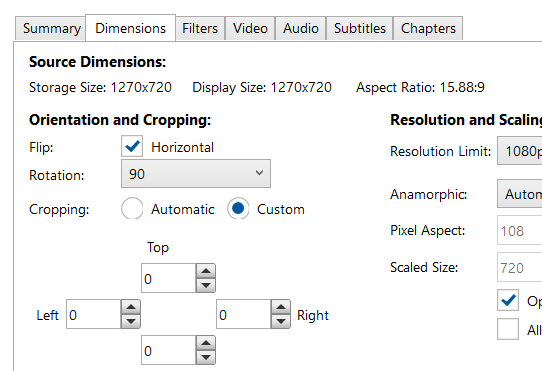
The Handbrake software also offers a “Flip” option which you can do after rotating it, which allows you to slip the video after rotating it. To use this option, follow these steps:
Under the “Orientation and Cropping” section, Go to Rotation and choose the degrees that best is best for your rotation requirements.
Click on “Flip” to flip your video horizontally.
Click on the “Preview” button at the bottom of the Handbrake window to see a preview of how your rotated video will look. When you are satisfied with the rotation, click on the “Start Encode” button to begin the encoding process.
Both of these methods for rotating videos are easy to use and produce good results. Experiment with them to see which method works best for you.
An Easy Way to Rotate Videos Using Filmora
Moreover, instead of using Handbrake, you can use Filmora Video Editor instead. Filmora is a video editor that is very easy to use. It has a variety of features, including the ability to rotate videos. You can download Filmora from the Filmora website. The website has links to the download page for each of the supported platforms.
For Win 7 or later (64-bit)
For macOS 10.14 or later
Step-by-Step on how to rotate videos in Filmora
In order for you to rotate videos in Filmora, follow these simple steps:
Step 1: Import the video that you want to rotate into Filmora.

Step 2: Click on the “Edit” tab at the top of the video timeline.
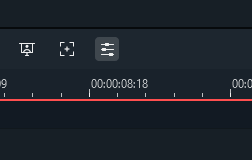
Step 3: Click on the “Rotate” button in the “Transform” section of the toolbar.

Step 4: Select the rotation angle that you want to rotate the video in the “Rotate” menu.

Step 5: Click on the “Preview” button at the bottom of the Filmora window to see a preview of how your rotated video will look. When you are satisfied with the rotation, click on the “OK” button to apply the rotation.

As you can see, rotating videos is a very easy process in both Handbrake and Filmora. Both Handbrake and Filmora offer simple methods for rotating videos. In Handbrake, you can rotate the video 90 degrees counterclockwise or 180 degrees.
In Filmora, you can rotate the video by any number of degrees in either direction. Experiment with these methods to see which one works best for you. Additionally, Filmora offers a number of other features, such as the ability to add text and transitions, that you may find useful.
Step 2: Click on the “Dimensions” tab at the top of the Handbrake window.

Step 3: Under the “Orientation and Cropping” section, click on one of the options in the “Rotate” menu.

Step 4: If you want to rotate a video 90 degrees counterclockwise, select “90 Degrees CW (Counter-Clockwise).” If you want to rotate the video 180 degrees so that it is upside down, select “180 Degrees.”

Step 5: Click on the “Preview” button at the bottom of the Handbrake window to see a preview of how your rotated video will look. When you are satisfied with the rotation, click on the “Start Encode” button to begin the encoding process.

The Handbrake software also offers a “Flip” option which you can do after rotating it, which allows you to slip the video after rotating it. To use this option, follow these steps:
Under the “Orientation and Cropping” section, Go to Rotation and choose the degrees that best is best for your rotation requirements.

Click on “Flip” to flip your video horizontally.

Click on the “Preview” button at the bottom of the Handbrake window to see a preview of how your rotated video will look. When you are satisfied with the rotation, click on the “Start Encode” button to begin the encoding process.
Both of these methods for rotating videos are easy to use and produce good results. Experiment with them to see which method works best for you.
An Easy Way to Rotate Videos Using Filmora
Moreover, instead of using Handbrake, you can use Filmora Video Editor instead. Filmora is a video editor that is very easy to use. It has a variety of features, including the ability to rotate videos. You can download Filmora from the Filmora website. The website has links to the download page for each of the supported platforms.
For Win 7 or later (64-bit)
For macOS 10.14 or later
Step-by-Step on how to rotate videos in Filmora
In order for you to rotate videos in Filmora, follow these simple steps:
Step 1: Import the video that you want to rotate into Filmora.

Step 2: Click on the “Edit” tab at the top of the video timeline.

Step 3: Click on the “Rotate” button in the “Transform” section of the toolbar.

Step 4: Select the rotation angle that you want to rotate the video in the “Rotate” menu.

Step 5: Click on the “Preview” button at the bottom of the Filmora window to see a preview of how your rotated video will look. When you are satisfied with the rotation, click on the “OK” button to apply the rotation.

As you can see, rotating videos is a very easy process in both Handbrake and Filmora. Both Handbrake and Filmora offer simple methods for rotating videos. In Handbrake, you can rotate the video 90 degrees counterclockwise or 180 degrees.
In Filmora, you can rotate the video by any number of degrees in either direction. Experiment with these methods to see which one works best for you. Additionally, Filmora offers a number of other features, such as the ability to add text and transitions, that you may find useful.
Step 2: Click on the “Dimensions” tab at the top of the Handbrake window.

Step 3: Under the “Orientation and Cropping” section, click on one of the options in the “Rotate” menu.

Step 4: If you want to rotate a video 90 degrees counterclockwise, select “90 Degrees CW (Counter-Clockwise).” If you want to rotate the video 180 degrees so that it is upside down, select “180 Degrees.”

Step 5: Click on the “Preview” button at the bottom of the Handbrake window to see a preview of how your rotated video will look. When you are satisfied with the rotation, click on the “Start Encode” button to begin the encoding process.

The Handbrake software also offers a “Flip” option which you can do after rotating it, which allows you to slip the video after rotating it. To use this option, follow these steps:
Under the “Orientation and Cropping” section, Go to Rotation and choose the degrees that best is best for your rotation requirements.

Click on “Flip” to flip your video horizontally.

Click on the “Preview” button at the bottom of the Handbrake window to see a preview of how your rotated video will look. When you are satisfied with the rotation, click on the “Start Encode” button to begin the encoding process.
Both of these methods for rotating videos are easy to use and produce good results. Experiment with them to see which method works best for you.
An Easy Way to Rotate Videos Using Filmora
Moreover, instead of using Handbrake, you can use Filmora Video Editor instead. Filmora is a video editor that is very easy to use. It has a variety of features, including the ability to rotate videos. You can download Filmora from the Filmora website. The website has links to the download page for each of the supported platforms.
For Win 7 or later (64-bit)
For macOS 10.14 or later
Step-by-Step on how to rotate videos in Filmora
In order for you to rotate videos in Filmora, follow these simple steps:
Step 1: Import the video that you want to rotate into Filmora.

Step 2: Click on the “Edit” tab at the top of the video timeline.

Step 3: Click on the “Rotate” button in the “Transform” section of the toolbar.

Step 4: Select the rotation angle that you want to rotate the video in the “Rotate” menu.

Step 5: Click on the “Preview” button at the bottom of the Filmora window to see a preview of how your rotated video will look. When you are satisfied with the rotation, click on the “OK” button to apply the rotation.

As you can see, rotating videos is a very easy process in both Handbrake and Filmora. Both Handbrake and Filmora offer simple methods for rotating videos. In Handbrake, you can rotate the video 90 degrees counterclockwise or 180 degrees.
In Filmora, you can rotate the video by any number of degrees in either direction. Experiment with these methods to see which one works best for you. Additionally, Filmora offers a number of other features, such as the ability to add text and transitions, that you may find useful.
Step 2: Click on the “Dimensions” tab at the top of the Handbrake window.

Step 3: Under the “Orientation and Cropping” section, click on one of the options in the “Rotate” menu.

Step 4: If you want to rotate a video 90 degrees counterclockwise, select “90 Degrees CW (Counter-Clockwise).” If you want to rotate the video 180 degrees so that it is upside down, select “180 Degrees.”

Step 5: Click on the “Preview” button at the bottom of the Handbrake window to see a preview of how your rotated video will look. When you are satisfied with the rotation, click on the “Start Encode” button to begin the encoding process.

The Handbrake software also offers a “Flip” option which you can do after rotating it, which allows you to slip the video after rotating it. To use this option, follow these steps:
Under the “Orientation and Cropping” section, Go to Rotation and choose the degrees that best is best for your rotation requirements.

Click on “Flip” to flip your video horizontally.

Click on the “Preview” button at the bottom of the Handbrake window to see a preview of how your rotated video will look. When you are satisfied with the rotation, click on the “Start Encode” button to begin the encoding process.
Both of these methods for rotating videos are easy to use and produce good results. Experiment with them to see which method works best for you.
An Easy Way to Rotate Videos Using Filmora
Moreover, instead of using Handbrake, you can use Filmora Video Editor instead. Filmora is a video editor that is very easy to use. It has a variety of features, including the ability to rotate videos. You can download Filmora from the Filmora website. The website has links to the download page for each of the supported platforms.
For Win 7 or later (64-bit)
For macOS 10.14 or later
Step-by-Step on how to rotate videos in Filmora
In order for you to rotate videos in Filmora, follow these simple steps:
Step 1: Import the video that you want to rotate into Filmora.

Step 2: Click on the “Edit” tab at the top of the video timeline.

Step 3: Click on the “Rotate” button in the “Transform” section of the toolbar.

Step 4: Select the rotation angle that you want to rotate the video in the “Rotate” menu.

Step 5: Click on the “Preview” button at the bottom of the Filmora window to see a preview of how your rotated video will look. When you are satisfied with the rotation, click on the “OK” button to apply the rotation.

As you can see, rotating videos is a very easy process in both Handbrake and Filmora. Both Handbrake and Filmora offer simple methods for rotating videos. In Handbrake, you can rotate the video 90 degrees counterclockwise or 180 degrees.
In Filmora, you can rotate the video by any number of degrees in either direction. Experiment with these methods to see which one works best for you. Additionally, Filmora offers a number of other features, such as the ability to add text and transitions, that you may find useful.
5 Excellent Tools To Convert Video to 60 FPS
Is the video you have too fast-paced? Does it show an action sequence or an intense basketball game? All the movement could make the video blurry. Changing the video to 60 FPS makes it better and crisper. So how can you do that? You can convert video to 60 FPS using these 5 excellent tools.
Why Convert Video to 60 FPS?
Perhaps you forgot to film your video in 60 FPS or 120 FPS. You can leave it at 30 FPS if you want to. But some videos look choppy when in that setting. By doubling the frames in the video, you make it a lot smoother. The motion will look so much more fluid. Consequently, that will let your viewers have a fantastic, immersive watching experience.
Do you plan to put the video in slow motion? That’s another great reason to convert the video to 60 FPS. Again, this makes the motion more fluid. So when you add the slow-motion effect, it just gets better. Not doing so will lead to terrible video quality, which your viewers would surely not like.
3 Methods To Convert Video to 60 FPS on Windows/Mac?
After reading those reasons, you may have thought of videos that you have that you can improve by converting to 60 FPS. So how can you do that? You can use these 3 effective methods. These are 3 different PC tools that allow for converting videos to 60 FPS.
1. Convert Video to 60 FPS With Wondershare Filmora
Free Download For Win 7 or later(64-bit)
Free Download For macOS 10.14 or later
Wondershare Filmora is one of the most amazing tools for converting videos to 60 FPS. This allows you to do that without complicated steps. It seems like the video just passed through the program with how fast and easy it is!

On top of that, Wondershare Filmora is a great video editor. It is complete with all the basic editing tools, plus some really great advanced features. So you can edit and enhance the video before or after converting it to 60 FPS. Because of that, Wondershare Filmora is a cost-effective tool.
Here are the steps to follow for turning a video to 60 FPS with Wondershare Filmora:
Step1 Open Wondershare Filmora. Click “New Project.”
Step2 Import the video that you want to convert to 60 FPS.
Step3 Drag the video to the timeline. Click “Export.”
Step4 Change the frame rate to 60 FPS. If you can’t find this, check if you are on the “Local” tab.
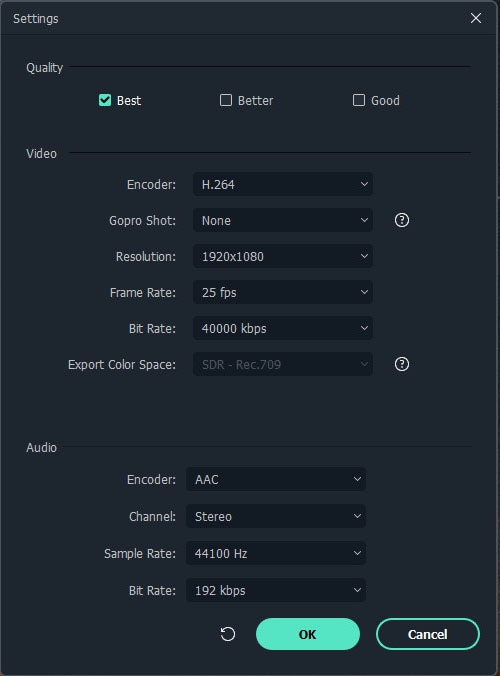
Step5 Click “Export.”
2. Use SmoothVideo Project to Make Video To 60 FPS
SmoothVideo Project (SVP) uses frame interpolation techniques - the same used by high-end TVs and projectors. This technique increases the frames by adding intermediate frames between existing ones. As a result, it produces smooth, fluid, and clear motion.
SmoothVideo Projects allow you to convert videos to 60 FPS and even to 120 or 144+ FPS. Also, it can convert the videos in real-time, on top of your video player.
Follow this guide to convert videos using this tool:
Step1 Install SVP and ensure to add SVPcode. If you already have the program installed, you can add SVPcode with the Maintain SVP 4 app.
Step2 Select “Browse for a video to transcode..”
Step3 Import the video/s that you want to convert to 60 FPS.
Step4 Pick 60 FPS when selecting a video profile for the video.
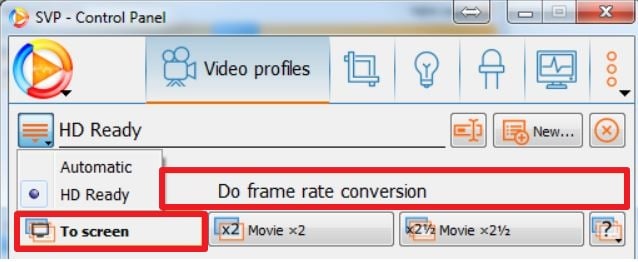
Step5 Choose between “Basic” and “Advanced” for the video compression setting.
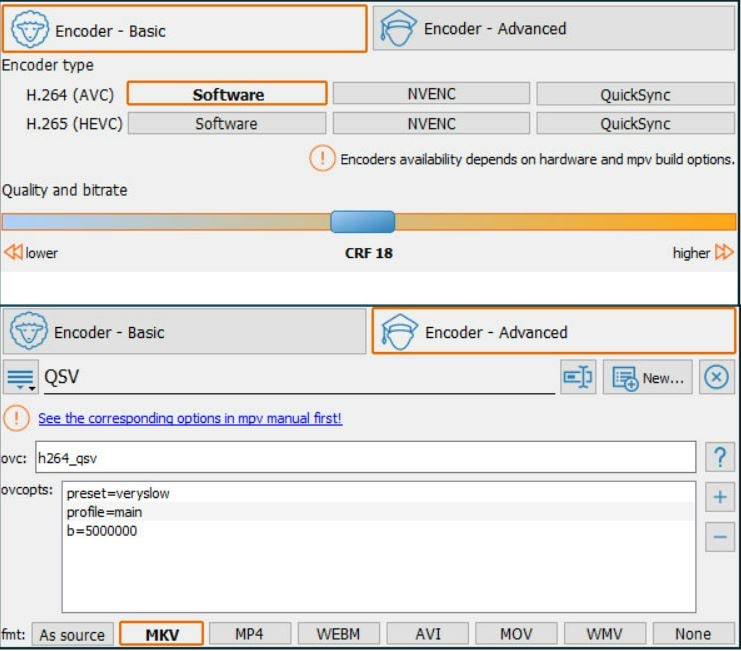
Step6 Click “Start.”
3. Make Videos 60 FPS With Freemake Video Converter
Freemake is an all-in-one video converter tool. It supports over 500 video file formats and lets you turn photos and audio into video and process multiple videos at once. The best thing is that you don’t even need to download the video. Freemake Video Converter can convert online videos too.
While converting the files, you have the option to change their framerate. Therefore, it’s an excellent tool for turning videos to 60 FPS.
Follow these steps to change a video’s frame rate using this app:
Step1 Launch Freemake Video Converter. Click “+Video” to import the video that you want to convert.
Step2 Double-click the output format to open the window with the settings option.
Step3 Click the gear or “Settings” button.
Step4 On the new window, click the drop-down menu for “Frame Rate.” Select “60 fps.”
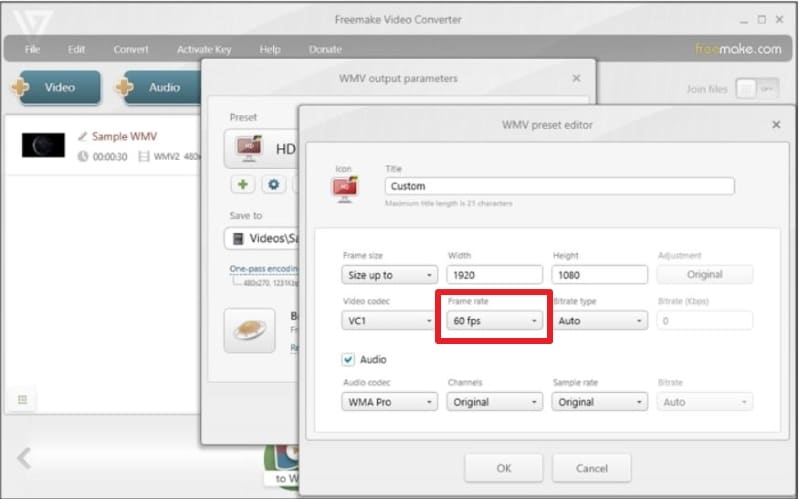
Step5 Click “Ok.”
Step6 Select the destination folder for the output file. Click “Convert.”
2 Fantastic 60 FPS Video Converter Online
What if you are not using a PC to edit your videos? For example, you shoot, edit, and upload your videos using your mobile phone. Or what if you use a PC, but you’re away from home? In these cases, you can use online tools. Here are the 2 best ones on the market.
1. VEED.IO 30 FPS to 60 FPS Online
Veed.io is a simple but ever-so-reliable online video tool. It lets you edit videos and change the frame rate for free. Also, it comes with an array of other tools that can help enhance the video. For instance, Veed.io can remove background noise from the video.
Veed.io also lets you change the video’s aspect ratio to optimize it for different video streaming platforms.
Here’s a guide on how to convert to 60 FPS using Veed.io:
Step1 Run your preferred web browser and go to the website of Veed.io.
Step2 Click “Get Started.”
Step3 Click “Upload a File” or drag the video file to the interface to upload it. Select the video that you want to convert to 60 FPS.
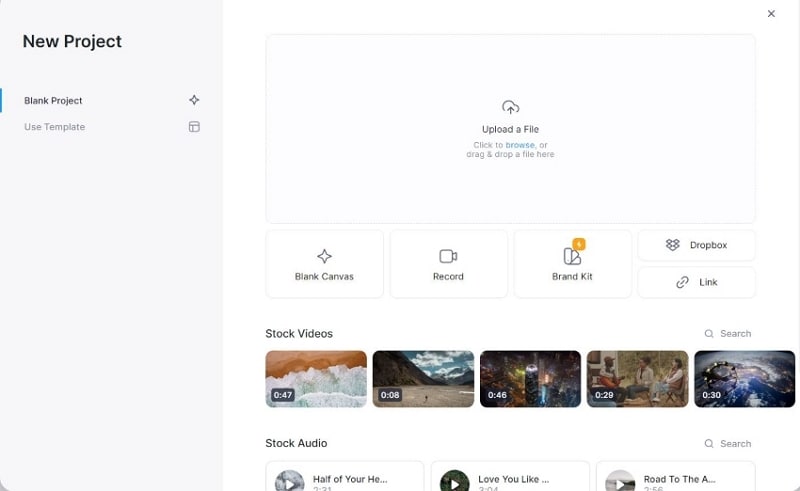
Step4 Click “Export” > “Advanced.”
Step5 Drag the slider for “Framerate Limit” to the right until the display text says “60.”
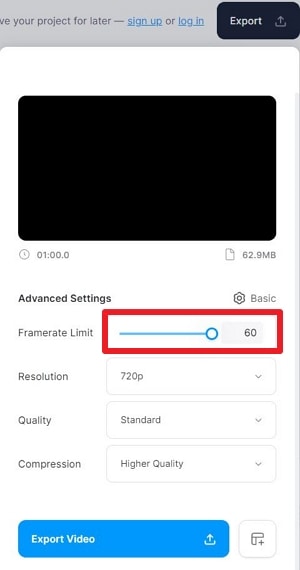
Step6 Click “Export Video.”
Step7 Please wait for Veed.io to finish processing your video. When the screen says, “Your video is ready.” Click the “Download” button.
![]()
Note: Sign in to your account to enable downloading.
2. 30 FPS to 60 FPS Online-Convert Tool
Online-Convert is a popular online file format converter. It supports north of 50 video source formats and allows you to convert files between them. Also, Online-Convert allows you to change the video’s frame rate. You can make it 60 FPS or even 120 FPS!
But please remember that, as the tool name suggests, Online-Convert is only a file converter. You can’t edit your videos using this online service. Thus, you need to either have a reliable video editor on your device or use another online tool with an editor function.
Anyway, here is a tutorial on how to convert videos to 60 FPS with this online tool:
Step1 Launch a web browser and go to the Online-Convert tool page.
Step2 Drag the video file to the green rectangle. Alternatively, click “Choose File”/ Enter URL” / “Dropbox” / “Google Drive” to import your file.

Step3 Scroll down to the “Change frame rate” option. Type “60” in the text box.
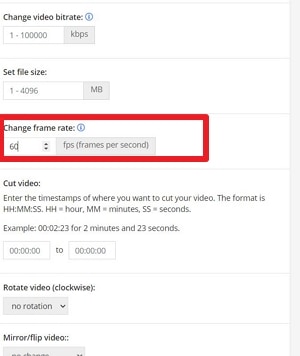
Step4 Click “Start.”
Step5 Wait for the conversion to finish. The download will start automatically.
Conclusion
Convert your videos to 60 FPS to make them smoother and give your audience a nicer viewing experience. You can use many tools to do that. We recommend trying Wondershare Filmora. Converting a video’s frame rate using this software is as easy as 1-2-3.
This video solution not only gives you the ability to change a video’s frame rate. Wondershare Filmora also provides you with many amazing video editing tools. Therefore, Filmora can help you turn your videos into art. It is worth it.
Free Download For macOS 10.14 or later
Wondershare Filmora is one of the most amazing tools for converting videos to 60 FPS. This allows you to do that without complicated steps. It seems like the video just passed through the program with how fast and easy it is!

On top of that, Wondershare Filmora is a great video editor. It is complete with all the basic editing tools, plus some really great advanced features. So you can edit and enhance the video before or after converting it to 60 FPS. Because of that, Wondershare Filmora is a cost-effective tool.
Here are the steps to follow for turning a video to 60 FPS with Wondershare Filmora:
Step1 Open Wondershare Filmora. Click “New Project.”
Step2 Import the video that you want to convert to 60 FPS.
Step3 Drag the video to the timeline. Click “Export.”
Step4 Change the frame rate to 60 FPS. If you can’t find this, check if you are on the “Local” tab.

Step5 Click “Export.”
2. Use SmoothVideo Project to Make Video To 60 FPS
SmoothVideo Project (SVP) uses frame interpolation techniques - the same used by high-end TVs and projectors. This technique increases the frames by adding intermediate frames between existing ones. As a result, it produces smooth, fluid, and clear motion.
SmoothVideo Projects allow you to convert videos to 60 FPS and even to 120 or 144+ FPS. Also, it can convert the videos in real-time, on top of your video player.
Follow this guide to convert videos using this tool:
Step1 Install SVP and ensure to add SVPcode. If you already have the program installed, you can add SVPcode with the Maintain SVP 4 app.
Step2 Select “Browse for a video to transcode..”
Step3 Import the video/s that you want to convert to 60 FPS.
Step4 Pick 60 FPS when selecting a video profile for the video.

Step5 Choose between “Basic” and “Advanced” for the video compression setting.

Step6 Click “Start.”
3. Make Videos 60 FPS With Freemake Video Converter
Freemake is an all-in-one video converter tool. It supports over 500 video file formats and lets you turn photos and audio into video and process multiple videos at once. The best thing is that you don’t even need to download the video. Freemake Video Converter can convert online videos too.
While converting the files, you have the option to change their framerate. Therefore, it’s an excellent tool for turning videos to 60 FPS.
Follow these steps to change a video’s frame rate using this app:
Step1 Launch Freemake Video Converter. Click “+Video” to import the video that you want to convert.
Step2 Double-click the output format to open the window with the settings option.
Step3 Click the gear or “Settings” button.
Step4 On the new window, click the drop-down menu for “Frame Rate.” Select “60 fps.”

Step5 Click “Ok.”
Step6 Select the destination folder for the output file. Click “Convert.”
2 Fantastic 60 FPS Video Converter Online
What if you are not using a PC to edit your videos? For example, you shoot, edit, and upload your videos using your mobile phone. Or what if you use a PC, but you’re away from home? In these cases, you can use online tools. Here are the 2 best ones on the market.
1. VEED.IO 30 FPS to 60 FPS Online
Veed.io is a simple but ever-so-reliable online video tool. It lets you edit videos and change the frame rate for free. Also, it comes with an array of other tools that can help enhance the video. For instance, Veed.io can remove background noise from the video.
Veed.io also lets you change the video’s aspect ratio to optimize it for different video streaming platforms.
Here’s a guide on how to convert to 60 FPS using Veed.io:
Step1 Run your preferred web browser and go to the website of Veed.io.
Step2 Click “Get Started.”
Step3 Click “Upload a File” or drag the video file to the interface to upload it. Select the video that you want to convert to 60 FPS.

Step4 Click “Export” > “Advanced.”
Step5 Drag the slider for “Framerate Limit” to the right until the display text says “60.”

Step6 Click “Export Video.”
Step7 Please wait for Veed.io to finish processing your video. When the screen says, “Your video is ready.” Click the “Download” button.
![]()
Note: Sign in to your account to enable downloading.
2. 30 FPS to 60 FPS Online-Convert Tool
Online-Convert is a popular online file format converter. It supports north of 50 video source formats and allows you to convert files between them. Also, Online-Convert allows you to change the video’s frame rate. You can make it 60 FPS or even 120 FPS!
But please remember that, as the tool name suggests, Online-Convert is only a file converter. You can’t edit your videos using this online service. Thus, you need to either have a reliable video editor on your device or use another online tool with an editor function.
Anyway, here is a tutorial on how to convert videos to 60 FPS with this online tool:
Step1 Launch a web browser and go to the Online-Convert tool page.
Step2 Drag the video file to the green rectangle. Alternatively, click “Choose File”/ Enter URL” / “Dropbox” / “Google Drive” to import your file.

Step3 Scroll down to the “Change frame rate” option. Type “60” in the text box.

Step4 Click “Start.”
Step5 Wait for the conversion to finish. The download will start automatically.
Conclusion
Convert your videos to 60 FPS to make them smoother and give your audience a nicer viewing experience. You can use many tools to do that. We recommend trying Wondershare Filmora. Converting a video’s frame rate using this software is as easy as 1-2-3.
This video solution not only gives you the ability to change a video’s frame rate. Wondershare Filmora also provides you with many amazing video editing tools. Therefore, Filmora can help you turn your videos into art. It is worth it.
The Best Peter McKinnon LUTs for Perfect Video Editing
Peter McKinnon is a highly talented video editor and YouTuber. He gained widespread recognition for his amazing video editing skills. Furthermore, his content always stands out from others for his exceptional color-grading abilities. Additionally, he has a keen eye for choosing the perfect color tones and contrasts to make his videos look impressive.
One of the secrets behind Peter’s impressive color grading is his use of LUTs. Peter McKinnon has developed his collection of LUTs. By using Peter McKinnon LUTs, you can easily apply his signature color grading style to your videos. These LUTs can enhance the colors, add depth and dimension, and give your videos that cinematic feel.
Part 1: Why Should You Use LUTs in Video Editing?
If you need Peter McKinnon LUT packs, you must know how effective LUTs are. Using Look-Up Tables in video editing has several advantages that can make your editing process easier, which are discussed as follows:
Save Time on Color Grading
LUTs offer a quick way to adjust the colors in your videos. Instead of manually tweaking each color parameter, you can apply a LUT with a few clicks. It saves time and lets you easily try different styles. Moreover, it makes the color grading process more convenient for beginners.
Maintain Consistency
Applying the same LUT to multiple clips ensures a consistent look throughout your video. It is constructive when you have different scenes or shots. Furthermore, you don’t need to edit each clip separately. Moreover, you can save time and effort by applying the same LUT to your project.
Professional and Creative Looks
LUTs are created by experts and provide a range of creative styles. They can imitate the look of different films, genres, or specific grading techniques. Additionally, using LUTs helps you achieve a particular mood or style. Furthermore, LUTs enhance your storytelling or align with your creative vision.
Match Footage from Different Sources
When working with footage from different cameras or lighting conditions, LUTs can help. They can help match the color and tone of the clips. Each camera may capture colors; lighting variations can affect the overall look. However, applying a LUT gives you a consistent result throughout.
Preview and Communicate Ideas
Another advantage is that LUTs offer real-time previews of the final look as you edit. Moreover, it helps you visualize the aesthetic and make informed creative decisions. Sharing LUTs with your team or collaborators communicates your creative ideas. Furthermore, it ensures everyone understands the desired look of the project.
Streamline Workflow
LUTs can be integrated into your editing software, allowing you to apply and modify them. They can be combined with other adjustments like exposure, contrast, and saturation. In addition to this, it streamlines your workflow, freeing up time to focus on other editing tasks.
Empower your videos with a new mood using different LUTs. Filmora now offers 100+ top-quality 3D LUTs cover a broad range of scenarios. Transform your videos with Filmora’s powerful 3D LUTs.
Apply LUT on Videos Apply LUT on Videos Learn More

Part 2: Top Peter McKinnon Influenced LUTs for Videos
Peter McKinnon is a great content creator with exceptional video editing skills. Here is a list of Peter McKinnon LUT Pack free and paid ones, which you can download. Make your videos look like Peter McKinnon’s and get the praise you deserve.
1. Cine LUTS V2
Cine LUTS V2 is a pack of 15 cinematic-style LUTs to color grade your videos. With these LUTs, you can achieve various cinematic looks, such as Dawn, Dusk, Elemental, and Ember. Moreover, the Dawn LUT adds a warm and soft color tone to your video. However, the Elemental LUT brings out vibrant colors, making your content appear bold and impactful. Furthermore, each LUT in this pack offers a unique color grading style.

2. Cine LUTS V1
With the Cine LUTs V1 pack, you’ll have access to 7 unique LUTs. This Peter McKinnon LUT pack gives your videos a cinematic look. Furthermore, this pack has different LUTs, including Orange & Teal and Noir. The Orange & Teal LUT adds a warm orange tone to the highlights and a cool teal tone to the shadows. However, you can use the Noir LUT to add a more dramatic look to your video.

3. Arctic Shade
Arctic Shade LUT is a color grading tool inspired by Peter McKinnon’s technique. Applying this LUT adjusts the white balance to give your video a balanced white exposure. Furthermore, it increases saturation and enhances contrast to make your colors pop. It’s a great option to experiment with and matches the color grading style of Peter McKinnon.

4. Bleak Galaxy
Bleak Galaxy is a fantastic LUT pack inspired by Peter McKinnon. This LUT is perfect for enhancing your night sky footage. It amplifies the blue tones, making the night sky even more beautiful. Additionally, it boosts saturation, bringing out the vibrant colors in the scene. With Bleak Galaxy, you can capture the details of the stunning night sky in all its beauty.

Part 3: Wondershare Filmora: Get Free LUTs on an Alternative Platform
Are you a fan of Peter McKinnon and want to make your content look professional and cinematic? It would be best to use professional video editing software like Wondershare Filmora . Filmora is an excellent tool that helps you in editing videos. Moreover, Filmora offers simple enhancement and adjustment tools for more advanced AI features.
Add LUTs on Video For Win 7 or later(64-bit)
Add LUTs on Video For macOS 10.14 or later
Besides video editing capabilities, you can color grade your videos like Peter McKinnon. In the same way, this tool offers paid and free LUTs that you can use. Additionally, Filmora has over 200 LUTs, each with a unique set of styles and color tones. You can download similar-looking Peter McKinnon LUTs free LUTs to apply on your digital media using Filmora.

Conclusion
In conclusion, Peter McKinnon is an impressive content creator and professional. There are many different LUTs inspired by Peter McKinnon LUT packs. Furthermore, these LUTs allow you to experiment and find the perfect color grading for your videos. Moreover, you can use these LUTs pack for a travel vlog, B-roll, or even a short film. With these LUTs, your videos will look better than ever.
Add LUTs on Video For Win 7 or later(64-bit)
Add LUTs on Video For macOS 10.14 or later
Apply LUT on Videos Apply LUT on Videos Learn More

Part 2: Top Peter McKinnon Influenced LUTs for Videos
Peter McKinnon is a great content creator with exceptional video editing skills. Here is a list of Peter McKinnon LUT Pack free and paid ones, which you can download. Make your videos look like Peter McKinnon’s and get the praise you deserve.
1. Cine LUTS V2
Cine LUTS V2 is a pack of 15 cinematic-style LUTs to color grade your videos. With these LUTs, you can achieve various cinematic looks, such as Dawn, Dusk, Elemental, and Ember. Moreover, the Dawn LUT adds a warm and soft color tone to your video. However, the Elemental LUT brings out vibrant colors, making your content appear bold and impactful. Furthermore, each LUT in this pack offers a unique color grading style.

2. Cine LUTS V1
With the Cine LUTs V1 pack, you’ll have access to 7 unique LUTs. This Peter McKinnon LUT pack gives your videos a cinematic look. Furthermore, this pack has different LUTs, including Orange & Teal and Noir. The Orange & Teal LUT adds a warm orange tone to the highlights and a cool teal tone to the shadows. However, you can use the Noir LUT to add a more dramatic look to your video.

3. Arctic Shade
Arctic Shade LUT is a color grading tool inspired by Peter McKinnon’s technique. Applying this LUT adjusts the white balance to give your video a balanced white exposure. Furthermore, it increases saturation and enhances contrast to make your colors pop. It’s a great option to experiment with and matches the color grading style of Peter McKinnon.

4. Bleak Galaxy
Bleak Galaxy is a fantastic LUT pack inspired by Peter McKinnon. This LUT is perfect for enhancing your night sky footage. It amplifies the blue tones, making the night sky even more beautiful. Additionally, it boosts saturation, bringing out the vibrant colors in the scene. With Bleak Galaxy, you can capture the details of the stunning night sky in all its beauty.

Part 3: Wondershare Filmora: Get Free LUTs on an Alternative Platform
Are you a fan of Peter McKinnon and want to make your content look professional and cinematic? It would be best to use professional video editing software like Wondershare Filmora . Filmora is an excellent tool that helps you in editing videos. Moreover, Filmora offers simple enhancement and adjustment tools for more advanced AI features.
Add LUTs on Video For Win 7 or later(64-bit)
Add LUTs on Video For macOS 10.14 or later
Besides video editing capabilities, you can color grade your videos like Peter McKinnon. In the same way, this tool offers paid and free LUTs that you can use. Additionally, Filmora has over 200 LUTs, each with a unique set of styles and color tones. You can download similar-looking Peter McKinnon LUTs free LUTs to apply on your digital media using Filmora.

Conclusion
In conclusion, Peter McKinnon is an impressive content creator and professional. There are many different LUTs inspired by Peter McKinnon LUT packs. Furthermore, these LUTs allow you to experiment and find the perfect color grading for your videos. Moreover, you can use these LUTs pack for a travel vlog, B-roll, or even a short film. With these LUTs, your videos will look better than ever.
Add LUTs on Video For Win 7 or later(64-bit)
Add LUTs on Video For macOS 10.14 or later
Also read:
- [Updated] Comprehensible Guide to Shifting Photos/Videos in iOS World
- 2024 Approved 7 Tips to Create Teaching Videos
- How to Add Effects on TikTok
- How to Create Video Contents That Convert Sales
- How to Transfer Music from Nokia C12 Pro to iPod | Dr.fone
- In 2024, How to Use Rules of Thirds
- In 2024, The Ultimate Tweeting of TikTok Phenomena
- Instant Fix: Troubleshoot and Solve AudioBox USB Connectivity Problems in Minutes
- Maximizing Storage on Your Windows 11 PC: Three Proven Techniques for Extending C Drive Capacity
- New 2024 Approved Guide To Creating the Best Video Collages
- New Digital Soundtrack The Ultimate DJ Collection for 2024
- New In 2024, How to Add Effects on TikTok
- PC Performance Issues: Why Is the Frame Rate Lower in Farming Simulator 22?
- Reliable User Guide to Fix Itel S23+ Running Slow and Freezing | Dr.fone
- Splitting Audio From Video in Sony Vegas Step by Step for 2024
- Unlock Honor Magic V2 Phone Password Without Factory Reset Full Guide Here
- Unveiling ChatGPT: How Microsoft Reinvented Natural Language Processing Technology
- Updated How to Create Your Own LOL Montage Video
- What Is HDRI? Everything You Need to Know About HDRI for 2024
- Title: In 2024, How to Zoom Video in VLC Media Player
- Author: Chloe
- Created at : 2024-12-05 07:43:43
- Updated at : 2024-12-12 05:36:49
- Link: https://ai-editing-video.techidaily.com/in-2024-how-to-zoom-video-in-vlc-media-player/
- License: This work is licensed under CC BY-NC-SA 4.0.

