
:max_bytes(150000):strip_icc():format(webp)/homeweatherstation-34f9e9a9aaf64446a8f21ff05991c079.jpg)
In 2024, If You Wish to Edit FLV Videos without Any Problems, You Should Utilize a Multipurpose Video Editor that Supports the FLV File Format
If You Wish to Edit FLV Videos without Any Problems, You Should Utilize a Multipurpose Video Editor that Supports the FLV File Format
FLV is a common container format for transferring digital video and audio information over the Internet. A.flv file is a flash video that may be seen on your computer with Adobe Flash Player, Adobe Air, or some third-party Adobe Flash plugins.
FLV has become the standard video format for web-based streaming video service providers such as Hulu and VEVO due to its superior functionality and tiny size. It’s also the default format for Quicktime on Mac systems.
If you wish to edit FLV videos without any problems, you should utilize a multipurpose video editor that supports the FLV file format.
Best FLV Editor to Edit FlV Video on Windows and Mac - Filmroa Video Editor
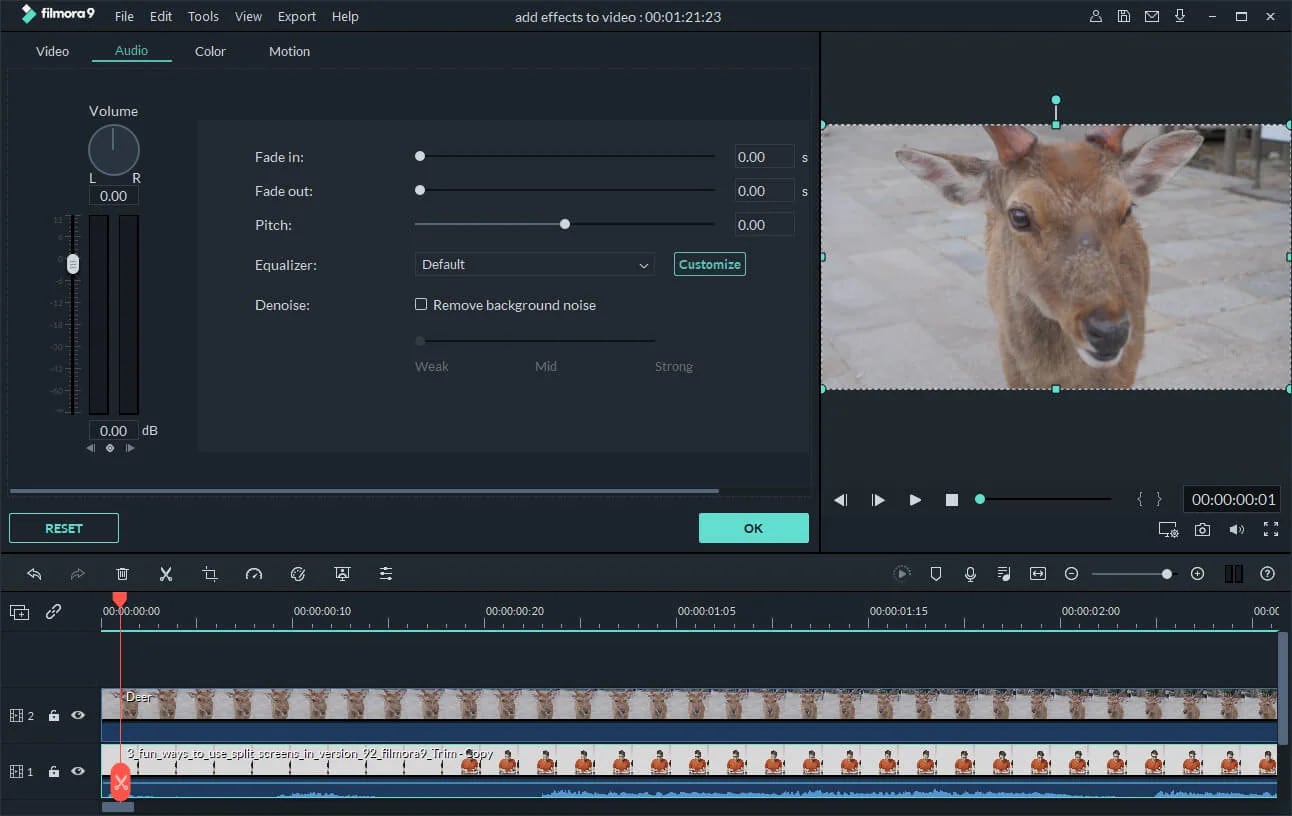
Filmora Video Editor is a professional FLV video editing application. This software allows you to edit 4K video files, share completed films directly on social media platforms, and add subtitles and audio files.
You may mix multiple films and enhance your footage with numerous transitions and other effects using this FLV video editing software. Furthermore, the free Filmora application is ideal for adding audio files or video clips from the wide library and uploading your soundtrack.
For Win 7 or later (64-bit)
For macOS 10.14 or later
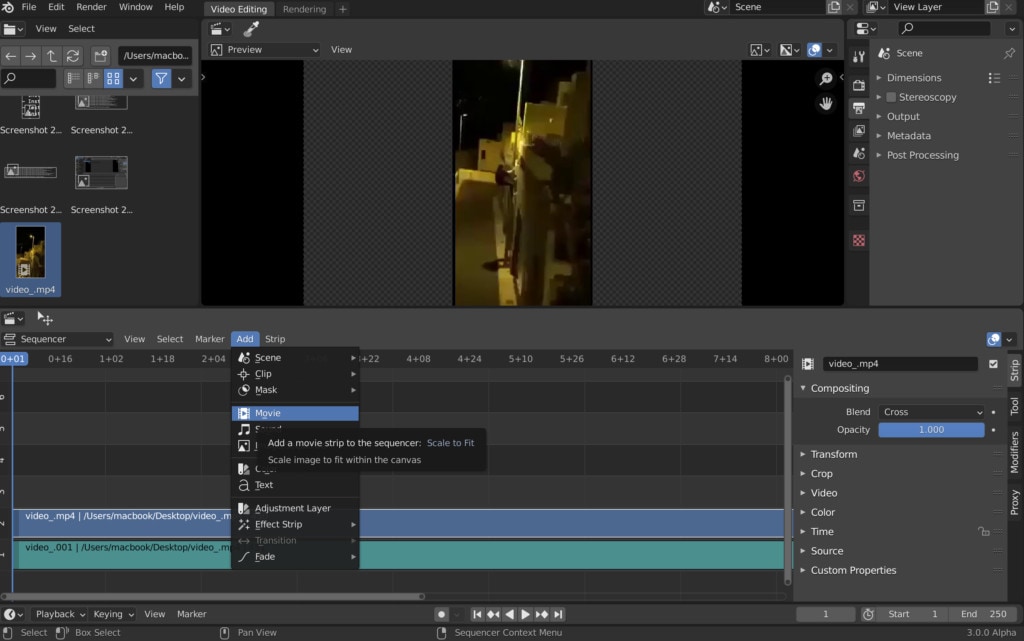
Therefore, you can use the following steps to edit FLV video on Windows and Mac:
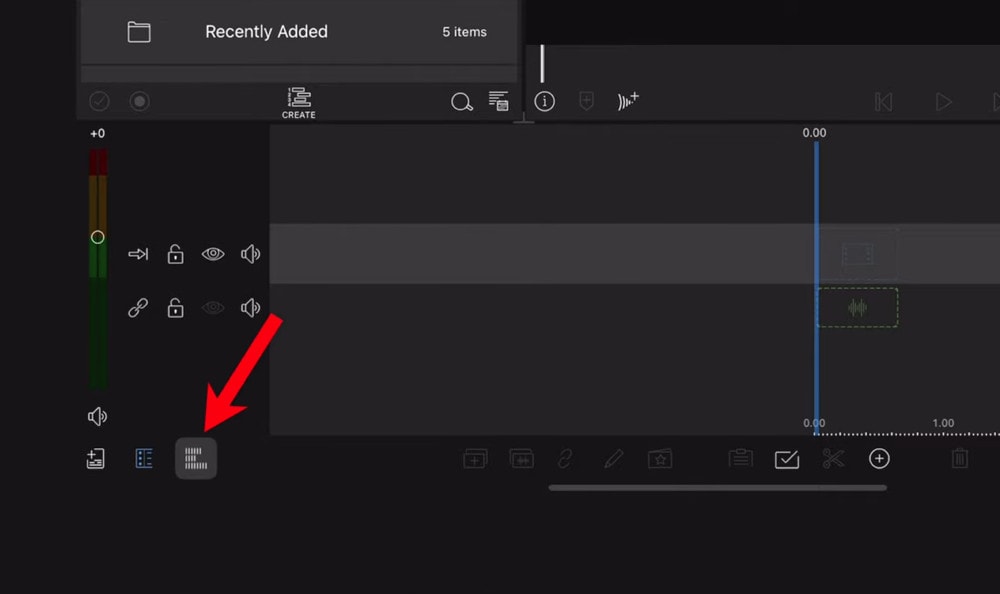
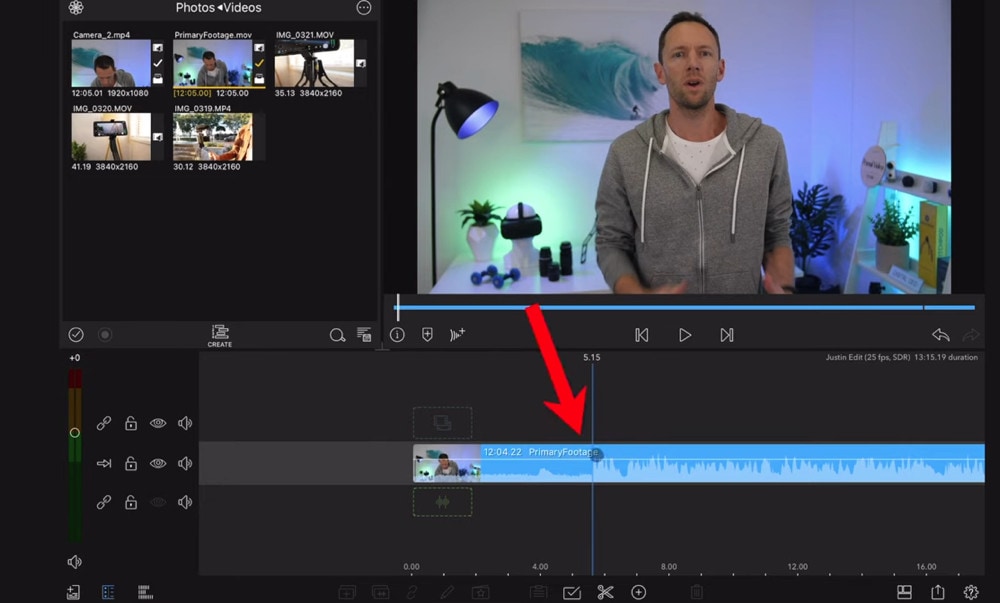
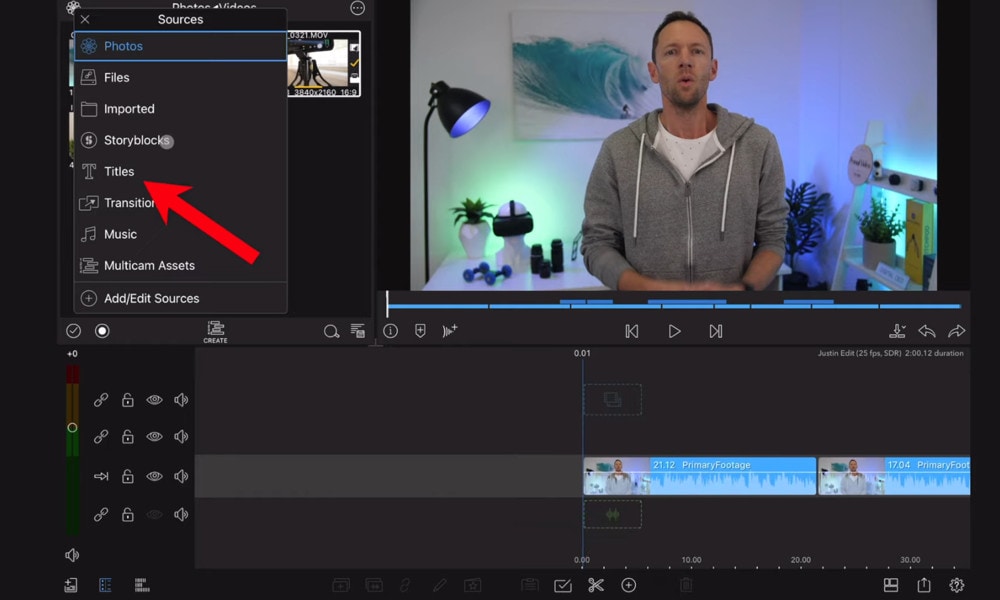
Step 1: Import file:

Step 2: Edit the FLV file:
Acquire the perfect tool in your palm for anything you want to do, such as clipping, cropping, rotating, and more.
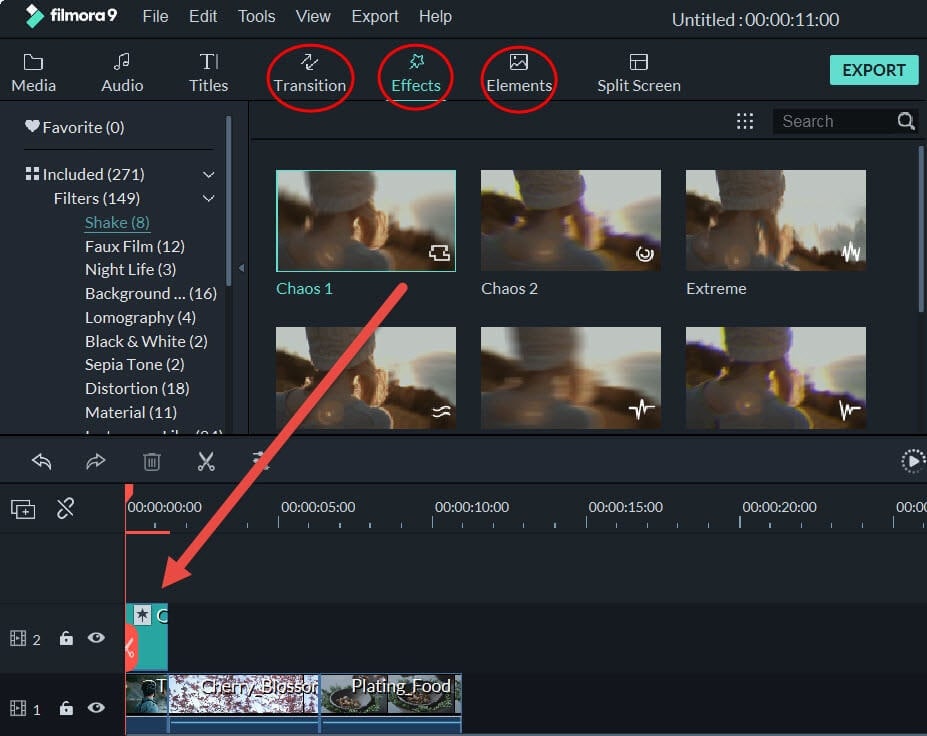
Furthermore, all editing capabilities in the toolbar allow drag-and-drop, making it even easier to touch up your films quickly. Consider the following scenario:
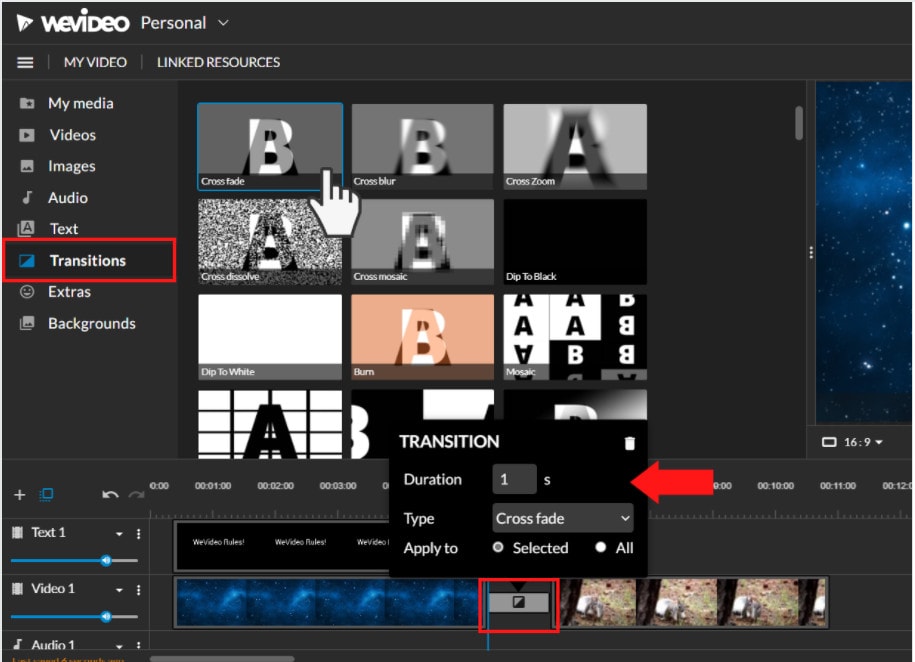
- Drag and drop a transition into the video/photo, or right-click it and select “Apply to All.”
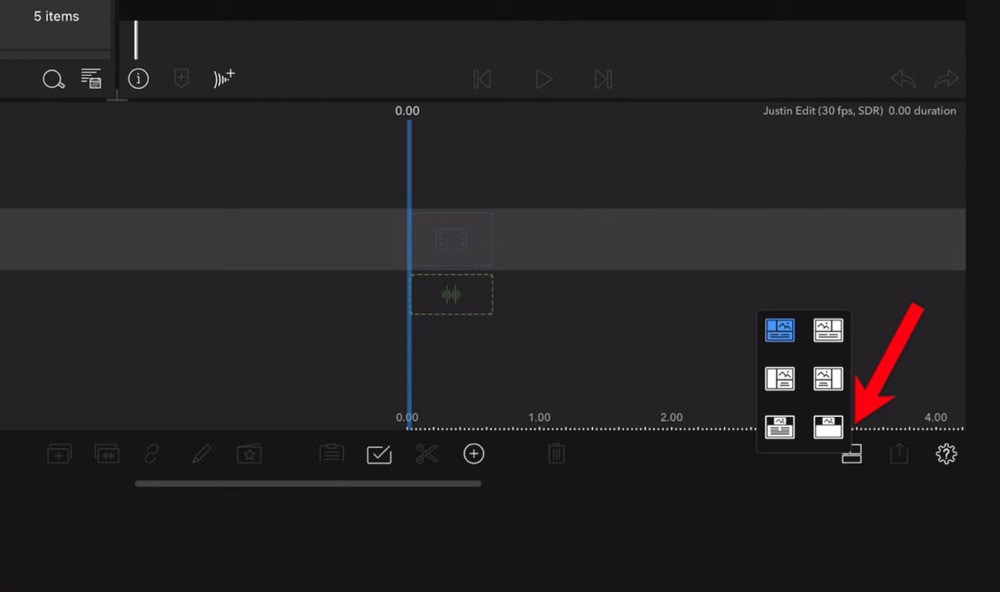
- Please drag & drop a title template to the position where you want it to appear, then adjust it.
- To use the effects, select one from the 50+ available video effects, select it, and apply it to your photos/videos instantaneously.
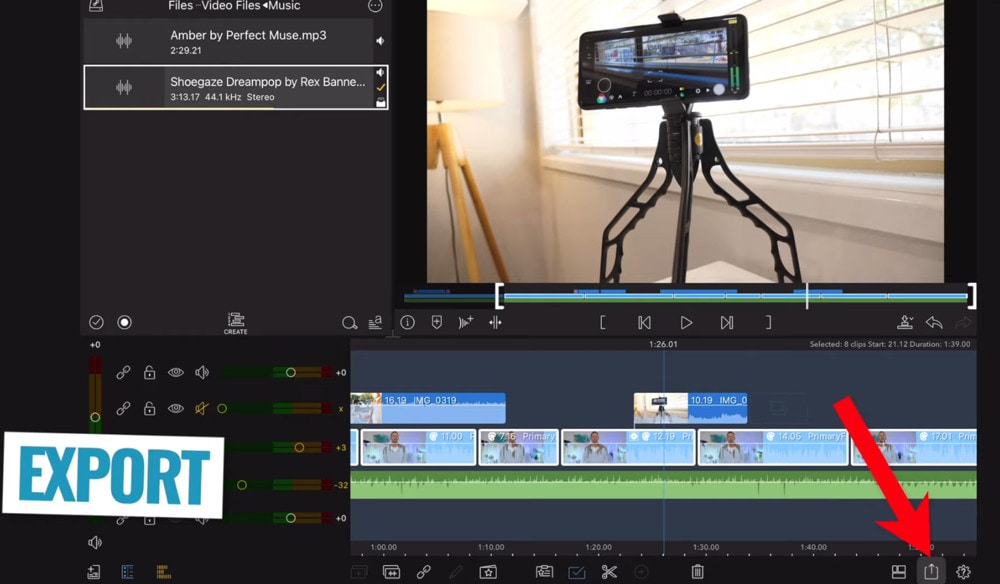
Step 3: Save or Export the file:

When you’re done, export your modified MP4 files to Windows/Mac and quickly share them on YouTube, with the option of sending a message to Facebook and Twitter. When you click Create in the program window’s middle right corner, you’ll be taken to the Output window below.
Alternative Way to Edit FlV Video on Windows
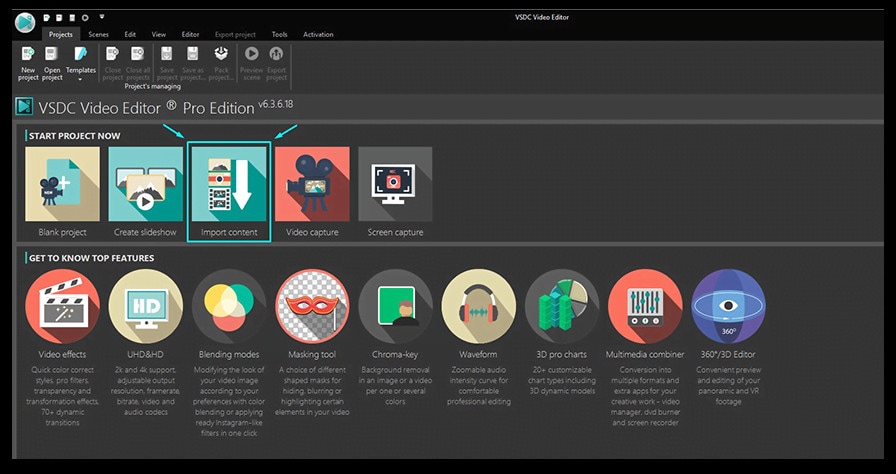
1. VSDC
VSDC is a free video editor along with a lot of advanced features. Cut, combine, trim, crop, and other editing capabilities are available to help you polish your FLV films.
Although it may not look logical, learning the editing capabilities hidden within modular boxes is simple. One noteworthy aspect of VSDC is its ability to produce good visual effects using many trendy video effects, transitions, and filters.
Furthermore, strong chroma keys, color correction, object modification, and other editing tools can be utilized to edit FLV videos. It not only creates excellent FLV videos, but it also supports a wide range of media conversion, allowing you to convert FLV files to various formats and export them without a watermark.
Therefore, follow the below mentioned steps to edit FLV video using VSDC:
Step 1: Install the software on the Windows. Open the application and import the video.
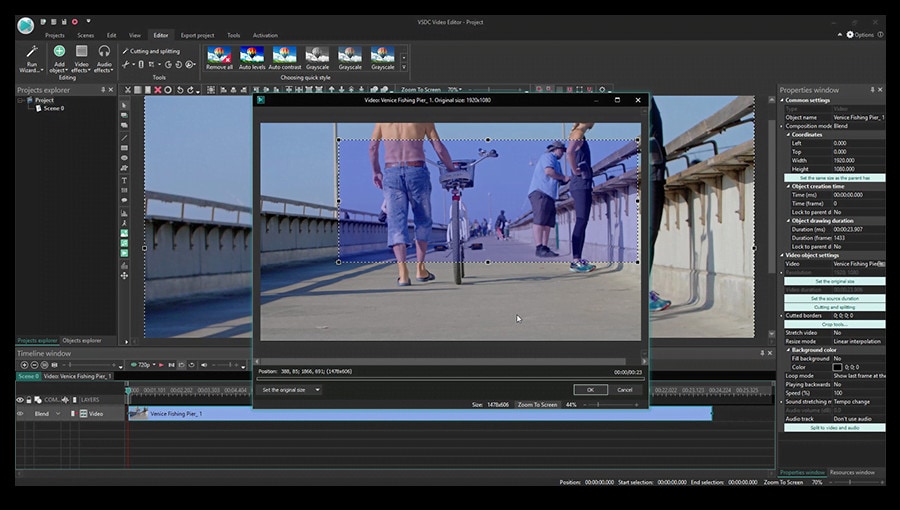
Step 2: Use cutting and splitting tools to edit the video.
The first icon is a picture of a pair of scissors, which is a cutting tool. It’s very useful when you need to cut the beginning or end of a film. Place the cursor exactly where you want to cut, then select “Trim start” or “Trim finish” from the dropdown cutting menu (the small triangle next to the scissors icon).
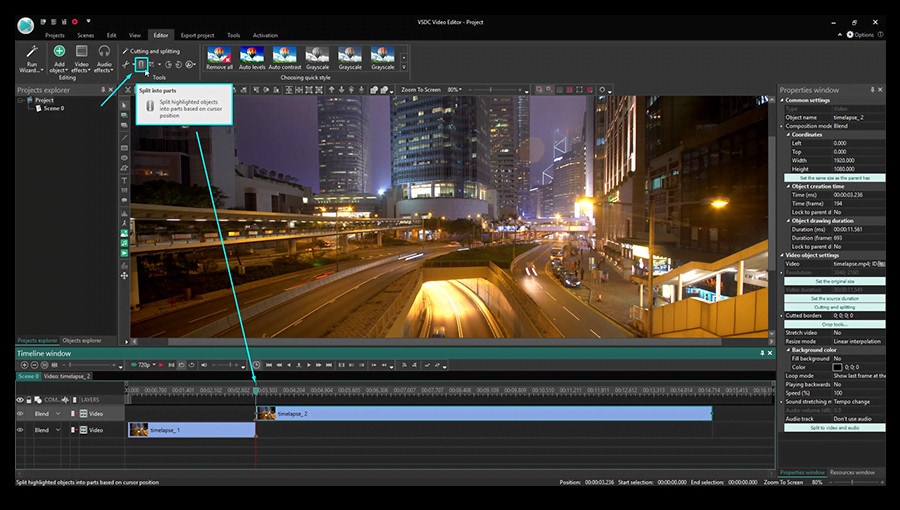
Cropping is also simple. If you have too much additional space around the scene object recorded, just choose the file you want to trim and select the cropping icon from the “Cutting and Splitting” option. A new window will appear, allowing you to select the region of the scene that should stay.
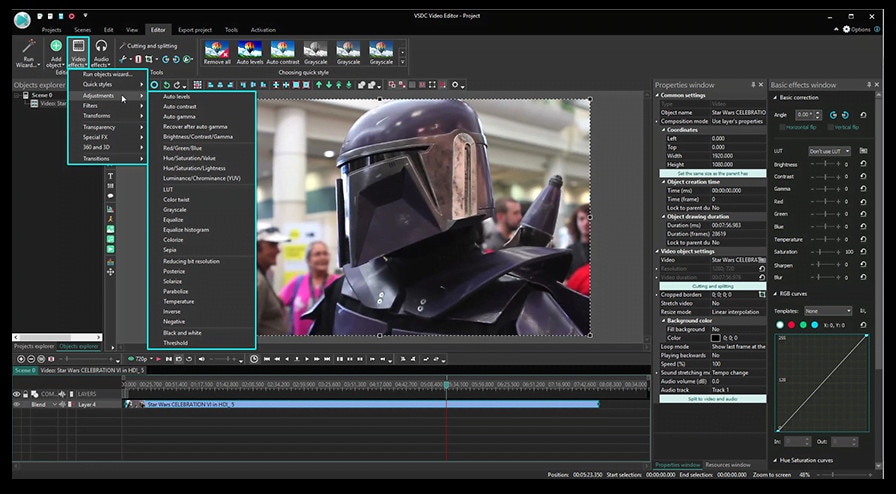
Step 3: Apply effects and transitions.
To use one, first select the video file you wish to edit, then go to the Video effects tab and select the effect you want to use. On the timeline, a new tab will appear, containing all of the effects done to the selected object. You can alter the effect’s duration and position in time by dragging it with the mouse there. The properties pane on the right-hand side can be used to change other parameters.
Transitions follow the same rule. Place your cursor where you want the transition to begin, then choose a transition from the Video effects dropdown menu and manually adjust the duration.
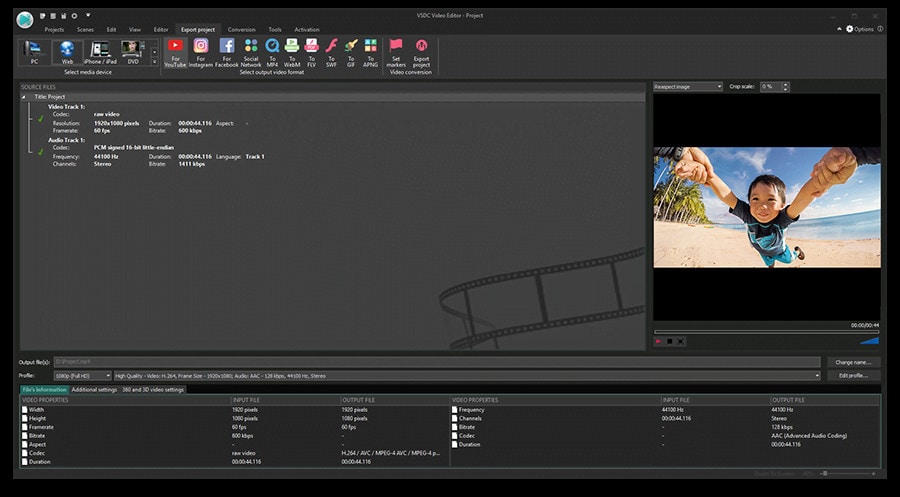
Step 4: Save changes and export video.
Make sure your movie appears exactly how you want it to before exporting it. If the video appears choppy, use the red preview button and lower the preview quality. When the PC’s resources are insufficient to process the video in real time, lagging can occur. Keep in mind that it has no bearing on the outcome. When you’re finished, navigate to the Export project tab and select an export format.
2. Adobe Premiere Pro:
Professional video editors use Premiere Pro to make everything from YouTube videos to Hollywood films like Mank, a 2021 Oscar candidate. It’s also widely utilized in the workflows of designers, animators, and VFX artists, and we can see why after lengthy testing.
We found the software’s UI to be simple to use, and it increased our productivity by separating things into various workspaces, such as editing, effects, and audio. When we tested it on both Mac and PC, we discovered that each workspace helps handle a specific activity while minimizing distraction.
Edit the FLV video with Adobe Premiere Pro using the following steps:
Step 1: Import the video and create initial sequence.
Step 2: In the Timeline, trim and rearrange clips, add audio, and transitions.
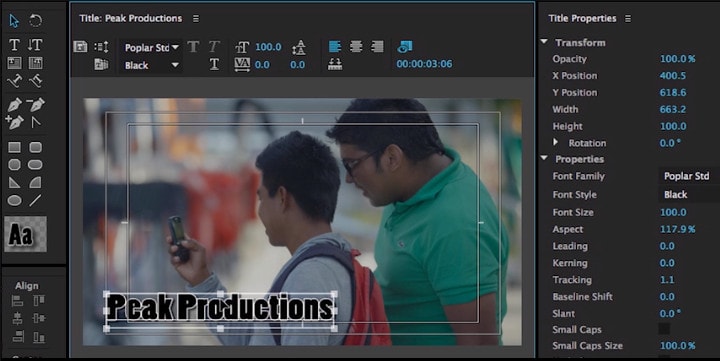
Step 3: Add title and graphics.
In Premiere Pro, you may make onscreen titles, as well as stylize and animate your images.
Step 4: Export your video.

Alternative Way to Edit FlV Video on Mac
1. Blender:
Under the GNU General Public License, Blender is a free, open-source 3D content production program that runs on all major operating systems. Blender is one of the greatest video editors for both Windows and Mac, with advanced features such as modifier-based modeling tools, powerful character animation capabilities, a node-based material, etc.
Because it is developed for professionals, it is tough to use as a beginner. However, it is unrestricted in its use and distribution. In addition, color options are changeable and versatile in the UI.
In contrast, this free video editor is perfect for semi-pros or those who want to enhance their video editing skills. However, you’ll need a lot of time and effort to learn it.
Step 1: Open the application.
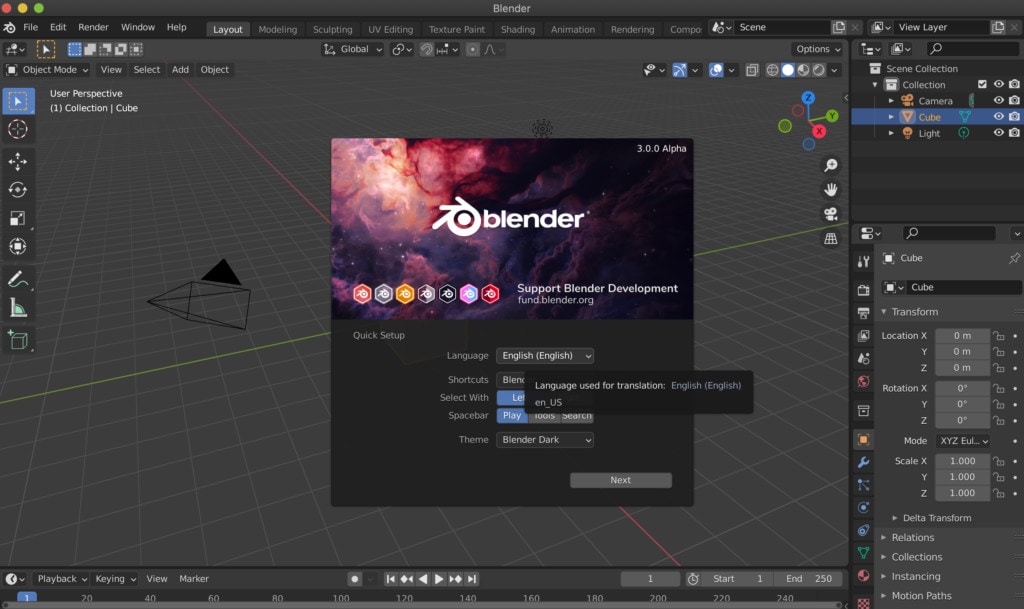
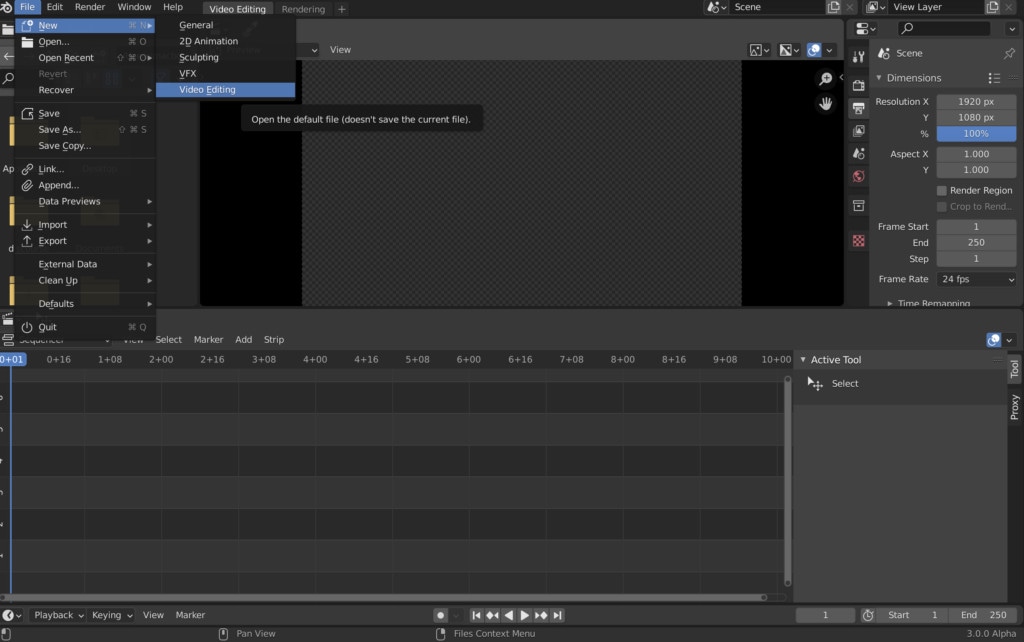
Step 2: Then, go into File->New->Video Editing to open the video editor.
Step 3: Import the video and start editing using the editing tools.
Step 4: Save and export the video.

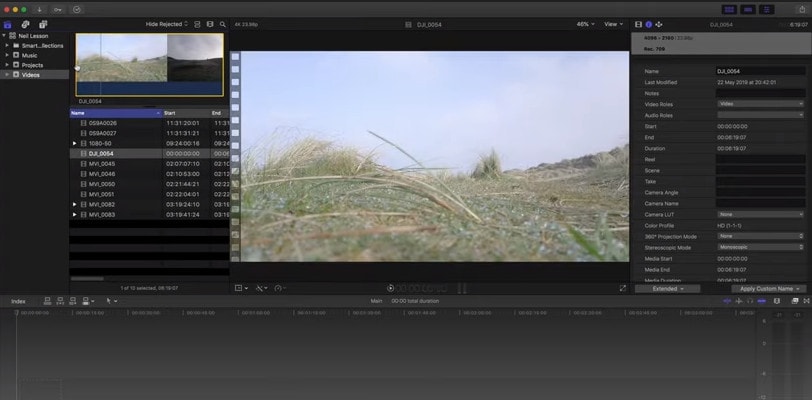
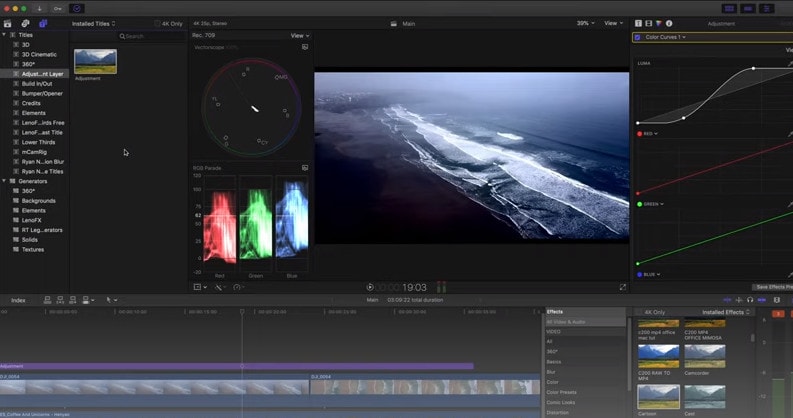
2. Final Cut Pro:
When it comes to video editing software, Apple’s Final Cut Pro is one of the industry standards. As a result, it’s widely utilized in the television and film industries - at least among Mac users. However, one of the truly convincing reasons to choose it over Premiere Pro is because it is subscription-free: you only pay once.
The software’s Magnetic Timeline, grouping tools, a vast selection of effects, solid organizational capabilities, and simple ways to add and edit audio make it a favorite among professional video editors. 360° video, HDR, and powerful color correcting tools are among the other capabilities. It’s a strong software with a lot of features.
Follow the steps to edit FLV video using Final Cut Pro:
Step 1: Create Project.
To make a movie in Final Cut Pro, you must first establish a project, which keeps track of your editing selections and the media you utilize.
Step 2: Select and add clips to the timeline:
The second stage in making a movie with Final Cut Pro is to add and arrange clips in your project. In the timeline, you can move and reorder clips.
Step 3: Cut and trim video:
Final Cut Pro has a number of features for altering the start and stop points of clips in the timeline, as well as regulating the pacing of shots from one to the next.
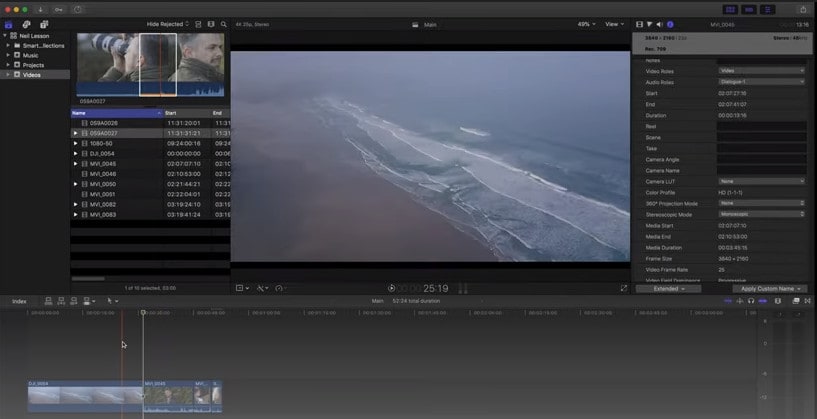
Step 4: Edit the video by adding effects and transitions:
Final Cut Pro includes a number of advanced editing features that make it simple to create a professional film. Visual enhancements and colour correction are among the finishing touches.

Step 5: Save and export video:
2 Ways to Edit FlV Video on Android:
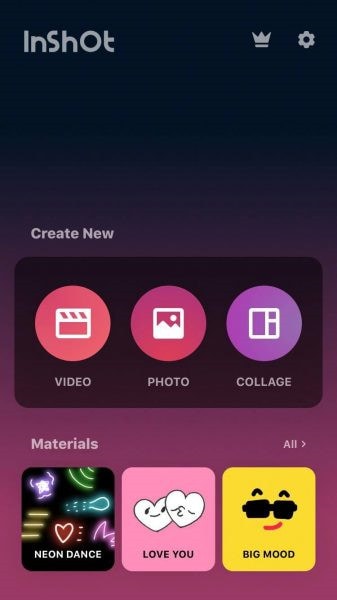
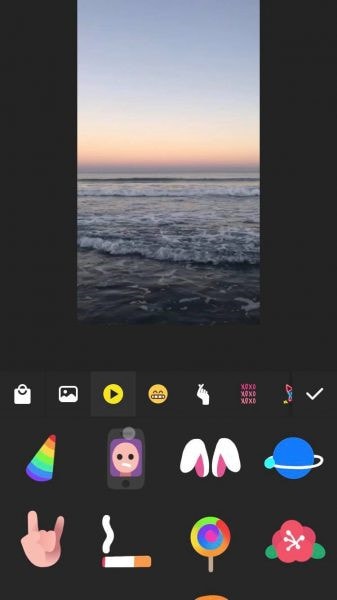
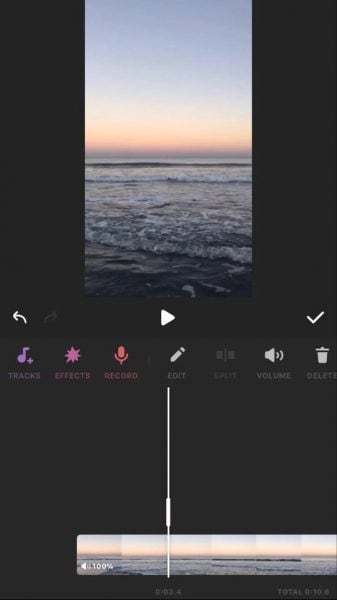
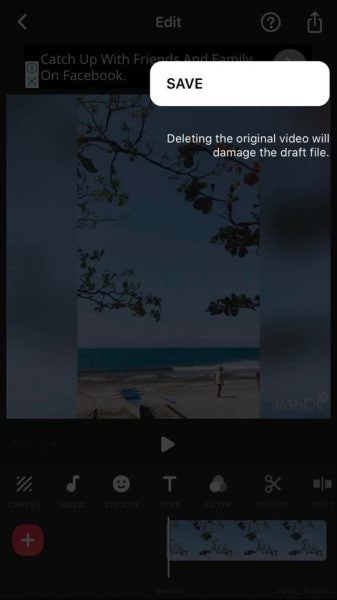
1. Inshot:
For Android users, Inshot is a fantastic image and video editor. This Android video editor allows you to add popular stickers and emoticons to your films, making them more fashionable and unique.
The program supports HD video output, allowing you more control over your footage. Moreover, the additional sound and video can be synchronized with the available video chronology.
You can quickly blend more than two movies into one with rich effects and sound with this Android editor app. In addition, you can generate a watermark using unique text provided in the app, and subtitles support allow you to produce one with a variety of fonts.
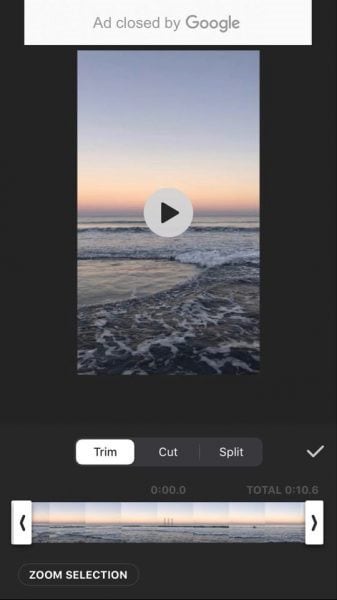
Following are the steps that you can follow to edit FLV video using Inshot:
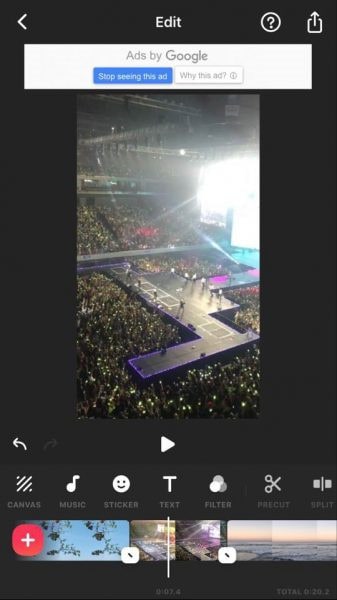
Step 1: Open the app and import the video.
Tap “Video” to open your phone’s gallery folder and begin editing a video in the InShot app. Select a video to work with. Adjust the canvass after your video has been loaded into the InShot App. For your other social media accounts, there are aspect ratios and sizes that work well with the video. It also has the option of being in portrait or landscape mode.
Step 2: Trim and split videos.
Step 3: Merge videos (optional):
By combining clips, you can combine them into a single film or project. Simply choose the videos you want to import from the drop-down menu. By tapping the “+” button on the lower left of the screen, you can insert and merge more videos. Your project will then be updated using the selected video.
Step 4: Apply filters, add music, text and stickers.
Step 5: Once you are done with the editing process, save the file.
2. Videoshow:
VideoShow has a lot of video editing options. It is a simple and practical video editing program and movie scene maker for art directors and beginners. Using this video cutter, you may reverse, blur, duplicate, edit, merge and split collage clips or films.
You can also use VideoShow to adjust the audio or add subtitles to any video. It also allows you to use different filters on any video on your device. Over 50 intricate themes are included in the program, allowing you to create gorgeous music videos, slide shows, and vlogs in no time.
The annual subscription package is for $135.19, or you can also make a one-time purchase for $225.78.
However, to edit the video, you can use the following steps:
Step 1: Download and install the videoshow application and open it. Upload the video that you want to edit.
Step 2: Edit the video by applying filters or cutting and trimming the part of the video that you want to remove.
Step 3: Save changes and export the video to your preferred location.
2 Ways to Edit FlV Video on iPhone:
1. LumaFusion:
No other software program on the iPhone comes close to the feature set that LumaFusion offers for video editing. It is the only premium app on this list, and it is well worth every penny.
But, of course, YouTubers aren’t the only ones who use the program; mobile journalists and professional video producers who don’t want to lug along their bulky camera equipment and editing apparatus also use it.
LumaFusion deals with up to six video and audio tracks for photographs, movies, audio, titles, and graphics, and six audio tracks for narration, music, and sound effects. You also receive a magnetic timeline; importing clips is a breeze once they’ve been imported.
There are many transitions and effects to choose from, all of which can be layered. Finally, it includes much royalty-free music, sound effects, and other assets. So if you need a professional video editing tool for your iPhone, LumaFusion ($29.99) is the way to go.
Follow these steps to edit FLV video using LumaFusion:
Step 1: To create your first project, press + at the bottom of the screen. You can create a new project by tapping that area or by tapping the Plus button.
Step 2: Import video:
The Import section is located in the top left corner of the screen. This defaults to the Photos tab when you initially launch a new project. All of the photographs and videos can be seen here.
Step 3: Check layout and adjust volume levels
Step 4: Edit the video and add titles.
Step 5: Export the video.
2. Filmora Go:
Without a doubt, Filmora is one of the greatest free video editors for iPhone that does not contain any watermarks. In addition, it’s compatible with both iPhones and Android devices and has a simple user interface.
Filmora is the greatest iPhone video editor for beginners, with themed filters and effects that add flair to your videos without any work.
Filmora has many unique features, including themes for your videos and ‘Materials,’ which are visual effects created by the program. Unfortunately, materials are only available with Filmora Pro, so keep that in mind.
Aside from that, you’ll find all of the typical features here. You can also add titles to videos, utilize stickers and effects, and add music to the background of your movie. You may also add another clip in picture-in-picture mode, which is beneficial.
Below are the following steps to edit FLV video:
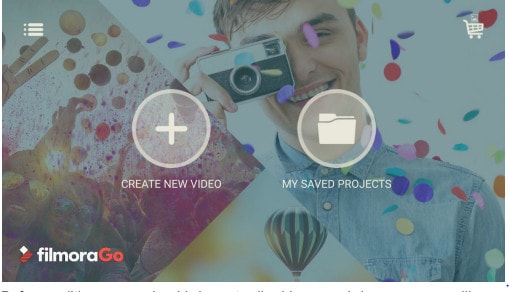
Step 1: Open the application and select ‘Create new video’. Now, import the video by choosing the video icon.
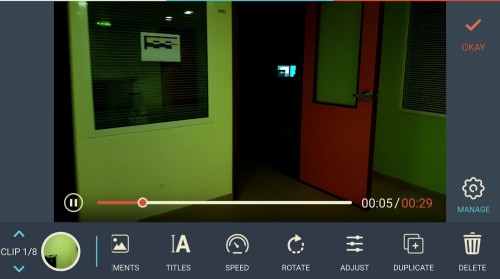
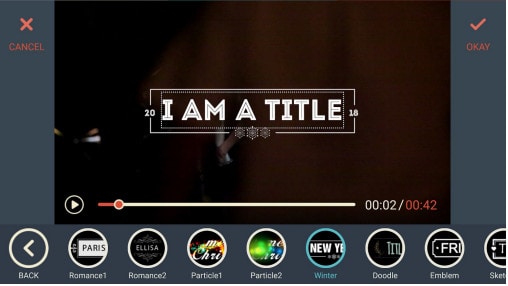
Step 2: Edit the video. Within the edit tool, you can trim and split the video. You can also improve the video quality by adding titles, transitions, and music, and voiceovers.


Step 3: After editing the video, select ‘SAVE’ and export the video or download it.
2 Ways to Edit FlV Video Online:
1. Fastreel:
If you’re seeking the finest free online video editor, Fastreel is a terrific tool to start with. This online video editing software provides a wide range of editing options. It can merge, edit, crop, and compress videos to make sharing easier.
It also includes many pre-made templates that you can change to create titles and transitions and other editing features like reverse, looping, and rotating. It’s also quite simple to use, and you can have polished videos in minutes.
There are also numerous pricing options to suit different customers, ranging from a completely free plan with watermarks to paid subscriptions with no limitations.
Use the following steps to edit FLV video:
Step 1: Open Fastreel web and import the video.
Step 2: Use templates to make it look attractive.
Step 3: Edit the video using the template.
Templates are unfinished videos with all of the effects already applied, such as backdrops, transitions, animated stickers, and titles. There are blank spots for your photos or videos, and you can arrange them in any sequence you like. You can also add music from the Fastreel library or upload your own track after entering your text.
Step 4: Once you are done with edits, save the video and export it.
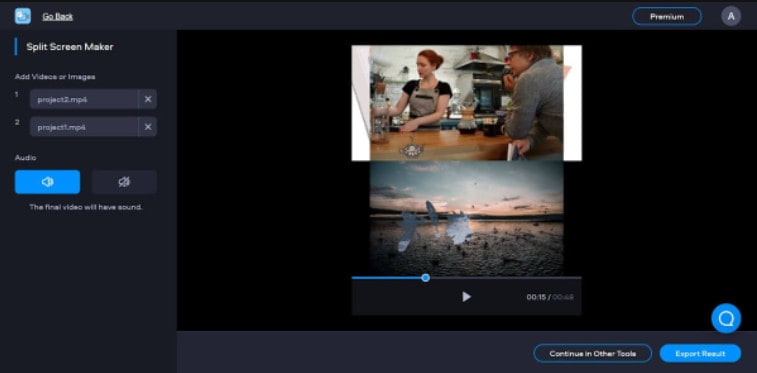
2. WeVideo:
When you’re seeking the greatest video producer online, another wonderful choice to explore is WeVideo.
Google, Dropbox, Rover, and Roche are just a few of the huge names that trust our online editor. Its fast, versatile editing engine and vast stock content collection for adding stock movies, photos, and audio tracks to your productions are ideal for business users.
WeVideo also stands out since it provides unlimited cloud storage for all of your videos, which you can download and watch on any device. The only drawback is that all of this comes at a price, with WeVideo offering a variety of payment plans ranging from $4.99 to $36.99 a month.
Follow the steps to edit videos using WeVideo:
Step 1: Open WeVideo and import the video file.
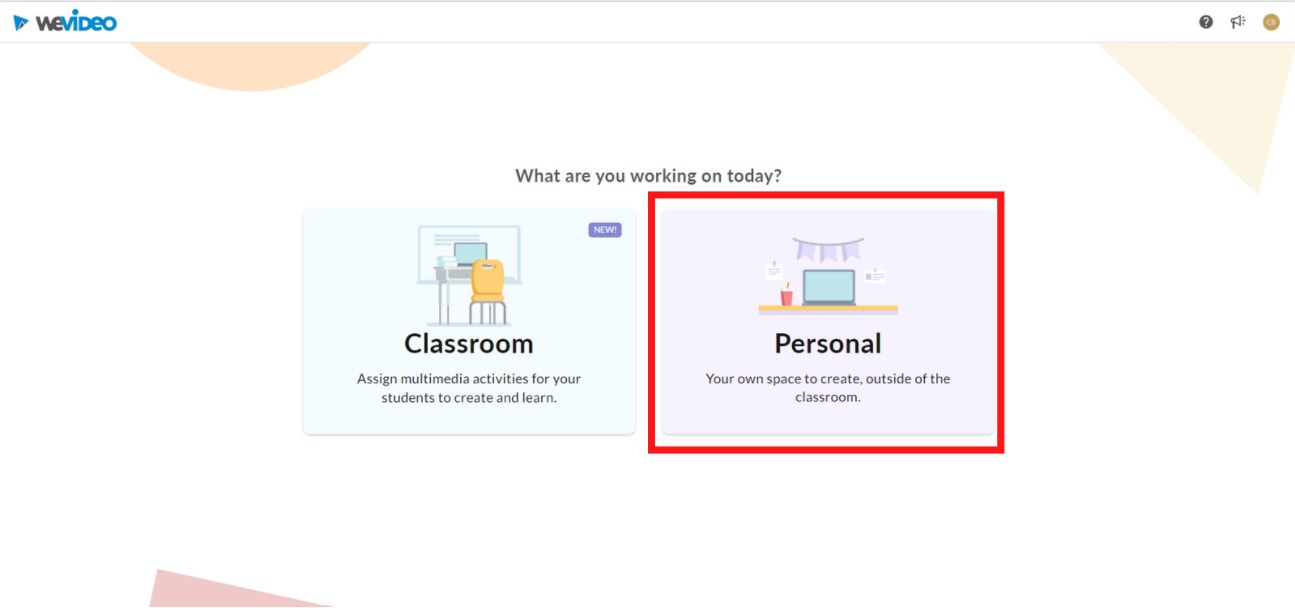
Step 2: Click on create new video in the left-hand corner of the screen.
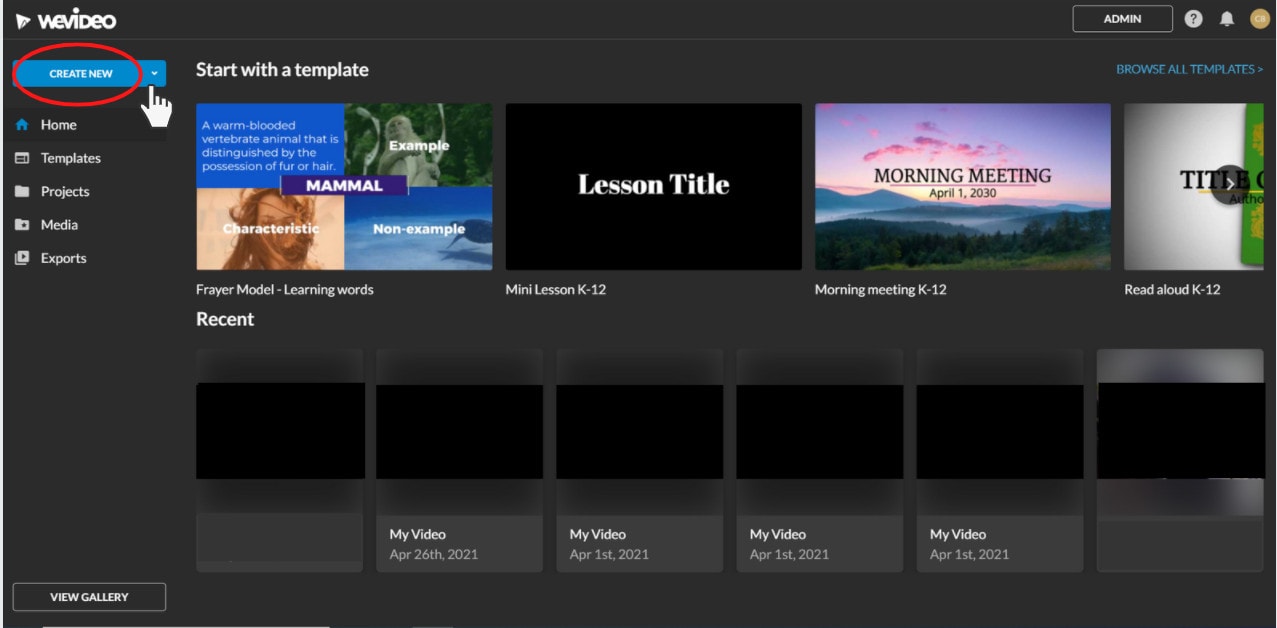
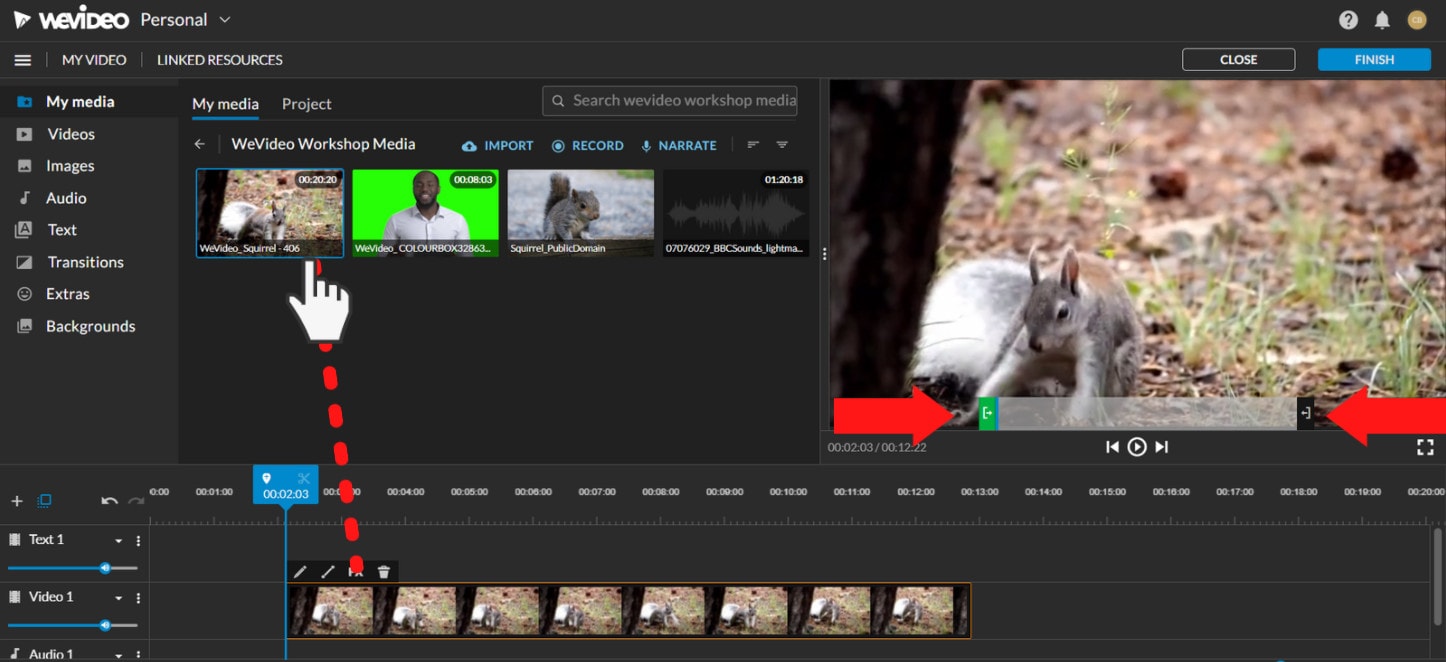
Step 3: Edit the video.
The video clip you imported will appear in the viewing window to the right once you click on it. By moving the arrows and either end, you can edit out the beginning or end of your footage.
- Drag the clip into your timeline from your media pool.
- Place the clip on your timeline by dragging and dropping it.
- Click the scissor symbol after moving the blue marker to the spot where you want to cut your clip.
- Once the material has been chopped, you can erase bits of it by selecting it with your mouse and then pressing delete on your keyboard or rearrange the clips in the timeline by dragging and dropping them to other positions.
Step 4: Add effects, transitions, and music to the video.
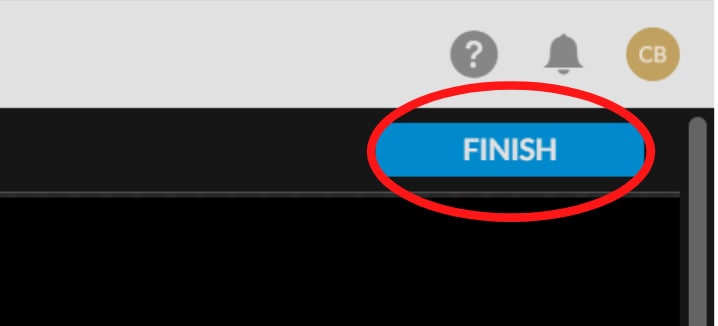
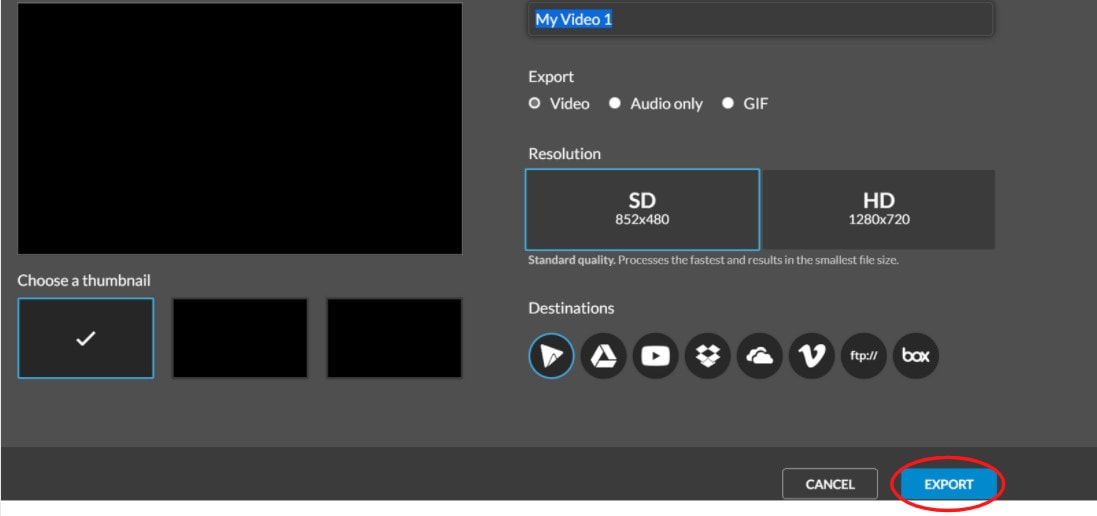
Step 5: Save and export the video by clicking on the Finish tab.
FAQs about editing FLV video
- How to open FLV files?
Any FLV player is required to view FLV files. Various players are available, including VLC, FLV Player, Sothink FLV Player for Mac, Tonec Free FLV Player, Any FLV Player, and others.
- Is Filmora compatible with Mac?
Filmora requires macOS Sierra (version 10.12) or later and the Big Sur (version 11) and Apple M1 chips. Touch Bar compatibility for MacBook Pro users and custom shortcuts to speed up editing.
- What is the best online FLV editor?
There are numerous free online editors to choose from. Fastreel, WeVideo, and FlexClip Video Maker are a few of the most popular.
- Is FLV better than MP4?
Because FLV and MP4 are the two most popular video file formats, it’s crucial to know which one is preferable. Adobe’s proprietary format is FLV. Both formats employ video and audio codecs and have equal performance levels. In their unprocessed state, MP4 files are more adaptable. You can, however, use an FLV file at the same time if you have the correct player.
- How do I choose a video editor?
When comparing video editing software, there are six crucial elements to consider.
- Budget and cost
- Ease of use/learning curve
- Multi-GPGPU acceleration and video format support
- Tools for advanced editing
- Music, special effects, and other goodies
- Customer service is second to none.
For macOS 10.14 or later
Therefore, you can use the following steps to edit FLV video on Windows and Mac:
Step 1: Import file:
Step 2: Edit the FLV file:
Acquire the perfect tool in your palm for anything you want to do, such as clipping, cropping, rotating, and more.
Furthermore, all editing capabilities in the toolbar allow drag-and-drop, making it even easier to touch up your films quickly. Consider the following scenario:
- Drag and drop a transition into the video/photo, or right-click it and select “Apply to All.”
- Please drag & drop a title template to the position where you want it to appear, then adjust it.
- To use the effects, select one from the 50+ available video effects, select it, and apply it to your photos/videos instantaneously.
Step 3: Save or Export the file:
When you’re done, export your modified MP4 files to Windows/Mac and quickly share them on YouTube, with the option of sending a message to Facebook and Twitter. When you click Create in the program window’s middle right corner, you’ll be taken to the Output window below.
Alternative Way to Edit FlV Video on Windows
1. VSDC
VSDC is a free video editor along with a lot of advanced features. Cut, combine, trim, crop, and other editing capabilities are available to help you polish your FLV films.
Although it may not look logical, learning the editing capabilities hidden within modular boxes is simple. One noteworthy aspect of VSDC is its ability to produce good visual effects using many trendy video effects, transitions, and filters.
Furthermore, strong chroma keys, color correction, object modification, and other editing tools can be utilized to edit FLV videos. It not only creates excellent FLV videos, but it also supports a wide range of media conversion, allowing you to convert FLV files to various formats and export them without a watermark.
Therefore, follow the below mentioned steps to edit FLV video using VSDC:
Step 1: Install the software on the Windows. Open the application and import the video.
Step 2: Use cutting and splitting tools to edit the video.
The first icon is a picture of a pair of scissors, which is a cutting tool. It’s very useful when you need to cut the beginning or end of a film. Place the cursor exactly where you want to cut, then select “Trim start” or “Trim finish” from the dropdown cutting menu (the small triangle next to the scissors icon).
Cropping is also simple. If you have too much additional space around the scene object recorded, just choose the file you want to trim and select the cropping icon from the “Cutting and Splitting” option. A new window will appear, allowing you to select the region of the scene that should stay.
Step 3: Apply effects and transitions.
To use one, first select the video file you wish to edit, then go to the Video effects tab and select the effect you want to use. On the timeline, a new tab will appear, containing all of the effects done to the selected object. You can alter the effect’s duration and position in time by dragging it with the mouse there. The properties pane on the right-hand side can be used to change other parameters.
Transitions follow the same rule. Place your cursor where you want the transition to begin, then choose a transition from the Video effects dropdown menu and manually adjust the duration.
Step 4: Save changes and export video.
Make sure your movie appears exactly how you want it to before exporting it. If the video appears choppy, use the red preview button and lower the preview quality. When the PC’s resources are insufficient to process the video in real time, lagging can occur. Keep in mind that it has no bearing on the outcome. When you’re finished, navigate to the Export project tab and select an export format.
2. Adobe Premiere Pro:
Professional video editors use Premiere Pro to make everything from YouTube videos to Hollywood films like Mank, a 2021 Oscar candidate. It’s also widely utilized in the workflows of designers, animators, and VFX artists, and we can see why after lengthy testing.
We found the software’s UI to be simple to use, and it increased our productivity by separating things into various workspaces, such as editing, effects, and audio. When we tested it on both Mac and PC, we discovered that each workspace helps handle a specific activity while minimizing distraction.
Edit the FLV video with Adobe Premiere Pro using the following steps:
Step 1: Import the video and create initial sequence.
Step 2: In the Timeline, trim and rearrange clips, add audio, and transitions.
Step 3: Add title and graphics.
In Premiere Pro, you may make onscreen titles, as well as stylize and animate your images.
Step 4: Export your video.
Alternative Way to Edit FlV Video on Mac
1. Blender:
Under the GNU General Public License, Blender is a free, open-source 3D content production program that runs on all major operating systems. Blender is one of the greatest video editors for both Windows and Mac, with advanced features such as modifier-based modeling tools, powerful character animation capabilities, a node-based material, etc.
Because it is developed for professionals, it is tough to use as a beginner. However, it is unrestricted in its use and distribution. In addition, color options are changeable and versatile in the UI.
In contrast, this free video editor is perfect for semi-pros or those who want to enhance their video editing skills. However, you’ll need a lot of time and effort to learn it.
Step 1: Open the application.
Step 2: Then, go into File->New->Video Editing to open the video editor.
Step 3: Import the video and start editing using the editing tools.
Step 4: Save and export the video.
2. Final Cut Pro:
When it comes to video editing software, Apple’s Final Cut Pro is one of the industry standards. As a result, it’s widely utilized in the television and film industries - at least among Mac users. However, one of the truly convincing reasons to choose it over Premiere Pro is because it is subscription-free: you only pay once.
The software’s Magnetic Timeline, grouping tools, a vast selection of effects, solid organizational capabilities, and simple ways to add and edit audio make it a favorite among professional video editors. 360° video, HDR, and powerful color correcting tools are among the other capabilities. It’s a strong software with a lot of features.
Follow the steps to edit FLV video using Final Cut Pro:
Step 1: Create Project.
To make a movie in Final Cut Pro, you must first establish a project, which keeps track of your editing selections and the media you utilize.
Step 2: Select and add clips to the timeline:
The second stage in making a movie with Final Cut Pro is to add and arrange clips in your project. In the timeline, you can move and reorder clips.
Step 3: Cut and trim video:
Final Cut Pro has a number of features for altering the start and stop points of clips in the timeline, as well as regulating the pacing of shots from one to the next.
Step 4: Edit the video by adding effects and transitions:
Final Cut Pro includes a number of advanced editing features that make it simple to create a professional film. Visual enhancements and colour correction are among the finishing touches.
Step 5: Save and export video:
2 Ways to Edit FlV Video on Android:
1. Inshot:
For Android users, Inshot is a fantastic image and video editor. This Android video editor allows you to add popular stickers and emoticons to your films, making them more fashionable and unique.
The program supports HD video output, allowing you more control over your footage. Moreover, the additional sound and video can be synchronized with the available video chronology.
You can quickly blend more than two movies into one with rich effects and sound with this Android editor app. In addition, you can generate a watermark using unique text provided in the app, and subtitles support allow you to produce one with a variety of fonts.
Following are the steps that you can follow to edit FLV video using Inshot:
Step 1: Open the app and import the video.
Tap “Video” to open your phone’s gallery folder and begin editing a video in the InShot app. Select a video to work with. Adjust the canvass after your video has been loaded into the InShot App. For your other social media accounts, there are aspect ratios and sizes that work well with the video. It also has the option of being in portrait or landscape mode.
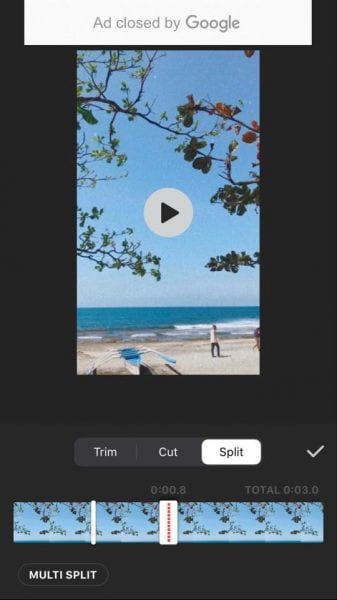
Step 2: Trim and split videos.
Step 3: Merge videos (optional):
By combining clips, you can combine them into a single film or project. Simply choose the videos you want to import from the drop-down menu. By tapping the “+” button on the lower left of the screen, you can insert and merge more videos. Your project will then be updated using the selected video.
Step 4: Apply filters, add music, text and stickers.
Step 5: Once you are done with the editing process, save the file.
2. Videoshow:
VideoShow has a lot of video editing options. It is a simple and practical video editing program and movie scene maker for art directors and beginners. Using this video cutter, you may reverse, blur, duplicate, edit, merge and split collage clips or films.
You can also use VideoShow to adjust the audio or add subtitles to any video. It also allows you to use different filters on any video on your device. Over 50 intricate themes are included in the program, allowing you to create gorgeous music videos, slide shows, and vlogs in no time.
The annual subscription package is for $135.19, or you can also make a one-time purchase for $225.78.
However, to edit the video, you can use the following steps:
Step 1: Download and install the videoshow application and open it. Upload the video that you want to edit.
Step 2: Edit the video by applying filters or cutting and trimming the part of the video that you want to remove.
Step 3: Save changes and export the video to your preferred location.
2 Ways to Edit FlV Video on iPhone:
1. LumaFusion:
No other software program on the iPhone comes close to the feature set that LumaFusion offers for video editing. It is the only premium app on this list, and it is well worth every penny.
But, of course, YouTubers aren’t the only ones who use the program; mobile journalists and professional video producers who don’t want to lug along their bulky camera equipment and editing apparatus also use it.
LumaFusion deals with up to six video and audio tracks for photographs, movies, audio, titles, and graphics, and six audio tracks for narration, music, and sound effects. You also receive a magnetic timeline; importing clips is a breeze once they’ve been imported.
There are many transitions and effects to choose from, all of which can be layered. Finally, it includes much royalty-free music, sound effects, and other assets. So if you need a professional video editing tool for your iPhone, LumaFusion ($29.99) is the way to go.
Follow these steps to edit FLV video using LumaFusion:
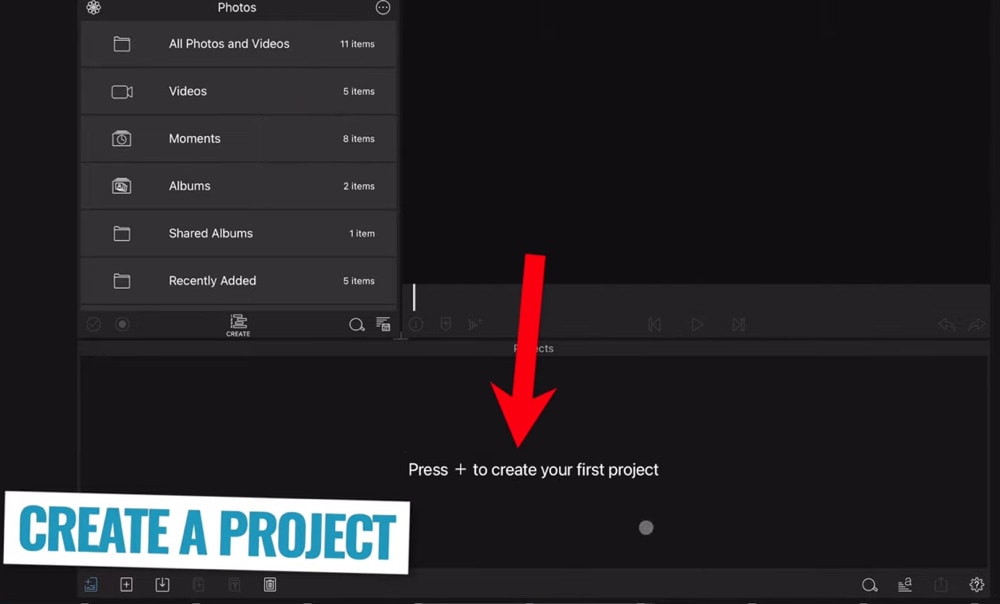
Step 1: To create your first project, press + at the bottom of the screen. You can create a new project by tapping that area or by tapping the Plus button.
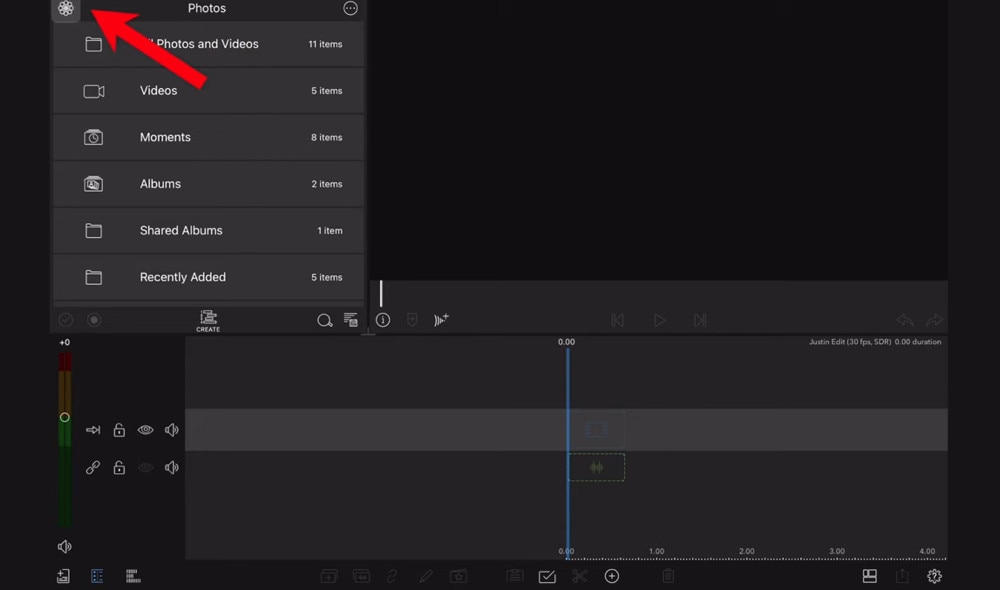
Step 2: Import video:
The Import section is located in the top left corner of the screen. This defaults to the Photos tab when you initially launch a new project. All of the photographs and videos can be seen here.
Step 3: Check layout and adjust volume levels
Step 4: Edit the video and add titles.
Step 5: Export the video.
2. Filmora Go:
Without a doubt, Filmora is one of the greatest free video editors for iPhone that does not contain any watermarks. In addition, it’s compatible with both iPhones and Android devices and has a simple user interface.
Filmora is the greatest iPhone video editor for beginners, with themed filters and effects that add flair to your videos without any work.
Filmora has many unique features, including themes for your videos and ‘Materials,’ which are visual effects created by the program. Unfortunately, materials are only available with Filmora Pro, so keep that in mind.
Aside from that, you’ll find all of the typical features here. You can also add titles to videos, utilize stickers and effects, and add music to the background of your movie. You may also add another clip in picture-in-picture mode, which is beneficial.
Below are the following steps to edit FLV video:
Step 1: Open the application and select ‘Create new video’. Now, import the video by choosing the video icon.
Step 2: Edit the video. Within the edit tool, you can trim and split the video. You can also improve the video quality by adding titles, transitions, and music, and voiceovers.
Step 3: After editing the video, select ‘SAVE’ and export the video or download it.
2 Ways to Edit FlV Video Online:
1. Fastreel:
If you’re seeking the finest free online video editor, Fastreel is a terrific tool to start with. This online video editing software provides a wide range of editing options. It can merge, edit, crop, and compress videos to make sharing easier.
It also includes many pre-made templates that you can change to create titles and transitions and other editing features like reverse, looping, and rotating. It’s also quite simple to use, and you can have polished videos in minutes.
There are also numerous pricing options to suit different customers, ranging from a completely free plan with watermarks to paid subscriptions with no limitations.
Use the following steps to edit FLV video:
Step 1: Open Fastreel web and import the video.
Step 2: Use templates to make it look attractive.
Step 3: Edit the video using the template.
Templates are unfinished videos with all of the effects already applied, such as backdrops, transitions, animated stickers, and titles. There are blank spots for your photos or videos, and you can arrange them in any sequence you like. You can also add music from the Fastreel library or upload your own track after entering your text.
Step 4: Once you are done with edits, save the video and export it.
2. WeVideo:
When you’re seeking the greatest video producer online, another wonderful choice to explore is WeVideo.
Google, Dropbox, Rover, and Roche are just a few of the huge names that trust our online editor. Its fast, versatile editing engine and vast stock content collection for adding stock movies, photos, and audio tracks to your productions are ideal for business users.
WeVideo also stands out since it provides unlimited cloud storage for all of your videos, which you can download and watch on any device. The only drawback is that all of this comes at a price, with WeVideo offering a variety of payment plans ranging from $4.99 to $36.99 a month.
Follow the steps to edit videos using WeVideo:
Step 1: Open WeVideo and import the video file.
Step 2: Click on create new video in the left-hand corner of the screen.
Step 3: Edit the video.
The video clip you imported will appear in the viewing window to the right once you click on it. By moving the arrows and either end, you can edit out the beginning or end of your footage.
- Drag the clip into your timeline from your media pool.
- Place the clip on your timeline by dragging and dropping it.
- Click the scissor symbol after moving the blue marker to the spot where you want to cut your clip.
- Once the material has been chopped, you can erase bits of it by selecting it with your mouse and then pressing delete on your keyboard or rearrange the clips in the timeline by dragging and dropping them to other positions.
Step 4: Add effects, transitions, and music to the video.
Step 5: Save and export the video by clicking on the Finish tab.
FAQs about editing FLV video
- How to open FLV files?
Any FLV player is required to view FLV files. Various players are available, including VLC, FLV Player, Sothink FLV Player for Mac, Tonec Free FLV Player, Any FLV Player, and others.
- Is Filmora compatible with Mac?
Filmora requires macOS Sierra (version 10.12) or later and the Big Sur (version 11) and Apple M1 chips. Touch Bar compatibility for MacBook Pro users and custom shortcuts to speed up editing.
- What is the best online FLV editor?
There are numerous free online editors to choose from. Fastreel, WeVideo, and FlexClip Video Maker are a few of the most popular.
- Is FLV better than MP4?
Because FLV and MP4 are the two most popular video file formats, it’s crucial to know which one is preferable. Adobe’s proprietary format is FLV. Both formats employ video and audio codecs and have equal performance levels. In their unprocessed state, MP4 files are more adaptable. You can, however, use an FLV file at the same time if you have the correct player.
- How do I choose a video editor?
When comparing video editing software, there are six crucial elements to consider.
- Budget and cost
- Ease of use/learning curve
- Multi-GPGPU acceleration and video format support
- Tools for advanced editing
- Music, special effects, and other goodies
- Customer service is second to none.
For macOS 10.14 or later
Therefore, you can use the following steps to edit FLV video on Windows and Mac:
Step 1: Import file:
Step 2: Edit the FLV file:
Acquire the perfect tool in your palm for anything you want to do, such as clipping, cropping, rotating, and more.
Furthermore, all editing capabilities in the toolbar allow drag-and-drop, making it even easier to touch up your films quickly. Consider the following scenario:
- Drag and drop a transition into the video/photo, or right-click it and select “Apply to All.”
- Please drag & drop a title template to the position where you want it to appear, then adjust it.
- To use the effects, select one from the 50+ available video effects, select it, and apply it to your photos/videos instantaneously.
Step 3: Save or Export the file:
When you’re done, export your modified MP4 files to Windows/Mac and quickly share them on YouTube, with the option of sending a message to Facebook and Twitter. When you click Create in the program window’s middle right corner, you’ll be taken to the Output window below.
Alternative Way to Edit FlV Video on Windows
1. VSDC
VSDC is a free video editor along with a lot of advanced features. Cut, combine, trim, crop, and other editing capabilities are available to help you polish your FLV films.
Although it may not look logical, learning the editing capabilities hidden within modular boxes is simple. One noteworthy aspect of VSDC is its ability to produce good visual effects using many trendy video effects, transitions, and filters.
Furthermore, strong chroma keys, color correction, object modification, and other editing tools can be utilized to edit FLV videos. It not only creates excellent FLV videos, but it also supports a wide range of media conversion, allowing you to convert FLV files to various formats and export them without a watermark.
Therefore, follow the below mentioned steps to edit FLV video using VSDC:
Step 1: Install the software on the Windows. Open the application and import the video.
Step 2: Use cutting and splitting tools to edit the video.
The first icon is a picture of a pair of scissors, which is a cutting tool. It’s very useful when you need to cut the beginning or end of a film. Place the cursor exactly where you want to cut, then select “Trim start” or “Trim finish” from the dropdown cutting menu (the small triangle next to the scissors icon).
Cropping is also simple. If you have too much additional space around the scene object recorded, just choose the file you want to trim and select the cropping icon from the “Cutting and Splitting” option. A new window will appear, allowing you to select the region of the scene that should stay.
Step 3: Apply effects and transitions.
To use one, first select the video file you wish to edit, then go to the Video effects tab and select the effect you want to use. On the timeline, a new tab will appear, containing all of the effects done to the selected object. You can alter the effect’s duration and position in time by dragging it with the mouse there. The properties pane on the right-hand side can be used to change other parameters.
Transitions follow the same rule. Place your cursor where you want the transition to begin, then choose a transition from the Video effects dropdown menu and manually adjust the duration.
Step 4: Save changes and export video.
Make sure your movie appears exactly how you want it to before exporting it. If the video appears choppy, use the red preview button and lower the preview quality. When the PC’s resources are insufficient to process the video in real time, lagging can occur. Keep in mind that it has no bearing on the outcome. When you’re finished, navigate to the Export project tab and select an export format.
2. Adobe Premiere Pro:
Professional video editors use Premiere Pro to make everything from YouTube videos to Hollywood films like Mank, a 2021 Oscar candidate. It’s also widely utilized in the workflows of designers, animators, and VFX artists, and we can see why after lengthy testing.
We found the software’s UI to be simple to use, and it increased our productivity by separating things into various workspaces, such as editing, effects, and audio. When we tested it on both Mac and PC, we discovered that each workspace helps handle a specific activity while minimizing distraction.
Edit the FLV video with Adobe Premiere Pro using the following steps:
Step 1: Import the video and create initial sequence.
Step 2: In the Timeline, trim and rearrange clips, add audio, and transitions.
Step 3: Add title and graphics.
In Premiere Pro, you may make onscreen titles, as well as stylize and animate your images.
Step 4: Export your video.
Alternative Way to Edit FlV Video on Mac
1. Blender:
Under the GNU General Public License, Blender is a free, open-source 3D content production program that runs on all major operating systems. Blender is one of the greatest video editors for both Windows and Mac, with advanced features such as modifier-based modeling tools, powerful character animation capabilities, a node-based material, etc.
Because it is developed for professionals, it is tough to use as a beginner. However, it is unrestricted in its use and distribution. In addition, color options are changeable and versatile in the UI.
In contrast, this free video editor is perfect for semi-pros or those who want to enhance their video editing skills. However, you’ll need a lot of time and effort to learn it.
Step 1: Open the application.
Step 2: Then, go into File->New->Video Editing to open the video editor.
Step 3: Import the video and start editing using the editing tools.
Step 4: Save and export the video.
2. Final Cut Pro:
When it comes to video editing software, Apple’s Final Cut Pro is one of the industry standards. As a result, it’s widely utilized in the television and film industries - at least among Mac users. However, one of the truly convincing reasons to choose it over Premiere Pro is because it is subscription-free: you only pay once.
The software’s Magnetic Timeline, grouping tools, a vast selection of effects, solid organizational capabilities, and simple ways to add and edit audio make it a favorite among professional video editors. 360° video, HDR, and powerful color correcting tools are among the other capabilities. It’s a strong software with a lot of features.
Follow the steps to edit FLV video using Final Cut Pro:
Step 1: Create Project.
To make a movie in Final Cut Pro, you must first establish a project, which keeps track of your editing selections and the media you utilize.
Step 2: Select and add clips to the timeline:
The second stage in making a movie with Final Cut Pro is to add and arrange clips in your project. In the timeline, you can move and reorder clips.
Step 3: Cut and trim video:
Final Cut Pro has a number of features for altering the start and stop points of clips in the timeline, as well as regulating the pacing of shots from one to the next.
Step 4: Edit the video by adding effects and transitions:
Final Cut Pro includes a number of advanced editing features that make it simple to create a professional film. Visual enhancements and colour correction are among the finishing touches.
Step 5: Save and export video:
2 Ways to Edit FlV Video on Android:
1. Inshot:
For Android users, Inshot is a fantastic image and video editor. This Android video editor allows you to add popular stickers and emoticons to your films, making them more fashionable and unique.
The program supports HD video output, allowing you more control over your footage. Moreover, the additional sound and video can be synchronized with the available video chronology.
You can quickly blend more than two movies into one with rich effects and sound with this Android editor app. In addition, you can generate a watermark using unique text provided in the app, and subtitles support allow you to produce one with a variety of fonts.
Following are the steps that you can follow to edit FLV video using Inshot:
Step 1: Open the app and import the video.
Tap “Video” to open your phone’s gallery folder and begin editing a video in the InShot app. Select a video to work with. Adjust the canvass after your video has been loaded into the InShot App. For your other social media accounts, there are aspect ratios and sizes that work well with the video. It also has the option of being in portrait or landscape mode.
Step 2: Trim and split videos.
Step 3: Merge videos (optional):
By combining clips, you can combine them into a single film or project. Simply choose the videos you want to import from the drop-down menu. By tapping the “+” button on the lower left of the screen, you can insert and merge more videos. Your project will then be updated using the selected video.
Step 4: Apply filters, add music, text and stickers.
Step 5: Once you are done with the editing process, save the file.
2. Videoshow:
VideoShow has a lot of video editing options. It is a simple and practical video editing program and movie scene maker for art directors and beginners. Using this video cutter, you may reverse, blur, duplicate, edit, merge and split collage clips or films.
You can also use VideoShow to adjust the audio or add subtitles to any video. It also allows you to use different filters on any video on your device. Over 50 intricate themes are included in the program, allowing you to create gorgeous music videos, slide shows, and vlogs in no time.
The annual subscription package is for $135.19, or you can also make a one-time purchase for $225.78.
However, to edit the video, you can use the following steps:
Step 1: Download and install the videoshow application and open it. Upload the video that you want to edit.
Step 2: Edit the video by applying filters or cutting and trimming the part of the video that you want to remove.
Step 3: Save changes and export the video to your preferred location.
2 Ways to Edit FlV Video on iPhone:
1. LumaFusion:
No other software program on the iPhone comes close to the feature set that LumaFusion offers for video editing. It is the only premium app on this list, and it is well worth every penny.
But, of course, YouTubers aren’t the only ones who use the program; mobile journalists and professional video producers who don’t want to lug along their bulky camera equipment and editing apparatus also use it.
LumaFusion deals with up to six video and audio tracks for photographs, movies, audio, titles, and graphics, and six audio tracks for narration, music, and sound effects. You also receive a magnetic timeline; importing clips is a breeze once they’ve been imported.
There are many transitions and effects to choose from, all of which can be layered. Finally, it includes much royalty-free music, sound effects, and other assets. So if you need a professional video editing tool for your iPhone, LumaFusion ($29.99) is the way to go.
Follow these steps to edit FLV video using LumaFusion:
Step 1: To create your first project, press + at the bottom of the screen. You can create a new project by tapping that area or by tapping the Plus button.
Step 2: Import video:
The Import section is located in the top left corner of the screen. This defaults to the Photos tab when you initially launch a new project. All of the photographs and videos can be seen here.
Step 3: Check layout and adjust volume levels
Step 4: Edit the video and add titles.
Step 5: Export the video.
2. Filmora Go:
Without a doubt, Filmora is one of the greatest free video editors for iPhone that does not contain any watermarks. In addition, it’s compatible with both iPhones and Android devices and has a simple user interface.
Filmora is the greatest iPhone video editor for beginners, with themed filters and effects that add flair to your videos without any work.
Filmora has many unique features, including themes for your videos and ‘Materials,’ which are visual effects created by the program. Unfortunately, materials are only available with Filmora Pro, so keep that in mind.
Aside from that, you’ll find all of the typical features here. You can also add titles to videos, utilize stickers and effects, and add music to the background of your movie. You may also add another clip in picture-in-picture mode, which is beneficial.
Below are the following steps to edit FLV video:
Step 1: Open the application and select ‘Create new video’. Now, import the video by choosing the video icon.
Step 2: Edit the video. Within the edit tool, you can trim and split the video. You can also improve the video quality by adding titles, transitions, and music, and voiceovers.
Step 3: After editing the video, select ‘SAVE’ and export the video or download it.
2 Ways to Edit FlV Video Online:
1. Fastreel:
If you’re seeking the finest free online video editor, Fastreel is a terrific tool to start with. This online video editing software provides a wide range of editing options. It can merge, edit, crop, and compress videos to make sharing easier.
It also includes many pre-made templates that you can change to create titles and transitions and other editing features like reverse, looping, and rotating. It’s also quite simple to use, and you can have polished videos in minutes.
There are also numerous pricing options to suit different customers, ranging from a completely free plan with watermarks to paid subscriptions with no limitations.
Use the following steps to edit FLV video:
Step 1: Open Fastreel web and import the video.
Step 2: Use templates to make it look attractive.
Step 3: Edit the video using the template.
Templates are unfinished videos with all of the effects already applied, such as backdrops, transitions, animated stickers, and titles. There are blank spots for your photos or videos, and you can arrange them in any sequence you like. You can also add music from the Fastreel library or upload your own track after entering your text.
Step 4: Once you are done with edits, save the video and export it.
2. WeVideo:
When you’re seeking the greatest video producer online, another wonderful choice to explore is WeVideo.
Google, Dropbox, Rover, and Roche are just a few of the huge names that trust our online editor. Its fast, versatile editing engine and vast stock content collection for adding stock movies, photos, and audio tracks to your productions are ideal for business users.
WeVideo also stands out since it provides unlimited cloud storage for all of your videos, which you can download and watch on any device. The only drawback is that all of this comes at a price, with WeVideo offering a variety of payment plans ranging from $4.99 to $36.99 a month.
Follow the steps to edit videos using WeVideo:
Step 1: Open WeVideo and import the video file.
Step 2: Click on create new video in the left-hand corner of the screen.
Step 3: Edit the video.
The video clip you imported will appear in the viewing window to the right once you click on it. By moving the arrows and either end, you can edit out the beginning or end of your footage.
- Drag the clip into your timeline from your media pool.
- Place the clip on your timeline by dragging and dropping it.
- Click the scissor symbol after moving the blue marker to the spot where you want to cut your clip.
- Once the material has been chopped, you can erase bits of it by selecting it with your mouse and then pressing delete on your keyboard or rearrange the clips in the timeline by dragging and dropping them to other positions.
Step 4: Add effects, transitions, and music to the video.
Step 5: Save and export the video by clicking on the Finish tab.
FAQs about editing FLV video
- How to open FLV files?
Any FLV player is required to view FLV files. Various players are available, including VLC, FLV Player, Sothink FLV Player for Mac, Tonec Free FLV Player, Any FLV Player, and others.
- Is Filmora compatible with Mac?
Filmora requires macOS Sierra (version 10.12) or later and the Big Sur (version 11) and Apple M1 chips. Touch Bar compatibility for MacBook Pro users and custom shortcuts to speed up editing.
- What is the best online FLV editor?
There are numerous free online editors to choose from. Fastreel, WeVideo, and FlexClip Video Maker are a few of the most popular.
- Is FLV better than MP4?
Because FLV and MP4 are the two most popular video file formats, it’s crucial to know which one is preferable. Adobe’s proprietary format is FLV. Both formats employ video and audio codecs and have equal performance levels. In their unprocessed state, MP4 files are more adaptable. You can, however, use an FLV file at the same time if you have the correct player.
- How do I choose a video editor?
When comparing video editing software, there are six crucial elements to consider.
- Budget and cost
- Ease of use/learning curve
- Multi-GPGPU acceleration and video format support
- Tools for advanced editing
- Music, special effects, and other goodies
- Customer service is second to none.
Top 11 Best Video Editing Apps for iPhone
Videography is an art, whether done professionally or just for fun. It includes many phases from pre-production to post-production and video editing is one of its important aspects. It is a gamechanger, as most of the mistakes done during production can be fixed in editing.
Video editing is done on large scale for film industries which require expensive and powerful computers but we won’t about them now. As video editing doesn’t only depend on powerful softwares and expensive computers, Skills play a vital role in video editing. A skilled artist on a mobile phone can create better content than a beginner with an expensive PC.
Therefore, here we will talk about small-scale editing which can be done on mobile phones and especially iPhones. Considering iPhones as they are one of the most common devices used by vloggers and small filmmakers. As a mobile video editor, you can edit your clips anywhere you want. Therefore editing videos on a go is quite important. So we have selected some top iPhone video editors for you which are as following:
- Filmora Go
- Free iPhone Video Editors
- Adobe Premiere Rush
- CapCut
- iMovie
- GoPro-Quik
- VN Video Editor
- Paid iPhone Video Editors
- Kinemaster
- Power Director
- LumaFusion
- InShot
- VivaCut
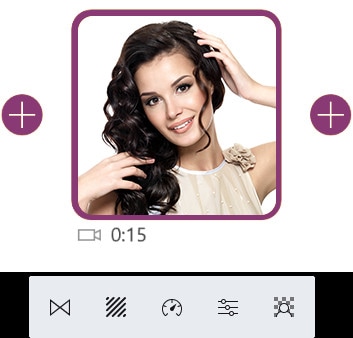
Filmora Go:
It is available on IOS and Android both.
Apart from having a professional video editor for PC, Wondershare has also introduced a video editor for mobile phones. Filmora Go is an amazing video editor, with many cool features such as chroma key, mask, keyframing, blending, e.t.c. It is fast and easy to use with built-in effects, transitions, and presets to speed up the editing process. It is a paid video editor but you can try it for free, free trial includes most of the features but it leaves a watermark on export.
~Features:
- Has speed curves for smooth speed ramping.
- Supports multiple images and video layers.
- Have many presets and filters for fast pace editing.
- Have cool features like chroma key, masking, keyframing, e.t.c.
- Supports “Pixabay’s” stock library.
~Cons:
- Its UI doesn’t support editing in landscape orientation.
- It doesn’t support 4k video resolution.


~Steps:
Import: Open Filmora Go, Click “New project” to start a new project, or Choose the previous one from the “Draft” portion. Select videos or images to import to your timeline. Hold and drag the clip to change its arrangement.
Edit: You can add text, effects, stickers, layers, e.t.c. by clicking their icon, present on the bar at the bottom.
Click the “PiP” icon to add image or video layers, you also can add multiple layers.
Select a clip to edit it. Different editing tools appear on the bottom bar. Here you can change its opacity, its speed, or add animations.
Effects: Click the “Effects” icon to open the effects menu. Select an effect to apply to your clip.
Click the white box between two clips to add transitions.
Export: Click the “Export” button to export your file. Select your desired resolution and frame rate to export your clip.


Some Free iPhone Video Editors:
If you do video editing rarely or do just basic video editing then it is useless to purchase paid video editors. Even if you are a content creator but tight on budget or new to this field, you can use free video editing softwares and save your cash for other pieces of equipment.
So, here we have mentioned some free video editors for you. Some of these are quite powerful and can do advanced editing while others are simple but easy to use.
Adobe Premiere Rush:
It is available on IOS and Android both.
Whether you are a beginner or a content creator using mobile phones or PCs for editing, you may have heard of Adobe softwares. It is a computer software company which makes powerful softwares for different purposes. Like premiere pro, they have designed a compact version for phones named “Premiere Rush”. It is a free video editor that has all the tools needed for video editing, from video effects to color grading and audio editing. Its UI is a bit similar to PC video editors. It is a free video editor with no watermarks. Although it takes some time to understand it. But once mastered, you can do editing quickly.
~Features:
- It is a free video editor with no watermark.
- It supports up to 4K resolution at 60fps.
- You can extract audio and can do voiceover directly from the software.
- It has hundreds of filters, overlays, and title designs.
- It has basic color grading tools.
- It also has a motion tracking feature. (in Paid version)
- It supports multiple audio, video, and text layers.


~Cons:
- It only runs on high-end devices. ( It is not supported in most mid-range phones)
- Not suitable for beginners. Its UI is quite hard to understand.
- Doesn’t have common features like the chroma key, masking, e.t.c.

~Price:
Its Premium version is available for 9.99/month. It includes some premium features. Or you can purchase the “All Apps Bundle” at $54.99/month for the annual plan.
CapCut:
It is available on IOS and Android both.
If you are looking for a free but good video editor to help you edit videos on the go, then you should get your hands on CapCut. It is a free mobile video editing software with many interesting features like keyframing, chroma-key, masking e.t.c. It also supports video and image layers. It has one of the best speed ramping features among other mobile video editors. It provides curves to smoothly speed ramp your clips. It can edit landscape, portrait, and even square video formats. It has many amazing effects and filters, it also has some stock clips.


~Features:
- It is completely free and has no watermarks.
- It supports up to 4K video resolution.
- Has curves for speed ramping.
- Has keyframes for animation.
- It has hundreds of effects, overlays, and titles.


~Cons:
- Its UI doesn’t support editing in landscape orientation.
- Lacks some common editing tools.
iMovie:
It is available on IOS and Mac.
iMovie is a free video editing software designed by apple for their flagship products. It is simple and easy to use. It has all the basic editing tools to enhance your video like crop, trim, transitions, effects, e.t.c. It also has a speed ramping feature which let you change the speed at different points of a clip. It’s AI mode “Magic Movie” lets you select clips and a style and software will make the final product for you.
Its “Storyboards” mode is a creative way of learning production and post-production skills. It lets you choose a theme from many famous Genres available, then it will guide you through the production process like capturing footage, arranging your shots, and creating cinematic titles to enhance your story.


~Features:
- It is free and easy to use.
- Let you do speed ramping.
- Supports Raw files.
- It’s AI mode creates videos for you on its own.
- The “Storyboarding” feature helps you through the production process.


~Cons:
- It only works on ios and Mac.
- Not suitable for professional projects.
GoPro - Quik:
It is available on IOS and Android and windows also.
It is a free and easy-to-use software designed by GoPro. It can edit clips of your GoPro or any other device. It is a quick and easy way to enhance your clips before posting them on any social platform. It can do basic edits like trim, rotate, color correction, e.t.c. It can also make amazing speed ramps by changing the speed of different parts of the clip (available in the premium version only). It doesn’t produce any watermarks. Although its premium version unlocks more features like speed ramping, more themes, and unlimited backup space.


~Features:
- Its free version doesn’t leave a watermark.
- It is simple and easy to use.
- Can do basic color correction.
- Have pre-made themes for faster editing.
- Change the speed at different parts of the video to create smooth speed ramps. (Available in the premium version.)
- Has a free version with limited tools for basic editing.

~Cons:
- It lacks advanced tools therefore not suitable for large projects.
- Its free version has many limitations.
~Price: Its subscription is available at $1.99/month or at discount for an annual subscription having $9.99/year.
VN Video editor:
It is available on IOS and Android, Windows, and Mac.
If you are looking for a video editor, which let you do fast but quality edits, then “VN video editor” is the right choice for you. It is free and easy-to-use software with many useful features like transitions, effects, speed ramps, PiP, chroma-key, keyframing, e.t.c. It supports different aspect ratios for all your social platforms.
It also has pre-made templates to speed up your editing process. Its Story mode let you manage your production and post-production work easily. It also has overlay mode, which can make awesome slide shows for you.


~Features:
- It is free software with no watermark.
- It supports up to 4K resolution at 60fps.
- Supports multi-layer editing.
- Have keyframing curves to create smooth animations.
- Have speed curves for smooth speed ramping.
- Its Story mode let you manage your production work easily.
- Can extract audio from a video file.


~Cons:
- Its UI doesn’t support editing landscape orientation.
- Its free version has limitations of creating max 100 projects.
~Price:
Its Premium version is available for $3.9/month or $20.9/year.
Some Paid iPhone Video Editors:
If you want to move forward and get your hands on these paid softwares to try new features then you should buy these paid softwares. As most of these softwares are quite affordable but they pack the punch. And some of them can give you more in return than your investment. Then what are you waiting for? go and try them yourself.
Kinemaster:
It is available on IOS and Android both.
If you want to do more than just trimming and cropping to your videos then you should try Kinemaster. For editors, who want to do some advanced-level video editing on their phone, then you must have Kinemaster on your phone. It is a paid software, which is packed with many useful features. It has many video and audio effects. It also has an amazing audio editor. It also has many title designs and basic color correction tools. It has hundreds of effects and transitions + more can be downloaded from its asset store. Its UI is suitable for beginners and content creators both. It is a paid software, but all its features are completely free to use, but the free version leaves a watermark on export.


~Features:
- It supports up to 4K resolution at 60fps. (depending on mobile configuration)
- Have amazing features like chroma key, keyframing, blend e.t.c
- Has built-in audio and video recorder.
- Supports multiple texts and video layers with different resolutions depending on the capability of the mobile phone.
- Has UI like a PC video editor and supports landscape orientation for editing.
- Have an asset store with 100s of free effects, transitions, and stock material.


~Cons:
- Can’t export 4K videos on most devices.
- Can’t apply keyframes and chroma key to the main video. (can be done on layers only)
~Price:
Its Premium version is available for $4.9/month or $39.9/year. It also includes all the premium assets.
Power Director:
It is available on IOS and Android both.
It is a paid but quite advanced video editor available for androids and IOS both. Like its PC version mobile version is also packed with many great features. It is compact and easy to use. It supports multiple video and audio layers. Have many cool filters and transitions. Can also do basic color corrections. To complete post-production work it also has audio editing tools and effects. It also has hundreds of title designs. Its UI is easy to use and supports both portrait and landscape orientation for editing. Most of its features can be used for free with a watermark on export. To remove the watermark you need to purchase the premium version.


~Features:
- It supports up to 4K resolution at 60fps. (compatible on most devices)
- Supports both Portrait and Landscape orientation for editing.
- Supports Key framing and video stabilization also.
- Supports multiple audio and video layers.
- Can edit videos in different aspect ratios.
- Have a vast stock library.


~Cons:
- Can’t export 4K videos on many devices.
- Can apply keyframing and chroma key to layers only.
- Software lags sometimes.
~Price:
Its Premium version is available for $4.9/month or $29.9/year.
LumaFusion:
It is available on IOS and Mac (with an m1 processor).
If you are a content creator and want to do professional-level video editing on your phone then you should get your hands on “LumaFusion”. It is of the most powerful and advanced video editors designed for a mobile phone. But it only works on iPhones and iPads. It is a multi-track video editor with many useful features like the Chroma key, keyframing, color grading, and color LUTs. Have powerful color grading tools and an audio editor. It also has a lock and load stabilizer. You have to purchase the software before using it. It doesn’t have any free version to try.

Credits: Pic by Luma touch website.
~Features:
- It supports up to 4K video resolution at a max of 240 fps.
- Can also edit and export 360 videos.
- Have powerful color correction tools. You can also import your own color LUTs.
- Supports Keyframing on almost all the editing tools within the software.
- You can add some third-party audio plugins.
- Supports up to 6 audio and video layers.
- Have “Storyblock” stock library. (Many of its contents are free to use)
- Supports external monitor for display.

Credits: Pic by Luma touch website.
~Cons:
- Not available for Android devices.
- Being an advanced software, it doesn’t have masking and speed ramping features.
- Doesn’t have a free version to try on.
~Price:
It is available for purchase at $29.99.
InShot:
It is available on IOS and Android both.
If you are new to video editing and want to do simple editing tasks then this software can be the right choice for you. It is simple and easy to use. Apart from just trimming and arranging your clips, it also has some cool features like speed ramping, chroma-key, mask e.t.c. It also has an HSL color grading tool. You can add multiple layers as PiP. It is a paid software but you can try it for free with the watermark on export.


~Features:
- It supports up to 4K resolution at 60fps.
- Its UI is beginner-friendly.
- Have some advanced color correction and grading tools.
- Supports multiple images and video layers as PiP.
- Have features like a mask, chroma key, and blend for layers.
- Can edit videos in different aspect ratios.
- Have speed curves for smooth speed ramping.


~Cons:
- Doesn’t have advanced tools.
- Its UI doesn’t support editing landscape orientation.
~Price:
It has 3 diff purchase plans. you can get its subscription for $3.9/month or $14.99/year. or you can purchase the software for lifetime at $34.99.
VivaCut:
It is available on IOS and Android both.
Almost every mobile video editor wished for doing PC-like video editing on their phone, but that was not possible due to software limitations and device compatibility. But now you can create PC-like videos on your phone through “VivaCut”. It is a paid software that is packed with many advanced features. Like 3D transform, overlay, Effects, Masking, e.t.c. It has one of the best color correction and grading tools among other mobile video editors. It has advanced keyframing and curve paths that can make splendid animations. It also supports multi-layer video editing. It also has a Grouping tool that let you combine several clips and texts into a single clip for easy editing. It also lets you import your presets. It is a paid software but you can try it for free with the watermark on export.


~Features:
- It supports multi-layer editing.
- Supports keyframing curves and 3D transform.
- Have advanced color correction and grading tools.
- Can Group multiple clips for easy editing.
- Let you import your presets.
- Can edit videos in different aspect ratios.
- Have an “FX plugin” library with many special effects that can be customized also.


~Cons:
- It doesn’t support 4K resolution.
- Its UI doesn’t support editing landscape orientation.
- It lags and crashes sometimes.
~Price:
Its premium version is available at $4.99/month or $19.99/year.
Which Should I Choose Free or Paid Video Editing Apps for iPhone:
If you do video editing once in a while or you don’t do more than just trimming and cropping then you shouldn’t purchase a paid video editing software. Because there are free video editors that can get your job done and even more than that. But if you are a content creator who doesn’t want to do editing on PCs or laptops, then you can get these paid video editors for your iPhone. These softwares are quite affordable and worthy of your investment. Some are cheaper than others. You can purchase the one, which meets your budget or fulfills your needs.
And if you are a beginner but want to move forward in this field then you should try free versions of these paid softwares. Select the one, which you are comfortable working on and once you are satisfied with the software then you can purchase its premium version.
- Free iPhone Video Editors
- Adobe Premiere Rush
- CapCut
- iMovie
- GoPro-Quik
- VN Video Editor
- Paid iPhone Video Editors
- Kinemaster
- Power Director
- LumaFusion
- InShot
- VivaCut
Filmora Go:
It is available on IOS and Android both.
Apart from having a professional video editor for PC, Wondershare has also introduced a video editor for mobile phones. Filmora Go is an amazing video editor, with many cool features such as chroma key, mask, keyframing, blending, e.t.c. It is fast and easy to use with built-in effects, transitions, and presets to speed up the editing process. It is a paid video editor but you can try it for free, free trial includes most of the features but it leaves a watermark on export.
~Features:
- Has speed curves for smooth speed ramping.
- Supports multiple images and video layers.
- Have many presets and filters for fast pace editing.
- Have cool features like chroma key, masking, keyframing, e.t.c.
- Supports “Pixabay’s” stock library.
~Cons:
- Its UI doesn’t support editing in landscape orientation.
- It doesn’t support 4k video resolution.
~Steps:
Import: Open Filmora Go, Click “New project” to start a new project, or Choose the previous one from the “Draft” portion. Select videos or images to import to your timeline. Hold and drag the clip to change its arrangement.
Edit: You can add text, effects, stickers, layers, e.t.c. by clicking their icon, present on the bar at the bottom.
Click the “PiP” icon to add image or video layers, you also can add multiple layers.
Select a clip to edit it. Different editing tools appear on the bottom bar. Here you can change its opacity, its speed, or add animations.
Effects: Click the “Effects” icon to open the effects menu. Select an effect to apply to your clip.
Click the white box between two clips to add transitions.
Export: Click the “Export” button to export your file. Select your desired resolution and frame rate to export your clip.
Some Free iPhone Video Editors:
If you do video editing rarely or do just basic video editing then it is useless to purchase paid video editors. Even if you are a content creator but tight on budget or new to this field, you can use free video editing softwares and save your cash for other pieces of equipment.
So, here we have mentioned some free video editors for you. Some of these are quite powerful and can do advanced editing while others are simple but easy to use.
Adobe Premiere Rush:
It is available on IOS and Android both.
Whether you are a beginner or a content creator using mobile phones or PCs for editing, you may have heard of Adobe softwares. It is a computer software company which makes powerful softwares for different purposes. Like premiere pro, they have designed a compact version for phones named “Premiere Rush”. It is a free video editor that has all the tools needed for video editing, from video effects to color grading and audio editing. Its UI is a bit similar to PC video editors. It is a free video editor with no watermarks. Although it takes some time to understand it. But once mastered, you can do editing quickly.
~Features:
- It is a free video editor with no watermark.
- It supports up to 4K resolution at 60fps.
- You can extract audio and can do voiceover directly from the software.
- It has hundreds of filters, overlays, and title designs.
- It has basic color grading tools.
- It also has a motion tracking feature. (in Paid version)
- It supports multiple audio, video, and text layers.
~Cons:
- It only runs on high-end devices. ( It is not supported in most mid-range phones)
- Not suitable for beginners. Its UI is quite hard to understand.
- Doesn’t have common features like the chroma key, masking, e.t.c.
~Price:
Its Premium version is available for 9.99/month. It includes some premium features. Or you can purchase the “All Apps Bundle” at $54.99/month for the annual plan.
CapCut:
It is available on IOS and Android both.
If you are looking for a free but good video editor to help you edit videos on the go, then you should get your hands on CapCut. It is a free mobile video editing software with many interesting features like keyframing, chroma-key, masking e.t.c. It also supports video and image layers. It has one of the best speed ramping features among other mobile video editors. It provides curves to smoothly speed ramp your clips. It can edit landscape, portrait, and even square video formats. It has many amazing effects and filters, it also has some stock clips.
~Features:
- It is completely free and has no watermarks.
- It supports up to 4K video resolution.
- Has curves for speed ramping.
- Has keyframes for animation.
- It has hundreds of effects, overlays, and titles.
~Cons:
- Its UI doesn’t support editing in landscape orientation.
- Lacks some common editing tools.
iMovie:
It is available on IOS and Mac.
iMovie is a free video editing software designed by apple for their flagship products. It is simple and easy to use. It has all the basic editing tools to enhance your video like crop, trim, transitions, effects, e.t.c. It also has a speed ramping feature which let you change the speed at different points of a clip. It’s AI mode “Magic Movie” lets you select clips and a style and software will make the final product for you.
Its “Storyboards” mode is a creative way of learning production and post-production skills. It lets you choose a theme from many famous Genres available, then it will guide you through the production process like capturing footage, arranging your shots, and creating cinematic titles to enhance your story.
~Features:
- It is free and easy to use.
- Let you do speed ramping.
- Supports Raw files.
- It’s AI mode creates videos for you on its own.
- The “Storyboarding” feature helps you through the production process.
~Cons:
- It only works on ios and Mac.
- Not suitable for professional projects.
GoPro - Quik:
It is available on IOS and Android and windows also.
It is a free and easy-to-use software designed by GoPro. It can edit clips of your GoPro or any other device. It is a quick and easy way to enhance your clips before posting them on any social platform. It can do basic edits like trim, rotate, color correction, e.t.c. It can also make amazing speed ramps by changing the speed of different parts of the clip (available in the premium version only). It doesn’t produce any watermarks. Although its premium version unlocks more features like speed ramping, more themes, and unlimited backup space.
~Features:
- Its free version doesn’t leave a watermark.
- It is simple and easy to use.
- Can do basic color correction.
- Have pre-made themes for faster editing.
- Change the speed at different parts of the video to create smooth speed ramps. (Available in the premium version.)
- Has a free version with limited tools for basic editing.
~Cons:
- It lacks advanced tools therefore not suitable for large projects.
- Its free version has many limitations.
~Price: Its subscription is available at $1.99/month or at discount for an annual subscription having $9.99/year.
VN Video editor:
It is available on IOS and Android, Windows, and Mac.
If you are looking for a video editor, which let you do fast but quality edits, then “VN video editor” is the right choice for you. It is free and easy-to-use software with many useful features like transitions, effects, speed ramps, PiP, chroma-key, keyframing, e.t.c. It supports different aspect ratios for all your social platforms.
It also has pre-made templates to speed up your editing process. Its Story mode let you manage your production and post-production work easily. It also has overlay mode, which can make awesome slide shows for you.
~Features:
- It is free software with no watermark.
- It supports up to 4K resolution at 60fps.
- Supports multi-layer editing.
- Have keyframing curves to create smooth animations.
- Have speed curves for smooth speed ramping.
- Its Story mode let you manage your production work easily.
- Can extract audio from a video file.
~Cons:
- Its UI doesn’t support editing landscape orientation.
- Its free version has limitations of creating max 100 projects.
~Price:
Its Premium version is available for $3.9/month or $20.9/year.
Some Paid iPhone Video Editors:
If you want to move forward and get your hands on these paid softwares to try new features then you should buy these paid softwares. As most of these softwares are quite affordable but they pack the punch. And some of them can give you more in return than your investment. Then what are you waiting for? go and try them yourself.
Kinemaster:
It is available on IOS and Android both.
If you want to do more than just trimming and cropping to your videos then you should try Kinemaster. For editors, who want to do some advanced-level video editing on their phone, then you must have Kinemaster on your phone. It is a paid software, which is packed with many useful features. It has many video and audio effects. It also has an amazing audio editor. It also has many title designs and basic color correction tools. It has hundreds of effects and transitions + more can be downloaded from its asset store. Its UI is suitable for beginners and content creators both. It is a paid software, but all its features are completely free to use, but the free version leaves a watermark on export.
~Features:
- It supports up to 4K resolution at 60fps. (depending on mobile configuration)
- Have amazing features like chroma key, keyframing, blend e.t.c
- Has built-in audio and video recorder.
- Supports multiple texts and video layers with different resolutions depending on the capability of the mobile phone.
- Has UI like a PC video editor and supports landscape orientation for editing.
- Have an asset store with 100s of free effects, transitions, and stock material.
~Cons:
- Can’t export 4K videos on most devices.
- Can’t apply keyframes and chroma key to the main video. (can be done on layers only)
~Price:
Its Premium version is available for $4.9/month or $39.9/year. It also includes all the premium assets.
Power Director:
It is available on IOS and Android both.
It is a paid but quite advanced video editor available for androids and IOS both. Like its PC version mobile version is also packed with many great features. It is compact and easy to use. It supports multiple video and audio layers. Have many cool filters and transitions. Can also do basic color corrections. To complete post-production work it also has audio editing tools and effects. It also has hundreds of title designs. Its UI is easy to use and supports both portrait and landscape orientation for editing. Most of its features can be used for free with a watermark on export. To remove the watermark you need to purchase the premium version.
~Features:
- It supports up to 4K resolution at 60fps. (compatible on most devices)
- Supports both Portrait and Landscape orientation for editing.
- Supports Key framing and video stabilization also.
- Supports multiple audio and video layers.
- Can edit videos in different aspect ratios.
- Have a vast stock library.
~Cons:
- Can’t export 4K videos on many devices.
- Can apply keyframing and chroma key to layers only.
- Software lags sometimes.
~Price:
Its Premium version is available for $4.9/month or $29.9/year.
LumaFusion:
It is available on IOS and Mac (with an m1 processor).
If you are a content creator and want to do professional-level video editing on your phone then you should get your hands on “LumaFusion”. It is of the most powerful and advanced video editors designed for a mobile phone. But it only works on iPhones and iPads. It is a multi-track video editor with many useful features like the Chroma key, keyframing, color grading, and color LUTs. Have powerful color grading tools and an audio editor. It also has a lock and load stabilizer. You have to purchase the software before using it. It doesn’t have any free version to try.
Credits: Pic by Luma touch website.
~Features:
- It supports up to 4K video resolution at a max of 240 fps.
- Can also edit and export 360 videos.
- Have powerful color correction tools. You can also import your own color LUTs.
- Supports Keyframing on almost all the editing tools within the software.
- You can add some third-party audio plugins.
- Supports up to 6 audio and video layers.
- Have “Storyblock” stock library. (Many of its contents are free to use)
- Supports external monitor for display.
Credits: Pic by Luma touch website.
~Cons:
- Not available for Android devices.
- Being an advanced software, it doesn’t have masking and speed ramping features.
- Doesn’t have a free version to try on.
~Price:
It is available for purchase at $29.99.
InShot:
It is available on IOS and Android both.
If you are new to video editing and want to do simple editing tasks then this software can be the right choice for you. It is simple and easy to use. Apart from just trimming and arranging your clips, it also has some cool features like speed ramping, chroma-key, mask e.t.c. It also has an HSL color grading tool. You can add multiple layers as PiP. It is a paid software but you can try it for free with the watermark on export.
~Features:
- It supports up to 4K resolution at 60fps.
- Its UI is beginner-friendly.
- Have some advanced color correction and grading tools.
- Supports multiple images and video layers as PiP.
- Have features like a mask, chroma key, and blend for layers.
- Can edit videos in different aspect ratios.
- Have speed curves for smooth speed ramping.
~Cons:
- Doesn’t have advanced tools.
- Its UI doesn’t support editing landscape orientation.
~Price:
It has 3 diff purchase plans. you can get its subscription for $3.9/month or $14.99/year. or you can purchase the software for lifetime at $34.99.
VivaCut:
It is available on IOS and Android both.
Almost every mobile video editor wished for doing PC-like video editing on their phone, but that was not possible due to software limitations and device compatibility. But now you can create PC-like videos on your phone through “VivaCut”. It is a paid software that is packed with many advanced features. Like 3D transform, overlay, Effects, Masking, e.t.c. It has one of the best color correction and grading tools among other mobile video editors. It has advanced keyframing and curve paths that can make splendid animations. It also supports multi-layer video editing. It also has a Grouping tool that let you combine several clips and texts into a single clip for easy editing. It also lets you import your presets. It is a paid software but you can try it for free with the watermark on export.
~Features:
- It supports multi-layer editing.
- Supports keyframing curves and 3D transform.
- Have advanced color correction and grading tools.
- Can Group multiple clips for easy editing.
- Let you import your presets.
- Can edit videos in different aspect ratios.
- Have an “FX plugin” library with many special effects that can be customized also.
~Cons:
- It doesn’t support 4K resolution.
- Its UI doesn’t support editing landscape orientation.
- It lags and crashes sometimes.
~Price:
Its premium version is available at $4.99/month or $19.99/year.
Which Should I Choose Free or Paid Video Editing Apps for iPhone:
If you do video editing once in a while or you don’t do more than just trimming and cropping then you shouldn’t purchase a paid video editing software. Because there are free video editors that can get your job done and even more than that. But if you are a content creator who doesn’t want to do editing on PCs or laptops, then you can get these paid video editors for your iPhone. These softwares are quite affordable and worthy of your investment. Some are cheaper than others. You can purchase the one, which meets your budget or fulfills your needs.
And if you are a beginner but want to move forward in this field then you should try free versions of these paid softwares. Select the one, which you are comfortable working on and once you are satisfied with the software then you can purchase its premium version.
Unravel the Creative Potential of Adobe After Effects for Precise Motion Synchronization. Learn How to Use Track Matte and Tracking with a Simple Alternative
The realm of video editing has seen significant progress in recent years. With premium tools such as Adobe After Effects, you can take your videos to the next level. However, not every tool is easy to navigate. Some features in popular video editing software can be hard to get around.
The following guide provides valuable insight on how to use Track Matte in After Effects. Explore the endless possibilities of Track Mattes After Effects and Mask Tracking in After Effects. Also, discover a simple alternative to make After Effects mask tracking easy.
AI Smart Masking Spice up your video content with the endless possibilities of AI masking functions!
Free Download Free Download Learn More

Part 1: How to Utilize Track Mattes in Adobe After Effects?
After Effects by Adobe is a software application dedicated to visual effects and motion graphics for videos. The tool is commonly used in the post-production process of videos. The wide toolset of After Effects can be useful in filmmaking, video gaming, and TV. After Effects offers everything you need to take your creative inspirations to the next level.
- Motion Graphics: After Effects lets users animate characters and backgrounds in videos. You can generate 3-dimensional models from 2D animations. After Effects also supports the animation of logos to bring your elements to life.
- Rotoscoping: You can remove elements or drop new ones in your video using After Effects. The Roto Brush Tool can easily separate the background and foreground. You can then replace unwanted objects and replace them with new elements.
- Motion Tracking: Tracking the movement of an object is quite simple in After Effects. You can pin any element to a moving object. The smooth dynamics can enhance the overall result of the footage.
- VFX and Special Effects: After Effects is the perfect tool to add special effects to your videos. Its VFX tool lets users add magic to the footage. You can make objects disappear, control the weather, stabilize your video, and more.
Using Track Mattes in After Effects
In Adobe After Effects, a track matte is a layer that defines the transparency of another layer. It acts as a stencil, determining which parts of the underlying layer are visible and which are transparent. Track mattes are used for creating various effects such as text animations, transitions, and seamlessly composing multiple layers. After Effects offers four Track Matte options:
![]()
- Alpha Matte: Alpha matte in After Effects allows white areas in the matte layer to become visible while black areas become transparent. Effectively, this helps the underlying layer to show through.
- Alpha Inverted Matte: In an alpha inverted matte, black areas in the matte layer are visible, and white areas are transparent. It reverses the transparency values to create unique effects.
- Luma Matte: A luma matte uses the brightness values of the matte layer to determine visibility. Bright areas in the matte layer are visible, while dark areas are transparent.
- Luma Inverted Matte: The luma inverted matte works opposite to the luma matte. The top layer’s dark areas are visible, while bright areas are transparent.
![]()
You can use any of the track mattes in After Effects according to your requirements. Following is a step-by-step guide on how to use track mattes:
Step 1
To apply a track matte to your video, you must work with two layers. The top layer acts as the alpha or the luminance layer. The bottom layer acts as the fill. Once you have identified the layers, you can proceed to the next step.
Step 2
Go to the “Modes” column and open the dropdown menu next to “Layer List.” Here, select the layer you wish to use as the track matte.
![]()
Step 3
You will see two toggle switches once you select your layer. You can use these switches and the available options to set the transparency for the Track Matte. You can add alpha matte in After Effects or other types from here.
![]()
Part 2: Performing Mask Tracking With Adobe After Effects: Reviewing the Steps
Another remarkable feature that After Effects offers is mask tracking. Using After Effects mask tracking, you can automatically animate a mask’s position, shape, or path. This is done to match the movement of an object in a video clip. You can now easily deal with complex or fast-moving footage with this feature. To use Track Mask in After Effects, you can follow these steps:
Step 1
Import the footage you wish to edit in After Effects. Select the clip you wish to track from the timeline. Then, select the “Pen” tool from the top toolbar or press G on your keyboard. Select the area around the object you wish to mask in the footage.
![]()
Step 2
Now, open the layer and right-click on the mask name to select “Track Mask.” This will open the mask tracker in the tracker panel at the right. Open the dropdown menu next to the “Method” option. Here, you can find a range of options for tracking methods. Choose the one according to your requirements. If the object isn’t moving much, you can choose a simple option such as “Position.”
![]()
Step 3
Tap the “Analyze Forward” icon and let the tracker analyze the frames in the clip. Once the process has finished, you can restart your clip and set “Mask Mode” from the timeline to “Subtract.” This will remove the selected object from the clip.
![]()
Step 4
To fill in the details, go to the “Window” menu from the top and select “Content Aware Fill.” Once you see the panel on the screen, set the “Alpha Extension” slider to a number of your choice and click on “Generate Fill Layer.”
![]()
Part 3: How to Make Masking Easy? Try Wondershare Filmora
Although After Effects is a great tool for professional-quality video editing, it is not everyone’s cup of tea. Features such as motion track masks in After Effects are challenging to navigate. Novice users can face trouble getting around the complex masking process in After Effects. For a simpler alternative, you can try Wondershare Filmora .
Filmora is the complete solution when it comes to video editing. The multi-platform tool offers a range of useful features for video and audio manipulation. With thousands of built-in templates and presets, Filmora can help users kick-start their creative journey. You can use this easy-to-use tool as the perfect alternative to After Effects mask tracking.
Free Download For Win 7 or later(64-bit)
Free Download For macOS 10.14 or later
Main Highlights of Wondershare Filmora
Filmora offers a comprehensive toolset to help users make the most of their media files. Some useful resources provided by Wondershare Filmora include:
- AI Text-Based Editing: Filmora allows users to convert audio from videos into editable text. This can help you easily modify your video content. The feature can be used for quick transcriptions, subtitles, and translations.
![]()
- Speed Ramping: Using Filmora, users can apply professional speed effects in footage. You can adjust your video speed and create unique cinematic effects in no time. Filmora also helps maintain the audio pitch to avoid abrupt changes.
![]()
- Compound Clip: Filmora can help users merge multiple clips into a single footage. You can obtain complete control over the integrated clip for editing. This can help users manage and adjust multiple clips easily.
![]()
- AI Vocal Remover: The Vocal Remover tool of Filmora offers AI power to separate vocals and music from any audio. You can get separate acapella and vocals for various purposes. From karaoke to creative dubs, everything is now possible with Filmora.
![]()
Using AI Smart Masking in Filmora – A Step-by-Step Guide
Filmora offers an AI-powered masking feature for users. This allows automatic recognition and selection of objects in videos. You can create seamless transitions, color-correct elements, remove background, and more. The tool can easily detect and separate objects, so you don’t have to put in manual effort. Here is the step-by-step guide for AI smart masking using Filmora:
Step 1: Import Footage in Filmora
Install and launch Wondershare Filmora on your device. From the homepage, tap “New Project” and go to the “File” tab from the top. Tap “Import Media” in the dropdown menu and insert your video clips into the timeline.
![]()
Step 2: Enable AI Mask
Select your clip in the timeline and go to the “Video” tab from the right panel. Select the “Mask” option and tap the “AI Mask” icon. Under the section, you can choose from options such as “Select Character” or “Smart Brush.” Select one according to your requirements and hit “Add Mask.”
![]()
Step 3: Adjust Mask Settings and Export File
After you apply the masking option, you can adjust other mask settings. Filmora allows users to set the expansion range, blur strength, opacity, and other aspects. Once satisfied with the results, tap the “Export” button from the top-right corner and choose a pathway to save your video.
![]()
Free Download For Win 7 or later(64-bit)
Free Download For macOS 10.14 or later
Conclusion
Adobe After Effects is an industry-standard tool for video editing and manipulation. Track Mattes and Track Masks in After Effects are valuable tools that can help elevate your video’s potential. For a simple and effective alternative, you can try Wondershare Filmora. The tool uses smart masking using AI to make the process easier.
Free Download Free Download Learn More
Part 1: How to Utilize Track Mattes in Adobe After Effects?
After Effects by Adobe is a software application dedicated to visual effects and motion graphics for videos. The tool is commonly used in the post-production process of videos. The wide toolset of After Effects can be useful in filmmaking, video gaming, and TV. After Effects offers everything you need to take your creative inspirations to the next level.
- Motion Graphics: After Effects lets users animate characters and backgrounds in videos. You can generate 3-dimensional models from 2D animations. After Effects also supports the animation of logos to bring your elements to life.
- Rotoscoping: You can remove elements or drop new ones in your video using After Effects. The Roto Brush Tool can easily separate the background and foreground. You can then replace unwanted objects and replace them with new elements.
- Motion Tracking: Tracking the movement of an object is quite simple in After Effects. You can pin any element to a moving object. The smooth dynamics can enhance the overall result of the footage.
- VFX and Special Effects: After Effects is the perfect tool to add special effects to your videos. Its VFX tool lets users add magic to the footage. You can make objects disappear, control the weather, stabilize your video, and more.
Using Track Mattes in After Effects
In Adobe After Effects, a track matte is a layer that defines the transparency of another layer. It acts as a stencil, determining which parts of the underlying layer are visible and which are transparent. Track mattes are used for creating various effects such as text animations, transitions, and seamlessly composing multiple layers. After Effects offers four Track Matte options:
![]()
- Alpha Matte: Alpha matte in After Effects allows white areas in the matte layer to become visible while black areas become transparent. Effectively, this helps the underlying layer to show through.
- Alpha Inverted Matte: In an alpha inverted matte, black areas in the matte layer are visible, and white areas are transparent. It reverses the transparency values to create unique effects.
- Luma Matte: A luma matte uses the brightness values of the matte layer to determine visibility. Bright areas in the matte layer are visible, while dark areas are transparent.
- Luma Inverted Matte: The luma inverted matte works opposite to the luma matte. The top layer’s dark areas are visible, while bright areas are transparent.
![]()
You can use any of the track mattes in After Effects according to your requirements. Following is a step-by-step guide on how to use track mattes:
Step 1
To apply a track matte to your video, you must work with two layers. The top layer acts as the alpha or the luminance layer. The bottom layer acts as the fill. Once you have identified the layers, you can proceed to the next step.
Step 2
Go to the “Modes” column and open the dropdown menu next to “Layer List.” Here, select the layer you wish to use as the track matte.
![]()
Step 3
You will see two toggle switches once you select your layer. You can use these switches and the available options to set the transparency for the Track Matte. You can add alpha matte in After Effects or other types from here.
![]()
Part 2: Performing Mask Tracking With Adobe After Effects: Reviewing the Steps
Another remarkable feature that After Effects offers is mask tracking. Using After Effects mask tracking, you can automatically animate a mask’s position, shape, or path. This is done to match the movement of an object in a video clip. You can now easily deal with complex or fast-moving footage with this feature. To use Track Mask in After Effects, you can follow these steps:
Step 1
Import the footage you wish to edit in After Effects. Select the clip you wish to track from the timeline. Then, select the “Pen” tool from the top toolbar or press G on your keyboard. Select the area around the object you wish to mask in the footage.
![]()
Step 2
Now, open the layer and right-click on the mask name to select “Track Mask.” This will open the mask tracker in the tracker panel at the right. Open the dropdown menu next to the “Method” option. Here, you can find a range of options for tracking methods. Choose the one according to your requirements. If the object isn’t moving much, you can choose a simple option such as “Position.”
![]()
Step 3
Tap the “Analyze Forward” icon and let the tracker analyze the frames in the clip. Once the process has finished, you can restart your clip and set “Mask Mode” from the timeline to “Subtract.” This will remove the selected object from the clip.
![]()
Step 4
To fill in the details, go to the “Window” menu from the top and select “Content Aware Fill.” Once you see the panel on the screen, set the “Alpha Extension” slider to a number of your choice and click on “Generate Fill Layer.”
![]()
Part 3: How to Make Masking Easy? Try Wondershare Filmora
Although After Effects is a great tool for professional-quality video editing, it is not everyone’s cup of tea. Features such as motion track masks in After Effects are challenging to navigate. Novice users can face trouble getting around the complex masking process in After Effects. For a simpler alternative, you can try Wondershare Filmora .
Filmora is the complete solution when it comes to video editing. The multi-platform tool offers a range of useful features for video and audio manipulation. With thousands of built-in templates and presets, Filmora can help users kick-start their creative journey. You can use this easy-to-use tool as the perfect alternative to After Effects mask tracking.
Free Download For Win 7 or later(64-bit)
Free Download For macOS 10.14 or later
Main Highlights of Wondershare Filmora
Filmora offers a comprehensive toolset to help users make the most of their media files. Some useful resources provided by Wondershare Filmora include:
- AI Text-Based Editing: Filmora allows users to convert audio from videos into editable text. This can help you easily modify your video content. The feature can be used for quick transcriptions, subtitles, and translations.
![]()
- Speed Ramping: Using Filmora, users can apply professional speed effects in footage. You can adjust your video speed and create unique cinematic effects in no time. Filmora also helps maintain the audio pitch to avoid abrupt changes.
![]()
- Compound Clip: Filmora can help users merge multiple clips into a single footage. You can obtain complete control over the integrated clip for editing. This can help users manage and adjust multiple clips easily.
![]()
- AI Vocal Remover: The Vocal Remover tool of Filmora offers AI power to separate vocals and music from any audio. You can get separate acapella and vocals for various purposes. From karaoke to creative dubs, everything is now possible with Filmora.
![]()
Using AI Smart Masking in Filmora – A Step-by-Step Guide
Filmora offers an AI-powered masking feature for users. This allows automatic recognition and selection of objects in videos. You can create seamless transitions, color-correct elements, remove background, and more. The tool can easily detect and separate objects, so you don’t have to put in manual effort. Here is the step-by-step guide for AI smart masking using Filmora:
Step 1: Import Footage in Filmora
Install and launch Wondershare Filmora on your device. From the homepage, tap “New Project” and go to the “File” tab from the top. Tap “Import Media” in the dropdown menu and insert your video clips into the timeline.
![]()
Step 2: Enable AI Mask
Select your clip in the timeline and go to the “Video” tab from the right panel. Select the “Mask” option and tap the “AI Mask” icon. Under the section, you can choose from options such as “Select Character” or “Smart Brush.” Select one according to your requirements and hit “Add Mask.”
![]()
Step 3: Adjust Mask Settings and Export File
After you apply the masking option, you can adjust other mask settings. Filmora allows users to set the expansion range, blur strength, opacity, and other aspects. Once satisfied with the results, tap the “Export” button from the top-right corner and choose a pathway to save your video.
![]()
Free Download For Win 7 or later(64-bit)
Free Download For macOS 10.14 or later
Conclusion
Adobe After Effects is an industry-standard tool for video editing and manipulation. Track Mattes and Track Masks in After Effects are valuable tools that can help elevate your video’s potential. For a simple and effective alternative, you can try Wondershare Filmora. The tool uses smart masking using AI to make the process easier.
A Review On 3D LUT Creator
We know the importance of color grading to improve the look and feel of your digital content. That’s why LUTs are essential, as they color-correct our media files. LUTs are pre-defined color transformations you can apply to your footage to achieve a specific aesthetic or mood. With LUTs, you can make your photos and videos look more cinematic, vibrant, or vintage, among other possibilities.
Besides this, your editing software also makes a huge difference. Therefore, use the 3D LUT Creator Pro tool for color correction and adjustments. It allows you to create custom LUTs and use pre-made LUTs from a vast library.
Part 1: Introduction to 3D LUTs Creator - How Is It Good in The LUTs Market
Lookup Tables (LUTs) are powerful tools that allow you to adjust and enhance the color and tone of your digital media. They are mathematical formulas that map the colors of your footage to new values to change the tone. Additionally, many LUTs are available for you to choose and use.
The options are endless, with so many options, from modern cinematic styles to vintage film looks. The content creators select from various LUTs to make their digital content look unique and professional.
Introducing 3D LUT Creator
3D LUT Creator is considered one of the best color grading and color correction tools. It helps you to create, adjust, and apply free 3D LUTs to your photos and videos. With this tool, you can get consistent color grading results, even when dealing with complex lighting situations. Besides LUTs, this tool offers other color correction features to make your content look unique.
Additionally, this professional tool offers plugins for multiple editing software. The integration helps with multiple tools, making your content look more professional. Furthermore, this tool has a store with different LUTs packs to download.

Empower your videos with a new mood using different LUTs. Filmora now offers 100+ top-quality 3D LUTs cover a broad range of scenarios. Transform your videos with Filmora’s powerful 3D LUTs.
Apply LUT on Videos Apply LUT on Videos Learn More


Part 2: Reviewing The Features of 3D LUT Creator
The 3D LUT Creator Pro is a tool packed with some amazing features for color correction to your digital media files. Some of the most prominent features related to 3D LUT Creator are discussed here.
- Plugins: This tool offers plugin support for different photo and video editing software. 3D LUT Creator free download is available for Premiere, DaVinci Resolve, Final Cut, and more. These plugins are available for both Mac and Windows.
- Colors of RGB Space: 3D LUT Creator has a great feature that changes your media file’s tone. The RGB feature allows you to toggle up and down or slide left and right to change the saturation and hue.
- Gradients: This amazing feature comes with seven color gradients to play with. You can use this feature to change and distribute these colors according to your preference. It also has a linear gradient for gray shades.
- Color Wheel: Another useful feature for color enhancement is the color wheel option. Its features can create a color scheme for you with its color matrix. Users can create their color scheme by changing and enhancing different colors.
- A/B Grid: It is another color correction option that you can use. This feature lets you change any color into a different one by changing hue and saturation.
- C/L Grids: This unique feature lets you set the tone of a specific color to your media file. It gives a particular color tint to your photos and videos.
- 2-D Curves: With this feature, you can change and modify the color toning of your images and videos. Moreover, you can play with the RGB wheel to give the desired color tone to your files.
- Volume: It is another impressive feature that allows you to adjust the brightness of your media content. Furthermore, you can highlight the subject in the image using this option.
- AI Retouch: AI Retouching plugin is a unique option that uses artificial intelligence to retouch and beautify your image. This option smoothens your skin and gives it a flawless look with no spots, dark circles, or blemishes.
Part 3: Testing The Advanced Functionalities of 3D LUT Creator
Apart from basic features, 3D LUT Creator is powered by advanced features. Here are some of the unique advanced features highlighted below.
- Complex Linear Gradient: One of the key features of 3D LUT Creator is the Complex Linear Gradient tool. The tool allows you to create complex color gradients with combinations. Moreover, you can even adjust RGB curves with this tool.
- Hald Images: 3D LUT Creator allows you to import and export Hald images, making working with other color grading software and tools easy. You can use these images to create complex color modifications and changes.
- Advanced Color Wheel: The Advanced Color Wheel is another powerful feature of 3D LUT Creator. It allows you to select and adjust colors in your digital media files. The wheel supports multiple color spaces for color correction, including RGB, HSL, and more.
- Technical 3D LUTs: Finally, 3D LUT Creator Pro includes a range of technical 3D LUTs. It can be used to adjust white balance and exposure composition. These LUTs are designed to help you achieve the perfect color and exposure balance in your images and videos.
Part 4: How to Utilize LUTs in Photoshop and 3D LUT Creator: Step-by-Step Guide
If you have trouble integrating this free 3D LUTs plugin with Photoshop, follow this guide. This step-by-step guide will navigate you and tell you how to use this tool in Photoshop.
Step 1Open The Tool to Integrate
The first step is to open the tool and click the File button after the tool is running. Once clicked, go to the Preference option to launch a new window.

Step 2Integrate the Photoshop
After selecting the integration option, a new window will pop up that allows you to select your Photoshop version. Make sure to use CS6 or newer versions to integrate the 3D LUT Creator to use color adjustment layers.
If you don’t find your version in the options, then you can choose the “Custom Photoshop” option and browse the path of your Photoshop.

Part 5: Top 3D LUTs Available in Store
The 3D LUT Creator is a professional tool with a LUT store on its website. This store has different LUT packs according to your style and taste. Download them and use them to make your content stand out from others.
1. GoPro LUTs Color Grading Pack
If you want to add a professional touch to your GoPro videos, the GoPro LUTs Color Grading Pack might be a good option. With over 50 LUTs, you can color impressively grade your videos. Furthermore, you can add warmth to your footage, enhance the contrast, or create a specific mood. The GoPro LUTs Color Grading Pack has a wide variety of options.

2. Psychedelia LUTs Pack
Give your photos and videos a unique and eye-catching look by trying out the Psychedelia LUTs Pack. This pack contains multiple LUTs that you can use for color correction and grading. The output results resemble infrared photography, giving your content a unique look. Moreover, these LUTs are perfect for enhancing your photos and videos on social media platforms like Instagram.

3. Winter Pack
Winter Pack is a LUT that you can use to give your media files a cold winter look. It highlights the color blue and gives a bluish tint to your media to make it look like it was shot during winter. Similarly, you can give your photos or videos a chilly and snowy appearance, perfect for winter-themed content. It is a simple and effective way to enhance the mood and atmosphere of your media files.

4. Zoan Cinematic Pack
Cinematic Pack lets you add a cinematic touch to your digital media files. This pack contains 8 LUTs that help you achieve a rich cinematic feel in your footage. It creates a dramatic look by darkening the colors and underexposing your photos and videos. With these LUTs, you can easily transform your digital media files to have a more cinematic feel.

5. Travel LUT Pack
Another amazing LUT pack that gives your photos and videos a more natural look is the Travel LUT Pack. It gives your media content a warm and natural look. These LUTs highlight the orange and brown colors to give your digital files a more earthy feel. Moreover, these LUTs add grains to your photos and videos for a perfect travel look.

Conclusion
In conclusion, LUTs are an essential tool in the editing process. They help you achieve consistent color grading across your footage or images, saving time and effort. LUTs allow you to easily apply specific color grading styles and look at your media. Furthermore, the 3D LUT Creator free download will let you edit LUTs and apply them to your Photoshop projects.
Try Filmora to apply 3D Luts on your video!
Add LUTs on Video For Win 7 or later(64-bit)
Add LUTs on Video For macOS 10.14 or later
Apply LUT on Videos Apply LUT on Videos Learn More
Part 2: Reviewing The Features of 3D LUT Creator
The 3D LUT Creator Pro is a tool packed with some amazing features for color correction to your digital media files. Some of the most prominent features related to 3D LUT Creator are discussed here.
- Plugins: This tool offers plugin support for different photo and video editing software. 3D LUT Creator free download is available for Premiere, DaVinci Resolve, Final Cut, and more. These plugins are available for both Mac and Windows.
- Colors of RGB Space: 3D LUT Creator has a great feature that changes your media file’s tone. The RGB feature allows you to toggle up and down or slide left and right to change the saturation and hue.
- Gradients: This amazing feature comes with seven color gradients to play with. You can use this feature to change and distribute these colors according to your preference. It also has a linear gradient for gray shades.
- Color Wheel: Another useful feature for color enhancement is the color wheel option. Its features can create a color scheme for you with its color matrix. Users can create their color scheme by changing and enhancing different colors.
- A/B Grid: It is another color correction option that you can use. This feature lets you change any color into a different one by changing hue and saturation.
- C/L Grids: This unique feature lets you set the tone of a specific color to your media file. It gives a particular color tint to your photos and videos.
- 2-D Curves: With this feature, you can change and modify the color toning of your images and videos. Moreover, you can play with the RGB wheel to give the desired color tone to your files.
- Volume: It is another impressive feature that allows you to adjust the brightness of your media content. Furthermore, you can highlight the subject in the image using this option.
- AI Retouch: AI Retouching plugin is a unique option that uses artificial intelligence to retouch and beautify your image. This option smoothens your skin and gives it a flawless look with no spots, dark circles, or blemishes.
Part 3: Testing The Advanced Functionalities of 3D LUT Creator
Apart from basic features, 3D LUT Creator is powered by advanced features. Here are some of the unique advanced features highlighted below.
- Complex Linear Gradient: One of the key features of 3D LUT Creator is the Complex Linear Gradient tool. The tool allows you to create complex color gradients with combinations. Moreover, you can even adjust RGB curves with this tool.
- Hald Images: 3D LUT Creator allows you to import and export Hald images, making working with other color grading software and tools easy. You can use these images to create complex color modifications and changes.
- Advanced Color Wheel: The Advanced Color Wheel is another powerful feature of 3D LUT Creator. It allows you to select and adjust colors in your digital media files. The wheel supports multiple color spaces for color correction, including RGB, HSL, and more.
- Technical 3D LUTs: Finally, 3D LUT Creator Pro includes a range of technical 3D LUTs. It can be used to adjust white balance and exposure composition. These LUTs are designed to help you achieve the perfect color and exposure balance in your images and videos.
Part 4: How to Utilize LUTs in Photoshop and 3D LUT Creator: Step-by-Step Guide
If you have trouble integrating this free 3D LUTs plugin with Photoshop, follow this guide. This step-by-step guide will navigate you and tell you how to use this tool in Photoshop.
Step 1Open The Tool to Integrate
The first step is to open the tool and click the File button after the tool is running. Once clicked, go to the Preference option to launch a new window.
Step 2Integrate the Photoshop
After selecting the integration option, a new window will pop up that allows you to select your Photoshop version. Make sure to use CS6 or newer versions to integrate the 3D LUT Creator to use color adjustment layers.
If you don’t find your version in the options, then you can choose the “Custom Photoshop” option and browse the path of your Photoshop.
Part 5: Top 3D LUTs Available in Store
The 3D LUT Creator is a professional tool with a LUT store on its website. This store has different LUT packs according to your style and taste. Download them and use them to make your content stand out from others.
1. GoPro LUTs Color Grading Pack
If you want to add a professional touch to your GoPro videos, the GoPro LUTs Color Grading Pack might be a good option. With over 50 LUTs, you can color impressively grade your videos. Furthermore, you can add warmth to your footage, enhance the contrast, or create a specific mood. The GoPro LUTs Color Grading Pack has a wide variety of options.
2. Psychedelia LUTs Pack
Give your photos and videos a unique and eye-catching look by trying out the Psychedelia LUTs Pack. This pack contains multiple LUTs that you can use for color correction and grading. The output results resemble infrared photography, giving your content a unique look. Moreover, these LUTs are perfect for enhancing your photos and videos on social media platforms like Instagram.
3. Winter Pack
Winter Pack is a LUT that you can use to give your media files a cold winter look. It highlights the color blue and gives a bluish tint to your media to make it look like it was shot during winter. Similarly, you can give your photos or videos a chilly and snowy appearance, perfect for winter-themed content. It is a simple and effective way to enhance the mood and atmosphere of your media files.
4. Zoan Cinematic Pack
Cinematic Pack lets you add a cinematic touch to your digital media files. This pack contains 8 LUTs that help you achieve a rich cinematic feel in your footage. It creates a dramatic look by darkening the colors and underexposing your photos and videos. With these LUTs, you can easily transform your digital media files to have a more cinematic feel.
5. Travel LUT Pack
Another amazing LUT pack that gives your photos and videos a more natural look is the Travel LUT Pack. It gives your media content a warm and natural look. These LUTs highlight the orange and brown colors to give your digital files a more earthy feel. Moreover, these LUTs add grains to your photos and videos for a perfect travel look.
Conclusion
In conclusion, LUTs are an essential tool in the editing process. They help you achieve consistent color grading across your footage or images, saving time and effort. LUTs allow you to easily apply specific color grading styles and look at your media. Furthermore, the 3D LUT Creator free download will let you edit LUTs and apply them to your Photoshop projects.
Try Filmora to apply 3D Luts on your video!
Add LUTs on Video For Win 7 or later(64-bit)
Add LUTs on Video For macOS 10.14 or later
Also read:
- Top 5 Websites and Software to Convert Powerpoint to Mp4
- Updated This Article Talks About if the Windows Movie Maker Available and if Yes, Then How You Can Download It and so On. It Further Comprises an Alternative to the Same to Create Videos
- In 2024, Everything You Need to Know About Color Grading in Photography
- New 2024 Approved VSDC Free Video Editor Review
- New In 2024, Guide To Cropping and Combining Content in Wondershare Filmora Latest
- Updated In 2024, Add Amazing Filters and Effects for Fun to Watch GIFs Using Adobe After Effects. Read on to Discover an Easy-to-Learn After Effects Alternative
- Updated As a Designer, Color Is the Most Powerful and the Most Diverse Tool at Your Disposal. Here Are Ten Matching Color Combinations to Get You Started on Your Next Project for 2024
- New In 2024, Create Perfect Slow Motion Videos With The Best CapCut Templates
- New 2024 Approved Quick Answer What Is a GIF File
- How to Remove Echo with Premiere Pro? Full Guide Here
- Looking for the Best Alternatives of iPad Compatible Slideshow Applications to Design High End Graphic Presentations? Rest Assured, You Have Landed at the Correct Spot
- Updated How to Create Chroma Key Written Text Effects in Filmora for 2024
- Updated How to Crop a Video in Windows Media Player
- New Create Photoshop GIFs with Zero Hustle
- Time Lapse Video Is Very Interesting and Creative, Which Usually Attracts More Attention. This Article Will Show You How to Make a Time Lapse Video with Adobe After Effects
- In 2024, Mix and Match The Ultimate List of 8 Video and Photo Merging Tools
- New How to Add Camera Shake to Video in Adobe After Effects
- Best Online MPEG to GIF Converters
- Updated In 2024, Best Online GIF to Image (PNG/JPG) Converters
- In 2024, Create Amazing Slow-Motion Videos 8 Affordable Slow-Motion Cameras
- 2024 Approved Guide Adding Audio in Wondershare Filmora
- Stunning Glitch Effect and Its Creation Steps for Premiere Pro
- In 2024, Do You Want to Show Your Mood in Your Digital Media Content but Dont Know How To? There Are Many Moody LUTs Available that Highlight Your Mood in Your Content
- Discover the Top 5 Online Tools for Merging Videos and Audios Quickly and Easily. Streamline Your Editing Process and Create Seamless Multimedia Content
- How to Remove Echo with Premiere Pro? Full Guide Here for 2024
- New How to Add Selective Color Effect to Your Videos for 2024
- Updated Do You Want to Print Designs Onto Your Garments or Other Fashion Accessories? Find Out How to Create a Screen Print Effect in Photoshop to Give Your Text or Graphics a Vintage or Retro Look
- New Legend Intro Maker – Create Intro Video with Ease
- New In 2024, How to Denoise in After Effects – Audio & Video Noise Removal
- Updated Top Shortcut Towards Timeline Template
- Here You Can Lean About the Different Ways for GIMP Transparent Background PNG Format Files
- 2024 Approved Best 15 Subtitle Apps 2023 Windows, Mac, iPhone, Android & Online
- New How to Add Text to Video for 2024
- In 2024, The Top 10 AI Video Analytics Companies at a Glance
- In 2024, Slow Motion Video Editors To Look Out For
- New 4 Ways to Rotate Videos on Windows PC for 2024
- How to Create Liquid Water Reveal Intro for 2024
- New In 2024, Guide To Using Free Luts for OBS
- In 2024, 10 Best Cartoon Video Makers (Online and Desktop Solution)
- New 2024 Approved End This Problem! Make Transparent Background Video Today
- Updated 2024 Approved What Is Motion Tracking and How to Use It
- New In 2024, How to Rotate AVI in Vertical/Portrait Orientation Windows, Mac,Android, iPhone & Online
- In 2024, 4 Methods How To Make a Recap Video
- You Can Easily Film Rotating Video Illusions From Your Smartphone and Edit Them on Wondershare Filmora in Just a Few Clicks
- Updated Art of Time Manipulation A Guide to After Effects Slow Motion Mastery for 2024
- This Article Discusses What Is Hitfilm Express, How to Download, Install and Use It, and Its Key Features. It Further Discusses Its Alternative for Editing Your Videos and More. Check Out Now for 2024
- Updated 2024 Approved 5 Excellent Tools To Convert Video to 60 FPS
- How can I get more stardust in pokemon go On Honor Play 8T? | Dr.fone
- Solutions to Spy on OnePlus Nord CE 3 5G with and without jailbreak | Dr.fone
- Unlock Samsung Galaxy S24 Phone Password Without Factory Reset Full Guide Here
- How and Where to Find a Shiny Stone Pokémon For Xiaomi Redmi Note 12T Pro? | Dr.fone
- Network Locked SIM Card Inserted On Your Motorola Moto G04 Phone? Unlock It Now
- Proven Ways to Fix There Was A Problem Parsing the Package on Infinix Note 30 | Dr.fone
- In 2024, 6 Methods to Protect Yourself from Location Tracking on Apple iPhone 13 Pro | Dr.fone
- How To Change Your SIM PIN Code on Your Tecno Spark 20 Pro+ Phone
- In 2024, Recommended Best Applications for Mirroring Your Xiaomi Redmi Note 12 4G Screen | Dr.fone
- How To Transfer Data From iPhone SE (2020) To Other iPhone 13 Pro devices? | Dr.fone
- In 2024, iSpoofer is not working On Huawei Nova Y71? Fixed | Dr.fone
- 2024 Approved 4 Smart Solutions to Create or Find Good Morning/Night GIFs
- In 2024, 5 Easy Ways to Copy Contacts from Samsung Galaxy M34 to iPhone 14 and 15 | Dr.fone
- Top 4 Ways to Trace Nokia XR21 Location | Dr.fone
- How to Remove Apple iPhone 11 Pro SIM Lock?
- Updated 2024 Approved Apps to Animate Still Pictures Which Could Make Your Pictures Become Internet Sensation
- In 2024, Downloading SamFw FRP Tool 3.0 for Poco C51
- How to Transfer Data After Switching From Itel P55 5G to Latest Samsung | Dr.fone
- In 2024, Top 10 Password Cracking Tools For Xiaomi Redmi Note 13 5G
- Fix Unfortunately Settings Has Stopped on Vivo S17t Quickly | Dr.fone
- In 2024, What You Want To Know About Two-Factor Authentication for iCloud On your Apple iPhone SE (2020)
- Simple ways to get lost videos back from Agni 2 5G
- How To Unlock a Itel A70 Easily?
- 6 Solutions to Unlock Gionee Phones If You Forgot Password, PIN, Pattern
- In 2024, How to Transfer Contacts from Motorola Edge 40 Pro To Phone | Dr.fone
- In 2024, Easy Fixes How To Recover Forgotten iCloud Password On your iPhone 12 Pro
- All You Need To Know About Mega Greninja For Honor Magic V2 | Dr.fone
- Prevent Cross-Site Tracking on OnePlus Nord 3 5G and Browser | Dr.fone
- How to Use Face ID to Pay for Apps on iPhone 15?
- How to Remove and Reset Face ID on iPhone 12 Pro
- How to Bypass Apple iPhone 6s Plus Passcode Easily Video Inside | Dr.fone
- In 2024, 4 Ways to Transfer Music from Itel P55+ to iPhone | Dr.fone
- In 2024, The Best Android SIM Unlock Code Generators Unlock Your Oppo A2 Phone Hassle-Free
- Super Easy Ways To Deal with Samsung Galaxy M34 5G Unresponsive Screen | Dr.fone
- How to Stop Life360 from Tracking You On Motorola Edge 2023? | Dr.fone
- In 2024, Tips and Tricks for Setting Up your Realme 12+ 5G Phone Pattern Lock
- 5 Best Route Generator Apps You Should Try On Google Pixel 7a | Dr.fone
- Different Methods To Unlock Your iPhone 14 Plus
- 8 Best Apps for Screen Mirroring Vivo V27e PC | Dr.fone
- In 2024, Easy Guide to Xiaomi Redmi 13C 5G FRP Bypass With Best Methods
- How to Unlock Apple ID Activation Lock From iPhone 14 Pro?
- In 2024, How to Change Google Play Location On Huawei Nova Y91 | Dr.fone
- In 2024, The Updated Method to Bypass Gionee F3 Pro FRP
- Title: In 2024, If You Wish to Edit FLV Videos without Any Problems, You Should Utilize a Multipurpose Video Editor that Supports the FLV File Format
- Author: Chloe
- Created at : 2024-04-24 07:08:20
- Updated at : 2024-04-25 07:08:20
- Link: https://ai-editing-video.techidaily.com/in-2024-if-you-wish-to-edit-flv-videos-without-any-problems-you-should-utilize-a-multipurpose-video-editor-that-supports-the-flv-file-format/
- License: This work is licensed under CC BY-NC-SA 4.0.
