
In 2024, Learn How to Create Your Own Custom Animated Text Intro in the Filmora Video Editor. Follow a Few Simple Steps to Create Something that Looks Incredible

Learn How to Create Your Own Custom Animated Text Intro in the Filmora Video Editor. Follow a Few Simple Steps to Create Something that Looks Incredible
Preparation
What you need to prepare:
- A computer (Windows or macOS)
- Your video materials.
- Filmora video editor
Step 1
Download and Install the Filmora video editor . Then, click on New Project once the program starts.
Step 2
Go to Titles and drag the Default Title to the Timeline. Then, double-click on the Default Title clip to open its settings. Here, type in your text → change the text color to Black → click OK → take a snapshot.

Step 3
Double-click on the Default Title once more and simply change the text color to anything other than black this time. Then, click OK and take another snapshot. After this, delete the Default Title from the Timeline.
Step 4
Next, go to Sample Color and drag the White color to the Timeline. Increase the White Color clip’s duration to 10 seconds by dragging the tail of the clip to the right.

Step 5
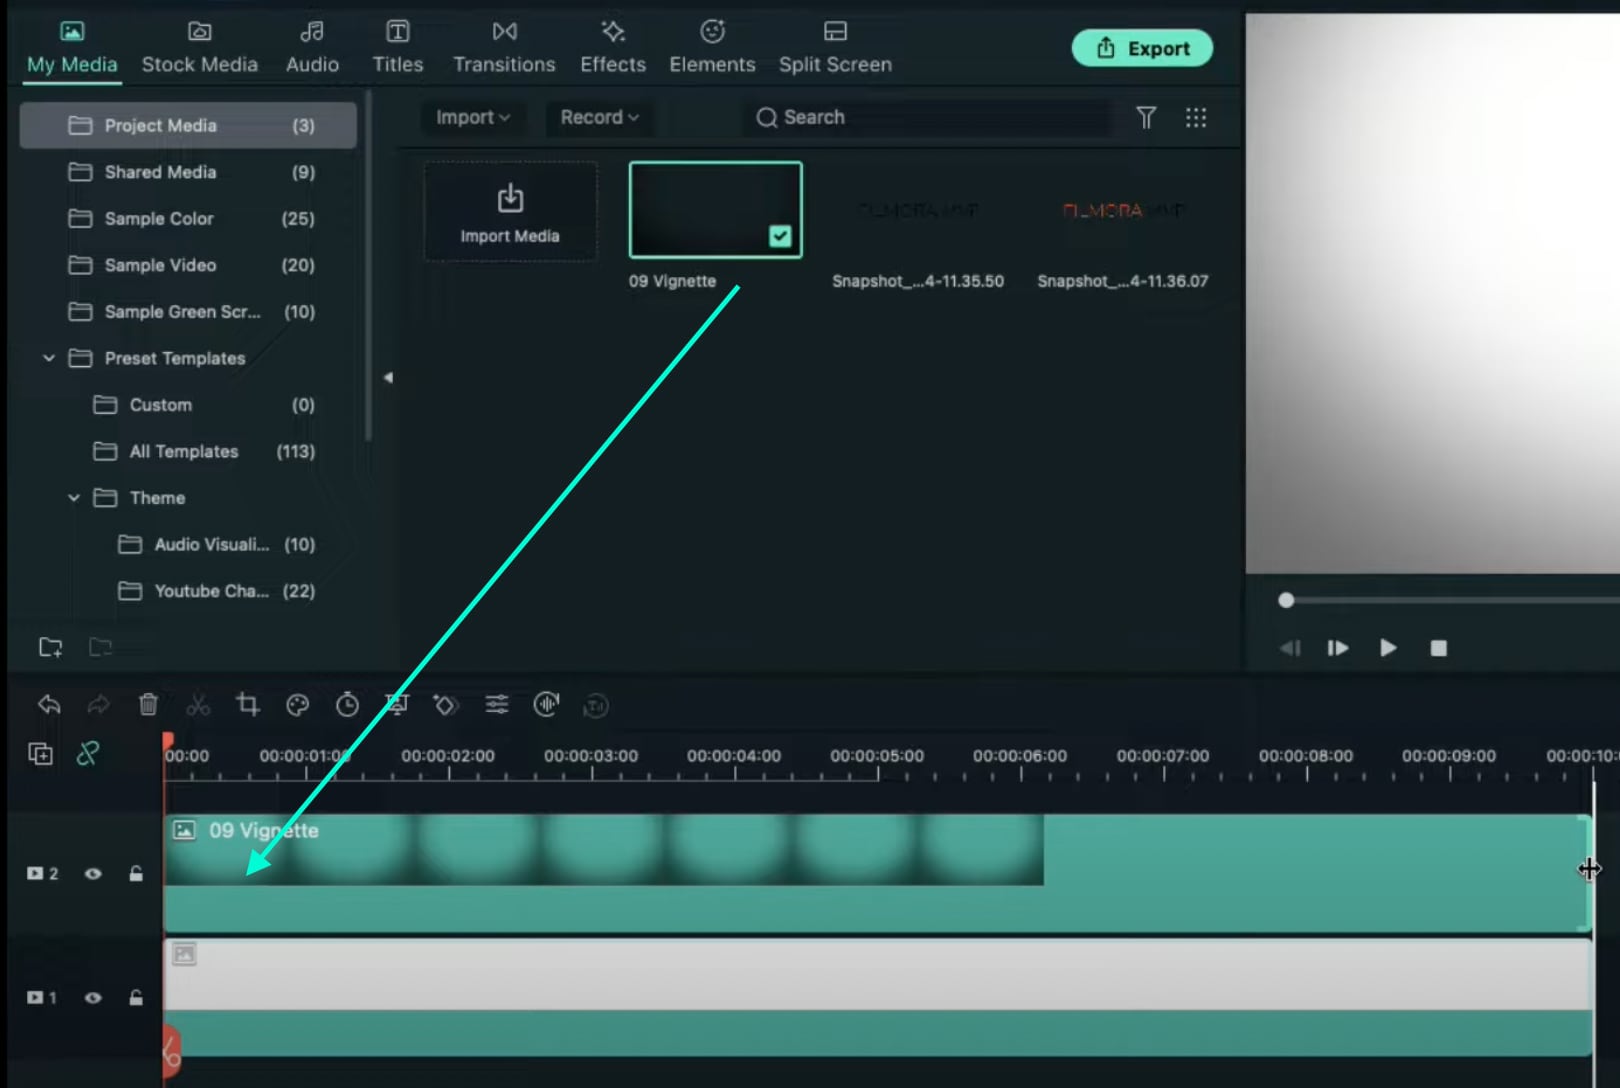
For the next step, you need to download a simple Vignette png image . Then, import the Vignette image into Filmora. Go to My Media and click on Import Media. Import it and drag the image to the Timeline. Then, move that clip to Track 3.
Step 6
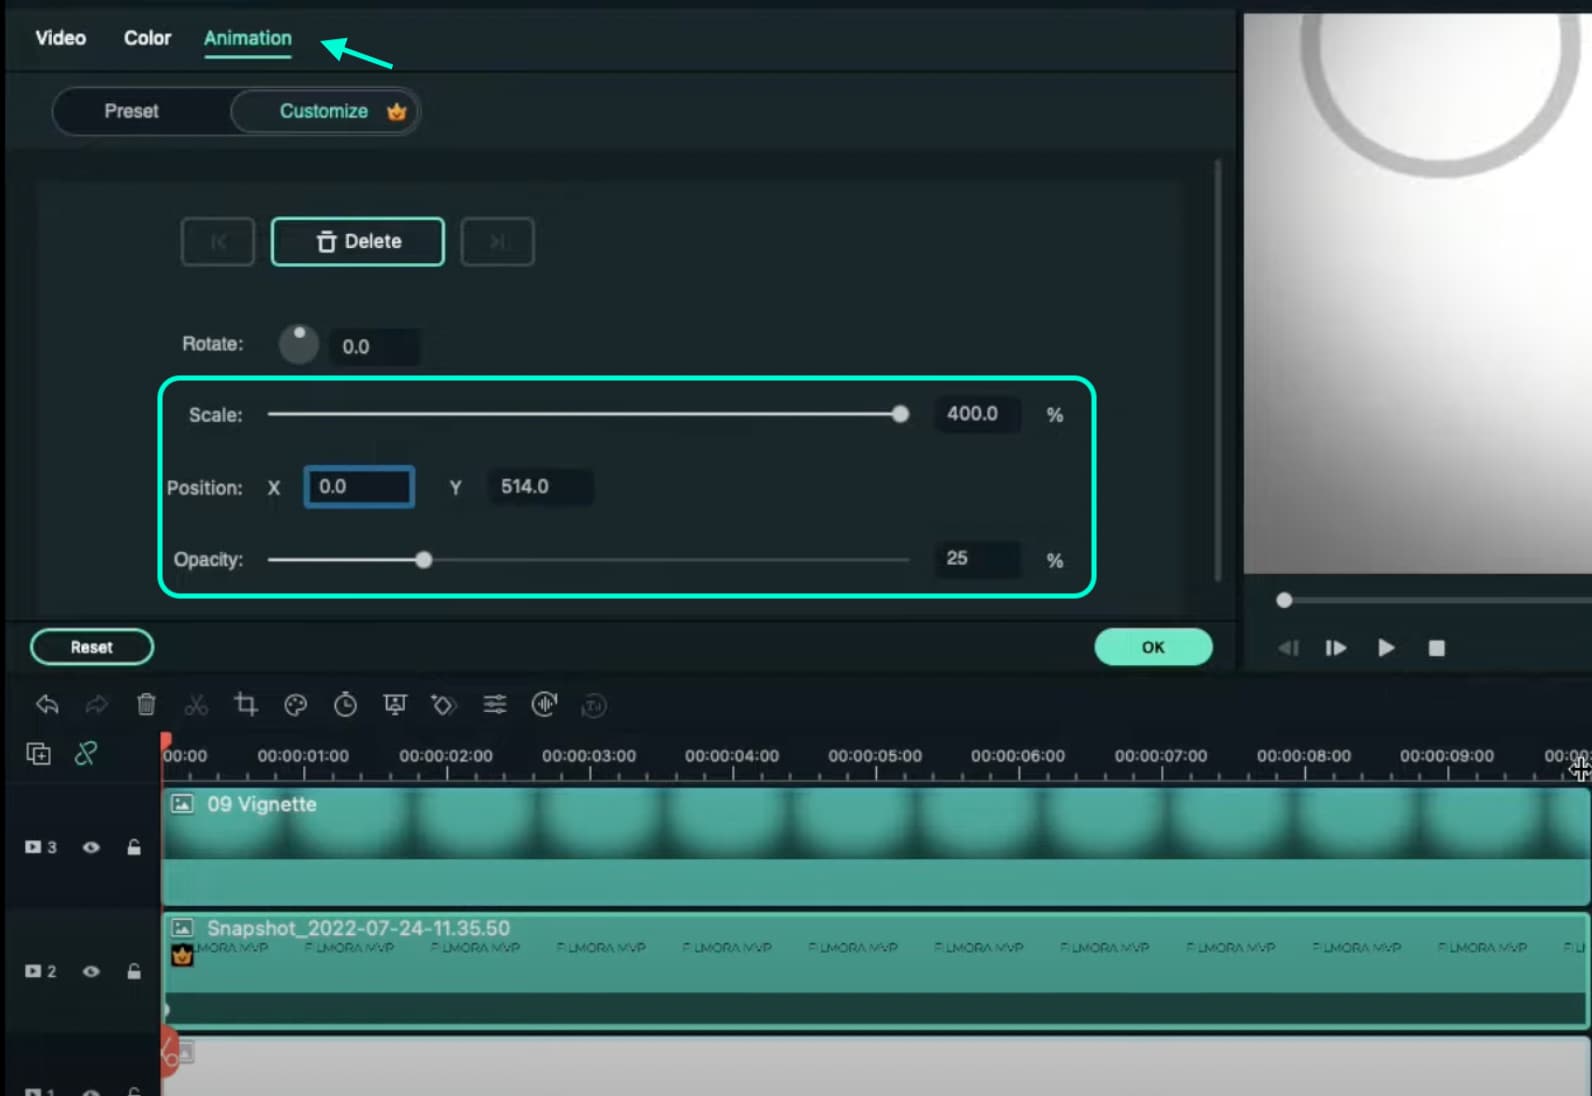
Drop the Black snapshot you took earlier to Track 2. Double-click on it, go to Animation, and apply these settings. After this, move the Playhead to the end of the clip and change the X-axis value to “-800”.
Step 7
Go to Effects and drag the Square Blur effect to Track 4 on the Timeline. Increase its duration to match the other clips. Then, click on the effect and change its Size bar value to 4. Click OK.

Step 8
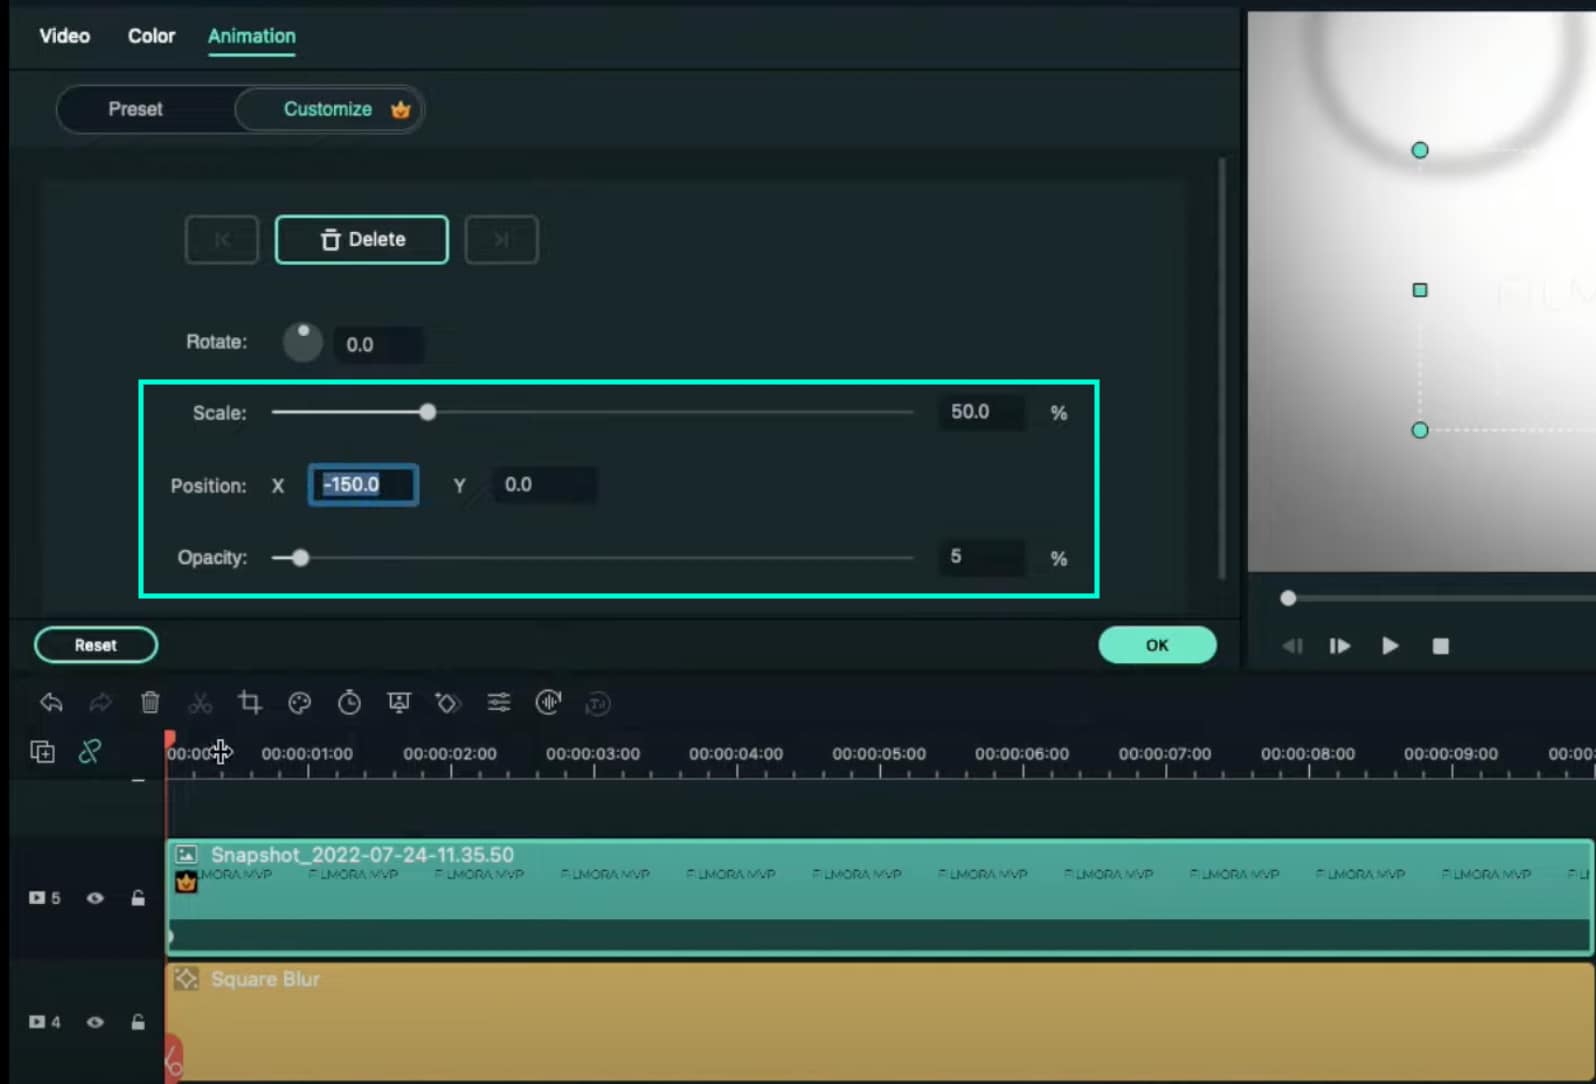
Place the Playhead at the beginning of the clip. Go to My Media and drag the Black snapshot to Track 5. Double-click on it → go to Animation and change the settings to look like this. Then, move the Playhead to 9 seconds. Here, change the X-axis to “150” and the Scale to 75%.
Step 9
Now, place the Playhead at the starting point and drag the colored snapshot in Track 6. Double-click on it and change the Scale to 50%. Then, move the Playhead to 9 seconds again and change the Scale to 75%. Click OK.
Step 10
Go to Sample Color and drag “Gradient 4” to Track 7 on the Timeline. Double-click on it → go to the Video tab → change the Blending Mode to Overlay → decrease the Opacity to 25%. Click OK.

Step 11
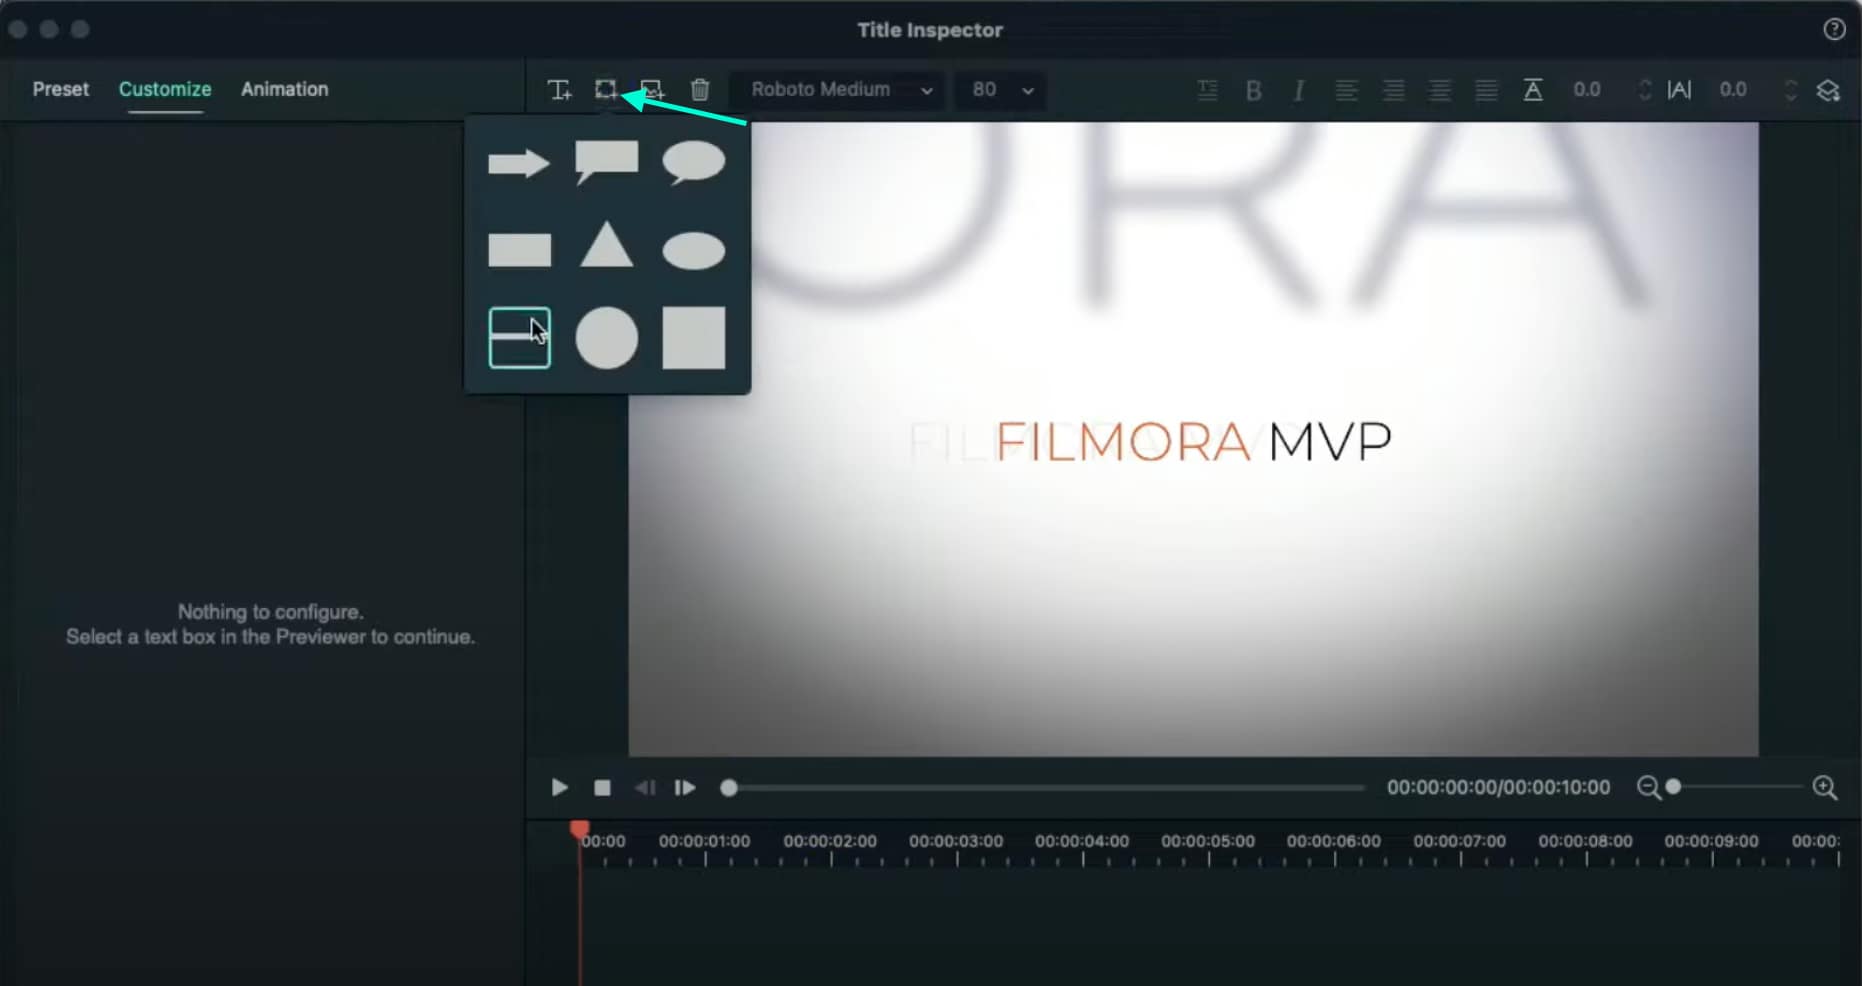
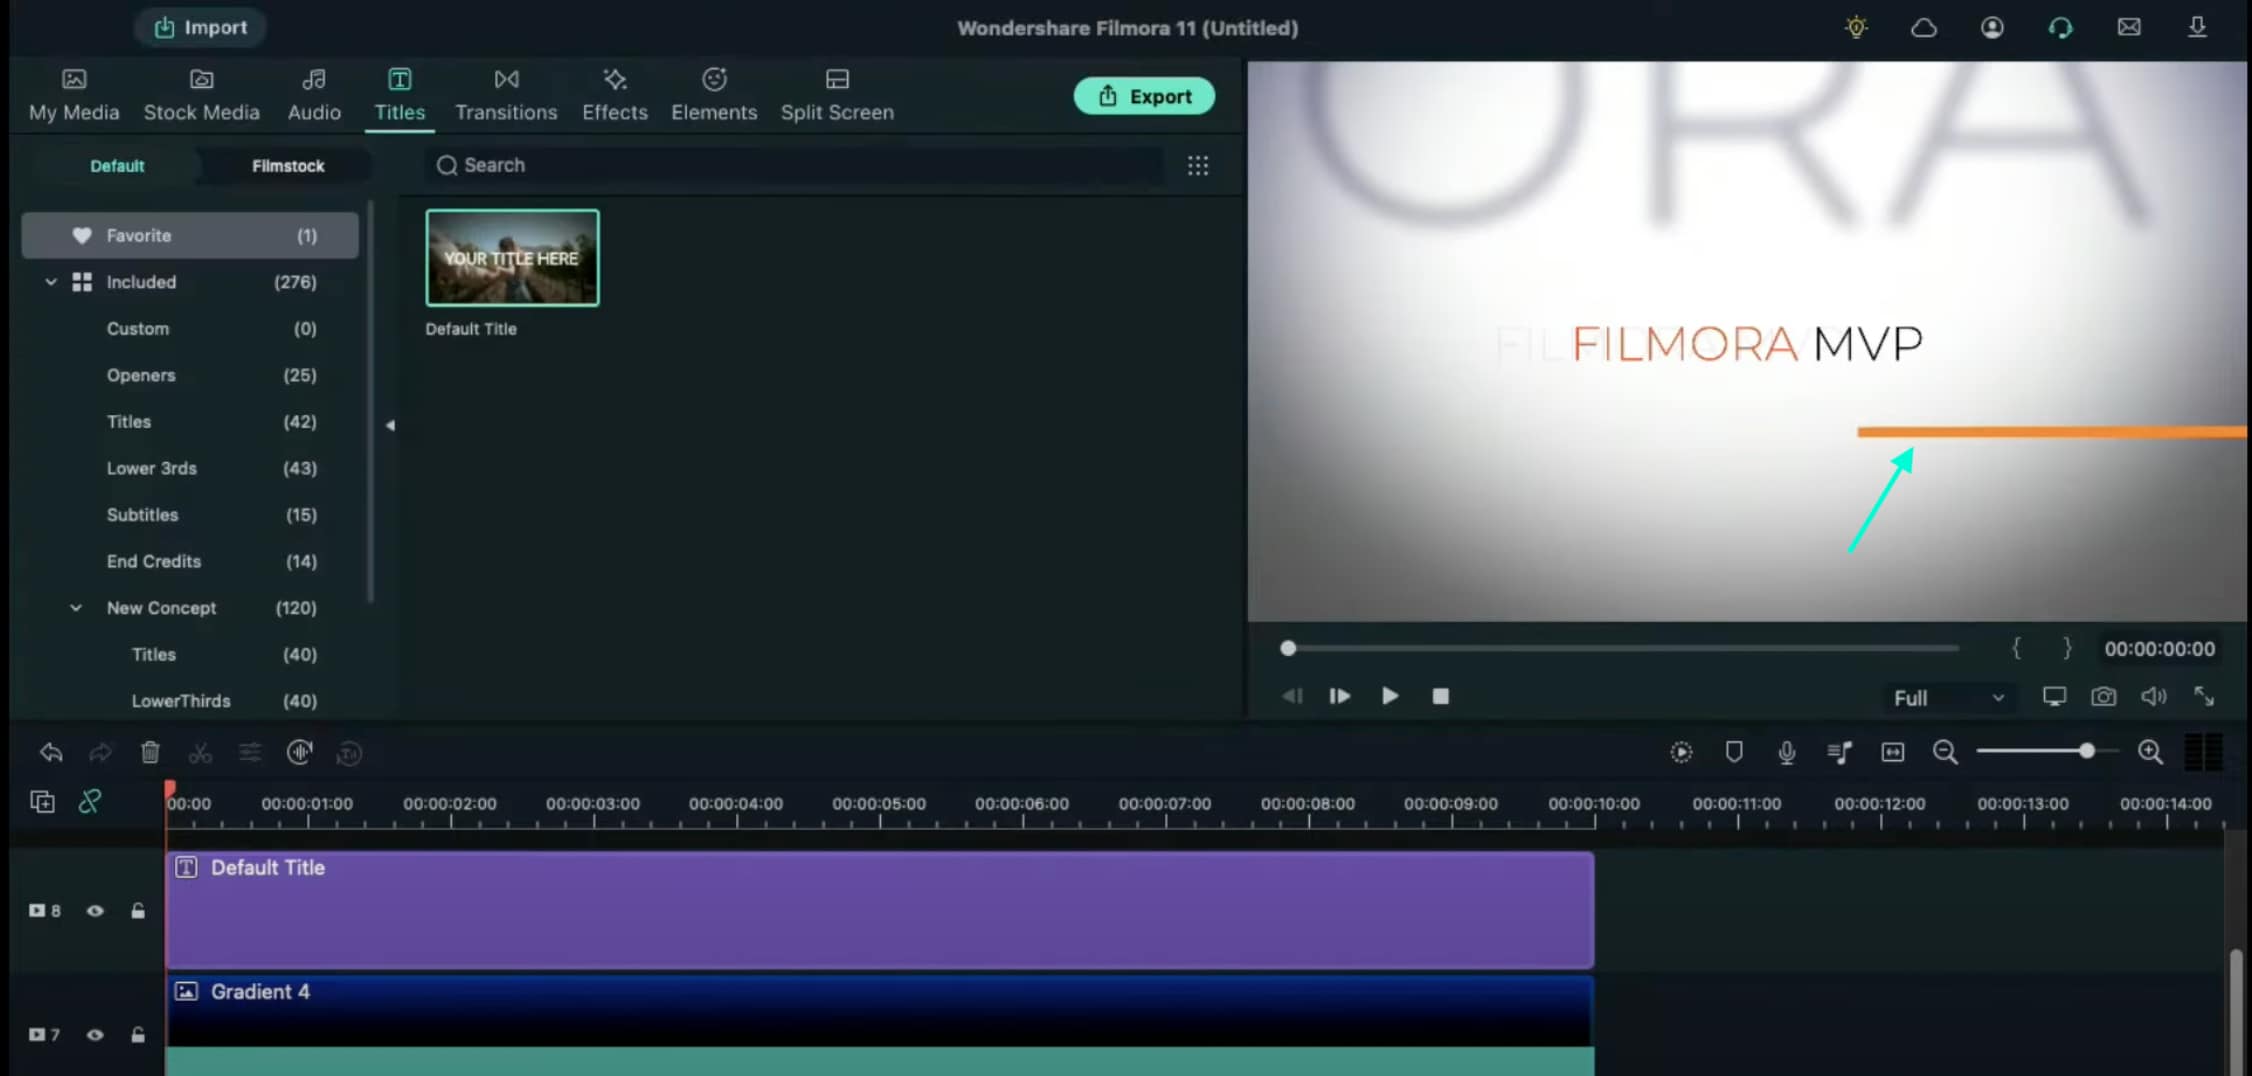
Drag a Default Title to Track 8 and double-click on it to open its Advanced settings. From here, delete the yellow text clip located under the video. Then, insert a Line shape.
Step 12
Increase the Line’s length to be almost as long as the screen. Then adjust its position until half of the Line is visible on the screen. Like this.
Step 13
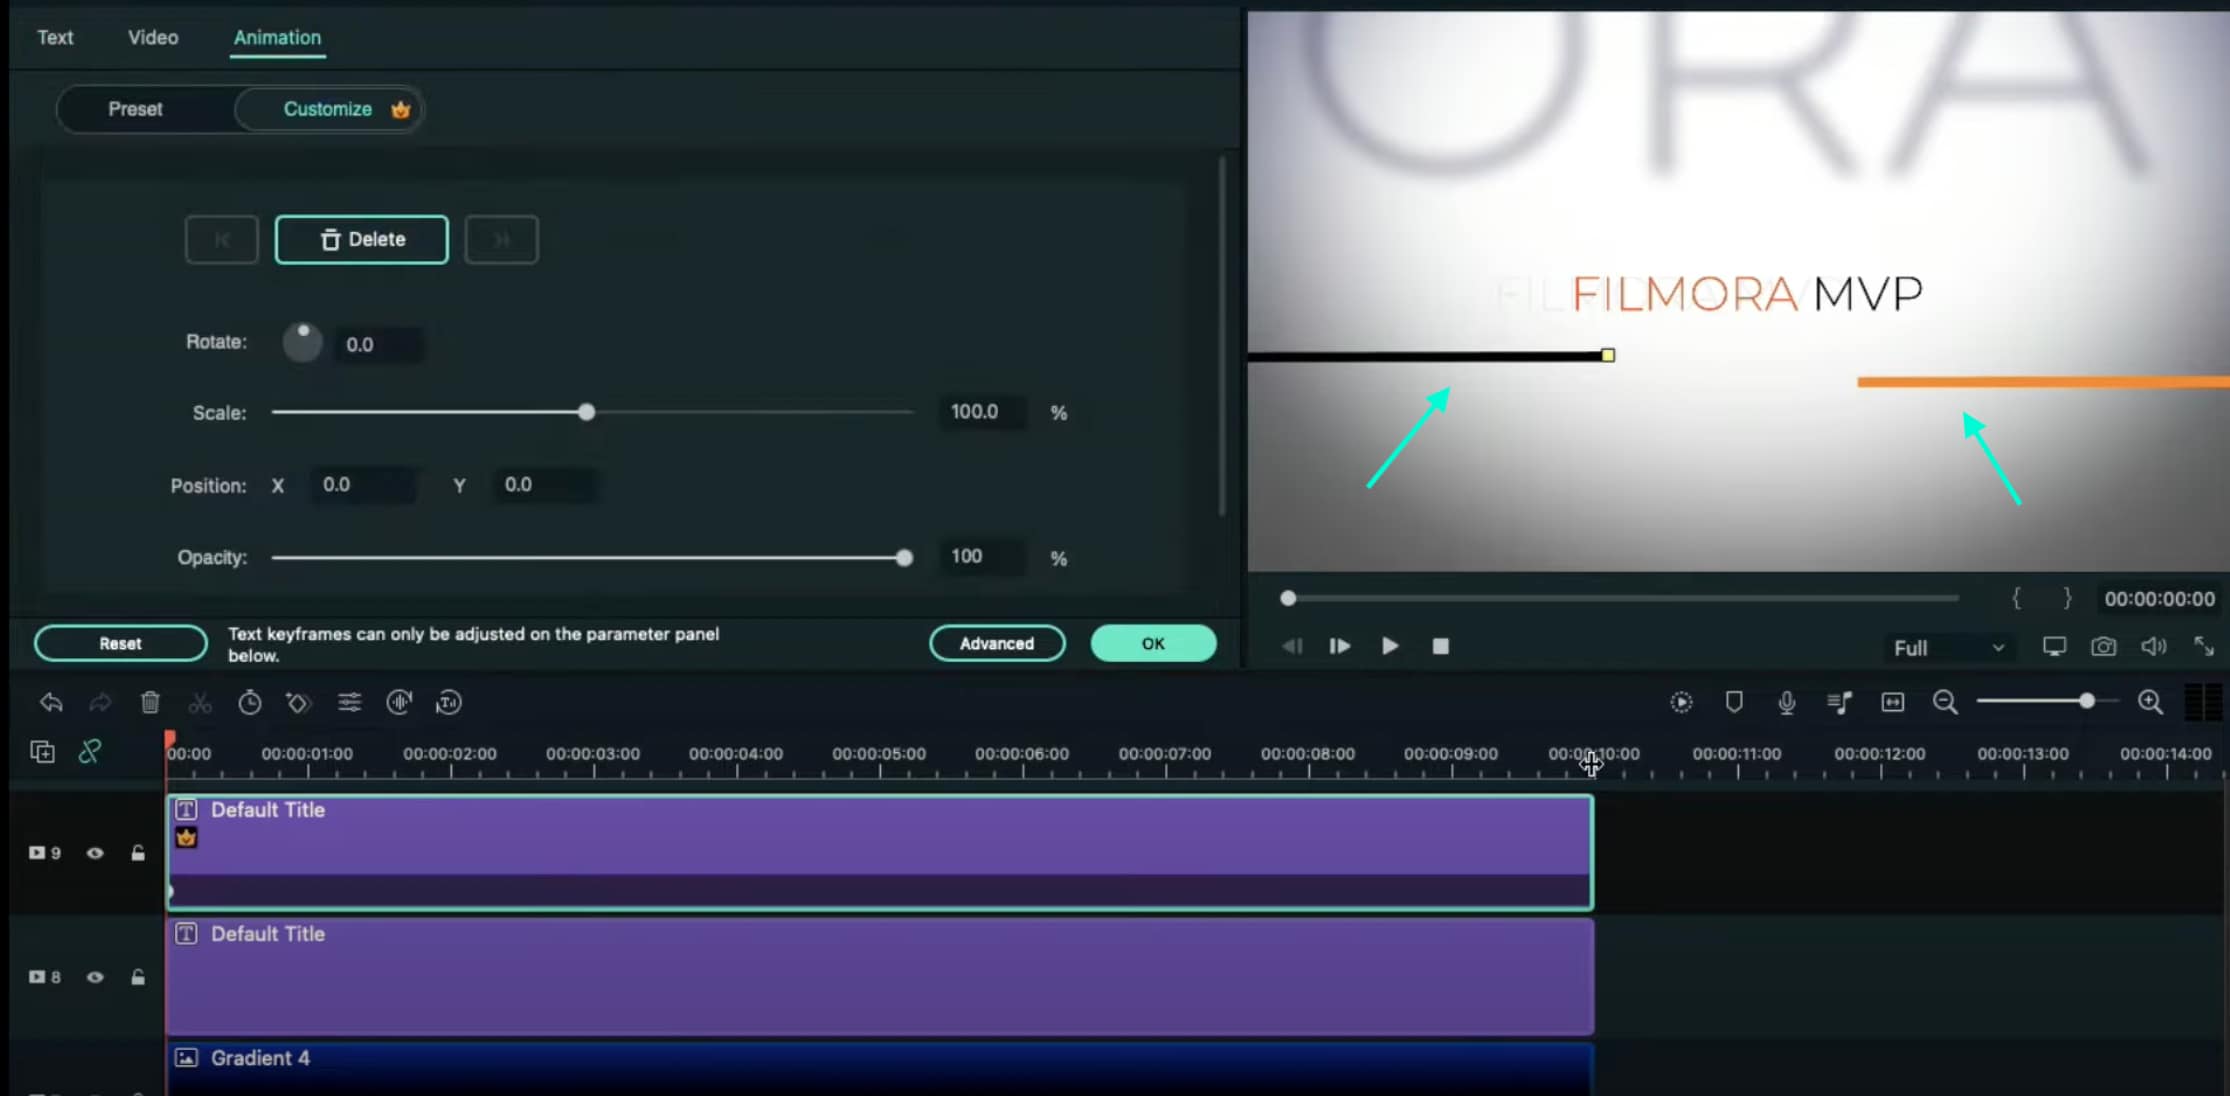
Copy this Default Title and paste it into Track 9. Open its Advanced settings and change the Line color to something different than the previous one. Then, move it to the other side of the screen, slightly above the previous line. Click OK.
Step 14
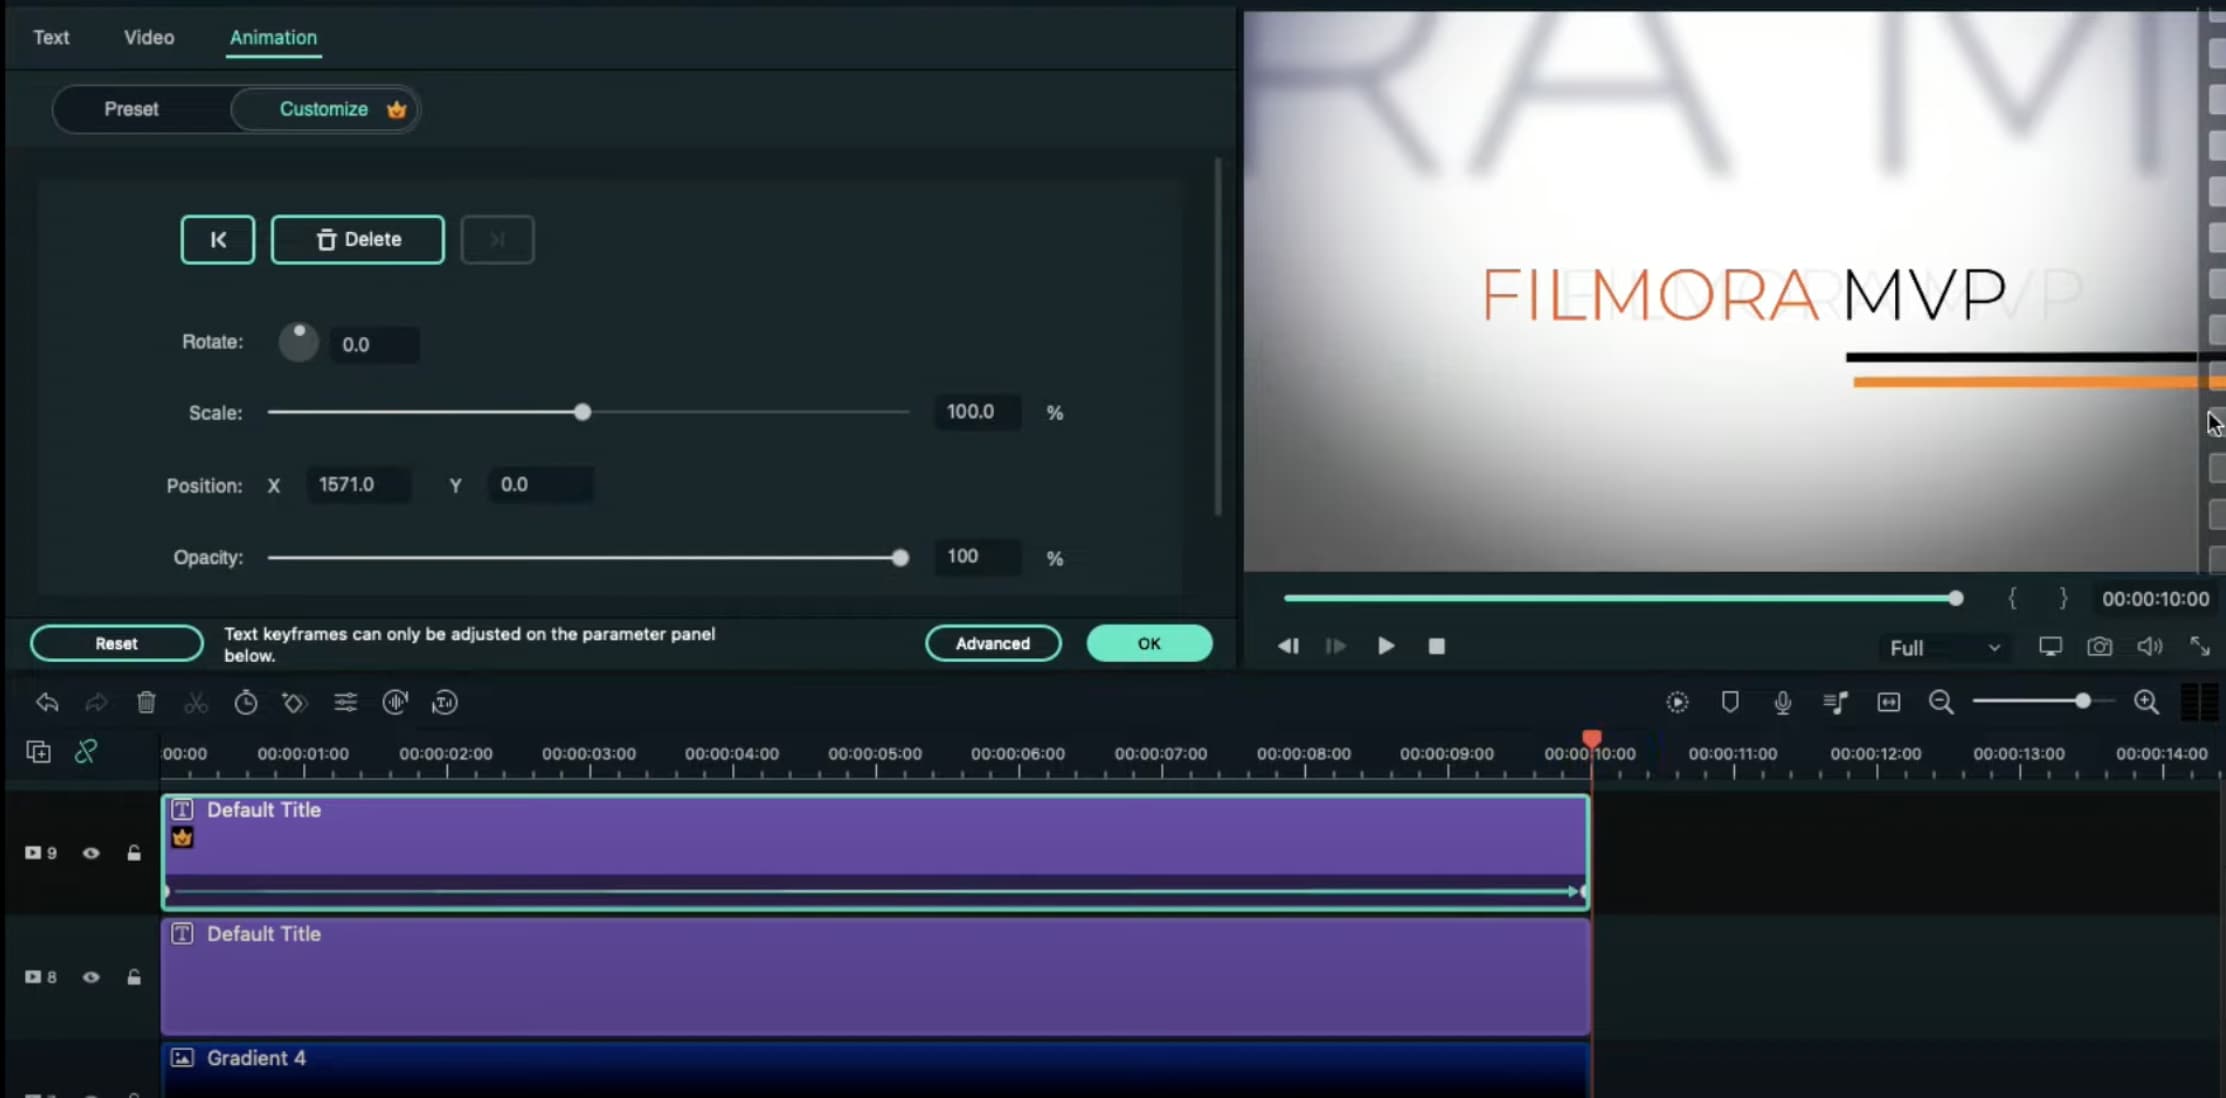
Now, select the Default Title on Track 9, double-click it, and go to the Animation tab. Move the Playhead at the starting point of the Timeline and add a keyframe. Then, move the Playhead to the end of the clip. Drag the X-axis position to the right until the Line shape moves all the way to the right side of the screen.
Do the same for the Default Title on Track 8. But this time, drag the X-axis position toward the other side. When you’re done, press OK.
Step 15
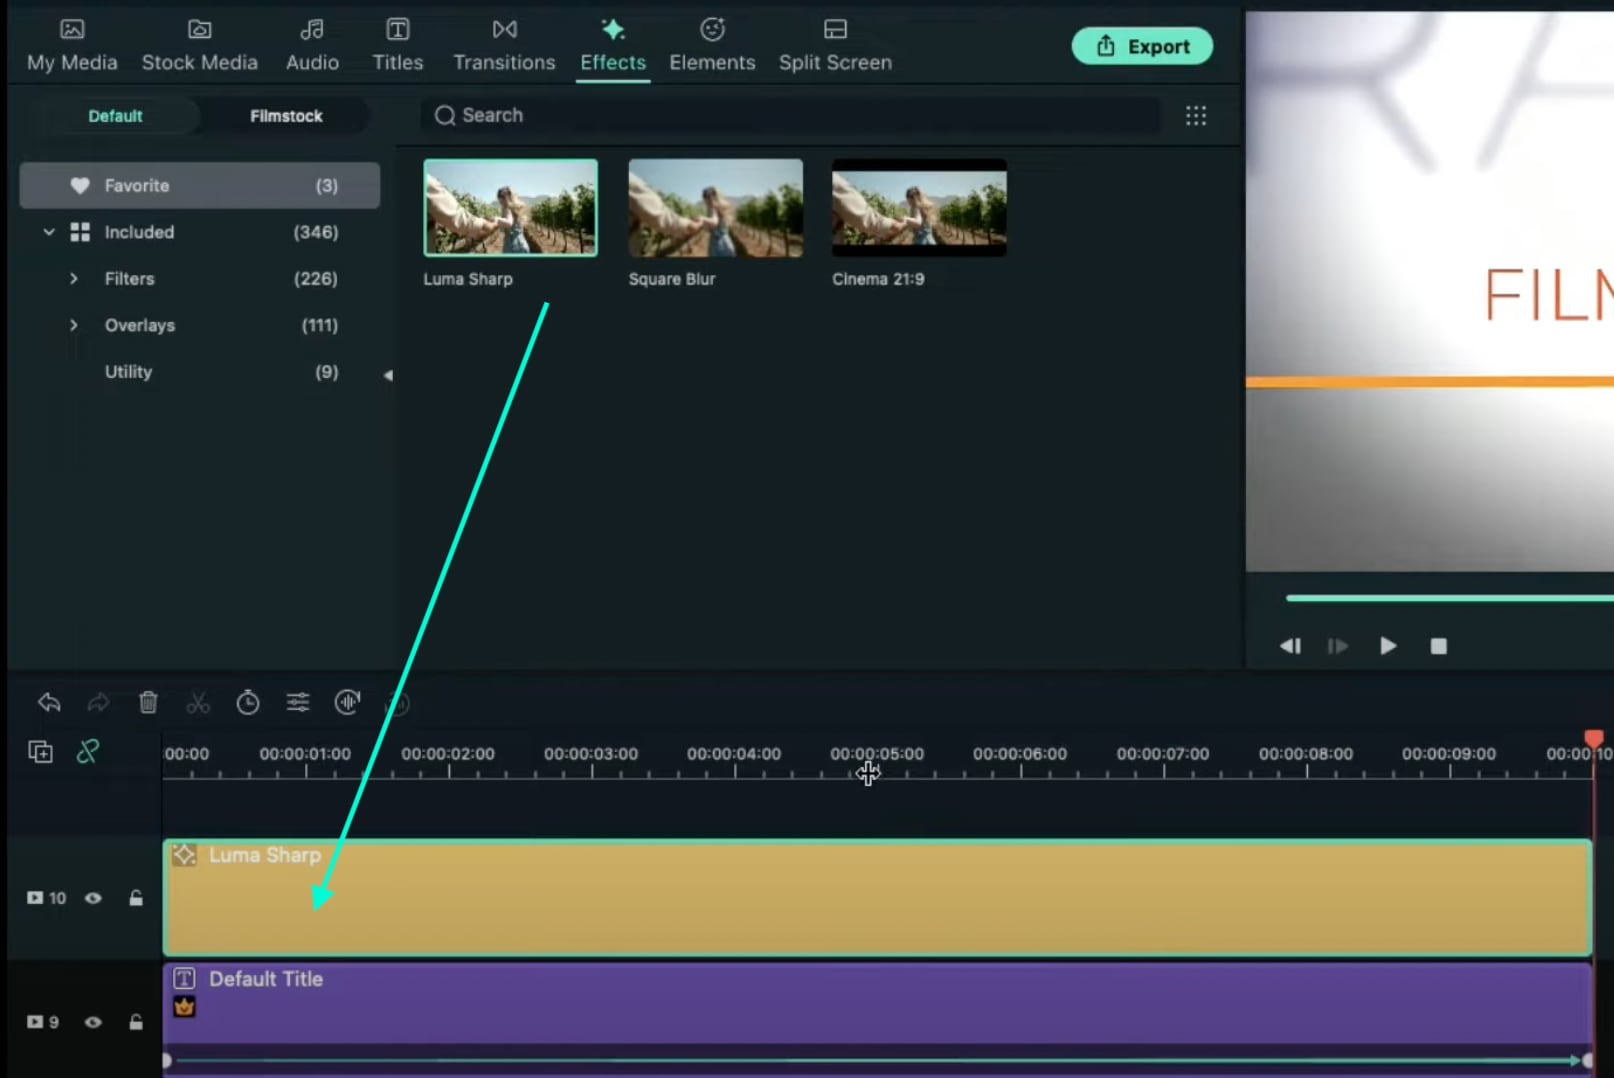
Go to the Effects tab → drag the Luma Sharp effect to Track 10. Click it and change its Intensity to 10.
Step 16
You’re all done. Click on the Render button to render all the clips and finally preview your creation. Congratulations on creating a text animation intro in Filmora.

Summary
What you’ve learned:
- Create a unique text animation intro in Filmora
- Animate text and titles
- How to add and animate different shapes in Filmora
- Edit the advanced settings of elements in the Filmora video editor
What you need to prepare:
- A computer (Windows or macOS)
- Your video materials.
- Filmora video editor
Step 1
Download and Install the Filmora video editor . Then, click on New Project once the program starts.
Step 2
Go to Titles and drag the Default Title to the Timeline. Then, double-click on the Default Title clip to open its settings. Here, type in your text → change the text color to Black → click OK → take a snapshot.

Step 3
Double-click on the Default Title once more and simply change the text color to anything other than black this time. Then, click OK and take another snapshot. After this, delete the Default Title from the Timeline.
Step 4
Next, go to Sample Color and drag the White color to the Timeline. Increase the White Color clip’s duration to 10 seconds by dragging the tail of the clip to the right.

Step 5
For the next step, you need to download a simple Vignette png image . Then, import the Vignette image into Filmora. Go to My Media and click on Import Media. Import it and drag the image to the Timeline. Then, move that clip to Track 3.

Step 6
Drop the Black snapshot you took earlier to Track 2. Double-click on it, go to Animation, and apply these settings. After this, move the Playhead to the end of the clip and change the X-axis value to “-800”.

Step 7
Go to Effects and drag the Square Blur effect to Track 4 on the Timeline. Increase its duration to match the other clips. Then, click on the effect and change its Size bar value to 4. Click OK.

Step 8
Place the Playhead at the beginning of the clip. Go to My Media and drag the Black snapshot to Track 5. Double-click on it → go to Animation and change the settings to look like this. Then, move the Playhead to 9 seconds. Here, change the X-axis to “150” and the Scale to 75%.

Step 9
Now, place the Playhead at the starting point and drag the colored snapshot in Track 6. Double-click on it and change the Scale to 50%. Then, move the Playhead to 9 seconds again and change the Scale to 75%. Click OK.
Step 10
Go to Sample Color and drag “Gradient 4” to Track 7 on the Timeline. Double-click on it → go to the Video tab → change the Blending Mode to Overlay → decrease the Opacity to 25%. Click OK.

Step 11
Drag a Default Title to Track 8 and double-click on it to open its Advanced settings. From here, delete the yellow text clip located under the video. Then, insert a Line shape.

Step 12
Increase the Line’s length to be almost as long as the screen. Then adjust its position until half of the Line is visible on the screen. Like this.

Step 13
Copy this Default Title and paste it into Track 9. Open its Advanced settings and change the Line color to something different than the previous one. Then, move it to the other side of the screen, slightly above the previous line. Click OK.

Step 14
Now, select the Default Title on Track 9, double-click it, and go to the Animation tab. Move the Playhead at the starting point of the Timeline and add a keyframe. Then, move the Playhead to the end of the clip. Drag the X-axis position to the right until the Line shape moves all the way to the right side of the screen.
Do the same for the Default Title on Track 8. But this time, drag the X-axis position toward the other side. When you’re done, press OK.

Step 15
Go to the Effects tab → drag the Luma Sharp effect to Track 10. Click it and change its Intensity to 10.

Step 16
You’re all done. Click on the Render button to render all the clips and finally preview your creation. Congratulations on creating a text animation intro in Filmora.

Summary
What you’ve learned:
- Create a unique text animation intro in Filmora
- Animate text and titles
- How to add and animate different shapes in Filmora
- Edit the advanced settings of elements in the Filmora video editor
What you need to prepare:
- A computer (Windows or macOS)
- Your video materials.
- Filmora video editor
Step 1
Download and Install the Filmora video editor . Then, click on New Project once the program starts.
Step 2
Go to Titles and drag the Default Title to the Timeline. Then, double-click on the Default Title clip to open its settings. Here, type in your text → change the text color to Black → click OK → take a snapshot.

Step 3
Double-click on the Default Title once more and simply change the text color to anything other than black this time. Then, click OK and take another snapshot. After this, delete the Default Title from the Timeline.
Step 4
Next, go to Sample Color and drag the White color to the Timeline. Increase the White Color clip’s duration to 10 seconds by dragging the tail of the clip to the right.

Step 5
For the next step, you need to download a simple Vignette png image . Then, import the Vignette image into Filmora. Go to My Media and click on Import Media. Import it and drag the image to the Timeline. Then, move that clip to Track 3.

Step 6
Drop the Black snapshot you took earlier to Track 2. Double-click on it, go to Animation, and apply these settings. After this, move the Playhead to the end of the clip and change the X-axis value to “-800”.

Step 7
Go to Effects and drag the Square Blur effect to Track 4 on the Timeline. Increase its duration to match the other clips. Then, click on the effect and change its Size bar value to 4. Click OK.

Step 8
Place the Playhead at the beginning of the clip. Go to My Media and drag the Black snapshot to Track 5. Double-click on it → go to Animation and change the settings to look like this. Then, move the Playhead to 9 seconds. Here, change the X-axis to “150” and the Scale to 75%.

Step 9
Now, place the Playhead at the starting point and drag the colored snapshot in Track 6. Double-click on it and change the Scale to 50%. Then, move the Playhead to 9 seconds again and change the Scale to 75%. Click OK.
Step 10
Go to Sample Color and drag “Gradient 4” to Track 7 on the Timeline. Double-click on it → go to the Video tab → change the Blending Mode to Overlay → decrease the Opacity to 25%. Click OK.

Step 11
Drag a Default Title to Track 8 and double-click on it to open its Advanced settings. From here, delete the yellow text clip located under the video. Then, insert a Line shape.

Step 12
Increase the Line’s length to be almost as long as the screen. Then adjust its position until half of the Line is visible on the screen. Like this.

Step 13
Copy this Default Title and paste it into Track 9. Open its Advanced settings and change the Line color to something different than the previous one. Then, move it to the other side of the screen, slightly above the previous line. Click OK.

Step 14
Now, select the Default Title on Track 9, double-click it, and go to the Animation tab. Move the Playhead at the starting point of the Timeline and add a keyframe. Then, move the Playhead to the end of the clip. Drag the X-axis position to the right until the Line shape moves all the way to the right side of the screen.
Do the same for the Default Title on Track 8. But this time, drag the X-axis position toward the other side. When you’re done, press OK.

Step 15
Go to the Effects tab → drag the Luma Sharp effect to Track 10. Click it and change its Intensity to 10.

Step 16
You’re all done. Click on the Render button to render all the clips and finally preview your creation. Congratulations on creating a text animation intro in Filmora.

Summary
What you’ve learned:
- Create a unique text animation intro in Filmora
- Animate text and titles
- How to add and animate different shapes in Filmora
- Edit the advanced settings of elements in the Filmora video editor
What you need to prepare:
- A computer (Windows or macOS)
- Your video materials.
- Filmora video editor
Step 1
Download and Install the Filmora video editor . Then, click on New Project once the program starts.
Step 2
Go to Titles and drag the Default Title to the Timeline. Then, double-click on the Default Title clip to open its settings. Here, type in your text → change the text color to Black → click OK → take a snapshot.

Step 3
Double-click on the Default Title once more and simply change the text color to anything other than black this time. Then, click OK and take another snapshot. After this, delete the Default Title from the Timeline.
Step 4
Next, go to Sample Color and drag the White color to the Timeline. Increase the White Color clip’s duration to 10 seconds by dragging the tail of the clip to the right.

Step 5
For the next step, you need to download a simple Vignette png image . Then, import the Vignette image into Filmora. Go to My Media and click on Import Media. Import it and drag the image to the Timeline. Then, move that clip to Track 3.

Step 6
Drop the Black snapshot you took earlier to Track 2. Double-click on it, go to Animation, and apply these settings. After this, move the Playhead to the end of the clip and change the X-axis value to “-800”.

Step 7
Go to Effects and drag the Square Blur effect to Track 4 on the Timeline. Increase its duration to match the other clips. Then, click on the effect and change its Size bar value to 4. Click OK.

Step 8
Place the Playhead at the beginning of the clip. Go to My Media and drag the Black snapshot to Track 5. Double-click on it → go to Animation and change the settings to look like this. Then, move the Playhead to 9 seconds. Here, change the X-axis to “150” and the Scale to 75%.

Step 9
Now, place the Playhead at the starting point and drag the colored snapshot in Track 6. Double-click on it and change the Scale to 50%. Then, move the Playhead to 9 seconds again and change the Scale to 75%. Click OK.
Step 10
Go to Sample Color and drag “Gradient 4” to Track 7 on the Timeline. Double-click on it → go to the Video tab → change the Blending Mode to Overlay → decrease the Opacity to 25%. Click OK.

Step 11
Drag a Default Title to Track 8 and double-click on it to open its Advanced settings. From here, delete the yellow text clip located under the video. Then, insert a Line shape.

Step 12
Increase the Line’s length to be almost as long as the screen. Then adjust its position until half of the Line is visible on the screen. Like this.

Step 13
Copy this Default Title and paste it into Track 9. Open its Advanced settings and change the Line color to something different than the previous one. Then, move it to the other side of the screen, slightly above the previous line. Click OK.

Step 14
Now, select the Default Title on Track 9, double-click it, and go to the Animation tab. Move the Playhead at the starting point of the Timeline and add a keyframe. Then, move the Playhead to the end of the clip. Drag the X-axis position to the right until the Line shape moves all the way to the right side of the screen.
Do the same for the Default Title on Track 8. But this time, drag the X-axis position toward the other side. When you’re done, press OK.

Step 15
Go to the Effects tab → drag the Luma Sharp effect to Track 10. Click it and change its Intensity to 10.

Step 16
You’re all done. Click on the Render button to render all the clips and finally preview your creation. Congratulations on creating a text animation intro in Filmora.

Summary
What you’ve learned:
- Create a unique text animation intro in Filmora
- Animate text and titles
- How to add and animate different shapes in Filmora
- Edit the advanced settings of elements in the Filmora video editor
How to Make a Video Slideshow in iMovie
How to Make a Video Slideshow in iMovie
An easy yet powerful editor
Numerous effects to choose from
Detailed tutorials provided by the official channel
Landing into the world of creativity, it can be a smart choice to experiment with creating a slideshow in iMovie. Stay tuned to understand the exquisite design know-hows!
In this article
01 [What’s the Advantage of Slideshow in iMovie?](#Part 1)
02 [How to Make a Video Slideshow in iMovie?](#Part 2)
03 [In What Way Could You Edit Your Video Shortly?](#Part 3)
Part 1 What’s the Advantage of Slideshow in iMovie?
Slideshow presentations land among the most elusive means of sharing valuable information across a diverse range of personal and professional content creation domains. Be it a fun-filled family event or a high end business centered client presentation; slideshows are there to address it all! Talking about affordable software solutions to adhere the purpose, you can conveniently pick the iMovie slideshow creator program.
Entering deeper into the software specifications, the iMovie application package is essentially a video and graphic editor tool, exclusively for MacOS and iOS supported devices. Working with the program, you can create stunning slideshow presentations and storytelling movies to commemorate your most cherished personal and commercial events, moments and scenarios.
Now that you have got an elementary overview of the iMovie video editor software, let us move ahead with our discussion to talk about the latter’s credibility towards creating top rated slideshow presentations in the following section prior to proceeding with addressing the concern of how to make a slideshow on iMovie:
Benefits of Creating iMovie Slideshows
● User Cohesive Working Interface
The most pronounced credibility of iOS compatible software tools and program utilities is undoubtedly, their user friendly operation characteristic, and iMovie is no exception to the lineage. The editor workspace of the slideshow creator is intelligently designed to suit the technical aptitude of the expanded diversity of tech savvy and amateur graphic editors. The interface is equally appealing to the newbies in the design realm.
To proceed with creating a slideshow in iMovie, you can either begin with scratch, working on an entirely new idea; or move ahead with picking any preset slideshow template or background theme, followed by customizing the same in line with the specific creation requirements. The software’s effect library is a vast storehouse of high end editing features and tools with the most convenient access.
● Customization Elements
The iMovie program allows you to create cinematic movie edits in Hollywood style. From curiosity generating trailers to nail biting thrills, you can add it all to engage your audience within your presentation. Talking about the customization flexibility, you can try hands at including studio logos, cast names and credit rolls to add extra value to the edits, while simultaneously appreciating the participants of your project.
If that’s not enough, you can work to create your presentations in a variety of genres and themes by choosing from tons of premade templates under a variety of genre centered categories and sub-categories. Moving further, you can also add related effects from the program’s effect library to match the mood and setting of the slideshow.
● Effects And Improvisations
The software offers a decent range of slideshow enhancement features and special effects. You can pick from over 10 different filters, 8 vivid themes and several numbers of sound and audio effects, along with including recorded voiceovers of your own. You can also go ahead to import audio tracks and music files that are saved locally on your iOS device.
● Convenient Presentation Sharing
To make your presentations accessible to a wider audience, you can proceed to share the created slideshows directly from IMovie to any of your preferred media sharing platforms, or export the same to an online storage account, like, AirDrop, iCloud Drive, etc.
Part 2 How to Make a Video Slideshow in iMovie?
Having observed the credibility of designing slideshow presentations in the iMovie video editor program, you might easily have a motivation to explore your graphic creativity by working with the software to make an iMovie slideshow of your own. Adhering to the concern, let us see through the process of making a slideshow in iMovie through a detailed, step by step guide in the following section:
User’s Guide to Create Video Slideshow in iMovie
Step 1: Download and Install the Program
To create slideshow with iMovie, start with visiting the home website of the iMovie video editor program and proceed to download the software in your desired iOS system for free. Next in the line is the installation process, which you need to complete in order to successfully launch the application in your system.
Step 2: Open a New Project
In the app’s welcome screen, navigate to and click on the ‘File’ tab in the ‘Functions Toolbar’ at the top. From the dropdown menu that follows, select the ‘New Project’ option to start working on a new slideshow. You can alternatively, press the ‘+ N’ command keys from your device keyboard to launch a new project. Once your project file is created, assign it a suitable name and select a desired aspect ratio.
Step 3: Create the First Slide
The inaugural slide of your presentation is generally consists of the slideshow the title, which you can add by clicking on the ‘Title’ icon under the ‘Preview’ box, to see a variety of text customization choices appear within the editor workspace.
To work with adding titles to a slide, choose a preferred text style; followed by navigating to the ‘Events Pane’ and dropping the same within the first dotted frame box. You can edit the text in the blue box above the first frame. The amount of text you can add depends on the size of the box. To change the length of the box, click on the same to drag it to a desired place and finally include the text in the ‘Preview’ box.
Navigate to and hit the ‘Show Fonts’ button to customize the added text in terms of color, fonts, style and size. Tap the ‘Preview Slide’ button to see the applied changes and click on ‘Done’ to confirm the same. You can repeat the above process to add titles and informative banners to all the slides within the slideshow presentation that you are about to create.
Step 3: Include Still Images
Browse through the locally saved images within your device gallery and add the desired ones at a specific point in the editor timeline using the ‘Drag and Drop’ method. A green colored indicative light will mark the spot where the images are being dropped. You are free to drop all the images at the same time and sort them at a later stage. Do not close the image folder in your device until you have imported all the stills.
The images can be alternatively added to the timeline by selecting the required ones from the iOS device’s Photo Booth or iPhoto account. All you need to do is navigate to and hit the ‘Photo’ button to drop the selected images in the ‘Photos’ box at the bottom right corner of the software workspace.
Step 4: Adjust Image Pans and Transitions
Having included the desired images within the slideshow project, it is now time to improvise them with classic and enhanced looks. You can adhere to the task by making suitable changes under the ‘Video Adjustments’, ‘Crop Tool’ and ‘Clock’ options. Drag the cursor to a desired slide to see all the 3 options pop up at the top your slide screen.
● Video Adjustment Tool
Using the ‘Video Adjustment’ option, you are granted the liberty to adjust the brightness, contrast, white point, exposure, saturation and levels of the added images. If your images have an appreciable quality by default, you can skip this step.
● Crop Tool
Consider working with the ‘Crop Tool’ to zoom or pan the system camera across a selected slide. Click on the ‘Fit’ option to set the image within a chosen frame size; however you need to be cautious lest using the tool may render an incorrectly cropped image. Select the ‘Crop’ option to adjust the image aspect ratio according to your specific size constraints.
The ‘Ken Burns’ tool, you can rely on this one to spark the slideshow images with the coolest zoom and pan effects. The tool is represented by ‘Red and Green’ boxes above the ‘Video Preview’ box in the editor timeline. You can easily move and resize the boxes using the ‘Hand’ and the ‘Cross Hair’ tools respectively. When you are satisfied with your work, hit ‘Done’ to return and confirm the changes, or click on the next presentation slide to crop and pan the same.
● Clock Tool
The ‘Clock’ icon lets you adjust the screen time of each slide, assigning a preset minimum duration of 0.25 seconds to each slide. Setting a play duration somewhere between 2-2.5 seconds would be an optimal choice. Avoid choosing shorter slide duration unless it becomes an obvious requirement, lest the audience may find it hard to process the contents.
Prefer adjusting the screen time separately for each slide, in case you have a large project with more than 50 slides. It is instead, advisable to time the entire project under one time frame, while setting a longer screen time for the title slide.
Step 5: Add an Upbeat Background Audio
Adding background music to your presentation slides is pretty simple, with you having to just position the audio files within the desired slides using the ‘Drag and Drop’ method. The slides containing music pieces will have a ‘Light Green’ highlighting box under them. To correct a wrong placement, drag the audio file across the individual slides and drop at the correct space. You can further, modify the length of the audio clips by extending and trimming them.
To import audio files from your online iTunes account, navigate to and click within the ‘Music and Sound Effects’ box at the bottom right corner of the editor timeline. You can also clip the music file to start playing the background audio from a certain point within the track. To do this, take the cursor to the end of the track and drag the red indicator line to the point where you wish the audio to end at or begin playing from.
Step 6: Share Your Presentation
Run a mock slideshow in the ‘Preview’ box to ensure that every element of the presentation is at its specified place. When all looks good, navigate to the ‘Functions Toolbar’ at the top and hit the ‘Share’ tab to select a media sharing platform of your choice. You can even choose to export your slideshow directly from the editor timeline via QuickTime.
Part 3 In What Way Could You Edit Your Video Shortly?
Creating slideshow iMovie presentations is a creative task and everything comes on the line with the finesse of editing skills to evoke an intelligent play with features, tools and effects. While you can master the art with consistent effort and practice, there are some really cool tips and tricks to quickly edit and uplift iMovie presentations.
Let us have a look at a few of the most prominent ones in the following section before you move ahead to create slideshow in iMovie:
01Cool Ways to Quickly Edit Your iMovie Videos
● Crop to Zoon in the Video
When editing your videos in the iMovie software, you can zoom in a desired portion of the video frame. All you need to do is, select a clip, tap on the ‘Crop’ button at the top right corner over the ‘Preview’ box, choose the ‘Crop to Fill’ option and drag the effect to the specific clip area you wish to crop. Apply your changes by clicking inside the checkbox at the top right corner.
● Split a Clip
You can reduce the size of a sufficiently long video clip by choosing to break the same into several parts or trim it to ward off unwanted portions. To split your footage, take your cursor to the specific splitting point of the clip within the editor timeline, make a right click, and select the ‘Split Clip’ option from the dropdown menu that follows next.
● Detach an Audio File
Detaching audio from a clip allows you to experiment with different video play options. You can let the run the in the background as you proceed to split a clip for inserting a still image. To work with the effect, navigate to and right click on a desired clip within the editor timeline and tap on ‘Detach Audio’ in the upcoming list of options. The added music clip in ’Blue’ will detach to appear as an independent clip in ‘Green’ within the software timeline.
● Fade Audio In and Out
To ensure a smooth audio transition between successive clips, try hands at fading the audio in and out by pointing the cursor at a detached green or an attached blue audio clip, followed by dragging the small round circles at the beginning or end of the footage. To introduce a gradual fade in or out effect, drag the round button to the center of the video clip.
● Include Transitions
Transitions allow a seamless presentation flow by ensuring a smooth movement between different slides appearing in continuity. Add a suitable transition element to the video footage of your slideshow by navigating to and hitting the ‘Transition’ tab in the ‘Functions Toolbar’. The default transition screen time is 1 second, but you can customize the same by double clicking on the effect post the latter’s addition within the editor timeline.
02Editing Video Slideshows in Filmora
The iMovie slideshow maker program is an excellent choice to work on, as far as the creation of classic and stunning examples of professional, personal and commercial presentations is concerned. However, if you ever land across the need to pick alternative software for making high end slideshows, you can safely choose to go with the Wondershare Filmora Video Editor slideshow creator and editor application package without having to think twice.
For Win 7 or later (64-bit)
For macOS 10.12 or later
Talking about the specific concern of editing flexibility, tools and features; working with the program you are entitled to access a trunk of graphic customization utilities to spark up your presentations that are bound to receive jaw dropping viewer appreciation. The vast, inbuilt effect library of the program houses more than 800 different and top rated, latest editing effects to uplift and improvise your presentations. Here’s a mention of some of the most distinguished ones:
● The ‘Picture-in-Picture’ effect allows you to layer several video clips in a single track.
● You can change the background and add special effects to the presentation slides with the ‘Green Screen’ feature.
● The ‘Split Screen’ feature of the editor program allows you to introduce a new and unique style of storytelling though a multi-screen access.
● Filmora offers over 70 different ‘AI Potrait’ effects that visibly have the highest accuracy of background removal.
● Using the ‘Auto Reframe’ tool to automatically resize your videos without any pro level editing skills.
● You can work towards creating high resolution screen recordings of business meetings, live events, gameplay sessions, product demo presentations, etc., with the software’s ‘Screen Recorder’ tool.
● Use the ‘Silence Detection’ feature to instantly fade out the slideshow music and make your narration more pronounced.
● You can use the ‘Color Match’ tool to introduce suitable color corrections simultaneously within several slides, thus saving much of your valuable time.
● The program allows you to eliminate the camera shake distortions from your clips with its ‘Video Stabilization’ feature.
● Ending Thoughts →
● iMovie slideshows are exemplary in class and style as far as graphic presentation design is concerned.
● You can quickly create and conveniently edit slideshow presentations with the iMovie graphic editor package in your favorite iOS devices.
● When looking for relevant iMovie alternatives to design and edit slideshow presentations, you can conveniently depend on the Wondershare Filmora video editor program.
Want to Feather Shapes in After Effects? Read This
Feathering shapes in After Effects can greatly enhance your designs’ overall look and feel. This technique involves creating a soft, blurred edge around the shapes, which adds a sense of depth and dimension. Whether you’re a beginner or an experienced After Effects user, understanding how to feather shapes is a valuable skill to have in your arsenal.
This guide will cover everything you need about feathering shapes in After Effects. From the basics to advanced techniques, you’ll learn how to add a professional touch to your designs and take your skills to the next level.
Whether you’re creating a logo, animation, or visual effect, the ability to feather shapes will help you achieve the desired look and feel for your project. So, let’s dive in and explore the world of feathering in After Effects!
What Is Mask Edge Feather in After Effects?
Mask Edge Feather in After Effects is a feature that enables you to create a soft or blurred transition between the masked and unmasked areas of your composition. The mask feather setting can be found in the properties and is measured in pixels. Increasing the feather value increases the softness or blurriness of the mask’s edges, creating a smoother transition between the masked and unmasked parts of the image.
One of the key benefits of feathering masks is that it allows you to blend the masked object with its background, making the effect look more natural and convincing. The mask feather tool can also create custom feather shapes anywhere along the edge of the mask. To access the mask feather tool, switch to the pen tool by pressing the “G“ key and selecting the feather pen.
The mask edge feather feature in After Effects is a powerful and versatile tool that can help you achieve a wide range of creative effects. Whether you’re creating an animation or visual effect, or want to add a professional touch to your designs, understanding how to use the mask feather tool is an essential skill in your After Effects toolkit.
How To Feather a Shape in After Effects?
Feathering a shape in After Effects is a simple process that can greatly enhance the look and feel of your designs. By following these steps, you’ll be able to easily feather shapes in After Effects and add a professional touch to your designs.
Keep in mind that the feather value can be adjusted to your preference and the needs of your project, so feel free to experiment and see what works best for you.
There are two options to feather the edge in After Effects:
A. Adding a Mask to Shape Layer
Step1 Add a mask to create a feathered edge.

Step2 Edit the feather parameter under the mask in the composition panel.

B. Applying Fast Box Blur Effect
Step1 Go to the “Effects and Preset“ tab and search for the “Fast Box Blur“ effect.
Step2 Increase the “Blur Radius“ to see the edges feather.
How To Use Variable Mask Feather in After Effects?
Variable mask feather in After Effects allows you to create masks with variable feathering. It means you can have different feather values for different parts of the same mask. This feature gives you greater control and flexibility over your masks, allowing you to easily create complex effects and transitions.
With variable mask feathers, you can create complex effects, such as a shape that feathers more in one direction than the other. Or you can create a mask with a soft transition in one area and a hard transition in another.
By experimenting with different feather values and mask shapes, you can achieve a wide range of creative effects in After Effects. To use variable mask feather in After Effects, you’ll need to follow these steps:
Step1 Use the pen tool to create corner points.
Step2 Create the Mask Feather points.
Step3 Adjust the Feather Parameter.
Step4 Go to “Pen Tool“ > “Mask Feather Tool“ and click anywhere on the mask path.
Step5 Drag the mask point feathering around the focus.
This tutorial came from Crish Design . For more tutorials about After Effects tips and techniques, you can refer to the Crish Design YouTube channel.
Need an Alternative? Try Wondershare Filmora
If you’re looking for a more accessible and user-friendly alternative to After Effects, consider using Wondershare Filmora . Filmora is a powerful video editing software that offers many of the same features as After Effects, including an edge feather feature that’s a great alternative to the mask edge feather in After Effects.
Free Download For Win 7 or later(64-bit)
Free Download For macOS 10.14 or later
The edge feather in Filmora is known as the “Blur Strength” and can be found in the “Masks” tab of the editor. Like the mask edge feather in After Effects, the Blur Strength in Filmora is measured in pixels and determines the softness or blurriness of the edges of the mask.

Filmora also offers a wide range of other features that make it a great choice for video editings, such as a user-friendly interface, an extensive library of special effects, and support for multiple file formats. Whether you’re a beginner or an experienced editor, Filmora has everything you need to create professional-quality videos.
So, if you’re looking for an alternative to After Effects that’s easier to use and more accessible, consider giving Wondershare Filmora a try. Its powerful edge-feature feature and user-friendly interface make it the perfect choice for creating professional-quality videos without the hassle of using complex and time-consuming software.
How To Use Shape Feather Tool in Wondershare Filmora?
The Shape Feather Tool in Wondershare Filmora is a great way to create a soft, gradual transition between different shapes in your video. This tool can be used to create a variety of effects, from gentle fades to complex animations.
Whether creating a simple animation or a complex visual effect, this tool gives you the control and flexibility you need to create professional-quality videos. To use the Shape Feather Tool in Filmora, follow these steps:
Step1 Open Wondershare Filmora and create a new project. Import the video and drag it to the timeline.

Step2 Double-click the video in the Player Window. In the editing window, click “Video“> “Mask“ and add a shape mask.

Step3 Scroll down to find the “Blur Strength“ option, and adjust the blur value.

How To Use Variable Mask Feather in Wondershare Filmora?
Wondershare Filmora also allows you to use variable mask feathers to create a smooth, gradual transition between different parts of your video.
But first, understand the process of using the pen tool. When using the pen tool to draw shapes in Filmora, you can customize the shape and feather to your specifications. To do this, select the pen tool and use it to draw the shape you want. You can adjust the feathering by moving the feathering control points and fine-tuning the Blur Strength in the “Mask“ tab.
To use Variable Mask Feather in Filmora, follow these steps:
Step1 Select the “Draw Mask“ option under the Mask tab, and use the pen tool to draw whatever shape you like in the video.

Step2 Adjust the “Blur Strength“ value.

Conclusion
Feathering shapes in After Effects and Wondershare Filmora are powerful tools for creating smooth, seamless transitions in your videos. With the mask feather setting in After Effects and the Shape Feather Tool in Filmora, you have the flexibility and control you need to create the exact look you want.
Whether you’re looking to feather shapes in After Effects or prefer the convenience of using Wondershare Filmora, there’s a solution for you. So why wait? Start feathering your shapes today and bring your video editing skills to the next level!
Free Download For macOS 10.14 or later
The edge feather in Filmora is known as the “Blur Strength” and can be found in the “Masks” tab of the editor. Like the mask edge feather in After Effects, the Blur Strength in Filmora is measured in pixels and determines the softness or blurriness of the edges of the mask.

Filmora also offers a wide range of other features that make it a great choice for video editings, such as a user-friendly interface, an extensive library of special effects, and support for multiple file formats. Whether you’re a beginner or an experienced editor, Filmora has everything you need to create professional-quality videos.
So, if you’re looking for an alternative to After Effects that’s easier to use and more accessible, consider giving Wondershare Filmora a try. Its powerful edge-feature feature and user-friendly interface make it the perfect choice for creating professional-quality videos without the hassle of using complex and time-consuming software.
How To Use Shape Feather Tool in Wondershare Filmora?
The Shape Feather Tool in Wondershare Filmora is a great way to create a soft, gradual transition between different shapes in your video. This tool can be used to create a variety of effects, from gentle fades to complex animations.
Whether creating a simple animation or a complex visual effect, this tool gives you the control and flexibility you need to create professional-quality videos. To use the Shape Feather Tool in Filmora, follow these steps:
Step1 Open Wondershare Filmora and create a new project. Import the video and drag it to the timeline.

Step2 Double-click the video in the Player Window. In the editing window, click “Video“> “Mask“ and add a shape mask.

Step3 Scroll down to find the “Blur Strength“ option, and adjust the blur value.

How To Use Variable Mask Feather in Wondershare Filmora?
Wondershare Filmora also allows you to use variable mask feathers to create a smooth, gradual transition between different parts of your video.
But first, understand the process of using the pen tool. When using the pen tool to draw shapes in Filmora, you can customize the shape and feather to your specifications. To do this, select the pen tool and use it to draw the shape you want. You can adjust the feathering by moving the feathering control points and fine-tuning the Blur Strength in the “Mask“ tab.
To use Variable Mask Feather in Filmora, follow these steps:
Step1 Select the “Draw Mask“ option under the Mask tab, and use the pen tool to draw whatever shape you like in the video.

Step2 Adjust the “Blur Strength“ value.

Conclusion
Feathering shapes in After Effects and Wondershare Filmora are powerful tools for creating smooth, seamless transitions in your videos. With the mask feather setting in After Effects and the Shape Feather Tool in Filmora, you have the flexibility and control you need to create the exact look you want.
Whether you’re looking to feather shapes in After Effects or prefer the convenience of using Wondershare Filmora, there’s a solution for you. So why wait? Start feathering your shapes today and bring your video editing skills to the next level!
10 Catchy Pixel Art Wallpapers and How to Custom Your Own
Versatile Video Editor - Wondershare Filmora
An easy yet powerful editor
Numerous effects to choose from
Detailed tutorials provided by the official channel
Pixel art is digital art created through computer software. In this digital art, images are edited on a pixel level. This gives the kind of aesthetic from computer video games using 8-bit and 16-bit technology. In general, this art uses very few color palettes, with some using only two.
The history of pixel art goes back to the 1930s with the monochromatic light bulb displays in New York City.
Pixel art tries to mimic the features of old video game graphics done by computers that were only able to display a few colors at once.
Digital pixel art evolved in such a way that artists are now dedicated to that art, and so create beautiful pixel art wallpapers that we’ll show you in this article.
In this article
01 Where to Look for Pixel Art Wallpapers?
02 10 Attractive Pixel Art Wallpapers Perfect for PC and Mobile
03 How to Customize Your Own Pixel Art Wallpapers
04 How to Make a Pixel Art Wallpaper Gif
Part 1: Where to Look for Pixel Art Wallpapers [for PC and Mobile]
1. alphacoders.com
In Wall.aphacoders you can find more than 900 thousand wallpapers of pixel art wallpapers for every taste. From video game wallpapers to movies and tv shows.
2. Wallpapercave.com
On this easy-to-use website, all you have to do is type what pixel art wallpaper you are looking for on the search bar. In addition, there is a trending section that will guide you through the most popular wallpapers on the website, as well as feature desktop wallpapers.
3. Wallpaperaccess.com [for Mobile]
This website specializes in mobile wallpapers. You can find the latest trending wallpapers. With a large pixel art wallpaper gallery, wallpaperaccess is one of the top wallpaper websites around. It has a search bar at the top to help you navigate the different wallpapers, or you can just scroll down and see trending wallpapers.
Part 2: 10 Attractive Pixel Art Wallpapers Perfect for PC and Mobile
Note: The following images are all from the internet.
1. Modern City
In this pixel art, 4k wallpaper depicts a modern city crossed by a river under an orange sky. It has a color palette ranging from dark gray to light gray and other tones of orange.
![]()
2. The Rainy Night
This is a GIF pixel art wallpaper for mobile. It depicts a town and a street crossing it over. In the background, we can see a bigger city under a starry night. The moving part of the GIF pixel art wallpaper is the continuous rain.
![]()
3. The Forest
In this artistic wallpaper, we have a forest background, seeing it through a margin of a river that crosses it. A fallen log serves as a bridge to cross the river. A deer is standing on the other side under large trees.
![]()
4. The Farm
In this retro wallpaper pixel art, we can see a farm over an orange background. Next to it is a graduation tower—the tones on this wallpaper range from orange to red and brown.
![]()
5. The Sunset City
In this mobile animated pixel art wallpaper, we have the backdrop of a modern city. Tall buildings connected with a bridge can be seen as well as a sun setting that gives the sky tones ranging from purple to light orange.
![]()
6. The Night City
In this mobile pixel art wallpaper, we have a very low palette of colors. It ranges from blue to orange tones. It is a closed street in a city. A person is on the balcony outside.
![]()
7. The Spaceship
In this space-inspired pixel art wallpaper, we can see a spaceship with six people, two onboard, commanding it. One is fixing the spaceship; one is resting on the back, one on top scouting, one on the edging reaching for another in open space. There is also a dog on top of the spaceship and an alien-like creature in open space.
![]()
8. The Old Tree
In this pixel art wallpaper, we have a huge old tree that served as a refuge for passersby. It has a broken wood ladder and a wooden floor on an opening on the tree. The tree is inside a river, and a boat is moored next to it. Two birds rest on rocks on the margin, and we have the perspective behind the birds.
![]()
9. The Broken Earth
In this pixel art wallpaper, we have the planet earth floating in space. One part of the planet is broken and floating away. This pixel art wallpaper uses a black background, as well as blue, green and several tones of blue to make the oceans.
![]()
10. The Airport
In this pixel art wallpaper, we have an airport terminal. We can see a plane landing on the course—workers pulling carts of baggage and other vehicles belonging to that setting. The sun is almost set, and so there is an orange sky above, as well as orange lights.
![]()
Part 3: How to Customize Your Own Pixel Art Wallpapers
It is easy to create your own pixel art wallpapers. There are many free online applications that you can use. For example, Aseprite.
Step 1: Download Aseprite and open.
Step 2: You have tools on the right, click on it and choose the pencil icon, or press “B”. Just click on the left button of your mouse and draw. Left-click to erase it.
Step 3: To change the size of the line, go to the upper menu and type in the size you want by hovering on the search bar.
Step 4: You can also change the size of your brush. Simple go to the upper menu and choose the brush icon. There you have many shapes to choose from.
Step 5: You can choose the color pallet you want to use on your pixel art wallpaper on the left-hand side of the screen.
Step 6: These are the basic tools to start drawing your wallpapers. To save and export your pixel art wallpaper, go to “File” and click on “Export”.
Part 4: How to Make a Pixel Art Wallpaper Gif
Filmora is a video editing software tool focused on editing and making high-quality videos. It supports 4K videos and the latest technologies in that sector. Filmora is also able to create pixel art Gifs, as we will explain below.
Wondershare Filmora
Get started easily with Filmora’s powerful performance, intuitive interface, and countless effects!
Try It Free Try It Free Try It Free Learn More >

Step 1: You can drag and drop your video onto a timeline to better use the editing tools and operate on this file.
Step 2: Once you have your video imported and on the timeline, you can start editing it. Filmora uses all the basic and advanced tools like split, rotate, crop, combine, speed up, speed down, and more.
Step 3: You can also add text, elements, and pixelated effects to your video. It helps explain and add information when editing the video.
Step 4: After you’ve gone through all the steps above, you can export your .gif file. Filmora is linked to the most popular social media platforms, so it is easy for you to share it. To export, go to “File” and click on “Export”. Change the settings as you desire and export your pixel art wallpaper.
Conclusion
Although pixel art is a sort of new art, it is already rich with many artists and people interested in it. It has evolved over the years with the advance of technology, and it has become more complex, even though one of its characteristics is to look dated. This article gives you examples of the different pixel art wallpapers for your computer or mobile phone and how to create your own pixel art wallpapers.
Pixel art is digital art created through computer software. In this digital art, images are edited on a pixel level. This gives the kind of aesthetic from computer video games using 8-bit and 16-bit technology. In general, this art uses very few color palettes, with some using only two.
The history of pixel art goes back to the 1930s with the monochromatic light bulb displays in New York City.
Pixel art tries to mimic the features of old video game graphics done by computers that were only able to display a few colors at once.
Digital pixel art evolved in such a way that artists are now dedicated to that art, and so create beautiful pixel art wallpapers that we’ll show you in this article.
In this article
01 Where to Look for Pixel Art Wallpapers?
02 10 Attractive Pixel Art Wallpapers Perfect for PC and Mobile
03 How to Customize Your Own Pixel Art Wallpapers
04 How to Make a Pixel Art Wallpaper Gif
Part 1: Where to Look for Pixel Art Wallpapers [for PC and Mobile]
1. alphacoders.com
In Wall.aphacoders you can find more than 900 thousand wallpapers of pixel art wallpapers for every taste. From video game wallpapers to movies and tv shows.
2. Wallpapercave.com
On this easy-to-use website, all you have to do is type what pixel art wallpaper you are looking for on the search bar. In addition, there is a trending section that will guide you through the most popular wallpapers on the website, as well as feature desktop wallpapers.
3. Wallpaperaccess.com [for Mobile]
This website specializes in mobile wallpapers. You can find the latest trending wallpapers. With a large pixel art wallpaper gallery, wallpaperaccess is one of the top wallpaper websites around. It has a search bar at the top to help you navigate the different wallpapers, or you can just scroll down and see trending wallpapers.
Part 2: 10 Attractive Pixel Art Wallpapers Perfect for PC and Mobile
Note: The following images are all from the internet.
1. Modern City
In this pixel art, 4k wallpaper depicts a modern city crossed by a river under an orange sky. It has a color palette ranging from dark gray to light gray and other tones of orange.
![]()
2. The Rainy Night
This is a GIF pixel art wallpaper for mobile. It depicts a town and a street crossing it over. In the background, we can see a bigger city under a starry night. The moving part of the GIF pixel art wallpaper is the continuous rain.
![]()
3. The Forest
In this artistic wallpaper, we have a forest background, seeing it through a margin of a river that crosses it. A fallen log serves as a bridge to cross the river. A deer is standing on the other side under large trees.
![]()
4. The Farm
In this retro wallpaper pixel art, we can see a farm over an orange background. Next to it is a graduation tower—the tones on this wallpaper range from orange to red and brown.
![]()
5. The Sunset City
In this mobile animated pixel art wallpaper, we have the backdrop of a modern city. Tall buildings connected with a bridge can be seen as well as a sun setting that gives the sky tones ranging from purple to light orange.
![]()
6. The Night City
In this mobile pixel art wallpaper, we have a very low palette of colors. It ranges from blue to orange tones. It is a closed street in a city. A person is on the balcony outside.
![]()
7. The Spaceship
In this space-inspired pixel art wallpaper, we can see a spaceship with six people, two onboard, commanding it. One is fixing the spaceship; one is resting on the back, one on top scouting, one on the edging reaching for another in open space. There is also a dog on top of the spaceship and an alien-like creature in open space.
![]()
8. The Old Tree
In this pixel art wallpaper, we have a huge old tree that served as a refuge for passersby. It has a broken wood ladder and a wooden floor on an opening on the tree. The tree is inside a river, and a boat is moored next to it. Two birds rest on rocks on the margin, and we have the perspective behind the birds.
![]()
9. The Broken Earth
In this pixel art wallpaper, we have the planet earth floating in space. One part of the planet is broken and floating away. This pixel art wallpaper uses a black background, as well as blue, green and several tones of blue to make the oceans.
![]()
10. The Airport
In this pixel art wallpaper, we have an airport terminal. We can see a plane landing on the course—workers pulling carts of baggage and other vehicles belonging to that setting. The sun is almost set, and so there is an orange sky above, as well as orange lights.
![]()
Part 3: How to Customize Your Own Pixel Art Wallpapers
It is easy to create your own pixel art wallpapers. There are many free online applications that you can use. For example, Aseprite.
Step 1: Download Aseprite and open.
Step 2: You have tools on the right, click on it and choose the pencil icon, or press “B”. Just click on the left button of your mouse and draw. Left-click to erase it.
Step 3: To change the size of the line, go to the upper menu and type in the size you want by hovering on the search bar.
Step 4: You can also change the size of your brush. Simple go to the upper menu and choose the brush icon. There you have many shapes to choose from.
Step 5: You can choose the color pallet you want to use on your pixel art wallpaper on the left-hand side of the screen.
Step 6: These are the basic tools to start drawing your wallpapers. To save and export your pixel art wallpaper, go to “File” and click on “Export”.
Part 4: How to Make a Pixel Art Wallpaper Gif
Filmora is a video editing software tool focused on editing and making high-quality videos. It supports 4K videos and the latest technologies in that sector. Filmora is also able to create pixel art Gifs, as we will explain below.
Wondershare Filmora
Get started easily with Filmora’s powerful performance, intuitive interface, and countless effects!
Try It Free Try It Free Try It Free Learn More >

Step 1: You can drag and drop your video onto a timeline to better use the editing tools and operate on this file.
Step 2: Once you have your video imported and on the timeline, you can start editing it. Filmora uses all the basic and advanced tools like split, rotate, crop, combine, speed up, speed down, and more.
Step 3: You can also add text, elements, and pixelated effects to your video. It helps explain and add information when editing the video.
Step 4: After you’ve gone through all the steps above, you can export your .gif file. Filmora is linked to the most popular social media platforms, so it is easy for you to share it. To export, go to “File” and click on “Export”. Change the settings as you desire and export your pixel art wallpaper.
Conclusion
Although pixel art is a sort of new art, it is already rich with many artists and people interested in it. It has evolved over the years with the advance of technology, and it has become more complex, even though one of its characteristics is to look dated. This article gives you examples of the different pixel art wallpapers for your computer or mobile phone and how to create your own pixel art wallpapers.
Pixel art is digital art created through computer software. In this digital art, images are edited on a pixel level. This gives the kind of aesthetic from computer video games using 8-bit and 16-bit technology. In general, this art uses very few color palettes, with some using only two.
The history of pixel art goes back to the 1930s with the monochromatic light bulb displays in New York City.
Pixel art tries to mimic the features of old video game graphics done by computers that were only able to display a few colors at once.
Digital pixel art evolved in such a way that artists are now dedicated to that art, and so create beautiful pixel art wallpapers that we’ll show you in this article.
In this article
01 Where to Look for Pixel Art Wallpapers?
02 10 Attractive Pixel Art Wallpapers Perfect for PC and Mobile
03 How to Customize Your Own Pixel Art Wallpapers
04 How to Make a Pixel Art Wallpaper Gif
Part 1: Where to Look for Pixel Art Wallpapers [for PC and Mobile]
1. alphacoders.com
In Wall.aphacoders you can find more than 900 thousand wallpapers of pixel art wallpapers for every taste. From video game wallpapers to movies and tv shows.
2. Wallpapercave.com
On this easy-to-use website, all you have to do is type what pixel art wallpaper you are looking for on the search bar. In addition, there is a trending section that will guide you through the most popular wallpapers on the website, as well as feature desktop wallpapers.
3. Wallpaperaccess.com [for Mobile]
This website specializes in mobile wallpapers. You can find the latest trending wallpapers. With a large pixel art wallpaper gallery, wallpaperaccess is one of the top wallpaper websites around. It has a search bar at the top to help you navigate the different wallpapers, or you can just scroll down and see trending wallpapers.
Part 2: 10 Attractive Pixel Art Wallpapers Perfect for PC and Mobile
Note: The following images are all from the internet.
1. Modern City
In this pixel art, 4k wallpaper depicts a modern city crossed by a river under an orange sky. It has a color palette ranging from dark gray to light gray and other tones of orange.
![]()
2. The Rainy Night
This is a GIF pixel art wallpaper for mobile. It depicts a town and a street crossing it over. In the background, we can see a bigger city under a starry night. The moving part of the GIF pixel art wallpaper is the continuous rain.
![]()
3. The Forest
In this artistic wallpaper, we have a forest background, seeing it through a margin of a river that crosses it. A fallen log serves as a bridge to cross the river. A deer is standing on the other side under large trees.
![]()
4. The Farm
In this retro wallpaper pixel art, we can see a farm over an orange background. Next to it is a graduation tower—the tones on this wallpaper range from orange to red and brown.
![]()
5. The Sunset City
In this mobile animated pixel art wallpaper, we have the backdrop of a modern city. Tall buildings connected with a bridge can be seen as well as a sun setting that gives the sky tones ranging from purple to light orange.
![]()
6. The Night City
In this mobile pixel art wallpaper, we have a very low palette of colors. It ranges from blue to orange tones. It is a closed street in a city. A person is on the balcony outside.
![]()
7. The Spaceship
In this space-inspired pixel art wallpaper, we can see a spaceship with six people, two onboard, commanding it. One is fixing the spaceship; one is resting on the back, one on top scouting, one on the edging reaching for another in open space. There is also a dog on top of the spaceship and an alien-like creature in open space.
![]()
8. The Old Tree
In this pixel art wallpaper, we have a huge old tree that served as a refuge for passersby. It has a broken wood ladder and a wooden floor on an opening on the tree. The tree is inside a river, and a boat is moored next to it. Two birds rest on rocks on the margin, and we have the perspective behind the birds.
![]()
9. The Broken Earth
In this pixel art wallpaper, we have the planet earth floating in space. One part of the planet is broken and floating away. This pixel art wallpaper uses a black background, as well as blue, green and several tones of blue to make the oceans.
![]()
10. The Airport
In this pixel art wallpaper, we have an airport terminal. We can see a plane landing on the course—workers pulling carts of baggage and other vehicles belonging to that setting. The sun is almost set, and so there is an orange sky above, as well as orange lights.
![]()
Part 3: How to Customize Your Own Pixel Art Wallpapers
It is easy to create your own pixel art wallpapers. There are many free online applications that you can use. For example, Aseprite.
Step 1: Download Aseprite and open.
Step 2: You have tools on the right, click on it and choose the pencil icon, or press “B”. Just click on the left button of your mouse and draw. Left-click to erase it.
Step 3: To change the size of the line, go to the upper menu and type in the size you want by hovering on the search bar.
Step 4: You can also change the size of your brush. Simple go to the upper menu and choose the brush icon. There you have many shapes to choose from.
Step 5: You can choose the color pallet you want to use on your pixel art wallpaper on the left-hand side of the screen.
Step 6: These are the basic tools to start drawing your wallpapers. To save and export your pixel art wallpaper, go to “File” and click on “Export”.
Part 4: How to Make a Pixel Art Wallpaper Gif
Filmora is a video editing software tool focused on editing and making high-quality videos. It supports 4K videos and the latest technologies in that sector. Filmora is also able to create pixel art Gifs, as we will explain below.
Wondershare Filmora
Get started easily with Filmora’s powerful performance, intuitive interface, and countless effects!
Try It Free Try It Free Try It Free Learn More >

Step 1: You can drag and drop your video onto a timeline to better use the editing tools and operate on this file.
Step 2: Once you have your video imported and on the timeline, you can start editing it. Filmora uses all the basic and advanced tools like split, rotate, crop, combine, speed up, speed down, and more.
Step 3: You can also add text, elements, and pixelated effects to your video. It helps explain and add information when editing the video.
Step 4: After you’ve gone through all the steps above, you can export your .gif file. Filmora is linked to the most popular social media platforms, so it is easy for you to share it. To export, go to “File” and click on “Export”. Change the settings as you desire and export your pixel art wallpaper.
Conclusion
Although pixel art is a sort of new art, it is already rich with many artists and people interested in it. It has evolved over the years with the advance of technology, and it has become more complex, even though one of its characteristics is to look dated. This article gives you examples of the different pixel art wallpapers for your computer or mobile phone and how to create your own pixel art wallpapers.
Pixel art is digital art created through computer software. In this digital art, images are edited on a pixel level. This gives the kind of aesthetic from computer video games using 8-bit and 16-bit technology. In general, this art uses very few color palettes, with some using only two.
The history of pixel art goes back to the 1930s with the monochromatic light bulb displays in New York City.
Pixel art tries to mimic the features of old video game graphics done by computers that were only able to display a few colors at once.
Digital pixel art evolved in such a way that artists are now dedicated to that art, and so create beautiful pixel art wallpapers that we’ll show you in this article.
In this article
01 Where to Look for Pixel Art Wallpapers?
02 10 Attractive Pixel Art Wallpapers Perfect for PC and Mobile
03 How to Customize Your Own Pixel Art Wallpapers
04 How to Make a Pixel Art Wallpaper Gif
Part 1: Where to Look for Pixel Art Wallpapers [for PC and Mobile]
1. alphacoders.com
In Wall.aphacoders you can find more than 900 thousand wallpapers of pixel art wallpapers for every taste. From video game wallpapers to movies and tv shows.
2. Wallpapercave.com
On this easy-to-use website, all you have to do is type what pixel art wallpaper you are looking for on the search bar. In addition, there is a trending section that will guide you through the most popular wallpapers on the website, as well as feature desktop wallpapers.
3. Wallpaperaccess.com [for Mobile]
This website specializes in mobile wallpapers. You can find the latest trending wallpapers. With a large pixel art wallpaper gallery, wallpaperaccess is one of the top wallpaper websites around. It has a search bar at the top to help you navigate the different wallpapers, or you can just scroll down and see trending wallpapers.
Part 2: 10 Attractive Pixel Art Wallpapers Perfect for PC and Mobile
Note: The following images are all from the internet.
1. Modern City
In this pixel art, 4k wallpaper depicts a modern city crossed by a river under an orange sky. It has a color palette ranging from dark gray to light gray and other tones of orange.
![]()
2. The Rainy Night
This is a GIF pixel art wallpaper for mobile. It depicts a town and a street crossing it over. In the background, we can see a bigger city under a starry night. The moving part of the GIF pixel art wallpaper is the continuous rain.
![]()
3. The Forest
In this artistic wallpaper, we have a forest background, seeing it through a margin of a river that crosses it. A fallen log serves as a bridge to cross the river. A deer is standing on the other side under large trees.
![]()
4. The Farm
In this retro wallpaper pixel art, we can see a farm over an orange background. Next to it is a graduation tower—the tones on this wallpaper range from orange to red and brown.
![]()
5. The Sunset City
In this mobile animated pixel art wallpaper, we have the backdrop of a modern city. Tall buildings connected with a bridge can be seen as well as a sun setting that gives the sky tones ranging from purple to light orange.
![]()
6. The Night City
In this mobile pixel art wallpaper, we have a very low palette of colors. It ranges from blue to orange tones. It is a closed street in a city. A person is on the balcony outside.
![]()
7. The Spaceship
In this space-inspired pixel art wallpaper, we can see a spaceship with six people, two onboard, commanding it. One is fixing the spaceship; one is resting on the back, one on top scouting, one on the edging reaching for another in open space. There is also a dog on top of the spaceship and an alien-like creature in open space.
![]()
8. The Old Tree
In this pixel art wallpaper, we have a huge old tree that served as a refuge for passersby. It has a broken wood ladder and a wooden floor on an opening on the tree. The tree is inside a river, and a boat is moored next to it. Two birds rest on rocks on the margin, and we have the perspective behind the birds.
![]()
9. The Broken Earth
In this pixel art wallpaper, we have the planet earth floating in space. One part of the planet is broken and floating away. This pixel art wallpaper uses a black background, as well as blue, green and several tones of blue to make the oceans.
![]()
10. The Airport
In this pixel art wallpaper, we have an airport terminal. We can see a plane landing on the course—workers pulling carts of baggage and other vehicles belonging to that setting. The sun is almost set, and so there is an orange sky above, as well as orange lights.
![]()
Part 3: How to Customize Your Own Pixel Art Wallpapers
It is easy to create your own pixel art wallpapers. There are many free online applications that you can use. For example, Aseprite.
Step 1: Download Aseprite and open.
Step 2: You have tools on the right, click on it and choose the pencil icon, or press “B”. Just click on the left button of your mouse and draw. Left-click to erase it.
Step 3: To change the size of the line, go to the upper menu and type in the size you want by hovering on the search bar.
Step 4: You can also change the size of your brush. Simple go to the upper menu and choose the brush icon. There you have many shapes to choose from.
Step 5: You can choose the color pallet you want to use on your pixel art wallpaper on the left-hand side of the screen.
Step 6: These are the basic tools to start drawing your wallpapers. To save and export your pixel art wallpaper, go to “File” and click on “Export”.
Part 4: How to Make a Pixel Art Wallpaper Gif
Filmora is a video editing software tool focused on editing and making high-quality videos. It supports 4K videos and the latest technologies in that sector. Filmora is also able to create pixel art Gifs, as we will explain below.
Wondershare Filmora
Get started easily with Filmora’s powerful performance, intuitive interface, and countless effects!
Try It Free Try It Free Try It Free Learn More >

Step 1: You can drag and drop your video onto a timeline to better use the editing tools and operate on this file.
Step 2: Once you have your video imported and on the timeline, you can start editing it. Filmora uses all the basic and advanced tools like split, rotate, crop, combine, speed up, speed down, and more.
Step 3: You can also add text, elements, and pixelated effects to your video. It helps explain and add information when editing the video.
Step 4: After you’ve gone through all the steps above, you can export your .gif file. Filmora is linked to the most popular social media platforms, so it is easy for you to share it. To export, go to “File” and click on “Export”. Change the settings as you desire and export your pixel art wallpaper.
Conclusion
Although pixel art is a sort of new art, it is already rich with many artists and people interested in it. It has evolved over the years with the advance of technology, and it has become more complex, even though one of its characteristics is to look dated. This article gives you examples of the different pixel art wallpapers for your computer or mobile phone and how to create your own pixel art wallpapers.
Also read:
- In 2024, How to Use OBS Chroma Key With/Without Green Screen
- Updated In 2024, How to Make a Slow Motion Video in Wondershare Filmora
- ReVisionFX ReelSmart Motion Blur Plugin For Premiere Pro
- You Can Make Stylish Chroma Key Text Effects After Reading This Article. Wondershare Filmora Will Fill the Crazy Colors in Your Handwritten Note or Words
- This Article Is Regarding the Guidance About the Split of the Audio From the Video in Premiere Pro. And Also, the Discussion of the Wondershare Fllmora as the Replacement and How to Perform a Similar Task in It
- 2024 Approved Why Vimeo Slideshow Maker Become Popular
- New 2024 Approved Perfecting the Art of Slowing Down Video on Instagram
- Want to Know How to Slow Down a Video on iPhone or Speed It Up? This Guide Provides Step by Step Method to Do so Using Simple Techniques. Find Out More About It
- Mask Tracking Is Believed to Be a Helpful Procedure for Marking Proper Areas in Videos. Learn How to Perform Premiere Pro Mask Tracking in This Guide for 2024
- Updated Top 10 TEXT TO SPEECH VIDEO MAKERS
- New Every Compositor Should Know The Trick of Color Match in After Effects
- New Final Cut Pro for iPad
- New Intro Videos Have the Potential to Make a First Impression on Viewers, and You Know How They Say that the First Impression Is the Last Impression
- Do You Want to Know How to Add Captivating Audio in Simple Videos? Nothing to Be Concerned About because This Article Will Help You in This Matter for 2024
- In 2024, Blender - A Video Editor for All Professor
- In 2024, AVI Video Format Is Known and Famous for Its Features. Many of You Must Have Heard About It but Do You Know some Details About AVI? Lets Increase Your Knowledge and Talk About It
- New Wish to Rock on YouTube, but Lacking Tricks? Here, We Will Tell You Everything About How the YouTube Algorithm AI Works and How You Can Perform Well According to AI
- Updated 2024 Approved Learn to Use Montage with These Movies
- New 2024 Approved 4K Videos Are the in Thing because of Their Flexibility and High Resolution. Stick Around to Learn How to Choose the Best Frame Rate for 4K Videos
- Windows Movie Maker Review for 2024
- 2024 Approved Best Online YouTube Video Trimmer
- New 10 Best Audio Visualizers Windows, Mac, Android, iPhone & Online for 2024
- Updated 2024 Approved Guide to Synchronizing Your Audio And Videos Properly?
- Updated 2024 Approved Best Dark Moody LUTs During Editing
- New 10 Best Innovative AR Video Effects to Check Out for 2024
- In 2024, Minecraft Pixel Art Is a Trending Subject, and They Simply Consist of In-Game Pixel Artworks, Besides the Minecraft Houses, Farms, or Cities. Lets Explore the Fantastic World of Minecraft Pixel Art
- New In 2024, Powerpoint Supported Video Format and User Tips
- In 2024, The Craziest 10 AI Editors Youve Ever Seen
- In 2024, Unlocking the Power of Smart Lock A Beginners Guide for Vivo S18e Users
- In 2024, 15 Top Pics Collage Apps
- In 2024, Can I Bypass a Forgotten Phone Password Of Xiaomi Redmi Note 12 Pro 4G?
- Updated In 2024, The Top Free 12 GIF Meme Maker at a Glance
- How To Restore Missing Music Files from S17t
- In 2024, How to Unlock Xiaomi Redmi Note 13 5G Pattern Lock if Forgotten? 6 Ways
- How to recover deleted contacts from Moto G14.
- In 2024, Bypass iCloud Activation Lock with IMEI Code On your iPhone 8
- How to Stop Life360 from Tracking You On Realme 11X 5G? | Dr.fone
- New An Ultimate Guide of Best Narrator Voice Generators
- Title: In 2024, Learn How to Create Your Own Custom Animated Text Intro in the Filmora Video Editor. Follow a Few Simple Steps to Create Something that Looks Incredible
- Author: Chloe
- Created at : 2024-06-09 16:15:24
- Updated at : 2024-06-10 16:15:24
- Link: https://ai-editing-video.techidaily.com/in-2024-learn-how-to-create-your-own-custom-animated-text-intro-in-the-filmora-video-editor-follow-a-few-simple-steps-to-create-something-that-looks-incredi/
- License: This work is licensed under CC BY-NC-SA 4.0.


