:max_bytes(150000):strip_icc():format(webp)/title-b16094ee6f3340328084b9e5cc01426f.jpg)
In 2024, Learn How to Use 3D Camera Tracking in Adobe After Effects and Take Your Skills to the Next Level

Learn How to Use 3D Camera Tracking in Adobe After Effects and Take Your Skills to the Next Level
Adobe After Effects is an ever-growing product, with new features introduced almost every year. One of these features is the 3D Camera Tracking, which allows you to take your motion graphic effects to the next level.
Camera Tracking is extracting the camera movement from a recorded video sequence. This process allows filmmakers to add computer-generated elements to a live action shot, track objects throughout a shot for compositing, and estimate camera movements for virtual reality applications.
In this article, we will explore what Camera Tracking is and Motion Tracking in After Effect. We’ll also show you how to use 3D Camera Tracking in After Effects on a Windows PC.
Part 1. What Is Camera Tracking
Camera Tracking is a process that determines the movement of a video clip. This information can be used to add certain effects to the video, such as objects that seem to follow the camera or text that appears to be stationary in the frame.
Camera Tracking is a relatively simple process, but it can be time-consuming. However, the results are often worth the effort, as it can add a whole new level of realism to your footage clips.
For example, you have taken a video clip of a zoo and want to add an object to it while making sure it gives a realistic look. This is where the Camera Tracking feature can help you make a smooth transition and add the element as if it was there.
Part 2. Why Use Camera Tracking?
Now that you know what Camera Tracking is, let’s have a look at some benefits of using it:
- Add a 3D object or element to a 2D video clip.
- Embed objects, texts, etc., to a video.
- Stabilize a shaky camera/video clip.
- Create special effects.
- Apply color grading.
- Replace a TV or PC screen with some information.
Thus, if you need some basic compositions or advanced ones, the Camera Tracking feature will help you track your videos, embed anything you want, or create special effects to make your clip different.
Part 3. Motion Tracking In After Effects
The Motion Tracking capability is Adobe After Effects’ feature that allows you to track the movement of the camera/an object in a video clip and use the data to add effects to objects.
Motion tracking can be used for various effects, like creating realistic text animations or adding special effects to objects in a video.
There are four main types of Motion Tracking in After Effects, each with its own advantages and disadvantages:
Single Point Tracking
Single Point tracking tracks a single position in a video clip. You can use it for composing a video clip with a single point of focus, and it is suitable for following the movement of an object with right-left or up-down motion.
Advantage: Single Point Tracking is perfect for tracking a single position or motion of a single object.
Disadvantage: No scale or rotation properties and needs a clear contrast point for effective results.
Two Point Tracking
Two Point Tracking is a feature that allows you to track two points in a footage clip and can be used for scale, motion, and rotation tracking.
Advantage: Two Point Tracking can track scale and rotation along with the motion.
Disadvantage: It doesn’t give effective results with a shaky video clip.
Four Point Tracking
The Four Point Tracking feature lets you track four different points (corners) in your footage and apply the tracking data to a layer in your composition.
The four points can be placed at the screen’s corners in your shot, and new footage is applied to cover the screen.
Advantage: Directly pins the data to each corner of the image.
Disadvantage: Cannot be used to create a 3D object.
3D Camera Tracking
With 3D camera tracking, you can track the movement of a camera in a video and place 3D elements in the scene that match the camera’s movement. This is a great way to add realism to your graphics and make them look like they’re part of the scene.
Advantage: 3D Camera Tracking can help you add shapes, texts, or 3D objects to 2D footage.
Disadvantage: A bit tricky and needs an expert grip on the tool to use effectively.
Part 4. How To Use 3D Camera Tracking In After Effects Of Windows
Here’s a simple and quick rundown of how to use 3D camera tracking in After Effects:
Step1Import Your Video Footage
Launch Adobe After Effects, create a new composition, and import your footage. Once your clip is uploaded, click the Window Menu. Scroll down and choose “Tracker.”
![]()
Here you will see four tracking options:
- Track Camera
- Warp Stabilizer
- Track Motion
- Stabilize Motion
![]()
Click “Track Camera” to add the 3D Camera Tracker effect to your selected layer. After Effects will start analyzing the layer, show the percentage, and count the total frames of clips tracked.
![]()
Note: The dots that appear on your video clips cannot be rendered out, as they are strictly referential.
Step2Establish The Tracking Points
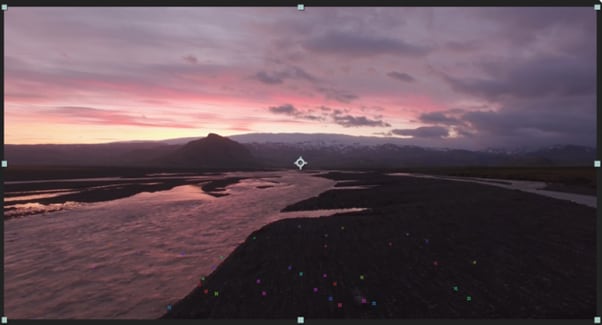
You have to select the tracking points and a plane to which it must be tracked. To do this, hover over the tracking point references in the After Effect compositions window. Between the three tracking points, a triangle will form, and a red “target” will appear to help you better visualize the plane.
Now, you have to find a tracking point that lays the red “target” parallel to your selected plane. Next, select the triangle that lines up best for your surface. Move the arrow away to disable the picker and stop the red “target.”
![]()
Step3Add The Text To Your Video Clip
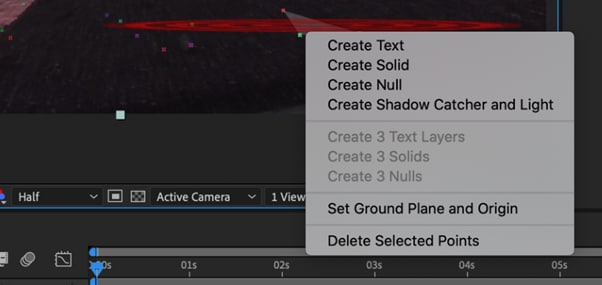
Once you define the plane, it’s time to add text to your video clip. To do this, right-click on the triangle you have set previously, and a window will appear, allowing you to create new layers.
Click “Create Text” to place the text on your tracked video clip. A new text layer will be added using the tracking data.
Step4Align Text On Tracked Footage
Now you have to align your text. In the timeline, locate the tracked text layer and click the arrow to the left to unveil all the editable properties for the layer.
Click the “Transform” option to use the transform options and use the layer lines to adjust the X, Y, and Scale values afterward.
![]()
Note: You can select your layer and press the S, P, R, or T keys to adjust the scale, position, rotation, and opacity, respectively.
Your text will now be added to your video footage. The method is similar to adding solid or null to your clips. However, the exact steps might differ a little.
Video - Learn 3D Camera Tracking In After Effects
Conclusion
In this article, we’ve discussed what Camera Tracking is and why to use it. We also provided information regarding Motion Tracking, its four types, and their advantages and disadvantages.
Furthermore, we walked you through the step-by-step process of using 3D Camera Tracking in Adobe After Effects for Windows.
We hope this guide helps you to add text to your video footage without much effort, and you now have complete knowledge of the Camera Tracking feature.
Free Download For Win 7 or later(64-bit)
Free Download For macOS 10.14 or later

Step2Establish The Tracking Points
You have to select the tracking points and a plane to which it must be tracked. To do this, hover over the tracking point references in the After Effect compositions window. Between the three tracking points, a triangle will form, and a red “target” will appear to help you better visualize the plane.
Now, you have to find a tracking point that lays the red “target” parallel to your selected plane. Next, select the triangle that lines up best for your surface. Move the arrow away to disable the picker and stop the red “target.”
![]()
Step3Add The Text To Your Video Clip
Once you define the plane, it’s time to add text to your video clip. To do this, right-click on the triangle you have set previously, and a window will appear, allowing you to create new layers.
Click “Create Text” to place the text on your tracked video clip. A new text layer will be added using the tracking data.

Step4Align Text On Tracked Footage
Now you have to align your text. In the timeline, locate the tracked text layer and click the arrow to the left to unveil all the editable properties for the layer.
Click the “Transform” option to use the transform options and use the layer lines to adjust the X, Y, and Scale values afterward.
![]()
Note: You can select your layer and press the S, P, R, or T keys to adjust the scale, position, rotation, and opacity, respectively.
Your text will now be added to your video footage. The method is similar to adding solid or null to your clips. However, the exact steps might differ a little.
Video - Learn 3D Camera Tracking In After Effects
Conclusion
In this article, we’ve discussed what Camera Tracking is and why to use it. We also provided information regarding Motion Tracking, its four types, and their advantages and disadvantages.
Furthermore, we walked you through the step-by-step process of using 3D Camera Tracking in Adobe After Effects for Windows.
We hope this guide helps you to add text to your video footage without much effort, and you now have complete knowledge of the Camera Tracking feature.
Free Download For Win 7 or later(64-bit)
Free Download For macOS 10.14 or later
Looking For a Cheap Camera to Make Slow Motion Video? Get It Now
Budget slow-motion cameras are not just for filmmakers but are for everyone who loves making eye-catching videos and pictures. These specialized cheap slow mo cameras let us slow down time and see things in smooth frames that we normally can’t. However, not everyone can afford such fancy cameras, which are usually expensive. So, we will talk about affordable slow-motion cameras and their importance in videography.
Slow Motion Video Maker Slow your video’s speed with better control of your keyframes to create unique cinematic effects!
Make A Slow Motion Video Make A Slow Motion Video More Features

Part 1: Some Great Cheap Slow-Motion Cameras One Can Go Across
If you are looking for some cameras that are budget-friendly but still manage to capture those cool, slow-motion moments, this article will help you with it. We will enlist some of the best inexpensive slow-motion cameras you can buy for detailed videography without worrying about your money.
- DJI Pocket 2
- Insta360 One X2
- GoPro HERO11
- Sony Cyber-Shot DSC-RX100 VII
- Canon EOS R50
- Nikon Z6 II
- Canon PowerShot G5 X Mark II
- Fujifilm X-S20
1. DJI Pocket 2
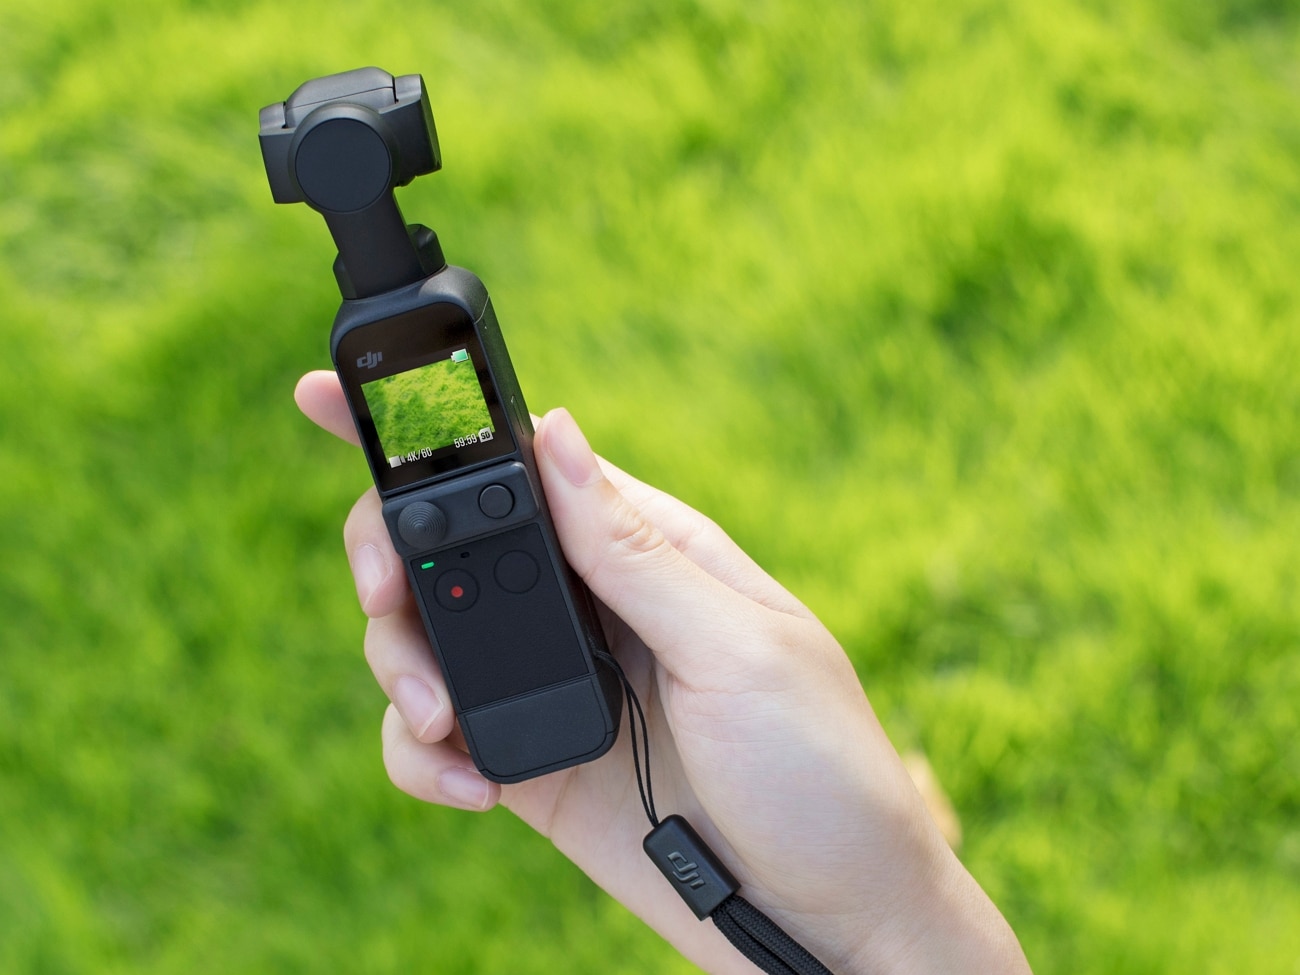
Another budget-friendly camera named DJI Pocket 2 Creative Combo is a small camera perfect for videographers. It fits right in your pocket and is easy for any adventure. The camera has a special feature that keeps videos steady, even when you’re moving. Moreover, its smart tracking feature keeps your subjects in focus no matter how they move. Plus, it takes great pictures with a good sensor and shoots super clear 4K videos at 60 frames per second.
Average Price: $344
2. Insta360 One X2
Insta360 One X2 is a versatile, pocket-sized camera that is your all-in-one filming solution. With this affordable slow-motion camera, you can capture 360-degree footage. You can also use stable wide-angle shots to capture scenes from far away. With its Flow State Stabilization, your videos stay steady without the need for a gimbal. Also, with its 100MB bitrate video recording, you can experience smoother slow-mo videos.
Average Price: $300

3. GoPro HERO11
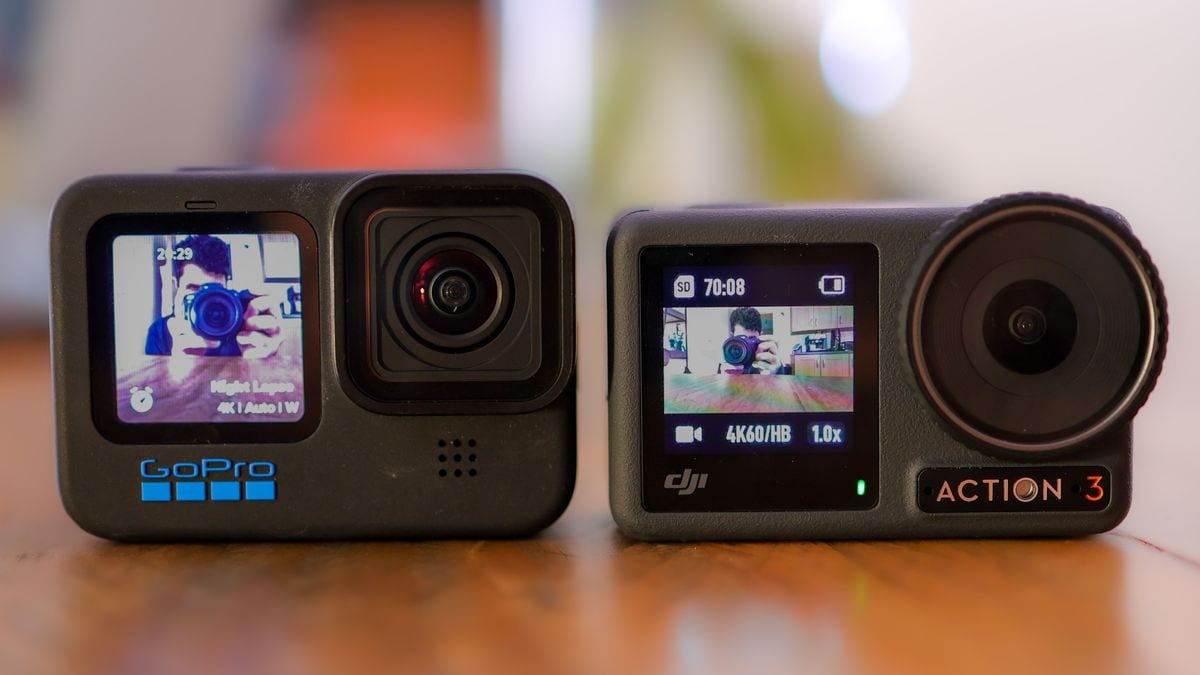
GoPro HERO11 Black allows you to shoot high-res 5.3K video at 60 fps and 4K at 120 fps. You can capture life’s action in stunning detail with its slow-motion feature. Also, thanks to Hyper Smooth 5.0 stabilization, your footage stays buttery smooth. Whether you’re a pro or a newbie, the one-button controls make it easy to use. All the features of this cheap slow-motion camera are packed into a compact and waterproof design for epic adventures.
Average Price: $299
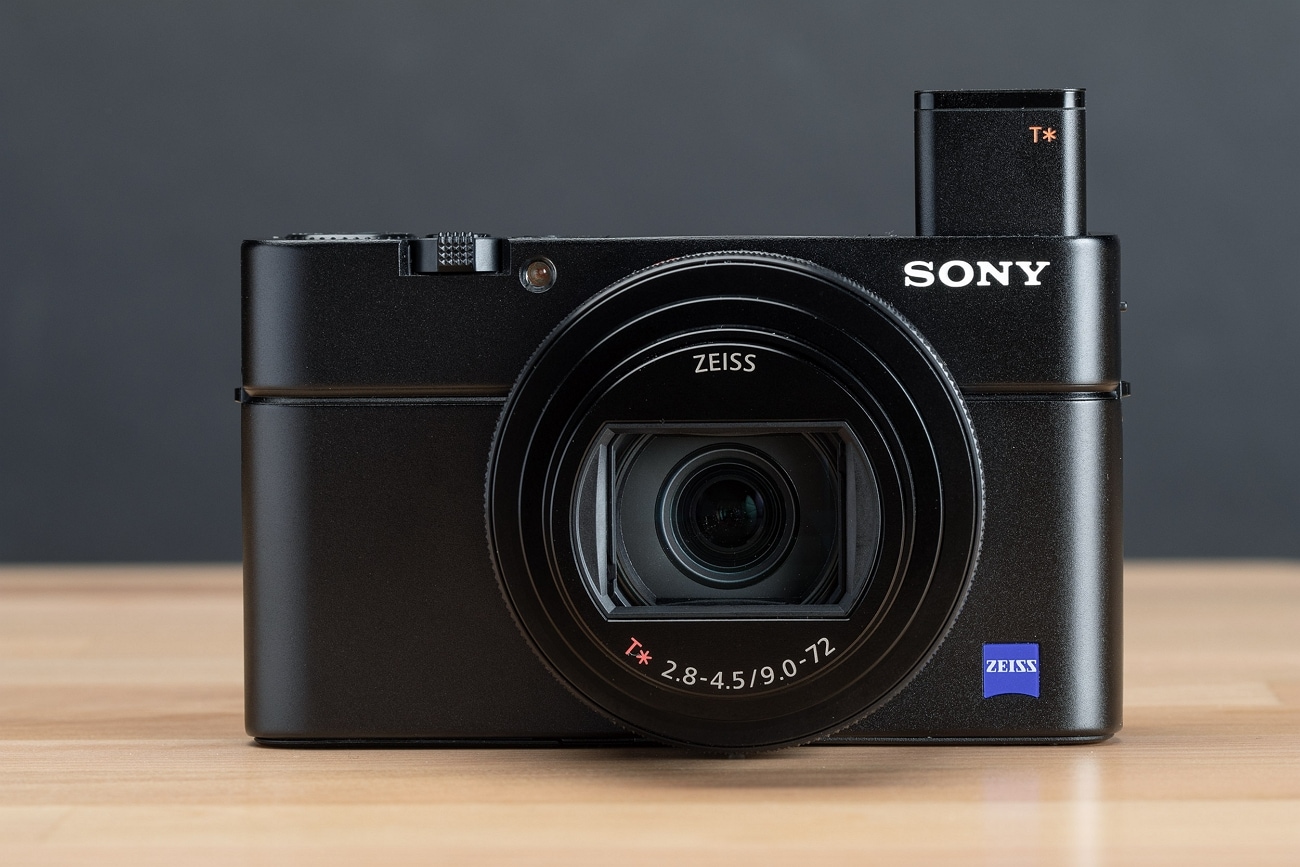
4. Sony Cyber-Shot DSC-RX100 VII
The Sony RX100 VII is a really powerful slow-motion camera. It’s got a 20.1MP sensor that takes awesome pictures. With its Zeiss Vario-Sonar T lens, it can zoom to a great extent, allowing the capture of scenes with lots of details. Also, it focuses quickly, like in 0.02 seconds, and can shoot up to 20 frames per second without any delays. It can shoot 4K videos and has features like Interval Shooting and image stabilization, making it perfect for pro-quality videos.
Average Price: $950
5. Canon EOS R50
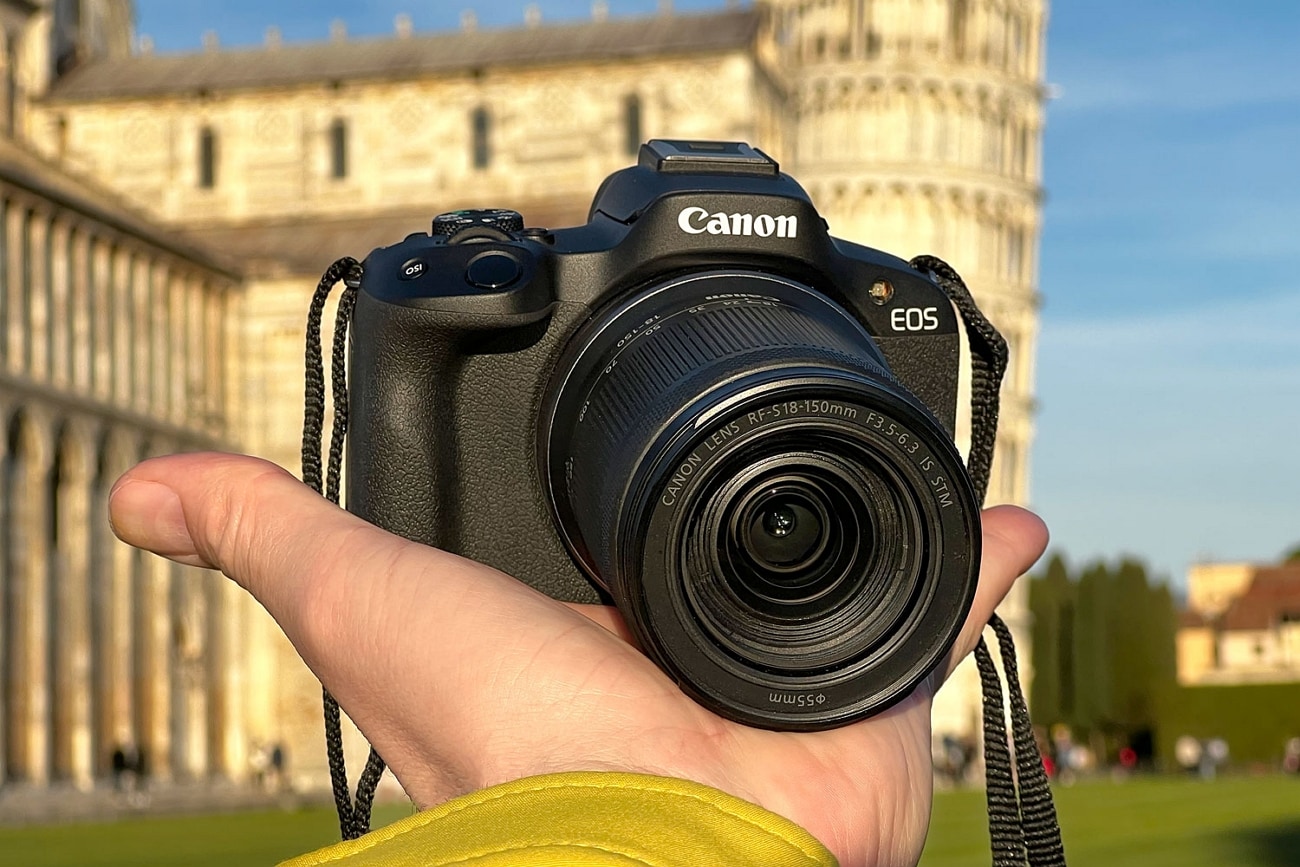
The Canon EOS R50 with an RF-S18-45mm STM Lens is a camera designed for filmmakers. The camera can shoot 4K videos and even super clear Full HD videos at 120 frames per second. Another handy thing is its auto-assist feature that helps with different photo settings. The focusing system is accurate and can quickly focus on different objects. And when the light isn’t great, it has a built-in flash that helps take better slow-motion videos at night.
Average Price: $699
6. Nikon Z6 II
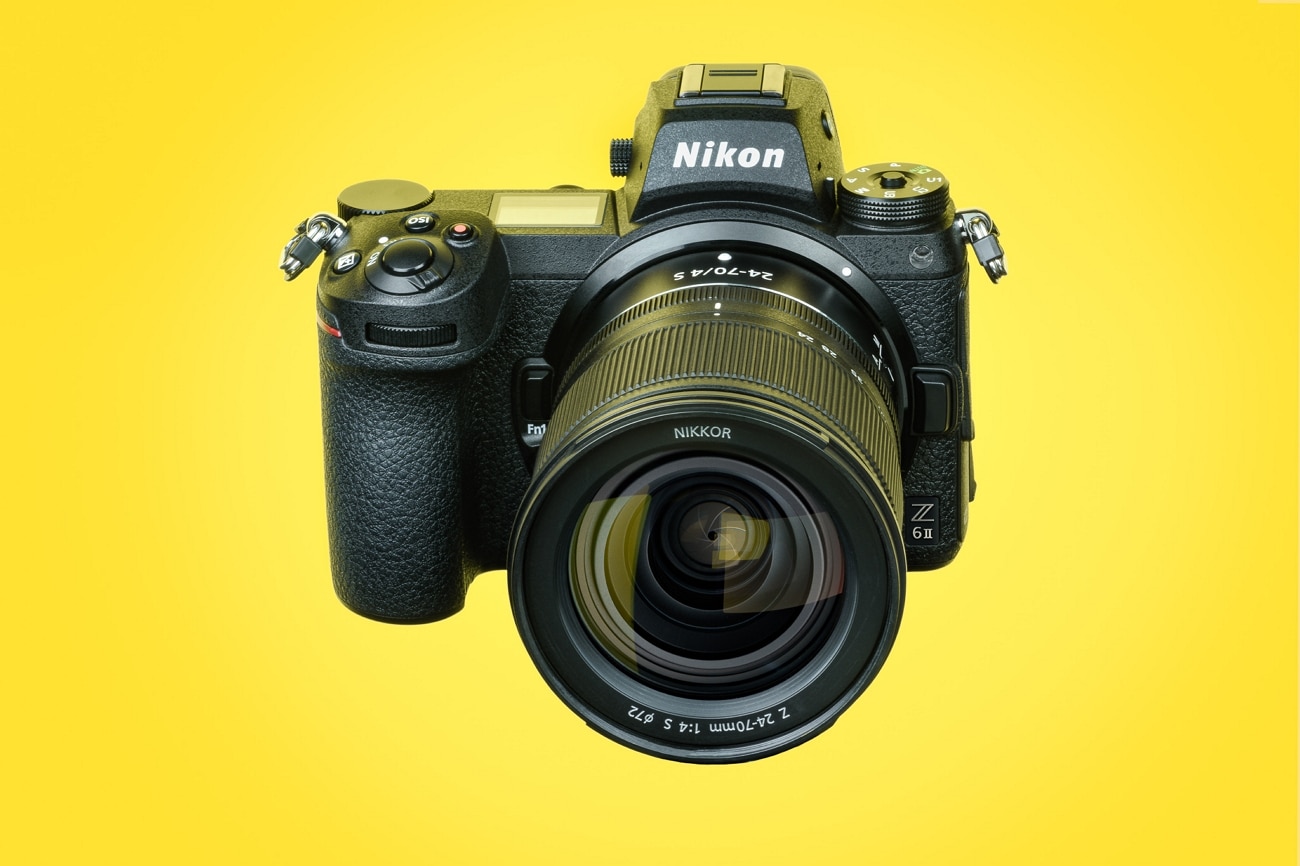
Nikon Z6 II captures smooth slow-motion at Full HD/120p. It also provides a stunning 4K Ultra HD/60p video for a professional look. With an impressive 24.5 MP sensor, it excels in low-light conditions. You can stay powered on the go with the convenience of charging via USB-C while shooting. So, enjoy the lightweight and compact design of this affordable slow-motion camera for easy portability.
Average Price: $1500
7. Canon PowerShot G5 X Mark II
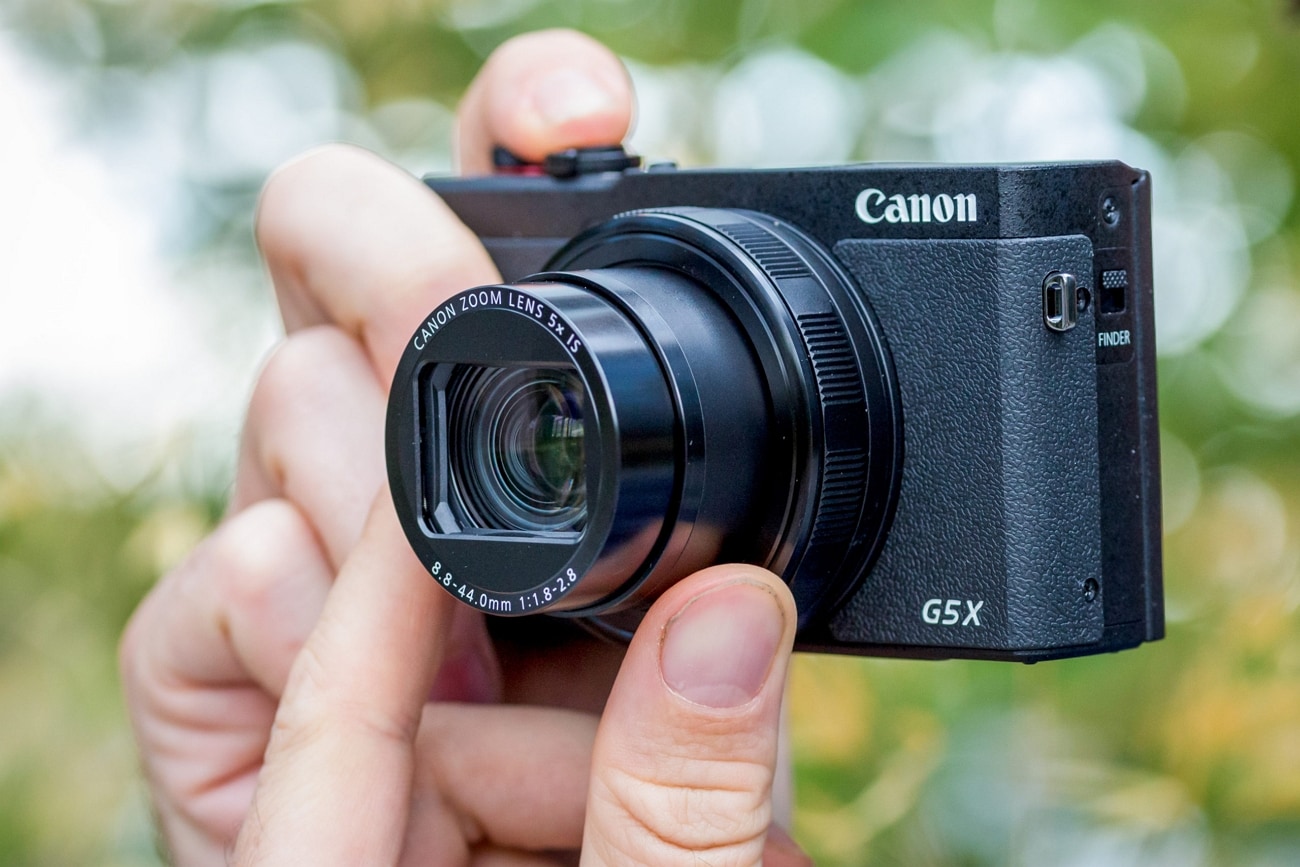
Canon PowerShot G5 X Mark II has a good 20.1-megapixel 1.0-inch Stacked CMOS Sensor that makes pictures look amazing. It also has a 5x Optical Zoom Lens with Optical Image Stabilizer, so it’s great for taking different kinds of clear and sharp photos. Plus, you can shoot awesome videos with this cheap slow-mo camera at 120 frames per second. This feature makes this camera an ideal choice for professional videography.
Average Price: $949
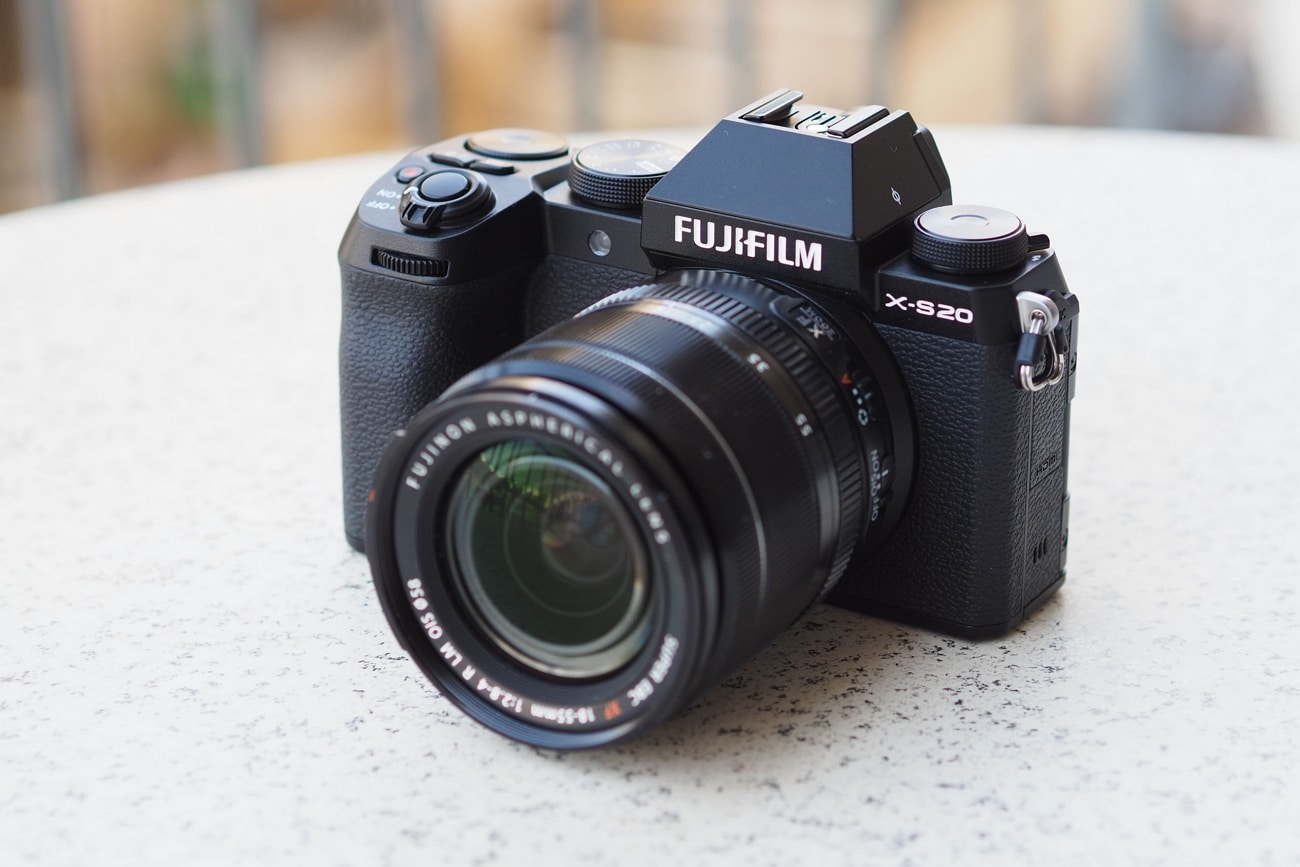
8. Fujifilm X-S20
The Fujifilm X-S20 is an in-expensive slow-motion camera known for its advanced features. With a 26.1MP sensor, this camera captures high-quality images and videos. The 3.0-inch vari-angle touchscreen is user-friendly to allow even beginners to shoot professional videos. Moreover, it is ideal for aesthetic video recording, as it can capture footage in an impressive 6.2K resolution.
Average Price: $1299
Part 2: Make Perfect Slow-Motion Videos with The Best Desktop Application
Let’s discuss making slow-motion videos without using any particular camera. You heard it right! It is possible to generate a slow-motion video filmed by any smartphone camera. You just have to install Wondershare Filmora on your system and import the video into it. This tool is capable of slowing down video smoothly with the help of its advanced AI features.
Wondershare Filmora also helps you to generate AI music and scripts that enhance your productivity. Moreover, it runs without any lagging, allowing you to continue the editing process seamlessly. Explore more features of Filmora below.
Steps Involved to Slow Down Video Professionally with Speed Ramping
In this section, we will learn how to edit your video to slow down using Filmora. Wondershare Filmora has a feature named Speed Ramping that allows you to slow down different parts of a video. Let’s discover how this can be achieved in a step-wise fashion.
Free Download For Win 7 or later(64-bit)
Free Download For macOS 10.14 or later
Step 1Activate Filmora and Import the Video
To begin, open Wondershare Filmora and create a new project, followed by importing your video. Subsequently, click the “+” icon on the video and choose the “Match to Media” option to ensure your project settings match the video’s resolution.

Step 2Make the Video to Slow Down
Add the video to the timeline and select the “Speed” icon. Then, pick a preset like 0.5x from the “Slow” menu to slow down the entire clip. On the other hand, you can also right-click the video, go to “Speed,” then “Uniform Speed,” and drag the slider left for slow motion.

Step 3Applying Speed Ramping on Specific Parts of Video
To create slow motion in specific parts of your video, go to the “Speed Ramping” window and choose the “Custom” option. Make adjustments to the speed by moving points below the line.

Step 4Freeze a Frame in the Video
If you want to freeze a frame, position the play head where you want to freeze it and select the “Add Freeze Frame” option. Set the freeze duration in the “Freeze Time Field” and adjust its position as needed. Click “OK” to save the changes.

Key Features of Wondershare Filmora
Filmora is a versatile video editing software that allows you to perform various tasks easily. This software is being used by professionals because of its innovative features. Some of these advanced features are listed below:
1. AI Copilot Editing
AI Copilot Editing is an innovative way to edit videos. It doesn’t just help; it also checks for mistakes and tells you if something’s wrong. This eliminates various errors and helps you edit smoothly. AI Copilot Editing changes how we edit videos, using smart tech to give helpful support for a smoother and more accurate editing experience.
2. AI Music Generator
The AI Music Generator changes how music gets made and helps create complete music tracks super-fast. You can choose different music styles and genres easily. Whether you need music for movies, for vlogs, or tunes for ads, this tool has you covered. This music can make your projects better and match exactly what you’re aiming for in your content.
3. AI Thumbnail Creator
The Automatic Thumbnail Generator makes creating video thumbnails super easy. It looks at your video and picks out three great shots for you to choose from. You can easily edit these shots to match what you want. You can also add text, titles, or cool graphics to the thumbnails. There are 58 different thumbnail styles to pick from, so you can find one that fits your video.
4. Screen Recorder
The Screen Recorder is an amazing tool that lets you record anything on your computer screen. It can also include your webcam footage while recording. You can capture both the sounds from your microphone and computer at the same time. It’s great for making videos of games, tutorials, or content for YouTube. Plus, it comes with editing tools and effects to make your recordings better before sharing them.
Conclusion
In conclusion, making awesome slow-motion videos doesn’t have to be hard if you’re on a budget. There are lots of affordable slow-mo cameras out there that can shoot great footage. Even then, you can always rely on the Filmora tool that can help create a slow-motion video. In this software, the Speed Ramping feature turns your raw videos into appealing slow-motion ones.
Whether you’ve got a cheap camera or editing tools, the most important thing is your imagination and how you see things.
Make A Slow Motion Video Make A Slow Motion Video More Features

Part 1: Some Great Cheap Slow-Motion Cameras One Can Go Across
If you are looking for some cameras that are budget-friendly but still manage to capture those cool, slow-motion moments, this article will help you with it. We will enlist some of the best inexpensive slow-motion cameras you can buy for detailed videography without worrying about your money.
- DJI Pocket 2
- Insta360 One X2
- GoPro HERO11
- Sony Cyber-Shot DSC-RX100 VII
- Canon EOS R50
- Nikon Z6 II
- Canon PowerShot G5 X Mark II
- Fujifilm X-S20
1. DJI Pocket 2
Another budget-friendly camera named DJI Pocket 2 Creative Combo is a small camera perfect for videographers. It fits right in your pocket and is easy for any adventure. The camera has a special feature that keeps videos steady, even when you’re moving. Moreover, its smart tracking feature keeps your subjects in focus no matter how they move. Plus, it takes great pictures with a good sensor and shoots super clear 4K videos at 60 frames per second.
Average Price: $344

2. Insta360 One X2
Insta360 One X2 is a versatile, pocket-sized camera that is your all-in-one filming solution. With this affordable slow-motion camera, you can capture 360-degree footage. You can also use stable wide-angle shots to capture scenes from far away. With its Flow State Stabilization, your videos stay steady without the need for a gimbal. Also, with its 100MB bitrate video recording, you can experience smoother slow-mo videos.
Average Price: $300

3. GoPro HERO11
GoPro HERO11 Black allows you to shoot high-res 5.3K video at 60 fps and 4K at 120 fps. You can capture life’s action in stunning detail with its slow-motion feature. Also, thanks to Hyper Smooth 5.0 stabilization, your footage stays buttery smooth. Whether you’re a pro or a newbie, the one-button controls make it easy to use. All the features of this cheap slow-motion camera are packed into a compact and waterproof design for epic adventures.
Average Price: $299

4. Sony Cyber-Shot DSC-RX100 VII
The Sony RX100 VII is a really powerful slow-motion camera. It’s got a 20.1MP sensor that takes awesome pictures. With its Zeiss Vario-Sonar T lens, it can zoom to a great extent, allowing the capture of scenes with lots of details. Also, it focuses quickly, like in 0.02 seconds, and can shoot up to 20 frames per second without any delays. It can shoot 4K videos and has features like Interval Shooting and image stabilization, making it perfect for pro-quality videos.
Average Price: $950

5. Canon EOS R50
The Canon EOS R50 with an RF-S18-45mm STM Lens is a camera designed for filmmakers. The camera can shoot 4K videos and even super clear Full HD videos at 120 frames per second. Another handy thing is its auto-assist feature that helps with different photo settings. The focusing system is accurate and can quickly focus on different objects. And when the light isn’t great, it has a built-in flash that helps take better slow-motion videos at night.
Average Price: $699

6. Nikon Z6 II
Nikon Z6 II captures smooth slow-motion at Full HD/120p. It also provides a stunning 4K Ultra HD/60p video for a professional look. With an impressive 24.5 MP sensor, it excels in low-light conditions. You can stay powered on the go with the convenience of charging via USB-C while shooting. So, enjoy the lightweight and compact design of this affordable slow-motion camera for easy portability.
Average Price: $1500

7. Canon PowerShot G5 X Mark II
Canon PowerShot G5 X Mark II has a good 20.1-megapixel 1.0-inch Stacked CMOS Sensor that makes pictures look amazing. It also has a 5x Optical Zoom Lens with Optical Image Stabilizer, so it’s great for taking different kinds of clear and sharp photos. Plus, you can shoot awesome videos with this cheap slow-mo camera at 120 frames per second. This feature makes this camera an ideal choice for professional videography.
Average Price: $949

8. Fujifilm X-S20
The Fujifilm X-S20 is an in-expensive slow-motion camera known for its advanced features. With a 26.1MP sensor, this camera captures high-quality images and videos. The 3.0-inch vari-angle touchscreen is user-friendly to allow even beginners to shoot professional videos. Moreover, it is ideal for aesthetic video recording, as it can capture footage in an impressive 6.2K resolution.
Average Price: $1299

Part 2: Make Perfect Slow-Motion Videos with The Best Desktop Application
Let’s discuss making slow-motion videos without using any particular camera. You heard it right! It is possible to generate a slow-motion video filmed by any smartphone camera. You just have to install Wondershare Filmora on your system and import the video into it. This tool is capable of slowing down video smoothly with the help of its advanced AI features.
Wondershare Filmora also helps you to generate AI music and scripts that enhance your productivity. Moreover, it runs without any lagging, allowing you to continue the editing process seamlessly. Explore more features of Filmora below.
Steps Involved to Slow Down Video Professionally with Speed Ramping
In this section, we will learn how to edit your video to slow down using Filmora. Wondershare Filmora has a feature named Speed Ramping that allows you to slow down different parts of a video. Let’s discover how this can be achieved in a step-wise fashion.
Free Download For Win 7 or later(64-bit)
Free Download For macOS 10.14 or later
Step 1Activate Filmora and Import the Video
To begin, open Wondershare Filmora and create a new project, followed by importing your video. Subsequently, click the “+” icon on the video and choose the “Match to Media” option to ensure your project settings match the video’s resolution.

Step 2Make the Video to Slow Down
Add the video to the timeline and select the “Speed” icon. Then, pick a preset like 0.5x from the “Slow” menu to slow down the entire clip. On the other hand, you can also right-click the video, go to “Speed,” then “Uniform Speed,” and drag the slider left for slow motion.

Step 3Applying Speed Ramping on Specific Parts of Video
To create slow motion in specific parts of your video, go to the “Speed Ramping” window and choose the “Custom” option. Make adjustments to the speed by moving points below the line.

Step 4Freeze a Frame in the Video
If you want to freeze a frame, position the play head where you want to freeze it and select the “Add Freeze Frame” option. Set the freeze duration in the “Freeze Time Field” and adjust its position as needed. Click “OK” to save the changes.

Key Features of Wondershare Filmora
Filmora is a versatile video editing software that allows you to perform various tasks easily. This software is being used by professionals because of its innovative features. Some of these advanced features are listed below:
1. AI Copilot Editing
AI Copilot Editing is an innovative way to edit videos. It doesn’t just help; it also checks for mistakes and tells you if something’s wrong. This eliminates various errors and helps you edit smoothly. AI Copilot Editing changes how we edit videos, using smart tech to give helpful support for a smoother and more accurate editing experience.
2. AI Music Generator
The AI Music Generator changes how music gets made and helps create complete music tracks super-fast. You can choose different music styles and genres easily. Whether you need music for movies, for vlogs, or tunes for ads, this tool has you covered. This music can make your projects better and match exactly what you’re aiming for in your content.
3. AI Thumbnail Creator
The Automatic Thumbnail Generator makes creating video thumbnails super easy. It looks at your video and picks out three great shots for you to choose from. You can easily edit these shots to match what you want. You can also add text, titles, or cool graphics to the thumbnails. There are 58 different thumbnail styles to pick from, so you can find one that fits your video.
4. Screen Recorder
The Screen Recorder is an amazing tool that lets you record anything on your computer screen. It can also include your webcam footage while recording. You can capture both the sounds from your microphone and computer at the same time. It’s great for making videos of games, tutorials, or content for YouTube. Plus, it comes with editing tools and effects to make your recordings better before sharing them.
Conclusion
In conclusion, making awesome slow-motion videos doesn’t have to be hard if you’re on a budget. There are lots of affordable slow-mo cameras out there that can shoot great footage. Even then, you can always rely on the Filmora tool that can help create a slow-motion video. In this software, the Speed Ramping feature turns your raw videos into appealing slow-motion ones.
Whether you’ve got a cheap camera or editing tools, the most important thing is your imagination and how you see things.
How to Make Vintage Film Effect 1980S
The 1980s is widely regarded as the golden era of music and film-making. If you play a video recorded in the 80s, you’ll notice graininess, blurriness, and light exposure, giving the footage a dreamy vintage touch. So, in this short tutorial, we’ll learn how to create a vintage 1980-style video with a retro effect that will leave your audience yearning for more.
Preparation

In this tutorial, you’ll need at least two video clips. First, take clear footage of a hoop dancer playing to music and a disco ball footage that you’ll add to the background. You can also add another footage to give your dancing video the perfect transition.
How to create a retro-style music video shot in the 80s:
Step1 Import the video clips on Filmora
Free Download For Win 7 or later(64-bit)
Free Download For macOS 10.14 or later

First, run Wondershare Filmora and add the video with the hoop dancer on the first track. Then, move the disco ball footage right above the first video track.
Step2 Add an animation keyframe

With the two videos imported on Filmora, move the playhead to the point where the hoop dancer begins to dance and double-click the disco ball footage.

Now find the Animation tab, then click the Customize tab. Next, click Add to apply a keyframe to this point of the video. Don’t stop there. Move the playhead to the right and add another keyframe to the footage before changing the opacity to 50%.

Meanwhile, we’ll add a keyframe to the third video with a lady removing her sunglasses. To do that, add the footage to the third track, then double-click the video track. After that, place the playhead at the start of the video and apply an animation keyframe before changing the opacity to 0%. Move the playhead a few keyframes forward and add another animation keyframe.
Step3 Add retro filters and effects to the video

Go to the Effect tab and choose Overlay. Once that is done, select the TV Static option before choosing the VHS Distortion effect. This effect will give your video the retro feeling of the 1980s. Don’t be afraid to try out the TV Static effects to find what works best in your video.
Summary
Creating a retro-style 1980s film is as easy as pie with Wondershare Filmora. You can also check out more 80s-inspired video effects on Wondershare’s Filmstock library. Ready to go back to the 80s? Hope so!
Free Download For macOS 10.14 or later

First, run Wondershare Filmora and add the video with the hoop dancer on the first track. Then, move the disco ball footage right above the first video track.
Step2 Add an animation keyframe

With the two videos imported on Filmora, move the playhead to the point where the hoop dancer begins to dance and double-click the disco ball footage.

Now find the Animation tab, then click the Customize tab. Next, click Add to apply a keyframe to this point of the video. Don’t stop there. Move the playhead to the right and add another keyframe to the footage before changing the opacity to 50%.

Meanwhile, we’ll add a keyframe to the third video with a lady removing her sunglasses. To do that, add the footage to the third track, then double-click the video track. After that, place the playhead at the start of the video and apply an animation keyframe before changing the opacity to 0%. Move the playhead a few keyframes forward and add another animation keyframe.
Step3 Add retro filters and effects to the video

Go to the Effect tab and choose Overlay. Once that is done, select the TV Static option before choosing the VHS Distortion effect. This effect will give your video the retro feeling of the 1980s. Don’t be afraid to try out the TV Static effects to find what works best in your video.
Summary
Creating a retro-style 1980s film is as easy as pie with Wondershare Filmora. You can also check out more 80s-inspired video effects on Wondershare’s Filmstock library. Ready to go back to the 80s? Hope so!
Free Download For macOS 10.14 or later

First, run Wondershare Filmora and add the video with the hoop dancer on the first track. Then, move the disco ball footage right above the first video track.
Step2 Add an animation keyframe

With the two videos imported on Filmora, move the playhead to the point where the hoop dancer begins to dance and double-click the disco ball footage.

Now find the Animation tab, then click the Customize tab. Next, click Add to apply a keyframe to this point of the video. Don’t stop there. Move the playhead to the right and add another keyframe to the footage before changing the opacity to 50%.

Meanwhile, we’ll add a keyframe to the third video with a lady removing her sunglasses. To do that, add the footage to the third track, then double-click the video track. After that, place the playhead at the start of the video and apply an animation keyframe before changing the opacity to 0%. Move the playhead a few keyframes forward and add another animation keyframe.
Step3 Add retro filters and effects to the video

Go to the Effect tab and choose Overlay. Once that is done, select the TV Static option before choosing the VHS Distortion effect. This effect will give your video the retro feeling of the 1980s. Don’t be afraid to try out the TV Static effects to find what works best in your video.
Summary
Creating a retro-style 1980s film is as easy as pie with Wondershare Filmora. You can also check out more 80s-inspired video effects on Wondershare’s Filmstock library. Ready to go back to the 80s? Hope so!
Free Download For macOS 10.14 or later

First, run Wondershare Filmora and add the video with the hoop dancer on the first track. Then, move the disco ball footage right above the first video track.
Step2 Add an animation keyframe

With the two videos imported on Filmora, move the playhead to the point where the hoop dancer begins to dance and double-click the disco ball footage.

Now find the Animation tab, then click the Customize tab. Next, click Add to apply a keyframe to this point of the video. Don’t stop there. Move the playhead to the right and add another keyframe to the footage before changing the opacity to 50%.

Meanwhile, we’ll add a keyframe to the third video with a lady removing her sunglasses. To do that, add the footage to the third track, then double-click the video track. After that, place the playhead at the start of the video and apply an animation keyframe before changing the opacity to 0%. Move the playhead a few keyframes forward and add another animation keyframe.
Step3 Add retro filters and effects to the video

Go to the Effect tab and choose Overlay. Once that is done, select the TV Static option before choosing the VHS Distortion effect. This effect will give your video the retro feeling of the 1980s. Don’t be afraid to try out the TV Static effects to find what works best in your video.
Summary
Creating a retro-style 1980s film is as easy as pie with Wondershare Filmora. You can also check out more 80s-inspired video effects on Wondershare’s Filmstock library. Ready to go back to the 80s? Hope so!
Replacing Sky Background Using Adobe Photoshop: A Comprehensive Guide
Editing images is an essential point for photographers to make their work stand out. Creators use certain editing tools to polish their captured media. Suppose having an image with low sunlight that dims the natural beauty of the surroundings. In this situation, replacing sky backgrounds seems the only way to set a stunning landscape.
Photographers mostly rely on Adobe Photoshop sky replacement packs for this purpose. Using this option, users put life in their dull media with skies. Without further delay, learn everything about sky replacement Photoshop in this guide.
Sky Replacement A cross-platform works like magic for background removal or sky replacement photos!
Free Download Free Download Learn More

Part 1: How Good Has Photoshop Been in Helping Users Make Crisp Pictures and Media?
Adobe Photoshop is a graphics editor tool designed for professional digital art. It is widely used to grow business through designing virtual backgrounds and graphics. You can adjust the subject’s features and poses to make perfect portraits. To transform letters into artistic expressions, it offers Photoshop brushes and paints. Users can collaborate with their teammates and share work for approvals with this tool.
Key Features To Look Out In Adobe Photoshop
This tool can accelerate workflow with its latest features. It allows you to expand, add, and remove content from images with high-quality results. The following are some key features of Photoshop for your better understanding of this tool:
- It offers a sky replacement Photoshop feature that can change the sky from captured images.
- You can remove and replace your background in Photoshop and refine it as required.
- With the remove object feature, users can erase unwanted objects from images.
- Use the “Colorize” feature and make your black-and-white images colorful.
- Enhance workflow by using “Layer” masking that hides part of images without erasing them.
Part 2: A Detailed Guide on How to Replace Sky Background in Photoshop?
With AI integration in Adobe Photoshop, you can change skies with simple clicks. It provides a collection of skies from the Blue Skies, Spectacular, and sunset categories. Also, users can import any sky from their gallery or download one from presets. To do so, let us show you how to change the sky in Photoshop in given steps:
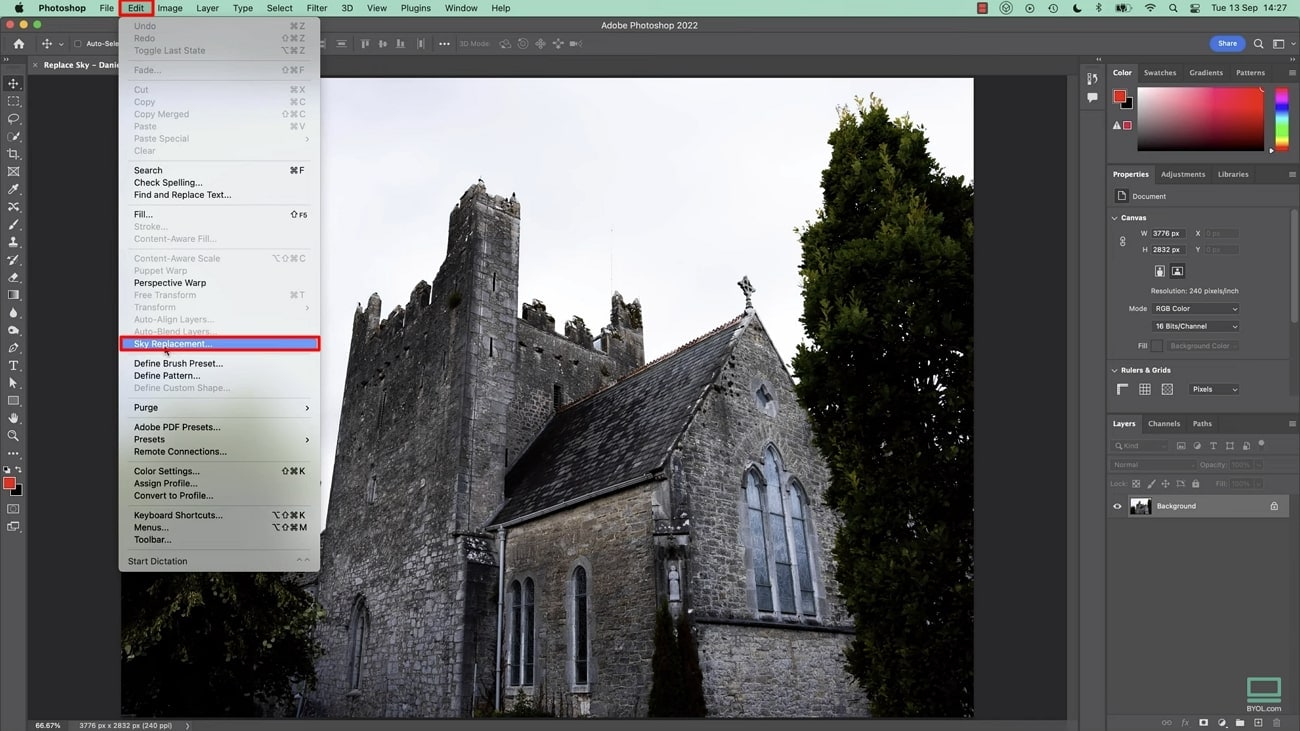
Step 1: Bring your desired image to the Adobe Photoshop. Head to the top toolbar and click the “Edit” option next to the “File.” Look for the “Sky Replacement” option from the list.
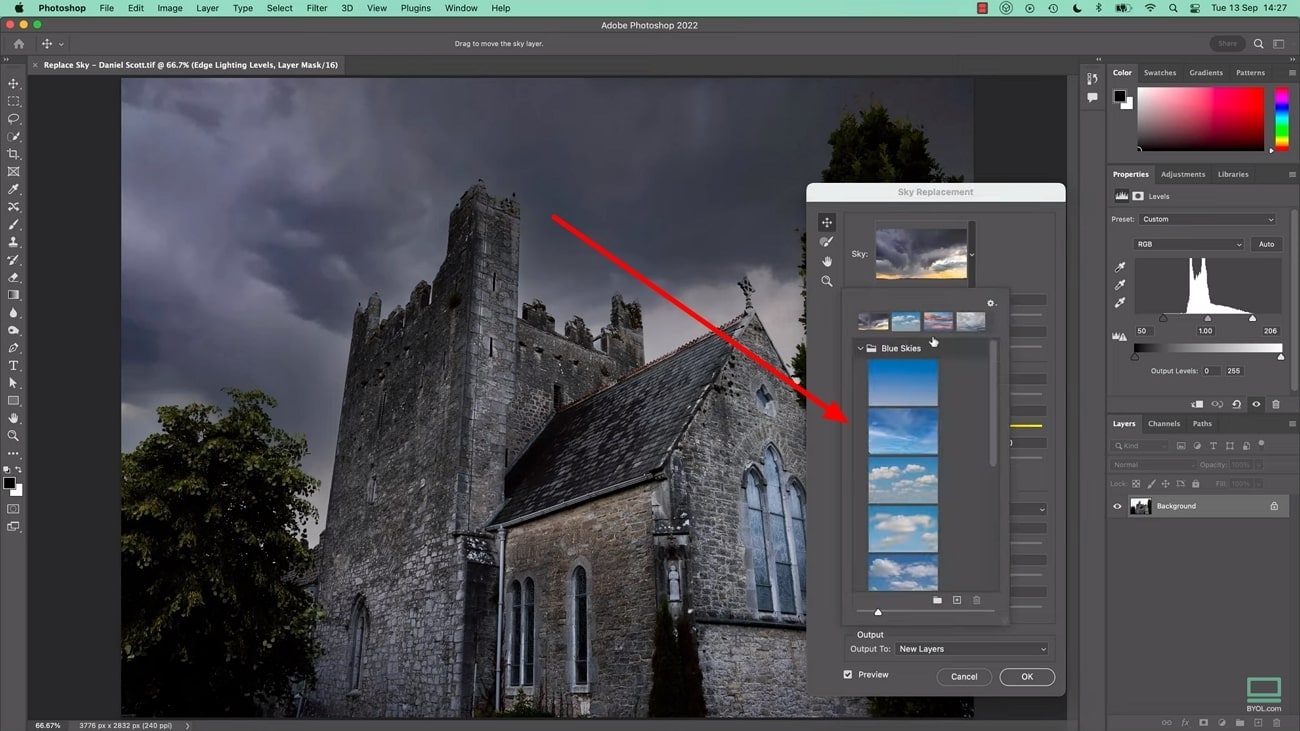
Step 2: After tapping “Sky Replacement,” you will get a respective screen on your front. Press the downward symbol next to the “Sky” and pick one sky from available options.
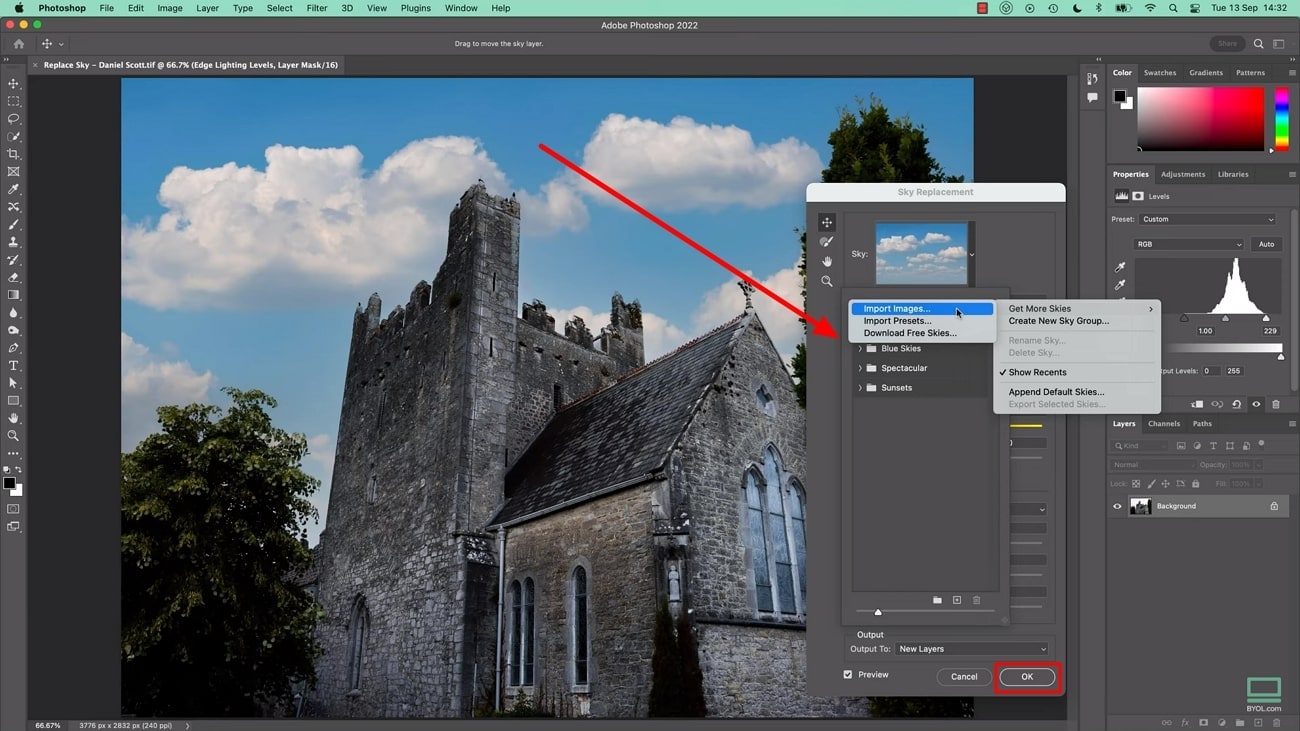
Step 3: Alternatively, you can hit the “+” icon and browse the sky image from your system. When you choose one, it gets added to the existing sky list. Select that and tap the “OK” button to apply changes in your media.
Part 3: An Alternative Solution: Wondershare Filmora Providing Workability with Easy Background Replacement
Changing sky in Photoshop is difficult for beginners and requires a basic skill set. It may take a lot of your time to understand its functionalities. That’s why choosing a tool with simple operation and high-quality output is important. In this regard, you should use Wondershare Filmora as a better option for everyone. It is a video editor that offers a variety of powerful features.
Using this tool, you can remove and change the background from your images or videos. With the integration of AI, it can automatically detect the object and foreground.
Other Prominent Video Editing Features
Apart from changing background, Filmora can perform A to Z video editing tasks. Let’s explore some of the key features to overview its fruitful functionalities:
Free Download For Win 7 or later(64-bit)
Free Download For macOS 10.14 or later
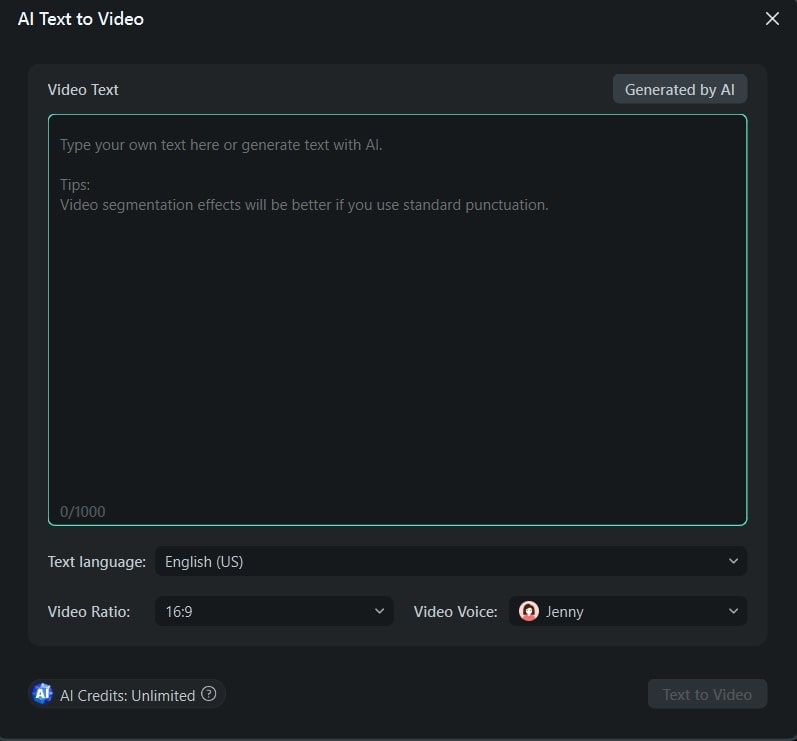
1. AI Text-to-Video
Who needs a camera and crew when you can effortlessly generate video from text? Filmora can transform your text into an engaging storytelling video with just text prompts. After getting the video, you can customize the video’s appearance with fonts, styles, and colors. Users can add smooth transitions between text elements for a cohesive flow.
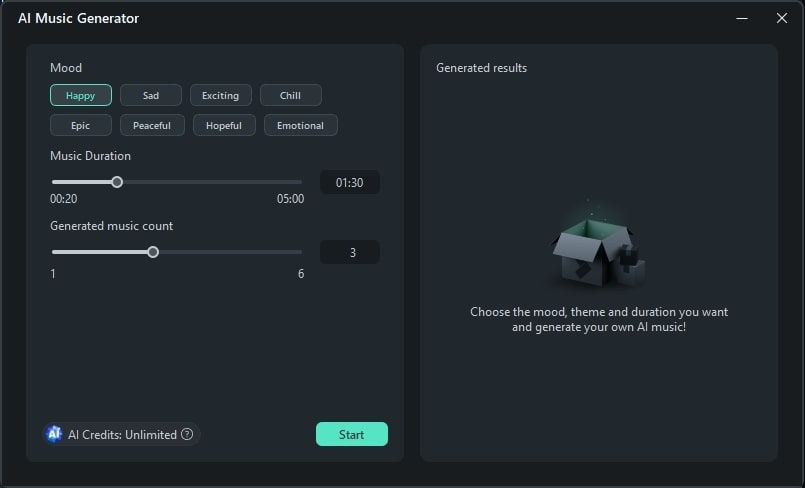
2. AI Music Generator
Sometimes, we get tired of searching for music that perfectly aligns with our video content. In such cases, AI music generator saves us by providing the music we want. It offers you many options to choose from different genres and styles. You can set the music duration and number of tracks you want to generate. Then, you can make manual adjustments like balancing sound and auto normalization.
3. AI Image
Similar to text-to-video, Filmora can generate images from text. To do so, just describe your imagination in simple words. Then, you are asked to pick one resolution from given options. You can use the generated images in your projects directly. It allows you to generate an image from your chosen style. A few of the styles include Freestyle, Cyberpunk, and Futuristic.

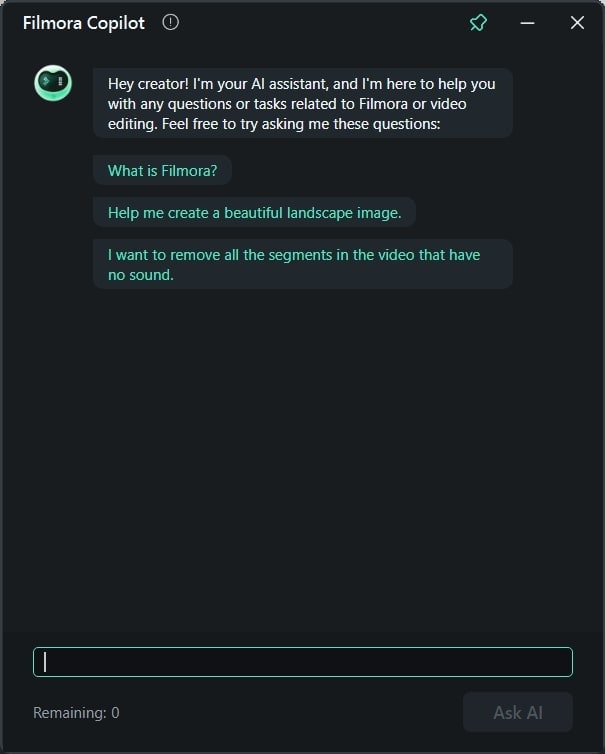
4. AI Copilot Editing
While editing projects, humans often require suggestions or assistance. For this purpose, Filmora provides you with AI Copilot as your personal AI assistant. It will prevent errors in your editing by sending error messages. You can get the best editing solution as per your needs. This way, the quality of your project gets increased.
5. AI Vocal Remover
With advanced algorithms, it is an exceptional feature of Filmora. It relieves your breath by removing unwanted vocals from your audio or video. You can now completely remove vocal sounds from the video and add your recorded ones. It’s an automated process that separates voice and background in the media panel.

Steps To Remove Background Using Two Unique Ways with Wondershare Filmora
Filmora is one of the easiest tools to operate that anyone can use to get desired results. It allows users to approach the same features in different ways. Similarly, there are two unique ways to remove or change the sky Photoshop background, which are given below.
Free Download For Win 7 or later(64-bit)
Free Download For macOS 10.14 or later
Method 1: Using Chroma Key
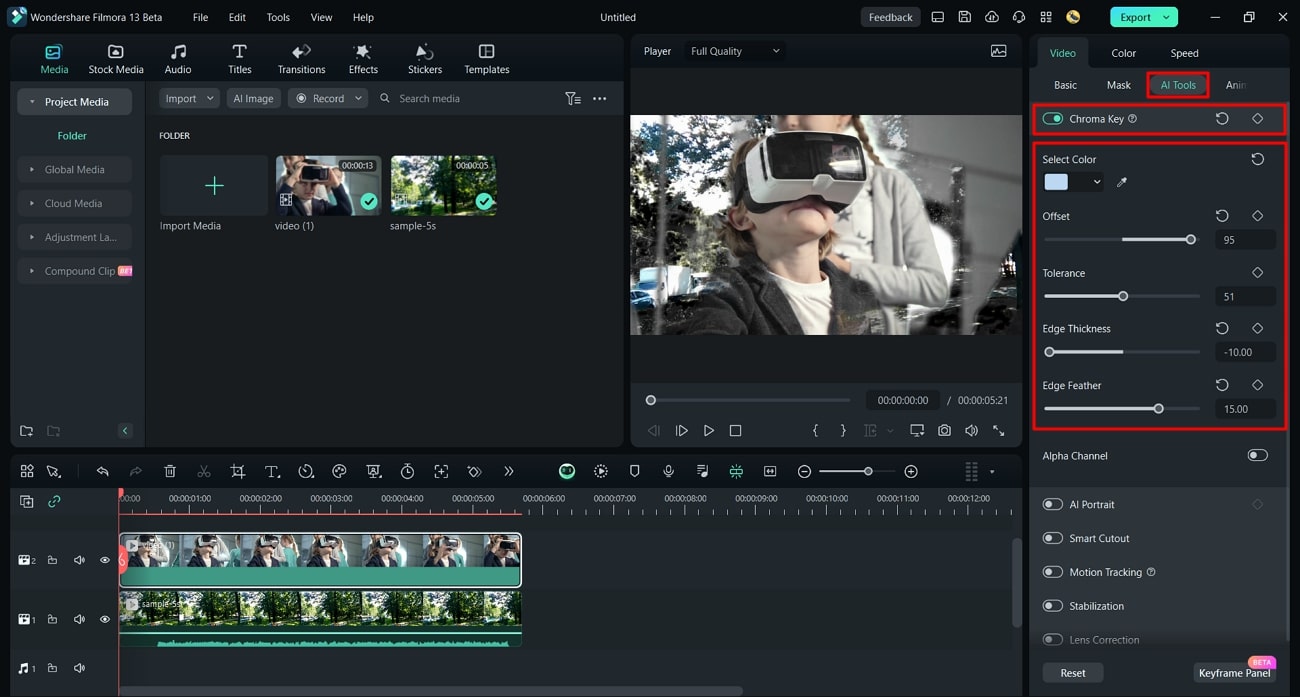
Step 1: Start your project in Filmora and import two files in the timeline. Bring the background clip first in the timeline, then the original file. Cut the unnecessary portion of background-clip.

Step 2: Keep them selected and come to the “AI Tools” option in the right-side panel. Enable the “Chroma Key” toggle, and AI will automatically replace the background. You can use the “Tolerance,” “Edge Thickness,” and “Edge Feather” sliders for manual changes.
Method 2: Through AI Portrait
Step 1: Import your background clip and main video in Filmora 13. Place the background clip on track 1 and the main clip on the 2nd track in the timeline.

Step 2: Hold both of them and head to the right-side panel. Press the “AI Tools” option and scroll to access the “AI Portrait.” Enable that option, and your background will automatically change with AI. Now, you can make manual changes by moving the “Edge Thickness” and “Feather” sliders.

Conclusion
To wrap up, let’s say that Sky Photoshop sets the right tone for your media with landscapes. On the other hand, this feature might prove difficult for some users to handle. Thus, they can rely on Wondershare Filmora for convenience. Beginners and professionals can benefit from its extraordinary features in video editing.
Free Download Free Download Learn More

Part 1: How Good Has Photoshop Been in Helping Users Make Crisp Pictures and Media?
Adobe Photoshop is a graphics editor tool designed for professional digital art. It is widely used to grow business through designing virtual backgrounds and graphics. You can adjust the subject’s features and poses to make perfect portraits. To transform letters into artistic expressions, it offers Photoshop brushes and paints. Users can collaborate with their teammates and share work for approvals with this tool.
Key Features To Look Out In Adobe Photoshop
This tool can accelerate workflow with its latest features. It allows you to expand, add, and remove content from images with high-quality results. The following are some key features of Photoshop for your better understanding of this tool:
- It offers a sky replacement Photoshop feature that can change the sky from captured images.
- You can remove and replace your background in Photoshop and refine it as required.
- With the remove object feature, users can erase unwanted objects from images.
- Use the “Colorize” feature and make your black-and-white images colorful.
- Enhance workflow by using “Layer” masking that hides part of images without erasing them.
Part 2: A Detailed Guide on How to Replace Sky Background in Photoshop?
With AI integration in Adobe Photoshop, you can change skies with simple clicks. It provides a collection of skies from the Blue Skies, Spectacular, and sunset categories. Also, users can import any sky from their gallery or download one from presets. To do so, let us show you how to change the sky in Photoshop in given steps:
Step 1: Bring your desired image to the Adobe Photoshop. Head to the top toolbar and click the “Edit” option next to the “File.” Look for the “Sky Replacement” option from the list.

Step 2: After tapping “Sky Replacement,” you will get a respective screen on your front. Press the downward symbol next to the “Sky” and pick one sky from available options.

Step 3: Alternatively, you can hit the “+” icon and browse the sky image from your system. When you choose one, it gets added to the existing sky list. Select that and tap the “OK” button to apply changes in your media.

Part 3: An Alternative Solution: Wondershare Filmora Providing Workability with Easy Background Replacement
Changing sky in Photoshop is difficult for beginners and requires a basic skill set. It may take a lot of your time to understand its functionalities. That’s why choosing a tool with simple operation and high-quality output is important. In this regard, you should use Wondershare Filmora as a better option for everyone. It is a video editor that offers a variety of powerful features.
Using this tool, you can remove and change the background from your images or videos. With the integration of AI, it can automatically detect the object and foreground.
Other Prominent Video Editing Features
Apart from changing background, Filmora can perform A to Z video editing tasks. Let’s explore some of the key features to overview its fruitful functionalities:
Free Download For Win 7 or later(64-bit)
Free Download For macOS 10.14 or later
1. AI Text-to-Video
Who needs a camera and crew when you can effortlessly generate video from text? Filmora can transform your text into an engaging storytelling video with just text prompts. After getting the video, you can customize the video’s appearance with fonts, styles, and colors. Users can add smooth transitions between text elements for a cohesive flow.

2. AI Music Generator
Sometimes, we get tired of searching for music that perfectly aligns with our video content. In such cases, AI music generator saves us by providing the music we want. It offers you many options to choose from different genres and styles. You can set the music duration and number of tracks you want to generate. Then, you can make manual adjustments like balancing sound and auto normalization.

3. AI Image
Similar to text-to-video, Filmora can generate images from text. To do so, just describe your imagination in simple words. Then, you are asked to pick one resolution from given options. You can use the generated images in your projects directly. It allows you to generate an image from your chosen style. A few of the styles include Freestyle, Cyberpunk, and Futuristic.

4. AI Copilot Editing
While editing projects, humans often require suggestions or assistance. For this purpose, Filmora provides you with AI Copilot as your personal AI assistant. It will prevent errors in your editing by sending error messages. You can get the best editing solution as per your needs. This way, the quality of your project gets increased.

5. AI Vocal Remover
With advanced algorithms, it is an exceptional feature of Filmora. It relieves your breath by removing unwanted vocals from your audio or video. You can now completely remove vocal sounds from the video and add your recorded ones. It’s an automated process that separates voice and background in the media panel.

Steps To Remove Background Using Two Unique Ways with Wondershare Filmora
Filmora is one of the easiest tools to operate that anyone can use to get desired results. It allows users to approach the same features in different ways. Similarly, there are two unique ways to remove or change the sky Photoshop background, which are given below.
Free Download For Win 7 or later(64-bit)
Free Download For macOS 10.14 or later
Method 1: Using Chroma Key
Step 1: Start your project in Filmora and import two files in the timeline. Bring the background clip first in the timeline, then the original file. Cut the unnecessary portion of background-clip.

Step 2: Keep them selected and come to the “AI Tools” option in the right-side panel. Enable the “Chroma Key” toggle, and AI will automatically replace the background. You can use the “Tolerance,” “Edge Thickness,” and “Edge Feather” sliders for manual changes.

Method 2: Through AI Portrait
Step 1: Import your background clip and main video in Filmora 13. Place the background clip on track 1 and the main clip on the 2nd track in the timeline.

Step 2: Hold both of them and head to the right-side panel. Press the “AI Tools” option and scroll to access the “AI Portrait.” Enable that option, and your background will automatically change with AI. Now, you can make manual changes by moving the “Edge Thickness” and “Feather” sliders.

Conclusion
To wrap up, let’s say that Sky Photoshop sets the right tone for your media with landscapes. On the other hand, this feature might prove difficult for some users to handle. Thus, they can rely on Wondershare Filmora for convenience. Beginners and professionals can benefit from its extraordinary features in video editing.
Also read:
- New In 2024, How to Create a Slideshow with Icecream Slideshow Maker
- New Learn How to Create Inspiring Motivational Videos Using AI. Explore Tools Like Midjourney, Runway Gen2, Chat-GPT, and Filmora AI for Seamless Content Creation. Start Your Journey
- Updated In 2024, Quick Answer What Is a GIF File?
- Updated 2024 Approved How To Create 3D Text In Video
- Updated Ways to Make Sure Your Recording Slideshow in Powerpoint Is Not Wrong for 2024
- New 2024 Approved How to Make Discord GIF PFP? Solved
- New Do You Want to Learn How to Use Premiere Pro Distortion Effects in Your Videos? We Have Provided a List of Distortion Premiere Pro Effects and How to Use Them
- MP3 CUTTER DOWNLOADMP3 Cutter Download Is One of the Most Reliable Tools for Editing of Music Files in a Fast and Friendly Way for 2024
- New 2024 Approved 15 Must-Use Gifs Editors
- Updated In 2024, Basic Introduction of LumaFusion Color Grading
- In 2024, You Can Match Paint Colors From Pictures for Your Wall, as Well as for Your Videos. And to Know How to Do Both, We Have Laid Down the Following Discussion
- 2024 Approved 4 Ways to Merge MP4 and MP3
- In 2024, Best Video Format Converter for PC and Online
- Updated Looking for the Best Alternatives of iPad Compatible Slideshow Applications to Design High End Graphic Presentations? Rest Assured, You Have Landed at the Correct Spot
- Updated Do You Want to Stream and Record at the Same Time but Cant Find an Easy Solution? This Guide Will Help You Get This Done Using Three Easy-to-Follow Methods
- In 2024, Top 10 Picks for Flawless Slow Motion Video Generation
- New 5 Ways to Denoise a Video for 2024
- Updated 5 Methods to Denoise a Video for 2024
- New In 2024, Working Out All Important Details of Slowing Down Video in After Effects
- New 2024 Approved Best Text Animations In After Effects
- New Do You Want to Record Videos with a Phantom High-Speed Camera? In This Guide, You Can Get a Detailed Note on the Phantom Camera
- New Final Cut Pro for iPad- Is It Available?
- 2024 Approved Getting To Know More About the Video Editing Interface of Wondershare Filmora
- New In 2024, How to Crop Videos in Windows Media Player
- Updated The Premiere Pro Video Templates Help Make Original Content of Broadcast Quality. The Article Introduces 10 Free Premiere Pro Templates that Are Sure to Make Your Life Easy
- 2024 Approved How To Quick Guide for Creating Google Slideshows
- New How to Add Echo Effect to Video
- 2024 Approved Looking Forward to Making up Your Career in Video Editing? Land in Here to Learn About the Credibility of some Popular Video Editing Courses
- Updated Top 5 Tools to Help You Know More Freeze-Frame Video Editing Skills
- New Hitfilm Express Video Editor Review for 2024
- How To Transfer Data From iPhone 15 To Other iPhone 13 devices? | Dr.fone
- Android Screen Stuck General Itel S23 Partly Screen Unresponsive | Dr.fone
- How to Transfer Music from Realme 11 Pro+ to iPod | Dr.fone
- Bypassing Google Account With vnROM Bypass For Infinix Smart 7
- New Top 10 Free Video Translators to Mitigate Translation Risks for 2024
- Will the iPogo Get You Banned and How to Solve It On Motorola G54 5G | Dr.fone
- How to Repair Broken video files of Nokia C02?
- Unlocking the Power of Smart Lock A Beginners Guide for Infinix Hot 30 5G Users
- How to Rescue Lost Contacts from HTC U23?
- New 2024 Approved The Most Straightforward Guide to Learning How to Clone Your Voice
- How to Unlock iCloud lock on your iPhone 12 and iPad?
- Undelete lost call logs from Motorola Edge+ (2023)
- How to Downgrade Apple iPhone 14 Pro without Losing Any Data? | Dr.fone
- Top 15 Apps To Hack WiFi Password On Vivo Y55s 5G (2023)
- In 2024, How to Use Pokémon Emerald Master Ball Cheat On Tecno Pova 5 Pro | Dr.fone
- How to Track Sony Xperia 5 V by Phone Number | Dr.fone
- Reasons for Samsung Galaxy A23 5G Stuck on Boot Screen and Ways To Fix Them | Dr.fone
- Will the iPogo Get You Banned and How to Solve It On Xiaomi Redmi Note 12 Pro 5G | Dr.fone
- In 2024, A Comprehensive Guide to Apple iPhone 13 Blacklist Removal Tips and Tools
- Apple iPhone 11 Pro Screen Mirroring You Must Know | Dr.fone
- Title: In 2024, Learn How to Use 3D Camera Tracking in Adobe After Effects and Take Your Skills to the Next Level
- Author: Chloe
- Created at : 2024-04-24 07:08:21
- Updated at : 2024-04-25 07:08:21
- Link: https://ai-editing-video.techidaily.com/in-2024-learn-how-to-use-3d-camera-tracking-in-adobe-after-effects-and-take-your-skills-to-the-next-level/
- License: This work is licensed under CC BY-NC-SA 4.0.

