
In 2024, Learn to Create Custom Sequence Presets in Premiere Pro for Efficient Video Editing. Ensure Consistency and Speed up Your Workflow with Personalized Settings

Learn to Create Custom Sequence Presets in Premiere Pro for Efficient Video Editing. Ensure Consistency and Speed up Your Workflow with Personalized Settings
You’ve probably heard of Adobe Premiere Pro – it’s a top-tier video editing software that’s widely recognized in the market. But have you delved into the nitty-gritty of sequence presets? A custom sequence preset is your best friend for maintaining consistency across projects.
It allows users to save specific settings for sequence attributes like frame rate, resolution, and audio settings. Instead of reconfiguring these settings for each new project, a custom sequence preset lets you jump right into editing. Now, how do you create one? Keep reading!
Part 1: How to Create a Custom Sequence in Premiere Pro
Creating a custom sequence is like tailoring a shirt to fit you perfectly. Here’s a step-by-step guide to help you do just that:
Step 1: Displays the New Sequence Window
Begin by launching Adobe Premiere Pro. Once opened, navigate to the top menu and select File > New > Sequence. This will open up the New Sequence window, where all the magic happens!
Step 2: Change the Editing Mode to Custom in the Settings Panel
You’ll see several tabs in the New Sequence window, but we will focus on the “Settings” tab for our purposes. Click on it.
Here, you’ll find the ‘Editing Mode’ dropdown menu. By default, it’s set to a specific format like ‘DSLR’ or ‘AVCHD.’ Change this to ‘Custom.’ This will unlock a plethora of options for you to play with.
Deep Dive into Settings:
- Frame Size: Define your video’s width and height. Remember, 1920x1080 is Full HD, and 3840x2160 is 4K. Choose based on your project needs.
- Frame Rate: 24fps is the cinematic standard, but if you’re creating content for TV or web, 30fps or 60fps might be more suitable.
- Pixel Aspect Ratio: Stick with ‘Square Pixels’ unless you have a specific reason to do otherwise.
- Fields: Choose ‘No Fields’ for progressive footage. If you’re unsure, this is a safe bet.
- Audio Settings: Here, you can configure the sample rate, among other things. 48000Hz is standard for video.
Step 3: Give the New Preset a Name and Save It
Once you’ve customized the settings to your satisfaction, it’s time to save this configuration for future use. At the bottom of the New Sequence window, you’ll see a ‘Save Preset’ button. Click on it.
A pop-up window will show up, requesting you to provide a name for your new preset. Choose something descriptive so you can easily recognize it later. Once named, click ‘OK’.
Your custom sequence preset is now saved and will appear under the ‘Custom’ folder in the ‘Sequence Presets’ tab.
Part 2: Why Custom Sequence Presets are Essential for Efficient Editing
As you delve deeper into video editing, you’ll begin to appreciate the little things that shave off minutes from your workflow, allowing you to dedicate more time to the creative process. This is precisely where the utility of custom sequence presets in Premiere Pro comes into play. But why are these presets so crucial?
- Consistency Across Projects: If you’re managing multiple projects or a series of videos, having a standard format ensures that all your content has a uniform look and feel. Consistency is a hallmark of professional-grade content. It’s not just about the visuals – maintaining a uniform audio quality and format is equally significant. With a preset, you no longer need to remember the minutiae of each setting, ensuring consistency effortlessly.
- Speed Up Your Workflow: Every minute you spend adjusting the sequence settings is a minute less you have for cutting, color correcting, audio mixing, or adding those special effects that make your videos pop. Over time, those minutes can add up to hours. By using a custom sequence preset, you can jump straight into the creative part of editing without the preliminary setup.
- Avoid Common Mistakes: Have you ever rendered an entire project only to find that the frame rate was off or the audio was set to the wrong sample rate? These kinds of errors can occur when setting up a new sequence from scratch each time. By relying on a preset, you mitigate the risks of such oversights.
- Personalized Templates for Different Platforms: Different platforms may have varying preferred settings. For instance, the ideal video format for YouTube might differ from that of Instagram or TikTok. Instead of Googling these settings each time, you can have a custom sequence preset ready for each platform, ensuring your content is optimized wherever it’s destined.
- Ease of Collaboration: If you’re working as part of a team, having standard sequence presets ensures everyone is on the same page. This is particularly handy when multiple editors are working on different segments of the same project. With custom presets, you’re not just aligning sequences but also visions.
Incorporating this practice into your editing routine might initially seem trivial, but its benefits compound with time.
Part 3: Summary
Creating a custom sequence preset in Adobe Premiere Pro isn’t just about streamlining your workflow – it’s about ensuring consistency across your projects.
By saving your most-used settings, you’re creating a base template that can be pulled up any time, granting you more time for the creative process.
Adobe Premiere Pro’s interface is designed to make tasks like these intuitive, so even if you’re a beginner, with a bit of practice, you’ll be creating custom sequence presets like a pro.
How to Do Velocity Edits on PC
If you are wondering what is velocity edit? Well, velocity editing is a term used in music production and MIDI (Musical Instrument Digital Interface) programming. When we talk about the velocity edit app, “velocity” refers to the intensity or force with which a note is played on a MIDI instrument, such as a keyboard. Velocity in a velocity editor is a parameter that gives expression to a MIDI performance to make the music sound more dynamic and realistic.
Part1 Best 3 velocity edit softwares
There are many velocity edit apps available that you can use as your velocity video editor. However, not every velocity edit app comes with multiple features and an easy to use interface. We outline some of the best velocity editor apps that you can download to do your velocity edit online.
01 Filmora
Filmora is one of the best video editing software. You can use it to create, edit, and produce videos with a variety of features such as trimming, cropping, adding music, transitions, and special effects.
Filmora also has velocity editing option, which is a control feature within the software. Velocity editing, in this case, involves manipulating the playback speed of a video clip or a portion of a clip. You can use Filmora as your velocity app edit to speed up, slow down, or reverse clips to achieve different creative effects and to enhance the storytelling of your video.
Filmora offers a suite of video editing capabilities if you are a content creator. These features include Keyframing, Split Screen, and Motion Tracking, as well as user-friendly tools such as Instant Model, Preset Templates, and Auto Beat Sync for seamless editing.
Great lifetime price deals
Fast rendering of videos
Supports multiple file formats
Screen recording is available
Monthly plans are expensive
02 Final Cut
Final Cut is a professional video editing software that is used by filmmakers, video editors, and content creators for editing movies, TV shows, and various other types of video content. You can use it to add effects and transitions, and for color grading and correction. Final Cut also has built-in tools for editing and enhancing audio within the software.
However, Final Cut Pro is for the high-end users who produce videos on a large scale. Similarly, the hardware requirements for Final Cut Pro are big and you need a Mac to use Final Cut Pro. If your system is running on Windows 10, or Linux, you can’t use the software.
Fast performance
Supports 360-degree footage
No mobile app
A one-time purchase required
03 Capcut
CapCut is a free, all-in-one velocity edit maker app for mobile video editing. CapCut is user-friendly and comes with a variety of velocity edit online features that make it suitable for creating short videos, especially for social media platforms. The intuitive graphical user interface makes it easier for users to use Capcut as a velocity editor.
Rich copyrighted content which is free to use.
A library of built-in templates.
Available in multiple languages
Advanced color grading tools are not well enough.
Does not support higher frame rate than 60 FPS.
Part2 How to do velocity edit in filmora?
AI velocity edit For Win 7 or later(64-bit)
AI velocity edit For macOS 10.14 or later
- Open Filmora and create a new project.
- Import the video clip you want to edit into the media library.
- Drag and drop the video clip onto the timeline.
- Right-click on the video clip in the timeline and select “Speed” and choose “Speed Ramping.”
- In the speed settings window, choose “Customize” and make changes to the speed by entering a speed multiplier or using the slider.
- Preview the edit to see if it achieves the desired effect and make further adjustments as needed.
- Once done with the velocity edit, export the video by clicking on the “Export” button, choosing the desired format and settings.
Conclusion
When it comes to video editing, velocity editing is a popular feature that content creators use frequently. A velocity editor lets you manipulate the speed and rhythm of video clips to create dynamic and engaging content. Various velocity edit apps have surfaced that offer a range of tools and features to enhance the video editing process. You can use these applications to alter the video velocity, create slow-motion effects, speed up scenes, or even reverse clips to suit the narrative flow of the content.
Choosing the right velocity edit maker helps you achieve the desired output in video projects, and there are many velocity app edit tools available online. Some applications like Filmora even offer the convenience of velocity edit online so that you can make quick adjustments to your videos without the need for extensive software installations. Fimora gives you the flexibility and accessibility of velocity editing, which makes it one of the best velocity editor tools for a streamlined and efficient editing process.
100+ Best TikTok Captions: Enhance Your Content
- Part 2: Creative Stimulation: A Comprehensive Inventory of Popular Titles on TikTok in 2024
- Part 3: Automatically Generate TikTok Captions using Filmora’s AI Copywriting Feature
- Part 4: Summary
Part 1: Why Videos Posted on TikTok Need a Catchy Title
Every TikTok creator, from amateur to influencer, will tell you that a caption isn’t just a few characters beneath your video; it’s the cherry on top of your content sundae. Let’s break down why:
- First Impressions Count: TikTok videos autoplay, but captions immediately catch the eye. A clever, concise caption can convince viewers to stay, engage, or share.
- Sets the Mood: Your video might be enigmatic or ambiguous. A caption gives it context. Whether you’re aiming for humor, poignancy, or sheer absurdity, the caption anchors your content.
- Boosts Discoverability: Strategic keywords in captions can make your videos more discoverable, especially as users search for specific content on TikTok.
- It’s Your Brand’s Voice: Established TikTokers have a recognizable style. Your captions can become a part of your brand’s unique voice, making you distinguishable in a sea of creators.
Part 2: Creative Stimulation: A Comprehensive Inventory of Popular Titles on TikTok in 2024
Captions aren’t just about information but about flair, wit, and personality. As TikTok evolves, so do the trends in captions. Let’s dive into some categories that are making waves this year:
TikTok Captions for Couples
- “With you, every moment is a duet 🎶”
- “Couple goals or just today’s blooper reel?”
- “He’s my favorite notification ❤️”
- “Love’s newest trendsetters 👫”
- “Two peas, one viral pod.”
- We found our perfect harmony on TikTok 🎵”
- “Dance partners for life, one TikTok at a time 💃🕺”
- “Our love story in 15-second clips 💖”
- “Capturing our love, one TikTok at a time 📸”
- “Making memories in the form of TikToks 📽️”
- “From duets to ‘I do.’ TikTok brought us together 💍”
- “Living for the trending dances and loving each other 💃❤️🕺”
- “Swipe right for our love story on TikTok ❤️”
- “Our love’s playlist: viral TikToks and sweet moments 🎥”
- “Our love shines brighter than any filter on TikTok ✨”
- “They say love is a dance. Ours is a TikTok routine 💃🕺”
- “Can’t stop the beat of our love on TikTok 🎶”
- “We’re the stars of our own TikTok romance 🌟”
- “Our hearts sync better than our choreography on TikTok 💖”
- “He’s my favorite co-star in this TikTok love story 🌟”
TikTok Captions for Friends
- “Real friends don’t let you do TikToks alone.”
- “Duo trouble. Double the fun 🎉”
- “Friendship goals, one TikTok at a time.”
- “Partners in crime and rhyme!”
- “Viral together, pals forever.”
- “Making TikToks with your bestie: 100% certified fun 🌟”
- “Double trouble, twice the laughter 😂✌️”
- “When life gives you friends, make TikToks 🎥”
- “Tag your partner in TikTok crime! 👯♂️👯♀️”
- “Filling TikTok with friendship vibes and good times 🌈”
- “Our friendship is the trending challenge we never want to end 💫”
- “Friendship + TikTok = Unstoppable duo 💥”
- “Creating TikToks that define #FriendshipGoals 🙌”
- “Friendship blooms, one TikTok dance move at a time 💃👭”
- “When the beat drops, we groove together! 🎶💃”
- “Our friendship is the real TikTok algorithm: always in sync 🔄”
- “Making memories, one TikTok dance at a time 🕺💖”
- “Friends who TikTok together, stick together 🤝”
- “Our friendship is the filter that makes life look better on TikTok ✨”
- “Shenanigans and dances with my favorite TikTok buddy! 🤪🕺”
Cool TikTok Captions
- Coolness level: Expert TikToker 😏”
- “Dropping coolness like beats in a TikTok track 🎶”
- “Living the TikTok dream, one swipe at a time 👻”
- “Chillin’ on TikTok like it’s second nature 🕶️”
- “Ice-cold moves in a world set ablaze 🔥”
- “TikTok vibes: Ice-cold, no melting allowed ❄️”
- “Cooler than the flip side of the TikTok pillow 😎”
- “Defying gravity with my TikTok cool factor 🚀”
- “When in doubt, TikTok it out with style 😏”
- “Raising the coolness quotient with every TikTok move 💯”
- “Cool kids make cool TikToks, and that’s a fact 🌟”
- “In a world of TikToks, be the coolest creator 🌍”
- “Cool, calm, and TikTok-collected 🎥✌️”
- “Living the TikTok life, one cool video at a time 🎬”
- “Keeping it cool and classy in the TikTok universe 🎩👌”
- “Cooler than a cucumber, even when the camera’s rolling 🥒”
- “TikTok: Where coolness finds its true stage 🌠”
- “Cool moves, hot content. TikTok game strong 🔥”
- “Embrace the coolness, TikTok is our canvas 🎨”
- “Coolness is an attitude, and my attitude is TikTok-fueled 😎”
Funny TikTok Captions
- “My dance moves: better than my cooking skills. Sorry, not sorry. 💃🍳”
- “Attempting to TikTok, but mostly just tripping over my own feet. 🙈”
- “I’m not clumsy, just testing gravity… a lot. 😂🌍”
- “Dancing like nobody’s watching, especially because I kicked the tripod. 🕺💥”
- “My TikToks are 10% talent, 90% pretending I know what I’m doing. 🤷♂️”
- “Making TikToks: Because embarrassing myself in person isn’t enough. 😜”
- “When life gives you lemons, make a funny TikTok. 🍋😂”
- “Dancing like nobody’s business, except TikTok’s. 🕺💼”
- “Overthinking my TikTok dances like they’re complex math problems. 🤔📚”
- “Pro tip: If in doubt, do the floss dance. It solves everything. 🦷💃”
- “Just a TikToker trapped in a human body. Send help! 🆘🤖”
- “My TikToks are like life: a mix of chaos and laughter. 🤪🎉”
- “Making faces in the mirror like I’m preparing for a TikTok masterpiece. 🤪😜”
- “Dancing to the beat of my own awkwardness. 🎶💃”
- “TikToking: The only time my ‘cool moves’ meet reality. 😎🤦”
- “Trying to dance like a TikTok star, ending up like a TikTok blooper reel. 🌟🙈”
- “Caution: May spontaneously burst into dance at any given moment. 🚀💃”
- “When TikTok dances look easier than they are… and I prove it. 🙌🕺”
- “If, at first, you don’t succeed on TikTok, laugh at yourself and try again. 😂🔄”
- “TikTok: Where ‘trending’ and ‘tripping’ have the same starting letter for a reason. 🤣🚶♂️”
Captions are more than just add-ons. They’re a part of the content’s DNA, influencing virality and engagement. The above lists are just a teaser. With so much potential, the right caption can be the difference between a few views and a few million. Stay tuned as we explore more on this topic!
Part 3: Automatically Generate TikTok Captions using Filmora’s AI Copywriting Feature
In the ever-evolving world of content creation, tech tools can be a creator’s best friend. With the overwhelming demand for frequent and catchy content, wouldn’t it be a game-changer if an AI could whip up the perfect TikTok caption for you? Enter Filmora’s AI Copywriting feature!
Create AI Captions For Win 7 or later(64-bit)
Create AI Captions For macOS 10.14 or later
Step 1: Download Filmora and Find the AI Copywriting Feature
Filmora, widely recognized for its video editing prowess, has now integrated an AI-powered copywriting feature. After downloading Filmora, navigate to the ‘Tools’ menu. Among the list, you’ll find the “AI Copywriting” option. It’s user-friendly and intuitive, making it perfect for both beginners and seasoned TikTokers.
Step 2: Enter Your Video Information
Filmora’s AI requires a bit of information to generate a caption that resonates with your content and audience:
- Select the Type of Headlines and Language: Whether you want something witty, poignant, or a mix of both, there’s an option for every mood. Plus, with multi-language support, you can cater to global audiences.
- Enter Your Video Content Topic: Give the AI a brief description of your video. It could be as simple as “a dog chasing its tail” or more abstract like “the feeling of nostalgia at a childhood park.”
After inputting the required details, Filmora’s AI will churn out multiple caption suggestions. Choose the one that best fits or use them as inspiration to craft your unique spin.
Part 4: Summary
TikTok has transformed the world of short video content, and behind each viral video is a captivating caption that perfectly captures the moment’s essence. While understanding the importance of catchy titles is crucial, having the tools and insights to generate them consistently can set you apart from the crowd.
Whether you’re brainstorming creatively or seeking assistance from innovative tools like Filmora’s AI Copywriting feature, remember that your caption is the gateway to engagement. Harness its power, and watch your TikTok presence soar!
How to Create Liquid Water Reveal Intro?
Introduction to any video content should be short, crisp, and impressive simultaneously. Hence, video content creators look for the best techniques to create fantastic introduction effects. Wondershare Filmora is the leading video editor equipped with built-in editing features with more than 200 instant modes and preset templates.
With more than 10+ billion stock media, plugin effects, advanced editing functions, etc., it is the first choice of many content creators. Wondershare Filmora comes with a built-in installer that can be quickly downloaded from the official website . Beginners and professionals can start using this creative video editing tool to make videos for personal and professional purposes.
Out of all the amazing effects available in this editing tool, it is easy to go with the liquid water reveal intro effect. It offers unique and engaging video content. Let us understand the detailed steps to create this effect in your next video easily and quickly.

Steps to create liquid water reveal intro
Wondershare Filmora offers multiple advanced capabilities to content creators. There are multiple options when it comes to creating impressive introductions. Let us explore the liquid water text reveal intro option in this section. We’ve bifurcated the different steps for quick understanding of our readers in an easy and effective way.
Free Download For Win 7 or later(64-bit)
Free Download For macOS 10.14 or later
Step1Launching Wondershare Filmora
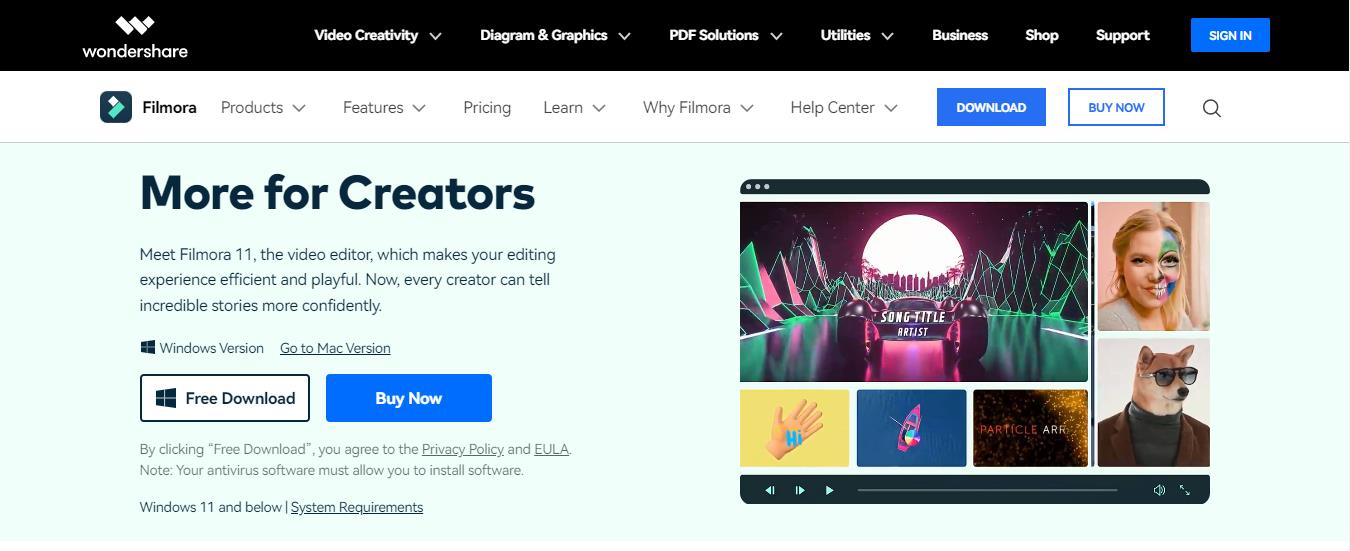
Before starting to edit the videos with the liquid water text reveal intro, it is necessary to download, install, and launch Wondershare Filmora. It is dedicated software that can be used for Windows or Mac devices. All you need to do is go to the official website of Wondershare Filmora and start the downloading process. The quick steps for the same are:
- Go to the official website of Wondershare Filmora on your Windows or Mac device.
- Select the Windows or Mac version according to your available device.
- Next, locate the “Free Download” button on the official website. It is located on the left side of the web page. It is easy to select the version type and initiate the download process.
- Once downloaded, the Wondershare Filmora Installer package will be available on your device.
- All you need to do is double-click on the installer package and start the installation process.
- Press yes for all the pop-ups initiated, including the “Agree” on the terms and conditions pop-up.
- The installation process will start quickly.
- Once completed, Wondershare Filmora will start and run automatically on your device.
Step2Importing and select the stock video
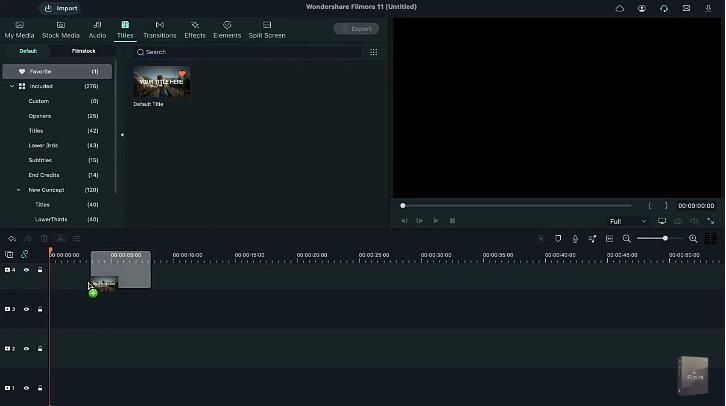
Once Wondershare Filmora is running on your system, you can start by importing and selecting the stock video. The quick steps for the same are:
- It is easy to download the stock video from any available source.
- Now, import the stock video from the source to the Wondershare Filmora.
- Locate the “Titles” option in the menu bar located next to the “Audio” option.
- Then, drop the default title on track two.
Step3Entering the text
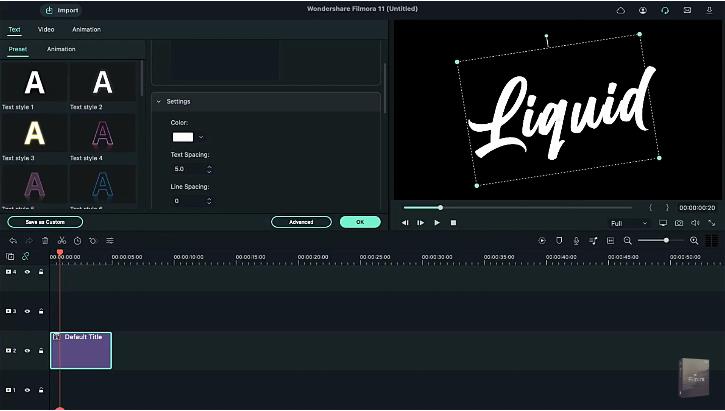
After the successful uploading of the stock video, it is time to add text to the intro. In this step, you can change the font style, and font size, and maintain the text spacing. The quick steps for the same are:
- Start by double-clicking on the default title.
- Enter the text in the space provided, e.g., here, we’ve entered “Liquid.”
- Start text editing by changing the font to “Billion Dreams.”
- Now, change the font size to 250.
- Then, increase the text spacing by five.
- Last, you have to rotate the text according to the needs and align its position accordingly.
Step4Selecting the color
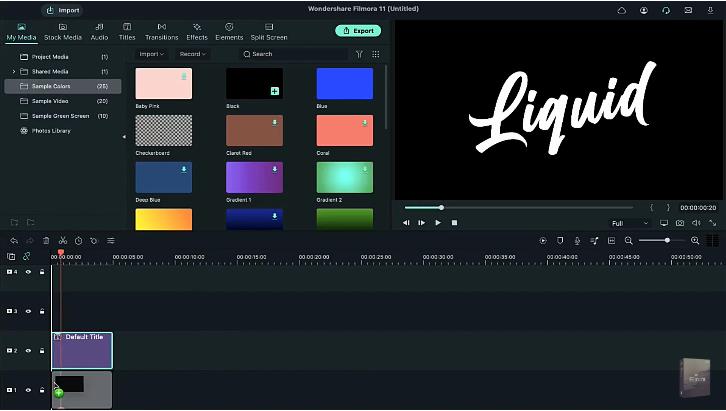
After making the text settings according to your liking or as required in the video, the next step is to select the color. It is easy to select it from the range of options available in the “Sample Color” menu of the tool. The quick steps for the same are:
- Go to the “My Media” option.
- Here, locate the “Sample Color” option and select it.
- Drop black color on track one and take a quick screenshot of it.
- Then, delete both these files from the timeline.
Step5Adding water effect
Now is the time to create the water text effect. It is located in the “Effects” section of Wondershare Filmora, along with numerous other options. You can select it by searching for it in the search bar. The quick steps for the same are:
- Drop the stock video on track one.
- Now, double-click on this video and bring it to half of the screen.
- Next, go to the “Effects” option.
- Search for “Water” and apply the water effect on track two.
- Lastly, extend the duration of this track.
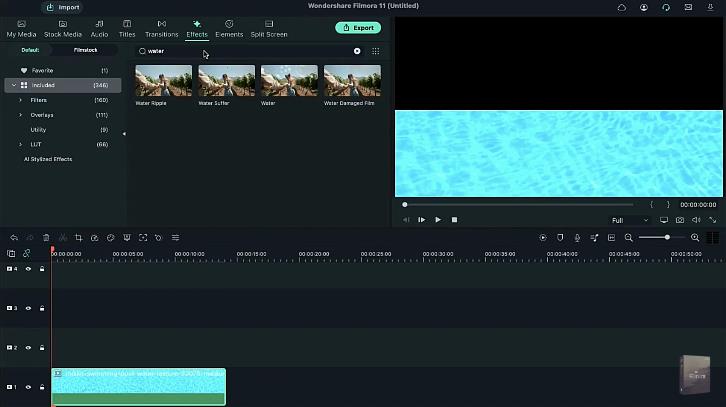
Step6Completing the water effect settings
After adding the water effect to the video, you can adjust the settings like “Emboss” and “Steps” for a realistic and creative feel. The quick steps to complete the water effect settings in the video are:
- Double-click on “Effects.”
- Increase the “Emboss” settings to 0.53.
- Decrease the “Steps” settings to seven.
- Press “OK” to apply changes.
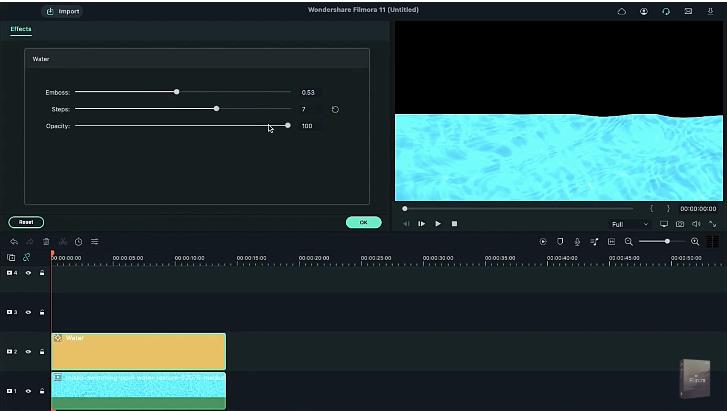
Step7Enabling the Chroma Key and other settings
Next, you have to enable the “Chroma Key” effect in the video. Further, the color pick logo and other settings are adjusted in this step only. The detailed steps for the same are:
- Go to “My Media.”
- Drop the screenshot on track three.
- Now, increase the duration of this track.
- Double-click on it and go to the “Videos” section.
- Locate the “Chroma Key (Green Screen)” effect and enable it.
- Go to the color pick logo and select the white color from the previous screen.
- Reduce the “Edge Thickness” to negative 3.3
- Reduce the “Edge Feather” to 1.1
- Press “OK” to apply these settings.
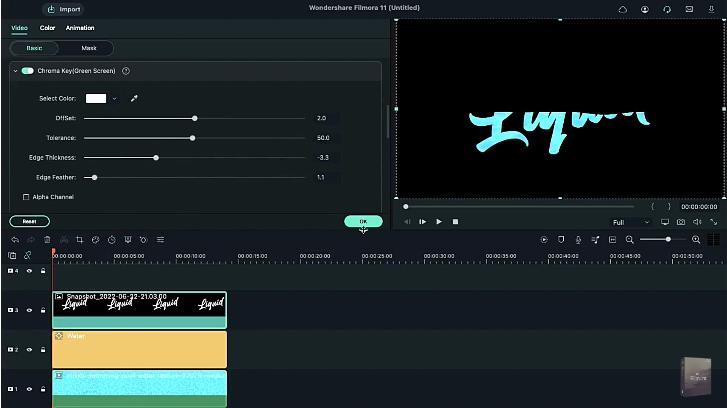
Step8Adding the stock video clip
The next step in the process of creating liquid water text reveal intro is to add the stock video clip. Here, you can adjust the clip position also. The quick steps for the same are:
- Start by selecting the stock video clip.
- Now, double-click on the stock video clip.
- Open the “Videos” option.
- Next, change the “Y” axis position and drag the clip out of the text.
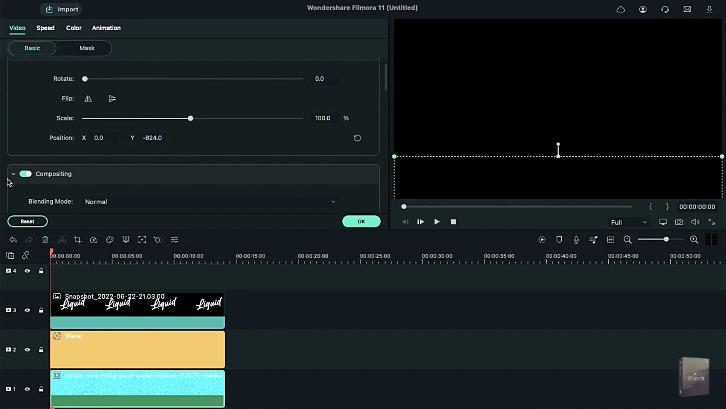
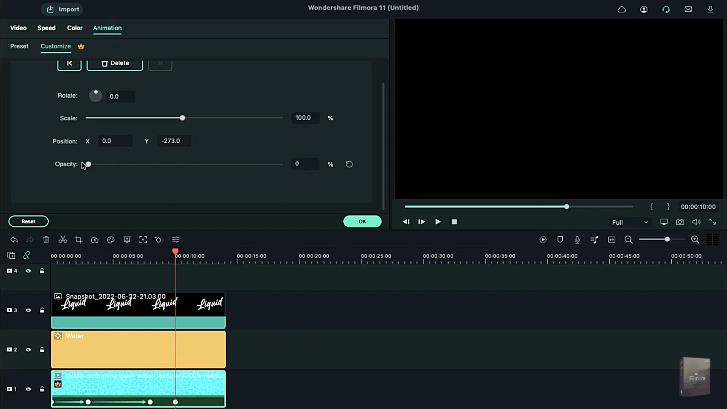
Step9Adding keyframes and adjusting playheads
Next, you have to add the keyframes and adjust the playheads in the video. In this step, it is easy to add the keyframes from the “Animations” option in Wondershare Filmora. The stock video is incorporated in this step, and playheads are added accordingly. Further, all the clips are made uniform in this step only. The quick steps for completing these features are:
- Start by opening the “Animations” tab.
- Go to the “Add” option to add a keyframe.
- Now, place the playhead at the three seconds position on the timeline.
- Then, bring the stock video to half of the text.
- Next, place the playhead in the eight seconds position and fill the text with the stock footage at the end.
- Again, place playhead but now at the ten seconds position.
- Locate the “Opacity” option and decrease it to zero.
- Last but not least, reduce all clips’ duration to ten seconds for uniformity.
Step10Previewing and export the video
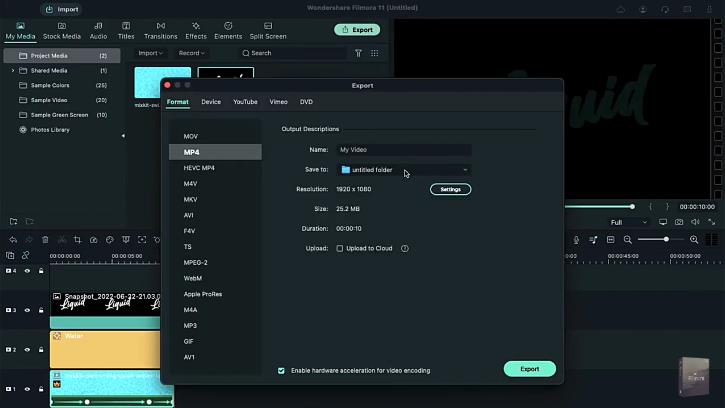
Once done with all the necessary effects and settings, it is time for a quick preview of the created video. The “Render Preview” option in the Wondershare Filmora offers a fast rendering of the made video to help users with a brief overview of the file. It reduces the preview lag, as observed in other tools due to the application of heavy effects and features. After previewing, you can quickly export the video. The quick steps for the same are:
- Click the “Render Preview” option.
- Go through the preview of the created file in detail. Check for any issues or changes required.
- Now, go to the “Export” option for quick exporting of the file with the liquid water text reveal intro.
So, you’re done with creating a liquid water text reveal intro in this way. It is easy to save these steps for quick future reference.
Wrapping Up
Hence, it is easy for Wondershare Filmora users to create liquid water reveal intro in their videos. All you need to do is quickly download and install Wondershare Filmora on your Windows or Mac devices. Once done, it will launch automatically on your system. Next, you can follow all the steps mentioned above one by one to incorporate liquid water text reveal intro in videos.
So, download Wondershare Filmora for your system right now and start creating professional-grade videos today!
Free Download For macOS 10.14 or later
Step1Launching Wondershare Filmora
Before starting to edit the videos with the liquid water text reveal intro, it is necessary to download, install, and launch Wondershare Filmora. It is dedicated software that can be used for Windows or Mac devices. All you need to do is go to the official website of Wondershare Filmora and start the downloading process. The quick steps for the same are:
- Go to the official website of Wondershare Filmora on your Windows or Mac device.
- Select the Windows or Mac version according to your available device.
- Next, locate the “Free Download” button on the official website. It is located on the left side of the web page. It is easy to select the version type and initiate the download process.
- Once downloaded, the Wondershare Filmora Installer package will be available on your device.
- All you need to do is double-click on the installer package and start the installation process.
- Press yes for all the pop-ups initiated, including the “Agree” on the terms and conditions pop-up.
- The installation process will start quickly.
- Once completed, Wondershare Filmora will start and run automatically on your device.

Step2Importing and select the stock video
Once Wondershare Filmora is running on your system, you can start by importing and selecting the stock video. The quick steps for the same are:
- It is easy to download the stock video from any available source.
- Now, import the stock video from the source to the Wondershare Filmora.
- Locate the “Titles” option in the menu bar located next to the “Audio” option.
- Then, drop the default title on track two.

Step3Entering the text
After the successful uploading of the stock video, it is time to add text to the intro. In this step, you can change the font style, and font size, and maintain the text spacing. The quick steps for the same are:
- Start by double-clicking on the default title.
- Enter the text in the space provided, e.g., here, we’ve entered “Liquid.”
- Start text editing by changing the font to “Billion Dreams.”
- Now, change the font size to 250.
- Then, increase the text spacing by five.
- Last, you have to rotate the text according to the needs and align its position accordingly.

Step4Selecting the color
After making the text settings according to your liking or as required in the video, the next step is to select the color. It is easy to select it from the range of options available in the “Sample Color” menu of the tool. The quick steps for the same are:
- Go to the “My Media” option.
- Here, locate the “Sample Color” option and select it.
- Drop black color on track one and take a quick screenshot of it.
- Then, delete both these files from the timeline.

Step5Adding water effect
Now is the time to create the water text effect. It is located in the “Effects” section of Wondershare Filmora, along with numerous other options. You can select it by searching for it in the search bar. The quick steps for the same are:
- Drop the stock video on track one.
- Now, double-click on this video and bring it to half of the screen.
- Next, go to the “Effects” option.
- Search for “Water” and apply the water effect on track two.
- Lastly, extend the duration of this track.

Step6Completing the water effect settings
After adding the water effect to the video, you can adjust the settings like “Emboss” and “Steps” for a realistic and creative feel. The quick steps to complete the water effect settings in the video are:
- Double-click on “Effects.”
- Increase the “Emboss” settings to 0.53.
- Decrease the “Steps” settings to seven.
- Press “OK” to apply changes.

Step7Enabling the Chroma Key and other settings
Next, you have to enable the “Chroma Key” effect in the video. Further, the color pick logo and other settings are adjusted in this step only. The detailed steps for the same are:
- Go to “My Media.”
- Drop the screenshot on track three.
- Now, increase the duration of this track.
- Double-click on it and go to the “Videos” section.
- Locate the “Chroma Key (Green Screen)” effect and enable it.
- Go to the color pick logo and select the white color from the previous screen.
- Reduce the “Edge Thickness” to negative 3.3
- Reduce the “Edge Feather” to 1.1
- Press “OK” to apply these settings.

Step8Adding the stock video clip
The next step in the process of creating liquid water text reveal intro is to add the stock video clip. Here, you can adjust the clip position also. The quick steps for the same are:
- Start by selecting the stock video clip.
- Now, double-click on the stock video clip.
- Open the “Videos” option.
- Next, change the “Y” axis position and drag the clip out of the text.

Step9Adding keyframes and adjusting playheads
Next, you have to add the keyframes and adjust the playheads in the video. In this step, it is easy to add the keyframes from the “Animations” option in Wondershare Filmora. The stock video is incorporated in this step, and playheads are added accordingly. Further, all the clips are made uniform in this step only. The quick steps for completing these features are:
- Start by opening the “Animations” tab.
- Go to the “Add” option to add a keyframe.
- Now, place the playhead at the three seconds position on the timeline.
- Then, bring the stock video to half of the text.
- Next, place the playhead in the eight seconds position and fill the text with the stock footage at the end.
- Again, place playhead but now at the ten seconds position.
- Locate the “Opacity” option and decrease it to zero.
- Last but not least, reduce all clips’ duration to ten seconds for uniformity.

Step10Previewing and export the video
Once done with all the necessary effects and settings, it is time for a quick preview of the created video. The “Render Preview” option in the Wondershare Filmora offers a fast rendering of the made video to help users with a brief overview of the file. It reduces the preview lag, as observed in other tools due to the application of heavy effects and features. After previewing, you can quickly export the video. The quick steps for the same are:
- Click the “Render Preview” option.
- Go through the preview of the created file in detail. Check for any issues or changes required.
- Now, go to the “Export” option for quick exporting of the file with the liquid water text reveal intro.

So, you’re done with creating a liquid water text reveal intro in this way. It is easy to save these steps for quick future reference.
Wrapping Up
Hence, it is easy for Wondershare Filmora users to create liquid water reveal intro in their videos. All you need to do is quickly download and install Wondershare Filmora on your Windows or Mac devices. Once done, it will launch automatically on your system. Next, you can follow all the steps mentioned above one by one to incorporate liquid water text reveal intro in videos.
So, download Wondershare Filmora for your system right now and start creating professional-grade videos today!
Also read:
- [New] Discover the Pathway to Photo Mosaic Brilliance
- [Updated] 2024 Approved Demystifying Triller's Unique Approach to Video Content
- [Updated] In 2024, Quick Playlist Streaming Your MP3 Music Library Online
- [Updated] Silencing Sound OBS Audio Solution
- [Updated] Zero-Price Path to Enhanced YouTube Video Analysis
- 2024 Approved How Windows Movie Maker Save MP4 File
- Blender Green Screen Effects for 2024
- Comprehensive Assessment: The Benefits & Features of Linksys's WRT1900ACS Open Source Router Unveiled
- Hassle-Free Ways to Remove FRP Lock on Oppo A18 Phones with/without a PC
- How to Unlock Apple iPhone 13 mini When We Dont Have Apple ID or Password?
- In 2024, How to Put a Filter on a Video in iMovie
- In 2024, Ultimate Guide on Samsung Galaxy M14 4G FRP Bypass
- In 2024, X-Voice Capture Software, PC
- New How to Add Filter to Video in Premiere Pro?
- New How To Make a Timelapse in After Effects for 2024
- New How to Make Tutorial Video with Filmora
- Updated How to Start a Vlog
- Updated In 2024, Convert Your Videos to 60 FPS Using These Excellent Tools
- Updated Something About Skin Care Vlog Ideas
- Title: In 2024, Learn to Create Custom Sequence Presets in Premiere Pro for Efficient Video Editing. Ensure Consistency and Speed up Your Workflow with Personalized Settings
- Author: Chloe
- Created at : 2025-02-24 19:07:54
- Updated at : 2025-03-04 02:30:23
- Link: https://ai-editing-video.techidaily.com/in-2024-learn-to-create-custom-sequence-presets-in-premiere-pro-for-efficient-video-editing-ensure-consistency-and-speed-up-your-workflow-with-personalized-/
- License: This work is licensed under CC BY-NC-SA 4.0.