
:max_bytes(150000):strip_icc():format(webp)/GettyImages-1135364530-dec5678c0c2c427ba18ae21452ff6326.jpg)
In 2024, Learning Unique Ways to Slow Down Time Lapse on iPhone
Learning Unique Ways to Slow Down Time Lapse on iPhone
We have all seen time-lapse videos in vlogs or developmental videos. The time-lapse effect has been around the corner for some time and assists in several tasks. However, when it comes to understanding the content of a video, they aren’t helpful. This article will help you understand how to slow down time lapse on an i Phone.
In addition, we’ll provide some insights on slow-down time-lapse videos. You can learn about its advantages for both viewers and creators. The article will highlight some tools for transforming a time-lapse into a slo-mo. We’ll also discuss an offline tool on how to slow down a time-lapse on an iPhone. Start reading this article for a brief overview of slow-motion videos and tools.
Slow Motion Video Maker Slow your video’s speed with better control of your keyframes to create unique cinematic effects!
Make A Slow Motion Video Make A Slow Motion Video More Features

Part 1: How Does Slowing Down Videos Help Viewers and Creators?
A time-lapse video certainly makes some scenes worthy of watching. However, a slow-motion video helps in better comprehension of the topic. In this section, we’ll discuss how slowing down time-lapse video s is helpful. We’ll shed light on their applications for viewers and content creators. Without further delay, let’s dive in to solve this mystery:
For Creators
Since the era of social media , content creation has become a new trend. Creators around the globe can interact with their followers from a single platform. It gives them a chance to share their ideas and showcase their talents. Hence, here is how slow-motion videos benefit a creator in his journey:
- In Video Tutorials: Do you have a channel where you post tutorials to perform a specific task? This effect can help you slow down the video for the audience to absorb your words. It helps creators to show their viewers that they genuinely care about them. A video where basics and details are discussed is considered right.
- In Revealing Details: We encounter situations where the camera cannot capture a moment right. This is because the normal playback speed cannot highlight video details. On the other hand, a slo-mo takes proper time to showcase details. These help handle an event planning or dress designing page.
- In Creating Aesthetics: Another application of slo-mos is that they help with creativity. Adding this effect at the right time and duration enhances visuals. Moreover, adding a slo-mo effect gives the video an aesthetic appeal. It can enhance the visuals of a travel, cooking, or fashion video.
For Viewers
Slow-motion videos benefit not only creators but also viewers. They help them with enhanced learning by breaking down complex information. If you are creating slo-mos as a creator, here is how they are helping your viewers:
- In Effective Learning: You are not unaware of tutorial or explainer videos. Whether you are a student or a housewife, you must have used YouTube to your benefit. A slow-motion video can break down a complex concept or steps for a recipe. In addition, it can help you operate technology better, like Word, Excel, and more.
- In Understanding Nature: People out there prefer documentaries over dramas. They are curious about nature and the way it works. In such documentaries, slo-mos are used to present a natural phenomenon. It helps the viewers understand how a certain process occurs. Moreover, it focuses on small details in an ecosystem to explain better.
- In Reflecting Content: Next time you watch reels, notice that slo-mos catch your attention. Videos with the right speed manipulation appeal to the eyes, and viewers often watch them again. In addition, they help focus on the specifics of a gadget, fashion product, or more.
Part 2: A Guide on How to Slow Down Time Lapses on iPhone
Now that you know the benefits of slow motions, let’s proceed to our next segment. Here, we will learn how to slow down a time-lapse on an i Phone using different techniques. This will involve looking into some tools for an i Phone time lapse slowdown:
1. iMovie
This tool is perfect if you are looking for a tool to effectively slow down time-laps e. It offers speed change options to transform your time-lapse videos into slomos. The tool supports popular video formats and creates results in 4K high resolution. Creating a slo-mo is straightforward, and users can also create a high-speed motion.

Key Features
- Provides 14 templates and 20 storyboards to get started with creative videos.
- The tool operates online; hence, it isn’t necessary to download any application.
- You can synchronize your work with devices like macOS, iPad, AirDrop, and iCloud.
Steps
Do you want to know ho w to slow down a time-lapse on i Phone ? The method of performing this function is very plain and accessible, and here is the guide:
Step 1: Open iMovie and click the “Start New Project” option to start editing. Continue to select “Magic Movie” across the pop-up to proceed into the editing section.

Step 2: Choose a file from the iPhone’s video gallery and select the “Pencil” icon to start editing. Go to the “Speed” option and click it to access speed change options.

Step 3: Navigate towards the speed slider and drag it towards the left to slow down. The option “1/2x” means the speed will be half the original speed.

2. Filmmaker Pro - Video Editor
If you want to slow down the time-lapse i Phone with additional editing options, use this tool. It is a professional-level content editor for iDevices and offers to slow down the speed. You can create or slow down timelapses. The editor will export your videos in 4K high resolution. Moreover, 120 royalty-free music tracks can be inserted into your slo-mo afterward.

Key Features
- Decorate your videos with stunning animations using keyframing and track motion.
- You have over 46 transition options to complete trending TikTok and Instagram challenges.
- Over 79 classic fonts, 92 beautiful fonts, 15 Hollywood, and 26 retro fonts options.
3. Video Up! Video Editor and Maker
Adjusting the time-lapse speed of the i Phone is possible via third-party applications. This is a versatile platform for creating slo-mos without any technicalities. You will find speed setting presets when you access its video adjustment options. These presets can automatically slow down or fasten a video at a specific point. However, you can also choose its Custom option to slow down a complete video.

Key Features
- It provides 2 video export resolution options: Ultra – 4K and Full HD – 1080p.
- Offers an option to insert voiceovers and built-in music tracks in your slo-mos or videos.
- CTA to share videos straight to Instagram, Facebook, WhatsApp, and more.
4. Vidma - Video Editor Music
Are you wondering how to slow down time-lapse videos on iPhone for specific durations? Vidma is the right tool for you, offering custom speed change and duration options. The speed slider option is a simple drag and adjust method. In addition, there is an audio pitch adjustment option to maintain audio during speed alteration.

Key Features
- Users have the option to merge, crop, or resize your images or videos using this tool.
- With its AI abilities, you can generate art from text and edit it further.
- The lowest playback speed to create slow motion is 0.1x, and the highest is 10.0x.
Part 3: A Comprehensive Desktop Solution for Slowing Down Time Lapses: Wondershare Filmora
Wondershare Filmora is a platform with diverse possibilities and compatibility across iOS devices. This allows you to import media using a cable from your iPhone. It doesn’t decline the video quality upon export or import; hence, it proves to be a superior tool to adjust the time-lapse speed of the i Phone. Filmora offers multiple opportunities to transform a time lapse into slo-mo.
You can also select the time period to apply the slow-motion effect via timeline editing. In addition, users can also choose the speed ramping option for professional results. Upon creating a slow motion, you can use Filmora’s video templates, text, and more to enhance visuals. In addition, there is an Optical Flow feature to help in enhancing the slo-mo effect.
Free Download For Win 7 or later(64-bit)
Free Download For macOS 10.14 or later
Step-by-Step Guide to Slow Down a Time Lapse Video into Slow Motion in Filmora
The basic technique to change the time-lapse speed of the i Phone involves Uniform Speed. This method modulates the playback speed of a video through the slider’s position. Here is how do I slow down time lapse on i Phone using Filmora:
Step 1Commence the Speed Change Action
Initiate Filmora by giving a “New Project” command and gaining access to the editing interface. Use the “Import” > “Import from a Camera or Phone” to import files. You need to connect to the iOS device first. Bring the clip to the timeline and access the settings panel that will appear on the screen. Further, choose the “Speed” > “Uniform Speed” option and drag the Speed slider towards the left to reduce it.

Step 2Access the AI Frame Interpolation Settings
In the pursuit of achieving a seamless slow-motion effect, use the AI Frame Interpolation settings. Navigate towards the bottom to access it and opt for the “Optical Flow” option.

Step 3Activate Render Preview for Thorough Evaluation
Upon adjusting, return to the timeline panel and select the video. With the help of your cursor, navigate to the “File” > “Render Preview” option. Enable a preview prior to finalizing the video, and then hit “Export.”

Key Features of Filmora
Filmora is not just confined to creating slow motion; the interface offers much more. There are multiple AI and manual features to edit videos, adjust audio, and insert text. Here are a few video editing features of Filmora amongst many:
Green Screen: Get rid of messy or unwanted backgrounds and replace them with something captivating. For this, film the model or object in front of a green screen and enable Chroma Key. It is an AI-driven function that will auto-remove the background while preserving the object.
AI Text-to-Video: Can’t find the right visuals or time to shoot content for your channel? Use this AI to create videos from prompts without having to put in any effort. The AI will auto-generate graphics to add to the video along with the AI voice insertion.
Compound Clip: Are there multiple clips in your timeline that you want to apply the same effects to? This function will help you transform multiple clips into one. Furthermore, you can apply similar effects or transitions. In addition, this function also ensures a smooth transfer from one clip to another.
AI Thumbnail Creator: Create and edit compelling thumbnails for your videos using this AI. The AI will analyze and select the perfect video frames as thumbnail options. Further, you can edit the thumbnail and insert multiple templates to show what the video is going to be about.
Conclusion
After going through this article, readers have an extensive knowledge of how to slow down time-lapse on i Phones using multiple tools and techniques. We provided a review of these tools but also the benefits of slo-mos in content creation and viewing.
In the end, we suggest Wondershare Filmora as the best alternative to all these applications. The software is not just AI integrated but has everything you need to create slo-mos in one place. Use Filmora for creative slo-mo and other video editing features.
Make A Slow Motion Video Make A Slow Motion Video More Features
Part 1: How Does Slowing Down Videos Help Viewers and Creators?
A time-lapse video certainly makes some scenes worthy of watching. However, a slow-motion video helps in better comprehension of the topic. In this section, we’ll discuss how slowing down time-lapse video s is helpful. We’ll shed light on their applications for viewers and content creators. Without further delay, let’s dive in to solve this mystery:
For Creators
Since the era of social media , content creation has become a new trend. Creators around the globe can interact with their followers from a single platform. It gives them a chance to share their ideas and showcase their talents. Hence, here is how slow-motion videos benefit a creator in his journey:
- In Video Tutorials: Do you have a channel where you post tutorials to perform a specific task? This effect can help you slow down the video for the audience to absorb your words. It helps creators to show their viewers that they genuinely care about them. A video where basics and details are discussed is considered right.
- In Revealing Details: We encounter situations where the camera cannot capture a moment right. This is because the normal playback speed cannot highlight video details. On the other hand, a slo-mo takes proper time to showcase details. These help handle an event planning or dress designing page.
- In Creating Aesthetics: Another application of slo-mos is that they help with creativity. Adding this effect at the right time and duration enhances visuals. Moreover, adding a slo-mo effect gives the video an aesthetic appeal. It can enhance the visuals of a travel, cooking, or fashion video.
For Viewers
Slow-motion videos benefit not only creators but also viewers. They help them with enhanced learning by breaking down complex information. If you are creating slo-mos as a creator, here is how they are helping your viewers:
- In Effective Learning: You are not unaware of tutorial or explainer videos. Whether you are a student or a housewife, you must have used YouTube to your benefit. A slow-motion video can break down a complex concept or steps for a recipe. In addition, it can help you operate technology better, like Word, Excel, and more.
- In Understanding Nature: People out there prefer documentaries over dramas. They are curious about nature and the way it works. In such documentaries, slo-mos are used to present a natural phenomenon. It helps the viewers understand how a certain process occurs. Moreover, it focuses on small details in an ecosystem to explain better.
- In Reflecting Content: Next time you watch reels, notice that slo-mos catch your attention. Videos with the right speed manipulation appeal to the eyes, and viewers often watch them again. In addition, they help focus on the specifics of a gadget, fashion product, or more.
Part 2: A Guide on How to Slow Down Time Lapses on iPhone
Now that you know the benefits of slow motions, let’s proceed to our next segment. Here, we will learn how to slow down a time-lapse on an i Phone using different techniques. This will involve looking into some tools for an i Phone time lapse slowdown:
1. iMovie
This tool is perfect if you are looking for a tool to effectively slow down time-laps e. It offers speed change options to transform your time-lapse videos into slomos. The tool supports popular video formats and creates results in 4K high resolution. Creating a slo-mo is straightforward, and users can also create a high-speed motion.
Key Features
- Provides 14 templates and 20 storyboards to get started with creative videos.
- The tool operates online; hence, it isn’t necessary to download any application.
- You can synchronize your work with devices like macOS, iPad, AirDrop, and iCloud.
Steps
Do you want to know ho w to slow down a time-lapse on i Phone ? The method of performing this function is very plain and accessible, and here is the guide:
Step 1: Open iMovie and click the “Start New Project” option to start editing. Continue to select “Magic Movie” across the pop-up to proceed into the editing section.
Step 2: Choose a file from the iPhone’s video gallery and select the “Pencil” icon to start editing. Go to the “Speed” option and click it to access speed change options.
Step 3: Navigate towards the speed slider and drag it towards the left to slow down. The option “1/2x” means the speed will be half the original speed.
2. Filmmaker Pro - Video Editor
If you want to slow down the time-lapse i Phone with additional editing options, use this tool. It is a professional-level content editor for iDevices and offers to slow down the speed. You can create or slow down timelapses. The editor will export your videos in 4K high resolution. Moreover, 120 royalty-free music tracks can be inserted into your slo-mo afterward.
Key Features
- Decorate your videos with stunning animations using keyframing and track motion.
- You have over 46 transition options to complete trending TikTok and Instagram challenges.
- Over 79 classic fonts, 92 beautiful fonts, 15 Hollywood, and 26 retro fonts options.
3. Video Up! Video Editor and Maker
Adjusting the time-lapse speed of the i Phone is possible via third-party applications. This is a versatile platform for creating slo-mos without any technicalities. You will find speed setting presets when you access its video adjustment options. These presets can automatically slow down or fasten a video at a specific point. However, you can also choose its Custom option to slow down a complete video.
Key Features
- It provides 2 video export resolution options: Ultra – 4K and Full HD – 1080p.
- Offers an option to insert voiceovers and built-in music tracks in your slo-mos or videos.
- CTA to share videos straight to Instagram, Facebook, WhatsApp, and more.
4. Vidma - Video Editor Music
Are you wondering how to slow down time-lapse videos on iPhone for specific durations? Vidma is the right tool for you, offering custom speed change and duration options. The speed slider option is a simple drag and adjust method. In addition, there is an audio pitch adjustment option to maintain audio during speed alteration.
Key Features
- Users have the option to merge, crop, or resize your images or videos using this tool.
- With its AI abilities, you can generate art from text and edit it further.
- The lowest playback speed to create slow motion is 0.1x, and the highest is 10.0x.
Part 3: A Comprehensive Desktop Solution for Slowing Down Time Lapses: Wondershare Filmora
Wondershare Filmora is a platform with diverse possibilities and compatibility across iOS devices. This allows you to import media using a cable from your iPhone. It doesn’t decline the video quality upon export or import; hence, it proves to be a superior tool to adjust the time-lapse speed of the i Phone. Filmora offers multiple opportunities to transform a time lapse into slo-mo.
You can also select the time period to apply the slow-motion effect via timeline editing. In addition, users can also choose the speed ramping option for professional results. Upon creating a slow motion, you can use Filmora’s video templates, text, and more to enhance visuals. In addition, there is an Optical Flow feature to help in enhancing the slo-mo effect.
Free Download For Win 7 or later(64-bit)
Free Download For macOS 10.14 or later
Step-by-Step Guide to Slow Down a Time Lapse Video into Slow Motion in Filmora
The basic technique to change the time-lapse speed of the i Phone involves Uniform Speed. This method modulates the playback speed of a video through the slider’s position. Here is how do I slow down time lapse on i Phone using Filmora:
Step 1Commence the Speed Change Action
Initiate Filmora by giving a “New Project” command and gaining access to the editing interface. Use the “Import” > “Import from a Camera or Phone” to import files. You need to connect to the iOS device first. Bring the clip to the timeline and access the settings panel that will appear on the screen. Further, choose the “Speed” > “Uniform Speed” option and drag the Speed slider towards the left to reduce it.
Step 2Access the AI Frame Interpolation Settings
In the pursuit of achieving a seamless slow-motion effect, use the AI Frame Interpolation settings. Navigate towards the bottom to access it and opt for the “Optical Flow” option.
Step 3Activate Render Preview for Thorough Evaluation
Upon adjusting, return to the timeline panel and select the video. With the help of your cursor, navigate to the “File” > “Render Preview” option. Enable a preview prior to finalizing the video, and then hit “Export.”
Key Features of Filmora
Filmora is not just confined to creating slow motion; the interface offers much more. There are multiple AI and manual features to edit videos, adjust audio, and insert text. Here are a few video editing features of Filmora amongst many:
Green Screen: Get rid of messy or unwanted backgrounds and replace them with something captivating. For this, film the model or object in front of a green screen and enable Chroma Key. It is an AI-driven function that will auto-remove the background while preserving the object.
AI Text-to-Video: Can’t find the right visuals or time to shoot content for your channel? Use this AI to create videos from prompts without having to put in any effort. The AI will auto-generate graphics to add to the video along with the AI voice insertion.
Compound Clip: Are there multiple clips in your timeline that you want to apply the same effects to? This function will help you transform multiple clips into one. Furthermore, you can apply similar effects or transitions. In addition, this function also ensures a smooth transfer from one clip to another.
AI Thumbnail Creator: Create and edit compelling thumbnails for your videos using this AI. The AI will analyze and select the perfect video frames as thumbnail options. Further, you can edit the thumbnail and insert multiple templates to show what the video is going to be about.
Conclusion
After going through this article, readers have an extensive knowledge of how to slow down time-lapse on i Phones using multiple tools and techniques. We provided a review of these tools but also the benefits of slo-mos in content creation and viewing.
In the end, we suggest Wondershare Filmora as the best alternative to all these applications. The software is not just AI integrated but has everything you need to create slo-mos in one place. Use Filmora for creative slo-mo and other video editing features.
[Top List] Best VHS Sound Effect That You Can Use in Video Making
Do you know why some videos grab your attention more than others? It’s about the visuals and the effects used in those videos. Effects are important in improving the overall experience and making a video more engaging. But it’s not just limited to video effects; audio effects can make a significant difference too. You can create specific themed content by adding effects to your videos.
When it comes to quality content, audio effects can add an extra layer of depth to it. They can transport you to a different time, place, or mood. However, you can create an old vintage-style video and make your audience go “WOW.” You can add an old retro-themed filter to your video, but adding a VHS sound effect is more important. This audio effect will make your video look more authentic and professional.
Part 1: How Are VHS Sound Effects Helpful in Video Creation?
Do you know how much VHS noise sound effects can be helpful? No problem if you don’t know how because this portion is going to answer you anyway.
1. Creates a Nostalgic Ambiance
VHS sound effects can bring back the feeling of nostalgia, just like the visual effects. The distinct sounds associated with VHS, like the gentle hum and hiss, create a vintage ambiance. It can make your video feel more authentic and take viewers back to the time of VHS tapes.
2. Adds Authenticity
Adding VHS audio effects can make your video feel more authentic. Similarly, if you want to recreate the experience of watching content on VHS tapes, this effect can help. Simulating audio imperfections like dropouts and tracking errors can make the video seem more genuine.
3. Sets Time Period
These audio effects help set the period and setting of your video. You can match the sound with the visuals using VHS tape sound effects. Moreover, it creates a consistent audio-visual experience that accurately represents a particular era.
4. Improves Genre and Atmosphere
Such sound effects are particularly effective in genres like horror or suspense. The gritty or distorted audio aesthetic associated with VHS can add depth and intensity to a video. It further improves the experience of your content and engages your audiences.
5. Experimenting Unconventional Techniques
Audio filters like VHS allow filmmakers and video creators to express their artistic style and vision. Using VHS-inspired audio elements, you can experiment with unconventional techniques. It also creates unique and original compositions that stand out from traditional sound designs.
Add VHS Sound Effect to Video
Simply add sound effects on video with Filmora Video Effect Editor ! Experience the magic of cool yet outstanding video effects, where your videos come to life in beautiful visuals.
Apply VHS Sound Effect Apply VHS Sound Effect Learn More >


Part 2: Best VHS Sound Effects To Use in 2024
A video is incomplete without good-quality audio and sound effects. So, if you want to create a VHS-style video, make sure to use VHS audio filters as well. Here are some classic VHS sounds you can use for your content.
1. Video Cass. Recorder 06
This audio effect gives your video the nostalgic feel of an old video reel playing. Its VHS-inspired audio effects last for 30 seconds. You can use this effect to create a vintage atmosphere in your videos. This effect can also transport your viewers back to the era of classic video recordings.
2. Creepy Distortion
You can create a haunting and unsettling atmosphere with this sound effect. It adds a creepy VHS sound distortion effect to your content. This effect is perfect for horror or suspenseful scenes. Moreover, this audio filter has a duration of 30 seconds.
3. VCR Deck Insert VHS Ta PE416803
With this audio effect, you can simulate the experience of inserting a tape into a VCR. You can add this effect to your video to enhance the authenticity and realism of a scene. It will help you in a situation where a tape is being loaded into a VCR. The duration of this audio is 20 seconds.
4. VCR Deck Insert VHS Ta PE416801
In this effect, you can hear the sound of someone inserting a tape into a VCR and pressing the play button. You can use this effect when showing scenes of tapes being loaded and played on a VCR. This 10-second audio effect will add an extra layer of realism and nostalgia.
5. VHS Player
Experience the entire process of using a VHS tape with this audio effect. You’ll hear the opening of the VHS box, inserting it into the VCR, followed by the playback sound. Then, there’s the fast-forward effect; additionally, you can enjoy the sound of the fast reverse. Finally, you’ll hear the stop, ejection of the VHS, and the storage of it back into its original box. This effect lasts for 3 minutes and 5 seconds.
6. VCR: Forward
Get the feeling of fast-forwarding through a VHS tape with this sound effect. It lasts 1 minute and 4 seconds and adds the authentic sound of a fast-forwarding VHS tape. You can use this audio effect when you want to add a similar effect to your content.
7. VCR VHS Tape Rewind M PE1046902
You can use this effect in your VHS-styled videos. It produces the sound of a VHS tape rewinding, followed by the VHS pause sound effect. This effect adds a distinct audio cue for rewinding and pausing scenes involving a VHS. The duration of this VHS effect is 4 seconds.
8. VCR: Rewind
Take a trip back in time with the sound of a VHS tape being rewound. This audio file adds a VHS rewind sound effect to your video. The duration of this file is 1 minute and 9 seconds. It will provide the nostalgic sound of a quick rewinding of a VHS tape.
9. Video Cass. Recorder 07
Using this audio effect, you can create the sensation of a video reel playing in a video cassette recorder. This VHS audio filter lasts for 30 seconds. You can use this effect to emphasize the vintage vibe of your video further. It also adds an old-fashioned charm to your video content.
10. VHS Player Rewind
This sound effect, provided by Pixabay, lasts 1 minute and 13 seconds. It starts with a glitchy and nostalgic VHS rewind sound to your video. The audio file brings back memories of vintage technology by adding the VHS rewind effect. You can recreate the experience of the 90s using this audio filter.
Bonus Part: Creating The Best VHS-Themed Videos With Wondershare Filmora
Filmora Video Editor is the ultimate tool and an incredible software for video editing. From audio effects to professional video edits, this tool can do a lot of stuff. This tool is now powered with AI technology which means more features are added in its latest version. You can edit your video and add sound effects that sync with your content feel.
Add VHS Sound Effect For Win 7 or later(64-bit)
Add VHS Sound Effect For macOS 10.14 or later
To make such videos having VHS effects, first, you need to learn how to use Wondershare Filmora. If you follow the following steps, you can easily edit your videos.
Step 1Starting Your Project
Open Wondershare Filmora and click on “New Project” to begin. This will bring up a new window where you can get started on your video. Import your video file by selecting the “Import Media” option and choosing the file from your system. Then, drag and drop the video into the timeline area to organize and prepare it for editing.

Step 2Apply VHS Effect to the Video
It’s time to add the VHS effects to your video. Look for the “Effects” option in the top bar and click on it. Next, search for “VHS” to find a variety of VHS overlays. Choose the one that suits your style and drag it onto the timeline, placing it over your video.

Step 3Apply VHS Sound Effects
For the VHS audio filter, go to the “Audio” tab, select “Sound Effect,” and search for “VHS.” Proceed further by selecting a suitable sound effect and dragging it onto the timeline beneath your video.

Step 4Export Your File
Once satisfied with the result, click the “Export” tab at the top left of the screen to save your video with the applied VHS effects.

Conclusion
In conclusion, a good video depends not only on your camera. There is so much post-production work behind good-quality content. You have to create a feel and ambiance in a video using effects and other overlays. You can create an old-themed video using the right filter and adding a VHS audio effect. Wondershare Filmora provides you with a platform where you can create such content with ease.
Apply VHS Sound Effect Apply VHS Sound Effect Learn More >
Part 2: Best VHS Sound Effects To Use in 2024
A video is incomplete without good-quality audio and sound effects. So, if you want to create a VHS-style video, make sure to use VHS audio filters as well. Here are some classic VHS sounds you can use for your content.
1. Video Cass. Recorder 06
This audio effect gives your video the nostalgic feel of an old video reel playing. Its VHS-inspired audio effects last for 30 seconds. You can use this effect to create a vintage atmosphere in your videos. This effect can also transport your viewers back to the era of classic video recordings.
2. Creepy Distortion
You can create a haunting and unsettling atmosphere with this sound effect. It adds a creepy VHS sound distortion effect to your content. This effect is perfect for horror or suspenseful scenes. Moreover, this audio filter has a duration of 30 seconds.
3. VCR Deck Insert VHS Ta PE416803
With this audio effect, you can simulate the experience of inserting a tape into a VCR. You can add this effect to your video to enhance the authenticity and realism of a scene. It will help you in a situation where a tape is being loaded into a VCR. The duration of this audio is 20 seconds.
4. VCR Deck Insert VHS Ta PE416801
In this effect, you can hear the sound of someone inserting a tape into a VCR and pressing the play button. You can use this effect when showing scenes of tapes being loaded and played on a VCR. This 10-second audio effect will add an extra layer of realism and nostalgia.
5. VHS Player
Experience the entire process of using a VHS tape with this audio effect. You’ll hear the opening of the VHS box, inserting it into the VCR, followed by the playback sound. Then, there’s the fast-forward effect; additionally, you can enjoy the sound of the fast reverse. Finally, you’ll hear the stop, ejection of the VHS, and the storage of it back into its original box. This effect lasts for 3 minutes and 5 seconds.
6. VCR: Forward
Get the feeling of fast-forwarding through a VHS tape with this sound effect. It lasts 1 minute and 4 seconds and adds the authentic sound of a fast-forwarding VHS tape. You can use this audio effect when you want to add a similar effect to your content.
7. VCR VHS Tape Rewind M PE1046902
You can use this effect in your VHS-styled videos. It produces the sound of a VHS tape rewinding, followed by the VHS pause sound effect. This effect adds a distinct audio cue for rewinding and pausing scenes involving a VHS. The duration of this VHS effect is 4 seconds.
8. VCR: Rewind
Take a trip back in time with the sound of a VHS tape being rewound. This audio file adds a VHS rewind sound effect to your video. The duration of this file is 1 minute and 9 seconds. It will provide the nostalgic sound of a quick rewinding of a VHS tape.
9. Video Cass. Recorder 07
Using this audio effect, you can create the sensation of a video reel playing in a video cassette recorder. This VHS audio filter lasts for 30 seconds. You can use this effect to emphasize the vintage vibe of your video further. It also adds an old-fashioned charm to your video content.
10. VHS Player Rewind
This sound effect, provided by Pixabay, lasts 1 minute and 13 seconds. It starts with a glitchy and nostalgic VHS rewind sound to your video. The audio file brings back memories of vintage technology by adding the VHS rewind effect. You can recreate the experience of the 90s using this audio filter.
Bonus Part: Creating The Best VHS-Themed Videos With Wondershare Filmora
Filmora Video Editor is the ultimate tool and an incredible software for video editing. From audio effects to professional video edits, this tool can do a lot of stuff. This tool is now powered with AI technology which means more features are added in its latest version. You can edit your video and add sound effects that sync with your content feel.
Add VHS Sound Effect For Win 7 or later(64-bit)
Add VHS Sound Effect For macOS 10.14 or later
To make such videos having VHS effects, first, you need to learn how to use Wondershare Filmora. If you follow the following steps, you can easily edit your videos.
Step 1Starting Your Project
Open Wondershare Filmora and click on “New Project” to begin. This will bring up a new window where you can get started on your video. Import your video file by selecting the “Import Media” option and choosing the file from your system. Then, drag and drop the video into the timeline area to organize and prepare it for editing.
Step 2Apply VHS Effect to the Video
It’s time to add the VHS effects to your video. Look for the “Effects” option in the top bar and click on it. Next, search for “VHS” to find a variety of VHS overlays. Choose the one that suits your style and drag it onto the timeline, placing it over your video.
Step 3Apply VHS Sound Effects
For the VHS audio filter, go to the “Audio” tab, select “Sound Effect,” and search for “VHS.” Proceed further by selecting a suitable sound effect and dragging it onto the timeline beneath your video.
Step 4Export Your File
Once satisfied with the result, click the “Export” tab at the top left of the screen to save your video with the applied VHS effects.
Conclusion
In conclusion, a good video depends not only on your camera. There is so much post-production work behind good-quality content. You have to create a feel and ambiance in a video using effects and other overlays. You can create an old-themed video using the right filter and adding a VHS audio effect. Wondershare Filmora provides you with a platform where you can create such content with ease.
How To Add Text In After Effects
In almost every video you come across, you will see text added to the video in different parts. There are various reasons why adding text to videos becomes a necessity. First of all, you can highlight the underlying message or key points in your video. Along with audio and video, the viewers will have another cue point in the form of text that they can retain in their memory for longer. You add animated texts to video to make the video interesting to watch and break the monotony of visual cues only.
Besides, you may have to want credits and add intro as well as outro to your video where adding text is almost a necessity. Text can help your viewer get the context of your video and make sense of the content. After Effects is a popular video editor thanks to its visual effects, text animation animations, and instant video enhancement tools. We will illustrate the different ways of adding text in After Effects in simple steps.
Part 1. Add Text in After Effects with Horizontal Type Tool
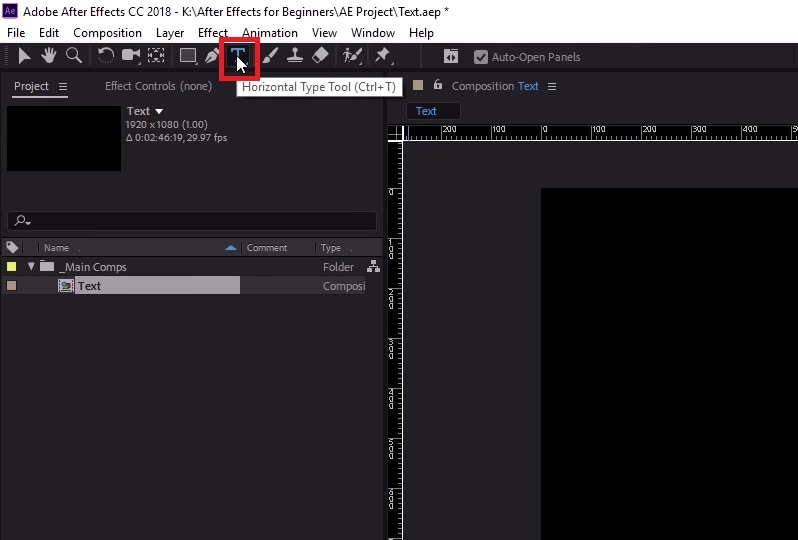
Once you have imported your video clip into the Timeline, there are several ways you can add text to your video. First of all, you can right-click on the Timeline and select New> Text to create an empty text layer and add any text you want. Similarly, you can go to Layer> New> Text option to do the same. But the easiest way of adding text in After Effects is by using Horizontal Type Tool. Here are the steps on how you can add text in AE with the type tool.
Step1Once you have imported your video into the Timeline, click on Horizontal Type Tool located in the top bar to add any text. You can press Ctrl+T(Windows) or Command+H(Mac) to get it instantly.
Step2Click on the video where you want to place the text and type your desired text there. After you are done adding your text, press Enter key in Num pad to exit out of the text field in the video.
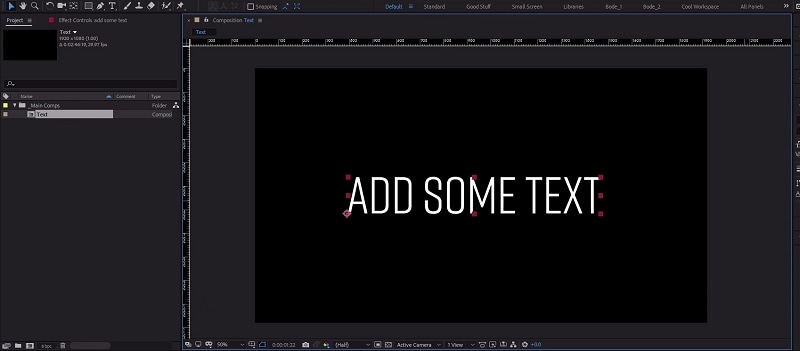
Step3This will automatically create a text layer on Timeline. You can now move the text and place it anywhere you want. You can also modify the text style and add animation which we will illustrate in the next section.
Part 2. Use the Character Panel to Edit Text in AE
When you select Type tool and add your desired text, you get a default style for the text. It is most likely that you have to modify the text style such as changing color, font, and size to fit in your video seamlessly. That is when you have to visit the Character Panel. Character Panel is where you get to edit the font of the text you have typed, increase or decrease the font size, change the font color, and much more. Apart from that, you can increase the spacing between lines when your text is a paragraph instead of a few words. Here are the steps to use Character Panel to edit text in AE.
Step1Once you have typed your text using Horizontal Type tool on the video, click on the text.
Step2Go to Character panel located in the right side of the screen. If it is minimized, click on the panel to expand it.
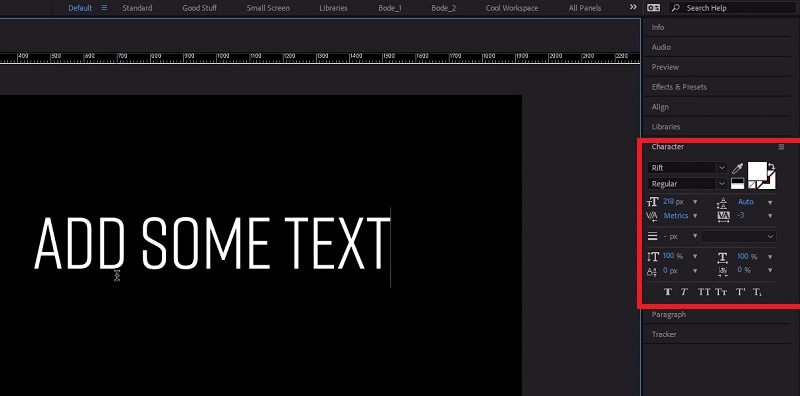
Step3The first option in the panel is the font of the text. By the side of the font is the text color. You can use the color picker tool to choose any color as per your preference.
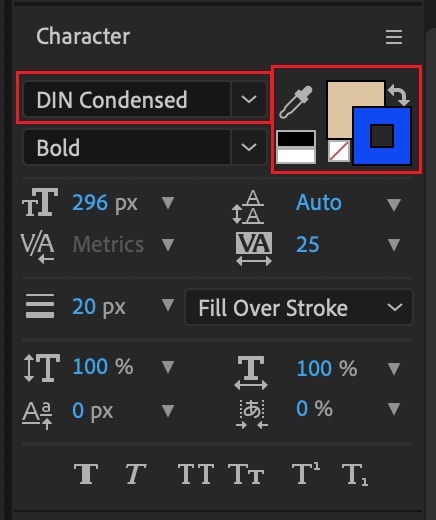
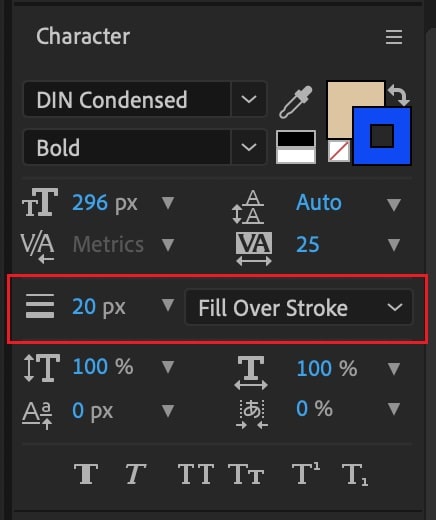
Step4Below the font, you can select the font style such as regular, bold, italics, and likewise. The subsequent part is to change the font size and adjust vertical spacing between lines and horizontal spacing between characters.
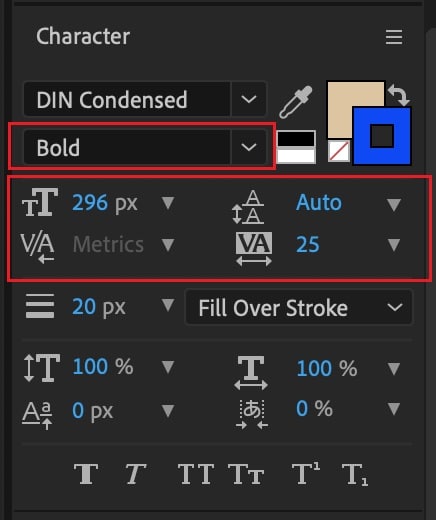
Step5The next section deals with Stroke option as well as fill the text option. You can fill the background of the text with any desired color.
Part 3. Add Animated Text to Video with Animation Presets
Now that you have added a static text and set the text format as per your preference, it is time to animate the text. A static text in a video does not look appealing, and animated texts make the video eye-catching instantly. You can use text animation presets in After Effects to add animated text to video. Here are the steps to add animated text to video with animation presets and effects.
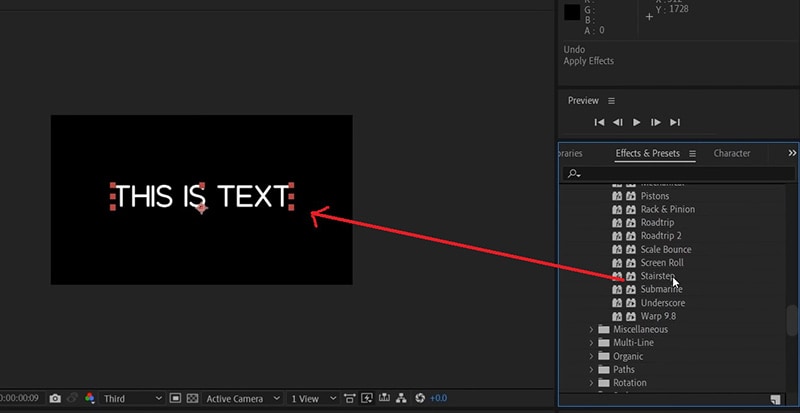
Step1Click on the text on your video that you want to animate. Go to Effects and Presets panel located on the right side.
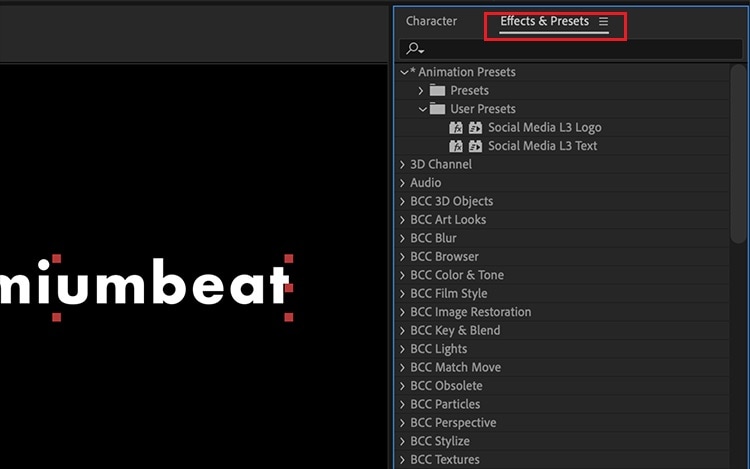
Step2Under Effects and Presets panel, Click on Text option. This will open all the different categories of animation presets available that you can apply to the text on your video.
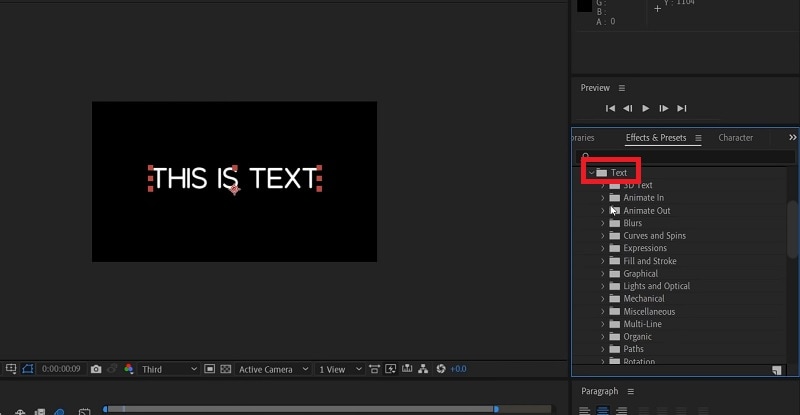
Step3Select any desired animation that you want to apply to the text and drag and drop the animation on the text in the composition window. Play the video and watch the applied animation on the text.
Part 4. Alternative Way to Add Text to Videos
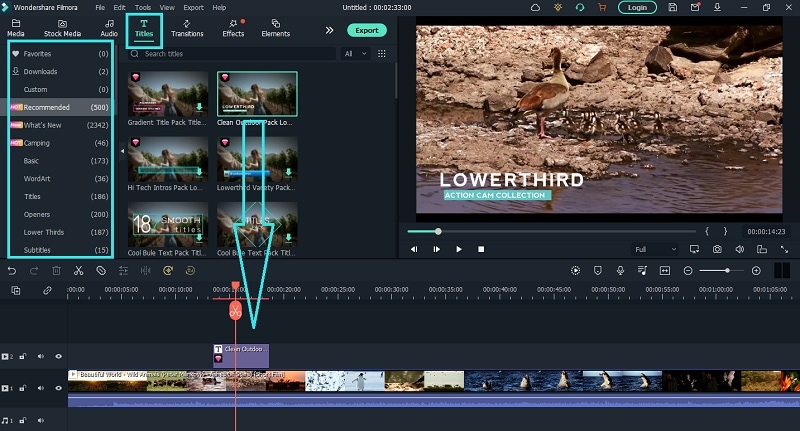
If you are not comfortable with After Effects as a video editor, we recommend Wondershare as the best AE alternative. This is because the user interface of Filmora is super simple and there are loads of text effects and animations available to enhance your video content. Filmora is a professional video editor that is extremely popular among amateur and professional video editors. The application is available for both Windows and Mac users. Here are the steps for adding animated text to video using Filmora.
Step1Install Wondershare Filmora on your computer and launch the application. Click on New Project option on the welcome screen. Otherwise, you can go to File> New Project option.

Step2Go to File> Import Media> Import Media Files to import your video file. You can also drop the video file directly into Project Media folder.

Step3Drag and drop the video file from Project Media folder into the Timeline. If you have multiple video clips, you need to arrange them sequentially on the Timeline.
Step4To add text to your video, go to Titles located at the top bar. Check the left panel where you can see different categories of text effects. Select any desired text effect and drop into the Timeline. Make sure that the text layer is above the video layer on Timeline. You can shift the text layer on Timeline to place it where you want it to appear. You can also stretch the duration of the text effect as per your requirements.
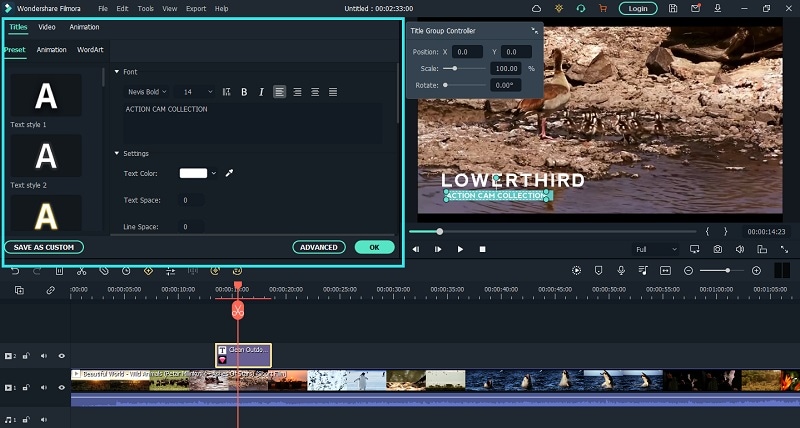
Step5You can edit the text effect by double clicking on the text layer on Timeline. Under Preset tab, you can change the text, font type and size, text color and much more. For further customization, you can click on Advanced button. At last, click on OK button to save the edits done.
The Bottom Line
If you want to add animated text to photo and video, After Effects is a great editor you can use. We have illustrated how you can add text and customize the text and finally, animate it as per your preference. However, if you are looking for AE alternative, we recommend Wondershare Filmora where you can add text to video instantly and choose from a wide range of text effects and animations.
Free Download For Win 7 or later(64-bit)
Free Download For macOS 10.14 or later
Fast and Easy Method to Match Color in Photoshop
Fast and Easy Method to Match Color in Photoshop
An easy yet powerful editor
Numerous effects to choose from
Detailed tutorials provided by the official channel
Photoshop is one such editing tool where we can easily edit our photos and videos. And Photoshop matches can colour in the same image, which is one of the most incredible features of this tool. And in the following discussion, we will be talking about how you can color match photos online with the help of Photoshop.
And lastly, we will be introducing you to another proficient tool that has the perfect feature to help you edit and colour match photos. So, let us get started with our discussion without any further delay.
In this article
01 [What Scene is Photoshop’s Color Matching Generally Used For?](#Part 1)
02 [How to perfectly match colors in Photoshop when combining photos?](#Part 2)
03 [Is There Any Other Ways to Use Color Matching?](#Part 3)
Part 1 What Scene is Photoshop’s Color Matching Generally Used For?
You can match color in Photoshop in just a few simple steps. And as far as the question of what scene can be used for it, you can use any and every photo you want to match the colour for. And the following steps will be noting how you can adjust the color of an image in Photoshop.
Step Open both the images, the one you want to alter and the one you want to change it with. And if it is just one image, open and select that one image.
Step Choose the “Image” and then select the “Adjustment” option. And after you choose the “Adjustment” option, go to the “Match Colour” option. You will be noticing the target photo that you have opted for.
Step You will find the “Image Statistics” portion in the dialogue portion. Opt for the “Source” list and select the image name consisting of the shades and hues you would want your image to be altered. You will notice a thumbnail appearing in the dialogue as you do so. And you will automatically see the colours of the photo have changed.
Step Now use the “Preview” feature to see the photoshop match colour tone, and then you will be done with adjusting the colour!
Part 2 How to perfectly match colors in Photoshop when combining photos
Now, we will be discussing the different steps that will help you match color from photo in Photoshop, with absolute precision and effortlessness. Here is the list of steps that you would need to follow to match skin tone in Photoshop most perfectly.
Step 1 Duplicate the background of the original photo
The first and the most essential step to match lighting photoshop or the colour or any other editing task is to duplicate the background of the original image. The reason for this is that without this step, we might lose out on the original background information, which is essential for the image.
And to duplicate the background of an image in Photoshop, you need to use a few shortcuts of your keyboard. If you are using a Windows device, then the shortcut for this will be “Ctrl+J”, and if you are using Mac, then the shortcut will be “ Command+J”.

Step 2 Select the Image whose colour you want to change.
Photoshop has several selection tools. Choose one of the many selection tools. You might choose the “Pen Tool” or the “Lasso Tool” or anything else. Select the image with the tool by drawing along the image with the tool. And when you are done with tracing the image with the selection tool of your choice, you will see a border marching around the image.

Step 3 Select the area of the second image
You will need the selection tool again. The second image is the one that consists of the colour you would want the original image to match with. So, use the selection tool again to trace out an area in the second picture with the colour you want.
Ensure that you trace out a substantial area with the colour you need. You need not be highly precise with selecting the area. Instead, focus on covering a large area so that you can cover up the different shades and hues of the colour.

Step 4 Move back to the original picture
We will proceed with the “Colour Match” feature in Photoshop, but before that, you must make sure that you have the original image selected. The technical term to use here is “Focus”. So, ensure that the original image is in focus.
You can bring the original image into “focus” by clicking anywhere inside the document’s window where the original image is present. And that will automatically bring back the focus to the original image.
Step 5 Bring the “Colour Match” command into function
After selecting the original image, reach out to the “Image” option and click on the “Adjustments” option. You will find the “Match Colour” option; click on it.
There are two sections of the “Color Match” option. One is the “Image Statistics” portion, and the other is the “Destination Image”. The “destination Image” portion consists of the name of the original image and a few image settings as well. The options include “luminescence”, “color intensity”, “fade”, and “neutralize”.
Step 6 Head to the “Image Statistics” portion
The “Image Statistics” portion consists of the “Source” option. It is present in the bottom down part of the “Image Statistics” box. It is a drop-down box, and you will have to click on it. Tap on the small downward arrow beside the “Source” option and then choose the second image where you traced out the area of the colour you would want your original image to have.

Your image might have more than one layer, and if so, you will have to opt for the correct layer from the “Layer” option of Photoshop.
Step 7 Select the correct options in the “Image Statistics” area
In the “Image Statistics” portion, you will find some options, such as “Use Selection in Source to Calculate Colours” and “Use Selection In Target To Calculate Adjustment”. You will have to click on this option and agree to them. It will instruct Photoshop to follow these instructions and colour match photos accordingly.

Click on “OK” after doing the changes mentioned above and exit the dialogue box to proceed with the next step.
Step 8 Add “Adjustment Layer”
Go to the “Layers” option and then opt for the “Layers Palette” present at the bottom. Then select “New Adjustment Layer” and click on the “Levels” option.

Step 9 Adjust the Pointers
You will find two pointers, one black and the other white. You will have to bring both the pointers to the centre of the line.
Then click on “OK” and exit the box to proceed with the next step.

Step 10 Select “Luminosity”
You will find the “Blend Mode” in the “Layers palette”. Select the “Blend Mode” from there. You will find it reflecting “Normal”, which is the default setting. You need to click on the small drop-down arrow and change the option from “Normal” to “Luminosity”.

Step 11 Deselect
Now, use the keyboard shortcut “Ctrl+D” if you are using windows and “Command+D” working on a Mac device. And this completes the entire process of colour matching in photoshop.
Part 3 Is There Any Other Ways to Use Color Matching?
You will find numerous other tools that give you the opportunity of editing images and videos. But there are only a few that will offer you the quality of precise and proficient features. And if you ask us whether there are any other ways of using colour matching, we would like to introduce to you one of the best photo editing tools- Filmora 11!
It has an incredible feature of “Colour Matching” that will offer you the ease of altering colours of your pictures in the most effortless way, with the quality of original intact and even sometimes enhanced. And now, we will be discussing the “Colour Matching” feature of Filmora 11.
If you want to change the color of a clipping, then Filmora 11’s “Color Matching” allows you to extract the clip and then match colors in just a few steps.
You can use the filters of this tool, and it allows you to match color from to 10as well. So, the efficiency and quality are incomparable.
It has an adaptive scene change, and no matter in which device you use Filmora to edit our images, it will work with equal proficiency.
● Key Takeaways from This Episode →
● In this discussion, we have enveloped the following topics.
● We discussed the scene in which you can match colors in Photoshop.
● Then we proceeded with the steps to help you use the “Color Match” feature of Photoshop.
● And lastly, we introduced o you to Filmora 1the best photo and video editing tool, and its incredible feature of “Color Matching”.
Photoshop is one such editing tool where we can easily edit our photos and videos. And Photoshop matches can colour in the same image, which is one of the most incredible features of this tool. And in the following discussion, we will be talking about how you can color match photos online with the help of Photoshop.
And lastly, we will be introducing you to another proficient tool that has the perfect feature to help you edit and colour match photos. So, let us get started with our discussion without any further delay.
In this article
01 [What Scene is Photoshop’s Color Matching Generally Used For?](#Part 1)
02 [How to perfectly match colors in Photoshop when combining photos?](#Part 2)
03 [Is There Any Other Ways to Use Color Matching?](#Part 3)
Part 1 What Scene is Photoshop’s Color Matching Generally Used For?
You can match color in Photoshop in just a few simple steps. And as far as the question of what scene can be used for it, you can use any and every photo you want to match the colour for. And the following steps will be noting how you can adjust the color of an image in Photoshop.
Step Open both the images, the one you want to alter and the one you want to change it with. And if it is just one image, open and select that one image.
Step Choose the “Image” and then select the “Adjustment” option. And after you choose the “Adjustment” option, go to the “Match Colour” option. You will be noticing the target photo that you have opted for.
Step You will find the “Image Statistics” portion in the dialogue portion. Opt for the “Source” list and select the image name consisting of the shades and hues you would want your image to be altered. You will notice a thumbnail appearing in the dialogue as you do so. And you will automatically see the colours of the photo have changed.
Step Now use the “Preview” feature to see the photoshop match colour tone, and then you will be done with adjusting the colour!
Part 2 How to perfectly match colors in Photoshop when combining photos
Now, we will be discussing the different steps that will help you match color from photo in Photoshop, with absolute precision and effortlessness. Here is the list of steps that you would need to follow to match skin tone in Photoshop most perfectly.
Step 1 Duplicate the background of the original photo
The first and the most essential step to match lighting photoshop or the colour or any other editing task is to duplicate the background of the original image. The reason for this is that without this step, we might lose out on the original background information, which is essential for the image.
And to duplicate the background of an image in Photoshop, you need to use a few shortcuts of your keyboard. If you are using a Windows device, then the shortcut for this will be “Ctrl+J”, and if you are using Mac, then the shortcut will be “ Command+J”.
Step 2 Select the Image whose colour you want to change.
Photoshop has several selection tools. Choose one of the many selection tools. You might choose the “Pen Tool” or the “Lasso Tool” or anything else. Select the image with the tool by drawing along the image with the tool. And when you are done with tracing the image with the selection tool of your choice, you will see a border marching around the image.
Step 3 Select the area of the second image
You will need the selection tool again. The second image is the one that consists of the colour you would want the original image to match with. So, use the selection tool again to trace out an area in the second picture with the colour you want.
Ensure that you trace out a substantial area with the colour you need. You need not be highly precise with selecting the area. Instead, focus on covering a large area so that you can cover up the different shades and hues of the colour.
Step 4 Move back to the original picture
We will proceed with the “Colour Match” feature in Photoshop, but before that, you must make sure that you have the original image selected. The technical term to use here is “Focus”. So, ensure that the original image is in focus.
You can bring the original image into “focus” by clicking anywhere inside the document’s window where the original image is present. And that will automatically bring back the focus to the original image.
Step 5 Bring the “Colour Match” command into function
After selecting the original image, reach out to the “Image” option and click on the “Adjustments” option. You will find the “Match Colour” option; click on it.
There are two sections of the “Color Match” option. One is the “Image Statistics” portion, and the other is the “Destination Image”. The “destination Image” portion consists of the name of the original image and a few image settings as well. The options include “luminescence”, “color intensity”, “fade”, and “neutralize”.
Step 6 Head to the “Image Statistics” portion
The “Image Statistics” portion consists of the “Source” option. It is present in the bottom down part of the “Image Statistics” box. It is a drop-down box, and you will have to click on it. Tap on the small downward arrow beside the “Source” option and then choose the second image where you traced out the area of the colour you would want your original image to have.
Your image might have more than one layer, and if so, you will have to opt for the correct layer from the “Layer” option of Photoshop.
Step 7 Select the correct options in the “Image Statistics” area
In the “Image Statistics” portion, you will find some options, such as “Use Selection in Source to Calculate Colours” and “Use Selection In Target To Calculate Adjustment”. You will have to click on this option and agree to them. It will instruct Photoshop to follow these instructions and colour match photos accordingly.
Click on “OK” after doing the changes mentioned above and exit the dialogue box to proceed with the next step.
Step 8 Add “Adjustment Layer”
Go to the “Layers” option and then opt for the “Layers Palette” present at the bottom. Then select “New Adjustment Layer” and click on the “Levels” option.
Step 9 Adjust the Pointers
You will find two pointers, one black and the other white. You will have to bring both the pointers to the centre of the line.
Then click on “OK” and exit the box to proceed with the next step.
Step 10 Select “Luminosity”
You will find the “Blend Mode” in the “Layers palette”. Select the “Blend Mode” from there. You will find it reflecting “Normal”, which is the default setting. You need to click on the small drop-down arrow and change the option from “Normal” to “Luminosity”.
Step 11 Deselect
Now, use the keyboard shortcut “Ctrl+D” if you are using windows and “Command+D” working on a Mac device. And this completes the entire process of colour matching in photoshop.
Part 3 Is There Any Other Ways to Use Color Matching?
You will find numerous other tools that give you the opportunity of editing images and videos. But there are only a few that will offer you the quality of precise and proficient features. And if you ask us whether there are any other ways of using colour matching, we would like to introduce to you one of the best photo editing tools- Filmora 11!
It has an incredible feature of “Colour Matching” that will offer you the ease of altering colours of your pictures in the most effortless way, with the quality of original intact and even sometimes enhanced. And now, we will be discussing the “Colour Matching” feature of Filmora 11.
If you want to change the color of a clipping, then Filmora 11’s “Color Matching” allows you to extract the clip and then match colors in just a few steps.
You can use the filters of this tool, and it allows you to match color from to 10as well. So, the efficiency and quality are incomparable.
It has an adaptive scene change, and no matter in which device you use Filmora to edit our images, it will work with equal proficiency.
● Key Takeaways from This Episode →
● In this discussion, we have enveloped the following topics.
● We discussed the scene in which you can match colors in Photoshop.
● Then we proceeded with the steps to help you use the “Color Match” feature of Photoshop.
● And lastly, we introduced o you to Filmora 1the best photo and video editing tool, and its incredible feature of “Color Matching”.
Also read:
- Updated How to Turn On/Off Motion Blur in Minecraft?
- Updated Are You Trying to Create a Stunning Intro for Your Video for Free? This Article Will Show You How to Make an Intro Video Using InVideo in a Few Simple Steps
- Updated In 2024, Best AR Video App - Top 10 Picks
- What Is Motion Blur in the Game, In 2024 Do You Really Need It?
- How to Create Your Own Subscribe Channel Graphics
- Updated Do You Want to Add Voiceovers to Your Video Project? Wondershare Filmora Is an Amazing Tool that Lets You Add Audio Files, Including Voiceovers
- 2024 Approved 5 Tips for Faster Editing in Filmora Video Editor
- Updated 2024 Approved Hitfilm Express - A Guide to Download, Install, Key Features
- In 2024, Create an Awesome Logo Reveal with Logo Intro Templates
- New In 2024, Competitive Guide To Use Slow Motion in After Effects
- 2024 Approved 7 Best MP4 Editors for Mac Edit MP4 in Mac
- Updated 2024 Approved 10 Best Vlogging Cameras for Beginners
- New 2024 Approved Best Practical Tips to Improve Your Lighting in the Sun
- Updated Hitfilm Express Video Editor Review for 2024
- In 2024, How to Add Subtitles in VLC Media Play
- Updated 2 Effective Ways to Add Text Behind Objects for 2024
- Best Tips for Camtasia Freeze-Frame for 2024
- Updated 2024 Approved Best 10 Fun Discord Bots You Need
- In 2024, The Ultimate Guide How to Bypass Swipe Screen to Unlock on Motorola Moto G04 Device
- Top 5 Vivo Y27 4G Bypass FRP Tools for PC That Actually Work
- How to Unlock Nokia G22 Phone without Google Account?
- Use Device Manager to identify malfunctioning drivers with Windows Device Manager on Windows 7
- Bypassing Google Account With vnROM Bypass For Honor X9b
- Top 5 Tracking Apps to Track Samsung Galaxy A05s without Them Knowing | Dr.fone
- Undelete lost messages from Samsung Galaxy A34 5G
- How to Exit Android Factory Mode On Lava Yuva 3 Pro? | Dr.fone
- New 2024 Approved Ultimate Guide to Translating YouTube Videos Without CC
- How To Unlock The iPhone 15 Pro SIM Lock 4 Easy Methods
- Recover lost data from Vivo V30 Lite 5G
- In 2024, Fixing Foneazy MockGo Not Working On Realme 12+ 5G | Dr.fone
- Edit and Send Fake Location on Telegram For your Honor 70 Lite 5G in 3 Ways | Dr.fone
- How to Delete iCloud Account From iPhone 13 mini without Password?
- Simple ways to get lost messages back from Nokia C12 Pro
- In 2024, Pokémon Go Cooldown Chart On Poco X5 | Dr.fone
- In 2024, How to Mirror Apple iPhone 12 Pro to Windows 10? | Dr.fone
- Title: In 2024, Learning Unique Ways to Slow Down Time Lapse on iPhone
- Author: Chloe
- Created at : 2024-04-24 07:08:13
- Updated at : 2024-04-25 07:08:13
- Link: https://ai-editing-video.techidaily.com/in-2024-learning-unique-ways-to-slow-down-time-lapse-on-iphone/
- License: This work is licensed under CC BY-NC-SA 4.0.
