
:max_bytes(150000):strip_icc():format(webp)/social-media-text-588a94263df78caebc620f05.jpg)
In 2024, Looking for the Simple Steps to Add Transition Effects in Your Video? We Will Illustrate How to Add Transition in Filmora and Mention Tips and Tricks for Video Transition Effects
Looking for the Simple Steps to Add Transition Effects in Your Video? We Will Illustrate How to Add Transition in Filmora and Mention Tips and Tricks for Video Transition Effects
Editing a video is equally important as recording a video. A raw video footage is never appealing to the eyes because of sudden cuts, unnecessary parts, and lack of eye-catching effects. That is why video editing is crucial for turning an unappealing raw video into an attention-grabbing video. As a matter of fact, the way you edit your video makes your video stand out when you are posting on social media platforms.
One of the most important aspects of video editing is adding transitions to video clips. When you jump from one scene to another and make sudden cuts, you need to apply some video transitions so that the move from one scene to another becomes soothing to the eyes. Different video editors have different transition effects and Wondershare Filmora has the best collection of transitions. We will illustrate how to add transition in Filmora and how to improve your video with video transitions.
Part 1. What is a Video transition effect?
A video transition effect is the most commonly used graphical effect in video editing. A video transition effect is essential whereby you connect one shot to another, especially when you are making sudden cuts in the video. Therefore, a video transition effect sits in between two shots and connects them together smoothly so that it does not look odd to the eyes. Video editing with transitions is a common practice for short videos on social media, presentation videos, and even movies.
A video transition effect is effective when you are jumping from two moods and emotions in the video. It is equally useful while jumping between storylines, points of view, and timelines. Besides, you can spice up your narrative and make your video eye-catching as well as eye-soothing. There are different types of video transition effects such as fade in and out, zoom in and out, dissolve, wipe and pan.
Part 2. How to add transitions in video?
To add transitions to your video, you will need a video editor. You should choose a video editor that has a wide collection of transition effects so that you can apply them to your video as per your preference. If you are someone who regularly makes videos and edits them, a variety of transitions will make the videos look different. There are Movie Maker transitions for Windows users and iMovie transitions for Mac users. But we recommend Wondershare Filmora as the best video editor for adding transitions.
<pFilmora is a professional video editor with so many different categories of transitions including the trending ones. Their team continuously adds new transitions to their collection, and you can download them and use on your videos. Starting from basic, slideshow, and social media to 3D, light and smoke, there is no dearth of transitions to fulfill your requirements. Here are the steps how to add transition in Filmora. Free Download For Win 7 or later(64-bit)
Free Download For macOS 10.14 or later
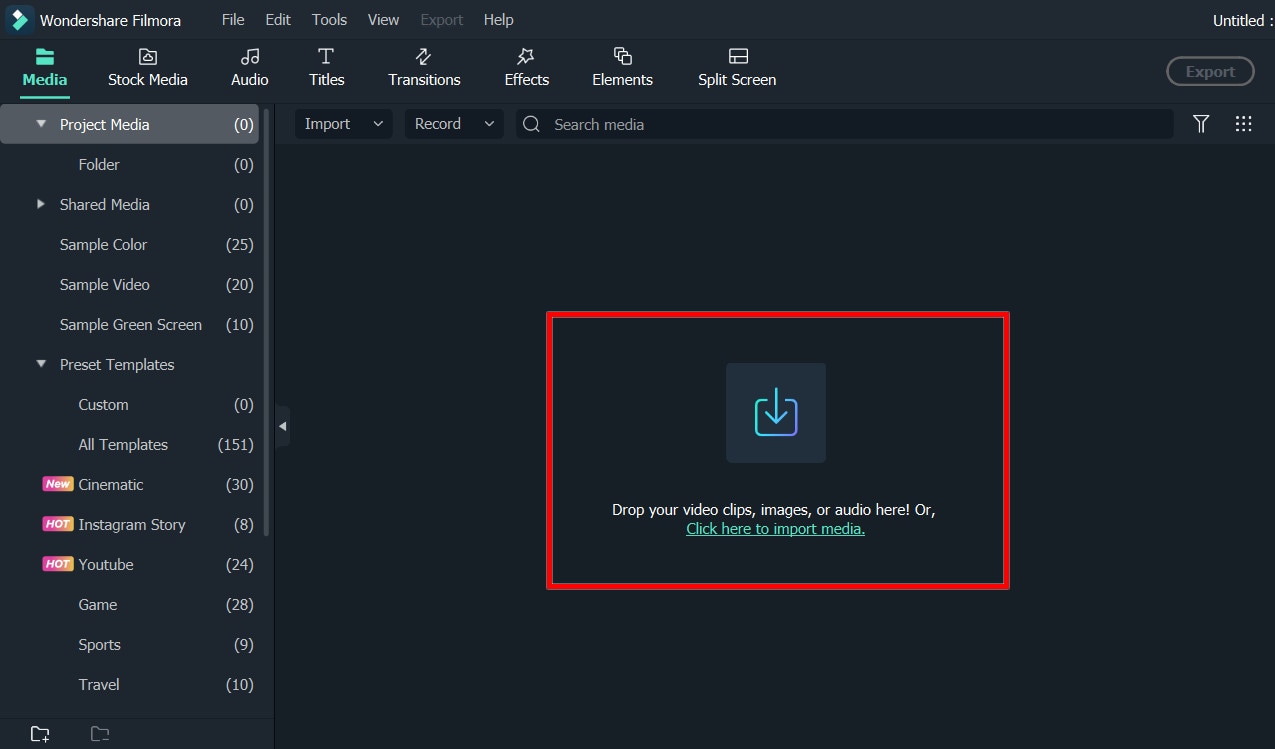
Step1 Download and install Filmora on your computer. Filmora is available for Windows and Mac users. Launch Filmora and click on New Project.

Step2 Drag and drop your video clips under Project Media folder. Thereafter, drag and drop them on Timeline.
If you have one raw video file, you can split it up into multiple video clips to add transitions in between them.
Step3 Go to Transitions tab located at the top bar. You will see all the categories of transitions on the left panel.

Step4 Once you select your desired transition effect, drag and drop it in between the video clips. You can add multiple transition effects for different video clips.

Play the video after you are done editing and adding transitions. Thereafter, click on Export button to save the video on your hard drive. You should follow the same steps on how to add transition effects in reels, status videos, and YouTube videos.
Part 3. Video transitions tips and tricks
If you want to make your video stand out by simply using video transition effects, you have to follow the following tips and tricks.
Consistency – Amateur video editors tend to use several extravagant transitions in one video that distract and even annoy the audience. You are using video transition effects not to distract but to smoothen the video content. Therefore, you need to be consistent with the video transition effect you use. You should use one or maximum of two transition effects throughout the video so that the audience does not get distracted.
Experiment – While it is true that you should not be using too many video transitions in one video, but you should definitely apply different video transition effects in different videos initially. This will help you to understand which transition is getting better traction, and thereafter, you can stick to it for the rest of your videos. This is particularly useful when you are making similar type of content for social media and video streaming sites.
Out of the Box – The reason you recommended Wondershare Filmora is that there is a huge collection of different types of transition effects. If you use the regular transitions such as fade, zoom, wipe, and dissolve, you cannot create an impression among your viewers. You have to use out of the box transitions so that your video can look and feel different even when you content is not. There are 3D effects, social media effects, and different genres of effects that can go well with your video content.
Judicious – There is a difference between transition effects and video effects. Transition effects should last only for a fraction of a second so that there is no aftereffect in mind. On the contrary, a video effect can last as long as required in the video. Therefore, do not stretch the duration of a transition effect and keep it as short as possible. Similarly, you should not use transition effects here and there unnecessarily. It should be used only when there is a proper scope such as scene cuts, mood changes, and subject changes.
Meaningful – Even transition effect has a meaning behind it and you should understand it and use wherever appropriate. For example, fade out effect signifies the fading of a scene or changing of mood. Similarly, a dissolve effect is appropriate when the subject is dissolved in certain thoughts or a scene is getting dissolved. That way the effect will look natural and more meaningful as well as impactful.
The Bottom Line
Video transition effects are essential in almost all types of videos. They enhance the video content and make the transition between scenes smoother. You should choose your video editor wisely so that you can avail different types of video transition effects. We recommend Wondershare Filmora for its better collection of video transition effects for all types of videos.
Step1 Download and install Filmora on your computer. Filmora is available for Windows and Mac users. Launch Filmora and click on New Project.
Step2 Drag and drop your video clips under Project Media folder. Thereafter, drag and drop them on Timeline.
If you have one raw video file, you can split it up into multiple video clips to add transitions in between them.
Step3 Go to Transitions tab located at the top bar. You will see all the categories of transitions on the left panel.
Step4 Once you select your desired transition effect, drag and drop it in between the video clips. You can add multiple transition effects for different video clips.
Play the video after you are done editing and adding transitions. Thereafter, click on Export button to save the video on your hard drive. You should follow the same steps on how to add transition effects in reels, status videos, and YouTube videos.
Part 3. Video transitions tips and tricks
If you want to make your video stand out by simply using video transition effects, you have to follow the following tips and tricks.
Consistency – Amateur video editors tend to use several extravagant transitions in one video that distract and even annoy the audience. You are using video transition effects not to distract but to smoothen the video content. Therefore, you need to be consistent with the video transition effect you use. You should use one or maximum of two transition effects throughout the video so that the audience does not get distracted.
Experiment – While it is true that you should not be using too many video transitions in one video, but you should definitely apply different video transition effects in different videos initially. This will help you to understand which transition is getting better traction, and thereafter, you can stick to it for the rest of your videos. This is particularly useful when you are making similar type of content for social media and video streaming sites.
Out of the Box – The reason you recommended Wondershare Filmora is that there is a huge collection of different types of transition effects. If you use the regular transitions such as fade, zoom, wipe, and dissolve, you cannot create an impression among your viewers. You have to use out of the box transitions so that your video can look and feel different even when you content is not. There are 3D effects, social media effects, and different genres of effects that can go well with your video content.
Judicious – There is a difference between transition effects and video effects. Transition effects should last only for a fraction of a second so that there is no aftereffect in mind. On the contrary, a video effect can last as long as required in the video. Therefore, do not stretch the duration of a transition effect and keep it as short as possible. Similarly, you should not use transition effects here and there unnecessarily. It should be used only when there is a proper scope such as scene cuts, mood changes, and subject changes.
Meaningful – Even transition effect has a meaning behind it and you should understand it and use wherever appropriate. For example, fade out effect signifies the fading of a scene or changing of mood. Similarly, a dissolve effect is appropriate when the subject is dissolved in certain thoughts or a scene is getting dissolved. That way the effect will look natural and more meaningful as well as impactful.
The Bottom Line
Video transition effects are essential in almost all types of videos. They enhance the video content and make the transition between scenes smoother. You should choose your video editor wisely so that you can avail different types of video transition effects. We recommend Wondershare Filmora for its better collection of video transition effects for all types of videos.
Tips to Make Cinematic Color Grading
New modern color grading software allows you to do point-and-click color grading right in your browser. Color changes are as easy and intuitive as painting or sketching.
You can choose from many different look presets and movie emulations based on Hollywood movies plus real-time previews of your favorite LUTs with this software.
Part 1. What is Cinematic Color Grading?
The cinematic look is all the rage these days and aims to mimic images captured on real film rather than digitally created. To achieve this effect, film directors use various means from lighting to cinematic color gradation. The latter is a powerful tool for bringing a cool or warm tone to a video and providing smooth color transitions to fall on an image that doesn’t look too real but feels emotional.
This kind of post-production processing, which produces beautiful results when used by color magicians, requires a deep understanding of colors and their effect on our psyche and even physiology. It’s not enough to watch a color grading video and use a LUT to get where you want. You should at the very least have an understanding of:
- Color wheel
- Color quality
- Color harmony and discord
- Warm and cool colors
- Color context
Part 2. Tips to make cinematic color grading
Here are three helpful tips to create cinematic-looking images in DaVinci Resolve.
In my 10-year career as a colorist, I’ve worked on every type of content imaginable: short, long, commercial, educational, episodic—you name it. And while each of these formats requires its approach, the one constant that spans them all is the client’s desire for a cinematic look.
Virtually all of us aspire to more cinematic color, but we often come up short—in part because the term itself has become too broad to effectively target. To focus on the goal, I like to think of “cinematic” as “an image whose key visual properties are consistent with those of printed film.”
The print film was the primary medium through which we consumed cinematic images for the first century of filmmaking and is therefore at the very heart of cinematic aesthetics. In this video, I’ll show you my top three secrets to achieving this aesthetic quickly and consistently in Davinci Resolve.
Tips1: Create Color Density
The first secret to film color is to create color density. Another key aesthetic property of film images is that colors can be either highly saturated or highly luminescent but cannot be both.
We can mimic this visual characteristic by identifying strongly saturated colors in our image and using the Hue vs. Lum to reduce their brightness. This simple technique is especially effective on pure primary colors (red, green, and blue).

Tips2: Separation Beats Saturation
The second secret to film color is prioritizing separation over saturation. When you feel like an image lacks overall color or pop, it’s all too easy to reach for the saturation knob, but that’s not a very cinematic solution.
Instead, try using split toning—pushing cool colors into shadows and warm colors into highlights—to increase tonal separation and add depth to an image. This characteristic is present in virtually every film print and is deeply evocative when applied correctly.
Tips3: Strong Contrast is Your Friend
The third secret of film colors is a strong contrast. This is not always easy, as a higher contrast look inherently requires more precision with exposure placement. Too often we pump up some contrast, end up with an image that looks blown out or too crisp, and then immediately back away from editing.
However, if you stick with high contrast long enough to improve your exposure, you’ll get a very different result and be well on your way to a more cinematic image.
Part 3. How to add color cinematic grading by using Filmora?
New modern color grading software allows you to do point-and-click color grading right in your browser. Color changes are as easy and intuitive as painting or sketching.
You can choose from many different look presets and movie emulations based on Hollywood movies plus real-time previews of your favorite LUTs with this software.
Wondershare Filmora is an option if you want to easily change the colors of your projects. You may just double-click the media after dragging it onto the editing timeline to change the contrast, saturation, brightness, and hue.
Despite its speed, it also allows you to merge, edit audio, divide, rotate, and apply as many cool video effects as you like.
Step1Add the media
After installing Wondershare Filmora, click the New Project and Import button to easily find and load your videos.
Step2Correct the color [Basic and Advanced]
In the timeline, double-click the video editing window. Select the “Color” panel and make adjustments.
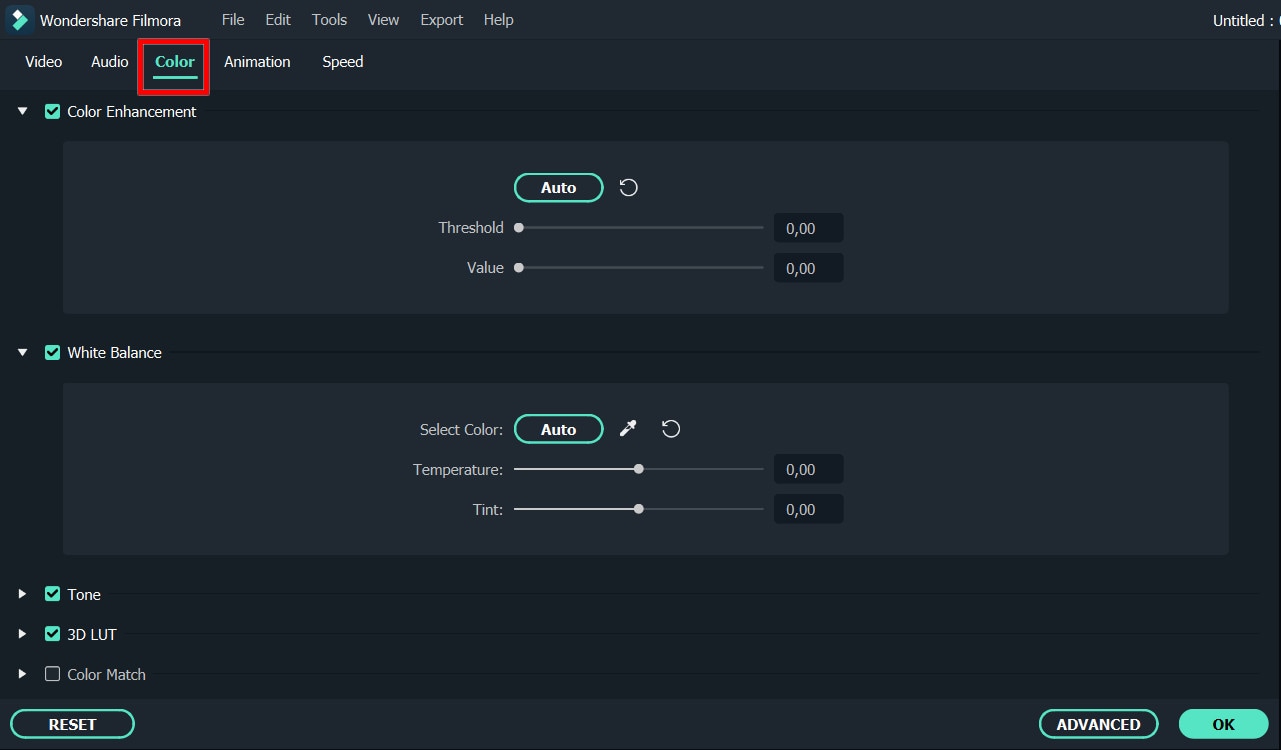
- Contrast: By adjusting this setting, you can control the brightness and color in different parts of the image.
- Saturation: This setting highlights the gray part of the video to a shade. You can adjust it to make the colors of the entire video image appear more saturated or more subdued.
- Brightness: You can change this setting to adjust the overall darkness and lightness of your project.
- Hue: Hue is generally the lightness of a color. Let’s say that when red is saturated with white, it creates a shade of pink.
- 3D LUT: 3D lookup tables provide your media with Hollywood movie color sets like the 007 series, Batman, Harry Porter, etc.
Hover over the indicator to adjust the color correction settings. Then left click on it and move the slider. The corresponding value stabilizes after releasing the mouse button.
With Filmora, you also have access to advanced color correction. Click the Advanced Color Tuning icon to enter the appropriate window where you can fine-tune the color or use preset templates.
The Preferences tab has a variety of templates, including Movie, Normal, 3D LUT, and Vignette. In the Edit tab, you can adjust color temperature, white balance, hue, 3D LUT, color, HSL, light, vignette, etc.
Step3Preview and save the new video
When you are satisfied with your creation, click “Export”. Then click the Settings button and save the new videos in different formats in the Format tab. You can also export the video directly to Vimeo or YouTube or burn it to DVD for better preservation.
Filmora’s color correction tools will make your videos look natural, more attractive, more vibrant, consistent, and professional.
Color Correction Presets
Color correction presets help your video achieve an enhanced cinematic look. Adjust gives you control over fine-tuning the colors in your shots. You can make various adjustments such as color temperature and exposure.
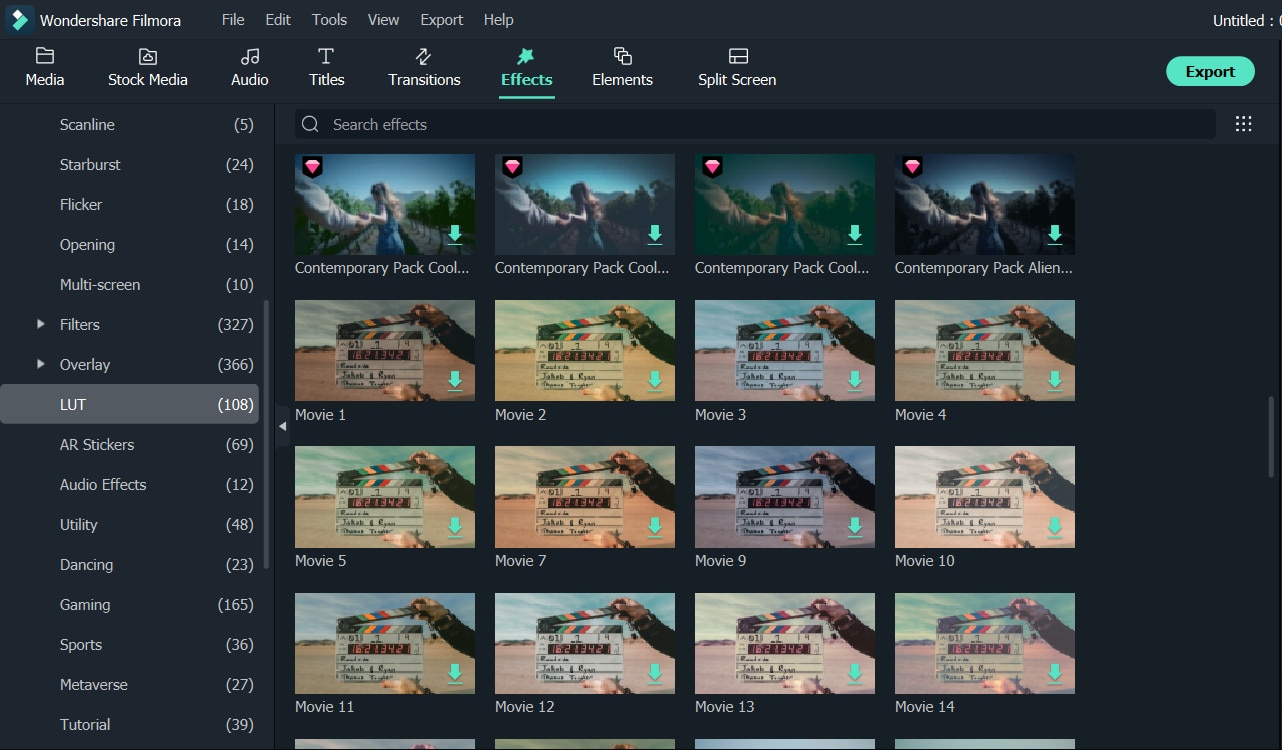
In the “Effects > LUT” tab, you’ll see an extensive selection of preset color settings. These include Vignettes, Movie Looks Like Old Movies, and Cinematic 3D LUT effects such as Harry Potter, Game of Thrones, House of Cards, and Mission Impossible.
Filmora’s Color Correction Advanced Tool also categorizes your presets. Click on All Presents to see six categories: Favorites, Custom, 3D Lut, Common, Film, and Vignette.
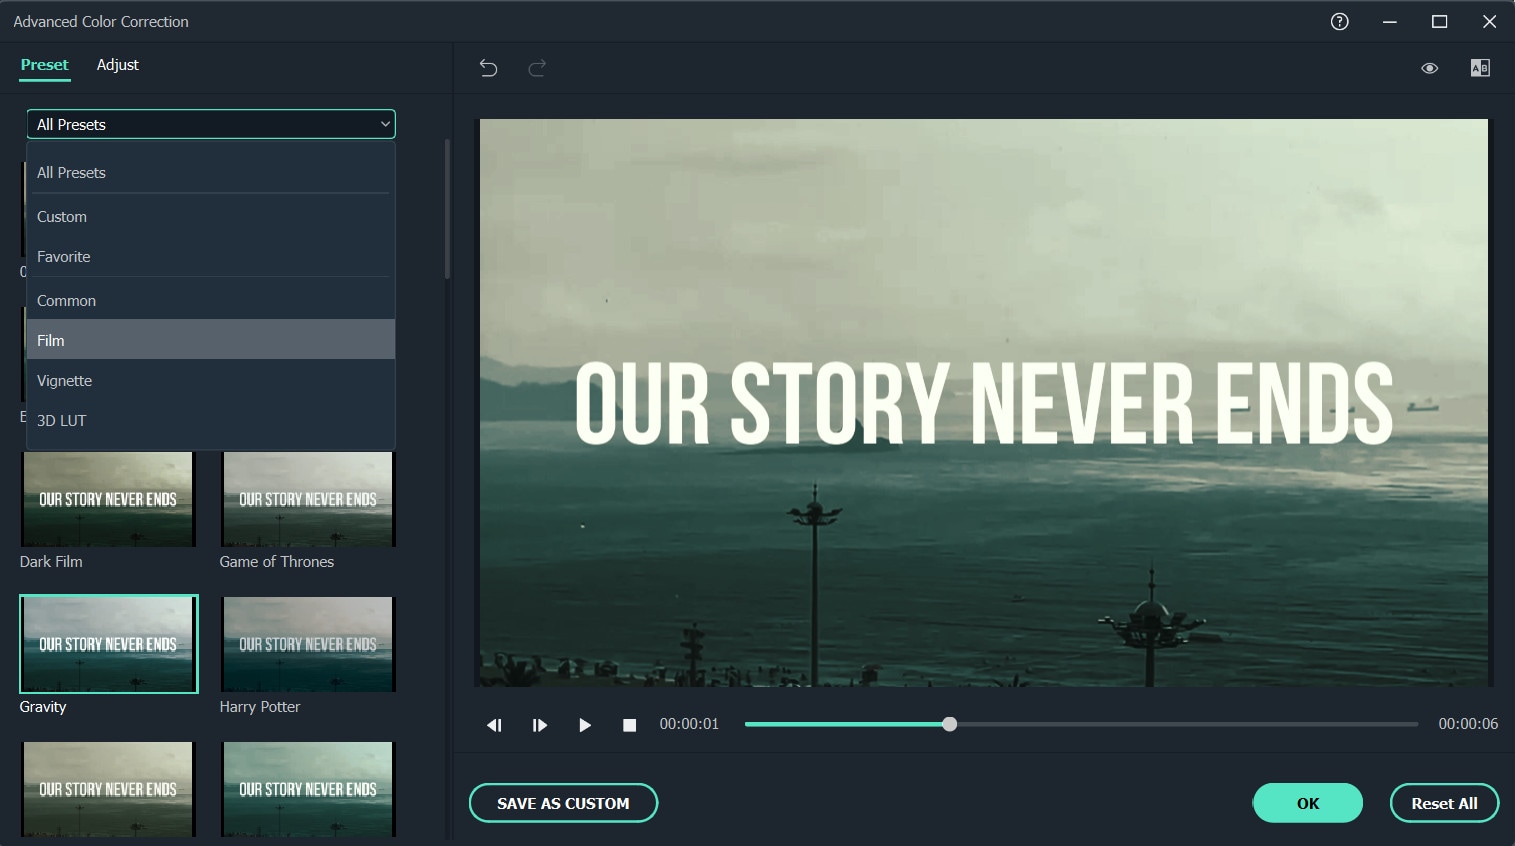
Double-click a preset to apply it to your video. You can see how it looks in the Advanced Color Correction preview window. If you are satisfied with the results, click OK.
Conclusion
Above are the steps to give your video a cinematic look using Wondershare Filmora, hope this helps if you are wondering how to do it. As we can see above, using Filmora video editor will make you more creative in making videos with a suitable emotional tone.
Free Download For Win 7 or later(64-bit)
Free Download For macOS 10.14 or later
Replacing Sky Background Using Adobe Photoshop: A Comprehensive Guide
Editing images is an essential point for photographers to make their work stand out. Creators use certain editing tools to polish their captured media. Suppose having an image with low sunlight that dims the natural beauty of the surroundings. In this situation, replacing sky backgrounds seems the only way to set a stunning landscape.
Photographers mostly rely on Adobe Photoshop sky replacement packs for this purpose. Using this option, users put life in their dull media with skies. Without further delay, learn everything about sky replacement Photoshop in this guide.
Sky Replacement A cross-platform works like magic for background removal or sky replacement photos!
Free Download Free Download Learn More

Part 1: How Good Has Photoshop Been in Helping Users Make Crisp Pictures and Media?
Adobe Photoshop is a graphics editor tool designed for professional digital art. It is widely used to grow business through designing virtual backgrounds and graphics. You can adjust the subject’s features and poses to make perfect portraits. To transform letters into artistic expressions, it offers Photoshop brushes and paints. Users can collaborate with their teammates and share work for approvals with this tool.
Key Features To Look Out In Adobe Photoshop
This tool can accelerate workflow with its latest features. It allows you to expand, add, and remove content from images with high-quality results. The following are some key features of Photoshop for your better understanding of this tool:
- It offers a sky replacement Photoshop feature that can change the sky from captured images.
- You can remove and replace your background in Photoshop and refine it as required.
- With the remove object feature, users can erase unwanted objects from images.
- Use the “Colorize” feature and make your black-and-white images colorful.
- Enhance workflow by using “Layer” masking that hides part of images without erasing them.
Part 2: A Detailed Guide on How to Replace Sky Background in Photoshop?
With AI integration in Adobe Photoshop, you can change skies with simple clicks. It provides a collection of skies from the Blue Skies, Spectacular, and sunset categories. Also, users can import any sky from their gallery or download one from presets. To do so, let us show you how to change the sky in Photoshop in given steps:
Step 1: Bring your desired image to the Adobe Photoshop. Head to the top toolbar and click the “Edit” option next to the “File.” Look for the “Sky Replacement” option from the list.

Step 2: After tapping “Sky Replacement,” you will get a respective screen on your front. Press the downward symbol next to the “Sky” and pick one sky from available options.

Step 3: Alternatively, you can hit the “+” icon and browse the sky image from your system. When you choose one, it gets added to the existing sky list. Select that and tap the “OK” button to apply changes in your media.

Part 3: An Alternative Solution: Wondershare Filmora Providing Workability with Easy Background Replacement
Changing sky in Photoshop is difficult for beginners and requires a basic skill set. It may take a lot of your time to understand its functionalities. That’s why choosing a tool with simple operation and high-quality output is important. In this regard, you should use Wondershare Filmora as a better option for everyone. It is a video editor that offers a variety of powerful features.
Using this tool, you can remove and change the background from your images or videos. With the integration of AI, it can automatically detect the object and foreground.
Other Prominent Video Editing Features
Apart from changing background, Filmora can perform A to Z video editing tasks. Let’s explore some of the key features to overview its fruitful functionalities:
Free Download For Win 7 or later(64-bit)
Free Download For macOS 10.14 or later
1. AI Text-to-Video
Who needs a camera and crew when you can effortlessly generate video from text? Filmora can transform your text into an engaging storytelling video with just text prompts. After getting the video, you can customize the video’s appearance with fonts, styles, and colors. Users can add smooth transitions between text elements for a cohesive flow.

2. AI Music Generator
Sometimes, we get tired of searching for music that perfectly aligns with our video content. In such cases, AI music generator saves us by providing the music we want. It offers you many options to choose from different genres and styles. You can set the music duration and number of tracks you want to generate. Then, you can make manual adjustments like balancing sound and auto normalization.

3. AI Image
Similar to text-to-video, Filmora can generate images from text. To do so, just describe your imagination in simple words. Then, you are asked to pick one resolution from given options. You can use the generated images in your projects directly. It allows you to generate an image from your chosen style. A few of the styles include Freestyle, Cyberpunk, and Futuristic.

4. AI Copilot Editing
While editing projects, humans often require suggestions or assistance. For this purpose, Filmora provides you with AI Copilot as your personal AI assistant. It will prevent errors in your editing by sending error messages. You can get the best editing solution as per your needs. This way, the quality of your project gets increased.

5. AI Vocal Remover
With advanced algorithms, it is an exceptional feature of Filmora. It relieves your breath by removing unwanted vocals from your audio or video. You can now completely remove vocal sounds from the video and add your recorded ones. It’s an automated process that separates voice and background in the media panel.

Steps To Remove Background Using Two Unique Ways with Wondershare Filmora
Filmora is one of the easiest tools to operate that anyone can use to get desired results. It allows users to approach the same features in different ways. Similarly, there are two unique ways to remove or change the sky Photoshop background, which are given below.
Free Download For Win 7 or later(64-bit)
Free Download For macOS 10.14 or later
Method 1: Using Chroma Key
Step 1: Start your project in Filmora and import two files in the timeline. Bring the background clip first in the timeline, then the original file. Cut the unnecessary portion of background-clip.

Step 2: Keep them selected and come to the “AI Tools” option in the right-side panel. Enable the “Chroma Key” toggle, and AI will automatically replace the background. You can use the “Tolerance,” “Edge Thickness,” and “Edge Feather” sliders for manual changes.

Method 2: Through AI Portrait
Step 1: Import your background clip and main video in Filmora 13. Place the background clip on track 1 and the main clip on the 2nd track in the timeline.

Step 2: Hold both of them and head to the right-side panel. Press the “AI Tools” option and scroll to access the “AI Portrait.” Enable that option, and your background will automatically change with AI. Now, you can make manual changes by moving the “Edge Thickness” and “Feather” sliders.

Conclusion
To wrap up, let’s say that Sky Photoshop sets the right tone for your media with landscapes. On the other hand, this feature might prove difficult for some users to handle. Thus, they can rely on Wondershare Filmora for convenience. Beginners and professionals can benefit from its extraordinary features in video editing.
Free Download Free Download Learn More
Part 1: How Good Has Photoshop Been in Helping Users Make Crisp Pictures and Media?
Adobe Photoshop is a graphics editor tool designed for professional digital art. It is widely used to grow business through designing virtual backgrounds and graphics. You can adjust the subject’s features and poses to make perfect portraits. To transform letters into artistic expressions, it offers Photoshop brushes and paints. Users can collaborate with their teammates and share work for approvals with this tool.
Key Features To Look Out In Adobe Photoshop
This tool can accelerate workflow with its latest features. It allows you to expand, add, and remove content from images with high-quality results. The following are some key features of Photoshop for your better understanding of this tool:
- It offers a sky replacement Photoshop feature that can change the sky from captured images.
- You can remove and replace your background in Photoshop and refine it as required.
- With the remove object feature, users can erase unwanted objects from images.
- Use the “Colorize” feature and make your black-and-white images colorful.
- Enhance workflow by using “Layer” masking that hides part of images without erasing them.
Part 2: A Detailed Guide on How to Replace Sky Background in Photoshop?
With AI integration in Adobe Photoshop, you can change skies with simple clicks. It provides a collection of skies from the Blue Skies, Spectacular, and sunset categories. Also, users can import any sky from their gallery or download one from presets. To do so, let us show you how to change the sky in Photoshop in given steps:
Step 1: Bring your desired image to the Adobe Photoshop. Head to the top toolbar and click the “Edit” option next to the “File.” Look for the “Sky Replacement” option from the list.
Step 2: After tapping “Sky Replacement,” you will get a respective screen on your front. Press the downward symbol next to the “Sky” and pick one sky from available options.
Step 3: Alternatively, you can hit the “+” icon and browse the sky image from your system. When you choose one, it gets added to the existing sky list. Select that and tap the “OK” button to apply changes in your media.
Part 3: An Alternative Solution: Wondershare Filmora Providing Workability with Easy Background Replacement
Changing sky in Photoshop is difficult for beginners and requires a basic skill set. It may take a lot of your time to understand its functionalities. That’s why choosing a tool with simple operation and high-quality output is important. In this regard, you should use Wondershare Filmora as a better option for everyone. It is a video editor that offers a variety of powerful features.
Using this tool, you can remove and change the background from your images or videos. With the integration of AI, it can automatically detect the object and foreground.
Other Prominent Video Editing Features
Apart from changing background, Filmora can perform A to Z video editing tasks. Let’s explore some of the key features to overview its fruitful functionalities:
Free Download For Win 7 or later(64-bit)
Free Download For macOS 10.14 or later
1. AI Text-to-Video
Who needs a camera and crew when you can effortlessly generate video from text? Filmora can transform your text into an engaging storytelling video with just text prompts. After getting the video, you can customize the video’s appearance with fonts, styles, and colors. Users can add smooth transitions between text elements for a cohesive flow.
2. AI Music Generator
Sometimes, we get tired of searching for music that perfectly aligns with our video content. In such cases, AI music generator saves us by providing the music we want. It offers you many options to choose from different genres and styles. You can set the music duration and number of tracks you want to generate. Then, you can make manual adjustments like balancing sound and auto normalization.
3. AI Image
Similar to text-to-video, Filmora can generate images from text. To do so, just describe your imagination in simple words. Then, you are asked to pick one resolution from given options. You can use the generated images in your projects directly. It allows you to generate an image from your chosen style. A few of the styles include Freestyle, Cyberpunk, and Futuristic.
4. AI Copilot Editing
While editing projects, humans often require suggestions or assistance. For this purpose, Filmora provides you with AI Copilot as your personal AI assistant. It will prevent errors in your editing by sending error messages. You can get the best editing solution as per your needs. This way, the quality of your project gets increased.
5. AI Vocal Remover
With advanced algorithms, it is an exceptional feature of Filmora. It relieves your breath by removing unwanted vocals from your audio or video. You can now completely remove vocal sounds from the video and add your recorded ones. It’s an automated process that separates voice and background in the media panel.
Steps To Remove Background Using Two Unique Ways with Wondershare Filmora
Filmora is one of the easiest tools to operate that anyone can use to get desired results. It allows users to approach the same features in different ways. Similarly, there are two unique ways to remove or change the sky Photoshop background, which are given below.
Free Download For Win 7 or later(64-bit)
Free Download For macOS 10.14 or later
Method 1: Using Chroma Key
Step 1: Start your project in Filmora and import two files in the timeline. Bring the background clip first in the timeline, then the original file. Cut the unnecessary portion of background-clip.
Step 2: Keep them selected and come to the “AI Tools” option in the right-side panel. Enable the “Chroma Key” toggle, and AI will automatically replace the background. You can use the “Tolerance,” “Edge Thickness,” and “Edge Feather” sliders for manual changes.
Method 2: Through AI Portrait
Step 1: Import your background clip and main video in Filmora 13. Place the background clip on track 1 and the main clip on the 2nd track in the timeline.
Step 2: Hold both of them and head to the right-side panel. Press the “AI Tools” option and scroll to access the “AI Portrait.” Enable that option, and your background will automatically change with AI. Now, you can make manual changes by moving the “Edge Thickness” and “Feather” sliders.
Conclusion
To wrap up, let’s say that Sky Photoshop sets the right tone for your media with landscapes. On the other hand, this feature might prove difficult for some users to handle. Thus, they can rely on Wondershare Filmora for convenience. Beginners and professionals can benefit from its extraordinary features in video editing.
Start Your Creative Journey Now. Follow This Step-by-Step Guide on How to Add Double Exposure Effects to Your Personal Videos by Using the Filmora Video Editor
Are you an aspiring video creator, or do you enjoy editing videos that captivate your viewers’ attention? In this digital era, it is essential to edit your videos by using tools that can help you produce a masterpiece and will impress your audience. With Filmora Video Editor, it is easier to create polished and professional-looking videos that stand out from the rest.
Free Download For Win 7 or later(64-bit)
Free Download For macOS 10.14 or later
To start your creative journey, you can hone your skills by focusing on at least one technique and progressively learning new skills. One of the various video editing techniques you can employ is double exposure. This method is based on an old technique in photography in which a film is exposed twice to create a single image. This article shows you how to use the same method to combine two or more video clips and create a double exposure effect.
You can create artistic videos that tell various stories and captivate viewers by using Filmora. The following steps describe how to create a double exposure effect in Filmora.
Step1 Download the Filmora application

Before you start editing, click https://bit.ly/3tav2d5 to download the Filmora app. On the page that appears, click the Free Download option. Then, the Filmora installer is automatically downloaded. To start installing Filmora, double-click the installer and click Agree to agree with the terms and conditions. Then, wait for approximately 2 minutes for the installation to complete.
Step2 Start a new project in Filmora

After a successful installation, the app automatically runs, and you can start editing videos. Click New Project to start a project on a clean canvas.
Before starting a new project, we recommend you plan a theme for your videos. You can incorporate different elements into your videos to convey a dramatic, light, or fun theme. This step will help you communicate the mood and message you want to convey to the audience.
Step3 Select a foreground video

To create a trendy double exposure effect, record a video clip with a white or neutral background. Then, import the specified video to Filmora. In the second layer of the video editing pane, drag the video.
The first video is called the foreground video, which serves as the base video to achieve the desired double exposure effect. It is important to choose neutral or calm colors to make it easier for you to remove the background and highlight the main subject of your video.
Step4 Edit the foreground video

Edit the foreground video by adjusting the color settings. Click the Color Correction icon to open the color settings. In the Advanced Color Tuning box that appears, click Adjust. In this article, the value of Exposure is set to 18, and Contrast is set to 28. Then, Vibrance and Saturation are set to -100. In the Light settings, the values of Highlights and Shadows are set to -100, Whites is set to 0, and Blacks is set to -30. You can experiment and play with the settings based on the theme that you want to achieve.
Step5 Select a background video

For the background video, select a video clip and import the video to Filmora. Then, drag the video in a layer below the foreground video.
When you select a background video, make sure that the video is vibrant, colorful, and has lots of texture. For example, you can select landscapes, flowers, leaves, textured patterns, city lights, sunsets, or other graphic components. The colors and lighting in the background video significantly impact the final output’s overall appearance.
Step6 Blend the foreground and background videos

If you want to produce a perfect double-exposed video, blending layers is properly essential. To do this, double click the foreground video. Go to the Compositing option and set Blending Mode to Lighten. You can also configure Blending Mode based on your preference.
The steps that are outlined in this article can help you apply double exposure effects to your videos. You can modify your videos to your preferences by using all the resources that Filmora provides.
A simple video clip with a double-exposure effect adds a dramatic and dreamy effect to it. The creator can work with colors, exposures, and brightness to achieve a double-exposure effect. This technique provides creative results and allows the video creator to tell a story to the audience in a manner that a plain video clip cannot convey. It is useful, especially when editing personal or professional videos, such as documentaries, wedding videos, travel vlogs, and other artistic works.
Before, the double-exposure effect could only be achieved by using cameras and specialized photographic skills. These days, creators can use Filmora Video Editor to replicate the double-exposure effect in just a few simple steps. Filmora Video Editor is an easy-to-use tool that has helped over 85 million video creators from 150 countries around the world. Videos are compatible with iPhone, iPad, Samsung, Amazon, HTC, PSP, and many more. You can also watch quality videos in AVI, VOB, MP4, WMV, 3GP, MKV, AVI, and more.
To help you save time, Filmora simplifies complex features and frequently improves its services by adding new features such as speed ramping, masking, auto beat sync, and auto synchronization. The video editor also allows creators to have more creative freedom over their videos and share their outputs on different platforms such as YouTube, Facebook, and Instagram.
For more information, you can visit http://www.wondershare.com/ or visit the social media accounts of Filmora to get the most recent launches and updates.
Download Filmora Video Editor now and tell the world your creative stories.
Free Download For macOS 10.14 or later
To start your creative journey, you can hone your skills by focusing on at least one technique and progressively learning new skills. One of the various video editing techniques you can employ is double exposure. This method is based on an old technique in photography in which a film is exposed twice to create a single image. This article shows you how to use the same method to combine two or more video clips and create a double exposure effect.
You can create artistic videos that tell various stories and captivate viewers by using Filmora. The following steps describe how to create a double exposure effect in Filmora.
Step1 Download the Filmora application
Before you start editing, click https://bit.ly/3tav2d5 to download the Filmora app. On the page that appears, click the Free Download option. Then, the Filmora installer is automatically downloaded. To start installing Filmora, double-click the installer and click Agree to agree with the terms and conditions. Then, wait for approximately 2 minutes for the installation to complete.
Step2 Start a new project in Filmora
After a successful installation, the app automatically runs, and you can start editing videos. Click New Project to start a project on a clean canvas.
Before starting a new project, we recommend you plan a theme for your videos. You can incorporate different elements into your videos to convey a dramatic, light, or fun theme. This step will help you communicate the mood and message you want to convey to the audience.
Step3 Select a foreground video
To create a trendy double exposure effect, record a video clip with a white or neutral background. Then, import the specified video to Filmora. In the second layer of the video editing pane, drag the video.
The first video is called the foreground video, which serves as the base video to achieve the desired double exposure effect. It is important to choose neutral or calm colors to make it easier for you to remove the background and highlight the main subject of your video.
Step4 Edit the foreground video
Edit the foreground video by adjusting the color settings. Click the Color Correction icon to open the color settings. In the Advanced Color Tuning box that appears, click Adjust. In this article, the value of Exposure is set to 18, and Contrast is set to 28. Then, Vibrance and Saturation are set to -100. In the Light settings, the values of Highlights and Shadows are set to -100, Whites is set to 0, and Blacks is set to -30. You can experiment and play with the settings based on the theme that you want to achieve.
Step5 Select a background video
For the background video, select a video clip and import the video to Filmora. Then, drag the video in a layer below the foreground video.
When you select a background video, make sure that the video is vibrant, colorful, and has lots of texture. For example, you can select landscapes, flowers, leaves, textured patterns, city lights, sunsets, or other graphic components. The colors and lighting in the background video significantly impact the final output’s overall appearance.
Step6 Blend the foreground and background videos
If you want to produce a perfect double-exposed video, blending layers is properly essential. To do this, double click the foreground video. Go to the Compositing option and set Blending Mode to Lighten. You can also configure Blending Mode based on your preference.
The steps that are outlined in this article can help you apply double exposure effects to your videos. You can modify your videos to your preferences by using all the resources that Filmora provides.
A simple video clip with a double-exposure effect adds a dramatic and dreamy effect to it. The creator can work with colors, exposures, and brightness to achieve a double-exposure effect. This technique provides creative results and allows the video creator to tell a story to the audience in a manner that a plain video clip cannot convey. It is useful, especially when editing personal or professional videos, such as documentaries, wedding videos, travel vlogs, and other artistic works.
Before, the double-exposure effect could only be achieved by using cameras and specialized photographic skills. These days, creators can use Filmora Video Editor to replicate the double-exposure effect in just a few simple steps. Filmora Video Editor is an easy-to-use tool that has helped over 85 million video creators from 150 countries around the world. Videos are compatible with iPhone, iPad, Samsung, Amazon, HTC, PSP, and many more. You can also watch quality videos in AVI, VOB, MP4, WMV, 3GP, MKV, AVI, and more.
To help you save time, Filmora simplifies complex features and frequently improves its services by adding new features such as speed ramping, masking, auto beat sync, and auto synchronization. The video editor also allows creators to have more creative freedom over their videos and share their outputs on different platforms such as YouTube, Facebook, and Instagram.
For more information, you can visit http://www.wondershare.com/ or visit the social media accounts of Filmora to get the most recent launches and updates.
Download Filmora Video Editor now and tell the world your creative stories.
Also read:
- Updated Detailed Steps to Rotate Videos in Lightworks for 2024
- Updated Top 5 Online Video Converter for Instagram
- New Little Known Ways of Adding Emojis to Photos on iPhone & Android for 2024
- New Best Ideas for Time Lapse Video
- Looking for Exciting Methods to Create Alluring GIFs Worthy of Making a Mass Appeal? Heres All About GIF Design You Will Ever Want to Know and Learn
- How To Change Text Color In Premiere Pro
- 2024 Approved Renderforest Is a Great Online Editing Platform to Use for Many Video Creators. If You Want to Make an Intro Video for Your Channel or Daily Vlogs, You Can Follow This Article to Know More Details
- Updated How to Add Text Effects in Adobe Premiere Pro for 2024
- Bored of Extraneous Software Downloads and Program Installations to Edit Your Videos? The Best Video Editing Online Utilities Are Here at Your Rescue for 2024
- In 2024, How to Easily Add VHS Green Screen to Your Video
- New How to Crop a Video in Windows Media Player for 2024
- New In 2024, 10 Best Meme Text to Speech Tools Windows, Mac, Android, iPhone
- Updated If You Are a Free Video Editor Being a Windows User, VSDC Free Video Editor Is a Great Choice. But Is It the Best Video Editor You Should Use? Find Out From Our VSDC Free Video Editor Review
- Updated Are You Looking for Different Solutions to Add VHS Effects to Your Videos? Dont Worry; This Article Will Provide Easy Solutions to Apply VHS
- New In 2024, Adobe Premiere Pro Download and Use Guide In Depth
- 2024 Approved Top 6 Drones for Videography
- How To Edit Youtube Videos In Easy Steps for 2024
- Guiding Principles of Track Matte and Tracking in Adobe After Effects
- Updated How Can Filmora Create an Audio Visualizer Project for a Song? All Steps, From Launching the App to Editing the Text, Are Detailed Here
- Updated MP3 CUTTER DOWNLOADMP3 Cutter Download Is One of the Most Reliable Tools for Editing of Music Files in a Fast and Friendly Way
- 2024 Approved How to Calculate & Change Video Aspect Ratio Online
- Updated Do You Wish to Create High-Quality Videos and Experience Effective Videos with Editing? No Problem at All because the Keyboard Shortcuts Listed Here Will Assist You
- Twitch Green Screen Guide
- New How To Brighten Video In Premiere Pro | Step By Step Guide for 2024
- Have You Ever Watched a Movie Where You Felt the Filmmakers Left You Hanging? Yea, Thats What Freeze Frame Does. Here We Will Enlighten You on What It Is, Freeze Frame Examples Where It Has Been Helpful to Drive Our Point Home
- New 2024 Approved How To Mirror a Video Clip in Premiere Pro
- Updated 2024 Approved 8 Frame Rate Video Converters You Must Try
- Ideas That Will Help You Out in Making Transparent Image
- Denoise Video in Adobe Premiere Pro – Audio and Video Noise Removal
- FLV Editors for Windows 11/10/8.1/8/7 Easily Edit FLV Videos on PC for 2024
- 2024 Approved Steps to Create One Click Video Reverse Effect in Filmora
- Updated Best GIF to MOV Converters for 2024
- Updated In 2024, The Latest 100+ Best TikTok Captions to Improve Your Next Post
- SBV to SRT How to Convert YouTube SBV Subtitle to SRT Format for 2024
- Updated How to Add Photos to Tik Tok Video for 2024
- Updated What Does It Mean to Color Grade Your Images, and Why Is It so Important? Does It Mean the Same Thing as a Color Correction? Read on to Gather All the Information You Need on Color Grading Photography
- Updated In 2024, Best Jump Cut Editing Tricks
- Updated In 2024, 10 Best Meme Text to Speech Tools Windows, Mac, Android, iPhone&Online
- Updated Guide Cropping and Combining Content in Wondershare Filmora Latest
- New Beginners Guide About WMV Format and Best WMV Video Editor for 2024
- New In 2024, 15 Best Travel Vloggers That You Should Follow
- Updated This Is the Method Employed During Every Evening Weather Broadcast The Newscaster Is Standing in Front of a Blank Screen, but the Viewers at Home See a Weather Map
- Splice App for Android - Guide to Download & Use
- In 2024, Difference Between Time Lapse and Hyperlapse
- How To Fake GPS On Infinix Note 30 For Mobile Legends? | Dr.fone
- In 2024, How to Detect and Remove Spyware on Realme V30? | Dr.fone
- Android Screen Stuck General Lava Blaze 2 Partly Screen Unresponsive | Dr.fone
- Top 4 Ways to Trace Oppo F25 Pro 5G Location | Dr.fone
- Process of Screen Sharing Nokia G22 to PC- Detailed Steps | Dr.fone
- 8 Solutions to Solve YouTube App Crashing on Honor Magic Vs 2 | Dr.fone
- In 2024, How to Successfully Bypass iCloud Activation Lock on Apple iPhone 11 Pro Max
- In 2024, Ways to stop parent tracking your Apple iPhone 11 Pro | Dr.fone
- In 2024, Is GSM Flasher ADB Legit? Full Review To Bypass Your Motorola Edge 40 ProFRP Lock
- Different Methods for Resetting Huawei P60 Phones with Screen Locked and Not | Dr.fone
- Full Guide to Fix iToolab AnyGO Not Working On Oppo Find X7 | Dr.fone
- In 2024, Forgotten The Voicemail Password Of Infinix Zero 5G 2023 Turbo? Try These Fixes
- How to Reset Poco X6 without Losing Data | Dr.fone
- In 2024, How to Unlock Verizon Apple iPhone SE
- How to Stop Life360 from Tracking You On Google Pixel Fold? | Dr.fone
- How to Screen Mirroring Vivo V29 to PC? | Dr.fone
- In 2024, How to Fix Pokemon Go Route Not Working On Huawei P60? | Dr.fone
- How to Stop My Spouse from Spying on My Xiaomi Redmi Note 12R | Dr.fone
- In 2024, Will Pokémon Go Ban the Account if You Use PGSharp On Motorola Razr 40 | Dr.fone
- In 2024, How to Fake GPS on Android without Mock Location For your Vivo V27 | Dr.fone
- How to Unlock Apple iPhone 11 Pro with a Mask On
- In 2024, Unlock Your Device iCloud DNS Bypass Explained and Tested, Plus Easy Alternatives On Apple iPhone 14 Pro
- MKV playback issues on Samsung Galaxy A14 4G
- Title: In 2024, Looking for the Simple Steps to Add Transition Effects in Your Video? We Will Illustrate How to Add Transition in Filmora and Mention Tips and Tricks for Video Transition Effects
- Author: Chloe
- Created at : 2024-04-24 07:08:22
- Updated at : 2024-04-25 07:08:22
- Link: https://ai-editing-video.techidaily.com/in-2024-looking-for-the-simple-steps-to-add-transition-effects-in-your-video-we-will-illustrate-how-to-add-transition-in-filmora-and-mention-tips-and-tricks/
- License: This work is licensed under CC BY-NC-SA 4.0.
