:max_bytes(150000):strip_icc():format(webp)/dualsenseedge-749ef030e3c84376926d817913be924b.jpg)
In 2024, Master Premiere Pro Custom Sequence Presets

Master Premiere Pro: Custom Sequence Presets
You’ve probably heard of Adobe Premiere Pro – it’s a top-tier video editing software that’s widely recognized in the market. But have you delved into the nitty-gritty of sequence presets? A custom sequence preset is your best friend for maintaining consistency across projects.
It allows users to save specific settings for sequence attributes like frame rate, resolution, and audio settings. Instead of reconfiguring these settings for each new project, a custom sequence preset lets you jump right into editing. Now, how do you create one? Keep reading!
Part 1: How to Create a Custom Sequence in Premiere Pro
Creating a custom sequence is like tailoring a shirt to fit you perfectly. Here’s a step-by-step guide to help you do just that:
Step 1: Displays the New Sequence Window
Begin by launching Adobe Premiere Pro. Once opened, navigate to the top menu and select File > New > Sequence. This will open up the New Sequence window, where all the magic happens!
Step 2: Change the Editing Mode to Custom in the Settings Panel
You’ll see several tabs in the New Sequence window, but we will focus on the “Settings” tab for our purposes. Click on it.
Here, you’ll find the ‘Editing Mode’ dropdown menu. By default, it’s set to a specific format like ‘DSLR’ or ‘AVCHD.’ Change this to ‘Custom.’ This will unlock a plethora of options for you to play with.
Deep Dive into Settings:
- Frame Size: Define your video’s width and height. Remember, 1920x1080 is Full HD, and 3840x2160 is 4K. Choose based on your project needs.
- Frame Rate: 24fps is the cinematic standard, but if you’re creating content for TV or web, 30fps or 60fps might be more suitable.
- Pixel Aspect Ratio: Stick with ‘Square Pixels’ unless you have a specific reason to do otherwise.
- Fields: Choose ‘No Fields’ for progressive footage. If you’re unsure, this is a safe bet.
- Audio Settings: Here, you can configure the sample rate, among other things. 48000Hz is standard for video.
Step 3: Give the New Preset a Name and Save It
Once you’ve customized the settings to your satisfaction, it’s time to save this configuration for future use. At the bottom of the New Sequence window, you’ll see a ‘Save Preset’ button. Click on it.
A pop-up window will show up, requesting you to provide a name for your new preset. Choose something descriptive so you can easily recognize it later. Once named, click ‘OK’.
Your custom sequence preset is now saved and will appear under the ‘Custom’ folder in the ‘Sequence Presets’ tab.
Part 2: Why Custom Sequence Presets are Essential for Efficient Editing
As you delve deeper into video editing, you’ll begin to appreciate the little things that shave off minutes from your workflow, allowing you to dedicate more time to the creative process. This is precisely where the utility of custom sequence presets in Premiere Pro comes into play. But why are these presets so crucial?
- Consistency Across Projects: If you’re managing multiple projects or a series of videos, having a standard format ensures that all your content has a uniform look and feel. Consistency is a hallmark of professional-grade content. It’s not just about the visuals – maintaining a uniform audio quality and format is equally significant. With a preset, you no longer need to remember the minutiae of each setting, ensuring consistency effortlessly.
- Speed Up Your Workflow: Every minute you spend adjusting the sequence settings is a minute less you have for cutting, color correcting, audio mixing, or adding those special effects that make your videos pop. Over time, those minutes can add up to hours. By using a custom sequence preset, you can jump straight into the creative part of editing without the preliminary setup.
- Avoid Common Mistakes: Have you ever rendered an entire project only to find that the frame rate was off or the audio was set to the wrong sample rate? These kinds of errors can occur when setting up a new sequence from scratch each time. By relying on a preset, you mitigate the risks of such oversights.
- Personalized Templates for Different Platforms: Different platforms may have varying preferred settings. For instance, the ideal video format for YouTube might differ from that of Instagram or TikTok. Instead of Googling these settings each time, you can have a custom sequence preset ready for each platform, ensuring your content is optimized wherever it’s destined.
- Ease of Collaboration: If you’re working as part of a team, having standard sequence presets ensures everyone is on the same page. This is particularly handy when multiple editors are working on different segments of the same project. With custom presets, you’re not just aligning sequences but also visions.
Incorporating this practice into your editing routine might initially seem trivial, but its benefits compound with time.
Part 3: Summary
Creating a custom sequence preset in Adobe Premiere Pro isn’t just about streamlining your workflow – it’s about ensuring consistency across your projects.
By saving your most-used settings, you’re creating a base template that can be pulled up any time, granting you more time for the creative process.
Adobe Premiere Pro’s interface is designed to make tasks like these intuitive, so even if you’re a beginner, with a bit of practice, you’ll be creating custom sequence presets like a pro.
A Comprehensive Guide to Slow Motion YouTube Videos and How to Manage Them
Everyone loves slow-mo scenes, dance videos, and content in related genres. Creativity is embedded in slow-motion videos to elevate your content. Not only do they refine the quality of your videos, but they also improve comprehension. YouTube is one of the well-known sources for gaining information. To understand a practical procedure, it offers a YouTube slow-motion option.
This option involves adjusting the playback speed of video for YouTube slo-mo. This article sheds light on how to slow down a YouTube video . There will be a detailed discussion on reducing YouTube video speed. In addition, we will introduce a high-performance video editor to perform this task. Keep reading this article to expand your creative horizons about slow YouTube videos.
Slow Motion Video Maker Slow your video’s speed with better control of your keyframes to create unique cinematic effects!
Make A Slow Motion Video Make A Slow Motion Video More Features

Part 1: How to Slow Down Videos in YouTube?
If you watch YouTube videos often, you must have been aware of the YouTube slow-down feature. The playback adjustment option on YouTube helps with that. By enabling that option, the whole YouTube video slows down. For adding slow-motion effects at specific durations, you can use Wondershare Filmora . In this part, we’ll explore both methods of slowing down a YouTube video:
Method 1. Direct Method
If you have the YouTube application, you can commence this action straight. If not, you can also open YouTube on your browser. Given below are the steps to play YouTube in slow motion:
Step 1
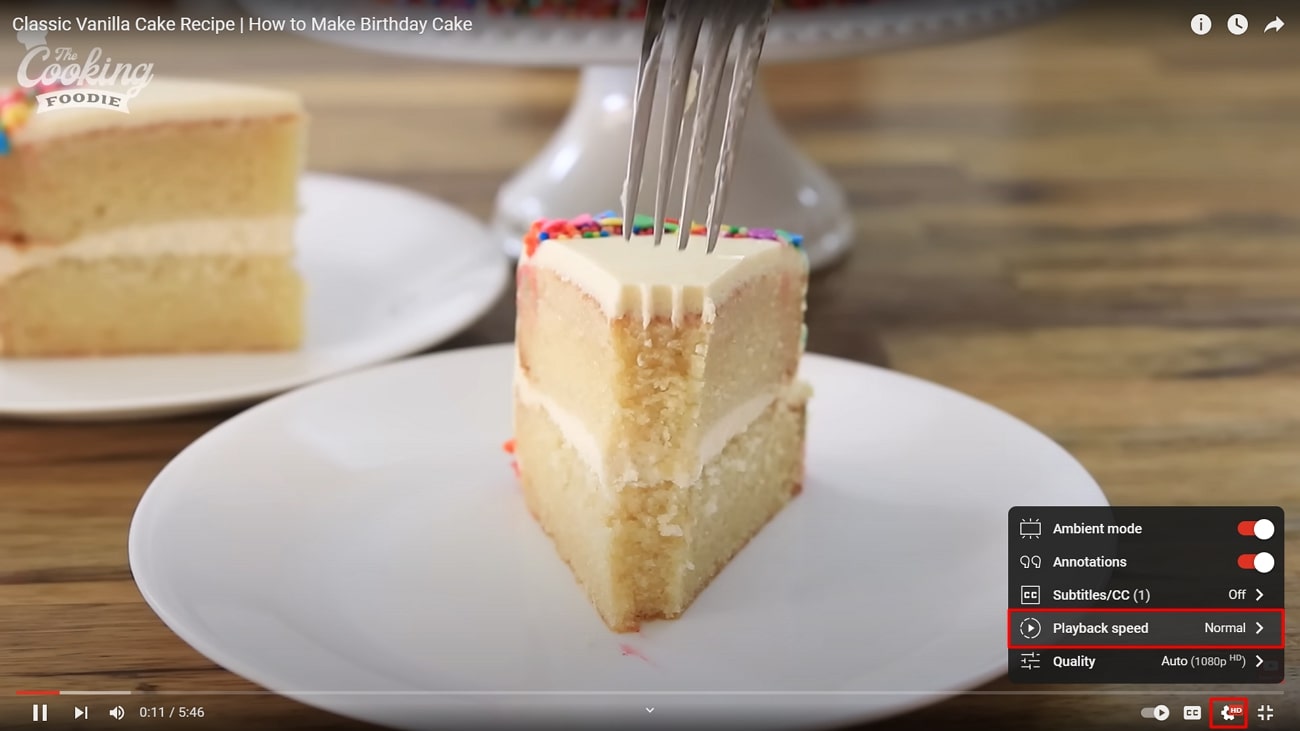
Once you play a YouTube video, navigate towards the bottom of this video. Afterward, click on the “Settings” option and select the “Playback speed” option.
Step 2
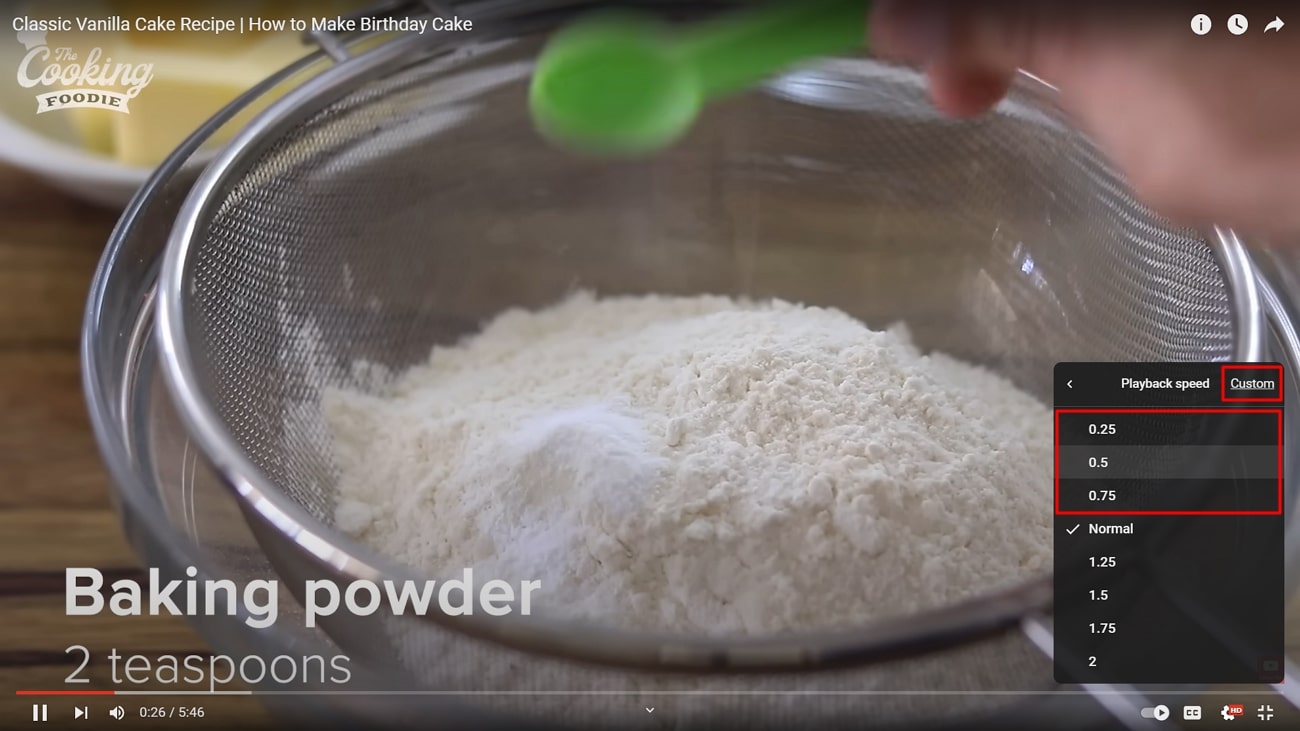
From the expansion menu, select a playback speed option as per preferences. You can select a speed between 0.75, 0.5, and 0.25. Afterward, play your video and see if the speed is right. This is the simplest method for YouTube video slow motion.
Method 2. Using Wondershare Filmora
In Wondershare Filmora, there are two methods to slow down YouTube videos. You can either use the Uniform Speed option or the Speed Ramping option. Moreover, you can add the Optical Flow effect to ensure a smooth, slow motion. In this section, we will first familiarize you with downloading a YouTube video. Here are the three major steps to create slow-motion in Filmora:
Free Download For Win 7 or later(64-bit)
Free Download For macOS 10.14 or later
Step 1Downloading a YouTube Video
YouTube doesn’t allow users to download a YouTube video on their devices. Hence, you will need third-party support to do so. Many sites offer YouTube video download services. We are using the y2mate.com , and here are the steps for it:
1. Copy the YouTube Video Link
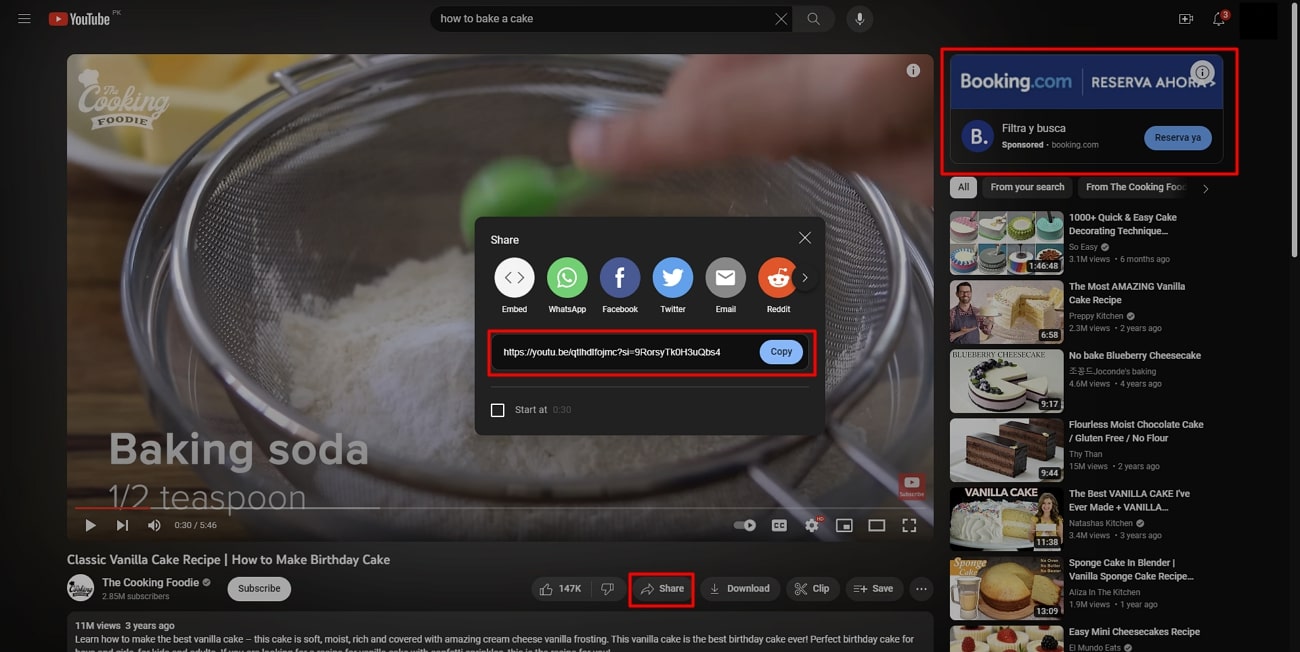
First, access the respective video that you want to download from YouTube. Locate the “Share” option at the bottom of this video and select it. Then click the “Copy” option to copy your video’s link.
2. Access the Site
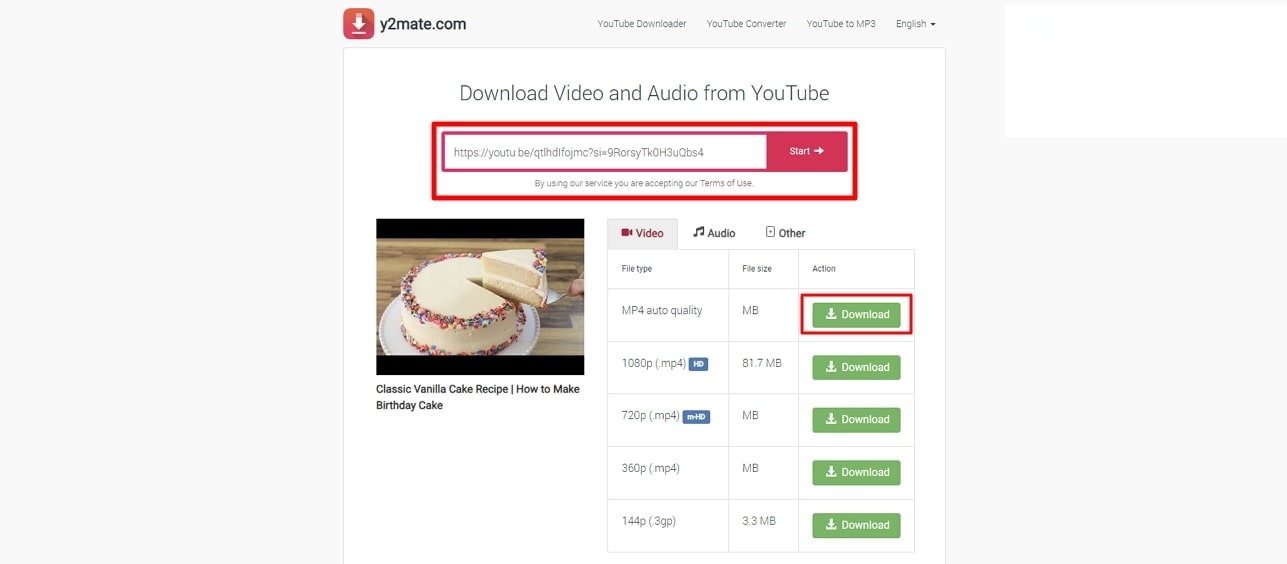
After copying the video’s link, access the site using your web browser. In the “Search or paste link here” box, paste the video link and click “Start.” From the download options appearing at the bottom, select a suitable option. Click on the “Download” button adjacent to your option.
Step 2Slow Down YouTube Video in Filmora
Once you have downloaded the video on your device, it is time to slow down the YouTube video. Filmora offers a plain and simple method to slow down a video. Here is a step-by-step guide to help you create video slow-mo in Filmora:
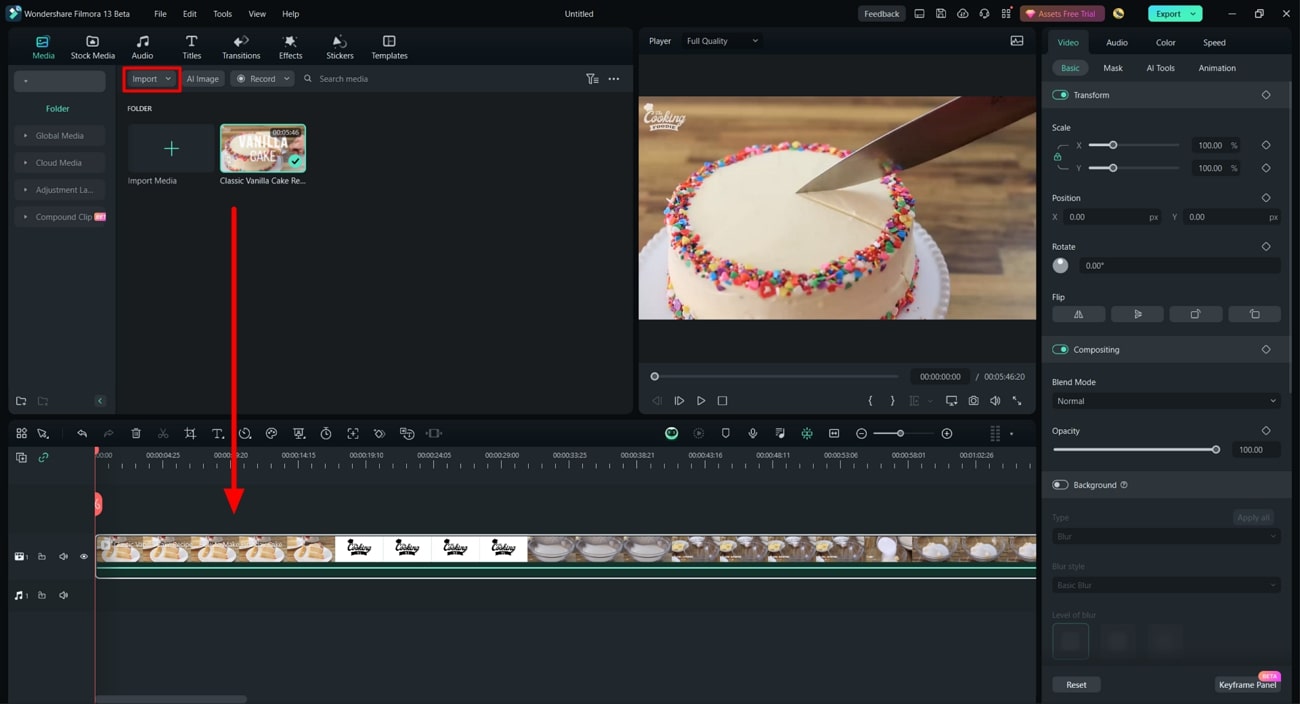
1. Import the YouTube Video
Since Wondershare Filmora is a desktop tool, you must download it first. Initiate it and click the “New Project” option to reach its editing interface. Click on the “Import” option to import the video you downloaded. Afterward, bring this video to the timeline using the drag-and-drop technique.
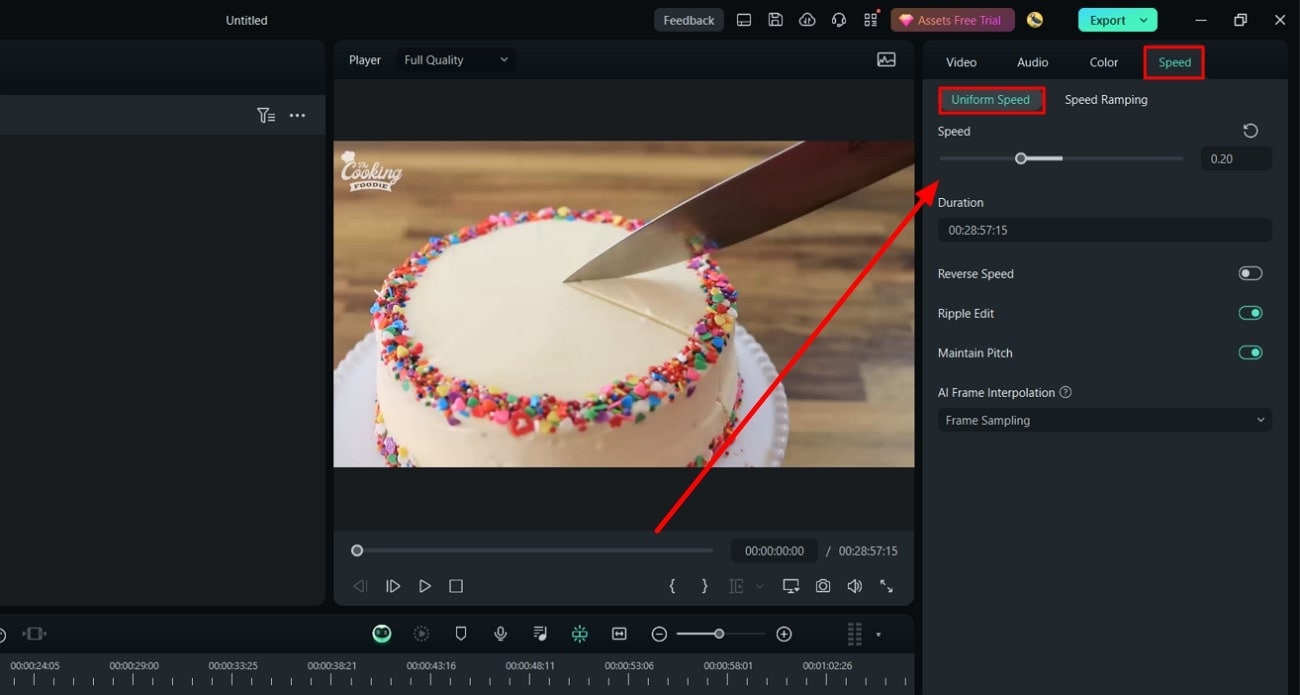
2. Access Uniform Speed
Select the video in the timeline and direct it toward the settings panel appearing on the right side. From the given tabs, go to the “Speed” tab and select “Uniform Speed.” Further, adjust the “Speed” slider or its value in the given box. This will slow down your video, and you can preview it to adjust further.
Step 3Smoothing Out the YouTube Slow-Mo
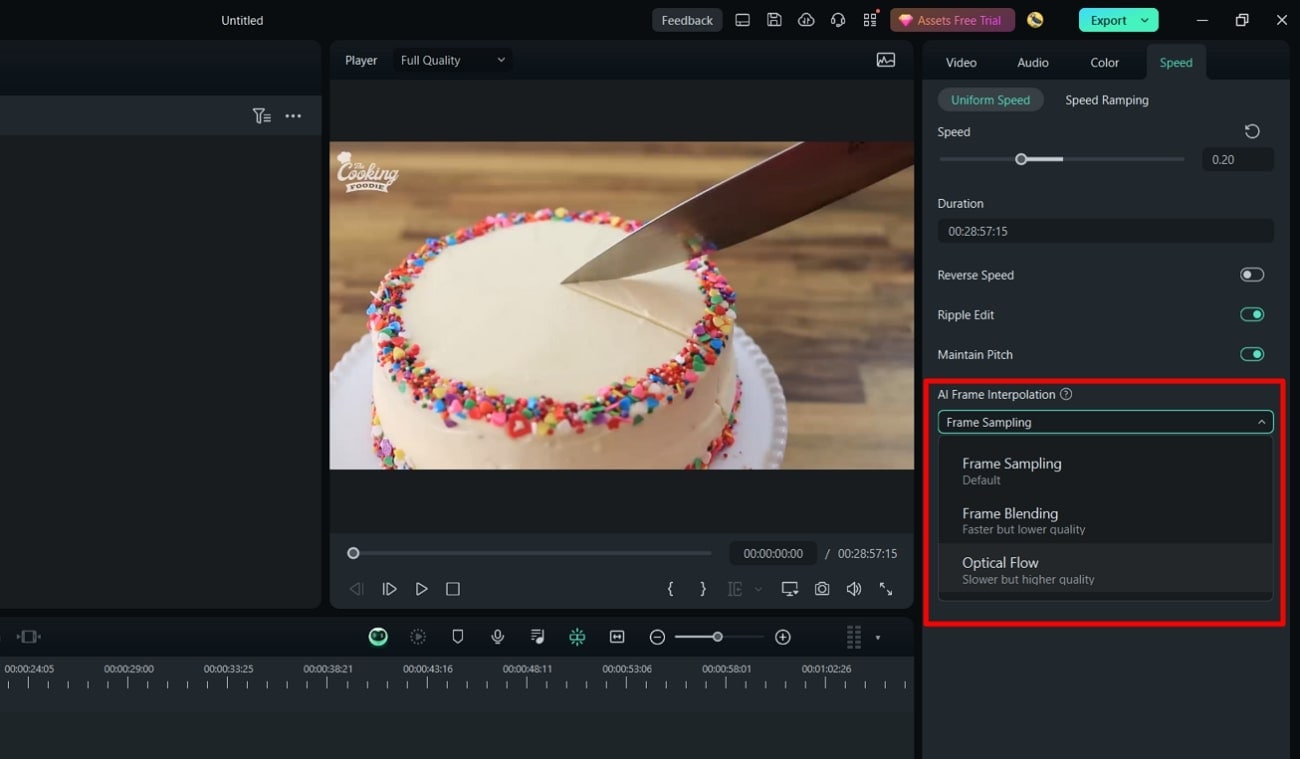
Upon previewing the YouTube slo-mo, you might notice some roughness in it. For creating a smooth slow-mo, use the Optical Flow option. Here are the steps to enable this option in Filmora:
1. Enable the Optical Flow Option
Navigate toward the “AI Frame Interpolation” section. You can find it at the bottom of the Uniform Speed tab. Afterward, expand this section and select the “Optical Flow” option.
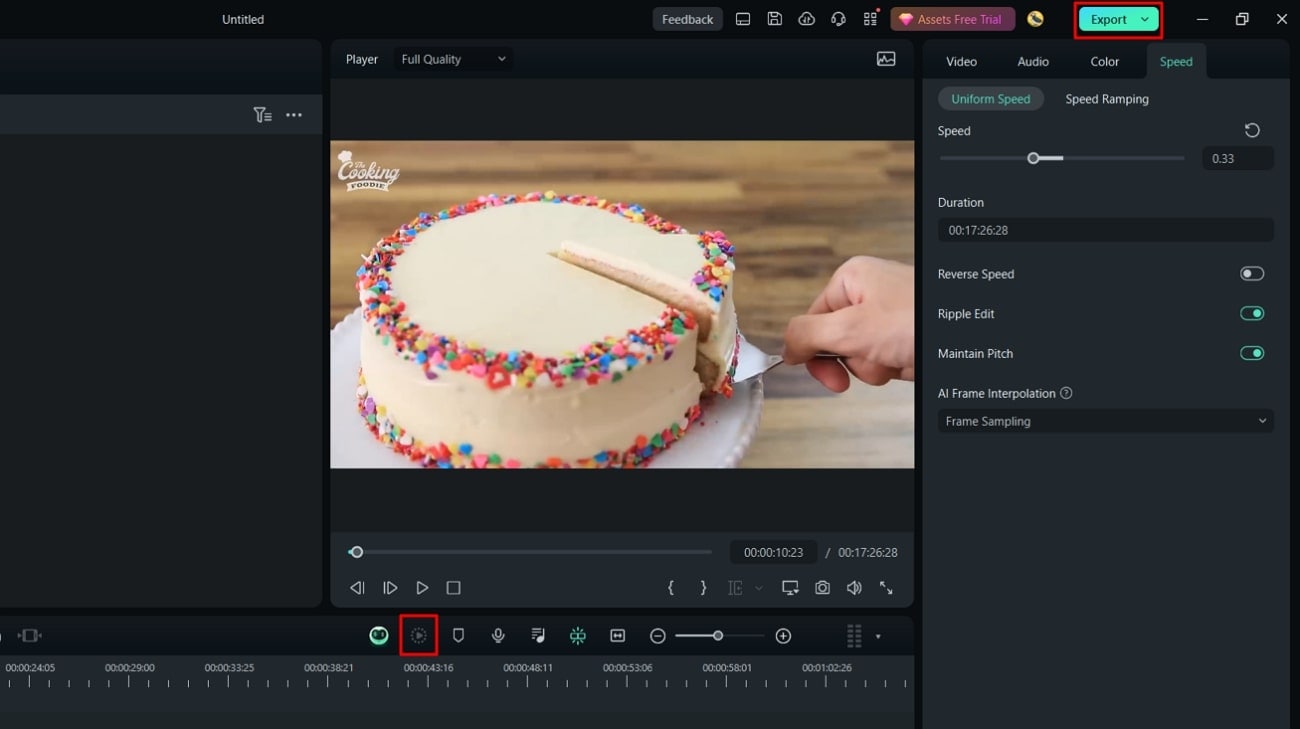
2. Render the YouTube Slow-Mo
Once you have enabled optical flow, direct it toward the timeline tool panel. Select the “Render Preview” option from there and see your video afterward. You’ll have a professional-level slow YouTube slow-motion video.
Part 2: Other Features Offered by Wondershare Filmora
Wondershare Filmora is a professional video editor that offers AI editing options. You can bring so much creativity to your videos with its effects and colors. It offers AI Chroma Key or AI Background Remover features to change backgrounds. Moreover, it runs on a timeline editing interface that helps with precise cut and trim.
You can slow down a video and increase its speed to save time. Wondershare Filmora is all about video editing, and there is no limit to its creativity. Let’s dive into this section to learn about some of those AI features below:
1. AI Thumbnail Creator
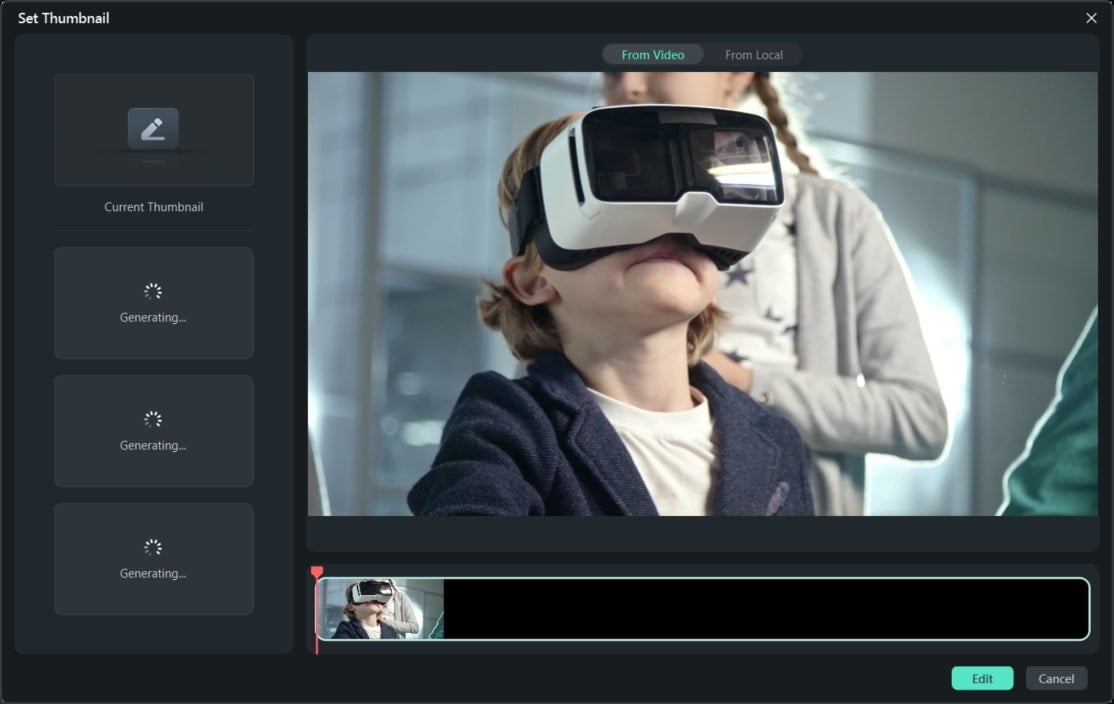
When creating a YouTube video for your channel, thumbnails play an important role. Filmora allows you to generate creative thumbnails for your videos. Through the support of AI, it opts for the finest frame out of your video as a thumbnail. Afterward, it offers you built-in templates that fit many content categories.
2. Speed Ramping
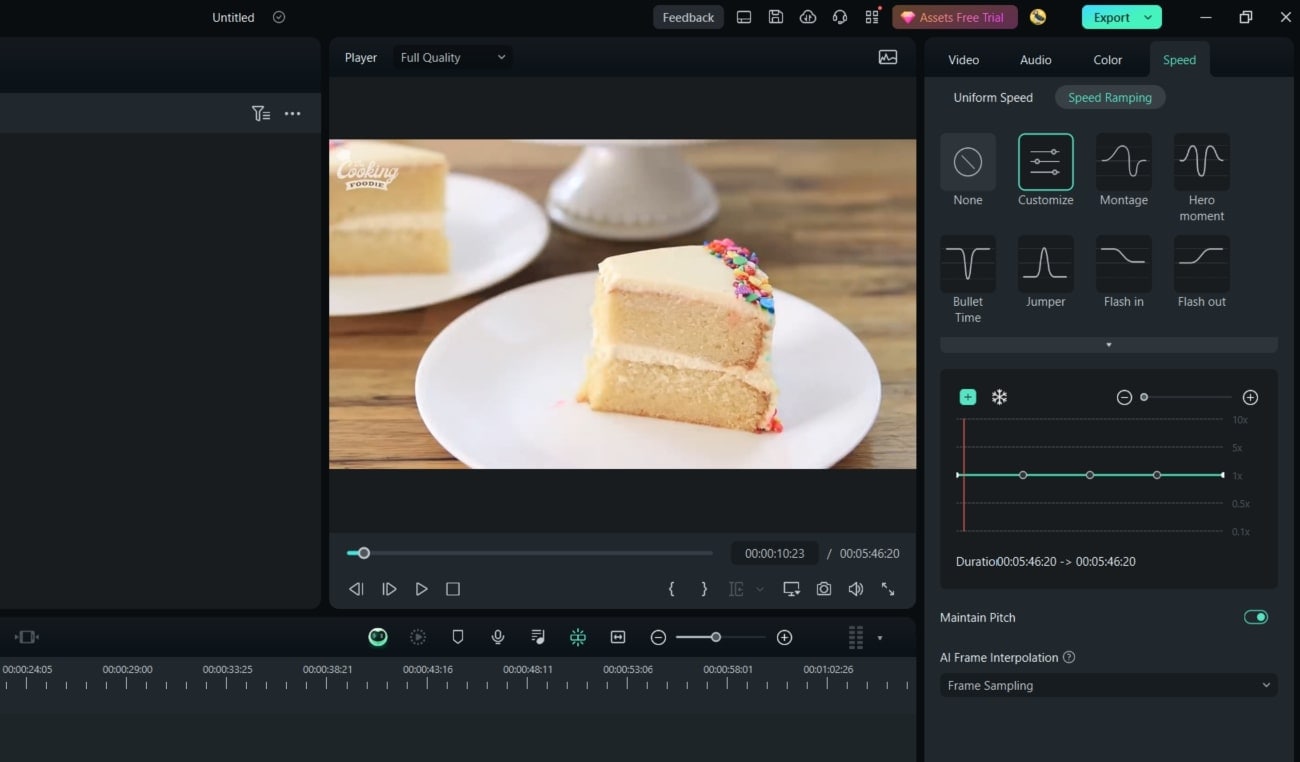
This function also allows you to slow down YouTube videos precisely. Using this feature, you can slow down specific parts of a video. It offers pre-designed speed options; however, you can also customize it. Montage, Hero moment, Bullet Time, Jumper, and other options exist as presets. Afterward, you can manipulate the frame speed option for a smooth outlook.
3. Silence Detection
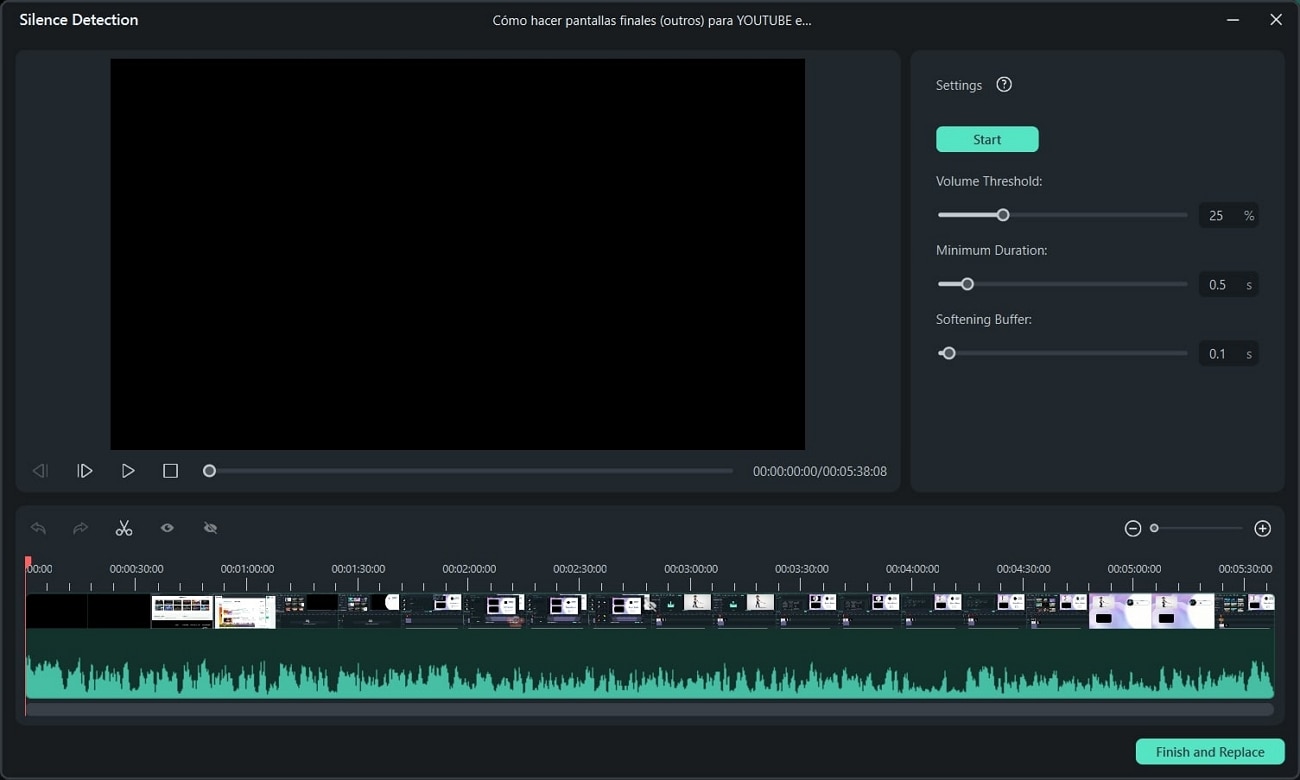
Silent pauses or loud breath noise in videos is often disturbing. Such elements decrease the audio and overall quality of a video clip or audio track. To avoid this, Filmora offers a Silence Detection feature backed by AI. It robotically spots the silent pauses, hums, and breaths in audio and eliminates them. This will save you from audience backlash and maintain content quality.
4. Speech-to-Text
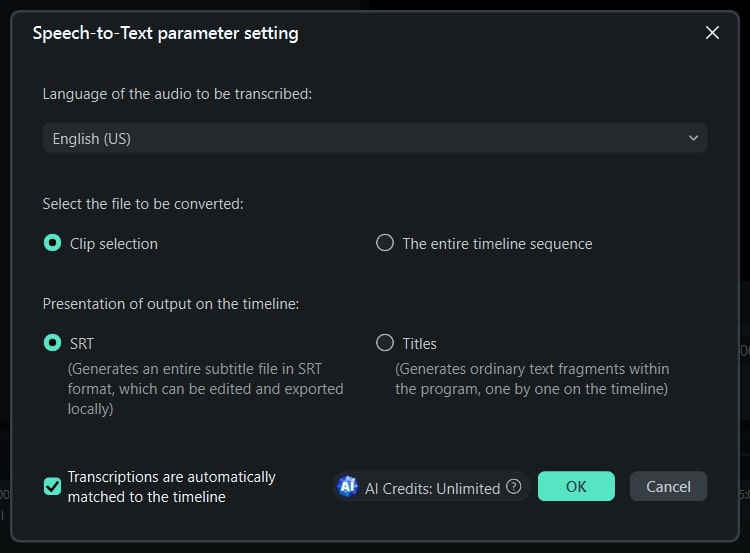
This feature belongs in the text editing category of Wondershare Filmora. The STT tool of Filmora has many applications in the field of filmmaking. It uses AI technology and NLP systems to analyze speech and convert it to text. You can use this text to create captions and subtitles for YouTube videos. In addition, you can use this feature for text-based editing in Filmora or other tools.
Conclusion
After reading this article, users have a comprehensive knowledge of YouTube slow motion. We discussed certain advantages of slowing down videos. The article also discussed how to slow down a YouTube video with precision. It was explained using a professional-grade video editor with a detailed guide. If you want to create a perfect YouTube slow-mo or slow down a specific part, use Filmora.
Make A Slow Motion Video Make A Slow Motion Video More Features

Part 1: How to Slow Down Videos in YouTube?
If you watch YouTube videos often, you must have been aware of the YouTube slow-down feature. The playback adjustment option on YouTube helps with that. By enabling that option, the whole YouTube video slows down. For adding slow-motion effects at specific durations, you can use Wondershare Filmora . In this part, we’ll explore both methods of slowing down a YouTube video:
Method 1. Direct Method
If you have the YouTube application, you can commence this action straight. If not, you can also open YouTube on your browser. Given below are the steps to play YouTube in slow motion:
Step 1
Once you play a YouTube video, navigate towards the bottom of this video. Afterward, click on the “Settings” option and select the “Playback speed” option.

Step 2
From the expansion menu, select a playback speed option as per preferences. You can select a speed between 0.75, 0.5, and 0.25. Afterward, play your video and see if the speed is right. This is the simplest method for YouTube video slow motion.

Method 2. Using Wondershare Filmora
In Wondershare Filmora, there are two methods to slow down YouTube videos. You can either use the Uniform Speed option or the Speed Ramping option. Moreover, you can add the Optical Flow effect to ensure a smooth, slow motion. In this section, we will first familiarize you with downloading a YouTube video. Here are the three major steps to create slow-motion in Filmora:
Free Download For Win 7 or later(64-bit)
Free Download For macOS 10.14 or later
Step 1Downloading a YouTube Video
YouTube doesn’t allow users to download a YouTube video on their devices. Hence, you will need third-party support to do so. Many sites offer YouTube video download services. We are using the y2mate.com , and here are the steps for it:
1. Copy the YouTube Video Link
First, access the respective video that you want to download from YouTube. Locate the “Share” option at the bottom of this video and select it. Then click the “Copy” option to copy your video’s link.

2. Access the Site
After copying the video’s link, access the site using your web browser. In the “Search or paste link here” box, paste the video link and click “Start.” From the download options appearing at the bottom, select a suitable option. Click on the “Download” button adjacent to your option.

Step 2Slow Down YouTube Video in Filmora
Once you have downloaded the video on your device, it is time to slow down the YouTube video. Filmora offers a plain and simple method to slow down a video. Here is a step-by-step guide to help you create video slow-mo in Filmora:
1. Import the YouTube Video
Since Wondershare Filmora is a desktop tool, you must download it first. Initiate it and click the “New Project” option to reach its editing interface. Click on the “Import” option to import the video you downloaded. Afterward, bring this video to the timeline using the drag-and-drop technique.

2. Access Uniform Speed
Select the video in the timeline and direct it toward the settings panel appearing on the right side. From the given tabs, go to the “Speed” tab and select “Uniform Speed.” Further, adjust the “Speed” slider or its value in the given box. This will slow down your video, and you can preview it to adjust further.

Step 3Smoothing Out the YouTube Slow-Mo
Upon previewing the YouTube slo-mo, you might notice some roughness in it. For creating a smooth slow-mo, use the Optical Flow option. Here are the steps to enable this option in Filmora:
1. Enable the Optical Flow Option
Navigate toward the “AI Frame Interpolation” section. You can find it at the bottom of the Uniform Speed tab. Afterward, expand this section and select the “Optical Flow” option.

2. Render the YouTube Slow-Mo
Once you have enabled optical flow, direct it toward the timeline tool panel. Select the “Render Preview” option from there and see your video afterward. You’ll have a professional-level slow YouTube slow-motion video.

Part 2: Other Features Offered by Wondershare Filmora
Wondershare Filmora is a professional video editor that offers AI editing options. You can bring so much creativity to your videos with its effects and colors. It offers AI Chroma Key or AI Background Remover features to change backgrounds. Moreover, it runs on a timeline editing interface that helps with precise cut and trim.
You can slow down a video and increase its speed to save time. Wondershare Filmora is all about video editing, and there is no limit to its creativity. Let’s dive into this section to learn about some of those AI features below:
1. AI Thumbnail Creator
When creating a YouTube video for your channel, thumbnails play an important role. Filmora allows you to generate creative thumbnails for your videos. Through the support of AI, it opts for the finest frame out of your video as a thumbnail. Afterward, it offers you built-in templates that fit many content categories.

2. Speed Ramping
This function also allows you to slow down YouTube videos precisely. Using this feature, you can slow down specific parts of a video. It offers pre-designed speed options; however, you can also customize it. Montage, Hero moment, Bullet Time, Jumper, and other options exist as presets. Afterward, you can manipulate the frame speed option for a smooth outlook.

3. Silence Detection
Silent pauses or loud breath noise in videos is often disturbing. Such elements decrease the audio and overall quality of a video clip or audio track. To avoid this, Filmora offers a Silence Detection feature backed by AI. It robotically spots the silent pauses, hums, and breaths in audio and eliminates them. This will save you from audience backlash and maintain content quality.

4. Speech-to-Text
This feature belongs in the text editing category of Wondershare Filmora. The STT tool of Filmora has many applications in the field of filmmaking. It uses AI technology and NLP systems to analyze speech and convert it to text. You can use this text to create captions and subtitles for YouTube videos. In addition, you can use this feature for text-based editing in Filmora or other tools.

Conclusion
After reading this article, users have a comprehensive knowledge of YouTube slow motion. We discussed certain advantages of slowing down videos. The article also discussed how to slow down a YouTube video with precision. It was explained using a professional-grade video editor with a detailed guide. If you want to create a perfect YouTube slow-mo or slow down a specific part, use Filmora.
How To Change Sky Background With Adobe Photoshop [Best Ways]
Editing images is an essential point for photographers to make their work stand out. Creators use certain editing tools to polish their captured media. Suppose having an image with low sunlight that dims the natural beauty of the surroundings. In this situation, replacing sky backgrounds seems the only way to set a stunning landscape.
Photographers mostly rely on Adobe Photoshop sky replacement packs for this purpose. Using this option, users put life in their dull media with skies. Without further delay, learn everything about sky replacement Photoshop in this guide.
Sky Replacement A cross-platform works like magic for background removal or sky replacement photos!
Free Download Free Download Learn More

Part 1: How Good Has Photoshop Been in Helping Users Make Crisp Pictures and Media?
Adobe Photoshop is a graphics editor tool designed for professional digital art. It is widely used to grow business through designing virtual backgrounds and graphics. You can adjust the subject’s features and poses to make perfect portraits. To transform letters into artistic expressions, it offers Photoshop brushes and paints. Users can collaborate with their teammates and share work for approvals with this tool.
Key Features To Look Out In Adobe Photoshop
This tool can accelerate workflow with its latest features. It allows you to expand, add, and remove content from images with high-quality results. The following are some key features of Photoshop for your better understanding of this tool:
- It offers a sky replacement Photoshop feature that can change the sky from captured images.
- You can remove and replace your background in Photoshop and refine it as required.
- With the remove object feature, users can erase unwanted objects from images.
- Use the “Colorize” feature and make your black-and-white images colorful.
- Enhance workflow by using “Layer” masking that hides part of images without erasing them.
Part 2: A Detailed Guide on How to Replace Sky Background in Photoshop?
With AI integration in Adobe Photoshop, you can change skies with simple clicks. It provides a collection of skies from the Blue Skies, Spectacular, and sunset categories. Also, users can import any sky from their gallery or download one from presets. To do so, let us show you how to change the sky in Photoshop in given steps:
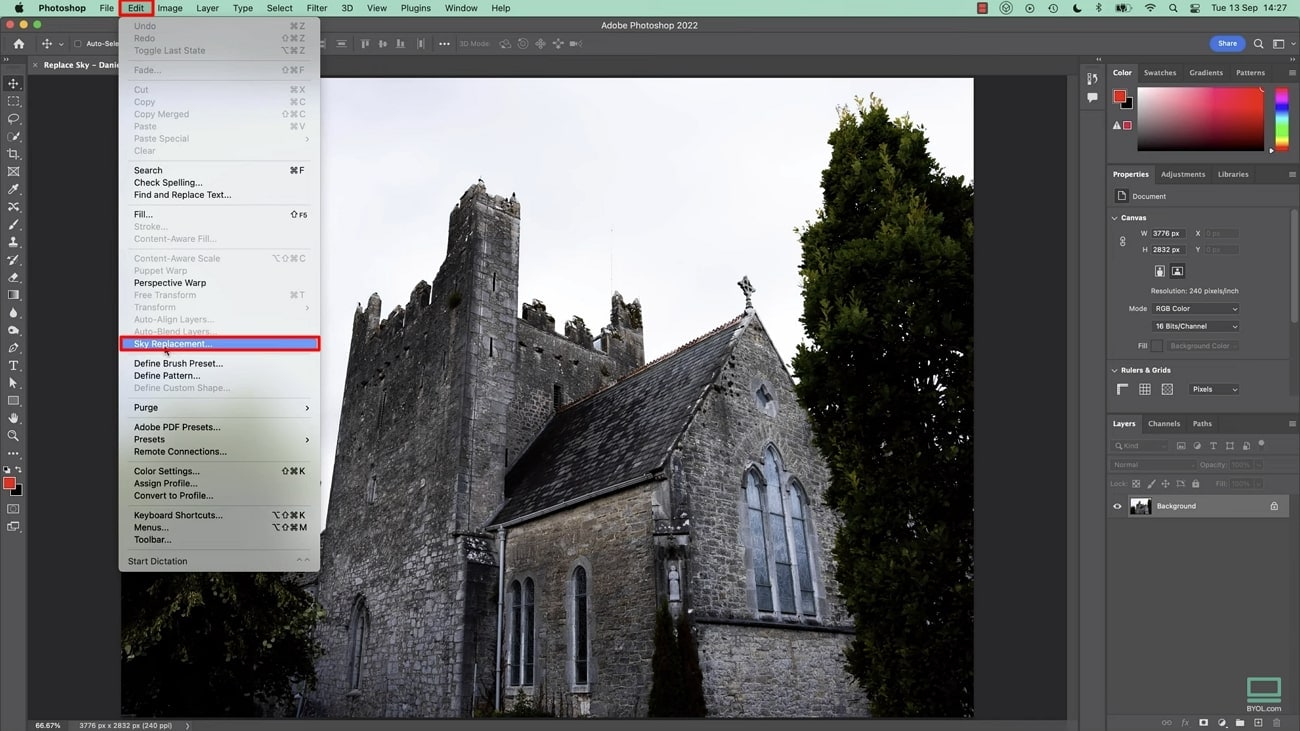
Step 1: Bring your desired image to the Adobe Photoshop. Head to the top toolbar and click the “Edit” option next to the “File.” Look for the “Sky Replacement” option from the list.
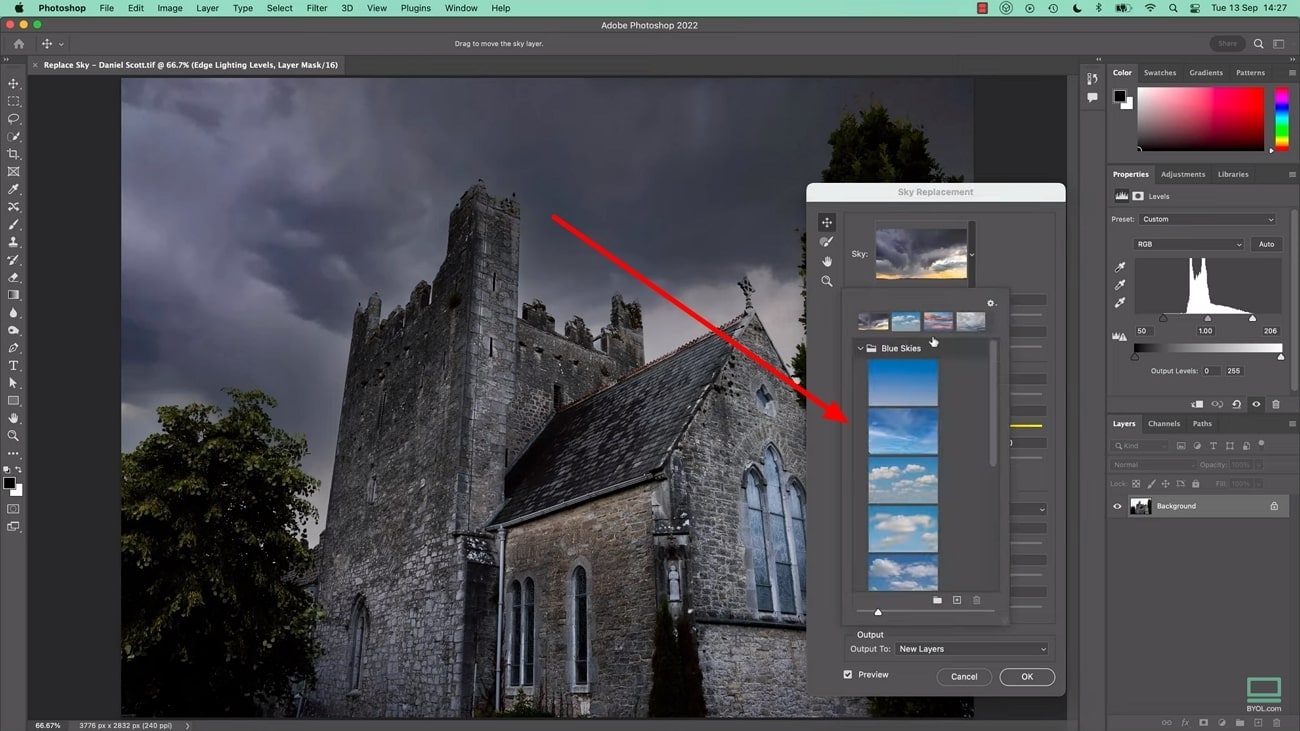
Step 2: After tapping “Sky Replacement,” you will get a respective screen on your front. Press the downward symbol next to the “Sky” and pick one sky from available options.
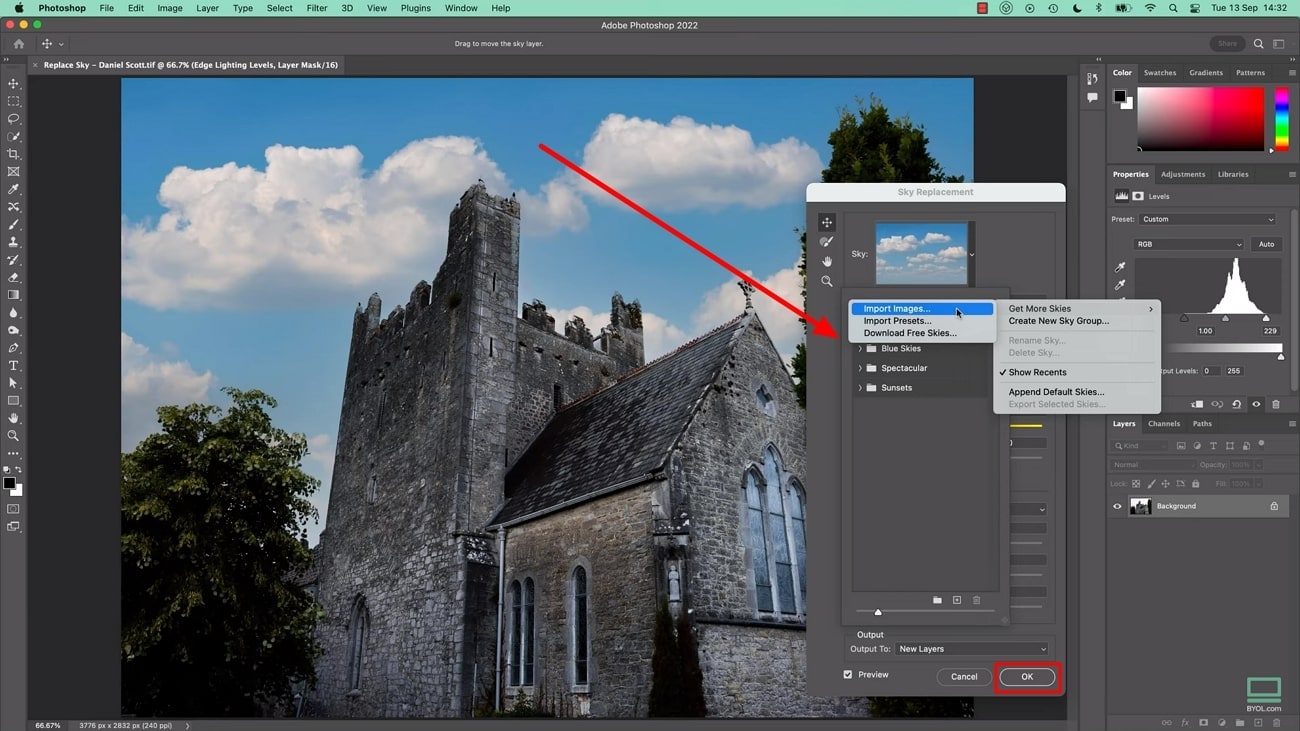
Step 3: Alternatively, you can hit the “+” icon and browse the sky image from your system. When you choose one, it gets added to the existing sky list. Select that and tap the “OK” button to apply changes in your media.
Part 3: An Alternative Solution: Wondershare Filmora Providing Workability with Easy Background Replacement
Changing sky in Photoshop is difficult for beginners and requires a basic skill set. It may take a lot of your time to understand its functionalities. That’s why choosing a tool with simple operation and high-quality output is important. In this regard, you should use Wondershare Filmora as a better option for everyone. It is a video editor that offers a variety of powerful features.
Using this tool, you can remove and change the background from your images or videos. With the integration of AI, it can automatically detect the object and foreground.
Other Prominent Video Editing Features
Apart from changing background, Filmora can perform A to Z video editing tasks. Let’s explore some of the key features to overview its fruitful functionalities:
Free Download For Win 7 or later(64-bit)
Free Download For macOS 10.14 or later
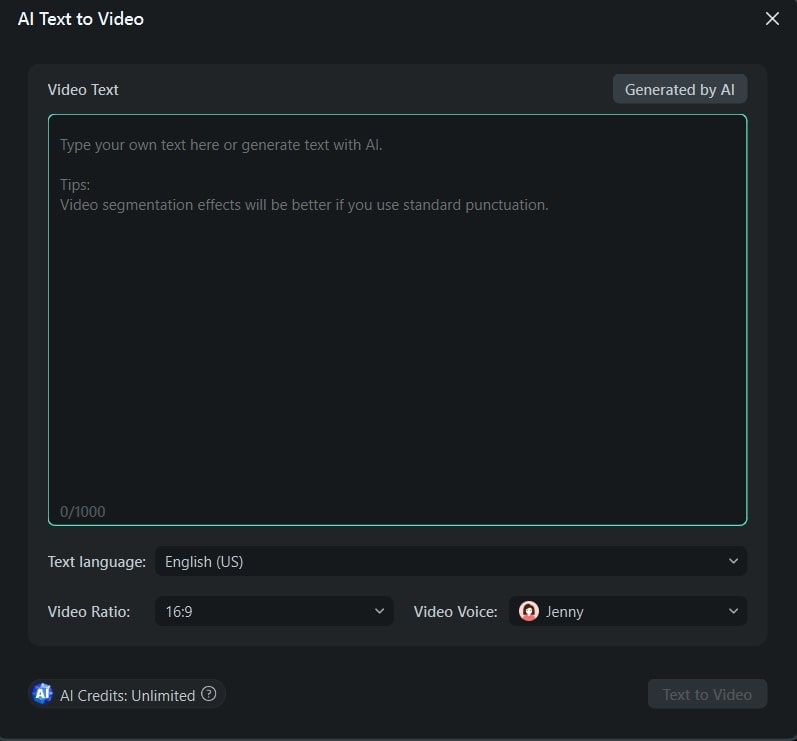
1. AI Text-to-Video
Who needs a camera and crew when you can effortlessly generate video from text? Filmora can transform your text into an engaging storytelling video with just text prompts. After getting the video, you can customize the video’s appearance with fonts, styles, and colors. Users can add smooth transitions between text elements for a cohesive flow.
2. AI Music Generator
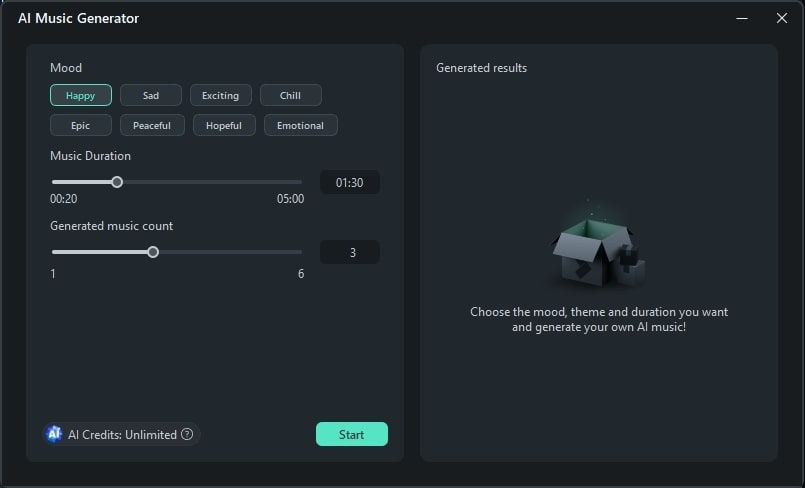
Sometimes, we get tired of searching for music that perfectly aligns with our video content. In such cases, AI music generator saves us by providing the music we want. It offers you many options to choose from different genres and styles. You can set the music duration and number of tracks you want to generate. Then, you can make manual adjustments like balancing sound and auto normalization.
3. AI Image
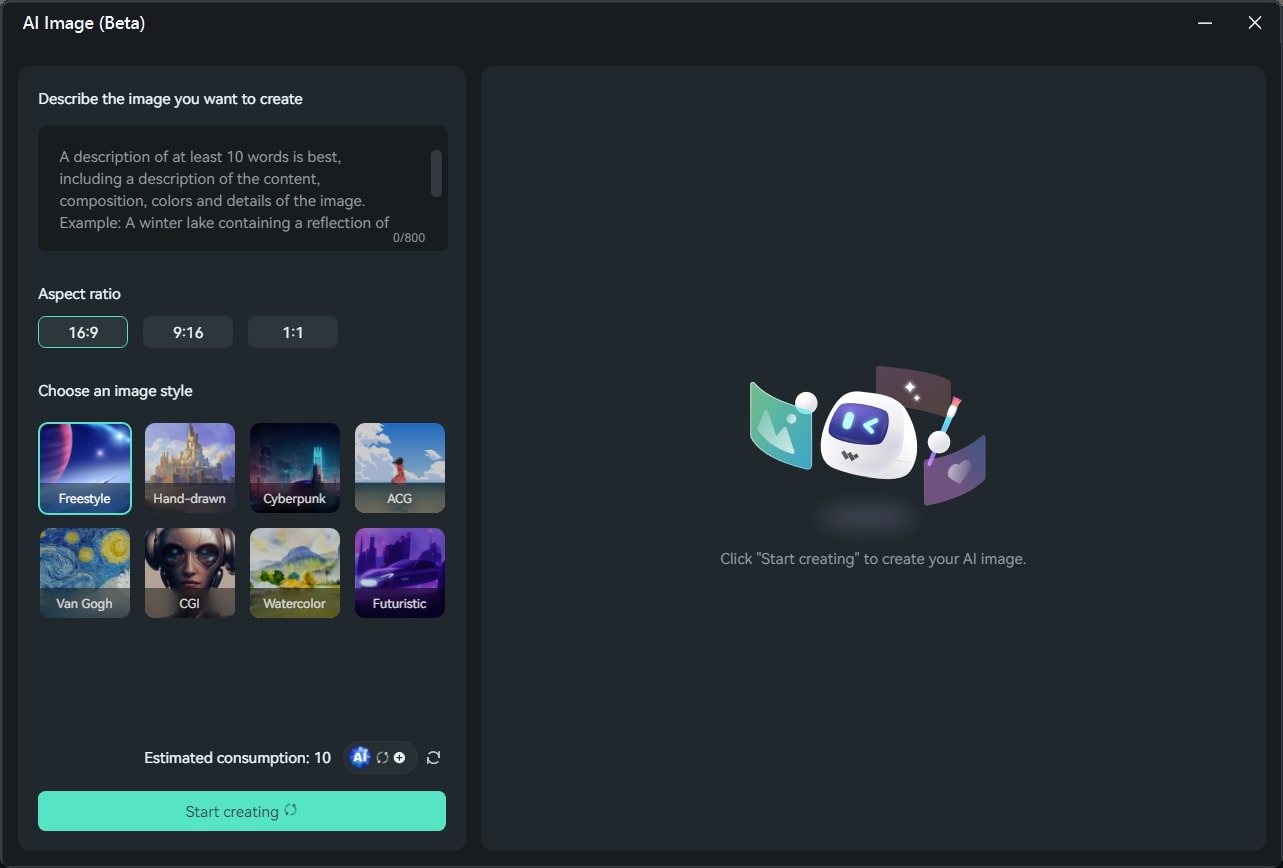
Similar to text-to-video, Filmora can generate images from text. To do so, just describe your imagination in simple words. Then, you are asked to pick one resolution from given options. You can use the generated images in your projects directly. It allows you to generate an image from your chosen style. A few of the styles include Freestyle, Cyberpunk, and Futuristic.
4. AI Copilot Editing
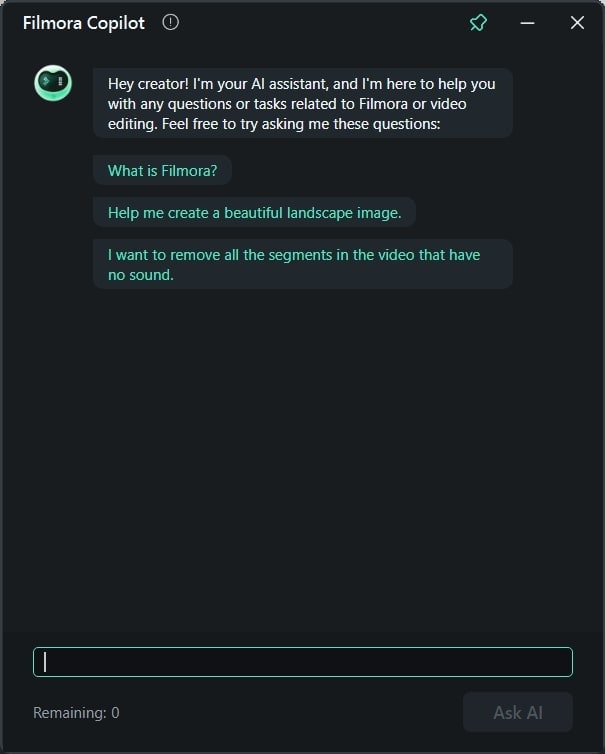
While editing projects, humans often require suggestions or assistance. For this purpose, Filmora provides you with AI Copilot as your personal AI assistant. It will prevent errors in your editing by sending error messages. You can get the best editing solution as per your needs. This way, the quality of your project gets increased.
5. AI Vocal Remover
With advanced algorithms, it is an exceptional feature of Filmora. It relieves your breath by removing unwanted vocals from your audio or video. You can now completely remove vocal sounds from the video and add your recorded ones. It’s an automated process that separates voice and background in the media panel.

Steps To Remove Background Using Two Unique Ways with Wondershare Filmora
Filmora is one of the easiest tools to operate that anyone can use to get desired results. It allows users to approach the same features in different ways. Similarly, there are two unique ways to remove or change the sky Photoshop background, which are given below.
Free Download For Win 7 or later(64-bit)
Free Download For macOS 10.14 or later
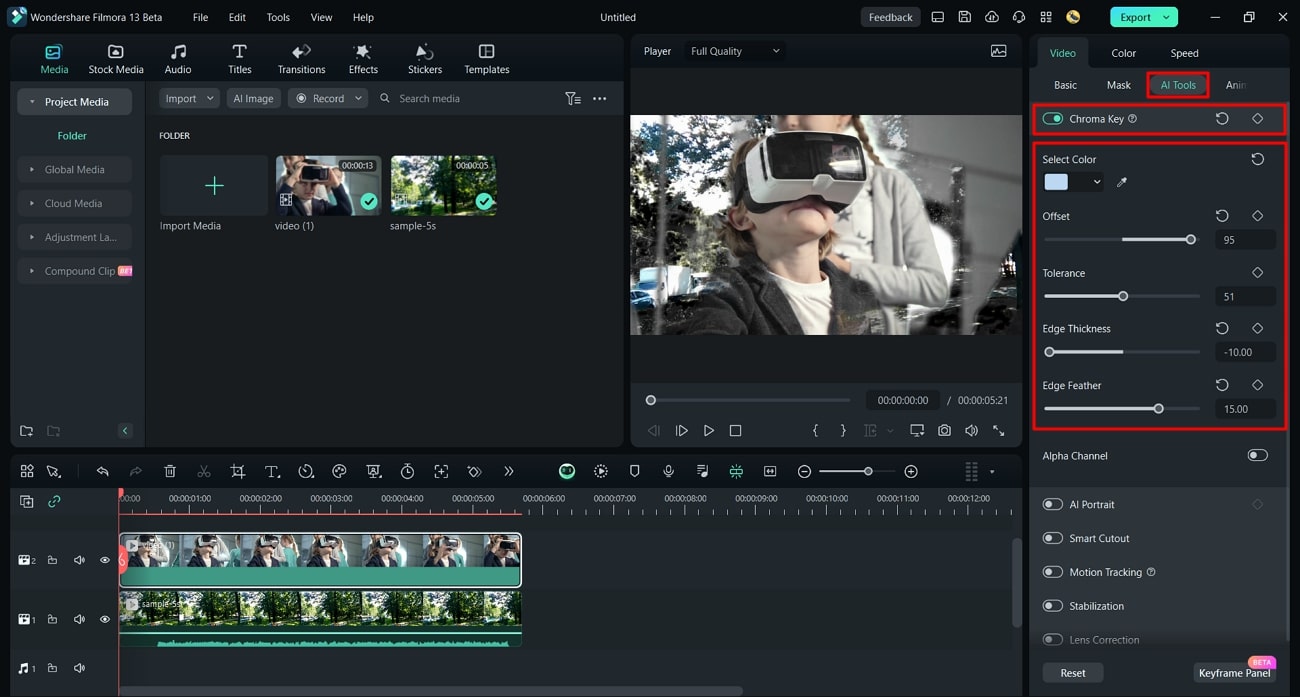
Method 1: Using Chroma Key
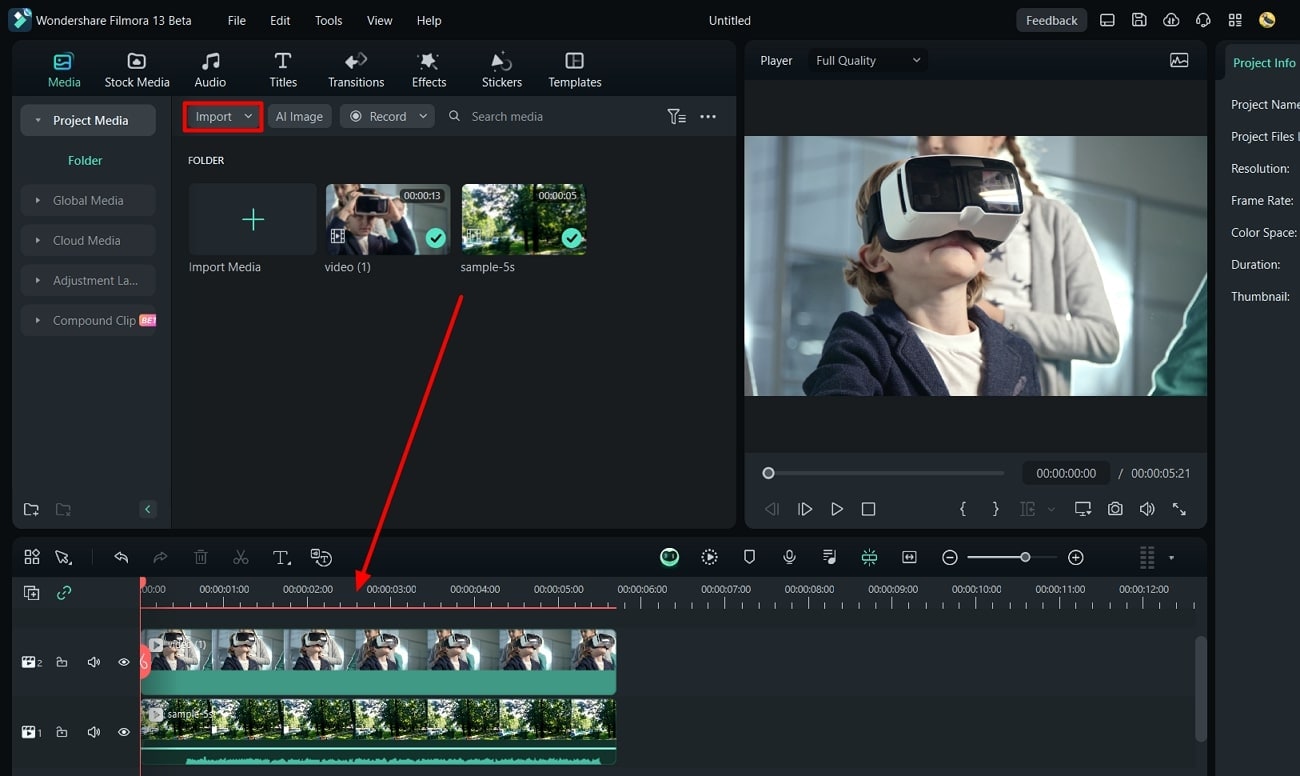
Step 1: Start your project in Filmora and import two files in the timeline. Bring the background clip first in the timeline, then the original file. Cut the unnecessary portion of background-clip.
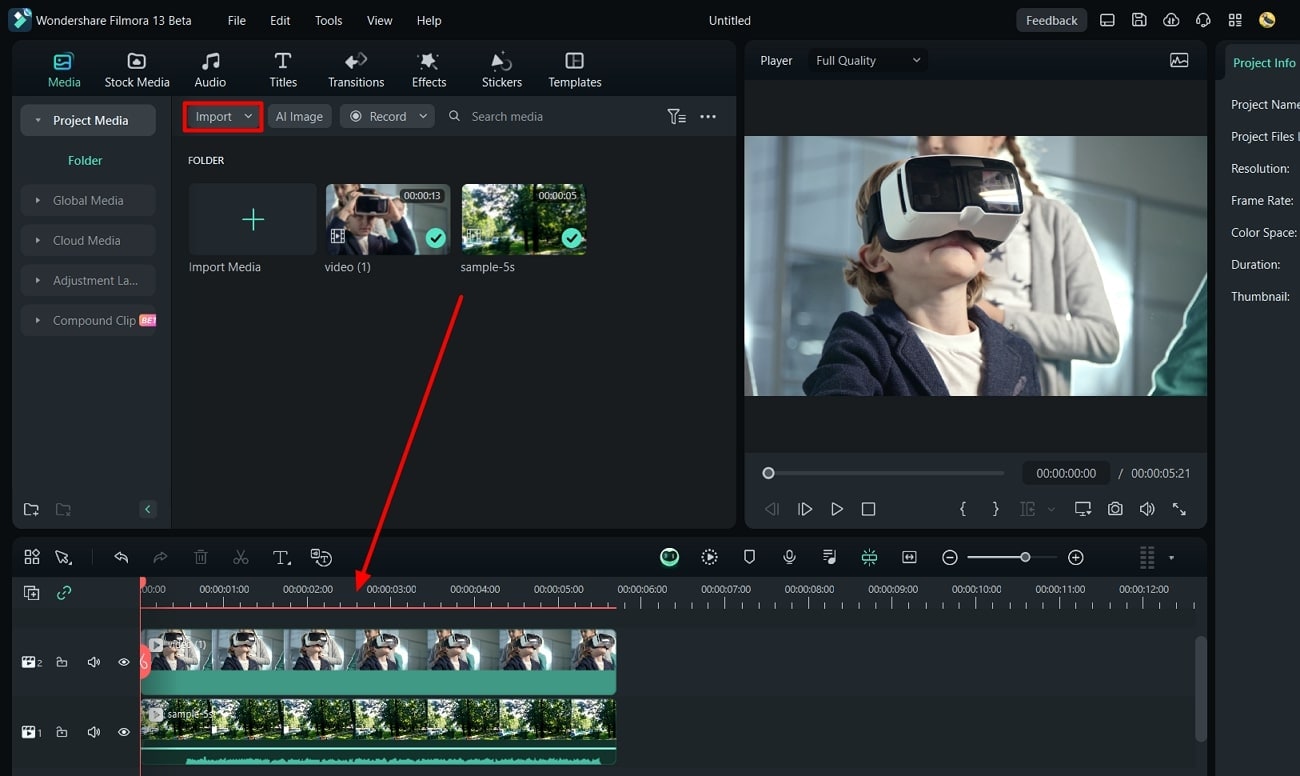
Step 2: Keep them selected and come to the “AI Tools” option in the right-side panel. Enable the “Chroma Key” toggle, and AI will automatically replace the background. You can use the “Tolerance,” “Edge Thickness,” and “Edge Feather” sliders for manual changes.
Method 2: Through AI Portrait
Step 1: Import your background clip and main video in Filmora 13. Place the background clip on track 1 and the main clip on the 2nd track in the timeline.
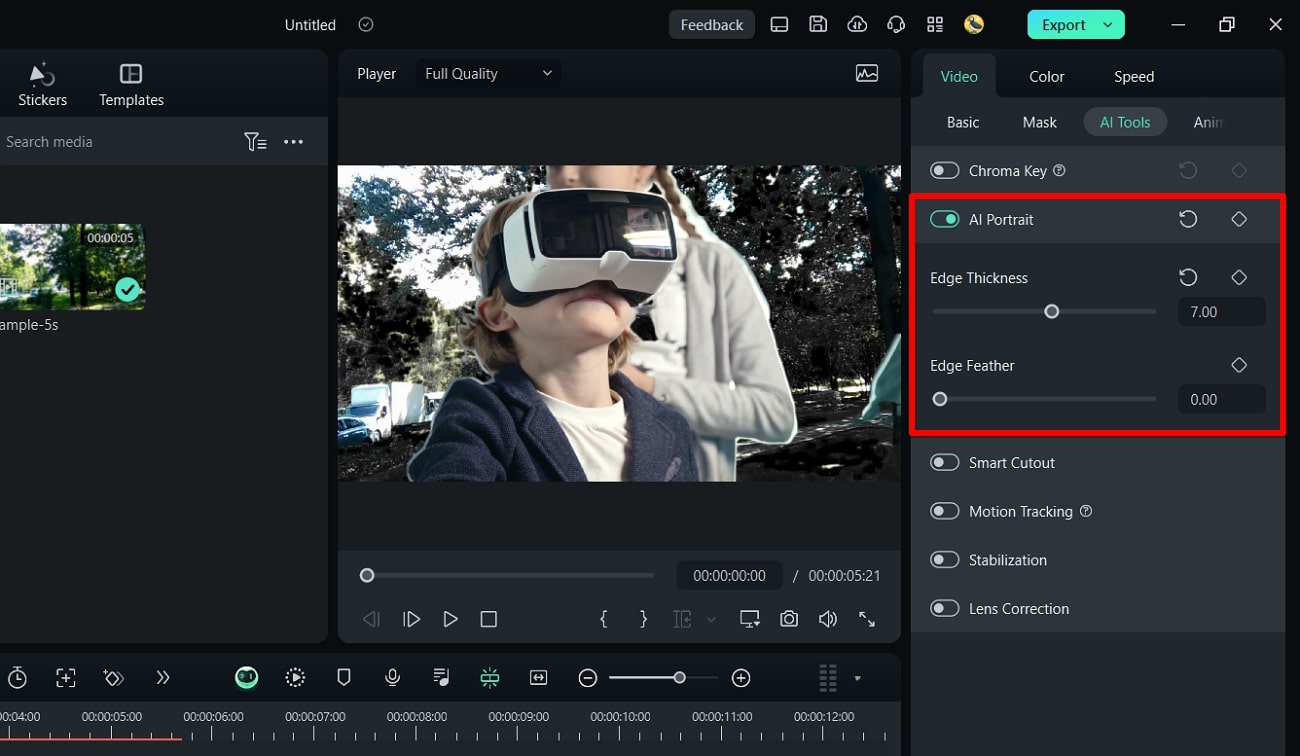
Step 2: Hold both of them and head to the right-side panel. Press the “AI Tools” option and scroll to access the “AI Portrait.” Enable that option, and your background will automatically change with AI. Now, you can make manual changes by moving the “Edge Thickness” and “Feather” sliders.
Conclusion
To wrap up, let’s say that Sky Photoshop sets the right tone for your media with landscapes. On the other hand, this feature might prove difficult for some users to handle. Thus, they can rely on Wondershare Filmora for convenience. Beginners and professionals can benefit from its extraordinary features in video editing.
Free Download Free Download Learn More

Part 1: How Good Has Photoshop Been in Helping Users Make Crisp Pictures and Media?
Adobe Photoshop is a graphics editor tool designed for professional digital art. It is widely used to grow business through designing virtual backgrounds and graphics. You can adjust the subject’s features and poses to make perfect portraits. To transform letters into artistic expressions, it offers Photoshop brushes and paints. Users can collaborate with their teammates and share work for approvals with this tool.
Key Features To Look Out In Adobe Photoshop
This tool can accelerate workflow with its latest features. It allows you to expand, add, and remove content from images with high-quality results. The following are some key features of Photoshop for your better understanding of this tool:
- It offers a sky replacement Photoshop feature that can change the sky from captured images.
- You can remove and replace your background in Photoshop and refine it as required.
- With the remove object feature, users can erase unwanted objects from images.
- Use the “Colorize” feature and make your black-and-white images colorful.
- Enhance workflow by using “Layer” masking that hides part of images without erasing them.
Part 2: A Detailed Guide on How to Replace Sky Background in Photoshop?
With AI integration in Adobe Photoshop, you can change skies with simple clicks. It provides a collection of skies from the Blue Skies, Spectacular, and sunset categories. Also, users can import any sky from their gallery or download one from presets. To do so, let us show you how to change the sky in Photoshop in given steps:
Step 1: Bring your desired image to the Adobe Photoshop. Head to the top toolbar and click the “Edit” option next to the “File.” Look for the “Sky Replacement” option from the list.

Step 2: After tapping “Sky Replacement,” you will get a respective screen on your front. Press the downward symbol next to the “Sky” and pick one sky from available options.

Step 3: Alternatively, you can hit the “+” icon and browse the sky image from your system. When you choose one, it gets added to the existing sky list. Select that and tap the “OK” button to apply changes in your media.

Part 3: An Alternative Solution: Wondershare Filmora Providing Workability with Easy Background Replacement
Changing sky in Photoshop is difficult for beginners and requires a basic skill set. It may take a lot of your time to understand its functionalities. That’s why choosing a tool with simple operation and high-quality output is important. In this regard, you should use Wondershare Filmora as a better option for everyone. It is a video editor that offers a variety of powerful features.
Using this tool, you can remove and change the background from your images or videos. With the integration of AI, it can automatically detect the object and foreground.
Other Prominent Video Editing Features
Apart from changing background, Filmora can perform A to Z video editing tasks. Let’s explore some of the key features to overview its fruitful functionalities:
Free Download For Win 7 or later(64-bit)
Free Download For macOS 10.14 or later
1. AI Text-to-Video
Who needs a camera and crew when you can effortlessly generate video from text? Filmora can transform your text into an engaging storytelling video with just text prompts. After getting the video, you can customize the video’s appearance with fonts, styles, and colors. Users can add smooth transitions between text elements for a cohesive flow.

2. AI Music Generator
Sometimes, we get tired of searching for music that perfectly aligns with our video content. In such cases, AI music generator saves us by providing the music we want. It offers you many options to choose from different genres and styles. You can set the music duration and number of tracks you want to generate. Then, you can make manual adjustments like balancing sound and auto normalization.

3. AI Image
Similar to text-to-video, Filmora can generate images from text. To do so, just describe your imagination in simple words. Then, you are asked to pick one resolution from given options. You can use the generated images in your projects directly. It allows you to generate an image from your chosen style. A few of the styles include Freestyle, Cyberpunk, and Futuristic.

4. AI Copilot Editing
While editing projects, humans often require suggestions or assistance. For this purpose, Filmora provides you with AI Copilot as your personal AI assistant. It will prevent errors in your editing by sending error messages. You can get the best editing solution as per your needs. This way, the quality of your project gets increased.

5. AI Vocal Remover
With advanced algorithms, it is an exceptional feature of Filmora. It relieves your breath by removing unwanted vocals from your audio or video. You can now completely remove vocal sounds from the video and add your recorded ones. It’s an automated process that separates voice and background in the media panel.

Steps To Remove Background Using Two Unique Ways with Wondershare Filmora
Filmora is one of the easiest tools to operate that anyone can use to get desired results. It allows users to approach the same features in different ways. Similarly, there are two unique ways to remove or change the sky Photoshop background, which are given below.
Free Download For Win 7 or later(64-bit)
Free Download For macOS 10.14 or later
Method 1: Using Chroma Key
Step 1: Start your project in Filmora and import two files in the timeline. Bring the background clip first in the timeline, then the original file. Cut the unnecessary portion of background-clip.

Step 2: Keep them selected and come to the “AI Tools” option in the right-side panel. Enable the “Chroma Key” toggle, and AI will automatically replace the background. You can use the “Tolerance,” “Edge Thickness,” and “Edge Feather” sliders for manual changes.

Method 2: Through AI Portrait
Step 1: Import your background clip and main video in Filmora 13. Place the background clip on track 1 and the main clip on the 2nd track in the timeline.

Step 2: Hold both of them and head to the right-side panel. Press the “AI Tools” option and scroll to access the “AI Portrait.” Enable that option, and your background will automatically change with AI. Now, you can make manual changes by moving the “Edge Thickness” and “Feather” sliders.

Conclusion
To wrap up, let’s say that Sky Photoshop sets the right tone for your media with landscapes. On the other hand, this feature might prove difficult for some users to handle. Thus, they can rely on Wondershare Filmora for convenience. Beginners and professionals can benefit from its extraordinary features in video editing.
Do You Wish to Create High-Quality Videos and Experience Effective Videos with Editing? No Problem at All because the Keyboard Shortcuts Listed Here Will Assist You
To get rid of mistakes in the videos and to make them more visually appealing, people prefer to edit videos. You can also shape the video in a storytelling way to express and present the cohesive story to the world. Nowadays, video editing is a demanded skill, and every person wishes to master it. In these scenarios, the built-in keyboard shortcuts will help you a lot.
The best tool that provides built-in keyboard shortcuts and can help you experience the best video editing experience is Wondershare Filmora. By the end of this article, you will be aware of the checkpoints along with the keyboard shortcuts of Filmora. We will also provide keyboard shortcuts in this article to encourage shortcut video editing.
Wondershare Filmora12 A cross-platform helping you make quick and efficient video editing!
Free Download Free Download Learn More

Part 1: Major Checkpoints in Quick Video Editing
While doing video editing, it is very important to focus on efficiency and speed. It is essential to focus on the speed and efficiency of a video editing tool. Moreover, there are some checkpoints that you have to consider before getting into video editing. Some of them are:
01of 05Preparing Footage
Before anything else, you have to arrange and prepare your footage. It helps optimize the editing procedure, and you can label the files properly. Besides this, it also saves you time searching for specific files and footage.
02of 05Timeline Setting
You have to set up your timelines in the desired and recognizable resolutions. Moreover, adjusting frame rates and duration of videos and creating customized templates before anything else.
03of 05Selection of moments
Make sure you watch your video in a proper manner so you don’t have to waste time finding a specific moment. By this, you will be able to select a moment without wasting additional time.
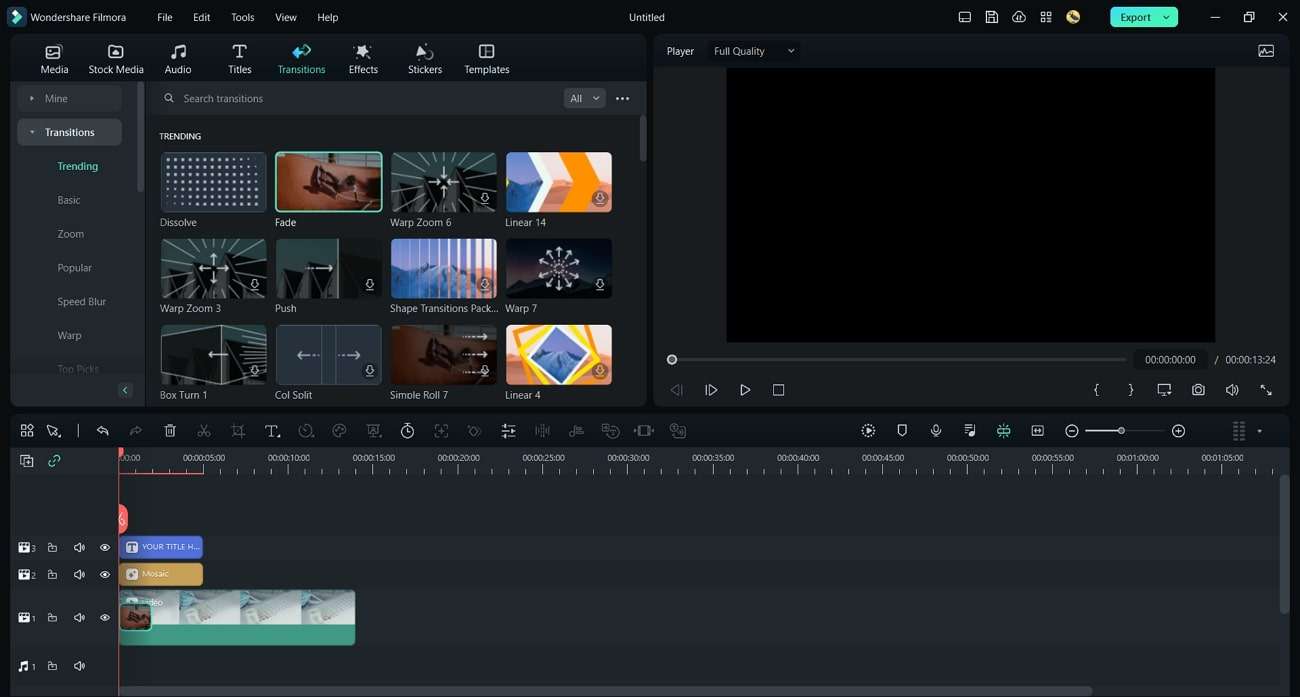
04of 05Transitions and Adjustments
While editing the videos, you need to add the basic transitions to add consistency. Furthermore, you can adjust the audio metrics of videos and sync them with the length of videos.
05of 05Preview and Export
After editing the videos, you also have to preview them to check and fix the mistakes. Above all, always select the tool through which you can preview the videos and export them in the desired output format.
Part 2: An Introduction to Wondershare Filmora and Its Video Editing Intuition
Wondershare Filmora can be referred to as a feature-packed, cost-effective, all-in-one, easy-to-use video editing software. This tool has the capability to create professional-grade videos. You can also take assistance from this tool for creating advanced-level content for your social media platforms. It is also known to be the best choice when it comes to editing videos.
In Filmora, you can find diversified video editing tools as it comprehends timeline-based editing, so you can also use it to edit your memories. Several video formats are compatible with Filmora, so you will not face restrictions in this part.
Free Download For Win 7 or later(64-bit)
Free Download For macOS 10.14 or later
Key Features of Wondershare Filmora
- The AI Smart Cutout feature of Filmora lets you highlight and edit diversified unrequired objects, persons, or pets from the background.
- One of the best things about Filmora is it supports the AI Image feature through which you can turn descriptive text into illustrative images.
- It also shows the integrations with ChatGPT, through which you can generate AI text during video editing. This is perfect for YouTube descriptions and titles.
- You can also adjust the speed of the video while controlling the keyframes to make cinematic-grade edits in simple videos.
- The title editing feature lets you create artistic features with modernized word art, illustrations, and animations.
Part 3: Learning All Keyboard Shorts for Quick and Efficient Video Editing
To maximize productivity and workflow efficiency, you can take assistance from the keyboard shortcuts. Luckily, the industry-standard tool named Filmora offers effective keyboard shortcuts. Do you wish to know the keyboard shortcuts integrated with Wondershare Filmora? There is nothing to worry about because in this part, you will find the effective and implementable easy edit video shortcuts:
| Function | Shortcut |
|---|---|
| Preference | Ctrl+Shift+, |
| Keyboard Shortcut | Ctrl+Alt+K |
| Exit | Alt+F |
| New Project | Ctrl+N |
| Open Project | Ctrl+O |
| Save Project | Ctrl+S |
| Save Project As | Ctrl+Shift+S |
| Archive Project | Ctrl+Shift+A |
| Import Media Files | Ctrl+I |
| Record Voice-Over | Alt+R |
| Add a New Folder | +Alt+N |
| Undo | Ctrl+Z |
| Redo | Ctrl+Y |
| Cut | Ctrl+X |
| Copy | Ctrl+C |
| Paste | Ctrl+V |
| Duplicate | Ctrl+D |
| Delete | Del |
| Ripple Delete | Shift+Del |
| Close Gap | Alt+Del |
| Select All | +A |
| Copy Effects | Ctrl+Alt+C |
| Paste Effects | Ctrl+Alt+V |
| Select Clip Range | X |
| Cancel the Selected Range | Shift+X |
| Nudge Left | Alt+Left |
| Nudge Right | Alt+Right |
| Nudge Up | Alt+Up |
| Edit Properties | Alt+E |
| Split | Ctrl+B |
| Trim Start to Playhead | Alt+[ |
| Trim End to Playhead | Alt+] |
| Crop to Fit | Ctrl+F |
| Crop and Zoom | Alt+C |
| Rotate 90CW | Ctrl+Alt+Right |
| Rotate CCW | Ctrl+Alt+Left |
| Group | Ctrl+G |
| UnGroup | Ctrl+Alt+G |
| Uniform Speed | Ctrl+R |
| Add Freeze Frame | Alt+F |
| Detach Audio | Ctrl+Alt+D |
| Mute | Ctrl+Shift+M |
| Stabilization | Alt+S |
| Chroma Key | Ctrl+Shift+G |
| Red Marker | Alt+1 |
| Orange Marker | Alt+2 |
| Yellow Marker | Alt+3 |
| Green Marker | Alt+4 |
| Cyan Marker | Alt+5 |
| Blue Marker | Alt+6 |
| Purple Marker | Alt+7 |
| Grey Marker | Alt+8 |
| Select All Clips With the Same Color Mark | Alt+Shift+ |
| Render Preview | Enter |
| Add Audio/Video Keyframes | Alt+Left Click |
| Previous Keyframes | [ |
| Next Keyframes | ] |
| Motion Tracking | Alt+X |
| Color Match | Alt+M |
| Insert | Shift+QI |
| Overwrite | Shift_+O |
| Replace | Alt+Mouse Drag |
| Rename | F2 |
| Reveal in Explorer | Ctrl+Shift+R |
| Apply | Alt+A |
| Quick Split Mode | C |
| Select | V |
| Open Audio Stretch | S |
| Exit Audio Stretch | Shift+S |
| Add to Favorites | Shift+F |
| Adjust the Bezier Curve | Alt+Mouse Drag |
| Split 9 Edited State0 | Shift+Enter |
| Merge Up (Cursor at the beginning of the sentence0 | Backspace |
| Merge down subtitles 9radio or edited state) | Alt+Q |
| Merge selected subtitles (multi-select state | Alt+Q |
| Play/Pause | Space |
| Stop | Ctrl +/ |
| Full Screen/Restore Snapshot | Ctrl+Alt+S |
| Previous Frame /Move Left | Left |
| Next Frame/ More Right | Right |
| Previous Edit Point / Move Up | Up |
| Next Edit Point/ Move Down | Down |
| Go To Next Second | Shift+Right |
| Go to Previous Marker | Shift+Up |
| Go to Next Marker | Shift+Down |
| Go to Project Beginning | Home |
| Go to Project End | End |
| Go to Selected Clip Start | Shift+Home |
| Go to Selected Clip End | Shift+End |
| Zoom In | Ctrl+= |
| Zoom Out | Ctrl+_ |
| Zoom to Fit Timeline | Shift+Z |
| Select Previous | Ctrl+Left |
| Select Next | Ctrl+Right |
| Horizontal Scroll (Timeline) | Alt+Scroll Up/Down |
| Vertical Scroll (Timeline) | Scroll Up/Down |
| Mark In | I |
| Mark Out | O |
| Clear In And Out | Ctrl+Shift+X |
| Add Marker | M |
| Edit Marker | Shift+M |
| Help | F |
| Export | Ctrl+ E |
Conclusion
In the article, you have discovered crucial information about video editing in Filmora. There are some checkpoints that you need to keep in mind before getting into editing. Integrating these checkpoints, there is a consistent need to understand keyboard shortcuts in video editing. This procedure, in particular, helps much in effective video editing.
With the help of the Filmora shortcut video editor, you can make cinematic-level edits to the video. It also integrates several features such as AI Smart Cutout, AI Copywriting, and more. To know more about these useful keyboard shortcuts, this article has surely been of great help.
Free Download Free Download Learn More

Part 1: Major Checkpoints in Quick Video Editing
While doing video editing, it is very important to focus on efficiency and speed. It is essential to focus on the speed and efficiency of a video editing tool. Moreover, there are some checkpoints that you have to consider before getting into video editing. Some of them are:
01of 05Preparing Footage
Before anything else, you have to arrange and prepare your footage. It helps optimize the editing procedure, and you can label the files properly. Besides this, it also saves you time searching for specific files and footage.
02of 05Timeline Setting
You have to set up your timelines in the desired and recognizable resolutions. Moreover, adjusting frame rates and duration of videos and creating customized templates before anything else.
03of 05Selection of moments
Make sure you watch your video in a proper manner so you don’t have to waste time finding a specific moment. By this, you will be able to select a moment without wasting additional time.
04of 05Transitions and Adjustments
While editing the videos, you need to add the basic transitions to add consistency. Furthermore, you can adjust the audio metrics of videos and sync them with the length of videos.
05of 05Preview and Export
After editing the videos, you also have to preview them to check and fix the mistakes. Above all, always select the tool through which you can preview the videos and export them in the desired output format.
Part 2: An Introduction to Wondershare Filmora and Its Video Editing Intuition
Wondershare Filmora can be referred to as a feature-packed, cost-effective, all-in-one, easy-to-use video editing software. This tool has the capability to create professional-grade videos. You can also take assistance from this tool for creating advanced-level content for your social media platforms. It is also known to be the best choice when it comes to editing videos.
In Filmora, you can find diversified video editing tools as it comprehends timeline-based editing, so you can also use it to edit your memories. Several video formats are compatible with Filmora, so you will not face restrictions in this part.
Free Download For Win 7 or later(64-bit)
Free Download For macOS 10.14 or later
Key Features of Wondershare Filmora
- The AI Smart Cutout feature of Filmora lets you highlight and edit diversified unrequired objects, persons, or pets from the background.
- One of the best things about Filmora is it supports the AI Image feature through which you can turn descriptive text into illustrative images.
- It also shows the integrations with ChatGPT, through which you can generate AI text during video editing. This is perfect for YouTube descriptions and titles.
- You can also adjust the speed of the video while controlling the keyframes to make cinematic-grade edits in simple videos.
- The title editing feature lets you create artistic features with modernized word art, illustrations, and animations.

Part 3: Learning All Keyboard Shorts for Quick and Efficient Video Editing
To maximize productivity and workflow efficiency, you can take assistance from the keyboard shortcuts. Luckily, the industry-standard tool named Filmora offers effective keyboard shortcuts. Do you wish to know the keyboard shortcuts integrated with Wondershare Filmora? There is nothing to worry about because in this part, you will find the effective and implementable easy edit video shortcuts:
| Function | Shortcut |
|---|---|
| Preference | Ctrl+Shift+, |
| Keyboard Shortcut | Ctrl+Alt+K |
| Exit | Alt+F |
| New Project | Ctrl+N |
| Open Project | Ctrl+O |
| Save Project | Ctrl+S |
| Save Project As | Ctrl+Shift+S |
| Archive Project | Ctrl+Shift+A |
| Import Media Files | Ctrl+I |
| Record Voice-Over | Alt+R |
| Add a New Folder | +Alt+N |
| Undo | Ctrl+Z |
| Redo | Ctrl+Y |
| Cut | Ctrl+X |
| Copy | Ctrl+C |
| Paste | Ctrl+V |
| Duplicate | Ctrl+D |
| Delete | Del |
| Ripple Delete | Shift+Del |
| Close Gap | Alt+Del |
| Select All | +A |
| Copy Effects | Ctrl+Alt+C |
| Paste Effects | Ctrl+Alt+V |
| Select Clip Range | X |
| Cancel the Selected Range | Shift+X |
| Nudge Left | Alt+Left |
| Nudge Right | Alt+Right |
| Nudge Up | Alt+Up |
| Edit Properties | Alt+E |
| Split | Ctrl+B |
| Trim Start to Playhead | Alt+[ |
| Trim End to Playhead | Alt+] |
| Crop to Fit | Ctrl+F |
| Crop and Zoom | Alt+C |
| Rotate 90CW | Ctrl+Alt+Right |
| Rotate CCW | Ctrl+Alt+Left |
| Group | Ctrl+G |
| UnGroup | Ctrl+Alt+G |
| Uniform Speed | Ctrl+R |
| Add Freeze Frame | Alt+F |
| Detach Audio | Ctrl+Alt+D |
| Mute | Ctrl+Shift+M |
| Stabilization | Alt+S |
| Chroma Key | Ctrl+Shift+G |
| Red Marker | Alt+1 |
| Orange Marker | Alt+2 |
| Yellow Marker | Alt+3 |
| Green Marker | Alt+4 |
| Cyan Marker | Alt+5 |
| Blue Marker | Alt+6 |
| Purple Marker | Alt+7 |
| Grey Marker | Alt+8 |
| Select All Clips With the Same Color Mark | Alt+Shift+ |
| Render Preview | Enter |
| Add Audio/Video Keyframes | Alt+Left Click |
| Previous Keyframes | [ |
| Next Keyframes | ] |
| Motion Tracking | Alt+X |
| Color Match | Alt+M |
| Insert | Shift+QI |
| Overwrite | Shift_+O |
| Replace | Alt+Mouse Drag |
| Rename | F2 |
| Reveal in Explorer | Ctrl+Shift+R |
| Apply | Alt+A |
| Quick Split Mode | C |
| Select | V |
| Open Audio Stretch | S |
| Exit Audio Stretch | Shift+S |
| Add to Favorites | Shift+F |
| Adjust the Bezier Curve | Alt+Mouse Drag |
| Split 9 Edited State0 | Shift+Enter |
| Merge Up (Cursor at the beginning of the sentence0 | Backspace |
| Merge down subtitles 9radio or edited state) | Alt+Q |
| Merge selected subtitles (multi-select state | Alt+Q |
| Play/Pause | Space |
| Stop | Ctrl +/ |
| Full Screen/Restore Snapshot | Ctrl+Alt+S |
| Previous Frame /Move Left | Left |
| Next Frame/ More Right | Right |
| Previous Edit Point / Move Up | Up |
| Next Edit Point/ Move Down | Down |
| Go To Next Second | Shift+Right |
| Go to Previous Marker | Shift+Up |
| Go to Next Marker | Shift+Down |
| Go to Project Beginning | Home |
| Go to Project End | End |
| Go to Selected Clip Start | Shift+Home |
| Go to Selected Clip End | Shift+End |
| Zoom In | Ctrl+= |
| Zoom Out | Ctrl+_ |
| Zoom to Fit Timeline | Shift+Z |
| Select Previous | Ctrl+Left |
| Select Next | Ctrl+Right |
| Horizontal Scroll (Timeline) | Alt+Scroll Up/Down |
| Vertical Scroll (Timeline) | Scroll Up/Down |
| Mark In | I |
| Mark Out | O |
| Clear In And Out | Ctrl+Shift+X |
| Add Marker | M |
| Edit Marker | Shift+M |
| Help | F |
| Export | Ctrl+ E |
Conclusion
In the article, you have discovered crucial information about video editing in Filmora. There are some checkpoints that you need to keep in mind before getting into editing. Integrating these checkpoints, there is a consistent need to understand keyboard shortcuts in video editing. This procedure, in particular, helps much in effective video editing.
With the help of the Filmora shortcut video editor, you can make cinematic-level edits to the video. It also integrates several features such as AI Smart Cutout, AI Copywriting, and more. To know more about these useful keyboard shortcuts, this article has surely been of great help.
Also read:
- New Follow a Few Simple Steps and Learn How to Create a Professional Glowing Edge Effect to Your Videos in Filmora
- In 2024, Best Software or Website to Convert Video Format
- Updated How To Make A Political Video for 2024
- New In 2024, A Guide to Speed up a Video on Splice
- Updated Find Out The Best Dark Moody LUTs During Editing for 2024
- Updated Makeup Video Is One of the Video Types that Many Vloggers Are Creating. If You Are Also the One Who Wants to Share Makeup Experiences in Videos, Then You Can Follow the Guide Below to Make a Makeup Video with Simple Steps
- New 2024 Approved Tips That Show Anybody How To Make Youtube Slideshow – Guaranteed
- New A Complete Guideline To Better Use QuickTime Player for 2024
- New 2024 Approved Create Perfect Slow Motion Videos With The Best CapCut Templates
- Updated 2024 Approved Create A Freeze Frame Sequence In Your Videos
- Fixing The Slow Playback Issues in DaVinci Resolve
- Updated In 2024, How to Create a Custom Sequence Preset in Premiere Pro
- Updated 4 Methods How To Make a Recap Video
- Updated In 2024, How to Create an Instant Slideshow on Mac
- Updated How to Use iMovie Text Effects
- New In 2024, 22 Free Video Editing Software to Save Your Money and Time
- Best 16 Motion Blur Apps for Videos & Photos
- Updated How to Create Glowing Edge Effect in TikTok Dancing Video for 2024
- New Record Slow Motion Videos With Phantom Slow-Mo Camera for 2024
- In 2024, Control Playback Speed in Premiere Pro
- Updated Why Did Filmora AI Portrait Attract People?
- How to Rotate Video in iMovie with Alternative
- New Hitfilm Express - A Guide to Download, Install, Key Features for 2024
- Updated How Long Does It Take To Edit Videos
- Top 10 Picks for Flawless Slow Motion Video Generation for 2024
- Want to Learn How to Make a Fortnite Montage? This Guide Will Give You the Low-Down on Creating Epic Montage Fortnite Videos that You Can Share with Other Players on Social Media Platforms for 2024
- 2024 Approved Read and Learn How to Convert a Slow-Motion Video to Normal in This Guide. Besides, Find the Best Desktop Solution to Adjust Video Speed Quickly and Easily
- Updated 2024 Approved 100 Working Methods to Learn How to Rotate TikTok Video
- New Figuring Out Proper Ways to Play a Video in Slow Motion on iPhone for 2024
- In 2024, ReVisionFX ReelSmart Motion Blur Plugin For Premiere Pro
- Updated How Do You Create In-Camera Transitions in Your Videos? A Complete Guide for Beginners to Create These Transitions Using Their Camera at Home
- Discover the Top 5 Free Online Video Filter Editors to Transform Your Videos with Captivating Color Grading and Correction Presets. Elevate Your Digital Storytelling Effortlessly
- 2024 Approved Step by Step to Cut Videos in Lightworks
- Updated Applications and Software Take up Your Devices Storage to Create Slow-Mo. Explore This Piece to Learn About some Slow-Motion Video Online Makers
- New In 2024, Find The Best Free Canon LUTs
- How to Unlock Verizon iPhone 14 Plus
- Does Airplane Mode Turn off GPS Location On Itel P40? | Dr.fone
- In 2024, What Legendaries Are In Pokemon Platinum On Samsung Galaxy A23 5G? | Dr.fone
- How to Fix Apple iPhone 11 Pro Max Passcode not Working?
- Bypassing Google Account With vnROM Bypass For Xiaomi
- 3uTools Virtual Location Not Working On Apple iPhone 14? Fix Now | Dr.fone
- Everything You Need to Know about Lock Screen Settings on your Vivo X100 Pro
- In 2024, Reset iTunes Backup Password Of iPhone 11 Pro Prevention & Solution | Dr.fone
- In 2024, Top 10 Best Spy Watches For your OnePlus Nord CE 3 Lite 5G | Dr.fone
- In 2024, Preparation to Beat Giovani in Pokemon Go For Oppo F23 5G | Dr.fone
- In 2024, 5 Ways To Teach You To Transfer Files from Vivo V30 Pro to Other Android Devices Easily | Dr.fone
- Android Unlock Code Sim Unlock Your Oppo Reno 8T Phone and Remove Locked Screen
- In 2024, How to Bypass FRP on Tecno Camon 20 Pro 5G?
- How to Hard Reset Realme 12+ 5G Without Password | Dr.fone
- In 2024, How to Remove a Previously Synced Google Account from Your Realme C55
- How To Change Your Apple ID on Apple iPhone 12 mini With or Without Password | Dr.fone
- 4 Most-Known Ways to Find Someone on Tinder For Honor 70 Lite 5G by Name | Dr.fone
- In 2024, How to Track Samsung Galaxy M54 5G Location by Number | Dr.fone
- In 2024, How To Fix OEM Unlock Missing on Infinix Smart 7 HD?
- How To Check if Your OnePlus Ace 2V Is Unlocked
- Updated Translate Audio/Video Content From Spanish to English and Vice Versa
- The way to get back lost videos from Vivo V27 Pro
- 8 Solutions to Fix Find My Friends Location Not Available On Vivo Y200e 5G | Dr.fone
- Title: In 2024, Master Premiere Pro Custom Sequence Presets
- Author: Chloe
- Created at : 2024-04-24 07:08:13
- Updated at : 2024-04-25 07:08:13
- Link: https://ai-editing-video.techidaily.com/in-2024-master-premiere-pro-custom-sequence-presets/
- License: This work is licensed under CC BY-NC-SA 4.0.

