
:max_bytes(150000):strip_icc():format(webp)/football-referee-signaling-touchdown-in-stadium-599944339-5a84cb9e875db900367df025.jpg)
In 2024, There Are Several Video Players that You Can Use to Watch Videos on Your PC. To Have a Better Experience Viewing Videos and Enhancing Them Across a Similar Platform, You Can Try Out VLC Media Player for PC
There Are Several Video Players that You Can Use to Watch Videos on Your PC. To Have a Better Experience Viewing Videos and Enhancing Them Across a Similar Platform, You Can Try Out VLC Media Player for PC
Video players have made it quite easy for users to watch movies and their favorite seasons whenever they wish to. While working on improving video quality, several video players have taken dominance across the current market. VLC Media Player stands among the top contenders of video players that have provided users with exceptional services. This article stands on discussing the pointers that would help you use VLC Media Player in a better way.
In this article
01 Key Features of VLC Media Player
02 List of VLC Media Player Supported Format
03 How to Play or Download Streaming Videos with VLC
04 How to Record Screen and Take Screenshots by Using VLC?
05 How to Convert Video File to Different Formats with VLC?
06 Extra Tips: Top Recommended Video Editor in 2022 – Filmora Video Editor
Part 1: Key Features of VLC Media Player
VLC Media Player is an open-source, free video player accessible for all users across major platforms. Being one of the best, it is essential to realize the features that make VLC Media Player special.

Convert Video Files
One of the most anticipated features of VLC is its conversion ability. While converting videos, users can also proceed towards audios. However, as our focus is across the video file formats, VLC offers an extensive set of formats to convert the video without compromising the quality.
Loop Parts of Video
Where most video players provide the option of looping complete files, VLC has changed the narrative of looping specific parts of a video by setting up markers across it. This helps users loop specific parts across their videos.
Stream Podcasts
VLC Media Player exempts the need to download dedicated platforms that stream podcasts for you. The video player allows you to stream podcasts across its platform without the need for any additional settings easily.
Enhance Your Videos
With VLC player, you can always consider revamping your video by adding different filters and effects across it. The user can change the brightness, contrast, colors, geometry, overlays, and several other video features across the platform.
Adding Subtitles
While watching movies and videos, you can download and add external subtitle files across the VLC player to improve your video experience.
Part 2: List of VLC Media Player Supported Format
The following VLC formats are supported across the platform. Users can consider using any of the following as per their convenience:
- AVI
- WMA
- MP4
- MOV
- 3GP
- OGG
- FLAC
- MKV
- MPEG-1/2
- DivX® (1/2/3/4/5/6)
- MPEG-4 ASP
- XviD
- 3ivX D4
- 261
- 263 / H.263i
- 264 / MPEG-4 AVC
- Cinepak
- Theora
- Dirac / VC-2
- MJPEG (A/B)
- WMV 1/2
- WMV 3 / WMV-9
- VC-1
- Sorenson 1/3
- DV
- On2 VP3/VP5/VP6
- Indeo Video v3 (IV32)
- Real Video (1/2/3/4)
Part 3: How to Play or Download Streaming Videos with VLC
As you use a video player, it is always preferable to have one that provides extensive and impressive functions. VLC Media Player for PC allows you to download and play videos across the platform. To understand the procedure, go through the steps provided below:
Step 1: Install VLC Media Player across your device. Run the video player once installed and proceed to select “Media.” Select “Open Network Stream” from the drop-down menu.

Step 2: You need to open the video’s web page that is to be downloaded through VLC. Copy and paste the video URL across the “Please enter a network URL:” box across the window that opens on the screen. Select the “ Stream “ option across the drop-down menu that appears across the “Play” option.

Step 3: On the next window, select “Add” and browse the output destination of the file along with its name.

Step 4: Following this, select the output format of the video file that you need to save your download video in. Ensure that the option of “Activate Transcoding” is enabled. Tap on “Next” to proceed.

Step 5: With all settings specified, click “Stream” to download the video across the specified destination.

Step 6: Once the video is downloaded, select “Media” and tap on “Open Files.” You can access the specific file folder and play the video from there across VLC Media Player with ease.

Part 4: How to Record Screen and Take Screenshots by Using VLC?
Being a content creator, you particularly wish to work on a low budget at the start. Recording videos and streaming them has been made easy with VLC Media Player. Follow the steps of recording screen and taking screenshots of your device with the help of VLC.
Recording Screen with VLC
Step 1: Open VLC Media Player on your device. You also need to open the platform to be recorded with VLC.

Step 2: Tap on “Media” followed by “Open Network Stream” across the drop-down menu to open a new window.

Step 3: Across the “Capture Mode” option, select “Desktop” to record the desktop screen across the player. Set up the desired frame rate for your screen recording. Tap on “Play” once you have configured all essential settings.

Taking Screenshots on VLC
Step 1: Access the “Media” section and select “Open File” to import a video across the player.

Step 2: After opening a video across VLC, you can capture your screen by proceeding to the “Video” tab and selecting the option of “Take Snapshot” to take a screenshot across VLC.

Step 3: You can also set up and use the hotkeys of “CTRL + ALT + S” and “Shift + S” for capturing the screen across the VLC player.
Part 5: How to Convert Video File to Different Formats with VLC?
If you are looking to convert your video file into different VLC formats, you can consider adopting the services of a VLC player. To cover this, look into the steps featured below:
Step 1: Open VLC Media Player on your device and navigate the “Media” tab. Select the “Convert/Save” option across the drop-down menu.

Step 2: With a new screen on the front, select “Add” to import the video file to be converted. Tap on “Convert/Save” once added.

Step 3: Once you add the video, a new screen opens containing the conversion options. Select the file format you wish to change to across the “Profile” option. Set up the output folder of the converted video across the “Destination file” option. As you have set the options, tap on “Start” to conclude the process and convert the video successfully.

Extra Tips: Top Recommended Video Editor in 2022 – Filmora Video Editor
Video editors are as important as video players within this current digital world. Content creators who have their setup across developing videos require platforms that can help them enhance their videos to perfection before playing them across video players such as VLC Media Player. Wondershare Filmora is a clear example of such video editors that provide proficient services in the video editing platform to their users.

For Win 7 or later (64-bit)
For macOS 10.12 or later
As far as the platform goes, it provides a simple and effective user interface to its users. It has tried to embed all necessary features across a simple structure to make things easier for beginners. This is how video editing is quite easy across Filmora Video Editor. With various editing options to work on, users can trim their videos, adjust their audios, add effects and transitions, and utilize visual effects to perfection.
Designing videos with Filmora is a treat for the creators. While recommending the platform for users, they can discover explicit tools for motion tracking, color matching, keyframing, and multiple other options. This is what makes Filmora an exceptional option in video editing platforms. At a price that numerous users can afford, the platform offers unique and diverse options compared to other video editors in the market.
Conclusion
This article has provided an in-depth understanding of the VLC Media Player and the feature it provides. It has also focused on discussing the details about the multiple procedures that can be tried across the player, including conversion, recording, and taking screenshots across VLC. Users new to this platform should look into these details before using it for their specific purpose.
Wondershare Filmora
Get started easily with Filmora’s powerful performance, intuitive interface, and countless effects!
Try It Free Try It Free Try It Free Learn More >

02 List of VLC Media Player Supported Format
03 How to Play or Download Streaming Videos with VLC
04 How to Record Screen and Take Screenshots by Using VLC?
05 How to Convert Video File to Different Formats with VLC?
06 Extra Tips: Top Recommended Video Editor in 2022 – Filmora Video Editor
Part 1: Key Features of VLC Media Player
VLC Media Player is an open-source, free video player accessible for all users across major platforms. Being one of the best, it is essential to realize the features that make VLC Media Player special.
Convert Video Files
One of the most anticipated features of VLC is its conversion ability. While converting videos, users can also proceed towards audios. However, as our focus is across the video file formats, VLC offers an extensive set of formats to convert the video without compromising the quality.
Loop Parts of Video
Where most video players provide the option of looping complete files, VLC has changed the narrative of looping specific parts of a video by setting up markers across it. This helps users loop specific parts across their videos.
Stream Podcasts
VLC Media Player exempts the need to download dedicated platforms that stream podcasts for you. The video player allows you to stream podcasts across its platform without the need for any additional settings easily.
Enhance Your Videos
With VLC player, you can always consider revamping your video by adding different filters and effects across it. The user can change the brightness, contrast, colors, geometry, overlays, and several other video features across the platform.
Adding Subtitles
While watching movies and videos, you can download and add external subtitle files across the VLC player to improve your video experience.
Part 2: List of VLC Media Player Supported Format
The following VLC formats are supported across the platform. Users can consider using any of the following as per their convenience:
- AVI
- WMA
- MP4
- MOV
- 3GP
- OGG
- FLAC
- MKV
- MPEG-1/2
- DivX® (1/2/3/4/5/6)
- MPEG-4 ASP
- XviD
- 3ivX D4
- 261
- 263 / H.263i
- 264 / MPEG-4 AVC
- Cinepak
- Theora
- Dirac / VC-2
- MJPEG (A/B)
- WMV 1/2
- WMV 3 / WMV-9
- VC-1
- Sorenson 1/3
- DV
- On2 VP3/VP5/VP6
- Indeo Video v3 (IV32)
- Real Video (1/2/3/4)
Part 3: How to Play or Download Streaming Videos with VLC
As you use a video player, it is always preferable to have one that provides extensive and impressive functions. VLC Media Player for PC allows you to download and play videos across the platform. To understand the procedure, go through the steps provided below:
Step 1: Install VLC Media Player across your device. Run the video player once installed and proceed to select “Media.” Select “Open Network Stream” from the drop-down menu.
Step 2: You need to open the video’s web page that is to be downloaded through VLC. Copy and paste the video URL across the “Please enter a network URL:” box across the window that opens on the screen. Select the “ Stream “ option across the drop-down menu that appears across the “Play” option.
Step 3: On the next window, select “Add” and browse the output destination of the file along with its name.
Step 4: Following this, select the output format of the video file that you need to save your download video in. Ensure that the option of “Activate Transcoding” is enabled. Tap on “Next” to proceed.
Step 5: With all settings specified, click “Stream” to download the video across the specified destination.
Step 6: Once the video is downloaded, select “Media” and tap on “Open Files.” You can access the specific file folder and play the video from there across VLC Media Player with ease.
Part 4: How to Record Screen and Take Screenshots by Using VLC?
Being a content creator, you particularly wish to work on a low budget at the start. Recording videos and streaming them has been made easy with VLC Media Player. Follow the steps of recording screen and taking screenshots of your device with the help of VLC.
Recording Screen with VLC
Step 1: Open VLC Media Player on your device. You also need to open the platform to be recorded with VLC.
Step 2: Tap on “Media” followed by “Open Network Stream” across the drop-down menu to open a new window.
Step 3: Across the “Capture Mode” option, select “Desktop” to record the desktop screen across the player. Set up the desired frame rate for your screen recording. Tap on “Play” once you have configured all essential settings.
Taking Screenshots on VLC
Step 1: Access the “Media” section and select “Open File” to import a video across the player.
Step 2: After opening a video across VLC, you can capture your screen by proceeding to the “Video” tab and selecting the option of “Take Snapshot” to take a screenshot across VLC.
Step 3: You can also set up and use the hotkeys of “CTRL + ALT + S” and “Shift + S” for capturing the screen across the VLC player.
Part 5: How to Convert Video File to Different Formats with VLC?
If you are looking to convert your video file into different VLC formats, you can consider adopting the services of a VLC player. To cover this, look into the steps featured below:
Step 1: Open VLC Media Player on your device and navigate the “Media” tab. Select the “Convert/Save” option across the drop-down menu.
Step 2: With a new screen on the front, select “Add” to import the video file to be converted. Tap on “Convert/Save” once added.
Step 3: Once you add the video, a new screen opens containing the conversion options. Select the file format you wish to change to across the “Profile” option. Set up the output folder of the converted video across the “Destination file” option. As you have set the options, tap on “Start” to conclude the process and convert the video successfully.
Extra Tips: Top Recommended Video Editor in 2022 – Filmora Video Editor
Video editors are as important as video players within this current digital world. Content creators who have their setup across developing videos require platforms that can help them enhance their videos to perfection before playing them across video players such as VLC Media Player. Wondershare Filmora is a clear example of such video editors that provide proficient services in the video editing platform to their users.
For Win 7 or later (64-bit)
For macOS 10.12 or later
As far as the platform goes, it provides a simple and effective user interface to its users. It has tried to embed all necessary features across a simple structure to make things easier for beginners. This is how video editing is quite easy across Filmora Video Editor. With various editing options to work on, users can trim their videos, adjust their audios, add effects and transitions, and utilize visual effects to perfection.
Designing videos with Filmora is a treat for the creators. While recommending the platform for users, they can discover explicit tools for motion tracking, color matching, keyframing, and multiple other options. This is what makes Filmora an exceptional option in video editing platforms. At a price that numerous users can afford, the platform offers unique and diverse options compared to other video editors in the market.
Conclusion
This article has provided an in-depth understanding of the VLC Media Player and the feature it provides. It has also focused on discussing the details about the multiple procedures that can be tried across the player, including conversion, recording, and taking screenshots across VLC. Users new to this platform should look into these details before using it for their specific purpose.
Wondershare Filmora
Get started easily with Filmora’s powerful performance, intuitive interface, and countless effects!
Try It Free Try It Free Try It Free Learn More >
Slow Down Videos on Instagram With Perfection: A Guide
Do you wish to see your followers on Instagram growing? As an influencer, you can make your content engaging through slow-motion Instagram reels. Slow-motion videos are visually pleasing as they highlight the details. People can easily observe the little movements in slow-motion Instagram videos. Moreover, such videos can showcase your creative skills to the audience.
This guide will explore how to generate professional slow-motion Instagram videos. By following the instructions, you can produce captivating results. Also, it will increase the chances of getting more followers on your Instagram feed.
Slow Motion Video Maker Slow your video’s speed with better control of your keyframes to create unique cinematic effects!
Make A Slow Motion Video Make A Slow Motion Video More Features

Part 1: How Can Slow Motion Videos Be Used in Social Media Content?
Slow-motion videos can be a great addition to your social media platforms. It will insert a cinematic impression into your content. To learn more details, jump to the below part explaining the use of slow motion videos in social media:
1. Displaying Products
Do you want to promote your product? Slow-motion videos can highlight the details of your product in a professional manner. You can display the main features of the product at a slow speed. Moreover, viewers would absorb the information with great ease.
2. Demos and Tutorials
Slow-motion videos can assist you in providing clear demonstrations. Slow-motion tutorials on your social media platform can make your audience understand better. Hence, while producing cooking or DIY videos, slow-motion effects would be valuable.
3. Adds Dramatic Effect
Slow-motion Instagram videos evoke emotions in people. In an action sequence, you can add dramatic effect through slow motion. Furthermore, it can help with the storytelling of your video. This will also help in generating an immersive experience for the audience.
Part 2: Composite Ways To Perform Slow Mo on Instagram
On Instagram, there are different approaches to creating slow-mo videos. Within a few taps, you can reduce the speed of the video on Instagram. This section will highlight the two ways to generate slow-motion Instagram reels.
Way 1: Before Recording the Reel
To create a slow-motion video, you can reduce the speed before recording. To do so, you will need to check the following steps in detail:
Step 1
Open your Instagram and swipe from left to right. Select “Reel” from the below options for recording. On the left panel, you can see the options for settings. From there, tap “Speed” to display the further options.

Step 2
Here, you can choose the lowest speed for slow-mo, which is “0.3x.” Then, tap on the desired speed from the given option. Afterward, press and hold the recording button to capture the video.

Way 2: During Editing Video
Instagram lets you modify the speed of a pre-recorded video. Thus, after recording the video, users can still reduce the speed. Mentioned below are the steps to help you with this process:
Step 1
Open your Instagram profile and swipe from left to right. Choose “Reel” from the bottom and select the “Plus” icon given in the bottom-left corner.

Step 2
Now, you can select and upload the desired video from your phone to Instagram. Afterward, click the “Edit” option at bottom left side to access further options. Here, select the “Speed” option and then move the slider to reduce the speed and make the video slow mo.

Part 3: Make Video Editing in Slow Mo Easy With Wondershare Filmora
Creating slow-mo reels on Instagram won’t add uniformity to the results. Thus, you should use a third-party tool like Filmora to produce convincing results. With the latest release of Volume 13, this tool has upgraded itself to a massive scale. It includes many AI features that can transform your editing experience. The AI features can finish tasks with great accuracy within a few minutes.
This desktop tool can also generate slow-motion videos with natural results. It does not degrade the frame rate of the video after slow-mo. In fact, it increases the video quality through rendering. Along with slow motion, this tool can add many visual effects. Hence, it’s an all-rounder tool to confront all the requirements for video editing.
Free Download For Win 7 or later(64-bit)
Free Download For macOS 10.14 or later
Methods to Create Slow Motion Instagram Reels with Filmora
On Filmora, there are many ways to create slow-motion Instagram reels. To discover them, jump to the below section:
Method 1: Using Optical Flow in Speed Ramping
Heading to our first method, we will use optical flow to smoothen the video’s slow motion. Let’s get started with the below-mentioned steps:
Step 1Sign in to Create a New Project
Start by following the on-screen instructions to sign into Filmora. Once logged into this tool, hit the “New Project” option. It will open the main interface of this tool on your screen.

Step 2Import Video to the Timeline
To import the preferred video, press “Ctrl+I”. With this, your video will be uploaded within a time of few minutes. Afterward, drag and drop it to the timeline below.

Step 3Select Uniform Speed
After dropping the video into the timeline, select it with your cursor. Go to the settings given on the right side and choose “Speed”. Select “Uniform Speed” and proceed to extend the settings for “AI Frame Interpolation.” Once done, select the “Optical Flow” option. To generate the final results, choose “Render Preview” from the toolbar of the timeline.

Method 2: Using Uniform Speed
After dragging the video on the timeline, right-click on it. From the pop-up options, select the option called “Uniform Speed”. Once done, follow the instructions given above to conclude the process.

Method 3: Using Toolbar
Start by selecting the video clip on the timeline. Once done, head to the “Toolbar” given above and click “Tools”. Now, expand “Speed” and then select “Uniform Speed”. Now, you can follow the steps given above to continue with the process.

Key Features of Wondershare Filmora
AI Thumbnail Creator: This tool observes the three best shots in your video for a thumbnail. Moreover, it contains 58 templates to produce engaging thumbnails for the videos. It also lets you customize the results with text and image editing.
Auto Reframe: Every social media platform has requirements for aspect ratio. With the auto-reframe feature, you can adjust the aspect ratios in an automated way. With this feature, you can convert videos for YouTube shorts, TikTok, and Instagram.
Background Remover: You can replace backgrounds from your video without needing a green screen. By doing so, the tool can make transparent or virtual backgrounds for you. Also, it cuts out images and objects from the background with accuracy.
Color Correction: Do you need to enhance the colors of your video? This tool provides many color correction techniques for videos. It contains over 40 color presets that you can apply to your videos. Also, it allows you to adjust the color gradings and properties with ease.
Conclusion
Slow-motion Instagram videos have higher chances of getting maximum views. Viewers can catch the unique details in such videos efficiently. Moreover, it will help you promote your brand by emphasizing its features. However, Filmora gives the best results in producing slow-motion videos. It uses advanced algorithms to create slow-mo videos without distorting the original quality.
Make A Slow Motion Video Make A Slow Motion Video More Features
Part 1: How Can Slow Motion Videos Be Used in Social Media Content?
Slow-motion videos can be a great addition to your social media platforms. It will insert a cinematic impression into your content. To learn more details, jump to the below part explaining the use of slow motion videos in social media:
1. Displaying Products
Do you want to promote your product? Slow-motion videos can highlight the details of your product in a professional manner. You can display the main features of the product at a slow speed. Moreover, viewers would absorb the information with great ease.
2. Demos and Tutorials
Slow-motion videos can assist you in providing clear demonstrations. Slow-motion tutorials on your social media platform can make your audience understand better. Hence, while producing cooking or DIY videos, slow-motion effects would be valuable.
3. Adds Dramatic Effect
Slow-motion Instagram videos evoke emotions in people. In an action sequence, you can add dramatic effect through slow motion. Furthermore, it can help with the storytelling of your video. This will also help in generating an immersive experience for the audience.
Part 2: Composite Ways To Perform Slow Mo on Instagram
On Instagram, there are different approaches to creating slow-mo videos. Within a few taps, you can reduce the speed of the video on Instagram. This section will highlight the two ways to generate slow-motion Instagram reels.
Way 1: Before Recording the Reel
To create a slow-motion video, you can reduce the speed before recording. To do so, you will need to check the following steps in detail:
Step 1
Open your Instagram and swipe from left to right. Select “Reel” from the below options for recording. On the left panel, you can see the options for settings. From there, tap “Speed” to display the further options.
Step 2
Here, you can choose the lowest speed for slow-mo, which is “0.3x.” Then, tap on the desired speed from the given option. Afterward, press and hold the recording button to capture the video.
Way 2: During Editing Video
Instagram lets you modify the speed of a pre-recorded video. Thus, after recording the video, users can still reduce the speed. Mentioned below are the steps to help you with this process:
Step 1
Open your Instagram profile and swipe from left to right. Choose “Reel” from the bottom and select the “Plus” icon given in the bottom-left corner.
Step 2
Now, you can select and upload the desired video from your phone to Instagram. Afterward, click the “Edit” option at bottom left side to access further options. Here, select the “Speed” option and then move the slider to reduce the speed and make the video slow mo.
Part 3: Make Video Editing in Slow Mo Easy With Wondershare Filmora
Creating slow-mo reels on Instagram won’t add uniformity to the results. Thus, you should use a third-party tool like Filmora to produce convincing results. With the latest release of Volume 13, this tool has upgraded itself to a massive scale. It includes many AI features that can transform your editing experience. The AI features can finish tasks with great accuracy within a few minutes.
This desktop tool can also generate slow-motion videos with natural results. It does not degrade the frame rate of the video after slow-mo. In fact, it increases the video quality through rendering. Along with slow motion, this tool can add many visual effects. Hence, it’s an all-rounder tool to confront all the requirements for video editing.
Free Download For Win 7 or later(64-bit)
Free Download For macOS 10.14 or later
Methods to Create Slow Motion Instagram Reels with Filmora
On Filmora, there are many ways to create slow-motion Instagram reels. To discover them, jump to the below section:
Method 1: Using Optical Flow in Speed Ramping
Heading to our first method, we will use optical flow to smoothen the video’s slow motion. Let’s get started with the below-mentioned steps:
Step 1Sign in to Create a New Project
Start by following the on-screen instructions to sign into Filmora. Once logged into this tool, hit the “New Project” option. It will open the main interface of this tool on your screen.
Step 2Import Video to the Timeline
To import the preferred video, press “Ctrl+I”. With this, your video will be uploaded within a time of few minutes. Afterward, drag and drop it to the timeline below.
Step 3Select Uniform Speed
After dropping the video into the timeline, select it with your cursor. Go to the settings given on the right side and choose “Speed”. Select “Uniform Speed” and proceed to extend the settings for “AI Frame Interpolation.” Once done, select the “Optical Flow” option. To generate the final results, choose “Render Preview” from the toolbar of the timeline.
Method 2: Using Uniform Speed
After dragging the video on the timeline, right-click on it. From the pop-up options, select the option called “Uniform Speed”. Once done, follow the instructions given above to conclude the process.
Method 3: Using Toolbar
Start by selecting the video clip on the timeline. Once done, head to the “Toolbar” given above and click “Tools”. Now, expand “Speed” and then select “Uniform Speed”. Now, you can follow the steps given above to continue with the process.
Key Features of Wondershare Filmora
AI Thumbnail Creator: This tool observes the three best shots in your video for a thumbnail. Moreover, it contains 58 templates to produce engaging thumbnails for the videos. It also lets you customize the results with text and image editing.
Auto Reframe: Every social media platform has requirements for aspect ratio. With the auto-reframe feature, you can adjust the aspect ratios in an automated way. With this feature, you can convert videos for YouTube shorts, TikTok, and Instagram.
Background Remover: You can replace backgrounds from your video without needing a green screen. By doing so, the tool can make transparent or virtual backgrounds for you. Also, it cuts out images and objects from the background with accuracy.
Color Correction: Do you need to enhance the colors of your video? This tool provides many color correction techniques for videos. It contains over 40 color presets that you can apply to your videos. Also, it allows you to adjust the color gradings and properties with ease.
Conclusion
Slow-motion Instagram videos have higher chances of getting maximum views. Viewers can catch the unique details in such videos efficiently. Moreover, it will help you promote your brand by emphasizing its features. However, Filmora gives the best results in producing slow-motion videos. It uses advanced algorithms to create slow-mo videos without distorting the original quality.
Speed up Video on Splice
Controlling the speed of the video enables viewers to engage with the content much more actively. There are instances when you may have a lengthy video scene or audio segment that includes little-to-no essential information, and you wish to speed it up. The whole video or audio file can be sped up or slowed down, or only specific sections can. It is simple to perform with a splice speed up video. As a result, the project size and duration are reduced, and viewers are given clearer instructions on how to speed up the video on Splice.

This article will emphasize how to speed up videos on Splice, covering the procedures and alternatives that will assist you in producing splice speed up videos.
Part I. Beginner’s Guide to Splice
Free video editing software for iPhone and iPad is called Splice. Users may edit HD photos and videos with this simple-to-use tool to create a polished film perfect for sharing online. Transitions, cuts, borders, audio effects, background music, and voiceover are just a few of the many capabilities offered by the program. Videos are a great method to grab a potential client’s interest when using online marketing strategies. Splice makes it simple to combine images and videos from your iPhone to create a professional-looking video that will impress your viewers.
Splice has many fantastic tools that make editing videos simple. It offers several choices that video producers would find useful. The essential features are as follows.
- Add Music
You have two options: choose a song from a streaming provider, or record your voiceovers. Additionally, the Splice app offers a huge selection of music from its catalog.
- Edit Videos
Other fundamental editing features include the ability to merge, change the speed, and trim.
- Add Text
Text can be added to your video to further illustrate a certain event.
- Add an Image or Video Overlay
By including picture overlays, you may get more creative.
- Apply Cutting-edge Effects
You may edit, chop, or even merge your films using Splice. Similarly, you may add titles, change the tempo, and even highlight particular moments by slowing down your videos. You can also add effects for even more attractive looks.
- Upload your Video to Social Media
This function is quite helpful for showcasing your writing abilities to friends and possible clients.
![]()
Note: For a thorough review of the Splice video editing app, visit this full review passage.
Part II. How to Change Video Speed Using Splice App
Users can generate eye-catching videos for usage and export with Splice’s various effects and tools.
Here are the steps on how to speed up the video on Splice.
Step1 Tap the video you want to modify the pace of in the timeline, and it turns blue.

Step2 From the editing toolbar, choose Speed. Utilize the slider beneath the timeline to change the speed.

Best Alternative to Splice Video Editor For Changing Speed Of Videos
Splice was distinctive during this time. It has significantly reduced peoples’ travel costs compared to desktop video editing software because you never have to take a heavy laptop with you. Splice is different from a desktop editing program. If you purchase a desktop app, you’ll have access to more sophisticated tools and the capacity to store your data. Splice will only work for you if you want to make lengthy movies with loads of intricate effects.
However, you can use alternative editing programs instead of utilizing them on your computer. The Filmora video editor is a unique example with sufficient effects and plugins. Filmora’s user-friendly interface allows you to swiftly edit whatever video to a professional standard. Use its extensive resource packs to make your video a specific result.
Free Download For Win 7 or later(64-bit)
Free Download For macOS 10.14 or later
Ultimate Guide to Customize Video Speed in Filmora
Method 1. Click the “Fast” or “Slow” Options to Change the Speed Automatically
Upon clicking your video clip, a tab will display several options to modify the speed of your video. You can choose from slow to fast options. Click each option to choose from the specific speed you want

Method 2. Change the Speed Uniformly with “Uniform Speed”
If you wish to change the uniform speed of your video clip, double-clip the video to access the Speed Panel. Adjust the speed slider based on your speed uniform preference.

Method 3. Use Speed Ramping In Filmora for Better Video Results
Speed ramping is evident as the action switches between slow, regular speed, and fast motion in innumerable action films and sports videos. When you progressively increase the pace of a video clip, this is called speed ramping. You have the option of changing pace swiftly or consistently in Filmora. It can vary the pace of the audio or video clips. Use the Speed Ramping feature in Filmora.
Double-click the media you want to speed up - choose Speed > Speed Ramping. Alternatively, right-click on the media and choose Speed Ramping. Another option is clicking the Speed icon > Speed Ramping in the toolbar.
The Speed Ramping tab will let you customize the speed line. Also, it provides you with 6 different templates you can use to enhance action footage. The templates are Bullet Time, Montage, Jumper, Hero Moment, Flash in, and Flash out. In case none of the templates appeal to you, you can create your own preset and save it.
The best thing about this feature is Filmora allows you to maintain the original audio pitch. Thus, it would not sound strange after speed-ramping the media.

Here’s how you can use the customization mode on the Speed Ramping panel.
- Click Customize.
- Place the playhead on the part of the video clip which you want to speed up or slow down.
- Click Add to add a speed keyframe in that spot. Filmora will mark Speed Ramping on the media.
- Drag the white dot in the adjustment panel to change the video speed. Drag it upwards to accelerate the video speed or downwards to decelerate it.

Splice Video Editor FAQs
1. Why can’t I upload projects when using Splice?
Relinking your Splice folder could help if you experience problems downloading or uploading projects. The cache folder in your Splice app can also be cleared to resolve most download problems. Splice may require more space than is available before exporting the movie, relying on your export preferences. Any stored files that are kept may also use space. For instance, the app may require up to 2 GB of storage space if your finished film is 1 GB.
If you’re experiencing trouble downloading samples from the website, check that your Splice account is logged in on both the website and the desktop client. If you’re not logged onto the same profile on both the website and the app, samples/packs you’ve purchased online won’t appear.
2. How to remove watermarks on my video saved from Splice?
- Android
You can choose between utilizing the Splice app and learning how to speed up video on the splice app or an online watermark removal tool to remove a watermark from Splice. Launch the application and choose the video you wish to modify. To erase any watermarks from your movie, click the three dots in the right corner of your screen and select “Watermarks.” Following that, you must submit your video to the software and adhere to the watermark removal instructions. Following that, you must submit your video to the software and adhere to the watermark removal instructions.
- iPhone
You must confirm that Splice is already loaded on your iPhone and is the most recent version. Open the program after installation, browse the project with the watermark and learn how to speed up video on iPhone with Splice. After selecting the watermark with a tap, click “Edit” from the menu in the screen’s top right-hand corner. You’ll now see a new tab labeled “Effects” immediately below the “Audio” tab; tap on it, and scroll down until you find the “Watermark” slider. To remove the watermark, slide it the entire way to the left. Your project is now free of the watermark.
Bottom Line
Most people need help to produce high-quality videos on their devices. Most often, they’ll need to transfer them to their computers for extensive editing and polishing. That’s no longer the case, particularly with the emergence of mobile editing programs like the Splice app. You can quickly and effortlessly produce high-quality video material with a few clicks.
Part II. How to Change Video Speed Using Splice App
Users can generate eye-catching videos for usage and export with Splice’s various effects and tools.
Here are the steps on how to speed up the video on Splice.
Step1 Tap the video you want to modify the pace of in the timeline, and it turns blue.
Step2 From the editing toolbar, choose Speed. Utilize the slider beneath the timeline to change the speed.
Best Alternative to Splice Video Editor For Changing Speed Of Videos
Splice was distinctive during this time. It has significantly reduced peoples’ travel costs compared to desktop video editing software because you never have to take a heavy laptop with you. Splice is different from a desktop editing program. If you purchase a desktop app, you’ll have access to more sophisticated tools and the capacity to store your data. Splice will only work for you if you want to make lengthy movies with loads of intricate effects.
However, you can use alternative editing programs instead of utilizing them on your computer. The Filmora video editor is a unique example with sufficient effects and plugins. Filmora’s user-friendly interface allows you to swiftly edit whatever video to a professional standard. Use its extensive resource packs to make your video a specific result.
Free Download For Win 7 or later(64-bit)
Free Download For macOS 10.14 or later
Ultimate Guide to Customize Video Speed in Filmora
Method 1. Click the “Fast” or “Slow” Options to Change the Speed Automatically
Upon clicking your video clip, a tab will display several options to modify the speed of your video. You can choose from slow to fast options. Click each option to choose from the specific speed you want
Method 2. Change the Speed Uniformly with “Uniform Speed”
If you wish to change the uniform speed of your video clip, double-clip the video to access the Speed Panel. Adjust the speed slider based on your speed uniform preference.
Method 3. Use Speed Ramping In Filmora for Better Video Results
Speed ramping is evident as the action switches between slow, regular speed, and fast motion in innumerable action films and sports videos. When you progressively increase the pace of a video clip, this is called speed ramping. You have the option of changing pace swiftly or consistently in Filmora. It can vary the pace of the audio or video clips. Use the Speed Ramping feature in Filmora.
Double-click the media you want to speed up - choose Speed > Speed Ramping. Alternatively, right-click on the media and choose Speed Ramping. Another option is clicking the Speed icon > Speed Ramping in the toolbar.
The Speed Ramping tab will let you customize the speed line. Also, it provides you with 6 different templates you can use to enhance action footage. The templates are Bullet Time, Montage, Jumper, Hero Moment, Flash in, and Flash out. In case none of the templates appeal to you, you can create your own preset and save it.
The best thing about this feature is Filmora allows you to maintain the original audio pitch. Thus, it would not sound strange after speed-ramping the media.
Here’s how you can use the customization mode on the Speed Ramping panel.
- Click Customize.
- Place the playhead on the part of the video clip which you want to speed up or slow down.
- Click Add to add a speed keyframe in that spot. Filmora will mark Speed Ramping on the media.
- Drag the white dot in the adjustment panel to change the video speed. Drag it upwards to accelerate the video speed or downwards to decelerate it.
Splice Video Editor FAQs
1. Why can’t I upload projects when using Splice?
Relinking your Splice folder could help if you experience problems downloading or uploading projects. The cache folder in your Splice app can also be cleared to resolve most download problems. Splice may require more space than is available before exporting the movie, relying on your export preferences. Any stored files that are kept may also use space. For instance, the app may require up to 2 GB of storage space if your finished film is 1 GB.
If you’re experiencing trouble downloading samples from the website, check that your Splice account is logged in on both the website and the desktop client. If you’re not logged onto the same profile on both the website and the app, samples/packs you’ve purchased online won’t appear.
2. How to remove watermarks on my video saved from Splice?
- Android
You can choose between utilizing the Splice app and learning how to speed up video on the splice app or an online watermark removal tool to remove a watermark from Splice. Launch the application and choose the video you wish to modify. To erase any watermarks from your movie, click the three dots in the right corner of your screen and select “Watermarks.” Following that, you must submit your video to the software and adhere to the watermark removal instructions. Following that, you must submit your video to the software and adhere to the watermark removal instructions.
- iPhone
You must confirm that Splice is already loaded on your iPhone and is the most recent version. Open the program after installation, browse the project with the watermark and learn how to speed up video on iPhone with Splice. After selecting the watermark with a tap, click “Edit” from the menu in the screen’s top right-hand corner. You’ll now see a new tab labeled “Effects” immediately below the “Audio” tab; tap on it, and scroll down until you find the “Watermark” slider. To remove the watermark, slide it the entire way to the left. Your project is now free of the watermark.
Bottom Line
Most people need help to produce high-quality videos on their devices. Most often, they’ll need to transfer them to their computers for extensive editing and polishing. That’s no longer the case, particularly with the emergence of mobile editing programs like the Splice app. You can quickly and effortlessly produce high-quality video material with a few clicks.
Five Thoughts on Discord Create Account’s How-To Questions
Five Thoughts on Discord Create Account
An easy yet powerful editor
Numerous effects to choose from
Detailed tutorials provided by the official channel
Discord was a great alternative to voice chat systems such as TeamSpeak, Mumble, and Ventrilo for online gamers. Gamers make discord accounts for these services to play together rather than the voice communication facilities integrated into games, which are frequently of poor quality and lack functionality.
Founded in 2015, discord allowed individuals to talk while playing PC games seamlessly. Users may utilize the service to establish servers that can include many text and audio channels. A typical discord account server may feature chat rooms dedicated to specific themes (such as “gaming” and “anime x manga”), as well as voice channels devoted to specific games or activities. The service’s high-quality, low-latency audio chat is a popular tool for Twitch broadcasters and podcasters. It has also expanded to accommodate massive video conversations to compete with Zoom.
In this article
01 [How Does Discord Work and What is it Used for?](#Part 1)
02 [How to Make a Discord Signup in the Browser?](#Part 2)
03 [How to Make a Discord Signup with Desktop?](#Part 3)
04 [How to Make a Signup Discord with App?](#Part 4)
05 [Discord Create Account FAQs](#Part 5)
Part 1 How Does Discord Work and What is it Used for?
Discord account allows friends to communicate with one another one-on-one or in groups via a server. You may use it to send direct messages to pals, as well as video calls, audio chat, and screen sharing. Once on a server, you can join a voice chat channel to communicate with other gamers who are playing certain games.
You can share many things on discord, including media files like images, gifs, audio, and videos. Speaking of videos, video editing doesn’t get any better than Filmora. Wondershare Filmora Video Editor is a sophisticated editing application for Windows and Mac users. It was initially known as Wondershare Video Editor, but following its fifth release, it got renamed Filmora. The video editor’s primary features include animation, overlays, audio control, on-screen recording, and multi-editing modes. The video editor is well-known for its feature-rich but the simple interface, making it suited for both novice and experienced users.
For Win 7 or later (64-bit)
For macOS 10.12 or later
Filmora’s standout features
● Editing Audio Equalizer 4K Resolution Support
● Support for GIFs
● Screen Dividers
● Controls For Video And Audio
● Multiple Video Clips Can Be Layered
● Stabilization of Video
● Presets for Color Grading
● Text Editing Expertise
● Tilt-Shift
● The mosaic (Blurring)
● Noise Elimination
● Importance in Social Life
● Preview of Each Frame
● Controlling the Speed
● Audio-Mixer
● Backgrounds in Chroma Key
● Screen Capture
● Separation of audio
● Scene Recognition
You can make your discord account and use it on almost any platform, including discord desktop software for Windows and Mac and iOS and Android apps for talking and calling on the move. If you prefer not to download anything, it also works in a web browser. You can link your discord account app to various popular services, such as Twitch and Spotify, so your friends can see your actions. While there is no discord Xbox app, you may link your discord and Xbox accounts so that others can see what you’re up to on your Xbox Series X or Xbox Series S.
Part 2 How to Make a Discord Signup in the Browser
Don’t have the discord account?
You can quickly sign up using your preferred web browser, i.e., Chrome, Microsoft Edge, Firefox, or Safari.
Follow the steps below to make a discord account using your web browser:
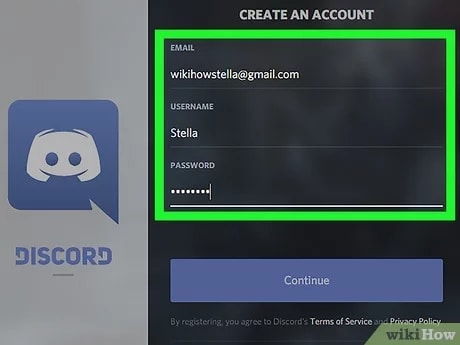
Step 1: Go to <www.discord.com> and click the “Login” button in the upper right corner.
Step 2: To establish a new discord account, click “Register” underneath the login page.
Step 3:
● Enter your email, a username, and a strong password.
● Date of birth.
● Accept the terms of service.
After entering the above, click the “Continue” button.
Step 4: Check the box besides “I am human” to enable the captcha.
Step 5: You will receive an email asking you to confirm your information. Select the “Verify email” option.
Once you’ve signed up for discord, you may access it via the Discord website or the mobile app. The program is free to download for Windows, Linux, Mac, Android, and iOS.
Follow the steps above to sign up on discord account successfully. Easy right? Let’s proceed!
Part 3 How to Make a Discord Signup with Desktop?
The discord creating account on your desktop is pretty much the same as using your browser.
Follow the steps below to make a discord account using your desktop.
Step 1: Click “Login” on the Discord website (top right).
Step 2: Underneath the sign-in box, click “Register.”
Step 3: Enter the email address, username, password, and birth date.
Step 4: Agree to the terms of service and then click “Continue.”
Step 5: Use the captcha to prove that you are not a robot.
Step 6: You will get an email to confirm your data; click on the link in the email to confirm.
See that? No big deal, right?
Part 4 How to Make a Signup Discord with App
Signing up for a discord account through the app is relatively easy, like the procedures above, you will not break a sweat.
Follow the easy steps below for discord create account on your smartphone device:
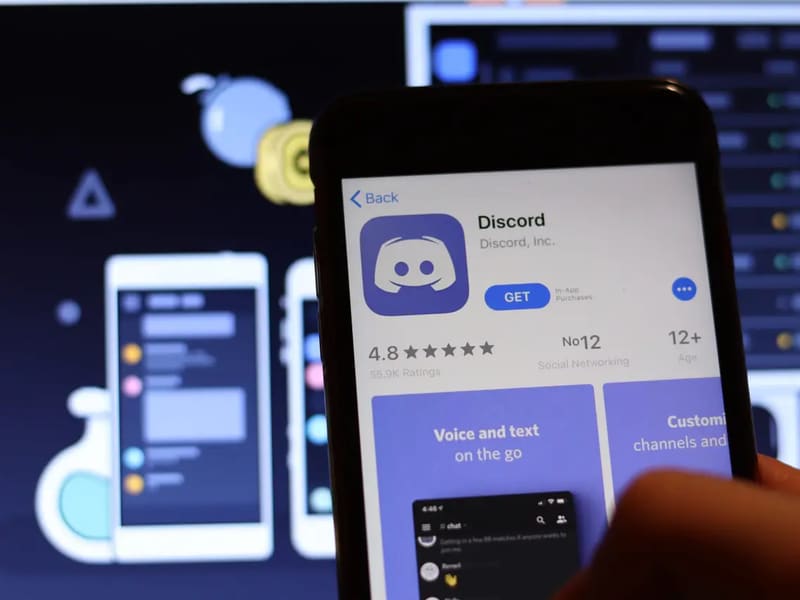
Step 1: Install and launch the Discord app on your smartphone
Step 2: Select the Register option.
Step 3: Choose whether to register by cellphone number or email address and input either one.
Step 4: You will get a message with a confirmation code or an email with a link.
Step 5: Enter the code or navigate to the URL.
Step 6: Enter your username and password here.
Step 7: Enter your birth date.
Step 8: Accept the terms of the agreement.
Step 9: Click “Next” to finish the Discord registration.
What Happens When You Disable your Discord Account?
When you deactivate your account, it goes to suspension mode. You may reactivate it by signing in and following the on-screen instructions. Keep in mind that discord accounts dormant for two years are removed, so if you want to keep yours, you must reactivate it (but you can disable it after this if you like).
After you deactivate an account, users will no longer get discord alerts. Users may, however, still receive friend requests, and any friend requests users get while their account is blocked will be ready for when they reactivate it. However, when a user decides to delete their account, the said account will get permanently deleted.
Tip: If you want to stay away from your discord account for a while with a plan to return to it later, it is advisable to log out or deactivate rather than delete it.
Part 5 Discord Create Account FAQs
Q. Is discord free, or do I have to pay?
A. Yes and no. The premium edition of discord is not free. If you don’t want to utilize the premium features, you may still download and make a discord account for free.
Q. Is there anything I cannot do on discord?
A. Do not organize, promote, or participate in any unlawful or possibly dangerous activities, such as sexual solicitation, human trafficking, or selling or enabling the sale of forbidden or potentially harmful products (firearms, ammunition, drugs, and controlled substances).
Q. Do messages disappear on discord?
A. Your messages are only destroyed: 1. if they are deleted individually (by you or a user with proper rights), 2. if you get banned, and the person banning you decides to delete all of your messages at once.
Q. Does discord account keep a record of interactions?
A. Yes, discord will track every discussion you have on discord acount, record everything you say on discord, and examine all photographs you transmit over discord.
Q. How will I know when someone blocks me on discord?
A. When you block someone, their online status on discord account changes to “offline” until unblocked and vice versa. They will also show offline in mutual servers or your chat history.
Q. How do I permanently delete my discord account?
A. To delete your discord created account for good, head to user settings, then tap on ‘my account.’ From there, tap on ‘Account Removal’ then tap on ‘Delete Account.’
If you are a server owner, you will have to delete the server or pass ownership of the server.
Q. How do I find servers to join on discord?
A. If you have a buddy who has a discord server you’d want to join, request an invite. If you’re a member of a discord community, ask for an invite or check on the community website.
By tapping the magnifying glass in the left window of the discord account app, you may also search for public servers that anybody can join.
● Ending Thoughts →
● Discord is a web program that works in most browsers. A desktop version is available for Windows, macOS, Linux, iOS, and Android. Discord’s desktop and browser versions are functionally and visually identical in practically every regard if you want to make a discord account. So, re-read the article and the FAQs on discord create account, and start your journey.
● Finally, for the creatives, boost your discord create account and usage experience by using Filmora to edit videos and make cool animations.
Discord was a great alternative to voice chat systems such as TeamSpeak, Mumble, and Ventrilo for online gamers. Gamers make discord accounts for these services to play together rather than the voice communication facilities integrated into games, which are frequently of poor quality and lack functionality.
Founded in 2015, discord allowed individuals to talk while playing PC games seamlessly. Users may utilize the service to establish servers that can include many text and audio channels. A typical discord account server may feature chat rooms dedicated to specific themes (such as “gaming” and “anime x manga”), as well as voice channels devoted to specific games or activities. The service’s high-quality, low-latency audio chat is a popular tool for Twitch broadcasters and podcasters. It has also expanded to accommodate massive video conversations to compete with Zoom.
In this article
01 [How Does Discord Work and What is it Used for?](#Part 1)
02 [How to Make a Discord Signup in the Browser?](#Part 2)
03 [How to Make a Discord Signup with Desktop?](#Part 3)
04 [How to Make a Signup Discord with App?](#Part 4)
05 [Discord Create Account FAQs](#Part 5)
Part 1 How Does Discord Work and What is it Used for?
Discord account allows friends to communicate with one another one-on-one or in groups via a server. You may use it to send direct messages to pals, as well as video calls, audio chat, and screen sharing. Once on a server, you can join a voice chat channel to communicate with other gamers who are playing certain games.
You can share many things on discord, including media files like images, gifs, audio, and videos. Speaking of videos, video editing doesn’t get any better than Filmora. Wondershare Filmora Video Editor is a sophisticated editing application for Windows and Mac users. It was initially known as Wondershare Video Editor, but following its fifth release, it got renamed Filmora. The video editor’s primary features include animation, overlays, audio control, on-screen recording, and multi-editing modes. The video editor is well-known for its feature-rich but the simple interface, making it suited for both novice and experienced users.
For Win 7 or later (64-bit)
For macOS 10.12 or later
Filmora’s standout features
● Editing Audio Equalizer 4K Resolution Support
● Support for GIFs
● Screen Dividers
● Controls For Video And Audio
● Multiple Video Clips Can Be Layered
● Stabilization of Video
● Presets for Color Grading
● Text Editing Expertise
● Tilt-Shift
● The mosaic (Blurring)
● Noise Elimination
● Importance in Social Life
● Preview of Each Frame
● Controlling the Speed
● Audio-Mixer
● Backgrounds in Chroma Key
● Screen Capture
● Separation of audio
● Scene Recognition
You can make your discord account and use it on almost any platform, including discord desktop software for Windows and Mac and iOS and Android apps for talking and calling on the move. If you prefer not to download anything, it also works in a web browser. You can link your discord account app to various popular services, such as Twitch and Spotify, so your friends can see your actions. While there is no discord Xbox app, you may link your discord and Xbox accounts so that others can see what you’re up to on your Xbox Series X or Xbox Series S.
Part 2 How to Make a Discord Signup in the Browser
Don’t have the discord account?
You can quickly sign up using your preferred web browser, i.e., Chrome, Microsoft Edge, Firefox, or Safari.
Follow the steps below to make a discord account using your web browser:
Step 1: Go to <www.discord.com> and click the “Login” button in the upper right corner.
Step 2: To establish a new discord account, click “Register” underneath the login page.
Step 3:
● Enter your email, a username, and a strong password.
● Date of birth.
● Accept the terms of service.
After entering the above, click the “Continue” button.
Step 4: Check the box besides “I am human” to enable the captcha.
Step 5: You will receive an email asking you to confirm your information. Select the “Verify email” option.
Once you’ve signed up for discord, you may access it via the Discord website or the mobile app. The program is free to download for Windows, Linux, Mac, Android, and iOS.
Follow the steps above to sign up on discord account successfully. Easy right? Let’s proceed!
Part 3 How to Make a Discord Signup with Desktop?
The discord creating account on your desktop is pretty much the same as using your browser.
Follow the steps below to make a discord account using your desktop.
Step 1: Click “Login” on the Discord website (top right).
Step 2: Underneath the sign-in box, click “Register.”
Step 3: Enter the email address, username, password, and birth date.
Step 4: Agree to the terms of service and then click “Continue.”
Step 5: Use the captcha to prove that you are not a robot.
Step 6: You will get an email to confirm your data; click on the link in the email to confirm.
See that? No big deal, right?
Part 4 How to Make a Signup Discord with App
Signing up for a discord account through the app is relatively easy, like the procedures above, you will not break a sweat.
Follow the easy steps below for discord create account on your smartphone device:
Step 1: Install and launch the Discord app on your smartphone
Step 2: Select the Register option.
Step 3: Choose whether to register by cellphone number or email address and input either one.
Step 4: You will get a message with a confirmation code or an email with a link.
Step 5: Enter the code or navigate to the URL.
Step 6: Enter your username and password here.
Step 7: Enter your birth date.
Step 8: Accept the terms of the agreement.
Step 9: Click “Next” to finish the Discord registration.
What Happens When You Disable your Discord Account?
When you deactivate your account, it goes to suspension mode. You may reactivate it by signing in and following the on-screen instructions. Keep in mind that discord accounts dormant for two years are removed, so if you want to keep yours, you must reactivate it (but you can disable it after this if you like).
After you deactivate an account, users will no longer get discord alerts. Users may, however, still receive friend requests, and any friend requests users get while their account is blocked will be ready for when they reactivate it. However, when a user decides to delete their account, the said account will get permanently deleted.
Tip: If you want to stay away from your discord account for a while with a plan to return to it later, it is advisable to log out or deactivate rather than delete it.
Part 5 Discord Create Account FAQs
Q. Is discord free, or do I have to pay?
A. Yes and no. The premium edition of discord is not free. If you don’t want to utilize the premium features, you may still download and make a discord account for free.
Q. Is there anything I cannot do on discord?
A. Do not organize, promote, or participate in any unlawful or possibly dangerous activities, such as sexual solicitation, human trafficking, or selling or enabling the sale of forbidden or potentially harmful products (firearms, ammunition, drugs, and controlled substances).
Q. Do messages disappear on discord?
A. Your messages are only destroyed: 1. if they are deleted individually (by you or a user with proper rights), 2. if you get banned, and the person banning you decides to delete all of your messages at once.
Q. Does discord account keep a record of interactions?
A. Yes, discord will track every discussion you have on discord acount, record everything you say on discord, and examine all photographs you transmit over discord.
Q. How will I know when someone blocks me on discord?
A. When you block someone, their online status on discord account changes to “offline” until unblocked and vice versa. They will also show offline in mutual servers or your chat history.
Q. How do I permanently delete my discord account?
A. To delete your discord created account for good, head to user settings, then tap on ‘my account.’ From there, tap on ‘Account Removal’ then tap on ‘Delete Account.’
If you are a server owner, you will have to delete the server or pass ownership of the server.
Q. How do I find servers to join on discord?
A. If you have a buddy who has a discord server you’d want to join, request an invite. If you’re a member of a discord community, ask for an invite or check on the community website.
By tapping the magnifying glass in the left window of the discord account app, you may also search for public servers that anybody can join.
● Ending Thoughts →
● Discord is a web program that works in most browsers. A desktop version is available for Windows, macOS, Linux, iOS, and Android. Discord’s desktop and browser versions are functionally and visually identical in practically every regard if you want to make a discord account. So, re-read the article and the FAQs on discord create account, and start your journey.
● Finally, for the creatives, boost your discord create account and usage experience by using Filmora to edit videos and make cool animations.
Also read:
- How To Unlink Audio and Video in DaVinci Resolve
- Are You Looking for Trustworthy GIF Converters to Use GIF Images Across Various Platforms? Find Out About Reliable and Authentic GIF Converters that You Can Easily Use for WMV to GIF Conversion Anytime You Want
- Updated Do You Wish to Create High-Quality Videos and Experience Effective Videos with Editing? No Problem at All because the Keyboard Shortcuts Listed Here Will Assist You
- How to Make Strobe Light Text Effect for 2024
- Updated In 2024, How to Create One Click Video Reverse Effect in Filmora
- How to Add Freeze Frame to Your Video From Any Device for 2024
- 2024 Approved The Glitch Filter Is Similar to an Error or a Distorted Effect in the Video. The Article Enables the Users to Get the VHS Filter in One of Their Travel Videos and Instagram Accounts
- New In 2024, Practical Way to Resize Video in Handbrake
- How to Use Lumetri Color in Adobe After Effects for 2024
- New In 2024, 15 Must-Use Gifs Editors
- 2024 Approved Want to Make Your Slideshows More Fun and Exciting? Follow the Given Discussion to Know How to Make a Slideshow Gif, Thereby Making Your Slideshow More Enjoyable than Ever
- In 2024, How to Create Your Own LOL Montage Video
- 2024 Approved Creating Flawless Slow-Motion Videos Is Every Content Creators Dream. Learn About DaVinci Resolve Slow-Motion Video Creation, Amongst Other Tools
- Updated Easy Way to Add Transitions to Videos for 2024
- New In 2024, 5 Best Video Denoisers
- Updated In 2024, Working Out All Important Details of Slowing Down Video in After Effects
- New In 2024, How To Change Speed of Video in Final Cut Pro?
- In 2024, Tactics to Make Transparent Image in Minimal Steps
- In 2024, How to Reset your Samsung Galaxy M14 4G Lock Screen Password
- How To Transfer Data From Apple iPhone 12 Pro To Other iPhone 13 Pro Max devices? | Dr.fone
- How to Fake Snapchat Location on Oppo Find N3 | Dr.fone
- New 2024 Approved 8 Best Motion Graphics Online Tools for Your Inspiration
- Solutions to Spy on Realme 11X 5G with and without jailbreak | Dr.fone
- Unlocking iPhone X Passcode without a Computer | Dr.fone
- How to recover old videos from your Google Pixel Fold
- Lock Your Samsung Galaxy S23 Ultra Phone in Style The Top 5 Gesture Lock Screen Apps
- Ultimate Guide from iPhone 13 iCloud Activation Lock Bypass
- In 2024, Unlocking Made Easy The Best 10 Apps for Unlocking Your Xiaomi Redmi 13C Device
- In 2024, Fake Android Location without Rooting For Your Motorola Moto G34 5G | Dr.fone
- Thinking About Changing Your Netflix Region Without a VPN On Motorola Razr 40? | Dr.fone
- How To Recover Lost Data from iPhone X? | Dr.fone
- New How to Translate Instagram Videos for Global Engagement for 2024
- What are Location Permissions Life360 On Samsung Galaxy XCover 7? | Dr.fone
- Top 10 AirPlay Apps in Poco X6 for Streaming | Dr.fone
- Title: In 2024, There Are Several Video Players that You Can Use to Watch Videos on Your PC. To Have a Better Experience Viewing Videos and Enhancing Them Across a Similar Platform, You Can Try Out VLC Media Player for PC
- Author: Chloe
- Created at : 2024-04-24 07:08:23
- Updated at : 2024-04-25 07:08:23
- Link: https://ai-editing-video.techidaily.com/in-2024-there-are-several-video-players-that-you-can-use-to-watch-videos-on-your-pc-to-have-a-better-experience-viewing-videos-and-enhancing-them-across-a-s/
- License: This work is licensed under CC BY-NC-SA 4.0.
