
:max_bytes(150000):strip_icc():format(webp)/how-to-use-remote-access-on-your-samsung-smart-tv-4688935-01-29c7de5dc77e4747a8070d12f0c3d84c.jpg)
In 2024, Top Things People Know About Wedding Slideshow
Top Things People Know About Wedding Slideshow
Top Things People Know About Wedding Slideshow
An easy yet powerful editor
Numerous effects to choose from
Detailed tutorials provided by the official channel
A wedding slideshow is a great way not only to save memories of your special day but also to connect with your guests and let them know your love story in an interesting and creative manner. A well-made wedding slideshow will certainly spice up the entire event and will make it a memorable day for you as well as your dear ones.

To create an eye-grabbing and engaging wedding slideshow there are several factors to be considered as the right selection of the images, effects, music, and much more. The content below will you to know about these factors and tools that will help you create a memorable slideshow.
In this article
01 [Key Steps for Creating a Wedding Slideshow](#Part 1)
02 [Tips to Further Spice Up and Make the Wedding Slideshow Even More Interesting](#Part 2)
03 [Hassle-free Tool for Finding Templates and Creating a Slideshow- Wondershare Filmora](#Part 3)
Part 1 Key Steps For Creating A Wedding Slideshow
There are key steps that go into the making of a wedding slideshow. Check them as below.

01Choose The Appropriate Software
For creating an impressive and engaging wedding slideshow it is very important to choose the right software that comes packed in with all your required features. There is an array of these online and desktop-based programs available. Check out the features, pros, and cons of each of these wedding slideshow maker, and then make a choice. Some of the popular ones include Wondershare Filmora, Animotica, Animoto, Adobe Spark, and others.
02Select A Theme And A Story
Another important thing to be considered before you start making the actual slideshow is deciding the story or the theme. Depending on the theme, the images, videos, and other elements of the wedding photo slideshow will be added. Choose a theme that matches the personality of the couple. The selection of the theme can make a huge difference to the overall creation of the slideshow.
03Duration Of The Slideshow
Next, you need to decide on the total duration for which you need to create the slideshow. A too-short video will not be able to convey your story while a long one can be boring for the viewers. So ideally, a slideshow between 7-10 minutes is good enough.
04Pick Up The Best Images And Videos
Next, comes the crucial and the major part of the slideshow- videos and images. First of all, make sure to choose high-quality clear images that if seen from a distance and on a bigger screen looks clear. Choose the pictures and the videos that go along with your selected story and the theme and portray the couple’s romance and relationship. In addition to the couple, the images of friends, relatives, colleagues, and other dear ones can be included.
Add effects, filters, templates, and other elements
To further spice up your slideshow and make it more interesting, add some filters, transitions, text, effects, and other elements. A lot of professional slideshow-making tools come with built-in effects that can be added. Wedding slide template also work as a great tool for making a slideshow in a hassle-free manner. Choose a design and keep adding the elements.
05Add An Appropriate Music
No matter how well created your wedding slideshow is, it looks incomplete until a music file is added. Depending on your slideshow theme you can either choose simple soft music, a peppy latest song, or any other audio file. The favorite song of the couple can also be included. Using an audio editing tool, you can add multiple audio clips to create a single file to be used for the slideshow.
Part 2 Tips To Further Spice Up And Make The Wedding Slideshow Even More Interesting
Above we have listed the key steps for creating a wedding slideshow. So, if you want to spice up and make your slideshow even more engaging and make it different from all regular others, the below-listed tips will be useful.
● Including some short video clips and images of relatives, best friends, and other dear ones.
● Add short video-based interviews of parents, siblings, and other dear ones about the couple, their relationship, and more.
● Marriage advise from married colleagues and friends.
● Wishes from the relatives and friends who cannot make it to the wedding for some reason.
● Including short clips of the wedding preparations.
● A voiceover of a friend or a relative can be added to the slideshow in a manner as if some script is being narrated.

Part 3 Hassle-Free Tool For Finding Templates And Creating A Slideshow- Wondershare Filmora
Wondershare Filmora Video Editor is a one-stop solution for all your wedding slideshow creation needs. This excellent Windows and Mac-based software is a professional video editing tool supporting advanced features. All your slideshow clips and videos can be processed and customized like a pro using the built-in features of the software like effects, filters, transitions, and more.
For Win 7 or later (64-bit)
For macOS 10.12 or later
A wide range of templates in different categories for creating a slideshow is also available and above all the software allows for creating an impressive slideshow in just a few simple steps. If needed, you can even use the stock footage as well as music files available at the site for your slideshow.
Steps to create a wedding slideshow using Wondershare Filmora
Step 1. Launch the installed software on your system and on the main interface choose the New Project button.
Step 2. The videos and the images that have to be added to the slideshow now have to be imported to the software Media Library.
The added media files can be customized using the editing tool in the software.
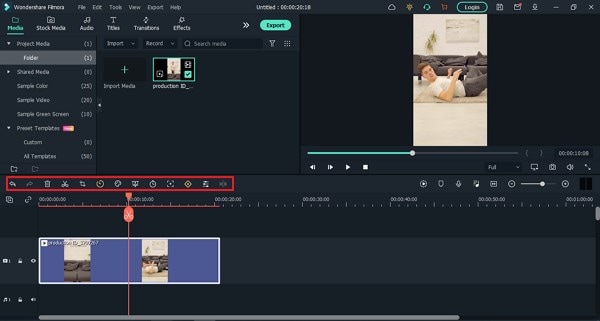
Now drag and move the images and videos to the timeline.
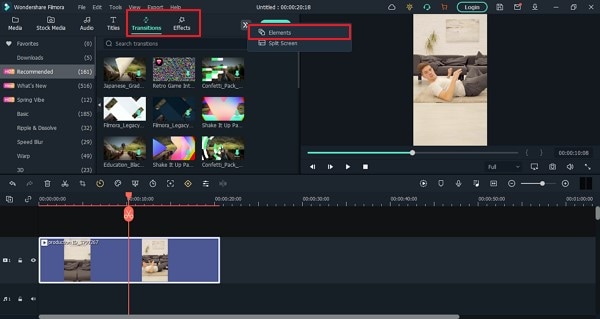
Step 3. Next comes the step of adding transitions. Multiple styles of transitions are available in the tool to choose from. You can also adjust the transition duration as needed.
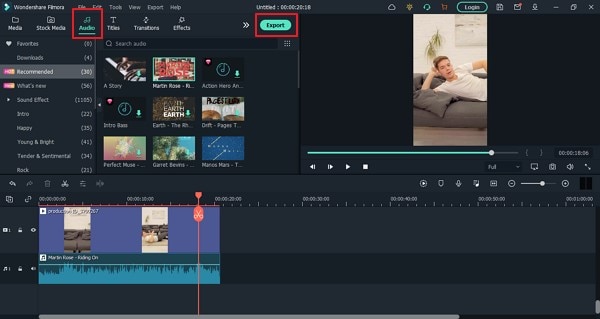
Step 4. Next, add the music to your slideshow. Use a locally saved music file or choose the one from the software media library. The option for adding a voice-over is also there.
Step 5. Finally, save and then export the slideshow. You can save it locally or to a DVD. Sharing option on social media sites is also present.

● Ending Thoughts →
● A wedding slideshow helps the guests at the wedding to know about the love story of the couple and is also a presentation to relive the wedding moments forever.
● There are several key factors and tips that should be followed for creating an engaging, and interesting slideshow.
● Wondershare Filmora is the best slideshow maker for wedding as it comes with variety of templates, editing tools and other functions.
A wedding slideshow is a great way not only to save memories of your special day but also to connect with your guests and let them know your love story in an interesting and creative manner. A well-made wedding slideshow will certainly spice up the entire event and will make it a memorable day for you as well as your dear ones.
To create an eye-grabbing and engaging wedding slideshow there are several factors to be considered as the right selection of the images, effects, music, and much more. The content below will you to know about these factors and tools that will help you create a memorable slideshow.
In this article
01 [Key Steps for Creating a Wedding Slideshow](#Part 1)
02 [Tips to Further Spice Up and Make the Wedding Slideshow Even More Interesting](#Part 2)
03 [Hassle-free Tool for Finding Templates and Creating a Slideshow- Wondershare Filmora](#Part 3)
Part 1 Key Steps For Creating A Wedding Slideshow
There are key steps that go into the making of a wedding slideshow. Check them as below.
01Choose The Appropriate Software
For creating an impressive and engaging wedding slideshow it is very important to choose the right software that comes packed in with all your required features. There is an array of these online and desktop-based programs available. Check out the features, pros, and cons of each of these wedding slideshow maker, and then make a choice. Some of the popular ones include Wondershare Filmora, Animotica, Animoto, Adobe Spark, and others.
02Select A Theme And A Story
Another important thing to be considered before you start making the actual slideshow is deciding the story or the theme. Depending on the theme, the images, videos, and other elements of the wedding photo slideshow will be added. Choose a theme that matches the personality of the couple. The selection of the theme can make a huge difference to the overall creation of the slideshow.
03Duration Of The Slideshow
Next, you need to decide on the total duration for which you need to create the slideshow. A too-short video will not be able to convey your story while a long one can be boring for the viewers. So ideally, a slideshow between 7-10 minutes is good enough.
04Pick Up The Best Images And Videos
Next, comes the crucial and the major part of the slideshow- videos and images. First of all, make sure to choose high-quality clear images that if seen from a distance and on a bigger screen looks clear. Choose the pictures and the videos that go along with your selected story and the theme and portray the couple’s romance and relationship. In addition to the couple, the images of friends, relatives, colleagues, and other dear ones can be included.
Add effects, filters, templates, and other elements
To further spice up your slideshow and make it more interesting, add some filters, transitions, text, effects, and other elements. A lot of professional slideshow-making tools come with built-in effects that can be added. Wedding slide template also work as a great tool for making a slideshow in a hassle-free manner. Choose a design and keep adding the elements.
05Add An Appropriate Music
No matter how well created your wedding slideshow is, it looks incomplete until a music file is added. Depending on your slideshow theme you can either choose simple soft music, a peppy latest song, or any other audio file. The favorite song of the couple can also be included. Using an audio editing tool, you can add multiple audio clips to create a single file to be used for the slideshow.
Part 2 Tips To Further Spice Up And Make The Wedding Slideshow Even More Interesting
Above we have listed the key steps for creating a wedding slideshow. So, if you want to spice up and make your slideshow even more engaging and make it different from all regular others, the below-listed tips will be useful.
● Including some short video clips and images of relatives, best friends, and other dear ones.
● Add short video-based interviews of parents, siblings, and other dear ones about the couple, their relationship, and more.
● Marriage advise from married colleagues and friends.
● Wishes from the relatives and friends who cannot make it to the wedding for some reason.
● Including short clips of the wedding preparations.
● A voiceover of a friend or a relative can be added to the slideshow in a manner as if some script is being narrated.
Part 3 Hassle-Free Tool For Finding Templates And Creating A Slideshow- Wondershare Filmora
Wondershare Filmora Video Editor is a one-stop solution for all your wedding slideshow creation needs. This excellent Windows and Mac-based software is a professional video editing tool supporting advanced features. All your slideshow clips and videos can be processed and customized like a pro using the built-in features of the software like effects, filters, transitions, and more.
For Win 7 or later (64-bit)
For macOS 10.12 or later
A wide range of templates in different categories for creating a slideshow is also available and above all the software allows for creating an impressive slideshow in just a few simple steps. If needed, you can even use the stock footage as well as music files available at the site for your slideshow.
Steps to create a wedding slideshow using Wondershare Filmora
Step 1. Launch the installed software on your system and on the main interface choose the New Project button.
Step 2. The videos and the images that have to be added to the slideshow now have to be imported to the software Media Library.
The added media files can be customized using the editing tool in the software.
Now drag and move the images and videos to the timeline.
Step 3. Next comes the step of adding transitions. Multiple styles of transitions are available in the tool to choose from. You can also adjust the transition duration as needed.
Step 4. Next, add the music to your slideshow. Use a locally saved music file or choose the one from the software media library. The option for adding a voice-over is also there.
Step 5. Finally, save and then export the slideshow. You can save it locally or to a DVD. Sharing option on social media sites is also present.
● Ending Thoughts →
● A wedding slideshow helps the guests at the wedding to know about the love story of the couple and is also a presentation to relive the wedding moments forever.
● There are several key factors and tips that should be followed for creating an engaging, and interesting slideshow.
● Wondershare Filmora is the best slideshow maker for wedding as it comes with variety of templates, editing tools and other functions.
How to Make A Funny Vlog for TikTok?
TikTok has been among the few social media platforms that have gained an exponential following in a truly short time. Regardless of this stunted digital environment, the platform made its statement of becoming part of the all-time greats.
TikTok became known as a short-video platform that influenced the making of funny vlogs. If you are interested in making a funny vlog, you are at the right place.
In this article
01 Ideas for Creating A Funny Vlog for TikTok
02 5 Popular Funny Vloggers on TikTok
Part 1: Ideas for Creating A Funny Vlog for TikTok
When creating a funny vlog across TikTok, there are numerous ideas that one can think of. However, since TikTok videos are of small lengths, achieving diversity is difficult yet possible. You’ll surely get your break if you understand the following ideas for creating a funny vlog.
React to Other Videos
While it may seem the most mainstream style of creating funny content across TikTok, it is also the most effective way of making people laugh while watching your video. This will also bring recurring viewers across your channel.
Display Failure Videos
It is always great to see people trying and doing something funny across the video. Failure videos are believed to be the other way of creating content for a funny vlog on your TikTok, which shall make people laugh hard.
Use Goofy and Peculiar Voices
Unrealistic and weird voices can make your short video seem funny. If you consider talking about something in a silly voice, it will make people burst out of laughter.
Trolling Family Members
One of the best ways to make something good out of TikTok is creating candid moments. This can always be done if you troll or prank your family members out of nowhere. Just keep reminding that you have to ensure no one gets injured due to it.
Impersonations
Making impersonated videos of major celebrities is another way of showing funny content to the viewers on TikTok. If you consider some funny examples for this, it will surely bring you effective results.
Make Puns and Funny Statements
Another great way to create a funny vlog for your TikTok is to be good at making puns. This is purely hilarious content and needs someone to be highly great in it.
Physical Challenges
This can be a bit risky, but it can become quite fun to make and show to the world if executed with care. However, this can be conducted individually or in a group of people, as you find it appropriate.
Use Effects of TikTok
TikTok makes sure to provide something funny in effects to its users. The use of effects for TikTok is an excellent technique to make funny vlogs; however, it can get funny if the elements used across it have a dubious meaning.
Run Everything in Reverse
One of the most straightforward techniques to make a funny vlog is to run everything in reverse order. The simplest thing of a video becomes the funniest to watch.
Part 2: 5 Popular Funny Vloggers on TikTok
This part will provide some popular examples of TikTokers who have made a considerate performance in providing funny content to people across the platform.
Khaby Lame
This is, without a doubt, the first-choice in TikTok accounts that would always come while relating to funny content. Khaby started his journey as a TikToker with a remarkably simple motive of pointing out the simplicity in different tasks, which were displayed to be difficult. Although it sounds pretty basic, the technique taken by Khaby has been so considerate it brought him millions of followers for creating funny content.

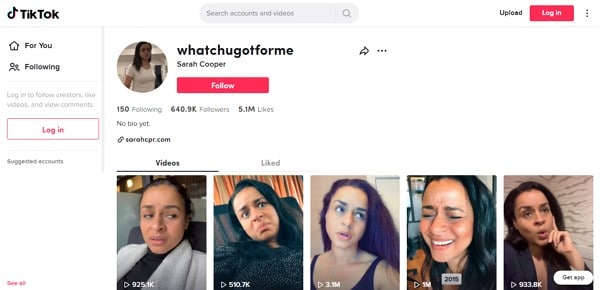
Sarah Cooper
Want to see a great impersonation of Donald Trump? It is undoubtedly great to see every time. With Sarah Cooper, it just becomes an entirely different story. Her impersonation has been so perfect that she has been referred to as one of the best funny vloggers on TikTok. Her likes across the platform may not be that great, but she has shown some stature in presenting funny content in a great way.
Dobre Twins
This twin duo is known across many social media platforms for its funny content. As the twins started using TikTok, they started creating good funny vlogs, which gained quite the traction for them. Their unique ideas to present different things have presented the following worth 23 million likes across TikTok, which is quite commendable. However, Lucas and Marcus are only known to operate this TikTok account.

Image alt: dobre twins funny tiktoker
Brittany Broski
Quite a few TikTokers actually make funny videos with impressive comedy. Brittany Broski is a celebrity in this genre, where she has taken great use of her comedy skills to present great vlogs with different and unique topics. Her take on comedy is entirely different, which makes her funny vlog unique and better than others.

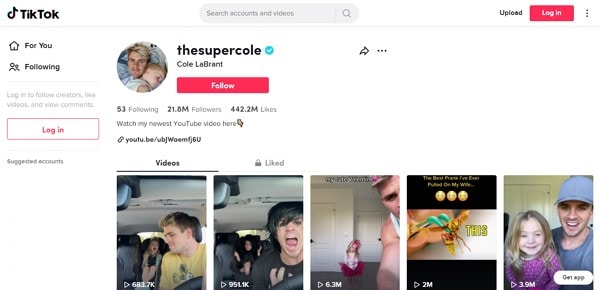
Cole LeBrant
This TikToker makes a good collection of funny vlogs across his account with his family. The variety and variability in his videos make him a different version of fun compared to other TikTokers. He has built a great reach across the account, which makes him an impressive choice.
Part 3: How to Make a Funny Vlog?
Funny vlogs are a fabulous way to interact with people of different tastes. It can be something that cherishes the moods of the viewers, regardless of their current emotions. To make this happen, you need a good platform that helps you create a video for your viewers to watch. Wondershare Filmora fulfills the needs of a video editor by providing you with the perfect options while editing the video for TikTok.
For Win 7 or later (64-bit)
For macOS 10.12 or later
If you are looking forward to understanding how to create a funny vlog for your TikTok using Filmora, you need to follow a set of simple steps. These are shown as follows:
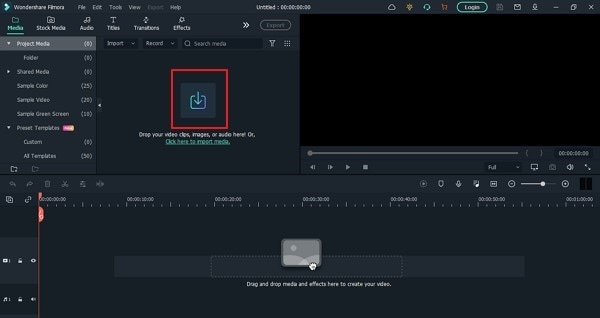
Step 1: Launch and Import Video
To start, you need to have Wondershare Filmora installed across your device. Launch the tool and click on “New Project” to start from scratch. Once the screen opens up, you need to click on the “Arrow Head” icon across the ‘Media’ Tab to import the audio you wish to amend for TikTok.
Step 2: Perform Basic Editing
Wondershare Filmora provides users with multiple options for editing their files. At first, drag the file onto the timeline. Following this, you can merge different videos or enhance the video by trimming it. Along with that, you can also consider splitting the image or changing its playback speed for different results.
Step 3: Add Effects and Transitions
After you are done with some basic editing, you can add different effects from the “Effects” section. To make the video look exclusive, you can also include “Transitions” across it. Use the “Elements” tab to include stickers and emojis to enhance your TikTok video.
Step 4: Manage the Audio
For managing the audio of your video, you can make several changes across it. You can detach audio and change the audio with another soundtrack. Filmora also allows you to add audio from the “Audio” section, which contains royalty-free music to add. Once you are done, click on the “Export” button to set the settings of the video before exporting it back onto the device.
Closing Words
This article has presented some of the finest tips that can be utilized for creating funny vlogs on your TikTok. If you coherently use these tips, you can get significant results across your account in the name of the followers. Along with that, you can also use Filmora for making the best funny vlog with different editing tools.
Wondershare Filmora
Get started easily with Filmora’s powerful performance, intuitive interface, and countless effects!
Try It Free Try It Free Try It Free Learn More >

02 5 Popular Funny Vloggers on TikTok
Part 1: Ideas for Creating A Funny Vlog for TikTok
When creating a funny vlog across TikTok, there are numerous ideas that one can think of. However, since TikTok videos are of small lengths, achieving diversity is difficult yet possible. You’ll surely get your break if you understand the following ideas for creating a funny vlog.
React to Other Videos
While it may seem the most mainstream style of creating funny content across TikTok, it is also the most effective way of making people laugh while watching your video. This will also bring recurring viewers across your channel.
Display Failure Videos
It is always great to see people trying and doing something funny across the video. Failure videos are believed to be the other way of creating content for a funny vlog on your TikTok, which shall make people laugh hard.
Use Goofy and Peculiar Voices
Unrealistic and weird voices can make your short video seem funny. If you consider talking about something in a silly voice, it will make people burst out of laughter.
Trolling Family Members
One of the best ways to make something good out of TikTok is creating candid moments. This can always be done if you troll or prank your family members out of nowhere. Just keep reminding that you have to ensure no one gets injured due to it.
Impersonations
Making impersonated videos of major celebrities is another way of showing funny content to the viewers on TikTok. If you consider some funny examples for this, it will surely bring you effective results.
Make Puns and Funny Statements
Another great way to create a funny vlog for your TikTok is to be good at making puns. This is purely hilarious content and needs someone to be highly great in it.
Physical Challenges
This can be a bit risky, but it can become quite fun to make and show to the world if executed with care. However, this can be conducted individually or in a group of people, as you find it appropriate.
Use Effects of TikTok
TikTok makes sure to provide something funny in effects to its users. The use of effects for TikTok is an excellent technique to make funny vlogs; however, it can get funny if the elements used across it have a dubious meaning.
Run Everything in Reverse
One of the most straightforward techniques to make a funny vlog is to run everything in reverse order. The simplest thing of a video becomes the funniest to watch.
Part 2: 5 Popular Funny Vloggers on TikTok
This part will provide some popular examples of TikTokers who have made a considerate performance in providing funny content to people across the platform.
Khaby Lame
This is, without a doubt, the first-choice in TikTok accounts that would always come while relating to funny content. Khaby started his journey as a TikToker with a remarkably simple motive of pointing out the simplicity in different tasks, which were displayed to be difficult. Although it sounds pretty basic, the technique taken by Khaby has been so considerate it brought him millions of followers for creating funny content.
Sarah Cooper
Want to see a great impersonation of Donald Trump? It is undoubtedly great to see every time. With Sarah Cooper, it just becomes an entirely different story. Her impersonation has been so perfect that she has been referred to as one of the best funny vloggers on TikTok. Her likes across the platform may not be that great, but she has shown some stature in presenting funny content in a great way.
Dobre Twins
This twin duo is known across many social media platforms for its funny content. As the twins started using TikTok, they started creating good funny vlogs, which gained quite the traction for them. Their unique ideas to present different things have presented the following worth 23 million likes across TikTok, which is quite commendable. However, Lucas and Marcus are only known to operate this TikTok account.
Image alt: dobre twins funny tiktoker
Brittany Broski
Quite a few TikTokers actually make funny videos with impressive comedy. Brittany Broski is a celebrity in this genre, where she has taken great use of her comedy skills to present great vlogs with different and unique topics. Her take on comedy is entirely different, which makes her funny vlog unique and better than others.
Cole LeBrant
This TikToker makes a good collection of funny vlogs across his account with his family. The variety and variability in his videos make him a different version of fun compared to other TikTokers. He has built a great reach across the account, which makes him an impressive choice.
Part 3: How to Make a Funny Vlog?
Funny vlogs are a fabulous way to interact with people of different tastes. It can be something that cherishes the moods of the viewers, regardless of their current emotions. To make this happen, you need a good platform that helps you create a video for your viewers to watch. Wondershare Filmora fulfills the needs of a video editor by providing you with the perfect options while editing the video for TikTok.
For Win 7 or later (64-bit)
For macOS 10.12 or later
If you are looking forward to understanding how to create a funny vlog for your TikTok using Filmora, you need to follow a set of simple steps. These are shown as follows:
Step 1: Launch and Import Video
To start, you need to have Wondershare Filmora installed across your device. Launch the tool and click on “New Project” to start from scratch. Once the screen opens up, you need to click on the “Arrow Head” icon across the ‘Media’ Tab to import the audio you wish to amend for TikTok.
Step 2: Perform Basic Editing
Wondershare Filmora provides users with multiple options for editing their files. At first, drag the file onto the timeline. Following this, you can merge different videos or enhance the video by trimming it. Along with that, you can also consider splitting the image or changing its playback speed for different results.
Step 3: Add Effects and Transitions
After you are done with some basic editing, you can add different effects from the “Effects” section. To make the video look exclusive, you can also include “Transitions” across it. Use the “Elements” tab to include stickers and emojis to enhance your TikTok video.
Step 4: Manage the Audio
For managing the audio of your video, you can make several changes across it. You can detach audio and change the audio with another soundtrack. Filmora also allows you to add audio from the “Audio” section, which contains royalty-free music to add. Once you are done, click on the “Export” button to set the settings of the video before exporting it back onto the device.
Closing Words
This article has presented some of the finest tips that can be utilized for creating funny vlogs on your TikTok. If you coherently use these tips, you can get significant results across your account in the name of the followers. Along with that, you can also use Filmora for making the best funny vlog with different editing tools.
Wondershare Filmora
Get started easily with Filmora’s powerful performance, intuitive interface, and countless effects!
Try It Free Try It Free Try It Free Learn More >
Top GIF to MP4 Converters
Great Video Converter - Wondershare Filmora
Provide abundant video effects - A creative video editor
Powerful color correction and grading
Detailed tutorials provided by the official channel
Introduction.
Many people have been searching online for the best GIF to MP4 converter that will help them playback their GIF files on their media player. It is easier for GIF animated files to be converted to MP4 files, as Mp4 is the most popular file format compatible with many devices. Some compatible devices include iOS devices, Mac, Android devices, Windows, etc.
By converting GIF into video, you make a wise move as an encoded MP4 video contains richer colors and higher resolutions, weighs 5 to 10 times lighter in file size, and has engaging audio compared to the GIF. In addition, MP4 is also a wide-known and accepted format for social sharing videos across the web. So, whether you want to convert your Gif to Mp4 for Instagram or you intend to add songs to your animated texts and convert to Mp4, this article will help you out.
We shall explore:
In this article
Part 1: Best Online GIF to MP4 Converters
Part 2: Top GIF to MP4 Software
Part 3: How to Convert GIF to MP4

Part 1: Best Online GIF to MP4 Converters
GIF pictures are a perfect source of entertainment and can also be helpful as memes on the internet. Those wondering what a GIF picture is all about are small videos without sound. They can be used in the comment section of the internet or sent as memes in messages on smartphones.
However, due to third-party keyboard applications, the use and sending of GIFs have become very easy. Thus, many people are trying to migrate from GIF to MP4, and this article is for them. We will give you the best four (4) GIFs to video converter online that you can use.
1. Ezgif
Ezgif is a free GIF to MP4 online converter that allows you to turn your ezGif GIF into MP4 videos with a single click leaving no watermark on your video. The process is relatively easy as you just need to upload a GIF file up to 35MB, then click the “Convert to MP4” button, and your MP4 video will be ready. Besides, it supports the conversions of WEBP and APNG to MP4.
Pros
It is super-fast and free.
It does not have a watermark.
There is no advert on the site.
It does not require any software to download.
Cons
It allows you to convert one file at a time.

2. Adobe Creative Cloud Express
Adobe Creative Cloud Express is a collection of mobile app-based and web-based video editing tools that all content creators use. It allows you to upload GIFs online and then convert GIFs to MP4. It also allows you to trim the GIF and directly download the MP4 to the local PC.
Pros
It is very free to use
it allows you to trim the GIF
it is available online and on App Store
it does not require any software to download.
Cons
Allows you to upload one GIF at a time
It has limited features


3. FlexClip
This tool is a feature-packed online video maker and GIF to MP4 converter. It allows users to easily upload GIFs from either their mobile phones or PC to FlexClip’s in-browser editor and also make some edits with both the GIFs and videos before you can convert them.
Pros
No software downloads are required
No experience is needed.
There are tons of features available
Cons
GIFs are irreversible
You cannot change GIFs speed

4. Convertio
This online conversion tool has made GIFs to MP4 conversion much more effortless. This free GIF to video converter has a simple interface and easy-to-use tools that help you turn GIF files to MP4 in a few clicks.
Pros
It is swift and free.
You can convert several files at once.
It does not require any download.
Cons
There are loads of ads on the site.
You can only use 2 concurrent conversions for the free account.

Part 2: Top GIF to MP4 Software
Many people have tried different software to convert GIFs into MP4 that have proven abortive. Most software on the internet only allows you to convert MPEG to GIF, WMV to GIF, or images to GIF files. Only a few software allows the conversion from GIF to videos.
Here are some of the top 4 GIF to MP4 Conversion software:
1. Filmora
Filmora Video Editor is the best software to convert any GIF picture to an MP4 video file. The best part is that you do not need to use the internet, and it works perfectly for all users. In addition, the software is super stable and does not crash even if you load more than ten video files on it. However, the Filmora video editor is a complete package that allows users to edit and convert any video with many accessible features. More so, you are not required to be a professional video editor to be able to convert the GIF image to a professional video.
With the Filmora software, you do not have to download and pay for the music, as the editor also has a great music library from which you can choose to add music within seconds. Moreover, the software has more than 100 different text styles and effects to make your GIF into MP4 videos more beautiful.
Pros
Available for both Windows and Mac Users
Beginners can also use it
It is free and easy to use
You don’t have to use the internet for it to work
Cons
It requires you to download it on your PC

2. Cloudconvert
This free online service tool allows users to convert any GIF image to an MP4 file. In addition, the user interface is quite tricky, but you can edit the videos, trim the videos, and crop them. Users can add subtitles to videos using the SRT files, and finally, you can export files directly to the Dropbox account.
Pros
It is free to use
It helps you export videos directly to your Dropbox
It provides you with a ton of audio and video editing features
Use SRT to add subtitles to your videos
Cons
It has a complicated user-interface
It does not support uploading to video sharing websites

3. Online-Convert
This is a perfect tool to convert GIF image to an MP4 file. In addition, this is a complete online video editor that allows users to perform various kinds of basic video converting options on their files. Users can rotate or crop the videos and extract the unwanted parts from the screen. Once the videos convert successfully, they can be downloaded or directly exported to Google Drive or Dropbox.
Pros
Users can directly export the converted files to the Cloud services
It allows users to convert different files to MP4
It provides users with files settings for basic video editing
Cons
No interactive interface
Many ads on the website

4. File-Conversion
One of the most popular file conversion websites offers this video editing software. In addition, it provides various video editing services rather than just converting GIFs to MP4 video files. It also provides a few settings, including size, resolution, and frame rate.
Pros
· It is user friendly
· It is free to use
· Allows users to change the quality of the output videos
Cons
· Using the service requires sign-up
It does not have an option to crop the Mp4 Videos or edit the frame rate
It does not have an option to export the videos to the third-party cloud services

Part 3: How to Convert GIF to MP4
Here are the quick and easy steps to Ezgif GIF to MP4 online conversion:
>
Step1: Choose File to Browse or Copy-Paste URL to Upload
Upload a GIF file to your timeline or paste an image URL that is up to 35MB and Click the “Upload” button

Step 2: Tap on Convert GIF to MP4
After the upload, click Convert GIF to MP4, and it will automatically get converted.

Step 3: Download the MP4
Export your video and download it on your device
Here is how to convert GIF to MP4 using Filmora software
Step 1: Install Filmora and Choose New Project
Open your Filmora software, click on New Project import GIF, or drag and drop them to your timeline.
Step 2: Import Media
If the media aspect ratio and resolution do not match when importing a file, a popup will appear. Make sure you click on DON’T CHANGE.

Step 3: Convert GIF to MP4
Click on export, then you rename and select your desired file format (MP4), and your GIFs will automatically convert.

Step 4: Export and Save
Finally, you can save the file on your device once the conversion process is complete.
Conclusion
From this article, we can pick that Ezgif is the best online tool and Filmora video editor is the easiest and perfect software that is good for GIF converter to MP4. This article also listed other video editors that can help you make GIFs from MP4 quickly and without stress.
Introduction.
Many people have been searching online for the best GIF to MP4 converter that will help them playback their GIF files on their media player. It is easier for GIF animated files to be converted to MP4 files, as Mp4 is the most popular file format compatible with many devices. Some compatible devices include iOS devices, Mac, Android devices, Windows, etc.
By converting GIF into video, you make a wise move as an encoded MP4 video contains richer colors and higher resolutions, weighs 5 to 10 times lighter in file size, and has engaging audio compared to the GIF. In addition, MP4 is also a wide-known and accepted format for social sharing videos across the web. So, whether you want to convert your Gif to Mp4 for Instagram or you intend to add songs to your animated texts and convert to Mp4, this article will help you out.
We shall explore:
In this article
Part 1: Best Online GIF to MP4 Converters
Part 2: Top GIF to MP4 Software
Part 3: How to Convert GIF to MP4
Part 1: Best Online GIF to MP4 Converters
GIF pictures are a perfect source of entertainment and can also be helpful as memes on the internet. Those wondering what a GIF picture is all about are small videos without sound. They can be used in the comment section of the internet or sent as memes in messages on smartphones.
However, due to third-party keyboard applications, the use and sending of GIFs have become very easy. Thus, many people are trying to migrate from GIF to MP4, and this article is for them. We will give you the best four (4) GIFs to video converter online that you can use.
1. Ezgif
Ezgif is a free GIF to MP4 online converter that allows you to turn your ezGif GIF into MP4 videos with a single click leaving no watermark on your video. The process is relatively easy as you just need to upload a GIF file up to 35MB, then click the “Convert to MP4” button, and your MP4 video will be ready. Besides, it supports the conversions of WEBP and APNG to MP4.
Pros
It is super-fast and free.
It does not have a watermark.
There is no advert on the site.
It does not require any software to download.
Cons
It allows you to convert one file at a time.
2. Adobe Creative Cloud Express
Adobe Creative Cloud Express is a collection of mobile app-based and web-based video editing tools that all content creators use. It allows you to upload GIFs online and then convert GIFs to MP4. It also allows you to trim the GIF and directly download the MP4 to the local PC.
Pros
It is very free to use
it allows you to trim the GIF
it is available online and on App Store
it does not require any software to download.
Cons
Allows you to upload one GIF at a time
It has limited features
3. FlexClip
This tool is a feature-packed online video maker and GIF to MP4 converter. It allows users to easily upload GIFs from either their mobile phones or PC to FlexClip’s in-browser editor and also make some edits with both the GIFs and videos before you can convert them.
Pros
No software downloads are required
No experience is needed.
There are tons of features available
Cons
GIFs are irreversible
You cannot change GIFs speed
4. Convertio
This online conversion tool has made GIFs to MP4 conversion much more effortless. This free GIF to video converter has a simple interface and easy-to-use tools that help you turn GIF files to MP4 in a few clicks.
Pros
It is swift and free.
You can convert several files at once.
It does not require any download.
Cons
There are loads of ads on the site.
You can only use 2 concurrent conversions for the free account.
Part 2: Top GIF to MP4 Software
Many people have tried different software to convert GIFs into MP4 that have proven abortive. Most software on the internet only allows you to convert MPEG to GIF, WMV to GIF, or images to GIF files. Only a few software allows the conversion from GIF to videos.
Here are some of the top 4 GIF to MP4 Conversion software:
1. Filmora
Filmora Video Editor is the best software to convert any GIF picture to an MP4 video file. The best part is that you do not need to use the internet, and it works perfectly for all users. In addition, the software is super stable and does not crash even if you load more than ten video files on it. However, the Filmora video editor is a complete package that allows users to edit and convert any video with many accessible features. More so, you are not required to be a professional video editor to be able to convert the GIF image to a professional video.
With the Filmora software, you do not have to download and pay for the music, as the editor also has a great music library from which you can choose to add music within seconds. Moreover, the software has more than 100 different text styles and effects to make your GIF into MP4 videos more beautiful.
Pros
Available for both Windows and Mac Users
Beginners can also use it
It is free and easy to use
You don’t have to use the internet for it to work
Cons
It requires you to download it on your PC
2. Cloudconvert
This free online service tool allows users to convert any GIF image to an MP4 file. In addition, the user interface is quite tricky, but you can edit the videos, trim the videos, and crop them. Users can add subtitles to videos using the SRT files, and finally, you can export files directly to the Dropbox account.
Pros
It is free to use
It helps you export videos directly to your Dropbox
It provides you with a ton of audio and video editing features
Use SRT to add subtitles to your videos
Cons
It has a complicated user-interface
It does not support uploading to video sharing websites
3. Online-Convert
This is a perfect tool to convert GIF image to an MP4 file. In addition, this is a complete online video editor that allows users to perform various kinds of basic video converting options on their files. Users can rotate or crop the videos and extract the unwanted parts from the screen. Once the videos convert successfully, they can be downloaded or directly exported to Google Drive or Dropbox.
Pros
Users can directly export the converted files to the Cloud services
It allows users to convert different files to MP4
It provides users with files settings for basic video editing
Cons
No interactive interface
Many ads on the website
4. File-Conversion
One of the most popular file conversion websites offers this video editing software. In addition, it provides various video editing services rather than just converting GIFs to MP4 video files. It also provides a few settings, including size, resolution, and frame rate.
Pros
· It is user friendly
· It is free to use
· Allows users to change the quality of the output videos
Cons
· Using the service requires sign-up
It does not have an option to crop the Mp4 Videos or edit the frame rate
It does not have an option to export the videos to the third-party cloud services
Part 3: How to Convert GIF to MP4
Here are the quick and easy steps to Ezgif GIF to MP4 online conversion:
>
Step1: Choose File to Browse or Copy-Paste URL to Upload
Upload a GIF file to your timeline or paste an image URL that is up to 35MB and Click the “Upload” button
Step 2: Tap on Convert GIF to MP4
After the upload, click Convert GIF to MP4, and it will automatically get converted.
Step 3: Download the MP4
Export your video and download it on your device
Here is how to convert GIF to MP4 using Filmora software
Step 1: Install Filmora and Choose New Project
Open your Filmora software, click on New Project import GIF, or drag and drop them to your timeline.
Step 2: Import Media
If the media aspect ratio and resolution do not match when importing a file, a popup will appear. Make sure you click on DON’T CHANGE.
Step 3: Convert GIF to MP4
Click on export, then you rename and select your desired file format (MP4), and your GIFs will automatically convert.
Step 4: Export and Save
Finally, you can save the file on your device once the conversion process is complete.
Conclusion
From this article, we can pick that Ezgif is the best online tool and Filmora video editor is the easiest and perfect software that is good for GIF converter to MP4. This article also listed other video editors that can help you make GIFs from MP4 quickly and without stress.
Want to Make Professional-Looking Videos? Keep Reading to Give Your Videos a Cinematic Feel with the Audio Mixer of Filmora
Have you seen those classic and outstanding videos of professional YouTubers? Yeah, they feel different from the videos we usually make. The reason mainly lies within the outclass audio quality of those videos.
And now, you might think it’s impossible to mess with the audio control without the support of a professional. But believe me; it’s much simpler than you think. In this brief guide, we’ll show you how to use the audio mixer of Filmora to fine-tune all of your videos skillfully.
But let’s first see what an audio mixer is.
Part 1: What is an audio mixer?
An audio mixer is a tool that gives you control over the audio quality of your videos. Using the audio mixer, you can easily give your video a cinematic feel by controlling different modes and levels.
And that’s not where it ends!!! This mixing console also allows you to mix, combine and balance audio from different sources. So control your audio and give your video that extra bit of depth.
To your surprise, you can access this excellent tool without cost using the world’s leading video editor, Filmora . Let’s see a brief intro of Wondershare Filmora, and then we’ll show you how to use the audio mixer of Filmora in a stepwise manner.
Free Download For Win 7 or later(64-bit)
Free Download For macOS 10.14 or later
Part 2: An easy-to-use audio mixer - Wondershare Filmora
![]()
Wondershare Filmora is one of the world’s leading video-editor and is no less than a blessing for all creators. Its stunning editing features like split screen, motion tracking, speed ramping, and many others allow you to take your video to the next level. Moreover, the massive arsenal of video effects and AI portraits gives you various choices.
What’s more, you can tweak the audio using auto synchronization, audio duckling, an audio visualizer, and even an audio mixer. Isn’t it fantastic? Now let’s move forward and see how we can sharpen our video with the audio mixer of Filmora in detail steps.
Part 3: Steps to effectively use the audio mixer in Filmora
Here are the steps you need to follow to use the audio mixer of Filmora effectively.
Step1Download & install
First, you must have a suitable version of Filmora installed on your device. Here are the steps to install the free version.
- Go to the official website of Filmora and hit the “Free Download” button. Filmora is available for Windows 11 and all the previous versions, as well as for macOS 10.14 to macOS 13
Free Download For Win 7 or later(64-bit)
Free Download For macOS 10.14 or later
- When the download finishes, follow the guidelines of the installation wizard to install Filmora on your computer.
Now let’s see how to prepare our video.
Step2Prepare your video
After you have installed the latest version of Filmora, you need to prepare your video for editing.
For this,
- Launch the Filmora on your computer and click the “New Project” button from the starting interface.

- Now let’s import our video. Click on the “Import Media” section or drag and drop your video/audio file here to import it.

- Once the media file has been imported, add it to the editing panel below with the drag-and-drop method. This is important to create a workspace for your video.

- Now it’s time to edit the video. Make all the editing you want with graphics and visuals to finalize your video before using the audio mixer. And once it’s done, we can move to the first-class audio mixer of Filmora.
Bonus Tip: Before using the audio mixer, ensure you have a headphone to see the changes you are making instead of relying on your desktop speaker.
Step3Start the audio mixer
To open up the audio mixer, click on the “audio mixer” icon on the toolbar below the preview window.

This is what your audio mixer will look like at the start.

Now we can start adjusting the audio settings. Let’s go with the audio levels first.
Step4Adjust the audio levels
To adjust the audio levels, look at the left side of the audio mixer. Here you’ll see two vertical bars, which are;
- The audio levels for the video clip.
- The audio levels for the sound and music in the music track.
You can adjust the icon up or down to make these channels louder or softer.

After the audio levels, let’s see how we can change the audio channels.
Free Download For Win 7 or later(64-bit)
Free Download For macOS 10.14 or later
Step5Adjust the audio channels
See those circles above the audio levels? These are for adjusting the audio channels.
- Rotate the knob-like icon in these circles to adjust the Audio channels’ pan/bounce control. This switches the sound between the left and right channels.
- On top of that, you can see these changes on the channel control panel.

To check the effect, let’s rotate the knob to the left. And to see the result hit the “Play” button on the bottom left corner of the audio mixer interface. Here’s how it looks.

Now it’s time to select the audio mode.
Step6Select the audio mode
The audio mixer of Filmora provides you with two audio mode options. These are;
● Stereo Mode
In the Stereo mode, you can pan from left to right and control your audio just like the knob of the audio channel.
● Surround Mode
You can pan from left to right and front to back in this mode by rotating the video or music icons. This provides you with complete control over the audio positions. But remember that this mode works best if your video is played with the surround sound system.

Once you have changed the audio mode, let’s look at the master levels.
Step7Adjust the master levels
On the very left of the window, you’ll find the Master levels.
This is where you can adjust the master section or all your audio files on your timeline.
- Just drag the master level slider upward and downwards, and you’ll notice the changes right away.

So done with the changes? Let’s preview them.
Free Download For Win 7 or later(64-bit)
Free Download For macOS 10.14 or later
Step8Preview your changes
After carefully making all the changes to your audio, preview it for the last time before going with them. The “Play” button is still there in the bottom left corner.
Perfect!!! No? Make the changes again until you are satisfied and then hit the “Apply” button on the bottom right corner to adjust these changes.

And here we are, done!!! Now you can easily surprise your friends with your master-like audio handling. Before we wind up our guide, we’ll answer some of the frequently asked questions about the audio mixer of Filmora. So let’s dive right into it.
Part 4: Hot FAQs about the audio mixer of Filmora
1.How important is an audio mixer in video editing?
An audio mixer is necessary if you want to create impressive videos. This master volume control allows you to deepen the audio effect and merge two audio sources to get the maximum out of them. This is why most content creators give grave importance to audio mixers during video editing.
2.Where can we find the audio mixer in Filmora?
Like other highly advanced editing tools, you can also find the audio mixer in Filmora. After you’ve placed your media file on the editing panel, the “audio mixer” icon appears on the toolbar under the preview channel.
3.Is the audio mixer of Filmora available for free?
Yes, you can freely use the audio mixer of Filmora as much as you want without any cost. And unlike many other free sound control tools, you get all the latest and advanced features like the preview tool with the audio mixer of Filmora.
Conclusion
Every top-ranked video contains the best-suited audio tracks with it. And the audio mixer of Filmora comes in handy whenever you want to tweak the audio settings of a video.
In this article, we’ve covered everything you need to know about using the audio mixer in Filmora.
Free Download For Win 7 or later(64-bit)
Free Download For macOS 10.14 or later
Free Download For macOS 10.14 or later
Part 2: An easy-to-use audio mixer - Wondershare Filmora
![]()
Wondershare Filmora is one of the world’s leading video-editor and is no less than a blessing for all creators. Its stunning editing features like split screen, motion tracking, speed ramping, and many others allow you to take your video to the next level. Moreover, the massive arsenal of video effects and AI portraits gives you various choices.
What’s more, you can tweak the audio using auto synchronization, audio duckling, an audio visualizer, and even an audio mixer. Isn’t it fantastic? Now let’s move forward and see how we can sharpen our video with the audio mixer of Filmora in detail steps.
Part 3: Steps to effectively use the audio mixer in Filmora
Here are the steps you need to follow to use the audio mixer of Filmora effectively.
Step1Download & install
First, you must have a suitable version of Filmora installed on your device. Here are the steps to install the free version.
- Go to the official website of Filmora and hit the “Free Download” button. Filmora is available for Windows 11 and all the previous versions, as well as for macOS 10.14 to macOS 13
Free Download For Win 7 or later(64-bit)
Free Download For macOS 10.14 or later
- When the download finishes, follow the guidelines of the installation wizard to install Filmora on your computer.
Now let’s see how to prepare our video.
Step2Prepare your video
After you have installed the latest version of Filmora, you need to prepare your video for editing.
For this,
- Launch the Filmora on your computer and click the “New Project” button from the starting interface.
- Now let’s import our video. Click on the “Import Media” section or drag and drop your video/audio file here to import it.
- Once the media file has been imported, add it to the editing panel below with the drag-and-drop method. This is important to create a workspace for your video.
- Now it’s time to edit the video. Make all the editing you want with graphics and visuals to finalize your video before using the audio mixer. And once it’s done, we can move to the first-class audio mixer of Filmora.
Bonus Tip: Before using the audio mixer, ensure you have a headphone to see the changes you are making instead of relying on your desktop speaker.
Step3Start the audio mixer
To open up the audio mixer, click on the “audio mixer” icon on the toolbar below the preview window.
This is what your audio mixer will look like at the start.
Now we can start adjusting the audio settings. Let’s go with the audio levels first.
Step4Adjust the audio levels
To adjust the audio levels, look at the left side of the audio mixer. Here you’ll see two vertical bars, which are;
- The audio levels for the video clip.
- The audio levels for the sound and music in the music track.
You can adjust the icon up or down to make these channels louder or softer.
After the audio levels, let’s see how we can change the audio channels.
Free Download For Win 7 or later(64-bit)
Free Download For macOS 10.14 or later
Step5Adjust the audio channels
See those circles above the audio levels? These are for adjusting the audio channels.
- Rotate the knob-like icon in these circles to adjust the Audio channels’ pan/bounce control. This switches the sound between the left and right channels.
- On top of that, you can see these changes on the channel control panel.
To check the effect, let’s rotate the knob to the left. And to see the result hit the “Play” button on the bottom left corner of the audio mixer interface. Here’s how it looks.
Now it’s time to select the audio mode.
Step6Select the audio mode
The audio mixer of Filmora provides you with two audio mode options. These are;
● Stereo Mode
In the Stereo mode, you can pan from left to right and control your audio just like the knob of the audio channel.
● Surround Mode
You can pan from left to right and front to back in this mode by rotating the video or music icons. This provides you with complete control over the audio positions. But remember that this mode works best if your video is played with the surround sound system.
Once you have changed the audio mode, let’s look at the master levels.
Step7Adjust the master levels
On the very left of the window, you’ll find the Master levels.
This is where you can adjust the master section or all your audio files on your timeline.
- Just drag the master level slider upward and downwards, and you’ll notice the changes right away.
So done with the changes? Let’s preview them.
Free Download For Win 7 or later(64-bit)
Free Download For macOS 10.14 or later
Step8Preview your changes
After carefully making all the changes to your audio, preview it for the last time before going with them. The “Play” button is still there in the bottom left corner.
Perfect!!! No? Make the changes again until you are satisfied and then hit the “Apply” button on the bottom right corner to adjust these changes.
And here we are, done!!! Now you can easily surprise your friends with your master-like audio handling. Before we wind up our guide, we’ll answer some of the frequently asked questions about the audio mixer of Filmora. So let’s dive right into it.
Part 4: Hot FAQs about the audio mixer of Filmora
1.How important is an audio mixer in video editing?
An audio mixer is necessary if you want to create impressive videos. This master volume control allows you to deepen the audio effect and merge two audio sources to get the maximum out of them. This is why most content creators give grave importance to audio mixers during video editing.
2.Where can we find the audio mixer in Filmora?
Like other highly advanced editing tools, you can also find the audio mixer in Filmora. After you’ve placed your media file on the editing panel, the “audio mixer” icon appears on the toolbar under the preview channel.
3.Is the audio mixer of Filmora available for free?
Yes, you can freely use the audio mixer of Filmora as much as you want without any cost. And unlike many other free sound control tools, you get all the latest and advanced features like the preview tool with the audio mixer of Filmora.
Conclusion
Every top-ranked video contains the best-suited audio tracks with it. And the audio mixer of Filmora comes in handy whenever you want to tweak the audio settings of a video.
In this article, we’ve covered everything you need to know about using the audio mixer in Filmora.
Free Download For Win 7 or later(64-bit)
Free Download For macOS 10.14 or later
Also read:
- 2024 Approved 4 Simple Methods for Making a High-Quality Recap Video
- In 2024, Are You Searching for the Best Cinematic LUTs for Premiere Pro? You Are in the Right Place because This Article Is Dedicated to LUTs
- Updated In 2024, Best 10 Crazy-Cool Examples of AR Video
- Updated In 2024, 12 Impressive AI Video Ideas for Creating Engaging Video Content
- New Figuring Out Proper Ways to Play a Video in Slow Motion on iPhone for 2024
- Best 6 WebM to GIF Converters for 2024
- Tips & Tricks To Perfectly Use the Audio Mixer in Filmora
- Updated 2024 Approved How To Make A Video Longer
- New Adobe Lightroom Color Grading Tutorial for 2024
- Free LUTs for OBS How to Use Them for 2024
- Updated In 2024, Best Video Editors to Add Text to a Video
- Top 10 Voice Over Generators Windows, Mac, Android, iPhone, and Onli
- 2024 Approved There Are 10 Slideshow Makers Coming with Beautiful Music for Creating a Stunning Slideshow
- Updated WebM to GIF Converters (Online and Offline Solutions)
- New Having Difficulty in Choosing the Most Affordable 3D Slideshow Software? Stay Here for the Best Application Choices of All Times to Create the Most Stunning Slideshows Ever
- How to Make A Jaw-Dropping Time Lapse Video, In 2024
- New In 2024, Updated 8 Ways to Merge SRT with MP4
- How to Create Cooking Video Intro and End Screen for YouTube Channel for 2024
- How to Spruce Up Your Telegram Profile for 2024
- Updated 2024 Approved A Complete Guideline About QuickTime Player
- 2024 Approved Having Difficulty in Choosing the Most Affordable 3D Slideshow Software? Stay Here for the Best Application Choices of All Times to Create the Most Stunning Slideshows Ever
- New In 2024, 8 Apps to Custom Your GIF Stickers
- Updated In 2024, Best Tools To Create Blend Image Collage
- New In 2024, Steps to Create Gold Text Effects After Effects
- New Best 5 AI Music Video Examples and Makers to Make Them
- Updated 2024 Approved How to Crop a Video in Davinci Resolve Step by Step
- New 2024 Approved Best 5 GIF to Video Converters You Cant-Miss
- Updated Movavi Video Editor Plus Review
- In 2024, Consider a LUT to Be a Color Preset that a Filmmaker Can Use to Start Working on a Project Quickly. Sony Engineers Have Developed LUTs to Help Filmmakers Perform Specific Tasks. All of These Are Available for Free
- 2024 Approved Create a Kickass COD Warzone Thumbnail for Free
- Best 10 Crazy-Cool Examples of AR Video
- How to Resize FLV Videos EfficientlyWindows, Mac, Android, iPhone & Online
- Updated Stunning Glitch Effect and Its Creation Steps for Premiere Pro for 2024
- Updated 2024 Approved How to Loop a Video on Vimeo?
- Want to Learn How to Crop or Trim Video in PowerPoint? We Have Got You Covered; We Have Given a Step-by-Step Guide that Will Allow You to Trim and Crop Videos Using This Presentation Program for 2024
- Top Tips on How to Design Travel Slideshow for 2024
- Updated 2024 Approved Hitfilm Express - A Guide to Download, Install, Key Features
- New Create a Brand Video to Make Your Business Shine
- How to Create Loop Videos with Filmora
- Why is iPogo not working On Samsung Galaxy A15 5G? Fixed | Dr.fone
- How To Revive Your Bricked OnePlus Ace 2 in Minutes | Dr.fone
- How to Easily Hard reset my Oppo F23 5G | Dr.fone
- How to Unlock Itel Phone with Broken Screen
- In 2024, How to Cast Poco F5 Pro 5G to Computer for iPhone and Android? | Dr.fone
- In 2024, How to Bypass Android Lock Screen Using Emergency Call On Realme 12+ 5G?
- Guide to Mirror Your Tecno Spark 10 5G to Other Android devices | Dr.fone
- Top 10 Fingerprint Lock Apps to Lock Your Xiaomi Redmi Note 12 5G Phone
- What You Need To Know To Improve Your Xiaomi Redmi 12 Hard Reset | Dr.fone
- In 2024, Catch or Beat Sleeping Snorlax on Pokemon Go For Apple iPhone 12 | Dr.fone
- Complete guide for recovering video files on Xiaomi Civi 3
- In 2024, Guide to Mirror Your Oppo A18 to Other Android devices | Dr.fone
- In 2024, 10 Free Location Spoofers to Fake GPS Location on your Vivo Y27s | Dr.fone
- Methods to Change GPS Location On Vivo V30 | Dr.fone
- Remove Realme Lock Screen without Password(Realme V30T)
- Issues playing H.265 HEVC video on Xiaomi 14 Pro
- How to Lock Apps on Realme C67 5G to Protect Your Individual Information
- How does the stardust trade cost In pokemon go On Samsung Galaxy S24 Ultra? | Dr.fone
- Title: In 2024, Top Things People Know About Wedding Slideshow
- Author: Chloe
- Created at : 2024-05-20 03:38:21
- Updated at : 2024-05-21 03:38:21
- Link: https://ai-editing-video.techidaily.com/in-2024-top-things-people-know-about-wedding-slideshow/
- License: This work is licensed under CC BY-NC-SA 4.0.
