:max_bytes(150000):strip_icc():format(webp)/GettyImages-1168002788-1bccccf67a1f4988bd355c09748383ab.jpg)
In 2024, Video in Text Cinematic Intro【Filmora Tutorial】

Video in Text Cinematic Intro【Filmora Tutorial】
Preparation
What you need to prepare:
- A computer (Windows or macOS)
- Your video materials.
- Filmora video editor
Step 1
Visit filmora.wondershare.com and download the Filmora video editor . Hit Install. When it’s done installing, the app will start automatically. When it does, click on New Project.
Step 2
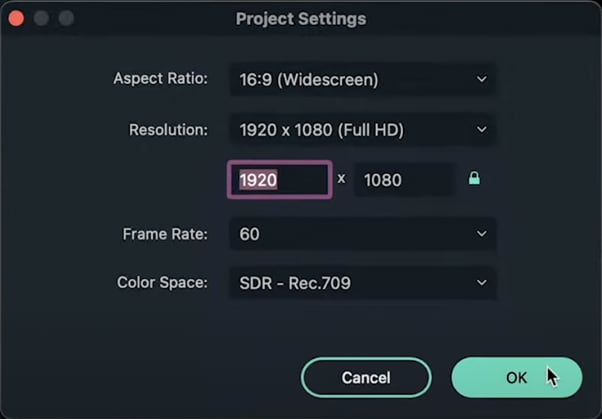
Before we start editing, go to File from the navigation panel at the top and select Project Settings. Then, set the resolution settings like in the example here.
Step 3
Now, download any background image you want. Make sure its resolution is 1920x1080. Import it and drag it to the Timeline.
Step 4
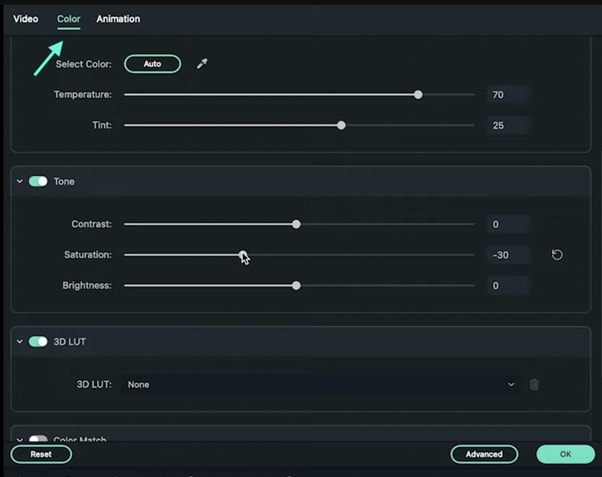
From the Timeline, double-click on the Background clip and decrease its opacity to 70%. Then, click on Color from the upper-left corner and change the settings as you wish.
Step 5
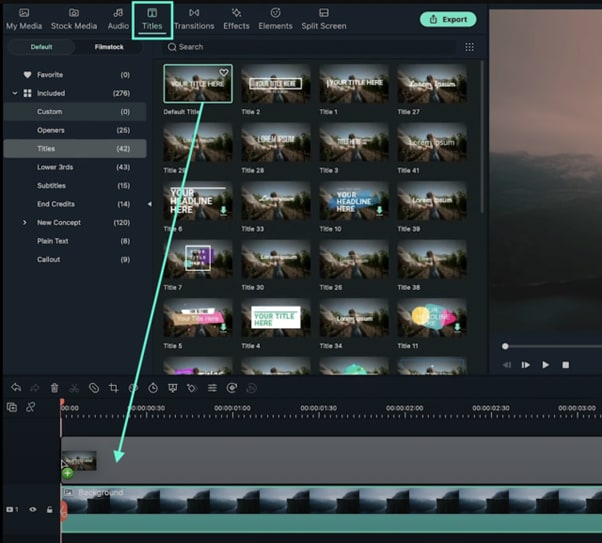
Go to the Titles tab and drag the Default Title to the Timeline. Double-click on the Default Title clip and change fonts, type in your text, etc.
Step 6
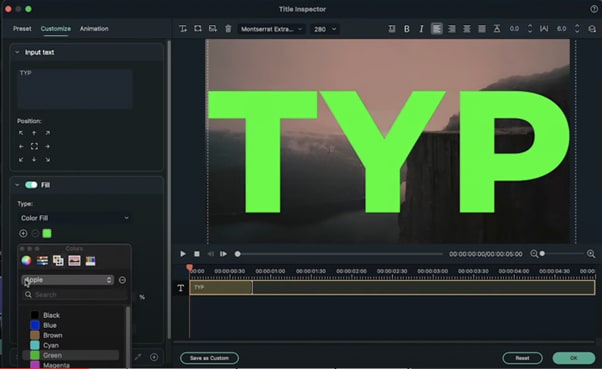
Drag the text to enlarge it so it fits the entire screen. Then, change its color to green. Press OK. Now, Export this clip and name it “1st Text”.
Step 7
Now, open a new Filmora project and edit the Project Settings like we did before. Then, go to Sample Color and drag the white color to the Timeline.
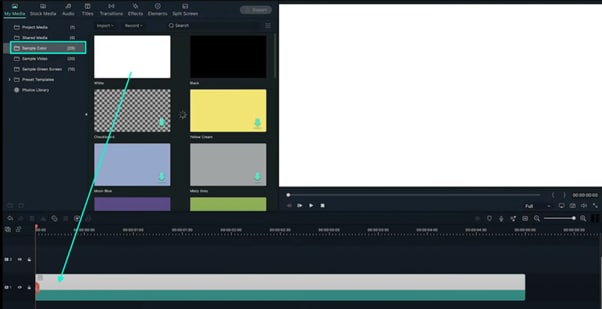
Step 8
Drag the Playhead to the 2-second marker. Drag the same Background image as before to this point. Then, double-click on the Background clip and increase the Brightness and Saturation bars to 50. Click OK.
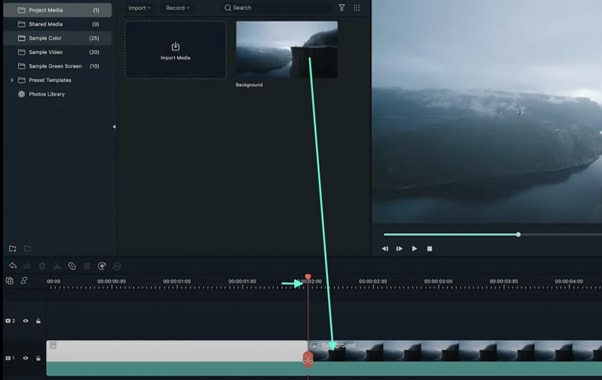
Step 9
Go to Transitions and type in “Push”. Drag the Push transition between the White layer and your Background image. Click on Export once again and name this clip “Transition”.
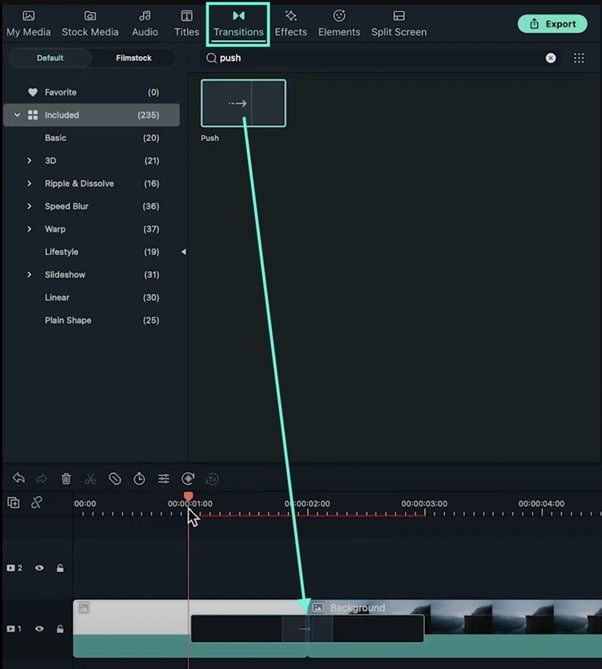
Step 10
Open a new Filmora project and adjust the Project Settings like we did the first time. Then, go to Sample Color and drag the White color to the Timeline once more.
Step 11
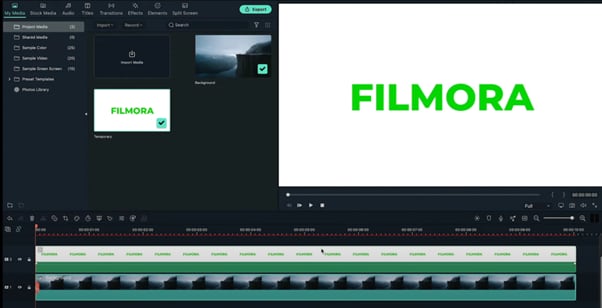
Go to Titles and drag the Default Title to the Timeline, above the White Sample Color clip. Now, double-click the Default Title clip and go to ADVANCED. Here, set the text color to green, choose a font you like, and increase the text size. Click OK. Export it and name it “Temporary”.
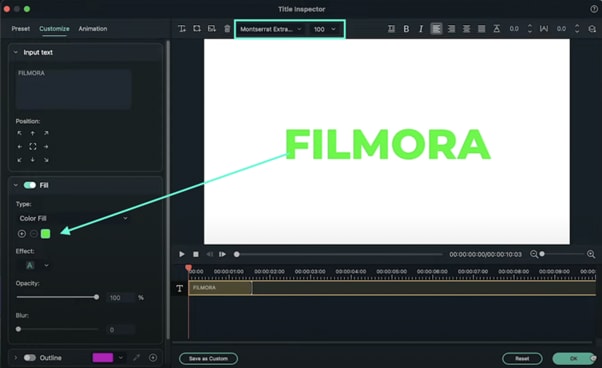
Step 12
Open a new project in Filmora. Import and Drag the same background image you used before to the Timeline. Double-click on it and drag the Saturation bar to -100. Now, drag the file you named “Temporary” into the Timeline.
Step 13
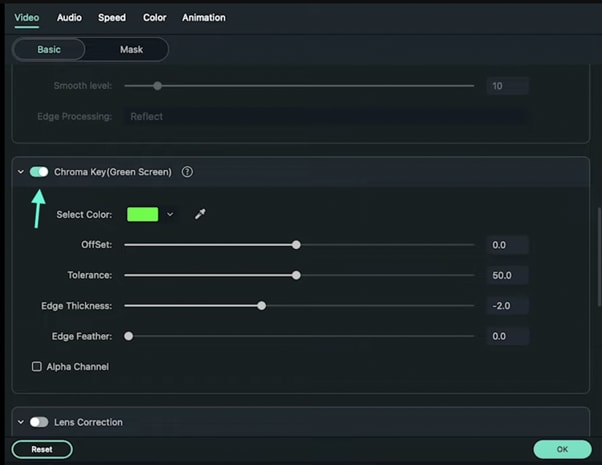
Double-click on the Temporary clip, scroll down when the new window appears, and find the Chroma key section. Enable this. Now, drag the Edge Feather bar to 0. Export this video and name it “2nd Text”.
Step 14
Open one more new project in Filmora and import the following files. There should be four, titled “Background”, “Transition”, “1st Text”, and “2nd Text”.
Step 15
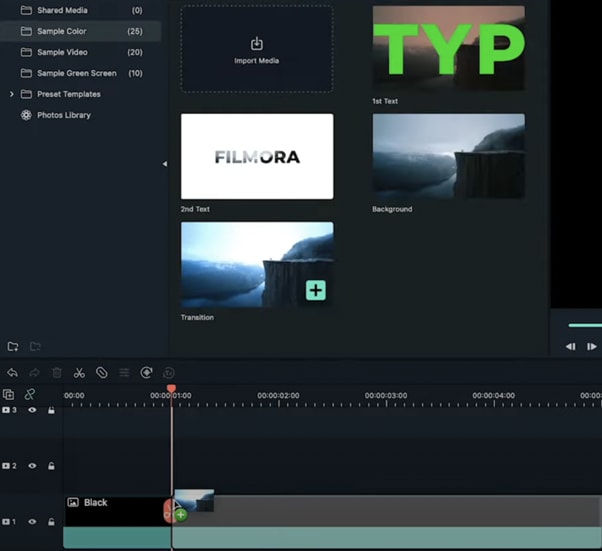
Click on Sample Color and drag the Black color to the 1st Track of the Timeline. Then, move the Playhead to the 1-second marker and drag the “Transition” clip to the same Track within the Timeline.
Step 16
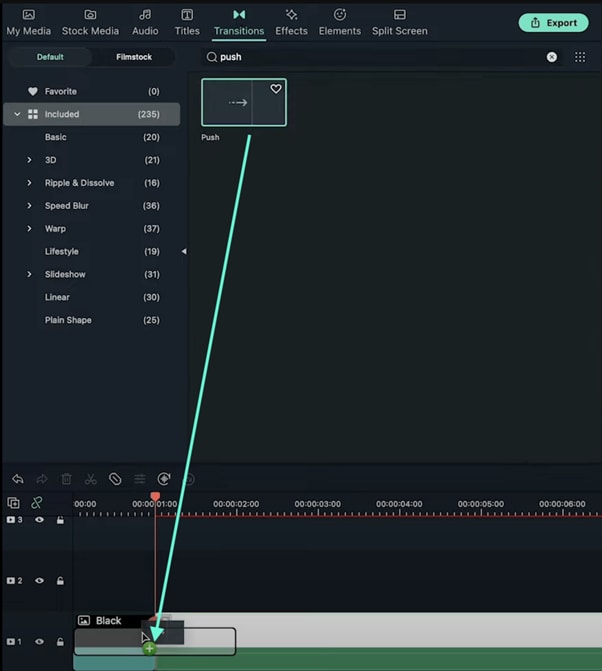
From the Transitions tab, select the Push transition and drag it to the Timeline.
Step 17
Set the Playhead at the 1-second marker once again. First, add the “1st Text” clip into Track 2 of the Timeline. Then, add another Push transition at the beginning of this clip.
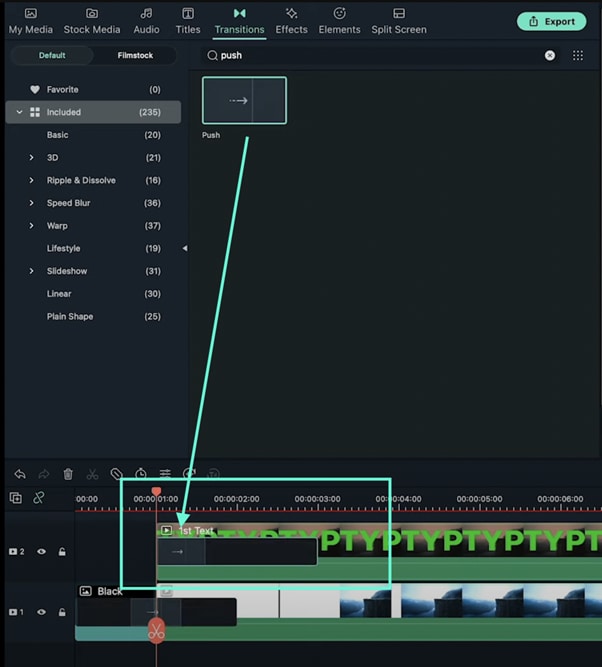
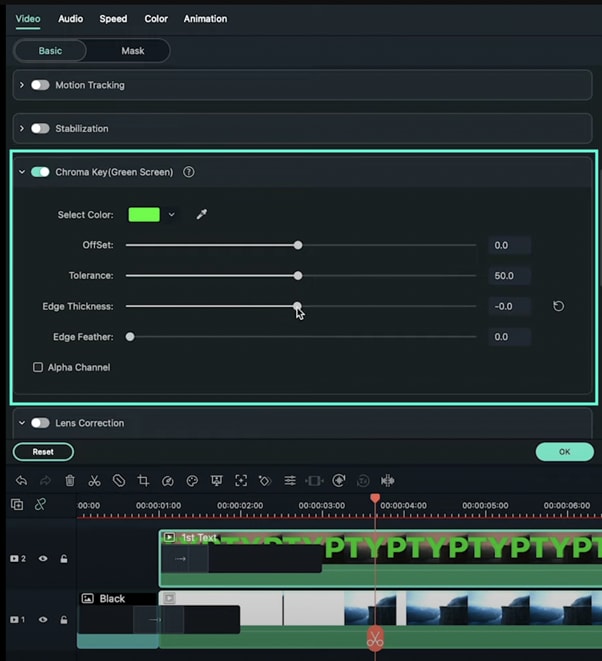
Step 18
Now, double-click on the “1st Text” clip and enable the Chroma Key option. Then, set the Edge Thickness and Edge Feather bars to 0.
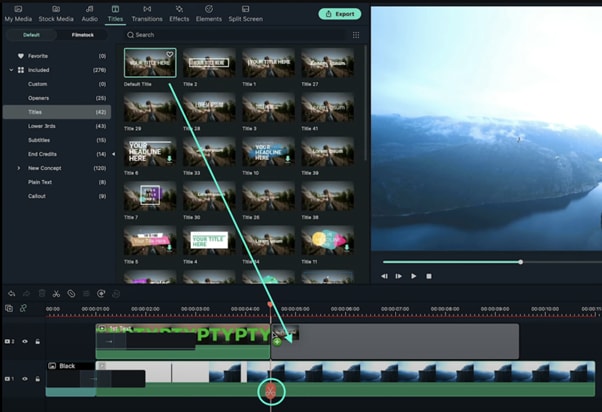
Step 19
Set the Playhead at 4.5 seconds. Snip the Timeline. Then, add a new Default Title on the right side of the Playhead on Track 2.
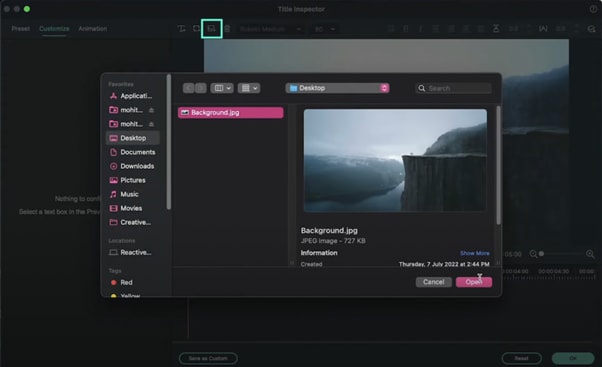
Step 20
Double-click on the Default Title and go to Advanced settings. From there, delete the default text and click on the highlighted button like in the image below to add a new background to this clip. Add the same background you’ve used throughout the entire video.
Step 21
Add a new text here and customize it to match the text style in your “2nd Text” clip you exported earlier. Click OK.
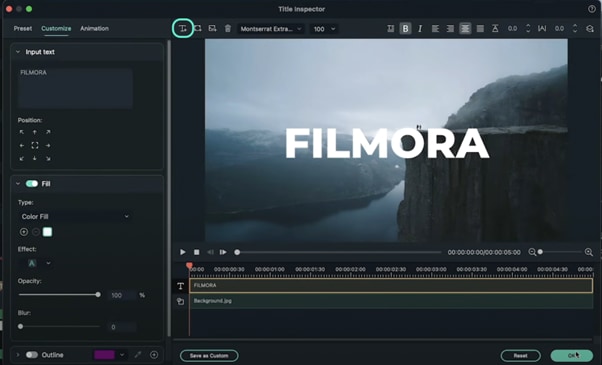
Step 22
Next, go to the Transitions tab and drag the “Row Split” transition clip between Track 2 and the New Default Title you just created. Then, double-click on the transition and change its duration to 1 second.
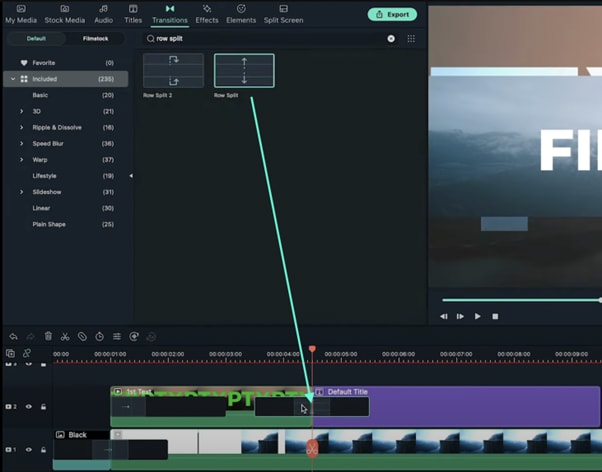
Step 23
Set the Playhead to the 5.5 seconds marker. Drag the “2nd Text” clip you exported earlier here. Then, simply add another Row Split transition between this clip and the Default Title.
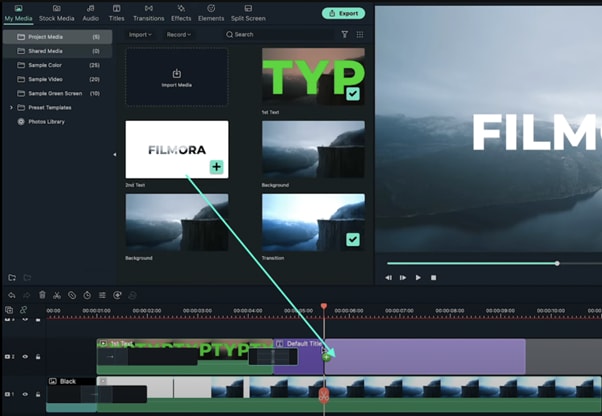
Step 24
That’s it! You’re done. All that’s left is to Render and export the video. Congratulations on creating a video in text cinematic intro in Filmora.
Summary
What you’ve learned:
- How to make advanced edits on titles in Filmora
- Basics of using green screen effects on text
- Using transitions in Filmora
- Exporting and re-using edited clips
- Creating a unique video in text cinematic intro
What you need to prepare:
- A computer (Windows or macOS)
- Your video materials.
- Filmora video editor
Step 1
Visit filmora.wondershare.com and download the Filmora video editor . Hit Install. When it’s done installing, the app will start automatically. When it does, click on New Project.
Step 2
Before we start editing, go to File from the navigation panel at the top and select Project Settings. Then, set the resolution settings like in the example here.

Step 3
Now, download any background image you want. Make sure its resolution is 1920x1080. Import it and drag it to the Timeline.
Step 4
From the Timeline, double-click on the Background clip and decrease its opacity to 70%. Then, click on Color from the upper-left corner and change the settings as you wish.

Step 5
Go to the Titles tab and drag the Default Title to the Timeline. Double-click on the Default Title clip and change fonts, type in your text, etc.

Step 6
Drag the text to enlarge it so it fits the entire screen. Then, change its color to green. Press OK. Now, Export this clip and name it “1st Text”.

Step 7
Now, open a new Filmora project and edit the Project Settings like we did before. Then, go to Sample Color and drag the white color to the Timeline.

Step 8
Drag the Playhead to the 2-second marker. Drag the same Background image as before to this point. Then, double-click on the Background clip and increase the Brightness and Saturation bars to 50. Click OK.

Step 9
Go to Transitions and type in “Push”. Drag the Push transition between the White layer and your Background image. Click on Export once again and name this clip “Transition”.

Step 10
Open a new Filmora project and adjust the Project Settings like we did the first time. Then, go to Sample Color and drag the White color to the Timeline once more.
Step 11
Go to Titles and drag the Default Title to the Timeline, above the White Sample Color clip. Now, double-click the Default Title clip and go to ADVANCED. Here, set the text color to green, choose a font you like, and increase the text size. Click OK. Export it and name it “Temporary”.

Step 12
Open a new project in Filmora. Import and Drag the same background image you used before to the Timeline. Double-click on it and drag the Saturation bar to -100. Now, drag the file you named “Temporary” into the Timeline.

Step 13
Double-click on the Temporary clip, scroll down when the new window appears, and find the Chroma key section. Enable this. Now, drag the Edge Feather bar to 0. Export this video and name it “2nd Text”.

Step 14
Open one more new project in Filmora and import the following files. There should be four, titled “Background”, “Transition”, “1st Text”, and “2nd Text”.
Step 15
Click on Sample Color and drag the Black color to the 1st Track of the Timeline. Then, move the Playhead to the 1-second marker and drag the “Transition” clip to the same Track within the Timeline.

Step 16
From the Transitions tab, select the Push transition and drag it to the Timeline.

Step 17
Set the Playhead at the 1-second marker once again. First, add the “1st Text” clip into Track 2 of the Timeline. Then, add another Push transition at the beginning of this clip.

Step 18
Now, double-click on the “1st Text” clip and enable the Chroma Key option. Then, set the Edge Thickness and Edge Feather bars to 0.

Step 19
Set the Playhead at 4.5 seconds. Snip the Timeline. Then, add a new Default Title on the right side of the Playhead on Track 2.

Step 20
Double-click on the Default Title and go to Advanced settings. From there, delete the default text and click on the highlighted button like in the image below to add a new background to this clip. Add the same background you’ve used throughout the entire video.

Step 21
Add a new text here and customize it to match the text style in your “2nd Text” clip you exported earlier. Click OK.

Step 22
Next, go to the Transitions tab and drag the “Row Split” transition clip between Track 2 and the New Default Title you just created. Then, double-click on the transition and change its duration to 1 second.

Step 23
Set the Playhead to the 5.5 seconds marker. Drag the “2nd Text” clip you exported earlier here. Then, simply add another Row Split transition between this clip and the Default Title.

Step 24
That’s it! You’re done. All that’s left is to Render and export the video. Congratulations on creating a video in text cinematic intro in Filmora.
Summary
What you’ve learned:
- How to make advanced edits on titles in Filmora
- Basics of using green screen effects on text
- Using transitions in Filmora
- Exporting and re-using edited clips
- Creating a unique video in text cinematic intro
What you need to prepare:
- A computer (Windows or macOS)
- Your video materials.
- Filmora video editor
Step 1
Visit filmora.wondershare.com and download the Filmora video editor . Hit Install. When it’s done installing, the app will start automatically. When it does, click on New Project.
Step 2
Before we start editing, go to File from the navigation panel at the top and select Project Settings. Then, set the resolution settings like in the example here.

Step 3
Now, download any background image you want. Make sure its resolution is 1920x1080. Import it and drag it to the Timeline.
Step 4
From the Timeline, double-click on the Background clip and decrease its opacity to 70%. Then, click on Color from the upper-left corner and change the settings as you wish.

Step 5
Go to the Titles tab and drag the Default Title to the Timeline. Double-click on the Default Title clip and change fonts, type in your text, etc.

Step 6
Drag the text to enlarge it so it fits the entire screen. Then, change its color to green. Press OK. Now, Export this clip and name it “1st Text”.

Step 7
Now, open a new Filmora project and edit the Project Settings like we did before. Then, go to Sample Color and drag the white color to the Timeline.

Step 8
Drag the Playhead to the 2-second marker. Drag the same Background image as before to this point. Then, double-click on the Background clip and increase the Brightness and Saturation bars to 50. Click OK.

Step 9
Go to Transitions and type in “Push”. Drag the Push transition between the White layer and your Background image. Click on Export once again and name this clip “Transition”.

Step 10
Open a new Filmora project and adjust the Project Settings like we did the first time. Then, go to Sample Color and drag the White color to the Timeline once more.
Step 11
Go to Titles and drag the Default Title to the Timeline, above the White Sample Color clip. Now, double-click the Default Title clip and go to ADVANCED. Here, set the text color to green, choose a font you like, and increase the text size. Click OK. Export it and name it “Temporary”.

Step 12
Open a new project in Filmora. Import and Drag the same background image you used before to the Timeline. Double-click on it and drag the Saturation bar to -100. Now, drag the file you named “Temporary” into the Timeline.

Step 13
Double-click on the Temporary clip, scroll down when the new window appears, and find the Chroma key section. Enable this. Now, drag the Edge Feather bar to 0. Export this video and name it “2nd Text”.

Step 14
Open one more new project in Filmora and import the following files. There should be four, titled “Background”, “Transition”, “1st Text”, and “2nd Text”.
Step 15
Click on Sample Color and drag the Black color to the 1st Track of the Timeline. Then, move the Playhead to the 1-second marker and drag the “Transition” clip to the same Track within the Timeline.

Step 16
From the Transitions tab, select the Push transition and drag it to the Timeline.

Step 17
Set the Playhead at the 1-second marker once again. First, add the “1st Text” clip into Track 2 of the Timeline. Then, add another Push transition at the beginning of this clip.

Step 18
Now, double-click on the “1st Text” clip and enable the Chroma Key option. Then, set the Edge Thickness and Edge Feather bars to 0.

Step 19
Set the Playhead at 4.5 seconds. Snip the Timeline. Then, add a new Default Title on the right side of the Playhead on Track 2.

Step 20
Double-click on the Default Title and go to Advanced settings. From there, delete the default text and click on the highlighted button like in the image below to add a new background to this clip. Add the same background you’ve used throughout the entire video.

Step 21
Add a new text here and customize it to match the text style in your “2nd Text” clip you exported earlier. Click OK.

Step 22
Next, go to the Transitions tab and drag the “Row Split” transition clip between Track 2 and the New Default Title you just created. Then, double-click on the transition and change its duration to 1 second.

Step 23
Set the Playhead to the 5.5 seconds marker. Drag the “2nd Text” clip you exported earlier here. Then, simply add another Row Split transition between this clip and the Default Title.

Step 24
That’s it! You’re done. All that’s left is to Render and export the video. Congratulations on creating a video in text cinematic intro in Filmora.
Summary
What you’ve learned:
- How to make advanced edits on titles in Filmora
- Basics of using green screen effects on text
- Using transitions in Filmora
- Exporting and re-using edited clips
- Creating a unique video in text cinematic intro
What you need to prepare:
- A computer (Windows or macOS)
- Your video materials.
- Filmora video editor
Step 1
Visit filmora.wondershare.com and download the Filmora video editor . Hit Install. When it’s done installing, the app will start automatically. When it does, click on New Project.
Step 2
Before we start editing, go to File from the navigation panel at the top and select Project Settings. Then, set the resolution settings like in the example here.

Step 3
Now, download any background image you want. Make sure its resolution is 1920x1080. Import it and drag it to the Timeline.
Step 4
From the Timeline, double-click on the Background clip and decrease its opacity to 70%. Then, click on Color from the upper-left corner and change the settings as you wish.

Step 5
Go to the Titles tab and drag the Default Title to the Timeline. Double-click on the Default Title clip and change fonts, type in your text, etc.

Step 6
Drag the text to enlarge it so it fits the entire screen. Then, change its color to green. Press OK. Now, Export this clip and name it “1st Text”.

Step 7
Now, open a new Filmora project and edit the Project Settings like we did before. Then, go to Sample Color and drag the white color to the Timeline.

Step 8
Drag the Playhead to the 2-second marker. Drag the same Background image as before to this point. Then, double-click on the Background clip and increase the Brightness and Saturation bars to 50. Click OK.

Step 9
Go to Transitions and type in “Push”. Drag the Push transition between the White layer and your Background image. Click on Export once again and name this clip “Transition”.

Step 10
Open a new Filmora project and adjust the Project Settings like we did the first time. Then, go to Sample Color and drag the White color to the Timeline once more.
Step 11
Go to Titles and drag the Default Title to the Timeline, above the White Sample Color clip. Now, double-click the Default Title clip and go to ADVANCED. Here, set the text color to green, choose a font you like, and increase the text size. Click OK. Export it and name it “Temporary”.

Step 12
Open a new project in Filmora. Import and Drag the same background image you used before to the Timeline. Double-click on it and drag the Saturation bar to -100. Now, drag the file you named “Temporary” into the Timeline.

Step 13
Double-click on the Temporary clip, scroll down when the new window appears, and find the Chroma key section. Enable this. Now, drag the Edge Feather bar to 0. Export this video and name it “2nd Text”.

Step 14
Open one more new project in Filmora and import the following files. There should be four, titled “Background”, “Transition”, “1st Text”, and “2nd Text”.
Step 15
Click on Sample Color and drag the Black color to the 1st Track of the Timeline. Then, move the Playhead to the 1-second marker and drag the “Transition” clip to the same Track within the Timeline.

Step 16
From the Transitions tab, select the Push transition and drag it to the Timeline.

Step 17
Set the Playhead at the 1-second marker once again. First, add the “1st Text” clip into Track 2 of the Timeline. Then, add another Push transition at the beginning of this clip.

Step 18
Now, double-click on the “1st Text” clip and enable the Chroma Key option. Then, set the Edge Thickness and Edge Feather bars to 0.

Step 19
Set the Playhead at 4.5 seconds. Snip the Timeline. Then, add a new Default Title on the right side of the Playhead on Track 2.

Step 20
Double-click on the Default Title and go to Advanced settings. From there, delete the default text and click on the highlighted button like in the image below to add a new background to this clip. Add the same background you’ve used throughout the entire video.

Step 21
Add a new text here and customize it to match the text style in your “2nd Text” clip you exported earlier. Click OK.

Step 22
Next, go to the Transitions tab and drag the “Row Split” transition clip between Track 2 and the New Default Title you just created. Then, double-click on the transition and change its duration to 1 second.

Step 23
Set the Playhead to the 5.5 seconds marker. Drag the “2nd Text” clip you exported earlier here. Then, simply add another Row Split transition between this clip and the Default Title.

Step 24
That’s it! You’re done. All that’s left is to Render and export the video. Congratulations on creating a video in text cinematic intro in Filmora.
Summary
What you’ve learned:
- How to make advanced edits on titles in Filmora
- Basics of using green screen effects on text
- Using transitions in Filmora
- Exporting and re-using edited clips
- Creating a unique video in text cinematic intro
Vintage Film Effect 1920S - How to Make
Do you want to roll back the hands of time and shoot a film like you were in WWI or Charlie Chaplin’s era? That’s what a vintage film effect is all about. In other words, this video effect will give your videos an old-film look and feel. So, without wasting time, let’s learn how to convert a normal video into a film shot in the 1920s with Wondershare Filmora.
Preparation
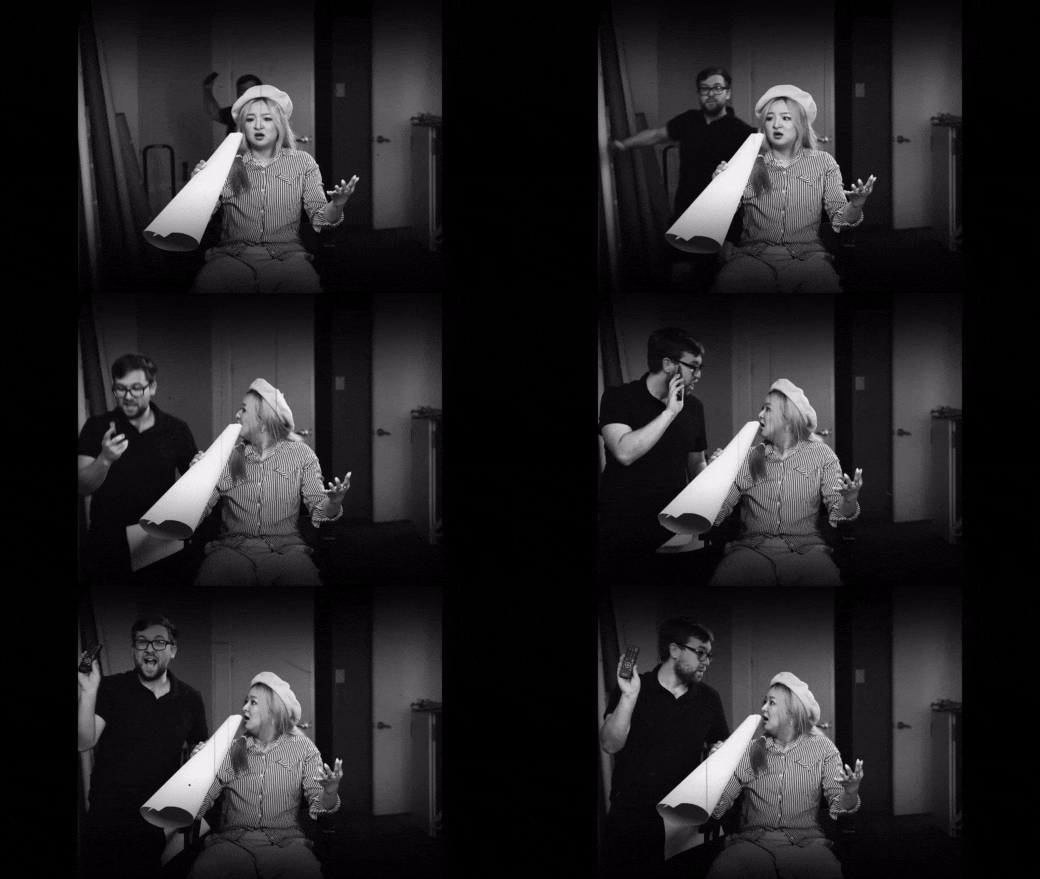
In this tutorial, you don’t need a lot of creativity to create a vintage film, as Wondershare Filmora will be doing the heavy lifting. Just shoot an action video like chasing each other around, chatting with friends, running away from something, or doing anything else. Let’s learn how to do that below!
Free Download For Win 7 or later(64-bit)
Free Download For macOS 10.14 or later
Step1 Add a video you want to edit
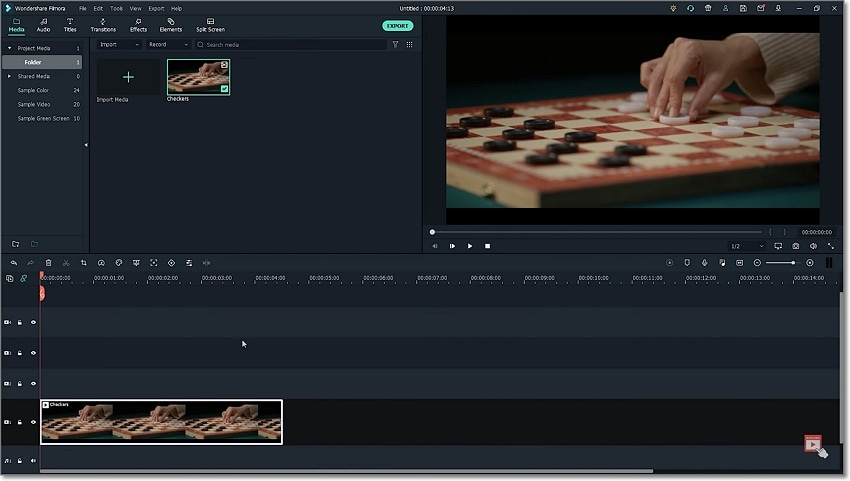
Upload your video on Filmora, then move it to the editing timeline by dragging it. This should take a second or two.
Step2 Add a crop effect
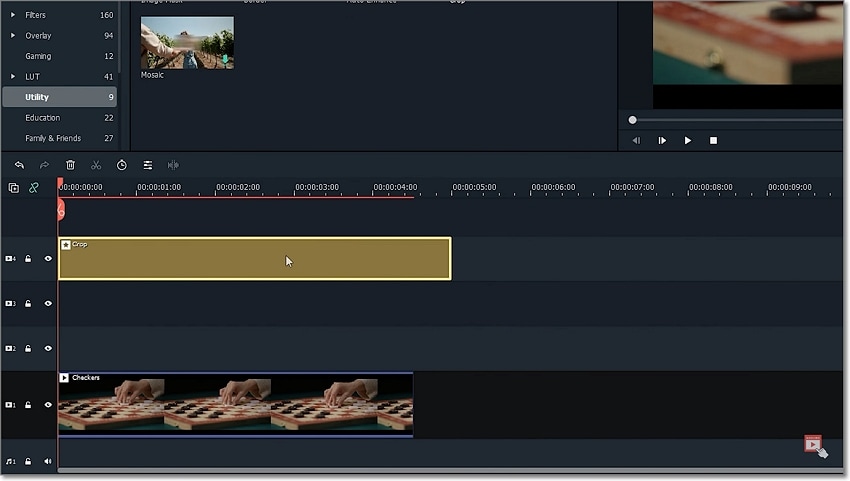
After successfully adding your video to the timeline, tap the Effect tab on top of the screen and click Utility. Then, choose the Crop effect and add a few tracks above the video clip.
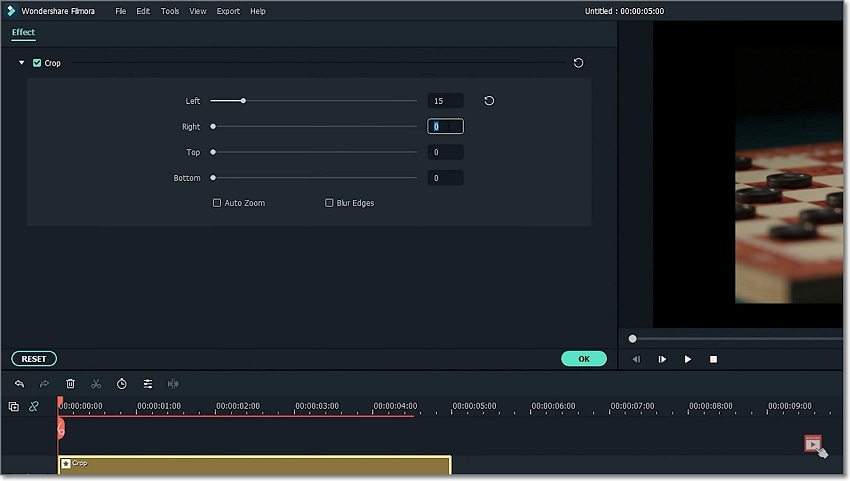
Next, double-tap the Crop effect on the editing timeline to open the effect editing tools. Now change the crop amount to 15 to add a vintage feel to your video. Just enter 15 on the Left and Right boxes.
Step3 Add the Dirty Film and Silent Film effects
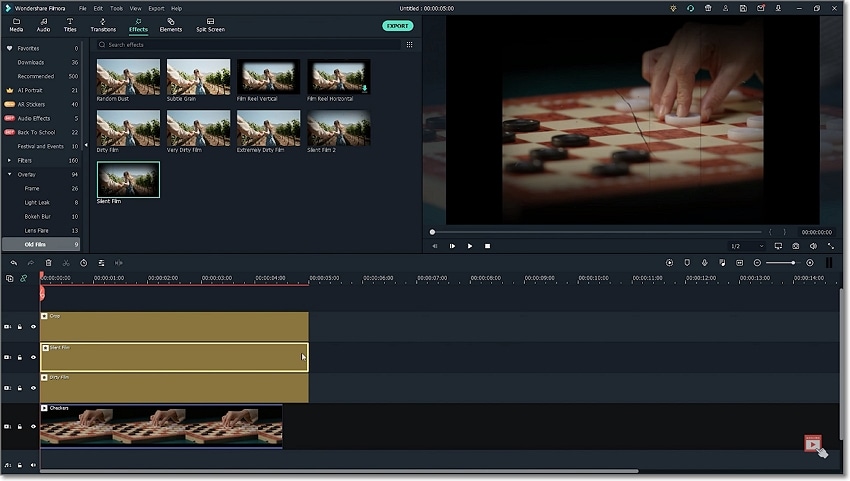
Tap the Effect tab, then open the Overlay drop-down menu. Then, choose the Old Film category before adding a Dirty Film effect above the clip. To apply a more vintage feel to your video, add a Silent Film effect to the track above the Dirty Film effect.
Step4 Add a black & white effect to your video

Up to this point, your film should now start having a more vintage feel. But to make it look even older, double-click the video clip and tap the Color tab. After that, open the 3D LUT arrow and choose the B&W Film option. Now play the video and enjoy.
Summary
See, you don’t need to break a sweat to add a vintage feel to your funny video. With Filmora, you’ll access multiple tools and effects to create an old-looking film with just a single click. And don’t forget to play around with other Filmora overlays and effects to bring out the inner video editor in you. Thanks for reading!
Free Download For macOS 10.14 or later
Step1 Add a video you want to edit

Upload your video on Filmora, then move it to the editing timeline by dragging it. This should take a second or two.
Step2 Add a crop effect

After successfully adding your video to the timeline, tap the Effect tab on top of the screen and click Utility. Then, choose the Crop effect and add a few tracks above the video clip.

Next, double-tap the Crop effect on the editing timeline to open the effect editing tools. Now change the crop amount to 15 to add a vintage feel to your video. Just enter 15 on the Left and Right boxes.
Step3 Add the Dirty Film and Silent Film effects

Tap the Effect tab, then open the Overlay drop-down menu. Then, choose the Old Film category before adding a Dirty Film effect above the clip. To apply a more vintage feel to your video, add a Silent Film effect to the track above the Dirty Film effect.
Step4 Add a black & white effect to your video

Up to this point, your film should now start having a more vintage feel. But to make it look even older, double-click the video clip and tap the Color tab. After that, open the 3D LUT arrow and choose the B&W Film option. Now play the video and enjoy.
Summary
See, you don’t need to break a sweat to add a vintage feel to your funny video. With Filmora, you’ll access multiple tools and effects to create an old-looking film with just a single click. And don’t forget to play around with other Filmora overlays and effects to bring out the inner video editor in you. Thanks for reading!
Free Download For macOS 10.14 or later
Step1 Add a video you want to edit

Upload your video on Filmora, then move it to the editing timeline by dragging it. This should take a second or two.
Step2 Add a crop effect

After successfully adding your video to the timeline, tap the Effect tab on top of the screen and click Utility. Then, choose the Crop effect and add a few tracks above the video clip.

Next, double-tap the Crop effect on the editing timeline to open the effect editing tools. Now change the crop amount to 15 to add a vintage feel to your video. Just enter 15 on the Left and Right boxes.
Step3 Add the Dirty Film and Silent Film effects

Tap the Effect tab, then open the Overlay drop-down menu. Then, choose the Old Film category before adding a Dirty Film effect above the clip. To apply a more vintage feel to your video, add a Silent Film effect to the track above the Dirty Film effect.
Step4 Add a black & white effect to your video

Up to this point, your film should now start having a more vintage feel. But to make it look even older, double-click the video clip and tap the Color tab. After that, open the 3D LUT arrow and choose the B&W Film option. Now play the video and enjoy.
Summary
See, you don’t need to break a sweat to add a vintage feel to your funny video. With Filmora, you’ll access multiple tools and effects to create an old-looking film with just a single click. And don’t forget to play around with other Filmora overlays and effects to bring out the inner video editor in you. Thanks for reading!
Free Download For macOS 10.14 or later
Step1 Add a video you want to edit

Upload your video on Filmora, then move it to the editing timeline by dragging it. This should take a second or two.
Step2 Add a crop effect

After successfully adding your video to the timeline, tap the Effect tab on top of the screen and click Utility. Then, choose the Crop effect and add a few tracks above the video clip.

Next, double-tap the Crop effect on the editing timeline to open the effect editing tools. Now change the crop amount to 15 to add a vintage feel to your video. Just enter 15 on the Left and Right boxes.
Step3 Add the Dirty Film and Silent Film effects

Tap the Effect tab, then open the Overlay drop-down menu. Then, choose the Old Film category before adding a Dirty Film effect above the clip. To apply a more vintage feel to your video, add a Silent Film effect to the track above the Dirty Film effect.
Step4 Add a black & white effect to your video

Up to this point, your film should now start having a more vintage feel. But to make it look even older, double-click the video clip and tap the Color tab. After that, open the 3D LUT arrow and choose the B&W Film option. Now play the video and enjoy.
Summary
See, you don’t need to break a sweat to add a vintage feel to your funny video. With Filmora, you’ll access multiple tools and effects to create an old-looking film with just a single click. And don’t forget to play around with other Filmora overlays and effects to bring out the inner video editor in you. Thanks for reading!
Detailed Steps to Resize Video in Davinci Resolve
While editing videos, you may change the aspect ratio of the video to change the size of the video to upload on different platforms like YouTube, Facebook, Pinterest, and Instagram. Videos come in different sizes and shapes. Some videos are portraits while the others are landscapes. Similarly, videos are captured in different places with different devices. So, we need to set a certain size of the video.
Definitely, a very large video can make delays in the work, similarly, a small size video can result in low resolution and bad quality. Resizing a video saves a lot of time and money whether you have a business, a YouTube channel, a short film, or a feature film. Today, we shall discuss how to resize the videos?
The two free ways to resize the video…
Here are a number of tools used in the market to resize the videos. We are going to teach How to resize the video in Davinci resolve and Fimora wondershare. Once you have mastered How to resize a video, it would be as simple as the ‘click’.
Now the good news is, you can dramatically export the videos in the same resolution in a very short time.
Let’s dive in !
Part 1. How to resize video in Davinci Resolve
Davinci Resolve is a very powerful tool to edit videos. Let’s suppose, you have some videos shots and all the videos have different sizes, some of the videos fit in the timeline and some are out of the timeline. No matter, you are going to make a video on the same scale with the same size.
Resize the video can be done in three ways:
- Zoom in zoom out
- Cropping
- Retime and scaling
1. Zoom in and Zoom out
First of all, select the videos in your timeline. You should stay in the middle of the frame to set it because it’s too wide. The timeline moves forward and backward. Let your video be 4k, go to the bottom-right corner and click on timeline format. Select timeline resolution, select ultra HD, or whatever you want from the drop-down list.
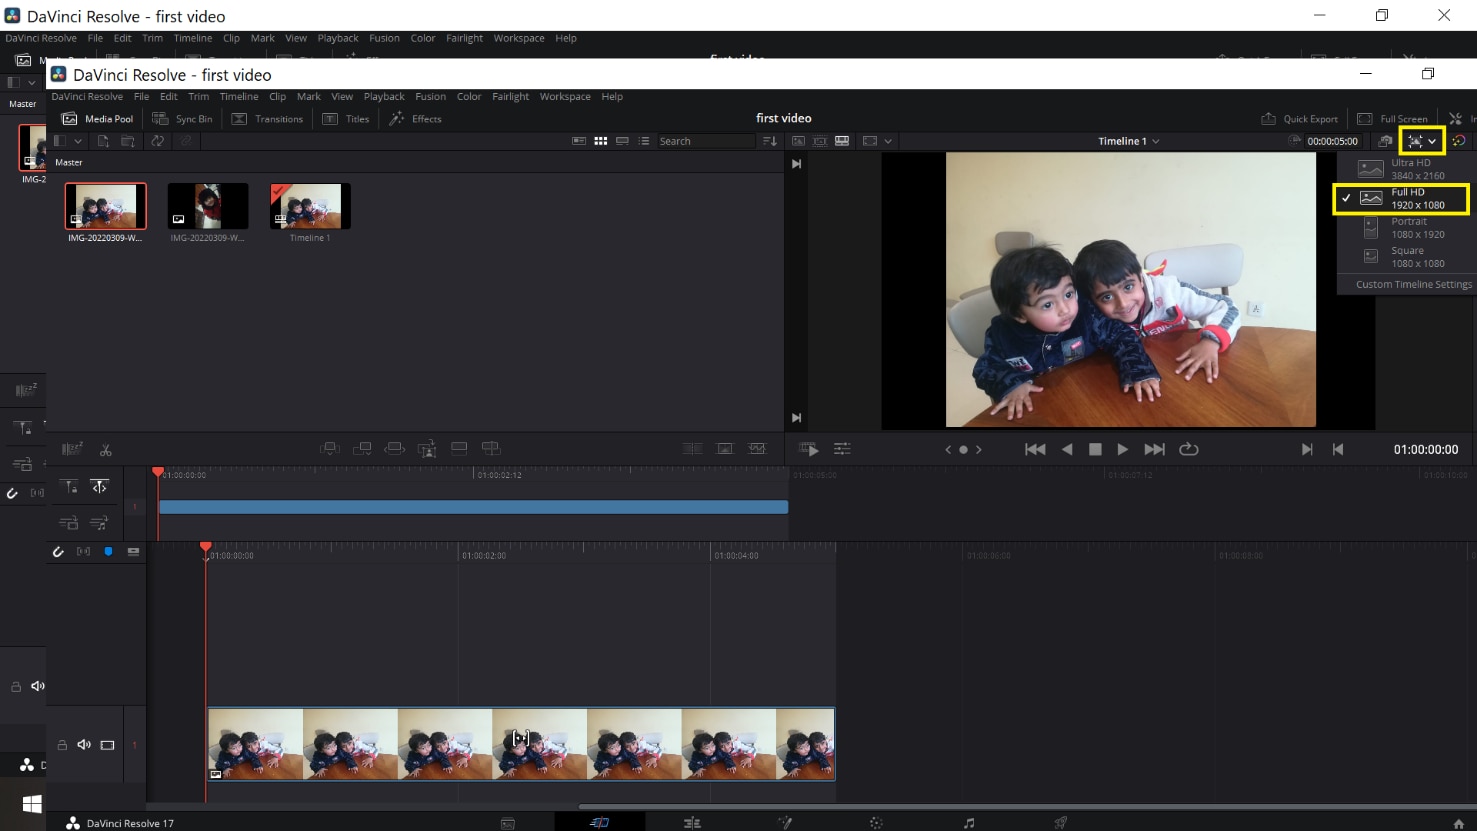
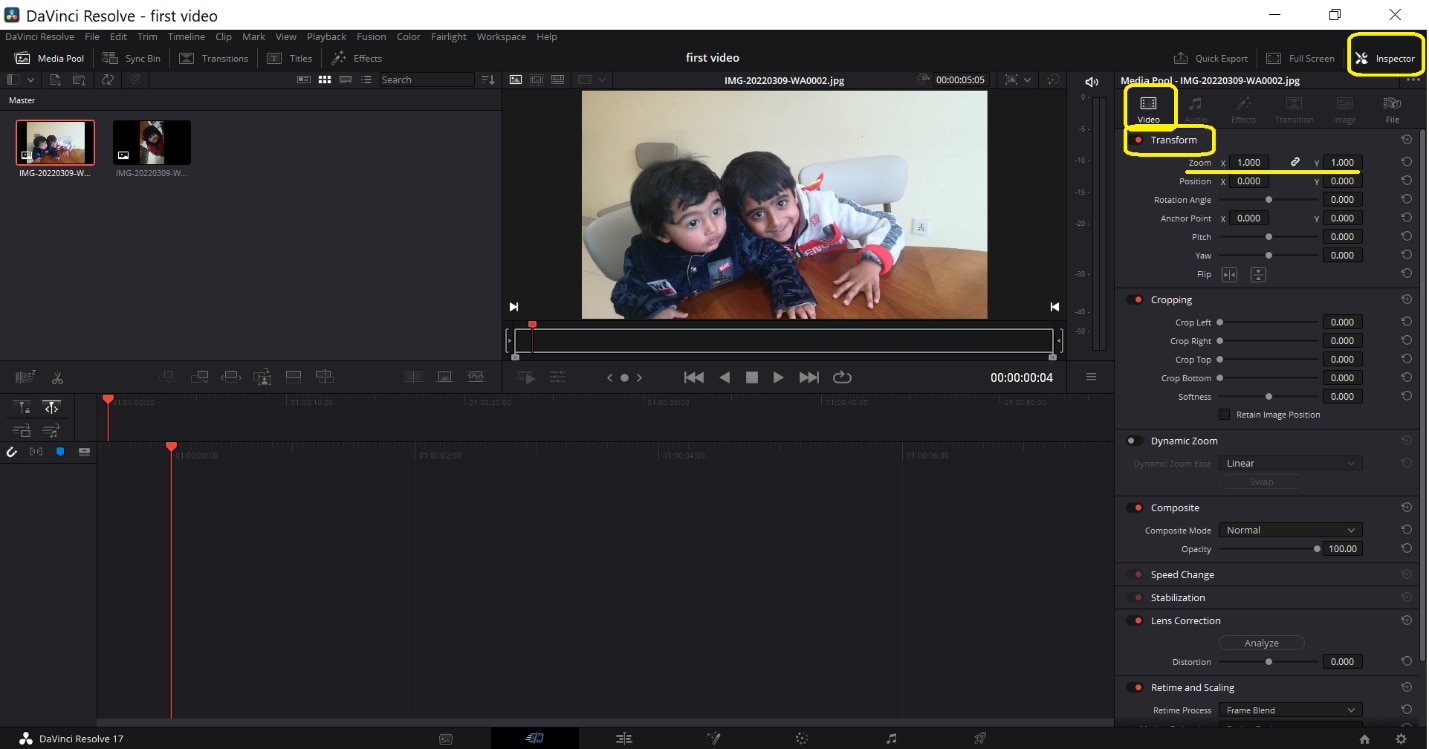
Go to the inspector from the up-right corner and select Transform under the video section. Here you can resize your image. Place the mouse over zoom x (Horizontal) and zoom y (vertical) values to drag left or right for zoom in or zoom out. The video can be resized accordingly.
Here you can also change its rotation.
2. Cropping
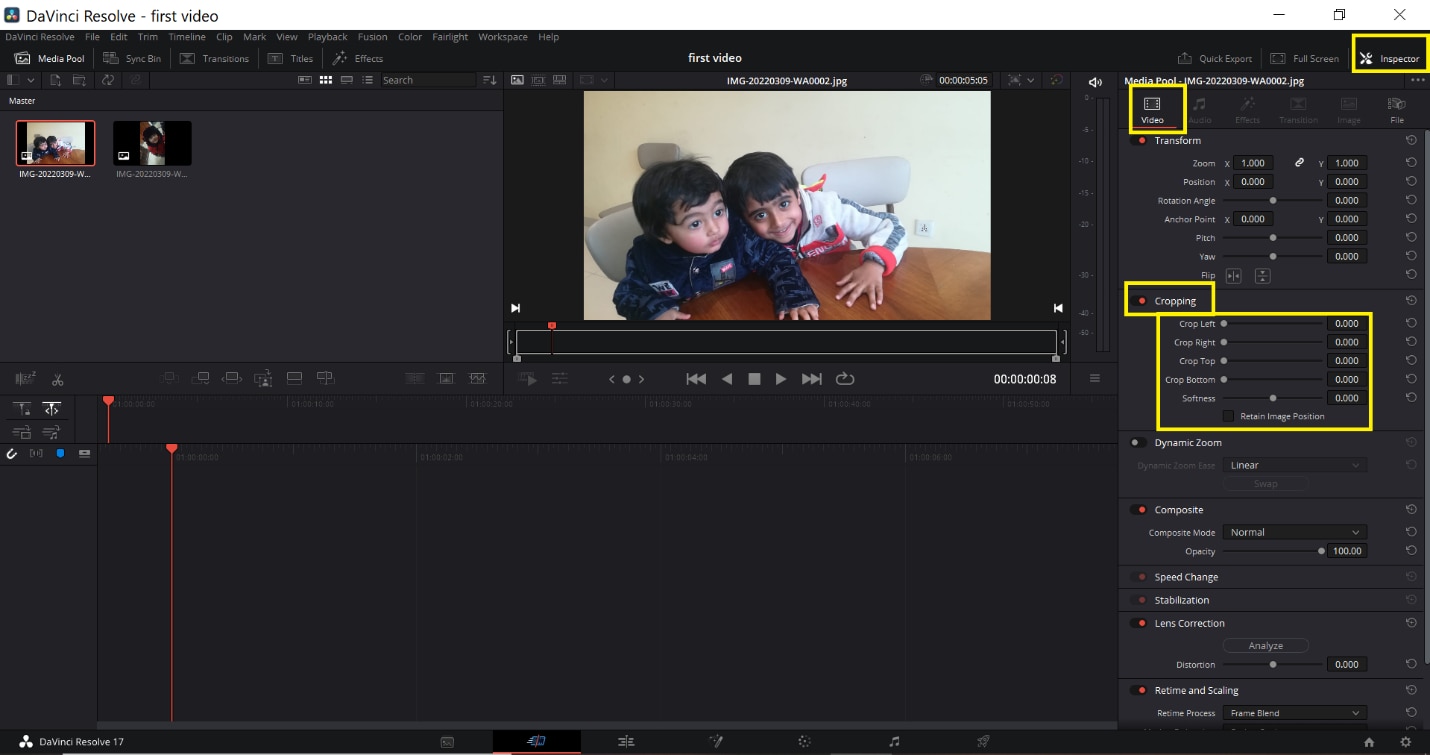
Go to the inspector from the up-right corner and select Transform. Now choose Cropping. Here are four options Crop left, crop right, crop Bottom, and crop Top. You can drag the scale from left to right to adjust the crop settings according to the desired result.
3. Retime and scaling
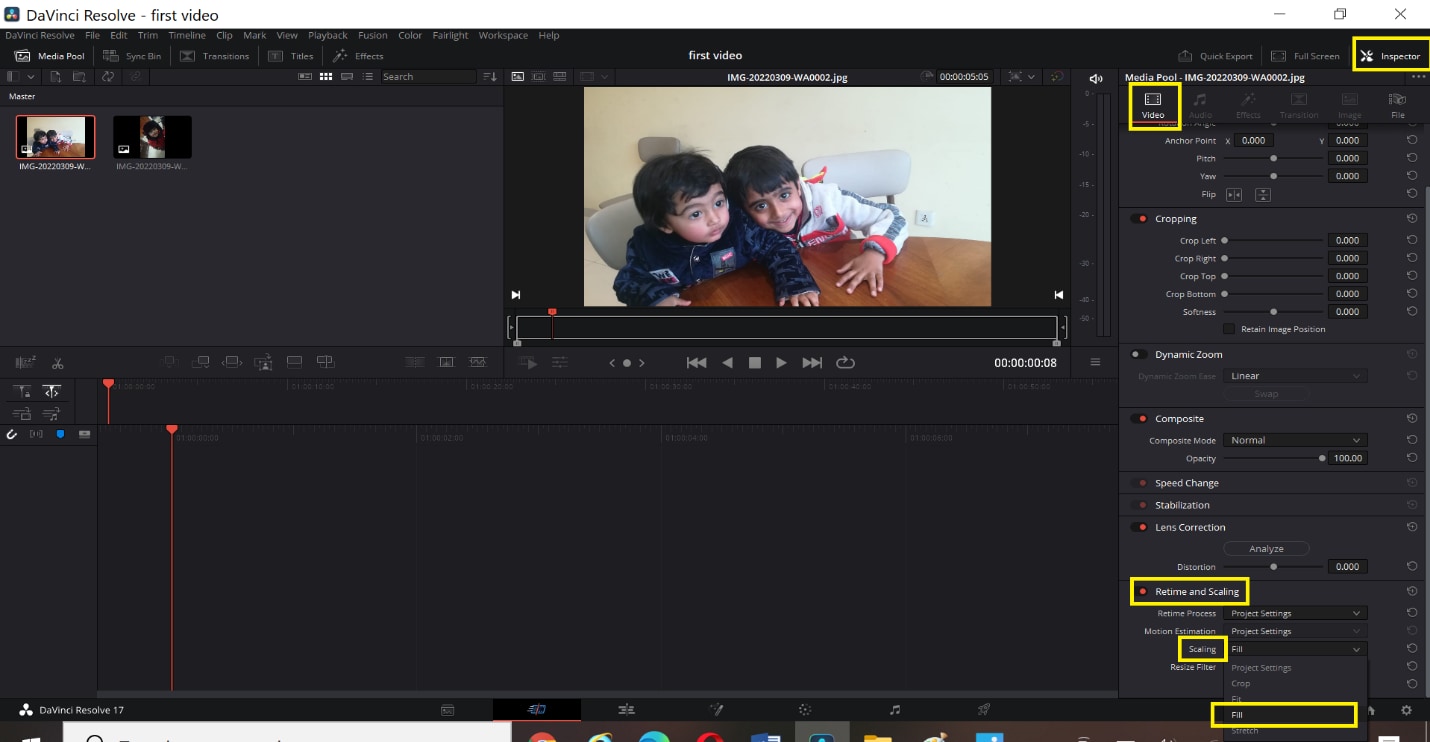
Go to the inspector from the up-right corner and select retime and scaling. You can choose stretch, Fit, Fill, or crop for cropping the video from the drop-down list.
- The Crop function is used to remove the unnecessary or uneven part of the video.
- The Fit function is to have the video auto-center and the selected clips are formatted according to the screen dimensions.
- Stretch Function allows changing the length of the certain clip at a certain duration.
After transforming, cropping, and resizing the videos, you can copy the same settings without repeating the above steps for each video.
Part 2. An alternative way to resize videos with Wondershare
Filmora Video Editor is another great video editing software. It is very easy to use. It offers many different features to resize the videos. Moreover, it allows zooming in the video to highlight the best part of your video. It allows the edited video to export on other devices or YouTube channels.
For Win 7 or later (64-bit)
For macOS 10.14 or later
You can resize your video in three ways:
- Resize video by cropping
- Scale in Scale-out
- Resize by changing Aspect Ratio
1. Resize video by cropping
- Import the videos from your storage by using the import button.
- Drag the videos in the timeline.
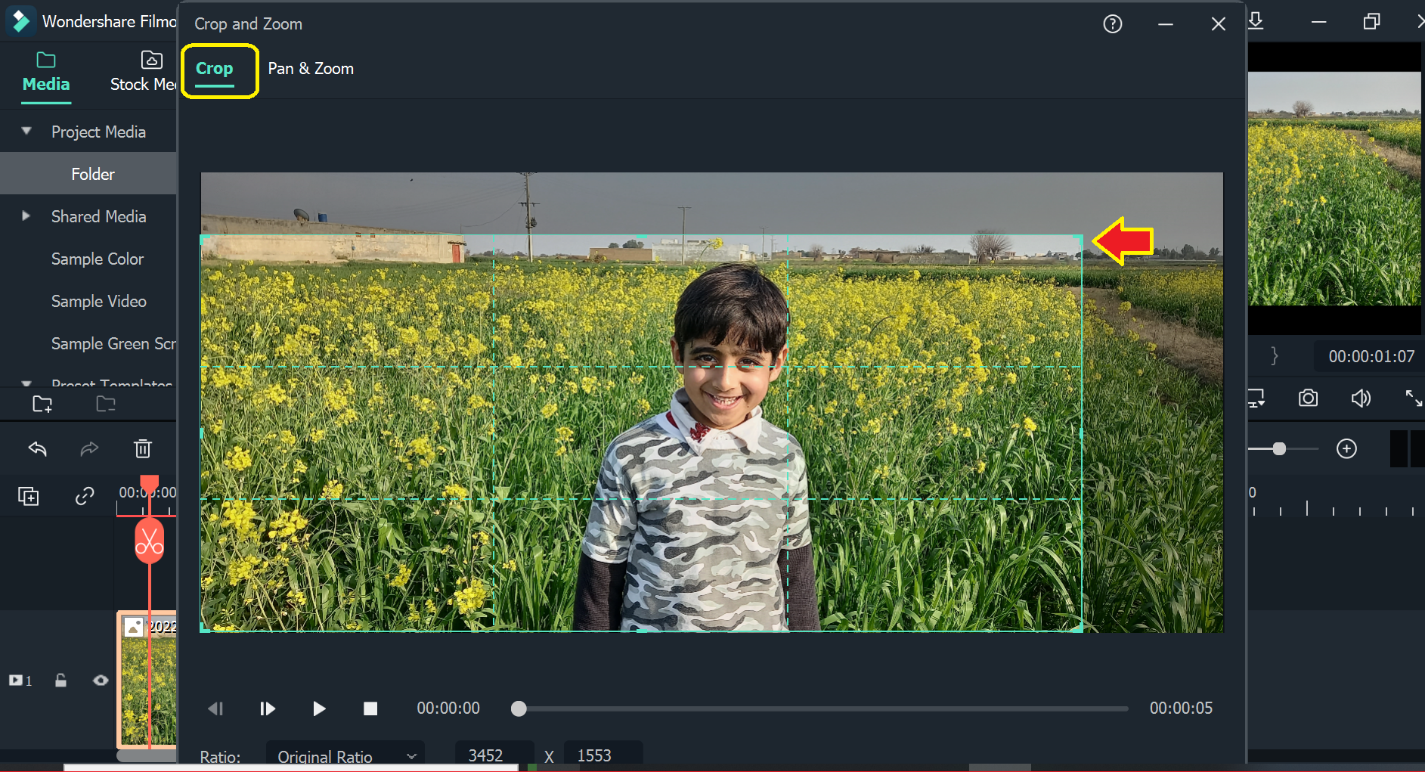
- Right-click on the desired video, crop and zoom option will appear in the menu.
- Select crop tab.
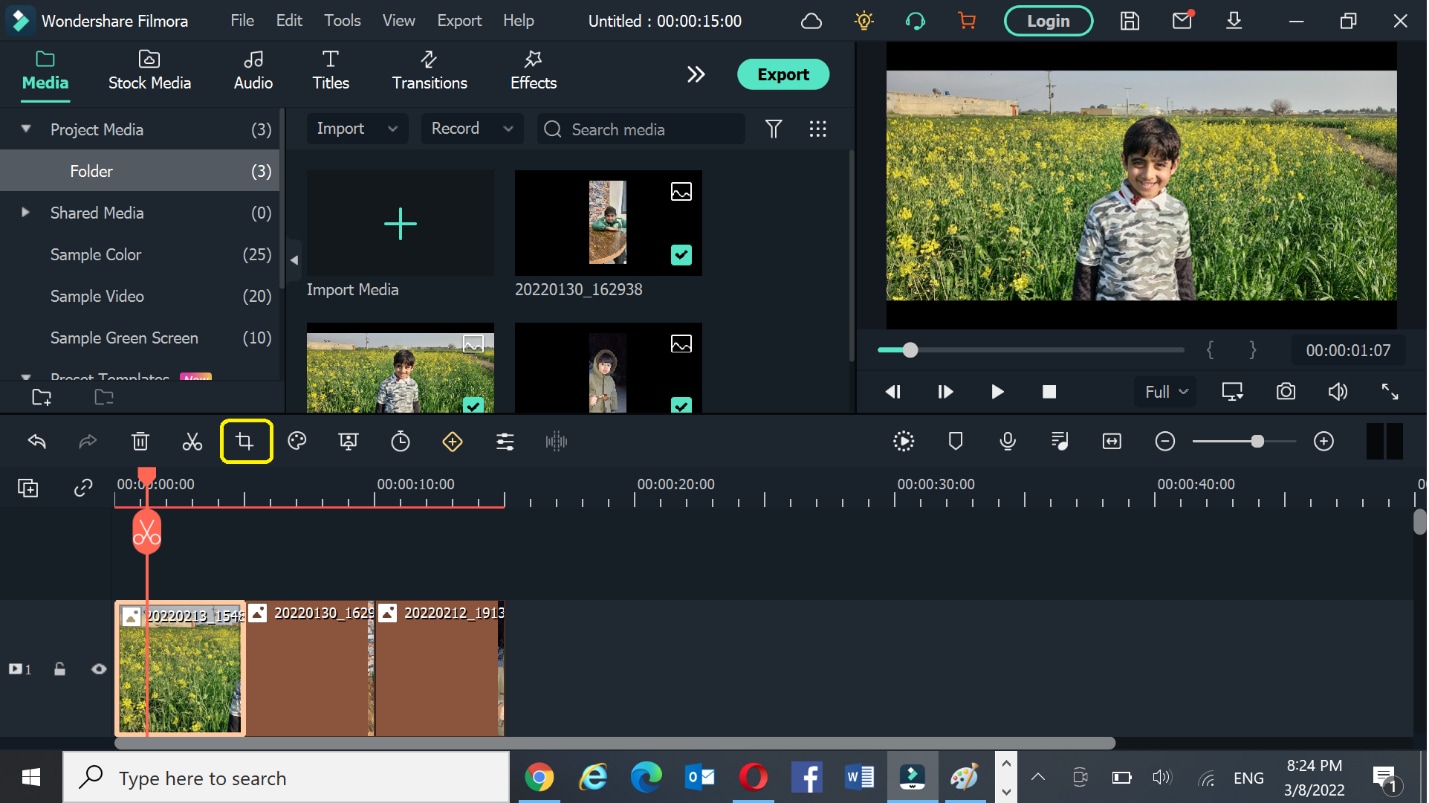
- Grab the corner of the crop inwards, and move to adjust as desired.
- Press the OK tab and your video is cropped.
2. Scale-in and scale-out
- Select the video in the timeline.
- Select the settings
- Click on the Transform tab under image section**.**
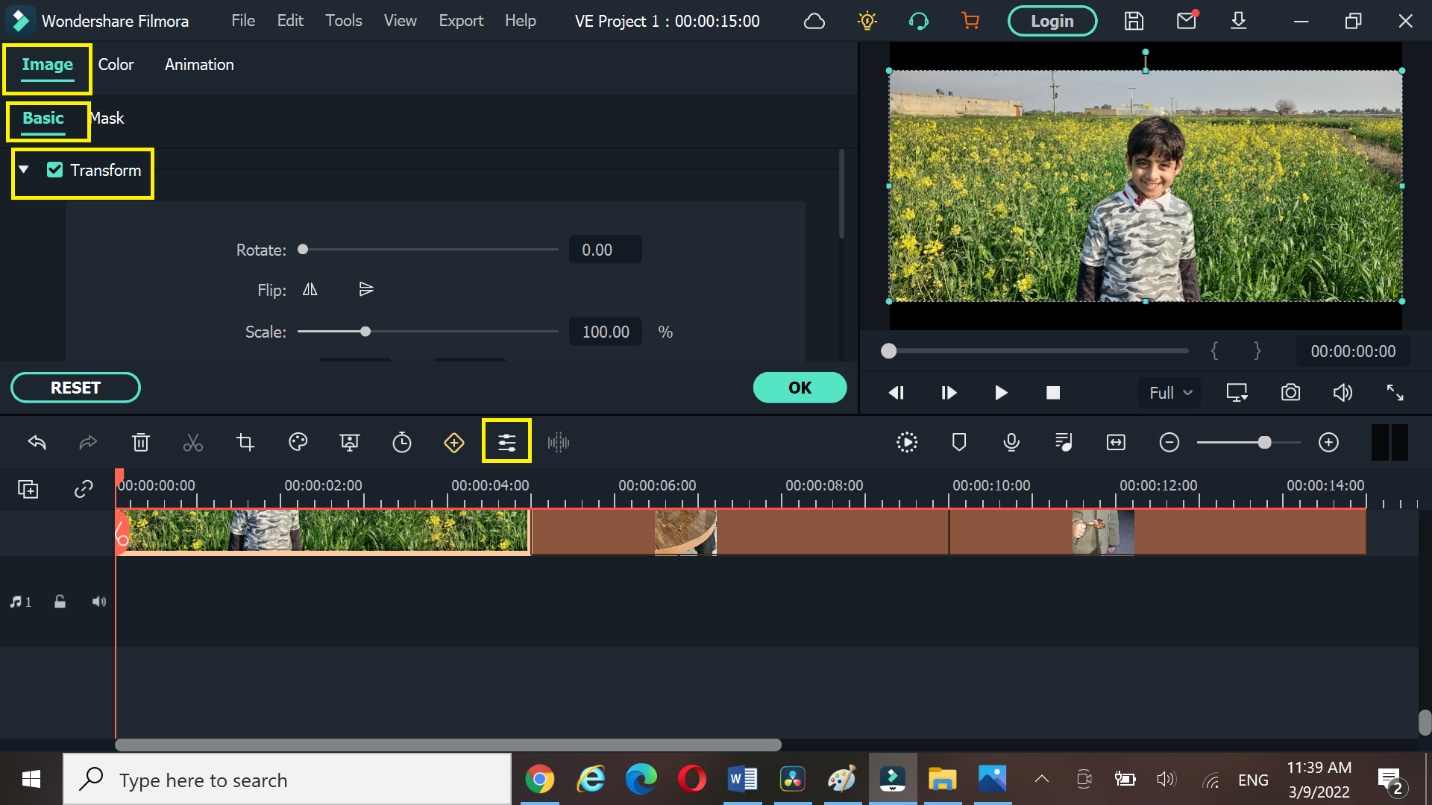
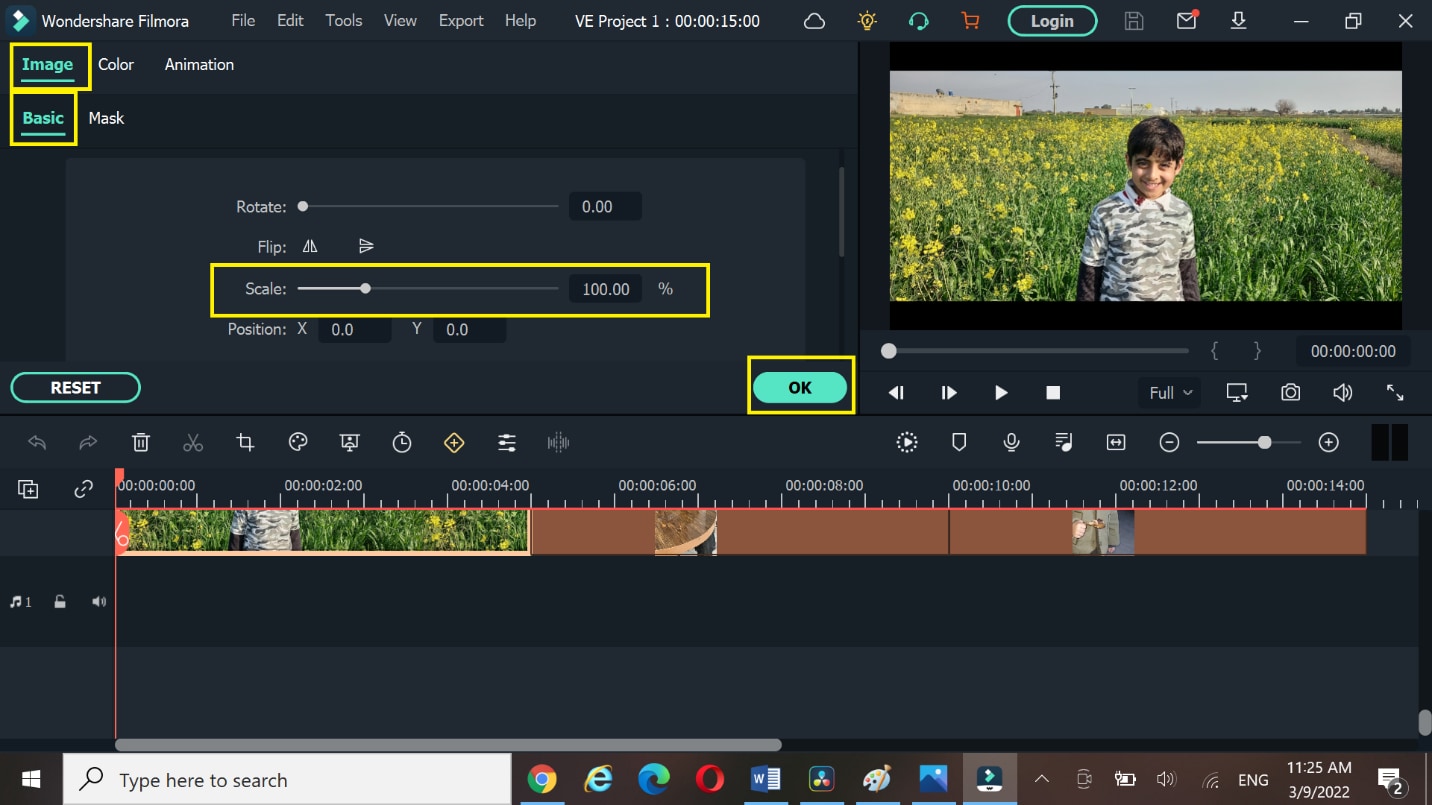
- Move the pointer from left to right on the Scale to zoom in and zoom out the video. You can remove the unwanted portion of the video.
- Press OK tab.
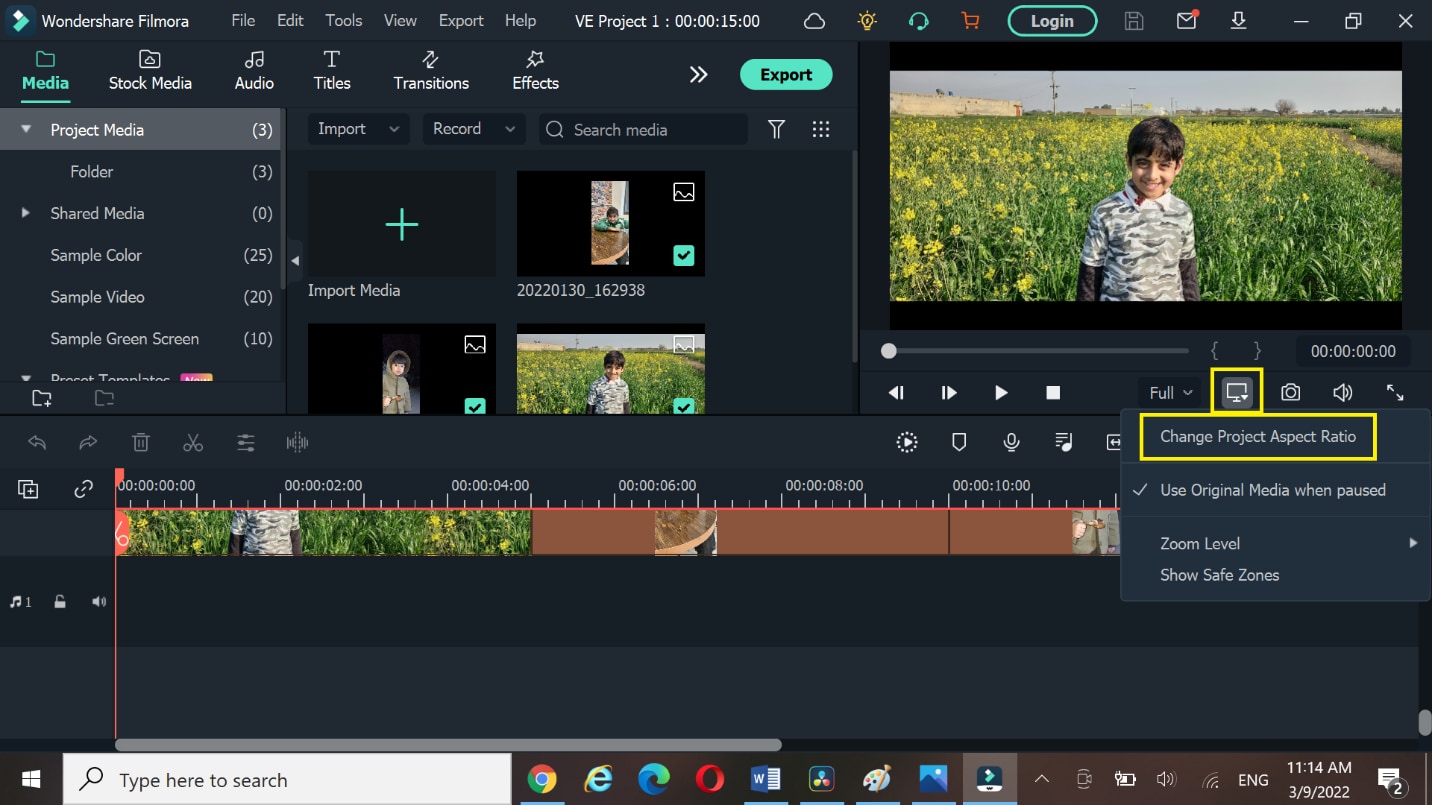
3. Resize video by changing aspect ratio
Some videos are 4k, 6k, and 8k but exporting them in the same resolution and waiting for a long time is really difficult. You need to resize the video to change its width and height. As different social media platforms require a different sizes for videos. We can say, resizing the video in terms of Giga bites and mega bites. You can do it by changing the Project Aspect Ratio. It is a very powerful technique to resize the videos in the timeline.
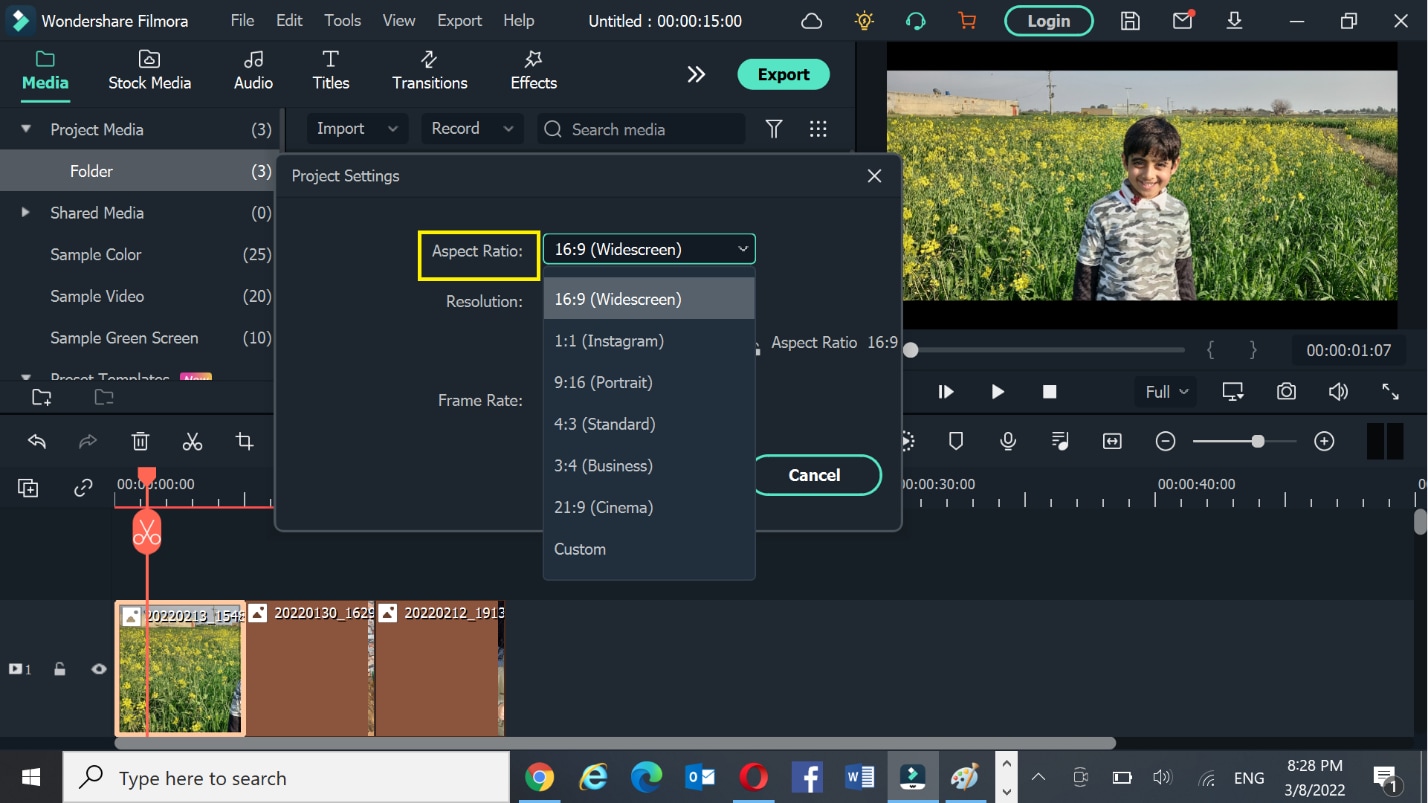
You can change the Project Aspect ratio like 16:9(wide-screen), 1:1(Instagram), 9:16(Portrait), 4:3(standard), 21:9(Cinema), or custom.
- Select the Aspect Ratio
- Change the ratio 16:9, 1:1, 9:16, 4:3, 21:9, or custom as desired.
- Select OK.
Conclusion
At this time, every business is using marketing to boost the economy, but video marketing is at its climax. Therefore, it is essential to take advantage of video editing tools to increase productivity and efficiency of work.
The Davinci Resolve and Filmora Wonder Share are the best video editing tools to resize the videos. You can easily use these tools on your laptop, tablets, or smartphones in a very short time. Along with this, you can share your compressed videos on different social media platforms like Facebook, Twitter, YouTube, Instagram, and LinkedIn. Moreover, you can enjoy the magical effects of these free tools at the ease of your smartphone. It is beneficial at both small and large businesses for the following
- Time saver
- Economical
- Good video quality
- Presentable
- Increase engagement
Hope the content would be useful for you. If you like the article please leave a comment.
Go to the inspector from the up-right corner and select Transform under the video section. Here you can resize your image. Place the mouse over zoom x (Horizontal) and zoom y (vertical) values to drag left or right for zoom in or zoom out. The video can be resized accordingly.
Here you can also change its rotation.

2. Cropping
Go to the inspector from the up-right corner and select Transform. Now choose Cropping. Here are four options Crop left, crop right, crop Bottom, and crop Top. You can drag the scale from left to right to adjust the crop settings according to the desired result.

3. Retime and scaling
Go to the inspector from the up-right corner and select retime and scaling. You can choose stretch, Fit, Fill, or crop for cropping the video from the drop-down list.
- The Crop function is used to remove the unnecessary or uneven part of the video.
- The Fit function is to have the video auto-center and the selected clips are formatted according to the screen dimensions.
- Stretch Function allows changing the length of the certain clip at a certain duration.

After transforming, cropping, and resizing the videos, you can copy the same settings without repeating the above steps for each video.
Part 2. An alternative way to resize videos with Wondershare
Filmora Video Editor is another great video editing software. It is very easy to use. It offers many different features to resize the videos. Moreover, it allows zooming in the video to highlight the best part of your video. It allows the edited video to export on other devices or YouTube channels.
For Win 7 or later (64-bit)
For macOS 10.14 or later
You can resize your video in three ways:
- Resize video by cropping
- Scale in Scale-out
- Resize by changing Aspect Ratio
1. Resize video by cropping
- Import the videos from your storage by using the import button.
- Drag the videos in the timeline.
- Right-click on the desired video, crop and zoom option will appear in the menu.
- Select crop tab.

- Grab the corner of the crop inwards, and move to adjust as desired.
- Press the OK tab and your video is cropped.

2. Scale-in and scale-out
- Select the video in the timeline.
- Select the settings
- Click on the Transform tab under image section**.**

- Move the pointer from left to right on the Scale to zoom in and zoom out the video. You can remove the unwanted portion of the video.
- Press OK tab.

3. Resize video by changing aspect ratio
Some videos are 4k, 6k, and 8k but exporting them in the same resolution and waiting for a long time is really difficult. You need to resize the video to change its width and height. As different social media platforms require a different sizes for videos. We can say, resizing the video in terms of Giga bites and mega bites. You can do it by changing the Project Aspect Ratio. It is a very powerful technique to resize the videos in the timeline.
You can change the Project Aspect ratio like 16:9(wide-screen), 1:1(Instagram), 9:16(Portrait), 4:3(standard), 21:9(Cinema), or custom.

- Select the Aspect Ratio
- Change the ratio 16:9, 1:1, 9:16, 4:3, 21:9, or custom as desired.
- Select OK.

Conclusion
At this time, every business is using marketing to boost the economy, but video marketing is at its climax. Therefore, it is essential to take advantage of video editing tools to increase productivity and efficiency of work.
The Davinci Resolve and Filmora Wonder Share are the best video editing tools to resize the videos. You can easily use these tools on your laptop, tablets, or smartphones in a very short time. Along with this, you can share your compressed videos on different social media platforms like Facebook, Twitter, YouTube, Instagram, and LinkedIn. Moreover, you can enjoy the magical effects of these free tools at the ease of your smartphone. It is beneficial at both small and large businesses for the following
- Time saver
- Economical
- Good video quality
- Presentable
- Increase engagement
Hope the content would be useful for you. If you like the article please leave a comment.
Go to the inspector from the up-right corner and select Transform under the video section. Here you can resize your image. Place the mouse over zoom x (Horizontal) and zoom y (vertical) values to drag left or right for zoom in or zoom out. The video can be resized accordingly.
Here you can also change its rotation.

2. Cropping
Go to the inspector from the up-right corner and select Transform. Now choose Cropping. Here are four options Crop left, crop right, crop Bottom, and crop Top. You can drag the scale from left to right to adjust the crop settings according to the desired result.

3. Retime and scaling
Go to the inspector from the up-right corner and select retime and scaling. You can choose stretch, Fit, Fill, or crop for cropping the video from the drop-down list.
- The Crop function is used to remove the unnecessary or uneven part of the video.
- The Fit function is to have the video auto-center and the selected clips are formatted according to the screen dimensions.
- Stretch Function allows changing the length of the certain clip at a certain duration.

After transforming, cropping, and resizing the videos, you can copy the same settings without repeating the above steps for each video.
Part 2. An alternative way to resize videos with Wondershare
Filmora Video Editor is another great video editing software. It is very easy to use. It offers many different features to resize the videos. Moreover, it allows zooming in the video to highlight the best part of your video. It allows the edited video to export on other devices or YouTube channels.
For Win 7 or later (64-bit)
For macOS 10.14 or later
You can resize your video in three ways:
- Resize video by cropping
- Scale in Scale-out
- Resize by changing Aspect Ratio
1. Resize video by cropping
- Import the videos from your storage by using the import button.
- Drag the videos in the timeline.
- Right-click on the desired video, crop and zoom option will appear in the menu.
- Select crop tab.

- Grab the corner of the crop inwards, and move to adjust as desired.
- Press the OK tab and your video is cropped.

2. Scale-in and scale-out
- Select the video in the timeline.
- Select the settings
- Click on the Transform tab under image section**.**

- Move the pointer from left to right on the Scale to zoom in and zoom out the video. You can remove the unwanted portion of the video.
- Press OK tab.

3. Resize video by changing aspect ratio
Some videos are 4k, 6k, and 8k but exporting them in the same resolution and waiting for a long time is really difficult. You need to resize the video to change its width and height. As different social media platforms require a different sizes for videos. We can say, resizing the video in terms of Giga bites and mega bites. You can do it by changing the Project Aspect Ratio. It is a very powerful technique to resize the videos in the timeline.
You can change the Project Aspect ratio like 16:9(wide-screen), 1:1(Instagram), 9:16(Portrait), 4:3(standard), 21:9(Cinema), or custom.

- Select the Aspect Ratio
- Change the ratio 16:9, 1:1, 9:16, 4:3, 21:9, or custom as desired.
- Select OK.

Conclusion
At this time, every business is using marketing to boost the economy, but video marketing is at its climax. Therefore, it is essential to take advantage of video editing tools to increase productivity and efficiency of work.
The Davinci Resolve and Filmora Wonder Share are the best video editing tools to resize the videos. You can easily use these tools on your laptop, tablets, or smartphones in a very short time. Along with this, you can share your compressed videos on different social media platforms like Facebook, Twitter, YouTube, Instagram, and LinkedIn. Moreover, you can enjoy the magical effects of these free tools at the ease of your smartphone. It is beneficial at both small and large businesses for the following
- Time saver
- Economical
- Good video quality
- Presentable
- Increase engagement
Hope the content would be useful for you. If you like the article please leave a comment.
Go to the inspector from the up-right corner and select Transform under the video section. Here you can resize your image. Place the mouse over zoom x (Horizontal) and zoom y (vertical) values to drag left or right for zoom in or zoom out. The video can be resized accordingly.
Here you can also change its rotation.

2. Cropping
Go to the inspector from the up-right corner and select Transform. Now choose Cropping. Here are four options Crop left, crop right, crop Bottom, and crop Top. You can drag the scale from left to right to adjust the crop settings according to the desired result.

3. Retime and scaling
Go to the inspector from the up-right corner and select retime and scaling. You can choose stretch, Fit, Fill, or crop for cropping the video from the drop-down list.
- The Crop function is used to remove the unnecessary or uneven part of the video.
- The Fit function is to have the video auto-center and the selected clips are formatted according to the screen dimensions.
- Stretch Function allows changing the length of the certain clip at a certain duration.

After transforming, cropping, and resizing the videos, you can copy the same settings without repeating the above steps for each video.
Part 2. An alternative way to resize videos with Wondershare
Filmora Video Editor is another great video editing software. It is very easy to use. It offers many different features to resize the videos. Moreover, it allows zooming in the video to highlight the best part of your video. It allows the edited video to export on other devices or YouTube channels.
For Win 7 or later (64-bit)
For macOS 10.14 or later
You can resize your video in three ways:
- Resize video by cropping
- Scale in Scale-out
- Resize by changing Aspect Ratio
1. Resize video by cropping
- Import the videos from your storage by using the import button.
- Drag the videos in the timeline.
- Right-click on the desired video, crop and zoom option will appear in the menu.
- Select crop tab.

- Grab the corner of the crop inwards, and move to adjust as desired.
- Press the OK tab and your video is cropped.

2. Scale-in and scale-out
- Select the video in the timeline.
- Select the settings
- Click on the Transform tab under image section**.**

- Move the pointer from left to right on the Scale to zoom in and zoom out the video. You can remove the unwanted portion of the video.
- Press OK tab.

3. Resize video by changing aspect ratio
Some videos are 4k, 6k, and 8k but exporting them in the same resolution and waiting for a long time is really difficult. You need to resize the video to change its width and height. As different social media platforms require a different sizes for videos. We can say, resizing the video in terms of Giga bites and mega bites. You can do it by changing the Project Aspect Ratio. It is a very powerful technique to resize the videos in the timeline.
You can change the Project Aspect ratio like 16:9(wide-screen), 1:1(Instagram), 9:16(Portrait), 4:3(standard), 21:9(Cinema), or custom.

- Select the Aspect Ratio
- Change the ratio 16:9, 1:1, 9:16, 4:3, 21:9, or custom as desired.
- Select OK.

Conclusion
At this time, every business is using marketing to boost the economy, but video marketing is at its climax. Therefore, it is essential to take advantage of video editing tools to increase productivity and efficiency of work.
The Davinci Resolve and Filmora Wonder Share are the best video editing tools to resize the videos. You can easily use these tools on your laptop, tablets, or smartphones in a very short time. Along with this, you can share your compressed videos on different social media platforms like Facebook, Twitter, YouTube, Instagram, and LinkedIn. Moreover, you can enjoy the magical effects of these free tools at the ease of your smartphone. It is beneficial at both small and large businesses for the following
- Time saver
- Economical
- Good video quality
- Presentable
- Increase engagement
Hope the content would be useful for you. If you like the article please leave a comment.
Detailed Tutorial to Rotate a Video in Cyberlink PowerDirector
Video Editing is a craft that is highly dependent on various characteristics of your video. But the way one presents it or goes about filming clips also has a profound effect on the end product. And as you may know, not every aspect of a video production activity always goes without hiccups. But editing can come in clutch as it can easily solve minor problems like skewed footage that was shot at the wrong angle or is upside down (an issue that can happen while using mobile phones).
Thus, with this article, we will be looking at steps to rotate a video in Cyberlink PowerDirector to help you when required. We have also mentioned the steps you will need to follow in Wondershare Filmora.
Note: We documented the steps in this guide with PowerDirector 365 and WonderShare Filmora X.
Steps to Rotate Videos with CyberLink PowerDirector
Put yourself in a situation where you’ve just finished filming a project with your smartphone but end up realizing that the footage isn’t in the right orientation by default. While the error has an easy fix on most smartphones, you can also perform this action with video editing tools.
Also, while this form of rotating might be the most basic implementation of the feature, you can often use the feature to add a dynamic nature to your video with Keyframes.
Definition: Keyframes in Video Editing is a software feature that allows an editor to set start and endpoints (denoted by In and Out Markers), presenting the opportunity to custom clip properties between the two positions. The set changes occur gradually as the playhead continues moving through the clip. Properties that can undergo modification with this method are zoom, rotation, colors, positions, etc.
The process of rotating clips is fairly straightforward; once you have PowerDirector 365 open, follow the steps listed below.
If you do not have CyberLink PowerDirector 365, download the software by visiting Cyberlink’s official website.
Step 1: Create a new video project in Cyberlink PowerDirector 365 and choose Full Mode.

Note: Full Mode in Cyberlink PowerDirector 365 will provide users access to a full-featured video editing tool similar in function to Wondershare Filmora. The other option available is Ad Designer.
Step 2: Now, import media onto the Timeline from the Media Library.
For this guide, we used the pre-existing stock footage in Cyberlink PowerDirector.

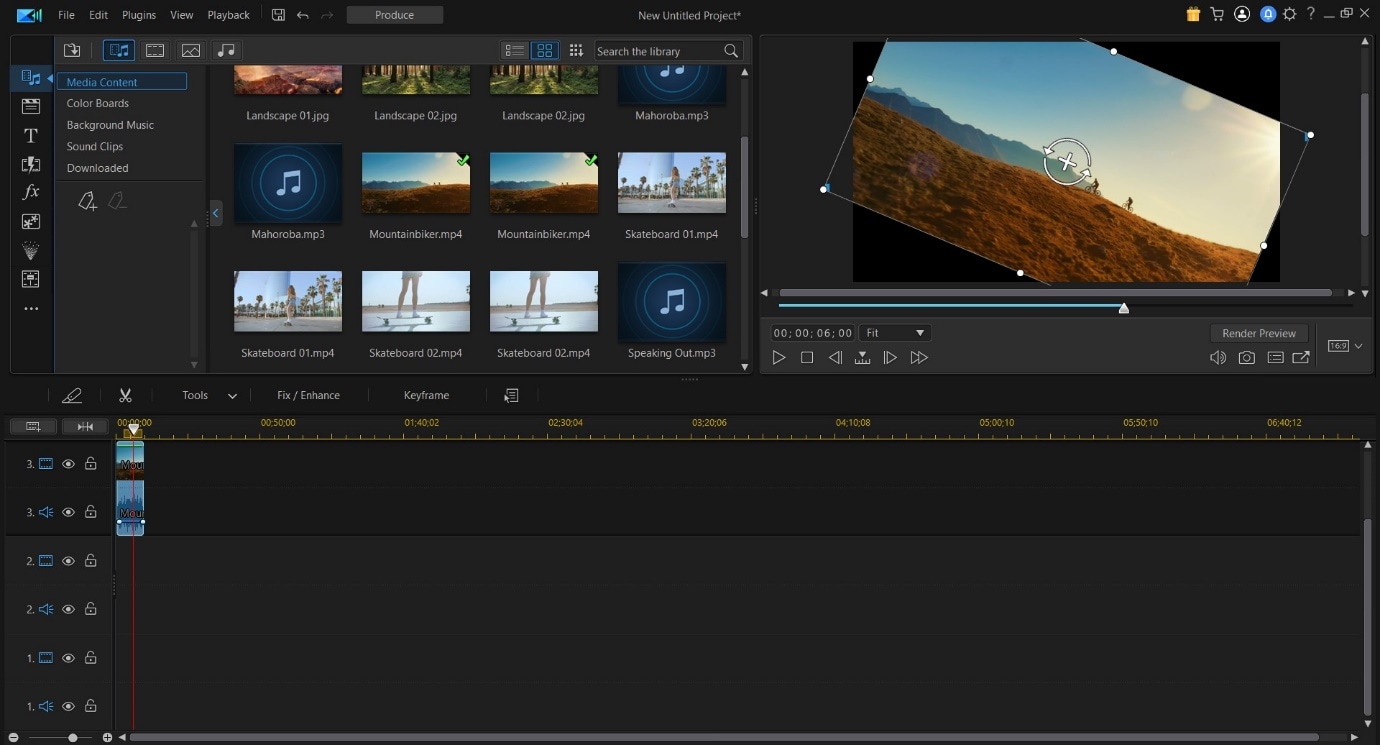
Step 3: Now, click on the video file on the Timeline; this will activate the video in the Preview Window. And it will provide you with access to the rotation circle, allowing you to change the orientation of the source file.
EXTRA
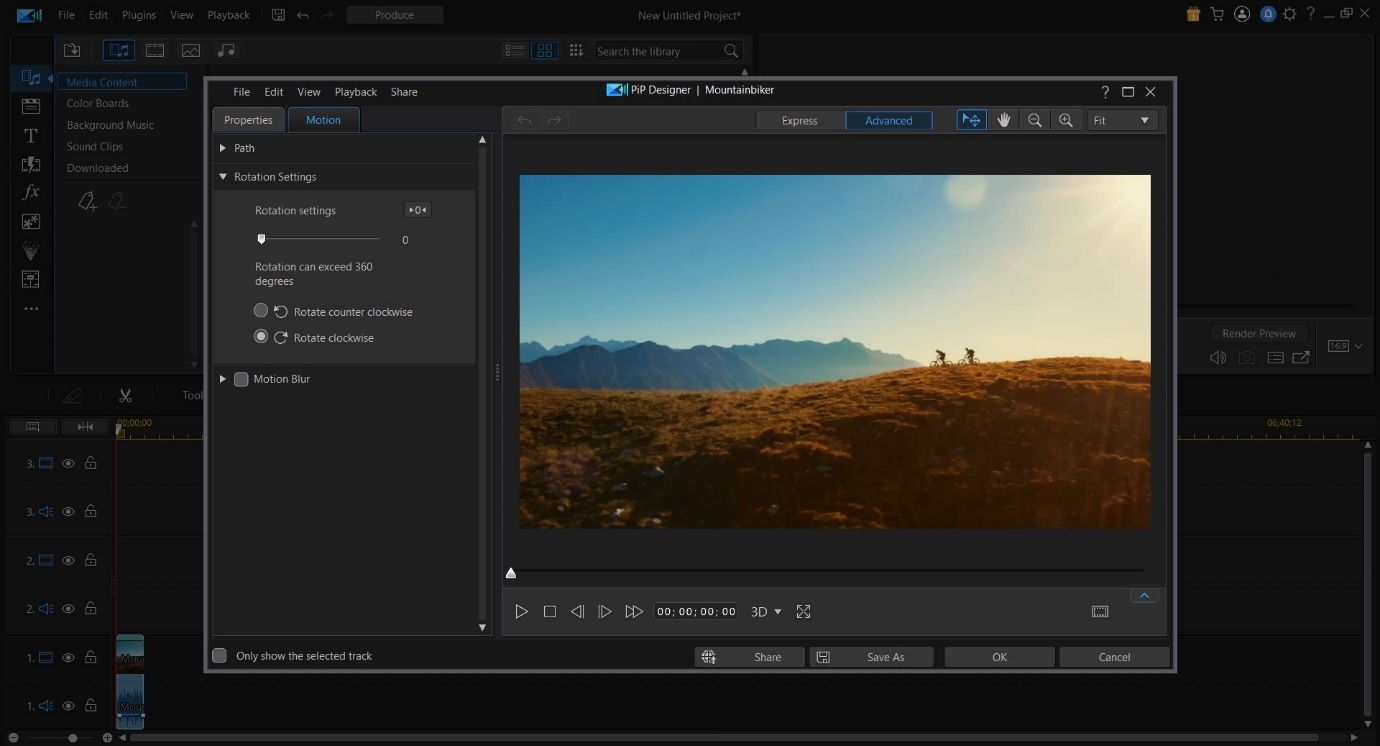
Rotation added in the PiP Designer will function as a keyframe-based rotation action. Right-click on the video in the preview window, choose Edit and then Modify to access this menu.
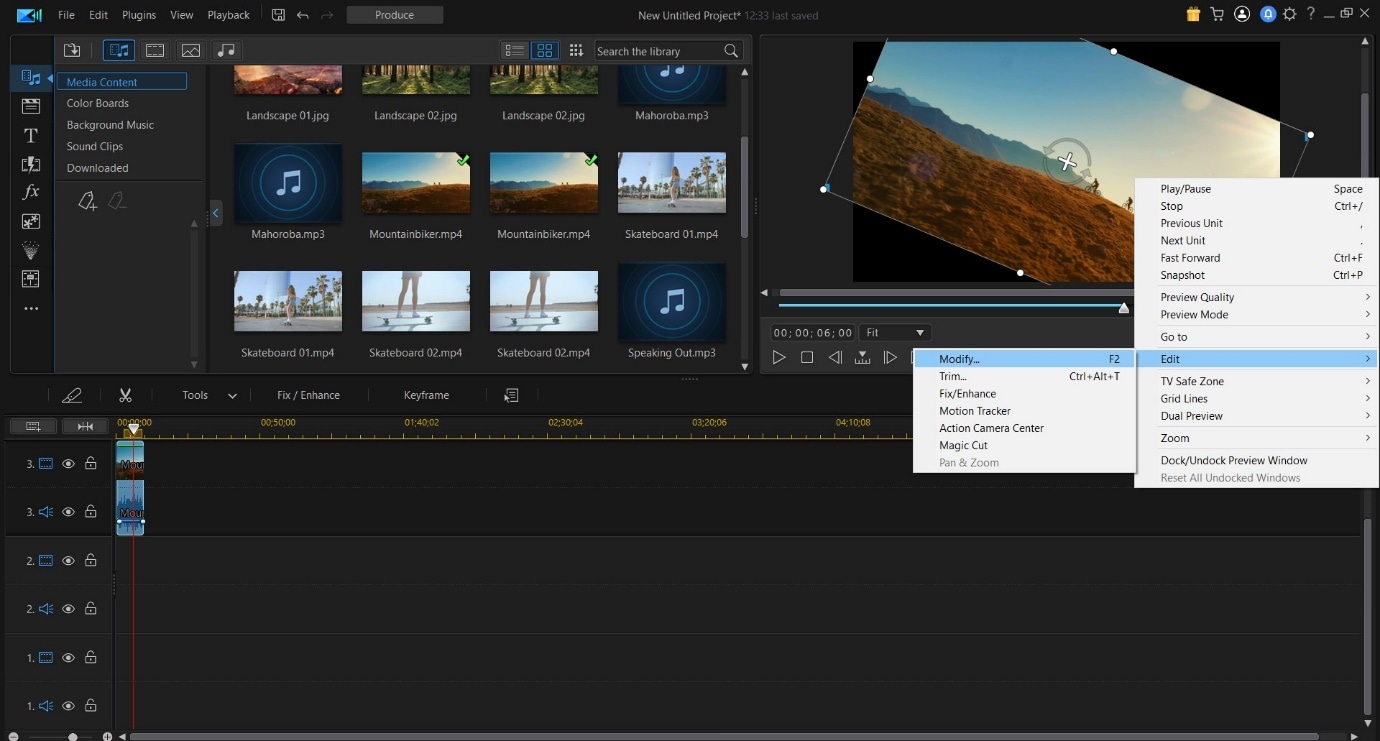
Following this, you can click on the Motion Tab, go into Rotation Settings, and modify the angle with greater precision. In the Preview Window, you will now be able to see the rotating video.
An Easier Way to Crop Video with Wondershare Filmora
Though Cyberlink PowerDirector 365 is a powerful video editing tool, we felt its menus were not as simple to navigate. Accessing the rotate function while available in the forefront, the use of PiP Designer didn’t feel intuitive.
In Wondershare Filmora Video Editor , rotating footage only happens via the Edit Option, and this straightforward approach felt simple. As for those who want to use Keyframes, the integration of this feature right above the Timeline is an appreciated convenience.
This emphasis on quick accessibility is present with almost every function in Filmora, and we believe this to be a significant advantage. The use of modern and unique iconography also increases familiarity, an aspect that will always be welcoming to new and budding creators.
If you do not already have Wondershare Filmora, you can download the software by visiting the official website.
To help you learn how to use the rotate function and show you an example of the easy accessibility in Filmora, here is how you can use the feature to get the output you desire.
For Win 7 or later (64-bit)
For macOS 10.14 or later
Once you have a new project open in Filmora, follow the steps listed below.
Step 1: Import a Media File to edit into your Video Project.

Step 2: Drag the video clip onto the Timeline and then select it with a mouse click to activate further interactions.

Step 3: Choose the Edit Option (marked in Red).
This will bring up the Edit Window in the left-top corner of your screen.

Step 4: Click on the Transform Menu and use the Rotation Slider to edit the orientation.

Having read this stretch of the guide, we believe you may have noticed how Filmora is more user-friendly and accessible due to its menu layout.
BONUS
Click on the Keyframe Button (marked in Green) to access the Keyframe Menu that allows you to set points between which a decided amount of rotation can happen.

The Bottom Line
This marks the end of our guide on how to rotate video in PowerDirector 365 and Wondershare Filmora X. Now, while both software are high-capable tools, we feel the keyframe-based working on rotation in Filmora is a lot more intuitive and easy to use. The ability to only have number-based rotation within the edit menu is also a positive, as rotating with a swivel like in PowerDirector isn’t always the most accurate.
And lastly, the modern iconography-based design of Wondershare Filmora is a factor to keep in mind, as this increases usability manifolds.
Note: Full Mode in Cyberlink PowerDirector 365 will provide users access to a full-featured video editing tool similar in function to Wondershare Filmora. The other option available is Ad Designer.
Step 2: Now, import media onto the Timeline from the Media Library.
For this guide, we used the pre-existing stock footage in Cyberlink PowerDirector.

Step 3: Now, click on the video file on the Timeline; this will activate the video in the Preview Window. And it will provide you with access to the rotation circle, allowing you to change the orientation of the source file.

EXTRA
Rotation added in the PiP Designer will function as a keyframe-based rotation action. Right-click on the video in the preview window, choose Edit and then Modify to access this menu.

Following this, you can click on the Motion Tab, go into Rotation Settings, and modify the angle with greater precision. In the Preview Window, you will now be able to see the rotating video.

An Easier Way to Crop Video with Wondershare Filmora
Though Cyberlink PowerDirector 365 is a powerful video editing tool, we felt its menus were not as simple to navigate. Accessing the rotate function while available in the forefront, the use of PiP Designer didn’t feel intuitive.
In Wondershare Filmora Video Editor , rotating footage only happens via the Edit Option, and this straightforward approach felt simple. As for those who want to use Keyframes, the integration of this feature right above the Timeline is an appreciated convenience.
This emphasis on quick accessibility is present with almost every function in Filmora, and we believe this to be a significant advantage. The use of modern and unique iconography also increases familiarity, an aspect that will always be welcoming to new and budding creators.
If you do not already have Wondershare Filmora, you can download the software by visiting the official website.
To help you learn how to use the rotate function and show you an example of the easy accessibility in Filmora, here is how you can use the feature to get the output you desire.
For Win 7 or later (64-bit)
For macOS 10.14 or later
Once you have a new project open in Filmora, follow the steps listed below.
Step 1: Import a Media File to edit into your Video Project.

Step 2: Drag the video clip onto the Timeline and then select it with a mouse click to activate further interactions.

Step 3: Choose the Edit Option (marked in Red).
This will bring up the Edit Window in the left-top corner of your screen.

Step 4: Click on the Transform Menu and use the Rotation Slider to edit the orientation.

Having read this stretch of the guide, we believe you may have noticed how Filmora is more user-friendly and accessible due to its menu layout.
BONUS
Click on the Keyframe Button (marked in Green) to access the Keyframe Menu that allows you to set points between which a decided amount of rotation can happen.

The Bottom Line
This marks the end of our guide on how to rotate video in PowerDirector 365 and Wondershare Filmora X. Now, while both software are high-capable tools, we feel the keyframe-based working on rotation in Filmora is a lot more intuitive and easy to use. The ability to only have number-based rotation within the edit menu is also a positive, as rotating with a swivel like in PowerDirector isn’t always the most accurate.
And lastly, the modern iconography-based design of Wondershare Filmora is a factor to keep in mind, as this increases usability manifolds.
Note: Full Mode in Cyberlink PowerDirector 365 will provide users access to a full-featured video editing tool similar in function to Wondershare Filmora. The other option available is Ad Designer.
Step 2: Now, import media onto the Timeline from the Media Library.
For this guide, we used the pre-existing stock footage in Cyberlink PowerDirector.

Step 3: Now, click on the video file on the Timeline; this will activate the video in the Preview Window. And it will provide you with access to the rotation circle, allowing you to change the orientation of the source file.

EXTRA
Rotation added in the PiP Designer will function as a keyframe-based rotation action. Right-click on the video in the preview window, choose Edit and then Modify to access this menu.

Following this, you can click on the Motion Tab, go into Rotation Settings, and modify the angle with greater precision. In the Preview Window, you will now be able to see the rotating video.

An Easier Way to Crop Video with Wondershare Filmora
Though Cyberlink PowerDirector 365 is a powerful video editing tool, we felt its menus were not as simple to navigate. Accessing the rotate function while available in the forefront, the use of PiP Designer didn’t feel intuitive.
In Wondershare Filmora Video Editor , rotating footage only happens via the Edit Option, and this straightforward approach felt simple. As for those who want to use Keyframes, the integration of this feature right above the Timeline is an appreciated convenience.
This emphasis on quick accessibility is present with almost every function in Filmora, and we believe this to be a significant advantage. The use of modern and unique iconography also increases familiarity, an aspect that will always be welcoming to new and budding creators.
If you do not already have Wondershare Filmora, you can download the software by visiting the official website.
To help you learn how to use the rotate function and show you an example of the easy accessibility in Filmora, here is how you can use the feature to get the output you desire.
For Win 7 or later (64-bit)
For macOS 10.14 or later
Once you have a new project open in Filmora, follow the steps listed below.
Step 1: Import a Media File to edit into your Video Project.

Step 2: Drag the video clip onto the Timeline and then select it with a mouse click to activate further interactions.

Step 3: Choose the Edit Option (marked in Red).
This will bring up the Edit Window in the left-top corner of your screen.

Step 4: Click on the Transform Menu and use the Rotation Slider to edit the orientation.

Having read this stretch of the guide, we believe you may have noticed how Filmora is more user-friendly and accessible due to its menu layout.
BONUS
Click on the Keyframe Button (marked in Green) to access the Keyframe Menu that allows you to set points between which a decided amount of rotation can happen.

The Bottom Line
This marks the end of our guide on how to rotate video in PowerDirector 365 and Wondershare Filmora X. Now, while both software are high-capable tools, we feel the keyframe-based working on rotation in Filmora is a lot more intuitive and easy to use. The ability to only have number-based rotation within the edit menu is also a positive, as rotating with a swivel like in PowerDirector isn’t always the most accurate.
And lastly, the modern iconography-based design of Wondershare Filmora is a factor to keep in mind, as this increases usability manifolds.
Note: Full Mode in Cyberlink PowerDirector 365 will provide users access to a full-featured video editing tool similar in function to Wondershare Filmora. The other option available is Ad Designer.
Step 2: Now, import media onto the Timeline from the Media Library.
For this guide, we used the pre-existing stock footage in Cyberlink PowerDirector.

Step 3: Now, click on the video file on the Timeline; this will activate the video in the Preview Window. And it will provide you with access to the rotation circle, allowing you to change the orientation of the source file.

EXTRA
Rotation added in the PiP Designer will function as a keyframe-based rotation action. Right-click on the video in the preview window, choose Edit and then Modify to access this menu.

Following this, you can click on the Motion Tab, go into Rotation Settings, and modify the angle with greater precision. In the Preview Window, you will now be able to see the rotating video.

An Easier Way to Crop Video with Wondershare Filmora
Though Cyberlink PowerDirector 365 is a powerful video editing tool, we felt its menus were not as simple to navigate. Accessing the rotate function while available in the forefront, the use of PiP Designer didn’t feel intuitive.
In Wondershare Filmora Video Editor , rotating footage only happens via the Edit Option, and this straightforward approach felt simple. As for those who want to use Keyframes, the integration of this feature right above the Timeline is an appreciated convenience.
This emphasis on quick accessibility is present with almost every function in Filmora, and we believe this to be a significant advantage. The use of modern and unique iconography also increases familiarity, an aspect that will always be welcoming to new and budding creators.
If you do not already have Wondershare Filmora, you can download the software by visiting the official website.
To help you learn how to use the rotate function and show you an example of the easy accessibility in Filmora, here is how you can use the feature to get the output you desire.
For Win 7 or later (64-bit)
For macOS 10.14 or later
Once you have a new project open in Filmora, follow the steps listed below.
Step 1: Import a Media File to edit into your Video Project.

Step 2: Drag the video clip onto the Timeline and then select it with a mouse click to activate further interactions.

Step 3: Choose the Edit Option (marked in Red).
This will bring up the Edit Window in the left-top corner of your screen.

Step 4: Click on the Transform Menu and use the Rotation Slider to edit the orientation.

Having read this stretch of the guide, we believe you may have noticed how Filmora is more user-friendly and accessible due to its menu layout.
BONUS
Click on the Keyframe Button (marked in Green) to access the Keyframe Menu that allows you to set points between which a decided amount of rotation can happen.

The Bottom Line
This marks the end of our guide on how to rotate video in PowerDirector 365 and Wondershare Filmora X. Now, while both software are high-capable tools, we feel the keyframe-based working on rotation in Filmora is a lot more intuitive and easy to use. The ability to only have number-based rotation within the edit menu is also a positive, as rotating with a swivel like in PowerDirector isn’t always the most accurate.
And lastly, the modern iconography-based design of Wondershare Filmora is a factor to keep in mind, as this increases usability manifolds.
Also read:
- Updated In 2024, Mastering DaVinci Resolve Scopes A Comprehensive Guide
- Updated Are You Also a Fan of the Slow Mo Guys? Well! Who Isnt? Learn How You Can Create Compelling Slow-Mo Videos Like the Slow Mo Guys Here
- Updated Unlocking the Power of DaVinci Resolve Scopes Enhance Your Color Grad
- Updated How Long Does It Take To Edit Videos
- Updated In 2024, How To Make Flying Objects in Wondershare Filmora
- Updated Do You Still Waste Time Making Transparent Background in Paint for 2024
- New In 2024, How to Add Subtitles in VLC Media Play
- New 11 Ways To Speed Up A Video On iPhone
- S-Log Is a Gamma Curve Optimized for Digital Cameras to Maximize the Image Sensors Performance. Although These Videos May Look Flat and Washed Out, They Contain Lots of Color Information
- Updated 2024 Approved 15 Best LUTS to Buy
- 2024 Approved How To Unlink Audio and Video in DaVinci Resolve
- 2024 Approved A Roster of 8 Top Color Match Generators
- 2024 Approved Learning How to Slow Down a Video on iPhone Properly
- In 2024, Using the Best Templates to Create Slow Motion Videos on CapCut
- Updated Top 15 Slow Motion CapCut Templates to Work With
- In 2024, Want to Make Professional-Looking Videos? Keep Reading to Give Your Videos a Cinematic Feel with the Audio Mixer of Filmora
- Best LUTs for Vlog A 2024 Overview
- New 2024 Approved Detailed Steps to Resize Video in Davinci Resolve
- 2024 Approved In This Article, We Will Review Movavi Video Editor and List Out Movavi Video Suites Features
- Updated Top 15 LUTS to Buy
- New 2024 Approved Final Cut Pro - How to Download and Install It?
- Fun & Easy Masking Tricks Wondershare Filmora Tutorial
- New How to Add Background to Video With/Without a Green Screen
- Updated Step by Step Guide of Make Gimp Transparent Background PNG
- In 2024, Top Tips for Camtasia Freeze-Frame
- In 2024, 10 Best Meme Text to Speech Tools Windows, Mac, Android, iPhone&Online
- New The Quick and Simple Way to Mirror Video in Premiere Pro
- Updated Overview of Best LUTs for Vlog
- This Article Is Regarding the Guideline for Splitting the Video Clips in Adobe After Effects. Here, You Will Also Know About the Most Appropriate Substitute, Wondershare Filmora. Being Economical, You Can Also Use It Practically for 2024
- Updated How to Use Kahoot! On Zoom
- New In 2024, How to Crop Videos in Windows Media Player
- New Best 8 Online MPEG to GIF Converters for 2024
- In 2024, iSpoofer is not working On Realme 11 Pro+? Fixed | Dr.fone
- How do I reset my Samsung Galaxy A05s Phone without technical knowledge? | Dr.fone
- 4 Easy Ways for Your Infinix Note 30 5G Hard Reset | Dr.fone
- How To Remove Flashlight From Apple iPhone XS Lock Screen | Dr.fone
- In 2024, How Can Oppo Find X6Mirror Share to PC? | Dr.fone
- Easy Guide How To Bypass ZTE FRP Android 10/11/12/13
- New In 2024, Easy Cartoon Characters Drawing Tutorials for You Beginners
- How to get the dragon scale and evolution-enabled pokemon On Vivo V27? | Dr.fone
- About Oppo Find X6 Pro FRP Bypass
- In 2024, Top 5 Tracking Apps to Track Nokia 150 (2023) without Them Knowing | Dr.fone
- In 2024, Top 10 Best Spy Watches For your Xiaomi 14 Pro | Dr.fone
- In 2024, Apple ID is Greyed Out From iPhone 13 How to Bypass?
- Title: In 2024, Video in Text Cinematic Intro【Filmora Tutorial】
- Author: Chloe
- Created at : 2024-04-24 07:08:16
- Updated at : 2024-04-25 07:08:16
- Link: https://ai-editing-video.techidaily.com/in-2024-video-in-text-cinematic-introfilmora-tutorial/
- License: This work is licensed under CC BY-NC-SA 4.0.

