
:max_bytes(150000):strip_icc():format(webp)/5-things-to-consider-before-buying-a-graphics-card-5225912-e71513f30b90445e8c0702a87db6fcdc.jpg)
In 2024, Ways to Merge Videos in HandBrake? Expectation Vs. Reality
Ways to Merge Videos in HandBrake? Expectation Vs. Reality
So you have captured some mind-blowing clips and want to join them together to make an excellent movie? But, sadly, you are still stuck because you are not sure what video editors would be suitable to complete this task fast.
If such miseries are haunting you, take a deep breath because many like you are searching for the right video merging tools. However, some people recommend using HandBrake for merging clips. So let’s dig some ground to know if the software can really combine clips. And if there’s a “Yes”? Then how to merge videos in HandBrake?
In this article
02 Using HandBrake to Merge Videos – Possible or Not?
03 Combining Videos with Filmora Wondershare
Part 1: What is HandBrake?
Before you gear up for HandBrake to merge videos, it would be wise to know a few essential details about this software.
HandBrake is a free tool for Windows, Linux, and MAC operating systems. The basic purpose of this software is to convert videos from any format in MKV, WebM, and MP4. It is an open-source program that allows users to convert their videos to play them on multiple devices, such as TV media players, computers, tablets, mobile phones, etc.
Moreover, this platform gives you the power to turn your low-quality videos into high-quality screen time. That is why most professional videographers use this tool to polish videos captured with old cameras.
A few more interesting features of HandBrake are:
- Combing artifacts removal due to interlacing
- Convert videos without negatively affecting the audio quality
- Volume and range adjustment
- Addition, removal, and preservation of soft subtitles
However, one vital thing to understand is that although HandBrake takes a tiny little space of your hard drive, the interface is complicated for beginners.

Part 2: Using HandBrake to Merge Videos – Possible or Not?
There is a great misconception about HandBrake among the newbies that HandBrake is primarily a video merger software. But, in reality, that is not true at all. Or, at least, the latest HandBrake version 1.5.1 lacks such features.
Even the official website states that HandBrake cannot combine two or more clips to make them whole.
So feel yourself lucky to read this article if you haven’t downloaded HandBrake yet. Congratulations! You are saved from another heartbreak.
But wait! If the software is not meant to merge clips, it doesn’t mean that you can’t use it to prepare your videos for the real deal. HandBrake can still be a helpful tool, permitting you to convert videos in a similar format before you start merging them on any other video editor.
For example, suppose you have two video clips in different formats. In that case, you can use HandBrake to convert all of them in a similar format so that they can be easily be merged when imported on any video merger tool.
But, again, the question is, if not HandBrake, then what?
Frankly, you will find hundreds of video editing tools with a combining clips feature, but not all of them deserve your attention and time. While software like DaVinci Resolve includes characteristics to merge two or more clips in a single shot, beginners and mid-level users may still find them a bit difficult at the start.
That is why professionals and experts prefer Filmora by Wondershare to merge videos without banging their heads on the screen.
So, how to merge videos in Filmora with simple clicks? Focus on the next part of the article to learn the step-by-step method within a few minutes.
Part 3: Combining Videos with Filmora Wondershare
Filmora Video Editor is a remarkable video editing tool for all types of users. The software works on all major operating systems (MAC and Windows) and includes a gigantic library of effects, presets, overlays, and so much more than you can imagine.
You can download Filmora for free if watermarks don’t annoy you. On the other hand, you can purchase a suitable plan to get rid of watermarks, so your videos look 100% professional.
For Win 7 or later (64-bit)
For macOS 10.14 or later
Now, without any more delay, let’s start learning how to combine videos in Filmora through the following steps.
Step 1: Install Filmora on Your Computer
Just visit Filmora’s website to download the latest version of the software for your Windows or MAC.

After downloading the software on your computer, install it. Once the software is ready, double-click the “Wondershare Filmora” icon (it should be on your desktop screen) to open the program.
As you can see, the interface is simple with user-friendly options.

Step 2: Import Multiple Videos in Filmora
Click on the blue icon with a “+” sign to import videos.

Or, click on the “File” button on the top menu to import files and drag and drop both clips to the same timeline.
As you can see, there are two clips on the timeline. The first clip is called “Cherry Blossom,” and the second clip’s name is “Plating Food.”

Step 3: Keep Video Clips on the Same Timeline
There shouldn’t be any gap or spaces between the two clips.

It is because gaps will create a dark blank space between the clips when you export the clips, like this:

Therefore, slide the second video right next to the first video without leaving any gaps with your mouse.

And guess what? You have already merged the two clips.
Step 4: Save Video on Your PC
Now, hit the “Export” button and save the merged video on your computer.

HandBrake is an outstanding tool for video conversion, but there’s no benefit of learning how to merge videos in HandBrake, as the software does not include such features. Nevertheless, when it is about combining multiple videos in high quality, you can rely on Filmora to merge clips in no time.
FAQs
Q1. Can you increase the video quality in HandBrake?
Yes. You can use HandBrake to convert videos and adjust the video quality settings as per your requirements before starting the conversion process.
Q2. Can you crop and resize the video in HandBrake?
HandBrake makes it easy to crop and resize all types of videos without disturbing the audio quality.
Q3. Can you use HandBrake clips on other video editors for video mergers?
After converting videos in HandBrake, you can use the clips in video editors, like Filmora, to merge clips.
02 Using HandBrake to Merge Videos – Possible or Not?
03 Combining Videos with Filmora Wondershare
Part 1: What is HandBrake?
Before you gear up for HandBrake to merge videos, it would be wise to know a few essential details about this software.
HandBrake is a free tool for Windows, Linux, and MAC operating systems. The basic purpose of this software is to convert videos from any format in MKV, WebM, and MP4. It is an open-source program that allows users to convert their videos to play them on multiple devices, such as TV media players, computers, tablets, mobile phones, etc.
Moreover, this platform gives you the power to turn your low-quality videos into high-quality screen time. That is why most professional videographers use this tool to polish videos captured with old cameras.
A few more interesting features of HandBrake are:
- Combing artifacts removal due to interlacing
- Convert videos without negatively affecting the audio quality
- Volume and range adjustment
- Addition, removal, and preservation of soft subtitles
However, one vital thing to understand is that although HandBrake takes a tiny little space of your hard drive, the interface is complicated for beginners.
Part 2: Using HandBrake to Merge Videos – Possible or Not?
There is a great misconception about HandBrake among the newbies that HandBrake is primarily a video merger software. But, in reality, that is not true at all. Or, at least, the latest HandBrake version 1.5.1 lacks such features.
Even the official website states that HandBrake cannot combine two or more clips to make them whole.
So feel yourself lucky to read this article if you haven’t downloaded HandBrake yet. Congratulations! You are saved from another heartbreak.
But wait! If the software is not meant to merge clips, it doesn’t mean that you can’t use it to prepare your videos for the real deal. HandBrake can still be a helpful tool, permitting you to convert videos in a similar format before you start merging them on any other video editor.
For example, suppose you have two video clips in different formats. In that case, you can use HandBrake to convert all of them in a similar format so that they can be easily be merged when imported on any video merger tool.
But, again, the question is, if not HandBrake, then what?
Frankly, you will find hundreds of video editing tools with a combining clips feature, but not all of them deserve your attention and time. While software like DaVinci Resolve includes characteristics to merge two or more clips in a single shot, beginners and mid-level users may still find them a bit difficult at the start.
That is why professionals and experts prefer Filmora by Wondershare to merge videos without banging their heads on the screen.
So, how to merge videos in Filmora with simple clicks? Focus on the next part of the article to learn the step-by-step method within a few minutes.
Part 3: Combining Videos with Filmora Wondershare
Filmora Video Editor is a remarkable video editing tool for all types of users. The software works on all major operating systems (MAC and Windows) and includes a gigantic library of effects, presets, overlays, and so much more than you can imagine.
You can download Filmora for free if watermarks don’t annoy you. On the other hand, you can purchase a suitable plan to get rid of watermarks, so your videos look 100% professional.
For Win 7 or later (64-bit)
For macOS 10.14 or later
Now, without any more delay, let’s start learning how to combine videos in Filmora through the following steps.
Step 1: Install Filmora on Your Computer
Just visit Filmora’s website to download the latest version of the software for your Windows or MAC.
After downloading the software on your computer, install it. Once the software is ready, double-click the “Wondershare Filmora” icon (it should be on your desktop screen) to open the program.
As you can see, the interface is simple with user-friendly options.
Step 2: Import Multiple Videos in Filmora
Click on the blue icon with a “+” sign to import videos.
Or, click on the “File” button on the top menu to import files and drag and drop both clips to the same timeline.
As you can see, there are two clips on the timeline. The first clip is called “Cherry Blossom,” and the second clip’s name is “Plating Food.”
Step 3: Keep Video Clips on the Same Timeline
There shouldn’t be any gap or spaces between the two clips.
It is because gaps will create a dark blank space between the clips when you export the clips, like this:
Therefore, slide the second video right next to the first video without leaving any gaps with your mouse.
And guess what? You have already merged the two clips.
Step 4: Save Video on Your PC
Now, hit the “Export” button and save the merged video on your computer.
HandBrake is an outstanding tool for video conversion, but there’s no benefit of learning how to merge videos in HandBrake, as the software does not include such features. Nevertheless, when it is about combining multiple videos in high quality, you can rely on Filmora to merge clips in no time.
FAQs
Q1. Can you increase the video quality in HandBrake?
Yes. You can use HandBrake to convert videos and adjust the video quality settings as per your requirements before starting the conversion process.
Q2. Can you crop and resize the video in HandBrake?
HandBrake makes it easy to crop and resize all types of videos without disturbing the audio quality.
Q3. Can you use HandBrake clips on other video editors for video mergers?
After converting videos in HandBrake, you can use the clips in video editors, like Filmora, to merge clips.
10 Best Voice Over Generators [Windows, Mac, Android, iPhone, and Online]
Best Voice Generator and Video Editor
Filmora’s Text to Speech (TTS) function allows you to convert your text files to voiceover and bring more elements to enrich your video.
Free Download Free Download Free Download Learn More >

Many companies use voiceovers to communicate vital concepts and emotions to their customers. Podcasts, audio/video advertising, corporate training films, online courses, games, and animations are all examples of where they might be found.
Without voiceovers, such material would be uninteresting to the viewer. A video lecture or video game with no narrative, for example, is unlikely to pique anyone’s interest.
Good voiceovers, on the other hand, are not inexpensive to make.
Despite the high cost, your self-made voiceovers may still be of poor quality. Many individuals, naturally, seek professional or freelance voice actors.
Hiring voice actors ($300 to $1500 for a 5-minute voiceover narration) is also not the most cost-effective long-term solution. Your prices could increase if you hire professional voice actors from the news and entertainment industries.
There are resources available. Voice over generators is available online. Most software products come in both free and premium versions, which you can pick from depending on your needs. These programs will swiftly help you reach your text to audio transformation goals, whether you’re a YouTube content maker in need of an informative voiceover or a disabled person looking for a user-friendly text-to-speech converter.
Yes! That’s correct. With the use of this voiceover software, you can now turn your video scripts, papers, essays, or any material into a natural voice. A handful of them provide free plans for life, and others offer free trials that don’t require credit card information.
Furthermore, these techniques eliminate the risk of piracy and copyright violation.
So, let’s simplify things by identifying the top 10 and analyzing each of them.
- ai (Supports Web)
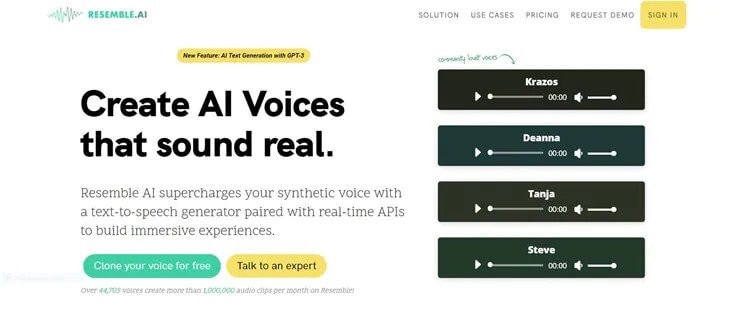
Resemble.ai operates in a variety of ways. It can not only help you make a speech out of the text, but it can also generate text for adverts with a single click. The platform can also produce a personalized voice that you can use as a voice assistant for Alexa, Google, and other services. The technique can also be used by call centres to clone their agents’ voices and customize them.
Resemble gives you four alternative ways to create synthetic voices. You can use the API to generate voices, record up to 50 samples immediately on the online platform, choose from a large number of voice actors, or submit raw audio without a script.
Features
- The software allows you to Customize your brand’s tone.
- It creates responsive IVR agents.
- Possible to do Advertisement text generation with AI with one click.
- Allows Instant language translation.
Cons
- The user interface could be enhanced.
- - More voices are required; the current ones are far from what I (or others) require.
Price
The cheapest package is $30 per month.
For a personalized plan, contact a Resemble representative.
- ai ( Supports Web, Mobile
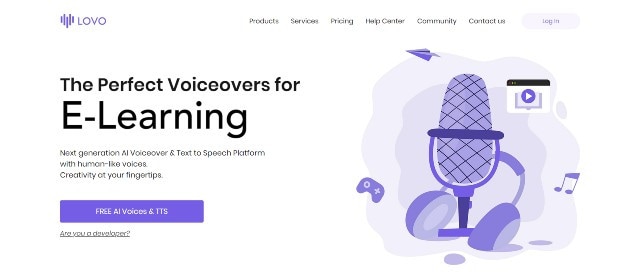
Lovo.ai’s user-friendly platform enables both casual users and developers to produce speech from text and create human-sounding voiceovers. Over 180 voice styles in 33 languages are available on the platform. The site is also regularly updated with new voices every day, giving consumers a wide range of options.
In just 15 minutes, the tool can generate personalized voices. On this platform, converting text to speech requires only three simple steps. Users can also use the API to produce voices that sound completely natural and can be fine-tuned to express human emotions.
Features
- Listening, conversion and sharing are all unlimited.
- A large voice library is available.
- Up to 15000 characters can be converted at once.
- Collection of unique voices. Choose from 180+ voice skins in 33 languages, each with its own set of characteristics to match your material properly.
- Genuine voices. Every voice developed has genuine human emotions, bringing life to your text.
Cons
- While the UI/UX is simple to use, it feels a little bland and dull.”
- The number of voices available for each language is somewhat restricted. More voice samples are available.”
- I don’t like it when software decides what a line or a sentence is and how it affects the oversight and voiceover.”
Pricing
Lovo.ai now offers two pricing options: (all pricing is for annual plans).
$34.99 per month for personal
$99.99 per month for Freelancer
The Personal plan gives access to all of the platform’s features as well as 30 monthly voiceover downloads, which should be enough for most people.
Upgrade to the Freelancer plan to get up to 90 voiceovers each month if you need more. Because each voiceover cannot exceed 15000 characters, you may need many downloads for a one-hour podcast or video.
You will have to pay an additional $69.99 per month per voice for voice cloning. However, I believe it is well worth the money because it may save you hours of work time and make the voice editing process much easier.
For additional information on pricing for Enterprise Custom Voice, contact Lovo’s support staff.
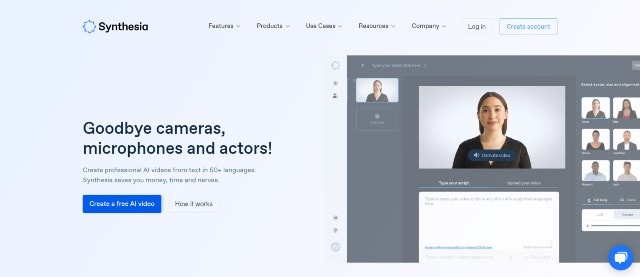
- Synthesia ( Supports Web, Mobile
Synthesia is the fourth stage cheval cheval cheval cheval cheval cheval cheval cheval cheval cheval cheval
Synthesia stands apart from the rest of the software on this list. It’s a video maker that also has an AI presenter.
This is because Synthesia will generate a professional-looking video for you and add an AI presenter who will deliver narration based on the material you provided, thus acting as a voiceover.
Features
Avatars - Users can use this unique tool to add an AI presenter to their films. There are many pre-built avatars to pick from.
Video with AI Presenter — Once you’ve chosen your avatar, all you have to do now is fill in your script. Synthesia allows you to make videos up to 2.5 hours long.
From text to video For the first time, turn plain words into a professional-looking video.
There are more than 60 languages available. We now support over 60 distinct languages.
There are over 45 AI avatars. Synthesia comes with 40+ avatars right out of the box.
These are Avatars that are unique to you.
Uploads of audio are possible using synthesis.
There is Music available for the background.
Ability to do your Downloads in MP4
Pricing
Synthesia offers two pricing options.
$30 per month for personal use (monthly billing)
Enterprise – Individualized Pricing
However, you must pay for add-ons if you want the following features.
Synthesia API – beginning at $49 per month. Custom Avatar – $1000 one-time.
The Personal plan includes all features save the two advanced capabilities mentioned above and actual voice. As a result, you can make up to 10 minutes of video per month.
Assume you’ve exhausted your video credits. More credits can be purchased for $30 for ten credits. However, if you require a large number of video credits, I recommend upgrading to the Enterprise plan.
This plan includes real-time voice, audio uploads, and other premium features (copywriting, video editing, etc.)
Cons
- Only video producers can use it. If you’re a podcaster, you’ll be disappointed with the tool.
- Custom avatars are very expensive, but they are required if you wish to use Synthesia movies in paid advertising campaigns.
4.Murf.ai ( Supports Web, Mobile)
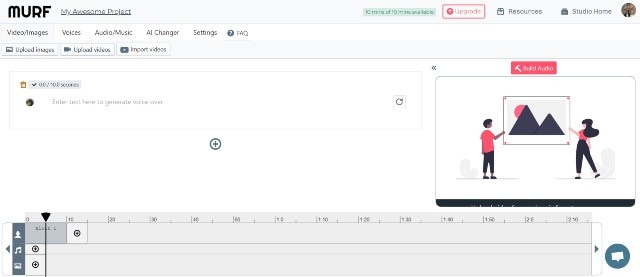
Murf.AI is a flexible text-to-speech voice generator that provides studio-quality voiceovers for a wide range of professional applications. The tool has a large voice library with over 115 distinct voices in 15 languages. Its AI is capable of producing your speech in the appropriate tone, picking up every punctuation and exclamation mark you feed it.
It also has a grammatical assistant, so you can create proofread scripts that will only improve your voiceover work. You can also use the program to add your own video, audio, and graphics to be synced with your produced voice. With its enterprise plan, the tool also has a powerful collaboration capability.
Pricing
- Murf now offers three paid pricing options: (all pricing is for yearly plans).
- Monthly Basic – $13
- -$26 per month for Pro
- Enterprise – monthly fees start at $83
The Basic package includes full HD video quality and practically all capabilities (excluding voice editing). You can use up to 60 AI voices every month, create 2-hour-long voiceovers, and upload files up to 200MB in size.
For most users, I believe this plan is adequate. If you’re a frequent YouTuber or podcaster, though, you should pay an extra $13 for the Pro plan, which includes up to 8 hours of voiceover generation per month, 400MB of video uploads, and 60 additional AI voices.
Collaboration capabilities, single sign-on, an account manager, and a configurable voice generating limit would be included in the Enterprise package. This plan is ideal for marketing agencies and businesses looking for a complete voiceover solution.
Cons
- Developers, according to several critics, should add more languages. Murf has many fewer AI voices in the library than his competitors.
5.Play.ht
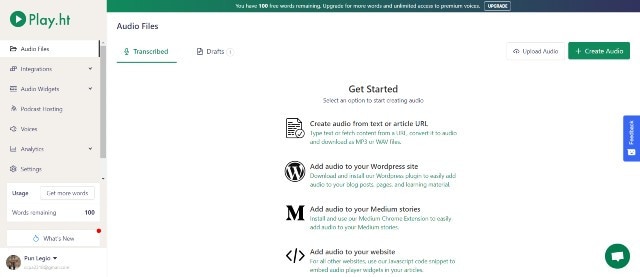
Play. Ht is a web-based voice generator that allows you to generate high-quality text-to-speech. Because of its basic user interface, the platform is exceptionally simple to use. It has a text box on the home page where you may input your text, choose the language, gender, and voice style, and choose the conversion speed.
Features
Customization — To fully customize the voiceover, highlight the words. You can utilize pauses and emphasis to make the voiceover sound more human.
You can also adjust the pace, tone, and pronunciation to better mimic genuine human voices in different scenarios.
Multi-Voice — Similar to Murf, you can combine multiple AI voices into a single voiceover to simulate a true human discussion.
Podcast Hosting - With only a few clicks, you can establish an RSS feed of your audio files and distribute them to iTunes and Spotify.
Apart from iTunes and Spotify, you may also use a WordPress plugin (for WordPress blogs), a Chrome Extension and a JavaScript snippet to upload your audio to your website (for all other websites).
Sounds Analytics - Play. It will gather information on all audio. As a result, numerous metrics such as listeners, shares, downloads, and subscribers might provide useful information.
Pricing
Play. ht has four pricing tiers as of August 2021. (all pricing below is for yearly plans).
$14.25 per month for personal use
$29.25 per month for professionals
$74.25 per month in Growth
$149.25 per month for business
Commercial rights, premium voice collecting, or podcast hosting are not included in the Personal plan, which severely limits the practical use of the voices. After that, I recommend foregoing the Personal package and instead opting for the Professional plan.
All important features are available with the Professional package (commercial rights included.) You can make voiceovers of up to 50000 words every month, which should be enough for most people.
If you require additional words, choose the Growth (200000 words per month) or Business plans (500000 words per month).
Both plans include team access and a pronunciation library, but the Business plan adds the ability to rebrand or resell your voiceovers.
Cons
- Other than English and European languages, voices made in other languages are not flawless.
- There isn’t a built-in video editor for adding voiceovers to videos.
- Clipchamp
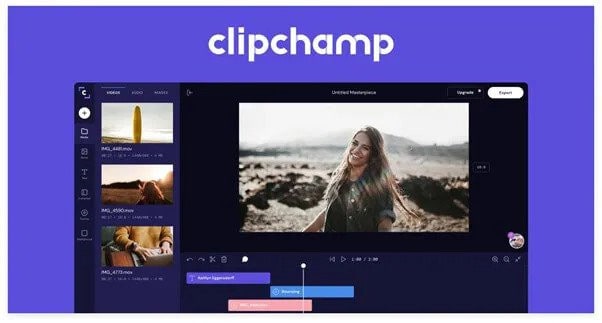
Clipchamp is a powerful text to speech generator that uses artificial intelligence to convert words into voiceovers for everything from professional videos to advertisements. In a matter of seconds, it can convert an imported script into speech.
Because of its simplicity, Clipchamp is another excellent choice for beginners. To generate a preview, simply select your voice, language, and speed before uploading a script. The AI technology in the tool analyzes the script to identify areas that need to be changed.
Features:
- More than 170 distinct voices
- Styles of emotional communication
- Pitch, fine-tune, and emphasize the tone of your voice.
- Simple to operate
Pricing
Clipchamp is available for a monthly fee of $6.0. Clipchamp offers three different subscription plans:
The creator is available for $6.00 per month.
$13.00 per month for a business.
$27.00 per month for Business Platinum.
Clipchamp also offers a limited-featured Free Plan.
Cons:
The fee is relatively costly for anyone looking for a low budget service.
- Balabolka ( Supports Windows)
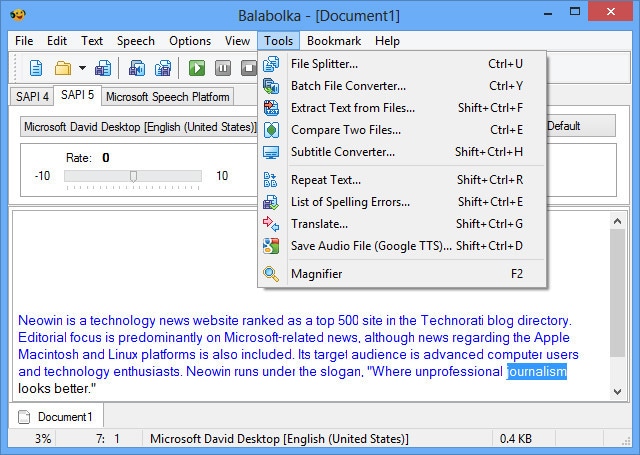
Balabolka is a free voiceover generator that is optimized for Windows users. It can read and write DOC, EPUB, DOCX, PDF, PPT, and RTF files. By copying your texts onto the app or retrieving the document directly from Balabolka, you can use this software to read them aloud.
You can also change the pitch and pace of the voiceover with Balabolka. Microsoft Speech API is used in this program. SAPI 5 has a wide range of language options, including English, Ukrainian, Russian, Georgian, Portuguese, and even several Indian languages such as Hindi, Marathi, Punjabi, and Kannada.
Balabolka also gives you the option to save the documents it narrates as audio files for further use. Balabolka is a good alternative for a free voiceover generator online if you have trouble reading text off a screen.
Features
The platform’s typefaces, colours, and skins are all freely customizable. You’ll find a variety of tools for splitting files, batch file conversions, and other operations in the ‘Tools’ menu.
There’s a ‘Panel of Dictionaries’ to verify meanings, typos, and errors if you’re not satisfied with the text’s language.
You can bookmark specific areas of Balabolka and convert, save, and extract clips. Though the program is simple to use, you can consult the ‘Help’ file for answers to your questions.
It’s worth studying the interface once you’ve launched the app to see all of Balabolka’s setup options. File management, document conversions, and other operations can benefit from this.
Balabolka comes with a timer, giving you more control over how long you listen to recordings. Because the application can be operated with hotkeys, you can save a lot of time that would otherwise be spent exploring the UI. Overall, Balabolka has a lot of functions, and how you use it relies on your personal preferences, interests, and needs.
Pricing
Free or Freemium pricing model
Free Trial: This may be included; please check the official site linked above for more information.
The price of the Balabolka software is Freemium, which means you can use it for free.
Cons
- Needs updates for new languages
8.. MorphVOX Junior ( Supports Mac)
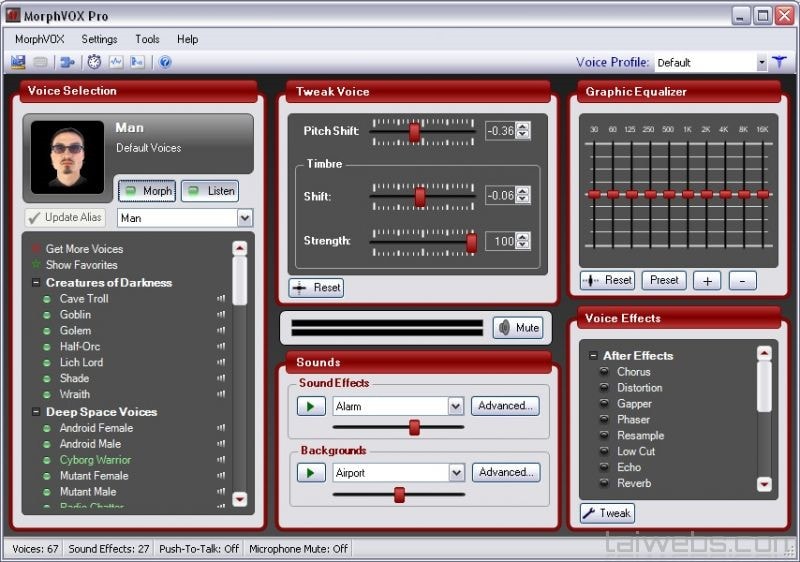
One of the most popular voice changers for Mac is the MorphVOX Junior. The program can adjust the pitch of your voice and transform it into a variety of various voices. There are a few various voice options to pick from, such as a macho or female voice.
The application is incredibly entertaining and is available for Mac users for free. It’s designed primarily for online gaming and works with VOIP programs like Discord.
Features:
- Assists you in recording high-quality audio.
- Background noise should be avoided and adjusted.
- To create a specific ambience, add your own background score.
- Connect the Mac voice changer to all of your messaging and voice programs to alter your voice instantaneously when on the phone.
- It only consumes a small amount of bandwidth and CPU memory.
Pricing
- It’s Free but the
MorphVox Pro 4 starts at $39.99
Cons
- The use of this voice changer is somewhat difficult. Before using it, the user must master its settings.
- It has Limited functionality.
- 9. Voicechanger plus (Supports iPhone)
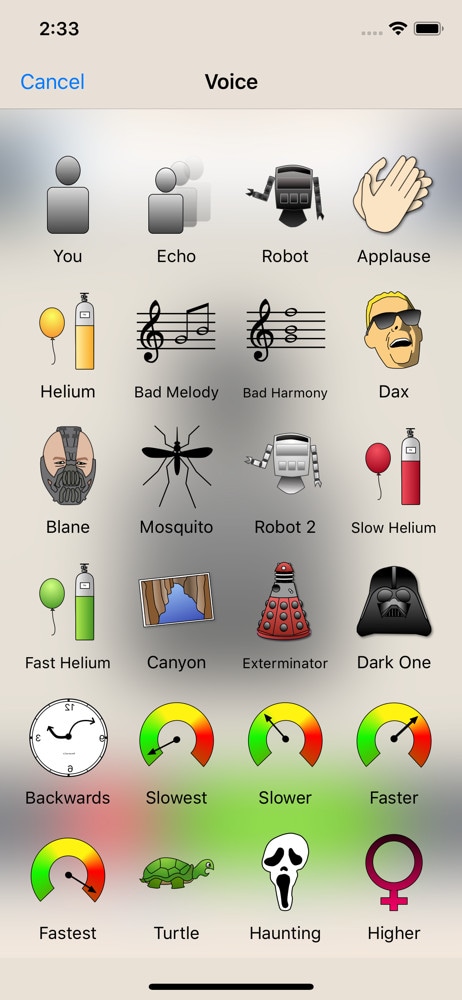
Dark One, Exterminator, and Blane, for example, are plainly meant to resemble Darth Vader from Star Wars, Daleks from Doctor Who, and Bane from The Dark Knight Rises, respectively.
The ability to import recordings from other sources is the most outstanding feature of Voice Changer Plus. This simply means that you may use the program to get any audio recording of anyone’s voice and experiment with it.
Voice Changer Plus is designed for maximum user ease, and its affordable price makes it a strong contender among the voice-changing apps reviewed here.
Features
- Backward playback of recorded audio is possible.
- Basic editing features are available.
- Various editing effects are available.
Pricing
Free but offers in-app purchases.
Cons
- Real-time recording is not possible.
- The free version is ambiguous and filled with advertisements.
- compatibility is low
- 10. Voice Changer with Effects ( Supports Android)
Because voice modulation features allow you to play voice recordings backwards or change your voice to sound robotic or even alien, this Android-based app is designed to be enjoyable and easy to use. Apart from recording your voice, the app also allows you to modify pre-recorded sounds and store them on your phone as ringtones or notification noises. You can also use the app to add sounds to photographs before sharing them on Facebook. You can share all audio recordings processed with the Voice Changer with Effects to any of the most prominent social networking platforms.
Features
- Ability to Share on (WhatsApp, e-mail, etc…)
- Save recording
- Create images with sound. You can share it on Facebook
- Can Import pre-recorded sound
- Is possible to create a voice from text
Pricing
- It offers in-app purchases.
Cons
- Advertisements are present.
- There are no other options for audio or video editing.
Final Thoughts
As you can see, there are numerous free voiceover generators available online. Most software products come in both free and premium versions, which you can pick from depending on your needs. These programs will swiftly help you reach your text to audio transformation goals, whether you’re a YouTube content maker in need of an informative voiceover or a disabled person looking for a user-friendly text-to-speech converter.
Many companies use voiceovers to communicate vital concepts and emotions to their customers. Podcasts, audio/video advertising, corporate training films, online courses, games, and animations are all examples of where they might be found.
Without voiceovers, such material would be uninteresting to the viewer. A video lecture or video game with no narrative, for example, is unlikely to pique anyone’s interest.
Good voiceovers, on the other hand, are not inexpensive to make.
Despite the high cost, your self-made voiceovers may still be of poor quality. Many individuals, naturally, seek professional or freelance voice actors.
Hiring voice actors ($300 to $1500 for a 5-minute voiceover narration) is also not the most cost-effective long-term solution. Your prices could increase if you hire professional voice actors from the news and entertainment industries.
There are resources available. Voice over generators is available online. Most software products come in both free and premium versions, which you can pick from depending on your needs. These programs will swiftly help you reach your text to audio transformation goals, whether you’re a YouTube content maker in need of an informative voiceover or a disabled person looking for a user-friendly text-to-speech converter.
Yes! That’s correct. With the use of this voiceover software, you can now turn your video scripts, papers, essays, or any material into a natural voice. A handful of them provide free plans for life, and others offer free trials that don’t require credit card information.
Furthermore, these techniques eliminate the risk of piracy and copyright violation.
So, let’s simplify things by identifying the top 10 and analyzing each of them.
- ai (Supports Web)
Resemble.ai operates in a variety of ways. It can not only help you make a speech out of the text, but it can also generate text for adverts with a single click. The platform can also produce a personalized voice that you can use as a voice assistant for Alexa, Google, and other services. The technique can also be used by call centres to clone their agents’ voices and customize them.
Resemble gives you four alternative ways to create synthetic voices. You can use the API to generate voices, record up to 50 samples immediately on the online platform, choose from a large number of voice actors, or submit raw audio without a script.
Features
- The software allows you to Customize your brand’s tone.
- It creates responsive IVR agents.
- Possible to do Advertisement text generation with AI with one click.
- Allows Instant language translation.
Cons
- The user interface could be enhanced.
- - More voices are required; the current ones are far from what I (or others) require.
Price
The cheapest package is $30 per month.
For a personalized plan, contact a Resemble representative.
- ai ( Supports Web, Mobile
Lovo.ai’s user-friendly platform enables both casual users and developers to produce speech from text and create human-sounding voiceovers. Over 180 voice styles in 33 languages are available on the platform. The site is also regularly updated with new voices every day, giving consumers a wide range of options.
In just 15 minutes, the tool can generate personalized voices. On this platform, converting text to speech requires only three simple steps. Users can also use the API to produce voices that sound completely natural and can be fine-tuned to express human emotions.
Features
- Listening, conversion and sharing are all unlimited.
- A large voice library is available.
- Up to 15000 characters can be converted at once.
- Collection of unique voices. Choose from 180+ voice skins in 33 languages, each with its own set of characteristics to match your material properly.
- Genuine voices. Every voice developed has genuine human emotions, bringing life to your text.
Cons
- While the UI/UX is simple to use, it feels a little bland and dull.”
- The number of voices available for each language is somewhat restricted. More voice samples are available.”
- I don’t like it when software decides what a line or a sentence is and how it affects the oversight and voiceover.”
Pricing
Lovo.ai now offers two pricing options: (all pricing is for annual plans).
$34.99 per month for personal
$99.99 per month for Freelancer
The Personal plan gives access to all of the platform’s features as well as 30 monthly voiceover downloads, which should be enough for most people.
Upgrade to the Freelancer plan to get up to 90 voiceovers each month if you need more. Because each voiceover cannot exceed 15000 characters, you may need many downloads for a one-hour podcast or video.
You will have to pay an additional $69.99 per month per voice for voice cloning. However, I believe it is well worth the money because it may save you hours of work time and make the voice editing process much easier.
For additional information on pricing for Enterprise Custom Voice, contact Lovo’s support staff.
- Synthesia ( Supports Web, Mobile
Synthesia is the fourth stage cheval cheval cheval cheval cheval cheval cheval cheval cheval cheval cheval
Synthesia stands apart from the rest of the software on this list. It’s a video maker that also has an AI presenter.
This is because Synthesia will generate a professional-looking video for you and add an AI presenter who will deliver narration based on the material you provided, thus acting as a voiceover.
Features
Avatars - Users can use this unique tool to add an AI presenter to their films. There are many pre-built avatars to pick from.
Video with AI Presenter — Once you’ve chosen your avatar, all you have to do now is fill in your script. Synthesia allows you to make videos up to 2.5 hours long.
From text to video For the first time, turn plain words into a professional-looking video.
There are more than 60 languages available. We now support over 60 distinct languages.
There are over 45 AI avatars. Synthesia comes with 40+ avatars right out of the box.
These are Avatars that are unique to you.
Uploads of audio are possible using synthesis.
There is Music available for the background.
Ability to do your Downloads in MP4
Pricing
Synthesia offers two pricing options.
$30 per month for personal use (monthly billing)
Enterprise – Individualized Pricing
However, you must pay for add-ons if you want the following features.
Synthesia API – beginning at $49 per month. Custom Avatar – $1000 one-time.
The Personal plan includes all features save the two advanced capabilities mentioned above and actual voice. As a result, you can make up to 10 minutes of video per month.
Assume you’ve exhausted your video credits. More credits can be purchased for $30 for ten credits. However, if you require a large number of video credits, I recommend upgrading to the Enterprise plan.
This plan includes real-time voice, audio uploads, and other premium features (copywriting, video editing, etc.)
Cons
- Only video producers can use it. If you’re a podcaster, you’ll be disappointed with the tool.
- Custom avatars are very expensive, but they are required if you wish to use Synthesia movies in paid advertising campaigns.
4.Murf.ai ( Supports Web, Mobile)
Murf.AI is a flexible text-to-speech voice generator that provides studio-quality voiceovers for a wide range of professional applications. The tool has a large voice library with over 115 distinct voices in 15 languages. Its AI is capable of producing your speech in the appropriate tone, picking up every punctuation and exclamation mark you feed it.
It also has a grammatical assistant, so you can create proofread scripts that will only improve your voiceover work. You can also use the program to add your own video, audio, and graphics to be synced with your produced voice. With its enterprise plan, the tool also has a powerful collaboration capability.
Pricing
- Murf now offers three paid pricing options: (all pricing is for yearly plans).
- Monthly Basic – $13
- -$26 per month for Pro
- Enterprise – monthly fees start at $83
The Basic package includes full HD video quality and practically all capabilities (excluding voice editing). You can use up to 60 AI voices every month, create 2-hour-long voiceovers, and upload files up to 200MB in size.
For most users, I believe this plan is adequate. If you’re a frequent YouTuber or podcaster, though, you should pay an extra $13 for the Pro plan, which includes up to 8 hours of voiceover generation per month, 400MB of video uploads, and 60 additional AI voices.
Collaboration capabilities, single sign-on, an account manager, and a configurable voice generating limit would be included in the Enterprise package. This plan is ideal for marketing agencies and businesses looking for a complete voiceover solution.
Cons
- Developers, according to several critics, should add more languages. Murf has many fewer AI voices in the library than his competitors.
5.Play.ht
Play. Ht is a web-based voice generator that allows you to generate high-quality text-to-speech. Because of its basic user interface, the platform is exceptionally simple to use. It has a text box on the home page where you may input your text, choose the language, gender, and voice style, and choose the conversion speed.
Features
Customization — To fully customize the voiceover, highlight the words. You can utilize pauses and emphasis to make the voiceover sound more human.
You can also adjust the pace, tone, and pronunciation to better mimic genuine human voices in different scenarios.
Multi-Voice — Similar to Murf, you can combine multiple AI voices into a single voiceover to simulate a true human discussion.
Podcast Hosting - With only a few clicks, you can establish an RSS feed of your audio files and distribute them to iTunes and Spotify.
Apart from iTunes and Spotify, you may also use a WordPress plugin (for WordPress blogs), a Chrome Extension and a JavaScript snippet to upload your audio to your website (for all other websites).
Sounds Analytics - Play. It will gather information on all audio. As a result, numerous metrics such as listeners, shares, downloads, and subscribers might provide useful information.
Pricing
Play. ht has four pricing tiers as of August 2021. (all pricing below is for yearly plans).
$14.25 per month for personal use
$29.25 per month for professionals
$74.25 per month in Growth
$149.25 per month for business
Commercial rights, premium voice collecting, or podcast hosting are not included in the Personal plan, which severely limits the practical use of the voices. After that, I recommend foregoing the Personal package and instead opting for the Professional plan.
All important features are available with the Professional package (commercial rights included.) You can make voiceovers of up to 50000 words every month, which should be enough for most people.
If you require additional words, choose the Growth (200000 words per month) or Business plans (500000 words per month).
Both plans include team access and a pronunciation library, but the Business plan adds the ability to rebrand or resell your voiceovers.
Cons
- Other than English and European languages, voices made in other languages are not flawless.
- There isn’t a built-in video editor for adding voiceovers to videos.
- Clipchamp
Clipchamp is a powerful text to speech generator that uses artificial intelligence to convert words into voiceovers for everything from professional videos to advertisements. In a matter of seconds, it can convert an imported script into speech.
Because of its simplicity, Clipchamp is another excellent choice for beginners. To generate a preview, simply select your voice, language, and speed before uploading a script. The AI technology in the tool analyzes the script to identify areas that need to be changed.
Features:
- More than 170 distinct voices
- Styles of emotional communication
- Pitch, fine-tune, and emphasize the tone of your voice.
- Simple to operate
Pricing
Clipchamp is available for a monthly fee of $6.0. Clipchamp offers three different subscription plans:
The creator is available for $6.00 per month.
$13.00 per month for a business.
$27.00 per month for Business Platinum.
Clipchamp also offers a limited-featured Free Plan.
Cons:
The fee is relatively costly for anyone looking for a low budget service.
- Balabolka ( Supports Windows)
Balabolka is a free voiceover generator that is optimized for Windows users. It can read and write DOC, EPUB, DOCX, PDF, PPT, and RTF files. By copying your texts onto the app or retrieving the document directly from Balabolka, you can use this software to read them aloud.
You can also change the pitch and pace of the voiceover with Balabolka. Microsoft Speech API is used in this program. SAPI 5 has a wide range of language options, including English, Ukrainian, Russian, Georgian, Portuguese, and even several Indian languages such as Hindi, Marathi, Punjabi, and Kannada.
Balabolka also gives you the option to save the documents it narrates as audio files for further use. Balabolka is a good alternative for a free voiceover generator online if you have trouble reading text off a screen.
Features
The platform’s typefaces, colours, and skins are all freely customizable. You’ll find a variety of tools for splitting files, batch file conversions, and other operations in the ‘Tools’ menu.
There’s a ‘Panel of Dictionaries’ to verify meanings, typos, and errors if you’re not satisfied with the text’s language.
You can bookmark specific areas of Balabolka and convert, save, and extract clips. Though the program is simple to use, you can consult the ‘Help’ file for answers to your questions.
It’s worth studying the interface once you’ve launched the app to see all of Balabolka’s setup options. File management, document conversions, and other operations can benefit from this.
Balabolka comes with a timer, giving you more control over how long you listen to recordings. Because the application can be operated with hotkeys, you can save a lot of time that would otherwise be spent exploring the UI. Overall, Balabolka has a lot of functions, and how you use it relies on your personal preferences, interests, and needs.
Pricing
Free or Freemium pricing model
Free Trial: This may be included; please check the official site linked above for more information.
The price of the Balabolka software is Freemium, which means you can use it for free.
Cons
- Needs updates for new languages
8.. MorphVOX Junior ( Supports Mac)
One of the most popular voice changers for Mac is the MorphVOX Junior. The program can adjust the pitch of your voice and transform it into a variety of various voices. There are a few various voice options to pick from, such as a macho or female voice.
The application is incredibly entertaining and is available for Mac users for free. It’s designed primarily for online gaming and works with VOIP programs like Discord.
Features:
- Assists you in recording high-quality audio.
- Background noise should be avoided and adjusted.
- To create a specific ambience, add your own background score.
- Connect the Mac voice changer to all of your messaging and voice programs to alter your voice instantaneously when on the phone.
- It only consumes a small amount of bandwidth and CPU memory.
Pricing
- It’s Free but the
MorphVox Pro 4 starts at $39.99
Cons
- The use of this voice changer is somewhat difficult. Before using it, the user must master its settings.
- It has Limited functionality.
- 9. Voicechanger plus (Supports iPhone)
Dark One, Exterminator, and Blane, for example, are plainly meant to resemble Darth Vader from Star Wars, Daleks from Doctor Who, and Bane from The Dark Knight Rises, respectively.
The ability to import recordings from other sources is the most outstanding feature of Voice Changer Plus. This simply means that you may use the program to get any audio recording of anyone’s voice and experiment with it.
Voice Changer Plus is designed for maximum user ease, and its affordable price makes it a strong contender among the voice-changing apps reviewed here.
Features
- Backward playback of recorded audio is possible.
- Basic editing features are available.
- Various editing effects are available.
Pricing
Free but offers in-app purchases.
Cons
- Real-time recording is not possible.
- The free version is ambiguous and filled with advertisements.
- compatibility is low
- 10. Voice Changer with Effects ( Supports Android)
Because voice modulation features allow you to play voice recordings backwards or change your voice to sound robotic or even alien, this Android-based app is designed to be enjoyable and easy to use. Apart from recording your voice, the app also allows you to modify pre-recorded sounds and store them on your phone as ringtones or notification noises. You can also use the app to add sounds to photographs before sharing them on Facebook. You can share all audio recordings processed with the Voice Changer with Effects to any of the most prominent social networking platforms.
Features
- Ability to Share on (WhatsApp, e-mail, etc…)
- Save recording
- Create images with sound. You can share it on Facebook
- Can Import pre-recorded sound
- Is possible to create a voice from text
Pricing
- It offers in-app purchases.
Cons
- Advertisements are present.
- There are no other options for audio or video editing.
Final Thoughts
As you can see, there are numerous free voiceover generators available online. Most software products come in both free and premium versions, which you can pick from depending on your needs. These programs will swiftly help you reach your text to audio transformation goals, whether you’re a YouTube content maker in need of an informative voiceover or a disabled person looking for a user-friendly text-to-speech converter.
How to Edit Recorded Video
The most critical component of post-production for a video marketer is editing. Your video will seem unfinished and repel your viewers if you cannot effortlessly weave your images together or get your cut to reach the proper frame. Learning to edit a video may soon become a never-ending task. While each project you work on will have somewhat different editing needs, the principles of video editing remain basically the same. You don’t need to spend a lot on costly equipment to have a professional appearance; if you pay attention to a few important things, you can produce excellent movies with whatever you have right now.
Content producers, entrepreneurs, and influencers can have much too much material to include into a single YouTube video. You may not be able to buy video editing software if you’re on a tight budget. So, what does a video marketer do if they don’t have editing software? To assist you with the process of video editing, we’ve put up this thorough tutorial that covers everything you’ll need to know to make stunning films, even if you’ve never done it before. We’ll also demonstrate how to utilize the super-intuitive and user-friendly editor to create a video.
Part 1. Edit Recorded Video in OBS
OBS is a video streaming and recording application. It’s open source, free, and works on Macs, Windows, and Linux. It is a strong and adaptable screencast video creation tool when paired with competent audio and video editing tools. Unfortunately, OBS doesn’t support editing feature and hence, we’re enlisting the recording steps so you can edit them by using a third-party toolkit mentioned in the guide.
Step 1. Download and Install OBS
Install OBS according to the instructions for your operating system by downloading it from the link below.
Step 2. Setup Screen Recording
The window is divided into separate parts called “docks” when you initially launch the app. Every dock has a distinct function. Scenes, Sources, Mixer, and Controls are the areas to pay attention to. OBS employs a Scenes and Sources system, which will be discussed in more depth in a later lesson. These two tools operate in tandem to help you keep track of your video, audio, and other production materials. When you first start OBS, you’ll see that a scene is already loaded, which you can locate in the bottom left corner of the interface.

You’ll also need to add a source to this scene before you can begin recording. Click the Add button at the bottom of the Sources panel, then pick Screen Capture on Linux or Display Capture on Mac and Windows with the default Scene chosen (it will be highlighted).
Step 3. Customize the Recording Source
You’ll need to create a new source before you can begin recording your desktop screen. Select “Display Capture” by clicking the “+” icon on the Sources dock. You will be prompted to name the Display source in a popup window. Click “OK”. At the bottom right of the screen, click the Settings icon. Take note of the Recording Path field under the Output tab. This is where your recorded video will be kept on your computer.

Step 4. Start/Stop Recording
You’ll be able to choose the computer screen display you wish to capture in the following window. If you just have one monitor, make that the default. OBS Studios should show you the screen in the window after a valid display has been chosen. We need to change your graphics settings if OBS is unable to successfully load the screen video. Click the Start Recording button in the bottom right corner when you’re ready to begin recording. When you’re finished, click Stop Recording, and a movie will be saved to the folder you chose in the preferences.

Part 2. Edit Recorded Video in Filmora
Wondershare Filmora is a powerful screen recording application that includes a video editing suite, screen sketching tools, AI face recognition, built-in video effect packs, customizable branding watermark, and more. It may not only make recording movies simpler, but it may also provide you more possibilities for making your films more professional, creative, and attractive. Filmora is a great tool for beginners who want to make high-quality explainer films, training videos, demo videos, and more quickly. Because of the excellent video templates, screen recording is more appealing. To highlight important information, people might utilize annotation tools like as callouts, arrows, and drawing motions.
Steps to Record and Edit with Filmora
Step 1: Install Filmora on your laptop
To begin, you must first download this software program to your system from the following links:
For Win 7 or later (64-bit)
For macOS 10.12 or later
After you’ve finished downloading it, you’ll need to install it on your computer so that you can start using it with your laptop.
Step 2: Launch the Program and Begin Customizing It
The next step is to launch the software application and start recording your screen. Simply click the New Recording button in the start-up box to start recording. You may totally alter your screen recordings using the tools included in Filmora. You may also incorporate your laptop’s Webcam or a microphone as an audio source in your recordings.

Step 3: Start/Stop Screen Recording
Now is the time to begin recording your audio, which you can accomplish by hitting the red circular recording button. Press the Square-shaped button on your laptop’s screen to end the recording.

Step 4: Edit the Recordings and Save Them
Finally, you may adjust your audio recordings with entirely configurable editing tools. To do so, use Filmora’s editor and utilize easy to complicated editing ways to edit your recorded audio files. Filmora’s Editor lets you add Animated Titles, amazing effects, Audio Enhancements, and more to your recorded video to make it more polished.

Step 5: Add Special Effects to Your Video
Wondershare Filmora was designed specifically to provide a professional touch to your videos. It includes a number of eye-catching and adaptable effects that you can use to make your video projects stand out from the crowd. We’ve gone through some of the greatest effects for giving life to your drab and amateurish videos in this section.

Step 6: Save or Share the Videos
Finally, after you’ve finished editing the recorded video, you may utilize the Filmora editor in its entirety, as described before. Click the Export option and select the platform where you wish to share your video clip to post your work of art immediately to YouTube or another well-known website. You may even alter the movie before sharing it if you desire.

Part 3. Edit Recorded Video with Zoom
Trimming and editing Zoom recordings is a necessary for digging out value-packed nuggets from captured footage. But although you already know this, you’re probably putting off doing so as you’re anticipating you’ll need to learn a ton of new tools to edit Zoom recordings.
Steps to Record Videos with Zoom
Step 1For the cloud recordings, go to zoom.us and log in to your account. Then, navigate to ‘Settings’ from the navigation menu on the left.

Step 2 Under Advanced cloud recording options, tick the option for ‘Optimize the recording for 3rd party video editor’ and click ‘Save’.

Step 3Then, navigate to ‘Recording’ from the navigation menu on the left. Check the option for ‘Optimize for 3rd party video editor.

Step 4To really edit a Zoom recording, whether it’s stored on your PC or Zoom cloud, you need to utilize third-party video editing software. But no worries, you don’t need any sophisticated equipment or software here.
Part 4. Edit Recorded Video in Teams
Teams gives the opportunity to record your online meetings. This may be especially beneficial for sharing meeting recordings with individuals unable to attend live, to preserve instructional material for future use, or to enable participants to revisit prior meeting topics. At the top of the meeting window, a message will appear stating that the recording has begun, which alerts participants that their interactions in the meeting may be recorded by the recording. You will also notice a recording sign and the duration of the recording in the top-left corner of the meeting window.
Steps to Record Videos with Teams
Step 1 Open Microsoft Teams on Windows and Mac.
Step 2 Go to appropriate Teams or Channel and click on the Video button at the top to create a video call.

Step 3Invite people and organize a meeting. Whenever you feel you need to record any significant point, click on the three-dot menu at the top.

Step 4 Click on Start recording and Microsoft Teams will start recording the video/voice call. As soon as you start recording, every participant will be told about it.
At any moment, you may stop recording from the same. Once the meeting as concluded, your recording will display in the Chat panel in the main Teams window. Please note that depending on the length of the recording it might take some time for the recording to complete and display in the meeting chat. To find the recording, pick the Chat panel, open the correct meeting from the chat list and the recording will display in the chat window once processed.

Part 5. Edit Recorded Video in Google Meet
With more individuals working from home these days, services like Google Meet are rising in popularity. You may have an online video conference, see everyone’s face, communicate, and take care of business. As with in-office meetings, notes with action items and summaries for online meetings are just as crucial. Unfortunately, it doesn’t always happen. To have formal documentation for your meeting or share it with people who couldn’t attend, try recording your Google Meet.
Steps to Record and Edit Videos by Meet
Step 1. Launch Meet
Visit Google Meet and sign in to join or start your meeting.
Step 2. Start Recording
Select the Activities symbol on the bottom right and pick Recording when you’re ready to start recording.

Step 3. Stop/Save Recording
Visit Google Drive and login in if required. Navigate to My Drive on the left and search for the Meet Recordings folder on the right. It may take several minutes for the recording to show. If you do not already have a Meet Recordings folder, Google Drive will create one. You’ll notice the recording named with the meeting identifier along with the date and hour. If Chat took occurred during the meeting, you’d view this as a distinct text file.
To get a preview of your recording or chat transcript, just double-click the file in the Meet Recordings folder on Google Drive. You may download, distribute, or acquire a link to the recording (or chat) file from the Meet Recordings folder or the File Preview. In the folder, right-click the file and pick an action from the menu. Notice you may execute further options such as Rename, Make a copy, and Open with.

Step 4. Use WeVideo to Edit Videos
WeVideo is the cloud-based video production tool that supports student creativity, narrative, engagement and multimodal learning. Video projects develop deep knowledge about a subject through creating abilities like teamwork, communication and critical thinking. Log in and click Create New. Choose what you want to make (video, recording, etc.) and a format. Upload your media or search the Stock media repository. Make any extra modifications and preview your movie one final time. All done? Click Finish to export, download and share your video!

Part 6: Related FAQs
1. How do I edit video recordings?
Most individuals have the tools they need to film and edit small videos. With a smartphone or tablet and access to a computer, you can get the job done without even checking out equipment, much less employing a key grip. A laptop isn’t the finest equipment to film a movie–that would be extremely uncomfortable. Smartphone or tablet is easy to use. This topic is for those with access to an iPhone and a PC. Android, iPad, and Mac users will have a distinct process. Smartphones and tablets often default to recording video at a very high-Quality level, which takes up a lot of memory and results in big file sizes. Most likely you will want to lessen the resolution that you photograph.
Can you edit an already uploaded video?
If you have found yourself in this circumstance, your initial instinct could be to worry and assume you must repair the issue, delete the uploaded video, and re-upload the new one. However, this procedure will make your prior video URL dead, and any embeds of your video will display the following graphic to visitors. Nevertheless, these aforementioned sites recognizes that artists occasionally make small honest errors, or someone included in the uploaded video may demand that they be removed from it. So, to permit that, makers may chop away sections from their film without resetting a video’s metrics.
How to edit recorded video on iPhone?
If you have iOS 13 or later, you can edit films in the built-in Photos app… much as you edit your images. You may cut, crop, and straighten your films. And you may make your film more attractive by altering brightness, color, or even making it black and white. Filming films on iPhone has gotten more popular as iPhone camera lenses have progressed over the years. Many iPhone filmmakers desire the capacity to edit their video directly from their phone for simple social sharing. Using a video editing software for iPhone is a terrific method to effortlessly produce and upload videos. just open the video you want to modify, then press Edit at the upper right to get it done.
Conclusion:
If you routinely use Google Meet or Zoom, it can be a good idea to record your conferences so you can still return to them at a later period. Recording these conversations and meetings may be a big assistance when it’s time for later evaluations, updates, and enabling absent team members catch up on the meeting topic. For instance, do you wish to share meeting minutes or information with people missing in this meeting? Essentially the call recording is for other co-workers to view afterwards. Instead, you may use the recommended screen recorders to capture every moment and then use a specialist video editor like Filmora to make the required edits before sharing it with others.
For macOS 10.12 or later
After you’ve finished downloading it, you’ll need to install it on your computer so that you can start using it with your laptop.
Step 2: Launch the Program and Begin Customizing It
The next step is to launch the software application and start recording your screen. Simply click the New Recording button in the start-up box to start recording. You may totally alter your screen recordings using the tools included in Filmora. You may also incorporate your laptop’s Webcam or a microphone as an audio source in your recordings.
Step 3: Start/Stop Screen Recording
Now is the time to begin recording your audio, which you can accomplish by hitting the red circular recording button. Press the Square-shaped button on your laptop’s screen to end the recording.
Step 4: Edit the Recordings and Save Them
Finally, you may adjust your audio recordings with entirely configurable editing tools. To do so, use Filmora’s editor and utilize easy to complicated editing ways to edit your recorded audio files. Filmora’s Editor lets you add Animated Titles, amazing effects, Audio Enhancements, and more to your recorded video to make it more polished.
Step 5: Add Special Effects to Your Video
Wondershare Filmora was designed specifically to provide a professional touch to your videos. It includes a number of eye-catching and adaptable effects that you can use to make your video projects stand out from the crowd. We’ve gone through some of the greatest effects for giving life to your drab and amateurish videos in this section.
Step 6: Save or Share the Videos
Finally, after you’ve finished editing the recorded video, you may utilize the Filmora editor in its entirety, as described before. Click the Export option and select the platform where you wish to share your video clip to post your work of art immediately to YouTube or another well-known website. You may even alter the movie before sharing it if you desire.
Part 3. Edit Recorded Video with Zoom
Trimming and editing Zoom recordings is a necessary for digging out value-packed nuggets from captured footage. But although you already know this, you’re probably putting off doing so as you’re anticipating you’ll need to learn a ton of new tools to edit Zoom recordings.
Steps to Record Videos with Zoom
Step 1For the cloud recordings, go to zoom.us and log in to your account. Then, navigate to ‘Settings’ from the navigation menu on the left.
Step 2 Under Advanced cloud recording options, tick the option for ‘Optimize the recording for 3rd party video editor’ and click ‘Save’.
Step 3Then, navigate to ‘Recording’ from the navigation menu on the left. Check the option for ‘Optimize for 3rd party video editor.
Step 4To really edit a Zoom recording, whether it’s stored on your PC or Zoom cloud, you need to utilize third-party video editing software. But no worries, you don’t need any sophisticated equipment or software here.
Part 4. Edit Recorded Video in Teams
Teams gives the opportunity to record your online meetings. This may be especially beneficial for sharing meeting recordings with individuals unable to attend live, to preserve instructional material for future use, or to enable participants to revisit prior meeting topics. At the top of the meeting window, a message will appear stating that the recording has begun, which alerts participants that their interactions in the meeting may be recorded by the recording. You will also notice a recording sign and the duration of the recording in the top-left corner of the meeting window.
Steps to Record Videos with Teams
Step 1 Open Microsoft Teams on Windows and Mac.
Step 2 Go to appropriate Teams or Channel and click on the Video button at the top to create a video call.
Step 3Invite people and organize a meeting. Whenever you feel you need to record any significant point, click on the three-dot menu at the top.
Step 4 Click on Start recording and Microsoft Teams will start recording the video/voice call. As soon as you start recording, every participant will be told about it.
At any moment, you may stop recording from the same. Once the meeting as concluded, your recording will display in the Chat panel in the main Teams window. Please note that depending on the length of the recording it might take some time for the recording to complete and display in the meeting chat. To find the recording, pick the Chat panel, open the correct meeting from the chat list and the recording will display in the chat window once processed.
Part 5. Edit Recorded Video in Google Meet
With more individuals working from home these days, services like Google Meet are rising in popularity. You may have an online video conference, see everyone’s face, communicate, and take care of business. As with in-office meetings, notes with action items and summaries for online meetings are just as crucial. Unfortunately, it doesn’t always happen. To have formal documentation for your meeting or share it with people who couldn’t attend, try recording your Google Meet.
Steps to Record and Edit Videos by Meet
Step 1. Launch Meet
Visit Google Meet and sign in to join or start your meeting.
Step 2. Start Recording
Select the Activities symbol on the bottom right and pick Recording when you’re ready to start recording.
Step 3. Stop/Save Recording
Visit Google Drive and login in if required. Navigate to My Drive on the left and search for the Meet Recordings folder on the right. It may take several minutes for the recording to show. If you do not already have a Meet Recordings folder, Google Drive will create one. You’ll notice the recording named with the meeting identifier along with the date and hour. If Chat took occurred during the meeting, you’d view this as a distinct text file.
To get a preview of your recording or chat transcript, just double-click the file in the Meet Recordings folder on Google Drive. You may download, distribute, or acquire a link to the recording (or chat) file from the Meet Recordings folder or the File Preview. In the folder, right-click the file and pick an action from the menu. Notice you may execute further options such as Rename, Make a copy, and Open with.
Step 4. Use WeVideo to Edit Videos
WeVideo is the cloud-based video production tool that supports student creativity, narrative, engagement and multimodal learning. Video projects develop deep knowledge about a subject through creating abilities like teamwork, communication and critical thinking. Log in and click Create New. Choose what you want to make (video, recording, etc.) and a format. Upload your media or search the Stock media repository. Make any extra modifications and preview your movie one final time. All done? Click Finish to export, download and share your video!
Part 6: Related FAQs
1. How do I edit video recordings?
Most individuals have the tools they need to film and edit small videos. With a smartphone or tablet and access to a computer, you can get the job done without even checking out equipment, much less employing a key grip. A laptop isn’t the finest equipment to film a movie–that would be extremely uncomfortable. Smartphone or tablet is easy to use. This topic is for those with access to an iPhone and a PC. Android, iPad, and Mac users will have a distinct process. Smartphones and tablets often default to recording video at a very high-Quality level, which takes up a lot of memory and results in big file sizes. Most likely you will want to lessen the resolution that you photograph.
Can you edit an already uploaded video?
If you have found yourself in this circumstance, your initial instinct could be to worry and assume you must repair the issue, delete the uploaded video, and re-upload the new one. However, this procedure will make your prior video URL dead, and any embeds of your video will display the following graphic to visitors. Nevertheless, these aforementioned sites recognizes that artists occasionally make small honest errors, or someone included in the uploaded video may demand that they be removed from it. So, to permit that, makers may chop away sections from their film without resetting a video’s metrics.
How to edit recorded video on iPhone?
If you have iOS 13 or later, you can edit films in the built-in Photos app… much as you edit your images. You may cut, crop, and straighten your films. And you may make your film more attractive by altering brightness, color, or even making it black and white. Filming films on iPhone has gotten more popular as iPhone camera lenses have progressed over the years. Many iPhone filmmakers desire the capacity to edit their video directly from their phone for simple social sharing. Using a video editing software for iPhone is a terrific method to effortlessly produce and upload videos. just open the video you want to modify, then press Edit at the upper right to get it done.
Conclusion:
If you routinely use Google Meet or Zoom, it can be a good idea to record your conferences so you can still return to them at a later period. Recording these conversations and meetings may be a big assistance when it’s time for later evaluations, updates, and enabling absent team members catch up on the meeting topic. For instance, do you wish to share meeting minutes or information with people missing in this meeting? Essentially the call recording is for other co-workers to view afterwards. Instead, you may use the recommended screen recorders to capture every moment and then use a specialist video editor like Filmora to make the required edits before sharing it with others.
The Craziest 10 AI Editors You’ve Seen
The Craziest 10 AI Editors You’ve Ever Seen
An easy yet powerful editor
Numerous effects to choose from
Detailed tutorials provided by the official channel
Technological advancements in the field of video editing have opened new opportunities and possibilities for the editors to unleash their creativity and AI-based video editors are a major contribution to the field. With these intelligent tools, the cumbersome process of video editing has not only become quick but also hassle-free and results in excellent pro videos. So, if you too have been looking for one such artificial intelligence videos editing tools, you are reading on the right page.

In this article
01 [What is AI video editing tools?](#Part 1)
02 [Things To Consider While Selecting An Ai Editing Tool](#Part 2)
03 [Top 10 AI Video Editors](#Part 3)
Part 1 What is AI video editing tools?
In simplest terms, the software that uses artificial intelligence for editing videos is termed AI editing tools. These programs make use of AI algorithms to perform advanced editing tasks for creating visually appealing and interesting videos. The AI tools have not only helped in accelerating the video editing tools but also assists in taking care of complex functions with ease. A good AI editing tool can perform multiple tasks like determining the shots, applying filters, adding transitions, proposing changes, color correction, face detection, and more.
Part 2 Things to consider while selecting an AI editing tool
An array of AI editing tools is available and selecting one can be a confusing task. So, while choosing one of these programs, several criteria can be considered and some of these are listed below.
● Allows editing videos in a hassle-free manner.
● Quick use and processing.
● User-friendly interface.
● Capability to process all types of videos in high resolution.
● Comes with all the needed features.
● The learning curve is not very steep.
Part 3 Top 10 AI Video Editors
After reviewing several AI-based editing software, we have selected the top 10 in the category. Check out the list below.
01Magisto
This is a powerful video editing tool that is simple and quick to use. You simply need to add the content file and select the styling type as needed along with audio and other content after which everything will be taken care by the software. The program is also capable of optimizing the video to reach the maximum number of people and this is done based on real-time analytics. This is a paid tool and is apt for creating marketing videos.

02Recreate
For creating and editing interesting videos for social media platforms, this is an apt tool that allows video customization through fonts, transitions, colors, overlays, and several other elements. Using this software, your written content can be converted into videos as the AI technology finds music as well as visuals automatically to match your requirements. Additionally, the program also supports features like recording voice-overs, removing the background, generating AI voices, and more.

03Synthesia
This is an excellent video editing tool that is AI-based that can be used for digital marketing, training, communication, and several other tasks. The tool allows creating of interesting videos from the scripts and these footages can be up to 30 minutes long. Support for around 40 languages makes the program apt for all types of users. Some other key features of the software include duplicating the video, multi-sliding videos, customization options for voice, and more. The interface is simple and the process is also hassle-free.

04RawShorts
This is an online AI-based tool that can help convert the texts and the articles into videos for social media platforms and others. The technology of the tool will analyze your text content to know the main idea on which your video is to based. Then it automatically looks for the content needed including the voice and creates as well as edits the footage. A free trial version of the program is also available though it comes with several limitations. The drag and drop interface of the tool further makes it user-friendly.

05Lumen5
For bulk editing of videos quickly, this is a good tool to consider. The interface is simple which along with the drag and drop feature makes the tool apt even for beginners. An array of video templates is available to match your theme requirements and the tool after identifying your requirements will lookout for the perfect music, content, layout, and other elements. There is also a library in the software from where you can find the desired collection of videos, images, and other media files.

06Kamua
For simple and quick editing of your videos, Kamua is a great tool to use. This is a browser-based program that supports all basic functions like resizing, captioning, and more. With its cloud computing feature, a large number of files can be processed quickly and the tool supports adding the subtitles automatically to your project and that too in more than 60 languages. The tool also has a free version for the users who first wish to test before buying the subscription.

07InVideo
This is another widely used online tool supporting advanced video editing functions. The AI-based technology of the software will let you convert your text into the desired videos effortlessly. The Intelligent Video Assistant of the software will also check for any hidden mistakes in your videos and will also correct them. You can add multiple effects to your videos using the tool to create eye-catchy footage.

08QuickStories
Using this AI-based editing tool, your video footage captured through a camera, GoPro as well as other devices can be edited like a pro to take them to an all-new level. The software support functions like intelligent tagging, night colors, white balancing, color rendering, and much more.

09Designs.ai
Using this online AI-based designing tool you can create posters, logos, banners, and several other videos with ease and in high quality. Text to video technology is supported by the program and you can even add voiceovers. Supporting more than 20 languages, the program also comes with a collection of images, clips, as well as audio files that can be used as needed. Transitions, animations, and other effects and elements can be added to improve the overall video look.

10**Wondershare Filmora Video Editor **
When it comes to video editing tools, the list remains incomplete without mentioning a versatile tool called Wondershare Filmora, This Windows and Mac-based software is easy and quick to install after which it is all set to create excellent videos using its extensive range of features. Using the tool, you can add transitions, effects, rotate, split, merge, and perform a host of other functions as well. Audio-based functions like audio compression, noise reduction, automatic audio syncing, and others are also supported. The interface of the tool is simple and the process of editing is hassle-free.
For Win 7 or later (64-bit)
For macOS 10.12 or later
● Ending Thoughts →
● AI-based video editing tools are intelligent programs that help in customizing the videos automatically.
● A number of these desktop and online tools are available to help you edit the footage.
● Depending on your files, editing, and other functions required, the selection of an appropriate tool can be done.
Technological advancements in the field of video editing have opened new opportunities and possibilities for the editors to unleash their creativity and AI-based video editors are a major contribution to the field. With these intelligent tools, the cumbersome process of video editing has not only become quick but also hassle-free and results in excellent pro videos. So, if you too have been looking for one such artificial intelligence videos editing tools, you are reading on the right page.
In this article
01 [What is AI video editing tools?](#Part 1)
02 [Things To Consider While Selecting An Ai Editing Tool](#Part 2)
03 [Top 10 AI Video Editors](#Part 3)
Part 1 What is AI video editing tools?
In simplest terms, the software that uses artificial intelligence for editing videos is termed AI editing tools. These programs make use of AI algorithms to perform advanced editing tasks for creating visually appealing and interesting videos. The AI tools have not only helped in accelerating the video editing tools but also assists in taking care of complex functions with ease. A good AI editing tool can perform multiple tasks like determining the shots, applying filters, adding transitions, proposing changes, color correction, face detection, and more.
Part 2 Things to consider while selecting an AI editing tool
An array of AI editing tools is available and selecting one can be a confusing task. So, while choosing one of these programs, several criteria can be considered and some of these are listed below.
● Allows editing videos in a hassle-free manner.
● Quick use and processing.
● User-friendly interface.
● Capability to process all types of videos in high resolution.
● Comes with all the needed features.
● The learning curve is not very steep.
Part 3 Top 10 AI Video Editors
After reviewing several AI-based editing software, we have selected the top 10 in the category. Check out the list below.
01Magisto
This is a powerful video editing tool that is simple and quick to use. You simply need to add the content file and select the styling type as needed along with audio and other content after which everything will be taken care by the software. The program is also capable of optimizing the video to reach the maximum number of people and this is done based on real-time analytics. This is a paid tool and is apt for creating marketing videos.
02Recreate
For creating and editing interesting videos for social media platforms, this is an apt tool that allows video customization through fonts, transitions, colors, overlays, and several other elements. Using this software, your written content can be converted into videos as the AI technology finds music as well as visuals automatically to match your requirements. Additionally, the program also supports features like recording voice-overs, removing the background, generating AI voices, and more.
03Synthesia
This is an excellent video editing tool that is AI-based that can be used for digital marketing, training, communication, and several other tasks. The tool allows creating of interesting videos from the scripts and these footages can be up to 30 minutes long. Support for around 40 languages makes the program apt for all types of users. Some other key features of the software include duplicating the video, multi-sliding videos, customization options for voice, and more. The interface is simple and the process is also hassle-free.
04RawShorts
This is an online AI-based tool that can help convert the texts and the articles into videos for social media platforms and others. The technology of the tool will analyze your text content to know the main idea on which your video is to based. Then it automatically looks for the content needed including the voice and creates as well as edits the footage. A free trial version of the program is also available though it comes with several limitations. The drag and drop interface of the tool further makes it user-friendly.
05Lumen5
For bulk editing of videos quickly, this is a good tool to consider. The interface is simple which along with the drag and drop feature makes the tool apt even for beginners. An array of video templates is available to match your theme requirements and the tool after identifying your requirements will lookout for the perfect music, content, layout, and other elements. There is also a library in the software from where you can find the desired collection of videos, images, and other media files.
06Kamua
For simple and quick editing of your videos, Kamua is a great tool to use. This is a browser-based program that supports all basic functions like resizing, captioning, and more. With its cloud computing feature, a large number of files can be processed quickly and the tool supports adding the subtitles automatically to your project and that too in more than 60 languages. The tool also has a free version for the users who first wish to test before buying the subscription.
07InVideo
This is another widely used online tool supporting advanced video editing functions. The AI-based technology of the software will let you convert your text into the desired videos effortlessly. The Intelligent Video Assistant of the software will also check for any hidden mistakes in your videos and will also correct them. You can add multiple effects to your videos using the tool to create eye-catchy footage.
08QuickStories
Using this AI-based editing tool, your video footage captured through a camera, GoPro as well as other devices can be edited like a pro to take them to an all-new level. The software support functions like intelligent tagging, night colors, white balancing, color rendering, and much more.
09Designs.ai
Using this online AI-based designing tool you can create posters, logos, banners, and several other videos with ease and in high quality. Text to video technology is supported by the program and you can even add voiceovers. Supporting more than 20 languages, the program also comes with a collection of images, clips, as well as audio files that can be used as needed. Transitions, animations, and other effects and elements can be added to improve the overall video look.
10**Wondershare Filmora Video Editor **
When it comes to video editing tools, the list remains incomplete without mentioning a versatile tool called Wondershare Filmora, This Windows and Mac-based software is easy and quick to install after which it is all set to create excellent videos using its extensive range of features. Using the tool, you can add transitions, effects, rotate, split, merge, and perform a host of other functions as well. Audio-based functions like audio compression, noise reduction, automatic audio syncing, and others are also supported. The interface of the tool is simple and the process of editing is hassle-free.
For Win 7 or later (64-bit)
For macOS 10.12 or later
● Ending Thoughts →
● AI-based video editing tools are intelligent programs that help in customizing the videos automatically.
● A number of these desktop and online tools are available to help you edit the footage.
● Depending on your files, editing, and other functions required, the selection of an appropriate tool can be done.
Also read:
- Updated 2024 Approved 4 Ways to Rotate Videos on Windows PC
- 2024 Approved Whatsapp Video converterKeywords Convert Video for Whatsapp 6600; Video Converter for Whatsapp 6600; Reduce Video Size for Whatsapp 1600; Whatsapp Supported Video Formats 720; Convert Video to Whatsapp Format 590
- How to Create an Alternate Reality Effect
- 2024 Approved This Article Talks in Detail About How to Download Windows Movie Maker 2012 Version, the Key Features, How to Use It, Etc. It Further Discusses an Alternative Way to Create Videos on Windows PC. Check Out
- Do You Want to Know About Efficient Motion Blur Plugins for Adobe Effects? Read This Article to Find Out How to Use Motion Blur Plugins for Enhanced Results
- Fixing The Slow Playback Issues in DaVinci Resolve for 2024
- New Best 8 AI Video Denoise Software
- 2024 Approved How To Create Transparent Background On Picsart
- New In 2024, Want to Immediately Know All About Discord GIF?
- New 15 Camera Shake Preset for Adobe Premiere Pro for 2024
- New In 2024, How Have Game Recording Software Improved Their Stature in the Market? An Overview
- Updated In 2024, Best Android Apps For Creating Slow Motion Videos
- Updated Using One of the Best Converter Tools to Turn GIFs Into PNG or JPG. Here, Learn About the Ten Best Ones for Different Operating Systems, with Details on Features, Prices, and More
- New In 2024, Some Effective Slow Motion Video Editors You Can Try
- Step by Step to Crop Videos Using Lightworks
- 4 Solutions to Resize a WebM File
- Updated Read and Learn How to Convert a Slow-Motion Video to Normal in This Guide. Besides, Find the Best Desktop Solution to Adjust Video Speed Quickly and Easily
- New How to Add Freeze Frame to Your Video From Any Device?
- 2024 Approved 20 Must-Have Graduation Songs
- How to Make a Bokeh Effect for 2024
- New A Complete Guide to Use Distortion Effect in Premiere Pro for 2024
- New This Article Has a Detailed Description of How You Can Split the Videos in Lightworks Including the the Discussion of Splitting the Wondershare Filmora as an Alternative. It Is Also a Suitable Choice
- Updated Wondering About How to Easily Create a Slideshow on Your iPhone? Well, Take Note of some of the Finest Apps to Turn Your Vision Into Reality
- 2024 Approved Want to Give a Bold and Colorful Look to Your Ad or Abstract Art Project? This Quick and Easy Tutorial Teaches How to Create a Risograph Effect in Photoshop
- New Looking for a Video Editor Where You Can Edit Your Tutorial and Training Videos? Camtasia Is a Great Choice. But Is It the Best Video Editor Available? Find Out From Our Camtasia Review
- 2024 Approved Ways to Make Canva Collages
- Updated How to Make Discord GIF Avatar in Depth Guide
- New In 2024, Top 12 Best Freeze Frame Video Editing Examples
- Best Video Grabbers for Chrome for 2024
- New How to Use Zoom in Google
- In 2024, How to Perfect Quick and Efficient Video Editing | Keyboard Shortcuts in Filmora
- How to Create Loop Videos with Filmora
- New In 2024, How-To Tutorials of Kapwing Collage Maker
- New How To Trim Video In Premiere Pro in Different Ways for 2024
- Updated 8 Tips to Apply Cinematic Color Grading to Your Video for 2024
- Complete guide for recovering video files on Reno 10 Pro 5G
- How To Unlock a Realme Easily?
- Simple and Effective Ways to Change Your Country on YouTube App Of your Lava Yuva 3 | Dr.fone
- In 2024, How To Remove Passcode From Apple iPhone 7 Plus? Complete Guide | Dr.fone
- In 2024, 5 Ways to Track Apple iPhone 6s Plus without App | Dr.fone
- In 2024, Here Are Some Reliable Ways to Get Pokemon Go Friend Codes For Honor Magic 6 Pro | Dr.fone
- 3 Ways to Change Location on Facebook Marketplace for Realme Note 50 | Dr.fone
- How to Unlock Apple iPhone 15 Pro Max without Passcode or Face ID
- Best Itel A60s Pattern Lock Removal Tools Remove Android Pattern Lock Without Losing Data
- Delete Gmail Account With/Without Password On Infinix Smart 8 Plus
- 9 Best Free Android Monitoring Apps to Monitor Phone Remotely For your Vivo V29 Pro | Dr.fone
- Title: In 2024, Ways to Merge Videos in HandBrake? Expectation Vs. Reality
- Author: Chloe
- Created at : 2024-04-24 07:08:16
- Updated at : 2024-04-25 07:08:16
- Link: https://ai-editing-video.techidaily.com/in-2024-ways-to-merge-videos-in-handbrake-expectation-vs-reality/
- License: This work is licensed under CC BY-NC-SA 4.0.
