
:max_bytes(150000):strip_icc():format(webp)/the-17-best-graphic-design-software-2024-1dd6c15b34124b25b65e4b096e4e6ba4.jpg)
In 2024, Which Is the Best Video Slideshow Maker Available Online? Methods to Prepare Custom Slideshows for Google Presentation. How to Make a Slide Show Video?
Which Is the Best Video Slideshow Maker Available Online? Methods to Prepare Custom Slideshows for Google Presentation. How to Make a Slide Show Video?
Want Make a Slide Show Video Here’s How
An easy yet powerful editor
Numerous effects to choose from
Detailed tutorials provided by the official channel
Dear readers you don’t have to worry a bit, in this article we bring you the best slideshow video maker and easy ways using which you can custom the templates for your presentation in your way.
In this article
01 8 Best Slideshow Video Templates
02 [10 Best Video Slideshow Maker](#Part 2)
03 [5 Easy Steps to Make a Slide Show Video](#Part 3)
04 [How to Custom Templates for Google Slides Presentation](#Part 4)
Part 1 Best Slideshow Video Templates
A slideshow video could be an effective way of presenting your point to your audience. This becomes super easy when you use a good template to create your slide show video. Here are 8 best slideshow video templets which you can give a try
01Instagram Slideshow
This slide show video template is best for creating videos for Instagram and other social media platforms.

02Clean Slideshow Template
This one is suited to create video slide show for family purposes. This template could also be engaged in a clean slideshow presentation for your office.

03Parallax Scrolling Slideshow Template
This is one of the most video templates which you can use for your slide show video. This template has various after-effects which can take your presentations to a different level.

04Modern Tie Slideshow Template
If you are in a business or corporate job then give this slideshow video template a try. With a unique, tiled look and a 3D tile drop-down effect, your videos will impress everyone.

05Minimal Slideshow template
Minimal slide template is best for business presentations or product promotion. Here you can use creative text images and graphics to promote your product.

06Sweet Memories Cinematic Slideshow
If you want the best template for presenting your memories, marriages, anniversaries, emotions etc then Sweet Memories Cinematic Slideshow is the one you need.

07Motiongray Slideshow Templates
If you want to turn your adventure images and videos into an impressive slide show video then this is a must try template for you.

08Stylish Spinning Columns Slideshow Template
This template is best suited for high-end business projects. Here you will have image placeholders paired with a modern spinning column transition effect to make the slideshow video outstanding.

09Fast Slide Slideshow Video Template
If you want to create a high paced slide video show with various concepts explained in it then go for the Fast Slide Slideshow Video Template.

10Creative Slideshow Template
For the ones who want dynamic, fast-paced animation style and bold typography in their slideshow video this is the best-suited one for them.

Part 2 10 Best Video Slideshow Maker
After knowing the best templates for your slideshow video you, may be curious to know about the slideshow video maker. Here, after a lot of research, we have come up with the list of 10 best slideshow video maker which can make your professional life easy. Check the list
01PhotoStage
PhotoStage by NHC Softwares is one the best online software to create video slide shows online. This tool is specially very helpful in creating personal and commercial presentations.
Key Features - Key features of PhotoStage includes user oriented interface, animations, and music tracks (300 +). It has inbuilt Audio editing tools and a built-in music collection. If you use this software in a paid version then you can unlock its thousands of animation effects and transitions. You can also export your slide show between PC, mobile, Web etc.
Price - PhotoStage PRO $70.
Rating - 4 stars

02SmartShow 3D
The next slideshow video maker to feature on our list is SmartShow 3D.
This software is known for its very easy to use interface with power-packed and loaded features.
Key Features - It has more than 200 templates for use of every kind. This software enables you to use 300+ transitions, special effects, 3D collages, and nature effects with animations and graphics. You can add music to your slideshow video from more than 200 music tracks with precise volume adjustment.
Price - Standard version cost $ 39.90 and the Deluxe version costs $ 59.50 (10 days free trial)
Rating - 5 stars

03Magix PhotoStory
If you have a bit of experience in making slideshows then you can take your slideshow making experience to another level using this software. A custom animation module and an integrated photo editing tool of Magix PhotoStory make it stand out in our list.
Key Features - 300+ library of effects coupled with a huge collection of music tracks. 100 + video templates and graphics. This software has Built-in filters for photo enhancement with the picture-in-picture option.
Price - $ 49.99 ( 30 days free trial )
Rating - 4.5 stars

04PTE AV Studio
The best suited online tool to make a slide show video is PTE AV Studio. If you want to create smooth and fluid visual slideshows then try this software once. Here you can combine pictures, videos, and audio files into sleek slideshows and impress your boss and colleagues.
Key Features - PTE AV studio supports 100+ effects and templates. It has the best video, photo, and multitrack sound editing tools among competitors. You can create custom animations and graphics if you want. With a huge collection of masks, filters, and text styles you can create high resolution slideshow videos.
Price - Standard Version costs $ 69 while and Pro version costs $ 139 (30 days free trial)
Rating - 4 stars

05Adobe Premiere Pro
If you are a regular slideshow user then no doubt you would know about Adobe Premiere Pro. Those who want easy to navigate the software with hundreds of features then try this one. The only draw [back of this software is that it has no inbuilt templates but don’t worry you can download thousands of templates from the internet for free.
Key Features - Animations could be added to slides using keyframes. Efficient video and audio editing and creating tool. Animations and graphics add a cherry to the cake. Advanced photo enhancement and filters to make your photos and slideshows stand out.
Price - $ 239.88 a year (30 days free trial)

06CyberLink MediaShow
Cyberlink MediaShow is one of the earliest software that came in the field of slideshow video creation. This software enables you to create awesome slideshows, movies, and screensavers. Cyberlink MediaShow has enough features to make eye-catching videos and still it is one of the easiest ones to use. If you aim to create easily simplistic videos then go for this software.
Key Features - Descent collection of transitions with a built-in photo editing module. It is equipped with face recognition and tagging feature. You can integrate social media platforms like Facebook and share to them directly from the software.
Price - $ 49.99 ( 30 days free trial )
Rating - 3.5 stars

07AquaSoft Slideshow
For users who want to create colourful and dynamic family-themed slide show videos then AquaSoft Slideshow is the software to try. After a review from thousands of users, this software has made a place in our featured list. The user-friendly interface with dozens of eye-catching effects and animated text make it fun to use. It allows you to create colourful, text-filled videos and so on.
Key Features - It is powered packed with more than 200 effects and transitions and hundreds of text options. It supports almost all the formats even the older ones like CDs and DVDs. Smooth and advanced editing tools for a better experience.
Price - Premium costs $ 57.00 while Ultimate costs $ 97.00 ( 30 days free trial version)
Rating - 4 stars

08Kizoa
This software helps you to create slide show videos which can be played on any screen. This is basically an online video creating and editing tool but it provides formats for creating slideshows too. You can use this tool on whatever platform you have like a tablet, TV, smartphone, computer screen etc.
Key Features - Intelligent cropping tool of Kizoa helps you to create and edit world-class finest images for your slideshow video. The created slideshow could be downloaded in various formats like MP4, AVI, MOV, etc. You can directly share the video to online platforms.
Price - Starter $ 29.99, Creator $ 49.99 , Professional $ 99.99, and Business $ 299.99
Rating - 4 stars

Part 3 5 Easy Steps to Make a Slide Show Video
Guys, now you know the best templates and best slideshow video makers but now the question comes “how to make a slideshow video?”. If you are confused and don’t have any clue about making a slideshow video then just get your google slides and follow the steps explained below.
Step 1: Get Free Screen Recorder
Firstly you have to start with launching Free Screen Recorder. You can use any screen recorder of your choice. Create your account on the screen recorder and get started.
Step 2. Record Your Google Slides
Noe on the screen recorder “Drag and drop” the sides of this box that appears on your screen to fit your slides into it. Select a suitable size for your video ( preferably 720 p).
Now on the left corner of the screen, you will see various controls using them you can perform various functions like start and stop recording, recording to webcam, selecting the size of the video, add audio and narration.
After performing all the functions click on “Record” to record your slides into video.
Step 3. Finishing of Recording
If you are satisfied with the video then click on the blue button to stop recording, and select “done” to save your video. However, if you don’t like it you can restart the process anytime.
Step 4. Editing of the Video
Once you have completed the recording of the video you can edit it according to your requirements. You can add or delete overlays, video sounds, narrations, graphics, green screen etc.
Step 5. Publish and Share your Slideshow video
After completing the editing and creating work click on “Publish”. You can save and publish your video directly on a YouTube channel, or Google Drive folder, or save your video as a file. And you can share it on any social media platform.
Part 4 How to Custom Templates for Google Slides Presentation
Just imagine, how easy would it have been if you could create the templates for your slide show videos. This would have made your professional life so easy. If you too are looking for such an online tool which provides you with the feature for creating custom templates for your slideshow video then you should try Wondershare’s Wondershare Filmora Video Editor Video Editor. Don’t get confused with the name it’s a video editor but has awesome features for creating custom slideshow videos. Following are some of the highlighting features of Filmora Video Editor.
Easy to use for beginners.
User-friendly interface and bunches of editing tools.
Library (royalty-free) containing hundreds of audio options.
Hundreds of templates, transitions, and filters to make your video eye-catching.
Here is a brief tutorial to use Wondershare Filmora Video Editor to create custom templates for your slideshow video.
For Win 7 or later (64-bit)
For macOS 10.12 or later
Step 1. Adding Photos and Videos
Open Filmora and click on the “Import menu”. Here select the photos and videos you want to use and click on “OK” to begin the importing.

Step 2. Positioning the Media Files on Timeline
Click on “File menu” > “Preferences option” > “Editing tab” > “Photo Placement drop-down menu”. Here you can perform various functions like zooming of images, setting the duration of images, transitions and effects, crop and fitting.

Now if you want to add more images and videos repeat steps 1 and 2.
Step 3. Use the transitions
Use transitions for smooth transitioning from one slide to another. Click on “Transition Setting Window” and set the duration for the transition.

Step 4. Apply Filters and Overlays
Go to “ Effect Tab” and select suitable filters and overlays for your video.

Step 5. Add Motion Graphics Element (Optional Step)
If you wish you can create motion graphics elements for your video. Click on the “ Elements tab” and select the best suited for you.

Step 6. Record Voiceover and create a Soundtrack
Go to “Media tab” > “ Record drop-down “ > “ Record Voiceover feature” to record and create soundtracks and voiceovers.

Step 7. Exporting the Slideshow Video
After making all the adjustments in the video click on the “Export” and wait for the Export window to appear on the screen. Now here you can select the output format of the file and the location for exporting your slideshow video.

● Ending Thoughts →
● Dear readers, now it’s time, to sum up this article. We hope our efforts have made things simple for you. We have tried to bring you the best online templates available online.
● You can now read our article and learn about the best slideshow video makers available online. You can use any one of them as per your need.
● If you want to create custom templates for your slideshow video, then we recommend to try Wondershare Filmora Video Editor for easy and effective custom template creation.
Dear readers you don’t have to worry a bit, in this article we bring you the best slideshow video maker and easy ways using which you can custom the templates for your presentation in your way.
In this article
01 8 Best Slideshow Video Templates
02 [10 Best Video Slideshow Maker](#Part 2)
03 [5 Easy Steps to Make a Slide Show Video](#Part 3)
04 [How to Custom Templates for Google Slides Presentation](#Part 4)
Part 1 Best Slideshow Video Templates
A slideshow video could be an effective way of presenting your point to your audience. This becomes super easy when you use a good template to create your slide show video. Here are 8 best slideshow video templets which you can give a try
01Instagram Slideshow
This slide show video template is best for creating videos for Instagram and other social media platforms.
02Clean Slideshow Template
This one is suited to create video slide show for family purposes. This template could also be engaged in a clean slideshow presentation for your office.
03Parallax Scrolling Slideshow Template
This is one of the most video templates which you can use for your slide show video. This template has various after-effects which can take your presentations to a different level.
04Modern Tie Slideshow Template
If you are in a business or corporate job then give this slideshow video template a try. With a unique, tiled look and a 3D tile drop-down effect, your videos will impress everyone.
05Minimal Slideshow template
Minimal slide template is best for business presentations or product promotion. Here you can use creative text images and graphics to promote your product.
06Sweet Memories Cinematic Slideshow
If you want the best template for presenting your memories, marriages, anniversaries, emotions etc then Sweet Memories Cinematic Slideshow is the one you need.
07Motiongray Slideshow Templates
If you want to turn your adventure images and videos into an impressive slide show video then this is a must try template for you.
08Stylish Spinning Columns Slideshow Template
This template is best suited for high-end business projects. Here you will have image placeholders paired with a modern spinning column transition effect to make the slideshow video outstanding.
09Fast Slide Slideshow Video Template
If you want to create a high paced slide video show with various concepts explained in it then go for the Fast Slide Slideshow Video Template.
10Creative Slideshow Template
For the ones who want dynamic, fast-paced animation style and bold typography in their slideshow video this is the best-suited one for them.
Part 2 10 Best Video Slideshow Maker
After knowing the best templates for your slideshow video you, may be curious to know about the slideshow video maker. Here, after a lot of research, we have come up with the list of 10 best slideshow video maker which can make your professional life easy. Check the list
01PhotoStage
PhotoStage by NHC Softwares is one the best online software to create video slide shows online. This tool is specially very helpful in creating personal and commercial presentations.
Key Features - Key features of PhotoStage includes user oriented interface, animations, and music tracks (300 +). It has inbuilt Audio editing tools and a built-in music collection. If you use this software in a paid version then you can unlock its thousands of animation effects and transitions. You can also export your slide show between PC, mobile, Web etc.
Price - PhotoStage PRO $70.
Rating - 4 stars
02SmartShow 3D
The next slideshow video maker to feature on our list is SmartShow 3D.
This software is known for its very easy to use interface with power-packed and loaded features.
Key Features - It has more than 200 templates for use of every kind. This software enables you to use 300+ transitions, special effects, 3D collages, and nature effects with animations and graphics. You can add music to your slideshow video from more than 200 music tracks with precise volume adjustment.
Price - Standard version cost $ 39.90 and the Deluxe version costs $ 59.50 (10 days free trial)
Rating - 5 stars
03Magix PhotoStory
If you have a bit of experience in making slideshows then you can take your slideshow making experience to another level using this software. A custom animation module and an integrated photo editing tool of Magix PhotoStory make it stand out in our list.
Key Features - 300+ library of effects coupled with a huge collection of music tracks. 100 + video templates and graphics. This software has Built-in filters for photo enhancement with the picture-in-picture option.
Price - $ 49.99 ( 30 days free trial )
Rating - 4.5 stars
04PTE AV Studio
The best suited online tool to make a slide show video is PTE AV Studio. If you want to create smooth and fluid visual slideshows then try this software once. Here you can combine pictures, videos, and audio files into sleek slideshows and impress your boss and colleagues.
Key Features - PTE AV studio supports 100+ effects and templates. It has the best video, photo, and multitrack sound editing tools among competitors. You can create custom animations and graphics if you want. With a huge collection of masks, filters, and text styles you can create high resolution slideshow videos.
Price - Standard Version costs $ 69 while and Pro version costs $ 139 (30 days free trial)
Rating - 4 stars
05Adobe Premiere Pro
If you are a regular slideshow user then no doubt you would know about Adobe Premiere Pro. Those who want easy to navigate the software with hundreds of features then try this one. The only draw [back of this software is that it has no inbuilt templates but don’t worry you can download thousands of templates from the internet for free.
Key Features - Animations could be added to slides using keyframes. Efficient video and audio editing and creating tool. Animations and graphics add a cherry to the cake. Advanced photo enhancement and filters to make your photos and slideshows stand out.
Price - $ 239.88 a year (30 days free trial)
06CyberLink MediaShow
Cyberlink MediaShow is one of the earliest software that came in the field of slideshow video creation. This software enables you to create awesome slideshows, movies, and screensavers. Cyberlink MediaShow has enough features to make eye-catching videos and still it is one of the easiest ones to use. If you aim to create easily simplistic videos then go for this software.
Key Features - Descent collection of transitions with a built-in photo editing module. It is equipped with face recognition and tagging feature. You can integrate social media platforms like Facebook and share to them directly from the software.
Price - $ 49.99 ( 30 days free trial )
Rating - 3.5 stars
07AquaSoft Slideshow
For users who want to create colourful and dynamic family-themed slide show videos then AquaSoft Slideshow is the software to try. After a review from thousands of users, this software has made a place in our featured list. The user-friendly interface with dozens of eye-catching effects and animated text make it fun to use. It allows you to create colourful, text-filled videos and so on.
Key Features - It is powered packed with more than 200 effects and transitions and hundreds of text options. It supports almost all the formats even the older ones like CDs and DVDs. Smooth and advanced editing tools for a better experience.
Price - Premium costs $ 57.00 while Ultimate costs $ 97.00 ( 30 days free trial version)
Rating - 4 stars
08Kizoa
This software helps you to create slide show videos which can be played on any screen. This is basically an online video creating and editing tool but it provides formats for creating slideshows too. You can use this tool on whatever platform you have like a tablet, TV, smartphone, computer screen etc.
Key Features - Intelligent cropping tool of Kizoa helps you to create and edit world-class finest images for your slideshow video. The created slideshow could be downloaded in various formats like MP4, AVI, MOV, etc. You can directly share the video to online platforms.
Price - Starter $ 29.99, Creator $ 49.99 , Professional $ 99.99, and Business $ 299.99
Rating - 4 stars
Part 3 5 Easy Steps to Make a Slide Show Video
Guys, now you know the best templates and best slideshow video makers but now the question comes “how to make a slideshow video?”. If you are confused and don’t have any clue about making a slideshow video then just get your google slides and follow the steps explained below.
Step 1: Get Free Screen Recorder
Firstly you have to start with launching Free Screen Recorder. You can use any screen recorder of your choice. Create your account on the screen recorder and get started.
Step 2. Record Your Google Slides
Noe on the screen recorder “Drag and drop” the sides of this box that appears on your screen to fit your slides into it. Select a suitable size for your video ( preferably 720 p).
Now on the left corner of the screen, you will see various controls using them you can perform various functions like start and stop recording, recording to webcam, selecting the size of the video, add audio and narration.
After performing all the functions click on “Record” to record your slides into video.
Step 3. Finishing of Recording
If you are satisfied with the video then click on the blue button to stop recording, and select “done” to save your video. However, if you don’t like it you can restart the process anytime.
Step 4. Editing of the Video
Once you have completed the recording of the video you can edit it according to your requirements. You can add or delete overlays, video sounds, narrations, graphics, green screen etc.
Step 5. Publish and Share your Slideshow video
After completing the editing and creating work click on “Publish”. You can save and publish your video directly on a YouTube channel, or Google Drive folder, or save your video as a file. And you can share it on any social media platform.
Part 4 How to Custom Templates for Google Slides Presentation
Just imagine, how easy would it have been if you could create the templates for your slide show videos. This would have made your professional life so easy. If you too are looking for such an online tool which provides you with the feature for creating custom templates for your slideshow video then you should try Wondershare’s Wondershare Filmora Video Editor Video Editor. Don’t get confused with the name it’s a video editor but has awesome features for creating custom slideshow videos. Following are some of the highlighting features of Filmora Video Editor.
Easy to use for beginners.
User-friendly interface and bunches of editing tools.
Library (royalty-free) containing hundreds of audio options.
Hundreds of templates, transitions, and filters to make your video eye-catching.
Here is a brief tutorial to use Wondershare Filmora Video Editor to create custom templates for your slideshow video.
For Win 7 or later (64-bit)
For macOS 10.12 or later
Step 1. Adding Photos and Videos
Open Filmora and click on the “Import menu”. Here select the photos and videos you want to use and click on “OK” to begin the importing.
Step 2. Positioning the Media Files on Timeline
Click on “File menu” > “Preferences option” > “Editing tab” > “Photo Placement drop-down menu”. Here you can perform various functions like zooming of images, setting the duration of images, transitions and effects, crop and fitting.
Now if you want to add more images and videos repeat steps 1 and 2.
Step 3. Use the transitions
Use transitions for smooth transitioning from one slide to another. Click on “Transition Setting Window” and set the duration for the transition.
Step 4. Apply Filters and Overlays
Go to “ Effect Tab” and select suitable filters and overlays for your video.
Step 5. Add Motion Graphics Element (Optional Step)
If you wish you can create motion graphics elements for your video. Click on the “ Elements tab” and select the best suited for you.
Step 6. Record Voiceover and create a Soundtrack
Go to “Media tab” > “ Record drop-down “ > “ Record Voiceover feature” to record and create soundtracks and voiceovers.
Step 7. Exporting the Slideshow Video
After making all the adjustments in the video click on the “Export” and wait for the Export window to appear on the screen. Now here you can select the output format of the file and the location for exporting your slideshow video.
● Ending Thoughts →
● Dear readers, now it’s time, to sum up this article. We hope our efforts have made things simple for you. We have tried to bring you the best online templates available online.
● You can now read our article and learn about the best slideshow video makers available online. You can use any one of them as per your need.
● If you want to create custom templates for your slideshow video, then we recommend to try Wondershare Filmora Video Editor for easy and effective custom template creation.
Frame Blending Is a Great Way to Smooth Out Your Video Footage in Adobe Premiere Pro. Using This Technique, You Can Create a More Natural Looking Motion by Averaging Out the Frames in Your Clips
Create High-Quality Video - Wondershare Filmora
An easy and powerful YouTube video editor
Numerous video and audio effects to choose from
Detailed tutorials are provided by the official channel
Frame blending is a video editing technique used to create smooth transitions between two video frames. This process is often used to create special effects or transition between two different video clips. Frame blending can be done manually or with the help of software.
When frame blending is done manually, the editor will take two consecutive frames and blend them. This is done by using a process called cross-fading. Cross-fading is when the first frame gradually fades out while the second frame gradually fades in. The result is a seamless transition between the two frames.
Frame blending can also be done with the help of software. Many software programs offer frame blending capabilities Like Adobe Premiere Pro and more. These software programs typically have a user interface that allows the user to select the two frames that they want to blend. The software will then perform the cross-fading process automatically.

In this article
01 What is frame blending in Premiere Pro?
02 How to Choose from Frame Blending/ Frame Sampling/ Optical Flow
03 How to use Frame Blanding in Adobe Premiere Pro?
What is frame blending in Premiere Pro?
In Adobe Premiere Pro, frame blending is a built-in feature that can be used to create smooth transitions between two video frames. This feature can be accessed by selecting the “Effects” tab and choosing the “Frame Blending” option.
When using frame blending in Premiere Pro, the user will first need to select the two frames they want to blend. The user can then specify the amount of cross-fade they want to apply. The software will then automatically perform the frame blending process.

How to Choose from Frame Blending/ Frame Sampling/ Optical Flow
The different types of frame blending are:
- Frame Sampling: best for smooth movements, no image distortion.
- Optical Flow: smoother results but can cause image distortion.
- Frame Blending: a mix of the two, some image distortion but smoother results.
So, choosing which type of frame blending to use depends on the footage and the desired results. If you want smooth results with no image distortion, frame sampling is the best option. However, if you don’t mind some image distortion in exchange for smoother results, optical flow or frame blending would be better choices.
How to decide which option is the best for your use? Let’s explain more, and It depends on the footage and the desired results. If you want smooth results with no image distortion, frame sampling is the best option. However, if you don’t mind some image distortion in exchange for smoother results, optical flow or frame blending would be better choices.

How to use Frame Blanding in Adobe Premiere Pro?
Step 1\
Using frame blending in Adobe Premiere Pro is a simple process. First, the user will need to select the two frames that they want to blend. The user can then specify the amount of cross-fade they want to apply. The software will then automatically perform the frame blending process.
Open up Adobe Premiere Pro and load the two frames that you want to blend to get started. Once the frames are loaded, select the “Effects” tab and then choose the “Frame Blending” option.
Step 2\
Next, select the two frames that you want to blend. You can perform this by clicking on the first frame and then holding down the “Shift” key while clicking on the second frame.
Once the two frames are selected, specify the amount of cross-fade that you want to apply. You can do this by adjusting the “Crossfade Duration” slider. The software will then automatically perform the frame blending process.

Frame blending is a simple and effective way to create smooth transitions between two video frames. This technique can create a variety of different effects, such as dissolves, fades, and more. Frame blending is a built-in feature in Adobe Premiere Pro and can be accessed by selecting the “Effects” tab and then choosing the “Frame Blending” option. To use frame blending, simply select the two frames you want to blend and specify the amount of cross-fade you want to apply. The software will then automatically perform the frame blending process.
You can also consider Filmora for Blending Frame
Filmora is a video editing software that allows you to create, edit, and export videos. The software includes various features, such as the ability to add text, transitions, and effects. You can also use Filmora to create titles, lower thirds, etc.
How to use Filmora?
To use Filmora, simply load the video you want to edit and make the changes you want. Once you’re happy with the results, export the video, and it will be saved in the format of your choice.
How to use Frame Blending in Filmora?
There are things to keep in mind when using frame blending in Filmora.
First, the software only supports AVI and WMV files. Second, the frame blending feature is only available in the paid version of the software. Lastly, frame blending can only be used on two video frames at a time.
The video is made up of distinct layers blended together to create a unique and appealing look. There is a craft of making a running frame out of more than one video or picture. Even though the technique is considerably older, and individuals undertake it with much work, it has recently become simpler. We now have the easier method of combining two or more clips in a single frame, which we term Blend Modes.

How to composite with blending modes?
- Choose the videos and effects that you wish to overlay.
- Double-click the overlay clip on the timeline to view and adjust the video options for the split-screen effect.
- Go to the Compositing section and choose Blending Mode from the drop-down menu to apply an effect. Select Screen from the drop-down menu if you’d like to overlay an effect over a video.
Frame blending is a simple and effective way to create smooth transitions between two video frames. This technique can create a variety of different effects, such as dissolves, fades, and more. Frame blending is a built-in feature in Filmora and can be accessed by loading the video you want to edit and then making the changes you want. Once you’re happy with the results, export the video, and it will be saved in the format of your choice.
Advance features in Filmora 11
The latest version of Filmora (11.2.1) includes several new and improved features, such as:
- The ability to add textured background images
- An updated user interface
- A wider variety of title templates
- More video and audio effects
- Improved performance and stability
Filmora is a good choice for video editors who want to do more with their software. The program contains all of the essential functions of a video editor, such as the ability to add text, transitions, and effects. In addition, Filmora also includes some more advanced features, such as the ability to add textured background images and the ability to create titles, lower thirds, and more.
For Win 7 or later (64-bit)
For macOS 10.12 or later
Conclusion
● Frame blending is a simple and effective way to create smooth transitions between two video frames. This technique can be used to create a variety of different effects, such as dissolves, fades, and more. Frame blending is a built-in feature in Filmora and can be accessed by loading the video you want to edit and then making the changes you want. Once you’re happy with the results, export the video, and it will be saved in the format of your choice.
Frame blending is a video editing technique used to create smooth transitions between two video frames. This process is often used to create special effects or transition between two different video clips. Frame blending can be done manually or with the help of software.
When frame blending is done manually, the editor will take two consecutive frames and blend them. This is done by using a process called cross-fading. Cross-fading is when the first frame gradually fades out while the second frame gradually fades in. The result is a seamless transition between the two frames.
Frame blending can also be done with the help of software. Many software programs offer frame blending capabilities Like Adobe Premiere Pro and more. These software programs typically have a user interface that allows the user to select the two frames that they want to blend. The software will then perform the cross-fading process automatically.
In this article
01 What is frame blending in Premiere Pro?
02 How to Choose from Frame Blending/ Frame Sampling/ Optical Flow
03 How to use Frame Blanding in Adobe Premiere Pro?
What is frame blending in Premiere Pro?
In Adobe Premiere Pro, frame blending is a built-in feature that can be used to create smooth transitions between two video frames. This feature can be accessed by selecting the “Effects” tab and choosing the “Frame Blending” option.
When using frame blending in Premiere Pro, the user will first need to select the two frames they want to blend. The user can then specify the amount of cross-fade they want to apply. The software will then automatically perform the frame blending process.
How to Choose from Frame Blending/ Frame Sampling/ Optical Flow
The different types of frame blending are:
- Frame Sampling: best for smooth movements, no image distortion.
- Optical Flow: smoother results but can cause image distortion.
- Frame Blending: a mix of the two, some image distortion but smoother results.
So, choosing which type of frame blending to use depends on the footage and the desired results. If you want smooth results with no image distortion, frame sampling is the best option. However, if you don’t mind some image distortion in exchange for smoother results, optical flow or frame blending would be better choices.
How to decide which option is the best for your use? Let’s explain more, and It depends on the footage and the desired results. If you want smooth results with no image distortion, frame sampling is the best option. However, if you don’t mind some image distortion in exchange for smoother results, optical flow or frame blending would be better choices.
How to use Frame Blanding in Adobe Premiere Pro?
Step 1\
Using frame blending in Adobe Premiere Pro is a simple process. First, the user will need to select the two frames that they want to blend. The user can then specify the amount of cross-fade they want to apply. The software will then automatically perform the frame blending process.
Open up Adobe Premiere Pro and load the two frames that you want to blend to get started. Once the frames are loaded, select the “Effects” tab and then choose the “Frame Blending” option.
Step 2\
Next, select the two frames that you want to blend. You can perform this by clicking on the first frame and then holding down the “Shift” key while clicking on the second frame.
Once the two frames are selected, specify the amount of cross-fade that you want to apply. You can do this by adjusting the “Crossfade Duration” slider. The software will then automatically perform the frame blending process.
Frame blending is a simple and effective way to create smooth transitions between two video frames. This technique can create a variety of different effects, such as dissolves, fades, and more. Frame blending is a built-in feature in Adobe Premiere Pro and can be accessed by selecting the “Effects” tab and then choosing the “Frame Blending” option. To use frame blending, simply select the two frames you want to blend and specify the amount of cross-fade you want to apply. The software will then automatically perform the frame blending process.
You can also consider Filmora for Blending Frame
Filmora is a video editing software that allows you to create, edit, and export videos. The software includes various features, such as the ability to add text, transitions, and effects. You can also use Filmora to create titles, lower thirds, etc.
How to use Filmora?
To use Filmora, simply load the video you want to edit and make the changes you want. Once you’re happy with the results, export the video, and it will be saved in the format of your choice.
How to use Frame Blending in Filmora?
There are things to keep in mind when using frame blending in Filmora.
First, the software only supports AVI and WMV files. Second, the frame blending feature is only available in the paid version of the software. Lastly, frame blending can only be used on two video frames at a time.
The video is made up of distinct layers blended together to create a unique and appealing look. There is a craft of making a running frame out of more than one video or picture. Even though the technique is considerably older, and individuals undertake it with much work, it has recently become simpler. We now have the easier method of combining two or more clips in a single frame, which we term Blend Modes.
How to composite with blending modes?
- Choose the videos and effects that you wish to overlay.
- Double-click the overlay clip on the timeline to view and adjust the video options for the split-screen effect.
- Go to the Compositing section and choose Blending Mode from the drop-down menu to apply an effect. Select Screen from the drop-down menu if you’d like to overlay an effect over a video.
Frame blending is a simple and effective way to create smooth transitions between two video frames. This technique can create a variety of different effects, such as dissolves, fades, and more. Frame blending is a built-in feature in Filmora and can be accessed by loading the video you want to edit and then making the changes you want. Once you’re happy with the results, export the video, and it will be saved in the format of your choice.
Advance features in Filmora 11
The latest version of Filmora (11.2.1) includes several new and improved features, such as:
- The ability to add textured background images
- An updated user interface
- A wider variety of title templates
- More video and audio effects
- Improved performance and stability
Filmora is a good choice for video editors who want to do more with their software. The program contains all of the essential functions of a video editor, such as the ability to add text, transitions, and effects. In addition, Filmora also includes some more advanced features, such as the ability to add textured background images and the ability to create titles, lower thirds, and more.
For Win 7 or later (64-bit)
For macOS 10.12 or later
Conclusion
● Frame blending is a simple and effective way to create smooth transitions between two video frames. This technique can be used to create a variety of different effects, such as dissolves, fades, and more. Frame blending is a built-in feature in Filmora and can be accessed by loading the video you want to edit and then making the changes you want. Once you’re happy with the results, export the video, and it will be saved in the format of your choice.
Ways to Learn Discord Game Bots – Even if You’re Just Starting Out
Ways to Learn Discord Game Bots – Even if You’re Just Starting out
An easy yet powerful editor
Numerous effects to choose from
Detailed tutorials provided by the official channel
Discord is free social communication service used by tens of millions of individuals aged 13 and above to socialize with their communities and friends. People use discord regularly to discuss various topics, from art projects and family vacations to homework and mental health help. It serves as a home for communities of different sizes but has become quite popular as discord bot games due to the rise in the gaming community.
The great majority of servers are private, invite-only locations where friends and communities may communicate and spend time together. More significant, more open groups based on specific themes like popular video games like PUBG and Genshin Impact. Because all discussions are opt-in, users have complete choice over who they connect with and how they use discord.
In this article
01 [What Are Discord Game Bots?](#Part 1)
02 [How Do You Add Bot Games to Discord?](#Part 2)
03 [Top 10 Picks of Discord Gaming Bots](#Part 3)
04 [Discord Game Bots FAQs](#Part 4)
Part 1 What Are Discord Game Bots?
Discord game bots are artificial intelligence (AI)-powered applications that automate processes and add music, games, welcome messages, memes, and other fun stuff to your server. These bots make it simple to interact with your audience, grow your community, and manage your server.
There is a plethora of game bots for discord to pick from, each with its purpose. Some may automatically welcome new users, while others utilize webhooks to interface with other apps—and it may be tough for novice users to figure out which ones will provide the most remarkable results for their requirements.
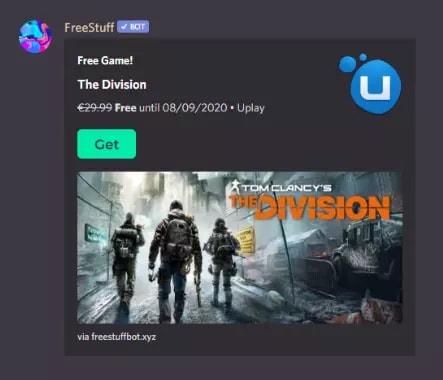
Part 2 How Do You Add Bot Games to Discord?
Follow the steps below to add game bots for discord successfully:
Step 1: To add a bot to your Discord server, go to the bot’s source page. We’ll be using ProBot for this lesson.
Step 2: Depending on the bot you’re adding, click Add to Discord or Invite Now.
Step 3: To grant the bot access, a pop-up window will appear asking you to check in to your Discord account.
Step 4: After you log in, you’ll see a box asking for account authorization. Locate and choose the Add to Server drop-down menu.
Step 5: This will bring up a list of discord servers where you can add a bot game discord. Continue after selecting your server.
Step 6: Examine the server permissions that the bot asks for. Select and deselect according to your requirements. When you’re ready, click Authorize.
For those who like to share their discord game bots experience through screen recordings and whatnot, a potent and convenient video editing tool to make your sessions look even more incredible is Filmora.
Wondershare Filmora Video Editor is a famous video editing program for those who wish to focus on editing and producing high-quality videos. The program supports 4K video editing. It’s a reasonably priced tool featuring effects for both video and audio. When it comes to designing, adding effects, and modifying movies, it provides users with many possibilities. You can use the tool to add overlays, create animations and objects, add music, and input text. Imagine sharing your experience in 4k!
For Win 7 or later (64-bit)
For macOS 10.12 or later
Part 3 Top 10 Picks of Discord Gaming Bots
01Karuta
Karuta is a discord game bot where you gather anime characters. In Karuta, though, you collect characters using trading cards. Your cards and other objects may be customized, upgraded, and traded with other players. Better still, you maintain the same cards between servers, allowing you to play Karuta with the same deck on any server where the game discord bot is!
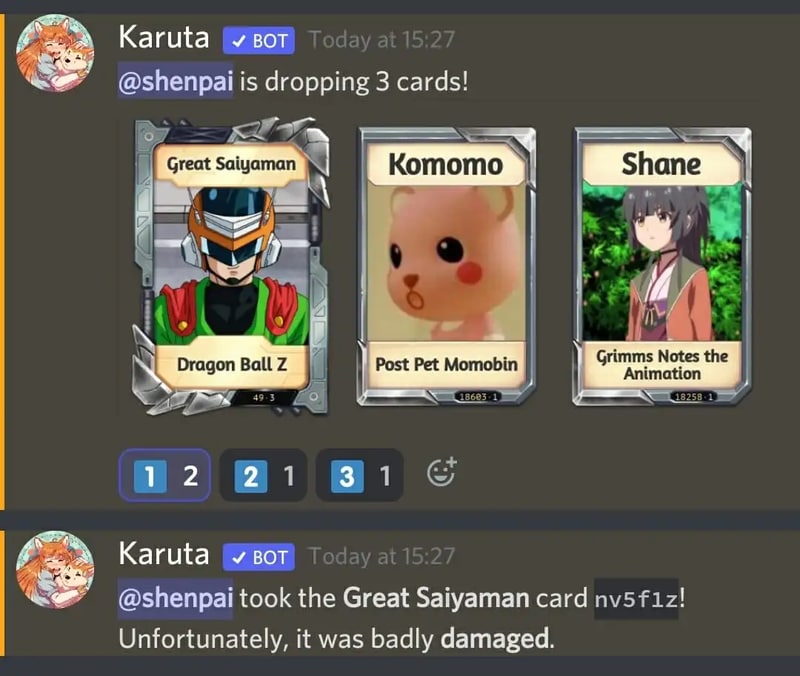
02Dragon Bot Z
Dragon Bot Z is the discord bot game that adds discord Ball Z, a multiplayer text-based RPG, to your server. Players in Discord Ball Z summon characters from the iconic Dragon Ball Z franchise, train them, fight foes, buy equipment, and trade with other players. This Discord game is ideal for Dragon Ball fans or anybody who likes text-based roleplaying games.

03Mudae
Mudae is a bot discord game with character-collecting. For example, you can claim popular anime and videogame characters as your “waifus” or “husbandos,” develop your harem, and compete for your favorite characters with other users. You can also trade the characters with other members.

04Rock Puppy
Rock Puppy is a basic yet entertaining game bots discord bot that incorporates several classic games. You can enjoy Discord games like ConnectFour, Truth or Dare, Trivia, Tic-Tac-Toe, Russian Roulette, and Would You Rather with Rock Puppy. You may also use magic 8-ball, dice, or tarot cards, play classic board and party games on your server with Rock Puppy.
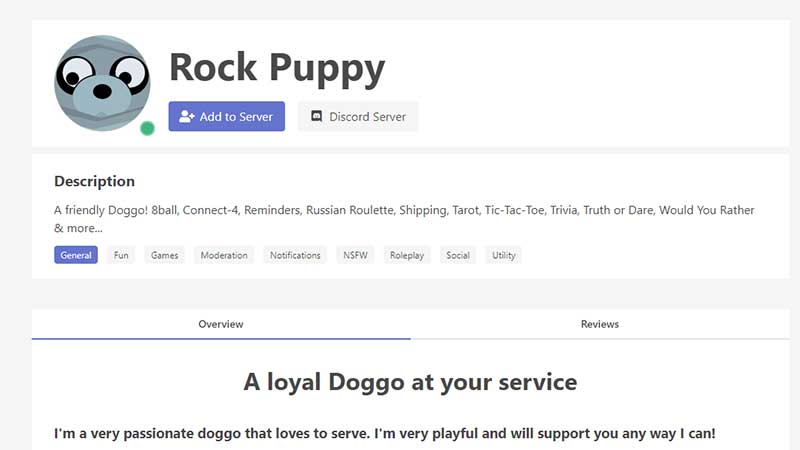
05GarticBOT
GarticBot is a bot game in discord that allows you to play the drawing game Gartic. GarticBot begins the Discord game by painting an image on your server. Members then compete against one another to predict the image the quickest. Others can guess your drawings if you submit them. Type the command g.draw, and Gartic will provide you with a URL to submit your artwork. GarticBot creates a fun Pictionary-style game for everyone on your server to play.

06TriviaBot
TriviaBot is the most popular trivia game discord bot. It has over 90,000 questions, and you can even submit your own for inclusion in the bot. Members can form and join teams to compete in competitions. You may also create a public leaderboard to display who performs the best on the server.

07GamesRob
The finest Uno discord game bot is GamesROB. ConnectFour, Trivia, Battleship, 2048, Tic-Tac-Toe, Minesweeper, and Hangman are the other traditional party games added to discord. You may also play “Detective,” a Discord game in which you try to figure out who is the “assassin” on your server, memory games, and Town, Country, River, a game in which you try to come up with as many phrases as possible within a theme.
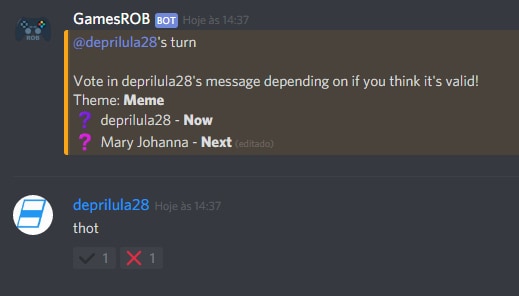
08Chess Reddit
Chess is a simple game that allows you to play chess on discord. You may play a chess game with other server members directly on the server. Instruct the bot on which pieces to move and where they should go. After each move, the Discord game bot creates a fresh graphic of the board so you can plot your next move. And, because the game hosts on your server, other users may watch and debate it!
09PokeMeow
PokeMeow is by far the most popular Pokemon game discord bot. With this Pokemon bot, you may capture Pokemon on your server, trade, battle with other players, and accomplish tasks for in-game currency and stuff. As you keep building up your Pokedex, the Pokemon bot also allows to compete with other users on the worldwide leaderboard! PokeMeow is the ideal Pokemon Discord bot for fans of the Pokemon series.
10IdleRPG
IdleRPG is a discord game where you may play a text-based roleplaying game. You may make your character complete with ethnicity and social status. Then, you can go on quests and combat beasts, purchase, and exchange mythic objects, join guilds, engage with gods, and even marry other players. Play through your character’s adventure while engaging with and creating stories with other players. IdleRPG is likely to provide your server with hundreds of hours of roleplaying pleasure.

Part 4 Discord Game Bots FAQs
Now, let us go through some FAQs about discord game bots:
Q. Is it possible to play games with discord bots?
A. You could indeed play discord games in-server with bots, challenge other members, and win prizes! A game bot is a terrific method to keep players engaged on your server, especially if it’s a gaming Discord channel.
Q. Do game bots spy on you?
A. No, game discord bots do not have inbuilt spyware.
Q. How many bots should a server have?
A. It’s best not to have more than 20 bots game on discord on a server at any moment. More bots than this may cause users to become confused and the service to seem suspicious.
Q. Are discord bots free?
A. All these discord game bots are free to use. However, some have premium upgrades.
Q. Which bot is the most popular game bot in discord?
A. Worddle
Q. Which bot is the best bot for gaming on discord?
A. Gawesome is an excellent alternative for adding a multifunctional bot to your discord server.
● Ending Thoughts →
● Discord is accessible communication and socializing service for individuals aged 13 and above.
● The platform extends to various servers, each with its users, rules, themes, and channels, but one underutilized feature is the ability to develop and code custom AI-powered bots.
● Game bots for discord are artificial intelligence (AI)-powered applications that automate processes and add games to your discord server.
● These game discord bots make it simple to interact with your audience, grow your community, and manage your server.
● Lastly, to enhance the discord game bots experience and bring your gaming videos to life, use the Filmora software.
Discord is free social communication service used by tens of millions of individuals aged 13 and above to socialize with their communities and friends. People use discord regularly to discuss various topics, from art projects and family vacations to homework and mental health help. It serves as a home for communities of different sizes but has become quite popular as discord bot games due to the rise in the gaming community.
The great majority of servers are private, invite-only locations where friends and communities may communicate and spend time together. More significant, more open groups based on specific themes like popular video games like PUBG and Genshin Impact. Because all discussions are opt-in, users have complete choice over who they connect with and how they use discord.
In this article
01 [What Are Discord Game Bots?](#Part 1)
02 [How Do You Add Bot Games to Discord?](#Part 2)
03 [Top 10 Picks of Discord Gaming Bots](#Part 3)
04 [Discord Game Bots FAQs](#Part 4)
Part 1 What Are Discord Game Bots?
Discord game bots are artificial intelligence (AI)-powered applications that automate processes and add music, games, welcome messages, memes, and other fun stuff to your server. These bots make it simple to interact with your audience, grow your community, and manage your server.
There is a plethora of game bots for discord to pick from, each with its purpose. Some may automatically welcome new users, while others utilize webhooks to interface with other apps—and it may be tough for novice users to figure out which ones will provide the most remarkable results for their requirements.
Part 2 How Do You Add Bot Games to Discord?
Follow the steps below to add game bots for discord successfully:
Step 1: To add a bot to your Discord server, go to the bot’s source page. We’ll be using ProBot for this lesson.
Step 2: Depending on the bot you’re adding, click Add to Discord or Invite Now.
Step 3: To grant the bot access, a pop-up window will appear asking you to check in to your Discord account.
Step 4: After you log in, you’ll see a box asking for account authorization. Locate and choose the Add to Server drop-down menu.
Step 5: This will bring up a list of discord servers where you can add a bot game discord. Continue after selecting your server.
Step 6: Examine the server permissions that the bot asks for. Select and deselect according to your requirements. When you’re ready, click Authorize.
For those who like to share their discord game bots experience through screen recordings and whatnot, a potent and convenient video editing tool to make your sessions look even more incredible is Filmora.
Wondershare Filmora Video Editor is a famous video editing program for those who wish to focus on editing and producing high-quality videos. The program supports 4K video editing. It’s a reasonably priced tool featuring effects for both video and audio. When it comes to designing, adding effects, and modifying movies, it provides users with many possibilities. You can use the tool to add overlays, create animations and objects, add music, and input text. Imagine sharing your experience in 4k!
For Win 7 or later (64-bit)
For macOS 10.12 or later
Part 3 Top 10 Picks of Discord Gaming Bots
01Karuta
Karuta is a discord game bot where you gather anime characters. In Karuta, though, you collect characters using trading cards. Your cards and other objects may be customized, upgraded, and traded with other players. Better still, you maintain the same cards between servers, allowing you to play Karuta with the same deck on any server where the game discord bot is!
02Dragon Bot Z
Dragon Bot Z is the discord bot game that adds discord Ball Z, a multiplayer text-based RPG, to your server. Players in Discord Ball Z summon characters from the iconic Dragon Ball Z franchise, train them, fight foes, buy equipment, and trade with other players. This Discord game is ideal for Dragon Ball fans or anybody who likes text-based roleplaying games.
03Mudae
Mudae is a bot discord game with character-collecting. For example, you can claim popular anime and videogame characters as your “waifus” or “husbandos,” develop your harem, and compete for your favorite characters with other users. You can also trade the characters with other members.
04Rock Puppy
Rock Puppy is a basic yet entertaining game bots discord bot that incorporates several classic games. You can enjoy Discord games like ConnectFour, Truth or Dare, Trivia, Tic-Tac-Toe, Russian Roulette, and Would You Rather with Rock Puppy. You may also use magic 8-ball, dice, or tarot cards, play classic board and party games on your server with Rock Puppy.
05GarticBOT
GarticBot is a bot game in discord that allows you to play the drawing game Gartic. GarticBot begins the Discord game by painting an image on your server. Members then compete against one another to predict the image the quickest. Others can guess your drawings if you submit them. Type the command g.draw, and Gartic will provide you with a URL to submit your artwork. GarticBot creates a fun Pictionary-style game for everyone on your server to play.
06TriviaBot
TriviaBot is the most popular trivia game discord bot. It has over 90,000 questions, and you can even submit your own for inclusion in the bot. Members can form and join teams to compete in competitions. You may also create a public leaderboard to display who performs the best on the server.
07GamesRob
The finest Uno discord game bot is GamesROB. ConnectFour, Trivia, Battleship, 2048, Tic-Tac-Toe, Minesweeper, and Hangman are the other traditional party games added to discord. You may also play “Detective,” a Discord game in which you try to figure out who is the “assassin” on your server, memory games, and Town, Country, River, a game in which you try to come up with as many phrases as possible within a theme.
08Chess Reddit
Chess is a simple game that allows you to play chess on discord. You may play a chess game with other server members directly on the server. Instruct the bot on which pieces to move and where they should go. After each move, the Discord game bot creates a fresh graphic of the board so you can plot your next move. And, because the game hosts on your server, other users may watch and debate it!
09PokeMeow
PokeMeow is by far the most popular Pokemon game discord bot. With this Pokemon bot, you may capture Pokemon on your server, trade, battle with other players, and accomplish tasks for in-game currency and stuff. As you keep building up your Pokedex, the Pokemon bot also allows to compete with other users on the worldwide leaderboard! PokeMeow is the ideal Pokemon Discord bot for fans of the Pokemon series.
10IdleRPG
IdleRPG is a discord game where you may play a text-based roleplaying game. You may make your character complete with ethnicity and social status. Then, you can go on quests and combat beasts, purchase, and exchange mythic objects, join guilds, engage with gods, and even marry other players. Play through your character’s adventure while engaging with and creating stories with other players. IdleRPG is likely to provide your server with hundreds of hours of roleplaying pleasure.
Part 4 Discord Game Bots FAQs
Now, let us go through some FAQs about discord game bots:
Q. Is it possible to play games with discord bots?
A. You could indeed play discord games in-server with bots, challenge other members, and win prizes! A game bot is a terrific method to keep players engaged on your server, especially if it’s a gaming Discord channel.
Q. Do game bots spy on you?
A. No, game discord bots do not have inbuilt spyware.
Q. How many bots should a server have?
A. It’s best not to have more than 20 bots game on discord on a server at any moment. More bots than this may cause users to become confused and the service to seem suspicious.
Q. Are discord bots free?
A. All these discord game bots are free to use. However, some have premium upgrades.
Q. Which bot is the most popular game bot in discord?
A. Worddle
Q. Which bot is the best bot for gaming on discord?
A. Gawesome is an excellent alternative for adding a multifunctional bot to your discord server.
● Ending Thoughts →
● Discord is accessible communication and socializing service for individuals aged 13 and above.
● The platform extends to various servers, each with its users, rules, themes, and channels, but one underutilized feature is the ability to develop and code custom AI-powered bots.
● Game bots for discord are artificial intelligence (AI)-powered applications that automate processes and add games to your discord server.
● These game discord bots make it simple to interact with your audience, grow your community, and manage your server.
● Lastly, to enhance the discord game bots experience and bring your gaming videos to life, use the Filmora software.
Thousands Already Know Ezgif and So Can You
Thousands Already Know Ezgif and So Can You
An easy yet powerful editor
Numerous effects to choose from
Detailed tutorials provided by the official channel
Everything about the know-how of Ezgif creator is here!
In this article
01 [How to Make a GIF on Ezgif](#Part 1)
02 [Video to GIF Made Easy Only With Ezgif](#Part 2)
03 [How to Crop a Video With Ezgif & Filmora](#Part 3)
Part 1 How to Make a GIF on Ezgif
GIFs take you to an exciting journey of expression and impact. With the introduction of GIF keyboards and a variety of creator tools, you are granted the liberty to use pre made GIFs as well as create stirring ones of your own to deliver your messages in unique and impactful ways. When it comes to creating GIFs, the online market is always ready with a heap of creator choices. While each of these tools is distinctive in its own way, some of them are leaders in making the mark among users.
About the Ezgif GIF Maker
Ezgif online GIF maker tool is amongst the most preferred GIF creators in today’s times. This one is a free and super convenient online tool that lets you create and convert animated GIFs in just a few clicks. Compatible with your Windows or MacOS devices, this tool is evidently among the fastest GIF creators of its time.
Apart from creating GIFs, you can also use this tool to cut, crop, trim and resize videos, ass and remove GIF backgrounds and much more. The tool is compatible with almost all common video and image formats; hence you can easily escape the glitch of sticking to a particular format for using this tool.
Here’s how you can use this tool for making next level GIFs:
Step 1: Launch the Tool
Open the Ezgif maker tool in your favorite browser. In the site’s welcome page, tap on ‘GIF Maker’ from the top toolbar.

Step 2: Upload Your Media
Click on ‘Browse’ to select your desired video or a set of still captures from your device and upload the same to the GIF maker timeline. You can choose from a manually or an alphabetically ordered upload. Ensure that the total file size is restricted within 100 MB.


Step 3: Let’s Create!
Click on ‘Upload and Make a GIF’. You will be shown a preview of your creation. At this point, you can customize the GIF with effects, filters and texts.

Step 4: Visual Adjustments
When using still images, consider arranging them in a particular order with the ‘Drag and Drop method’. You can skip this step if you are satisfied with the default arrangement. If you are creating a GIF from a video, pay attention to adjust its play duration.

Step 5: Beautify and Save Your Artwork
When you are satisfied with your work, tap ‘Make a GIF’. You can see your final creation appear. Click on ‘Save’ to add your artwork to your device memory. You can also customize your creation from the toolbar below the created GIF before saving it.

Part 2 Video to GIF Made Easy Only With Ezgif
As stated earlier, you can create GIFs from images and convert videos to GIFs using the Ezgif converter. What’s interesting is that the conversion process is quite fast and you are allowed to play with your editing skills to your heart’s content while customizing your artwork. Given below is a quick guide to convert videos in any common file format into impressive GIFs:
● Step 1
Visit ezgif.com, the official site of the Ezgif creator tool, in any suitable browser of your choice. In the homepage of the tool’s website, navigate to the toolbar at the top and click on ‘Video to GIF’.
Ezgif Video to GIF Converter Link:

● Step 2
In the converter interface, you can either upload a locally saved video from your device by clicking on ‘Browse’ or copy-paste a desired video URL in the address box and tap ‘Upload Video’.

● Step 3
In the tool’s editing interface, set required play duration for your video by setting the start and end points of the clip.
● Step 4
When you are done, click on ‘Convert to GIF’ and wait for the conversion process to finish. You can now see your created GIF in the pop up window that appears next. Click on ‘Save’ option in the toolbar beneath the created GIF to download your creation to your device.
Part 3 How to Crop a Video With Ezgif & Filmora
Ezgif is a multi faceted online tool that allows you to take up a variety of tasks in addition to just creating classy GIFs. Video to GIF conversion is one thing, besides that, you can also crop your videos using this tool. Wondering how to go about the process? Here’s a quick, stepwise tutorial to answer this for you. Follow the steps given below to crop your videos with a blink:
● Step 1: Launch the Ezgif Crop Tool
Open the official Ezgif website and navigate to the ‘Crop Video’ tab on the top toolbar in the welcome page. You can alternatively click on the link given below to reach the ‘Crop Video’ interface directly.
● Step 2: Upload Your Video
To upload a locally saved video, click on the ‘Choose File’ button. You will see the file name appear beside it. You can alternatively, copy-paste the URL of a desired video in the address box. Click on ‘Upload Video’ for the file to get uploaded.

● Step 3: Adjust Video Borders
To crop the video to a desired part, you need to set its borders within the required section. To do this, ‘Hold and Drag’ the mouse to highlight a desired section. Now leave the mouse to see the highlighted section within a frame.

● Step 4: Final Touches
After you have the desired section, scroll down to find some adjustment options. Here, you can resize, set aspect ratio and make frame adjustments to your cropping clip. When selecting the output video format, you can either choose to stick with the original file format or change to mp4.
Tap on ‘Crop Video’ when you are done making the changes. The conversion process may take a few seconds. You can enjoy looking at the swaying kitten in the meantime.

● Step 5: Download and Save
Once the conversion finishes, you will see your cropped video appear on the screen. Click on ‘Save’ from the toolbar below the video to download the sane to your device.

Ezgif is certainly an affordable GIF creator and video cropper tool, no doubt about that, but if you are looking for an alternative, you can consider using the Filmora GIF creator software for cropping a video to your favorite part. This one is a free to use, quick and smart tool with the most convenient user interface.
The huge audio-visual effects library of this software allows you to add sound, music and overlays to your clips and intensify them with text and filters. Here’s a quick tutorial on cropping videos with this software:
● Step 1
Download and install Filmora in your device. When finished, launch the software to reach its editor timeline.
Filmora Crop Video Tool Direct Link:
● Step 2
Within the timeline, select and right click on a desired video. Select ‘Crop and Zoom’ for the drop down menu. You can alternatively click on the ‘Crop’ icon.
● Step 3
In the pop-up window that follows, either choose a preset aspect ratio, or click on ‘Custom’ and navigate the rectangle to select a clip area to crop.

Wondershare Filmora - Best Video Editor for Mac/Windows
5,481,435 people have downloaded it.
Build unique custom animations without breaking a sweat.
Focus on creating epic stories and leave the details to Filmora’s auto features.
Start a creative adventure with drag & drop effects and endless possibilities.
Filmora simplifies advanced features to save you time and effort.
Filmora cuts out repetition so you can move on to your next creative breakthrough.
● Key Takeaways from This Episode →
● Ezgif is one of the most suitable GIF creator and converter tools available online that allows you to explore your skills and create top quality GIFs, convert videos to GIFs and crop video clips, all at one place.
●This one is a quick and hassle free solution to your video and GIF editing concerns. When browsing through its feasible alternatives, you can safely count upon the Filmora video editor and GIF creator software for making and customizing GIFs and video clips.
Everything about the know-how of Ezgif creator is here!
In this article
01 [How to Make a GIF on Ezgif](#Part 1)
02 [Video to GIF Made Easy Only With Ezgif](#Part 2)
03 [How to Crop a Video With Ezgif & Filmora](#Part 3)
Part 1 How to Make a GIF on Ezgif
GIFs take you to an exciting journey of expression and impact. With the introduction of GIF keyboards and a variety of creator tools, you are granted the liberty to use pre made GIFs as well as create stirring ones of your own to deliver your messages in unique and impactful ways. When it comes to creating GIFs, the online market is always ready with a heap of creator choices. While each of these tools is distinctive in its own way, some of them are leaders in making the mark among users.
About the Ezgif GIF Maker
Ezgif online GIF maker tool is amongst the most preferred GIF creators in today’s times. This one is a free and super convenient online tool that lets you create and convert animated GIFs in just a few clicks. Compatible with your Windows or MacOS devices, this tool is evidently among the fastest GIF creators of its time.
Apart from creating GIFs, you can also use this tool to cut, crop, trim and resize videos, ass and remove GIF backgrounds and much more. The tool is compatible with almost all common video and image formats; hence you can easily escape the glitch of sticking to a particular format for using this tool.
Here’s how you can use this tool for making next level GIFs:
Step 1: Launch the Tool
Open the Ezgif maker tool in your favorite browser. In the site’s welcome page, tap on ‘GIF Maker’ from the top toolbar.
Step 2: Upload Your Media
Click on ‘Browse’ to select your desired video or a set of still captures from your device and upload the same to the GIF maker timeline. You can choose from a manually or an alphabetically ordered upload. Ensure that the total file size is restricted within 100 MB.
Step 3: Let’s Create!
Click on ‘Upload and Make a GIF’. You will be shown a preview of your creation. At this point, you can customize the GIF with effects, filters and texts.
Step 4: Visual Adjustments
When using still images, consider arranging them in a particular order with the ‘Drag and Drop method’. You can skip this step if you are satisfied with the default arrangement. If you are creating a GIF from a video, pay attention to adjust its play duration.
Step 5: Beautify and Save Your Artwork
When you are satisfied with your work, tap ‘Make a GIF’. You can see your final creation appear. Click on ‘Save’ to add your artwork to your device memory. You can also customize your creation from the toolbar below the created GIF before saving it.
Part 2 Video to GIF Made Easy Only With Ezgif
As stated earlier, you can create GIFs from images and convert videos to GIFs using the Ezgif converter. What’s interesting is that the conversion process is quite fast and you are allowed to play with your editing skills to your heart’s content while customizing your artwork. Given below is a quick guide to convert videos in any common file format into impressive GIFs:
● Step 1
Visit ezgif.com, the official site of the Ezgif creator tool, in any suitable browser of your choice. In the homepage of the tool’s website, navigate to the toolbar at the top and click on ‘Video to GIF’.
Ezgif Video to GIF Converter Link:
● Step 2
In the converter interface, you can either upload a locally saved video from your device by clicking on ‘Browse’ or copy-paste a desired video URL in the address box and tap ‘Upload Video’.
● Step 3
In the tool’s editing interface, set required play duration for your video by setting the start and end points of the clip.
● Step 4
When you are done, click on ‘Convert to GIF’ and wait for the conversion process to finish. You can now see your created GIF in the pop up window that appears next. Click on ‘Save’ option in the toolbar beneath the created GIF to download your creation to your device.
Part 3 How to Crop a Video With Ezgif & Filmora
Ezgif is a multi faceted online tool that allows you to take up a variety of tasks in addition to just creating classy GIFs. Video to GIF conversion is one thing, besides that, you can also crop your videos using this tool. Wondering how to go about the process? Here’s a quick, stepwise tutorial to answer this for you. Follow the steps given below to crop your videos with a blink:
● Step 1: Launch the Ezgif Crop Tool
Open the official Ezgif website and navigate to the ‘Crop Video’ tab on the top toolbar in the welcome page. You can alternatively click on the link given below to reach the ‘Crop Video’ interface directly.
● Step 2: Upload Your Video
To upload a locally saved video, click on the ‘Choose File’ button. You will see the file name appear beside it. You can alternatively, copy-paste the URL of a desired video in the address box. Click on ‘Upload Video’ for the file to get uploaded.
● Step 3: Adjust Video Borders
To crop the video to a desired part, you need to set its borders within the required section. To do this, ‘Hold and Drag’ the mouse to highlight a desired section. Now leave the mouse to see the highlighted section within a frame.
● Step 4: Final Touches
After you have the desired section, scroll down to find some adjustment options. Here, you can resize, set aspect ratio and make frame adjustments to your cropping clip. When selecting the output video format, you can either choose to stick with the original file format or change to mp4.
Tap on ‘Crop Video’ when you are done making the changes. The conversion process may take a few seconds. You can enjoy looking at the swaying kitten in the meantime.
● Step 5: Download and Save
Once the conversion finishes, you will see your cropped video appear on the screen. Click on ‘Save’ from the toolbar below the video to download the sane to your device.
Ezgif is certainly an affordable GIF creator and video cropper tool, no doubt about that, but if you are looking for an alternative, you can consider using the Filmora GIF creator software for cropping a video to your favorite part. This one is a free to use, quick and smart tool with the most convenient user interface.
The huge audio-visual effects library of this software allows you to add sound, music and overlays to your clips and intensify them with text and filters. Here’s a quick tutorial on cropping videos with this software:
● Step 1
Download and install Filmora in your device. When finished, launch the software to reach its editor timeline.
Filmora Crop Video Tool Direct Link:
● Step 2
Within the timeline, select and right click on a desired video. Select ‘Crop and Zoom’ for the drop down menu. You can alternatively click on the ‘Crop’ icon.
● Step 3
In the pop-up window that follows, either choose a preset aspect ratio, or click on ‘Custom’ and navigate the rectangle to select a clip area to crop.
Wondershare Filmora - Best Video Editor for Mac/Windows
5,481,435 people have downloaded it.
Build unique custom animations without breaking a sweat.
Focus on creating epic stories and leave the details to Filmora’s auto features.
Start a creative adventure with drag & drop effects and endless possibilities.
Filmora simplifies advanced features to save you time and effort.
Filmora cuts out repetition so you can move on to your next creative breakthrough.
● Key Takeaways from This Episode →
● Ezgif is one of the most suitable GIF creator and converter tools available online that allows you to explore your skills and create top quality GIFs, convert videos to GIFs and crop video clips, all at one place.
●This one is a quick and hassle free solution to your video and GIF editing concerns. When browsing through its feasible alternatives, you can safely count upon the Filmora video editor and GIF creator software for making and customizing GIFs and video clips.
Also read:
- 2024 Approved If You Do Not Know How to QuickTime Trim Video Clips, You Are in the Right Place. We Have Provided Information that Will Help You Trim Videos with This Application and Make Them Engaging for Viewers
- New 2024 Approved Best Cinematic LUTs For Premiere Pro You Can Come Across
- Updated How to Do Perfect Match Paint 100 the Easy Way for 2024
- 9 Best Sparkle Effects Photo and Video Editors You Should Know for 2024
- New An Ultimate Guide To Edit a Music Video Aspect Ratio and First Cut for 2024
- New Create Kinetice Typography Text Effect in Filmora for 2024
- New 18 Video Editors Weve Tested Heres What We Learned
- New 2024 Approved Top 20 Best Text To Speech Software Windows, Mac, Android, iPhone & Online
- 2024 Approved And when It Comes to Voice Changers for Discord, None Is as Easy to Operate as the Voicemod. Here Is a Detailed Guide About How to Use Voicemod on Discord on Mobile and Desktop Devices
- Updated How to Comment on YouTube Live Chat
- New Do You Know How You Can Trim or Merge Using Wondershare Filmora? Trimming and Merging Using This Tool Is an Easy Task; Learn How
- 2024 Approved Best Way To Color Grading & Color Correction in Filmora
- New Top 18 Video Editors for PC and Mac
- New 2024 Approved Make A Countdown Video
- Different Ways to Crop TikTok Video in High-Quality
- Find The Best Free Canon LUTs
- Updated In 2024, How to Crop a Video in Davinci Resolve Step by Step
- Quickest Guide | Zoom In and Out on Snapchat
- Updated In 2024, 10 Best Free Spanish Text To Speech Converter Software Windows, Mac, Android, iPhone, & Online
- In 2024, Keyframes Interval Everything You Need To Know | Filmora
- Updated 3 In-Camera Transitions Tricks To Make Videos for 2024
- Updated 2024 Approved Replacing the Sky in Adobe After Effects An Extensive Guide
- Updated How to Make A Slideshow Video (+Filmora Techniques)
- Updated Zoom In and Out on Snapchat for 2024
- In 2024, 30+ Amazing Templates for VN Video Editor
- 2024 Approved Are You Looking for Different Solutions to Add VHS Effects to Your Videos? Dont Worry; This Article Will Provide Easy Solutions to Apply VHS
- New Best iOS Slow Motion Apps To Work With
- Best Practical Tips to Improve Your Lighting in the Sun for 2024
- In 2024, SRT Not Displaying How to Open and Use SRT File in VLC?
- 2024 Approved Top 18 Video Editors for PC and Mac
- In 2024, Best 12 AI Video Generators to Pick
- Updated Are You Trying to Create a Stunning Intro for Your Video for Free? This Article Will Show You How to Make an Intro Video Using InVideo in a Few Simple Steps
- 2024 Approved Discover the Top 5 Online Tools for Merging Videos and Audios Quickly and Easily. Streamline Your Editing Process and Create Seamless Multimedia Content
- 2024 Approved 4 Ways to Loop a Video on Vimeo
- What are Location Permissions Life360 On Xiaomi Redmi Note 12 4G? | Dr.fone
- How to Factory Reset Motorola Moto G24 If I Forgot Security Code or Password? | Dr.fone
- Apple ID Locked for Security Reasons From Apple iPhone XR? Find the Best Solution Here
- My Videos Arent Playing on Motorola Moto G84 5G – What Can I Do? | Dr.fone
- In 2024, 9 Best Free Android Monitoring Apps to Monitor Phone Remotely For your ZTE Nubia Flip 5G | Dr.fone
- Different Methods for Resetting Honor V Purse Phones with Screen Locked and Not | Dr.fone
- Top 7 iCloud Activation Bypass Tools For your iPhone XS
- How and Where to Find a Shiny Stone Pokémon For HTC U23 Pro? | Dr.fone
- Identify missing or malfunctioning drivers with Windows Device Manager in Windows 11 & 10 & 7
- How to restore wiped videos on V27e
- Looking For A Location Changer On Xiaomi Redmi Note 12R? Look No Further | Dr.fone
- Best SolarMovie Alternatives-Watch Movies Online for 2024
- How to Factory Reset Infinix Note 30 Pro in 5 Easy Ways | Dr.fone
- Recover lost data from Xiaomi 13 Ultra
- In 2024, Unlock Your Boost Mobile Apple iPhone 11 Pro Before the Plan Expires
- Title: In 2024, Which Is the Best Video Slideshow Maker Available Online? Methods to Prepare Custom Slideshows for Google Presentation. How to Make a Slide Show Video?
- Author: Chloe
- Created at : 2024-04-24 07:08:24
- Updated at : 2024-04-25 07:08:24
- Link: https://ai-editing-video.techidaily.com/in-2024-which-is-the-best-video-slideshow-maker-available-online-methods-to-prepare-custom-slideshows-for-google-presentation-how-to-make-a-slide-show-video/
- License: This work is licensed under CC BY-NC-SA 4.0.
