
:max_bytes(150000):strip_icc():format(webp)/twittermute-5bc42bbd46e0fb002679ac08.jpg)
In 2024, Windows Movie Maker Review
Windows Movie Maker Review
Are you considering creating impressive movies from your video clips? Then you need to install this famous Windows movie maker tool to fulfill your job. This is expert video editing Microsoft software that you may use for free. This video editing tool by Windows has received massive recognition due to its simplicity. Also, it makes every task easy and quick, like combining video clips to form digital movies, including various effects, background music, transitions, and titles.
So, Windows Movie Maker is undoubtedly the ideal software for this job. Moreover, video editors using this app experience several attributes in their organization to finally emerge with the perfect videos, like audio options, animations, transitions overlays, and timeline narration. It has user-friendly features, which you’ll enjoy experimenting with. This software also has XML code allowing its end users to modify live effects and transitions or even prepare very new ones.
This brilliant tool can even do primary track editing, including fade-out and fade-in effects in your final audio tracks. Windows movie maker even allows you to post your final project effortlessly on various video sites and social media platforms. Here’s a complete guide:
1. Download and Install Windows Movie Maker
Windows movie maker was previously recognized in Windows 7 as Windows Live Movie Maker. So to experience the features of this software, first, you need to download and install this app which is available free of charge. The steps are as follows.
- Firstly, download the setup file of Windows Live Essentials.
- You’ve to double-click on this setup file called windows-movie-maker.exe. Then tap on ‘Yes’ to permit the setup package to function.
- You’ll now be redirected to the installation window of Windows Essential. Next, you’ll see two options towards the web page’s top, and you’ll have to select the option ‘Install all of Windows Essentials (recommended)’ to continue with the installation process.
Windows Essentials comprise Microsoft OneDrive, Outlook Connector Pack, Movie Maker, Writer, Mail, Photo Gallery, and Messenger.
- Locate ‘View Details’ towards the left end of the page and tap on it. A progress and percentage bar will pop out along with the details regarding the program you’re installing.
- You need to wait a while to install Windows Movie Maker Software. Pause until the program completes its installation. After you find that the program title changes to another program such as Mail, you may proceed again.
- Now click on the Windows icon and then the ‘Start’ menu on the bottom left of your computer screen.
- Type and Search for ‘Windows Movie Maker, and you’ll find the newly downloaded app on the screen.
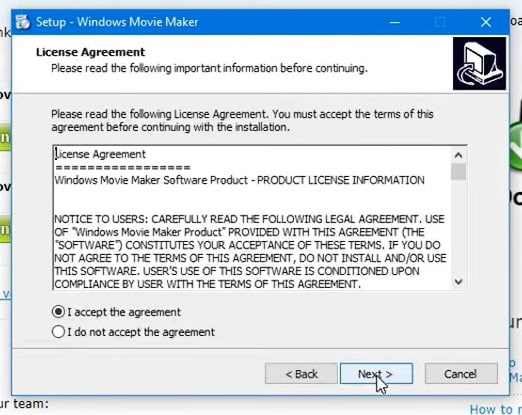
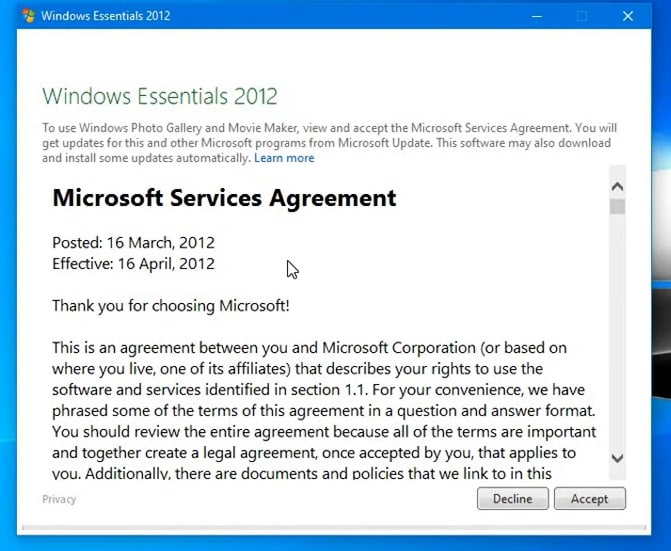
- Click on the icon with film reel, which is the Movie Maker app, and you’ll locate it above the Start menu. Next, you’ll be redirected to the terms of use of Windows Essentials for this Window to begin.
- Find the ‘Accept ‘ button towards the screen’s right-end corner and tap on it. Windows Movie Maker will now open.
- Next, tap on ‘Close’ when prompted with an error message from the installation windows.
You may now Enjoy Windows Movie Maker Live and begin making movies and videos using this software.
2. Interface
The user interface of Winona Movie Maker has three essential areas: the timeline and the storyboard, the panes and the toolbar, and the menu bar. This area covers…
- Timeline and storyboard: It offers a timeline and storyboard usage details for working with the current project clips.
- Panes: It offers details regarding Collections pane usage for viewing all your collections. Furthermore, it offers information regarding the Movie Task pane for all general tasks during movie making or project editing.
- Toolbar and Menubar: Here, you’ll get details regarding toolbar and menu commands usage for different tasks in this software.
3. Basic Editing
Adding clips to your timeline is the most straightforward method for creating digital movies using Movie Maker. Thereby, picking any one AutoMovie Themes out of those seven choices from default, sepia, black and white, pan and zoom, fade, cinematic, and contemporary.
You can enjoy the following choices for editing all your video clips:
- Creating clips: You may create new clips from different video clips after you’re done with capturing and importing in the Windows Movie Maker. You may create clips in the software anytime, according to your convenience.
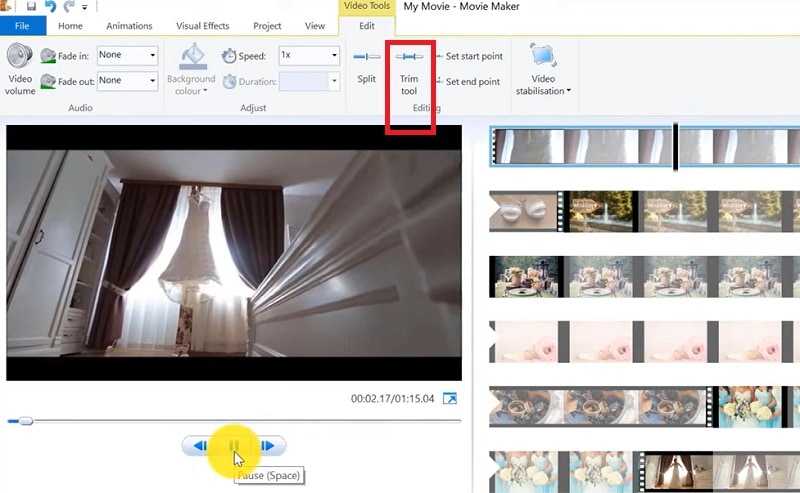
- Trimming any clip: You may hide any clip part you don’t wish to keep in the project. For instance, you may trim the clip’s end or beginning. Also, trimming doesn’t erase the details provided in their source material.
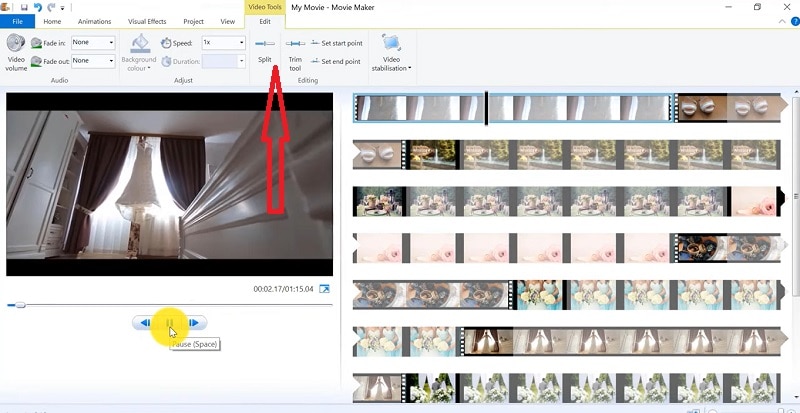
- Splitting Clips: Movie Maker allows you to split any video into two parts which can be helpful when you wish to add a video transition picture between the clips.
- Combining clips: Movie Maker allows you to merge two or multiple contiguous clips. Contiguous indicates that you need to record these clips together so that the beginning and end times are the same as the following video clip.
4. Add Video Effects
Video effects’ ascertain how any title, picture, or video clip displays in the final movie or project. Video effects permit you to include various effects in the movie and are added for the total time that the title, picture, or video clip displays.
Furthermore, you may add various other effects, which you’ll find in the folder of video effects in their Collections pane. You may maintain video effects when moving, copying, cutting, or splitting a picture or video clip.
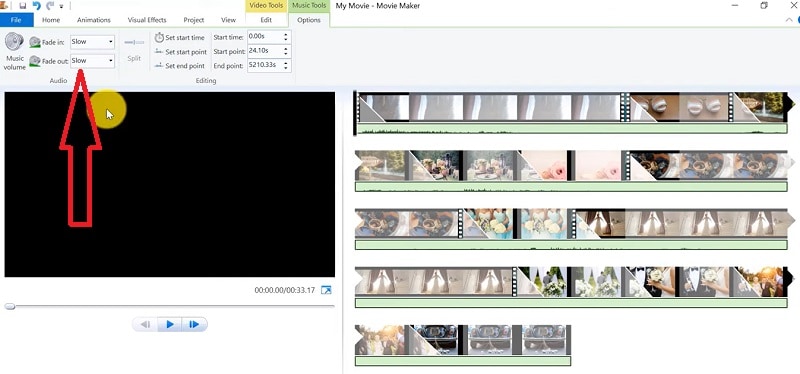
5. Audio Editing
Windows Movie Maker permits you to operate various audios in several ways. A few specific audio-related jobs you may execute in Windows Movie Live Maker comprise the following:
- Audio levels adjustment: You can adjust your audio level so that you can easily control the audio playback and balance after you have the audio that comes up on Music/ Audio and Audio tracks in your timeline.
- Timeline narration: You may include a voice narration for the picture or video clips, which will appear on the timeline’s video track. There’ll be an automated synchronization of the audio narration with your video, where the narration shall elaborate on the movie event or action when you play it.
- Audio Clips Volume adjustment: You may adjust the audio volume for the video clip’s audio portion or the clips containing only audio. This permits you to control the audio clip’s volume such that you can hear it based on the sound level you’ve set for your audio clip.
- Adding audio effects: You may add various audio effects like mute, fade out and fade in.
6. Share Files
Are you done with video project editing, and now you wish to share it? Windows Movie Maker offers you various choices for sharing straight away from their app, comprising:
- YouTube
- Vimeo
So with this power, you may guarantee to share the video’s correct aspect ratio and size version to any planned platform. Nevertheless, you don’t require signing in to your Microsoft account for sharing to the preferred platform, which may act as a hurdle for all its users who do not have Microsoft Office accounts.
7. Pros and Cons
The software’s advantages are its automated preview, simple controls, and user-friendliness. Additionally, the following are some clear advantages and disadvantages of using Windows Movie Maker:
Pros
- This app is perfect for all novices and is an ideal introduction as it utilizes several pro editing systems’ general workflow components like assembling timelines and importing. Its interface has easy navigation and is exceptionally intuitive for most new beginners as well.
- Windows Live MovieMaker is a video editing Microsoft application that arrives standard with all Windows computers. It is amongst the most favorite editing apps obtainable and exact, as other programs are user-friendly and fun. This software comes free with Vista, XP, and Windows Me and has effortless usage. Moreover, you may download additional video plugins, plus it won’t give you any chance to complain regarding its free software.
- This app is straightforward to learn, and you won’t require any experience in film editing for using Windows Media Player. You’ll explore more than 130 effects with accessible Fantastic credits, titles, and transitions. Next to this, you may drag and then drop the clip at any place in the timeline.
- Windows Movie Maker is an ideal app for image slide shows and was developed to create photo and home movie slide shows. It presents excellent fun transitions and themes; you may add music easily. This app provides excellent variety, being a free editing application. Furthermore, it offers transitions and striking effects to function with.
- Windows Live Movie Maker is free of cost for all Microsoft Windows users and is basically for clients having zero to minimum experience editing audio and videos. Moreover, it has many special effects you may use while creating videos. Also, you may frag and then place any picture or video anywhere you wish to see it.
- You can choose from several themes, enhancing your film with tools like contemporary themes, fade effects, and sepia toning choices. You have to click once, and then the users can choose and apply from the multiple effects collection.
Cons
- Windows Movie Maker contains unlimited audio and video tracks, yet it provides just one accessible one at a time. Hence, if you wish to include some other audio or music track, you may prepare the video, thereby sending it to the ultimate file.
- It isn’t uninstallable using any remove or add control panel. Also, it is impossible to do video overlaying.
- This app requires much patience because it is prone to crashes. Moreover, you’ll require enough time and effort to do video reversing. It often becomes frustrating for all advanced editors to cut clips into small parts and then add them back. Hence, Windows Movie maker isn’t good for professional video editors.
- Windows Live MovieMaker can crash and freeze and is known to suffer frequent crashes. Hence, ensure saving often and avoid creating complex videos. Also, you cannot perform complex editing and can now prepare single audio and video track.
8. Windows Movie Maker Alternative Software
Wondershare Filmora Video Editor is the best alternative for Windows Movie Live Maker and is a highly favored and most effective software program. You can download it for free, and it is adaptable with Windows 7 OS or above. This app is user-friendly but powerful and allows you to split, merge, crop, and trip various video clips with essential built-in video editing attributes.
Free Download For Win 7 or later(64-bit)
Free Download For macOS 10.14 or later
Additionally, you may get a few advanced properties like video stabilization, color correction, and green screen in Filmora effortlessly. You may even explore several fashionable and modern video effects such as music, text, and intros for topics like games, Education, Travel, Vlogger, Beauty, etc. Here is the comparison between the two software:
Filmora and Windows Movie Maker comparison
| Basis | Windows Movie Maker | Wondershare Filmora |
|---|---|---|
| Pricing | Free/ inexpensive | Quote basedAnnual SubscriptionOne-time paymentMonthly Payment |
| Interface | Pleasing interface | Auto movie options |
| Effects | Several overlays and effects | Special effects choices and transition overlays |
| Integration | YouTubeFacebookVimeoEmail | TwitterInstagramFacebookVimeoYouTube |
Conclusion
You may use Windows Movie Maker Live for capturing videos and audio to the computer using various video sources, including Web Cameras and Video Cameras, thereby using the recorded data in your new movies. You may import still pictures, video, and audio into this application to use in the movies you’re making. Moreover, after you’ve finished with video and audio content editing in this app, which may involve adding effects, video transitions, and titles, you may finally save the ultimate movie and then share and watch it with your family and friends.
How to Create Sports Intro and YouTube Endscreen?
Are you deep into sports? Have you created a sports channel on YouTube but are still clueless? You do not need to panic. The article has got you covered.
There is an extensive range of sports channels on YouTube struggling and surviving. It includes gaming, exercise, athletics, basketball, hockey, and tennis sports. A promising sports background music in the intro and outro makes it appealing for the audience. Hence, the article will focus on three platforms for exercise downloading impeccable background music.
The step-by-step guide to creating an outstanding sports intro will also be sketched out. So, what are we waiting for? Time to commence this!
In this article
01 How to Create an Epic Sports Intro?
02 How to Edit a Sport Style YouTube Outro or End Screen?
03 3 Recommended Sites to Download Background Music for Exercise Videos
Part 1: How to Create an Epic Sports Intro?
Do you own a sports channel? Continue exploring the section to know more!
A sports channel needs a promising intro to keep the audience interested in the content. An exceptional intro to a sports channel with great music enables you to gain subscribers. The sub-section would cover an extensive procedure to make a startling sports intro with yoga background music or other sport. So, let us start? Shall we?
For Win 7 or later (64-bit)
For macOS 10.12 or later
Step 1: Open Wondershare Filmora from your computer. Now, head to the “Audio” panel to drop a powerful track to the timeline. Use the “Media” panel to import the sports video clips for your intro.

Step 2: Keep the highlights and trim the clips to be in sync with the music. After the editing is concluded, shift your focus to the “Titles.” Move to the Titles panel and use title animations for the “Energy Sports” pack.

Step 3: Drag and drop the titles on the top of the footage. It would be best to match the duration of the video clips with the titles. Now, double-click the title to rename it according to your need.

Step 4: To make the ending more powerful, right-click on the last video clip and click on “Speed and Duration.” Enhance the speed to make it engaging. Moving on, navigate to the “Effects” panel.

Step 5: From there, pick the “Shake” filter and drag and drop the “Chaos 1” to the last clip. Similarly, click on the “Distortion” filter to drop the “Chromatic Aberration” effect onto the last clip.

Step 6: Now, it is time to add transitions to create a smooth connection between the clips. Click on “Transitions” and then “Energy Sports” pack. Drag and drop both transitions in between the clips. A creative and captivating sports intro has been created with solid sports background music.

Part 2: How to Edit a Sport Style YouTube Outro or End Screen?
Communicating with the users about a channel doesn’t have to be with words. The background music for exercise expresses the aims of a channel more perfectly. The same goes for a profound sport-style outro which tells the audience that we are ending on a high note.
The sub-section takes the opportunity to offer a step-by-step to edit a sport-style YouTube end screen. So, come with us as we explore it together! Let us go!
For Win 7 or later (64-bit)
For macOS 10.12 or later
Step 1: To begin, launch Wondershare. Import the targeted video clips that you need as an engaging YouTube outro. After that, click on “Split Screen.” Please choose your favorite split-screen design and drag it to the timeline.

Step 2: Use the imported videos to drag them on the preview window in the split-screen design as selected. You can adjust the scale and position through the mouse click. Now, drag and drop the video onto the timeline and trim it as needed.

Step 3: Head to the “Effects” tab and search for blur in the space bar. Drag and drop the square blur to the second part of the video. Adjust the blur intensity as required. Import another video and add it to the timeline.

Step 4: Insert dissolved transitions between the first two cuts to smooth the process. Now, it is time to add an avatar image. Import the profile picture to the timeline above the second track. Head to the utility category under the “Effects” tab and drag the “Image Mask” to the image on the timeline.

Step 5: Double click on it to alter the masking width so that the circle mask can fit on the image. Scale down the picture and set it to the center of the frame. Navigate to the “Elements” panel and pick the YouTube subscribe button. Drag it to the third track afterward.

Step 6: Place the location on the preview window as you need. Now, move to the social media category in the “Titles” to choose the perfect one and add it to the timeline above the last clip. The user is instructed to add a transition at the beginning of the clip. Rename the social media names of your sports channel, and you are done with the process.

Part 3: 3 Recommended Sites to Download Background Music for Exercise Videos
Sports background music is one of the significant ways to keep the audience motivated for sports and exercise. It helps enhance the subscribers’ multifold. Therefore, the importance of promising yoga background music cannot be neglected.
Mixkit
Mixkit is a renowned place to access royalty-free marketplaces, bringing revolution to the market and content creators. It is extremely workable to download background music for exercise in seconds. Based on genre, mood, and tag, you can search for a suitable music track.
The trap sport workout, motivating mornings, positive energy, super strong, and the greatest comeback is one of the most exemplary tracks from Mixkit. The audio can be listened to before making the decision. The genre offers ambient, cinematic, funk, hip-hop, acoustic, classical, and electronica.

TunePocket
Changing the narrative of music platforms, TunePocket pretty much takes the lead. The filter results make the process flawless. You can tailor the search results by playing with category, mood, genres, instruments, length, and tempo.
The duration of each sports background music is also mentioned to give the content creators an idea. Power dance workout, workout fitness motivation, summer western dance, young gamers, and sports power electro, and techno blast are some examples of outstanding music tracks.

Envato Elements
The next on the list is Envato Elements making wonders in the business. The search filters are refined as the user deems necessary. Online exercise, motivational EDM, fitness, workout, corporate meditation, and exercise are some amazing examples of royalty-free music. The search results can be tailored according to relevancy and popularity.

Concluding Remarks
There is an awful load of sports channels on YouTube. The content creators are trying their best to beat the competitors. It is crucial to access energetic background music for exercise to make intro and outro engaging.
The article recommended three apps to download sports background music. The step-by-step guide to creating an inspiring sports intro and editing sports style YouTube outro via Filmora.
Wondershare Filmora
Get started easily with Filmora’s powerful performance, intuitive interface, and countless effects!
Try It Free Try It Free Try It Free Learn More >

02 How to Edit a Sport Style YouTube Outro or End Screen?
03 3 Recommended Sites to Download Background Music for Exercise Videos
Part 1: How to Create an Epic Sports Intro?
Do you own a sports channel? Continue exploring the section to know more!
A sports channel needs a promising intro to keep the audience interested in the content. An exceptional intro to a sports channel with great music enables you to gain subscribers. The sub-section would cover an extensive procedure to make a startling sports intro with yoga background music or other sport. So, let us start? Shall we?
For Win 7 or later (64-bit)
For macOS 10.12 or later
Step 1: Open Wondershare Filmora from your computer. Now, head to the “Audio” panel to drop a powerful track to the timeline. Use the “Media” panel to import the sports video clips for your intro.
Step 2: Keep the highlights and trim the clips to be in sync with the music. After the editing is concluded, shift your focus to the “Titles.” Move to the Titles panel and use title animations for the “Energy Sports” pack.
Step 3: Drag and drop the titles on the top of the footage. It would be best to match the duration of the video clips with the titles. Now, double-click the title to rename it according to your need.
Step 4: To make the ending more powerful, right-click on the last video clip and click on “Speed and Duration.” Enhance the speed to make it engaging. Moving on, navigate to the “Effects” panel.
Step 5: From there, pick the “Shake” filter and drag and drop the “Chaos 1” to the last clip. Similarly, click on the “Distortion” filter to drop the “Chromatic Aberration” effect onto the last clip.
Step 6: Now, it is time to add transitions to create a smooth connection between the clips. Click on “Transitions” and then “Energy Sports” pack. Drag and drop both transitions in between the clips. A creative and captivating sports intro has been created with solid sports background music.
Part 2: How to Edit a Sport Style YouTube Outro or End Screen?
Communicating with the users about a channel doesn’t have to be with words. The background music for exercise expresses the aims of a channel more perfectly. The same goes for a profound sport-style outro which tells the audience that we are ending on a high note.
The sub-section takes the opportunity to offer a step-by-step to edit a sport-style YouTube end screen. So, come with us as we explore it together! Let us go!
For Win 7 or later (64-bit)
For macOS 10.12 or later
Step 1: To begin, launch Wondershare. Import the targeted video clips that you need as an engaging YouTube outro. After that, click on “Split Screen.” Please choose your favorite split-screen design and drag it to the timeline.
Step 2: Use the imported videos to drag them on the preview window in the split-screen design as selected. You can adjust the scale and position through the mouse click. Now, drag and drop the video onto the timeline and trim it as needed.
Step 3: Head to the “Effects” tab and search for blur in the space bar. Drag and drop the square blur to the second part of the video. Adjust the blur intensity as required. Import another video and add it to the timeline.
Step 4: Insert dissolved transitions between the first two cuts to smooth the process. Now, it is time to add an avatar image. Import the profile picture to the timeline above the second track. Head to the utility category under the “Effects” tab and drag the “Image Mask” to the image on the timeline.
Step 5: Double click on it to alter the masking width so that the circle mask can fit on the image. Scale down the picture and set it to the center of the frame. Navigate to the “Elements” panel and pick the YouTube subscribe button. Drag it to the third track afterward.
Step 6: Place the location on the preview window as you need. Now, move to the social media category in the “Titles” to choose the perfect one and add it to the timeline above the last clip. The user is instructed to add a transition at the beginning of the clip. Rename the social media names of your sports channel, and you are done with the process.
Part 3: 3 Recommended Sites to Download Background Music for Exercise Videos
Sports background music is one of the significant ways to keep the audience motivated for sports and exercise. It helps enhance the subscribers’ multifold. Therefore, the importance of promising yoga background music cannot be neglected.
Mixkit
Mixkit is a renowned place to access royalty-free marketplaces, bringing revolution to the market and content creators. It is extremely workable to download background music for exercise in seconds. Based on genre, mood, and tag, you can search for a suitable music track.
The trap sport workout, motivating mornings, positive energy, super strong, and the greatest comeback is one of the most exemplary tracks from Mixkit. The audio can be listened to before making the decision. The genre offers ambient, cinematic, funk, hip-hop, acoustic, classical, and electronica.
TunePocket
Changing the narrative of music platforms, TunePocket pretty much takes the lead. The filter results make the process flawless. You can tailor the search results by playing with category, mood, genres, instruments, length, and tempo.
The duration of each sports background music is also mentioned to give the content creators an idea. Power dance workout, workout fitness motivation, summer western dance, young gamers, and sports power electro, and techno blast are some examples of outstanding music tracks.
Envato Elements
The next on the list is Envato Elements making wonders in the business. The search filters are refined as the user deems necessary. Online exercise, motivational EDM, fitness, workout, corporate meditation, and exercise are some amazing examples of royalty-free music. The search results can be tailored according to relevancy and popularity.
Concluding Remarks
There is an awful load of sports channels on YouTube. The content creators are trying their best to beat the competitors. It is crucial to access energetic background music for exercise to make intro and outro engaging.
The article recommended three apps to download sports background music. The step-by-step guide to creating an inspiring sports intro and editing sports style YouTube outro via Filmora.
Wondershare Filmora
Get started easily with Filmora’s powerful performance, intuitive interface, and countless effects!
Try It Free Try It Free Try It Free Learn More >
Are You Eager to Know How to Create an Adjustment Layer in Premiere Pro? This Article Will Highlight the Significance of Adding an Adjustment Layer in Premiere Pro
Are you using Premiere Pro frequently? Adobe Premiere Pro is considered advanced software for editing video clips proficiently. You can find a diverse range of features in Premiere Pro that allows you to transform your videos immensely.
If you want to be a professional video editor, you must know the basic techniques of executing video editing. In Premiere Pro, there are various options and features that can help you in enhancing your productivity. For instance, the use of adjustment layers in video editing can make a huge difference. By reading this article, you can come to know about the Premiere Pro adjustment layer efficiently.

Part 1: What is Adjustment Layer in Premiere Pro?
In Premiere Pro, you can save time efficiently by editing each layer individually. To do so, you can find the feature of the adjustment layer in Premiere Pro that enables you to apply the same effect to multiple clips instantly. This will eventually save you time and manual effort. However, you must ensure that the adjustment layer has been placed on top of the layers stack section.
In an adjustment layer in Premiere Pro, you can add multiple effects to create a captivating illustration in your video clips. Moreover, you can also create multiple adjustment layers in Premiere Pro to handle and apply the effects in your clips proficiently. Also, you can easily move, remove, or cut the Premiere Pro adjustment layer anytime within a few clicks.

Furthermore, you can also remove the adjustment layer from your timeline easily without modifying the composition settings of your video. If you get a basic understanding of creating and managing the adjustment layer in Premiere Pro, you can efficiently enhance the visual appeal of your videos. To learn more about the Premiere Pro adjustment layer, continue reading.
Part 2: How to Add an Adjustment Layer in Premiere Pro?
In this section, we will briefly address how to add an adjustment layer in Premiere Pro in a simpler manner.
Step1 Once you have uploaded your project in Premiere Pro, go to the “File” tab and select the “New” option. Afterward, tap on “Adjustment Layer.”

Step2 You can also go to the bottom of your project’s panel and tap on the “New Item” icon. After clicking on this icon, you can click on the “Adjustment layer” option. Afterward, you can modify the video settings to change the settings of the adjustment layer. Once done, hit the “OK” button.

Step3 Once the adjustment layer has been created, you can drag and drop it into the timeline. To change its name, you can right-click on it.

Part 3: Three Ways to Use Adjustment Layer in Premiere Pro
Do you want to use the Premiere Pro adjustment layer significantly? In this section, we will highlight three ways through which you can use the adjustment layer in Premiere Pro to edit your videos.
1. Color Grading
Color grading in Premiere Pro can help you to adjust the balance and tone of your video. You can use the color grading effects and tools to set the exposure, brightness, saturation, and light according to your preference. It will also let you redefine the colors in your video efficiently. To use the adjustment layer for color grading, you can read the below instructions:
Step1 After uploading the video clip in Premiere Pro, create a new adjustment layer in the timeline. Drag and adjust it according to the duration of your video clip. Once done, go to the “Effects” tab and search for “FilmConvert Nitrate.”

Step2 Apply this effect to the adjustment layer and choose your camera to match the color profile. Afterward, you can adjust the saturation, exposure filmstock, and curves according to your choice. You can also increase the vibrancy and hue saturation curves for more enhancement. You can also navigate to the basic correction section to modify the contrast value accordingly.
2. Transition
To merge multiple video clips smoothly and efficiently, transitional effects can assist you. By adding a suitable transition effect, you can make your whole video look clean and cinematic. Moreover, you can use adjustment layers in Premiere Pro to add transition effects to your effect professionally. To do the transition effect, you can proceed to the following instructions:
Step1 First, drag and drop your video clips into the timeline. Once done, create the adjustment layer and apply it above the layers of video clips. Once done, search the “Offset” effect and apply it to the adjustment layer.
Step2 Now add the keyframe to the position where you want to start and end the transition effect. Afterward, right-click on the first keyframe and select “Temporal Interpolation.” From there, choose “Ease Out.” Repeat the same process with the last keyframe. Once done, add the “Directional blur” effect to the adjustment layer for a smoother look.

3. Mask
By using masks in Premiere Pro, you can efficiently blur, highlight, or add an effect to a specific area of your video clip. With this tool, you can draw different mask shapes, such as ellipses, rectangles, etc. Thus, it’s a great way to edit any particular part of the video clip effortlessly. Here are the simple steps to add masks to the video clips using the adjustment layer:
Step1 Add the adjustment layer to the timeline and head to the “Effects” library to locate the “Crop” effect. Add this effect to the adjustment layer and then head to the Effects control.

Step2 Now enhance the top and bottom properties to 15%. You can also adjust the headspace of the person accordingly. Also, you can animate the black bars to produce a more cinematic look in your video.
Part 4: FAQ about Adjustment Layers in Premiere Pro
If you have some questions or concerns about using the adjustment layer in Premiere Pro, we have discussed the commonly asked question below.
Why is the adjustment layer greyed out in my Premiere Pro?
To fix grayed adjustment layer in Premiere Pro, there are two methods that you can follow:
Method 1: At the bottom of your project panel, click on the “New Item” icon and select “Adjustment Layer.” Once done, adjust the settings and press the “OK” button. Now you can drag and drop the adjustment layer in the timeline.
Method 2: Click on your “Project Panel” and then navigate to the “File” tab. From there, select “New” and then click on “Adjustment Layer.” Once done, you can drag and drop the adjustment layer at the timeline.
Conclusion
Premiere Pro is a famous video editing software that lets you enhance your videos proficiently. In this tool, using adjustment layers can help you in making your editing process quicker and easier. That’s why, in this article, we have focused on how to add an adjustment layer in Premiere Pro. Moreover, we have also shed light on how to use the adjustment layer precisely with various effects to enhance your videos.
Are you using Premiere Pro frequently? Adobe Premiere Pro is considered advanced software for editing video clips proficiently. You can find a diverse range of features in Premiere Pro that allows you to transform your videos immensely.
If you want to be a professional video editor, you must know the basic techniques of executing video editing. In Premiere Pro, there are various options and features that can help you in enhancing your productivity. For instance, the use of adjustment layers in video editing can make a huge difference. By reading this article, you can come to know about the Premiere Pro adjustment layer efficiently.
Part 1: What is Adjustment Layer in Premiere Pro?
In Premiere Pro, you can save time efficiently by editing each layer individually. To do so, you can find the feature of the adjustment layer in Premiere Pro that enables you to apply the same effect to multiple clips instantly. This will eventually save you time and manual effort. However, you must ensure that the adjustment layer has been placed on top of the layers stack section.
In an adjustment layer in Premiere Pro, you can add multiple effects to create a captivating illustration in your video clips. Moreover, you can also create multiple adjustment layers in Premiere Pro to handle and apply the effects in your clips proficiently. Also, you can easily move, remove, or cut the Premiere Pro adjustment layer anytime within a few clicks.
Furthermore, you can also remove the adjustment layer from your timeline easily without modifying the composition settings of your video. If you get a basic understanding of creating and managing the adjustment layer in Premiere Pro, you can efficiently enhance the visual appeal of your videos. To learn more about the Premiere Pro adjustment layer, continue reading.
Part 2: How to Add an Adjustment Layer in Premiere Pro?
In this section, we will briefly address how to add an adjustment layer in Premiere Pro in a simpler manner.
Step1 Once you have uploaded your project in Premiere Pro, go to the “File” tab and select the “New” option. Afterward, tap on “Adjustment Layer.”
Step2 You can also go to the bottom of your project’s panel and tap on the “New Item” icon. After clicking on this icon, you can click on the “Adjustment layer” option. Afterward, you can modify the video settings to change the settings of the adjustment layer. Once done, hit the “OK” button.
Step3 Once the adjustment layer has been created, you can drag and drop it into the timeline. To change its name, you can right-click on it.
Part 3: Three Ways to Use Adjustment Layer in Premiere Pro
Do you want to use the Premiere Pro adjustment layer significantly? In this section, we will highlight three ways through which you can use the adjustment layer in Premiere Pro to edit your videos.
1. Color Grading
Color grading in Premiere Pro can help you to adjust the balance and tone of your video. You can use the color grading effects and tools to set the exposure, brightness, saturation, and light according to your preference. It will also let you redefine the colors in your video efficiently. To use the adjustment layer for color grading, you can read the below instructions:
Step1 After uploading the video clip in Premiere Pro, create a new adjustment layer in the timeline. Drag and adjust it according to the duration of your video clip. Once done, go to the “Effects” tab and search for “FilmConvert Nitrate.”
Step2 Apply this effect to the adjustment layer and choose your camera to match the color profile. Afterward, you can adjust the saturation, exposure filmstock, and curves according to your choice. You can also increase the vibrancy and hue saturation curves for more enhancement. You can also navigate to the basic correction section to modify the contrast value accordingly.
2. Transition
To merge multiple video clips smoothly and efficiently, transitional effects can assist you. By adding a suitable transition effect, you can make your whole video look clean and cinematic. Moreover, you can use adjustment layers in Premiere Pro to add transition effects to your effect professionally. To do the transition effect, you can proceed to the following instructions:
Step1 First, drag and drop your video clips into the timeline. Once done, create the adjustment layer and apply it above the layers of video clips. Once done, search the “Offset” effect and apply it to the adjustment layer.
Step2 Now add the keyframe to the position where you want to start and end the transition effect. Afterward, right-click on the first keyframe and select “Temporal Interpolation.” From there, choose “Ease Out.” Repeat the same process with the last keyframe. Once done, add the “Directional blur” effect to the adjustment layer for a smoother look.
3. Mask
By using masks in Premiere Pro, you can efficiently blur, highlight, or add an effect to a specific area of your video clip. With this tool, you can draw different mask shapes, such as ellipses, rectangles, etc. Thus, it’s a great way to edit any particular part of the video clip effortlessly. Here are the simple steps to add masks to the video clips using the adjustment layer:
Step1 Add the adjustment layer to the timeline and head to the “Effects” library to locate the “Crop” effect. Add this effect to the adjustment layer and then head to the Effects control.
Step2 Now enhance the top and bottom properties to 15%. You can also adjust the headspace of the person accordingly. Also, you can animate the black bars to produce a more cinematic look in your video.
Part 4: FAQ about Adjustment Layers in Premiere Pro
If you have some questions or concerns about using the adjustment layer in Premiere Pro, we have discussed the commonly asked question below.
Why is the adjustment layer greyed out in my Premiere Pro?
To fix grayed adjustment layer in Premiere Pro, there are two methods that you can follow:
Method 1: At the bottom of your project panel, click on the “New Item” icon and select “Adjustment Layer.” Once done, adjust the settings and press the “OK” button. Now you can drag and drop the adjustment layer in the timeline.
Method 2: Click on your “Project Panel” and then navigate to the “File” tab. From there, select “New” and then click on “Adjustment Layer.” Once done, you can drag and drop the adjustment layer at the timeline.
Conclusion
Premiere Pro is a famous video editing software that lets you enhance your videos proficiently. In this tool, using adjustment layers can help you in making your editing process quicker and easier. That’s why, in this article, we have focused on how to add an adjustment layer in Premiere Pro. Moreover, we have also shed light on how to use the adjustment layer precisely with various effects to enhance your videos.
How To Create Quiz Videos: Detailed Guide
Quiz videos are becoming popular on YouTube but creating good content takes work. You’ll have to spend time on it, find the right questions and spend resources on powerful video editing software. In this guide, we’ll show you what a quiz video is, its advantages, and how you can use Filmora to make interactive video quizzes.
So, what are you waiting for? Read on to learn how to create quiz videos for Youtube!
Part 1. What Is A Quiz Video?
A quiz video is a type of content that provides viewers with a series of questions that are typically about a particular topic or subject matter and may also provide additional information about the topic. You can use the video for various purposes, including educational, entertainment, and marketing.

To make an appealing video quiz, you have to look at it from various angles, such as its purpose, type, and relevancy.
Moreover, a well-made quiz video will demand the viewer’s attention and encourage them to take action without being intrusive or annoying. One of the best ways is to provide visual captions that can explain the point being made in an engaging, fast-paced, and entertaining way.
Part 2. What Are The Advantages Of A Quiz And How To Use It?
Quizzing is a great way to engage your audience and encourage them to interact with your content. They can be used to create thought-provoking content, impart knowledge, and improve learning outcomes.
When used correctly, a quiz can be a powerful learning tool. But how do you use it effectively? And what are some of the advantages?
To answer these questions, we’ve provided some advantages of creating video quizzes and some scenarios where you can use them.
Advantages
Here are some advantages of video quizzes:
Draw Attention
A quiz can draw the viewer’s attention to the topic under discussion. Specifically, if you are a teacher, you can use GK question videos in your classroom to emphasize the content you are teaching and can better assess your students’ knowledge.
Increase Interactivity
Quizzes are a great way to increase engagement and interaction with your audience. By incorporating video into your questions, you can add an element of excitement and increase the likelihood that people will want to participate.

A Good Way To Introduce A Topic
Quizzes are an excellent way to introduce a new topic or subject matter. They can help you provide context and background information to help people understand the concepts you’re trying to teach or introduce.
Increase One’s Impressions Of Your Content
By adding a quiz, you can increase the time that someone spends on your page or channel as they work to answer the questions. This is valuable because it allows you to introduce a new topic in a fun and interactive way, along with getting more impressions on your content.
Scene
Here are some scenes where you can use the quizzes:
Educational
You can use quizzes in any educational setting, such as a classroom, online course, or YouTube video, to provide knowledge to others and assess their understanding.
Speech
Quizzes can also be used in speeches to add interest and engagement. For instance, a motivational speaker can play a quiz during their talks to the audience to help them understand his point better and get their response.
Presentation
Adding a fun quiz to your presentation can help to break the monotony and keep your audience engaged throughout the session.
Social media
Quizzes can aid in generating engagement on your social media page. For example, you can use them to drive traffic to your website or blog or simply to get people talking about your brand.
Part 3. How To Make An Interactive Quiz Video In Filmora?
Suppose the above advantages have compelled you to create an interactive quiz video to engage your audience and get them involved in your content. In that case, you can use Filmora software which makes it easy to make quiz videos with its built-in interactive video editing tools.
Here’s how you can make an interactive quiz video using Filmora :
Free Download For Win 7 or later(64-bit)
Free Download For macOS 10.14 or later
Step1 Upload Your Materials
In the first step, it is essential that you complete in-depth research and find reliable information for your quiz video. Afterward, go to the Filmora website and download the software that is compatible with your system. Install the program on your PC/laptop and launch it.
On the homepage, select the “Create New Project” option, and choose “Click here to upload a media file” to upload your video. Alternatively, you can drag and drop the background video from your system to the Filmora interface.
Finally, drag and drop the background video into the timeline.

Step2 Make An Intro
Now, start by creating an introduction. You can do this by opening the “Media” tab, selecting a template, and dropping it in the timeline once it is downloaded.
Then, go to the “Titles” tab, choose a text style you like, and drop it in the timeline. Finally, align both the template and your video file.
To add text to your intro, click on the text track in the timeline. Enter the intro text, ideally the quiz topic, then customize the text color and style as desired. The Advanced option also lets you animate your text. Save the changes by clicking “OK.”
Step3 Add A Quiz To The Timeline
Next, add the GK questions and answers to your video using the “Titles” tab. You should adjust the display time and text on the timeline as needed.

Step4 Increase Interactivity In Your Quiz Video
To make your video more engaging, go to the “Transition” tab and add an interesting transition effect. You can also add effects or countdown elements between questions or reveal the answer.
Step5 Repeat The Process And Export Your Final Video
After completing the previous steps, you can now create the entire quiz video by repeating the above steps.
Once you are done, click the “Play” icon to preview your work, and select the “Export” icon to either save the clip to your device or upload it directly to your YouTube channel.
Conclusion
In this detailed guide, we’ve explored what a video quiz is, its advantages, and scenes where you can use them. We’ve also walked you through the step-by-step process of making an interactive video quiz using the Wondershare Filmora software.
Hopefully, you’ve enjoyed reading this article and can now create quiz videos for your presentation, classroom, or YouTube videos.
Free Download For macOS 10.14 or later
Step1 Upload Your Materials
In the first step, it is essential that you complete in-depth research and find reliable information for your quiz video. Afterward, go to the Filmora website and download the software that is compatible with your system. Install the program on your PC/laptop and launch it.
On the homepage, select the “Create New Project” option, and choose “Click here to upload a media file” to upload your video. Alternatively, you can drag and drop the background video from your system to the Filmora interface.
Finally, drag and drop the background video into the timeline.
Step2 Make An Intro
Now, start by creating an introduction. You can do this by opening the “Media” tab, selecting a template, and dropping it in the timeline once it is downloaded.
Then, go to the “Titles” tab, choose a text style you like, and drop it in the timeline. Finally, align both the template and your video file.
To add text to your intro, click on the text track in the timeline. Enter the intro text, ideally the quiz topic, then customize the text color and style as desired. The Advanced option also lets you animate your text. Save the changes by clicking “OK.”
Step3 Add A Quiz To The Timeline
Next, add the GK questions and answers to your video using the “Titles” tab. You should adjust the display time and text on the timeline as needed.
Step4 Increase Interactivity In Your Quiz Video
To make your video more engaging, go to the “Transition” tab and add an interesting transition effect. You can also add effects or countdown elements between questions or reveal the answer.
Step5 Repeat The Process And Export Your Final Video
After completing the previous steps, you can now create the entire quiz video by repeating the above steps.
Once you are done, click the “Play” icon to preview your work, and select the “Export” icon to either save the clip to your device or upload it directly to your YouTube channel.
Conclusion
In this detailed guide, we’ve explored what a video quiz is, its advantages, and scenes where you can use them. We’ve also walked you through the step-by-step process of making an interactive video quiz using the Wondershare Filmora software.
Hopefully, you’ve enjoyed reading this article and can now create quiz videos for your presentation, classroom, or YouTube videos.
Also read:
- Updated In 2024, Guide To Scaling and Setting Videos in Filmora | Tutorial
- How to Create LUTs with LUTs Generator for 2024
- Updated In 2024, Finest Approach to Slow Down a Video CapCut All-in-One Video Editor
- How to Change Video Resolution in Filmora for 2024
- In 2024, Are You Stuck with How to Use Discord GIF Ideally? Check that Out in This Article, as We Will Guide You on All You Need to Know About GIFs for Discord
- Do You Wish to Design the Perfect Slow-Motion Video on Your Smartphone? Learn some Top-Rated Free Slow-Mo Apps for Android and iOS Users in This Article
- 2024 Approved How to Delete White Background in Photoshop. How to Create a Transparent Background in Photoshop? Steps to Get Rid of White Background in Photoshop
- 2024 Approved Best Free Video Editing Software for Reddit
- New Do You Want to Know How to Edit a Time Lapse Video on iPhone, Interesting Ideas, and some Tips and Pointers for Shooting a Professional Time Lapse Video? Find Out Everything in This Guide
- Updated Whether Youre a Professional Animator or a Beginner Into This. If You Want to Use the OBS Studio Chroma Key, Weve Presented some Efficient Ways to Proceed. Learn More Here
- How to Create an URL for Your Video, In 2024
- 2024 Approved This Article Presents the Guide to Using Magic Effects for Creating Competent Films with Step-by-Step Instructions and Filmoras Grow and Win Program Contest
- One of the Latest Tools for Editing Video and Images Is AI Composite Video App Which Is Popular Among Users. Learn All About This Tool and Its Functioning for 2024
- Whether Youre a Professional Animator or a Beginner Into This. If You Want to Use the OBS Studio Chroma Key, Weve Presented some Efficient Ways to Proceed. Learn More Here for 2024
- New In 2024, Best Phantom Slow-Mo Camera For Recording Slow Motion Videos
- New 2024 Approved Final Cut Pro for iPad
- How To Split Videos in Premier Pro for 2024
- New 2 Actionable Ways to Extract Subtitles From MKV Videos without Quality Loss for 2024
- How to Add a Slideshow in PowerPoint
- Synchronizing Videos Can Be Hectic, but Do You Wish to Know a Good Tool for This Purpose? This Article Will Discuss Wondershare Filmora, Which Is Perfect for This for 2024
- What Is a Memoji and How to Make a Memoji? You Can Learn Top 8 Memoji Makers for PC, Android, or iOS, and the Steps to Make a Memoji
- New 4K Videos Are the in Thing because of Their Flexibility and High Resolution. Stick Around to Learn How to Choose the Best Frame Rate for 4K Videos for 2024
- Updated 2024 Approved How to Convert Videos to Slow Motion?
- New 6 Instant Ways to Create Windows 10 Slideshow for 2024
- Updated In 2024, Step by Step to Cut Video in Adobe Premiere Pro
- Follow a Few Simple Steps and Learn How to Create a Professional Glowing Edge Effect to Your Videos in Filmora for 2024
- New 2024 Approved How to Speed Up and Slow Down a Video
- Finest Approach to Slow Down a Video CapCut All-in-One Video Editor
- In 2024, Step by Step Guide on Make Gimp Transparent Background PNG
- Updated Create Your Slow Zoom TikTok in Minutes for 2024
- New AI Features of Filmora - Silence Detection in Videos for 2024
- In 2024, 2 Methods to Cut Video in VLC on Windows
- Updated In 2024, Something That You Should Know About MP4 Video Format
- Steps to Remove Background Noise From Video Sony Vegas for 2024
- 2024 Approved 3D Ray Traced Settings In After Effects
- New Do You Want a LUT that You Can Use for Your High-Definition Content? You Can Use Rec 709 LUT Premiere Pro for Your HD Digital Media to Give the Perfect Result
- New If You Want to Know How to Live Stream Pre-Recorded Video, You Are in the Right Place. We Will Give You a Complete Guide on 8 Ways You Can Live Stream Pre-Recorded Videos Successfully
- How to Find iSpoofer Pro Activation Key On Oppo Find N3 Flip? | Dr.fone
- 5 Ways to Reset Tecno Camon 20 Without Volume Buttons | Dr.fone
- 2024 Approved Adobe Animate Text Effects Skills You Need to Know
- How to Transfer Photos from Honor Magic V2 to Laptop Without USB | Dr.fone
- Translate Videos and Subtitles with Veed.io for 2024
- How To Enable USB Debugging on a Locked Samsung Galaxy A14 5G Phone
- The Most Useful Tips for Pokemon Go Ultra League On OnePlus Nord N30 SE | Dr.fone
- In 2024, How to Watch Hulu Outside US On Honor X8b | Dr.fone
- In 2024, How to Transfer Data from Oppo A78 to BlackBerry | Dr.fone
- In 2024, Troubleshooting Error Connecting to the Apple ID Server From Apple iPhone 15 Pro Max
- What You Need To Know To Improve Your Vivo S18 Hard Reset | Dr.fone
- In 2024, How PGSharp Save You from Ban While Spoofing Pokemon Go On Motorola Razr 40 Ultra? | Dr.fone
- Best Pokemons for PVP Matches in Pokemon Go For Apple iPhone 6 Plus | Dr.fone
- Vivo Y56 5G Tutorial - Bypass Lock Screen,Security Password Pin,Fingerprint,Pattern
- How To Restore Missing Call Logs from Honor X50 GT
- Complete guide for recovering messages files on Nokia 130 Music
- In 2024, Top 10 OnePlus Ace 2V Android SIM Unlock APK
- In 2024, How to Use Life360 on Windows PC For Xiaomi Redmi 12 5G? | Dr.fone
- In 2024, How can I get more stardust in pokemon go On Honor 90 Lite? | Dr.fone
- The Ultimate List of Live Chat Apps for Shopify
- Bypassing Google Account With vnROM Bypass For Poco F5 Pro 5G
- In 2024, Forgot Pattern Lock? Heres How You Can Unlock Vivo Y78+ Pattern Lock Screen
- In 2024, Learn How To Lock Stolen Your Apple iPhone SE (2020) Properly | Dr.fone
- How to Retrieve deleted photos on Vivo
- 9 Solutions to Fix Poco M6 Pro 4G System Crash Issue | Dr.fone
- New 2024 Approved Never Miss a Moment With Free World Cup Live Streaming
- How to Mirror Poco M6 Pro 4G to Mac? | Dr.fone
- Fix Unfortunately Settings Has Stopped on ZTE Nubia Flip 5G Quickly | Dr.fone
- How to identify some outdated your hardware drivers with Windows Device Manager on Windows 10
- Top 6 Apps/Services to Trace Any Vivo Y36 Location By Mobile Number | Dr.fone
- In 2024, Complete Guide For Apple iPhone 11 Pro Lock Screen | Dr.fone
- Tutorial to Change Vivo Y36i IMEI without Root A Comprehensive Guide
- A Guide Honor X50 Wireless and Wired Screen Mirroring | Dr.fone
- MP4 won't play on my Motorola
- How to Stop Life360 from Tracking You On Infinix Hot 40 Pro? | Dr.fone
- In 2024, Tecno Camon 20 Premier 5G ADB Format Tool for PC vs. Other Unlocking Tools Which One is the Best?
- Top 10 Fixes for Phone Keep Disconnecting from Wi-Fi On Honor Magic 6 Lite | Dr.fone
- Title: In 2024, Windows Movie Maker Review
- Author: Chloe
- Created at : 2024-04-24 07:08:16
- Updated at : 2024-04-25 07:08:16
- Link: https://ai-editing-video.techidaily.com/in-2024-windows-movie-maker-review/
- License: This work is licensed under CC BY-NC-SA 4.0.
