:max_bytes(150000):strip_icc():format(webp)/GettyImages-545864051-5c29cf6346e0fb0001d25712.jpg)
Kdenlive Review – Is It The Best Video Editor, In 2024

Kdenlive Review – Is It The Best Video Editor?
When you look for an open source video editor online, you will come across several popular video editors. One of them has to be Kdenlive video editor that is available free and compatible across all desktop operating systems. The video editor claims to be suitable for beginners as well as for professional video editors.
Starting from multi-track video editing and support for different file formats to loads to effects and flexible interface, Kdenlive video editor seems to be truly powerful. But is it comparable to premium video editors and is it suitable for standard and advanced video editing? Read our Kdenlive tutorial and review for everything you need to know.
Part 1. Key Features of Kdenlive
If you need to edit videos occasionally, a free video editor is what you will be looking for. Unfortunately, most free videos have very basic video editing tools and they are suitable for editing personal videos only. On the contrary, Kdenlive comes with all the standard as well as some advanced video editing features. Here are all the key features of Kdenlive video editor that you should be aware of.
Multi-track editing – Kdenlive comes with a versatile timeline where you can have multiple tracks consisting of video clips, audio files and different effects and objects. You can lock the tracks as well as mute them so that you can experiment as you edit your video.
Effects and Transitions – Even though limited, there are eye-catching effects and transitions available. You can also go for color correction as well as minor adjustments in your audio. Besides, the titler lets you create amazing 2D texts and titles.
Proxy Editing – Kdenlive uses proxy editing technique to lower the resolution of high-resolution videos while you edit them. This takes away the pressure on the CPU resources, but when it renders, the original resolution gets restored back. That is why Kdenlive has been effective in low-end computers as well.
Flexible User Interface – Kdenlive comes with a customizable user interface. This means you can arrange the layouts of your workflow as per your requirements. Besides, there are configurable keyboard shortcuts. There are also different themes available for the user interface.
Keyframing – One of the advanced features of Kdenlive is that you can keyframe any effect. This means you can change the parameters of the effects with time using curves. Besides, the software supports green screen effect.
Miscellaneous – The software supports almost all types of audio and video file formats. There is an option for automatic backup which is highly useful in any video editing software. The software also supports online resources and add-ons.
Part 2. Basic Editing with Kdenlive
Kdenlive is available for free and you should definitely try it out. Thereafter, you decide whether it is perfect for you or not. After Kdenlive download, here are all the steps for basic video editing with Kdenlive.
Import a clip:
Step 1: Launch Kdenlive on your computer and make sure you have the video clip ready on your hard drive.
Step 2: Go to Project menu option. Click on “Add Clip or Folder” option. You can include all the video clips on any folder.
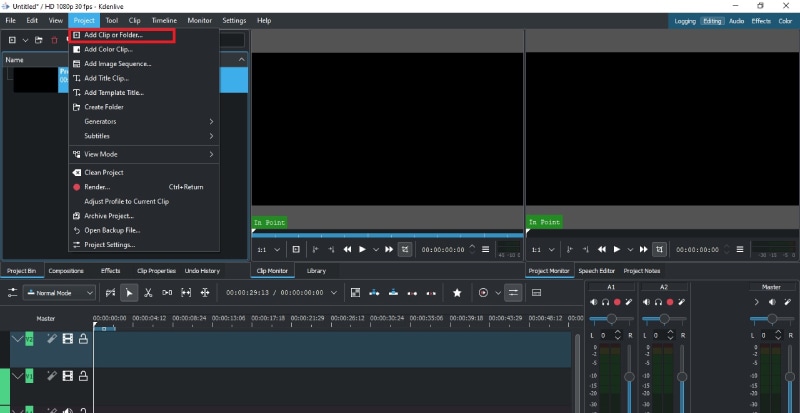
Step 3: The imported clips will then have to be dragged and dropped on the timeline from Project Bin.
Trim and Export:
Step 1: Import the video clip on Kdenlive and drag and drop the clip on the timeline.
Step 2: Put the timeline cursor over the point on the video clip from where you want to trim it.
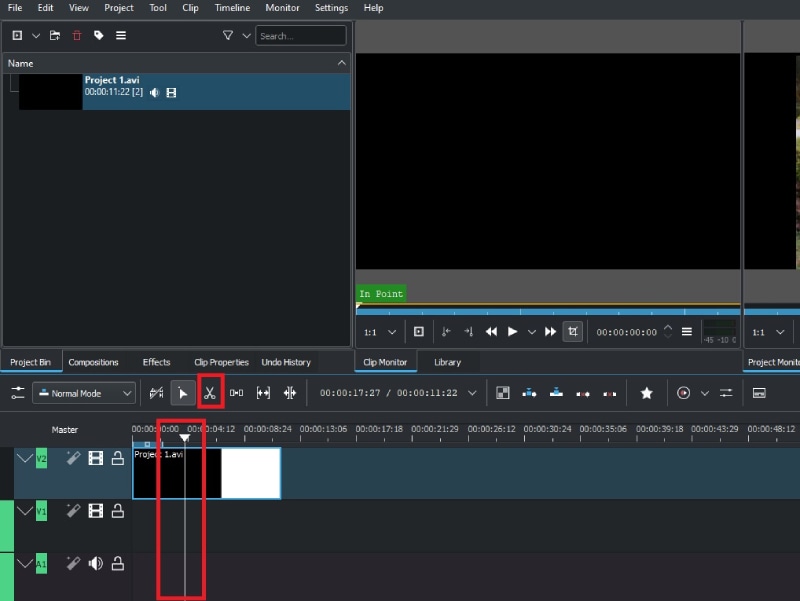
Step 3: Click on Scissor icon to start trimming. Thereafter, move the red timeline cursor to the point where you want the trimming to end.
![]()
Add multiple tracks:
There is enough number of tracks already available on Kdenlive timeline. However, when you are editing a large video project, you may need more tracks that already present.
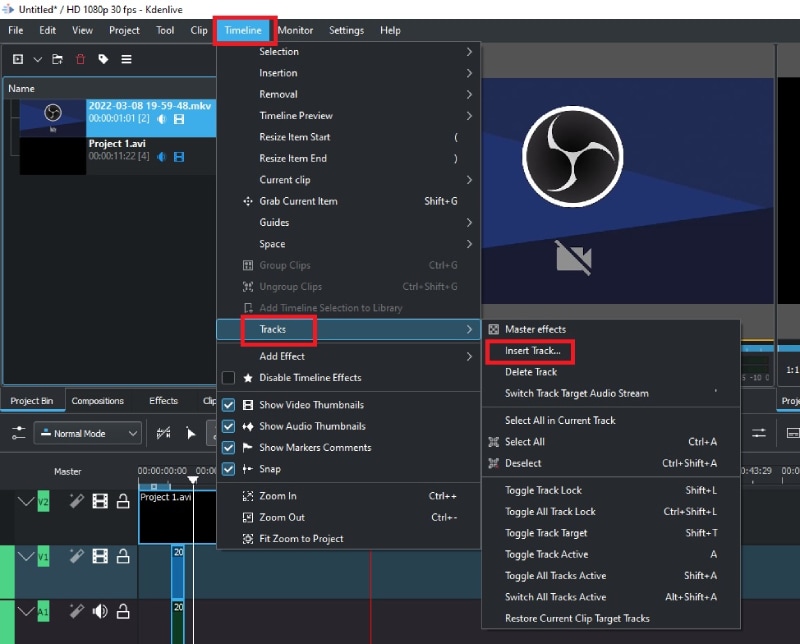
Step 1: Go to Timeline menu option.
Step 2: Go to Tracks> Inset Track option.
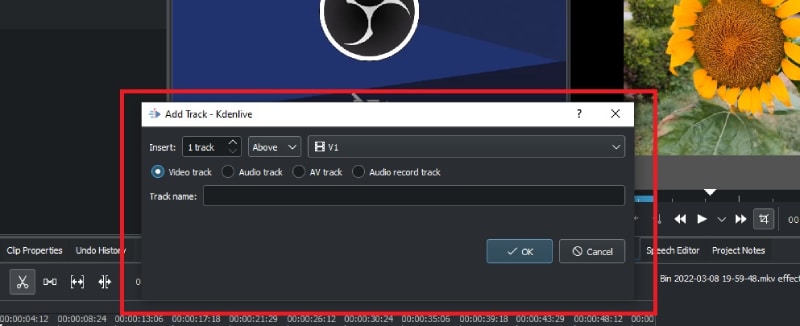
Step 3: Enter a name for the track and select the type of track and click on Ok button.
Adjust brightness and contrast:
Step 1: Go to Effects> Color and Image Correction.
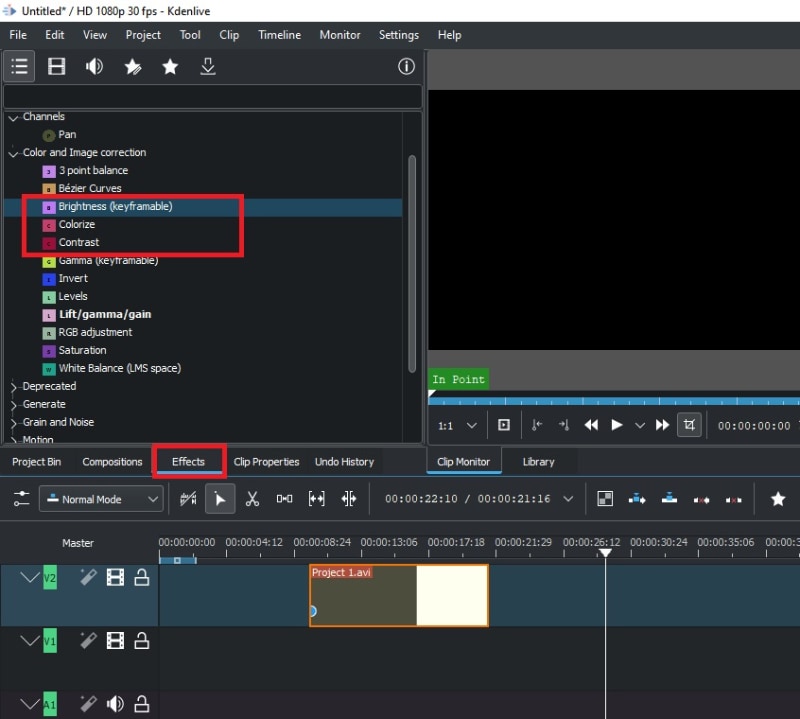
Step 2: Drag and drop Brightness or Contrast directly on the video clip.
Step 3: Click on Brightness that you just placed on the video clip and adjust the parameter from its slider.
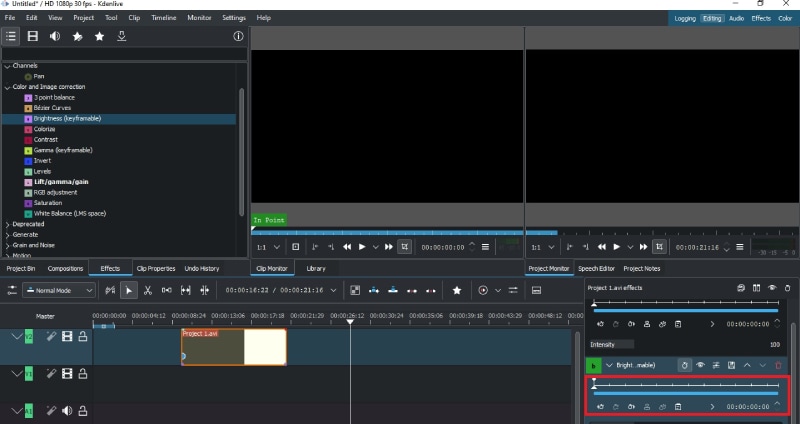
Speed up or slow down:
Step 1: Right-click on the video clip that is on the timeline and click on Change Speed option.
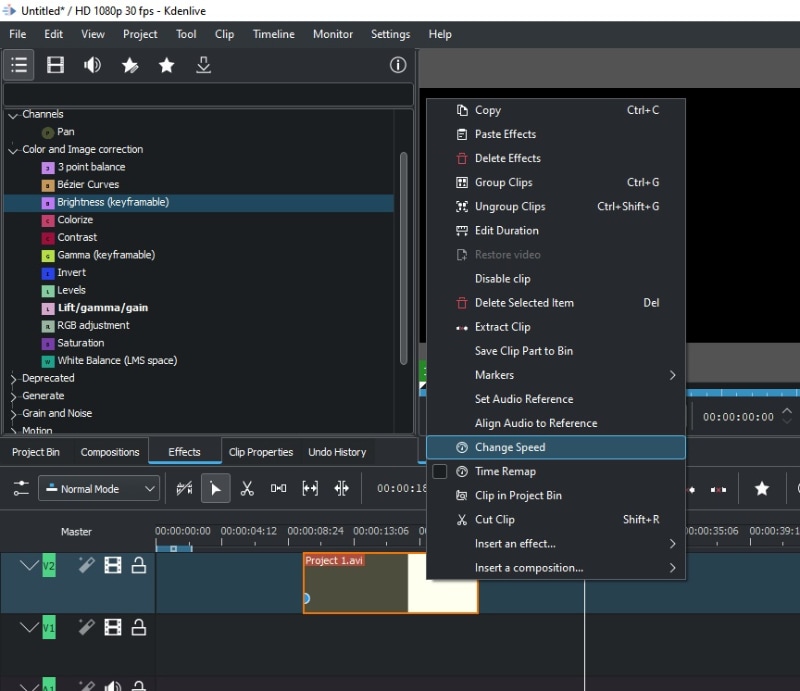
Step 2: Adjust the slider to increase or decrease video clip speed and click on Ok button.

Part 3. Advanced Editing with Kdenlive
Now that we have discussed the basic editing Kdenlive tutorial, let us focus on a couple of useful advanced editing features of Kdenlive.
Use green screen effects:
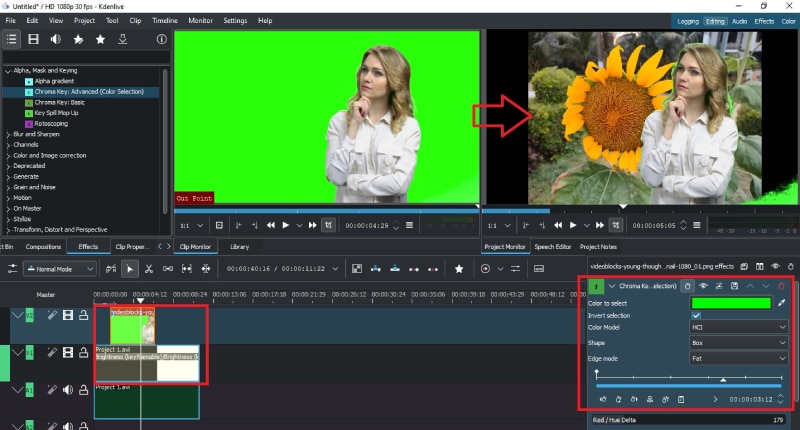
You must have the video clip with green screen background on the timeline. Below the green screen clip should be the background image with which you want to replace the green screen background.
Step 1: Go to Effect> Alpha, Mask and Keying option.
Step 2: Drag and drop “Chroma Key : Advanced” on the video clip where there is a green screen.
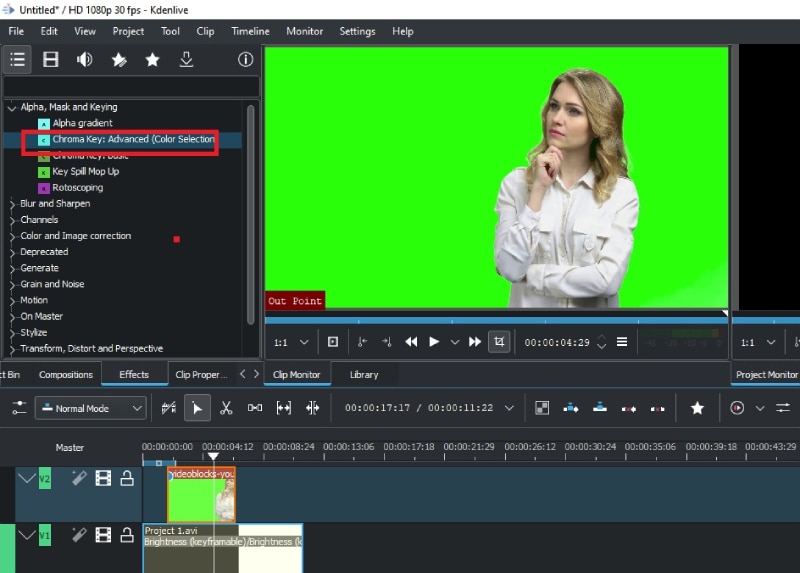
Step 3: Click on video clip and adjust the parameters to soften the edges and make it as natural as possible.
**Add audio:
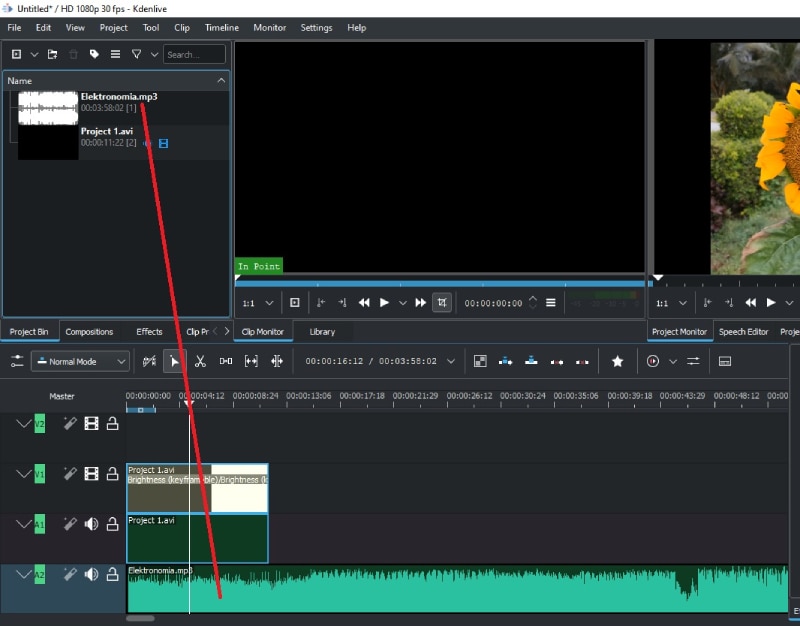
Adding audio files and music files to the video is as easy as adding video clips. You should have your audio file ready on your hard drive.
Step 1: Go to Project menu option. Click on “Add Clip or Folder” option. Select the audio file or folder from your hard drive.

Step 2: The imported audio files will have to be dragged and dropped on the timeline from Project Bin.
Part 4. Best Kdenlive Alternative to Edit Videos
Kdenlive has several drawbacks that prevent it from becoming the best video editor. Even though the features are sufficient for beginners, it is not suitable for professional editing. There is a lack of advanced options such as motion tracking or faster video production. Besides, the effects are very limited in number and so are the text and audio effects. That is why we recommend Wondershare Filmora as the best alternative to Kdenlive Mac and Windows.
Filmora is a premium video editor with video capturing feature. You can record your screen and webcam video. There is no dearth of effects, filters, elements and royalty-free media files. The user interface is cleaner and hence, it is suitable for both beginners and professionals. Here are the key features of Filmora.

For Win 7 or later (64-bit)
For macOS 10.12 or later
- 4K video editing and exporting without lag.
- Noise removal, color tuning, and video stabilization.
- Standard editing like trim, crop, split, join, rotate etc.
- Advanced text styles, audio mixing options, and audio equalizers.
- Wide range of stock media files. Supports different file formats.
- Capture screen and webcam video with internal and external audio.
Frequently Asked Questions
**Is Kdenlive a good editor?
Kdenlive is a good editor if you are getting started in video editing or you are editing your video for personal usage. However, for professional and even social media videos, a premium video editor will be better. We recommend Filmora over Kdenlive because Kdenlive lacks advanced video editing options.
**Does Kdenlive cost money?
Kdenlive Windows, Mac, and Linux are available free of cost as it belongs to the open-source software category. There is also no premium version available, and hence, all the features are unlocked in the free version.
**What can you do with Kdenlive?
You can trim your video, add music, add effects, adjust speed, correct colors, and add green screen effect. Besides, you can add multiple video clips and audio files to the timeline. There are options for keyframable effects as well.
Detailed Guide to Resize Your Video in VLC
Videos are one of the most popular types of content on the internet. There are millions of videos uploaded to YouTube, Facebook, and other video-sharing sites each day. Sharing your videos with others is possible when you know how to resize them in VLC. VLC is a free media player that allows you to convert or compress your videos in order to make them smaller for uploading or downloading.
Videos are a great way to showcase your business, company, or product on social media sites like Facebook and Twitter. But what happens when you use the wrong size for your video? The whole thing looks distorted and low quality. It’s not very appealing.
Luckily, resizing videos in VLC is simple. All you need is the right software and the right steps.
This blog post will walk you through how to resize videos using VLC. We’ll cover what the default settings are for video resolutions, how to change them, and why it’s important to know what size of video you’re uploading before uploading it.
So without further ado, let’s get started!
Step by step to resize your video in VLC
Anyone who has a lot of videos on their computer knows how frustrating it can be to find the video you want among the hundreds of ones you have. Well, VLC makes it possible to resize your videos so they’ll fit onto your desktop. Here’s how:
Resizing by converting to a smaller file size
Because some video formats, such as MKV and AVI, take up too much space, it’s a good idea to convert videos to smaller formats, such as FLV, WMV, and so on. To lower the video size, you’ll be pleased to learn that VLC allows you to convert video/audio files without the need to install any other software. The video conversion guide for VLC can be found below.
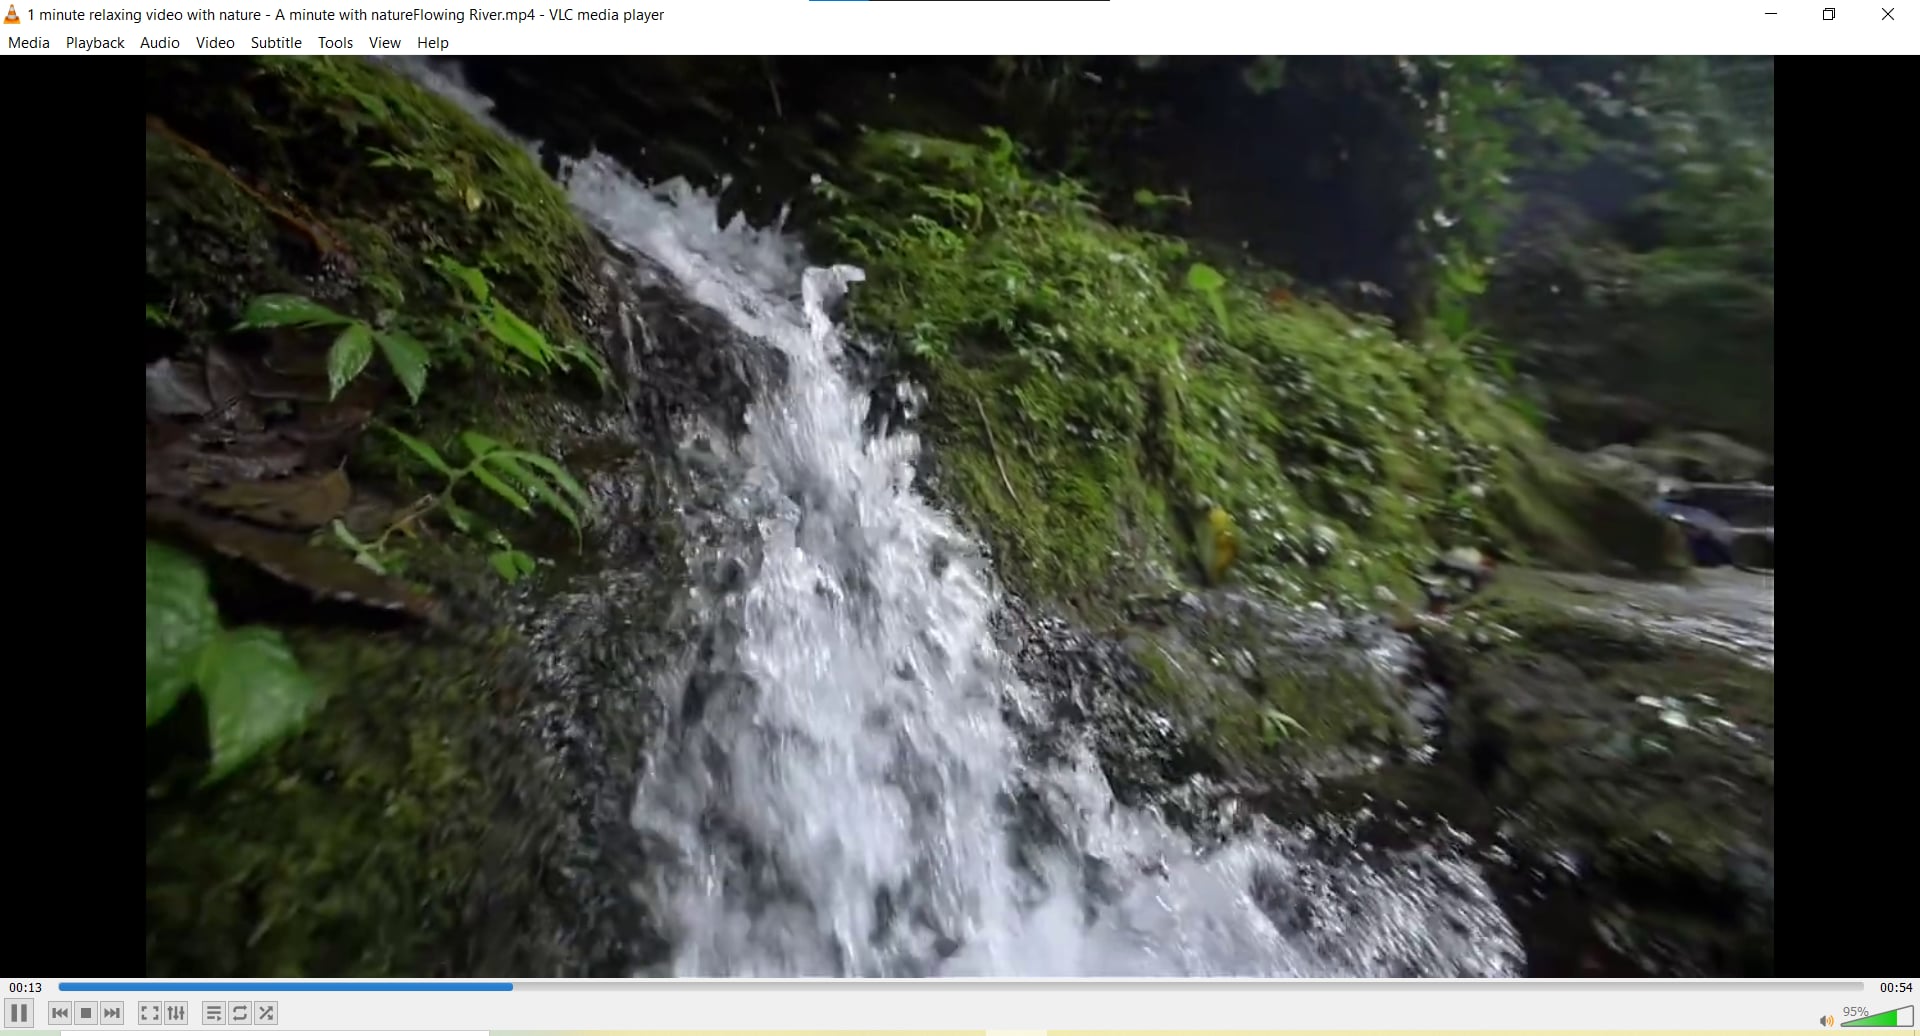
Step 1: Launch the VLC Media Player.
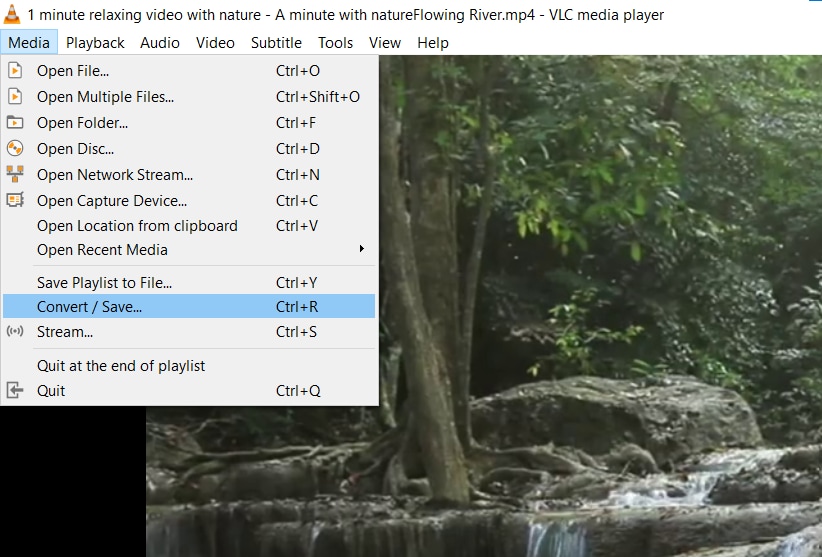
Step 2: Go to the menu and pick Media > Convert/Save from the drop-down menu, then Add > Convert/Save from the drop-down menu.
Step 3: Choose a profile for the video you wish to convert.
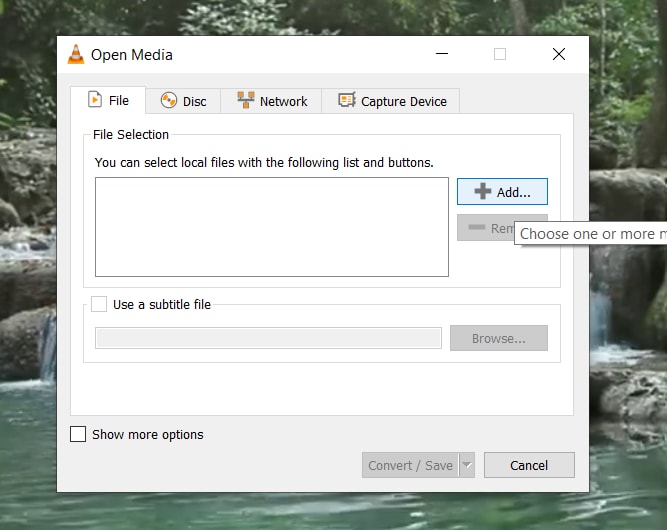
Step 4: Select the Start button to start VLC video compression.
Resizing by cutting unnecessary video segment
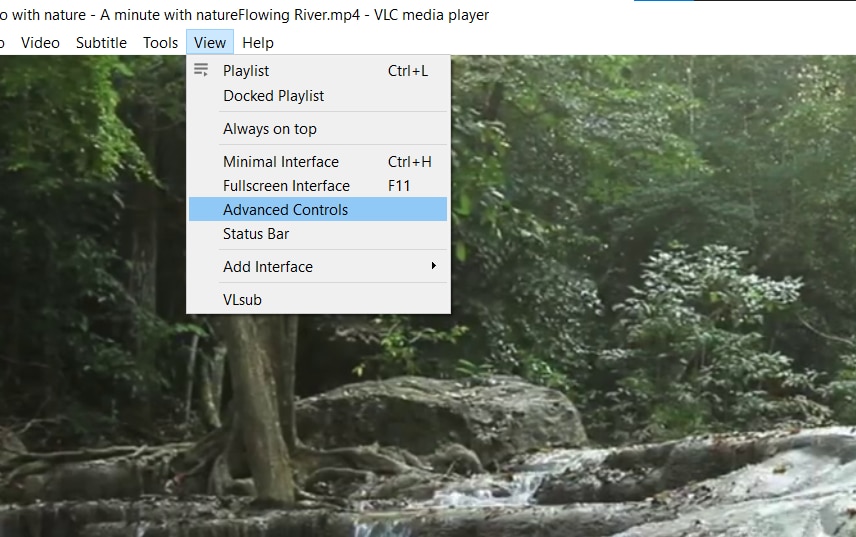
Step 1: Launch the VLC Media Player

Step 2: Go to Menu > View Menu > Advanced Controls in VLC Media Player and select it from the menu.
Step 3: Play the video you want to crop and then click the Record button on the scene you want to crop and then the same button to pause the video where you want to crop it.
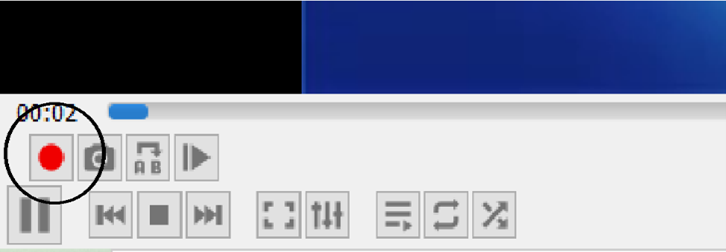
Step 4: In Windows 7, 8, and XP, the film will automatically save in Library > Videos, and in My Documents > My Videos in Windows 7.
VLC Media Player is unquestionably one of the greatest video players available for free. Nonetheless, it isn’t the finest video reduction because it just reduces the size of videos by using certain simple parameters rather than complex ones. As a result, we offer Fimora, an all-in-one video toolbox that can convert, compress, download, record, edit, burn, and more, as a better video compressor. You can change the video resolution, bit rate, encoder, format, and other settings to compress video and audio files in a variety of formats. Follow the simple steps below to get this VLC compressor replacement on your Windows/Mac for free.
An easier way to resize videos using Filmora
Filmora Video Editor is a powerful, yet easy to use video editor for PC and Mac. With the most intuitive and streamlined editing process out there, Filmora lets you cut and resize videos with just a few clicks of your mouse.
Through this part, we’ll show you how to resize videos using Filmora’s three-step process: import video files, select video clips, and edit them. We’ll also teach you some shortcuts for making the editing process as quick as possible!
A common challenge for beginner video editors is knowing where to start. With Filmora, you begin by importing your video files, selecting the clip you want to cut, and then editing it. It’s a three-step process that takes less than five minutes!
Once you have finished editing your video clip, Filmora will give you the option to share it on social media or export it in MP4 or AVI format.
Keep reading to learn more about how to cut and resize videos using Filmora’s three-step process!
For Win 7 or later (64-bit)
For macOS 10.14 or later
Step by Step on How to Resize Videos using Filmora
Resizing videos in Filmora is a quick and easy process. To resize videos, first make sure you have imported your video file into the editor.
Resizing by changing the dimensions
Step 1: To import a video file, either drag and drop the file on the screen or click on “Import Files” in the toolbar.

Step 2: Once you’ve imported your video, select the video clips that you want to resize by clicking on them; then, resizing them is as simple as dragging their borders!
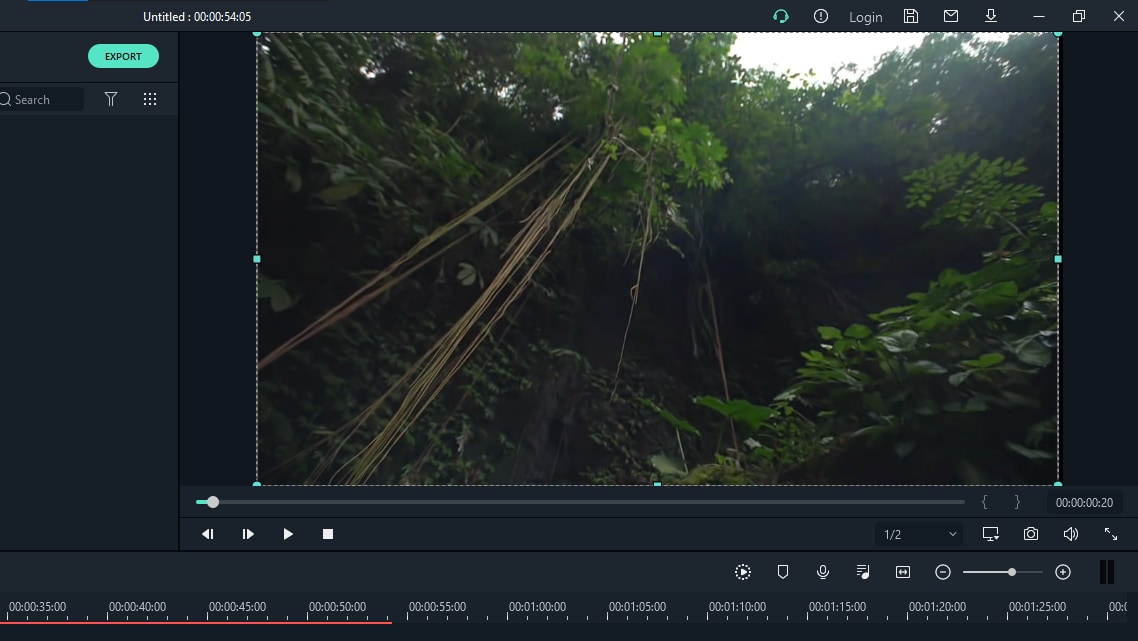
Step 3: You can also use the size fields at the bottom of the frame to change their dimensions.
Step 4: Keep in mind that changing one dimension of a video clip will affect both its width and height proportionally. For example, if you enlarge a 16:9 widescreen clip to 720p (from 480p), it will be double its original proportions (720x480).
Resizing by shrinking video file size.
Step 1: To import a video file, either drag and drop it onto the screen or use the toolbar’s “Import Files” option.
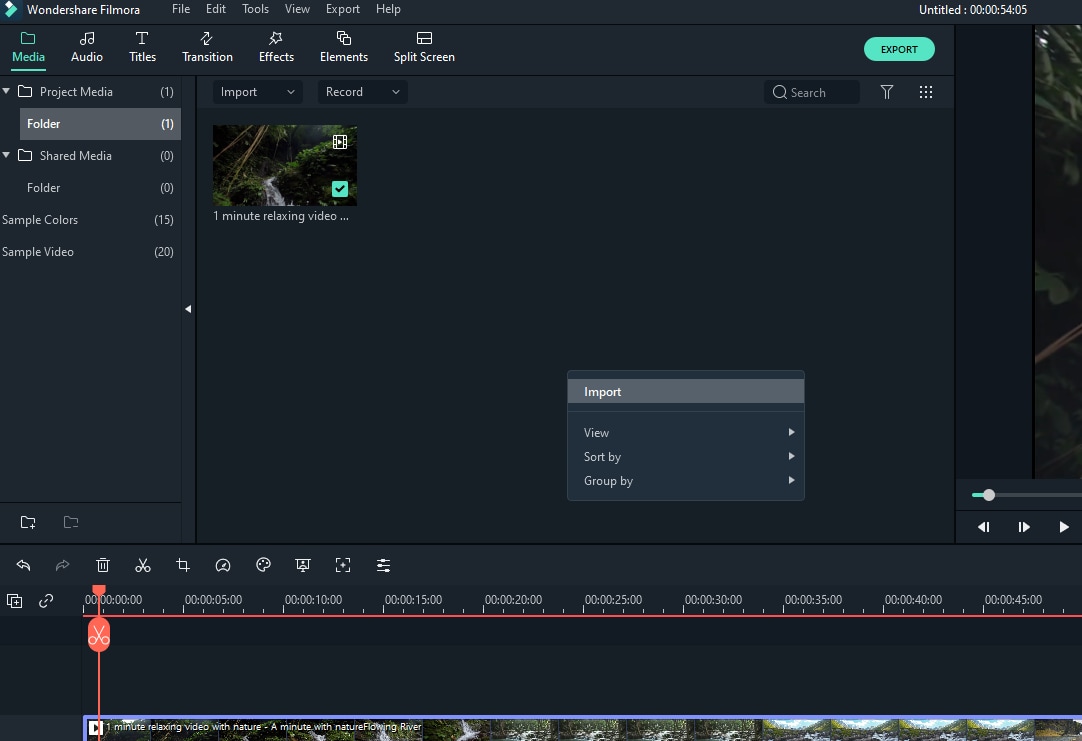
Step 2: Open the video shrinker’s output window by clicking the “Export” button.
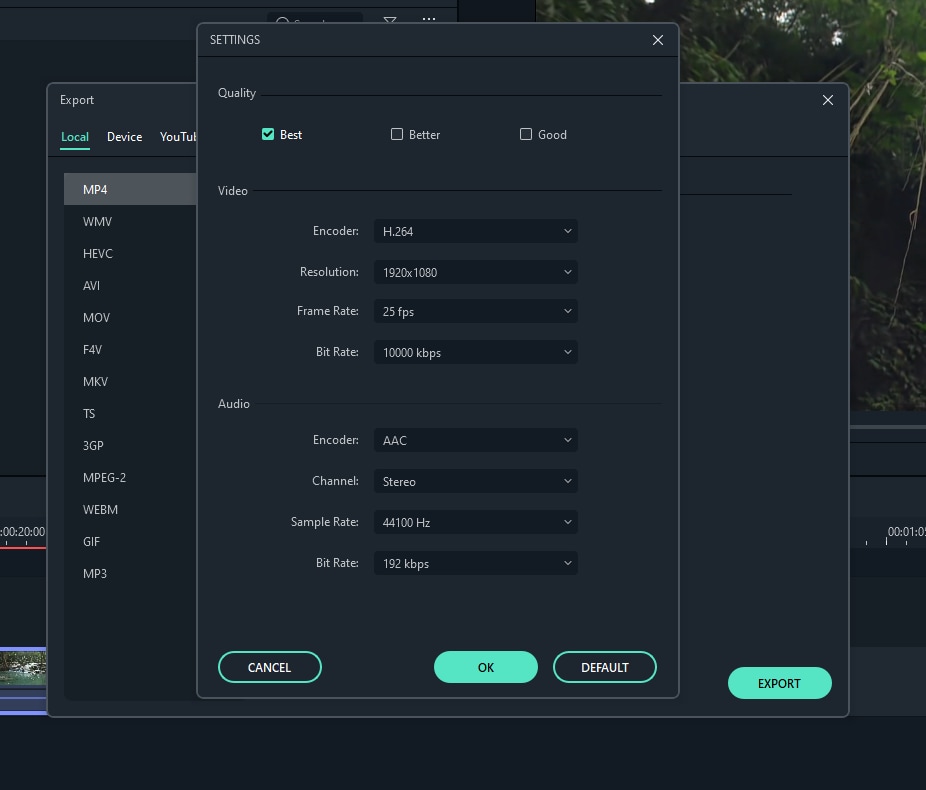
Step 3: Select the Format tab and keep the video in its original format as a result. Then, in the “Settings” panel, click the triangle button below to downsize the video by choosing a lower video resolution, frame rate, or bit rate. When it comes to video formats, you can choose among FLV, MP4, and other similar formats, which normally result in smaller files.
Step 4: The shrunk file should be exported.
Conclusion
So you’ve got this beautiful video you want to post on your social media page or website, but the dimensions are all wrong. No worries! There’s an easy solution to your problem. Filmora is a video editing software that is easy to use and versatile and powerful at the same time. Whether you’re just starting out or are a pro, Filmora is the perfect tool for the job. You don’t need to be an expert to edit videos in Filmora; it’s easy enough for beginners. With Filmora, you can resize your videos in seconds by following these simple steps above.
Step 2: Go to the menu and pick Media > Convert/Save from the drop-down menu, then Add > Convert/Save from the drop-down menu.

Step 3: Choose a profile for the video you wish to convert.

Step 4: Select the Start button to start VLC video compression.
Resizing by cutting unnecessary video segment
Step 1: Launch the VLC Media Player

Step 2: Go to Menu > View Menu > Advanced Controls in VLC Media Player and select it from the menu.

Step 3: Play the video you want to crop and then click the Record button on the scene you want to crop and then the same button to pause the video where you want to crop it.

Step 4: In Windows 7, 8, and XP, the film will automatically save in Library > Videos, and in My Documents > My Videos in Windows 7.
VLC Media Player is unquestionably one of the greatest video players available for free. Nonetheless, it isn’t the finest video reduction because it just reduces the size of videos by using certain simple parameters rather than complex ones. As a result, we offer Fimora, an all-in-one video toolbox that can convert, compress, download, record, edit, burn, and more, as a better video compressor. You can change the video resolution, bit rate, encoder, format, and other settings to compress video and audio files in a variety of formats. Follow the simple steps below to get this VLC compressor replacement on your Windows/Mac for free.
An easier way to resize videos using Filmora
Filmora Video Editor is a powerful, yet easy to use video editor for PC and Mac. With the most intuitive and streamlined editing process out there, Filmora lets you cut and resize videos with just a few clicks of your mouse.
Through this part, we’ll show you how to resize videos using Filmora’s three-step process: import video files, select video clips, and edit them. We’ll also teach you some shortcuts for making the editing process as quick as possible!
A common challenge for beginner video editors is knowing where to start. With Filmora, you begin by importing your video files, selecting the clip you want to cut, and then editing it. It’s a three-step process that takes less than five minutes!
Once you have finished editing your video clip, Filmora will give you the option to share it on social media or export it in MP4 or AVI format.
Keep reading to learn more about how to cut and resize videos using Filmora’s three-step process!
For Win 7 or later (64-bit)
For macOS 10.14 or later
Step by Step on How to Resize Videos using Filmora
Resizing videos in Filmora is a quick and easy process. To resize videos, first make sure you have imported your video file into the editor.
Resizing by changing the dimensions
Step 1: To import a video file, either drag and drop the file on the screen or click on “Import Files” in the toolbar.

Step 2: Once you’ve imported your video, select the video clips that you want to resize by clicking on them; then, resizing them is as simple as dragging their borders!

Step 3: You can also use the size fields at the bottom of the frame to change their dimensions.
Step 4: Keep in mind that changing one dimension of a video clip will affect both its width and height proportionally. For example, if you enlarge a 16:9 widescreen clip to 720p (from 480p), it will be double its original proportions (720x480).
Resizing by shrinking video file size.
Step 1: To import a video file, either drag and drop it onto the screen or use the toolbar’s “Import Files” option.

Step 2: Open the video shrinker’s output window by clicking the “Export” button.

Step 3: Select the Format tab and keep the video in its original format as a result. Then, in the “Settings” panel, click the triangle button below to downsize the video by choosing a lower video resolution, frame rate, or bit rate. When it comes to video formats, you can choose among FLV, MP4, and other similar formats, which normally result in smaller files.

Step 4: The shrunk file should be exported.
Conclusion
So you’ve got this beautiful video you want to post on your social media page or website, but the dimensions are all wrong. No worries! There’s an easy solution to your problem. Filmora is a video editing software that is easy to use and versatile and powerful at the same time. Whether you’re just starting out or are a pro, Filmora is the perfect tool for the job. You don’t need to be an expert to edit videos in Filmora; it’s easy enough for beginners. With Filmora, you can resize your videos in seconds by following these simple steps above.
Step 2: Go to the menu and pick Media > Convert/Save from the drop-down menu, then Add > Convert/Save from the drop-down menu.

Step 3: Choose a profile for the video you wish to convert.

Step 4: Select the Start button to start VLC video compression.
Resizing by cutting unnecessary video segment
Step 1: Launch the VLC Media Player

Step 2: Go to Menu > View Menu > Advanced Controls in VLC Media Player and select it from the menu.

Step 3: Play the video you want to crop and then click the Record button on the scene you want to crop and then the same button to pause the video where you want to crop it.

Step 4: In Windows 7, 8, and XP, the film will automatically save in Library > Videos, and in My Documents > My Videos in Windows 7.
VLC Media Player is unquestionably one of the greatest video players available for free. Nonetheless, it isn’t the finest video reduction because it just reduces the size of videos by using certain simple parameters rather than complex ones. As a result, we offer Fimora, an all-in-one video toolbox that can convert, compress, download, record, edit, burn, and more, as a better video compressor. You can change the video resolution, bit rate, encoder, format, and other settings to compress video and audio files in a variety of formats. Follow the simple steps below to get this VLC compressor replacement on your Windows/Mac for free.
An easier way to resize videos using Filmora
Filmora Video Editor is a powerful, yet easy to use video editor for PC and Mac. With the most intuitive and streamlined editing process out there, Filmora lets you cut and resize videos with just a few clicks of your mouse.
Through this part, we’ll show you how to resize videos using Filmora’s three-step process: import video files, select video clips, and edit them. We’ll also teach you some shortcuts for making the editing process as quick as possible!
A common challenge for beginner video editors is knowing where to start. With Filmora, you begin by importing your video files, selecting the clip you want to cut, and then editing it. It’s a three-step process that takes less than five minutes!
Once you have finished editing your video clip, Filmora will give you the option to share it on social media or export it in MP4 or AVI format.
Keep reading to learn more about how to cut and resize videos using Filmora’s three-step process!
For Win 7 or later (64-bit)
For macOS 10.14 or later
Step by Step on How to Resize Videos using Filmora
Resizing videos in Filmora is a quick and easy process. To resize videos, first make sure you have imported your video file into the editor.
Resizing by changing the dimensions
Step 1: To import a video file, either drag and drop the file on the screen or click on “Import Files” in the toolbar.

Step 2: Once you’ve imported your video, select the video clips that you want to resize by clicking on them; then, resizing them is as simple as dragging their borders!

Step 3: You can also use the size fields at the bottom of the frame to change their dimensions.
Step 4: Keep in mind that changing one dimension of a video clip will affect both its width and height proportionally. For example, if you enlarge a 16:9 widescreen clip to 720p (from 480p), it will be double its original proportions (720x480).
Resizing by shrinking video file size.
Step 1: To import a video file, either drag and drop it onto the screen or use the toolbar’s “Import Files” option.

Step 2: Open the video shrinker’s output window by clicking the “Export” button.

Step 3: Select the Format tab and keep the video in its original format as a result. Then, in the “Settings” panel, click the triangle button below to downsize the video by choosing a lower video resolution, frame rate, or bit rate. When it comes to video formats, you can choose among FLV, MP4, and other similar formats, which normally result in smaller files.

Step 4: The shrunk file should be exported.
Conclusion
So you’ve got this beautiful video you want to post on your social media page or website, but the dimensions are all wrong. No worries! There’s an easy solution to your problem. Filmora is a video editing software that is easy to use and versatile and powerful at the same time. Whether you’re just starting out or are a pro, Filmora is the perfect tool for the job. You don’t need to be an expert to edit videos in Filmora; it’s easy enough for beginners. With Filmora, you can resize your videos in seconds by following these simple steps above.
Step 2: Go to the menu and pick Media > Convert/Save from the drop-down menu, then Add > Convert/Save from the drop-down menu.

Step 3: Choose a profile for the video you wish to convert.

Step 4: Select the Start button to start VLC video compression.
Resizing by cutting unnecessary video segment
Step 1: Launch the VLC Media Player

Step 2: Go to Menu > View Menu > Advanced Controls in VLC Media Player and select it from the menu.

Step 3: Play the video you want to crop and then click the Record button on the scene you want to crop and then the same button to pause the video where you want to crop it.

Step 4: In Windows 7, 8, and XP, the film will automatically save in Library > Videos, and in My Documents > My Videos in Windows 7.
VLC Media Player is unquestionably one of the greatest video players available for free. Nonetheless, it isn’t the finest video reduction because it just reduces the size of videos by using certain simple parameters rather than complex ones. As a result, we offer Fimora, an all-in-one video toolbox that can convert, compress, download, record, edit, burn, and more, as a better video compressor. You can change the video resolution, bit rate, encoder, format, and other settings to compress video and audio files in a variety of formats. Follow the simple steps below to get this VLC compressor replacement on your Windows/Mac for free.
An easier way to resize videos using Filmora
Filmora Video Editor is a powerful, yet easy to use video editor for PC and Mac. With the most intuitive and streamlined editing process out there, Filmora lets you cut and resize videos with just a few clicks of your mouse.
Through this part, we’ll show you how to resize videos using Filmora’s three-step process: import video files, select video clips, and edit them. We’ll also teach you some shortcuts for making the editing process as quick as possible!
A common challenge for beginner video editors is knowing where to start. With Filmora, you begin by importing your video files, selecting the clip you want to cut, and then editing it. It’s a three-step process that takes less than five minutes!
Once you have finished editing your video clip, Filmora will give you the option to share it on social media or export it in MP4 or AVI format.
Keep reading to learn more about how to cut and resize videos using Filmora’s three-step process!
For Win 7 or later (64-bit)
For macOS 10.14 or later
Step by Step on How to Resize Videos using Filmora
Resizing videos in Filmora is a quick and easy process. To resize videos, first make sure you have imported your video file into the editor.
Resizing by changing the dimensions
Step 1: To import a video file, either drag and drop the file on the screen or click on “Import Files” in the toolbar.

Step 2: Once you’ve imported your video, select the video clips that you want to resize by clicking on them; then, resizing them is as simple as dragging their borders!

Step 3: You can also use the size fields at the bottom of the frame to change their dimensions.
Step 4: Keep in mind that changing one dimension of a video clip will affect both its width and height proportionally. For example, if you enlarge a 16:9 widescreen clip to 720p (from 480p), it will be double its original proportions (720x480).
Resizing by shrinking video file size.
Step 1: To import a video file, either drag and drop it onto the screen or use the toolbar’s “Import Files” option.

Step 2: Open the video shrinker’s output window by clicking the “Export” button.

Step 3: Select the Format tab and keep the video in its original format as a result. Then, in the “Settings” panel, click the triangle button below to downsize the video by choosing a lower video resolution, frame rate, or bit rate. When it comes to video formats, you can choose among FLV, MP4, and other similar formats, which normally result in smaller files.

Step 4: The shrunk file should be exported.
Conclusion
So you’ve got this beautiful video you want to post on your social media page or website, but the dimensions are all wrong. No worries! There’s an easy solution to your problem. Filmora is a video editing software that is easy to use and versatile and powerful at the same time. Whether you’re just starting out or are a pro, Filmora is the perfect tool for the job. You don’t need to be an expert to edit videos in Filmora; it’s easy enough for beginners. With Filmora, you can resize your videos in seconds by following these simple steps above.
A Complete Guide to the Best Brand Story Videos |2023|
With the advent of streaming content accessible anytime, anywhere, conventional marketing has somewhat lost grip on its performance. Consumers are now savvy as they now take a step further, like using ad blockers or tuning out ads.
However, it doesn’t imply the end of advertising as a brand promotion tool altogether. Individuals still desire best-in-class deals and products and spend their money shopping. All they need is to get informed about the product or service more entertainingly and innovatively.
This is one of the reasons why many established brands are now shifting toward their brand storytelling. And there’s no better and highly effective way to portray your brand story than with video. Simply making a video resembling any conventional TV commercial ad with an irritating ‘Call Today’ voiceover won’t be enough to get results.
Modern-day consumers are much more educated and sophisticated than before. You must learn how many creative and successful brands are infusing their branding and storytelling strategies to engage their customers. If you’re reading this article, you’re aiming to build your own brand storytelling video and are wondering how to make it a successful one.
Take no worries as the further sections will clear all your doubts and give you the perfect answer. So, let’s start.

Source : https://www.pexels.com/photo/business-plan-printed-on-paper-on-a-clipboard-8970679/
- Spotify - All Ears On You
- Airbnb - The Story of a Symbol of Belonging
- Apple - Chase
- Nike - Most Powerful Brand Story Videos
- Bells - Reader
- Dove - You’re More Beautiful Than You Think
- El Gordo - The Spanish Christmas Lottery Ad 2021
Part I. The Most Successful Video Practises of Brand Storytelling
1. Spotify - All Ears On You
Since 2008, Spotify has continued gathering as much information (personal preferences, likes, and dislikes) about their audiences as possible. It has helped them set personalized ad campaigns that will best fit their customers’ interests.
One of their latest, popular campaigns is ‘All Ears On You.’ Take a glimpse of this video to check how the video ad appears. Launched in June, this campaign focuses on celebrating your weird listening habits. It leveraged the users’ in-app experience to let them be proud of their unique choices. This helped Spotify to strengthen its emotional relationship with its listeners.
Learn From Spotify’s Famous Marketing Practices:
- Get the Most Out of Big Data: The customer insights and data helped Spotify make precise, on-point ads. Your firm should also acquire customers’ data and later leverage it to amplify the user experience and make marketing campaigns more relatable.
- Leverage User-Generated Content: Your audience is more interested in what other customers think and say about your business. The most successful video ads don’t involve facts about the company but the customers instead. Make a video using clips where your customers tell a story about themselves and their experience with your brand.
- Utilize The Trending Hashtags & Topics: Social medial trends and news feed is what attracts today’s customers the most. Spotify’s advertisement team always wraps their ad campaigns into a package of top-events-and-stories. Find the most popular and trending hashtags and topics related to your business niche and incorporate them in your brand storytelling video.
Some other marketing practices that teach valuable lessons to businesses for brand video marketing include:
- Leveraging the mentions on social media platforms
- Going for a customer-centric marketing approach with personalized interactions
2. Airbnb - The Story of a Symbol of Belonging
The center of focus of Airbnb’s brand story revolves around the basic ideology of ‘belonging.’ The brand found its mission - to shape the world into a place where individuals can ‘belong anywhere.’
Their official tagline also turned out to be ‘Belong Anywhere,’ which eventually led to the development of their whole brand story and new logo. This symbol was created to make sure it’s instantly recognizable.
Valuable Storytelling Lessons From Airbnb’s Marketing Practices:
- Let Your Customers Be At The Heart Of Your Organization: After interviewing users, Airbnb found out that no one can better inform them about their company than the community of their regular users. The conversations and interviews with such users helped Airbnb to prepare its entire brand story. Thus, you should, too, keep your customers at your core.
- It’s Never Too Late To Discover Your Story: Although launched in 2008, the company Airbnb realized they’d need to discover their business mission to scale and progress. They are an example that it’s never too late for your brand to find the brand story.
- Content Is The King: Airbnb always keeps posting content on its own blog and YouTube channel. Most of their content is based on user experiences and revolves around stories from within the brand’s community. Such high-quality content helped them to engage with the customers more efficiently.
3. Apple - Chase
Chase recently announced via email their latest introduction to the market - Apple Pay. They introduced it in collaboration with Apple as the new mode to pay. Chase leveraged this email communication to inform people about their latest collaboration with Apple.
They also used email to reinforce their commitment to helping people to buy Apple products like the iPhone 14 pro with accessible funds. While ensuring to align with Apple’s marketing strategy for the Apple Pay service announcement (primarily based on social media), Chase put more emphasis on real-time media.
Their marketing practice used direct, real-time media to connect with the on-the-go audience seemingly ready to buy an Apple product with a quick source of funds. Their brand story ad focused more on the ‘on-the-go’ audience who would readily agree to make such a purchase.
4. Nike - Most Powerful Brand Story Videos
If you’ve watched a Nike video ad featuring LeBron James or others, you’ll know how much emphasis on emotions and inspiration. They don’t go for the direct marketing of their brand and products. Instead, they produce video ads with a powerful message drawn from a compelling storyline.
This makes Nike unique from numerous other brands as it has been an expert in brand storytelling for years now. Every piece of video ad from their collection triggers the audience’s feelings and emotions, which can only be met and satisfied by using Nike products.
There’s a lot of power within emotional branding, and Nike has shaped and transformed its whole marketing model into a storytelling form that motivates the audience to take action - ‘Just do it with Nike products. Some of the marketing strategies that have helped them grow over the years include the following:
- They promote the advantages of their product’s features rather than simply highlighting and promoting the features. This is called benefit-based marketing practice.
- They sell brand stories more than their products, which has always been their primary marketing strategy.
- Nike is very strong in the social media game. They leverage user-generated content to create their video ads.
- Collaborating with influencers like LeBron James and Cristiano Ronaldo has always been at the core of their marketing strategy.
5. Bells - Reader
The marketing manager of Bell - Thami Silwana - revealed that the idea behind the ‘Bells-Reader’ campaign is to assist men in acknowledging, comprehending, and speaking about their personal victories.
They realized that sometimes it could be troublesome for men to interact with one another and acknowledge their inside feeling and emotions when one of them have achieved something. Their tagline, ‘Give That Man a Bell, ’ best fits in terms of a man-to-man acknowledging something worth the celebration.
Here is what the video ad director Greg incorporated in the video to make it hit the marketing campaign’s motto:
Sentimentality:
- Greg incorporated an excellent blend of drama, emotion, and sentimentality in this two minutes video ad, which was as good as a two-hour Hollywood movie.
- The video hit the emotions on so many levels that you’ll feel like drinking a glass of whisky at the end of the ad.
- Your brand should also create a brand story video where you help your customers to acknowledge themselves by hitting their emotions at different levels.
- To know how just take a look at the ad yourself: https://www.youtube.com/watch .
6. Dove - You’re More Beautiful Than You Think
The Real Beauty Ad Campaign by Dove focuses on women’s natural charisma and beauty. The ad emphasizes promoting the self-esteem of every woman. In their ‘Dove Real Beauty Sketches’ video ad, you’ll find the events to be chosen, arranged, connected, and assessed as meaningful for a specific set of audience.
Although the video ad’s primary focus is women’s empowerment, it’s still a commercial that promotes Dove products. The ad ends with the phrase ‘you’re more beautiful than you think,’ and a Dove brand logo appears.
Significantly, Dove desires women to know that they are always encouraged, supported, and acknowledged for their real beauty. This storytelling helped Dove boost its product sales without making any direct references.
7. El Gordo - The Spanish Christmas Lottery Ad 2021
Conventionally, you’ll get to know about the arrival of Christmas in Spain when you’ll find the Spanish Christmas Lottery hitting the screens as a commercial. The Christmas Lottery’s 2021 ad version was recorded and created in the picturesque and snowy town of Elizondo.
The ad signifies the spirit of the Christmas festive season and amazingly resonates with the motto of El Gordo - the greatest prize is to share it. They used aesthetics and scenic beauty to allure the viewers and drive them into buying the lottery.
They used the marketing practice of hitting people’s emotions during Christmas when they could truly immerse themselves into enjoying things like winning the lottery.
Part 2. Need Pro-Quality Video Result From Your Video Maker? Try Filmora - The Best in the Market
If you seek pro-quality video results from your video maker for the ‘best-in-class’ brand story videos, use Filmora. It has emerged as the leading video-making tool for global marketers where you can create, edit, and save all sorts of ‘state-of-the-art,’ ‘next-level’ marketing brand videos.
Try Filmora to ensure brand awareness, advertise your business, introduce the audience to your brand and its products, and boost sales. One software, multiple benefits. Here are some features of Filmora that can effectively help you make your brand story videos.
- Numerous Resources: Filmora is an excellent platform to explore your inner creativity as it has thousands of video assets accessible to its users. The widespread availability of unique advanced and basic features will help you create the most appealing brand story video.
- Green Screen: Your brand storytelling videos will become bland if you miss out on adding a unique background. Thanks to the Green Screen feature by Filmora, it takes only a few simple clicks to add such attractive backgrounds to your videos.
- Split Screen: When making your brand story video, it’s more likely that you’ll want to show a comparison of two products side-by-side. In that case, the Split Screen feature from Filmora comes in handy. It lets you incorporate two or more video footage or clips in the video.
- Audio Ducking: Your brand story will involve several key pointers that you’ll want to highlight for the audience. With Filmora’s Audio Ducking feature, you can easily highlight the dialogues and speeches during the video. This will help you to emphasize those video parts so that the audience can hear them with clarity. Of course, the feature fades the background music for those speech and dialogue parts.
- Color Grading: The more appealing the brand story video, the more the viewers. That’s precisely what the color grading feature does for you. It allows you to adjust the tint, 3D Luts, temperature, and lights in all your marketing videos. Introduce mesmerizing cinematographic effects in your videos with Fimora’s ‘state-of-the-art’ color tuning features.
Telling your brand story via videos has just become simpler and faster than ever with Filmora. Try the software for magical results.
Free Download For Win 7 or later(64-bit)
Free Download For macOS 10.14 or later
Conclusion
Telling your brand story is more crucial than ever as it lets you reach new levels of personalization and establish deeper bonds and connections with your clients or customers.
With the ideal brand storytelling strategy and the best video maker tool, you can easily connect with the audience and let them know all about your brand, its products, and its purpose. So, get started today!
Free Download For Win 7 or later(64-bit)
Free Download For macOS 10.14 or later
Part I. The Most Successful Video Practises of Brand Storytelling
1. Spotify - All Ears On You
Since 2008, Spotify has continued gathering as much information (personal preferences, likes, and dislikes) about their audiences as possible. It has helped them set personalized ad campaigns that will best fit their customers’ interests.
One of their latest, popular campaigns is ‘All Ears On You.’ Take a glimpse of this video to check how the video ad appears. Launched in June, this campaign focuses on celebrating your weird listening habits. It leveraged the users’ in-app experience to let them be proud of their unique choices. This helped Spotify to strengthen its emotional relationship with its listeners.
Learn From Spotify’s Famous Marketing Practices:
- Get the Most Out of Big Data: The customer insights and data helped Spotify make precise, on-point ads. Your firm should also acquire customers’ data and later leverage it to amplify the user experience and make marketing campaigns more relatable.
- Leverage User-Generated Content: Your audience is more interested in what other customers think and say about your business. The most successful video ads don’t involve facts about the company but the customers instead. Make a video using clips where your customers tell a story about themselves and their experience with your brand.
- Utilize The Trending Hashtags & Topics: Social medial trends and news feed is what attracts today’s customers the most. Spotify’s advertisement team always wraps their ad campaigns into a package of top-events-and-stories. Find the most popular and trending hashtags and topics related to your business niche and incorporate them in your brand storytelling video.
Some other marketing practices that teach valuable lessons to businesses for brand video marketing include:
- Leveraging the mentions on social media platforms
- Going for a customer-centric marketing approach with personalized interactions
2. Airbnb - The Story of a Symbol of Belonging
The center of focus of Airbnb’s brand story revolves around the basic ideology of ‘belonging.’ The brand found its mission - to shape the world into a place where individuals can ‘belong anywhere.’
Their official tagline also turned out to be ‘Belong Anywhere,’ which eventually led to the development of their whole brand story and new logo. This symbol was created to make sure it’s instantly recognizable.
Valuable Storytelling Lessons From Airbnb’s Marketing Practices:
- Let Your Customers Be At The Heart Of Your Organization: After interviewing users, Airbnb found out that no one can better inform them about their company than the community of their regular users. The conversations and interviews with such users helped Airbnb to prepare its entire brand story. Thus, you should, too, keep your customers at your core.
- It’s Never Too Late To Discover Your Story: Although launched in 2008, the company Airbnb realized they’d need to discover their business mission to scale and progress. They are an example that it’s never too late for your brand to find the brand story.
- Content Is The King: Airbnb always keeps posting content on its own blog and YouTube channel. Most of their content is based on user experiences and revolves around stories from within the brand’s community. Such high-quality content helped them to engage with the customers more efficiently.
3. Apple - Chase
Chase recently announced via email their latest introduction to the market - Apple Pay. They introduced it in collaboration with Apple as the new mode to pay. Chase leveraged this email communication to inform people about their latest collaboration with Apple.
They also used email to reinforce their commitment to helping people to buy Apple products like the iPhone 14 pro with accessible funds. While ensuring to align with Apple’s marketing strategy for the Apple Pay service announcement (primarily based on social media), Chase put more emphasis on real-time media.
Their marketing practice used direct, real-time media to connect with the on-the-go audience seemingly ready to buy an Apple product with a quick source of funds. Their brand story ad focused more on the ‘on-the-go’ audience who would readily agree to make such a purchase.
4. Nike - Most Powerful Brand Story Videos
If you’ve watched a Nike video ad featuring LeBron James or others, you’ll know how much emphasis on emotions and inspiration. They don’t go for the direct marketing of their brand and products. Instead, they produce video ads with a powerful message drawn from a compelling storyline.
This makes Nike unique from numerous other brands as it has been an expert in brand storytelling for years now. Every piece of video ad from their collection triggers the audience’s feelings and emotions, which can only be met and satisfied by using Nike products.
There’s a lot of power within emotional branding, and Nike has shaped and transformed its whole marketing model into a storytelling form that motivates the audience to take action - ‘Just do it with Nike products. Some of the marketing strategies that have helped them grow over the years include the following:
- They promote the advantages of their product’s features rather than simply highlighting and promoting the features. This is called benefit-based marketing practice.
- They sell brand stories more than their products, which has always been their primary marketing strategy.
- Nike is very strong in the social media game. They leverage user-generated content to create their video ads.
- Collaborating with influencers like LeBron James and Cristiano Ronaldo has always been at the core of their marketing strategy.
5. Bells - Reader
The marketing manager of Bell - Thami Silwana - revealed that the idea behind the ‘Bells-Reader’ campaign is to assist men in acknowledging, comprehending, and speaking about their personal victories.
They realized that sometimes it could be troublesome for men to interact with one another and acknowledge their inside feeling and emotions when one of them have achieved something. Their tagline, ‘Give That Man a Bell, ’ best fits in terms of a man-to-man acknowledging something worth the celebration.
Here is what the video ad director Greg incorporated in the video to make it hit the marketing campaign’s motto:
Sentimentality:
- Greg incorporated an excellent blend of drama, emotion, and sentimentality in this two minutes video ad, which was as good as a two-hour Hollywood movie.
- The video hit the emotions on so many levels that you’ll feel like drinking a glass of whisky at the end of the ad.
- Your brand should also create a brand story video where you help your customers to acknowledge themselves by hitting their emotions at different levels.
- To know how just take a look at the ad yourself: https://www.youtube.com/watch .
6. Dove - You’re More Beautiful Than You Think
The Real Beauty Ad Campaign by Dove focuses on women’s natural charisma and beauty. The ad emphasizes promoting the self-esteem of every woman. In their ‘Dove Real Beauty Sketches’ video ad, you’ll find the events to be chosen, arranged, connected, and assessed as meaningful for a specific set of audience.
Although the video ad’s primary focus is women’s empowerment, it’s still a commercial that promotes Dove products. The ad ends with the phrase ‘you’re more beautiful than you think,’ and a Dove brand logo appears.
Significantly, Dove desires women to know that they are always encouraged, supported, and acknowledged for their real beauty. This storytelling helped Dove boost its product sales without making any direct references.
7. El Gordo - The Spanish Christmas Lottery Ad 2021
Conventionally, you’ll get to know about the arrival of Christmas in Spain when you’ll find the Spanish Christmas Lottery hitting the screens as a commercial. The Christmas Lottery’s 2021 ad version was recorded and created in the picturesque and snowy town of Elizondo.
The ad signifies the spirit of the Christmas festive season and amazingly resonates with the motto of El Gordo - the greatest prize is to share it. They used aesthetics and scenic beauty to allure the viewers and drive them into buying the lottery.
They used the marketing practice of hitting people’s emotions during Christmas when they could truly immerse themselves into enjoying things like winning the lottery.
Part 2. Need Pro-Quality Video Result From Your Video Maker? Try Filmora - The Best in the Market
If you seek pro-quality video results from your video maker for the ‘best-in-class’ brand story videos, use Filmora. It has emerged as the leading video-making tool for global marketers where you can create, edit, and save all sorts of ‘state-of-the-art,’ ‘next-level’ marketing brand videos.

Try Filmora to ensure brand awareness, advertise your business, introduce the audience to your brand and its products, and boost sales. One software, multiple benefits. Here are some features of Filmora that can effectively help you make your brand story videos.
- Numerous Resources: Filmora is an excellent platform to explore your inner creativity as it has thousands of video assets accessible to its users. The widespread availability of unique advanced and basic features will help you create the most appealing brand story video.
- Green Screen: Your brand storytelling videos will become bland if you miss out on adding a unique background. Thanks to the Green Screen feature by Filmora, it takes only a few simple clicks to add such attractive backgrounds to your videos.
- Split Screen: When making your brand story video, it’s more likely that you’ll want to show a comparison of two products side-by-side. In that case, the Split Screen feature from Filmora comes in handy. It lets you incorporate two or more video footage or clips in the video.
- Audio Ducking: Your brand story will involve several key pointers that you’ll want to highlight for the audience. With Filmora’s Audio Ducking feature, you can easily highlight the dialogues and speeches during the video. This will help you to emphasize those video parts so that the audience can hear them with clarity. Of course, the feature fades the background music for those speech and dialogue parts.
- Color Grading: The more appealing the brand story video, the more the viewers. That’s precisely what the color grading feature does for you. It allows you to adjust the tint, 3D Luts, temperature, and lights in all your marketing videos. Introduce mesmerizing cinematographic effects in your videos with Fimora’s ‘state-of-the-art’ color tuning features.
Telling your brand story via videos has just become simpler and faster than ever with Filmora. Try the software for magical results.
Free Download For Win 7 or later(64-bit)
Free Download For macOS 10.14 or later
Conclusion
Telling your brand story is more crucial than ever as it lets you reach new levels of personalization and establish deeper bonds and connections with your clients or customers.
With the ideal brand storytelling strategy and the best video maker tool, you can easily connect with the audience and let them know all about your brand, its products, and its purpose. So, get started today!
Free Download For Win 7 or later(64-bit)
Free Download For macOS 10.14 or later
Reviewing Efectum App and The Best Alternatives for Smartphone Users
Video editors, from professionals to beginners, might be aware of the Efectum app. If not, then let us tell you it’s an editing app widely known as a pro video maker or editor. This platform was launched publicly on August 10, 2017, by Craigpark Limited. Users can avail themselves of its latest version from the Play Store or App Store of their smartphones.
Although Efectum is free to use, you must pay to use some exclusive features. Additionally, Android users benefit from the Efectum app download without a watermark facility. At the same time, Apple users have to pay for a subscription to remove watermarks from videos. Before downloading it, read this article and review your decision to work on the Efectum slow-motion app.
Slow Motion Video Maker Slow your video’s speed with better control of your keyframes to create unique cinematic effects!
Make A Slow Motion Video Make A Slow Motion Video More Features

Part 1: A Review of Efectum App and How to Use It to Perfection?
Efectum is a pro video editing or making application that adds fun to your social media feed. With various editing features, this application helps users to follow social media trends. It is a popular platform for adding fast-motion or slow-motion effects to your media. For users interested in exploring the Efectum app, below is a list of features that it offers:

- Timelapse: It’s a photographic technique to turn a longer period into a shorter clip. This application can make a timelapse video to reveal events that might skip to the eye.
- Rewind Video: The Efectum app can edit your video into reverse or rewind certain actions. To do so, you just need simple clicks, and creativity will be added to your content.
- Video Formats: Another specialty of this app is to let you import the video in a popular format. It enables you to share the clip directly on social media platforms.
- Favorites Music: In this app, you can browse music of your choice for your content. This app can extract audio from existing videos. Besides, users can pick one from the recommended list.
- Multiple Speeds: You might have heard this app as an Efectum slow-motion app. It is true because Efectum offers easy slow-motion and fast-motion transformation of clips.
- Clips Editing: Cutting, trimming, and merging clips are general features that every editing tool offers. Efectum can also combine several shots, add text, and apply filters where required.
After discovering all the possible functionalities, come to the point. As this app can convert your normal video into slow motion, the question arises: how? To solve this query, we have shown you how to use Efectum apps to create a slow-motion video.
Step 1
Take your first step and download Efectum on your smartphone. Launch the app and allow necessary permissions. From its home screen, tap the “Speed” option and access another window to import media. Choose an existing video from your phone album. Otherwise, hit the “Record” button at the top left side to capture new media (only available on Android).

Step 2
You will enter the main editing screen as you import media. Touch the “Speed” icon from the bottom toolbar and find an extended speed section. Use the slider and move it to the left for slow-motion or right for fast-motion videos. You can drag the slider to the extent you want to slow down the footage. Later, tap the Correct icon from the bottom right to save the changes.

Step 3
Now, you can also try “Trim,” “Filters,” and “Color” icons to polish your video. Afterward, go to the top right side and click the “Export” button. Wait for the processing and navigate to another screen. Choose “Save Video” to get the clip on your phone or “Share” to export on other platforms.

Part 2: Some Quick Alternatives to Efectum App for Slowing Down Videos
Efectum is undoubtedly a good platform to change video speed with other editing options. Some users might find it boring and get annoyed due to the watermark it locates in videos. They want an alternative to the Efectum app download without a watermark. Thus, in this section, we have enlisted the current best replacements for Efectum that are worth trying.
- FXMotion Slow Fast Video Maker
- CapCut - Video Editor
- InVideo
- VN-Video Editor & Maker
- InShot Video Editor & Maker
1. FXMotion Slow Fast Video Maker (iOS )
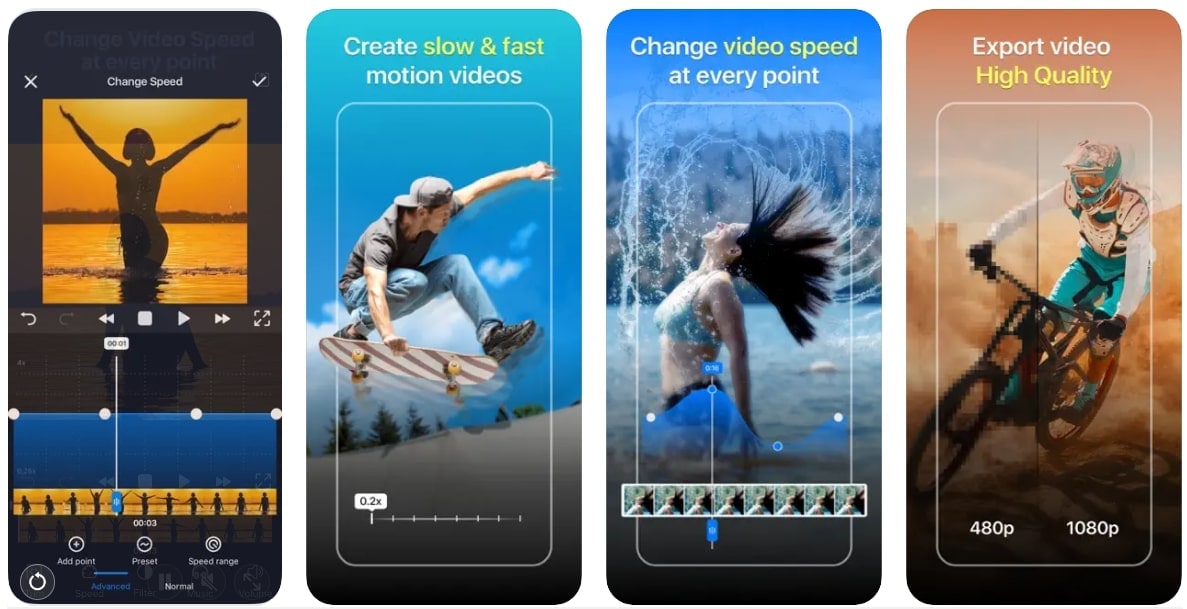
If you are unsatisfied with the Efectum app for limited speed adjustments, try this app. It is designed to change video speed in your own way with the speed graph. You can create a slow-motion video of up to 0.1x speed and a fast motion of up to 10x speed. With high-quality resolution output, it serves quick response. This application lets you share the edited video with friends on social media.
Pros
- Allow choosing output quality from 480p and 1080p resolution options.
- Provides a music library to add thrill or sensation to slow-down videos.
Cons
- Restrict you just to change speed and does not offer any feature for video editing.
2. CapCut - Video Editor (iOS /Android )
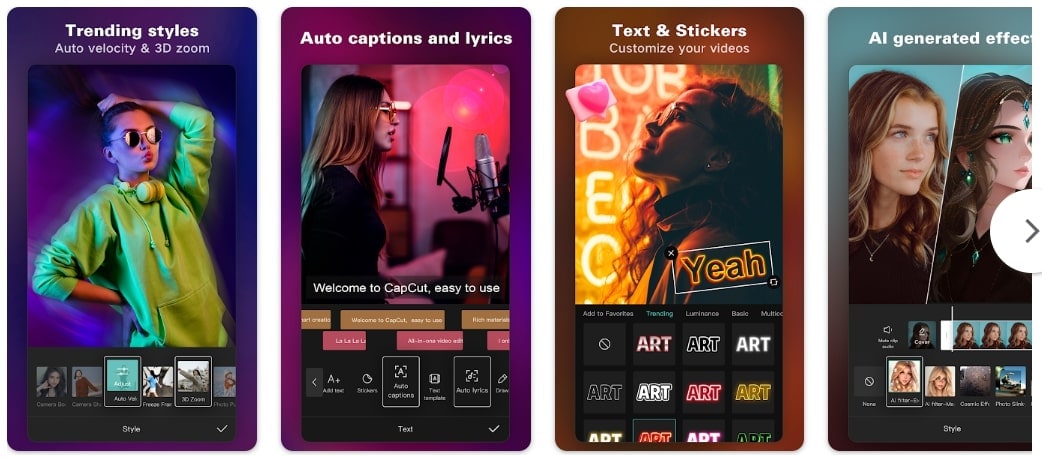
It’s a popular video editor with advanced editing and pre-designed video templates. This platform offers built-in fonts, effects, and stickers to add creativity to your content. Furthermore, CapCut provides you with Chroma key, stabilization, and Keyframe animation options. Besides these advanced features, you can alter video speed from 0.1x to 10x. Also, it lets you add a speed curve for a smooth, slow motion.
Pros
- Add auto-caption and lyrics in videos with speech recognition ability.
- Extract audio clips or add sound effects from a rich music library.
Cons
- It does not offer exporting in frame rate higher than 60fps.
3. InVideo (Android )
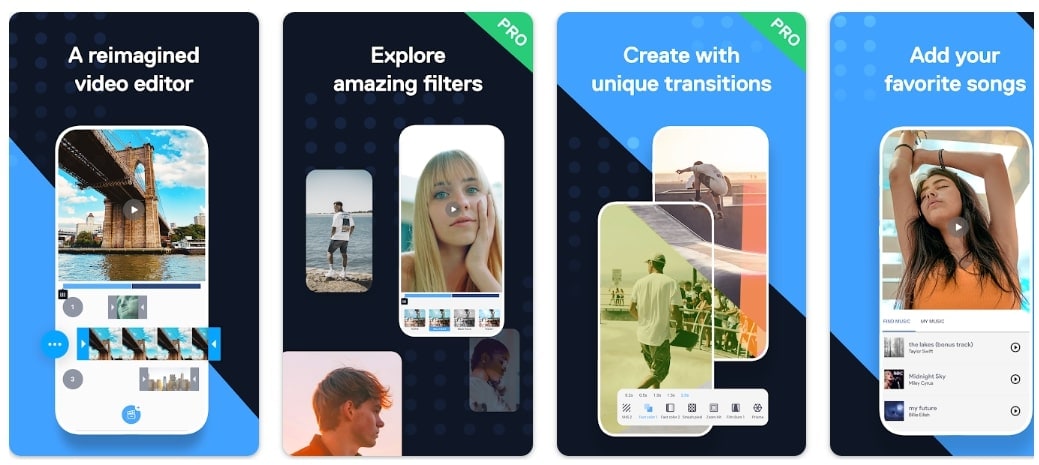
Instead of an Efectum app download, discover possibilities with InVideo. This app is an expert in creating aesthetic stop motions, ads, reels, and tutorials. It can speed up and speed down your clips. In addition, you can make a boomerang of shots and add cinematic transitions in clips. From its extensive music library, users can add music or import voiceovers.
Pros
- Utilize over 150 stickers, filters, and text templates to level up your projects.
- Record new footage with a built-in 60fps frame rate and 4k resolution.
Cons
- The best footage stock and other assets are reserved for subscribed users.
4. VN-Video Editor & Maker (iOS /Android )
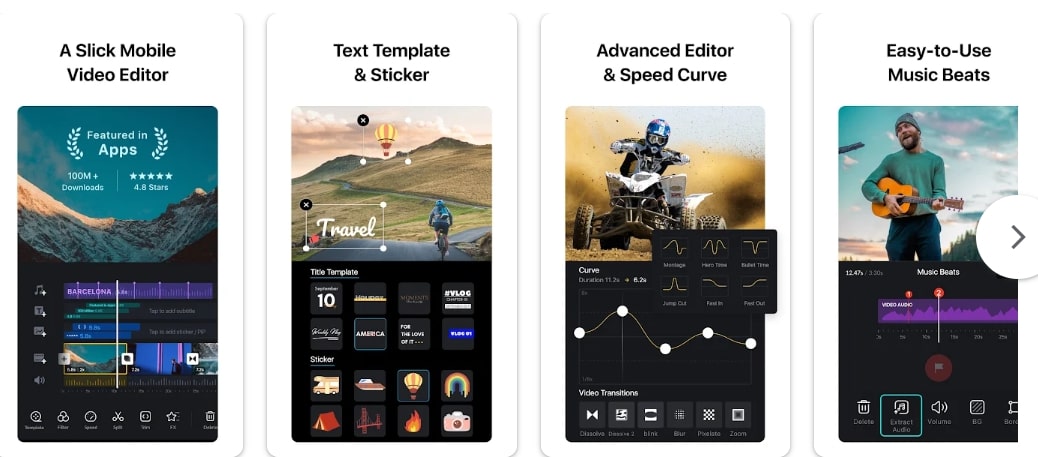
If searching for an alternative like the Efectum app, download without the watermark; use this app. It satisfies the needs of professionals and amateur video editors with high-quality videos. VN’s speed curve is more like Adobe Premiere Pro’s speed ramping. Thus, you can adjust the playback of your video with 6-speed adjustment curves.
Pros
- It enables you to freeze frames, reverse videos, and add keyframe animations.
- Perform multi-trach timeline editing and save non-destructive editing drafts anytime.
Cons
- You might face laggings in playback or missing audio in exported videos.
5. Video Editor & Maker – InShot (iOS /Android )
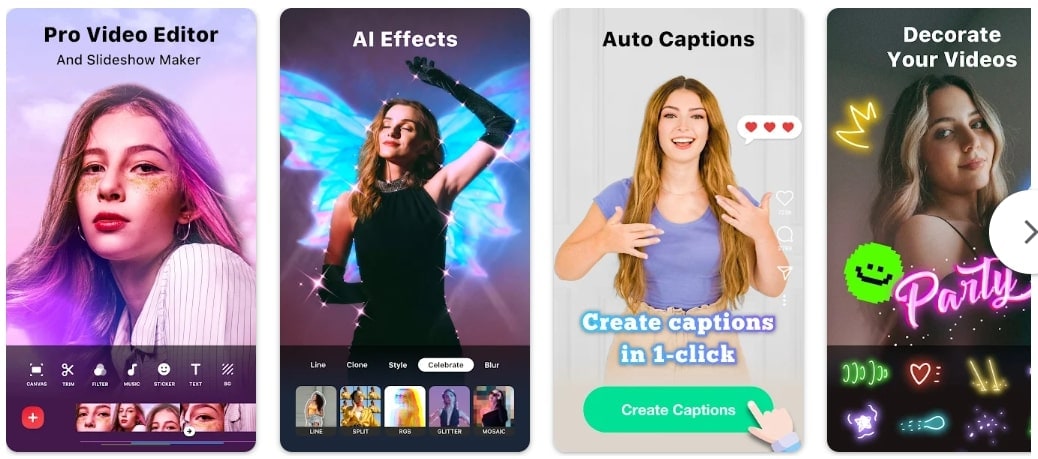
Another good option in place of the Efectum app that you can consider is InShot. This platform offers some AI features such as auto-caption, smart tracking, and AI effects. InShot enables you to make smooth slow-mo with a speed ramping feature and keyframe editing. Plus, you can create multi-layered videos with filters, transitions, and AI effects.
Pros
- Make photo collages with AI effects and blend screenshots with AI context recognition.
- Export videos in 4K resolution to YouTube, Instagram, Twitter, and WhatsApp.
Cons
- Impose a watermark on videos unless you pay to remove it, which annoys many users.
Part 3: Want to Make Advanced Changes to Your Slow-Motion Videos? Shift To Wondershare Filmora
Mobile apps have enabled you to work anywhere but with a strong internet connection. If you don’t have an active internet connection, you will not process video editing. That’s exactly where desktop tools ensure smooth work progress without the internet. Moreover, desktop applications offer more flexibility in editing with advanced features.
In this regard, you should use Wondershare Filmora as an exception video editor. This software proves to be the right platform for slowing down videos with many customization options. It is integrated with AI and offers AI features to boost your productivity with creativity. You can get assistance from AI Copilot and generate copyright-free music or images on Filmora.
Free Download For Win 7 or later(64-bit)
Free Download For macOS 10.14 or later
How to Use Filmora for Creating Slow-Motion Videos
This AI platform is not limited to cutting and merging clips; thus, explore it by installing it. Using Filmora is not a big deal, but you can follow the step-by-step guide for further clarity.
Step 1Launch Filmora 13 and Initiate a Project
To begin creativity, you need to launch Filmora in your system. Ensure that you download the latest version, which is Filmora 13. Afterward, enter its main interface and tap on the “New Project” to access the editing window. Import your project in the media panel and drag it to the timeline.

Step 2Slow Down the Speed with Uniform Speed Option
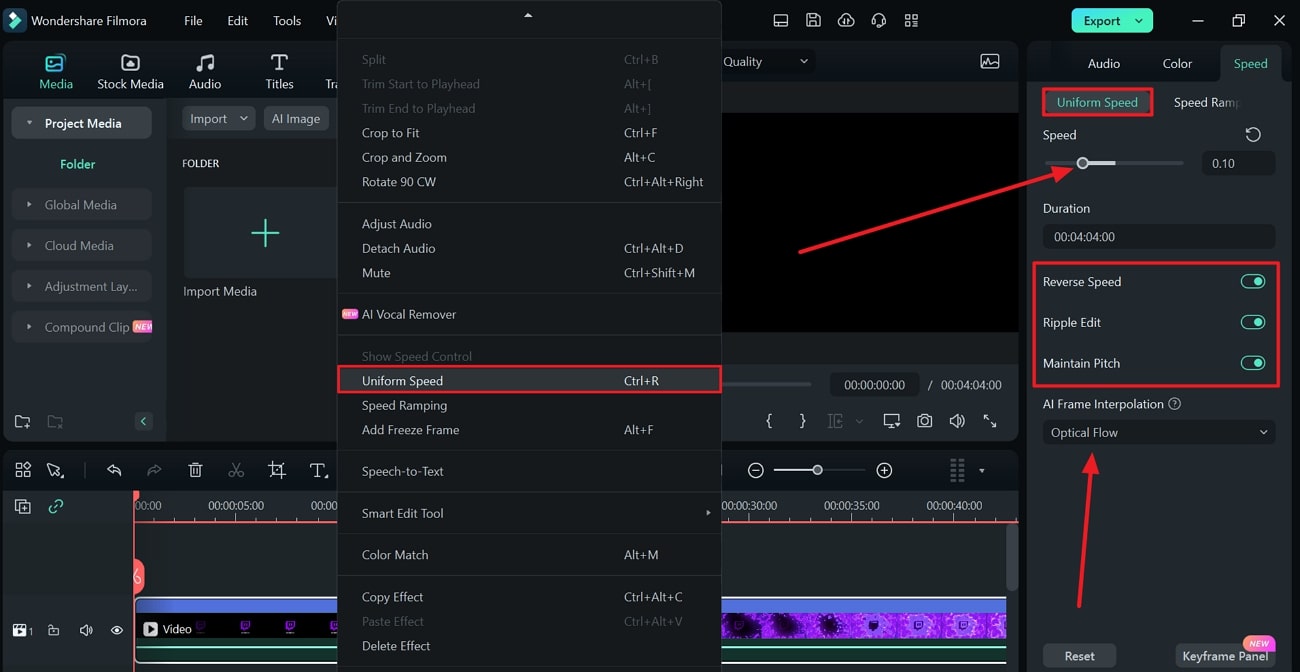
Right-click on the video and select the “Uniform Speed” option from the list. Direct toward the right side and find a “Speed” slider to adjust the speed. Move it to the left for slow-motion video and preview changes simultaneously. Toggle the “Ripple Edit” and “Maintain Pitch” for better results. Go to the “AI Frame Interpolation” and choose “Optical Flow” from the extended list.
Step 3Use Speed Ramping to Customize Slow Motion and Export
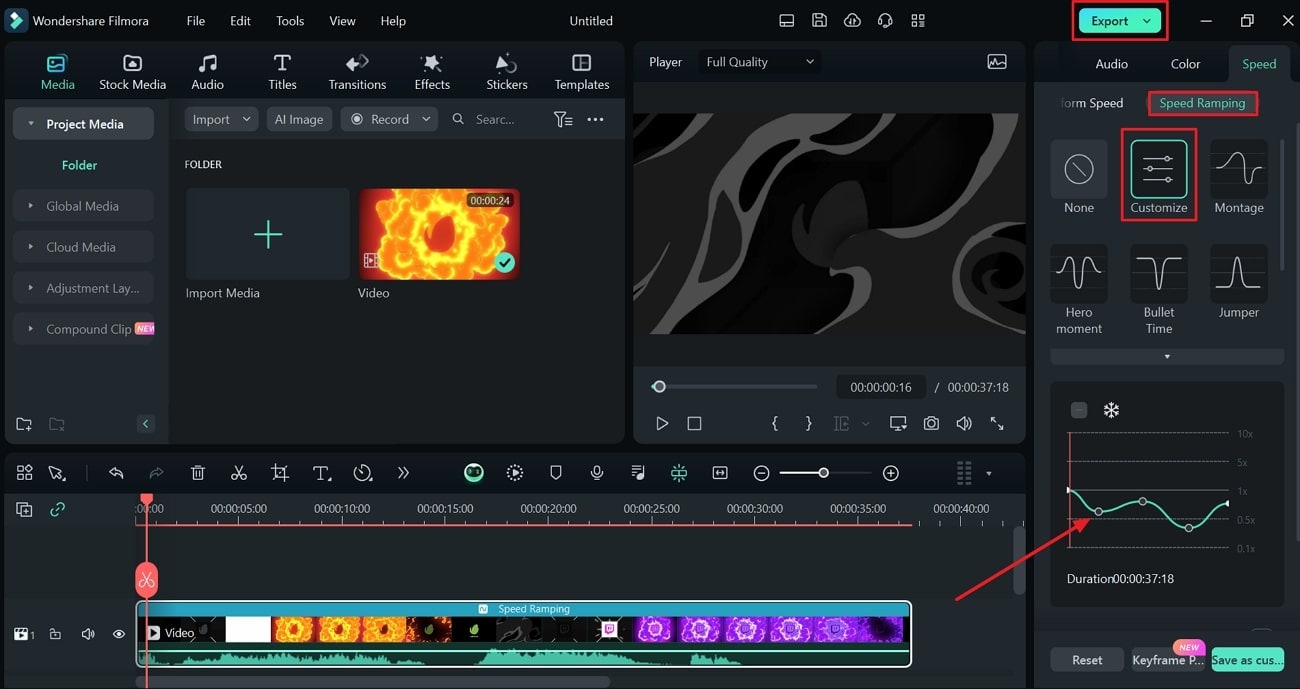
If you want to shift speed in videos smoothly, press the “Speed Ramping” from the top. Pick any ramping template or tap on the “Customize” option. Reach the graph below and slow down the speed by moving the dots downward. Adjust the speed ramping by locating the graph dots and seeing changes. Now, go to the top right side and choose “Export” to get the video on your device.
Conclusion
Ultimately, the Efectum app is a fun way to play videos fast forward or slow forward. This guide has highlighted every aspect of Efectum to achieve perfection in video editing. If someone is uncomfortable with this platform, they can use an alternative explained earlier. Yet, if you haven’t found a perfect platform, use Wondershare Filmora and unlock creativity with AI.
Make A Slow Motion Video Make A Slow Motion Video More Features

Part 1: A Review of Efectum App and How to Use It to Perfection?
Efectum is a pro video editing or making application that adds fun to your social media feed. With various editing features, this application helps users to follow social media trends. It is a popular platform for adding fast-motion or slow-motion effects to your media. For users interested in exploring the Efectum app, below is a list of features that it offers:

- Timelapse: It’s a photographic technique to turn a longer period into a shorter clip. This application can make a timelapse video to reveal events that might skip to the eye.
- Rewind Video: The Efectum app can edit your video into reverse or rewind certain actions. To do so, you just need simple clicks, and creativity will be added to your content.
- Video Formats: Another specialty of this app is to let you import the video in a popular format. It enables you to share the clip directly on social media platforms.
- Favorites Music: In this app, you can browse music of your choice for your content. This app can extract audio from existing videos. Besides, users can pick one from the recommended list.
- Multiple Speeds: You might have heard this app as an Efectum slow-motion app. It is true because Efectum offers easy slow-motion and fast-motion transformation of clips.
- Clips Editing: Cutting, trimming, and merging clips are general features that every editing tool offers. Efectum can also combine several shots, add text, and apply filters where required.
After discovering all the possible functionalities, come to the point. As this app can convert your normal video into slow motion, the question arises: how? To solve this query, we have shown you how to use Efectum apps to create a slow-motion video.
Step 1
Take your first step and download Efectum on your smartphone. Launch the app and allow necessary permissions. From its home screen, tap the “Speed” option and access another window to import media. Choose an existing video from your phone album. Otherwise, hit the “Record” button at the top left side to capture new media (only available on Android).

Step 2
You will enter the main editing screen as you import media. Touch the “Speed” icon from the bottom toolbar and find an extended speed section. Use the slider and move it to the left for slow-motion or right for fast-motion videos. You can drag the slider to the extent you want to slow down the footage. Later, tap the Correct icon from the bottom right to save the changes.

Step 3
Now, you can also try “Trim,” “Filters,” and “Color” icons to polish your video. Afterward, go to the top right side and click the “Export” button. Wait for the processing and navigate to another screen. Choose “Save Video” to get the clip on your phone or “Share” to export on other platforms.

Part 2: Some Quick Alternatives to Efectum App for Slowing Down Videos
Efectum is undoubtedly a good platform to change video speed with other editing options. Some users might find it boring and get annoyed due to the watermark it locates in videos. They want an alternative to the Efectum app download without a watermark. Thus, in this section, we have enlisted the current best replacements for Efectum that are worth trying.
- FXMotion Slow Fast Video Maker
- CapCut - Video Editor
- InVideo
- VN-Video Editor & Maker
- InShot Video Editor & Maker
1. FXMotion Slow Fast Video Maker (iOS )
If you are unsatisfied with the Efectum app for limited speed adjustments, try this app. It is designed to change video speed in your own way with the speed graph. You can create a slow-motion video of up to 0.1x speed and a fast motion of up to 10x speed. With high-quality resolution output, it serves quick response. This application lets you share the edited video with friends on social media.

Pros
- Allow choosing output quality from 480p and 1080p resolution options.
- Provides a music library to add thrill or sensation to slow-down videos.
Cons
- Restrict you just to change speed and does not offer any feature for video editing.
2. CapCut - Video Editor (iOS /Android )
It’s a popular video editor with advanced editing and pre-designed video templates. This platform offers built-in fonts, effects, and stickers to add creativity to your content. Furthermore, CapCut provides you with Chroma key, stabilization, and Keyframe animation options. Besides these advanced features, you can alter video speed from 0.1x to 10x. Also, it lets you add a speed curve for a smooth, slow motion.

Pros
- Add auto-caption and lyrics in videos with speech recognition ability.
- Extract audio clips or add sound effects from a rich music library.
Cons
- It does not offer exporting in frame rate higher than 60fps.
3. InVideo (Android )
Instead of an Efectum app download, discover possibilities with InVideo. This app is an expert in creating aesthetic stop motions, ads, reels, and tutorials. It can speed up and speed down your clips. In addition, you can make a boomerang of shots and add cinematic transitions in clips. From its extensive music library, users can add music or import voiceovers.

Pros
- Utilize over 150 stickers, filters, and text templates to level up your projects.
- Record new footage with a built-in 60fps frame rate and 4k resolution.
Cons
- The best footage stock and other assets are reserved for subscribed users.
4. VN-Video Editor & Maker (iOS /Android )
If searching for an alternative like the Efectum app, download without the watermark; use this app. It satisfies the needs of professionals and amateur video editors with high-quality videos. VN’s speed curve is more like Adobe Premiere Pro’s speed ramping. Thus, you can adjust the playback of your video with 6-speed adjustment curves.

Pros
- It enables you to freeze frames, reverse videos, and add keyframe animations.
- Perform multi-trach timeline editing and save non-destructive editing drafts anytime.
Cons
- You might face laggings in playback or missing audio in exported videos.
5. Video Editor & Maker – InShot (iOS /Android )
Another good option in place of the Efectum app that you can consider is InShot. This platform offers some AI features such as auto-caption, smart tracking, and AI effects. InShot enables you to make smooth slow-mo with a speed ramping feature and keyframe editing. Plus, you can create multi-layered videos with filters, transitions, and AI effects.

Pros
- Make photo collages with AI effects and blend screenshots with AI context recognition.
- Export videos in 4K resolution to YouTube, Instagram, Twitter, and WhatsApp.
Cons
- Impose a watermark on videos unless you pay to remove it, which annoys many users.
Part 3: Want to Make Advanced Changes to Your Slow-Motion Videos? Shift To Wondershare Filmora
Mobile apps have enabled you to work anywhere but with a strong internet connection. If you don’t have an active internet connection, you will not process video editing. That’s exactly where desktop tools ensure smooth work progress without the internet. Moreover, desktop applications offer more flexibility in editing with advanced features.
In this regard, you should use Wondershare Filmora as an exception video editor. This software proves to be the right platform for slowing down videos with many customization options. It is integrated with AI and offers AI features to boost your productivity with creativity. You can get assistance from AI Copilot and generate copyright-free music or images on Filmora.
Free Download For Win 7 or later(64-bit)
Free Download For macOS 10.14 or later
How to Use Filmora for Creating Slow-Motion Videos
This AI platform is not limited to cutting and merging clips; thus, explore it by installing it. Using Filmora is not a big deal, but you can follow the step-by-step guide for further clarity.
Step 1Launch Filmora 13 and Initiate a Project
To begin creativity, you need to launch Filmora in your system. Ensure that you download the latest version, which is Filmora 13. Afterward, enter its main interface and tap on the “New Project” to access the editing window. Import your project in the media panel and drag it to the timeline.

Step 2Slow Down the Speed with Uniform Speed Option
Right-click on the video and select the “Uniform Speed” option from the list. Direct toward the right side and find a “Speed” slider to adjust the speed. Move it to the left for slow-motion video and preview changes simultaneously. Toggle the “Ripple Edit” and “Maintain Pitch” for better results. Go to the “AI Frame Interpolation” and choose “Optical Flow” from the extended list.

Step 3Use Speed Ramping to Customize Slow Motion and Export
If you want to shift speed in videos smoothly, press the “Speed Ramping” from the top. Pick any ramping template or tap on the “Customize” option. Reach the graph below and slow down the speed by moving the dots downward. Adjust the speed ramping by locating the graph dots and seeing changes. Now, go to the top right side and choose “Export” to get the video on your device.

Conclusion
Ultimately, the Efectum app is a fun way to play videos fast forward or slow forward. This guide has highlighted every aspect of Efectum to achieve perfection in video editing. If someone is uncomfortable with this platform, they can use an alternative explained earlier. Yet, if you haven’t found a perfect platform, use Wondershare Filmora and unlock creativity with AI.
Also read:
- In 2024, Looking Forward to Making up Your Career in Video Editing? Land in Here to Learn About the Credibility of some Popular Video Editing Courses
- Updated How to Animate Designs With Canva GIF
- New 15 Best Vloggers That You Should Follow for Travel for 2024
- Do You Know How to Create AI Thumbnails for Videos? This Article Will Mention some of the Best Tools to Generate Attractive Thumbnails for Videos with AI
- New How Can You Deny These Top 10 Free Speech to Text Software for 2024
- New How to Create Freeze Frame Clone Effect for 2024
- In 2024, Looking Into How Slow Mo Guys Have Changed the Dynamics of Slow-Motion
- Add Stylish Text to Videos for 2024
- 2024 Approved 10 Best Mp3 Visualizers Windows, Mac, Android, iPhone & Online
- In 2024, Best Way To Color Grading & Color Correction in Filmora
- Do You Want to Know About the Best Filmic Pro LUTs for Video Editing? This Article Provides Details on the Best Recommendations for 2024
- Updated Time Lapse Videos Play an Important Part in Videography. If You Want to Start Video Shooting, Then You Shouldnt Miss Time Lapse Video. This Article Will Show You some Ideas over This
- Video Marketing Is Adopted by Most Companies in This Digital Era. In This Post, We Are Going to Share some Useful Tips to Create a Better Product Video Ads to Help Prompt Business for 2024
- In This Article, Youll Find Four Solutions for Rotating Your Go-Pro Videos. The Following Tools Will Be Used for This Purpose for 2024
- In 2024, How to Use Filmora Slideshow Maker for Making Slideshow? What Is Slideshow Filmora? Know the Steps to Make Filmora Slideshow. What Are Steps to Make Filmora Slideshow Template?
- 2024 Approved Top 20 Best Text To Speech Software Windows, Mac, Android, iPhone & Online
- Updated Learn How to Create Quiz Videos for YouTube that Are Interactive and Can Get Your Audience Engaged with Your Content
- 2024 Approved End Your Struggles with Choppy Playback on DaVinci Resolve. Read This Guide to Find Effective Fixes and Reliable DaVinci Resolve Slow Playback Alternatives
- New Online Video Makers for 2024
- 2024 Approved Top 8 Video Grabbers for Chrome
- Best Audio Plug-Ins For Video Editors for 2024
- In 2024, How to Merge Videos in HandBrake? Expectation Vs. Reality
- 2024 Approved This Article Will Show You How to Make a Tattoo Disappear on Your Body Magically
- What You Should Know About Speech-to-Text Technology
- Updated In 2024, Top 5 Video Filter Software Improve Your Videos with Filters
- New 2024 Approved AI Features of Filmora - Silence Detection in Videos
- New Are You Looking to Finish Your YouTube Video in Style? The Following Are the Best End Screen Makers to Choose From
- New In 2024, 10 Best Old Film Overlays to Make Your Videos Look Vintage
- New 2024 Approved Top 22 Free Video Editing Software
- In 2024, Step-By-Step Guide To Creating Halftone Effects In Photoshop
- In 2024, Step by Step to Split Clips in VLC
- New In 2024, 10 Best Video Editing Apps With Templates
- In 2024, WMV File Format Has Many Benefits over the Video Industry. If You Are Excited to Know More About the Format and Its Pros and Cons, Then Lets Start the Discussion
- Updated How to Crop a Video in Windows Media Player for 2024
- New 2024 Approved MP3 Cutter Download
- Change Video Speed with FFmpeg
- In 2024, This Article Discusses What Is Hitfilm Express, How to Download, Install and Use It, and Its Key Features. It Further Discusses Its Alternative for Editing Your Videos and More. Check Out Now
- New In 2024, 10 Matching Color Combination That Works Together
- New 2024 Approved 11 Tools To Create Radial Blur Photo Mobile And Desktop
- Best 4 Love Video Maker with Music
- Updated 2024 Approved 3 Best Effects to Appear on Camera Made with Filmora
- New 2024 Approved How To Add Text In After Effects
- Updated Filmora Is a Great Video Editor that Many Users Are Making Intro Video with It. This Article Will Guide You How to Create an Intro Video with Filmora
- New 15 Free Cinematic LUTs for Your Film for 2024
- 2024 Approved Best Video Title Generators
- In 2024, How to Reset your Samsung Galaxy Z Fold 5 Lock Screen Password
- In 2024, Apple ID Locked or Disabled On Apple iPhone 15? 7 Mehtods You Cant-Miss
- In 2024, How to Bypass Google FRP Lock from Motorola Moto G84 5G Devices
- 8 Solutions to Fix Find My Friends Location Not Available On Honor Magic 6 Lite | Dr.fone
- Universal Unlock Pattern for Oppo Find N3 Flip
- 5 Ways to Reset Tecno Pop 8 Without Volume Buttons | Dr.fone
- The Best 8 VPN Hardware Devices Reviewed On Itel P55 5G | Dr.fone
- Calls on Honor X50 Go Straight to Voicemail? 12 Fixes | Dr.fone
- Disable screen lock on Gionee F3 Pro
- In 2024, Reset iTunes Backup Password Of Apple iPhone 6s Plus Prevention & Solution
- How to Spy on Text Messages from Computer & Lava Yuva 2 Pro | Dr.fone
- 2 Ways to Transfer Text Messages from Oppo A2 to iPhone 15/14/13/12/11/X/8/ | Dr.fone
- CatchEmAll Celebrate National Pokémon Day with Virtual Location On Vivo Y200e 5G | Dr.fone
- How to Mirror Apple iPhone X to PC via USB? | Dr.fone
- Proven Ways in How To Hide Location on Life360 For Realme 11 Pro+ | Dr.fone
- New In 2024, 10 Great Apps to Turn Funny Animated Images Into Comics
- Disable screen lock on Google
- Full Guide to Fix iToolab AnyGO Not Working On Motorola Moto G04 | Dr.fone
- Full Guide to Fix iToolab AnyGO Not Working On Asus ROG Phone 8 | Dr.fone
- In 2024, Ultimate Guide to Catch the Regional-Located Pokemon For Oppo K11x | Dr.fone
- 10 Best Fake GPS Location Spoofers for Honor 90 | Dr.fone
- In 2024, 3 Ways to Erase iPhone 15 Pro Max When Its Locked Within Seconds | Dr.fone
- In 2024, How to Change Lock Screen Wallpaper on Vivo V30
- In 2024, How to Change Netflix Location to Get More Country Version On Oppo Reno 11F 5G | Dr.fone
- Title: Kdenlive Review – Is It The Best Video Editor, In 2024
- Author: Chloe
- Created at : 2024-05-20 03:38:13
- Updated at : 2024-05-21 03:38:13
- Link: https://ai-editing-video.techidaily.com/kdenlive-review-is-it-the-best-video-editor-in-2024/
- License: This work is licensed under CC BY-NC-SA 4.0.

