:max_bytes(150000):strip_icc():format(webp)/GettyImages-1369568023-c596ac8d6b5a4f3682bda2fa0feb12bd.jpg)
Kdenlive Video Editor Review

Kdenlive Video Editor Review
When you look for an open source video editor online, you will come across several popular video editors. One of them has to be Kdenlive video editor that is available free and compatible across all desktop operating systems. The video editor claims to be suitable for beginners as well as for professional video editors.
Starting from multi-track video editing and support for different file formats to loads to effects and flexible interface, Kdenlive video editor seems to be truly powerful. But is it comparable to premium video editors and is it suitable for standard and advanced video editing? Read our Kdenlive tutorial and review for everything you need to know.
Part 1. Key Features of Kdenlive
If you need to edit videos occasionally, a free video editor is what you will be looking for. Unfortunately, most free videos have very basic video editing tools and they are suitable for editing personal videos only. On the contrary, Kdenlive comes with all the standard as well as some advanced video editing features. Here are all the key features of Kdenlive video editor that you should be aware of.
Multi-track editing – Kdenlive comes with a versatile timeline where you can have multiple tracks consisting of video clips, audio files and different effects and objects. You can lock the tracks as well as mute them so that you can experiment as you edit your video.
Effects and Transitions – Even though limited, there are eye-catching effects and transitions available. You can also go for color correction as well as minor adjustments in your audio. Besides, the titler lets you create amazing 2D texts and titles.
Proxy Editing – Kdenlive uses proxy editing technique to lower the resolution of high-resolution videos while you edit them. This takes away the pressure on the CPU resources, but when it renders, the original resolution gets restored back. That is why Kdenlive has been effective in low-end computers as well.
Flexible User Interface – Kdenlive comes with a customizable user interface. This means you can arrange the layouts of your workflow as per your requirements. Besides, there are configurable keyboard shortcuts. There are also different themes available for the user interface.
Keyframing – One of the advanced features of Kdenlive is that you can keyframe any effect. This means you can change the parameters of the effects with time using curves. Besides, the software supports green screen effect.
Miscellaneous – The software supports almost all types of audio and video file formats. There is an option for automatic backup which is highly useful in any video editing software. The software also supports online resources and add-ons.
Part 2. Basic Editing with Kdenlive
Kdenlive is available for free and you should definitely try it out. Thereafter, you decide whether it is perfect for you or not. After Kdenlive download, here are all the steps for basic video editing with Kdenlive.
Import a clip:
Step 1: Launch Kdenlive on your computer and make sure you have the video clip ready on your hard drive.
Step 2: Go to Project menu option. Click on “Add Clip or Folder” option. You can include all the video clips on any folder.

Step 3: The imported clips will then have to be dragged and dropped on the timeline from Project Bin.
Trim and Export:
Step 1: Import the video clip on Kdenlive and drag and drop the clip on the timeline.
Step 2: Put the timeline cursor over the point on the video clip from where you want to trim it.

Step 3: Click on Scissor icon to start trimming. Thereafter, move the red timeline cursor to the point where you want the trimming to end.
![]()
Add multiple tracks:
There is enough number of tracks already available on Kdenlive timeline. However, when you are editing a large video project, you may need more tracks that already present.
Step 1: Go to Timeline menu option.
Step 2: Go to Tracks> Inset Track option.

Step 3: Enter a name for the track and select the type of track and click on Ok button.

Adjust brightness and contrast:
Step 1: Go to Effects> Color and Image Correction.

Step 2: Drag and drop Brightness or Contrast directly on the video clip.
Step 3: Click on Brightness that you just placed on the video clip and adjust the parameter from its slider.

Speed up or slow down:
Step 1: Right-click on the video clip that is on the timeline and click on Change Speed option.

Step 2: Adjust the slider to increase or decrease video clip speed and click on Ok button.

Part 3. Advanced Editing with Kdenlive
Now that we have discussed the basic editing Kdenlive tutorial, let us focus on a couple of useful advanced editing features of Kdenlive.
Use green screen effects:
You must have the video clip with green screen background on the timeline. Below the green screen clip should be the background image with which you want to replace the green screen background.
Step 1: Go to Effect> Alpha, Mask and Keying option.
Step 2: Drag and drop “Chroma Key : Advanced” on the video clip where there is a green screen.

Step 3: Click on video clip and adjust the parameters to soften the edges and make it as natural as possible.

**Add audio:
Adding audio files and music files to the video is as easy as adding video clips. You should have your audio file ready on your hard drive.
Step 1: Go to Project menu option. Click on “Add Clip or Folder” option. Select the audio file or folder from your hard drive.

Step 2: The imported audio files will have to be dragged and dropped on the timeline from Project Bin.

Part 4. Best Kdenlive Alternative to Edit Videos
Kdenlive has several drawbacks that prevent it from becoming the best video editor. Even though the features are sufficient for beginners, it is not suitable for professional editing. There is a lack of advanced options such as motion tracking or faster video production. Besides, the effects are very limited in number and so are the text and audio effects. That is why we recommend Wondershare Filmora as the best alternative to Kdenlive Mac and Windows.
Filmora is a premium video editor with video capturing feature. You can record your screen and webcam video. There is no dearth of effects, filters, elements and royalty-free media files. The user interface is cleaner and hence, it is suitable for both beginners and professionals. Here are the key features of Filmora.

For Win 7 or later (64-bit)
For macOS 10.12 or later
- 4K video editing and exporting without lag.
- Noise removal, color tuning, and video stabilization.
- Standard editing like trim, crop, split, join, rotate etc.
- Advanced text styles, audio mixing options, and audio equalizers.
- Wide range of stock media files. Supports different file formats.
- Capture screen and webcam video with internal and external audio.
Frequently Asked Questions
**Is Kdenlive a good editor?
Kdenlive is a good editor if you are getting started in video editing or you are editing your video for personal usage. However, for professional and even social media videos, a premium video editor will be better. We recommend Filmora over Kdenlive because Kdenlive lacks advanced video editing options.
**Does Kdenlive cost money?
Kdenlive Windows, Mac, and Linux are available free of cost as it belongs to the open-source software category. There is also no premium version available, and hence, all the features are unlocked in the free version.
**What can you do with Kdenlive?
You can trim your video, add music, add effects, adjust speed, correct colors, and add green screen effect. Besides, you can add multiple video clips and audio files to the timeline. There are options for keyframable effects as well.
2 Practical Ways to Combine Videos on TikTok
Meta Description: If you have several videos you would like to combine into one video, follow the steps in this article to combine videos on TikTok.
Many people continue to ask how to combine videos on TikTok. If you saw a video that grabbed your attention but consisted of several recordings, you might be wondering how you can combine the videos for TikTok. In this article, we’ll provide all the solutions you need. We’ll explore the best ways to combine videos on TikTok without surpassing the time limit the platform specified. On that note, let’s begin.
2 Practical Ways to Combine Videos on TikTok
This section will explore two practical ways to help you combine videos on TikTok. First, follow the steps outlined to complete the process.
Using the TikTok Camera
You can first combine videos on TikTok by using its official camera. To achieve this, follow the steps outlined below to combine your videos seamlessly.
- First, visit TikTok and click the ‘+’ icon at the bottom of the screen.
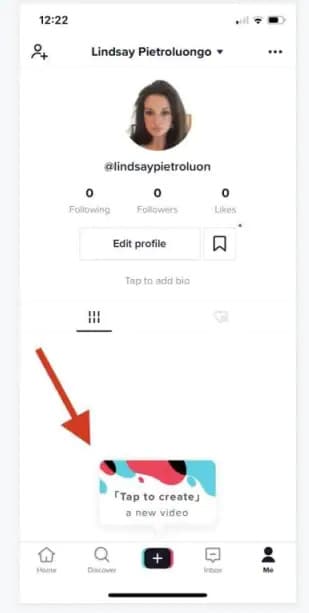
- Once you do this, you can advance to recording the clips you want.
- Click the timer button at the top of the screen to choose how long you would like to shoot your video; you can select 5 seconds, 10 seconds, etc.
- Before starting the countdown, drag the red bar by the audio track to where you want the clip to end.
- You can repeat the recording many times to have many clips recorded.
- Once you’re done recording, click the ‘adjust clip’ icon to adjust your video clips.
- After adjusting, hit the ‘done’ button and have your combined video.
You can go ahead and share with your followers and the general public.
Use the Combining Function
The second practical way you can combine TikTok videos into a single video is by using the app’s built-in combining function. To find out how you can use this technique for your videos, follow the steps outlined below.
- Once you have the TikTok app on your device, open it and go to the menu bar. Select the ‘+’ button; it should be at the end of the screen.
- Instead of recording through the TikTok camera, choose the ‘upload’ button, and it will take you to your device storage, where you can select the videos you would like to upload on TikTok.
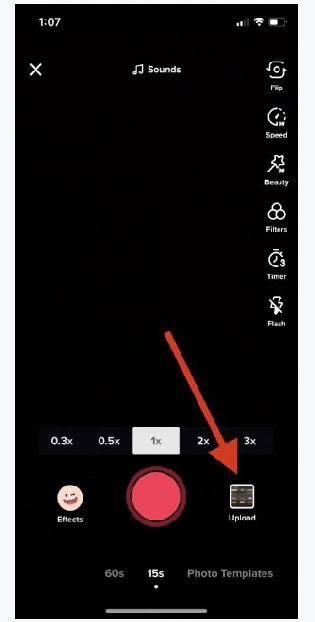
- Now, choose the ‘select multiple’ option at the left corner of your screen. Once you select this option, you can select different videos you would like to join together. Once you are satisfied with your choice, hit the ‘next’ button.
- TikTok will allow you to combine the videos for up to 60 seconds. You can customize the video arrangement according to your preference.
- If you’re satisfied with the final video result, click the next option, and you can share it on your TikTok account.
How to Combine Draft Videos on TikTok
Now that you know how to combine videos on TikTok, you’re probably wondering about the best way to combine the drafts you saved on your TikTok account. Maybe when you made the videos, you were unmotivated to upload them. However, now you want to combine the videos into a single video and don’t know how to proceed. So, follow the steps outlined in this article to get it done.
Step 1: Go to Your Drafts
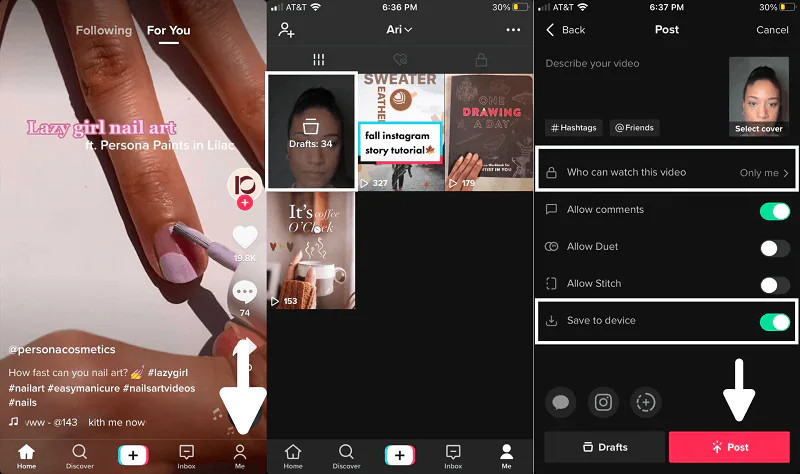
To begin, you have to launch the TikTok app and click on the ‘me’ option at the end of the screen. Then, it will redirect you to your profile, choose the ‘drafts’ category, and take you to the videos you saved on the app and never published.
Step 2: Update Privacy Settings
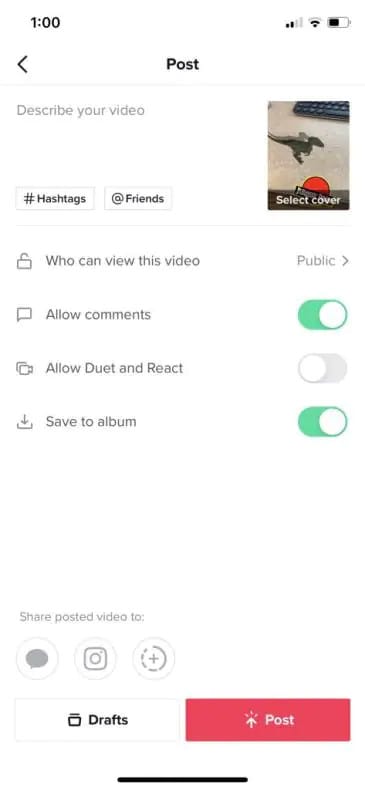
Now you want to change the privacy setting in the ‘who can watch this video’ category to ‘just me.’ After updating, tap on ‘post.’ After posting your video, you can change the setting by clicking on ‘change cut.’ You can reduce the video length and add new videos to combine TikTok drafts.
Step 3: Add Filters and More Effects
You can also add music to your newly combined video and texts, stickers, filters, and many more effects to enhance your video.
Step 4: Save Draft
Once again, save the video as a draft, but you’ll have to choose a thumbnail for your video. You can choose any part of the video to become the thumbnail. Then, post your video by navigating to the home screen again and clicking the plus icon to post; select your video and post.
Use Third-Party Tools to Combine Videos for TikTok Before Uploading
There are several tools you can use to combine TikTok videos. While there is software, some are available online. Since TikTok gives limited editing functions, most TikTokers want a rich editing tool that they can use to edit and combine videos for TikTok. Below are three user-friendly software you can use to successfully edit and combine your videos.
Wondershare filmora
This is the best editing software you can find; it makes it relatively easy to combine your TikTok videos into a single video. Not only does Filmora allow you to combine videos before you upload them, but you can also use its host of editing tools to enhance your video. You can use this software for any type of video like slideshows, documentaries, photomontages, and many more. It is quite easy to use, irrespective of your editing skills, because of its user-friendly interface.
It is a strong contender in the editing world because it offers different effects, overlays, titles, transitions, etc. You can also upload your video directly to TikTok and other social media platforms. With many themes available on the platform, you can create a slideshow right on the platform. Follow the steps outlined below to combine multiple videos on Wondershare Filmora.
- First, you have to download the app on your device; you can do this from the official website. Install the app afterward, and the launch to begin.
- Next, select ‘create new project,’ It will take you to the media screen. Click the ‘add’ button and choose ‘import media file.’
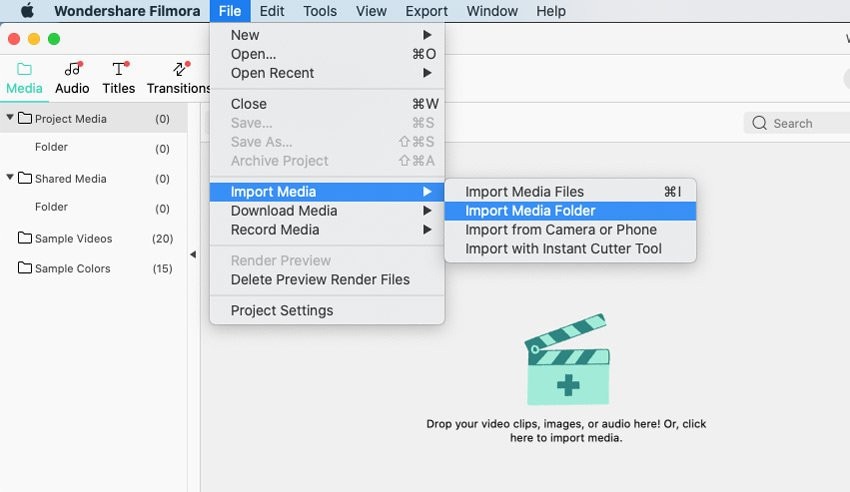
- You can then navigate to the folder with the videos you want to combine and choose.
- Afterward, drag the videos to the timeline. Filmora will ask you if you want to match the project to the resolution of your media; choose to ‘match to media’
- This will make the videos into one. You can rearrange the video clips to your preference; simply click and drag the videos to reposition them.
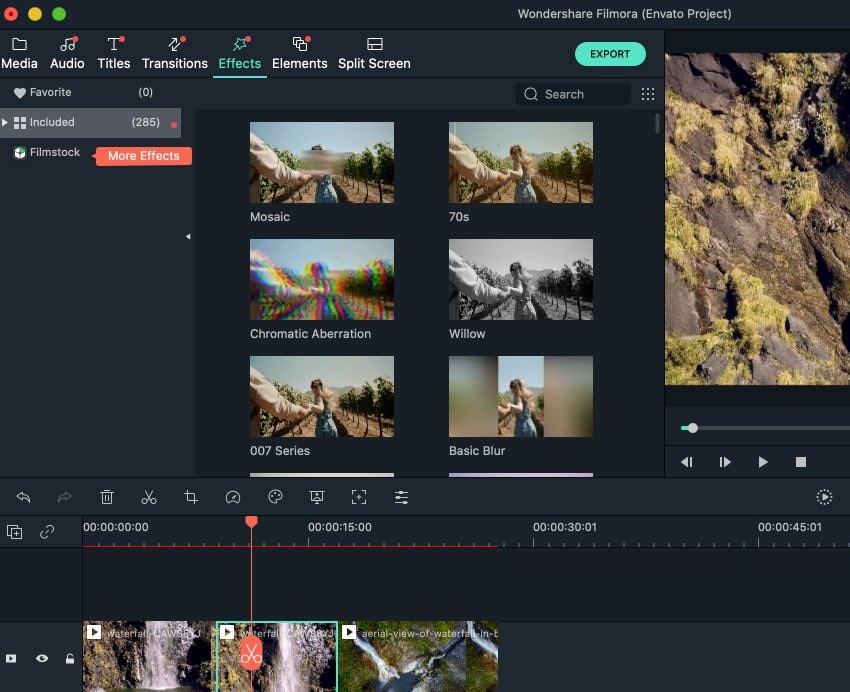
- You can also use the effects, filters, transitions, and overlays on Filmora to enhance your TikTok video.
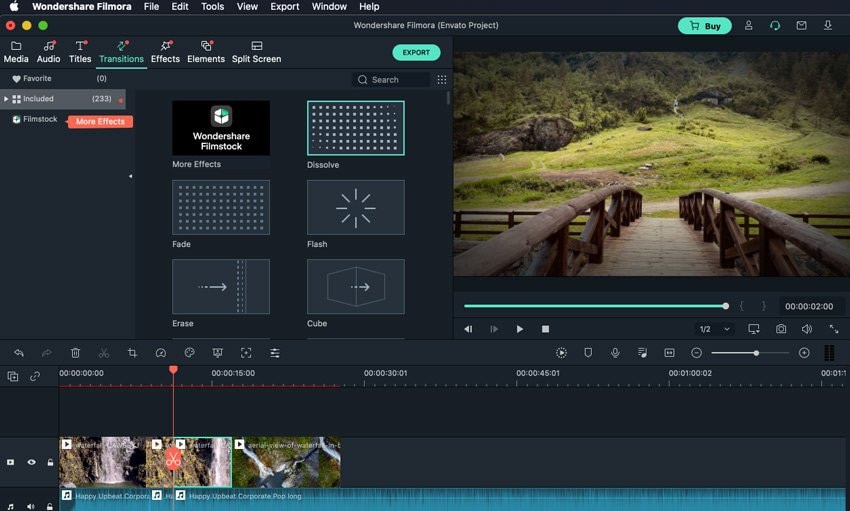
- Once everything looks good, click on the ‘export’ button at the top of the screen.
- You can then rename your video and choose where you would like to save the video. Filmora also allows you to adjust your video’s resolution and bitrate before clicking the ‘export’ option.
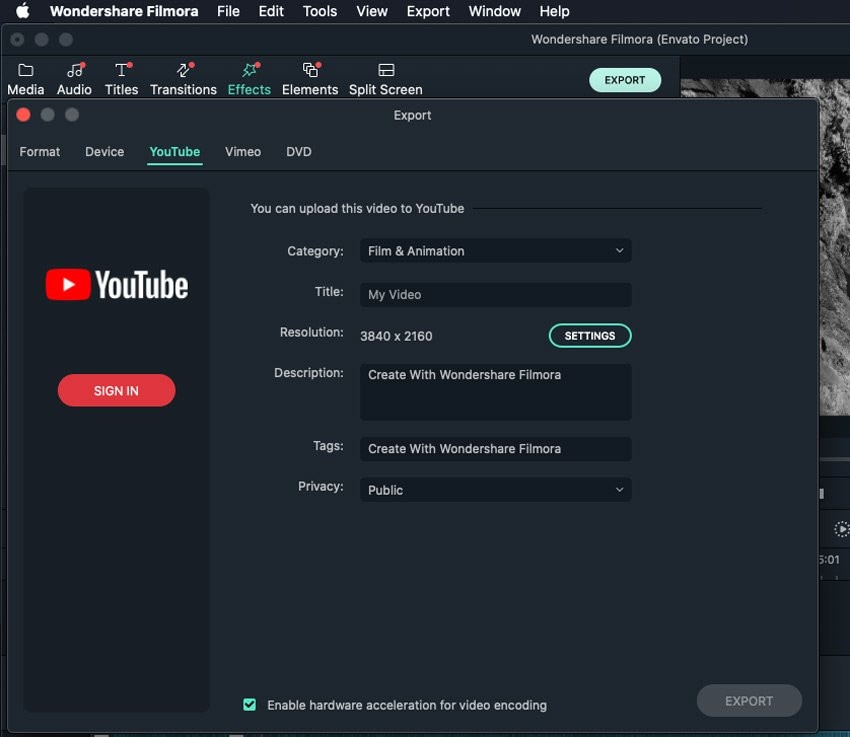
VideoProc Converter

Another third-party app you can use to edit your video and combine videos for TikTok is VideooProc Converter. It allows you to merge several videos in a lossless manner, and you can also cut, trim, rotate and resize your videos to your preference. You could also change the format and any other requirements you would like to tweak. Some beginners might find this video editor hard to navigate. However, the steps below should make the process easier for you.
- Firstly, download VideoProc Converter and launch the software.
- Import your TikTok videos and select and output format for your video; there are many options to choose from.
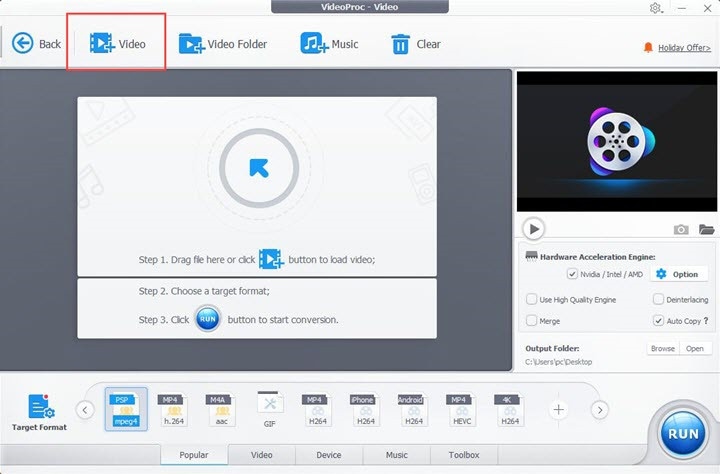
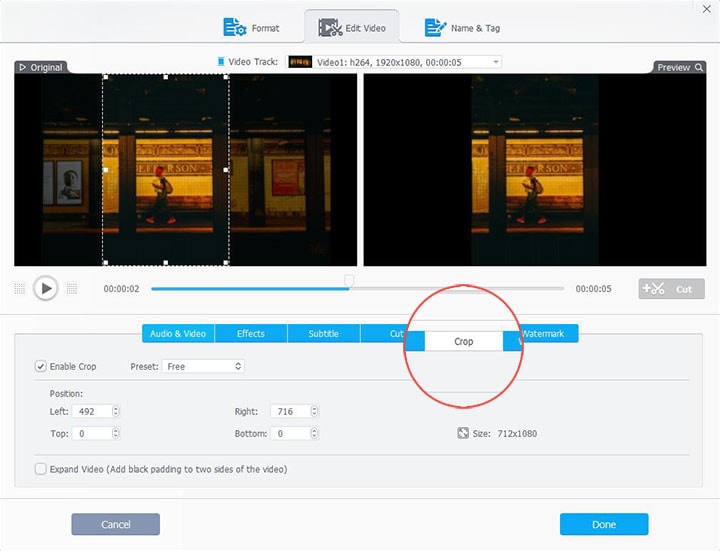
- You can then start editing each video clip separately. You can resize, trim and crop your videos. You can also apply effects, rotate the videos, and add subtitles.
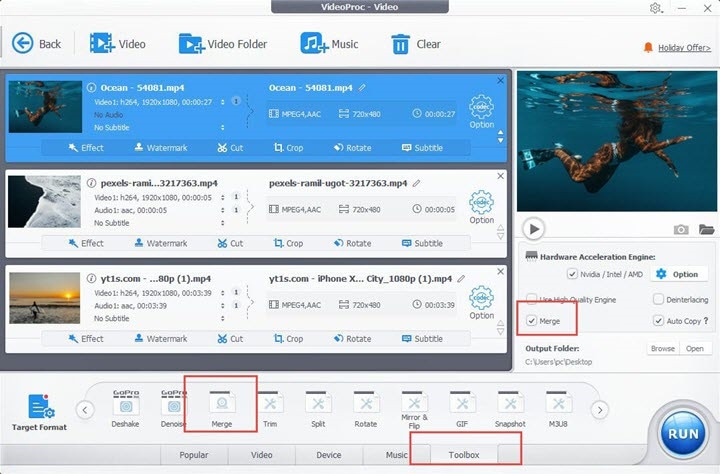
- Next, go to the end of the screen and click the ‘toolbox’ option, select ‘merge,’ and you can choose the videos you would like to combine.
- After combining the videos, you can save the video and export it to your preferred storage device.
Adobe Spark
This is another top video-combining tool you can use for your TikTok videos. It allows you to make quick edits on your TikTok videos. Of course, you have to own a TikTok account to use this video editor. However, using it is quite simple, and the steps outlined below show just that.
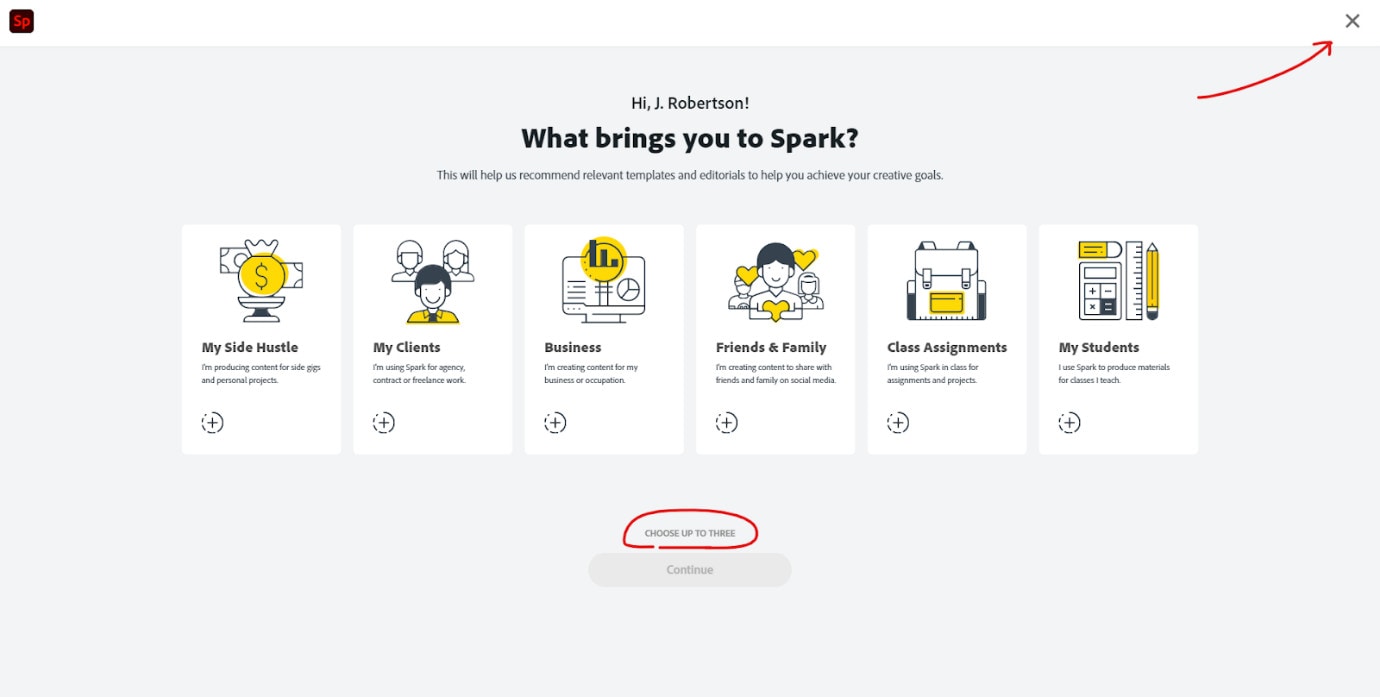
- Go to the Adobe Spark website and sign-in; you can create an account if you don’t have one.
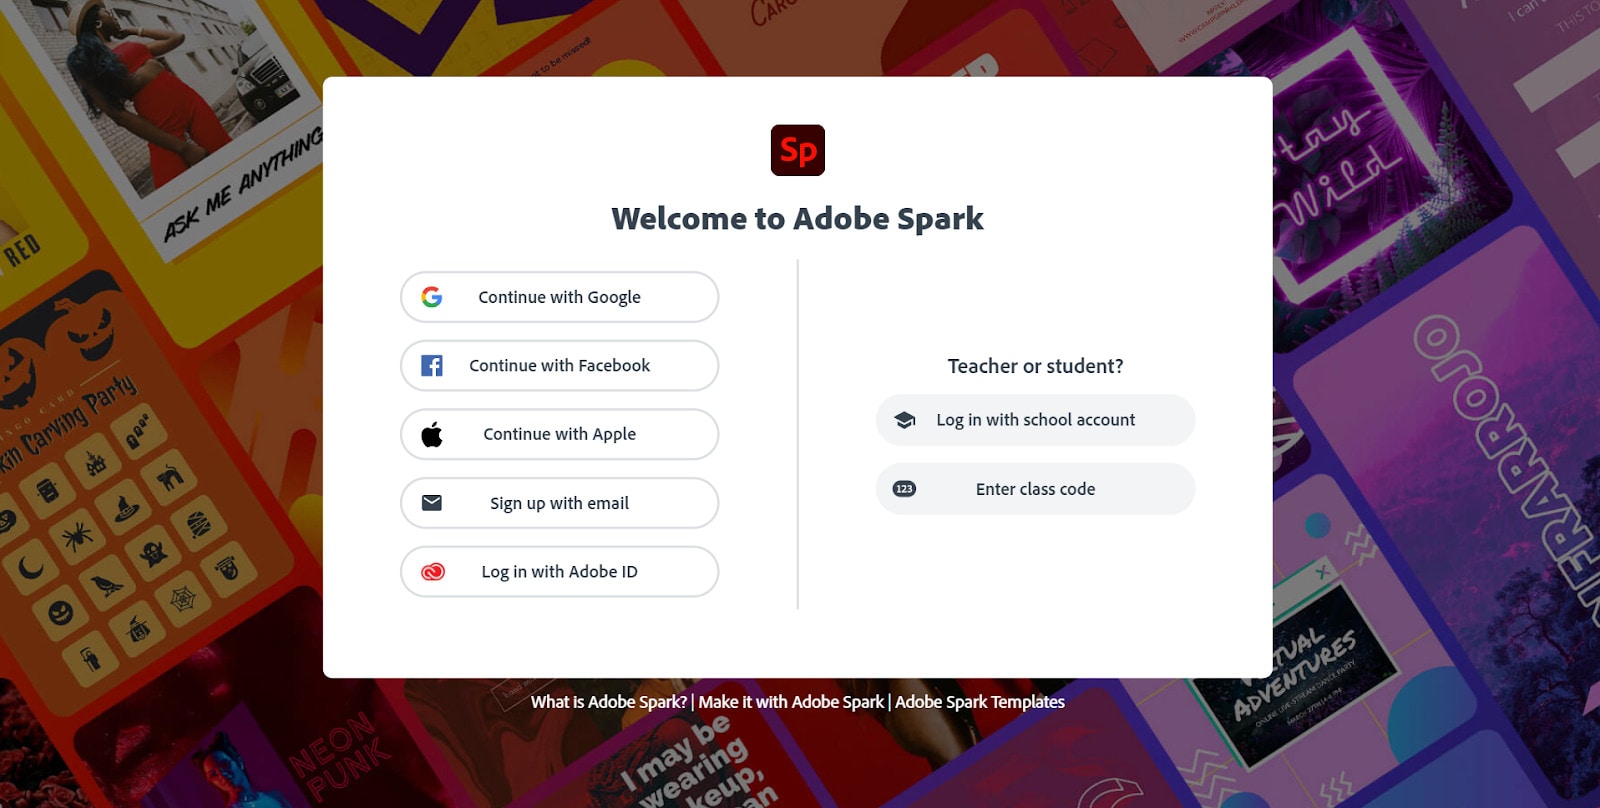
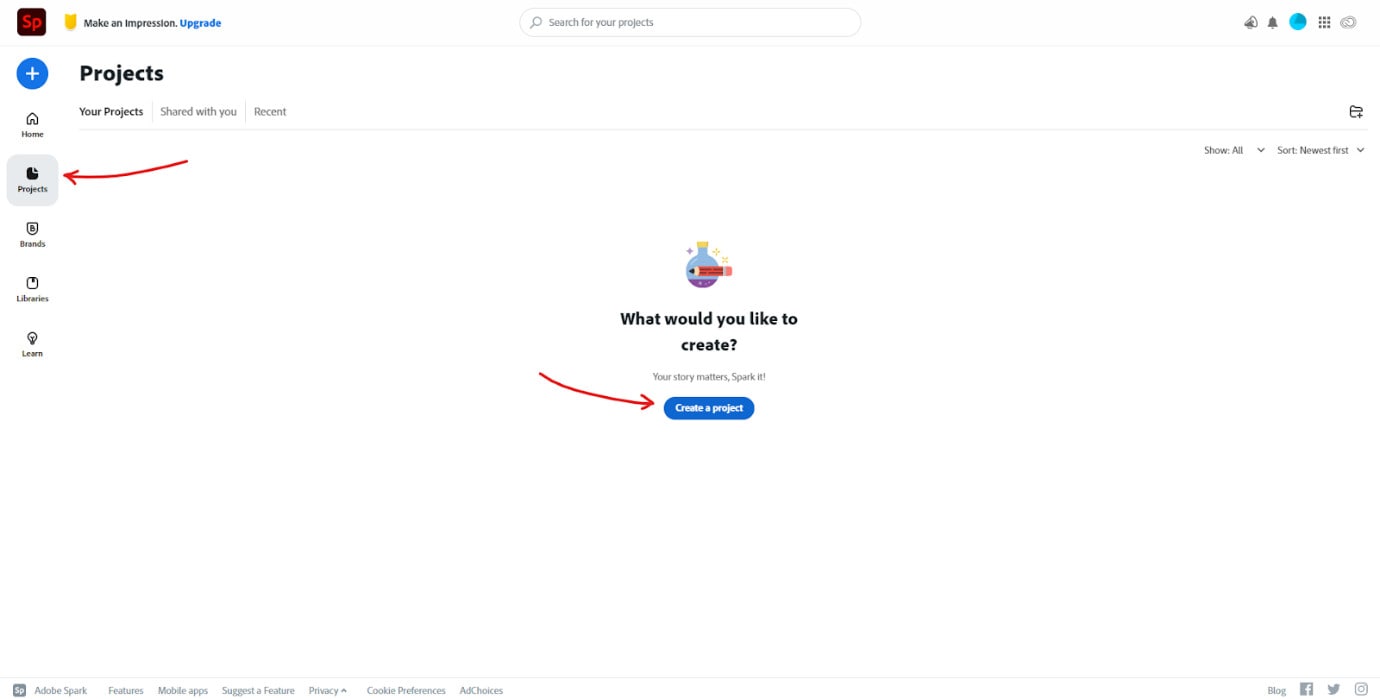
- Navigate to the ‘project’ tab on the homepage and select ‘create a project.’
- Click the ‘videos’ tab and choose a template you prefer. You would also have to give your video a title. Once you’re done, choose ‘start from scratch’ to begin.
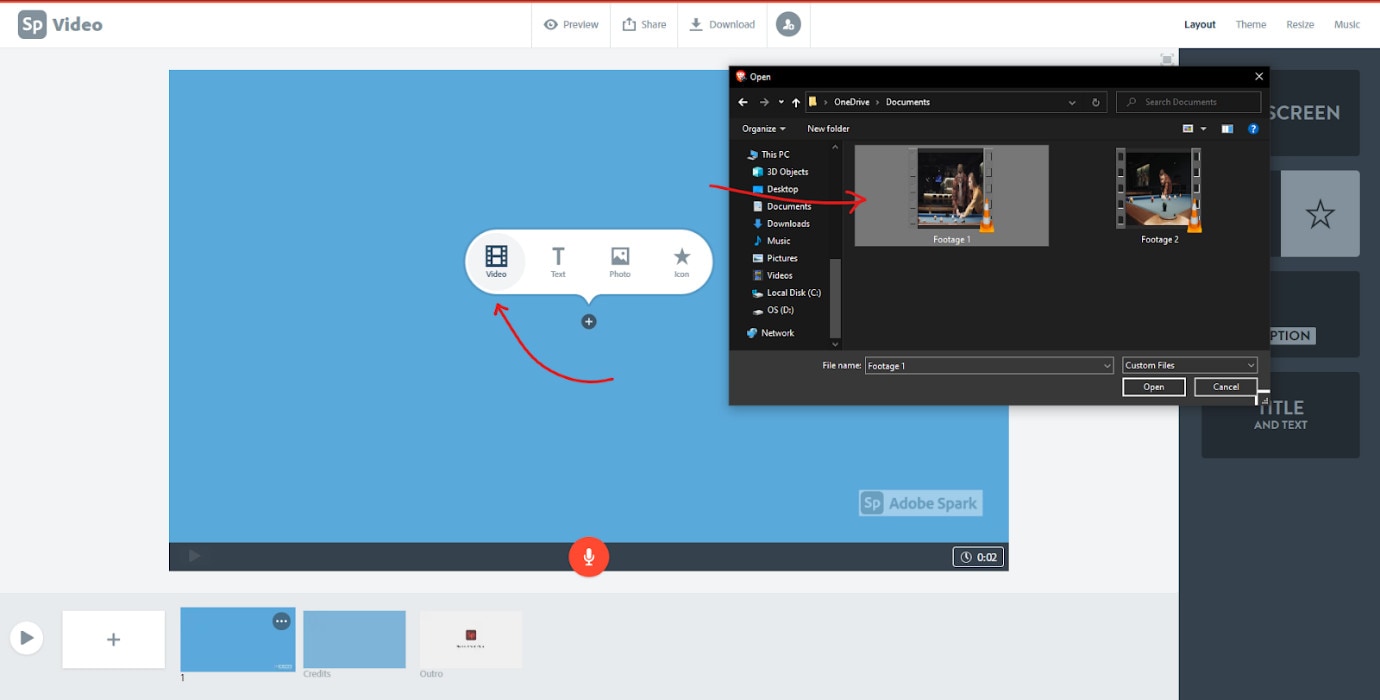
- It would take you to the video editor; hover over an empty slide and click ‘video’ to choose the video you would like to upload.

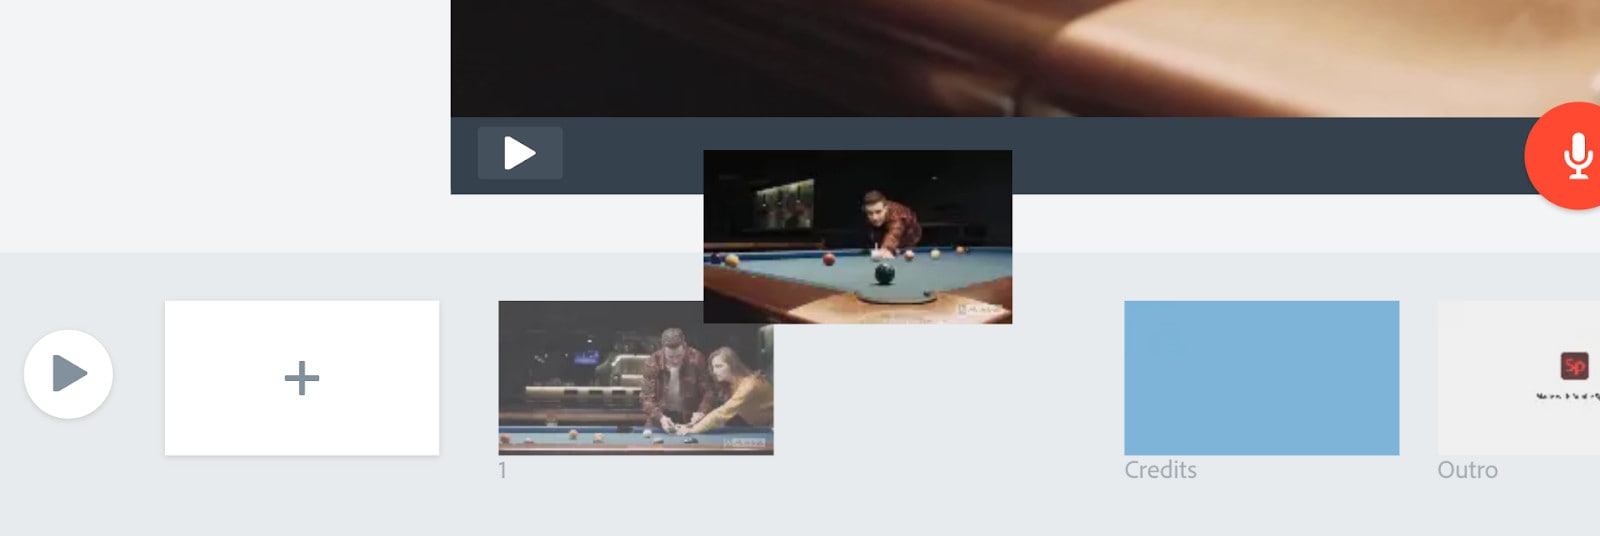
- Adobe Spark allows you to trim the length of the video if you think it’s too long. Repeat the previous step to add another video again.
- Once you’ve added all the videos you want, you can rearrange them in the proper sequence.
- Now you can save your video; click the ‘download’ button, and Adobe Spark will automatically download the newly combined video to your device.
7 Tips and Tricks You Should Know for TikTok Videos Creation
Although most tips focus on how you can redo your video to focus on the video-sharing platform, we have some tips and tricks you should know for TikTok video creation that focuses on combining videos. If you’re always having drafts or would like to enhance your videos, these cool tips will serve as a quick method for you.
- Combine Photos and Videos
TikTok allows you to combine videos and images. This comes in handy when trying to make a point on your video. For example, you’re probably wondering how you can add a foundation picture to your video. It is quite simple if you follow the steps below.
- Launch the TikTok app and click the ‘+’ button at the end of the screen.
- Record your video and select the ‘impacts’ screen at the end of the screen after a few moments.’
- Choose ‘transfer your picture to change foundation from the options that pop up.’
- Continue recording your video, and the chosen picture will become your video foundation.
- Add Overlay to TikTok Videos
Another tip we have is how to add overlay videos on TikTok without third-party editing apps; follow the steps below.
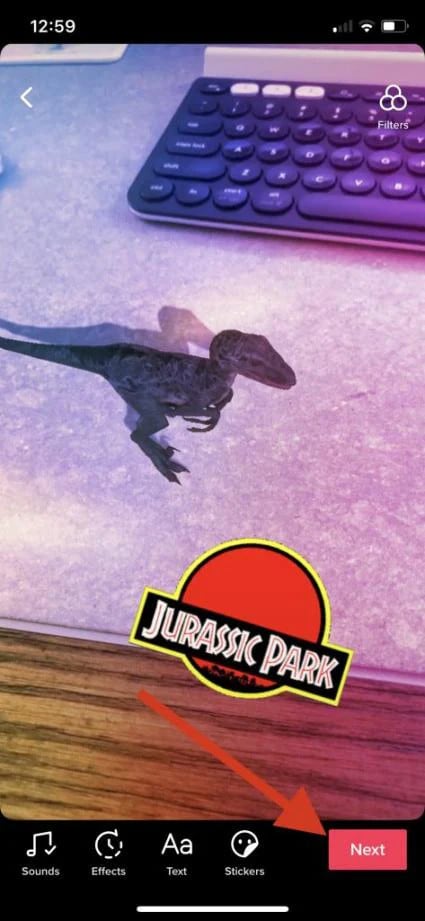
- After chronicling your videos, you can choose to add a melodic overlay, channels, and many more enhancements like stickers and text overlays.
- Once you add this to your video, choose next, and it will take you to the next page, where you can add subtitles, hashtags, and many more before you post.
- How to Add Videos to TikTok After Posting
Apart from making videos, you can also make two-part duets on TikTok. Additionally, TikTok allows you to record with different formats; follow the steps below.
- Firstly, go to the video you would like to edit and click the three-dot icon to edit your video.
- Once you edit the video by changing the format or adding another part, save your video, and TikTok allows you to post your video again.
- Place Videos Side by Side
Another tip we have in store for you is how you can place videos side by side on TikTok; the steps below help you achieve this.
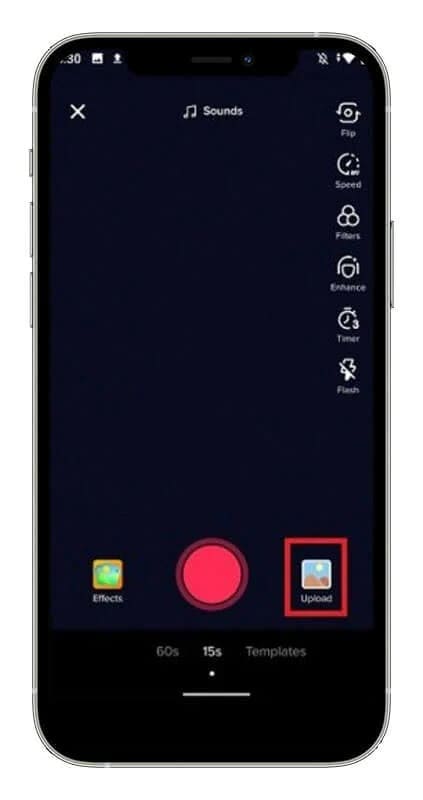
- First, click the ‘star’ button at the side of your screen and select ‘add to favorite.’
- Now, record a second video on your TikTok or simply import it if you have already recorded the video.
- Download the first video, and you can use the combining feature on TikTok to make the video run next to each other
- Once you’re satisfied, you can now proceed to post your video.
- Learn to Perform Duets on TikTok
Another thing you can do on TikTok is to duet with other TikTok users
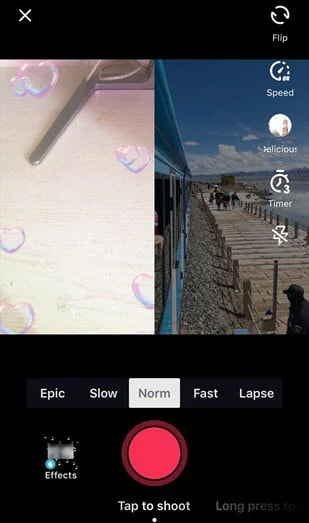
- To do this, go to TikTok and find the video you would like to duet
- At the end of the screen, click on the ‘share’ option and choose ‘duet’ from the option available
- Tap the red icon at the middle of the screen to start recording your video; your video usually appears on the left while the other video shows up in the right corner.
- Once you’re done recording, click the checkmark icon at the top of the screen to save your recording.
- Replay the duet to ensure you like the result; you can add effects, stickers, and other editing features you want to the video before you post.
- Set a Timer for Recording Videos
One of the ways you can record multiple scenes for a video is by using the recording tool; the steps below show you how to do that.
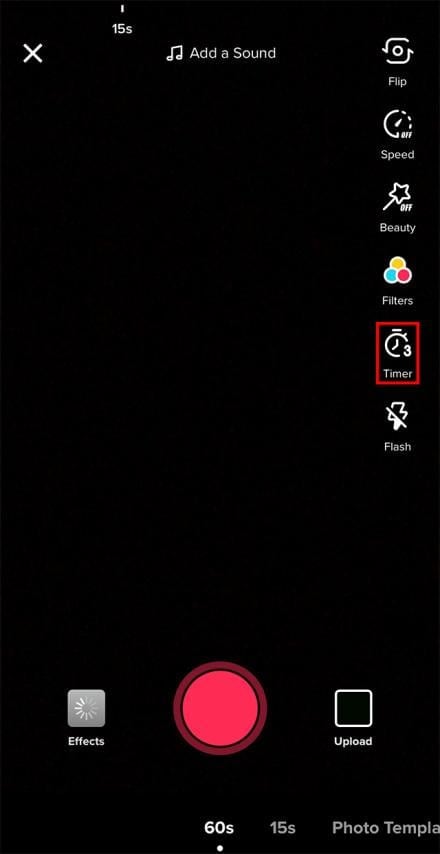
- Once you launch TikTok and click on the camera icon
- Tap the ‘clock’ icon at the side of the screen; you can choose between 3-10 seconds
- Click the red circle to start recording
- A countdown on the screen gives you time to get ready to record. Once the countdown gets to zero, TikTok starts recording your video.
- Use the Stitch Feature
Stitched videos allow you to add the first maker’s details in the new video; these details connect TikTok users to the first video. It is quite easy to stitch one video to another. Simply navigate to the ‘privacy and settings’ tab, and you can enable or disable stitching for your TikTok videos; you can also turn this on and off for your videos. Follow the steps below to stitch your TikTok videos.
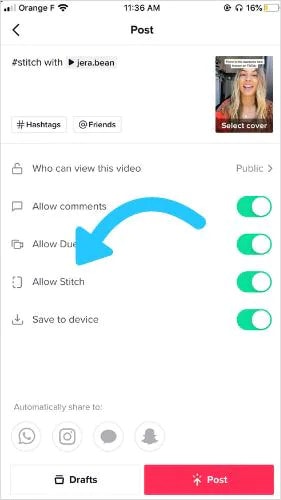
- Open the TikTok app and choose the video you would like to stitch
- Now choose the three-dot icon and select the ‘advanced’ option
- You can stitch up to five seconds from the video you would like to stick to add to the current video.
- You can add recordings to the stitched option and then stitch them together to post.
Final Thoughts
Whether you’re a stranger to the TikTok scene or a professional, TikTok is quite popular as a video-sharing platform. However, you don’t always get it right the first time, and you might want to combine various videos into one perfect option to upload. Apart from the two practical ways you can do this on TikTok, we also share three third-party apps you can use to achieve this. You can also explore the seven tips shared in this article to maximize your potential on the TikTok app.

- Once you do this, you can advance to recording the clips you want.
- Click the timer button at the top of the screen to choose how long you would like to shoot your video; you can select 5 seconds, 10 seconds, etc.
- Before starting the countdown, drag the red bar by the audio track to where you want the clip to end.
- You can repeat the recording many times to have many clips recorded.
- Once you’re done recording, click the ‘adjust clip’ icon to adjust your video clips.
- After adjusting, hit the ‘done’ button and have your combined video.
You can go ahead and share with your followers and the general public.
Use the Combining Function
The second practical way you can combine TikTok videos into a single video is by using the app’s built-in combining function. To find out how you can use this technique for your videos, follow the steps outlined below.
- Once you have the TikTok app on your device, open it and go to the menu bar. Select the ‘+’ button; it should be at the end of the screen.
- Instead of recording through the TikTok camera, choose the ‘upload’ button, and it will take you to your device storage, where you can select the videos you would like to upload on TikTok.

- Now, choose the ‘select multiple’ option at the left corner of your screen. Once you select this option, you can select different videos you would like to join together. Once you are satisfied with your choice, hit the ‘next’ button.
- TikTok will allow you to combine the videos for up to 60 seconds. You can customize the video arrangement according to your preference.
- If you’re satisfied with the final video result, click the next option, and you can share it on your TikTok account.

How to Combine Draft Videos on TikTok
Now that you know how to combine videos on TikTok, you’re probably wondering about the best way to combine the drafts you saved on your TikTok account. Maybe when you made the videos, you were unmotivated to upload them. However, now you want to combine the videos into a single video and don’t know how to proceed. So, follow the steps outlined in this article to get it done.
Step 1: Go to Your Drafts
To begin, you have to launch the TikTok app and click on the ‘me’ option at the end of the screen. Then, it will redirect you to your profile, choose the ‘drafts’ category, and take you to the videos you saved on the app and never published.
Step 2: Update Privacy Settings
Now you want to change the privacy setting in the ‘who can watch this video’ category to ‘just me.’ After updating, tap on ‘post.’ After posting your video, you can change the setting by clicking on ‘change cut.’ You can reduce the video length and add new videos to combine TikTok drafts.
Step 3: Add Filters and More Effects
You can also add music to your newly combined video and texts, stickers, filters, and many more effects to enhance your video.
Step 4: Save Draft

Once again, save the video as a draft, but you’ll have to choose a thumbnail for your video. You can choose any part of the video to become the thumbnail. Then, post your video by navigating to the home screen again and clicking the plus icon to post; select your video and post.
Use Third-Party Tools to Combine Videos for TikTok Before Uploading
There are several tools you can use to combine TikTok videos. While there is software, some are available online. Since TikTok gives limited editing functions, most TikTokers want a rich editing tool that they can use to edit and combine videos for TikTok. Below are three user-friendly software you can use to successfully edit and combine your videos.
Wondershare filmora
This is the best editing software you can find; it makes it relatively easy to combine your TikTok videos into a single video. Not only does Filmora allow you to combine videos before you upload them, but you can also use its host of editing tools to enhance your video. You can use this software for any type of video like slideshows, documentaries, photomontages, and many more. It is quite easy to use, irrespective of your editing skills, because of its user-friendly interface.
It is a strong contender in the editing world because it offers different effects, overlays, titles, transitions, etc. You can also upload your video directly to TikTok and other social media platforms. With many themes available on the platform, you can create a slideshow right on the platform. Follow the steps outlined below to combine multiple videos on Wondershare Filmora.
- First, you have to download the app on your device; you can do this from the official website. Install the app afterward, and the launch to begin.
- Next, select ‘create new project,’ It will take you to the media screen. Click the ‘add’ button and choose ‘import media file.’

- You can then navigate to the folder with the videos you want to combine and choose.
- Afterward, drag the videos to the timeline. Filmora will ask you if you want to match the project to the resolution of your media; choose to ‘match to media’
- This will make the videos into one. You can rearrange the video clips to your preference; simply click and drag the videos to reposition them.

- You can also use the effects, filters, transitions, and overlays on Filmora to enhance your TikTok video.

- Once everything looks good, click on the ‘export’ button at the top of the screen.
- You can then rename your video and choose where you would like to save the video. Filmora also allows you to adjust your video’s resolution and bitrate before clicking the ‘export’ option.

VideoProc Converter

Another third-party app you can use to edit your video and combine videos for TikTok is VideooProc Converter. It allows you to merge several videos in a lossless manner, and you can also cut, trim, rotate and resize your videos to your preference. You could also change the format and any other requirements you would like to tweak. Some beginners might find this video editor hard to navigate. However, the steps below should make the process easier for you.
- Firstly, download VideoProc Converter and launch the software.
- Import your TikTok videos and select and output format for your video; there are many options to choose from.

- You can then start editing each video clip separately. You can resize, trim and crop your videos. You can also apply effects, rotate the videos, and add subtitles.

- Next, go to the end of the screen and click the ‘toolbox’ option, select ‘merge,’ and you can choose the videos you would like to combine.

- After combining the videos, you can save the video and export it to your preferred storage device.
Adobe Spark
This is another top video-combining tool you can use for your TikTok videos. It allows you to make quick edits on your TikTok videos. Of course, you have to own a TikTok account to use this video editor. However, using it is quite simple, and the steps outlined below show just that.
- Go to the Adobe Spark website and sign-in; you can create an account if you don’t have one.

- Navigate to the ‘project’ tab on the homepage and select ‘create a project.’

- Click the ‘videos’ tab and choose a template you prefer. You would also have to give your video a title. Once you’re done, choose ‘start from scratch’ to begin.

- It would take you to the video editor; hover over an empty slide and click ‘video’ to choose the video you would like to upload.

- Adobe Spark allows you to trim the length of the video if you think it’s too long. Repeat the previous step to add another video again.

- Once you’ve added all the videos you want, you can rearrange them in the proper sequence.

- Now you can save your video; click the ‘download’ button, and Adobe Spark will automatically download the newly combined video to your device.
7 Tips and Tricks You Should Know for TikTok Videos Creation
Although most tips focus on how you can redo your video to focus on the video-sharing platform, we have some tips and tricks you should know for TikTok video creation that focuses on combining videos. If you’re always having drafts or would like to enhance your videos, these cool tips will serve as a quick method for you.
- Combine Photos and Videos
TikTok allows you to combine videos and images. This comes in handy when trying to make a point on your video. For example, you’re probably wondering how you can add a foundation picture to your video. It is quite simple if you follow the steps below.
- Launch the TikTok app and click the ‘+’ button at the end of the screen.
- Record your video and select the ‘impacts’ screen at the end of the screen after a few moments.’
- Choose ‘transfer your picture to change foundation from the options that pop up.’
- Continue recording your video, and the chosen picture will become your video foundation.
- Add Overlay to TikTok Videos
Another tip we have is how to add overlay videos on TikTok without third-party editing apps; follow the steps below.

- After chronicling your videos, you can choose to add a melodic overlay, channels, and many more enhancements like stickers and text overlays.
- Once you add this to your video, choose next, and it will take you to the next page, where you can add subtitles, hashtags, and many more before you post.
- How to Add Videos to TikTok After Posting
Apart from making videos, you can also make two-part duets on TikTok. Additionally, TikTok allows you to record with different formats; follow the steps below.
- Firstly, go to the video you would like to edit and click the three-dot icon to edit your video.
- Once you edit the video by changing the format or adding another part, save your video, and TikTok allows you to post your video again.
- Place Videos Side by Side
Another tip we have in store for you is how you can place videos side by side on TikTok; the steps below help you achieve this.

- First, click the ‘star’ button at the side of your screen and select ‘add to favorite.’
- Now, record a second video on your TikTok or simply import it if you have already recorded the video.
- Download the first video, and you can use the combining feature on TikTok to make the video run next to each other
- Once you’re satisfied, you can now proceed to post your video.
- Learn to Perform Duets on TikTok
Another thing you can do on TikTok is to duet with other TikTok users

- To do this, go to TikTok and find the video you would like to duet
- At the end of the screen, click on the ‘share’ option and choose ‘duet’ from the option available
- Tap the red icon at the middle of the screen to start recording your video; your video usually appears on the left while the other video shows up in the right corner.
- Once you’re done recording, click the checkmark icon at the top of the screen to save your recording.
- Replay the duet to ensure you like the result; you can add effects, stickers, and other editing features you want to the video before you post.
- Set a Timer for Recording Videos
One of the ways you can record multiple scenes for a video is by using the recording tool; the steps below show you how to do that.

- Once you launch TikTok and click on the camera icon
- Tap the ‘clock’ icon at the side of the screen; you can choose between 3-10 seconds
- Click the red circle to start recording
- A countdown on the screen gives you time to get ready to record. Once the countdown gets to zero, TikTok starts recording your video.
- Use the Stitch Feature
Stitched videos allow you to add the first maker’s details in the new video; these details connect TikTok users to the first video. It is quite easy to stitch one video to another. Simply navigate to the ‘privacy and settings’ tab, and you can enable or disable stitching for your TikTok videos; you can also turn this on and off for your videos. Follow the steps below to stitch your TikTok videos.

- Open the TikTok app and choose the video you would like to stitch
- Now choose the three-dot icon and select the ‘advanced’ option
- You can stitch up to five seconds from the video you would like to stick to add to the current video.
- You can add recordings to the stitched option and then stitch them together to post.
Final Thoughts
Whether you’re a stranger to the TikTok scene or a professional, TikTok is quite popular as a video-sharing platform. However, you don’t always get it right the first time, and you might want to combine various videos into one perfect option to upload. Apart from the two practical ways you can do this on TikTok, we also share three third-party apps you can use to achieve this. You can also explore the seven tips shared in this article to maximize your potential on the TikTok app.

- Once you do this, you can advance to recording the clips you want.
- Click the timer button at the top of the screen to choose how long you would like to shoot your video; you can select 5 seconds, 10 seconds, etc.
- Before starting the countdown, drag the red bar by the audio track to where you want the clip to end.
- You can repeat the recording many times to have many clips recorded.
- Once you’re done recording, click the ‘adjust clip’ icon to adjust your video clips.
- After adjusting, hit the ‘done’ button and have your combined video.
You can go ahead and share with your followers and the general public.
Use the Combining Function
The second practical way you can combine TikTok videos into a single video is by using the app’s built-in combining function. To find out how you can use this technique for your videos, follow the steps outlined below.
- Once you have the TikTok app on your device, open it and go to the menu bar. Select the ‘+’ button; it should be at the end of the screen.
- Instead of recording through the TikTok camera, choose the ‘upload’ button, and it will take you to your device storage, where you can select the videos you would like to upload on TikTok.

- Now, choose the ‘select multiple’ option at the left corner of your screen. Once you select this option, you can select different videos you would like to join together. Once you are satisfied with your choice, hit the ‘next’ button.
- TikTok will allow you to combine the videos for up to 60 seconds. You can customize the video arrangement according to your preference.
- If you’re satisfied with the final video result, click the next option, and you can share it on your TikTok account.

How to Combine Draft Videos on TikTok
Now that you know how to combine videos on TikTok, you’re probably wondering about the best way to combine the drafts you saved on your TikTok account. Maybe when you made the videos, you were unmotivated to upload them. However, now you want to combine the videos into a single video and don’t know how to proceed. So, follow the steps outlined in this article to get it done.
Step 1: Go to Your Drafts
To begin, you have to launch the TikTok app and click on the ‘me’ option at the end of the screen. Then, it will redirect you to your profile, choose the ‘drafts’ category, and take you to the videos you saved on the app and never published.
Step 2: Update Privacy Settings
Now you want to change the privacy setting in the ‘who can watch this video’ category to ‘just me.’ After updating, tap on ‘post.’ After posting your video, you can change the setting by clicking on ‘change cut.’ You can reduce the video length and add new videos to combine TikTok drafts.
Step 3: Add Filters and More Effects
You can also add music to your newly combined video and texts, stickers, filters, and many more effects to enhance your video.
Step 4: Save Draft

Once again, save the video as a draft, but you’ll have to choose a thumbnail for your video. You can choose any part of the video to become the thumbnail. Then, post your video by navigating to the home screen again and clicking the plus icon to post; select your video and post.
Use Third-Party Tools to Combine Videos for TikTok Before Uploading
There are several tools you can use to combine TikTok videos. While there is software, some are available online. Since TikTok gives limited editing functions, most TikTokers want a rich editing tool that they can use to edit and combine videos for TikTok. Below are three user-friendly software you can use to successfully edit and combine your videos.
Wondershare filmora
This is the best editing software you can find; it makes it relatively easy to combine your TikTok videos into a single video. Not only does Filmora allow you to combine videos before you upload them, but you can also use its host of editing tools to enhance your video. You can use this software for any type of video like slideshows, documentaries, photomontages, and many more. It is quite easy to use, irrespective of your editing skills, because of its user-friendly interface.
It is a strong contender in the editing world because it offers different effects, overlays, titles, transitions, etc. You can also upload your video directly to TikTok and other social media platforms. With many themes available on the platform, you can create a slideshow right on the platform. Follow the steps outlined below to combine multiple videos on Wondershare Filmora.
- First, you have to download the app on your device; you can do this from the official website. Install the app afterward, and the launch to begin.
- Next, select ‘create new project,’ It will take you to the media screen. Click the ‘add’ button and choose ‘import media file.’

- You can then navigate to the folder with the videos you want to combine and choose.
- Afterward, drag the videos to the timeline. Filmora will ask you if you want to match the project to the resolution of your media; choose to ‘match to media’
- This will make the videos into one. You can rearrange the video clips to your preference; simply click and drag the videos to reposition them.

- You can also use the effects, filters, transitions, and overlays on Filmora to enhance your TikTok video.

- Once everything looks good, click on the ‘export’ button at the top of the screen.
- You can then rename your video and choose where you would like to save the video. Filmora also allows you to adjust your video’s resolution and bitrate before clicking the ‘export’ option.

VideoProc Converter

Another third-party app you can use to edit your video and combine videos for TikTok is VideooProc Converter. It allows you to merge several videos in a lossless manner, and you can also cut, trim, rotate and resize your videos to your preference. You could also change the format and any other requirements you would like to tweak. Some beginners might find this video editor hard to navigate. However, the steps below should make the process easier for you.
- Firstly, download VideoProc Converter and launch the software.
- Import your TikTok videos and select and output format for your video; there are many options to choose from.

- You can then start editing each video clip separately. You can resize, trim and crop your videos. You can also apply effects, rotate the videos, and add subtitles.

- Next, go to the end of the screen and click the ‘toolbox’ option, select ‘merge,’ and you can choose the videos you would like to combine.

- After combining the videos, you can save the video and export it to your preferred storage device.
Adobe Spark
This is another top video-combining tool you can use for your TikTok videos. It allows you to make quick edits on your TikTok videos. Of course, you have to own a TikTok account to use this video editor. However, using it is quite simple, and the steps outlined below show just that.
- Go to the Adobe Spark website and sign-in; you can create an account if you don’t have one.

- Navigate to the ‘project’ tab on the homepage and select ‘create a project.’

- Click the ‘videos’ tab and choose a template you prefer. You would also have to give your video a title. Once you’re done, choose ‘start from scratch’ to begin.

- It would take you to the video editor; hover over an empty slide and click ‘video’ to choose the video you would like to upload.

- Adobe Spark allows you to trim the length of the video if you think it’s too long. Repeat the previous step to add another video again.

- Once you’ve added all the videos you want, you can rearrange them in the proper sequence.

- Now you can save your video; click the ‘download’ button, and Adobe Spark will automatically download the newly combined video to your device.
7 Tips and Tricks You Should Know for TikTok Videos Creation
Although most tips focus on how you can redo your video to focus on the video-sharing platform, we have some tips and tricks you should know for TikTok video creation that focuses on combining videos. If you’re always having drafts or would like to enhance your videos, these cool tips will serve as a quick method for you.
- Combine Photos and Videos
TikTok allows you to combine videos and images. This comes in handy when trying to make a point on your video. For example, you’re probably wondering how you can add a foundation picture to your video. It is quite simple if you follow the steps below.
- Launch the TikTok app and click the ‘+’ button at the end of the screen.
- Record your video and select the ‘impacts’ screen at the end of the screen after a few moments.’
- Choose ‘transfer your picture to change foundation from the options that pop up.’
- Continue recording your video, and the chosen picture will become your video foundation.
- Add Overlay to TikTok Videos
Another tip we have is how to add overlay videos on TikTok without third-party editing apps; follow the steps below.

- After chronicling your videos, you can choose to add a melodic overlay, channels, and many more enhancements like stickers and text overlays.
- Once you add this to your video, choose next, and it will take you to the next page, where you can add subtitles, hashtags, and many more before you post.
- How to Add Videos to TikTok After Posting
Apart from making videos, you can also make two-part duets on TikTok. Additionally, TikTok allows you to record with different formats; follow the steps below.
- Firstly, go to the video you would like to edit and click the three-dot icon to edit your video.
- Once you edit the video by changing the format or adding another part, save your video, and TikTok allows you to post your video again.
- Place Videos Side by Side
Another tip we have in store for you is how you can place videos side by side on TikTok; the steps below help you achieve this.

- First, click the ‘star’ button at the side of your screen and select ‘add to favorite.’
- Now, record a second video on your TikTok or simply import it if you have already recorded the video.
- Download the first video, and you can use the combining feature on TikTok to make the video run next to each other
- Once you’re satisfied, you can now proceed to post your video.
- Learn to Perform Duets on TikTok
Another thing you can do on TikTok is to duet with other TikTok users

- To do this, go to TikTok and find the video you would like to duet
- At the end of the screen, click on the ‘share’ option and choose ‘duet’ from the option available
- Tap the red icon at the middle of the screen to start recording your video; your video usually appears on the left while the other video shows up in the right corner.
- Once you’re done recording, click the checkmark icon at the top of the screen to save your recording.
- Replay the duet to ensure you like the result; you can add effects, stickers, and other editing features you want to the video before you post.
- Set a Timer for Recording Videos
One of the ways you can record multiple scenes for a video is by using the recording tool; the steps below show you how to do that.

- Once you launch TikTok and click on the camera icon
- Tap the ‘clock’ icon at the side of the screen; you can choose between 3-10 seconds
- Click the red circle to start recording
- A countdown on the screen gives you time to get ready to record. Once the countdown gets to zero, TikTok starts recording your video.
- Use the Stitch Feature
Stitched videos allow you to add the first maker’s details in the new video; these details connect TikTok users to the first video. It is quite easy to stitch one video to another. Simply navigate to the ‘privacy and settings’ tab, and you can enable or disable stitching for your TikTok videos; you can also turn this on and off for your videos. Follow the steps below to stitch your TikTok videos.

- Open the TikTok app and choose the video you would like to stitch
- Now choose the three-dot icon and select the ‘advanced’ option
- You can stitch up to five seconds from the video you would like to stick to add to the current video.
- You can add recordings to the stitched option and then stitch them together to post.
Final Thoughts
Whether you’re a stranger to the TikTok scene or a professional, TikTok is quite popular as a video-sharing platform. However, you don’t always get it right the first time, and you might want to combine various videos into one perfect option to upload. Apart from the two practical ways you can do this on TikTok, we also share three third-party apps you can use to achieve this. You can also explore the seven tips shared in this article to maximize your potential on the TikTok app.

- Once you do this, you can advance to recording the clips you want.
- Click the timer button at the top of the screen to choose how long you would like to shoot your video; you can select 5 seconds, 10 seconds, etc.
- Before starting the countdown, drag the red bar by the audio track to where you want the clip to end.
- You can repeat the recording many times to have many clips recorded.
- Once you’re done recording, click the ‘adjust clip’ icon to adjust your video clips.
- After adjusting, hit the ‘done’ button and have your combined video.
You can go ahead and share with your followers and the general public.
Use the Combining Function
The second practical way you can combine TikTok videos into a single video is by using the app’s built-in combining function. To find out how you can use this technique for your videos, follow the steps outlined below.
- Once you have the TikTok app on your device, open it and go to the menu bar. Select the ‘+’ button; it should be at the end of the screen.
- Instead of recording through the TikTok camera, choose the ‘upload’ button, and it will take you to your device storage, where you can select the videos you would like to upload on TikTok.

- Now, choose the ‘select multiple’ option at the left corner of your screen. Once you select this option, you can select different videos you would like to join together. Once you are satisfied with your choice, hit the ‘next’ button.
- TikTok will allow you to combine the videos for up to 60 seconds. You can customize the video arrangement according to your preference.
- If you’re satisfied with the final video result, click the next option, and you can share it on your TikTok account.

How to Combine Draft Videos on TikTok
Now that you know how to combine videos on TikTok, you’re probably wondering about the best way to combine the drafts you saved on your TikTok account. Maybe when you made the videos, you were unmotivated to upload them. However, now you want to combine the videos into a single video and don’t know how to proceed. So, follow the steps outlined in this article to get it done.
Step 1: Go to Your Drafts
To begin, you have to launch the TikTok app and click on the ‘me’ option at the end of the screen. Then, it will redirect you to your profile, choose the ‘drafts’ category, and take you to the videos you saved on the app and never published.
Step 2: Update Privacy Settings
Now you want to change the privacy setting in the ‘who can watch this video’ category to ‘just me.’ After updating, tap on ‘post.’ After posting your video, you can change the setting by clicking on ‘change cut.’ You can reduce the video length and add new videos to combine TikTok drafts.
Step 3: Add Filters and More Effects
You can also add music to your newly combined video and texts, stickers, filters, and many more effects to enhance your video.
Step 4: Save Draft

Once again, save the video as a draft, but you’ll have to choose a thumbnail for your video. You can choose any part of the video to become the thumbnail. Then, post your video by navigating to the home screen again and clicking the plus icon to post; select your video and post.
Use Third-Party Tools to Combine Videos for TikTok Before Uploading
There are several tools you can use to combine TikTok videos. While there is software, some are available online. Since TikTok gives limited editing functions, most TikTokers want a rich editing tool that they can use to edit and combine videos for TikTok. Below are three user-friendly software you can use to successfully edit and combine your videos.
Wondershare filmora
This is the best editing software you can find; it makes it relatively easy to combine your TikTok videos into a single video. Not only does Filmora allow you to combine videos before you upload them, but you can also use its host of editing tools to enhance your video. You can use this software for any type of video like slideshows, documentaries, photomontages, and many more. It is quite easy to use, irrespective of your editing skills, because of its user-friendly interface.
It is a strong contender in the editing world because it offers different effects, overlays, titles, transitions, etc. You can also upload your video directly to TikTok and other social media platforms. With many themes available on the platform, you can create a slideshow right on the platform. Follow the steps outlined below to combine multiple videos on Wondershare Filmora.
- First, you have to download the app on your device; you can do this from the official website. Install the app afterward, and the launch to begin.
- Next, select ‘create new project,’ It will take you to the media screen. Click the ‘add’ button and choose ‘import media file.’

- You can then navigate to the folder with the videos you want to combine and choose.
- Afterward, drag the videos to the timeline. Filmora will ask you if you want to match the project to the resolution of your media; choose to ‘match to media’
- This will make the videos into one. You can rearrange the video clips to your preference; simply click and drag the videos to reposition them.

- You can also use the effects, filters, transitions, and overlays on Filmora to enhance your TikTok video.

- Once everything looks good, click on the ‘export’ button at the top of the screen.
- You can then rename your video and choose where you would like to save the video. Filmora also allows you to adjust your video’s resolution and bitrate before clicking the ‘export’ option.

VideoProc Converter

Another third-party app you can use to edit your video and combine videos for TikTok is VideooProc Converter. It allows you to merge several videos in a lossless manner, and you can also cut, trim, rotate and resize your videos to your preference. You could also change the format and any other requirements you would like to tweak. Some beginners might find this video editor hard to navigate. However, the steps below should make the process easier for you.
- Firstly, download VideoProc Converter and launch the software.
- Import your TikTok videos and select and output format for your video; there are many options to choose from.

- You can then start editing each video clip separately. You can resize, trim and crop your videos. You can also apply effects, rotate the videos, and add subtitles.

- Next, go to the end of the screen and click the ‘toolbox’ option, select ‘merge,’ and you can choose the videos you would like to combine.

- After combining the videos, you can save the video and export it to your preferred storage device.
Adobe Spark
This is another top video-combining tool you can use for your TikTok videos. It allows you to make quick edits on your TikTok videos. Of course, you have to own a TikTok account to use this video editor. However, using it is quite simple, and the steps outlined below show just that.
- Go to the Adobe Spark website and sign-in; you can create an account if you don’t have one.

- Navigate to the ‘project’ tab on the homepage and select ‘create a project.’

- Click the ‘videos’ tab and choose a template you prefer. You would also have to give your video a title. Once you’re done, choose ‘start from scratch’ to begin.

- It would take you to the video editor; hover over an empty slide and click ‘video’ to choose the video you would like to upload.

- Adobe Spark allows you to trim the length of the video if you think it’s too long. Repeat the previous step to add another video again.

- Once you’ve added all the videos you want, you can rearrange them in the proper sequence.

- Now you can save your video; click the ‘download’ button, and Adobe Spark will automatically download the newly combined video to your device.
7 Tips and Tricks You Should Know for TikTok Videos Creation
Although most tips focus on how you can redo your video to focus on the video-sharing platform, we have some tips and tricks you should know for TikTok video creation that focuses on combining videos. If you’re always having drafts or would like to enhance your videos, these cool tips will serve as a quick method for you.
- Combine Photos and Videos
TikTok allows you to combine videos and images. This comes in handy when trying to make a point on your video. For example, you’re probably wondering how you can add a foundation picture to your video. It is quite simple if you follow the steps below.
- Launch the TikTok app and click the ‘+’ button at the end of the screen.
- Record your video and select the ‘impacts’ screen at the end of the screen after a few moments.’
- Choose ‘transfer your picture to change foundation from the options that pop up.’
- Continue recording your video, and the chosen picture will become your video foundation.
- Add Overlay to TikTok Videos
Another tip we have is how to add overlay videos on TikTok without third-party editing apps; follow the steps below.

- After chronicling your videos, you can choose to add a melodic overlay, channels, and many more enhancements like stickers and text overlays.
- Once you add this to your video, choose next, and it will take you to the next page, where you can add subtitles, hashtags, and many more before you post.
- How to Add Videos to TikTok After Posting
Apart from making videos, you can also make two-part duets on TikTok. Additionally, TikTok allows you to record with different formats; follow the steps below.
- Firstly, go to the video you would like to edit and click the three-dot icon to edit your video.
- Once you edit the video by changing the format or adding another part, save your video, and TikTok allows you to post your video again.
- Place Videos Side by Side
Another tip we have in store for you is how you can place videos side by side on TikTok; the steps below help you achieve this.

- First, click the ‘star’ button at the side of your screen and select ‘add to favorite.’
- Now, record a second video on your TikTok or simply import it if you have already recorded the video.
- Download the first video, and you can use the combining feature on TikTok to make the video run next to each other
- Once you’re satisfied, you can now proceed to post your video.
- Learn to Perform Duets on TikTok
Another thing you can do on TikTok is to duet with other TikTok users

- To do this, go to TikTok and find the video you would like to duet
- At the end of the screen, click on the ‘share’ option and choose ‘duet’ from the option available
- Tap the red icon at the middle of the screen to start recording your video; your video usually appears on the left while the other video shows up in the right corner.
- Once you’re done recording, click the checkmark icon at the top of the screen to save your recording.
- Replay the duet to ensure you like the result; you can add effects, stickers, and other editing features you want to the video before you post.
- Set a Timer for Recording Videos
One of the ways you can record multiple scenes for a video is by using the recording tool; the steps below show you how to do that.

- Once you launch TikTok and click on the camera icon
- Tap the ‘clock’ icon at the side of the screen; you can choose between 3-10 seconds
- Click the red circle to start recording
- A countdown on the screen gives you time to get ready to record. Once the countdown gets to zero, TikTok starts recording your video.
- Use the Stitch Feature
Stitched videos allow you to add the first maker’s details in the new video; these details connect TikTok users to the first video. It is quite easy to stitch one video to another. Simply navigate to the ‘privacy and settings’ tab, and you can enable or disable stitching for your TikTok videos; you can also turn this on and off for your videos. Follow the steps below to stitch your TikTok videos.

- Open the TikTok app and choose the video you would like to stitch
- Now choose the three-dot icon and select the ‘advanced’ option
- You can stitch up to five seconds from the video you would like to stick to add to the current video.
- You can add recordings to the stitched option and then stitch them together to post.
Final Thoughts
Whether you’re a stranger to the TikTok scene or a professional, TikTok is quite popular as a video-sharing platform. However, you don’t always get it right the first time, and you might want to combine various videos into one perfect option to upload. Apart from the two practical ways you can do this on TikTok, we also share three third-party apps you can use to achieve this. You can also explore the seven tips shared in this article to maximize your potential on the TikTok app.
List of Supported Whatsapp Video Format You May Want to Know
Among the different communication platforms, WhatsApp is very famous. The application lets you communicate with your loved ones living far away via messages, audio, and video calls. Unlike other platforms, WhatsApp has a lot of happy users.
With WhatsApp, you can not only communicate but also offers media file sharing. You can share your favorite meme, funny videos, and other things through WhatsApp. If you want to share a video but can’t, the WhatsApp video format is not supported. To learn about WhatsApp-supported video formats, keep reading the article.
In this article
01 Introduction About WhatsApp Supported Video Formats
02 Tips About How to Convert Video for WhatsApp
03 Tricks About How to Edit Video for WhatsApp
Part 1. Introduction About WhatsApp Supported Video Formats
Are you facing trouble with WhatsApp videos and sharing them? It might be because of the video format WhatsApp as WhatsApp supports certain video formats. You should have the video in the supported format for using videos on WhatsApp and sharing them.

WhatsApp supports a maximum file size of 16MB is approximately a video of 90 seconds to 3 minutes. Whereas if we talk about WhatsApp status, it allows 30 seconds duration for the video. WhatsApp supports and MPEG-4 codec for videos and audio, and AC3.
Moving on, the WhatsApp-supported video formats include MP4, MKV, AVI, MOV, and also 3GP. Do you want to know more about these formats? Let’s help you.
MP4
This is the most commonly used format for both video and audio files. Other than this, MP4 also stores data like subtitles, still images, etc. Interesting, it also allows streaming.
MKV
MKV is an open container, free format. The format can hold videos, pictures, audio, and also an unlimited number of subtitles. Additionally, the format is universally used to store multimedia content like your favorite TV show or movies.
AVI
Audio Video Interleave is another video format supported by WhatsApp. Do you know that the AVI format supports synchronous audio-with-video playback? The file format stores both video and audio data in a file container.
MOV
Apple developed a MOV file format that can hold a wide range of media content like your audio, video, and even text. It stores data in the same file but on different tracks. The file format is commonly used in video editing software.
3GP
3GP is Third Generation Partnership Project (3GPP), a multimedia container for multimedia services. The format works great on 3G mobile phones, but it can also be used on 2G and 4G phones. 3GP is also a video format supported by WhatsApp.
Part 2. Tips About How to Convert Video for WhatsApp
Now that you know about video formats supported by WhatsApp, shall we introduce tips to convert the file format? In case you have a video that is not supported by WhatsApp, the following section of this article will assist as we are about to introduce Wondershare UniConverter . The video converter software is GPU accelerated, and it promises to maintain the original video quality.
UniConverter offers 90x faster conversion speed. You can convert video from and to different formats and also for different devices. Moreover, with UniConverter, you can convert multiple media files at once. Do you know what else UniConverter has to offer? The software is not just a video converter; it’s much more than that; you can use its Background Remover, Subtitle Editor, Smart Trimmer, etc.
Apart from converting your videos to WhatsApp video format, with UniConverter, you can also convert them into various popular web formats like Facebook, Instagram, Vimeo, YouTube, Amazon, and also eBay. Do you know an exciting thing about UniConverter? Well, it also supports various 4K and 3D files. If you are impressed with UniConverter, let’s move on and share the steps to use the software:
Step 1: To start, launch Wondershare UniConverter on your device and make sure that you have selected the ‘Converter’ option from the left menu. After this, from the right window, import the video files that you plan to work with.

Step 2: Now, head to the bottom of the main screen and look for the ‘Output Format’ option. Open it and go to the ‘Video’ section. There, from the list of various file formats, select the supported video format for WhatsApp from the left and the right, select a resolution.

Step 3: UniConverter is famous for its speedy conversion; for this, hit on the ‘High-Speed Conversion’ from the top right corner. Next, select your desired location to save the file from the bottom by using the ‘File Location’ field. Once done, hit the ‘Convert’ button to get the video format converted.

Part 3. Tricks About How to Edit Video for WhatsApp
Do you plan to edit your WhatsApp videos? If you do, then we have a little treat for you; let us introduce Wondershare Filmora Video Editor . The software can change your editing game with its phenomenal features and amazing editing elements.
Do you want to know what features and elements we are talking about? Let’s tell you. Wondershare Filmora offers high-quality effects and transitions that can transform your video. Along with this, you get a wide variety of titles and other editing elements that could be used.
Filmora has a clean and straight interface; users can understand the software very quickly and work with it. Moreover, the video editor lets you select your preferred output format and then export the file. You get various cool features like green screen background, split-screen, join video, and a lot more.
For Win 7 or later (64-bit)
For macOS 10.12 or later
Interestingly, the software offers elements according to the latest trends and events around, like Christmas, Valentine’s, birthday, etc. Do you want to use Filmora to edit your WhatsApp video? For guidance, follow the steps shared below:
Step 1: For editing, launch Wondershare Filmora on your device and import the video file by heading to the ‘File’ tab. After that, hover on to the ‘Import Media’ option and select the ‘Import Media Files’ option.

Step 2: After locating your desired file, import it. Once successfully imported, then drag the file from the ‘Project Media’ section to the ‘Timeline’ so that you can start the editing.

Step 3: Let the fun begins! You can edit and transform your video file by adding various sound effects to it that Filmora offers you. Users can access the effects from the ‘Audio’ tab.

Step 4: Are you worried about titles? Don’t worry because Filmora offers a wide range of title templates that you can select from and customize too. Just head to the ‘Titles’ tab from the top menu bar and enjoy.

Step 5: What is editing without cool transitions and effects? Filmora comes with unique and distinct video effects and transitions that you can use by accessing the ‘Effects’ and ‘Transitions’ tabs.

Step 6: Once you are satisfied with all the editing, it’s time to export the video file. Hit on the ‘Export’ button and select WhatsApp-supported video format to save the file.

Wrapping Up
If you have been struggling with WhatsApp videos, this article is for you. We have discussed in detail WhatsApp-supported video formats. Not just this, we also talked about a video converter that could be used to convert video formats. Moreover, we shared a video editor to edit your WhatsApp videos. Are you ready for a bit of surprise?
Let’s talk about Wondershare Filmora Video Editor, the editing king to drastically change your videos and make them shine. The software is not an ordinary editor; it lets you trim, cut, join, split your video along with other editing options.
Do you know any good software for motion tracking? Wondershare Filmora offers many brilliant features like Key Framing, Silence Detection, Green Screen, Color Match, and whatnot. If you want to create exciting videos with exciting effects and features, then Filmora is a must-try.
Wondershare Filmora
Get started easily with Filmora’s powerful performance, intuitive interface, and countless effects!
Try It Free Try It Free Try It Free Learn More >

02 Tips About How to Convert Video for WhatsApp
03 Tricks About How to Edit Video for WhatsApp
Part 1. Introduction About WhatsApp Supported Video Formats
Are you facing trouble with WhatsApp videos and sharing them? It might be because of the video format WhatsApp as WhatsApp supports certain video formats. You should have the video in the supported format for using videos on WhatsApp and sharing them.

WhatsApp supports a maximum file size of 16MB is approximately a video of 90 seconds to 3 minutes. Whereas if we talk about WhatsApp status, it allows 30 seconds duration for the video. WhatsApp supports and MPEG-4 codec for videos and audio, and AC3.
Moving on, the WhatsApp-supported video formats include MP4, MKV, AVI, MOV, and also 3GP. Do you want to know more about these formats? Let’s help you.
MP4
This is the most commonly used format for both video and audio files. Other than this, MP4 also stores data like subtitles, still images, etc. Interesting, it also allows streaming.
MKV
MKV is an open container, free format. The format can hold videos, pictures, audio, and also an unlimited number of subtitles. Additionally, the format is universally used to store multimedia content like your favorite TV show or movies.
AVI
Audio Video Interleave is another video format supported by WhatsApp. Do you know that the AVI format supports synchronous audio-with-video playback? The file format stores both video and audio data in a file container.
MOV
Apple developed a MOV file format that can hold a wide range of media content like your audio, video, and even text. It stores data in the same file but on different tracks. The file format is commonly used in video editing software.
3GP
3GP is Third Generation Partnership Project (3GPP), a multimedia container for multimedia services. The format works great on 3G mobile phones, but it can also be used on 2G and 4G phones. 3GP is also a video format supported by WhatsApp.
Part 2. Tips About How to Convert Video for WhatsApp
Now that you know about video formats supported by WhatsApp, shall we introduce tips to convert the file format? In case you have a video that is not supported by WhatsApp, the following section of this article will assist as we are about to introduce Wondershare UniConverter . The video converter software is GPU accelerated, and it promises to maintain the original video quality.
UniConverter offers 90x faster conversion speed. You can convert video from and to different formats and also for different devices. Moreover, with UniConverter, you can convert multiple media files at once. Do you know what else UniConverter has to offer? The software is not just a video converter; it’s much more than that; you can use its Background Remover, Subtitle Editor, Smart Trimmer, etc.
Apart from converting your videos to WhatsApp video format, with UniConverter, you can also convert them into various popular web formats like Facebook, Instagram, Vimeo, YouTube, Amazon, and also eBay. Do you know an exciting thing about UniConverter? Well, it also supports various 4K and 3D files. If you are impressed with UniConverter, let’s move on and share the steps to use the software:
Step 1: To start, launch Wondershare UniConverter on your device and make sure that you have selected the ‘Converter’ option from the left menu. After this, from the right window, import the video files that you plan to work with.

Step 2: Now, head to the bottom of the main screen and look for the ‘Output Format’ option. Open it and go to the ‘Video’ section. There, from the list of various file formats, select the supported video format for WhatsApp from the left and the right, select a resolution.

Step 3: UniConverter is famous for its speedy conversion; for this, hit on the ‘High-Speed Conversion’ from the top right corner. Next, select your desired location to save the file from the bottom by using the ‘File Location’ field. Once done, hit the ‘Convert’ button to get the video format converted.

Part 3. Tricks About How to Edit Video for WhatsApp
Do you plan to edit your WhatsApp videos? If you do, then we have a little treat for you; let us introduce Wondershare Filmora Video Editor . The software can change your editing game with its phenomenal features and amazing editing elements.
Do you want to know what features and elements we are talking about? Let’s tell you. Wondershare Filmora offers high-quality effects and transitions that can transform your video. Along with this, you get a wide variety of titles and other editing elements that could be used.
Filmora has a clean and straight interface; users can understand the software very quickly and work with it. Moreover, the video editor lets you select your preferred output format and then export the file. You get various cool features like green screen background, split-screen, join video, and a lot more.
For Win 7 or later (64-bit)
For macOS 10.12 or later
Interestingly, the software offers elements according to the latest trends and events around, like Christmas, Valentine’s, birthday, etc. Do you want to use Filmora to edit your WhatsApp video? For guidance, follow the steps shared below:
Step 1: For editing, launch Wondershare Filmora on your device and import the video file by heading to the ‘File’ tab. After that, hover on to the ‘Import Media’ option and select the ‘Import Media Files’ option.

Step 2: After locating your desired file, import it. Once successfully imported, then drag the file from the ‘Project Media’ section to the ‘Timeline’ so that you can start the editing.

Step 3: Let the fun begins! You can edit and transform your video file by adding various sound effects to it that Filmora offers you. Users can access the effects from the ‘Audio’ tab.

Step 4: Are you worried about titles? Don’t worry because Filmora offers a wide range of title templates that you can select from and customize too. Just head to the ‘Titles’ tab from the top menu bar and enjoy.

Step 5: What is editing without cool transitions and effects? Filmora comes with unique and distinct video effects and transitions that you can use by accessing the ‘Effects’ and ‘Transitions’ tabs.

Step 6: Once you are satisfied with all the editing, it’s time to export the video file. Hit on the ‘Export’ button and select WhatsApp-supported video format to save the file.

Wrapping Up
If you have been struggling with WhatsApp videos, this article is for you. We have discussed in detail WhatsApp-supported video formats. Not just this, we also talked about a video converter that could be used to convert video formats. Moreover, we shared a video editor to edit your WhatsApp videos. Are you ready for a bit of surprise?
Let’s talk about Wondershare Filmora Video Editor, the editing king to drastically change your videos and make them shine. The software is not an ordinary editor; it lets you trim, cut, join, split your video along with other editing options.
Do you know any good software for motion tracking? Wondershare Filmora offers many brilliant features like Key Framing, Silence Detection, Green Screen, Color Match, and whatnot. If you want to create exciting videos with exciting effects and features, then Filmora is a must-try.
Wondershare Filmora
Get started easily with Filmora’s powerful performance, intuitive interface, and countless effects!
Try It Free Try It Free Try It Free Learn More >

02 Tips About How to Convert Video for WhatsApp
03 Tricks About How to Edit Video for WhatsApp
Part 1. Introduction About WhatsApp Supported Video Formats
Are you facing trouble with WhatsApp videos and sharing them? It might be because of the video format WhatsApp as WhatsApp supports certain video formats. You should have the video in the supported format for using videos on WhatsApp and sharing them.

WhatsApp supports a maximum file size of 16MB is approximately a video of 90 seconds to 3 minutes. Whereas if we talk about WhatsApp status, it allows 30 seconds duration for the video. WhatsApp supports and MPEG-4 codec for videos and audio, and AC3.
Moving on, the WhatsApp-supported video formats include MP4, MKV, AVI, MOV, and also 3GP. Do you want to know more about these formats? Let’s help you.
MP4
This is the most commonly used format for both video and audio files. Other than this, MP4 also stores data like subtitles, still images, etc. Interesting, it also allows streaming.
MKV
MKV is an open container, free format. The format can hold videos, pictures, audio, and also an unlimited number of subtitles. Additionally, the format is universally used to store multimedia content like your favorite TV show or movies.
AVI
Audio Video Interleave is another video format supported by WhatsApp. Do you know that the AVI format supports synchronous audio-with-video playback? The file format stores both video and audio data in a file container.
MOV
Apple developed a MOV file format that can hold a wide range of media content like your audio, video, and even text. It stores data in the same file but on different tracks. The file format is commonly used in video editing software.
3GP
3GP is Third Generation Partnership Project (3GPP), a multimedia container for multimedia services. The format works great on 3G mobile phones, but it can also be used on 2G and 4G phones. 3GP is also a video format supported by WhatsApp.
Part 2. Tips About How to Convert Video for WhatsApp
Now that you know about video formats supported by WhatsApp, shall we introduce tips to convert the file format? In case you have a video that is not supported by WhatsApp, the following section of this article will assist as we are about to introduce Wondershare UniConverter . The video converter software is GPU accelerated, and it promises to maintain the original video quality.
UniConverter offers 90x faster conversion speed. You can convert video from and to different formats and also for different devices. Moreover, with UniConverter, you can convert multiple media files at once. Do you know what else UniConverter has to offer? The software is not just a video converter; it’s much more than that; you can use its Background Remover, Subtitle Editor, Smart Trimmer, etc.
Apart from converting your videos to WhatsApp video format, with UniConverter, you can also convert them into various popular web formats like Facebook, Instagram, Vimeo, YouTube, Amazon, and also eBay. Do you know an exciting thing about UniConverter? Well, it also supports various 4K and 3D files. If you are impressed with UniConverter, let’s move on and share the steps to use the software:
Step 1: To start, launch Wondershare UniConverter on your device and make sure that you have selected the ‘Converter’ option from the left menu. After this, from the right window, import the video files that you plan to work with.

Step 2: Now, head to the bottom of the main screen and look for the ‘Output Format’ option. Open it and go to the ‘Video’ section. There, from the list of various file formats, select the supported video format for WhatsApp from the left and the right, select a resolution.

Step 3: UniConverter is famous for its speedy conversion; for this, hit on the ‘High-Speed Conversion’ from the top right corner. Next, select your desired location to save the file from the bottom by using the ‘File Location’ field. Once done, hit the ‘Convert’ button to get the video format converted.

Part 3. Tricks About How to Edit Video for WhatsApp
Do you plan to edit your WhatsApp videos? If you do, then we have a little treat for you; let us introduce Wondershare Filmora Video Editor . The software can change your editing game with its phenomenal features and amazing editing elements.
Do you want to know what features and elements we are talking about? Let’s tell you. Wondershare Filmora offers high-quality effects and transitions that can transform your video. Along with this, you get a wide variety of titles and other editing elements that could be used.
Filmora has a clean and straight interface; users can understand the software very quickly and work with it. Moreover, the video editor lets you select your preferred output format and then export the file. You get various cool features like green screen background, split-screen, join video, and a lot more.
For Win 7 or later (64-bit)
For macOS 10.12 or later
Interestingly, the software offers elements according to the latest trends and events around, like Christmas, Valentine’s, birthday, etc. Do you want to use Filmora to edit your WhatsApp video? For guidance, follow the steps shared below:
Step 1: For editing, launch Wondershare Filmora on your device and import the video file by heading to the ‘File’ tab. After that, hover on to the ‘Import Media’ option and select the ‘Import Media Files’ option.

Step 2: After locating your desired file, import it. Once successfully imported, then drag the file from the ‘Project Media’ section to the ‘Timeline’ so that you can start the editing.

Step 3: Let the fun begins! You can edit and transform your video file by adding various sound effects to it that Filmora offers you. Users can access the effects from the ‘Audio’ tab.

Step 4: Are you worried about titles? Don’t worry because Filmora offers a wide range of title templates that you can select from and customize too. Just head to the ‘Titles’ tab from the top menu bar and enjoy.

Step 5: What is editing without cool transitions and effects? Filmora comes with unique and distinct video effects and transitions that you can use by accessing the ‘Effects’ and ‘Transitions’ tabs.

Step 6: Once you are satisfied with all the editing, it’s time to export the video file. Hit on the ‘Export’ button and select WhatsApp-supported video format to save the file.

Wrapping Up
If you have been struggling with WhatsApp videos, this article is for you. We have discussed in detail WhatsApp-supported video formats. Not just this, we also talked about a video converter that could be used to convert video formats. Moreover, we shared a video editor to edit your WhatsApp videos. Are you ready for a bit of surprise?
Let’s talk about Wondershare Filmora Video Editor, the editing king to drastically change your videos and make them shine. The software is not an ordinary editor; it lets you trim, cut, join, split your video along with other editing options.
Do you know any good software for motion tracking? Wondershare Filmora offers many brilliant features like Key Framing, Silence Detection, Green Screen, Color Match, and whatnot. If you want to create exciting videos with exciting effects and features, then Filmora is a must-try.
Wondershare Filmora
Get started easily with Filmora’s powerful performance, intuitive interface, and countless effects!
Try It Free Try It Free Try It Free Learn More >

02 Tips About How to Convert Video for WhatsApp
03 Tricks About How to Edit Video for WhatsApp
Part 1. Introduction About WhatsApp Supported Video Formats
Are you facing trouble with WhatsApp videos and sharing them? It might be because of the video format WhatsApp as WhatsApp supports certain video formats. You should have the video in the supported format for using videos on WhatsApp and sharing them.

WhatsApp supports a maximum file size of 16MB is approximately a video of 90 seconds to 3 minutes. Whereas if we talk about WhatsApp status, it allows 30 seconds duration for the video. WhatsApp supports and MPEG-4 codec for videos and audio, and AC3.
Moving on, the WhatsApp-supported video formats include MP4, MKV, AVI, MOV, and also 3GP. Do you want to know more about these formats? Let’s help you.
MP4
This is the most commonly used format for both video and audio files. Other than this, MP4 also stores data like subtitles, still images, etc. Interesting, it also allows streaming.
MKV
MKV is an open container, free format. The format can hold videos, pictures, audio, and also an unlimited number of subtitles. Additionally, the format is universally used to store multimedia content like your favorite TV show or movies.
AVI
Audio Video Interleave is another video format supported by WhatsApp. Do you know that the AVI format supports synchronous audio-with-video playback? The file format stores both video and audio data in a file container.
MOV
Apple developed a MOV file format that can hold a wide range of media content like your audio, video, and even text. It stores data in the same file but on different tracks. The file format is commonly used in video editing software.
3GP
3GP is Third Generation Partnership Project (3GPP), a multimedia container for multimedia services. The format works great on 3G mobile phones, but it can also be used on 2G and 4G phones. 3GP is also a video format supported by WhatsApp.
Part 2. Tips About How to Convert Video for WhatsApp
Now that you know about video formats supported by WhatsApp, shall we introduce tips to convert the file format? In case you have a video that is not supported by WhatsApp, the following section of this article will assist as we are about to introduce Wondershare UniConverter . The video converter software is GPU accelerated, and it promises to maintain the original video quality.
UniConverter offers 90x faster conversion speed. You can convert video from and to different formats and also for different devices. Moreover, with UniConverter, you can convert multiple media files at once. Do you know what else UniConverter has to offer? The software is not just a video converter; it’s much more than that; you can use its Background Remover, Subtitle Editor, Smart Trimmer, etc.
Apart from converting your videos to WhatsApp video format, with UniConverter, you can also convert them into various popular web formats like Facebook, Instagram, Vimeo, YouTube, Amazon, and also eBay. Do you know an exciting thing about UniConverter? Well, it also supports various 4K and 3D files. If you are impressed with UniConverter, let’s move on and share the steps to use the software:
Step 1: To start, launch Wondershare UniConverter on your device and make sure that you have selected the ‘Converter’ option from the left menu. After this, from the right window, import the video files that you plan to work with.

Step 2: Now, head to the bottom of the main screen and look for the ‘Output Format’ option. Open it and go to the ‘Video’ section. There, from the list of various file formats, select the supported video format for WhatsApp from the left and the right, select a resolution.

Step 3: UniConverter is famous for its speedy conversion; for this, hit on the ‘High-Speed Conversion’ from the top right corner. Next, select your desired location to save the file from the bottom by using the ‘File Location’ field. Once done, hit the ‘Convert’ button to get the video format converted.

Part 3. Tricks About How to Edit Video for WhatsApp
Do you plan to edit your WhatsApp videos? If you do, then we have a little treat for you; let us introduce Wondershare Filmora Video Editor . The software can change your editing game with its phenomenal features and amazing editing elements.
Do you want to know what features and elements we are talking about? Let’s tell you. Wondershare Filmora offers high-quality effects and transitions that can transform your video. Along with this, you get a wide variety of titles and other editing elements that could be used.
Filmora has a clean and straight interface; users can understand the software very quickly and work with it. Moreover, the video editor lets you select your preferred output format and then export the file. You get various cool features like green screen background, split-screen, join video, and a lot more.
For Win 7 or later (64-bit)
For macOS 10.12 or later
Interestingly, the software offers elements according to the latest trends and events around, like Christmas, Valentine’s, birthday, etc. Do you want to use Filmora to edit your WhatsApp video? For guidance, follow the steps shared below:
Step 1: For editing, launch Wondershare Filmora on your device and import the video file by heading to the ‘File’ tab. After that, hover on to the ‘Import Media’ option and select the ‘Import Media Files’ option.

Step 2: After locating your desired file, import it. Once successfully imported, then drag the file from the ‘Project Media’ section to the ‘Timeline’ so that you can start the editing.

Step 3: Let the fun begins! You can edit and transform your video file by adding various sound effects to it that Filmora offers you. Users can access the effects from the ‘Audio’ tab.

Step 4: Are you worried about titles? Don’t worry because Filmora offers a wide range of title templates that you can select from and customize too. Just head to the ‘Titles’ tab from the top menu bar and enjoy.

Step 5: What is editing without cool transitions and effects? Filmora comes with unique and distinct video effects and transitions that you can use by accessing the ‘Effects’ and ‘Transitions’ tabs.

Step 6: Once you are satisfied with all the editing, it’s time to export the video file. Hit on the ‘Export’ button and select WhatsApp-supported video format to save the file.

Wrapping Up
If you have been struggling with WhatsApp videos, this article is for you. We have discussed in detail WhatsApp-supported video formats. Not just this, we also talked about a video converter that could be used to convert video formats. Moreover, we shared a video editor to edit your WhatsApp videos. Are you ready for a bit of surprise?
Let’s talk about Wondershare Filmora Video Editor, the editing king to drastically change your videos and make them shine. The software is not an ordinary editor; it lets you trim, cut, join, split your video along with other editing options.
Do you know any good software for motion tracking? Wondershare Filmora offers many brilliant features like Key Framing, Silence Detection, Green Screen, Color Match, and whatnot. If you want to create exciting videos with exciting effects and features, then Filmora is a must-try.
Wondershare Filmora
Get started easily with Filmora’s powerful performance, intuitive interface, and countless effects!
Try It Free Try It Free Try It Free Learn More >

Are You Excited to Find Out the Top-Class VHS Video Effects Maker? Put Your Worries at Rest because This Article Will Provide the Best VHS Effect Makers
VHS effects are the trendiest and most highly usable effects for videos through which you can add retro qualities in simple videos. You must have noticed the classical yet smooth distortion in the famous music videos. This smoother distortion that gives a retro vibe in the video is possible with the VHS effects. You don’t have to spend millions on this as many VHS effect online tools are at your disposal.
This discussion aims to familiarize you with the most known and reliable VHS filter online tools. You will also discover much-needed and significant knowledge of VHS effects. The offline tool through which you can add VHS effects in videos like never before will also be discussed here.
Part 1: What Do You Know About VHS Effects?
The VHS effects are the visual and auditory artifacts, along with smoother playback video distortion. The term VHS indicates the technology “Video Home System tapes.” From the 1980s-1990s, these effects were well-known and readily used in digital content. Moreover, in recent years, the vintage appeal of the videos has been achieved with these VHS effects. You can learn more about this from the provided information:
- Lines of VHS: The lines in VHS are tracking lines, and it is used to implement distortion effects in the videos. You can notice that these lines often run vertically in the video effects.
- Vintage Frames: You may have seen the darkening and faded effects on the edges in the VHS-integrated videos. The playback equipment limitation initially caused it; however, many videographers apply these effects in videos to give them a vintage look.
- Glitching Effects: VHS effects are not completed without comprehension of glitching effects. This includes rolling bars and sudden statics. This also gives the look of tape damage and signal interface and is perfect for flashbacks.
- Nostalgic Provocation: With this effect, you can add nostalgic feelings. If you are going to make movies regarding history, it can also help you by adding retro effects. It also replicates imperfections to give a unique look to videos.
Add VHS Effect to Video
Simply add video effects on Video with Filmora Video Effect Editor ! Experience the magic of cool yet outstanding video effects, where your videos come to life in beautiful visuals.
Apply VHS Effect Apply VHS Effect Learn More >

Part 2: Top VHS Video Effect Online Tools to Use in 2024
A substantial inventory of tools can confuse you and make it harder to select the best tool. We wish to bring peace and harmony to your videography career and wish you to get familiar with the VHS effect online video tools without getting confused. You can find the industry-grade tool for making videos visually appealing here:
| 1. Veed.io | 2. Kapwing |
|---|---|
| 3. Clideo | 4. FlexClip |
| 5. Fastreel | 6. CreatorKit |
1. Veed.io
Veed.io lets you transform simple-looking videos into a masterpiece of aesthetics and retros with its VHS overlays. With this online VHS effect tool, you can also add perfect flashbacks along with VHS to engage users. Creating the loops of videos and adding VHS overlays is also possible with this. It also helps to add customized subtitles to the videos to make it more understandable.
Some Prominent Characteristics of Veed.io
- It is an all-in-one video editor through which you can add modern modifications to create stunning and powerful videos. This tool can help in creating marketing, training, TikTok, and demos.
- You can also optimize the videos by trimming, cropping, rotating, and splitting them. Other than this, you can add customized audio in simple videos.
- Removing unnecessary background noises and awkward pauses is also possible with Veed.io. You can also upgrade your productivity by using its pre-built templates.

2. Kapwing
To add VHS effects to video online for free, you can get assistance from this premium grade tool - Kapwing . It also supports timeline-based nondestructive editing, which gives you a free hand in customization. Other than this, you can also create the layers in the videos and add VHS effects where needed. If you have some unique idea in mind, don’t hesitate to choose a blank canvas.
Some Prominent Characteristics of Kapwing
- Kapwing lets you import videos from different sources. You can use Google Drive, Google Photos, or your device’s gallery to add a video.
- Using its preset templates, you can create high-quality videos without investing extra time. It also supports diversified plugins to boost your productivity.
- There are versatile shapes, emojis, and elements in it that you can use as per your need. This also lets you add customized text and subtitles to videos.

3. Clideo
This fast and secure VHS effect online video tool helps you add realistic VHS effects to videos. You can not only add the effects but can also change the format of videos without any issues. Other than this, you also apply several intuitive filters to make videos more studio friendly. Clideo can edit diversified metrics of the videos and work as a reputable video editor.
Some Prominent Characteristics of Clideo
- With this tool, you can add text to a video, change its fonts and colors, or make a picture in a picture split screen.
- It also assists you in merging lengthy videos into smaller ones. You can also compress the large-sized videos to make them more shareable.
- Creating memes, managing the speed of videos, resizing their dimensions, or cropping unrequired parts is also possible with this.

4. FlexClip
Distorted video quality is much adored in today’s world, and you can also add these effects to your videos. You can deploy this effect to represent something in the past, and it can boost your engagement in the entertainment industry. If you are worried that the quality of the video will be compromised with FlexClip , you can use its duplicating feature so the original video is preserved.
Some Prominent Characteristics of FlexClip
- It supports the text-to-speech feature through which you can not only add voiceover but can also customize the voice style.
- If you want to make videos more engaging, you can use the previously existing soundtracks of FlexClip. You can also search for the required soundtrack through specific genres.
- There are versatile effects, logos, shapes, cooperative, decorative, and title overlays, so you can make videos more illustrative.

5. Fastreel
This online-based platform can escalate your user experience by adding VHS effects to the videos. You can add high-quality VHS effects in videos and create perfect slideshows. Not only personally, but you can also use the capabilities of this tool to expand your professional life. Fastreel also lets you merge multiple videos and then apply the VHS effects.
Some Prominent Characteristics of Fastreel
- This tool works like an all-in-one video editor, as you can reverse, crop, resize, flip, and loop videos.
- If you are a slow-motion video lover, you can also make slow and stop-motion videos with built-in features.
- Fastreel can also convert images into videos or make video collages for you. Other than this, you are also free to add music to videos.

6. CreatorKit
Along with hundreds of promotional templates for high-quality VHS effects, this VHS filter online tool never fails to amaze users with its higher functionality. CreatorKit can create engaging product videos with intuitive text styles. You can use its background removal if you want to create transparent-grade videos.
Some Prominent Characteristics of CreatorKit
- To create optimized videos, you can use its Shopify integrations to access more elements and other things.
- It can add animated price tags along with showcasing product features. You can also create intros and outros with this.
- There are several colors generated and gradient-generating bases that can assist you in showcasing the brand colors without any issues.

Part 3: Software Alternative: Insert Best VHS Effects Using Wondershare Filmora
It will not be inappropriate to say that Wondershare Filmora is the top-ranked video editor in the market. With Filmora, you can add several types of VHS effects in videos, such as horror filters, distortion bad, static, lines, vintage, and more. You can also search for customized effects by adding keywords and their subscription status.
Add VHS Video Effect For Win 7 or later(64-bit)
Add VHS Video Effect For macOS 10.14 or later
Wondershare Filmora is also a better option than other VHS effect online tools because you can also access versatile stock media files in it. There are tons of pre-built templates in Filmora, and you can also access all your previous projects from Filmora Cloud. Adding high-quality audio to videos is also possible with this tool.
Instructions to Add VHS Effects in Videos with Filmora
The instructions through which you can add the VHS effects in videos with any complications are given here:
Step 1Launch Filmora and Add a Video
To get started, install and launch Wondershare Filmora on your device. Make sure you use the updated version of Filmora. Next, click the “New Project” button and select “Click here to import media.” Next, add the video of your choice on which you wish to apply the VHS effect.

Step 2Add Video to Timeline and Apply Effect
Following this, drag the video to the “Timeline,” click on “Effects” from the above panel and go to “Search Bar.” From there, search for “VHS Effects” and select the effect from the available options. After selecting it, drag it on the video present in the timeline.

Step 3Download the VHS Effect Integrated Video
To continue, you can also modify it to a further extent by clicking on the added effect. There are several features that can help you with modification, such as Transitions, Stickers, and more. Afterward, click the “Export” button, customize the “Name,” “Save To,” “Format,” Quality,” and other metrics of videos. Finally, hit the “Export” button and save the video on your device.

Conclusion
To summarize, it can be said that you can use the VHS effect online video tools to create cinematic-level videos. VHS effects are smooth distortion effects that are used in several videos. You can learn more about this from the above information. Besides this, several online tools such as Veed.io, Clideo, FlexClip, and more can help you add VHS effects to videos.
To learn more about these tools, look at the information provided above. In case you wish to add the VHS effects to videos without facing any complications, don’t refrain from using the top-class tool named Wondershare Filmora. The steps to accomplish this task in a flawless manner are also discussed above for you.
Apply VHS Effect Apply VHS Effect Learn More >

Part 2: Top VHS Video Effect Online Tools to Use in 2024
A substantial inventory of tools can confuse you and make it harder to select the best tool. We wish to bring peace and harmony to your videography career and wish you to get familiar with the VHS effect online video tools without getting confused. You can find the industry-grade tool for making videos visually appealing here:
| 1. Veed.io | 2. Kapwing |
|---|---|
| 3. Clideo | 4. FlexClip |
| 5. Fastreel | 6. CreatorKit |
1. Veed.io
Veed.io lets you transform simple-looking videos into a masterpiece of aesthetics and retros with its VHS overlays. With this online VHS effect tool, you can also add perfect flashbacks along with VHS to engage users. Creating the loops of videos and adding VHS overlays is also possible with this. It also helps to add customized subtitles to the videos to make it more understandable.
Some Prominent Characteristics of Veed.io
- It is an all-in-one video editor through which you can add modern modifications to create stunning and powerful videos. This tool can help in creating marketing, training, TikTok, and demos.
- You can also optimize the videos by trimming, cropping, rotating, and splitting them. Other than this, you can add customized audio in simple videos.
- Removing unnecessary background noises and awkward pauses is also possible with Veed.io. You can also upgrade your productivity by using its pre-built templates.

2. Kapwing
To add VHS effects to video online for free, you can get assistance from this premium grade tool - Kapwing . It also supports timeline-based nondestructive editing, which gives you a free hand in customization. Other than this, you can also create the layers in the videos and add VHS effects where needed. If you have some unique idea in mind, don’t hesitate to choose a blank canvas.
Some Prominent Characteristics of Kapwing
- Kapwing lets you import videos from different sources. You can use Google Drive, Google Photos, or your device’s gallery to add a video.
- Using its preset templates, you can create high-quality videos without investing extra time. It also supports diversified plugins to boost your productivity.
- There are versatile shapes, emojis, and elements in it that you can use as per your need. This also lets you add customized text and subtitles to videos.

3. Clideo
This fast and secure VHS effect online video tool helps you add realistic VHS effects to videos. You can not only add the effects but can also change the format of videos without any issues. Other than this, you also apply several intuitive filters to make videos more studio friendly. Clideo can edit diversified metrics of the videos and work as a reputable video editor.
Some Prominent Characteristics of Clideo
- With this tool, you can add text to a video, change its fonts and colors, or make a picture in a picture split screen.
- It also assists you in merging lengthy videos into smaller ones. You can also compress the large-sized videos to make them more shareable.
- Creating memes, managing the speed of videos, resizing their dimensions, or cropping unrequired parts is also possible with this.

4. FlexClip
Distorted video quality is much adored in today’s world, and you can also add these effects to your videos. You can deploy this effect to represent something in the past, and it can boost your engagement in the entertainment industry. If you are worried that the quality of the video will be compromised with FlexClip , you can use its duplicating feature so the original video is preserved.
Some Prominent Characteristics of FlexClip
- It supports the text-to-speech feature through which you can not only add voiceover but can also customize the voice style.
- If you want to make videos more engaging, you can use the previously existing soundtracks of FlexClip. You can also search for the required soundtrack through specific genres.
- There are versatile effects, logos, shapes, cooperative, decorative, and title overlays, so you can make videos more illustrative.

5. Fastreel
This online-based platform can escalate your user experience by adding VHS effects to the videos. You can add high-quality VHS effects in videos and create perfect slideshows. Not only personally, but you can also use the capabilities of this tool to expand your professional life. Fastreel also lets you merge multiple videos and then apply the VHS effects.
Some Prominent Characteristics of Fastreel
- This tool works like an all-in-one video editor, as you can reverse, crop, resize, flip, and loop videos.
- If you are a slow-motion video lover, you can also make slow and stop-motion videos with built-in features.
- Fastreel can also convert images into videos or make video collages for you. Other than this, you are also free to add music to videos.

6. CreatorKit
Along with hundreds of promotional templates for high-quality VHS effects, this VHS filter online tool never fails to amaze users with its higher functionality. CreatorKit can create engaging product videos with intuitive text styles. You can use its background removal if you want to create transparent-grade videos.
Some Prominent Characteristics of CreatorKit
- To create optimized videos, you can use its Shopify integrations to access more elements and other things.
- It can add animated price tags along with showcasing product features. You can also create intros and outros with this.
- There are several colors generated and gradient-generating bases that can assist you in showcasing the brand colors without any issues.

Part 3: Software Alternative: Insert Best VHS Effects Using Wondershare Filmora
It will not be inappropriate to say that Wondershare Filmora is the top-ranked video editor in the market. With Filmora, you can add several types of VHS effects in videos, such as horror filters, distortion bad, static, lines, vintage, and more. You can also search for customized effects by adding keywords and their subscription status.
Add VHS Video Effect For Win 7 or later(64-bit)
Add VHS Video Effect For macOS 10.14 or later
Wondershare Filmora is also a better option than other VHS effect online tools because you can also access versatile stock media files in it. There are tons of pre-built templates in Filmora, and you can also access all your previous projects from Filmora Cloud. Adding high-quality audio to videos is also possible with this tool.
Instructions to Add VHS Effects in Videos with Filmora
The instructions through which you can add the VHS effects in videos with any complications are given here:
Step 1Launch Filmora and Add a Video
To get started, install and launch Wondershare Filmora on your device. Make sure you use the updated version of Filmora. Next, click the “New Project” button and select “Click here to import media.” Next, add the video of your choice on which you wish to apply the VHS effect.

Step 2Add Video to Timeline and Apply Effect
Following this, drag the video to the “Timeline,” click on “Effects” from the above panel and go to “Search Bar.” From there, search for “VHS Effects” and select the effect from the available options. After selecting it, drag it on the video present in the timeline.

Step 3Download the VHS Effect Integrated Video
To continue, you can also modify it to a further extent by clicking on the added effect. There are several features that can help you with modification, such as Transitions, Stickers, and more. Afterward, click the “Export” button, customize the “Name,” “Save To,” “Format,” Quality,” and other metrics of videos. Finally, hit the “Export” button and save the video on your device.

Conclusion
To summarize, it can be said that you can use the VHS effect online video tools to create cinematic-level videos. VHS effects are smooth distortion effects that are used in several videos. You can learn more about this from the above information. Besides this, several online tools such as Veed.io, Clideo, FlexClip, and more can help you add VHS effects to videos.
To learn more about these tools, look at the information provided above. In case you wish to add the VHS effects to videos without facing any complications, don’t refrain from using the top-class tool named Wondershare Filmora. The steps to accomplish this task in a flawless manner are also discussed above for you.
Also read:
- New 2024 Approved Best Frame Rate for 4K Video
- In 2024, Dubbing Videos With Voiceovers | Wondershare Filmora Tutorial
- Updated In 2024, VSDC Free Video Editor Review
- Updated How To Slow Down GIF Building an Understanding for 2024
- 2024 Approved How to Make a YouTube Intro by Filmora
- Do You Want to Know Which Are the Best Wondershare Filmora LUTs to Use? There Are Many LUTs that You Can Download, Each with a Different Tone and Style
- New 2024 Approved Step by Step to Crop Videos Using Lightworks
- In 2024, 4 Ways to Rotate Videos on Windows PC
- In 2024, Detailed Tutorial to Crop a Video Using Openshot?
- 2024 Approved Do You Want to Know About the DaVinci Resolve Adjustment Layer? Read This Article to Learn How to Use an Adjustment Layer (Clip) in DaVinci Resolve to Edit Videos
- 2024 Approved To Get Cinematographs of a Music Video, You Need to Understand the Basics of Camera Movement. As Well Framing and Lighting of the Setup Are Illustrated in This Article
- New 5 Tried-And-True Ways to GIF Making for 2024
- Updated In 2024, How to Add Freeze Frame to Your Video From Any Device?
- 2024 Approved Want to Make a Funny Vlog on TikTok? Trying to Find the Right Topic for It? This Article Presents some Impressive Options for Making a Funny Vlog for TikTok
- 2024 Approved Ever Wondered About the Similarity You Bear with an Anime Character? If You Have Not yet Looked Into This Exciting Aspect of Motion Graphic Design, You Can Very Well Break the Ice Here
- Updated Create Kinetice Typography Text Effect in Filmora for 2024
- New In 2024, How to Create Video Contents That Convert Sales
- What Is MKV Format and How To Play MKV Video for 2024
- Updated In 2024, How to Loop a Video on Vimeo?
- Want to Play a Video in the Loop on Your Mac? Here Is How You Can Make a Video Loop in QuickTime in Simple Steps
- New Easy Ways to Edit Recorded Video for 2024
- Learn to Merge Clips in DaVinci Resolve Simple Steps
- Motion Blur Photo With GIMP Step-By-Step Guide
- How to Remove Background Noise From Video Sony Vegas for 2024
- New 2024 Approved A Guide to Color Grade Your Picture in LightRoom
- Confused About Which GoPro Should You Use? This Article Introduces and Provides a Detailed Overview of the Best GoPro for YouTubers You Can Find in the Market for Vlogging
- Updated Brightening a Video Doesnt Need to Be Complicated. This Article Will Discuss How to Brighten up Your Videos Easily Using Premiere Pro
- In 2024, How to Livestream Zoom on Facebook?
- Updated 2024 Approved 4 Methods to Merge MP4 and MP3
- In 2024, Want to Add the Amazing Video Text Effects that You Generally See on Video Streaming Platforms? Use Filmora to Add Popular Video Text Effects Instantly
- Updated | How to Livestream Zoom on Facebook, In 2024
- In 2024, Splitting a Video Into Frames with the FFmpeg Step by Step
- Updated Here Is a Complete Overview of VSCO Video Editor; the Best Photo-Editing App that Helps You Adjust Your Pictures Right After You Capture Them
- New Mastering Video Speed Control Slow Down, Speed Up, and Edit with Ease
- In 2024, The Ultimate Wedding Videography Checklist
- You Can Make Stylish Chroma Key Text Effects After Reading This Article. Wondershare Filmora Will Fill the Crazy Colors in Your Handwritten Note or Words
- Premiere Pro Slow Playback Issues Finding The Best Solutions
- Updated In 2024, 100+ Best TikTok Captions Enhance Your Content
- How to Make Cool COD Warzone Thumbnail
- How to Make Vintage Film Effect 1950S
- New 2024 Approved Record Slow Motion Videos With Phantom Slow-Mo Camera
- New In 2024, Detailed Steps to Rotate Videos in Lightworks
- Updated 2024 Approved How to Brighten Video in Premiere Pro
- Three Solutions to Hard Reset Honor X50i+? | Dr.fone
- In 2024, Proven Ways in How To Hide Location on Life360 For Apple iPhone SE (2022) | Dr.fone
- The Complete Guide to Huawei Nova Y91 FRP Bypass Everything You Need to Know
- In 2024, How to Remove iPhone 8 Plus Device from iCloud
- Possible solutions to restore deleted call logs from Oppo Reno 10 5G
- In 2024, How to Fake Snapchat Location without Jailbreak On Apple iPhone X | Dr.fone
- Planning to Use a Pokemon Go Joystick on Realme 11 Pro+? | Dr.fone
- In 2024, How to use iSpoofer on Itel P55? | Dr.fone
- How can I get more stardust in pokemon go On Motorola Moto G84 5G? | Dr.fone
- In 2024, Complete Fixes To Solve iPhone 14 Pro Randomly Asking for Apple ID Password | Dr.fone
- Top 10 AirPlay Apps in Oppo A38 for Streaming | Dr.fone
- Tecno Pova 6 Pro 5G ADB Format Tool for PC vs. Other Unlocking Tools Which One is the Best?
- In 2024, How To Unlink Your Apple iPhone X From Your Apple ID
- Most Asked Questions about Pokemon Go Battle League Rewards On Apple iPhone 11 Pro | Dr.fone
- In 2024, Is GSM Flasher ADB Legit? Full Review To Bypass Your Honor 90 Lite Phone FRP Lock
- 2 Ways to Monitor Lenovo ThinkPhone Activity | Dr.fone
- Title: Kdenlive Video Editor Review
- Author: Chloe
- Created at : 2024-05-20 03:37:30
- Updated at : 2024-05-21 03:37:30
- Link: https://ai-editing-video.techidaily.com/kdenlive-video-editor-review/
- License: This work is licensed under CC BY-NC-SA 4.0.


