:max_bytes(150000):strip_icc():format(webp)/X-Logo-on-Phone-35c83db6a3c34b689ab069ff50b96bcc.jpg)
Knowing All Ways To Slow Down Video With Adobe Premiere Pro for 2024

Knowing All Ways To Slow Down Video With Adobe Premiere Pro
Play with time and craft an epic action sequence in videos. Speed ramping is a technique that video editors use for this purpose. You might be thinking that it’s a simple slow-motion effect, but it’s slightly different. In reality, speed ramping is the process of ensuring a smoother transition in speed of scenes. Countless movies and sports videos use slow and fast motion for several reasons.
Premiere Pro Slow Motion allows creative expression in videos. To do so, editors rely on Adobe Premiere Pro software for well-crafted videos. Careful editing is required to maintain continuity and cohesiveness in clips through motion Adobe. This article will guide you on how to use slow motion on Adobe Premiere. Explore this feature and all the necessary details for a polished video outlook.
Slow Motion Video Maker Slow your video’s speed with better control of your keyframes to create unique cinematic effects!
Make A Slow Motion Video Make A Slow Motion Video More Features

Part 1: Explaining the Slow-Motion Feature of Adobe Premiere Pro
Adobe Premiere Pro is a video editing software part of Adobe Creative Suite. Professional editors and beginners both use this tool to make their content creative. Whether you are reworking a previous art piece or a new project, it can alter colors for good. You can insert background music, animations, and other forms of multimedia using Adobe.
Among its limitless features is a speed-ramping or slow-motion function. To unlock Adobe Premiere slow-motion in detail, you can head into the below details:
- Using this option, you can adjust the speed of the video as required. For instance, if you set it to 50%, your video will play at half speed compared to the original clips.
- Apart from the speed, users can adjust the duration of slow motion. This adjustment delivers a stylized and customized look to your clips.
- Make the slow-motion transition smoother with the optical flow feature. It can intelligently generate new frames to make your clips look like shots at a higher frame rate.
- Not all clips are worth slowing down, so there are many frame rates to do this. You can set the frame rate from 30fps, 120fps, 240fps, and 960fps.
Part 2: Understanding the Operations of Performing Slow Motion on Adobe Premiere Pro
If you want to perform speed ramping in videos, first access Adobe Premiere Pro. Many users find video editing difficult in Adobe. For their ease, this section will explain the slow-mo Adobe Premiere in simple steps:
Step 1
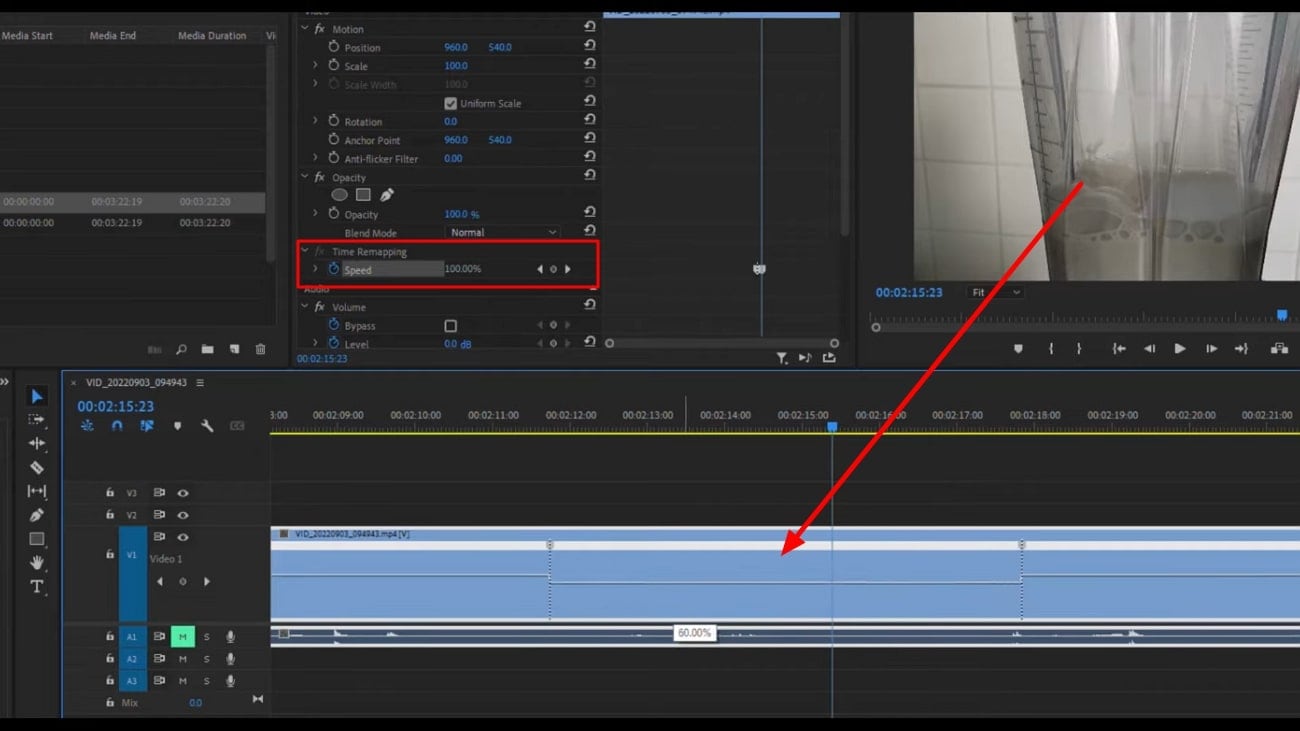
After getting into the Adobe Premiere Pro, enter to its editing screen. Import your video clip and move towards its timeline section. There, right-click on the FX icon and choose “Time Remapping” to go to “Speed.” Now, you can see the white speed ramping line.

Step 2
Add the keyframe by clicking the left-side circle icon next to the speed ramping line. Zoom in the section and add another keyframe.

Step 3
Click on the middle of the keyframe and pull it down slowly. To add a slow ramp instead of an abrupt change in speed, hit on the start and drag towards the right. Repeat the same to the other end of the keyframe. You can see a slow shift in speed. Later, you can adjust the speed and the ramp.
Part 3: What Are Some Potential Disadvantages of Using Adobe Premiere Pro for Performing Such Operations?
Many people might initially find the above steps intense and difficult to understand. Slow motion in Premiere Pro is useful in speed ramping, but you can face some issues using it. As everything has some bad side, this operation also does. You should read forward and know such disadvantages to avoid any inconvenience:
- Playback Lagging: Adobe causes lagging and major issues in playback. If you don’t use optical flow and render frames freeze, you cannot make any speed ramps.
- System Compatibility Issues: Speed ramping requires a system with a good GPU. Otherwise, problems might occur when it doesn’t interact well with the computer’s GPU.
- Complex Processing: This feature will interrupt your workflow if you are not a professional editor. As you will have to watch several tutorial videos to use just one feature.
- Frame Rate Adjustment Problems: Premiere Pro can show bugs if you use a high frame rate. It will start troubling when you use 120fps slow motion in clips.
Generally, it also requires strong computer specs and uses RAM of at least 8GB. The majority of editors look for an alternative due to its high learning curve and system requirements.
Part 5: Wondershare Filmora: Comprehending the Best Ways to Slow Down Videos
In search of a substitute, there could be many options on the internet. If someone is looking for easy-to-use software, they should use Wondershare Filmora . This video editor is the real game changer in adjusting speed ramping without laggings. Surprisingly, it does not require system requirements, and you can quickly launch it.
Filmora uses AI for a smooth optical flow compared with Adobe Premiere slow motion. It also ensures high quality and optimization of videos. With new AI features, you don’t need any help from experts, as AI can do it for you.
Free Download For Win 7 or later(64-bit)
Free Download For macOS 10.14 or later
Step-by-Step Guide to Slow Down Video Using Filmora
If you want more creative slow-motion videos, then keep reading. Here, you will find the easiest way to slow down videos in Filmora:
Step 1Install Filmora and Import Your Project in the Timeline
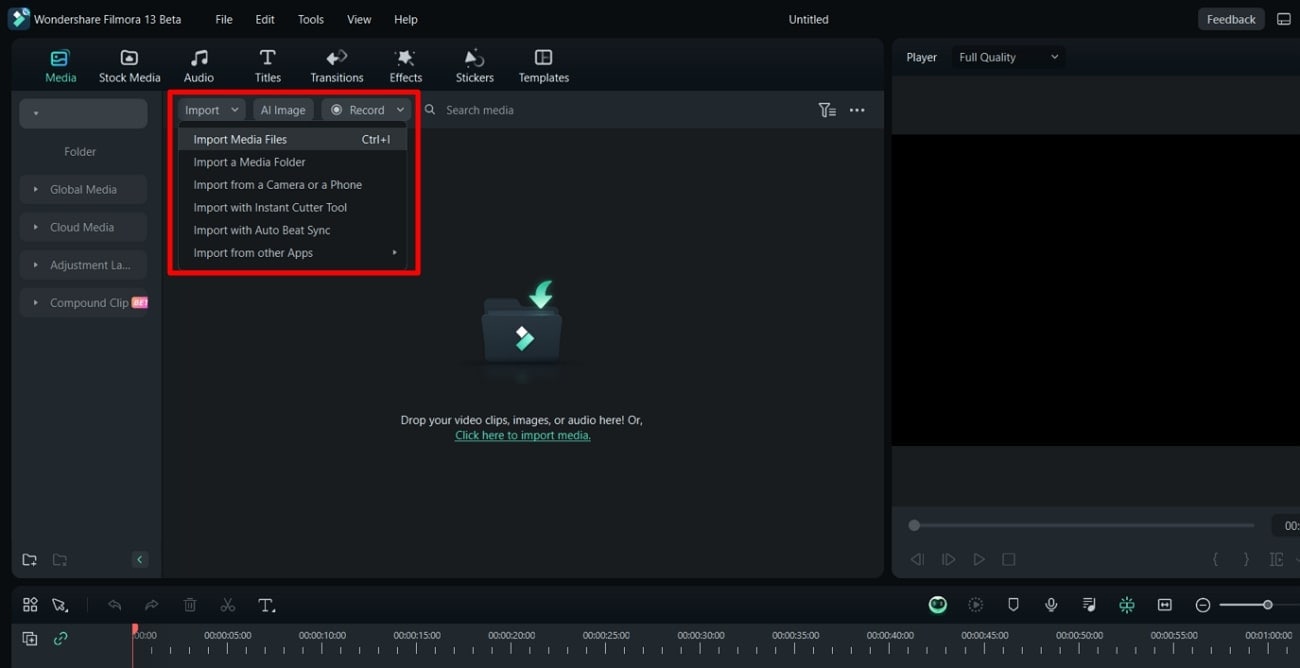
Launch the Filmora 13 in your system within simple steps. Access its main interface and hit the “New Project” button. Enter the editing window and import your project. Press the “Ctrl + I” keys from your keyboard to import the video. Browse the video and click “Open” to bring the video to Filmora. Then, drag and drop the video in the timeline section.
Step 2Explore Speed Ramping to Make Videos Super Slow
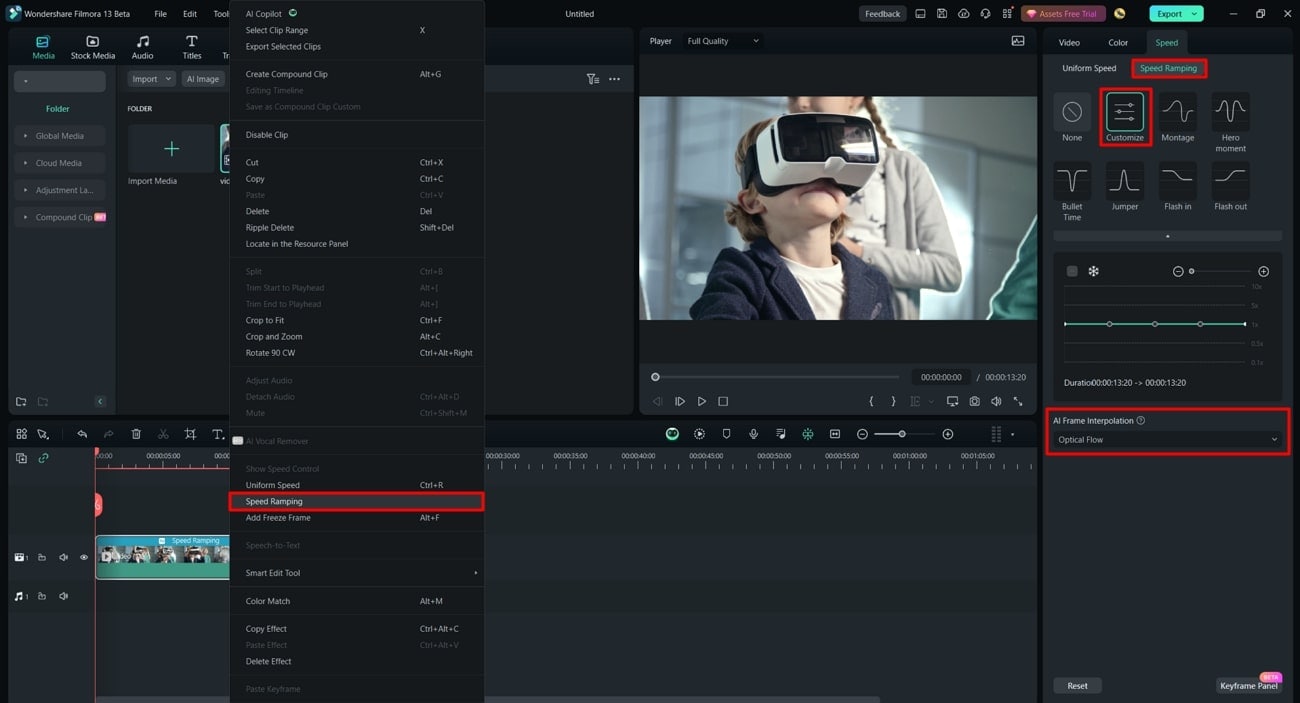
Place your cursor on the video and right-click on it. From the list, choose “Speed Ramping” and navigate toward the right-side panel. There, tap on “Customize” to open the further settings. Look for the “AI Frame Interpolation” and expand it to choose the “Optical Flow” option. You can adjust the speed manually from the graphical section on the right.
Step 3Get Render Review and Look for Export Button
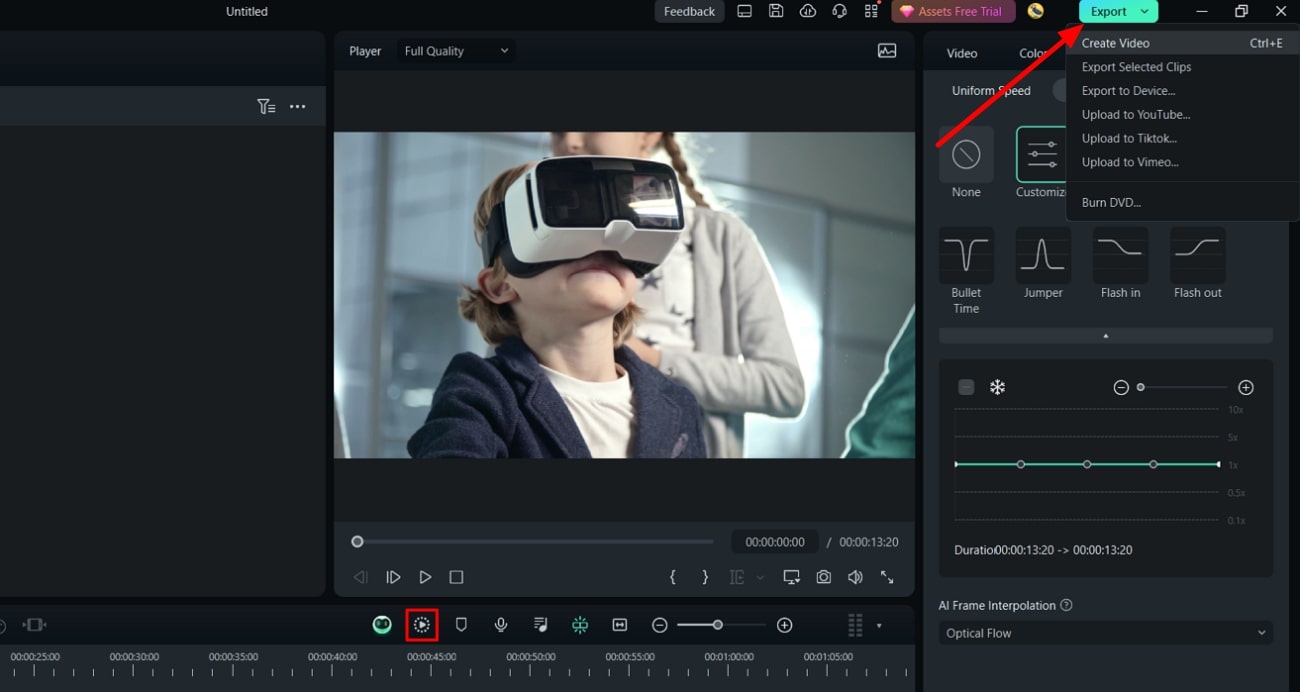
Go to the timeline section toolbar for a smoother playback. Explore the “Render Preview” icon next to a green robotic icon. Finally, you can click the “Export” button at the top right corner to shift the video to your computer.
Conclusion
To conclude, speed ramping is a unique way to slow down video scenes. In this regard, professional video editors prefer Adobe Premiere Pro Slow Motion. On the contrary, this software is not a good choice for beginners and non-tech persons. That’s where Wondershare Filmora can make the process easier for all users. The plus point is it ensures quality with dedicated customization.
Make A Slow Motion Video Make A Slow Motion Video More Features

Part 1: Explaining the Slow-Motion Feature of Adobe Premiere Pro
Adobe Premiere Pro is a video editing software part of Adobe Creative Suite. Professional editors and beginners both use this tool to make their content creative. Whether you are reworking a previous art piece or a new project, it can alter colors for good. You can insert background music, animations, and other forms of multimedia using Adobe.
Among its limitless features is a speed-ramping or slow-motion function. To unlock Adobe Premiere slow-motion in detail, you can head into the below details:
- Using this option, you can adjust the speed of the video as required. For instance, if you set it to 50%, your video will play at half speed compared to the original clips.
- Apart from the speed, users can adjust the duration of slow motion. This adjustment delivers a stylized and customized look to your clips.
- Make the slow-motion transition smoother with the optical flow feature. It can intelligently generate new frames to make your clips look like shots at a higher frame rate.
- Not all clips are worth slowing down, so there are many frame rates to do this. You can set the frame rate from 30fps, 120fps, 240fps, and 960fps.
Part 2: Understanding the Operations of Performing Slow Motion on Adobe Premiere Pro
If you want to perform speed ramping in videos, first access Adobe Premiere Pro. Many users find video editing difficult in Adobe. For their ease, this section will explain the slow-mo Adobe Premiere in simple steps:
Step 1
After getting into the Adobe Premiere Pro, enter to its editing screen. Import your video clip and move towards its timeline section. There, right-click on the FX icon and choose “Time Remapping” to go to “Speed.” Now, you can see the white speed ramping line.

Step 2
Add the keyframe by clicking the left-side circle icon next to the speed ramping line. Zoom in the section and add another keyframe.

Step 3
Click on the middle of the keyframe and pull it down slowly. To add a slow ramp instead of an abrupt change in speed, hit on the start and drag towards the right. Repeat the same to the other end of the keyframe. You can see a slow shift in speed. Later, you can adjust the speed and the ramp.

Part 3: What Are Some Potential Disadvantages of Using Adobe Premiere Pro for Performing Such Operations?
Many people might initially find the above steps intense and difficult to understand. Slow motion in Premiere Pro is useful in speed ramping, but you can face some issues using it. As everything has some bad side, this operation also does. You should read forward and know such disadvantages to avoid any inconvenience:
- Playback Lagging: Adobe causes lagging and major issues in playback. If you don’t use optical flow and render frames freeze, you cannot make any speed ramps.
- System Compatibility Issues: Speed ramping requires a system with a good GPU. Otherwise, problems might occur when it doesn’t interact well with the computer’s GPU.
- Complex Processing: This feature will interrupt your workflow if you are not a professional editor. As you will have to watch several tutorial videos to use just one feature.
- Frame Rate Adjustment Problems: Premiere Pro can show bugs if you use a high frame rate. It will start troubling when you use 120fps slow motion in clips.
Generally, it also requires strong computer specs and uses RAM of at least 8GB. The majority of editors look for an alternative due to its high learning curve and system requirements.
Part 5: Wondershare Filmora: Comprehending the Best Ways to Slow Down Videos
In search of a substitute, there could be many options on the internet. If someone is looking for easy-to-use software, they should use Wondershare Filmora . This video editor is the real game changer in adjusting speed ramping without laggings. Surprisingly, it does not require system requirements, and you can quickly launch it.
Filmora uses AI for a smooth optical flow compared with Adobe Premiere slow motion. It also ensures high quality and optimization of videos. With new AI features, you don’t need any help from experts, as AI can do it for you.
Free Download For Win 7 or later(64-bit)
Free Download For macOS 10.14 or later
Step-by-Step Guide to Slow Down Video Using Filmora
If you want more creative slow-motion videos, then keep reading. Here, you will find the easiest way to slow down videos in Filmora:
Step 1Install Filmora and Import Your Project in the Timeline
Launch the Filmora 13 in your system within simple steps. Access its main interface and hit the “New Project” button. Enter the editing window and import your project. Press the “Ctrl + I” keys from your keyboard to import the video. Browse the video and click “Open” to bring the video to Filmora. Then, drag and drop the video in the timeline section.

Step 2Explore Speed Ramping to Make Videos Super Slow
Place your cursor on the video and right-click on it. From the list, choose “Speed Ramping” and navigate toward the right-side panel. There, tap on “Customize” to open the further settings. Look for the “AI Frame Interpolation” and expand it to choose the “Optical Flow” option. You can adjust the speed manually from the graphical section on the right.

Step 3Get Render Review and Look for Export Button
Go to the timeline section toolbar for a smoother playback. Explore the “Render Preview” icon next to a green robotic icon. Finally, you can click the “Export” button at the top right corner to shift the video to your computer.

Conclusion
To conclude, speed ramping is a unique way to slow down video scenes. In this regard, professional video editors prefer Adobe Premiere Pro Slow Motion. On the contrary, this software is not a good choice for beginners and non-tech persons. That’s where Wondershare Filmora can make the process easier for all users. The plus point is it ensures quality with dedicated customization.
Top 7 MP4 Video Editors on Mac: Edit MP4 Videos Easily
There are a lot of individuals out there who want to know what the most exemplary video editing application for Mac is. Well, it all relies on what you need to accomplish. Do you need free video editing software? Are you planning to use the software for business or solely for personal use as a pastime?
You may need to get your hands on the most complex video editing software you can access on Mac, or you might prefer something simple to use and free to install. There is no need to worry because I will usher you through some of these below.
We’ve conducted a significant study into what some believe to be the video editing programs currently available for Mac, and we’re ready to share what we’ve discovered.
Getting Started
It can be challenging to locate a video editing app that meets your requirements. It’s simple to see why: software developers are torn between making home films and developing Hollywood-quality films.
The finest applications don’t force you to pick between “powerful” and “easy-to-use” instead of focusing on providing you with tools to help you accomplish your vision while being intuitive and simple to use.
Keep reading as I show you the best MP4 video editing software that is available on Mac:
#1: Filmora – Overall Best
It is available in Mac Os and Windows.
Wondershare’s recently released professional editing software perfect for individuals who want to edit videos quickly but professionally. Filmora Video Editor is perfect for achieving the “greatest of both worlds” outcome. It has all of the features you’ll need to make a video. Plus, you won’t have to waste a lot of time surfing YouTube tutorials to study how to use it. This enables you to concentrate on your creativity rather than learning how to utilize the program.
For Win 7 or later (64-bit)
For macOS 10.14 or later
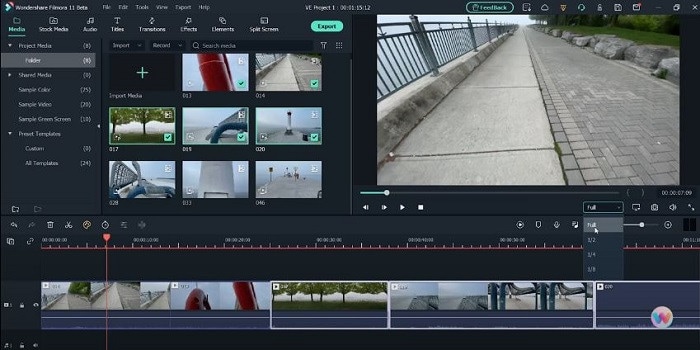
Features:
- Free Included Video Effects
- Motion Tracking
- Animation Keyframing
- Color Matching
- Motion Elements
- Green Screen
- Direct Upload to Leading Social and Sharing Platforms
Cons:
- The free edition has a watermark.
- Large-scale content editing can be slow at times.
How to Edit MP4 Video in Filmora
You never know what you’ll want in the video editing room, and that is why you must equip yourself thoroughly for all of the obstacles that will arise during the video editing process. Since post-production may take several days, sometimes months, prepare yourself patiently and remember that you are not in a race; take it slowly.
To start making your first video in Filmora, follow the instructions below:
- Start Filmora and Choose Your Preferred Aspect Ratio
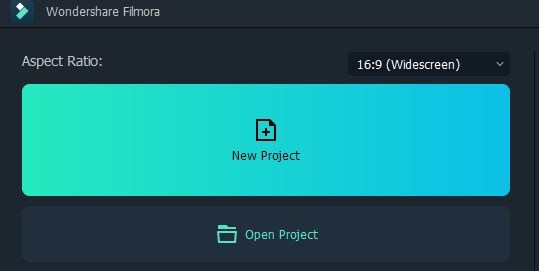
When you’re ready to get started on a new video, double-click Filmora’s desktop icon. The software’s greeting screen will prompt you to create a new project or open an existing one. You can also select the aspect ratio here to save time when editing.
- Make a New Project
Allow the editor to load after clicking New Project on the software’s welcome screen. After gaining access to Fillmora’s video editor, you may hit the Register button to activate the software.

Select the aspect ratio for the final edit of your video by going to the File menu and selecting Project Settings. You’ll be able to choose from various dimensions, including the typical 16:9 or 4:3 ratios, the less popular 9:16 aspect ratio for vertically oriented films, and the 1:1 aspect ratio for square-shaped videos. You may also adjust the aspect ratio to suit your requirements.
- Import Your Files
You can find the Import button in the upper left corner of the film editor; hit it and choose Import Media Files. Next, navigate to the folder on your hard drive where the material you wish to edit is located. Select the Import button after selecting the video, audio, or photo files you wish to utilize in your project.

Import with Instant Cutter Tool is now available in the Import menu. The Instant Cutter Tool was created to make trimming 4K and other huge video files simple. Filmora also can quickly edit videos captured with action cameras. You may easily enhance your films with the lens correction tools or the Fish Eye Distortion feature.
- Organize Your Clips
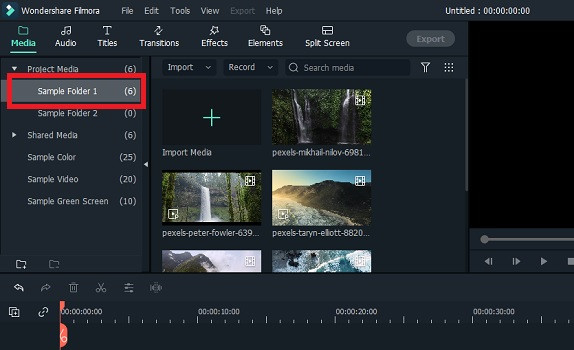
Filmora’s Media tab, underneath the Load button, will hold the documents you import into the interface. When you have to seek the videos and photos you want to add to the timeline, working with several different files in a single project becomes considerably more difficult. You can utilize the My Album feature to create folders and organize your files to reduce clutter and frustration.
Click the Add a New Folder icon at the bottom of the “My Project” section in the upper right corner of the screen. You can sort the footage numerically or in another way that improves your productivity and reduces the hassle you spend looking through files.
- Arrange The Video and Audio Files on The Timeline
Since raw footage frequently contains errors orbits that don’t belong in your video, simply drag them from the Media tab and place them on the timeline if you want to delete or trim your videos. You may add as many clips as you would like, but each additional one will be added after the last one, and you must drag the files to the proper position on the timeline to reorganize them.
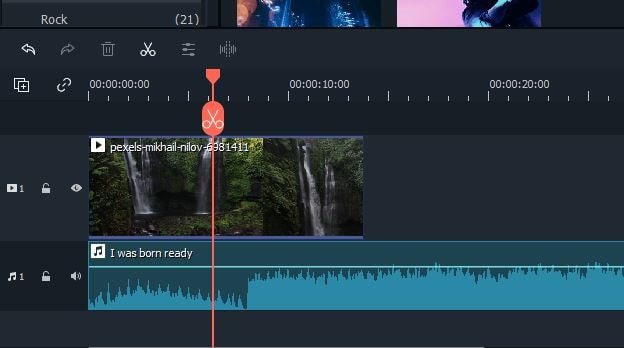
To evaluate the video clips you’ve uploaded to the timeline, press Play or use the Spacebar. You may also use the playhead to navigate to a specific place in the film. Place the playhead at the precise location where the segment of the video you want to cut begins, then repeat the process on the other end.
- Apply Visual Effects
You may now separate the audio and video files, add music, make transitions between the clips, or apply one of Filmora’s many graphic effects after deleting all the undesirable sections from your video clips.
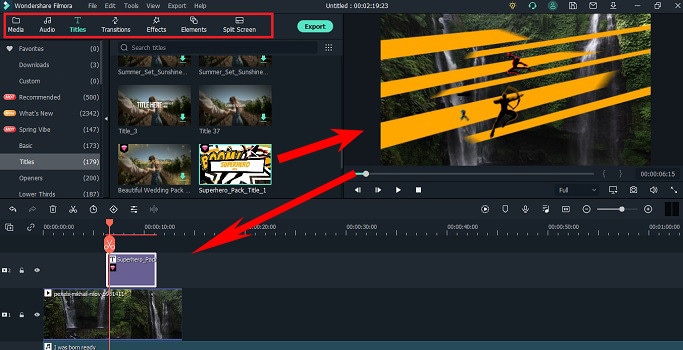
If you want to place opening titles, end credits, or subtitles on your video, click the Text /Credit icon. The software includes a variety of text templates that you can use for various reasons. Drag and drop the theme you chose to the proper spot on the timeline, then use the software’s preview box to add the required text.
- Export Your Final Output
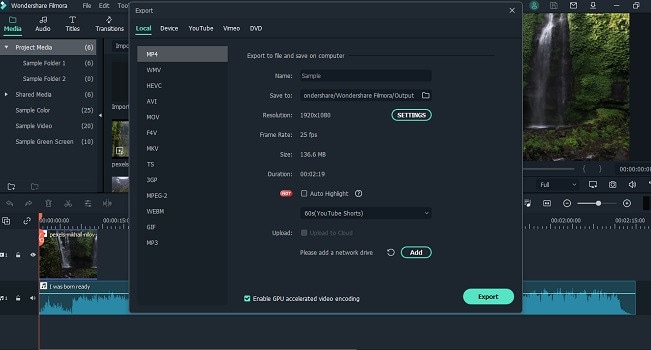
Hit the Export button when you’re sure there’s nothing further you want to do with your project. You can quickly select the video file type in the Format section in the Output window and customize the video for Smartphones, iPads, or gaming consoles like the PS4 or Xbox One.
Choose the type that better serves the project you’re working on from the Format tab, then provide the video a title and choose the location on your storage device where it will be exported. You may choose the video resolution, modify the frame rate, and choose an encoder by clicking the Settings button.
Users who do not want to preserve their videos on their storage devices can export them to Vimeo or YouTube. Because the rendering and uploading procedures occur simultaneously, exporting videos helps users save time waiting to submit the video online. To properly distribute your films on these social media networks, you’ll need a YouTube channel or a Facebook account.
#2: iMovie
It is available in Windows and Mac OS.
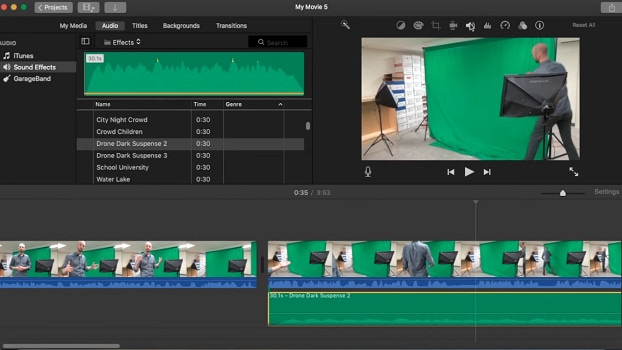
This software is a consumer-grade video editor that is available for free. Users who would like to produce videos with material from their Photos library quickly will benefit from the app. iMovie has a more straightforward timeline editor that excludes multi-track editing to make things easier.
Picture-in-picture video and slow-motion or fast-forward special effects are also supported. With iMovie, you can create titles, drag-and-drop effects, and insert motion graphics like 3D globes or travel maps. You can find ready-to-use music and sound effects in the program.
Features:
- Compatible with 4K resolution.
- It can save all the original files into one file.
- You can switch across different devices anytime.
- Advanced video editing capabilities.
- Drag and drop with ease.
- It is easy to use.
Cons:
- It necessitates a large amount of HDD space.
- It’s time-consuming to import MP4 files for processing.
- Before importing, you must convert MP4 files to codecs for best results.
#3: DaVinci Resolve
It is available in Mac OS, Windows, and Linux.
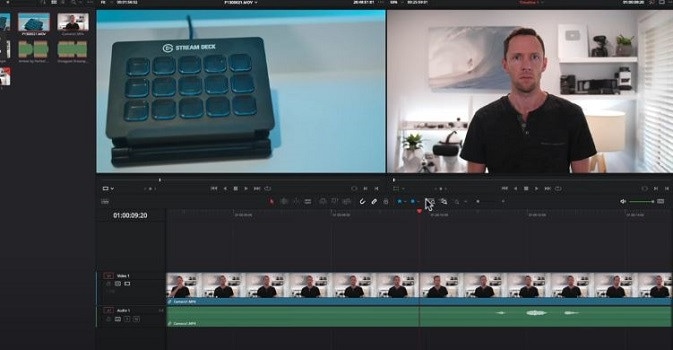
DaVinci Resolve is a non-linear movie editing and color grading. It is the only software application globally that includes editing, color grading, special effects, motion graphics, and sound editing. Its attractive, sleek interface is simple to learn and use for new users yet powerful for experienced ones.
Features:
- Tons of extra video effects
- It offers 10bit video at 120 fps and resolutions higher than 4K.
- It includes numerous controls for photos, logos, text, and transitions.
- A color warper based on mesh and grids offers a completely new way to manipulate color.
- The DaVinci Neural Engine powers the magic mask’s automated object separation.
- High-speed audio production with new context-sensitive keyboard and mouse features
Cons:
- Its learning curve is steep.
- There is no external software compatibility.
- Allows you to export MKV files but not import them.
- Only the premium version includes audio noise reduction.
- Some advanced grading and tracking tools are disabled in the free edition.
#3: OpenShot
It is available in Linux, Mac Os, and Windows.
OpenShot Video Editor gives you an endless number of tracks to make your edits look natural, making it simple to get started putting together clips. After you’ve imported the necessary files, all you have to do now is organize the various films, photographs, or sounds within those tracks in any way you want. You may easily edit and crop these clips at any point and add effects and animations to improve your final product.
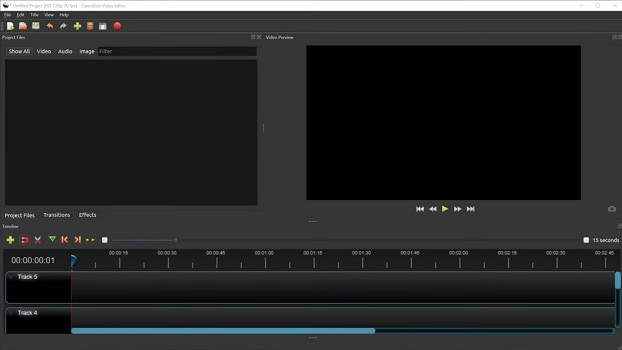
Features:
- Several videos, audio, and image formats are supported.
- Keyframe animations with powerful curves.
- Desktop synchronization (drag and drop capability).
- Endless tracks or layers.
- Real-time previews of media transitions.
- Advanced Timeline feature.
- Frame accuracy.
Cons:
- It might have a shaky performance.
- It has limited video editing features.
- Hardware acceleration is less sophisticated.
- It may not be as cutting-edge as other modern software.
#4: EDIUS
It is available in Windows and Mac OS.
For experts and aspiring video enthusiasts, EDIUS is the best editing program. EDIUS is a paid video editing software that arose from a collection of Adobe Premiere Plus plugins. It has no subscription fees — you pay for it and keep it with a permanent license. It is the recommended software of choice for many broadcasters throughout the world, thanks to its versatility in dealing with numerous video formats as well as its ease of use when contrasted to some of its rivals.
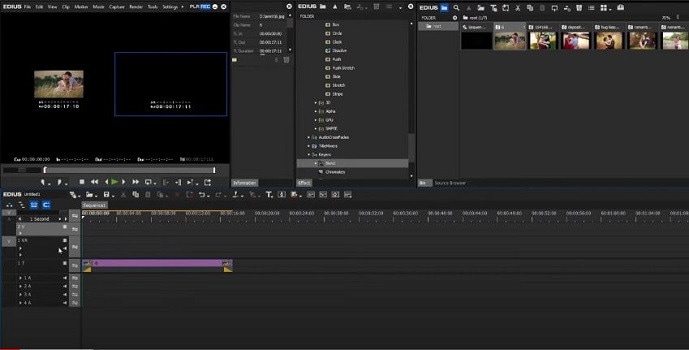
Features:
- It has Nikon Z9 “N-RAW” support
- It is compatible with N-RAW and ProRes RAW files shot by Nikon cameras.
- It supports 8K editing and exporting.
- You can paste improvements to clip attributes.
- You can copy and paste attributes between clips.
- It offers a “clip color” feature for pasting objects.
- It includes Mync updates.
- It has a superior 4K workflow.
- It has a flexible user interface.
Cons:
- It does not have a free trial version.
#5: Autodesk Smoke
It is available in Mac OS only.
By merging workflows with node-based blending capabilities in a timeline-centered editing interface, the Autodesk Smoke video editing tool helps production companies improve productivity. Autodesk Smoke is a video editing software that combines advanced video effects with an intuitive interface. Most folks assume Smoke as a finalizing tool, but it’s also a complete editing kit with a built-in node-based compositor.
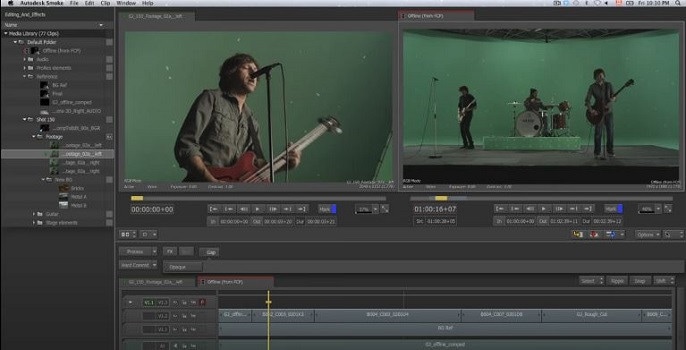
Features:
- It has an innovative timeline workflow base
- Compositing with ConnectFX nodes
- It is supported with Powerful Compositing
- It has 3D Text and geometry
- Trimming in motion
- It is supported with FCP X and Smoke
Cons:
- Only Macs are supported, and a very powerful system is required.
- You cannot use smoke on multiple monitors.
#6: Adobe Premiere Pro CC
It is available in Mac OS and Windows.
Adobe Premiere Pro CC is a powerful, professional-level digital video editing suite with excellent collaboration tools suitable for even the most demanding users. This program, which is both economical and straightforward, has been at the high end of the market for several years and shows no signs of slowing down, as new upgrades are continuously made available for free download. If you want to master how to edit videos professionally with little to no expertise, Adobe Premiere Pro CC might be the right tool for you.
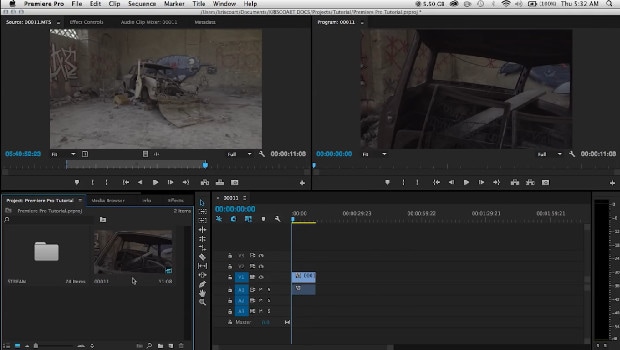
Features:
- Motion Graphics Templates are available.
- Graphics and video titling.
- Its user interface is extremely responsive.
- It is supported by Immersive Virtual Reality (VR).
- Workflow Integration.
- Effortless and continuous editing.
- Multiple file formats are supported.
- You may install plugins to add extras.
Cons:
- You may need to pay monthly or yearly payments in this subscription-based model.
- It’s pretty complicated, and you might get lost in it.
- Strong computer specifications are required.
- It necessitates a large amount of RAM.
FAQ
Which Should I Choose, Free or Paid MP4 Editor?
If you need to work on videos on a regular basis, or if you wish to edit films for your own Facebook or Instagram use, paid software is probably not necessary. However, keep in mind that video editor tools cannot compete with paid software. Based on our own experience, they’re generally limited in terms of capabilities and performance, and they often have other annoyances like advertisements or export restrictions.
That said, if you simply need to make minor edits or aren’t planning on editing films for a long time, the most exemplary free video editing programs listed above can be handy. However, if you use video editing software regularly or for work, I strongly advise you to invest in professional video editing software.
What Editing Tools Do Professionals Use?
Several people are curious about the software used by professionals. On the other hand, professional editors use various tools to improve their video editing productivity. Many use Adobe Audition for audio editing. Many users prefer Final Cut Pro for color grading. They often use Premiere Pro and Lightworks for film editing. And semi-pros use Filmora to speed up the video editing process.
What Software Do YouTubers Are Using to Make Their Videos?
Several YouTubers prefer simple video software to create YouTube content. They chose Filmora because of its built-in effects, flash animations, graphics, and transitions, which total over 300.
Furthermore, several YouTubers with advanced video editing talents use Premiere Pro.
What MP4 Video Editor Is Best for Beginners?
One of the most significant aspects to consider for beginners is convenience and affordability. On the Mac, users choose Filmora, Movavi, Powerdirector, and iMovie.
What Should I Think About Before Buying Professional Video Editing Tools?
If you are reading this, you might be wondering, “What persuades me to c a professional video editor?” Is it because you’ve seen other YouTubers utilizing them?
Is there enough time in your schedule to study these expert video editors? If this is the situation, think about the price you are investing in and if those high-end features and functionalities are really what you need. Well, I have something to recommend for you.
Filmora can handle 95 percent of your video editing needs for just $49.99 a year, thanks to its absurdly short learning curve and user-friendly design. You won’t have to waste time studying a tiresome manual with Filmora, and you can start editing videos straight away because everything is set up for it.
For macOS 10.14 or later

Features:
- Free Included Video Effects
- Motion Tracking
- Animation Keyframing
- Color Matching
- Motion Elements
- Green Screen
- Direct Upload to Leading Social and Sharing Platforms
Cons:
- The free edition has a watermark.
- Large-scale content editing can be slow at times.
How to Edit MP4 Video in Filmora
You never know what you’ll want in the video editing room, and that is why you must equip yourself thoroughly for all of the obstacles that will arise during the video editing process. Since post-production may take several days, sometimes months, prepare yourself patiently and remember that you are not in a race; take it slowly.
To start making your first video in Filmora, follow the instructions below:
- Start Filmora and Choose Your Preferred Aspect Ratio
When you’re ready to get started on a new video, double-click Filmora’s desktop icon. The software’s greeting screen will prompt you to create a new project or open an existing one. You can also select the aspect ratio here to save time when editing.

- Make a New Project
Allow the editor to load after clicking New Project on the software’s welcome screen. After gaining access to Fillmora’s video editor, you may hit the Register button to activate the software.

Select the aspect ratio for the final edit of your video by going to the File menu and selecting Project Settings. You’ll be able to choose from various dimensions, including the typical 16:9 or 4:3 ratios, the less popular 9:16 aspect ratio for vertically oriented films, and the 1:1 aspect ratio for square-shaped videos. You may also adjust the aspect ratio to suit your requirements.
- Import Your Files
You can find the Import button in the upper left corner of the film editor; hit it and choose Import Media Files. Next, navigate to the folder on your hard drive where the material you wish to edit is located. Select the Import button after selecting the video, audio, or photo files you wish to utilize in your project.

Import with Instant Cutter Tool is now available in the Import menu. The Instant Cutter Tool was created to make trimming 4K and other huge video files simple. Filmora also can quickly edit videos captured with action cameras. You may easily enhance your films with the lens correction tools or the Fish Eye Distortion feature.
- Organize Your Clips

Filmora’s Media tab, underneath the Load button, will hold the documents you import into the interface. When you have to seek the videos and photos you want to add to the timeline, working with several different files in a single project becomes considerably more difficult. You can utilize the My Album feature to create folders and organize your files to reduce clutter and frustration.
Click the Add a New Folder icon at the bottom of the “My Project” section in the upper right corner of the screen. You can sort the footage numerically or in another way that improves your productivity and reduces the hassle you spend looking through files.
- Arrange The Video and Audio Files on The Timeline
Since raw footage frequently contains errors orbits that don’t belong in your video, simply drag them from the Media tab and place them on the timeline if you want to delete or trim your videos. You may add as many clips as you would like, but each additional one will be added after the last one, and you must drag the files to the proper position on the timeline to reorganize them.

To evaluate the video clips you’ve uploaded to the timeline, press Play or use the Spacebar. You may also use the playhead to navigate to a specific place in the film. Place the playhead at the precise location where the segment of the video you want to cut begins, then repeat the process on the other end.
- Apply Visual Effects
You may now separate the audio and video files, add music, make transitions between the clips, or apply one of Filmora’s many graphic effects after deleting all the undesirable sections from your video clips.

If you want to place opening titles, end credits, or subtitles on your video, click the Text /Credit icon. The software includes a variety of text templates that you can use for various reasons. Drag and drop the theme you chose to the proper spot on the timeline, then use the software’s preview box to add the required text.
- Export Your Final Output

Hit the Export button when you’re sure there’s nothing further you want to do with your project. You can quickly select the video file type in the Format section in the Output window and customize the video for Smartphones, iPads, or gaming consoles like the PS4 or Xbox One.
Choose the type that better serves the project you’re working on from the Format tab, then provide the video a title and choose the location on your storage device where it will be exported. You may choose the video resolution, modify the frame rate, and choose an encoder by clicking the Settings button.
Users who do not want to preserve their videos on their storage devices can export them to Vimeo or YouTube. Because the rendering and uploading procedures occur simultaneously, exporting videos helps users save time waiting to submit the video online. To properly distribute your films on these social media networks, you’ll need a YouTube channel or a Facebook account.
#2: iMovie
It is available in Windows and Mac OS.
This software is a consumer-grade video editor that is available for free. Users who would like to produce videos with material from their Photos library quickly will benefit from the app. iMovie has a more straightforward timeline editor that excludes multi-track editing to make things easier.
Picture-in-picture video and slow-motion or fast-forward special effects are also supported. With iMovie, you can create titles, drag-and-drop effects, and insert motion graphics like 3D globes or travel maps. You can find ready-to-use music and sound effects in the program.

Features:
- Compatible with 4K resolution.
- It can save all the original files into one file.
- You can switch across different devices anytime.
- Advanced video editing capabilities.
- Drag and drop with ease.
- It is easy to use.
Cons:
- It necessitates a large amount of HDD space.
- It’s time-consuming to import MP4 files for processing.
- Before importing, you must convert MP4 files to codecs for best results.
#3: DaVinci Resolve
It is available in Mac OS, Windows, and Linux.
DaVinci Resolve is a non-linear movie editing and color grading. It is the only software application globally that includes editing, color grading, special effects, motion graphics, and sound editing. Its attractive, sleek interface is simple to learn and use for new users yet powerful for experienced ones.

Features:
- Tons of extra video effects
- It offers 10bit video at 120 fps and resolutions higher than 4K.
- It includes numerous controls for photos, logos, text, and transitions.
- A color warper based on mesh and grids offers a completely new way to manipulate color.
- The DaVinci Neural Engine powers the magic mask’s automated object separation.
- High-speed audio production with new context-sensitive keyboard and mouse features
Cons:
- Its learning curve is steep.
- There is no external software compatibility.
- Allows you to export MKV files but not import them.
- Only the premium version includes audio noise reduction.
- Some advanced grading and tracking tools are disabled in the free edition.
#3: OpenShot
It is available in Linux, Mac Os, and Windows.
OpenShot Video Editor gives you an endless number of tracks to make your edits look natural, making it simple to get started putting together clips. After you’ve imported the necessary files, all you have to do now is organize the various films, photographs, or sounds within those tracks in any way you want. You may easily edit and crop these clips at any point and add effects and animations to improve your final product.

Features:
- Several videos, audio, and image formats are supported.
- Keyframe animations with powerful curves.
- Desktop synchronization (drag and drop capability).
- Endless tracks or layers.
- Real-time previews of media transitions.
- Advanced Timeline feature.
- Frame accuracy.
Cons:
- It might have a shaky performance.
- It has limited video editing features.
- Hardware acceleration is less sophisticated.
- It may not be as cutting-edge as other modern software.
#4: EDIUS
It is available in Windows and Mac OS.
For experts and aspiring video enthusiasts, EDIUS is the best editing program. EDIUS is a paid video editing software that arose from a collection of Adobe Premiere Plus plugins. It has no subscription fees — you pay for it and keep it with a permanent license. It is the recommended software of choice for many broadcasters throughout the world, thanks to its versatility in dealing with numerous video formats as well as its ease of use when contrasted to some of its rivals.

Features:
- It has Nikon Z9 “N-RAW” support
- It is compatible with N-RAW and ProRes RAW files shot by Nikon cameras.
- It supports 8K editing and exporting.
- You can paste improvements to clip attributes.
- You can copy and paste attributes between clips.
- It offers a “clip color” feature for pasting objects.
- It includes Mync updates.
- It has a superior 4K workflow.
- It has a flexible user interface.
Cons:
- It does not have a free trial version.
#5: Autodesk Smoke
It is available in Mac OS only.
By merging workflows with node-based blending capabilities in a timeline-centered editing interface, the Autodesk Smoke video editing tool helps production companies improve productivity. Autodesk Smoke is a video editing software that combines advanced video effects with an intuitive interface. Most folks assume Smoke as a finalizing tool, but it’s also a complete editing kit with a built-in node-based compositor.

Features:
- It has an innovative timeline workflow base
- Compositing with ConnectFX nodes
- It is supported with Powerful Compositing
- It has 3D Text and geometry
- Trimming in motion
- It is supported with FCP X and Smoke
Cons:
- Only Macs are supported, and a very powerful system is required.
- You cannot use smoke on multiple monitors.
#6: Adobe Premiere Pro CC
It is available in Mac OS and Windows.
Adobe Premiere Pro CC is a powerful, professional-level digital video editing suite with excellent collaboration tools suitable for even the most demanding users. This program, which is both economical and straightforward, has been at the high end of the market for several years and shows no signs of slowing down, as new upgrades are continuously made available for free download. If you want to master how to edit videos professionally with little to no expertise, Adobe Premiere Pro CC might be the right tool for you.

Features:
- Motion Graphics Templates are available.
- Graphics and video titling.
- Its user interface is extremely responsive.
- It is supported by Immersive Virtual Reality (VR).
- Workflow Integration.
- Effortless and continuous editing.
- Multiple file formats are supported.
- You may install plugins to add extras.
Cons:
- You may need to pay monthly or yearly payments in this subscription-based model.
- It’s pretty complicated, and you might get lost in it.
- Strong computer specifications are required.
- It necessitates a large amount of RAM.
FAQ
Which Should I Choose, Free or Paid MP4 Editor?
If you need to work on videos on a regular basis, or if you wish to edit films for your own Facebook or Instagram use, paid software is probably not necessary. However, keep in mind that video editor tools cannot compete with paid software. Based on our own experience, they’re generally limited in terms of capabilities and performance, and they often have other annoyances like advertisements or export restrictions.
That said, if you simply need to make minor edits or aren’t planning on editing films for a long time, the most exemplary free video editing programs listed above can be handy. However, if you use video editing software regularly or for work, I strongly advise you to invest in professional video editing software.
What Editing Tools Do Professionals Use?
Several people are curious about the software used by professionals. On the other hand, professional editors use various tools to improve their video editing productivity. Many use Adobe Audition for audio editing. Many users prefer Final Cut Pro for color grading. They often use Premiere Pro and Lightworks for film editing. And semi-pros use Filmora to speed up the video editing process.
What Software Do YouTubers Are Using to Make Their Videos?
Several YouTubers prefer simple video software to create YouTube content. They chose Filmora because of its built-in effects, flash animations, graphics, and transitions, which total over 300.
Furthermore, several YouTubers with advanced video editing talents use Premiere Pro.
What MP4 Video Editor Is Best for Beginners?
One of the most significant aspects to consider for beginners is convenience and affordability. On the Mac, users choose Filmora, Movavi, Powerdirector, and iMovie.
What Should I Think About Before Buying Professional Video Editing Tools?
If you are reading this, you might be wondering, “What persuades me to c a professional video editor?” Is it because you’ve seen other YouTubers utilizing them?
Is there enough time in your schedule to study these expert video editors? If this is the situation, think about the price you are investing in and if those high-end features and functionalities are really what you need. Well, I have something to recommend for you.
Filmora can handle 95 percent of your video editing needs for just $49.99 a year, thanks to its absurdly short learning curve and user-friendly design. You won’t have to waste time studying a tiresome manual with Filmora, and you can start editing videos straight away because everything is set up for it.
For macOS 10.14 or later

Features:
- Free Included Video Effects
- Motion Tracking
- Animation Keyframing
- Color Matching
- Motion Elements
- Green Screen
- Direct Upload to Leading Social and Sharing Platforms
Cons:
- The free edition has a watermark.
- Large-scale content editing can be slow at times.
How to Edit MP4 Video in Filmora
You never know what you’ll want in the video editing room, and that is why you must equip yourself thoroughly for all of the obstacles that will arise during the video editing process. Since post-production may take several days, sometimes months, prepare yourself patiently and remember that you are not in a race; take it slowly.
To start making your first video in Filmora, follow the instructions below:
- Start Filmora and Choose Your Preferred Aspect Ratio
When you’re ready to get started on a new video, double-click Filmora’s desktop icon. The software’s greeting screen will prompt you to create a new project or open an existing one. You can also select the aspect ratio here to save time when editing.

- Make a New Project
Allow the editor to load after clicking New Project on the software’s welcome screen. After gaining access to Fillmora’s video editor, you may hit the Register button to activate the software.

Select the aspect ratio for the final edit of your video by going to the File menu and selecting Project Settings. You’ll be able to choose from various dimensions, including the typical 16:9 or 4:3 ratios, the less popular 9:16 aspect ratio for vertically oriented films, and the 1:1 aspect ratio for square-shaped videos. You may also adjust the aspect ratio to suit your requirements.
- Import Your Files
You can find the Import button in the upper left corner of the film editor; hit it and choose Import Media Files. Next, navigate to the folder on your hard drive where the material you wish to edit is located. Select the Import button after selecting the video, audio, or photo files you wish to utilize in your project.

Import with Instant Cutter Tool is now available in the Import menu. The Instant Cutter Tool was created to make trimming 4K and other huge video files simple. Filmora also can quickly edit videos captured with action cameras. You may easily enhance your films with the lens correction tools or the Fish Eye Distortion feature.
- Organize Your Clips

Filmora’s Media tab, underneath the Load button, will hold the documents you import into the interface. When you have to seek the videos and photos you want to add to the timeline, working with several different files in a single project becomes considerably more difficult. You can utilize the My Album feature to create folders and organize your files to reduce clutter and frustration.
Click the Add a New Folder icon at the bottom of the “My Project” section in the upper right corner of the screen. You can sort the footage numerically or in another way that improves your productivity and reduces the hassle you spend looking through files.
- Arrange The Video and Audio Files on The Timeline
Since raw footage frequently contains errors orbits that don’t belong in your video, simply drag them from the Media tab and place them on the timeline if you want to delete or trim your videos. You may add as many clips as you would like, but each additional one will be added after the last one, and you must drag the files to the proper position on the timeline to reorganize them.

To evaluate the video clips you’ve uploaded to the timeline, press Play or use the Spacebar. You may also use the playhead to navigate to a specific place in the film. Place the playhead at the precise location where the segment of the video you want to cut begins, then repeat the process on the other end.
- Apply Visual Effects
You may now separate the audio and video files, add music, make transitions between the clips, or apply one of Filmora’s many graphic effects after deleting all the undesirable sections from your video clips.

If you want to place opening titles, end credits, or subtitles on your video, click the Text /Credit icon. The software includes a variety of text templates that you can use for various reasons. Drag and drop the theme you chose to the proper spot on the timeline, then use the software’s preview box to add the required text.
- Export Your Final Output

Hit the Export button when you’re sure there’s nothing further you want to do with your project. You can quickly select the video file type in the Format section in the Output window and customize the video for Smartphones, iPads, or gaming consoles like the PS4 or Xbox One.
Choose the type that better serves the project you’re working on from the Format tab, then provide the video a title and choose the location on your storage device where it will be exported. You may choose the video resolution, modify the frame rate, and choose an encoder by clicking the Settings button.
Users who do not want to preserve their videos on their storage devices can export them to Vimeo or YouTube. Because the rendering and uploading procedures occur simultaneously, exporting videos helps users save time waiting to submit the video online. To properly distribute your films on these social media networks, you’ll need a YouTube channel or a Facebook account.
#2: iMovie
It is available in Windows and Mac OS.
This software is a consumer-grade video editor that is available for free. Users who would like to produce videos with material from their Photos library quickly will benefit from the app. iMovie has a more straightforward timeline editor that excludes multi-track editing to make things easier.
Picture-in-picture video and slow-motion or fast-forward special effects are also supported. With iMovie, you can create titles, drag-and-drop effects, and insert motion graphics like 3D globes or travel maps. You can find ready-to-use music and sound effects in the program.

Features:
- Compatible with 4K resolution.
- It can save all the original files into one file.
- You can switch across different devices anytime.
- Advanced video editing capabilities.
- Drag and drop with ease.
- It is easy to use.
Cons:
- It necessitates a large amount of HDD space.
- It’s time-consuming to import MP4 files for processing.
- Before importing, you must convert MP4 files to codecs for best results.
#3: DaVinci Resolve
It is available in Mac OS, Windows, and Linux.
DaVinci Resolve is a non-linear movie editing and color grading. It is the only software application globally that includes editing, color grading, special effects, motion graphics, and sound editing. Its attractive, sleek interface is simple to learn and use for new users yet powerful for experienced ones.

Features:
- Tons of extra video effects
- It offers 10bit video at 120 fps and resolutions higher than 4K.
- It includes numerous controls for photos, logos, text, and transitions.
- A color warper based on mesh and grids offers a completely new way to manipulate color.
- The DaVinci Neural Engine powers the magic mask’s automated object separation.
- High-speed audio production with new context-sensitive keyboard and mouse features
Cons:
- Its learning curve is steep.
- There is no external software compatibility.
- Allows you to export MKV files but not import them.
- Only the premium version includes audio noise reduction.
- Some advanced grading and tracking tools are disabled in the free edition.
#3: OpenShot
It is available in Linux, Mac Os, and Windows.
OpenShot Video Editor gives you an endless number of tracks to make your edits look natural, making it simple to get started putting together clips. After you’ve imported the necessary files, all you have to do now is organize the various films, photographs, or sounds within those tracks in any way you want. You may easily edit and crop these clips at any point and add effects and animations to improve your final product.

Features:
- Several videos, audio, and image formats are supported.
- Keyframe animations with powerful curves.
- Desktop synchronization (drag and drop capability).
- Endless tracks or layers.
- Real-time previews of media transitions.
- Advanced Timeline feature.
- Frame accuracy.
Cons:
- It might have a shaky performance.
- It has limited video editing features.
- Hardware acceleration is less sophisticated.
- It may not be as cutting-edge as other modern software.
#4: EDIUS
It is available in Windows and Mac OS.
For experts and aspiring video enthusiasts, EDIUS is the best editing program. EDIUS is a paid video editing software that arose from a collection of Adobe Premiere Plus plugins. It has no subscription fees — you pay for it and keep it with a permanent license. It is the recommended software of choice for many broadcasters throughout the world, thanks to its versatility in dealing with numerous video formats as well as its ease of use when contrasted to some of its rivals.

Features:
- It has Nikon Z9 “N-RAW” support
- It is compatible with N-RAW and ProRes RAW files shot by Nikon cameras.
- It supports 8K editing and exporting.
- You can paste improvements to clip attributes.
- You can copy and paste attributes between clips.
- It offers a “clip color” feature for pasting objects.
- It includes Mync updates.
- It has a superior 4K workflow.
- It has a flexible user interface.
Cons:
- It does not have a free trial version.
#5: Autodesk Smoke
It is available in Mac OS only.
By merging workflows with node-based blending capabilities in a timeline-centered editing interface, the Autodesk Smoke video editing tool helps production companies improve productivity. Autodesk Smoke is a video editing software that combines advanced video effects with an intuitive interface. Most folks assume Smoke as a finalizing tool, but it’s also a complete editing kit with a built-in node-based compositor.

Features:
- It has an innovative timeline workflow base
- Compositing with ConnectFX nodes
- It is supported with Powerful Compositing
- It has 3D Text and geometry
- Trimming in motion
- It is supported with FCP X and Smoke
Cons:
- Only Macs are supported, and a very powerful system is required.
- You cannot use smoke on multiple monitors.
#6: Adobe Premiere Pro CC
It is available in Mac OS and Windows.
Adobe Premiere Pro CC is a powerful, professional-level digital video editing suite with excellent collaboration tools suitable for even the most demanding users. This program, which is both economical and straightforward, has been at the high end of the market for several years and shows no signs of slowing down, as new upgrades are continuously made available for free download. If you want to master how to edit videos professionally with little to no expertise, Adobe Premiere Pro CC might be the right tool for you.

Features:
- Motion Graphics Templates are available.
- Graphics and video titling.
- Its user interface is extremely responsive.
- It is supported by Immersive Virtual Reality (VR).
- Workflow Integration.
- Effortless and continuous editing.
- Multiple file formats are supported.
- You may install plugins to add extras.
Cons:
- You may need to pay monthly or yearly payments in this subscription-based model.
- It’s pretty complicated, and you might get lost in it.
- Strong computer specifications are required.
- It necessitates a large amount of RAM.
FAQ
Which Should I Choose, Free or Paid MP4 Editor?
If you need to work on videos on a regular basis, or if you wish to edit films for your own Facebook or Instagram use, paid software is probably not necessary. However, keep in mind that video editor tools cannot compete with paid software. Based on our own experience, they’re generally limited in terms of capabilities and performance, and they often have other annoyances like advertisements or export restrictions.
That said, if you simply need to make minor edits or aren’t planning on editing films for a long time, the most exemplary free video editing programs listed above can be handy. However, if you use video editing software regularly or for work, I strongly advise you to invest in professional video editing software.
What Editing Tools Do Professionals Use?
Several people are curious about the software used by professionals. On the other hand, professional editors use various tools to improve their video editing productivity. Many use Adobe Audition for audio editing. Many users prefer Final Cut Pro for color grading. They often use Premiere Pro and Lightworks for film editing. And semi-pros use Filmora to speed up the video editing process.
What Software Do YouTubers Are Using to Make Their Videos?
Several YouTubers prefer simple video software to create YouTube content. They chose Filmora because of its built-in effects, flash animations, graphics, and transitions, which total over 300.
Furthermore, several YouTubers with advanced video editing talents use Premiere Pro.
What MP4 Video Editor Is Best for Beginners?
One of the most significant aspects to consider for beginners is convenience and affordability. On the Mac, users choose Filmora, Movavi, Powerdirector, and iMovie.
What Should I Think About Before Buying Professional Video Editing Tools?
If you are reading this, you might be wondering, “What persuades me to c a professional video editor?” Is it because you’ve seen other YouTubers utilizing them?
Is there enough time in your schedule to study these expert video editors? If this is the situation, think about the price you are investing in and if those high-end features and functionalities are really what you need. Well, I have something to recommend for you.
Filmora can handle 95 percent of your video editing needs for just $49.99 a year, thanks to its absurdly short learning curve and user-friendly design. You won’t have to waste time studying a tiresome manual with Filmora, and you can start editing videos straight away because everything is set up for it.
For macOS 10.14 or later

Features:
- Free Included Video Effects
- Motion Tracking
- Animation Keyframing
- Color Matching
- Motion Elements
- Green Screen
- Direct Upload to Leading Social and Sharing Platforms
Cons:
- The free edition has a watermark.
- Large-scale content editing can be slow at times.
How to Edit MP4 Video in Filmora
You never know what you’ll want in the video editing room, and that is why you must equip yourself thoroughly for all of the obstacles that will arise during the video editing process. Since post-production may take several days, sometimes months, prepare yourself patiently and remember that you are not in a race; take it slowly.
To start making your first video in Filmora, follow the instructions below:
- Start Filmora and Choose Your Preferred Aspect Ratio
When you’re ready to get started on a new video, double-click Filmora’s desktop icon. The software’s greeting screen will prompt you to create a new project or open an existing one. You can also select the aspect ratio here to save time when editing.

- Make a New Project
Allow the editor to load after clicking New Project on the software’s welcome screen. After gaining access to Fillmora’s video editor, you may hit the Register button to activate the software.

Select the aspect ratio for the final edit of your video by going to the File menu and selecting Project Settings. You’ll be able to choose from various dimensions, including the typical 16:9 or 4:3 ratios, the less popular 9:16 aspect ratio for vertically oriented films, and the 1:1 aspect ratio for square-shaped videos. You may also adjust the aspect ratio to suit your requirements.
- Import Your Files
You can find the Import button in the upper left corner of the film editor; hit it and choose Import Media Files. Next, navigate to the folder on your hard drive where the material you wish to edit is located. Select the Import button after selecting the video, audio, or photo files you wish to utilize in your project.

Import with Instant Cutter Tool is now available in the Import menu. The Instant Cutter Tool was created to make trimming 4K and other huge video files simple. Filmora also can quickly edit videos captured with action cameras. You may easily enhance your films with the lens correction tools or the Fish Eye Distortion feature.
- Organize Your Clips

Filmora’s Media tab, underneath the Load button, will hold the documents you import into the interface. When you have to seek the videos and photos you want to add to the timeline, working with several different files in a single project becomes considerably more difficult. You can utilize the My Album feature to create folders and organize your files to reduce clutter and frustration.
Click the Add a New Folder icon at the bottom of the “My Project” section in the upper right corner of the screen. You can sort the footage numerically or in another way that improves your productivity and reduces the hassle you spend looking through files.
- Arrange The Video and Audio Files on The Timeline
Since raw footage frequently contains errors orbits that don’t belong in your video, simply drag them from the Media tab and place them on the timeline if you want to delete or trim your videos. You may add as many clips as you would like, but each additional one will be added after the last one, and you must drag the files to the proper position on the timeline to reorganize them.

To evaluate the video clips you’ve uploaded to the timeline, press Play or use the Spacebar. You may also use the playhead to navigate to a specific place in the film. Place the playhead at the precise location where the segment of the video you want to cut begins, then repeat the process on the other end.
- Apply Visual Effects
You may now separate the audio and video files, add music, make transitions between the clips, or apply one of Filmora’s many graphic effects after deleting all the undesirable sections from your video clips.

If you want to place opening titles, end credits, or subtitles on your video, click the Text /Credit icon. The software includes a variety of text templates that you can use for various reasons. Drag and drop the theme you chose to the proper spot on the timeline, then use the software’s preview box to add the required text.
- Export Your Final Output

Hit the Export button when you’re sure there’s nothing further you want to do with your project. You can quickly select the video file type in the Format section in the Output window and customize the video for Smartphones, iPads, or gaming consoles like the PS4 or Xbox One.
Choose the type that better serves the project you’re working on from the Format tab, then provide the video a title and choose the location on your storage device where it will be exported. You may choose the video resolution, modify the frame rate, and choose an encoder by clicking the Settings button.
Users who do not want to preserve their videos on their storage devices can export them to Vimeo or YouTube. Because the rendering and uploading procedures occur simultaneously, exporting videos helps users save time waiting to submit the video online. To properly distribute your films on these social media networks, you’ll need a YouTube channel or a Facebook account.
#2: iMovie
It is available in Windows and Mac OS.
This software is a consumer-grade video editor that is available for free. Users who would like to produce videos with material from their Photos library quickly will benefit from the app. iMovie has a more straightforward timeline editor that excludes multi-track editing to make things easier.
Picture-in-picture video and slow-motion or fast-forward special effects are also supported. With iMovie, you can create titles, drag-and-drop effects, and insert motion graphics like 3D globes or travel maps. You can find ready-to-use music and sound effects in the program.

Features:
- Compatible with 4K resolution.
- It can save all the original files into one file.
- You can switch across different devices anytime.
- Advanced video editing capabilities.
- Drag and drop with ease.
- It is easy to use.
Cons:
- It necessitates a large amount of HDD space.
- It’s time-consuming to import MP4 files for processing.
- Before importing, you must convert MP4 files to codecs for best results.
#3: DaVinci Resolve
It is available in Mac OS, Windows, and Linux.
DaVinci Resolve is a non-linear movie editing and color grading. It is the only software application globally that includes editing, color grading, special effects, motion graphics, and sound editing. Its attractive, sleek interface is simple to learn and use for new users yet powerful for experienced ones.

Features:
- Tons of extra video effects
- It offers 10bit video at 120 fps and resolutions higher than 4K.
- It includes numerous controls for photos, logos, text, and transitions.
- A color warper based on mesh and grids offers a completely new way to manipulate color.
- The DaVinci Neural Engine powers the magic mask’s automated object separation.
- High-speed audio production with new context-sensitive keyboard and mouse features
Cons:
- Its learning curve is steep.
- There is no external software compatibility.
- Allows you to export MKV files but not import them.
- Only the premium version includes audio noise reduction.
- Some advanced grading and tracking tools are disabled in the free edition.
#3: OpenShot
It is available in Linux, Mac Os, and Windows.
OpenShot Video Editor gives you an endless number of tracks to make your edits look natural, making it simple to get started putting together clips. After you’ve imported the necessary files, all you have to do now is organize the various films, photographs, or sounds within those tracks in any way you want. You may easily edit and crop these clips at any point and add effects and animations to improve your final product.

Features:
- Several videos, audio, and image formats are supported.
- Keyframe animations with powerful curves.
- Desktop synchronization (drag and drop capability).
- Endless tracks or layers.
- Real-time previews of media transitions.
- Advanced Timeline feature.
- Frame accuracy.
Cons:
- It might have a shaky performance.
- It has limited video editing features.
- Hardware acceleration is less sophisticated.
- It may not be as cutting-edge as other modern software.
#4: EDIUS
It is available in Windows and Mac OS.
For experts and aspiring video enthusiasts, EDIUS is the best editing program. EDIUS is a paid video editing software that arose from a collection of Adobe Premiere Plus plugins. It has no subscription fees — you pay for it and keep it with a permanent license. It is the recommended software of choice for many broadcasters throughout the world, thanks to its versatility in dealing with numerous video formats as well as its ease of use when contrasted to some of its rivals.

Features:
- It has Nikon Z9 “N-RAW” support
- It is compatible with N-RAW and ProRes RAW files shot by Nikon cameras.
- It supports 8K editing and exporting.
- You can paste improvements to clip attributes.
- You can copy and paste attributes between clips.
- It offers a “clip color” feature for pasting objects.
- It includes Mync updates.
- It has a superior 4K workflow.
- It has a flexible user interface.
Cons:
- It does not have a free trial version.
#5: Autodesk Smoke
It is available in Mac OS only.
By merging workflows with node-based blending capabilities in a timeline-centered editing interface, the Autodesk Smoke video editing tool helps production companies improve productivity. Autodesk Smoke is a video editing software that combines advanced video effects with an intuitive interface. Most folks assume Smoke as a finalizing tool, but it’s also a complete editing kit with a built-in node-based compositor.

Features:
- It has an innovative timeline workflow base
- Compositing with ConnectFX nodes
- It is supported with Powerful Compositing
- It has 3D Text and geometry
- Trimming in motion
- It is supported with FCP X and Smoke
Cons:
- Only Macs are supported, and a very powerful system is required.
- You cannot use smoke on multiple monitors.
#6: Adobe Premiere Pro CC
It is available in Mac OS and Windows.
Adobe Premiere Pro CC is a powerful, professional-level digital video editing suite with excellent collaboration tools suitable for even the most demanding users. This program, which is both economical and straightforward, has been at the high end of the market for several years and shows no signs of slowing down, as new upgrades are continuously made available for free download. If you want to master how to edit videos professionally with little to no expertise, Adobe Premiere Pro CC might be the right tool for you.

Features:
- Motion Graphics Templates are available.
- Graphics and video titling.
- Its user interface is extremely responsive.
- It is supported by Immersive Virtual Reality (VR).
- Workflow Integration.
- Effortless and continuous editing.
- Multiple file formats are supported.
- You may install plugins to add extras.
Cons:
- You may need to pay monthly or yearly payments in this subscription-based model.
- It’s pretty complicated, and you might get lost in it.
- Strong computer specifications are required.
- It necessitates a large amount of RAM.
FAQ
Which Should I Choose, Free or Paid MP4 Editor?
If you need to work on videos on a regular basis, or if you wish to edit films for your own Facebook or Instagram use, paid software is probably not necessary. However, keep in mind that video editor tools cannot compete with paid software. Based on our own experience, they’re generally limited in terms of capabilities and performance, and they often have other annoyances like advertisements or export restrictions.
That said, if you simply need to make minor edits or aren’t planning on editing films for a long time, the most exemplary free video editing programs listed above can be handy. However, if you use video editing software regularly or for work, I strongly advise you to invest in professional video editing software.
What Editing Tools Do Professionals Use?
Several people are curious about the software used by professionals. On the other hand, professional editors use various tools to improve their video editing productivity. Many use Adobe Audition for audio editing. Many users prefer Final Cut Pro for color grading. They often use Premiere Pro and Lightworks for film editing. And semi-pros use Filmora to speed up the video editing process.
What Software Do YouTubers Are Using to Make Their Videos?
Several YouTubers prefer simple video software to create YouTube content. They chose Filmora because of its built-in effects, flash animations, graphics, and transitions, which total over 300.
Furthermore, several YouTubers with advanced video editing talents use Premiere Pro.
What MP4 Video Editor Is Best for Beginners?
One of the most significant aspects to consider for beginners is convenience and affordability. On the Mac, users choose Filmora, Movavi, Powerdirector, and iMovie.
What Should I Think About Before Buying Professional Video Editing Tools?
If you are reading this, you might be wondering, “What persuades me to c a professional video editor?” Is it because you’ve seen other YouTubers utilizing them?
Is there enough time in your schedule to study these expert video editors? If this is the situation, think about the price you are investing in and if those high-end features and functionalities are really what you need. Well, I have something to recommend for you.
Filmora can handle 95 percent of your video editing needs for just $49.99 a year, thanks to its absurdly short learning curve and user-friendly design. You won’t have to waste time studying a tiresome manual with Filmora, and you can start editing videos straight away because everything is set up for it.
Detailed Steps to Rotate Videos in Lightworks
Lightworks is a professional non-linear video editing software application developed by EditShare. It supports Windows and Linux, and macOS.
Lightworks has a very simple and intuitive user interface. The basic workflow is: import your media files into the project, then edit them using the various tools available. When you’re finished, export your project as a video file.
Lightworks can be used for a variety of purposes, including creating videos for social media, corporate videos, documentaries, and more. It’s also been used to edit some major Hollywood films, such as The Wolf of Wall Street and The King’s Speech.
In this article, we will discuss how to rotate videos in the Lightworks application. Below is a way to rotate videos in Lightworks manually, here, we will use the Z-axis rotation.
Step-by-step on how to rotate videos in Lightworks
How to Manually Rotate a Video in Lightworks
To manually rotate a video in Lightworks, follow these steps:
Step 1: Import your video into the project.
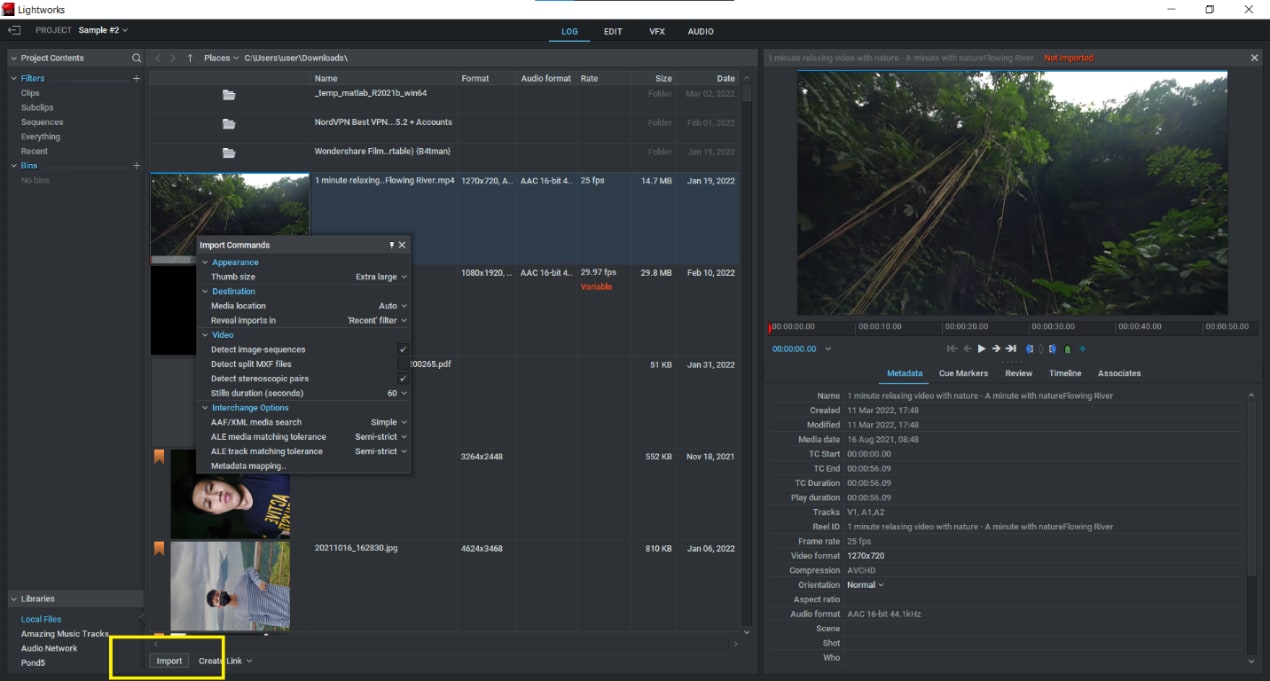
Step 2: Choose the portion of the video you want to rotate; if you want to rotate the entire movie, simply choose the entire video instead of a specific portion.

Step 3: Click on the “VFX” tab and go to the “3D DVE” section.
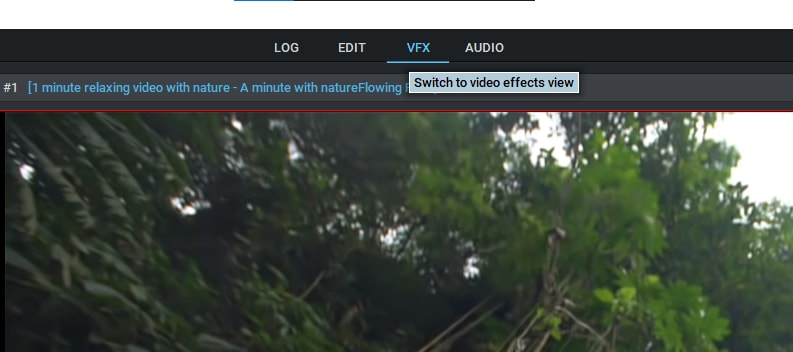
Step 4: Choose the Z axis and rotate the video to the desired degree. You can also modify the orientation of the video by entering a value in the box provided in front of the Z-axis.

Step 5: Click on the Enter in the keyboard button.
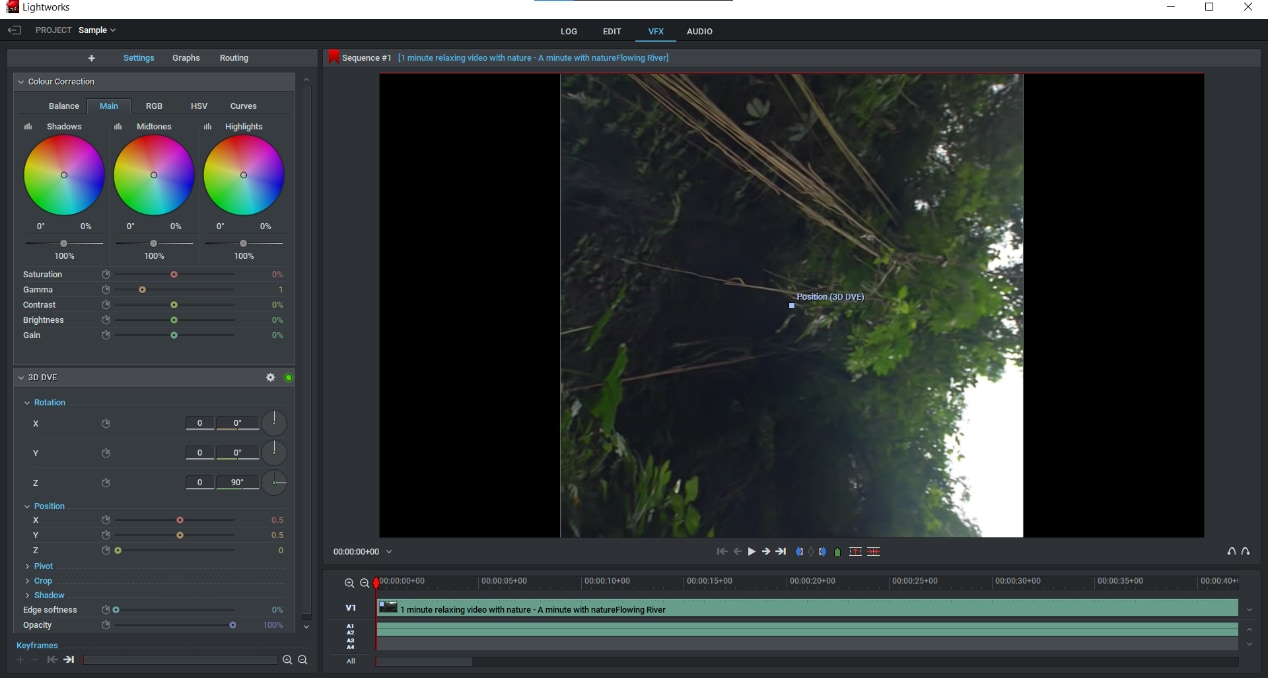
Your video will now be rotated by the selected number of degrees.
How to Rotate Videos in Filmora
On the other hand, Lightworks has an alternative video editing tool which is Filmora Video Editor . If you are looking for a lightweight video editor with an easy-to-use interface, then Filmora is the best option for you. It offers powerful features such as motion graphics, text editing, and audio editing, while still being very easy to use.
You can try it for free by downloading the trial version from the Filmora website. Filmora also offers a wide range of export options, so you can easily share your videos with others. You can export your video as an MP4 or MOV file, or upload it directly to YouTube or Facebook.
For Win 7 or later (64-bit)
For macOS 10.14 or later
Step-by-step on how to rotate videos in Filmora
How to Manually Rotate a Video in Filmora
To rotate videos in Filmora manually…
Step 1: Import your video into the project.

Step 2: Click the video clip you want to rotate.
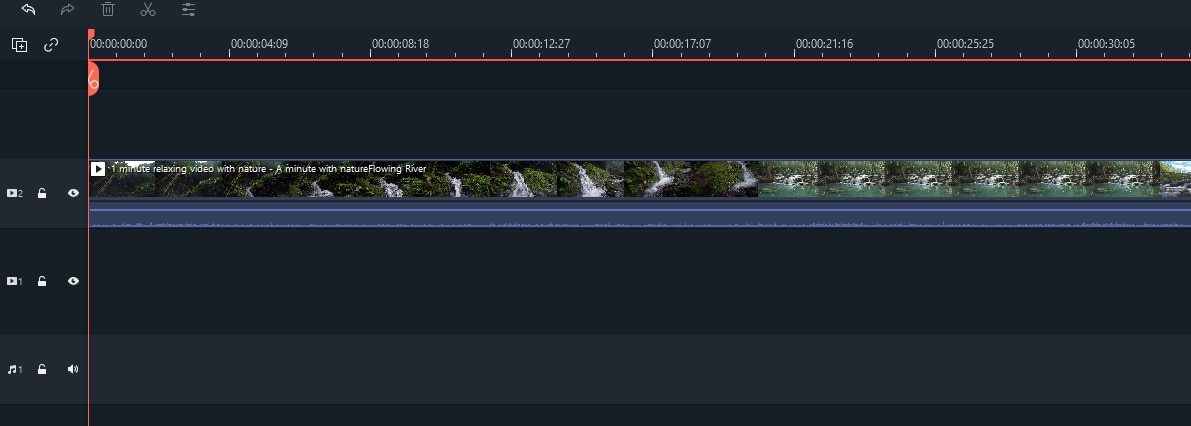
Step 3: Click on the “Edit” tool above the timeline and go to the “Transform” section. Then, select the “Rotate” option.

Step 4: Select the desired rotation option.

Step 5: Click on the “Ok” button.

Your video will now be rotated by the selected number of degrees.
In conclusion, Lightworks is a powerful video editing application that offers a lot of features and options. If you’re looking for something with all the features you need, then it’s a great choice. However, if you’re on a tight budget, there are other applications available that may be more suitable for your needs.
Filmora is a lightweight video editor that is easy to use and offers powerful features such as motion graphics, text editing, and audio editing. You can try it for free by downloading the trial version from the Filmora website.
Step 2: Choose the portion of the video you want to rotate; if you want to rotate the entire movie, simply choose the entire video instead of a specific portion.

Step 3: Click on the “VFX” tab and go to the “3D DVE” section.

Step 4: Choose the Z axis and rotate the video to the desired degree. You can also modify the orientation of the video by entering a value in the box provided in front of the Z-axis.

Step 5: Click on the Enter in the keyboard button.

Your video will now be rotated by the selected number of degrees.
How to Rotate Videos in Filmora
On the other hand, Lightworks has an alternative video editing tool which is Filmora Video Editor . If you are looking for a lightweight video editor with an easy-to-use interface, then Filmora is the best option for you. It offers powerful features such as motion graphics, text editing, and audio editing, while still being very easy to use.
You can try it for free by downloading the trial version from the Filmora website. Filmora also offers a wide range of export options, so you can easily share your videos with others. You can export your video as an MP4 or MOV file, or upload it directly to YouTube or Facebook.
For Win 7 or later (64-bit)
For macOS 10.14 or later
Step-by-step on how to rotate videos in Filmora
How to Manually Rotate a Video in Filmora
To rotate videos in Filmora manually…
Step 1: Import your video into the project.

Step 2: Click the video clip you want to rotate.

Step 3: Click on the “Edit” tool above the timeline and go to the “Transform” section. Then, select the “Rotate” option.


Step 4: Select the desired rotation option.

Step 5: Click on the “Ok” button.

Your video will now be rotated by the selected number of degrees.
In conclusion, Lightworks is a powerful video editing application that offers a lot of features and options. If you’re looking for something with all the features you need, then it’s a great choice. However, if you’re on a tight budget, there are other applications available that may be more suitable for your needs.
Filmora is a lightweight video editor that is easy to use and offers powerful features such as motion graphics, text editing, and audio editing. You can try it for free by downloading the trial version from the Filmora website.
Step 2: Choose the portion of the video you want to rotate; if you want to rotate the entire movie, simply choose the entire video instead of a specific portion.

Step 3: Click on the “VFX” tab and go to the “3D DVE” section.

Step 4: Choose the Z axis and rotate the video to the desired degree. You can also modify the orientation of the video by entering a value in the box provided in front of the Z-axis.

Step 5: Click on the Enter in the keyboard button.

Your video will now be rotated by the selected number of degrees.
How to Rotate Videos in Filmora
On the other hand, Lightworks has an alternative video editing tool which is Filmora Video Editor . If you are looking for a lightweight video editor with an easy-to-use interface, then Filmora is the best option for you. It offers powerful features such as motion graphics, text editing, and audio editing, while still being very easy to use.
You can try it for free by downloading the trial version from the Filmora website. Filmora also offers a wide range of export options, so you can easily share your videos with others. You can export your video as an MP4 or MOV file, or upload it directly to YouTube or Facebook.
For Win 7 or later (64-bit)
For macOS 10.14 or later
Step-by-step on how to rotate videos in Filmora
How to Manually Rotate a Video in Filmora
To rotate videos in Filmora manually…
Step 1: Import your video into the project.

Step 2: Click the video clip you want to rotate.

Step 3: Click on the “Edit” tool above the timeline and go to the “Transform” section. Then, select the “Rotate” option.


Step 4: Select the desired rotation option.

Step 5: Click on the “Ok” button.

Your video will now be rotated by the selected number of degrees.
In conclusion, Lightworks is a powerful video editing application that offers a lot of features and options. If you’re looking for something with all the features you need, then it’s a great choice. However, if you’re on a tight budget, there are other applications available that may be more suitable for your needs.
Filmora is a lightweight video editor that is easy to use and offers powerful features such as motion graphics, text editing, and audio editing. You can try it for free by downloading the trial version from the Filmora website.
Step 2: Choose the portion of the video you want to rotate; if you want to rotate the entire movie, simply choose the entire video instead of a specific portion.

Step 3: Click on the “VFX” tab and go to the “3D DVE” section.

Step 4: Choose the Z axis and rotate the video to the desired degree. You can also modify the orientation of the video by entering a value in the box provided in front of the Z-axis.

Step 5: Click on the Enter in the keyboard button.

Your video will now be rotated by the selected number of degrees.
How to Rotate Videos in Filmora
On the other hand, Lightworks has an alternative video editing tool which is Filmora Video Editor . If you are looking for a lightweight video editor with an easy-to-use interface, then Filmora is the best option for you. It offers powerful features such as motion graphics, text editing, and audio editing, while still being very easy to use.
You can try it for free by downloading the trial version from the Filmora website. Filmora also offers a wide range of export options, so you can easily share your videos with others. You can export your video as an MP4 or MOV file, or upload it directly to YouTube or Facebook.
For Win 7 or later (64-bit)
For macOS 10.14 or later
Step-by-step on how to rotate videos in Filmora
How to Manually Rotate a Video in Filmora
To rotate videos in Filmora manually…
Step 1: Import your video into the project.

Step 2: Click the video clip you want to rotate.

Step 3: Click on the “Edit” tool above the timeline and go to the “Transform” section. Then, select the “Rotate” option.


Step 4: Select the desired rotation option.

Step 5: Click on the “Ok” button.

Your video will now be rotated by the selected number of degrees.
In conclusion, Lightworks is a powerful video editing application that offers a lot of features and options. If you’re looking for something with all the features you need, then it’s a great choice. However, if you’re on a tight budget, there are other applications available that may be more suitable for your needs.
Filmora is a lightweight video editor that is easy to use and offers powerful features such as motion graphics, text editing, and audio editing. You can try it for free by downloading the trial version from the Filmora website.
[Top iOS Solutions] Finding Premium Slow Motion Apps For Video Creation
iPhone is undoubtedly an awesome device to capture moments. Regardless of the iOS you are using; it has better lens and resolution sensors than Android. The launch of the iPhone 5S enables users to record video in slow motion with their smartphones. Although it is best in capturing and editing slow-mo, people still look for third-party apps .
The reason might be that the iPhone slow motion app offers certain additional features. Maybe they provide more advanced settings and personalization. To find an answer, you should read this article, which lists the best iPhone slow-mo apps.
Slow Motion Video Maker Slow your video’s speed with better control of your keyframes to create unique cinematic effects!
Make A Slow Motion Video Make A Slow Motion Video More Features

Part 1: [Top 10] Slowing Down Videos With Finest iPhone Slow Motion Apps
Are you an enthusiastic user of the iPhone and want to create videos across it to save time? Provided are some quick and effective iPhone slow-motion apps that you can go with. These applications will help you create the best slow-motion content without taking up much effort:
- Slow Motion Video Fx Editor
- SloMo Slow Motion Video Editor
- Slow Motion Video Editor
- Slow Motion’ Video Editor
- Slow Motion Video FX Edit
- Slow Fast Motion Video Editor
- Slow-Fast Motion Video Editor
- TimeFreeze
- Vidma – Video Editor Music
- Vizmato: Video Editor & Maker
1. Slow Motion Video Fx Editor
If you are seeking an iPhone slo-mo app, then this application holds all the relevant features. The application is designed to assist users in achieving slow motion and other speed effects. For precise and accurate slow motion, it offers basic slider and timeline settings. You can slow down a video at any scene by incorporating Advanced or Basic options.

Key Features
- The application offers to manipulate frame rate by 240 fps and 12x slower.
- Users can improve videos by incorporating music using its music library of 170+ tracks.
- The platform provides sharing options along social platforms like Instagram and Facebook.
2. SloMo Slow Motion Video Editor
This iPhone slow-motion app has all the abilities to slow down videos and enhance them. It provides two options to slow down a video via playback speed or video frame rate. The playback speed slows a video instantly while the frame rates smoothen it. You can also choose a specific period for adding the slow-motion effect.

Key Features
- The frame manipulation goes up to 120 fps, and the playback speed goes 12x.
- The application offers 40 color filters to enhance your video’s visual outlook.
- There are multiple ratio options to export a video to upload it to different platforms.
3. Slow Motion Video Editor
Create ultra-slow motion or ultra-high motion videos with this iPhone slo-mo app. It offers distinct speed manipulation options, such as up to 10x to slow down a video. In addition, the application offers built-in speed templates to help you add speed effects to dance videos. Users can also retain the original audio of the videos after speed alteration.

Key Features
- An intuitive user interface that offers a seamless slo-mo editing method.
- Import music from iTunes into this iPhone slo-mo app and add it to your videos.
- Publish your slo-mos directly to other editing apps like GoPro and InShot for additional editing.
4. Slow Motion’ Video Editor
Make professional-grade slow-motion videos using this iPhone slow-motion app. The application can record and edit videos at 60 to 240 fps, ensuring smooth, slow motions. With its modern and accessible user interface, achieving slow motions is easy. Other speed settings include split-second freezing frames and time-lapse videos.

Key Features
- The application passes subscription charges via iTunes for a seamless and trusted process.
- You can trim the unnecessary parts of the video using its Trim tool.
- Offers one-click functionality to share videos across Instagram, YouTube, Facebook, or Email.
5. Slow Motion Video FX Edit
Do you want to be in control of your slow-motion videos while editing? This iPhone slow motion app offers custom speed manipulation options like 12x and 240 fps. You can add freeze frames if you want to highlight a specific part of the video. With its interface, speed manipulation is just as simple as dragging a slider.

Key Features
- Enhance your video’s visuals with up to 40 stunning visual filters to enhance colors.
- The application offers weekly, monthly, and yearly plans to suit your requirements.
- You can add music from your library to videos or specific scenes via this app.
6. Slow Fast Motion Video Editor
Apply slow motion effect to the specific parts of your videos using this iPhone slow motion app. You can access it on the app store; the application is free to download. It features a timeline editing interface and a playback speed of up to 8x for Slomo. It separates the video frames, and you can change their speed, and afterward, it merges them.

Key Features
- The ability to incorporate music from your music library into videos with this app.
- You can manually trim out video segments and merge them back.
- Showcase your creativity to other social platforms directly from the app.
7. Slow-Fast Motion Video Editor
This iPhone slow-motion app download unlocks a professional way of creating slo-mos. The user interface is professional and accessible for all types of editors. It displays a velocity graph to change the playback speed to 8x at specific video frames. This application slows down video to 1/10th of its actual speed. It also maintains the pitch of audio while creating fast or slow-motion videos.

Key Features
- There is no restriction on video length to edit in this iPhone slow-motion app.
- It doesn’t export video with Watermark addition, which is remarkable for branding.
- You can edit and export a video in Portrait or Landscape display.
8. TimeFreeze
If you want to create slow-motion videos effectively, then this iPhone slow-motion app can do it. It works by manipulating the video frame rates from 24 fps to 120 fps. Along with slowing down videos, you can slow down high-motion video to normal as well. The user interface is basic and lacks technicalities to be accessed by skilled people.

Key Features
- The application supports all iOS 12.1, macOS 12.1, and newer versions.
- Uses advanced image processing algorithms for video frame manipulation.
- The application is free to use and only takes up 25.3 MB of your iPhone’s storage.
9. Vidma - Video Editor Music
You have read about many applications that offer to transform normal videos into slow motions. However, this iPhone slo-mo app is much more than just a speed changer. It slows down your videos via a velocity graph and maintains the audio pitch during the process. Using this application, you can slow down videos to 0.1x while also having video reverse options.

Key Features
- With 1000+ music tracks and hundreds of visual effects and filters, your videos can stand out.
- Along with the slow motion, you can also create time-lapse and apply speed ramping presets.
- Export your video in high-quality 4K resolution without any quality loss.
10. Vizmato: Video Editor & Maker
Vizmato stands as a multipurpose video editing app with slow-motion capabilities. Beyond the creation of compelling slow-motion scenes, Vizmato adds dramatic flair by reversing the speed. Furthermore, the software extends the speed manipulation feature via a custom option. In this way, everyone gets a chance to design their videos per their preferences.

Key Features
- It offers 20+ visual themes, 40+ effects, and 140+ music assets to uplift your videos.
- The tool can transform images into slideshows, making a video of your memories.
- You can record and add voiceovers with this iPhone slow-motion app.
Bonus Part: Wondershare Filmora and Slow Motion Video Making: A Simple Connection
Having no fun while editing video with the iPhone slow-motion app? It’s obvious because such applications are limited to slowing down your videos. So, using Wondershare Filmora could change the game in video editing of all types. Users from every field can rely on Filmora to get unique and polished content. This editing platform is available online for Windows, macOS, and mobile phone users.
Wondershare Filmora is integrated with artificial intelligence to boost your productivity in editing. You can use Filmora’s asset library to get media or create your own with AI. Using Filmora will amaze you at every step of editing and creating engaging media.
Free Download For Win 7 or later(64-bit)
Free Download For macOS 10.14 or later
Steps to Slow Down Video with Speed Ramping in Filmora
Speed ramping is a way to slow down or speed up videos smoothly. A slow change in videos gives a more professional outlook to videos. Have you observed this feature in any of the above-discussed iPhone slow-motion apps? The answer is no, so let’s benefit from speed ramping in Filmora by following the given steps.
Step 1Start Working on the New Project
Begin your video editing journey after downloading Filmora on your device. After downloading, open this platform and select “New Project.” This way, you will access its editing screen to begin working. Start with importing your video and bringing it to the timeline.

Step 2Discover the Speed Ramping Option with Templates
Place your cursor on the video and right-click to choose “Speed Ramping” from the list. Now, you can see an editing screen on your right. Pick any of the templates for effortless speed ramping.

Step 3Customize Speed Ramping to Smoothly Slow Down Videos
Otherwise, hit the “Customize” and direct downward. Go to the editing panel and hold the dots to move downward if you want to slow down. You can speed up video portions by holding the dots upward. Meanwhile, you can play the video to see the changes.

Step 4Use Optical Flow for Good Quality and Move to Save Changes
Extend the “AI Frame Interpolation” menu and hit the “Optical Flow.” That’s how you will get a high-quality video with slow speed. Keep editing or save changes through the “Export” button on the upper right.

Find Core Functionalities of Wondershare Filmora
Before using Filmora, it’s important to explore it to avoid confusion. Considering this point, you should discover some of its main features below:
1. AI Copywriting
Except for AI, no one can provide you with an engaging script on short notice. Thus, Filmora integrates an AI copywriting feature for generating the desired script within seconds. It accepts natural language prompts, not limiting experts to giving commands. This feature is considered professional in creating YouTube descriptions to rank the content.
2. AI Copilot Editing
Humans typically need suggestions in editing, whether they are beginners or professionals. What could be better than having an AI as your personal editing assistant? Filmora offers an AI copilot editor that answers your editing-related queries. Besides, it navigates you toward practical solutions by providing links or buttons.
3. AI Audio Denoise
Sometimes, background noises ruin the vocals of the audio. Remove that noise with the help of AI, which can detect the noise type for exact results. This feature can enhance your audio by performing reverb reduction. It can make the voice clear that is present in surroundings, like electrical voices from devices. Audio denoise proves vital in recording podcasts and online course recording scenarios.
4. AI Portrait
It’s a human urge to look beautiful, and video editing apps are not denying it. Filmora also provides more than 70 AI portrait effects to beautify facial features. Moreover, it can assist you in removing the background and keeping humans in video frames. Some AI stickers include Heart eyes, Emojis, and Sunglasses that can evoke humorous emotions.
Conclusion
Until now, you might find your answer about using iPhone slow-motion apps. The overview of such premium apps has guided you to select an app that best aligns with your needs. If you are still confused, use Wondershare Filmora, an incredible video editor. This platform is available for iPhone, Android, Windows, and macOS with its limitless editing tools.
Make A Slow Motion Video Make A Slow Motion Video More Features

Part 1: [Top 10] Slowing Down Videos With Finest iPhone Slow Motion Apps
Are you an enthusiastic user of the iPhone and want to create videos across it to save time? Provided are some quick and effective iPhone slow-motion apps that you can go with. These applications will help you create the best slow-motion content without taking up much effort:
- Slow Motion Video Fx Editor
- SloMo Slow Motion Video Editor
- Slow Motion Video Editor
- Slow Motion’ Video Editor
- Slow Motion Video FX Edit
- Slow Fast Motion Video Editor
- Slow-Fast Motion Video Editor
- TimeFreeze
- Vidma – Video Editor Music
- Vizmato: Video Editor & Maker
1. Slow Motion Video Fx Editor
If you are seeking an iPhone slo-mo app, then this application holds all the relevant features. The application is designed to assist users in achieving slow motion and other speed effects. For precise and accurate slow motion, it offers basic slider and timeline settings. You can slow down a video at any scene by incorporating Advanced or Basic options.

Key Features
- The application offers to manipulate frame rate by 240 fps and 12x slower.
- Users can improve videos by incorporating music using its music library of 170+ tracks.
- The platform provides sharing options along social platforms like Instagram and Facebook.
2. SloMo Slow Motion Video Editor
This iPhone slow-motion app has all the abilities to slow down videos and enhance them. It provides two options to slow down a video via playback speed or video frame rate. The playback speed slows a video instantly while the frame rates smoothen it. You can also choose a specific period for adding the slow-motion effect.

Key Features
- The frame manipulation goes up to 120 fps, and the playback speed goes 12x.
- The application offers 40 color filters to enhance your video’s visual outlook.
- There are multiple ratio options to export a video to upload it to different platforms.
3. Slow Motion Video Editor
Create ultra-slow motion or ultra-high motion videos with this iPhone slo-mo app. It offers distinct speed manipulation options, such as up to 10x to slow down a video. In addition, the application offers built-in speed templates to help you add speed effects to dance videos. Users can also retain the original audio of the videos after speed alteration.

Key Features
- An intuitive user interface that offers a seamless slo-mo editing method.
- Import music from iTunes into this iPhone slo-mo app and add it to your videos.
- Publish your slo-mos directly to other editing apps like GoPro and InShot for additional editing.
4. Slow Motion’ Video Editor
Make professional-grade slow-motion videos using this iPhone slow-motion app. The application can record and edit videos at 60 to 240 fps, ensuring smooth, slow motions. With its modern and accessible user interface, achieving slow motions is easy. Other speed settings include split-second freezing frames and time-lapse videos.

Key Features
- The application passes subscription charges via iTunes for a seamless and trusted process.
- You can trim the unnecessary parts of the video using its Trim tool.
- Offers one-click functionality to share videos across Instagram, YouTube, Facebook, or Email.
5. Slow Motion Video FX Edit
Do you want to be in control of your slow-motion videos while editing? This iPhone slow motion app offers custom speed manipulation options like 12x and 240 fps. You can add freeze frames if you want to highlight a specific part of the video. With its interface, speed manipulation is just as simple as dragging a slider.

Key Features
- Enhance your video’s visuals with up to 40 stunning visual filters to enhance colors.
- The application offers weekly, monthly, and yearly plans to suit your requirements.
- You can add music from your library to videos or specific scenes via this app.
6. Slow Fast Motion Video Editor
Apply slow motion effect to the specific parts of your videos using this iPhone slow motion app. You can access it on the app store; the application is free to download. It features a timeline editing interface and a playback speed of up to 8x for Slomo. It separates the video frames, and you can change their speed, and afterward, it merges them.

Key Features
- The ability to incorporate music from your music library into videos with this app.
- You can manually trim out video segments and merge them back.
- Showcase your creativity to other social platforms directly from the app.
7. Slow-Fast Motion Video Editor
This iPhone slow-motion app download unlocks a professional way of creating slo-mos. The user interface is professional and accessible for all types of editors. It displays a velocity graph to change the playback speed to 8x at specific video frames. This application slows down video to 1/10th of its actual speed. It also maintains the pitch of audio while creating fast or slow-motion videos.

Key Features
- There is no restriction on video length to edit in this iPhone slow-motion app.
- It doesn’t export video with Watermark addition, which is remarkable for branding.
- You can edit and export a video in Portrait or Landscape display.
8. TimeFreeze
If you want to create slow-motion videos effectively, then this iPhone slow-motion app can do it. It works by manipulating the video frame rates from 24 fps to 120 fps. Along with slowing down videos, you can slow down high-motion video to normal as well. The user interface is basic and lacks technicalities to be accessed by skilled people.

Key Features
- The application supports all iOS 12.1, macOS 12.1, and newer versions.
- Uses advanced image processing algorithms for video frame manipulation.
- The application is free to use and only takes up 25.3 MB of your iPhone’s storage.
9. Vidma - Video Editor Music
You have read about many applications that offer to transform normal videos into slow motions. However, this iPhone slo-mo app is much more than just a speed changer. It slows down your videos via a velocity graph and maintains the audio pitch during the process. Using this application, you can slow down videos to 0.1x while also having video reverse options.

Key Features
- With 1000+ music tracks and hundreds of visual effects and filters, your videos can stand out.
- Along with the slow motion, you can also create time-lapse and apply speed ramping presets.
- Export your video in high-quality 4K resolution without any quality loss.
10. Vizmato: Video Editor & Maker
Vizmato stands as a multipurpose video editing app with slow-motion capabilities. Beyond the creation of compelling slow-motion scenes, Vizmato adds dramatic flair by reversing the speed. Furthermore, the software extends the speed manipulation feature via a custom option. In this way, everyone gets a chance to design their videos per their preferences.

Key Features
- It offers 20+ visual themes, 40+ effects, and 140+ music assets to uplift your videos.
- The tool can transform images into slideshows, making a video of your memories.
- You can record and add voiceovers with this iPhone slow-motion app.
Bonus Part: Wondershare Filmora and Slow Motion Video Making: A Simple Connection
Having no fun while editing video with the iPhone slow-motion app? It’s obvious because such applications are limited to slowing down your videos. So, using Wondershare Filmora could change the game in video editing of all types. Users from every field can rely on Filmora to get unique and polished content. This editing platform is available online for Windows, macOS, and mobile phone users.
Wondershare Filmora is integrated with artificial intelligence to boost your productivity in editing. You can use Filmora’s asset library to get media or create your own with AI. Using Filmora will amaze you at every step of editing and creating engaging media.
Free Download For Win 7 or later(64-bit)
Free Download For macOS 10.14 or later
Steps to Slow Down Video with Speed Ramping in Filmora
Speed ramping is a way to slow down or speed up videos smoothly. A slow change in videos gives a more professional outlook to videos. Have you observed this feature in any of the above-discussed iPhone slow-motion apps? The answer is no, so let’s benefit from speed ramping in Filmora by following the given steps.
Step 1Start Working on the New Project
Begin your video editing journey after downloading Filmora on your device. After downloading, open this platform and select “New Project.” This way, you will access its editing screen to begin working. Start with importing your video and bringing it to the timeline.

Step 2Discover the Speed Ramping Option with Templates
Place your cursor on the video and right-click to choose “Speed Ramping” from the list. Now, you can see an editing screen on your right. Pick any of the templates for effortless speed ramping.

Step 3Customize Speed Ramping to Smoothly Slow Down Videos
Otherwise, hit the “Customize” and direct downward. Go to the editing panel and hold the dots to move downward if you want to slow down. You can speed up video portions by holding the dots upward. Meanwhile, you can play the video to see the changes.

Step 4Use Optical Flow for Good Quality and Move to Save Changes
Extend the “AI Frame Interpolation” menu and hit the “Optical Flow.” That’s how you will get a high-quality video with slow speed. Keep editing or save changes through the “Export” button on the upper right.

Find Core Functionalities of Wondershare Filmora
Before using Filmora, it’s important to explore it to avoid confusion. Considering this point, you should discover some of its main features below:
1. AI Copywriting
Except for AI, no one can provide you with an engaging script on short notice. Thus, Filmora integrates an AI copywriting feature for generating the desired script within seconds. It accepts natural language prompts, not limiting experts to giving commands. This feature is considered professional in creating YouTube descriptions to rank the content.
2. AI Copilot Editing
Humans typically need suggestions in editing, whether they are beginners or professionals. What could be better than having an AI as your personal editing assistant? Filmora offers an AI copilot editor that answers your editing-related queries. Besides, it navigates you toward practical solutions by providing links or buttons.
3. AI Audio Denoise
Sometimes, background noises ruin the vocals of the audio. Remove that noise with the help of AI, which can detect the noise type for exact results. This feature can enhance your audio by performing reverb reduction. It can make the voice clear that is present in surroundings, like electrical voices from devices. Audio denoise proves vital in recording podcasts and online course recording scenarios.
4. AI Portrait
It’s a human urge to look beautiful, and video editing apps are not denying it. Filmora also provides more than 70 AI portrait effects to beautify facial features. Moreover, it can assist you in removing the background and keeping humans in video frames. Some AI stickers include Heart eyes, Emojis, and Sunglasses that can evoke humorous emotions.
Conclusion
Until now, you might find your answer about using iPhone slow-motion apps. The overview of such premium apps has guided you to select an app that best aligns with your needs. If you are still confused, use Wondershare Filmora, an incredible video editor. This platform is available for iPhone, Android, Windows, and macOS with its limitless editing tools.
Also read:
- Updated 2024 Approved Add Camera Shake to Video in Adobe After Effects
- Updated 2024 Approved How to Splice Videos Together on iPhone
- 2024 Approved How to Create Chroma Key Written Text Effects in Filmora
- 8 Unexpected Ways to Add Emoji to Photo Online for 2024
- Updated How to Vlog? A Beginners Guide to Start Vlogging
- Updated 2024 Approved Applying the Effect of Camera Shake in Video Creation
- Updated 2024 Approved VSCO Slow Motion
- New Quick Solved How to Add Subtitles to a Video on iPhones
- New Top Applications That Can Help Apply The Best VHS Camera Effect for 2024
- AI Has Influenced All Video Editors to Speed up Editing. This Article Discusses the Significance of AI Slow Motion and the Tools that Offer It
- Do You Have a Sony Camera and Want to Try Different LUTs on Your Digital Content? Youre at the Right Place, as You Can Apply Sony HLG LUTs to Your Media
- Updated In 2024, Denoise a Video in Adobe Premiere Pro – Audio and Video Noise Removal
- Create Promotional Video for 2024
- Updated Read Through This Post to Know What Frame Rate Is, the Different Variations, and Why 60FPS Is Superior. Also, Know the Tools Available to Make the Conversion
- Ultimate Guide To Make A Political Video
- Updated 2024 Approved Best Practical Tips to Improve Your Lighting in the Sun
- New How Have Game Recording Software Improved Their Stature in the Market? An Overview
- Troubleshoot Snapchat Camera Zoomed in Issue
- Best Movie Title Maker
- Updated Color Correction Basics (S-LOG Footage)
- Updated Have You a Desire to Imbibe Your PowerPoint Presentations with Custom Effects and Tools? Be There to Learn All About Creating Custom Slideshows in PowerPoint with Utmost Ease
- Updated How to Blur a Still or Moving Part of Video for 2024
- Updated 2024 Approved How to Convert Videos to Slow Motion?
- Updated 2024 Approved How to Customize Your Loading Text Effect?
- New Add Some Shake to Videos with Alight Motion for 2024
- New 2024 Approved Everything About Adding Effects In Kinemaster
- Updated Are You Curious About the Functionality of LUTs in LumaFusion? This Article Will Satisfy Your Queries with Ease
- In 2024, As a Designer, Color Is the Most Powerful and the Most Diverse Tool at Your Disposal. Here Are Ten Matching Color Combinations to Get You Started on Your Next Project
- Updated With Many Available Video Editing Solutions in the Market Today, It Is a Bit Hard to Choose the Best Video Editing Software for Your Unique Needs
- In 2024, How to Create Vintage Film Effect 1950S
- 2024 Approved Want to Have Slow Zoom Effect in Your Video? We Will Illustrate How to Apply Slow Zoom Effect to Your Video on Your Smartphone, Computer, and TikTok
- Updated In 2024, 5 Excellent Tools To Convert Video to 60 FPS
- Top Best Free LUTs For Premiere Pro for 2024
- Step by Step to Cut Video in Adobe Premiere Pro for 2024
- Bypass iCloud Activation Lock with IMEI Code From your iPhone 15 Pro Max
- How Vivo Y100 Mirror Screen to PC? | Dr.fone
- In 2024, Here are Some Pro Tips for Pokemon Go PvP Battles On Honor 90 Pro | Dr.fone
- In 2024, Here Are Some Reliable Ways to Get Pokemon Go Friend Codes For Oppo A78 5G | Dr.fone
- Life360 Learn How Everything Works On Realme GT 5 | Dr.fone
- In 2024, How to Sign Out of Apple ID From iPhone 15 Plus without Password?
- In 2024, How to Fix Pokemon Go Route Not Working On Motorola Moto G04? | Dr.fone
- In 2024, How to Use Google Assistant on Your Lock Screen Of Infinix Zero 5G 2023 Turbo Phone
- How To Transfer Data From iPhone 6s Plus To Other iPhone 12 Pro devices? | Dr.fone
- Possible solutions to restore deleted music from Reno 9A
- Fixing Foneazy MockGo Not Working On Xiaomi Redmi Note 12 Pro 5G | Dr.fone
- Top IMEI Unlokers for Your Samsung Galaxy A14 5G Phone
- In 2024, How to Unlock SIM Card on Vivo Y200 online without jailbreak
- In 2024, 3 Ways to Unlock Your iPhone SE (2022) for Free
- In 2024, Latest way to get Shiny Meltan Box in Pokémon Go Mystery Box On Tecno Camon 20 Pro 5G | Dr.fone
- How to Reset Itel A70 Without the Home Button | Dr.fone
- How to Perform Hard Reset on Oppo Find N3 Flip? | Dr.fone
- In 2024, Your Account Has Been Disabled in the App Store and iTunes On iPhone 12 Pro?
- In 2024, Top 10 Fingerprint Lock Apps to Lock Your Samsung Phone
- How To Restore Missing Photos Files from 90 Lite.
- How To Bypass the Required Apple Store Verification For Apple iPhone 6s | Dr.fone
- How To Transfer Data From Apple iPhone X To Android/iOS? | Dr.fone
- How To Remove or Bypass Knox Enrollment Service On Oppo Reno 11F 5G
- How To Use Allshare Cast To Turn On Screen Mirroring On Samsung Galaxy A34 5G | Dr.fone
- Forgotten The Voicemail Password Of Realme C67 4G? Try These Fixes
- What To Do if Your Motorola Razr 40 Ultra Auto Does Not Work | Dr.fone
- 3 Things You Must Know about Fake Snapchat Location On Realme 11 5G | Dr.fone
- How to Send and Fake Live Location on Facebook Messenger Of your Oppo A78 5G | Dr.fone
- Prank Your Friends! Easy Ways to Fake and Share Google Maps Location On Realme C67 4G | Dr.fone
- How to get the dragon scale and evolution-enabled pokemon On Realme C33 2023? | Dr.fone
- In 2024, How to Unlock Apple iPhone 13 without Passcode or Face ID | Dr.fone
- Title: Knowing All Ways To Slow Down Video With Adobe Premiere Pro for 2024
- Author: Chloe
- Created at : 2024-04-24 07:08:13
- Updated at : 2024-04-25 07:08:13
- Link: https://ai-editing-video.techidaily.com/knowing-all-ways-to-slow-down-video-with-adobe-premiere-pro-for-2024/
- License: This work is licensed under CC BY-NC-SA 4.0.

