
:max_bytes(150000):strip_icc():format(webp)/tclsclass-0185b3ecd41d454589d2a9984629b919.jpg)
Learn About How You Can Create a Smooth Speed Ramp with Premiere Pro. Also, Find Alternative Software “WonderShare Filmora” For the Same Purpose with a Much Easier User Interface
Learn About How You Can Create a Smooth Speed Ramp with Premiere Pro. Also, Find Alternative Software “WonderShare Filmora” For the Same Purpose with a Much Easier User Interface
Versatile Video Editor - Wondershare Filmora
An easy and powerful editor
Numerous effects to choose from
Detailed tutorials are provided by the official channel
Speed ramping is a popular Premiere Pro effect for good reason: it looks fantastic! When utilized simultaneously to spice up a video clip, slow motion and quick motion may both be great aesthetic choices. This practice may save you time by enabling you to show more about what you want to see in your edit without using harsh jump cuts.

This effect may be used for a number of reasons, including clip transitions, speeding up a clip to make it shorter, and slowing down a clip to make it longer. Speed ramping may be used with a number of various effects.
According to the business, Adobe Premiere Pro is one of the most widely used video editing products on the market today. The ability to alter the speed of individual clips is one of Premiere Pro’s most important capabilities. While speed ramping is often used in sports highlights, changing the speed of video may be useful for a number of other types of material.
You’ll learn how to construct a spectacular speed ramp in Adobe Premiere Pro, beginning with capturing the proper kind of video and moving to advanced tips and methods. Following that, we’ll go through some ideas and inspiration for when to use a speed ramp in your circumstance.
What is Speed Ramping?
A speed ramp is used to gradually increase the speed of a video clip as it accelerates or decelerates. It is guaranteed that a smooth transition between two separate speeds will take place. The method is crucial in changing the tempo of the film and, as a consequence, creating a dramatic impression. The film’s required velocity is achieved by the employment of super-fast visual effects.
A speed ramp, as opposed to a rapid shift in speed, provides for a more smooth transition between two drastically differing speeds. This method is used to focus attention on certain parts of your video, which has a huge impact on your editing. It provides just the right amount of zing to keep your audience interested and excited about your presentation.
Examples of Speed Ramping
It works especially well when utilized to focus the viewer’s attention on a certain moment or action in your videos, such as a tough jump or an impending bullet. Another name for this approach speeds ramping (sometimes known as time remapping). It may also be used to create a visually pleasing transition between two clips or pictures inside a single movie.
You may also use Speed Ramping to alter the runtime of your video to fit the time limits of other social media sites, such as Instagram and Vine. If you just have 30 seconds to deliver your video, the following are the two most common places where people apply speed ramping techniques:
Assume you are shooting a person walking and want the clip to play in slow motion so that viewers can clearly see the person’s face. In this scenario, speed ramping is precisely what you need since it enables you to do precisely that.
Do you remember the famous movie “The Matrix” scene, when Neo dodges the bullets? It’s not some typical scene; it’s a pretty good example of speed ramping.
How to Create Speed Ramping/Time Remapping in Premiere Pro?
Speed Ramping premiere pro is an excellent tool for speeding up video clips. ‘ In order to speed up or slow down the speed of a video clip, this effect may be employed. In this article, you’ll learn how to make the most of this fantastic tool in Adobe Premiere Pro.

While using Premiere Pro, the ability to change a clip’s speed without altering its pitch is a very useful feature. An example of how this feature comes in helpful is when you have a clip that shows someone or something moving from left to right or vice versa.
Advanced Premiere Pro Time Remapping
The fact that this effect is so simple to use is its main benefit. By moving handles around on the clip, you may quickly choose different regions of the clip to be influenced by the adjustment when you apply it. This makes achieving the required result extremely quick and easy.

If you want to go deep into the game, Speed Ramp offers some more advanced options that give you even more control over your speed modifications. The properties section allows you to designate which portions of the timeline are affected by the ramp, as well as change factors like the curve type and bias.
Steps To Use Speed Ramping In Premiere Pro
Follow the below-mentioned steps to learn how to use speed ramping in premiere pro:
- Download and install Adobe Premiere Pro. Once installed, launch the application.
- Create a new project in Premiere by clicking the New Project button. After that, import the film that you want to speed ramp. It is the simplest and most straightforward method of importing film into Premiere to just click and drag the clip into the project window.
- Before commencing any work with speed, click and drag the video track in the timeline to make it taller by increasing the height of the track. This will guarantee that you can see the speed ramp as you go to the next stages.
- To create a sequence if you don’t already have one, drag a clip into the timeline and drop it where you want it to appear. Using the clip’s parameters, Premiere will automatically generate a sequence with the necessary settings.
- Decide when you want to apply the speed ramp and mark the spot on the screen where you will do so. The key to a pleasant speed ramp is movement, so choose a time when the environment is very active. You can specify in and out points, cut the clip with “Command+K,” or divide the clip into parts using the razor blade tool (which is accessible through the “Command+K” shortcut).
- Keyframes will be created at this point. It’s first and foremost important that the keyframes be clearly visible. Access the proper view by selecting “Show Clip Keyframes” from the context menu when you right-click on your clip.
- Another drop-down option will appear, from which you’ll choose “Time Remapping” and then press the “Enter” key.
- Select “Speed” from the drop-down menu.
- To create a keyframe, choose the pen from the toolbar (or just use the “P” key on your keyboard) and click on the white line running across the video track. If you wish to make a speed ramp, you’ll need at least two keyframes: one to indicate where the speed ramp should begin and another to indicate where it should terminate.
- If you wish to create more sophisticated speed ramps, you may do so by including more keyframes in your animation.
- Switch back to the selection tool when you’ve finished placing your keyframes. “V” is the shortcut key for this.
- Now comes the critical moment: it’s time to change the speed. This is a task that Premiere Pro makes rather simple. The only thing you have to do now is click on the white line between the keyframes you have created and drag it either up or down, depending on your preference for speed or slowness.
- It’s not finished yet; we still need to smooth it out a little more. With the selection tool selected, click and drag one of the keyframe markers to the other side of the screen. The number of frames across which the speed shift will occur will be stretched out as a result of this. The longer and more gradual the speed ramp will be, the greater the distance between the two sides of the keyframe indication is separated.
- Complete the process with the other keyframe, and your speed ramp will be complete!
Techniques to Make Speed Ramping Smooth
In this section, we will be viewing some advanced time remapping features of Adobe Premiere Pro, which are as follows.
Keyframe Interpolation
When creating a speed ramp, keyframes are used to indicate the beginning and finishing points of the speed shift. However, there are a number of methods in which Premiere may transport the clip from point A to point B.
In the video industry, filling in the data between the two locations is known as keyframe interpolation.
- Simply dragging to divide a keyframe, like in the previous example, results in an equitable speed increase between the keyframes in the animation. Linear interpolation is the term used to describe this process.
- Instead of using Bezier Interpolation, you may utilize it to produce a smoother, more natural speed ramp. With Bezier Interpolation, the pace at which the speed increases will likewise accelerate, giving the effect of a more pronounced ramp.
- To build an S-curve shape, choose a keyframe and drag the Bezier handles to the desired position. Make adjustments until you are satisfied with the outcome.
Speed Ramp Transition
Speed ramp transitions are easy to make and may be utilized to add visual interest to a wide range of video genres. This effect is achieved by boosting the clip speed at the end of a clip before transitioning into a cut.
- In the second clip, the tempo is abruptly boosted and subsequently decreased to provide a smooth transition between situations. It may symbolize the passage of time, a character’s perplexity, or simply add flair to a commercial film.
- Using Premiere Pro, create a ramp-up at the end of your first clip and a ramp-down at the start of your second clip. The speed rubber band will be curved like a bell curve across the two clips when finished.
Adding speed ramps to films in Premiere Pro may improve the usefulness and looks of a variety of movies, from narrative features to social media posts. In Premiere, you may easily create and adjust speed duration directly in the timeline to meet any needs.
Speed Ramping In Wondershare Filmora
We understood how to do speed ramping in Premiere Pro. You can also get the same results using a much easier software that is “Wondershare Filmora”.
What is Wondershare Filmora?
Filmora is a video editor that is best suited for social video editors, vloggers, home movies, and other video projects. In addition, it may be used on both Macs and PCs. To begin using Filmora, you just need to pay a one-time registration fee of $0! You’ll notice a watermark when you export from the free version. For $59.99, Filmora’s latest version is a one-time purchase that doesn’t need a subscription!
Amazing Features
Filmora is an award-winning video editing program, that allows users to create visually stunning videos without the need for complex editing techniques.
Video playback in Filmora’s latest version may be accelerated by the graphics card (GPU). It’s accelerating at an alarming rate right now. It’s also possible to lower the resolution of a 4K or higher video for quicker playing. Cuts and splits are a snap using Filmora. Make a cut by dragging your play head to the location where you want to split the footage. Then, to remove the additional clip from the clip, use the delete key.
Even those with the most basic PC hardware may use this video editing software to create high-quality movies. Moreover, the most anticipated features that Filmora’s latest version offers are as follows:
- Motion Tracking
- Keyframing Animations
- Audio Ducking
- Split Screen
- Video Transitions
- Speed Control
- Color Grading
- Filmstock Effects
- Multiple Formats Exporting
Users may utilize the color tuning option to change the white balance and dynamic range of their video clip, among other things. You may alter the audio levels of each track using the audio mixer tool. The advanced Text Editor function allows you to adjust the color, size, font, and even the motion of text. The screen recording tool enables you to capture your computer’s screen as well as your webcam in excellent quality. The video stabilization feature lowers or eliminates the effect of camera shake on video.
Speed Ramping In Filmora
The method is crucial in changing the tempo of the film and, as a consequence, creating a dramatic impression. The film’s required speed is achieved by the employment of super-fast visual effects.
When using a camera with a much higher frame rate, the speed ramping approach may provide excellent effects. It aids in the production of the most dramatic impression.
Speed ramping effects are available in six presets, which include Montage, Hero Moment, Bullet Time, Jumper, and Flash In, all of which will add a theatrical element to your movie that will leave your viewers in awe.

Creative pros can swiftly and effectively speed up a movie with Wondershare Filmora. However, in order to get the intended results, it is essential to completely understand and adhere to the approach.
Wondershare Filmora 11 has a variety of tools and features to help you create a visually stunning film in a short period of time. Its Instant Mode allows you to produce a video creation from start to finish in less than 5 minutes.
Steps
- Download and Install Filmora. Launch the application on your system.

- Navigate to the chosen video and open it in the program to speed up and lengthen it. You may also add the movie to the interface by dragging and dropping it there.

- When the video appears in the timeline, right-click it to begin playback. As a consequence, a context menu is displayed.

- Select Speed from the pop-up editing window, and then select Speed Ramping from the drop-down menu.

- Alternatively, right-click on the video or audio clip, choose Speed from the drop-down menu, and select Speed Ramping.

- In the Speed Ramping panel, you may adjust the speed or choose from a number of presets, including Montage, Hero Moment, Bullet Time, Jumper, Flash in, and Flash out, to use as templates. You have the option of using the Preset speed ramps. Alternatively, you may personalize your own innovative ones.

- Move the play head to the point where you wish to increase or decrease the speed of the video or audio. Then, to add speed keyframes, choose the Add icon from the toolbar. The video or audio clips will be marked as Speed Ramping when the speed ramp has been added by Filmora.

- If you want to delete a keyframe, you can do so by selecting that particular keyframe and selecting the delete button like in the image:

- As we go on to the video keyframe speed adjustment, just slide the keyframe dot upward or downward to alter the point speed of the movie. Aside from that, you can keep the audio pitch constant regardless of how fast or slow the video is moving.

- The settings will be saved if you are pleased with them after you make the necessary modifications. In any other case, you may use the Reset button to return to the original configuration.
- When you’ve finished your work, go to the “File” panel and choose “Save Project” from the list of options that display. Change the name of the project and then click “Save.”
- Additionally, the movie may be exported using Filmora’s “Export” feature; just choose “Export” and then specify a new name for the file. The video may be exported to a device, a system, or even YouTube. After that, choose “Export.”

Speed Ramping Tips
- High Frame Rate: The frame rate is an important consideration when it comes to speed ramping. If you wish to slow down the video after it’s been recorded, shoot it at a frame rate higher than 60 frames per second. When a video is slowed down, there should be enough frames to guarantee that the video passes the 24 frames per second threshold frame rate.
- Choose The Appropriate Frame Resolution: Another possibility is to modify your video’s frame resolution. The tip has the ability to edit the clip’s properties from the Slowing down the video is achieved by changing the frame rate in the clip’s parameters from 120 to 24 frames per second. As a consequence, the frames will be expanded to the proper frame rate. As a consequence, the video is slowed down but not jerked.
- Purposeful Time Remapping: Instead of keeping the same pace throughout the film, a deliberate speed ramp should be implemented. A video has emotional, mysterious, exciting, and slow-motion Why is this the case? The usage of the same video speed throughout the film may have a negative influence on the watching experience. As a result, it is critical that videos be separated into genres and that the tempo of the videos is modified accordingly.
Conclusion
The use of the ideal cinematic effect at the right time boosts the audience and engagement with the material. This respective article explored speed ramping in-depth and oughts to teach creative pros how to slow down a video and speed up a movie. It covers speed raming in premiere pro and then moves toward Wondershare Filmora which seems a bit easier. Wondershare Filmora is a good choice for completing the task as quickly as possible. You will have access to all of the effects and tools mentioned, as well as the ability to keep the audio pitch consistent throughout the effect, which is critical while altering the video speed.
Speed ramping is a popular Premiere Pro effect for good reason: it looks fantastic! When utilized simultaneously to spice up a video clip, slow motion and quick motion may both be great aesthetic choices. This practice may save you time by enabling you to show more about what you want to see in your edit without using harsh jump cuts.
This effect may be used for a number of reasons, including clip transitions, speeding up a clip to make it shorter, and slowing down a clip to make it longer. Speed ramping may be used with a number of various effects.
According to the business, Adobe Premiere Pro is one of the most widely used video editing products on the market today. The ability to alter the speed of individual clips is one of Premiere Pro’s most important capabilities. While speed ramping is often used in sports highlights, changing the speed of video may be useful for a number of other types of material.
You’ll learn how to construct a spectacular speed ramp in Adobe Premiere Pro, beginning with capturing the proper kind of video and moving to advanced tips and methods. Following that, we’ll go through some ideas and inspiration for when to use a speed ramp in your circumstance.
What is Speed Ramping?
A speed ramp is used to gradually increase the speed of a video clip as it accelerates or decelerates. It is guaranteed that a smooth transition between two separate speeds will take place. The method is crucial in changing the tempo of the film and, as a consequence, creating a dramatic impression. The film’s required velocity is achieved by the employment of super-fast visual effects.
A speed ramp, as opposed to a rapid shift in speed, provides for a more smooth transition between two drastically differing speeds. This method is used to focus attention on certain parts of your video, which has a huge impact on your editing. It provides just the right amount of zing to keep your audience interested and excited about your presentation.
Examples of Speed Ramping
It works especially well when utilized to focus the viewer’s attention on a certain moment or action in your videos, such as a tough jump or an impending bullet. Another name for this approach speeds ramping (sometimes known as time remapping). It may also be used to create a visually pleasing transition between two clips or pictures inside a single movie.
You may also use Speed Ramping to alter the runtime of your video to fit the time limits of other social media sites, such as Instagram and Vine. If you just have 30 seconds to deliver your video, the following are the two most common places where people apply speed ramping techniques:
Assume you are shooting a person walking and want the clip to play in slow motion so that viewers can clearly see the person’s face. In this scenario, speed ramping is precisely what you need since it enables you to do precisely that.
Do you remember the famous movie “The Matrix” scene, when Neo dodges the bullets? It’s not some typical scene; it’s a pretty good example of speed ramping.
How to Create Speed Ramping/Time Remapping in Premiere Pro?
Speed Ramping premiere pro is an excellent tool for speeding up video clips. ‘ In order to speed up or slow down the speed of a video clip, this effect may be employed. In this article, you’ll learn how to make the most of this fantastic tool in Adobe Premiere Pro.
While using Premiere Pro, the ability to change a clip’s speed without altering its pitch is a very useful feature. An example of how this feature comes in helpful is when you have a clip that shows someone or something moving from left to right or vice versa.
Advanced Premiere Pro Time Remapping
The fact that this effect is so simple to use is its main benefit. By moving handles around on the clip, you may quickly choose different regions of the clip to be influenced by the adjustment when you apply it. This makes achieving the required result extremely quick and easy.
If you want to go deep into the game, Speed Ramp offers some more advanced options that give you even more control over your speed modifications. The properties section allows you to designate which portions of the timeline are affected by the ramp, as well as change factors like the curve type and bias.
Steps To Use Speed Ramping In Premiere Pro
Follow the below-mentioned steps to learn how to use speed ramping in premiere pro:
- Download and install Adobe Premiere Pro. Once installed, launch the application.
- Create a new project in Premiere by clicking the New Project button. After that, import the film that you want to speed ramp. It is the simplest and most straightforward method of importing film into Premiere to just click and drag the clip into the project window.
- Before commencing any work with speed, click and drag the video track in the timeline to make it taller by increasing the height of the track. This will guarantee that you can see the speed ramp as you go to the next stages.
- To create a sequence if you don’t already have one, drag a clip into the timeline and drop it where you want it to appear. Using the clip’s parameters, Premiere will automatically generate a sequence with the necessary settings.
- Decide when you want to apply the speed ramp and mark the spot on the screen where you will do so. The key to a pleasant speed ramp is movement, so choose a time when the environment is very active. You can specify in and out points, cut the clip with “Command+K,” or divide the clip into parts using the razor blade tool (which is accessible through the “Command+K” shortcut).
- Keyframes will be created at this point. It’s first and foremost important that the keyframes be clearly visible. Access the proper view by selecting “Show Clip Keyframes” from the context menu when you right-click on your clip.
- Another drop-down option will appear, from which you’ll choose “Time Remapping” and then press the “Enter” key.
- Select “Speed” from the drop-down menu.
- To create a keyframe, choose the pen from the toolbar (or just use the “P” key on your keyboard) and click on the white line running across the video track. If you wish to make a speed ramp, you’ll need at least two keyframes: one to indicate where the speed ramp should begin and another to indicate where it should terminate.
- If you wish to create more sophisticated speed ramps, you may do so by including more keyframes in your animation.
- Switch back to the selection tool when you’ve finished placing your keyframes. “V” is the shortcut key for this.
- Now comes the critical moment: it’s time to change the speed. This is a task that Premiere Pro makes rather simple. The only thing you have to do now is click on the white line between the keyframes you have created and drag it either up or down, depending on your preference for speed or slowness.
- It’s not finished yet; we still need to smooth it out a little more. With the selection tool selected, click and drag one of the keyframe markers to the other side of the screen. The number of frames across which the speed shift will occur will be stretched out as a result of this. The longer and more gradual the speed ramp will be, the greater the distance between the two sides of the keyframe indication is separated.
- Complete the process with the other keyframe, and your speed ramp will be complete!
Techniques to Make Speed Ramping Smooth
In this section, we will be viewing some advanced time remapping features of Adobe Premiere Pro, which are as follows.
Keyframe Interpolation
When creating a speed ramp, keyframes are used to indicate the beginning and finishing points of the speed shift. However, there are a number of methods in which Premiere may transport the clip from point A to point B.
In the video industry, filling in the data between the two locations is known as keyframe interpolation.
- Simply dragging to divide a keyframe, like in the previous example, results in an equitable speed increase between the keyframes in the animation. Linear interpolation is the term used to describe this process.
- Instead of using Bezier Interpolation, you may utilize it to produce a smoother, more natural speed ramp. With Bezier Interpolation, the pace at which the speed increases will likewise accelerate, giving the effect of a more pronounced ramp.
- To build an S-curve shape, choose a keyframe and drag the Bezier handles to the desired position. Make adjustments until you are satisfied with the outcome.
Speed Ramp Transition
Speed ramp transitions are easy to make and may be utilized to add visual interest to a wide range of video genres. This effect is achieved by boosting the clip speed at the end of a clip before transitioning into a cut.
- In the second clip, the tempo is abruptly boosted and subsequently decreased to provide a smooth transition between situations. It may symbolize the passage of time, a character’s perplexity, or simply add flair to a commercial film.
- Using Premiere Pro, create a ramp-up at the end of your first clip and a ramp-down at the start of your second clip. The speed rubber band will be curved like a bell curve across the two clips when finished.
Adding speed ramps to films in Premiere Pro may improve the usefulness and looks of a variety of movies, from narrative features to social media posts. In Premiere, you may easily create and adjust speed duration directly in the timeline to meet any needs.
Speed Ramping In Wondershare Filmora
We understood how to do speed ramping in Premiere Pro. You can also get the same results using a much easier software that is “Wondershare Filmora”.
What is Wondershare Filmora?
Filmora is a video editor that is best suited for social video editors, vloggers, home movies, and other video projects. In addition, it may be used on both Macs and PCs. To begin using Filmora, you just need to pay a one-time registration fee of $0! You’ll notice a watermark when you export from the free version. For $59.99, Filmora’s latest version is a one-time purchase that doesn’t need a subscription!
Amazing Features
Filmora is an award-winning video editing program, that allows users to create visually stunning videos without the need for complex editing techniques.
Video playback in Filmora’s latest version may be accelerated by the graphics card (GPU). It’s accelerating at an alarming rate right now. It’s also possible to lower the resolution of a 4K or higher video for quicker playing. Cuts and splits are a snap using Filmora. Make a cut by dragging your play head to the location where you want to split the footage. Then, to remove the additional clip from the clip, use the delete key.
Even those with the most basic PC hardware may use this video editing software to create high-quality movies. Moreover, the most anticipated features that Filmora’s latest version offers are as follows:
- Motion Tracking
- Keyframing Animations
- Audio Ducking
- Split Screen
- Video Transitions
- Speed Control
- Color Grading
- Filmstock Effects
- Multiple Formats Exporting
Users may utilize the color tuning option to change the white balance and dynamic range of their video clip, among other things. You may alter the audio levels of each track using the audio mixer tool. The advanced Text Editor function allows you to adjust the color, size, font, and even the motion of text. The screen recording tool enables you to capture your computer’s screen as well as your webcam in excellent quality. The video stabilization feature lowers or eliminates the effect of camera shake on video.
Speed Ramping In Filmora
The method is crucial in changing the tempo of the film and, as a consequence, creating a dramatic impression. The film’s required speed is achieved by the employment of super-fast visual effects.
When using a camera with a much higher frame rate, the speed ramping approach may provide excellent effects. It aids in the production of the most dramatic impression.
Speed ramping effects are available in six presets, which include Montage, Hero Moment, Bullet Time, Jumper, and Flash In, all of which will add a theatrical element to your movie that will leave your viewers in awe.
Creative pros can swiftly and effectively speed up a movie with Wondershare Filmora. However, in order to get the intended results, it is essential to completely understand and adhere to the approach.
Wondershare Filmora 11 has a variety of tools and features to help you create a visually stunning film in a short period of time. Its Instant Mode allows you to produce a video creation from start to finish in less than 5 minutes.
Steps
- Download and Install Filmora. Launch the application on your system.
- Navigate to the chosen video and open it in the program to speed up and lengthen it. You may also add the movie to the interface by dragging and dropping it there.
- When the video appears in the timeline, right-click it to begin playback. As a consequence, a context menu is displayed.
- Select Speed from the pop-up editing window, and then select Speed Ramping from the drop-down menu.
- Alternatively, right-click on the video or audio clip, choose Speed from the drop-down menu, and select Speed Ramping.
- In the Speed Ramping panel, you may adjust the speed or choose from a number of presets, including Montage, Hero Moment, Bullet Time, Jumper, Flash in, and Flash out, to use as templates. You have the option of using the Preset speed ramps. Alternatively, you may personalize your own innovative ones.
- Move the play head to the point where you wish to increase or decrease the speed of the video or audio. Then, to add speed keyframes, choose the Add icon from the toolbar. The video or audio clips will be marked as Speed Ramping when the speed ramp has been added by Filmora.
- If you want to delete a keyframe, you can do so by selecting that particular keyframe and selecting the delete button like in the image:
- As we go on to the video keyframe speed adjustment, just slide the keyframe dot upward or downward to alter the point speed of the movie. Aside from that, you can keep the audio pitch constant regardless of how fast or slow the video is moving.
- The settings will be saved if you are pleased with them after you make the necessary modifications. In any other case, you may use the Reset button to return to the original configuration.
- When you’ve finished your work, go to the “File” panel and choose “Save Project” from the list of options that display. Change the name of the project and then click “Save.”
- Additionally, the movie may be exported using Filmora’s “Export” feature; just choose “Export” and then specify a new name for the file. The video may be exported to a device, a system, or even YouTube. After that, choose “Export.”
Speed Ramping Tips
- High Frame Rate: The frame rate is an important consideration when it comes to speed ramping. If you wish to slow down the video after it’s been recorded, shoot it at a frame rate higher than 60 frames per second. When a video is slowed down, there should be enough frames to guarantee that the video passes the 24 frames per second threshold frame rate.
- Choose The Appropriate Frame Resolution: Another possibility is to modify your video’s frame resolution. The tip has the ability to edit the clip’s properties from the Slowing down the video is achieved by changing the frame rate in the clip’s parameters from 120 to 24 frames per second. As a consequence, the frames will be expanded to the proper frame rate. As a consequence, the video is slowed down but not jerked.
- Purposeful Time Remapping: Instead of keeping the same pace throughout the film, a deliberate speed ramp should be implemented. A video has emotional, mysterious, exciting, and slow-motion Why is this the case? The usage of the same video speed throughout the film may have a negative influence on the watching experience. As a result, it is critical that videos be separated into genres and that the tempo of the videos is modified accordingly.
Conclusion
The use of the ideal cinematic effect at the right time boosts the audience and engagement with the material. This respective article explored speed ramping in-depth and oughts to teach creative pros how to slow down a video and speed up a movie. It covers speed raming in premiere pro and then moves toward Wondershare Filmora which seems a bit easier. Wondershare Filmora is a good choice for completing the task as quickly as possible. You will have access to all of the effects and tools mentioned, as well as the ability to keep the audio pitch consistent throughout the effect, which is critical while altering the video speed.
Change Background Color in After Effects
Adobe After Effects is a powerful video editor. After Effects is particularly popular for its special effects that you can add to your videos and blow the mind of your audience. In any video, the background plays a major role in enhancing the overall frame and scene. If you are planning to change background color After Effects or add special effects, you must shoot your video with a solid color background.
During the post-production phase, you can change the background uniformly to any color scheme or special effect as per the requirement of the scene. Since the learning curve for After Effects is slightly steeper, you should know the exact steps to change After Effects background color. We will explain the process in simple steps and provide you with an alternative way to change background color.
Part 1. How to change video BG color in After Effects?
After Effects is widely used for professionals to add animations and special effects to videos during video editing phase. Starting from editing social media videos and YouTube videos to short films and even movies, After Effects finds its application in every field of video editing. Changing background color in After Effects is super simple even though other video editing techniques could be slightly complex for beginners. Here are the steps on how to change background color in After Effects.
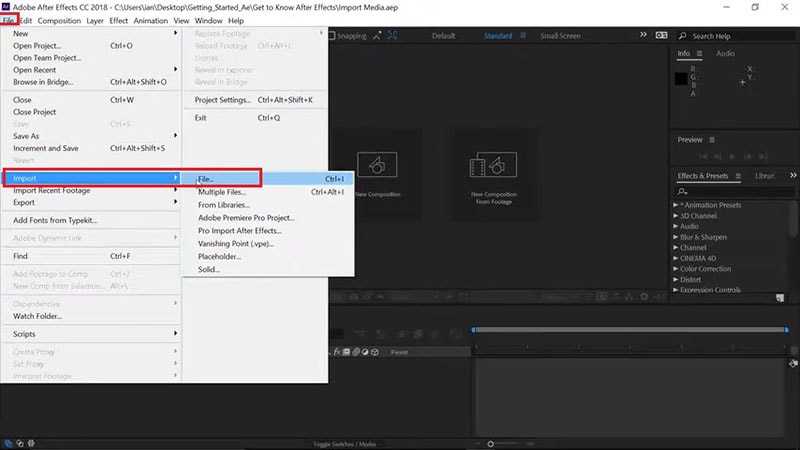
Step1 Open After Effects on your computer. Go to File> Import> File. Select the video file from your hard drive and it will appear under Project tab.
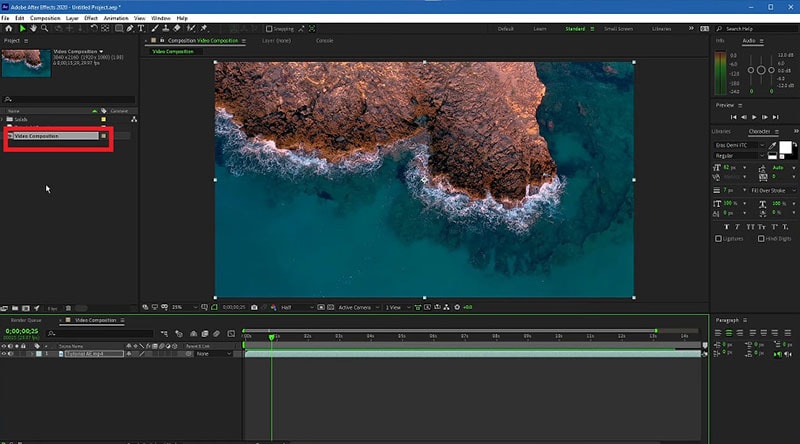
Step2 Drag and drop your video into Timeline. Select the video clip and right-click on Video Composition option located below Project tab.
Step3 From the menu, click on Composition Settings option. You can also use Ctrl + K(Windows) or Command + K(Mac) key combination to open Composition Settings directly.

Step4 On Composition Settings window, go to Background Color and set the color as per your preference. You can also use a color picker as well to select any color from the video directly.
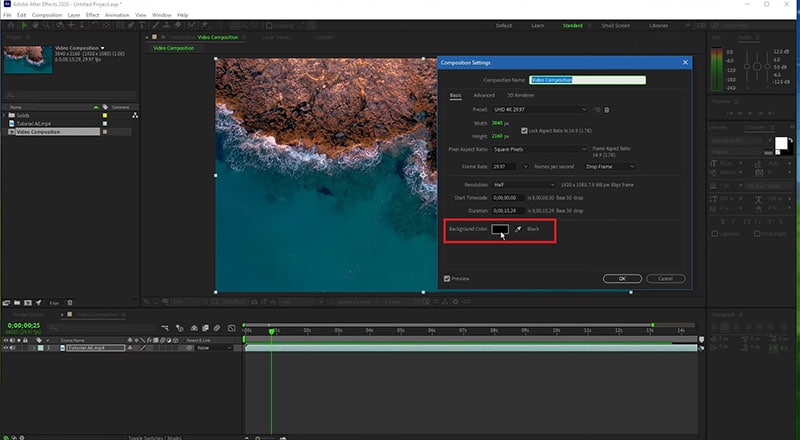
Step5 Click on Ok to set the new background color. Depending on the transparency of your video scene or the transition effect such as fade in and out, the background color will be more prominent.
Part 2. Alternative way to change background color
The best alternative to After Effects is Wondershare Filmora as Filmora has a wide range of special effects and animations. Filmora is a professional video editor where you can perform all basic as well as advanced video editing work. Most importantly, Filmora comes with an intuitive user interface so that even amateurs can use it easily.
There are several ways you can change background color in your video. For example, you can remove background color even when you do not have a solid color. If your video has a solid color, you can change background color to any color or graphical element using Chroma key. Here are the steps to change background color in Filmora .
Free Download For Win 7 or later(64-bit)
Free Download For macOS 10.14 or later
Step1 Download and install Filmora and it is available for Windows and Mac. Launch Filmora and click on New Project.

Step2 Import your video under Project Media folder and drag and drop into Timeline.
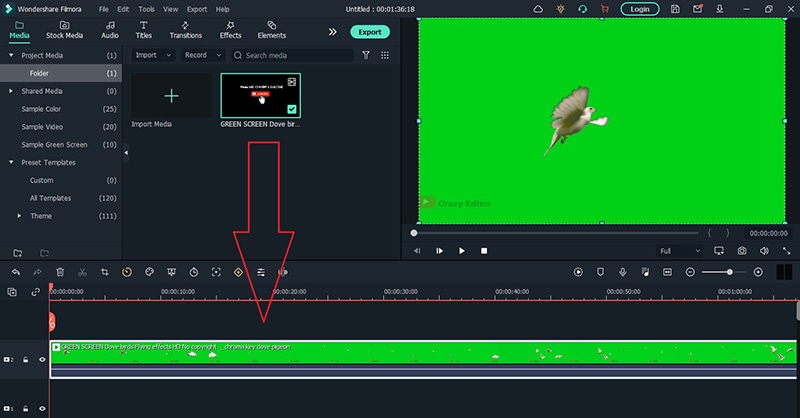
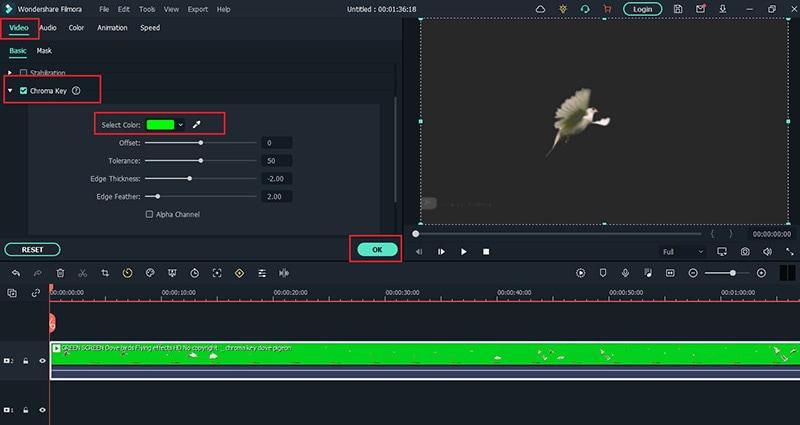
Step3 Double-click on the video clip and go to Video tab and turn on Chroma Key option. Select the solid color present in the background of the video and click on Ok button.
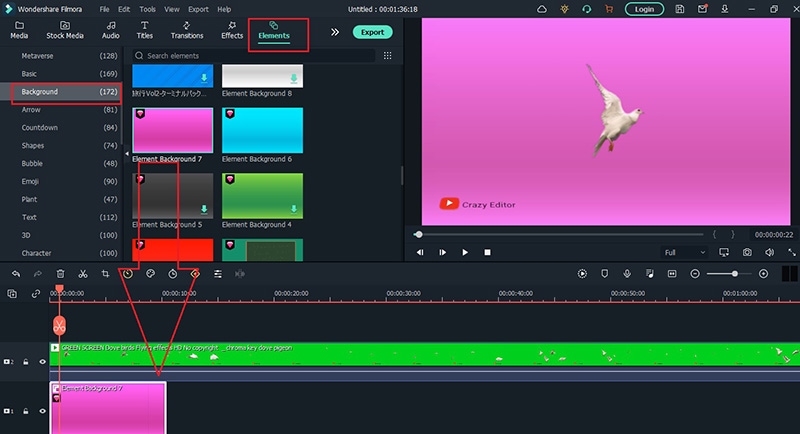
Step4 You will see the background color of the video disappear. Go to Elements> Background and drag and drop any background into Timeline. Make sure it is placed below the video clip and extend the duration of the background color as per your requirements.
Step5 Finally, play the video and click on Export button to save the video.
Part 3. FAQs about Video Background Colors
1. How do I remove background color in After Effects?
Import your video clip with a solid background color and place it on Timeline. Go to Effect menu> Keying> Keylight option. In Effects window and under Keylight, you will see Screen Colour option. Click on the eyedropper icon and select the background color you want to remove.
2. How do I change a solid background in After Effects?
The steps for After Effects how to change background color solid involve removing the background color and adding a layer of solid color to replace the transparency of the video. Go to Layer> New> Solid. Under Solid Settings window, go to Color and select the desired color from Color option and click on OK button. The new color will get reflected in the background of the video.
3. How do you add a white background in After Effects?
Go to Layer> New> Solid and add a white color solid first. However, this white color layer will not be visible unless you turn the background of your video transparent. Go to Effects & Presets and search for Luma Key and drop Luma Key on your video. Set Key type as Brighter and the threshold of the Lema key as per suitability on your video to see the white background appear.
Free Download For macOS 10.14 or later
Step1 Download and install Filmora and it is available for Windows and Mac. Launch Filmora and click on New Project.
Step2 Import your video under Project Media folder and drag and drop into Timeline.
Step3 Double-click on the video clip and go to Video tab and turn on Chroma Key option. Select the solid color present in the background of the video and click on Ok button.
Step4 You will see the background color of the video disappear. Go to Elements> Background and drag and drop any background into Timeline. Make sure it is placed below the video clip and extend the duration of the background color as per your requirements.
Step5 Finally, play the video and click on Export button to save the video.
Part 3. FAQs about Video Background Colors
1. How do I remove background color in After Effects?
Import your video clip with a solid background color and place it on Timeline. Go to Effect menu> Keying> Keylight option. In Effects window and under Keylight, you will see Screen Colour option. Click on the eyedropper icon and select the background color you want to remove.
2. How do I change a solid background in After Effects?
The steps for After Effects how to change background color solid involve removing the background color and adding a layer of solid color to replace the transparency of the video. Go to Layer> New> Solid. Under Solid Settings window, go to Color and select the desired color from Color option and click on OK button. The new color will get reflected in the background of the video.
3. How do you add a white background in After Effects?
Go to Layer> New> Solid and add a white color solid first. However, this white color layer will not be visible unless you turn the background of your video transparent. Go to Effects & Presets and search for Luma Key and drop Luma Key on your video. Set Key type as Brighter and the threshold of the Lema key as per suitability on your video to see the white background appear.
Learning Unique Ways to Slow Down Time Lapse on iPhone
We have all seen time-lapse videos in vlogs or developmental videos. The time-lapse effect has been around the corner for some time and assists in several tasks. However, when it comes to understanding the content of a video, they aren’t helpful. This article will help you understand how to slow down time lapse on an i Phone.
In addition, we’ll provide some insights on slow-down time-lapse videos. You can learn about its advantages for both viewers and creators. The article will highlight some tools for transforming a time-lapse into a slo-mo. We’ll also discuss an offline tool on how to slow down a time-lapse on an iPhone. Start reading this article for a brief overview of slow-motion videos and tools.
Slow Motion Video Maker Slow your video’s speed with better control of your keyframes to create unique cinematic effects!
Make A Slow Motion Video Make A Slow Motion Video More Features

Part 1: How Does Slowing Down Videos Help Viewers and Creators?
A time-lapse video certainly makes some scenes worthy of watching. However, a slow-motion video helps in better comprehension of the topic. In this section, we’ll discuss how slowing down time-lapse video s is helpful. We’ll shed light on their applications for viewers and content creators. Without further delay, let’s dive in to solve this mystery:
For Creators
Since the era of social media , content creation has become a new trend. Creators around the globe can interact with their followers from a single platform. It gives them a chance to share their ideas and showcase their talents. Hence, here is how slow-motion videos benefit a creator in his journey:
- In Video Tutorials: Do you have a channel where you post tutorials to perform a specific task? This effect can help you slow down the video for the audience to absorb your words. It helps creators to show their viewers that they genuinely care about them. A video where basics and details are discussed is considered right.
- In Revealing Details: We encounter situations where the camera cannot capture a moment right. This is because the normal playback speed cannot highlight video details. On the other hand, a slo-mo takes proper time to showcase details. These help handle an event planning or dress designing page.
- In Creating Aesthetics: Another application of slo-mos is that they help with creativity. Adding this effect at the right time and duration enhances visuals. Moreover, adding a slo-mo effect gives the video an aesthetic appeal. It can enhance the visuals of a travel, cooking, or fashion video.
For Viewers
Slow-motion videos benefit not only creators but also viewers. They help them with enhanced learning by breaking down complex information. If you are creating slo-mos as a creator, here is how they are helping your viewers:
- In Effective Learning: You are not unaware of tutorial or explainer videos. Whether you are a student or a housewife, you must have used YouTube to your benefit. A slow-motion video can break down a complex concept or steps for a recipe. In addition, it can help you operate technology better, like Word, Excel, and more.
- In Understanding Nature: People out there prefer documentaries over dramas. They are curious about nature and the way it works. In such documentaries, slo-mos are used to present a natural phenomenon. It helps the viewers understand how a certain process occurs. Moreover, it focuses on small details in an ecosystem to explain better.
- In Reflecting Content: Next time you watch reels, notice that slo-mos catch your attention. Videos with the right speed manipulation appeal to the eyes, and viewers often watch them again. In addition, they help focus on the specifics of a gadget, fashion product, or more.
Part 2: A Guide on How to Slow Down Time Lapses on iPhone
Now that you know the benefits of slow motions, let’s proceed to our next segment. Here, we will learn how to slow down a time-lapse on an i Phone using different techniques. This will involve looking into some tools for an i Phone time lapse slowdown:
1. iMovie
This tool is perfect if you are looking for a tool to effectively slow down time-laps e. It offers speed change options to transform your time-lapse videos into slomos. The tool supports popular video formats and creates results in 4K high resolution. Creating a slo-mo is straightforward, and users can also create a high-speed motion.

Key Features
- Provides 14 templates and 20 storyboards to get started with creative videos.
- The tool operates online; hence, it isn’t necessary to download any application.
- You can synchronize your work with devices like macOS, iPad, AirDrop, and iCloud.
Steps
Do you want to know ho w to slow down a time-lapse on i Phone ? The method of performing this function is very plain and accessible, and here is the guide:
Step 1: Open iMovie and click the “Start New Project” option to start editing. Continue to select “Magic Movie” across the pop-up to proceed into the editing section.

Step 2: Choose a file from the iPhone’s video gallery and select the “Pencil” icon to start editing. Go to the “Speed” option and click it to access speed change options.

Step 3: Navigate towards the speed slider and drag it towards the left to slow down. The option “1/2x” means the speed will be half the original speed.

2. Filmmaker Pro - Video Editor
If you want to slow down the time-lapse i Phone with additional editing options, use this tool. It is a professional-level content editor for iDevices and offers to slow down the speed. You can create or slow down timelapses. The editor will export your videos in 4K high resolution. Moreover, 120 royalty-free music tracks can be inserted into your slo-mo afterward.

Key Features
- Decorate your videos with stunning animations using keyframing and track motion.
- You have over 46 transition options to complete trending TikTok and Instagram challenges.
- Over 79 classic fonts, 92 beautiful fonts, 15 Hollywood, and 26 retro fonts options.
3. Video Up! Video Editor and Maker
Adjusting the time-lapse speed of the i Phone is possible via third-party applications. This is a versatile platform for creating slo-mos without any technicalities. You will find speed setting presets when you access its video adjustment options. These presets can automatically slow down or fasten a video at a specific point. However, you can also choose its Custom option to slow down a complete video.

Key Features
- It provides 2 video export resolution options: Ultra – 4K and Full HD – 1080p.
- Offers an option to insert voiceovers and built-in music tracks in your slo-mos or videos.
- CTA to share videos straight to Instagram, Facebook, WhatsApp, and more.
4. Vidma - Video Editor Music
Are you wondering how to slow down time-lapse videos on iPhone for specific durations? Vidma is the right tool for you, offering custom speed change and duration options. The speed slider option is a simple drag and adjust method. In addition, there is an audio pitch adjustment option to maintain audio during speed alteration.

Key Features
- Users have the option to merge, crop, or resize your images or videos using this tool.
- With its AI abilities, you can generate art from text and edit it further.
- The lowest playback speed to create slow motion is 0.1x, and the highest is 10.0x.
Part 3: A Comprehensive Desktop Solution for Slowing Down Time Lapses: Wondershare Filmora
Wondershare Filmora is a platform with diverse possibilities and compatibility across iOS devices. This allows you to import media using a cable from your iPhone. It doesn’t decline the video quality upon export or import; hence, it proves to be a superior tool to adjust the time-lapse speed of the i Phone. Filmora offers multiple opportunities to transform a time lapse into slo-mo.
You can also select the time period to apply the slow-motion effect via timeline editing. In addition, users can also choose the speed ramping option for professional results. Upon creating a slow motion, you can use Filmora’s video templates, text, and more to enhance visuals. In addition, there is an Optical Flow feature to help in enhancing the slo-mo effect.
Free Download For Win 7 or later(64-bit)
Free Download For macOS 10.14 or later
Step-by-Step Guide to Slow Down a Time Lapse Video into Slow Motion in Filmora
The basic technique to change the time-lapse speed of the i Phone involves Uniform Speed. This method modulates the playback speed of a video through the slider’s position. Here is how do I slow down time lapse on i Phone using Filmora:
Step 1Commence the Speed Change Action
Initiate Filmora by giving a “New Project” command and gaining access to the editing interface. Use the “Import” > “Import from a Camera or Phone” to import files. You need to connect to the iOS device first. Bring the clip to the timeline and access the settings panel that will appear on the screen. Further, choose the “Speed” > “Uniform Speed” option and drag the Speed slider towards the left to reduce it.

Step 2Access the AI Frame Interpolation Settings
In the pursuit of achieving a seamless slow-motion effect, use the AI Frame Interpolation settings. Navigate towards the bottom to access it and opt for the “Optical Flow” option.

Step 3Activate Render Preview for Thorough Evaluation
Upon adjusting, return to the timeline panel and select the video. With the help of your cursor, navigate to the “File” > “Render Preview” option. Enable a preview prior to finalizing the video, and then hit “Export.”

Key Features of Filmora
Filmora is not just confined to creating slow motion; the interface offers much more. There are multiple AI and manual features to edit videos, adjust audio, and insert text. Here are a few video editing features of Filmora amongst many:
Green Screen: Get rid of messy or unwanted backgrounds and replace them with something captivating. For this, film the model or object in front of a green screen and enable Chroma Key. It is an AI-driven function that will auto-remove the background while preserving the object.
AI Text-to-Video: Can’t find the right visuals or time to shoot content for your channel? Use this AI to create videos from prompts without having to put in any effort. The AI will auto-generate graphics to add to the video along with the AI voice insertion.
Compound Clip: Are there multiple clips in your timeline that you want to apply the same effects to? This function will help you transform multiple clips into one. Furthermore, you can apply similar effects or transitions. In addition, this function also ensures a smooth transfer from one clip to another.
AI Thumbnail Creator: Create and edit compelling thumbnails for your videos using this AI. The AI will analyze and select the perfect video frames as thumbnail options. Further, you can edit the thumbnail and insert multiple templates to show what the video is going to be about.
Conclusion
After going through this article, readers have an extensive knowledge of how to slow down time-lapse on i Phones using multiple tools and techniques. We provided a review of these tools but also the benefits of slo-mos in content creation and viewing.
In the end, we suggest Wondershare Filmora as the best alternative to all these applications. The software is not just AI integrated but has everything you need to create slo-mos in one place. Use Filmora for creative slo-mo and other video editing features.
Make A Slow Motion Video Make A Slow Motion Video More Features
Part 1: How Does Slowing Down Videos Help Viewers and Creators?
A time-lapse video certainly makes some scenes worthy of watching. However, a slow-motion video helps in better comprehension of the topic. In this section, we’ll discuss how slowing down time-lapse video s is helpful. We’ll shed light on their applications for viewers and content creators. Without further delay, let’s dive in to solve this mystery:
For Creators
Since the era of social media , content creation has become a new trend. Creators around the globe can interact with their followers from a single platform. It gives them a chance to share their ideas and showcase their talents. Hence, here is how slow-motion videos benefit a creator in his journey:
- In Video Tutorials: Do you have a channel where you post tutorials to perform a specific task? This effect can help you slow down the video for the audience to absorb your words. It helps creators to show their viewers that they genuinely care about them. A video where basics and details are discussed is considered right.
- In Revealing Details: We encounter situations where the camera cannot capture a moment right. This is because the normal playback speed cannot highlight video details. On the other hand, a slo-mo takes proper time to showcase details. These help handle an event planning or dress designing page.
- In Creating Aesthetics: Another application of slo-mos is that they help with creativity. Adding this effect at the right time and duration enhances visuals. Moreover, adding a slo-mo effect gives the video an aesthetic appeal. It can enhance the visuals of a travel, cooking, or fashion video.
For Viewers
Slow-motion videos benefit not only creators but also viewers. They help them with enhanced learning by breaking down complex information. If you are creating slo-mos as a creator, here is how they are helping your viewers:
- In Effective Learning: You are not unaware of tutorial or explainer videos. Whether you are a student or a housewife, you must have used YouTube to your benefit. A slow-motion video can break down a complex concept or steps for a recipe. In addition, it can help you operate technology better, like Word, Excel, and more.
- In Understanding Nature: People out there prefer documentaries over dramas. They are curious about nature and the way it works. In such documentaries, slo-mos are used to present a natural phenomenon. It helps the viewers understand how a certain process occurs. Moreover, it focuses on small details in an ecosystem to explain better.
- In Reflecting Content: Next time you watch reels, notice that slo-mos catch your attention. Videos with the right speed manipulation appeal to the eyes, and viewers often watch them again. In addition, they help focus on the specifics of a gadget, fashion product, or more.
Part 2: A Guide on How to Slow Down Time Lapses on iPhone
Now that you know the benefits of slow motions, let’s proceed to our next segment. Here, we will learn how to slow down a time-lapse on an i Phone using different techniques. This will involve looking into some tools for an i Phone time lapse slowdown:
1. iMovie
This tool is perfect if you are looking for a tool to effectively slow down time-laps e. It offers speed change options to transform your time-lapse videos into slomos. The tool supports popular video formats and creates results in 4K high resolution. Creating a slo-mo is straightforward, and users can also create a high-speed motion.
Key Features
- Provides 14 templates and 20 storyboards to get started with creative videos.
- The tool operates online; hence, it isn’t necessary to download any application.
- You can synchronize your work with devices like macOS, iPad, AirDrop, and iCloud.
Steps
Do you want to know ho w to slow down a time-lapse on i Phone ? The method of performing this function is very plain and accessible, and here is the guide:
Step 1: Open iMovie and click the “Start New Project” option to start editing. Continue to select “Magic Movie” across the pop-up to proceed into the editing section.
Step 2: Choose a file from the iPhone’s video gallery and select the “Pencil” icon to start editing. Go to the “Speed” option and click it to access speed change options.
Step 3: Navigate towards the speed slider and drag it towards the left to slow down. The option “1/2x” means the speed will be half the original speed.
2. Filmmaker Pro - Video Editor
If you want to slow down the time-lapse i Phone with additional editing options, use this tool. It is a professional-level content editor for iDevices and offers to slow down the speed. You can create or slow down timelapses. The editor will export your videos in 4K high resolution. Moreover, 120 royalty-free music tracks can be inserted into your slo-mo afterward.
Key Features
- Decorate your videos with stunning animations using keyframing and track motion.
- You have over 46 transition options to complete trending TikTok and Instagram challenges.
- Over 79 classic fonts, 92 beautiful fonts, 15 Hollywood, and 26 retro fonts options.
3. Video Up! Video Editor and Maker
Adjusting the time-lapse speed of the i Phone is possible via third-party applications. This is a versatile platform for creating slo-mos without any technicalities. You will find speed setting presets when you access its video adjustment options. These presets can automatically slow down or fasten a video at a specific point. However, you can also choose its Custom option to slow down a complete video.
Key Features
- It provides 2 video export resolution options: Ultra – 4K and Full HD – 1080p.
- Offers an option to insert voiceovers and built-in music tracks in your slo-mos or videos.
- CTA to share videos straight to Instagram, Facebook, WhatsApp, and more.
4. Vidma - Video Editor Music
Are you wondering how to slow down time-lapse videos on iPhone for specific durations? Vidma is the right tool for you, offering custom speed change and duration options. The speed slider option is a simple drag and adjust method. In addition, there is an audio pitch adjustment option to maintain audio during speed alteration.
Key Features
- Users have the option to merge, crop, or resize your images or videos using this tool.
- With its AI abilities, you can generate art from text and edit it further.
- The lowest playback speed to create slow motion is 0.1x, and the highest is 10.0x.
Part 3: A Comprehensive Desktop Solution for Slowing Down Time Lapses: Wondershare Filmora
Wondershare Filmora is a platform with diverse possibilities and compatibility across iOS devices. This allows you to import media using a cable from your iPhone. It doesn’t decline the video quality upon export or import; hence, it proves to be a superior tool to adjust the time-lapse speed of the i Phone. Filmora offers multiple opportunities to transform a time lapse into slo-mo.
You can also select the time period to apply the slow-motion effect via timeline editing. In addition, users can also choose the speed ramping option for professional results. Upon creating a slow motion, you can use Filmora’s video templates, text, and more to enhance visuals. In addition, there is an Optical Flow feature to help in enhancing the slo-mo effect.
Free Download For Win 7 or later(64-bit)
Free Download For macOS 10.14 or later
Step-by-Step Guide to Slow Down a Time Lapse Video into Slow Motion in Filmora
The basic technique to change the time-lapse speed of the i Phone involves Uniform Speed. This method modulates the playback speed of a video through the slider’s position. Here is how do I slow down time lapse on i Phone using Filmora:
Step 1Commence the Speed Change Action
Initiate Filmora by giving a “New Project” command and gaining access to the editing interface. Use the “Import” > “Import from a Camera or Phone” to import files. You need to connect to the iOS device first. Bring the clip to the timeline and access the settings panel that will appear on the screen. Further, choose the “Speed” > “Uniform Speed” option and drag the Speed slider towards the left to reduce it.
Step 2Access the AI Frame Interpolation Settings
In the pursuit of achieving a seamless slow-motion effect, use the AI Frame Interpolation settings. Navigate towards the bottom to access it and opt for the “Optical Flow” option.
Step 3Activate Render Preview for Thorough Evaluation
Upon adjusting, return to the timeline panel and select the video. With the help of your cursor, navigate to the “File” > “Render Preview” option. Enable a preview prior to finalizing the video, and then hit “Export.”
Key Features of Filmora
Filmora is not just confined to creating slow motion; the interface offers much more. There are multiple AI and manual features to edit videos, adjust audio, and insert text. Here are a few video editing features of Filmora amongst many:
Green Screen: Get rid of messy or unwanted backgrounds and replace them with something captivating. For this, film the model or object in front of a green screen and enable Chroma Key. It is an AI-driven function that will auto-remove the background while preserving the object.
AI Text-to-Video: Can’t find the right visuals or time to shoot content for your channel? Use this AI to create videos from prompts without having to put in any effort. The AI will auto-generate graphics to add to the video along with the AI voice insertion.
Compound Clip: Are there multiple clips in your timeline that you want to apply the same effects to? This function will help you transform multiple clips into one. Furthermore, you can apply similar effects or transitions. In addition, this function also ensures a smooth transfer from one clip to another.
AI Thumbnail Creator: Create and edit compelling thumbnails for your videos using this AI. The AI will analyze and select the perfect video frames as thumbnail options. Further, you can edit the thumbnail and insert multiple templates to show what the video is going to be about.
Conclusion
After going through this article, readers have an extensive knowledge of how to slow down time-lapse on i Phones using multiple tools and techniques. We provided a review of these tools but also the benefits of slo-mos in content creation and viewing.
In the end, we suggest Wondershare Filmora as the best alternative to all these applications. The software is not just AI integrated but has everything you need to create slo-mos in one place. Use Filmora for creative slo-mo and other video editing features.
Want to Create an Impressive Video Collage but Clueless About the Best Tools? No Worries as We Are Here and Will Help You to Learn About the Best Video Collage Maker PC Tools
10 Mind-Blowing Video Collage Maker for PC
An easy yet powerful editor
Numerous effects to choose from
Detailed tutorials provided by the official channel
Video collages are a great way to play multiple short videos at the same time. These collages can be used for different purposes and platforms like social media platforms, online video sharing sites, brand promotion, announcing an event or a service, and similar others.

Whatever may be the situation, you would need a good and feature-packed tool for creating such a collage so that videos look perfect in a frame, background audio can be added, and other customizations can be done. Keep reading below to learn about the best video collage maker for PC.
In this article
01 [Top 10 Video Collage Makers for Pc](#Part 1)
02 [Alternatives to Video Collage Maker for Pc](#Part 2)
Part 1 Top 10 video collage makers for PC
Among the long list of tools available, below we have shortlisted the top 10 PC tools that can be used for creating a video collage.
01**Wondershare Filmora Video Editor **
This Windows and Mac-based software is the best choice when it comes to creating a simple video collage in an effortless manner.
Key features
● Create a video collage using the split-screen feature of the software.
● Excellent video editing tool supporting advanced features for creating professional-looking videos.
● Support customizable animation options along with precise editing functions.
● Support to multiple audio-related features like automatic audio sync, audio compression, audio transitions, and more.
● Offers of stock collection of images, and other media files.
● Windows and Mac support.
For Win 7 or later (64-bit)
For macOS 10.12 or later
04Movavi Video Editor Plus
Unleash your creativity and make stunning videos including video collages using this excellent software.
Key features:
● Create stunning video collages with multiple video customization options.
● Allows adding titles, transitions, stickers, and filters.
● Option to apply chroma-key for changing the background.
● Option for creating automatic video collages.
● User-friendly interface.
● Windows and Mac support.

05Aiseesoft Video Converter Ultimate
Though the name suggests the software to be a video conversion tool, it is a multi-tasking software that can perform a variety of functions including video collage making and thus can be considered as a decent video collage app for PC.
Key features
● A feature-rich program that can also be used for creating a video collage.
● Allows performing a variety of features like video conversion, editing, compression, and more.
● Option for editing the video effects and also editing ID3 info.
● Create interesting GIF animations.
● Simple and easy-to-understand layout.
● Windows and Mac support.

06Cidade Video Collage Studio
Using this intuitive tool, you can quickly create a video collage by combining all your favorite videos in one place.
Key features
● Create a video collage by combining multiple videos or creating a video grid.
● Intuitive and user-friendly interface.
● Multiple-grid options to choose from.
● Allows applying effects like Sepia, Lomo, and others.
● Background audio or music files can be added.
● Option to change the background color and also preview the video.

07Blu-ray Master Video Converter Ultimate
This is a video toolbox supporting multiple functions that also include creating a video collage.
Key feature
● Create a video collage using high-quality videos.
● Support customizing and editing videos using several built-in tools.
● Video conversion to over 500 formats supported.
● Multiple layouts and templates for video collage are available.
● Almost all video, image, and audio formats are supported.

08Adobe Premiere Elements
If you are looking for an advanced and professional tool for creating a video collage and for other video editing needs, this is the right choice.
Key features:
● Create professional-looking collages using high-quality video files.
● The interface is clean with support for advanced functions.
● Option for adding multiple video effects.
● Comes with help documents and guides to help you with the software functions.
● Windows and Mac support.

09Collage Maker
For creating a simple video collage on your Windows system this is a good tool to consider.
Key features
● Simple and basic collage-making tool.
● Comes with customizable and adjustable layout options.
● Option to add stickers ad text to the collage.
● Allows mixing videos, and images along with the music file.

1010. iMovie
For Mac users, iMovie is the default video editing tool that is pre-installed on the system. Besides editing functions, the tool can also perform other tasks like creating a video collage.
Key features:
● Allows to quickly create a video collage.
● Intuitive interface.
● Comes pre-installed with Mac systems.
● Transitions and other effects can be added.

Part 2 Alternatives to video collage maker for PC
If you do not want to download any additional software on your PC for creating a video collage, there are alternatives available in form of online tools and phone-based apps. The online tools are free and simple to use supporting all basic and needed functions. Some of the popular names in the category include FastReels, Typito, Kapwing, and more.
Apps are a great option when you want to create a collage on your mobile phone. Multiple apps for the task are available on the Google play store and Apple Store. Some of the widely used ones are PicStich, PicPlayPost Movie Video Editor, Mojo, and others.
● Ending Thoughts →
● Video collages are an interesting way to combine and play short multiple videos or play them in a grid.
● There are several PC-based video collage maker tools available like Wondershare Filmora, and others.
● As alternatives, you can use online tools or phone-based apps for creating a video collage.
Video collages are a great way to play multiple short videos at the same time. These collages can be used for different purposes and platforms like social media platforms, online video sharing sites, brand promotion, announcing an event or a service, and similar others.
Whatever may be the situation, you would need a good and feature-packed tool for creating such a collage so that videos look perfect in a frame, background audio can be added, and other customizations can be done. Keep reading below to learn about the best video collage maker for PC.
In this article
01 [Top 10 Video Collage Makers for Pc](#Part 1)
02 [Alternatives to Video Collage Maker for Pc](#Part 2)
Part 1 Top 10 video collage makers for PC
Among the long list of tools available, below we have shortlisted the top 10 PC tools that can be used for creating a video collage.
01**Wondershare Filmora Video Editor **
This Windows and Mac-based software is the best choice when it comes to creating a simple video collage in an effortless manner.
Key features
● Create a video collage using the split-screen feature of the software.
● Excellent video editing tool supporting advanced features for creating professional-looking videos.
● Support customizable animation options along with precise editing functions.
● Support to multiple audio-related features like automatic audio sync, audio compression, audio transitions, and more.
● Offers of stock collection of images, and other media files.
● Windows and Mac support.
For Win 7 or later (64-bit)
For macOS 10.12 or later
04Movavi Video Editor Plus
Unleash your creativity and make stunning videos including video collages using this excellent software.
Key features:
● Create stunning video collages with multiple video customization options.
● Allows adding titles, transitions, stickers, and filters.
● Option to apply chroma-key for changing the background.
● Option for creating automatic video collages.
● User-friendly interface.
● Windows and Mac support.
05Aiseesoft Video Converter Ultimate
Though the name suggests the software to be a video conversion tool, it is a multi-tasking software that can perform a variety of functions including video collage making and thus can be considered as a decent video collage app for PC.
Key features
● A feature-rich program that can also be used for creating a video collage.
● Allows performing a variety of features like video conversion, editing, compression, and more.
● Option for editing the video effects and also editing ID3 info.
● Create interesting GIF animations.
● Simple and easy-to-understand layout.
● Windows and Mac support.
06Cidade Video Collage Studio
Using this intuitive tool, you can quickly create a video collage by combining all your favorite videos in one place.
Key features
● Create a video collage by combining multiple videos or creating a video grid.
● Intuitive and user-friendly interface.
● Multiple-grid options to choose from.
● Allows applying effects like Sepia, Lomo, and others.
● Background audio or music files can be added.
● Option to change the background color and also preview the video.
07Blu-ray Master Video Converter Ultimate
This is a video toolbox supporting multiple functions that also include creating a video collage.
Key feature
● Create a video collage using high-quality videos.
● Support customizing and editing videos using several built-in tools.
● Video conversion to over 500 formats supported.
● Multiple layouts and templates for video collage are available.
● Almost all video, image, and audio formats are supported.
08Adobe Premiere Elements
If you are looking for an advanced and professional tool for creating a video collage and for other video editing needs, this is the right choice.
Key features:
● Create professional-looking collages using high-quality video files.
● The interface is clean with support for advanced functions.
● Option for adding multiple video effects.
● Comes with help documents and guides to help you with the software functions.
● Windows and Mac support.
09Collage Maker
For creating a simple video collage on your Windows system this is a good tool to consider.
Key features
● Simple and basic collage-making tool.
● Comes with customizable and adjustable layout options.
● Option to add stickers ad text to the collage.
● Allows mixing videos, and images along with the music file.
1010. iMovie
For Mac users, iMovie is the default video editing tool that is pre-installed on the system. Besides editing functions, the tool can also perform other tasks like creating a video collage.
Key features:
● Allows to quickly create a video collage.
● Intuitive interface.
● Comes pre-installed with Mac systems.
● Transitions and other effects can be added.
Part 2 Alternatives to video collage maker for PC
If you do not want to download any additional software on your PC for creating a video collage, there are alternatives available in form of online tools and phone-based apps. The online tools are free and simple to use supporting all basic and needed functions. Some of the popular names in the category include FastReels, Typito, Kapwing, and more.
Apps are a great option when you want to create a collage on your mobile phone. Multiple apps for the task are available on the Google play store and Apple Store. Some of the widely used ones are PicStich, PicPlayPost Movie Video Editor, Mojo, and others.
● Ending Thoughts →
● Video collages are an interesting way to combine and play short multiple videos or play them in a grid.
● There are several PC-based video collage maker tools available like Wondershare Filmora, and others.
● As alternatives, you can use online tools or phone-based apps for creating a video collage.
Also read:
- In 2024, Create Slide Masking Effect Intro
- New 2024 Approved How to Create Sports Intro and YouTube Endscreen?
- Updated In 2024, 3 Ways to Make Time-Lapse Video on MacBook
- Updated 2024 Approved How to Make a Neon Dance Effect With Filmora
- New 8 Top Premiere Pro Slideshow Templates for 2024
- New Creating a Slideshow Is Necessity of the Modern Time. Whether You Plan a Business Meeting or You Are Going to Do some Family Event with Slideshow Presentation, a Good Slideshow Maker Will Help You in This Direction
- Updated 2024 Approved Easy Steps to Add Miniature Effect to Videos
- Updated In 2024, How to Create a Dynamic Text Animation in Filmora — Step-By-Step
- New In 2024, 8 Best Free Photo Collage with Music Video Maker
- Updated Easily Sync Audio With Video With Filmora for 2024
- Updated We All Know Very Well that a 1-Second-Video Has Several Images in a Single Row. Even with iMovie Time-Lapse, You Can Create This! So, without Any Further Ado, Lets Learn How to Make a Timelapse in iMovie
- Converting an SRT File to VTT Is Extremely Easy. The Article Enlists Various Methods You Can Use to Convert an SRT File to VTT, Introducing You to Filmora, Which Allows You to Edit Your SRT Files
- New Final Cut Pro - How to Download and Install It for 2024
- New Do You Wish to Design the Perfect Slow-Motion Video on Your Smartphone? Learn some Top-Rated Free Slow-Mo Apps for Android and iOS Users in This Article
- Updated Best Things People Know About Wedding Slideshow for 2024
- 2024 Approved In This Article, We Will Show You How to Rotate Videos Using Obs
- Level Up Videos By Applying Keyframe Like A Pro
- New Easily Cut Large Video Faster on Mac
- New You Need to Follow Certain Steps to Complete Your Project. In the Section Below, We Will Discuss in Detail the Steps to Make a Movie From Windows Movie Maker
- 2024 Approved Do You Want to Create Slow-Motion Videos? This Article Shows Methods to Create Slow-Mo Videos without Changing the Medias Quality
- How to Add Camera Shake to Video in Adobe After Effects for 2024
- This Article Is Regarding the Guideline for Splitting the Video Clips in Adobe After Effects. Here, You Will Also Know About the Most Appropriate Substitute, Wondershare Filmora. Being Economical, You Can Also Use It Practically for 2024
- How to Export iMovie for 2024
- New 2024 Approved | How to Livestream Zoom on Facebook?
- Updated Have You Ever Tried to Remove the Transparent Background of Gif and Failed? This Blog Will Help You with This Issue. Also, We Will Discuss How to Create Animated Gifs and the Best Tools for Them
- 2024 Approved This Well-Written Article Will Share a Descriptive Method on How to Stream Zoom to YouTube Quickly. By Doing so, You Can Share Your Zoom Session Live with Your YouTube Audience Effortlessly
- Updated How Much Wedding Videographer Cost for 2024
- Updated In 2024, How to Create Datamoshing Effect to Your Footage in After Effects?
- New 2024 Approved How to Use the Logo Intro Templates for Your Next Video
- Updated In 2024, Easy Ways to Add Text Overlay to Video
- Are You Searching for Professional Subtitle Apps? Read This Article to Explore Various Compatible Subtitle Apps that You Can Run on Multiple Platforms for 2024
- New Text Animation Intro Tutorial in Filmora
- New How to Rotate AVI in Vertical/Portrait Orientation Windows, Mac,Android, iPhone & Online for 2024
- New 2024 Approved Cropping Video in VLC Step by Step
- 3 Ways to Track Apple iPhone 14 Plus without Them Knowing | Dr.fone
- In 2024, A Quick Guide to Tecno Pova 5 FRP Bypass Instantly
- How To Recover Lost Data from iPhone 13 Pro Max? | Dr.fone
- What Is AI Voice Text to Speech? | Wondershare Virbo Glossary
- How To Unlock SIM Cards Of Xiaomi Redmi Note 12 Pro 4G Without PUK Codes
- In 2024, How to Come up With the Best Pokemon Team On Samsung Galaxy Z Flip 5? | Dr.fone
- Fix Unfortunately Settings Has Stopped on Lenovo ThinkPhone Quickly | Dr.fone
- How to recover old call logs from your Tecno Spark 10 5G?
- In 2024, Easy Ways to Manage Your Xiaomi Redmi Note 12 5G Location Settings | Dr.fone
- In 2024, What Legendaries Are In Pokemon Platinum On Oppo K11 5G? | Dr.fone
- In 2024, How to Display Apple iPhone 12 mini Screen on PC Easily? | Dr.fone
- How To Update or Downgrade iPhone 6 Plus Without iTunes? | Dr.fone
- Title: Learn About How You Can Create a Smooth Speed Ramp with Premiere Pro. Also, Find Alternative Software “WonderShare Filmora” For the Same Purpose with a Much Easier User Interface
- Author: Chloe
- Created at : 2024-05-20 03:37:35
- Updated at : 2024-05-21 03:37:35
- Link: https://ai-editing-video.techidaily.com/learn-about-how-you-can-create-a-smooth-speed-ramp-with-premiere-pro-also-find-alternative-software-wondershare-filmora-for-the-same-purpose-with-a-much-eas/
- License: This work is licensed under CC BY-NC-SA 4.0.
