
Learn How to Add Dynamic Shake Effects to Your Videos Using Alight Motion. Our Step-by-Step Guide Makes It Easy to Create Cinematic Footage

Learn How to Add Dynamic Shake Effects to Your Videos Using Alight Motion. Our Step-by-Step Guide Makes It Easy to Create Cinematic Footage
Are you looking to add some dynamic effects to your videos? Have you ever wanted to create footage that feels like shaking but didn’t know how to do it? Well, you’re in luck! This guide will show you how to use Alight Motion, a video editing app, to add shake effects to your videos.
Whether you’re a professional videographer or a hobbyist, this guide will take you step-by-step through adding shake effects with Alight Motion. With its easy-to-use interface and powerful features, Alight Motion makes it simple to take your videos to the next level. So, let’s get started and shake things up!

Overview of Alight Motion
Alight Motion is a powerful video editing app that allows users to create dynamic and engaging videos. It offers many features, including motion graphics, visual effects, and animation tools. With Alight Motion, you can easily add shake effects to your videos and other dynamic effects such as panning, zooming, and rotation.
One of the great things about Alight Motion is its user-friendly interface. The app is designed to be intuitive and easy to use, making it accessible to users of all skill levels.
Alight Motion has everything you need to create high-quality, cinematic footage, whether you’re a professional videographer or just getting started with video editing. So, if you want to take your videos to the next level, give Alight Motion a try!
How To Add Shake Effects to Your Video in Alight Motion?
By following these simple steps, you’ll be able to create footage that feels like shaking, adding a sense of dynamic movement to your videos. Shake effects can be a great addition to any video if you want to create a dramatic effect or add visual interest to your footage. So, let’s learn how to add shake effects to your videos in Alight Motion.
Step1 Open the Alight Motion app and tap “New Project.”
Step2 Import your video clip.
Step3 Adjust the length of your clip, then tap “Add Effect.”

Step4 Search for the video effect. In this case, search “Tiles.”
Step5 Adjust the video using the effect settings.
Step6 Search for the blur effect. In this case, search “Motion Blur.”
Step7 Search for the shake effect. In this case, search “Auto-Shake.”
Step8 Adjust the speed, magnitude, and other elements and effects of the video clip.
Step9 Preview the video and tap “Save.”
[Bonus] Filmora for Mobile – Best Alternative to Alight Motion
Filmora for mobile is a powerful video editing app that can be an alternative to Alight Motion. It has a user-friendly interface and offers a wide range of features that allow users to create professional-looking videos easily. Some of the key features of Filmora for mobile include:
Free Download For Win 7 or later(64-bit)
Free Download For macOS 10.14 or later
- Motion graphics and visual effects: Filmora for mobile has a wide range of motion graphics and visual effects that you can use to enhance your videos, including shake effects.
- Video trimming, merging, and splitting: The app allows you to trim, merge and split your videos to create the perfect footage.
- Music and audio editing: Filmora for mobile has a built-in music library and audio editing tools that you can use to add music and sound effects to your videos.
- Text and title overlays: You can add text and title overlays to your videos to create captions, subtitles, and more.
- Speed control: Adjust the speed of your videos to create fast-paced or slow-motion footage.
With Filmora for mobile, you can easily create high-quality, professional-looking videos with shake effects and all the other features that Alight Motion offers. The app has a simple and intuitive interface that makes it easy for users of all skill levels to create stunning videos.
Effects in Filmora for Mobile
Filmora for mobile offers a wide variety of effects that you can use to enhance your videos and make them stand out. The shaking effect is one popular effect that adds a sense of movement and drama to your footage. With Filmora, you can easily adjust the intensity of the shake effect to create a subtle or more pronounced effect.
Another great effect that Filmora for mobile offers is the split-screen effect. This allows you to split your screen into multiple sections and play different videos or images in each section. This can be useful for creating a sense of simultaneity and storytelling.
Additionally, Filmora for mobile offers a wide variety of transition effects that you can use to transition between different clips in your video smoothly. These effects include wipes, fades, and more. With these effects, you can take your videos to the next level.
How To Add Shake Effects in Filmora for Mobile
Shake effects can be a great addition to any video if you want to create a dramatic effect or add visual interest to your footage. By following the simple steps outlined in this guide, you’ll be able to add shake effects to your videos in Filmora for mobile and take your videos to the next level. So, let’s get started and learn how to add shake effects in Filmora for mobile.
Step1 Open the Filmora mobile app and tap “More.”
Step2 Select the effect in the list of effects loaded.
Step3 Click the “Use“ button to make the effect present in your clip.
Step4 Select the video clip from your device that you want to edit.
Step5 Select the shake effect you want to use and tap the check icon.
Step6 Adjust the duration of the effect to your desired length.
Step7 Tap the “Export“ button to save your video.
After following the steps outlined in this guide, you can easily add shake effects to your videos in Filmora for mobile. However, if you’re still having trouble, we recommend watching the following video for more detailed instructions:
Which Is Better? Alight Motion or Filmora for Mobile?
It ultimately depends on your specific needs and preferences when deciding between Alight Motion and Filmora for mobile. Both apps are powerful video editing tools that offer many features and effects but have their strengths and weaknesses.
| | Alight Motion | Filmora | |
| —————————- | ————————————————————————————————— | ——————————————————– |
| Operating System | Android and iOS | Android and iOS |
| App Store Rating | 4.4 out of 5 | 4.7 out of 5 |
| Google Play Store Rating | 3.6 out of 5 | 4.7 out of 5 |
| Pricing | Free with In-app Purchases | Free with In-app Purchases |
| Number of Shake Effects | 100+ shake effects | 8 different camera shake |
Alight Motion is a powerful video editing app that offers many features and effects, including 100+ shake effects. The app is available for Android and iOS and has received a 4.4 out of 5 rating on the App Store and a 3.6 out of 5 rating on the Google Play Store. Alight Motion is free to download and use, but some features and effects may require in-app purchases.
One of the standout features of Alight Motion is its motion graphics and visual effects capabilities. The app has a wide range of shake effects that you can use to add a sense of movement and drama to your footage.
Alight Motion is suitable for professional videographers who want to create high-quality and professional-looking videos. The app is also great for those who want to create videos for social media platforms, especially those who want to create dynamic and visually engaging videos.
On the other hand, Filmora for mobile is also a powerful video editing app that offers a wide range of features and effects, including 8 different camera shake effects.
The app is available for Android and iOS and has received a 4.7 out of 5 rating on the App Store and a 4.7 out of 5 rating on the Google Play Store. Filmora is free to download and use, but some features and effects may require in-app purchases.
The shake effect feature in Filmora for mobile is simple and allows you to add a subtle or more pronounced shake effect to your footage. Additionally, Filmora for mobile offers a wide range of other effects, including visual effects, transition effects, and color correction tools, that you can use to enhance your videos.
Filmora for mobile is suitable as a user-friendly and easy-to-use video editing app. The app is perfect for hobbyists, YouTubers, or social media content creators who want to create high-quality videos with various effects. It’s also great for those seeking a mobile-based alternative to desktop video editing software.
People Also Ask
Here are some questions that people commonly ask concerning the topic of adding shake effects to videos using Alight Motion.
Q1. How Do You Add Effects to Alight Motion?
To add effects to Alight Motion, you can follow these steps:
Step1 Open the Alight Motion app and create a new project or open an existing one.
Step2 Select the layer to which you want to add the effect, then tap on the “Effects“ button.
Step3 Browse the available effects and tap on the desired effect to apply it to the selected layer.
Step4 You can add multiple layers to your video.
Q2. How Many Effects Are in Alight Motion?
As of now, Alight Motion offers 100+ effects that you can use to enhance your videos and make them stand out. These effects include a wide range of motion graphics, visual effects, and animation tools. Some of the effects available in Alight Motion include shaking effects, panning, zooming, rotation, color correction, and many more.
The app is regularly updated, so the number of effects available may increase over time. The wide range of effects gives you the power to create dynamic and visually engaging videos. With Alight Motion, the possibilities are endless.
Q3. Is 8GB RAM Enough for Alight Motion?
8GB of RAM is generally enough for running Alight Motion, although the app’s recommended minimum is 2GB of RAM. Having more RAM would allow for smoother performance and the ability to handle larger and more complex projects. However, with 8GB of RAM, you should still be able to run Alight Motion without any major issues.
Conclusion
Alight Motion and Filmora for mobile are powerful video editing apps that offer a wide range of features and effects. Each app has its strengths and weaknesses, and it ultimately depends on your specific needs and preferences.
Alight Motion offers more shake effects, while Filmora for mobile offers more simplicity. Both apps can be used to create high-quality and professional-looking videos. It’s recommended to try both apps and see which one works best for you.
Detailed Guide to Crop Video in Sony Vegas Pro
Sony Vegas Pro is a video editing software package for non-linear editing (NLE) originally published by Sonic Foundry, now owned and run by Magix Software GmbH. Written in the C++ programming language, the software uses the Microsoft Windows operating system and is compatible with 64-bit versions.
It has been used to produce TV shows and feature films. More recently, Sony released a consumer video-editing program known as Movie Studio Platinum 13, which was designed for consumer-level editors. In the previous year by Sonic Foundry, a division of Sony Pictures Digital. The software was re-branded as Sony Vegas following Sonic Foundry’s merger with Sony Pictures Digital in 2007, and after the latter sold off Sonic Foundry in 2008, it became a part of MAGIX.
Other video editing products from Sony include Movie Studio, Sound Forge Pro, and ACID Pro.
The original version was called Sound Forge. The software was upgraded to incorporate features of the newly acquired product Vegas, which had been released as a Windows version of the original DOS-based Non-Linear Editor (NLE) developed by US company, Canopus.
About Sony Vegas Pro
The powerful video editing software makes it easy to create professional-quality videos. It provides the users with some special features like easy trimming, splitting and merging of clips, etc. By using Vegas Pro you can easily crop your short video (a clip) and also resize it.
Sony Vegas Pro is a video editing software produced by Sony Creative Software. It is used for professional video, audio post-production and 3D animation.
Sony Vegas Pro is a video editing software that is used worldwide. It has great features and it can be utilized by individuals who are newbies in the field of creating videos. Sony Vegas Pro 12, 11, 10 have been installed many times on Windows 7, 8, 8.1 operating systems without encountering any problems. But some users face problems with the installation process of Sony Vegas Pro 13, 14 versions. Many individuals have got different difficulties.
Cropping means cutting off a part of the video. Instead of enlarging the video by moving its borders, you have to trim it from both sides. The editing procedure includes removing unwanted parts from short videos, making them shorter and more effective. It can also create suspense or interest for audiences. Here are the steps to crop a video in Sony Vegas Pro:
Step-by-step on how to crop videos using Vegas Pro?
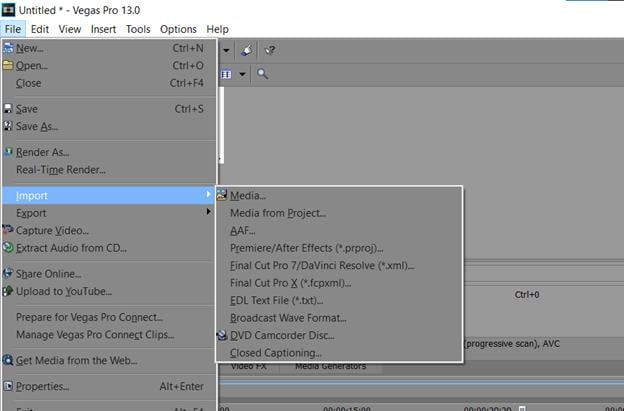
Step 1: Click on ‘Import’ and import the video to be edited. Click on it and drag-drop to timeline. You can see a green indicator in the form of a splitter between two clips in the timeline, which shows where the clip ends and starts playing.
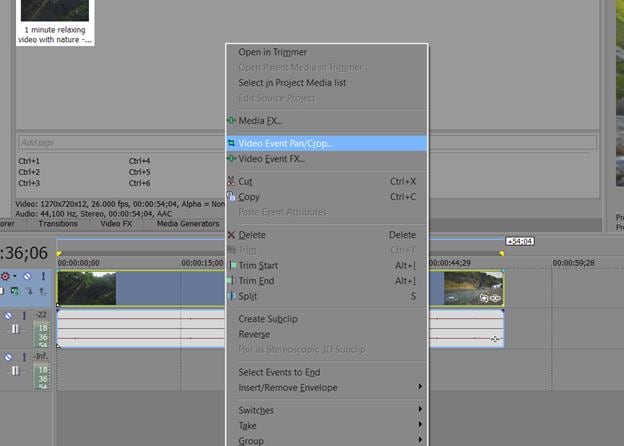
Step 2: Open the video you want to edit, in the timeline of your project. Right-click on the clip and select “Video Event Pan/Crop”.
Step 3: Alternatively, you can also select crop effect by pressing the icon in the clip. Or, select the Crop icon from the toolbar to add it to a track.

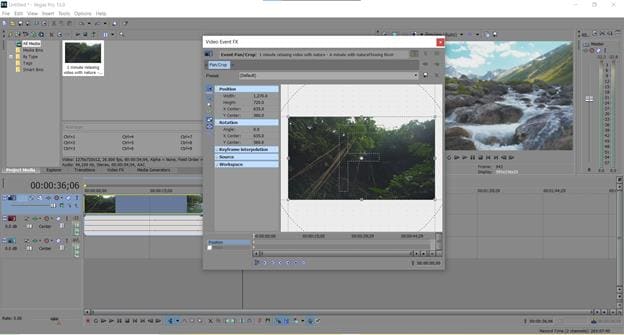
Step 4: The crop window will pop up. You can now drag the dotted rectangle to the ‘crop’ part of the video that you want. Press enter once done to apply the crop. You can also use the “Previous Frame” or “Next Frame” button to navigate to another frame of your video and drag the dotted rectangle from there, without changing your current frame.
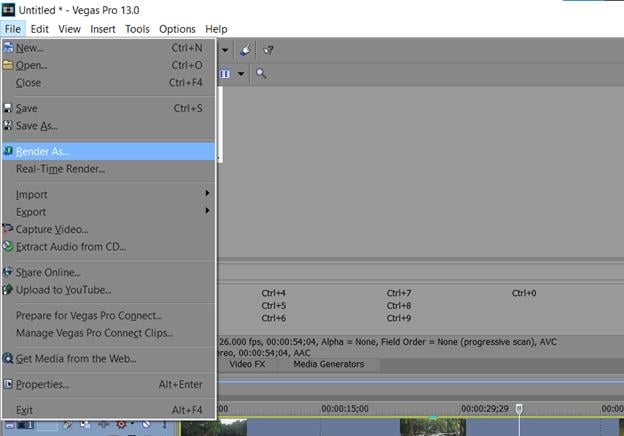
Step 5: When you have finished adjusting the crop area, go to File > Export > Render Video. In the Render Video window that pops up, select the file format and quality of your render. You can also adjust the size, frame rate, and bitrate options from here. Once ready, press “Render” to begin rendering your video with the cropped area. This will give you a new output video where only the selected portion of the previous video is visible.
Sony Vegas Pro provides advanced options for users to easily crop videos in multiple formats like - HDV, AVCHD, and many more.
And… Voila! You have successfully cropped your video in Sony Vegas Pro.
Alternatively, there is a better way to crop a video and that is using the Wondershare Filmora. It is easier and user-friendly. It also has a lot of features that you can choose from.
An Easier Way to Crop a Video with Filmora
Filmora Video Editor is a free windows movie maker. It is one of the best windows movie makers available in the market. Filmora uses MPEG-4 AVC codec for editing videos and also offers many output formats like MP4, AVI, FLV, etc. In addition to these features, it includes a video stabilization algorithm, picture in picture editor, and many more. It is a free windows movie maker so anyone who has a windows computer can download and use this software.
It includes many interesting and useful features which you will not find in other movie makers like:
Support for multiple videos, audio, image formats: The program offers support for multiple videos, audio, image formats. Video stabilization algorithm: Video stabilization algorithm is used to remove unwanted shakes from your videos. Apart from this it also contains a picture-in-picture editor and many more useful features.
Filmora is an indie filmmaker’s go-to tool to create gorgeous-looking videos. No matter your skill level, it’s easy enough for beginners and powerful enough for professionals.
For Win 7 or later (64-bit)
For macOS 10.14 or later
Step-by-step on how to crop videos using Wondershare Filmora?
So, here are the steps to crop videos using Wondershare Filmora.
Step 1: Open the video you want to edit in Wondershare Filmora. Drag it and drop to timeline.
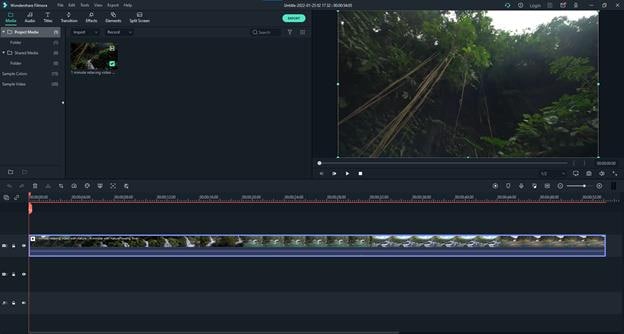
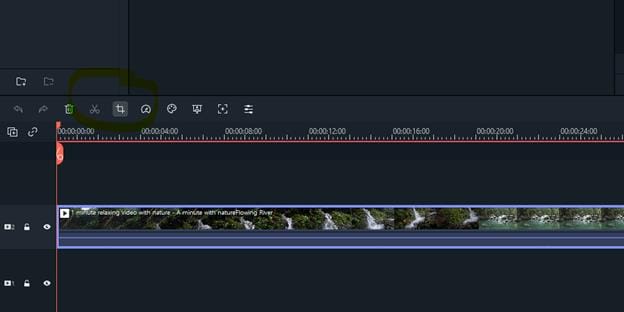
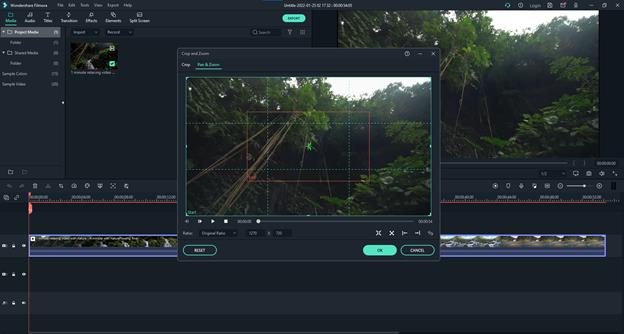
Step 2: In your timeline, select a portion of the video that needs cropping and click on ‘Crop and Zoom’ tab located at the bottom right corner of your screen. Here you can see the Crop and Zoom window where you can adjust the crop area. Adjust the size, shape of your video with these options.
Step 3: Once done with your adjustment click on ‘OK’ button to apply your crop. You can see that the selected portion of the video is now cropped.
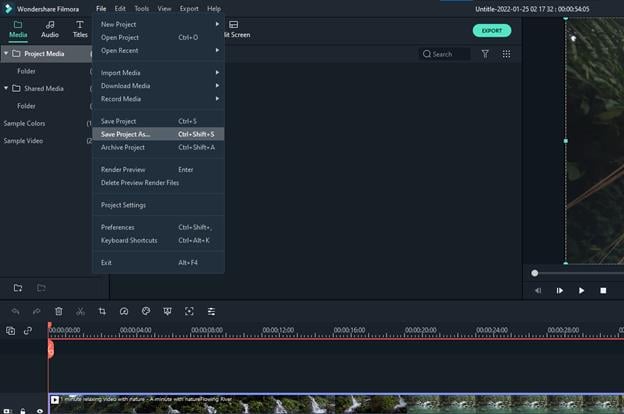
Step 4: Finally, click on “Save” to save your video with cropping. Congratulations, you have successfully cropped your video! So, this was all about how to crop videos using Wondershare Filmora software step by step. Using these easy steps anyone can simple edit their videos and save them in multiple formats without any loss of quality or data.
Step 2: Open the video you want to edit, in the timeline of your project. Right-click on the clip and select “Video Event Pan/Crop”.

Step 3: Alternatively, you can also select crop effect by pressing the icon in the clip. Or, select the Crop icon from the toolbar to add it to a track.

Step 4: The crop window will pop up. You can now drag the dotted rectangle to the ‘crop’ part of the video that you want. Press enter once done to apply the crop. You can also use the “Previous Frame” or “Next Frame” button to navigate to another frame of your video and drag the dotted rectangle from there, without changing your current frame.

Step 5: When you have finished adjusting the crop area, go to File > Export > Render Video. In the Render Video window that pops up, select the file format and quality of your render. You can also adjust the size, frame rate, and bitrate options from here. Once ready, press “Render” to begin rendering your video with the cropped area. This will give you a new output video where only the selected portion of the previous video is visible.

Sony Vegas Pro provides advanced options for users to easily crop videos in multiple formats like - HDV, AVCHD, and many more.
And… Voila! You have successfully cropped your video in Sony Vegas Pro.
Alternatively, there is a better way to crop a video and that is using the Wondershare Filmora. It is easier and user-friendly. It also has a lot of features that you can choose from.
An Easier Way to Crop a Video with Filmora
Filmora Video Editor is a free windows movie maker. It is one of the best windows movie makers available in the market. Filmora uses MPEG-4 AVC codec for editing videos and also offers many output formats like MP4, AVI, FLV, etc. In addition to these features, it includes a video stabilization algorithm, picture in picture editor, and many more. It is a free windows movie maker so anyone who has a windows computer can download and use this software.
It includes many interesting and useful features which you will not find in other movie makers like:
Support for multiple videos, audio, image formats: The program offers support for multiple videos, audio, image formats. Video stabilization algorithm: Video stabilization algorithm is used to remove unwanted shakes from your videos. Apart from this it also contains a picture-in-picture editor and many more useful features.
Filmora is an indie filmmaker’s go-to tool to create gorgeous-looking videos. No matter your skill level, it’s easy enough for beginners and powerful enough for professionals.
For Win 7 or later (64-bit)
For macOS 10.14 or later
Step-by-step on how to crop videos using Wondershare Filmora?
So, here are the steps to crop videos using Wondershare Filmora.
Step 1: Open the video you want to edit in Wondershare Filmora. Drag it and drop to timeline.

Step 2: In your timeline, select a portion of the video that needs cropping and click on ‘Crop and Zoom’ tab located at the bottom right corner of your screen. Here you can see the Crop and Zoom window where you can adjust the crop area. Adjust the size, shape of your video with these options.

Step 3: Once done with your adjustment click on ‘OK’ button to apply your crop. You can see that the selected portion of the video is now cropped.

Step 4: Finally, click on “Save” to save your video with cropping. Congratulations, you have successfully cropped your video! So, this was all about how to crop videos using Wondershare Filmora software step by step. Using these easy steps anyone can simple edit their videos and save them in multiple formats without any loss of quality or data.

Step 2: Open the video you want to edit, in the timeline of your project. Right-click on the clip and select “Video Event Pan/Crop”.

Step 3: Alternatively, you can also select crop effect by pressing the icon in the clip. Or, select the Crop icon from the toolbar to add it to a track.

Step 4: The crop window will pop up. You can now drag the dotted rectangle to the ‘crop’ part of the video that you want. Press enter once done to apply the crop. You can also use the “Previous Frame” or “Next Frame” button to navigate to another frame of your video and drag the dotted rectangle from there, without changing your current frame.

Step 5: When you have finished adjusting the crop area, go to File > Export > Render Video. In the Render Video window that pops up, select the file format and quality of your render. You can also adjust the size, frame rate, and bitrate options from here. Once ready, press “Render” to begin rendering your video with the cropped area. This will give you a new output video where only the selected portion of the previous video is visible.

Sony Vegas Pro provides advanced options for users to easily crop videos in multiple formats like - HDV, AVCHD, and many more.
And… Voila! You have successfully cropped your video in Sony Vegas Pro.
Alternatively, there is a better way to crop a video and that is using the Wondershare Filmora. It is easier and user-friendly. It also has a lot of features that you can choose from.
An Easier Way to Crop a Video with Filmora
Filmora Video Editor is a free windows movie maker. It is one of the best windows movie makers available in the market. Filmora uses MPEG-4 AVC codec for editing videos and also offers many output formats like MP4, AVI, FLV, etc. In addition to these features, it includes a video stabilization algorithm, picture in picture editor, and many more. It is a free windows movie maker so anyone who has a windows computer can download and use this software.
It includes many interesting and useful features which you will not find in other movie makers like:
Support for multiple videos, audio, image formats: The program offers support for multiple videos, audio, image formats. Video stabilization algorithm: Video stabilization algorithm is used to remove unwanted shakes from your videos. Apart from this it also contains a picture-in-picture editor and many more useful features.
Filmora is an indie filmmaker’s go-to tool to create gorgeous-looking videos. No matter your skill level, it’s easy enough for beginners and powerful enough for professionals.
For Win 7 or later (64-bit)
For macOS 10.14 or later
Step-by-step on how to crop videos using Wondershare Filmora?
So, here are the steps to crop videos using Wondershare Filmora.
Step 1: Open the video you want to edit in Wondershare Filmora. Drag it and drop to timeline.

Step 2: In your timeline, select a portion of the video that needs cropping and click on ‘Crop and Zoom’ tab located at the bottom right corner of your screen. Here you can see the Crop and Zoom window where you can adjust the crop area. Adjust the size, shape of your video with these options.

Step 3: Once done with your adjustment click on ‘OK’ button to apply your crop. You can see that the selected portion of the video is now cropped.

Step 4: Finally, click on “Save” to save your video with cropping. Congratulations, you have successfully cropped your video! So, this was all about how to crop videos using Wondershare Filmora software step by step. Using these easy steps anyone can simple edit their videos and save them in multiple formats without any loss of quality or data.

Step 2: Open the video you want to edit, in the timeline of your project. Right-click on the clip and select “Video Event Pan/Crop”.

Step 3: Alternatively, you can also select crop effect by pressing the icon in the clip. Or, select the Crop icon from the toolbar to add it to a track.

Step 4: The crop window will pop up. You can now drag the dotted rectangle to the ‘crop’ part of the video that you want. Press enter once done to apply the crop. You can also use the “Previous Frame” or “Next Frame” button to navigate to another frame of your video and drag the dotted rectangle from there, without changing your current frame.

Step 5: When you have finished adjusting the crop area, go to File > Export > Render Video. In the Render Video window that pops up, select the file format and quality of your render. You can also adjust the size, frame rate, and bitrate options from here. Once ready, press “Render” to begin rendering your video with the cropped area. This will give you a new output video where only the selected portion of the previous video is visible.

Sony Vegas Pro provides advanced options for users to easily crop videos in multiple formats like - HDV, AVCHD, and many more.
And… Voila! You have successfully cropped your video in Sony Vegas Pro.
Alternatively, there is a better way to crop a video and that is using the Wondershare Filmora. It is easier and user-friendly. It also has a lot of features that you can choose from.
An Easier Way to Crop a Video with Filmora
Filmora Video Editor is a free windows movie maker. It is one of the best windows movie makers available in the market. Filmora uses MPEG-4 AVC codec for editing videos and also offers many output formats like MP4, AVI, FLV, etc. In addition to these features, it includes a video stabilization algorithm, picture in picture editor, and many more. It is a free windows movie maker so anyone who has a windows computer can download and use this software.
It includes many interesting and useful features which you will not find in other movie makers like:
Support for multiple videos, audio, image formats: The program offers support for multiple videos, audio, image formats. Video stabilization algorithm: Video stabilization algorithm is used to remove unwanted shakes from your videos. Apart from this it also contains a picture-in-picture editor and many more useful features.
Filmora is an indie filmmaker’s go-to tool to create gorgeous-looking videos. No matter your skill level, it’s easy enough for beginners and powerful enough for professionals.
For Win 7 or later (64-bit)
For macOS 10.14 or later
Step-by-step on how to crop videos using Wondershare Filmora?
So, here are the steps to crop videos using Wondershare Filmora.
Step 1: Open the video you want to edit in Wondershare Filmora. Drag it and drop to timeline.

Step 2: In your timeline, select a portion of the video that needs cropping and click on ‘Crop and Zoom’ tab located at the bottom right corner of your screen. Here you can see the Crop and Zoom window where you can adjust the crop area. Adjust the size, shape of your video with these options.

Step 3: Once done with your adjustment click on ‘OK’ button to apply your crop. You can see that the selected portion of the video is now cropped.

Step 4: Finally, click on “Save” to save your video with cropping. Congratulations, you have successfully cropped your video! So, this was all about how to crop videos using Wondershare Filmora software step by step. Using these easy steps anyone can simple edit their videos and save them in multiple formats without any loss of quality or data.

How to Color Grading in Final Cut Pro
Have you ever questioned the purpose of those odd video scopes or how to build super grades from the start in Final Cut Pro? In contrast to editing talents, color grading is a technical and difficult ability that takes practice.
In order to help, we decided to compile a thorough beginner’s article to color grading in Final Cut Pro.
With that said, let’s begin!
1. Discover how you color grade in Final Cut Pro
Color grading may be a tedious and time-consuming operation, therefore it’s a skill set that calls for a lot of patience. Some editors won’t conduct any color grading or correction beyond the bare minimum. But even mundane-looking film may look remarkable if you know how to give it a dramatic touch.
A more cinematic grade requires a number of procedures, and there is no one method that works for all situations. We’ll therefore walk you through the process of creating a cinematic color grade in Final Cut Pro, but depending on your material, you might need to add or omit some phases.
Step1Filming
Since the raw video is essential for producing a cinematic image, an outstanding grade begins with the camera.
Use the greatest quality settings your camera offers while recording your video; the more information in your picture, the more you can manipulate it during grading.
While it may seem preferable to shoot with as much color as you can, using a duller color profile is very necessary. Your camera will have color settings, and although the washed-out, drab appearance may not inspire confidence in you, it will offer you a lot more editing possibility.
Step2Create a color profile
After importing your film, you may be concerned about the general dull look of your recordings. The reason for that is because you have not yet matched the color profile of your sequence to the one of your camera. To start on this process, it goes as follows.
- Drag your clip onto your timeline and make sure it is selected. Click on the Inspector icon.
- Then click on the Information tab of the clip.
- Navigate all the way down through the options to find the Color LUT option.
- Then choose the Color profile that matches your clip based on the camera it is filmed with.
- You’re done!
Step3Checking the scopes
The Scopes in Final Cut Pro are panels that display the color information of your shots. They are quite complicated and can be difficult to comprehend if you did not use them ever before. You can activate Video Scopes by clicking View > Show in Viewer > Video Scopes from the View menu. The three components of grading are the highlights, mid-tones, and shadows. Your highlights are shown at the top and your shadows are at the bottom in all grading tools and scopes.
2. Include Color Wheels
Now that your setup is complete, you can begin grading your footage. Grading is done in multiple layers stacked on top of each other. It may take multiple levels to create the desired look. Follow the instructions below to modify your settings to match your clip if you want to give your footage a cinematic look.
You may access a wider range of color manipulation tools with the built-in color wheels, exposure adjustments, including isolation of color selection, RGB modifications across tone ranges, and simple masking.
3. Color board
A vertical color spectrum is shown on the Color Board, and it is intersected by a horizontal line that features four nodes. These are the ranges of the footage that are designated as the Highlights, Midtones, and Shadows, respectively.
Adjusting a node to a new color space has an immediate and noticeable impact on the corresponding section of the image. If you move above the horizontal line, it will increase, and if you go below the line, it will decrease.
You also have control over the Saturation and Exposure settings. These are wonderful to have if you want to increase the contrast in your photographs and make particular colors more vivid or muted.
4. Masks
Using the Shape Masks feature, each of these individual effects can be perfect for particular regions of your footage. In addition, by utilizing a Color Mask, you can alter the appearance of a specific color. It is possible to apply multiple iterations of each color adjustment to a clip and find it listed under the Effect heading.
The order can be changed by dragging and dropping, and either method can be disabled or enabled. Utilizing keyframes allows for the effects of color grading to be specifically timed as well. Last but not least, keep in mind that the quality and color sample depth of the clips determine how much of an overall adjustment you are capable of making to a color.
5. Color Curves
If you are experienced with more advanced picture editing software, such as Adobe Photoshop, you will benefit greatly from using color curves. Adjustments can be made independently to both the Luma (the brightest areas) and the primary composite colors (red, blue, and green).
6. Match Colors
Match Color is an additional choice that may be made from the improvement’s menu. This function will try to replicate the visual style of one video clip in another. First, choose the clip whose color you want to change, click on that clip that has the desired appearance, and last, choose Match Color.
You will still be able to utilize these settings as shortcuts even after you have gained more experience with manual grading and are comfortable making finer adjustments manually. It is important to keep in mind that while using Final Cut Pro X for color grading, effects can be layered on top of one another.
It’s not likely that a single tool or adjustment will solve an issue or produce the desired result; rather, it’s more likely that a number of different impacts will be required. In the same way that different visual effects in Final Cut Pro X may be toggled on and off, any layers that you add to a clip can have their visibility controlled from the Inspector window.
Conclusion
In Final Cut Pro X, you may choose from a wide variety of grading plugins, ranging from more affordable solutions like FCPeffects to more expensive ones like Magic Bullet Looks, which are designed specifically for feature film-style grades.
Additionally, there is a variety of stand-alone applications for color grading, such as DaVinci Resolve and FilmConvert. You might be comfortable with their gear, but you should also know that their professional-grade color package includes some rather complex editing options.
Beginning to experiment with all of Final Cut Pro X’s functions and determining which ones are most useful to you is the best method to gain an understanding of the program’s color grading capabilities. If you don’t currently have a project that requires your attention, you can download stock footage and experiment with it.
Free Download For Win 7 or later(64-bit)
Free Download For macOS 10.14 or later
Free Download For macOS 10.14 or later
How to Add Freeze Frame to Your Video From Any Device?
Adding effects is an essential part of video editing to make a regular video look extraordinary. There are literally unlimited video effects available in popular video editors. You need to apply a video effect as per the trend and requirements of your video. Freeze frame effect has become extremely popular among video creators in today’s world of social media. Use freeze frame effect to freeze a specific scene in your video so that you can draw the attention of your viewers to that particular moment.
For example, in a match highlight video, you freeze the frame moment before a goal to show the positioning of the players or strikers. Owing to the popularity of freeze frame effect, you will find the video effect in almost all popular video editor apps for computers and smartphones. In fact, even popular online video editors have included the effect in their video effects. We will illustrate how to add freeze frame effect to your video on any device.
Part 1. How to Add Freeze Frame Video Effect on PC
If you are a computer user and you are looking for a video editor to add freeze frame effect to your video, we recommend Wondershare Filmora. Filmora is extremely popular among video creators for its wide range of video effects as well as its intuitive user interface. Adding freeze frame effect is super easy in Filmora and here are the steps to follow.
Step1Download and install Filmora for Windows PC. Launch Filmora and click on New Project button.
Step2Import your video clip under Project Media and then drop it into Timeline.
Step3Play the video and pause it where you want to freeze frame. Click on Snapshot icon to take photo of the frame. You will find the photo you have taken just now under Media library. In the meantime, you should split the video clip where you paused it to make space for the still image to get added and stay frozen.
Drag and drop the image on Timeline and stretch it to the duration up to which you want the frame to stay frozen. This image should be on top of the video clip in Timeline. You should place the image exactly where you paused the video.
Step4Double-click on the image in Timeline and adjust parameters as required. Play the video to notice the freeze frame effect. Click on Export button to save the video.
Part 2. How to Add Freeze Frame Video Effect on Mac
If you are a Mac user, the best video editor you can use to edit your video is Final Cut Pro. FCP is widely used by professional video creators and editors to edit their videos as per requirements. There are different categories of video effects available on FCP including freeze frame effect. Make sure your video is recorded with high frame rate and resolution for better outcomes. Here are the steps on how to add freeze frame in Final Cut Pro.
Step1Launch Final Cut Pro on your Mac. Go to File> Import> Files and select your video clip from the storage device. Drag it into the Timeline.

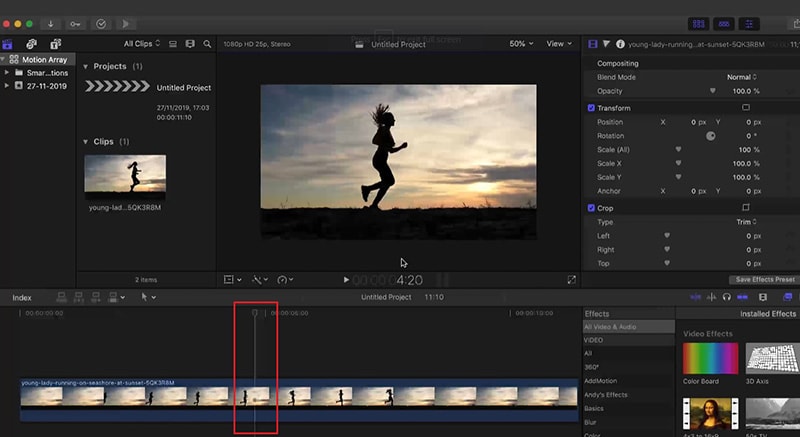
Step2Grab and move the Playhead to the point where you want to freeze the frame. Click on the video clip in the Timeline.
Step3Go to Edit menu and click on Add Freeze Frame. This will split your video clip and add frozen frame where you have placed the Playhead.
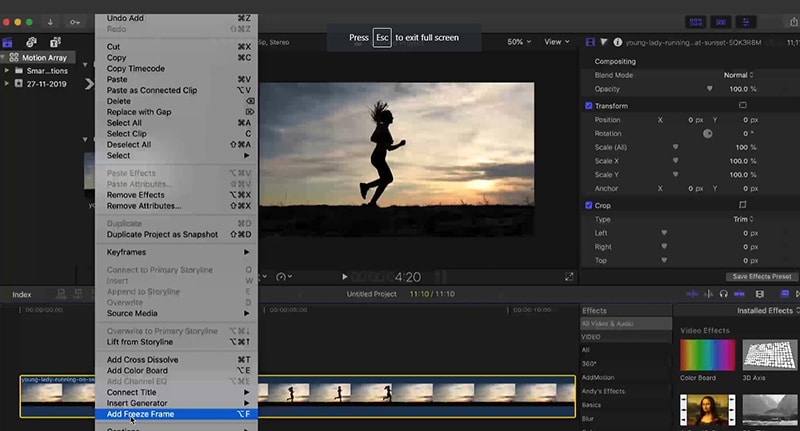
The default duration of the frozen freeze is four seconds. You can stretch it as per your requirements.
Just for information, both Windows and Mac users can also Premiere Pro add freeze frame effect if they already have Premiere Pro installed on their computers. The freeze frame feature in Premiere Pro is referred to as Add Frame Hold effect.
Part 3. How to Add Freeze Frame Video Effects Online
If you do not want to download and install a dedicated video editor on your computer, you can apply freeze frame effect to your video online as well. This will save your space as well as put less pressure on your CPU resource. We recommend Kapwing online video editor to use freeze frame effect on the go from any device directly from web browser. Here are the steps to add freeze frame effect to your video online.
Step1Open web browser on your device and visit “kapwing.com/tools/freeze-frame”. Click on Choose a video button.

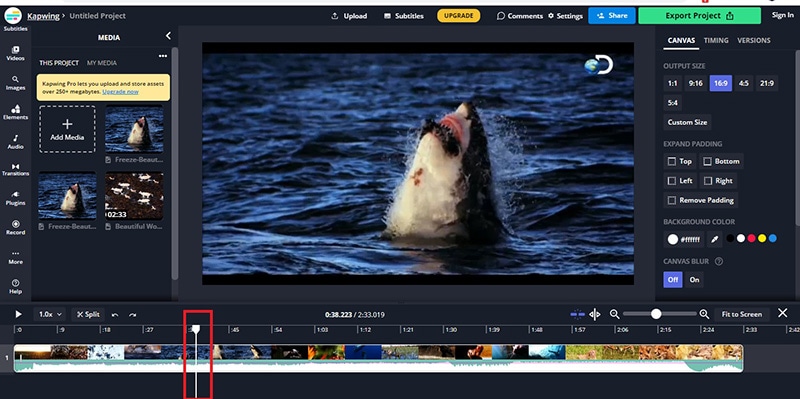
Step2Drop your video file into Timeline and click on the video clip. Move the Playhead to the point where you want to add freeze frame effect.
Step3Go to Timing tab located in the top-right corner. Click on Freeze Frame button to add still image of the scene in the video. You can click multiple times to add more still images of the same scene. The more still images, the greater its duration will be.
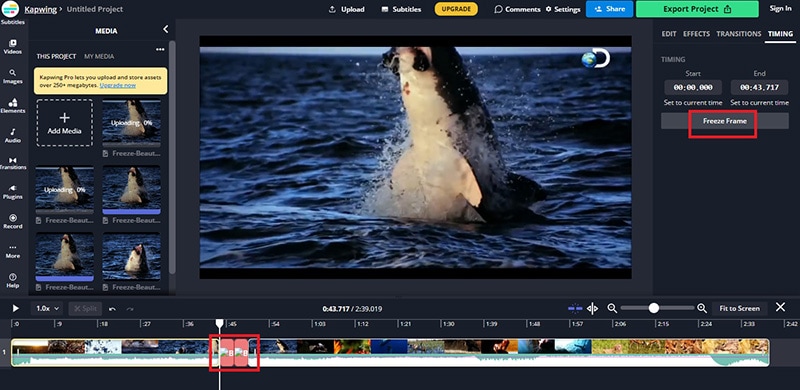
Step4Play the video and you can have multiple freeze frame effects in the video clip.
This is undoubtedly the easiest way to add freeze frame effects for beginners.
Part 4. How to Add Freeze Frame Video Effects on Mobile
If you are using an Android smartphone or iPhone, you can apply freeze frame effect directly on your mobile instantly. In today’s world, people capture videos through their smartphones thanks to high-quality phone camera. You can use CapCut video editor app on both Android and iOS devices to add freeze frame effects. Here are the steps you need to follow.
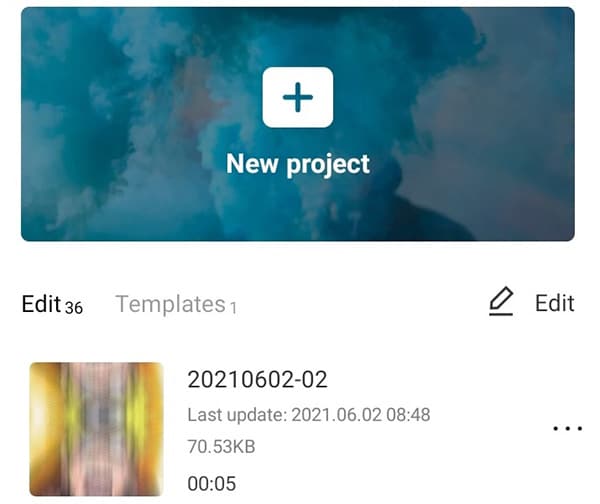
Step1Install CapCut app on your phone. Launch the app and tap on New Project.
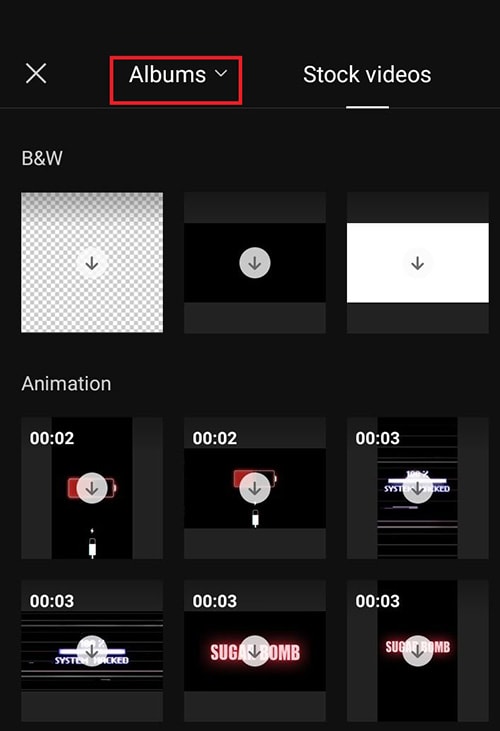
Step2Go to Albums and select the video to which you want to add the frame freeze effect.
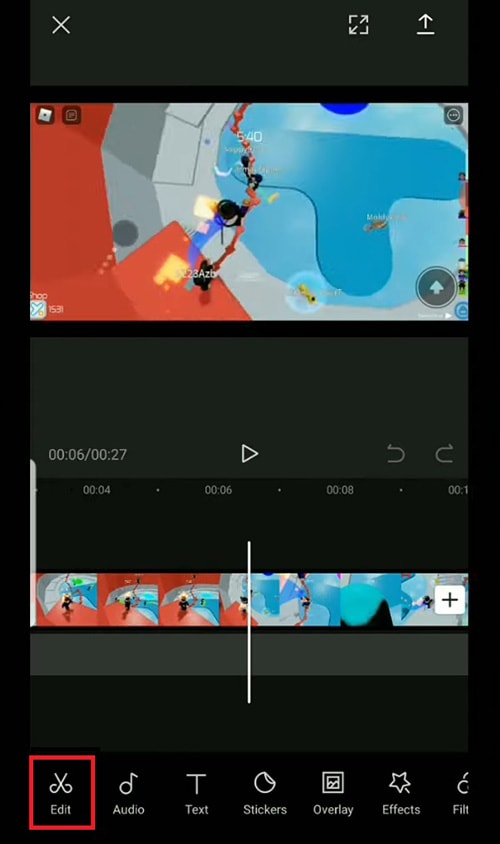
Step3Put the Playhead to the point where you want to add the effect. Tap on Edit option.
Step4Search for Freeze option located at the bottom and tap on it to insert still image of the scene in Timeline.
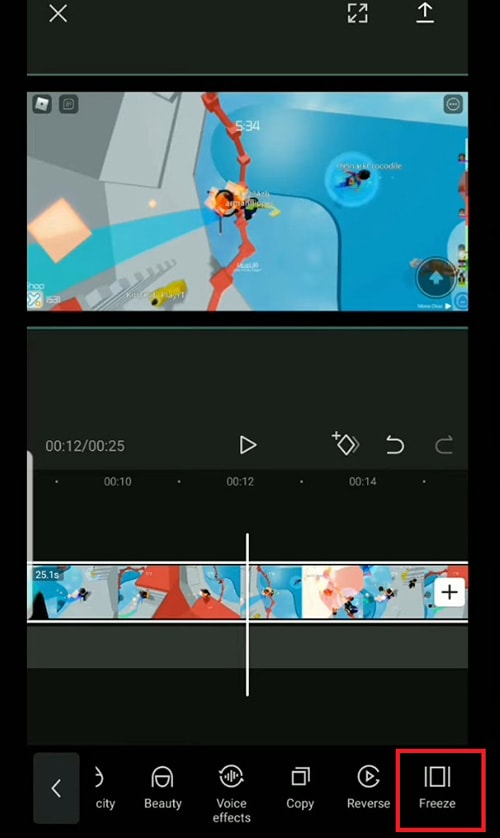
Step5You can drag the duration of the frame freeze effect as per your requirement.
The Bottom Line
Adding freeze frame to your videos before and during impactful moments can enhance your video content. We have illustrated how to add a freeze frame in Final Cut Pro for Mac users. You can also add it to your video online using Kapwing video editor. You can use CapCut app to use the effect in your video on your smartphone. We recommend Filmora to add the effect quickly and conveniently on your PC.
Free Download For Win 7 or later(64-bit)
Free Download For macOS 10.14 or later
Free Download For macOS 10.14 or later
Also read:
- New How to Create and Add an Adjustment Layer in Final Cut Pro for 2024
- New Learn How to Create Custom Titles in Filmora and Add a Unique Lower Third Animation Effect in Six Simple Steps
- New Best Audio Waveform Generator
- A Detailed Guid to Remove Background From a Video in Premier Pro
- Updated Top 9 Best Solutions To Go For When Creating an AI Thumbnail for 2024
- 2024 Approved Best Free LUTs to Use
- Guide Create The Perfect VHS Effect Look in Premiere Pro
- New Learn Color Correction in After Effects with These Videos
- Spooky Halloween with the Best 15+ Halloween Countdown Video Clips
- Updated How to Upload the Video to Twitch? Well, if You Dont Know the Process, This Detailed Guide Will Help You. While Explaining the Process, This Article Will Also Let You Know some Twitch Video Upload Guidelines
- In 2024, Ways to Merge Videos in HandBrake? Expectation Vs. Reality
- New 5 Tried-And-True Ways to GIF Making for 2024
- New In 2024, Zoom In and Out on Snapchat
- Updated How to Crop Videos in Windows Media Player
- Updated In 2024, Top 10 Free WhatsApp Video Converter
- Updated What Is a Memoji and How to Make a Memoji? You Can Learn Top 8 Memoji Makers for PC, Android, or iOS, and the Steps to Make a Memoji
- Updated Best 10 iPad Slideshow Apps to Create a Slideshow for 2024
- New You May Want to Change the Speed of Certain Portions of Your Video. This Article Enlightens You on How to Splice and Speed up the Video in Simple Ways
- New While Fiddling with Solutions to Complement the Ordinary Text Messages with Graphic Elements, People Also Ask About Ways to Add Emoji to Photo Online. Stay Here to Get the Best Answers
- 2024 Approved The Craziest 10 AI Editors Youve Seen
- New Best 8 Educational Video Websites for Teachers
- New Which 10 Best Video Editing Online Makers Is Worth Your Attention?
- 2024 Approved Do You Wish to Create the Best Video Collages ? No Problem, because Wondershare Filmora Will Help You Make the Best Video Collages
- Updated How To Use Virtual Green Screen to Shoot Video for 2024
- Updated Do You Know that You Can Apply Different LUTs and Create Your Own? There Are Many LUT Online and Offline Generators that You Can Use to Create Your LUT
- In 2024, Little Tricks to Create Canva Slideshow No One Is Telling You
- New Do You Wish to Know How FFmpeg Can Remove Audio From a Video? If Yes, Keep Scrolling This Guide to Remove Audio From Video with FFmpeg and Other Alternative Software
- Updated Fixes | What If YouTube Zoom to Fill Not Working for 2024
- New Quickly Turn Any Video Into a Paper Rip Effect for 2024
- New Easily Combine Videos and Audios with 5 Simple Online Tools for 2024
- New How to Crop a Video in Windows Media Player for 2024
- In 2024, Ultimate Guide to Catch the Regional-Located Pokemon For Apple iPhone 13 Pro Max | Dr.fone
- The Easy Way to Remove an Apple ID from Your MacBook For your iPhone 11
- How To Bypass Google FRP on Nubia Red Magic 8S Pro+
- In 2024, Lock Your Poco C51 Phone in Style The Top 5 Gesture Lock Screen Apps
- In 2024, 3 Methods to Mirror Vivo T2 5G to Roku | Dr.fone
- In 2024, How to Change your Samsung Galaxy M14 5G Location on Twitter | Dr.fone
- Top 10 AirPlay Apps in Tecno Camon 20 Pro 5G for Streaming | Dr.fone
- How To Fix OEM Unlock Missing on Samsung Galaxy S23 FE?
- In 2024, Unlock Your iPhone 7 Plus in Minutes with ICCID Code Everything You Need to Know
- In 2024, How PGSharp Save You from Ban While Spoofing Pokemon Go On Realme 12 Pro 5G? | Dr.fone
- How to Perform Hard Reset on Honor 90 Pro? | Dr.fone
- Where Is the Best Place to Catch Dratini On Honor 90 Pro | Dr.fone
- How To Transfer Data from Apple iPhone 14 to New iPhone 15 | Dr.fone
- In 2024, How to Transfer Contacts from Motorola Moto G73 5G to Outlook | Dr.fone
- Apply These Techniques to Improve How to Detect Fake GPS Location On Infinix Smart 8 | Dr.fone
- Methods to Change GPS Location On Sony Xperia 5 V | Dr.fone
- Additional Tips About Sinnoh Stone For Nokia C110 | Dr.fone
- In 2024, How to Transfer Data from Poco X5 to Other Android Devices? | Dr.fone
- How To Fake GPS On Nokia C210 For Mobile Legends? | Dr.fone
- In 2024, How to Unlock Apple iPhone 14 Pro When We Dont Have Apple ID or Password?
- Strategies for Apps That Wont Download From Play Store On Lava Blaze Curve 5G | Dr.fone
- In 2024, Is Fake GPS Location Spoofer a Good Choice On Samsung Galaxy S23 Tactical Edition? | Dr.fone
- What is Fake GPS Location Pro and Is It Good On Nubia Z50S Pro? | Dr.fone
- How To Track IMEI Number Of Itel S23+ Through Google Earth?
- In 2024, Troubleshooting Error Connecting to the Apple ID Server On iPhone X
- 5 Easy Ways to Change Location on YouTube TV On Sony Xperia 5 V | Dr.fone
- Top 10 Streaming Services Worth a Try for 2024
- Forgotten The Voicemail Password Of Xiaomi Redmi Note 12R? Try These Fixes
- In 2024, How to Bypass FRP on Itel P40?
- Recover your photos after Moto G14 has been deleted.
- Title: Learn How to Add Dynamic Shake Effects to Your Videos Using Alight Motion. Our Step-by-Step Guide Makes It Easy to Create Cinematic Footage
- Author: Chloe
- Created at : 2024-06-09 16:15:25
- Updated at : 2024-06-10 16:15:25
- Link: https://ai-editing-video.techidaily.com/learn-how-to-add-dynamic-shake-effects-to-your-videos-using-alight-motion-our-step-by-step-guide-makes-it-easy-to-create-cinematic-footage/
- License: This work is licensed under CC BY-NC-SA 4.0.


